Initialization of the Setup............................................................................. 19
Glossary of Terms.......................................................................................... 20
Internet Connection Guide2
To connect the instrument to the Internet, a full-time online connection (ADSL, optical fiber, cable Internet, etc.) using a
broadband router or a modem equipped with a router is necessary.
•Since no broadband router or modem settings can be made by the instrument itself, use a computer to make the settings before connecting to the instru-
ment.
•Since this instrument does not support PPPoE communication, it is not possible to directly connect to the modem without a router.
•Dial-up and ISDN connections cannot be used.
Depending on the Internet connection, the number of connectable devices may be limited. This may mean that your
instrument cannot be connected to the Internet. If in doubt, check your contract or contact your provider.
Select the connection environment of your home from the following.
Selection of the Connection Environment
NOTE
For details on connection operations,
refer to page 3.
Only WEP encryption is available.
LAN
terminal
For details on operations for connections using static IP address or proxy server, refer to page 14.
For details on connection operations,
refer to page 11.
For details on connection operations,
refer to page 6.
USB wireless
LAN adaptor
Wireless game
adaptor
•Strongly secured encryption, WPA2 format, etc.
can be set.
•Wireless connection of several Internet devices
is possible.
•For a list of wireless game adaptors whose
compatibility has been confirmed by Yamaha,
refer to the website:
http://music.yamaha.com/download/
Set the instrument within 10–20 m
from the access point. If the signal
is weak, the loading of web pages
will become slow and the connec-
tion will be unstable. The signal will
not be received if there is an obsta-
cle blocking reception.
•It is comparatively inexpensive.
•Electric power source is unnecessary.
•For a list of USB wireless LAN adaptors whose
compatibility has been confirmed by Yamaha,
refer to the website:
http://music.yamaha.com/download/
*The USB wireless LAN adaptor which is not on the list
cannot be used.
An ADSL modem, optical
network unit (ONU) or
cable modem
*Some modems have a
built-in router.
To use the Inter-
net connection,
you will first need
to subscribe to
an Internet ser-
vice or provider.
LAN
terminal
USB TO
DEVICE
terminal
router cable
Internet
LAN cable connection
Provider
LAN cable
Wireless LAN Connection
Access point
with router
Modem
Internet Connection Guide3
1
Connect the devices according to the example.
First turn the power of the instrument off, then connect the devices as shown in the illustration below, and finally
turn the power on again.
•For an illustration of the location of the LAN terminal, refer to the Owner’s Manual (Chapter 10).
2
Press the [INTERNET] button.
When the special website appears
Since the instrument is connected to the special website, you do not need to make Internet settings. About the operations in
the special website, refer to the Owner’s Manual (Chapter 9).
•The contents of the service as appearing here are current as of May, 2009. The available contents of the service are subject to change.
When the special website does not appear
Proceed to step 3.
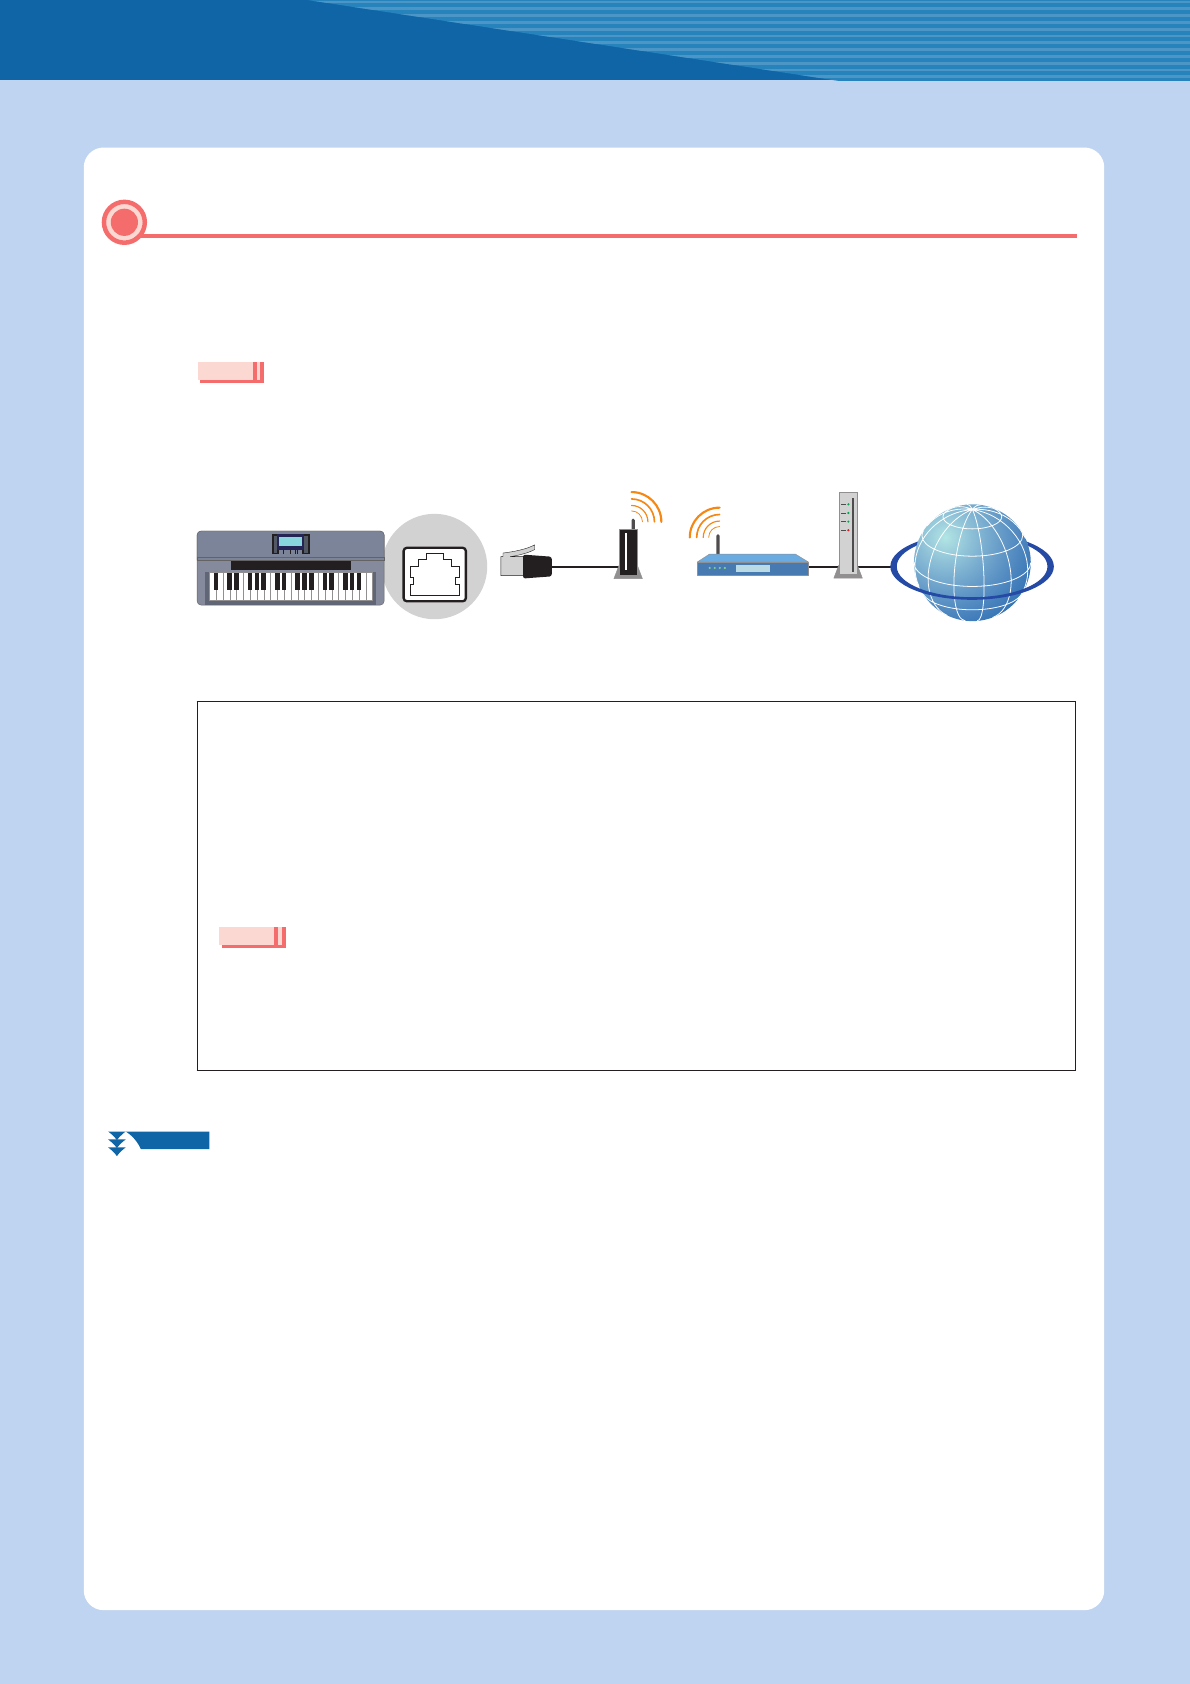
Required Devices
•LAN cable
•Router cable (This is unnecessary if your modem has router capability.)
•Modem (ADSL modem, optical network unit or cable modem)
•Before installing a new router, check that the router performs normally by connecting via a computer.
Connection
LAN Cable Connection
NOTE
LAN cable
LAN
terminal
Router cableModem
Internet
NOTE
NOTE
NEXT PAGE
Connection
Internet Connection Guide4
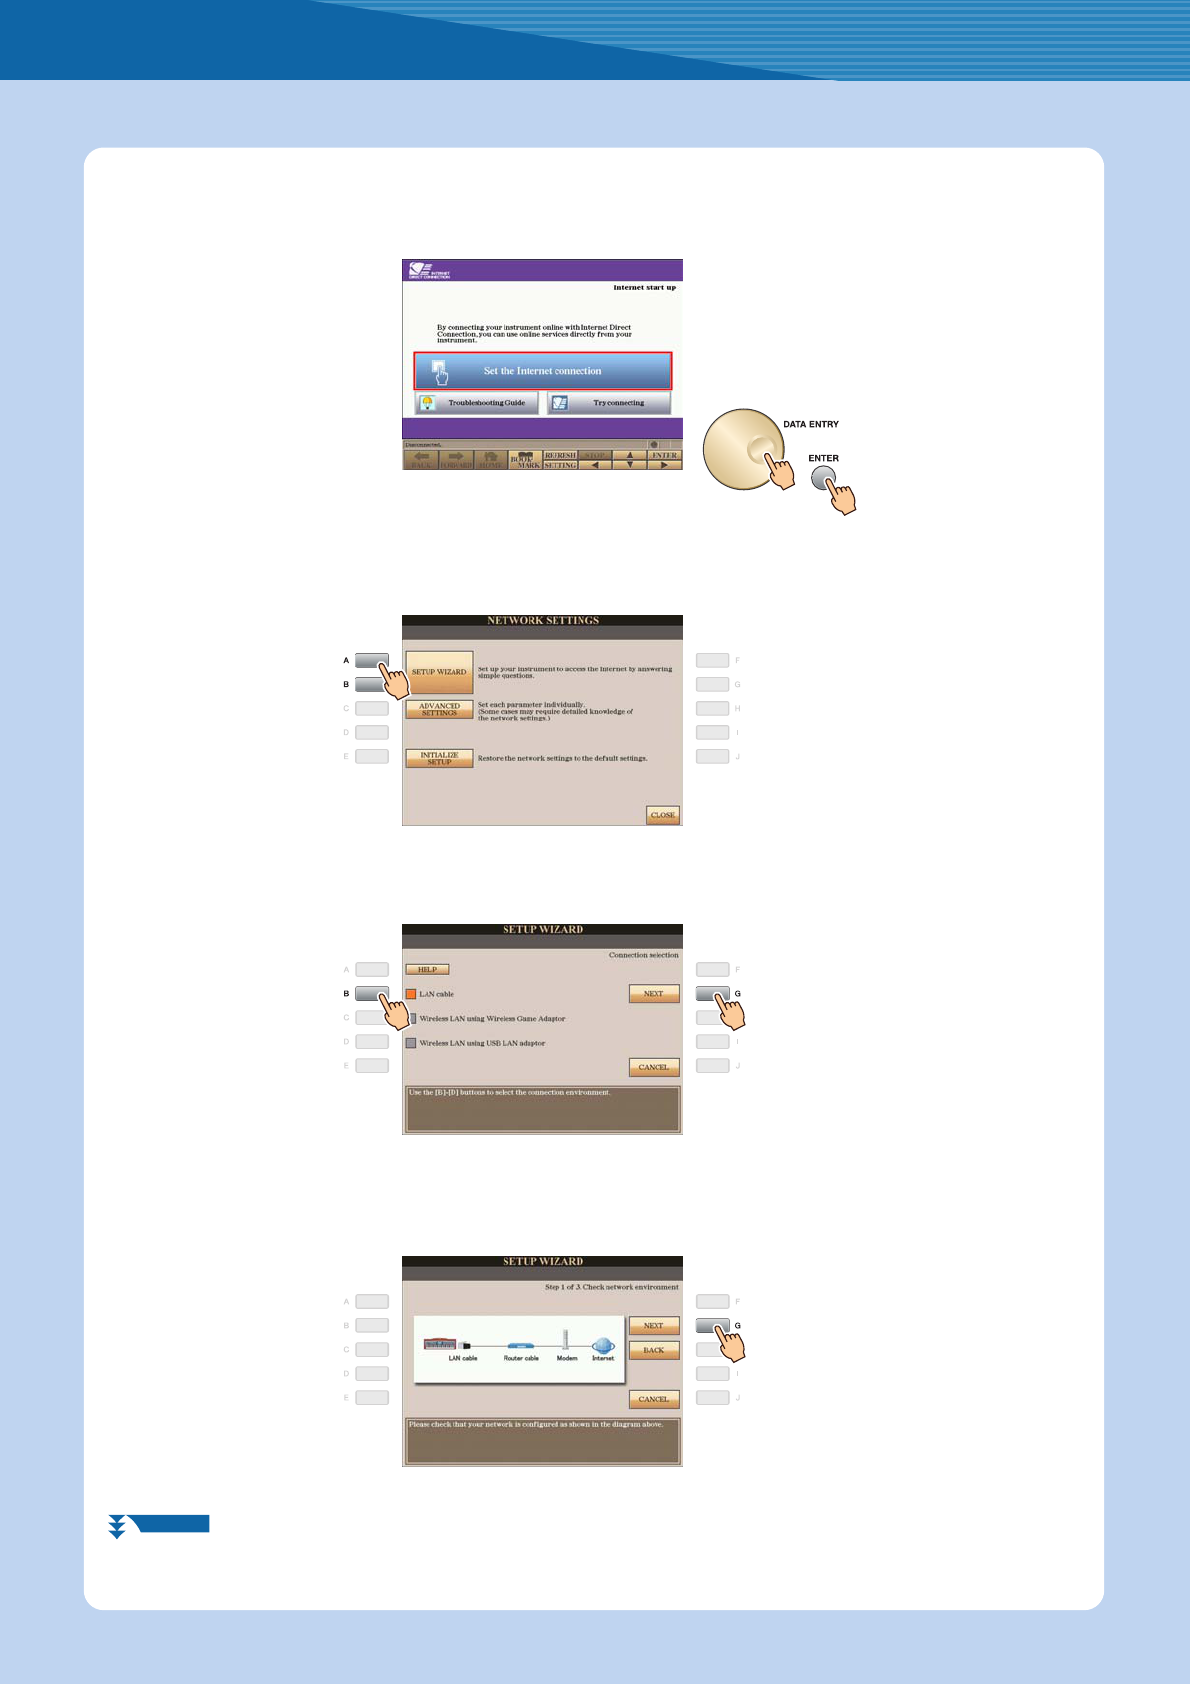
3
Use the [DATA ENTRY] dial to select “Set the Internet connection,” then press the [ENTER]
button to execute.
4
Use the [A]/[B] buttons to select “SETUP WIZARD.”
5
Press the [B] button to select “LAN cable,” then press the [G] button to proceed to “NEXT.”
6
Make sure that the devices are connected as shown in the illustration of the display, then
press the [G] button to proceed to “NEXT.”
NEXT PAGE
Connection
Internet Connection Guide5
7
Press the [G](CONNECTION) button to check the connection to the special website.
The settings are saved by checking the connection.
•Because the settings are lost when you turn off the power of the instrument, be sure to save the settings and changes you made.
8
Press the [G](DONE) button to connect to the special website.
When the special website appears, the network settings to the Internet are complete.
When the special website does not appear, refer to “Connection Help” on page 18.
For more details on the operations in the special website, refer to the Owner’s Manual (Chapter 9).
NOTE
Connection
Internet Connection Guide6
1
Connect the devices according to the example.
First turn the power of the instrument off, then connect the devices as shown in the illustration below, and finally
turn the power on again.
•For an illustration of the location of the USB TO DEVICE terminal, refer to the Owner’s Manual (Chapter 10).
•Only WEP encryption is available.
2
Press the [INTERNET] button.
3
Use the [DATA ENTRY] dial to select “Set the Internet connection,” then press the [ENTER]
button to execute.
Required Devices
•USB wireless LAN adaptor
For a list of USB wireless LAN adaptors whose compatibility has been confirmed by Yamaha, refer to the
website:
http://music.yamaha.com/download/
* The USB wireless LAN adaptor which is not on the list cannot be used.
•Access point with router (The router capability here is unnecessary if your modem has router capability.)
•Modem (ADSL modem, optical network unit or cable modem)
•About the confirmation and changes in the setting of the access point with router side, read the owner’s manual for the product you are
using.
•Before installing a new router, check that the router performs normally by connecting via a computer.
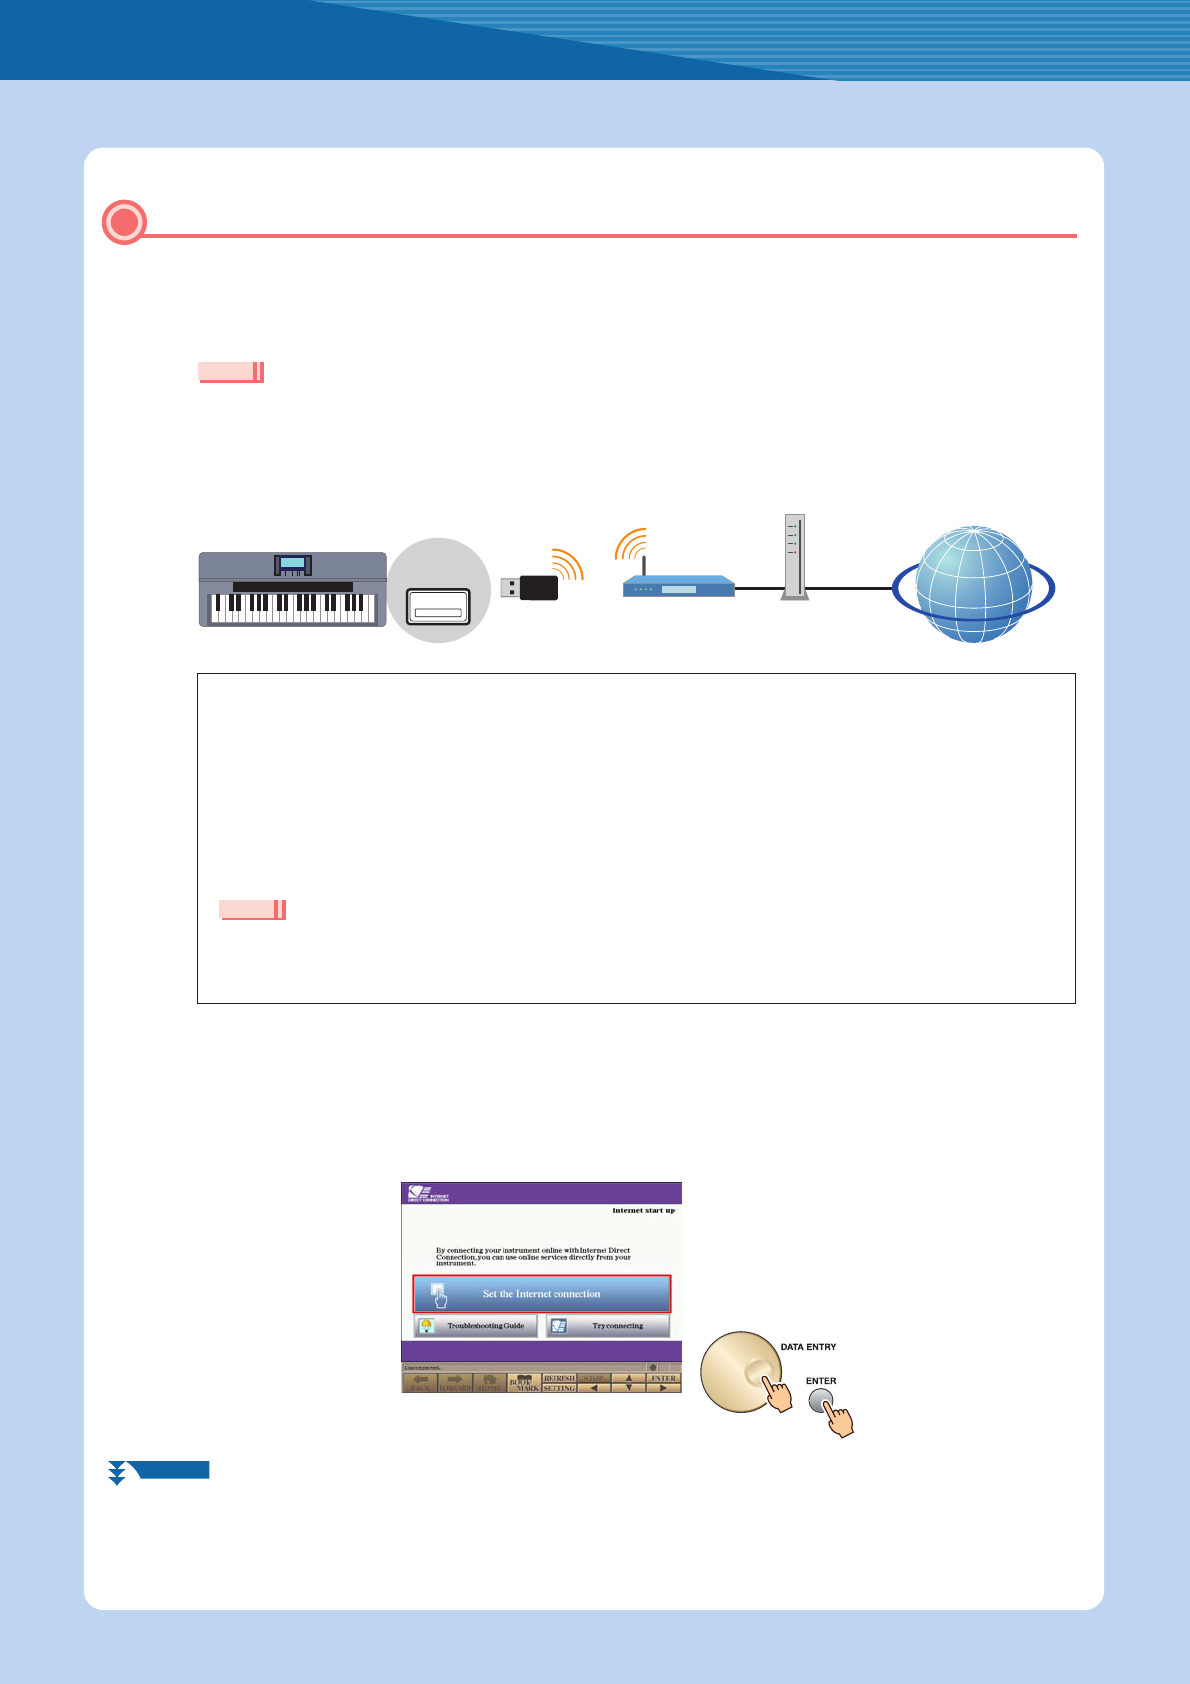
Wireless LAN Connection Using USB LAN Adaptor
NOTE
USB wireless
LAN adaptor
USB TO
DEVICE
terminal
Access point
with router
Modem
Internet
Set the instrument within 10–20 m from the
access point. The signal will not be received if
there is an obstacle blocking reception.
Wireless
network
NOTE
NEXT PAGE
Connection
Internet Connection Guide7
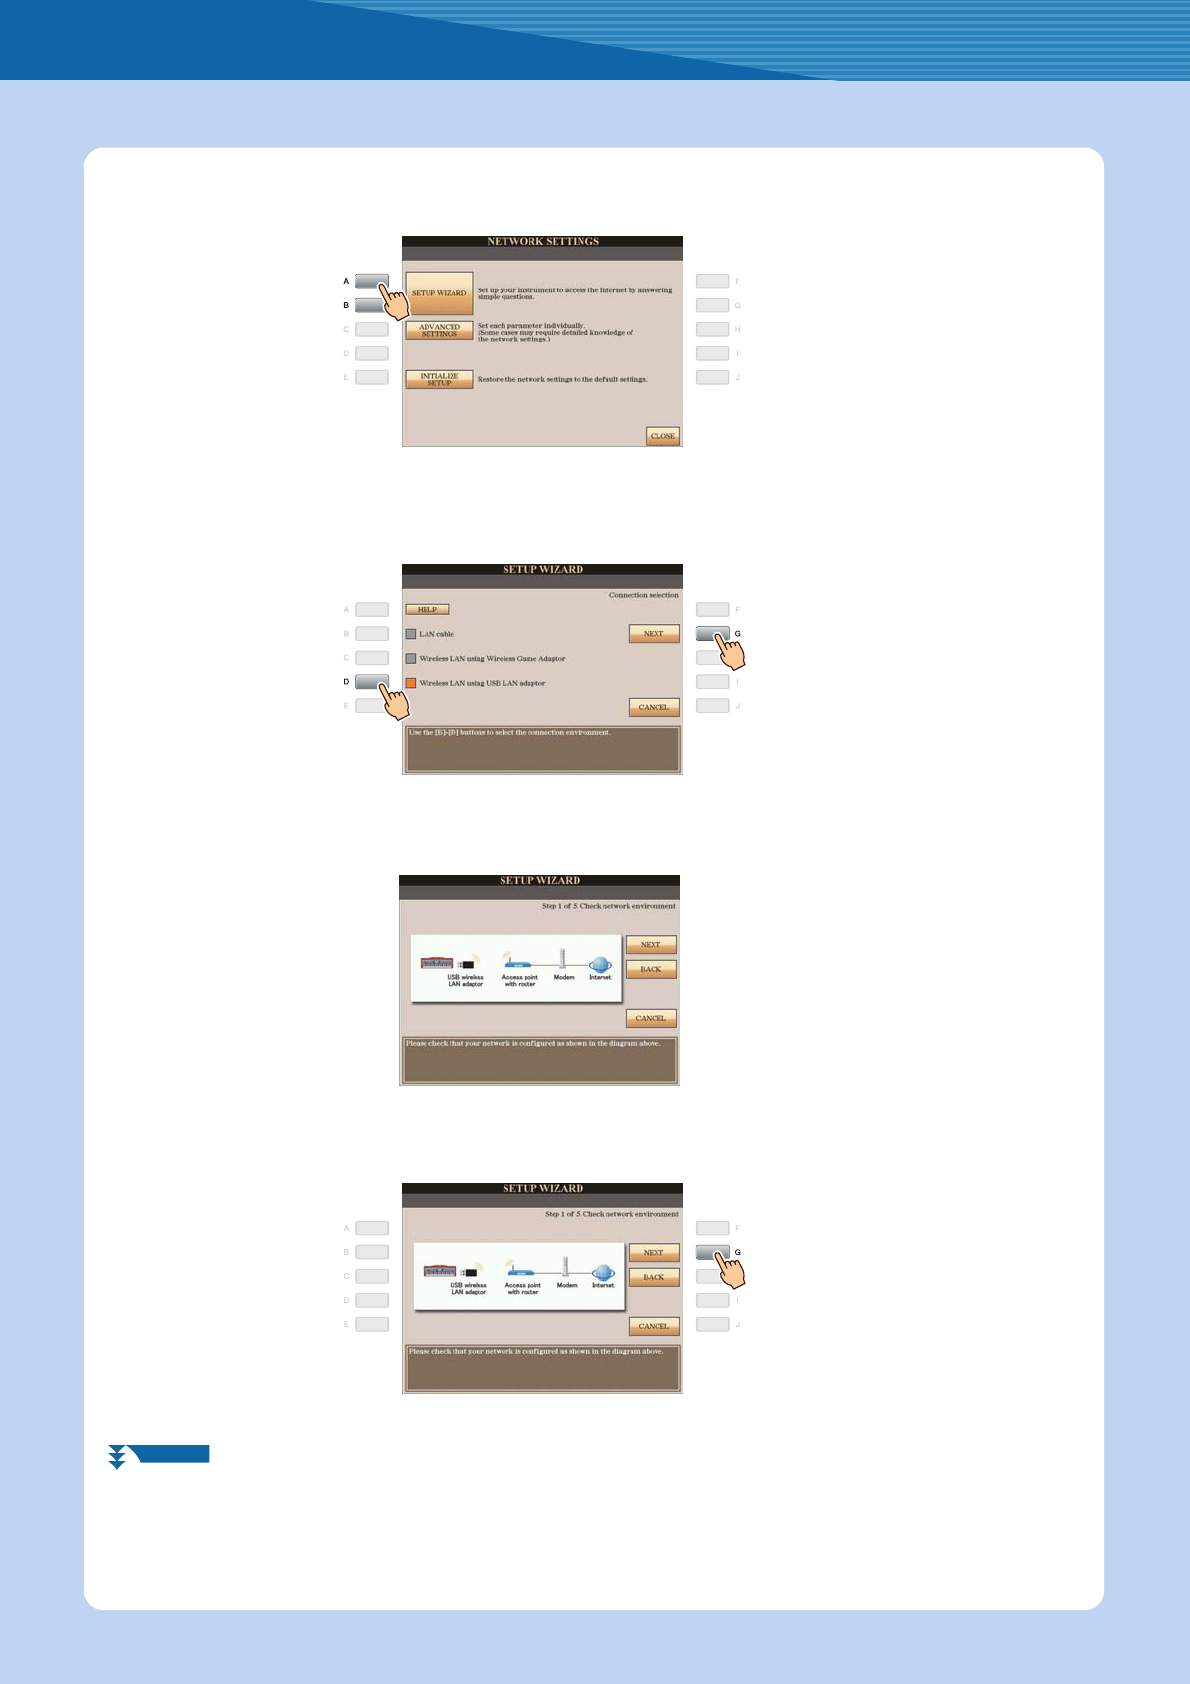
4
Use the [A]/[B] buttons to select “SETUP WIZARD.”
5
Press the [D] button to select the “Wireless LAN using USB LAN adaptor,” then press the [G]
button to proceed to “NEXT.”
6
Make sure that the devices are connected as shown in the illustration of the display.
7
Press the [G](NEXT) button to search for wireless network near the instrument.
NEXT PAGE
Connection
Internet Connection Guide8
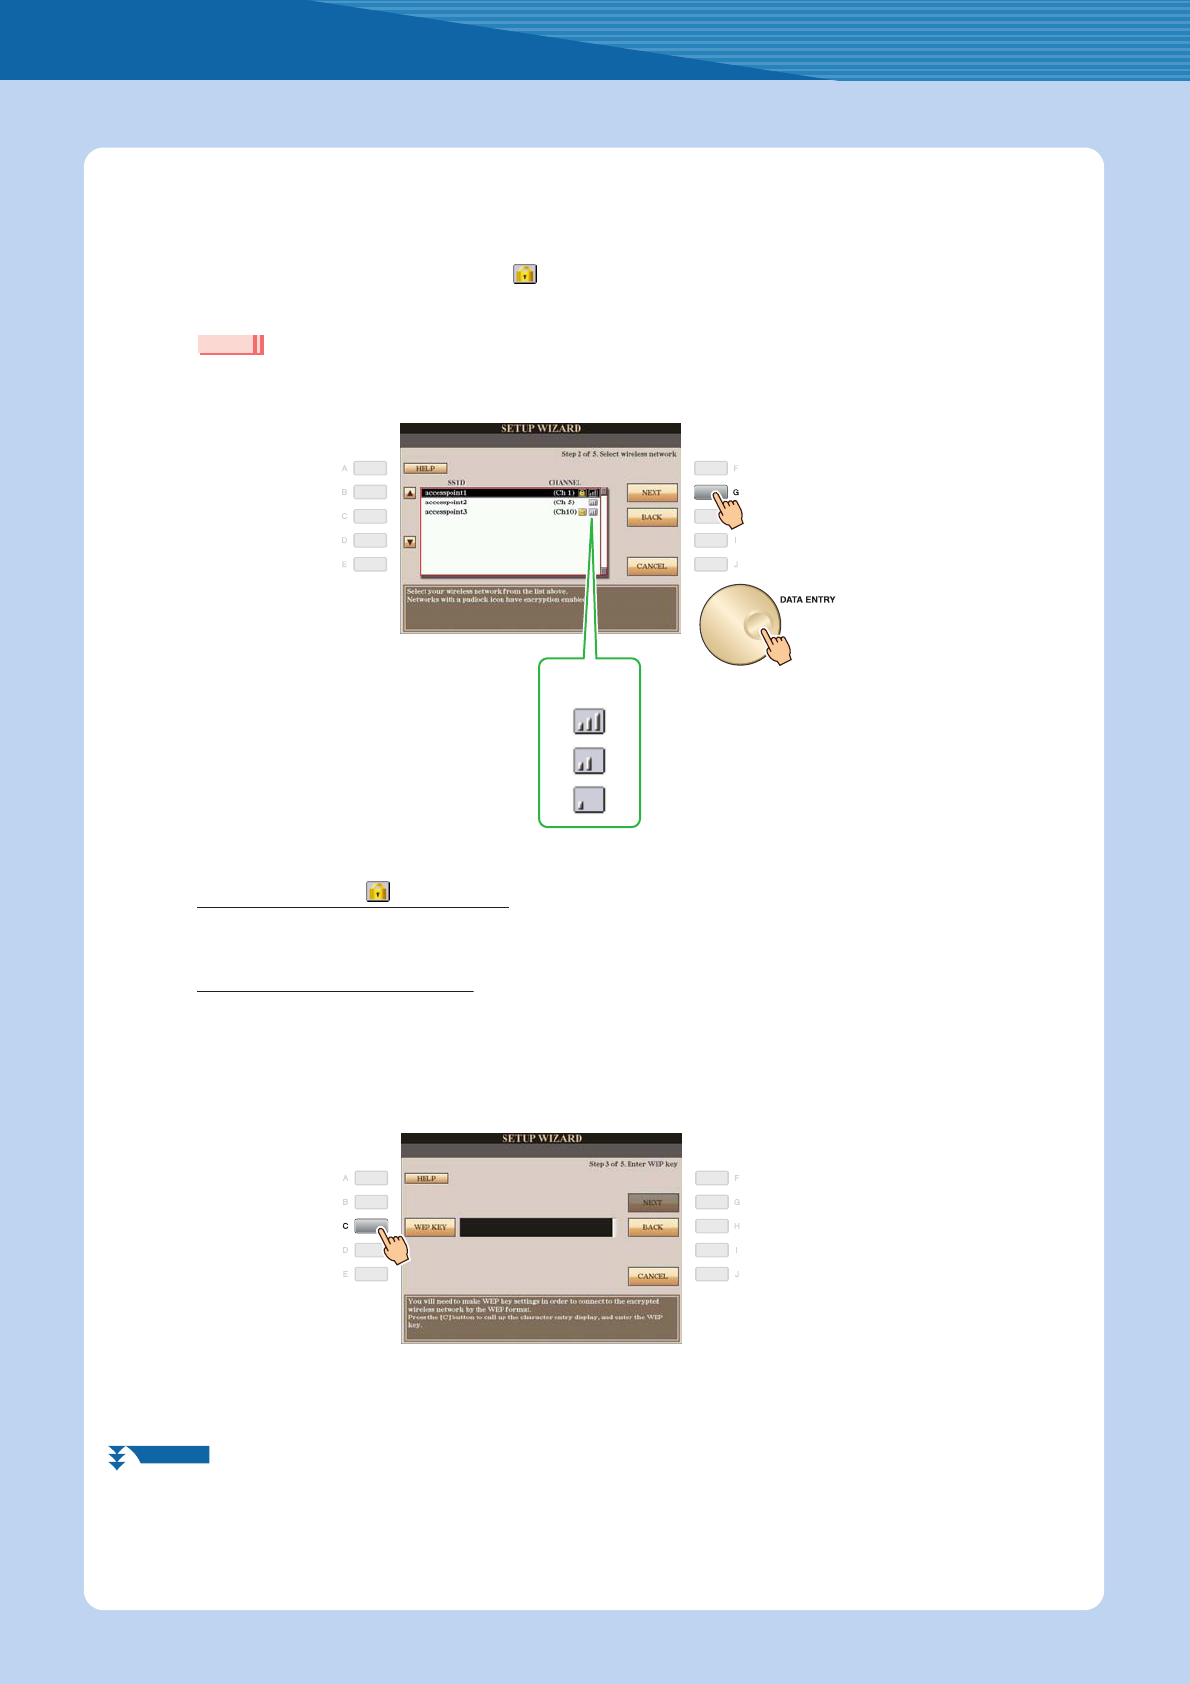
8
Use the [DATA ENTRY] dial to select the desired wireless network, then press the [G] button
to proceed to “NEXT.”
The SSID and channel of the selected wireless network are automatically set. Since the encrypted wireless
network is displayed with padlock icon “,” input the WEP key. Make sure that the settings are the same as
those for the access point on the router side.
•For details on confirmation and changes in the setting of the access point on the router side, refer to the owner’s manual for the product you
are using.
With padlock icon “” (encryption)
Since your access point with router is an encrypted setting, proceed to step 9 to input the WEP key.
No padlock icon (No encryption)
Because your access point with router is not an encrypted setting, you don’t need to make a setting for the WEP key. Proceed
to step 12 on page 9. If you want to encrypt the access point, change this in the settings of your access point with router.
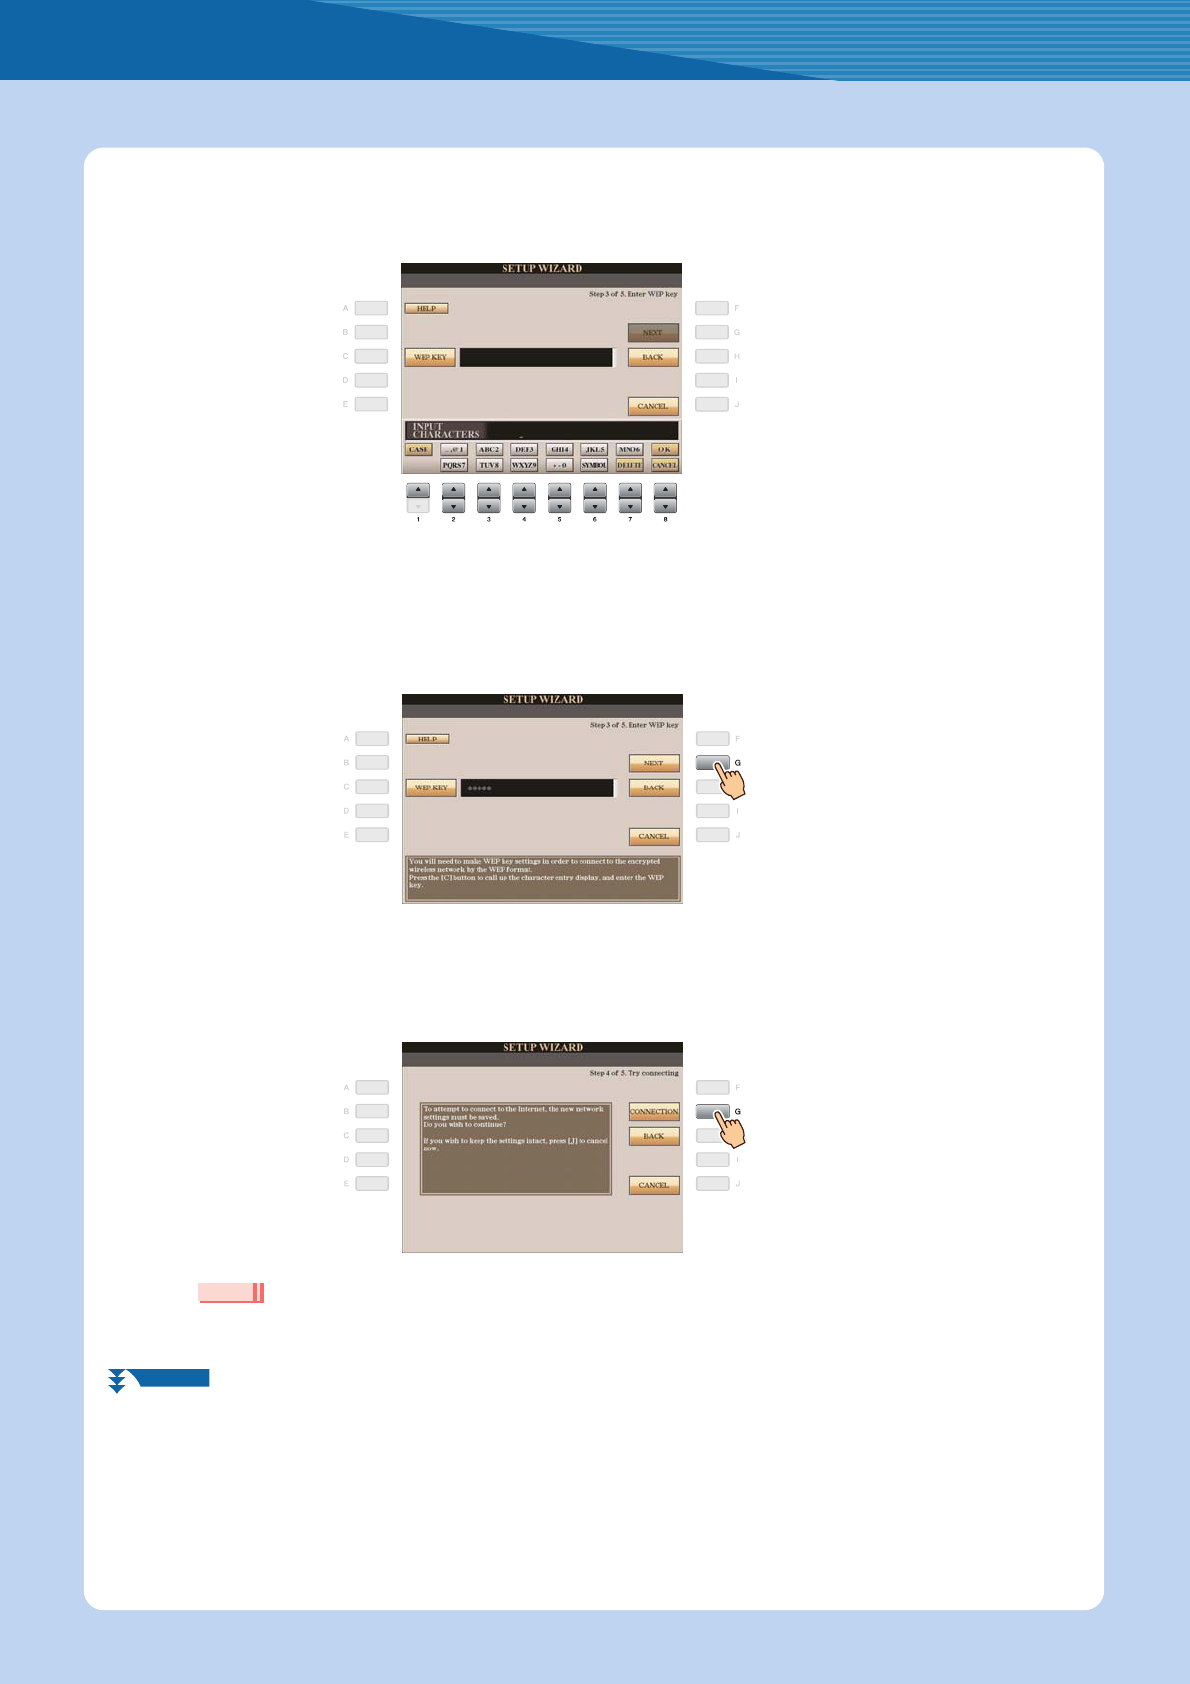
9
Press the [C](WEP KEY) button to call up the character-entry display to input the WEP key.
Only WEP encryption is available.
NOTE
The strength of the reception may not be
displayed depending on the particular USB
wireless LAN adaptor you are using.
Strength of the
reception
NEXT PAGE
Connection
Internet Connection Guide9
10
Input the WEP key.
Refer to the Owner’s Manual (Starting Up) for character-entry details.
To cancel the WEP key input, press the [8t](CANCEL) button.
11
Press the [G](NEXT) button to set the WEP key input.
When you set the WEP key input, the characters are hidden and displayed as “******.”
12
Press the [G](CONNECTION) button to check the connection to the special website.
The settings are saved by checking the connection.
•Because the settings are lost when you turn off the power of the instrument, be sure to save the settings and changes you made.
NOTE
NEXT PAGE
Connection
Internet Connection Guide10
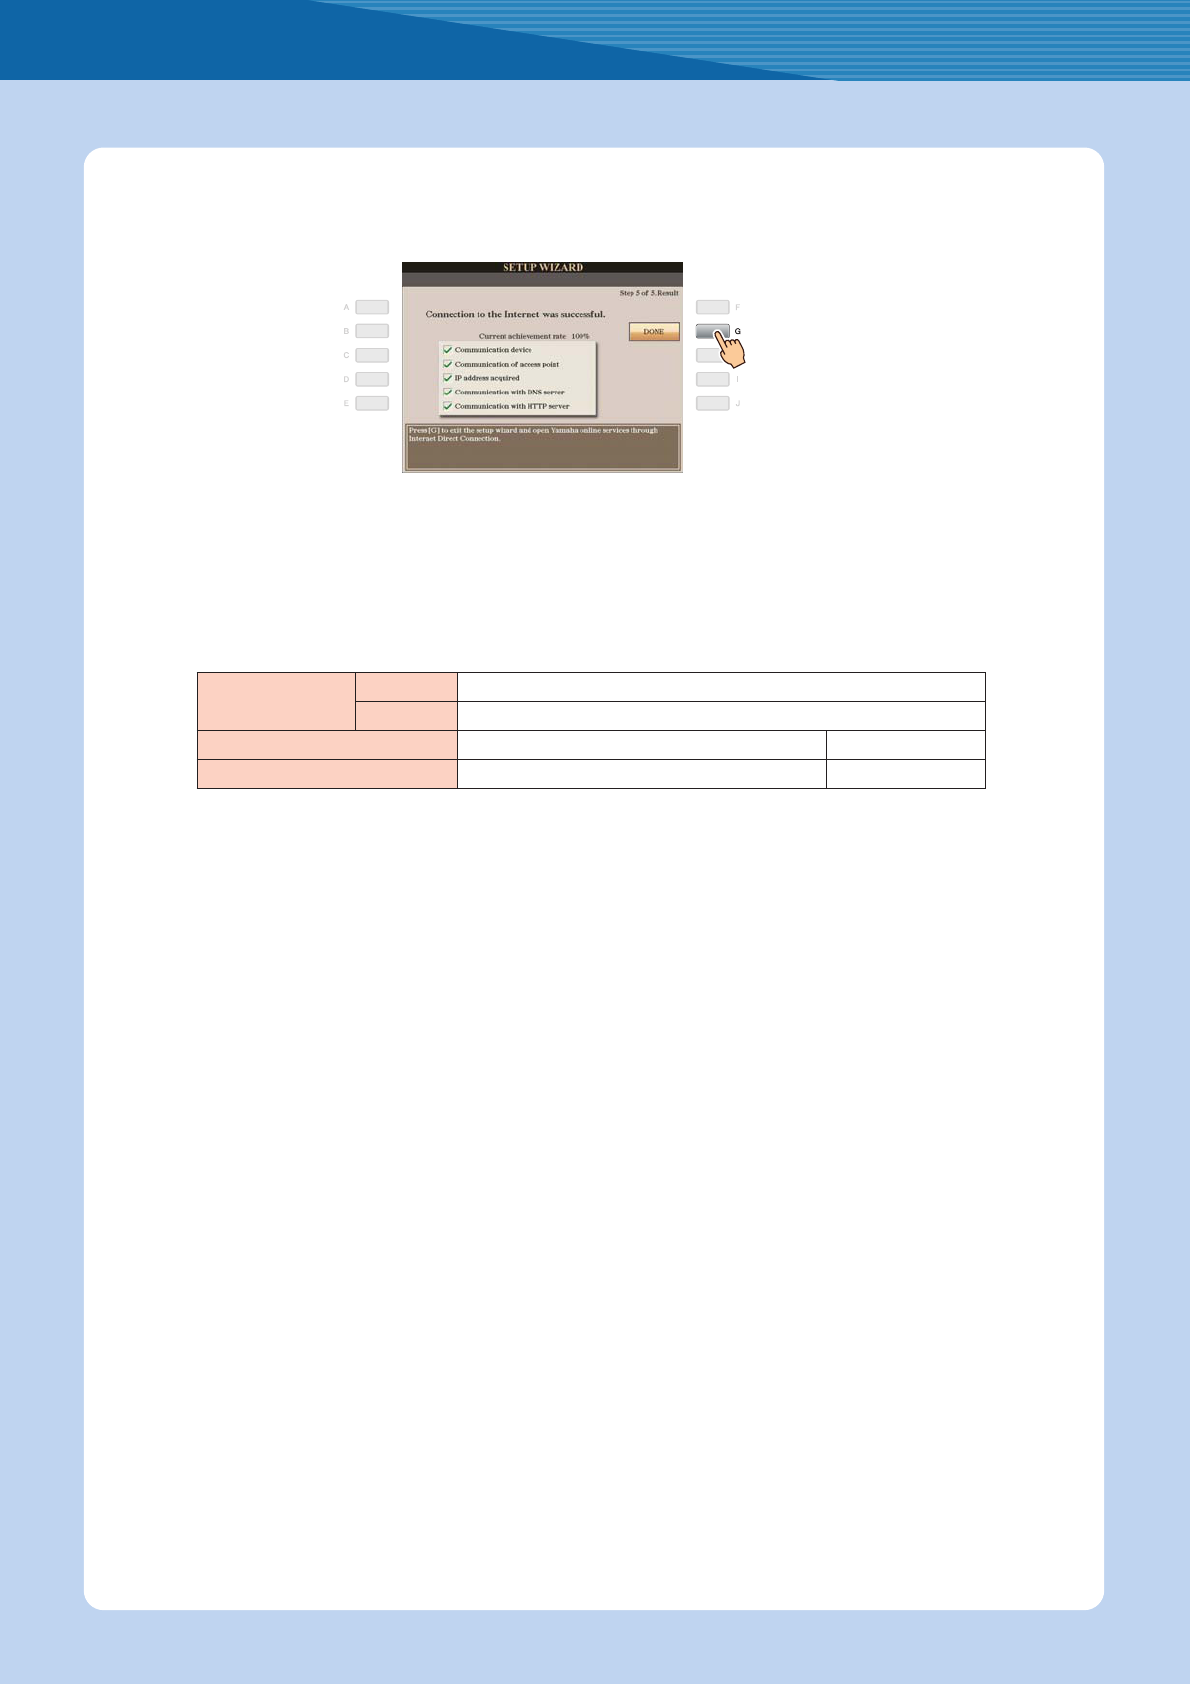
13
Press the [G](DONE) button to connect to the special website.
When the special website appears, the network settings to the Internet are complete.
When the special website does not appear, refer to “Connection Help” on page 18.
For details on operations in the special website, refer to the Owner’s Manual (Chapter 9).
Make a written note of the settings, in case you have to enter them again.
Access point
SSID
Channel
EncryptionYESNO
WEP key—
Connection
Internet Connection Guide11
1
Connect the devices according to the example.
First turn the power of the instrument off, then connect the devices as shown in the illustration below, and finally
turn the power on again.
•For an illustration of the location of the LAN terminal, refer to the Owner’s Manual (Chapter 10).
Required Devices
•LAN cable
•Wireless game adaptor
For a list of wireless game adaptors whose compatibility has been confirmed by Yamaha, refer to the web-
site:
http://music.yamaha.com/download/
•Access point with router (The router capability here is unnecessary if your modem has router capability.)
•Modem (ADSL modem, optical network unit or cable modem)
•The wireless game adaptor requires connection to the AC outlet. For details on changes in the settings of the wireless game adaptor,
read the owner’s manual for the product you are using.
•About confirmation and changes in the setting of the access point on the router side, read the owner’s manual for the product you are
using.
•Before installing a new router, check that the router performs normally by connecting via a computer.
Wireless LAN Connection Using Wireless Game Adaptor
Ik heb de cvp 505 ben op zoek naar leuke muziek met begeleiding op usb of via mail . Wil er ook wel voor betalen , mag piano muziek zijn maar ook mooie instrumentale muziek , hoor het graag . Vriendelijke groet Peter .
Gesteld op 11-4-2023 om 11:19
Olá. Meu nome é Jonas ,estou no Brasil e preciso REINSTALAR os TIMBRES originais de fábrica no clavenova mod.cvp505 onde posso conseguir ? obrigado.
Gesteld op 11-4-2023 om 00:58
Gebruikershandleiding.com neemt misbruik van zijn services uitermate serieus. U kunt hieronder aangeven waarom deze vraag ongepast is. Wij controleren de vraag en zonodig wordt deze verwijderd.
Product:
Spelregels forum
Om tot zinvolle vragen te komen hanteren wij de volgende spelregels:
lees eerst de handleiding door;
controleer of uw vraag al eerder door iemand anders is gesteld;
probeer uw vraag zo duidelijk mogelijk te stellen;
heeft u een probleem en al geprobeerd om dit op te lossen, vermeld dit erbij aub;
heeft u een oplossing gekregen van een bezoeker dan horen wij dat graag in dit forum;
wilt u een reactie geven op een vraag of antwoord, gebruik dan niet dit formulier maar klik op de knop 'reageer op deze vraag';
uw vraag wordt direct op de website gezet; vermijd daarom persoonlijke gegevens in te vullen;
Belangrijk! Als er een antwoord wordt gegeven op uw vraag, dan is het voor de gever van het antwoord nuttig om te weten als u er wel (of niet) mee geholpen bent! Wij vragen u dus ook te reageren op een antwoord.
Belangrijk! Antwoorden worden ook per e-mail naar abonnees gestuurd. Laat uw emailadres achter op deze site, zodat u op de hoogte blijft. U krijgt dan ook andere vragen en antwoorden te zien.
Abonneren
Abonneer u voor het ontvangen van emails voor uw Yamaha CVP-505 bij:
nieuwe vragen en antwoorden
nieuwe handleidingen
U ontvangt een email met instructies om u voor één of beide opties in te schrijven.
Ontvang uw handleiding per email
Vul uw emailadres in en ontvang de handleiding van Yamaha CVP-505 in de taal/talen: Engels als bijlage per email.
De handleiding is 0,61 mb groot.
U ontvangt de handleiding per email binnen enkele minuten. Als u geen email heeft ontvangen, dan heeft u waarschijnlijk een verkeerd emailadres ingevuld of is uw mailbox te vol. Daarnaast kan het zijn dat uw internetprovider een maximum heeft aan de grootte per email. Omdat hier een handleiding wordt meegestuurd, kan het voorkomen dat de email groter is dan toegestaan bij uw provider.
Uw handleiding is per email verstuurd. Controleer uw email
Als u niet binnen een kwartier uw email met handleiding ontvangen heeft, kan het zijn dat u een verkeerd emailadres heeft ingevuld of dat uw emailprovider een maximum grootte per email heeft ingesteld die kleiner is dan de grootte van de handleiding.
Er is een email naar u verstuurd om uw inschrijving definitief te maken.
Controleer uw email en volg de aanwijzingen op om uw inschrijving definitief te maken
U heeft geen emailadres opgegeven
Als u de handleiding per email wilt ontvangen, vul dan een geldig emailadres in.
Uw vraag is op deze pagina toegevoegd
Wilt u een email ontvangen bij een antwoord en/of nieuwe vragen? Vul dan hier uw emailadres in.