518251
55
Verklein
Vergroot
Pagina terug
1/68
Pagina verder
Users instructions
The mind440 Series
m4-m/m4-m-CB
Behind-the-ear
2
3
The hearing aid, ear-set and accessories shown in these
instructions may not look the same as the ones you
have. We furthermore reserve the right to make any
changes considered necessary.
Hearing aids, accessories and batteries
should not be disposed of with normal
household waste. Please consult your na-
tional Widex distributor for advice on how
to dispose of your hearing aid.
4
Contents
Thank you..... . . . . . . . . . . . . . . . . . . . . . . . . . . . . . . . . . . . . . . . . . . . . . 6
Ear-set solutions. . . . . . . . . . . . . . . . . . . . . . . . . . . . . . . . . . . . . . . . . . 7
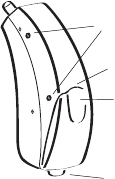
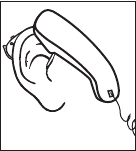
The hearing aid. . . . . . . . . . . . . . . . . . . . . . . . . . . . . . . . . . . . . . . . . . . 8
Function signals . . . . . . . . . . . . . . . . . . . . . . . . . . . . . . . . . . . . . . . 9
Right/left identification . . . . . . . . . . . . . . . . . . . . . . . . . . . . . . . . 9
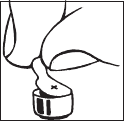
The battery. . . . . . . . . . . . . . . . . . . . . . . . . . . . . . . . . . . . . . . . . . . 10
Inserting the battery. . . . . . . . . . . . . . . . . . . . . . . . . . . . . . . 10
Removing the battery . . . . . . . . . . . . . . . . . . . . . . . . . . . . . 12
Low battery indication. . . . . . . . . . . . . . . . . . . . . . . . . . . . . 13
Turning the hearing aid on and off . . . . . . . . . . . . . . . . . . . . 15
Possible start-up settings . . . . . . . . . . . . . . . . . . . . . . . . . . . . . 16
Automatic volume adjustment. . . . . . . . . . . . . . . . . . . . . . . . 16
Listening programs. . . . . . . . . . . . . . . . . . . . . . . . . . . . . . . . . . . 17
Switching between the listening programs . . . . . . . . . 19
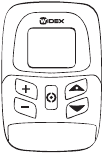
Remote control. . . . . . . . . . . . . . . . . . . . . . . . . . . . . . . . . . . . . . . 20
Using a telephone . . . . . . . . . . . . . . . . . . . . . . . . . . . . . . . . . . . . 21
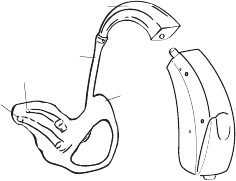
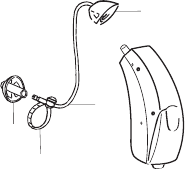
Hearing aid with an earmould . . . . . . . . . . . . . . . . . . . . . . . . . . . 22
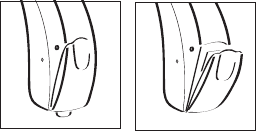
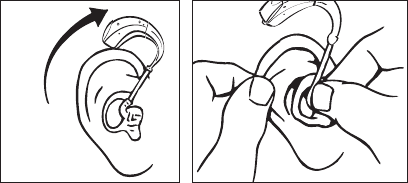
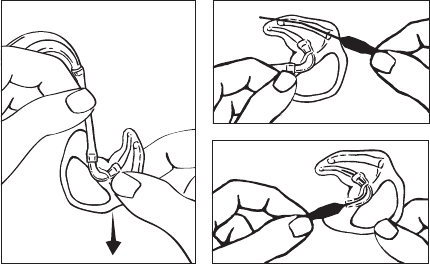
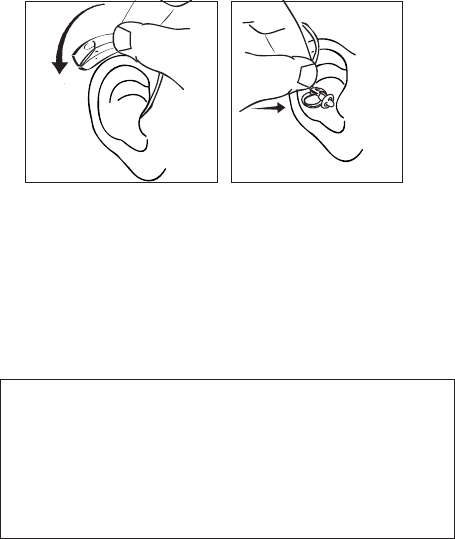
Placing the hearing aid and earmould. . . . . . . . . . . . . . . . . 23
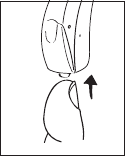
Removing the hearing aid and earmould . . . . . . . . . . . . . . 24
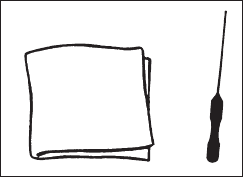
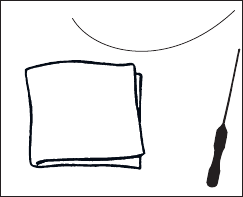
Cleaning . . . . . . . . . . . . . . . . . . . . . . . . . . . . . . . . . . . . . . . . . . . . . 25
The hearing aid. . . . . . . . . . . . . . . . . . . . . . . . . . . . . . . . . . . . 26
The microphone openings. . . . . . . . . . . . . . . . . . . . . . . . . 26
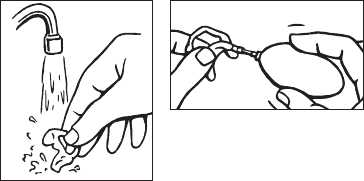
The earmould . . . . . . . . . . . . . . . . . . . . . . . . . . . . . . . . . . . . . 27
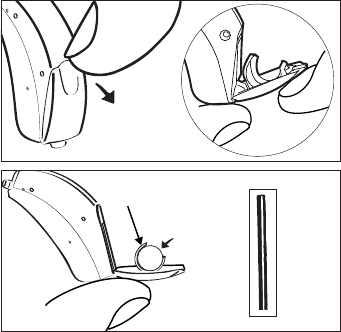
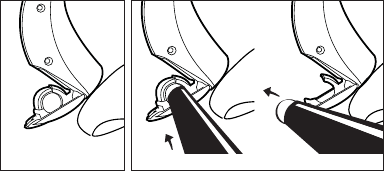
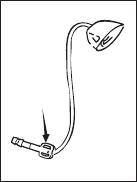
Changing the tubing . . . . . . . . . . . . . . . . . . . . . . . . . . . . . . . . . 28
In case of malfunction . . . . . . . . . . . . . . . . . . . . . . . . . . . . . . . . 29
Hearing aid with an instant ear-tip . . . . . . . . . . . . . . . . . . . . . . . 31
Right/left identification . . . . . . . . . . . . . . . . . . . . . . . . . . . . . . . 32
Placing the hearing aid and instant ear-tip . . . . . . . . . . . . 33
5
Removing the hearing aid and instant ear -tip. . . . . . . . . . 34
Cleaning . . . . . . . . . . . . . . . . . . . . . . . . . . . . . . . . . . . . . . . . . . . . . 35
The hearing aid. . . . . . . . . . . . . . . . . . . . . . . . . . . . . . . . . . . . 36
The microphone openings. . . . . . . . . . . . . . . . . . . . . . . . . 36
The ear-set . . . . . . . . . . . . . . . . . . . . . . . . . . . . . . . . . . . . . . . . 37
Changing the ear-set . . . . . . . . . . . . . . . . . . . . . . . . . . . . . . . . . 39
Assembling a new ear-set. . . . . . . . . . . . . . . . . . . . . . . . . . . . . 40
Tubing and ear-tip size . . . . . . . . . . . . . . . . . . . . . . . . . . . . . . . 41
The anchor . . . . . . . . . . . . . . . . . . . . . . . . . . . . . . . . . . . . . . . . . . . 42
In case of malfunction . . . . . . . . . . . . . . . . . . . . . . . . . . . . . . . . 46
Hearing aid with a custom ear-tip . . . . . . . . . . . . . . . . . . . . . . . 48
Right/left identification . . . . . . . . . . . . . . . . . . . . . . . . . . . . . . . 49
Placing the hearing aid and custom ear-tip . . . . . . . . . . . . 50
Removing the hearing aid and custom ear-tip . . . . . . . . . 51
Cleaning . . . . . . . . . . . . . . . . . . . . . . . . . . . . . . . . . . . . . . . . . . . . . 52
The hearing aid. . . . . . . . . . . . . . . . . . . . . . . . . . . . . . . . . . . . 53
The microphone openings. . . . . . . . . . . . . . . . . . . . . . . . . 53
The ear-set . . . . . . . . . . . . . . . . . . . . . . . . . . . . . . . . . . . . . . . . 54
Changing the tubing . . . . . . . . . . . . . . . . . . . . . . . . . . . . . . . . . 56
Assembling a new ear-set. . . . . . . . . . . . . . . . . . . . . . . . . . . . . 57
Tubing size . . . . . . . . . . . . . . . . . . . . . . . . . . . . . . . . . . . . . . . . . . . 58
In case of malfunction . . . . . . . . . . . . . . . . . . . . . . . . . . . . . . . . 59
Caring for your hearing aid . . . . . . . . . . . . . . . . . . . . . . . . . . . . . . 61
Good advice. . . . . . . . . . . . . . . . . . . . . . . . . . . . . . . . . . . . . . . . . . . . . 63
Your hearing aid. . . . . . . . . . . . . . . . . . . . . . . . . . . . . . . . . . . . . . . . . 66
6
Thank you....
.... for choosing a Widex hearing aid.
Your hearing aid is a sophisticated instrument that can
be adjusted to your requirements in consultation with
your hearing care professional.
All illustrations in this booklet
show a right-ear hearing aid.
Unless otherwise stated, the
same principles apply to the left
ear.
We hope you will be pleased with your new Widex
hearing aid.
7
General
Ear-set solutions
Several ear-set solutions are available for your hearing
aid. Below, your hearing care professional can tick off
the solution chosen for you.
Earmould Instant ear-tip Custom ear-tip
Important
Unless otherwise indicated, the information provid-
ed in this booklet applies to all three ear-set types. In
addition to the general instructions, please be sure
to read the sections that apply to your specific ear-
set solution.
8
The hearing aid
The illustration below shows the hearing aid without
the ear-set.
1. Microphone openings, where the sound enters the
hearing aid.
2. Program button for choosing between different
listening programs is available on some models.
3. On/off function, which is integrated into the bat-
tery drawer (see page 15).
4. Nail grip on the battery drawer for easy opening.
1.
2.
3.
4.
9
General
Function signals
Your hearing aid may be set to produce a signal to indi-
cate the use of certain functions. The signal can be a
spoken message or tones adjusted by the hearing care
professional in consultation with you. The signal can
also be deactivated.
Right/left identification
If you wear hearing aids on both ears,
the hearing aids can be provided with
coloured marks (red mark = right and
blue mark = left).
The arrow shows the position of the
identification mark.
10
The battery
We recommend Zinc Air batteries. Use a type 10 bat-
tery for your hearing aid.
To obtain replacement batteries, please consult your
hearing care professional. It is important to take note of
the expiry date and the recommendations regarding
disposal of used batteries on the battery pack. The bat-
tery life will depend on a number of factors, such as the
setting of your hearing aid, how many hours you use it
daily and the listening environments in which you use
it.
Inserting the battery
Before inserting a new battery in the
hearing aid, remember to remove the
adhesive tab. Once the tab has been
removed, the battery will start func-
tioning after a few seconds. Do not
use batteries on which there is a sticky residue from the
tab or other unwanted substance.
11
General
1. Use the nail grip to open the battery drawer. Do not
press the battery drawer beyond the open position.
2. Place the battery in the drawer as illustrated, that is
so that the plus (+) sign on the battery is facing in
the direction indicated by the plus (+) sign printed
on the round battery holder (see the long arrow).
You can use the provided battery magnet to steer
the battery into place.
If the battery drawer does not close easily, the battery
is incorrectly inserted.
Always place the battery in the actual battery drawer
as illustrated and not in the open space inside the
hearing aid.
+
+
2
1
12
Removing the battery
1. Open the battery drawer as previously described.
Place the hearing aid on the provided cloth on a
clean, plane surface and turn it as illustrated.
2. Supporting the drawer with your finger, use the
provided battery magnet to push the battery out of
the battery drawer from the minus side.
12
13
General
Low battery indication
In the standard setting the hearing aid will produce a
spoken message when the battery is nearly exhausted
(see page 9). If a setting with tone indication has been
chosen, four beep-tones will be produced. Once the
battery is totally exhausted, the hearing aid will be
completely silent. Exactly how long the hearing aid will
function after the low battery indication varies from
one case to another. We recommend that you always
have a spare battery with you.
Never leave an exhausted battery in the hearing aid.
Exhausted batteries may leak, damaging the hearing
aid.
14
Your hearing aid may be provided
with a battery drawer without a nail
grip, which means that you need a
tool to open the battery drawer.
This type of drawer can be a good
choice if the hearing aid is worn by
a child. A special tool for opening
the drawer will be included with
this drawer.
The battery drawer is opened as illus-
trated.
15
General
Turning the hearing aid on and off
The battery drawer of your hearing aid also functions
as the on/off switch.
1. Close the battery drawer to turn on the hearing aid.
If you have just turned off the hearing aid, wait at
least three seconds before turning it on again.
2. Open the battery drawer to turn off the hearing aid.
In the standard setting a spoken message will indicate
that the hearing aid has been switched on (see page
9).
Please remember to switch the hearing aid off when it
is not in use. Remove the battery if the hearing aid will
not be used for several days.
1
2
16
Possible start-up settings
The hearing aid can be set to start up in two different
ways. In the standard start-up setting the hearing aid
minimises whistling while it is being placed on the ear.
The alternative is a setting where the hearing aid whis-
tles slightly while you place it on the ear. Together with
your hearing care professional you can choose the
start-up setting that suits your needs best.
Automatic volume adjustment
The hearing aid volume is adjusted automatically in ac-
cordance with your sound environment.
Important
If the volume in your hearing aid is generally too
loud or too weak, or if the reproduced sounds are
distorted, or you would like any further information,
consult your hearing care professional.
17
General
Listening programs
Depending on how your hearing care professional has
programmed your hearing aid, you can have up to six
listening programs intended for specific listening situa-
tions.
At the back of this booklet your hearing care profes-
sional can list the listening programs that are available
in your hearing aid. If your needs change over time, the
combination of listening programs can be changed.
When selecting a listening program, please remember
that there are situations where it is particularly impor-
tant to be able to hear the surrounding sounds (e.g.
traffic, warning signals).
Master: Standard program
Acclimatisation: Has the same features as the Master
program, but provides slightly less amplification.
Music: For listening to music.
TV: For listening to the TV.
Comfort: Attenuates background noise.
Audibility Extender: Makes high-frequency sounds
audible.
18
Zen: Makes fractal tones. The tones are adjusted ac-
cording to your hearing loss.
The Zen program may be used with amplification so
both the surrounding sounds and the fractal tones are
heard together. Or, it may be used alone (without am-
plification) in quiet when you are not required to hear
surrounding sounds.
Up to two listening programs with one Zen style each
can be programmed for Zen. Furthermore, a special
Zen program can be made available. This is called Zen+
and can contain up to three Zen styles.
Important
Use of the different Zen programs may interfere
with hearing surrounding sounds including speech.
The programs should not be used when hearing
such sounds is important. Switch the hearing aid to
a non-Zen program in those situations.
19
General
Switching between the listening
programs
If your hearing aid model is provided
with a program button, you can
switch between the listening pro-
grams by pressing the program but-
ton at the bottom of the hearing aid.
Each time you switch to another program, a click will
be produced unless this function has been disabled.
In the standard setting, a spoken message will indicate
your choice of program (see page 9).
Zen+
If your hearing aid is provided with the Zen+ program,
you access this program by pressing the program but-
ton for more than one second. This function is called
SmartToggle.
A short press of the program button in the Smart Toggle
mode will allow you to cycle through the available Zen
styles. You can exit SmartToggle by pressing and hold-
ing the program button for more than a second.
20
If you have chosen the tone indication setting, the vari-
ous sounds tell you which program you have chosen:
Program 1: One brief beep
Program 2: Two brief beeps
Program 3: Three brief beeps
Program 4: One long and one brief beep
Program 5: One long and two brief beeps
• Zen+: Tone
Remote control
Some hearing aid models may be pro-
vided with a remote control. These hear-
ing aids have no program button. If your
hearing aid has a remote control, please
also refer to the users instructions for
the remote control.
21
General
Using a telephone
When listening on a telephone, we
recommend that you hold the tele-
phone against your head at an an-
gle above your ear, and not directly
against the ear. If the sound is not
optimal, try to move the telephone
loudspeaker to a slightly different
position.
22
Hearing aid with an earmould
The ear-set consists of the following parts:
1. Earhook
2. Tubing
3. Earmould
3a. Sound bore
3b. Vent
2
1
3
3a
3b
23
Hearing aid with an earmould
Placing the hearing aid and earmould
1. Insert the earmould in the ear canal while holding
the lower part of the tubing.
2. It may help to pull the outer ear backwards and up-
wards with the opposite hand.
3. Place the hearing aid behind the ear, so that the
earhook rests comfortably on the ear, close to your
head.
1.
2.
3.
24
Removing the hearing aid and earmould
1. Remove the hearing aid from its position behind
the ear.
2. Carefully pull the earmould out of the ear canal,
while holding the lower part of the tubing.
If it is difficult, you can try to move the earmould care-
fully from side to side while pulling it out. It may also
help to pull the outer ear backwards and upwards with
the opposite hand.
1
2
25
Hearing aid with an earmould
Cleaning
The following cleaning accessories are available for the
hearing aid and ear-set.
1. Soft cloth
2. Wax removing tool
Contact your hearing care professional if you need ad-
ditional supplies of cleaning accessories.
1.
2.
26
The hearing aid
Clean the hearing aid with the
soft cloth after use. Never use wa-
ter or cleaning solutions to clean
the hearing aid.
The microphone openings
Clean the microphone openings
by passing the wax removing
tool straight through the open-
ings.
If you feel resistance, withdraw
the tool and try again. Use only
the provided wax removing tool.
When the hearing aid is not in
use, the battery drawer should
be left open, so as to ventilate
the hearing aid and allow it to
dry.
27
Hearing aid with an earmould
The earmould
Make sure that your earmould is clean and free of ear-
wax and moisture. Never use alcohol or other cleaning
solutions to clean the earmould.
Cleaning the earmould:
1. Disconnect the earmould from the tubing.
2. Clean the vent with the wax removing tool.
3. Clean the sound bore with the wax removing tool.
1
2
3
28
4. At least once a week, disconnect the earmould
from the tubing and rinse the earmould thoroughly
in lukewarm water. Allow it to dry overnight.
5. If there is still moisture in the earmould, use a blow-
er or similar to blow it dry before attaching the ear-
mould to the tubing.
Changing the tubing
If your ear-set tubing becomes slack, stiff, yellow or
cracked, replace the tubing.
For further supplies of tubing or if the earmould no
longer fits your ear, contact your hearing care profes-
sional.
4
5
29
Hearing aid with an earmould
In case of malfunction
If the hearing aid is dead, it could be because:
The hearing aid is not turned on. Make sure that the
battery drawer is closed.
The battery is dead or does not work. Insert a new bat-
tery in the battery drawer of the hearing aid.
The sound bore of the earmould is blocked. Clean the
blocked sound bore as described on page 27.
If the hearing aid volume is not powerful enough, it
could be because:
The battery is nearly exhausted. Insert a new battery in
the battery drawer of the hearing aid.
The sound bore of the earmould is blocked. Clean the
blocked sound bore as described on page 27.
Your ear is blocked by earwax. Contact your physician/
ENT doctor.
Your hearing may have changed. Contact your hear-
ing care professional.
30
If the hearing aid whistles continuously, it could be
because:
Your ear is blocked by earwax. Contact your physician/
ENT doctor.
The tubing is broken. Replace the tubing.
The tubing is yellow and stiff. Replace the tubing.
The tubing often comes off the earmould or hearing aid
hook. Replace the tubing.
The hook is cracked. Contact your hearing care profes-
sional.
The earmould is not correctly placed in your ear canal.
Take the earmould out and reinsert it.
The earmould fits loosely in your ear canal. Contact
your hearing care professional.
31
Hearing aid with an instant ear-tip
The ear-set consists of the following parts:
1. Tubing with
1a. hook
1b. anchor
2. Instant ear-tip
1a.
1b.
2.
1.
32
Right/left identification
The ear-set tubing is available in dif-
ferent lengths for the right and left
ear, respectively. The individual size
is printed on the tubing. Red print
indicates that it is for the right ear
and blue print that it is for the left
ear.
33
Hearing aid with an instant ear-tip
Placing the hearing aid and instant ear-tip
1. Place the hearing aid behind the ear, so that the
hook and tubing rest comfortably on the ear, close
to your head.
2. Insert the ear-tip in the ear canal while holding the
lower part of the tubing.
Make sure that the anchor is positioned correctly, se-
curing the position of the ear-set.
Check at regular intervals that the hearing aid and ear-
set are positioned correctly.
2
1
Important
We do not recommend wearing the hearing aid
without the anchor for the instant ear-tip solution. If
the hearing aid is not secured by the anchor, it can
fall off your ear and be lost.
34
Removing the hearing aid and instant ear -tip
1. Remove the hearing aid from its position behind
the ear.
2. Carefully pull the ear-tip out of the ear canal, while
holding the lower part of the tubing.
1
2
35
Hearing aid with an instant ear-tip
Cleaning
The following cleaning accessories are available for the
hearing aid and ear-set.
1. Soft cloth
2. Wax removing tool
3. Cleaning thread
Contact your hearing care professional if you need ad-
ditional supplies of cleaning accessories.
1.
2.
3.
55
Hearing aid with a custom ear-tip
3. Pass the cleaning thread through the tubing. Pull
the thread out at the other end.
If necessary, the custom ear-tip
can be washed.
Pull the ear-tip off the tubing as
described.
Rinse the ear-tip thoroughly in
lukewarm water.
Allow it to dry overnight.
3
55

Hulp nodig? Stel uw vraag in het forum

Spelregels

Misbruik melden

Gebruikershandleiding.com neemt misbruik van zijn services uitermate serieus. U kunt hieronder aangeven waarom deze vraag ongepast is. Wij controleren de vraag en zonodig wordt deze verwijderd.

Product:

Bijvoorbeeld antisemitische inhoud, racistische inhoud, of materiaal dat gewelddadige fysieke handelingen tot gevolg kan hebben.

Bijvoorbeeld een creditcardnummer, een persoonlijk identificatienummer, of een geheim adres. E-mailadressen en volledige namen worden niet als privégegevens beschouwd.

Spelregels forum

Om tot zinvolle vragen te komen hanteren wij de volgende spelregels:

Belangrijk! Als er een antwoord wordt gegeven op uw vraag, dan is het voor de gever van het antwoord nuttig om te weten als u er wel (of niet) mee geholpen bent! Wij vragen u dus ook te reageren op een antwoord.

Belangrijk! Antwoorden worden ook per e-mail naar abonnees gestuurd. Laat uw emailadres achter op deze site, zodat u op de hoogte blijft. U krijgt dan ook andere vragen en antwoorden te zien.

Abonneren

Abonneer u voor het ontvangen van emails voor uw Widex MIND440 m4-m-CB AHO bij:


U ontvangt een email met instructies om u voor één of beide opties in te schrijven.


Ontvang uw handleiding per email

Vul uw emailadres in en ontvang de handleiding van Widex MIND440 m4-m-CB AHO in de taal/talen: Engels als bijlage per email.

De handleiding is 2,11 mb groot.


U ontvangt de handleiding per email binnen enkele minuten. Als u geen email heeft ontvangen, dan heeft u waarschijnlijk een verkeerd emailadres ingevuld of is uw mailbox te vol. Daarnaast kan het zijn dat uw internetprovider een maximum heeft aan de grootte per email. Omdat hier een handleiding wordt meegestuurd, kan het voorkomen dat de email groter is dan toegestaan bij uw provider.

Stel vragen via chat aan uw handleiding

Stel uw vraag over deze PDF

Andere handleiding(en) van Widex MIND440 m4-m-CB AHO

Widex MIND440 m4-m-CB AHO Gebruiksaanwijzing - Nederlands - 68 pagina's

Widex MIND440 m4-m-CB AHO Gebruiksaanwijzing - Deutsch - 64 pagina's


Uw handleiding is per email verstuurd. Controleer uw email

Als u niet binnen een kwartier uw email met handleiding ontvangen heeft, kan het zijn dat u een verkeerd emailadres heeft ingevuld of dat uw emailprovider een maximum grootte per email heeft ingesteld die kleiner is dan de grootte van de handleiding.

Er is een email naar u verstuurd om uw inschrijving definitief te maken.

Controleer uw email en volg de aanwijzingen op om uw inschrijving definitief te maken

U heeft geen emailadres opgegeven

Als u de handleiding per email wilt ontvangen, vul dan een geldig emailadres in.

Uw vraag is op deze pagina toegevoegd

Wilt u een email ontvangen bij een antwoord en/of nieuwe vragen? Vul dan hier uw emailadres in.


Info