


-
hallo ik ben in het bezit een wanscam hw 0038 ip camera, , het lukt me niet om de email in te stellen? heeft iemand nog een idee?
Reageer op deze vraag Misbruik melden
Ik heb alle vorige vragen en antwoorden hierover gelezen maar niets helpt!
verder werkt de camera zoals het hoort!
Via Gmail alles geprobeerd maar helaas Gesteld op 2-10-2015 om 14:07-
Antwoord op diverse vragen...
Waardeer dit antwoord (5) Misbruik melden
Ik heb dezelfde camera, en ik vind dat de software die erbij hoort zeer slecht is.
Na lang zoeken kwam ik bij "TinyCam Monitor" voor Android uit.
Hierbij hoef je niks aan de camera zelf in te stellen. De software zoekt de camera zelf.
Ook als de verbinding een tijdje verbroken is geweest gaat de software weer op zoek naar de camera.
Je kan een mailadres instellen, en nog vele andere dingen.
Je kunt zelfs een server instellen, zodat je via je computer je opnamen kan bekijken.
De Pro versie kost iets van €4, maar is het dik en dubbel waard vind ik, maar sommigen hebben aan de gratis versie al genoeg.
Het werkt beter als je een snelle telefoon of tablet hebt. Geantwoord op 5-2-2016 om 23:55
-
-
hoi ik heb een wanscam en deze was al geïnstalleerd door mijn ex vriend op mijn laptop en op onze mobiele telefoons. nu wij uit elkaar zijn en niet meer samen wonen wil ik de Cam opnieuw installeren op mijn laptop en op mijn nieuwe mobiele telefoon maar ik kom steeds maar tot het punt dat ik een gebruikersnaam moet invoeren deze is: admin en overal staat dat er geen wachtwoord hoort te zijn maar als ik op verder klik vraagt hij toch om een wachtwoord. hoe kan ik achter dit wachtwoord komen? en kan het zijn dat mijn ex deze heeft ingesteld. zo ja hoe reset ik alles en installeer ik als nog mijn wanscam opnieuw zodat mijn ex via zijn telefoon niet meer mee kan kijken.
Reageer op deze vraag Misbruik melden
groetjes Gesteld op 11-3-2015 om 14:53-
Het reset knopje gebruiken aan de onderkant en dan krijg je standaard wachtwoord en dat is admin of geen wachtwoord. Je kan zelf dan een nieuwe verzinnen Geantwoord op 24-1-2016 om 10:19
Waardeer dit antwoord Misbruik melden
-
-
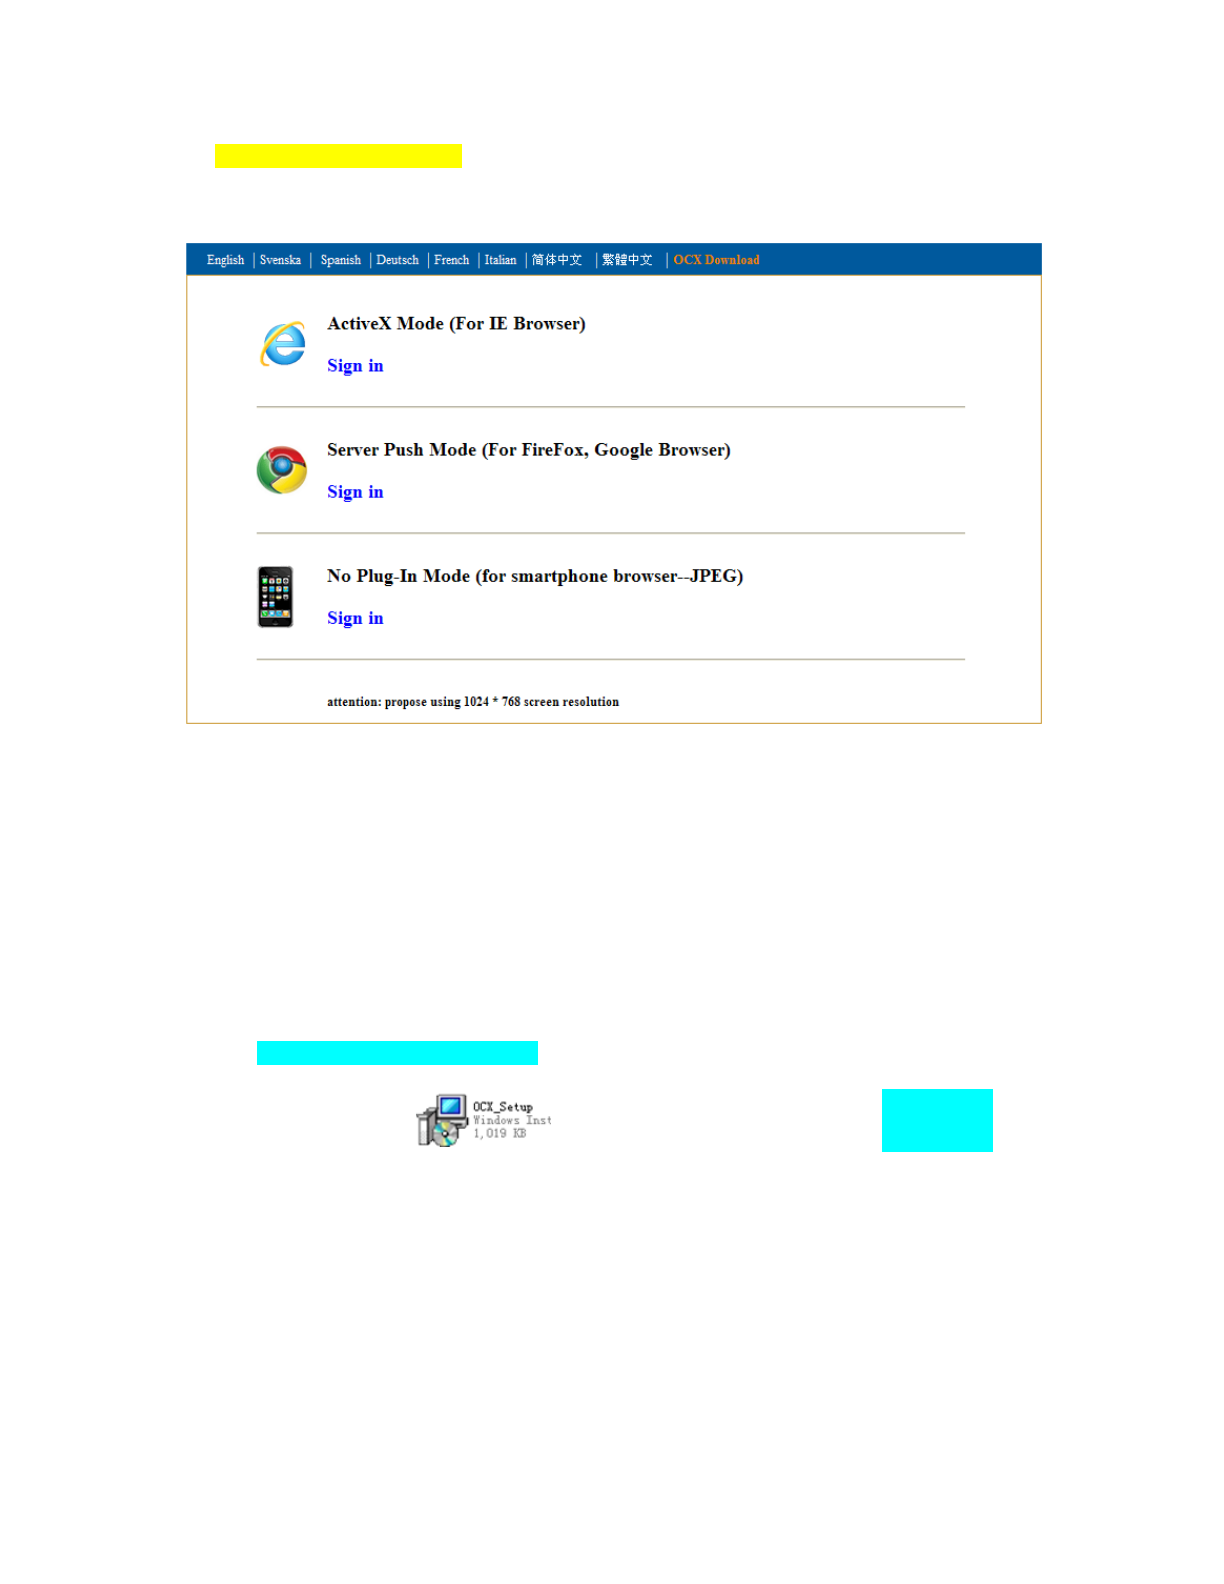
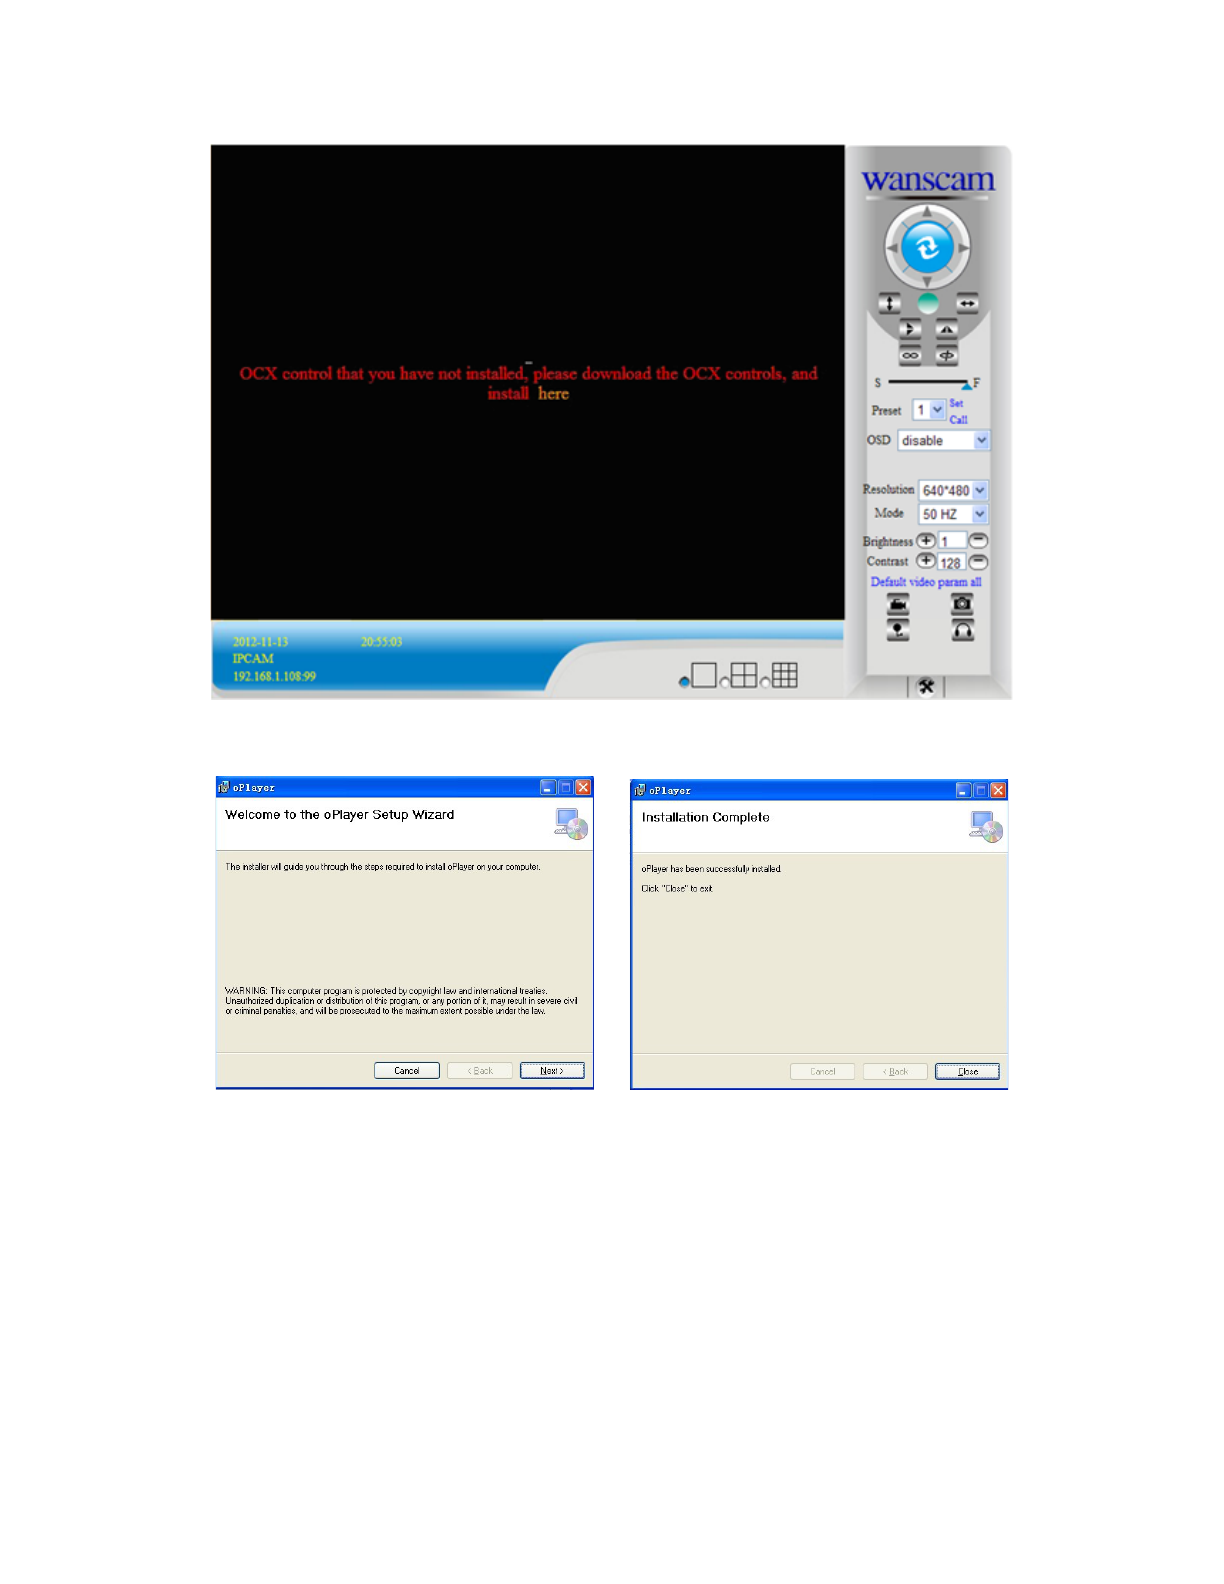
De (kleine) meegeleverde installatie CD met OCX setup past niet in mijn iMAC en op de windows laptop wordt de cd niet herkend/gevonden, waardoor ik de setup niet op een USB stick kan overzetten. Is dit programma niet op internet te vinden ? Gesteld op 14-2-2015 om 16:41
Reageer op deze vraag Misbruik melden-
ja is op internet te vinden... alleen us t in t chinees. .. alleen het hoofdscherm is engels... dus tenzijeje chinees kan heb je er geen bal aan Geantwoord op 1-3-2015 om 18:58
Waardeer dit antwoord Misbruik melden
-
-
Bij het instellen van de diverse gegevens zoals de basic en wifi etc. geeft het progamma aan dat ik niet geauthoriseerd ben. Terwijl ik als administrator ben ingelogd en het programma opstart als aministrator. Ik draai windows7 . Gesteld op 10-1-2015 om 17:19
Reageer op deze vraag Misbruik melden-
Wat kan ik doen om dit probleem op te lossen ? Geantwoord op 21-8-2015 om 09:15
Waardeer dit antwoord (1) Misbruik melden
-
-
Hallo,
Reageer op deze vraag Misbruik melden
Werkt de software ook met Windows8? Ik heb de software geinstalleerd en geprobeerd op te starten maar zonder resultaat, zowel via de snelkoppeling op het bureaublad als via verkenner...
Als ik op de site van Wanscam kijk zie in Win8 er ook niet tussen staan...
Site Wanscam: Klik op deze LINK
Enig idee hoe ik dan nog de camera aan kan sturen?
Mvgr, Marcel Oerlemans Gesteld op 19-4-2014 om 12:55-
Ik zit met pressies het zelfde probleem, als ik inlog met admin en none als wachtwoord ingeef (of wachtwoord leeg laat) krijg ik chinese tekens en OK in een popup venster te zien verder kom ik niet Geantwoord op 22-12-2014 om 20:26
Waardeer dit antwoord (7) Misbruik melden
-
-
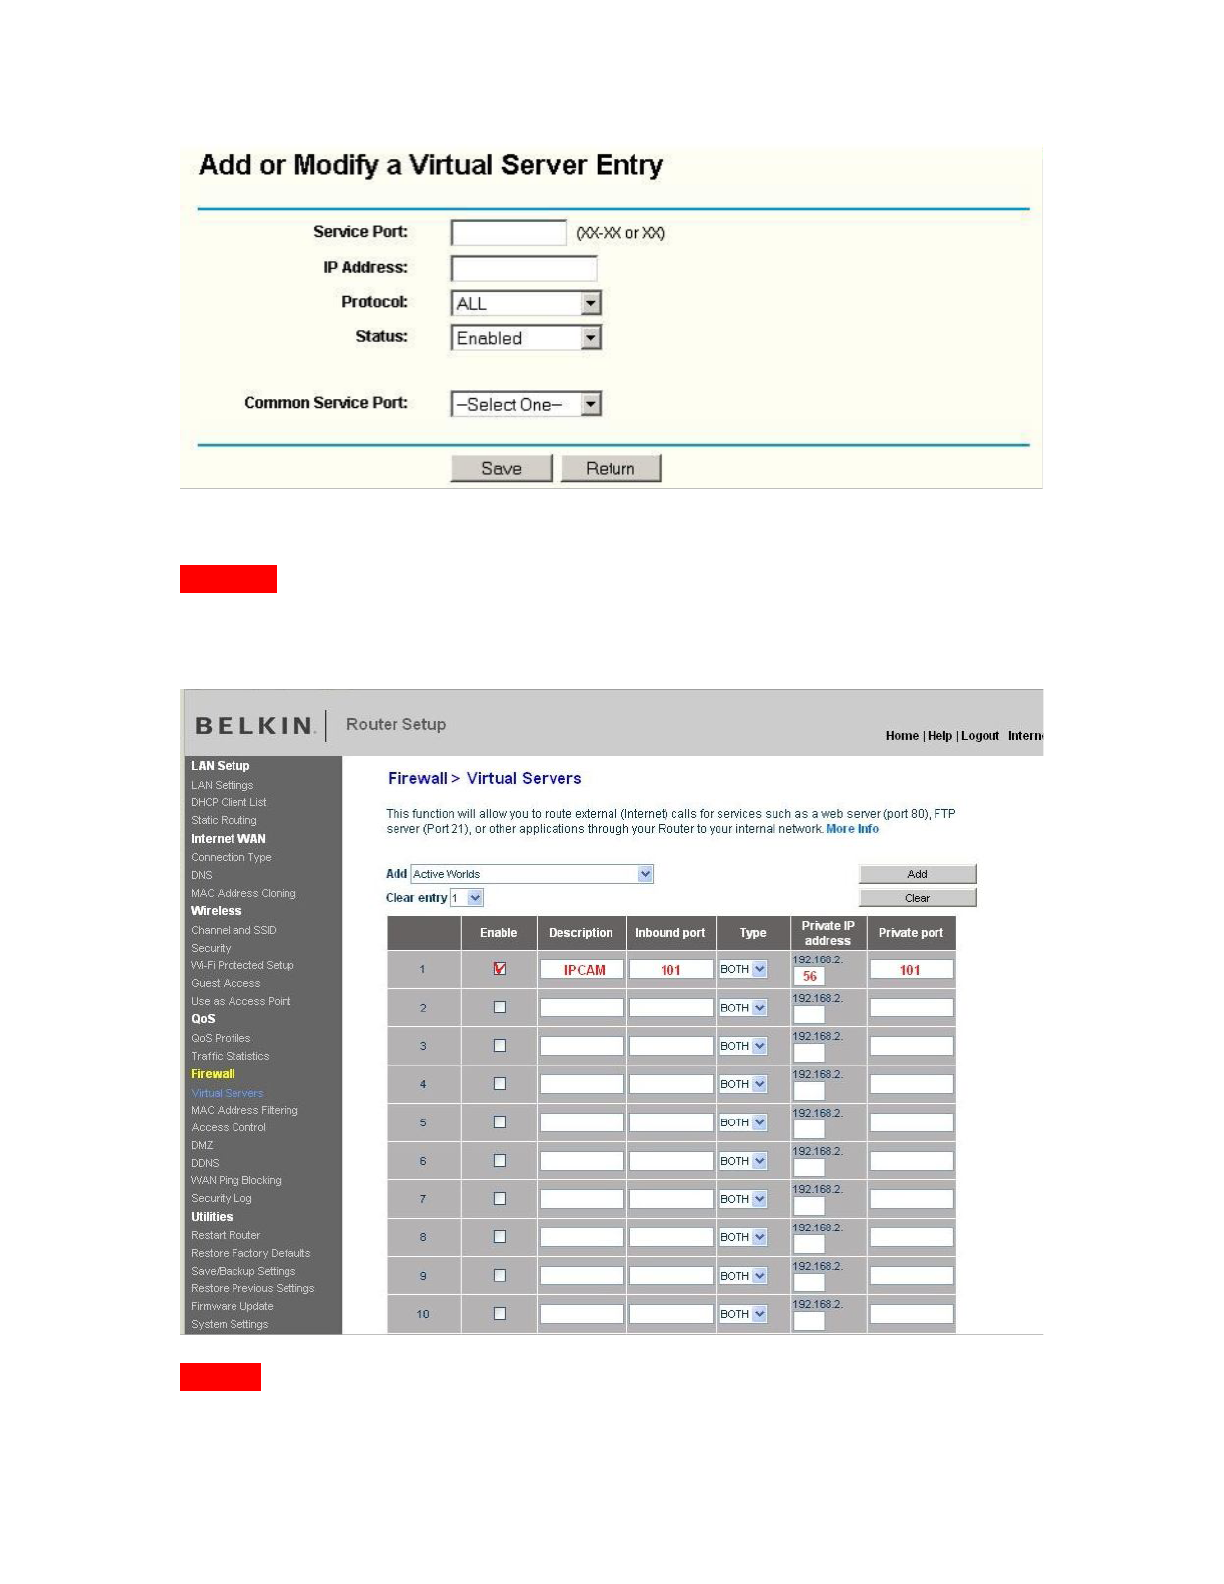
Kan iemand vertellen hoe je verbinding kunt maken zonder WiFi? Thuis met WiFi is er wel verbinding met de wanscam, maar t is niet gelukt om verbinding te kunnen maken zonder WiFi wanneer ik bijvoorbeeld buitenshuis ben.
Reageer op deze vraag Misbruik melden
Gesteld op 7-3-2014 om 16:32-
je moet je poort forwarden in je router anders gaat dit niet Geantwoord op 15-3-2014 om 18:43
Waardeer dit antwoord Misbruik melden
-
-
Inside camera staat binnen voor raam. Werkt deze dan wel als infrarood naar buiten? Gesteld op 4-3-2014 om 19:32
Reageer op deze vraag Misbruik melden-
Ja cam werkt wel maar op het beeld zul je de IR ledjes weerspiegeld zien Geantwoord op 22-9-2014 om 09:39
Waardeer dit antwoord Misbruik melden
-
-
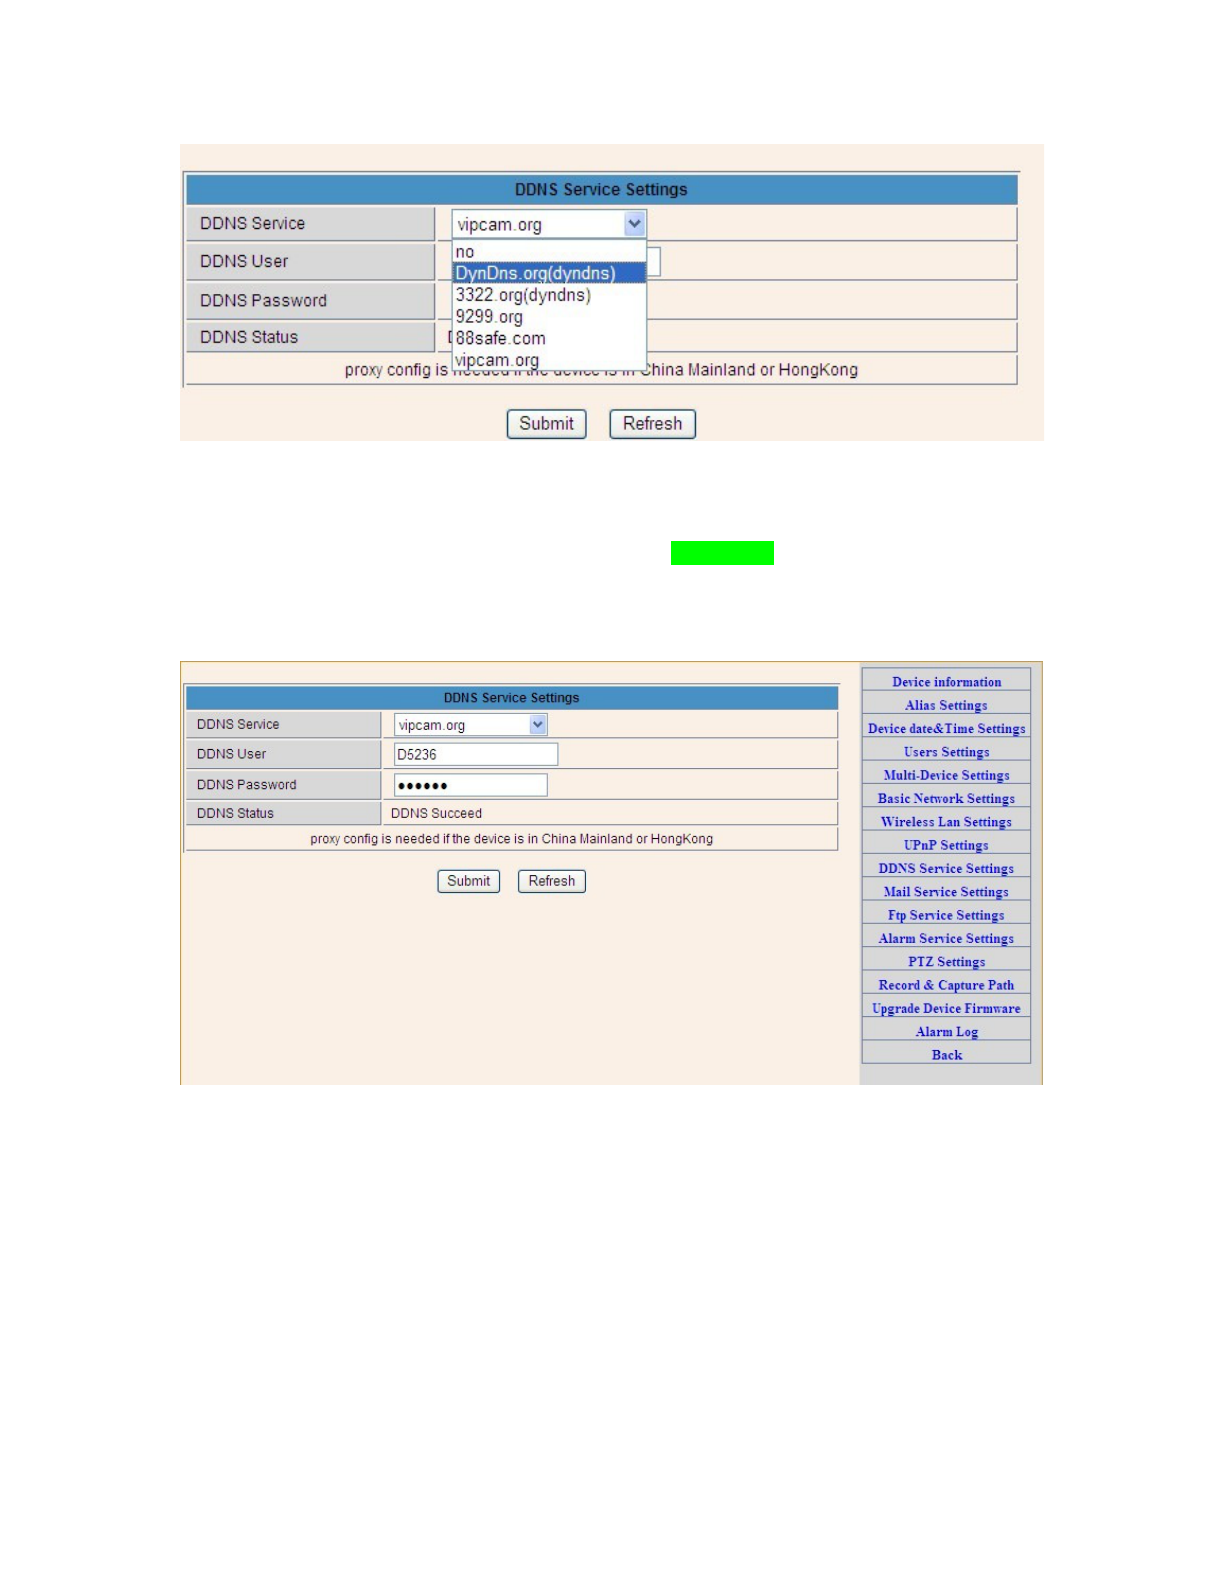
#1; weet iemand hoe ik het voor elkaar krijg om de meldingen via de mail aan te zetten. heb alles ingesteld maar werkt niet.
Reageer op deze vraag Misbruik melden
#2; is het ook mogelijk om meldingen op je telefoon te krijgen via de app. ik gebruik m via de i-phone. Gesteld op 27-1-2014 om 15:01-
werkt alleen volgens mij met gmail.
Waardeer dit antwoord (2) Misbruik melden
en je moet uiteraard de instellingen hebben
eerste vak.
eigen email.
tweede vak
smtp.gmail.com
derde vak port
456
need auth..
aanvinken
sll....
TLS
smtp user
eigen email van gmail
paswoord
dat van je gmail
resiever
je email waar je alarm mail moet komen
Geantwoord op 24-4-2014 om 12:18
-
-
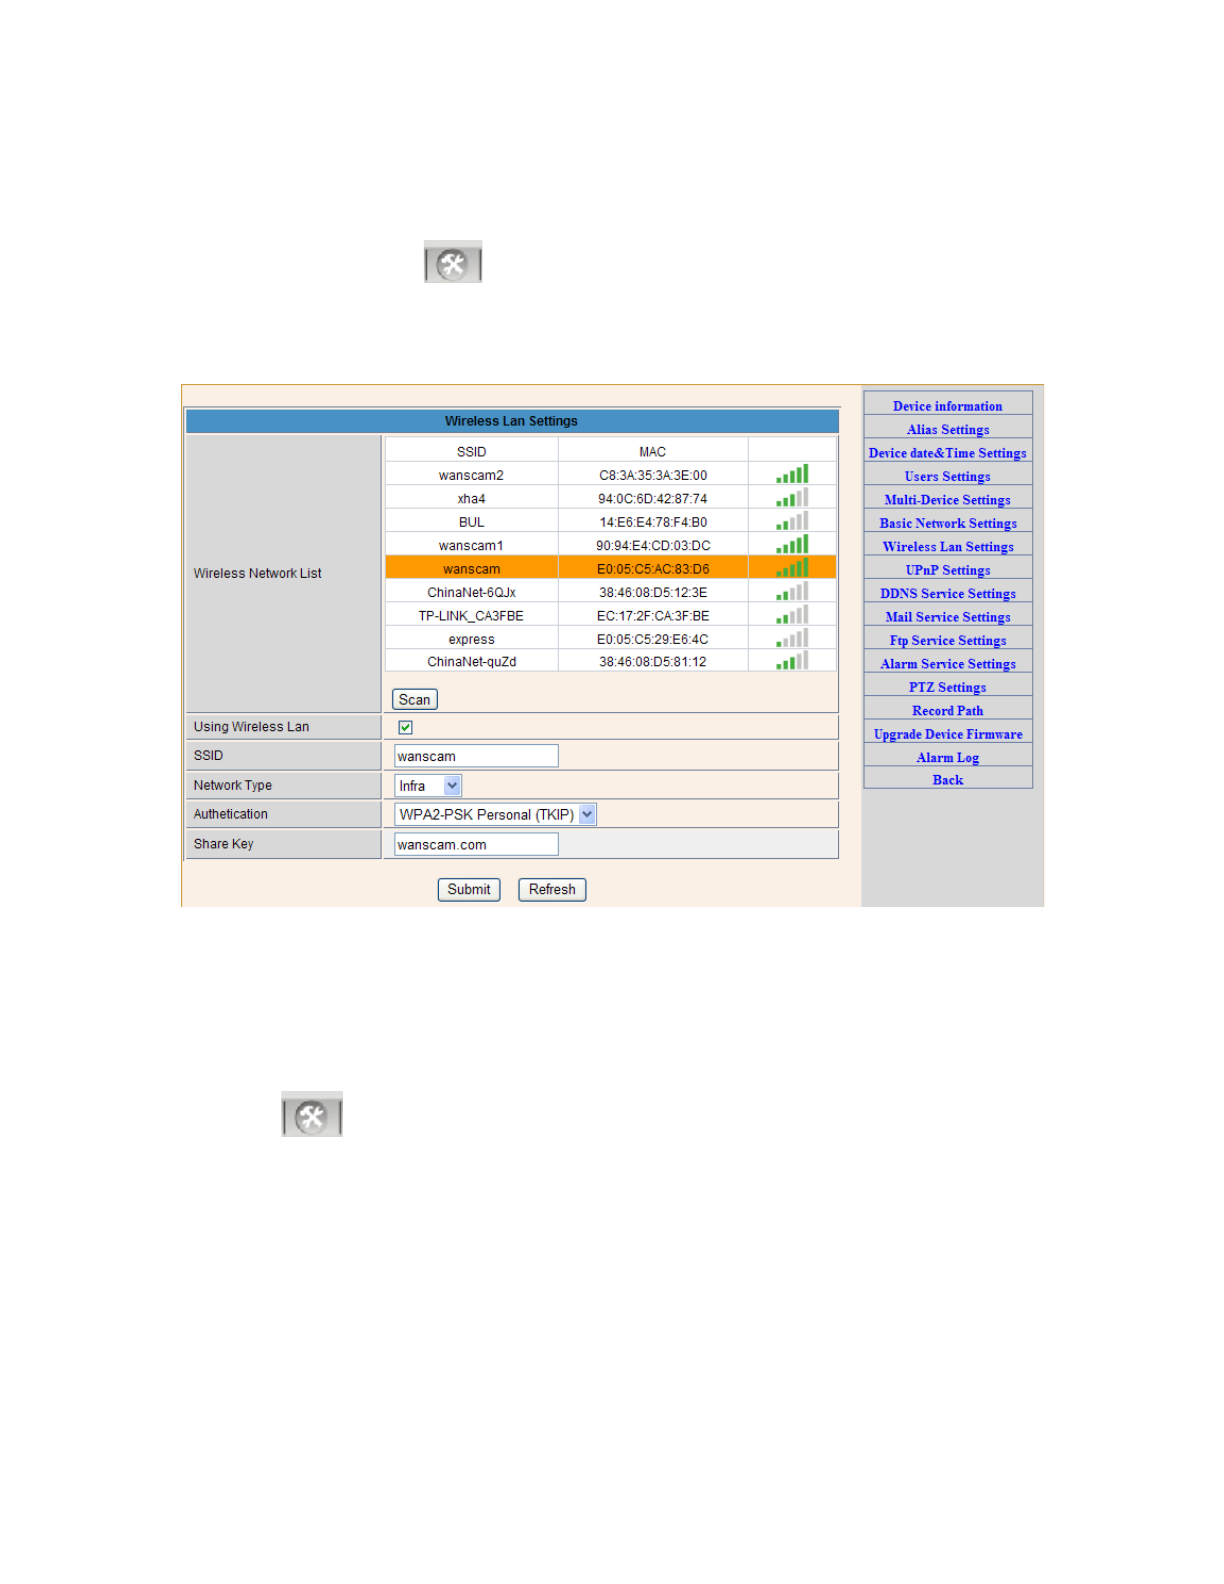
Een vraag over het draadloos aansluiten. Ik heb alle stappen ondernomen en via de kabel heb ik een perfect beeld. Als ik daarna de wireless lan instellingen doorloop en vervolgens na het rebooten van de camera de LAN kabel eruit trek, heb ik geen beeld en mn Cisco router ziet de camera ook niet. Nu een keer of 8 geprobeert op verschillende manieren, maar draadloos krijg ik m niet aan de gang, terwijl ik m juist draadloos nodig heb.
Reageer op deze vraag Misbruik melden
help?!! Gesteld op 22-12-2013 om 13:24-
Ik las je berichtje over de wanscam camera en hoop eigenlijk dat je misschien al een oplossing hebt gevonden om de camera draadloos te krijgen. Ik heb nl het zelfde probleem met deze camera, het lukt me gewoon niet. Alles werkt totdat…ik de lankabel verwijder.
Waardeer dit antwoord (7) Misbruik melden
Met vriendelijke groet
Monique Geantwoord op 10-1-2014 om 10:46
-
-
heb ook hetzelfde probleem met kabel oké zonder noppes!!! Geantwoord op 15-1-2014 om 18:56
Waardeer dit antwoord (6) Misbruik melden -
Hij doet het !!! ( Zonder Lankabel ) Geantwoord op 16-1-2014 om 20:17
Waardeer dit antwoord (13) Misbruik melden -
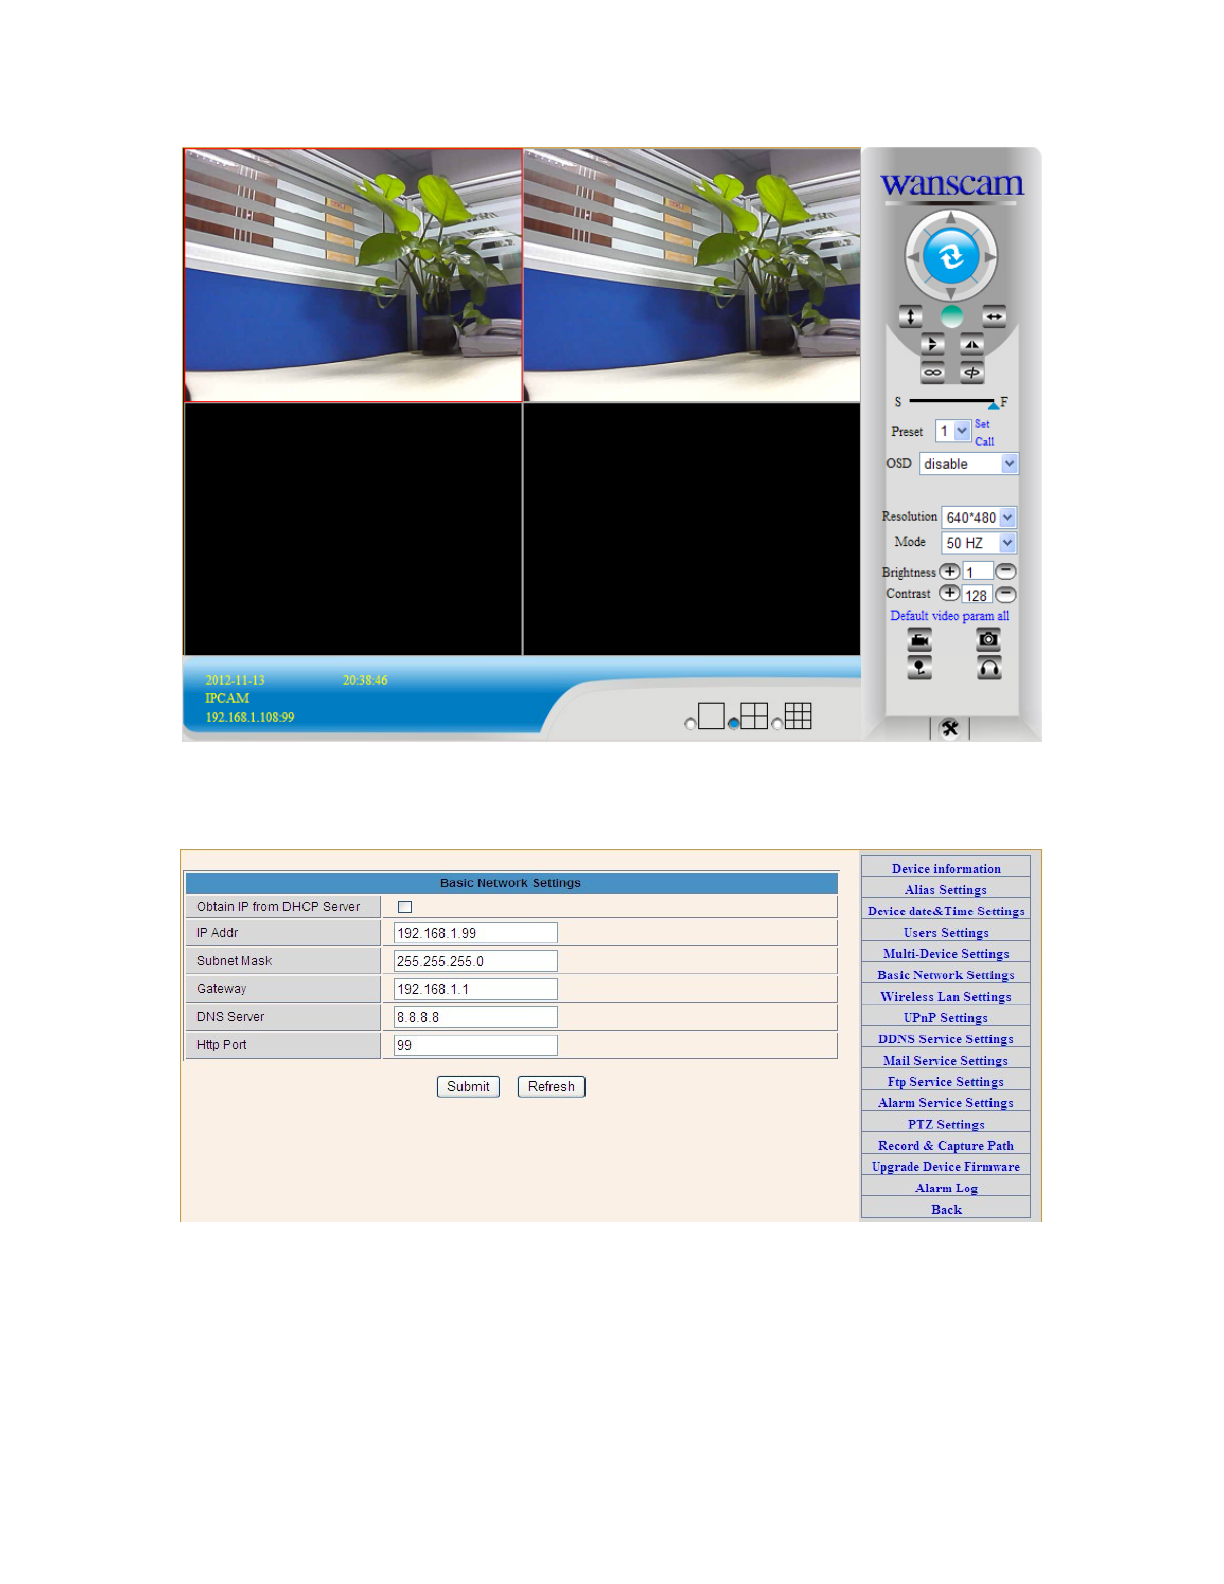
DHCP in de camera instellingen uitvinken Geantwoord op 16-1-2014 om 20:42
Waardeer dit antwoord (1) Misbruik melden -
Idd camera werkt alleen met lan kabel zodra ik hem uittrek stopt hij.
Waardeer dit antwoord Misbruik melden
Ook DHCP uitgevinkt zoals ik heb gelezen in dit forum, maar helaas geen resultaat wie o wie kan mij de gouden tip geven
alles al geprobeert........ Geantwoord op 16-4-2014 om 19:30 -
je moet in je router iets aanpassen.
Waardeer dit antwoord Misbruik melden
de router geeft je camera een ip nummer.
daar moet je in je router een vaste ip van gaan maken.
dat heet forwarden
Ook moet je dat doen in je camera progamma Geantwoord op 24-4-2014 om 12:21 -
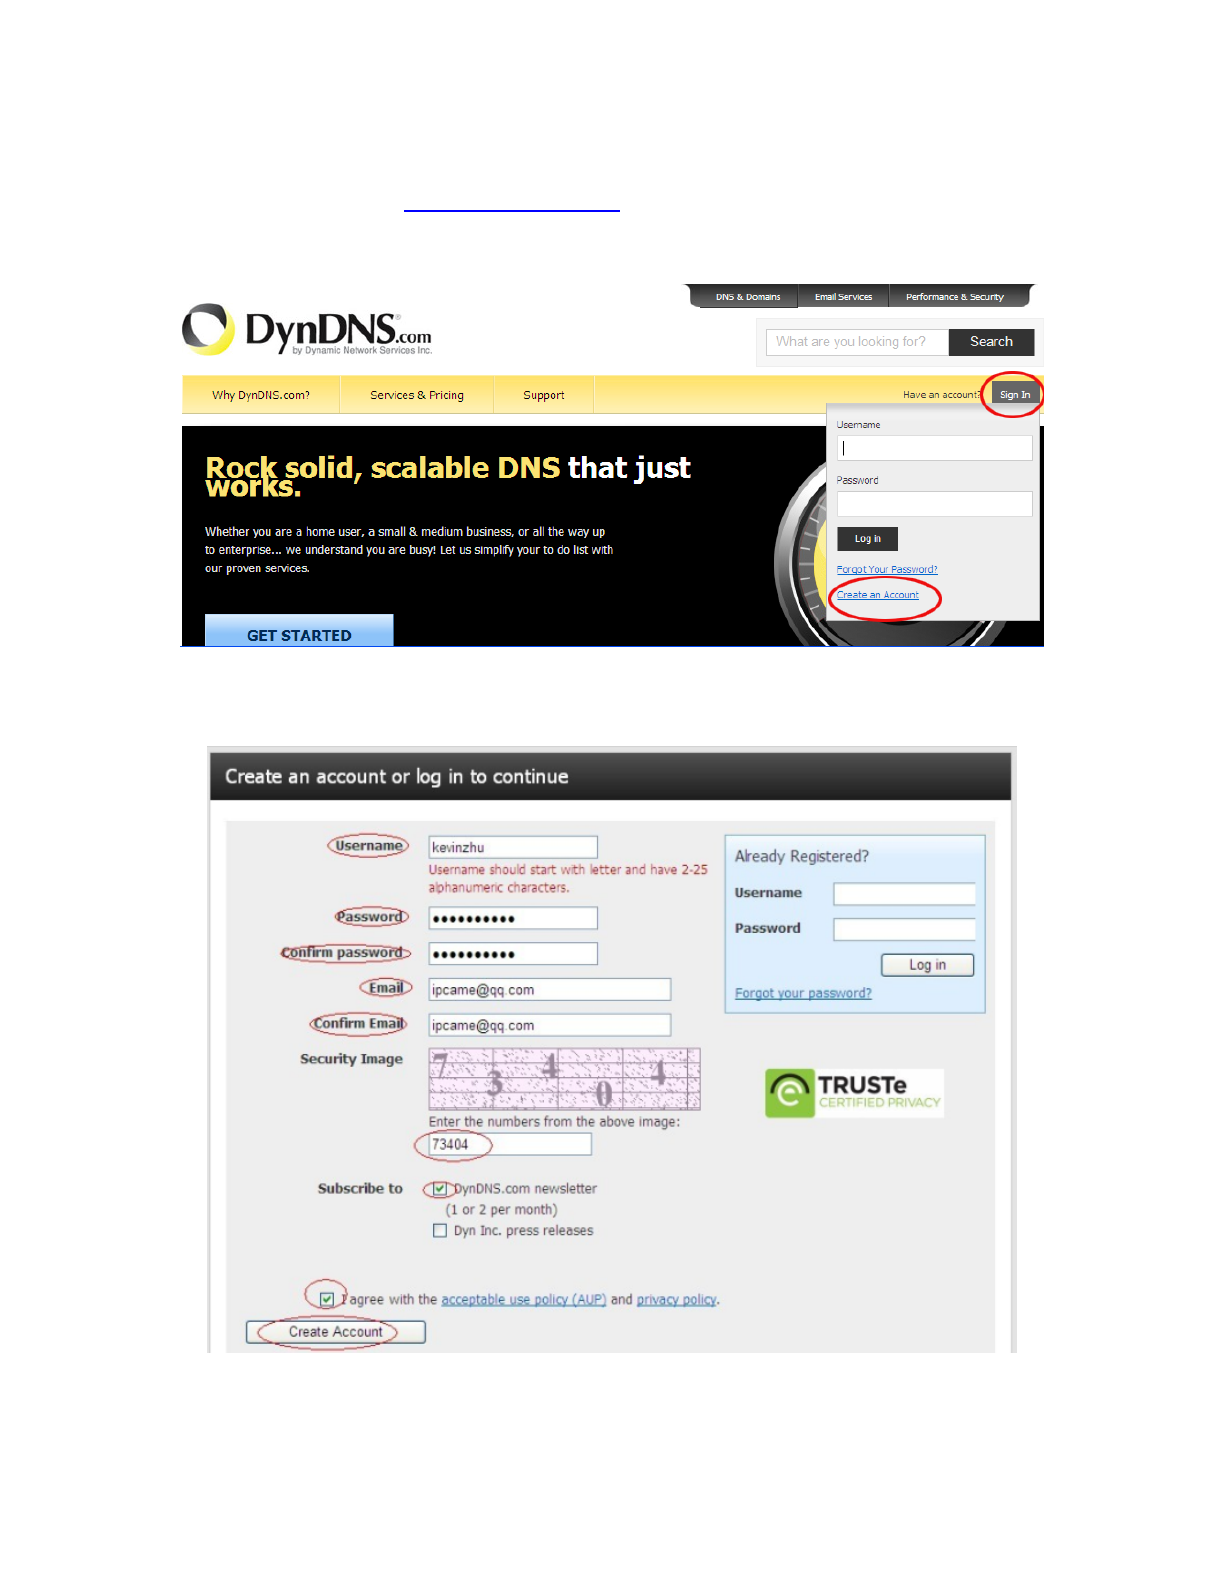
Iemand een idee hoe je email alert instelt? al aantal keer geprobeerd maar elke keer met testen kan hij de server niet vinden Gesteld op 19-11-2013 om 19:00
Reageer op deze vraag Misbruik melden-
Ga naar de site van:
Waardeer dit antwoord (2) Misbruik melden
Babyfoon-met-camera.nl
deze installeren je cam voor het luttele bedrag van € 29,95 en elke volgend evoor € 10,00
Ik heb dit na vele avonden tobben ook gedaan em ik werd prima geholpen met mijn 3 camera's. ALs je het bedrag afzet tegenover de tijd en de ergenis die je er in stopt is het haast gratis !
Ik heb overigens geen enkel belang in "babyfoon-met-camera.nl" hoor. Geantwoord op 18-12-2013 om 09:45
-
-
Geachte heer/mevrouw,
Reageer op deze vraag Misbruik melden
Ik heb de JW0011 camera gekocht via marktplaats.nl. Bij de handleidingen staat deze camera er niet bij. Alleen de JW0004, wat een totaal andere camera is.
Met vriendelijke groet,
Wilfrid van Meer Gesteld op 13-11-2013 om 09:56-
Gek hè........het zal wel aan het verschil in typenummer liggen.... Geantwoord op 13-11-2013 om 10:05
Waardeer dit antwoord Misbruik melden
-
-
dat is de gemene truuk, jammer dan Geantwoord op 15-1-2014 om 20:24
Waardeer dit antwoord Misbruik melden -
Ik heb een wanscam hoe laat ik dit werken met ipad Gesteld op 5-11-2013 om 14:38
Reageer op deze vraag Misbruik melden-
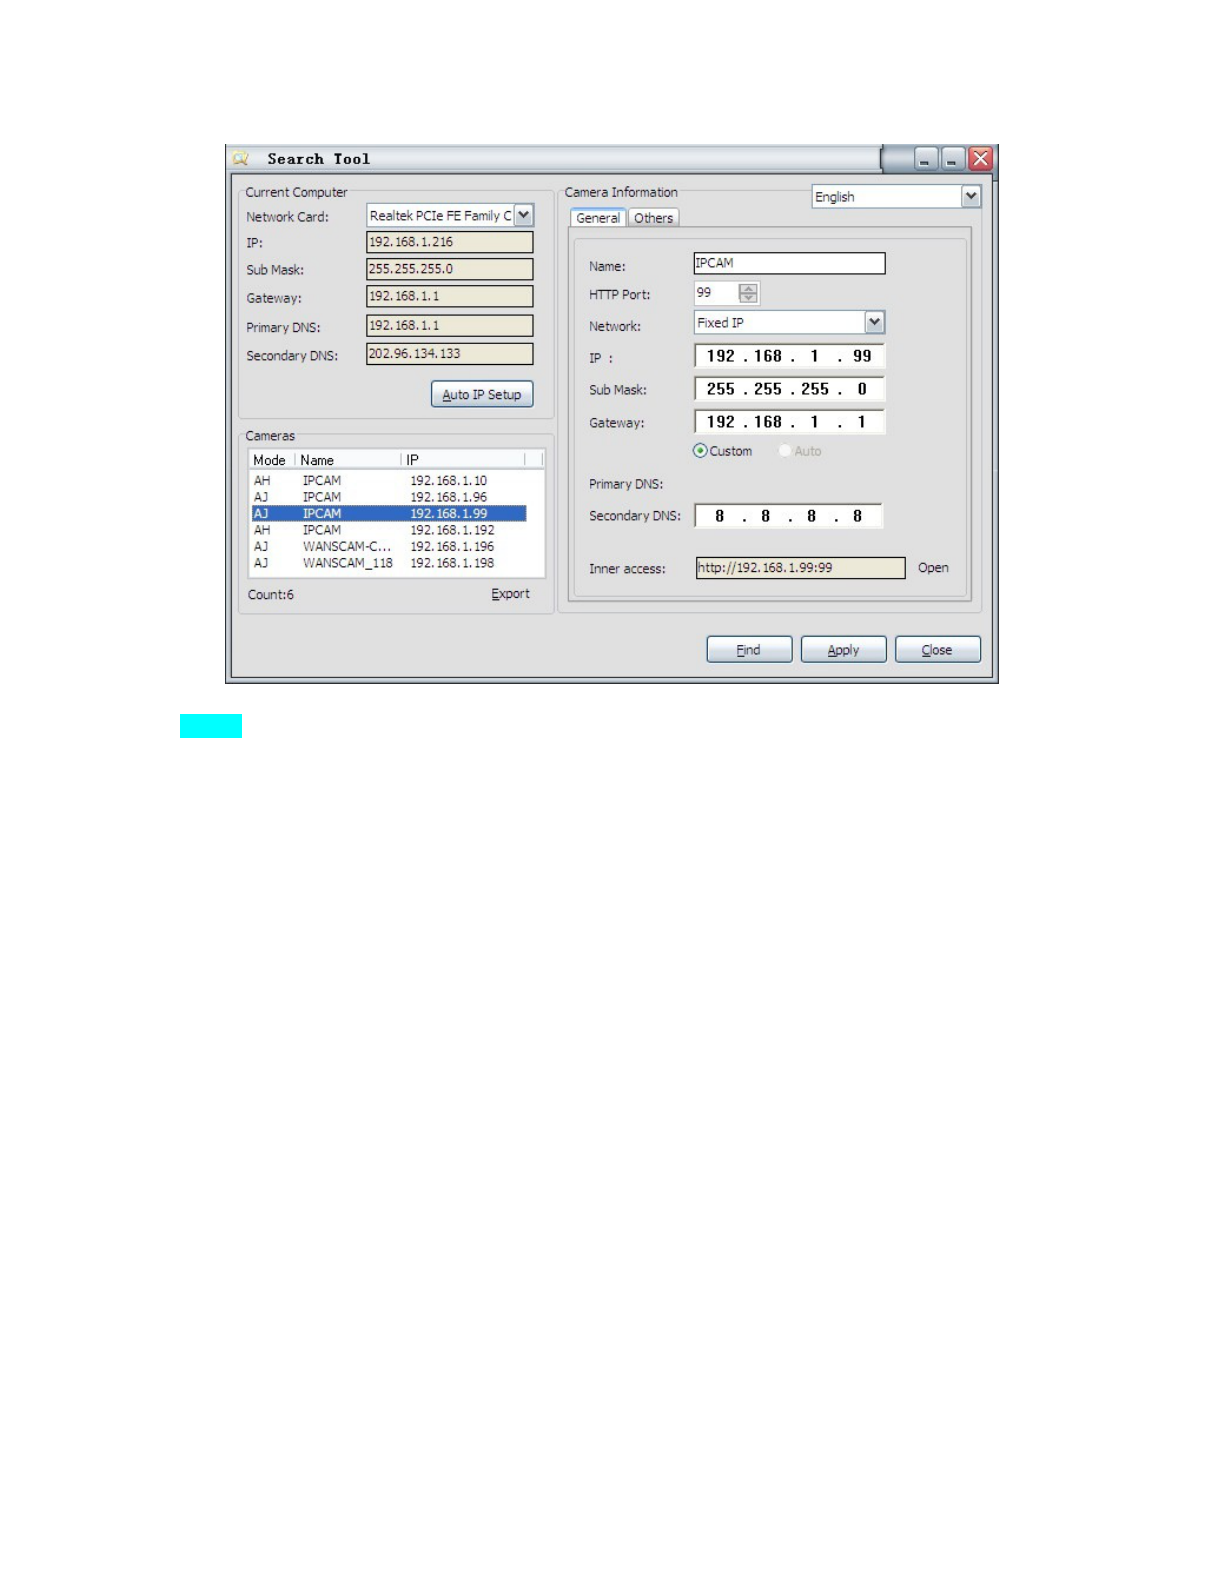
Mijne werkt gewoon via de link uit de searchtool. Geantwoord op 19-11-2013 om 18:58
Waardeer dit antwoord Misbruik melden
-
-
Ik denk hetzelfde als op Mac of Iphone Geantwoord op 16-1-2014 om 20:19
Waardeer dit antwoord Misbruik melden -
Waarom kan ik de handleiding NL van de Wanscam HD HW 0021 niet via mijn Ipad ophalen(slotje) Gesteld op 12-7-2013 om 15:09
Reageer op deze vraag Misbruik melden-
oplayer instaleren van de cd? Geantwoord op 19-11-2013 om 19:01
Waardeer dit antwoord (2) Misbruik melden
-
-
Heb een IP.wanscam binnen camera aangeschaft. Hij werkt wel als ik met een draad naar m`n draadloze router gaat. Maar kan het buiten stroom geheel draadloos? Heb wel DDNS, maar ben echt een leek. Gesteld op 15-4-2013 om 17:15
Reageer op deze vraag Misbruik melden-
Gewoon even instelling nakijken daar moet je eerst verbinden maken met de wifi Geantwoord op 19-11-2013 om 18:59
Waardeer dit antwoord Misbruik melden
-
-
heb de wanscam een paar weken, het installeren ging moeizaam hij gaf beeld voor een paar dagen, maakt ook geen contact meer met me tools heb alles geprobeert maar de server van de camera reageert niet. wat te doen Gesteld op 28-2-2013 om 11:49
Reageer op deze vraag Misbruik melden-
In mijn ogen contact opnemen met de leverancier Geantwoord op 28-2-2013 om 11:54
Waardeer dit antwoord Misbruik melden
-
-
Hallo,
Reageer op deze vraag Misbruik melden
mijn wanscam deed het heel goed. maar nu kan ik hem via de computer niet meer bedienen, heb alles verwijderd en voor de zoveelste x geinstalleed. wel beeld maar kan hem niet bedienen.
Weet iemand waar dat aan kan liggen?
Gesteld op 23-2-2013 om 18:52-
Misschien heb je bij de instellingen je bevoegdheid op visitor gezet, dan kun je alleen maar kijken en niet bedíenen. Die instellingen kun je aanpassen met administratorrechten. Standaard is gebruikersnaam admin zonder wachtwoord. Wanneer je die rechten niet meer hebt moet je de camera renetten door met een paperclip in het gaatje onderop de bodem van de camera te drukken en daarna weer met de searchtool de instellingen opnieuw volgens de handleiding uit te voeren. In de Google playstore kun je de IPcam viewer basic vinden, klik daar op Wansview model Wansview NC541 en voer het externe IP adres en poortnummer in samen met gebruikersnaam en wachtwoord en je hebt je camera op je Android smartphone, voor iPad werkt de gratis app.Camviewer goed Geantwoord op 24-2-2013 om 01:53
Waardeer dit antwoord Misbruik melden
-
-
Waar kan je nieuwe firmware vinden Gesteld op 12-1-2013 om 18:44
Reageer op deze vraag Misbruik melden-
dat zou ik ook wel willen weten, misschien dat daar de problemen mee opgelost worden............van Avanca hoef je geen echte support te verwachten in ieder geval...... Geantwoord op 26-1-2013 om 12:42
Waardeer dit antwoord (4) Misbruik melden
-
-
Er staat geen app voor de iphone op de bijgeleverde cd rom voor deze wifi cam, welke app kan ik daarvoor gebruiken Gesteld op 21-12-2012 om 22:04
Reageer op deze vraag Misbruik melden-
e-view maar het werkt voor geen meter wat een drama dat ding Geantwoord op 22-12-2012 om 17:05
Waardeer dit antwoord (6) Misbruik melden
-
-
E-view Geantwoord op 12-1-2013 om 18:46
Waardeer dit antwoord (3) Misbruik melden -
Ik heb een wifi internet camera vandaag bezorgd gekregen alleen de cd die ik bij kreeg daar staat niks op komt een melding over formateren enzo daar eenmaal opgeklikt lukt ook niet wat is het probleem dan? ik heb zelfs weinig verstand van
Reageer op deze vraag Misbruik melden
Gesteld op 21-12-2012 om 18:25-
ocx setup map heb je inde cd dat moet je hebben . Geantwoord op 22-12-2012 om 18:22
Waardeer dit antwoord (2) Misbruik melden
-
-
ik heb het zelfde ook niet benaderbaar de cd hij wil er op schrijven
Waardeer dit antwoord (4) Misbruik melden
dus hoe krijg je zo iets aan de praat.en ook voor je smartphone ,zie helemaal geen software daar voor. Geantwoord op 22-2-2013 om 14:24
