De informatie in dit document kan zonder voorafgaande kennisgeving worden gewijzigd. Wanders res & stoves aanvaard geen aansprakelijkheid voor technische fouten,
redactionele fouten, drukfouten of weglatingen in deze publicatie.
4
Algemeen
Over het algemeen zorgt de dealer waar u uw gashaard heeft aangeschaft, ook voor de installatie ervan en de
aansluiting op het gasnet. Is dat niet het geval, verzeker u er dan van dat de installatie wordt uitgevoerd door
een erkende installateur. Aansluiten van gasinstallaties door onbevoegden is verboden. Wij kunnen u in dat
geval geen garantie geven op de juiste werking van de gaskachel.
Batterijen
De batterijen van de afstandsbediening en ontvanger hebben een levensduur van ongeveer één jaar. Gebruik
van alkaline batterijen wordt aanbevolen.
Vervangen is noodzakelijk wanneer bij de afstandsbediening de LED auwer begint te branden en het woord
“BATT” in het display verschijnt. Bij de ontvanger zult u middels geluidstonen erop gewezen worden dat de
batterijen vervangen dienen te worden. U hoort, tijdens het ontsteken, gedurende 0,8 seconden een toon
gevolgd door 0,2 seconden rust.
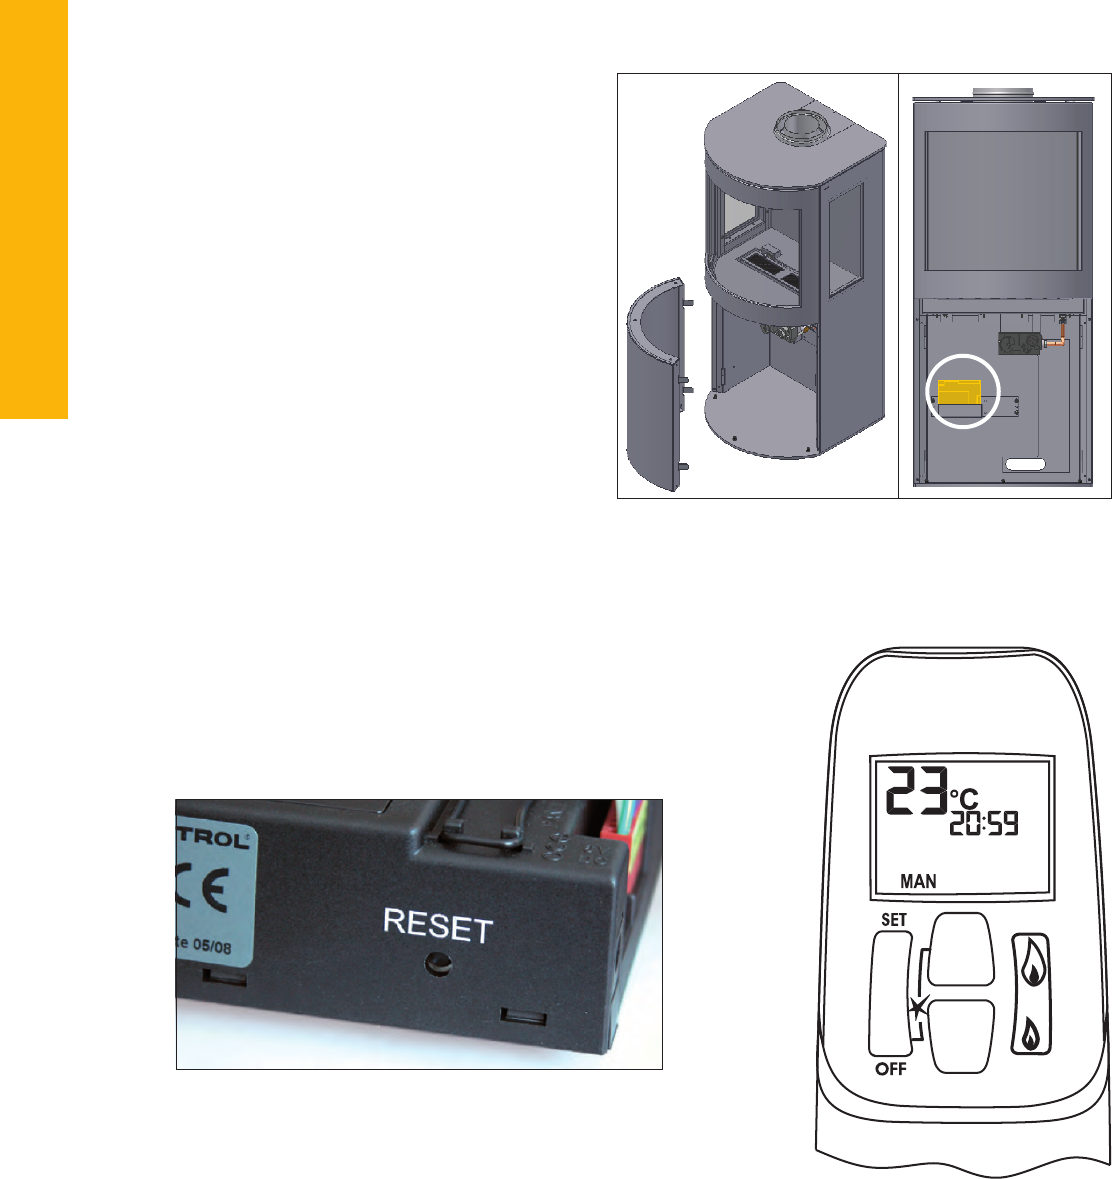
Vervangen van de batterijen van de
afstandsbediening
Open het klepje aan de achterzijde van
de afstandsbediening. Haal voorzichtig de
9V-blokbatterij eruit en maak deze los van de
contacthouder. Voorkom het trekken aan de kabel.
Verbind de nieuwe batterij en plaats het geheel
terug. Sluit het klepje.
Vervangen van de batterijen van de
ontvanger
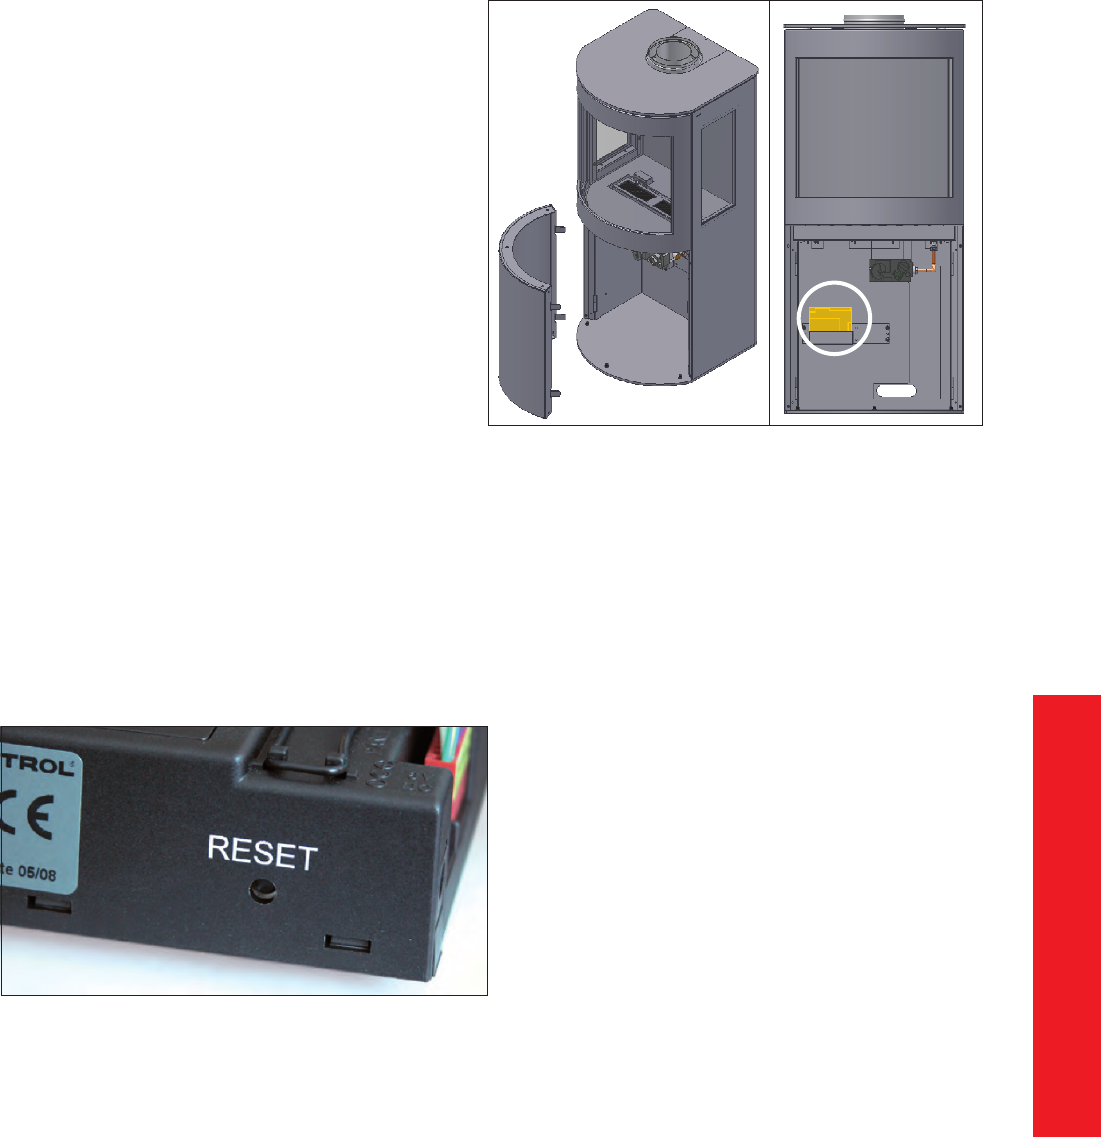
Trek voorzichtig de klep onder van de haard. Trek
voorzichtig de gehele ontvanger uit de houder
onder in de kachel. Schuif het klepje open en plaats
4 nieuwe 1,5V-batterijen (type LR6 of AA). Let op dat
u de batterijen op de juiste wijze in de ontvanger
plaatst. Leg vervolgens de ontvanger weer in de
kachel.
Instellen van de afstandsbediening
Als de batterijen geplaatst zijn moet de elektronische code ingesteld worden
(alleen bij eerste ingebruikname) druk de reset knop op de ontvanger net
zo lang in tot u 2 signalen hoort daarna reset knop loslaten nu moet u
binnen 20 sec de kleine vlam knop drukken tot u een lang signaal hoort
ter bevestiging dat de code is ingesteld.
5
NL
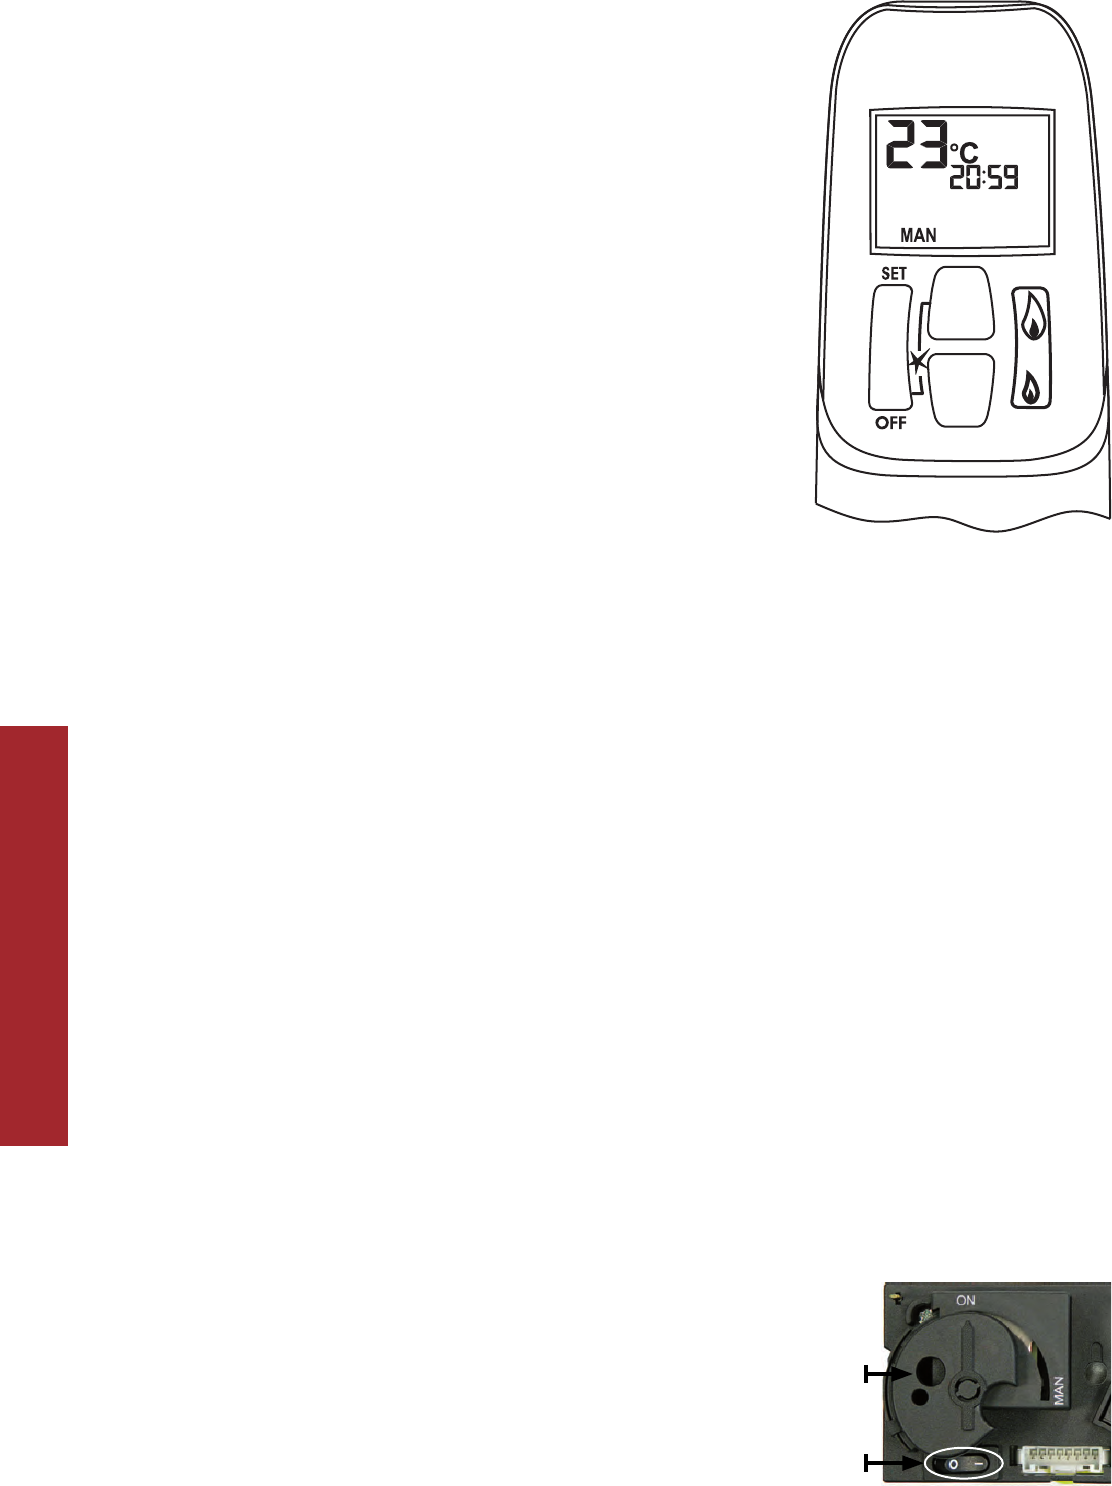
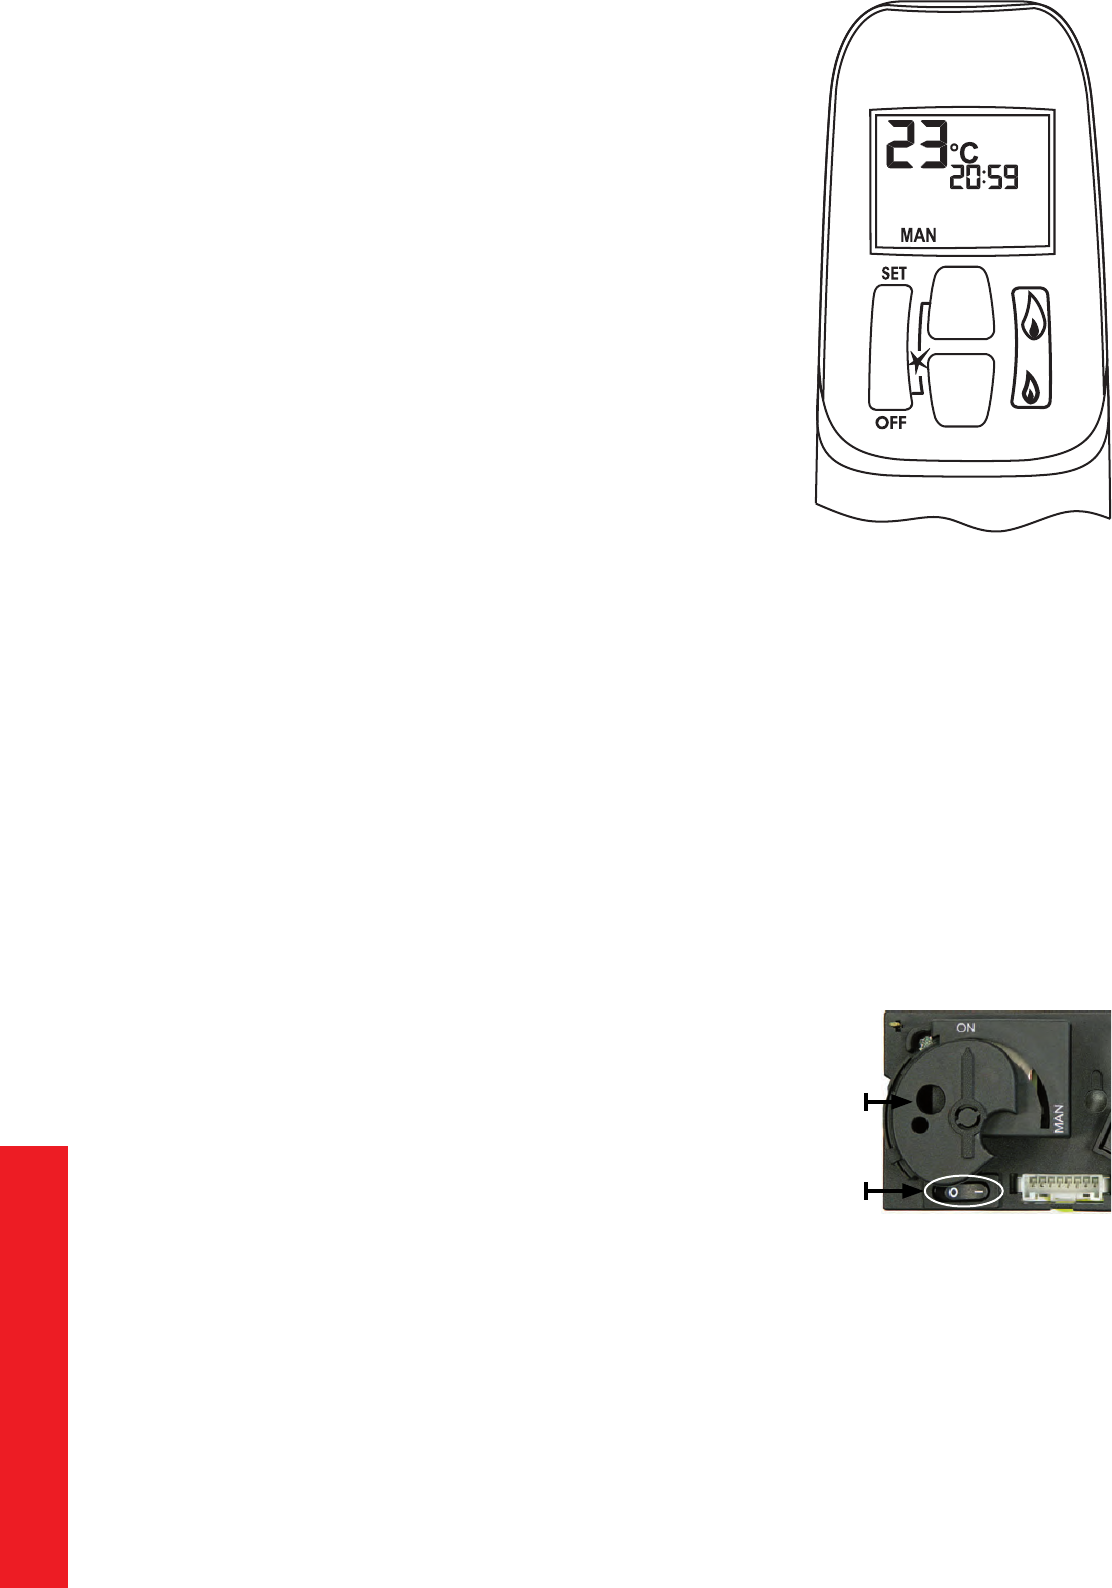
Tijd instellen
•Door het gelijktijdig indrukken van de grote vlam knop en de kleine vlam knop zal het display gaan
knipperen u bent nu in de set mode.
•In de set mode kunt u de grote vlam knop indrukken om de uren in te stellen en de kleine vlam knop
om de minuten in te stellen.
•Wacht of druk de OFF knop om terug te keren naar hand bediening.
Omschakelen van ºC/24u naar ºF/12u
•Druk de OFF knop en de kleine vlam knop gelijk-tijdig (2 sec) in om van ºF (en 12 uurs klok) om te
schakelen naar ºC (en 24 uurs klok) en omgekeerd.
Mogelijke instellingen
•Door het indrukken van de SET knop kunt u snel omschakelen tussen MAN dag temperatuur
nacht temperatuur timer MAN.
•MAN in deze setting kunt u doormiddel van de knoppen grote vlam of kleine vlam handmatig de vlam
hoger of lager instellen
•Dag temperatuur () in deze setting kunt u de gewenste temperatuur overdag instellen de afstandsbediening
fungeert dan als thermostaat .
•Nacht temperatuur () in deze setting kunt u de gewenste nacht temperatuur instellen.
•TIMER in de timer setting kunt 2 inschakel- en 2 uitschakeltijden instellen per 24 uur. Als de nacht instelling
op - - - staat zal de kachel op waakvlam gaan branden.
Instellen van de temperatuur
•Selecteer de dag temperatuur of nacht temperatuur door de SET knop kort in te drukken.
•Druk nu de SET knop langer in tot het display knippert.
•Stel de temperatuur in met de knoppen of (5ºC is de minimum dag temperatuur).
•Wacht of druk de OFF knop om naar thermostaat gestuurde controle te gaan.
•Om de batterijen te sparen adviseren wij om de temperatuur voor de nacht terug te regelen tot u het - - -
symbool in de display ziet.
Instellen van de timer functie
•Selecteer de timer functie door de SET knop enkele malen kort in te drukken.
•Druk de SET knop nu langer in totdat P1 () knippert.
•Stel de uren in met toets , de minuten met knop .
•Druk de SET knop kort in voor de volgende tijd.
•Als alle 4 tijden ingesteld zijn drukt u op de OFF knop om het instellen te beëindigen.
Bediening (afstandsbediening)
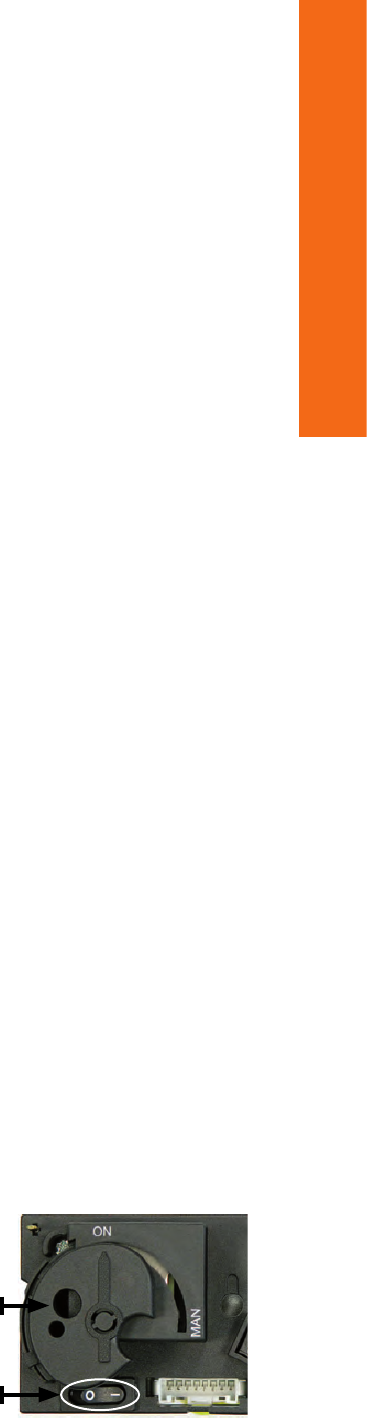
Aansteken van het vuur
•Open de gas afsluitkraan die in de gasleiding naar het toestel is
gemonteerd.
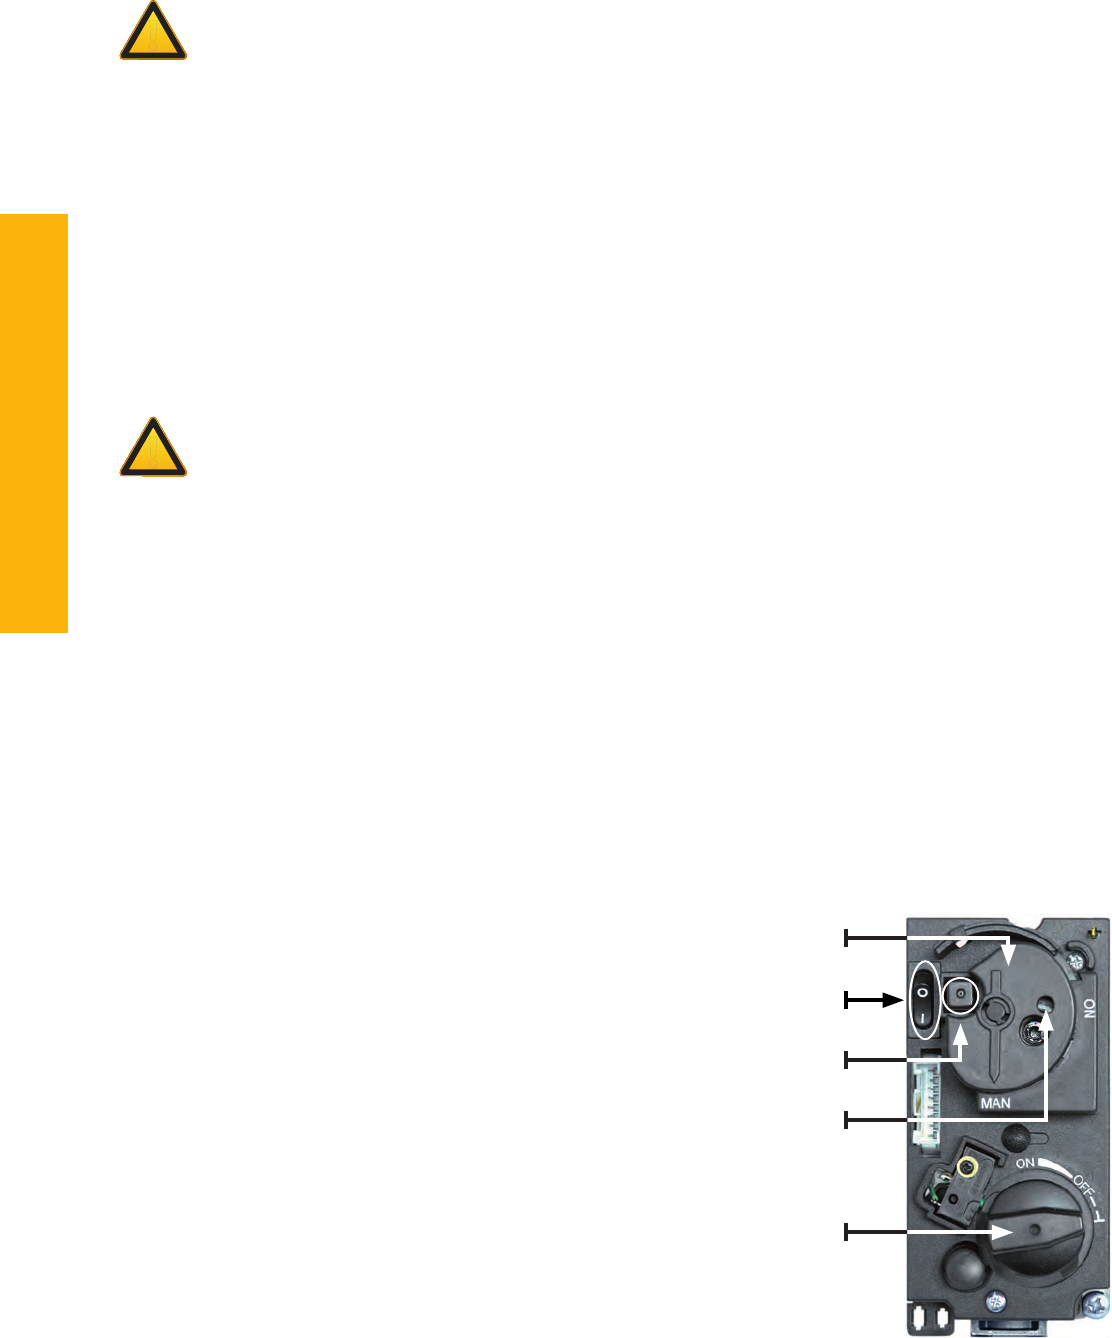
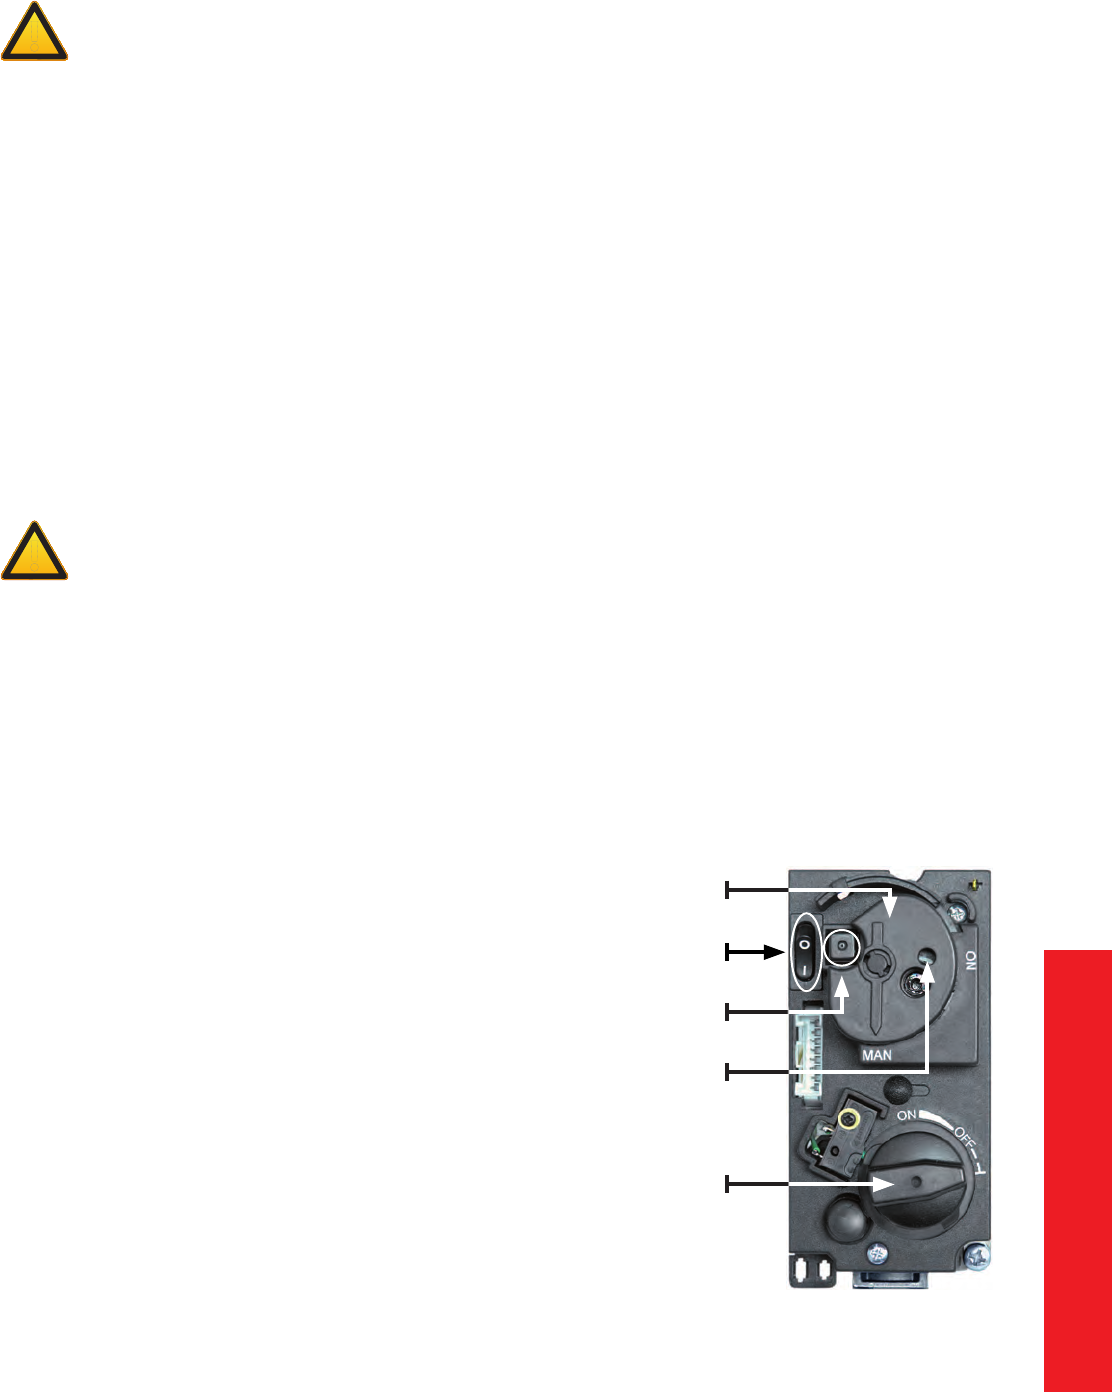
•Druk de “O I” schakelaar , op het gasregelblok, in de “I” positie.
• Draai de bedieningsknop , op het gasregelblok, in de ON positie.
• Druk op de handzender de knoppen en gelijktijdig in. Een
kort geluidssignaal zal de start bevestigen. Daarna zullen korte
geluidssignaaltjes (0,2 sec. toon, 1Hz.) volgen totdat de waakvlam en
hoofdbrander worden ontstoken. Nadat de hoofdbrander is ontstoken
gaat de vlamhoogte automatisch naar de maximale stand.
Mogelijke foutmeldingen
•Lange signalen (0,8 sec. toon, 0,2 sec. rust) tijdens de ontsteking batterijen van de ontvanger zijn bijna
leeg. (Nadat dit signaal optreedt kan men nog ongeveer 10x het toestel inschakelen.)
•5 Seconden continu signaal foutmelding. Bijvoorbeeld; één van de kabels is niet verbonden, de “O I”
schakelaar staat niet in de “I” positie.
6
•5x Kort signaal (0,2 sec. toon, 0,2 sec. rust) ontsteking van waakvlam en hoofdbrander is niet gelukt.
Mogelijke oorzaak lucht in de waakvlamleiding.
Belangrijk: Gaat de waakvlam uit, dan dient U minimaal 5 MINUTEN te wachten voordat men de
bovenstaande handelingen herhaalt.
Instellen van de vlamhoogte
•Na ontsteking van de brander gaat de vlamhoogte automatisch naar de maximale stand.
•Druk continu op knop om het vlambeeld te verlagen en om de brander uit te schakelen (doven van het
vuur: “STAND BY”). Kort op toets drukken verlaagt het vlambeeld geleidelijk.
•Druk op toets om het vlambeeld te verhogen. Kort op toets drukken verhoogt het vlambeeld geleidelijk.
Uitschakelen van het toestel
•Druk op toets om het vlambeeld te verlagen en om de brander uit te schakelen.
•Druk daarna op de “OFF” knop om het gehele toestel, inclusief de waakvlam, uit te schakelen.
•Wordt het toestel langere tijd niet gebruikt, dan is het aan te bevelen om de gas afsluitkraan in de
toevoerleiding dicht te draaien.
Belangrijk: Wanneer door welke oorzaak dan ook de waakvlam dooft, 5 MINUTEN wachten alvorens
de waakvlam opnieuw aan te steken.
Storing
Als blijkt dat de signalen van de afstandsbediening niet goed bij de kachel (ontvanger) aankomen, kan dit
veroorzaakt worden door:
•Lege batterijen: batterijen vervangen.
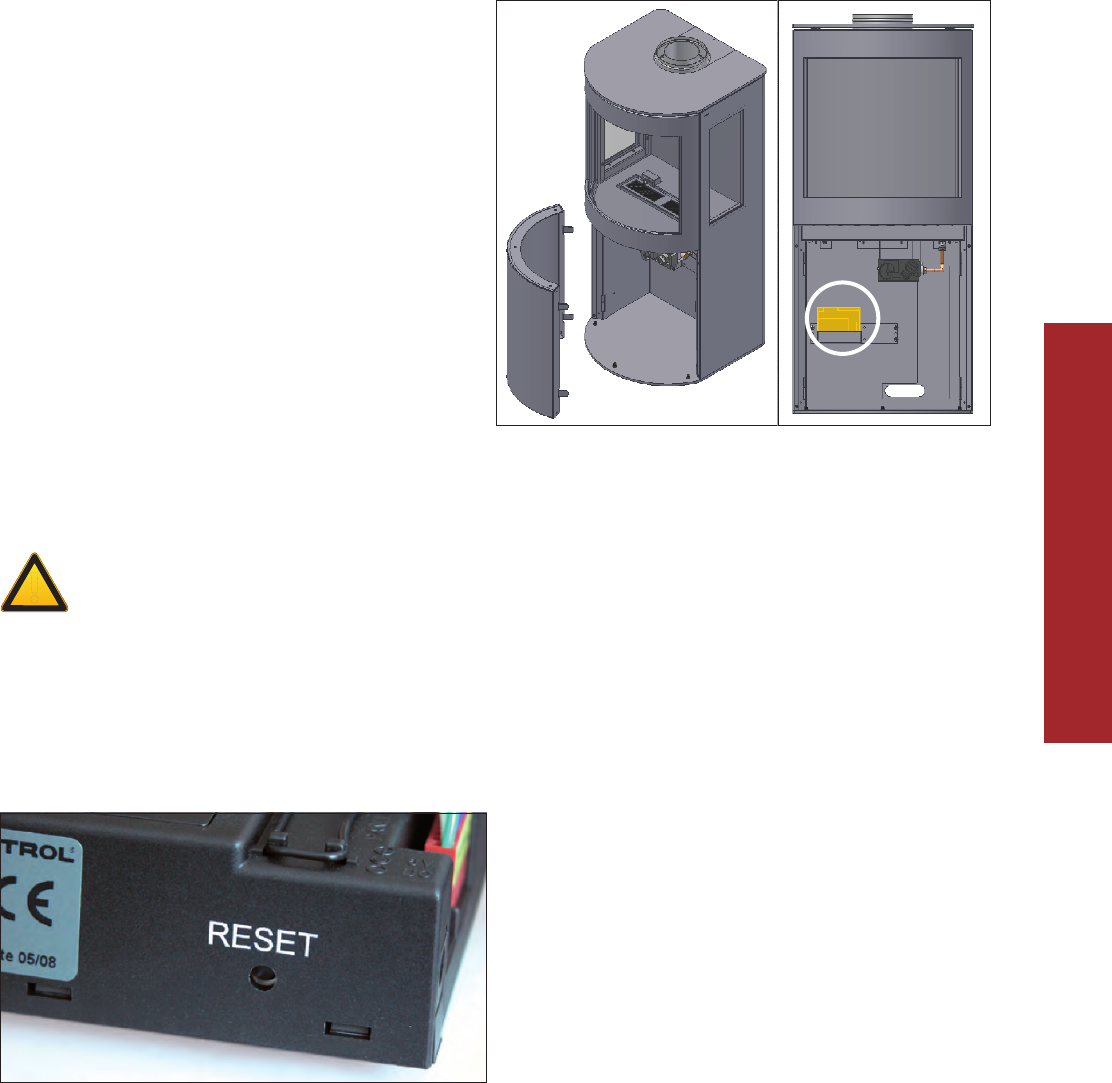
•Een elektronisch probleem: oplossen door de “RESET” knop op de ontvanger in te drukken.
•Indien het toestel zich regelmatig uitschakelt dient u kontact met uw installateur op te nemen.
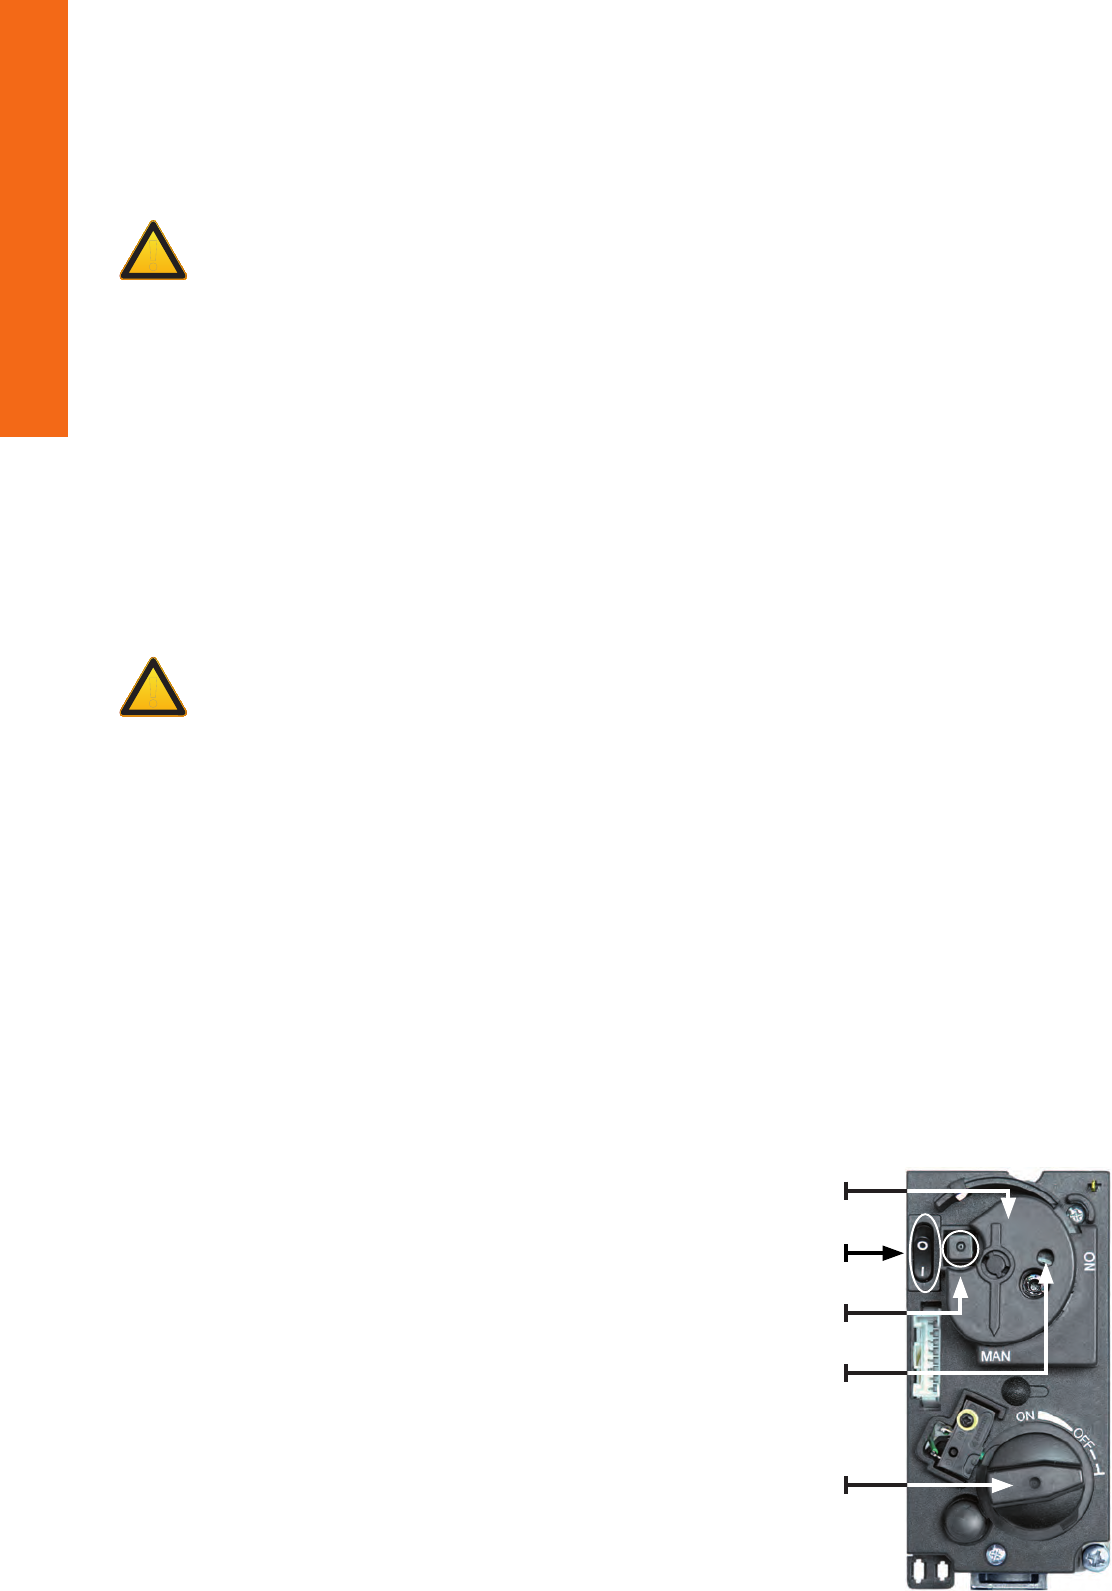
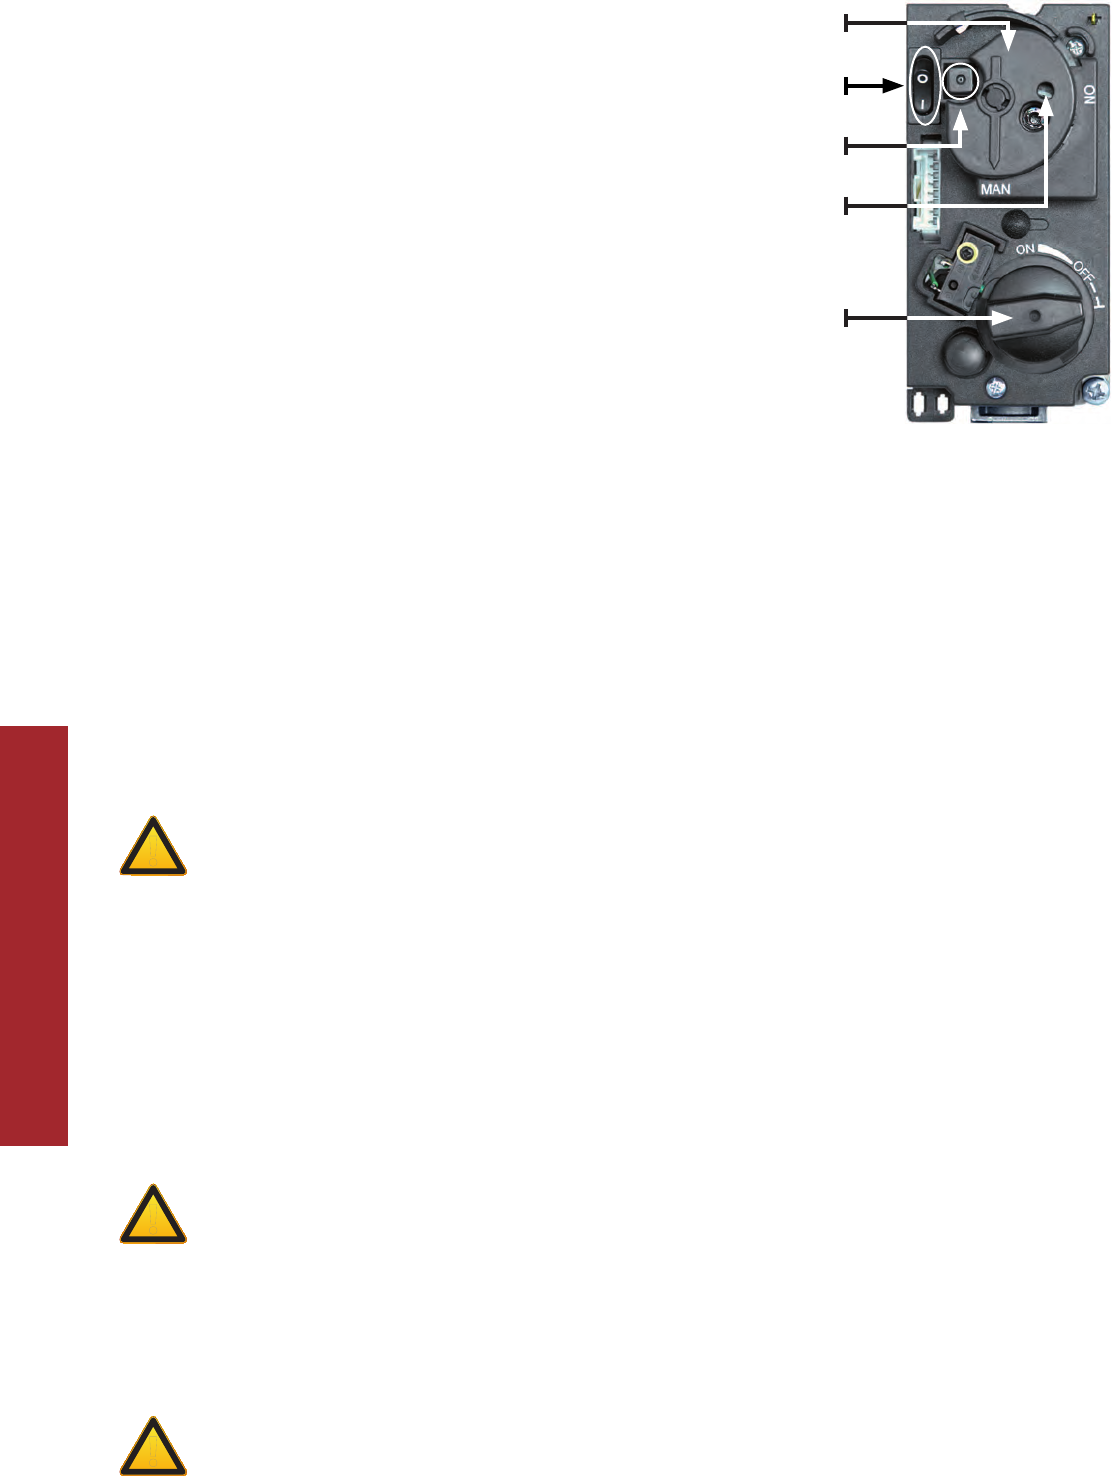
Bediening (handbediening)
Als de batterijen leeg zijn of in geval dat de ontvanger defect is kan men de kachel ook met de hand bedienen.
Hiervoor moet eerst de ontsteek (piëzo) kabel van de ontvanger worden ontkoppelt en die voorzichtig op de
piëzo aansluiting van het gasregelblok worden geschoven.
Aansteken en uitschakelen van het vuur
1. Open de gas afsluitkraan die in de gasleiding naar het toestel is
gemonteerd.
2. Druk de “O I” schakelaar , op het gasregelblok, in de “I” positie.
3. Draai de motorknop , op het gasregelblok, geheel rechtsom. De
knop maakt hierbij een tikkend geluid.
4. Draai de bedieningsknop , op het gasregelblok, in de MAN positie
in de bedieningsknop wordt nu een opening zichtbaar .
5. Druk bijvoorbeeld met een pen in de opening het metalen pennetje
in. Er stroomt nu gas naar de waakvlam.
6. Terwijl men het metalen pennetje ingedrukt houdt, dient men enkele
malen de (vierkante) ontsteekknop (naast de “O I” schakelaar) in te
drukken om de waakvlam te ontsteken. Door het glasraam kan men
zien of de waakvlam brandt.
7. Als de waakvlam brandt, het metalen pennetje nog 10 seconden
ingedrukt houden en daarna loslaten. Gaat de waakvlam uit dan
dient u minimaal 5 minuten te wachten voordat u de bovenstaande
stappen herhaalt.
!
!
7
NL
8. Draai de bedieningsknop naar de “ON” positie.
9. Door de motorknop linksom te draaien kan men de brander ontsteken en kan men de juiste vlamhoogte
kiezen.
10. Om het vuur te doven de motorknop geheel rechtsom draaien, de waakvlam blijft branden
11. Om ook de waakvlam te doven moet u de “O I” schakelaar op “O” zetten.
12. Gaskraan sluiten.
Eerste keer stoken
Wanneer u uw gaskachel voor de eerste keer gebruikt, moet de haard ‘instoken’. Het toestel is voorzien van
een hittebestendige laklaag die nog moet inbranden in de kachel. Dat kan een vervelende geur met zich
meebrengen, maar is verder onschadelijk. We raden u aan de kachel circa drie uur te stoken op de hoogste
stand waarbij u de ruimte goed ventileert.
Verkleuren van wanden, plafonds en roosters
Na het stoken van de haard kunnen wanden, plafonds en roosters verkleuren. Dit komt doordat
stofdeeltjes verbranden in de convectiemantel. Dit is een natuurlijk proces waar WANDERS niet
verantwoordelijk voor is. Om verkleuring te minimaliseren verwijzen wij naar het advies dat gegeven
wordt in de sfeerhaardenbranche. Uw installateur kan u hierover informeren.
Tijdens het instoken kan er aanslag komen op het keramische glas van de kacheldeur. Deze aanslag verwijdert
u als het glas koud is eenvoudig met een licht vochtige doek. Eventueel gebruikt u speciaal schoonmaakmiddel
voor keramische kookplaten.
Op pagina 13 wordt beschreven hoe u het glas verwijderd.
Let op vingerafdrukken
Pas op dat u het gereinigde glas niet meer met de vingers aanraakt wanneer u de kacheldeur sluit.
Vingerafdrukken branden in het glas.
Tijdens de eerste keer stoken, berekent uw kachel zelf hoeveel tijd nodig is om de ingestelde temperatuur te
bereiken. Op basis daarvan kiest uw haard de meest eciënte manier om het vertrek te verwarmen.
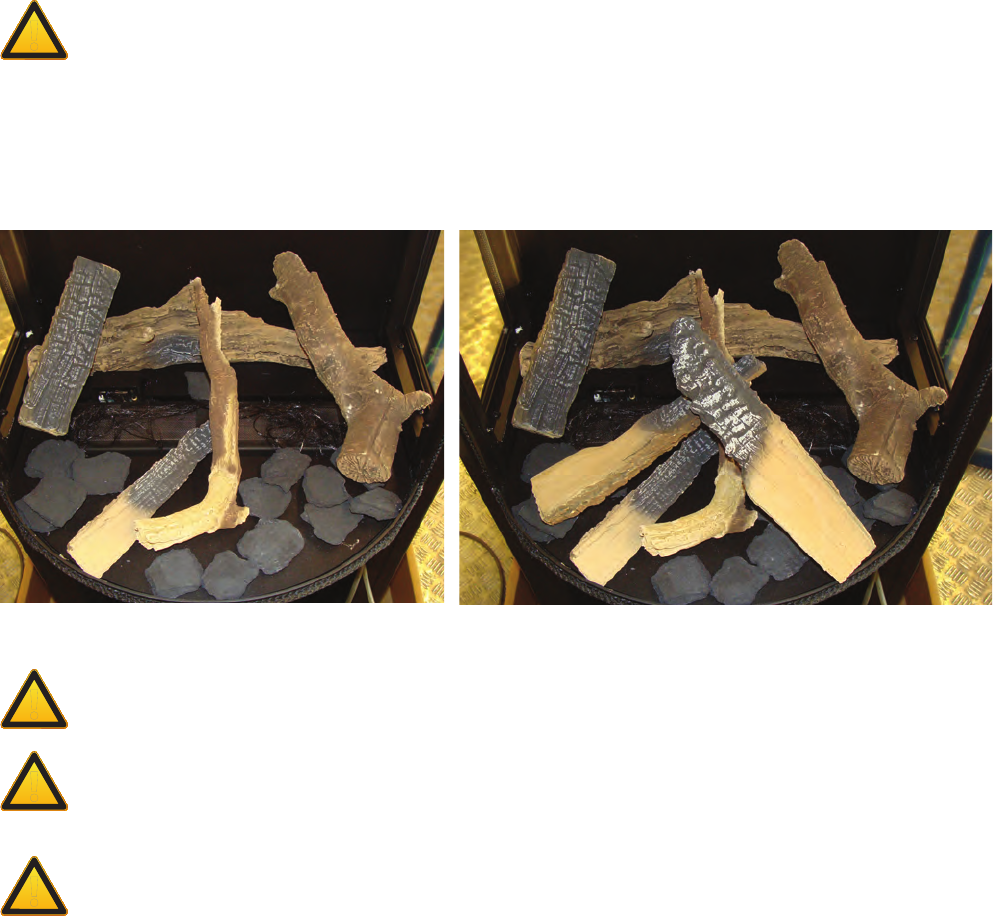
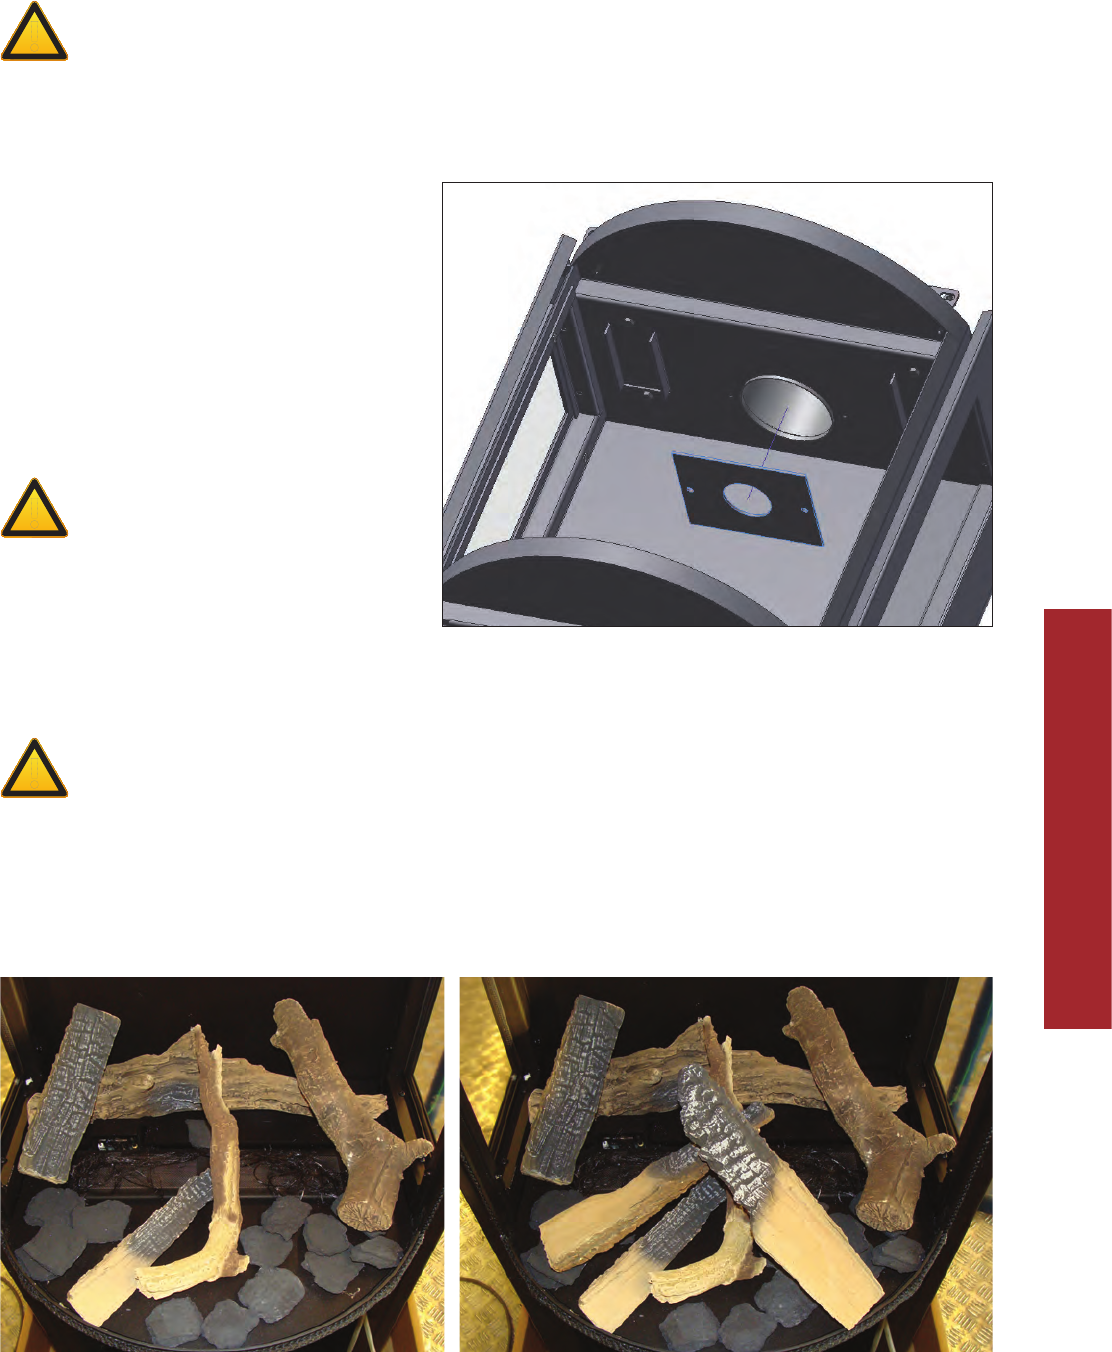
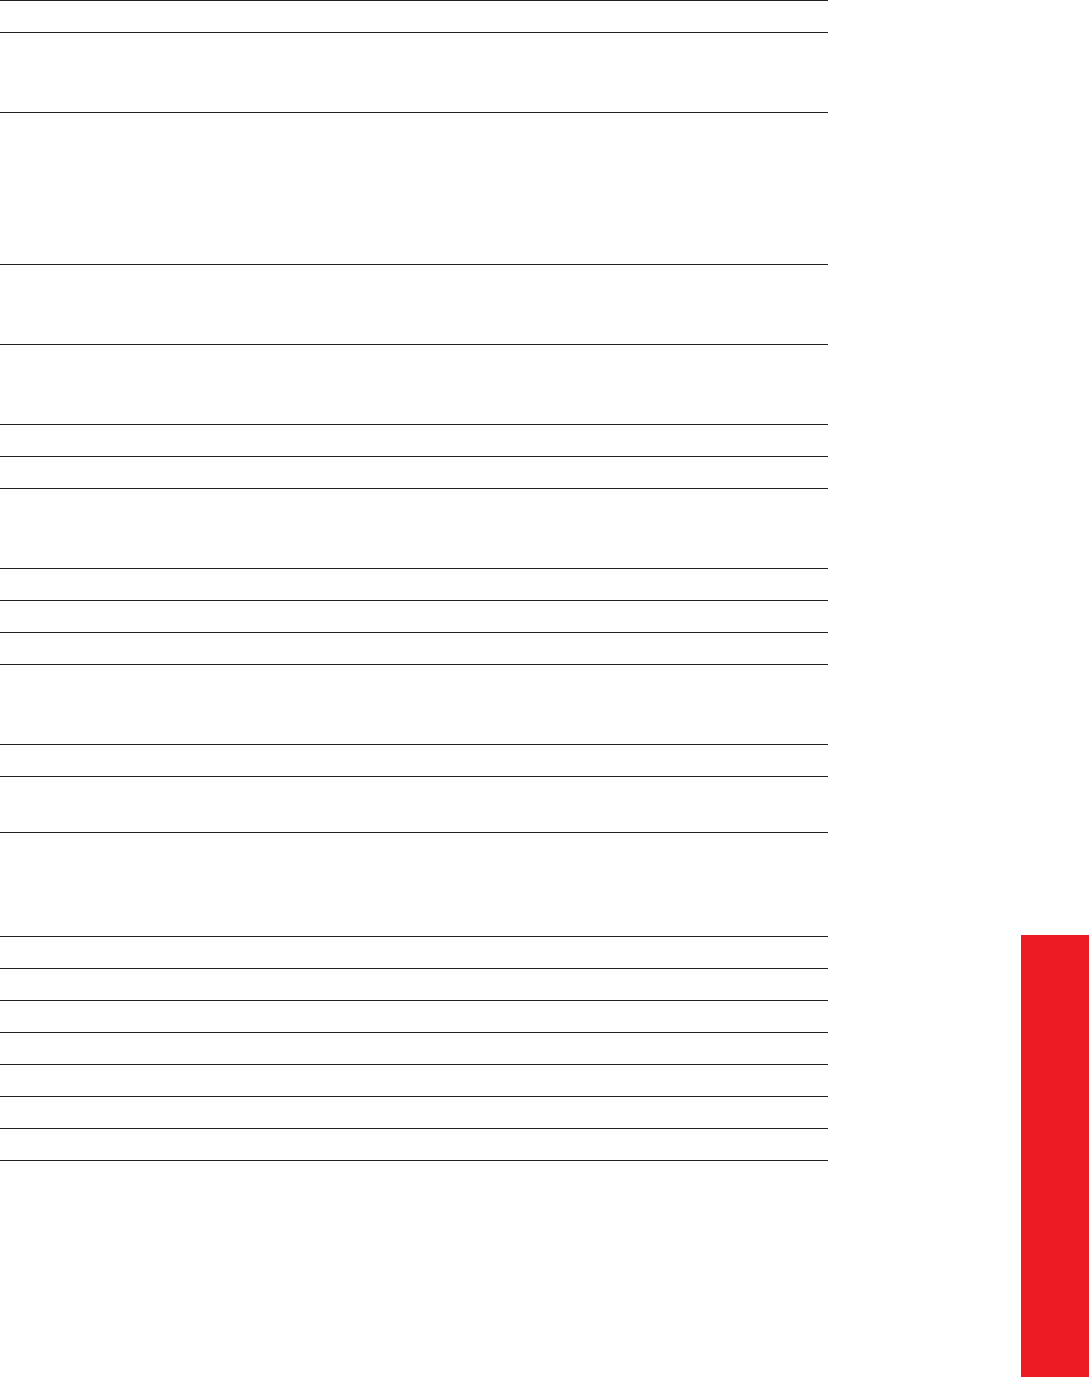
Let erop dat er geen houtblokken voor de waakvlam liggen. Het gas moet vrijelijk naar de hoofdbrander
kunnen stromen. De hoofdbrander bevindt zich onder de houtset. Voor een juiste opstelling van de
keramische houtset, zie pag 14.
Het is raadzaam in het stookseizoen de waakvlam te laten branden. Dat voorkomt eventuele
condensvorming en mogelijk kalksporen aan de binnenzijde van de deur.
Nieuwbouwwoning of recente renovatie?
Wacht zes weken met stoken in een nieuwbouwwoning die recent is opgeleverd, of een ruimte die
onlangs sterk is gerenoveerd. In muren en plafonds zitten dan nog gassen, weekmakers en vocht
afkomstig van stuc- en schilderwerk. Door de warme luchtstromen, kunnen de vele stofdeeltjes in de
ruimte verkleuren en vastplakken aan wanden en plafonds. Ook het vocht in de muren en plafonds
wordt warm, wat gele vlekken kan veroorzaken.
!
!
!
8
Onderhoud
Klein onderhoud
Voorkom te veel stof en deeltjes van tabaksrook, kaarsen en olielampen in de lucht van uw woning. Verhitting
van deze deeltjes, via het convectie systeem kan leiden tot verkleuring van wanden en plafond. Daarom dient
men het vertrek waar het toestel staat altijd voldoende te ventileren. Verwijder regelmatig de eventuele
aanslag achter de deur met een stofzuiger. Indien men op het toestel morst dient het onmiddellijk uitgezet te
worden. Pas als het toestel is afgekoeld kan men het reinigen.
Gebruik geen agressieve schoonmaak- en schuurmiddelen en geen kachelpoets.
Jaarlijks onderhoud
Uw gashaard moet minimaal één keer per jaar worden gecontroleerd en onderhouden door een erkend
installateur. De volgende onderdelen worden dan nagekeken:
•De dichtheid van de gas- en rookgasafvoer en de verbrandingsluchttoevoer.
•De juiste werking van het gasregelblok, het thermokoppelcircuit (beveiliging tegen onverwachte
gasuitstroom) en het ontsteken van de hoofdbrander.
•Het volledige kanalensysteem, inclusief de gevel- of dakdoorvoer en de uitmonding net daarbuiten.
•Eventuele slijtage van afdichtingen van deuren en glasramen.
•Schoongemaakt worden: de hoofdbrander, de waakvlam, de rookgasafvoer en de toevoer van de
verbrandingslucht. Stof in de kachel kan met een stofzuiger schoongemaakt worden.
Veiligheid
Een warmtebron van WANDERS, is meer dan alleen de haard in uw kamer. Ook het rookkanaal en de dak- en/of
geveldoorvoer maken deel uit van het verwarmingssysteem. Alleen als uw gashaard is geïnstalleerd met het
concentrische rookkanaal van WANDERS, kunnen wij u garanderen dat de kachel veilig brandt.
Elke gashaard van WANDERS is voorzien van een thermokoppelbeveiliging. Dit voorkomt dat gas vrij uitstroomt
als de waakvlam is uitgevallen.
Een aantal aanbevelingen voor een veilig gebruik van uw gaskachel:
•Stook uw gashaard alleen als hij goed gesloten is. Als het glas is gebroken, mag u de kachel niet gebruiken.
•Voorkom dat kleine kinderen of hulpbehoevenden in de buurt van een brandende kachel komen en laat ze
niet alleen als de haard brandt. Gebruik eventueel een haardscherm.
•Laat kinderen nooit spelen met de afstandsbediening.
•Giet of leg geen brandbare vloeistoen en materialen op de houtset. Dit kan de kachel onherstelbaar
beschadigen.
•Plaats geen brandbare materialen, bijvoorbeeld gordijnen, vlakbij de haard. Houd minimaal een afstand van
1,5 meter aan.
•De gashaard mag alleen gerepareerd worden met originele onderdelen en door een erkend installateur.
•Mocht om welke reden dan ook de waakvlam uitvallen, wacht dan vijf minuten voordat u de kachel weer
ontsteekt.
Mogelijke foutmeldingen
Mocht uw gashaard niet naar wens functioneren, neem dan contact op met de verkoper van uw gaskachel of
een erkend installateur. Mocht de waakvlam niet aanslaan, dan kunt u zelf actie ondernemen.
•Controleer of de gastoevoer open staat. Mocht u deze niet kunnen vinden, neem dan contact op met uw
installateur.
•Mogelijke oorzaak is lucht in de waakvlamleiding. Wacht vijf minuten en ontsteek de kachel opnieuw. Lukt
!
9
NL
dit opnieuw niet, schakel dan een erkend installateur in.
Garantie
Op uw gaskachel biedt WANDERS Metaalproducten B.V. te Netterden een garantie van 5 jaar na aankoopdatum,
mits de haard op de juiste wijze is geïnstalleerd en wordt gebruikt volgens de aanwijzingen in deze handleiding.
Onder de garantie vallen alle gebreken die te herleiden zijn tot materiaal- en constructiefouten. In die gevallen
ontvangt u gratis nieuwe onderdelen. Arbeidsloon en andere kosten vallen niet onder de garantie. Defecte
onderdelen kunt u franco toezenden aan WANDERS Metaalproducten B.V., Amtweg 4, 7077 AL, Netterden.
Buiten de garantie vallen: storingen ontstaan door: onoordeelkundig gebruik; niet juiste naleving van de
installatie- en bedieningsvoorschriften; installatie door een niet-erkend installateur; verwaarlozing van het
toestel en het ombouwen van de haard naar een andere gassoort.
Wanders is niet verantwoordelijk voor eventuele scheuren in sierpleisterwerk en verkleuringen van wanden,
plafonds en/of roosters na het stoken van de haard. Verkleuringen kunnen ontstaan doordat stofdeeltjes
verbranden in de convectiemantel. Om de kans op scheuren in sierpleisterwerk en eventuele verkleuringen
te minimaliseren verwijzen wij naar het advies dat gegeven wordt in de sfeerhaardenbranche. Uw installateur
kan u hierover informeren.
Klachten worden in behandeling genomen nadat de verkooprma, installateur of het gasbedrijf een klacht
heeft ingediend, vergezeld van een kopie van de aankoopbon met aankoopdatum. Reparaties geven geen
recht op verlenging van de garantietermijn. Alle gevolgschade wordt uitgesloten.
Installatievoorschriften
Uw gashaard mag alleen geïnstalleerd worden door een bevoegd installateur en in combinatie met het
concentrische kanalensysteem van WANDERS (M&G). Pas dan is de haard goedgekeurd volgens de Europese
CE-norm voor gastoestellen. Wij bieden geen garantie wanneer de gaskachel onvolledig of onjuist is
aangesloten en/of geïnstalleerd. Het kanalensysteem bestaat uit een binnenkanaal met een diameter van
100 millimeter en een buitenkanaal van 150 millimeter. De rookgassen worden door natuurlijke trek via het
binnenste kanaal van 100 mm naar buiten afgevoerd, terwijl de verbrandingslucht tussen de kanalen van 100
mm en 150 mm wordt toegevoerd.
Het toestel mag alleen geplaatst en aangesloten worden door een erkend installateur volgens de algemeen
geldende gasinstallatievoorschriften en volgens onderstaande installatievoorschriften. Daarnaast gelden de
nationale en lokale wet- en regelgeving voor plaatsing en gebruik van gesloten gastoestellen. Alleen een
erkend installateur heeft de bevoegdheid om (volgens de voorschriften) de instelwaarden te veranderen en
eventuele overige aanpassingen door te voeren.
Voor de installatie van het toestel dient de installateur te controleren of de gegevens op het typeplaatje
overeenkomen met de gassoort en druk waar het toestel op aangesloten wordt. Is dit niet het geval,
dan mag de gaskachel niet worden aangesloten.
Plaatsing
De gashaard is zonder problemen te plaatsen in een kierdichte of mechanisch geventileerde woning. Hiervoor
is geen extra beluchting voor de verbranding nodig. Een rookgasventilator is niet noodzakelijk. Rookgassen
worden door natuurlijke trek via het binnenkanaal afgevoerd naar buiten. De zuurstof om de kachel te stoken,
wordt tussen de kanalen aangevoerd. Het is om die reden verboden isolatie aan te brengen tussen het binnen-
en buitenkanaal.
!
10
Als gebruik wordt gemaakt van een bestaande schoorsteen, dient u eerst uw installateur te raadplegen. Als
de schoorsteen eerder is gebruikt voor een hout of kolen openhaard moet deze vakkundig worden gereinigd.
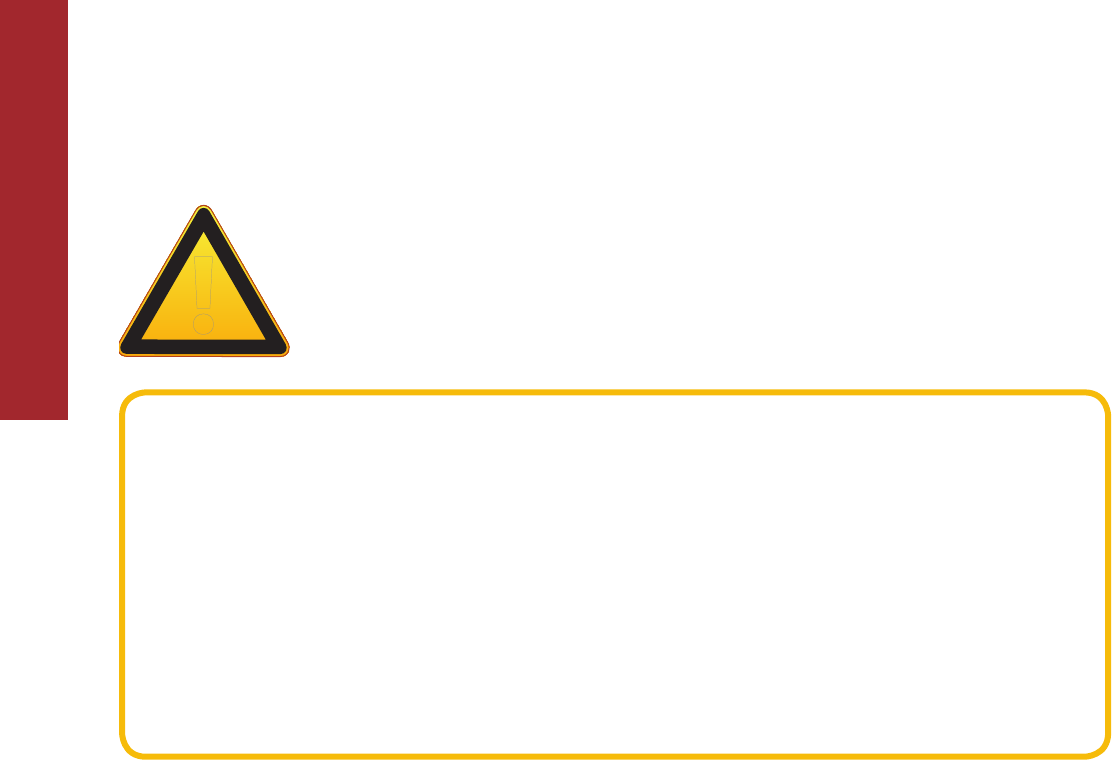
De Balsa mag niet worden ingebouwd en moet op een voldoende stevige vloer worden geplaatst. De afstand
van de Balsa tot de achterwand moet minimaal 10 cm zijn. Links en rechts van de kachel moet minimaal moet
80 cm vrije ruimte zijn.
Isolatie
In verband met de hoge buitenwandtemperaturen tot circa 150 graden Celsius (300 graden Fahrenheit) is het
verboden brandbare materialen in de nabijheid van het kanalensysteem toe te passen. Het hele concentrische
kanalensysteem moet brandvrij omkokerd worden tussen de plaats waar deze uit het zicht verdwijnt tot de
uitmonding in gevel of dak. Ventileer het omkokerde concentrische kanaal door (per verdieping) nabij vloer
en plafond een rooster te plaatsen. Gebruik universele muurbeugels met een diameter van 150 millimeter
voor het bevestigen van het concentrische kanalensysteem.
Het concentrische kanaal mag niet geisoleerd worden.
Als er gebruik wordt gemaakt van een bestaande schoorsteen, dient u eerst na te gaan of deze schoorsteen
voldoende is geïsoleerd en een voldoende diameter heeft voor het concentrische kanalensysteem. Als
de schoorsteen eerder is gebruikt voor een hout of kolen openhaard moet deze vakkundig worden
schoongemaakt. Voor aansluiting van een gashaard op een bestaande schoorsteen, moet u de speciale
aansluitset van WANDERS gebruiken.
Gasaansluiting
•Gebruik in de toevoerleiding een goedgekeurde G3/8” stopkraan met koppeling.
•Ontlucht de toevoerleiding voordat het toestel wordt vastgekoppeld.
•Vermijd spanningen op de bedieningskraan en leidingen. Dit geeft kans op gaslekkage.
•Controleer de aansluiting op gasdichtheid.
Plaatsen van het concentrische kanalensysteem
Het toestel is in combinatie met het WANDERS concentrisch kanalensysteem (Ø 100 mm - Ø 150 mm)
goedgekeurd volgens de Europese CE-norm voor gastoestellen, en mag daarom uitsluitend met dit systeem
worden toegepast. De garantie op het toestel vervalt indien deze (geheel of gedeeltelijk) is geïnstalleerd met
een ander kanalensysteem. Het WANDERS concentrische kanalensysteem (Ø 100 mm - Ø 150 mm) is toe te
passen bij nieuwbouw of bij een bestaand rookkanaal.
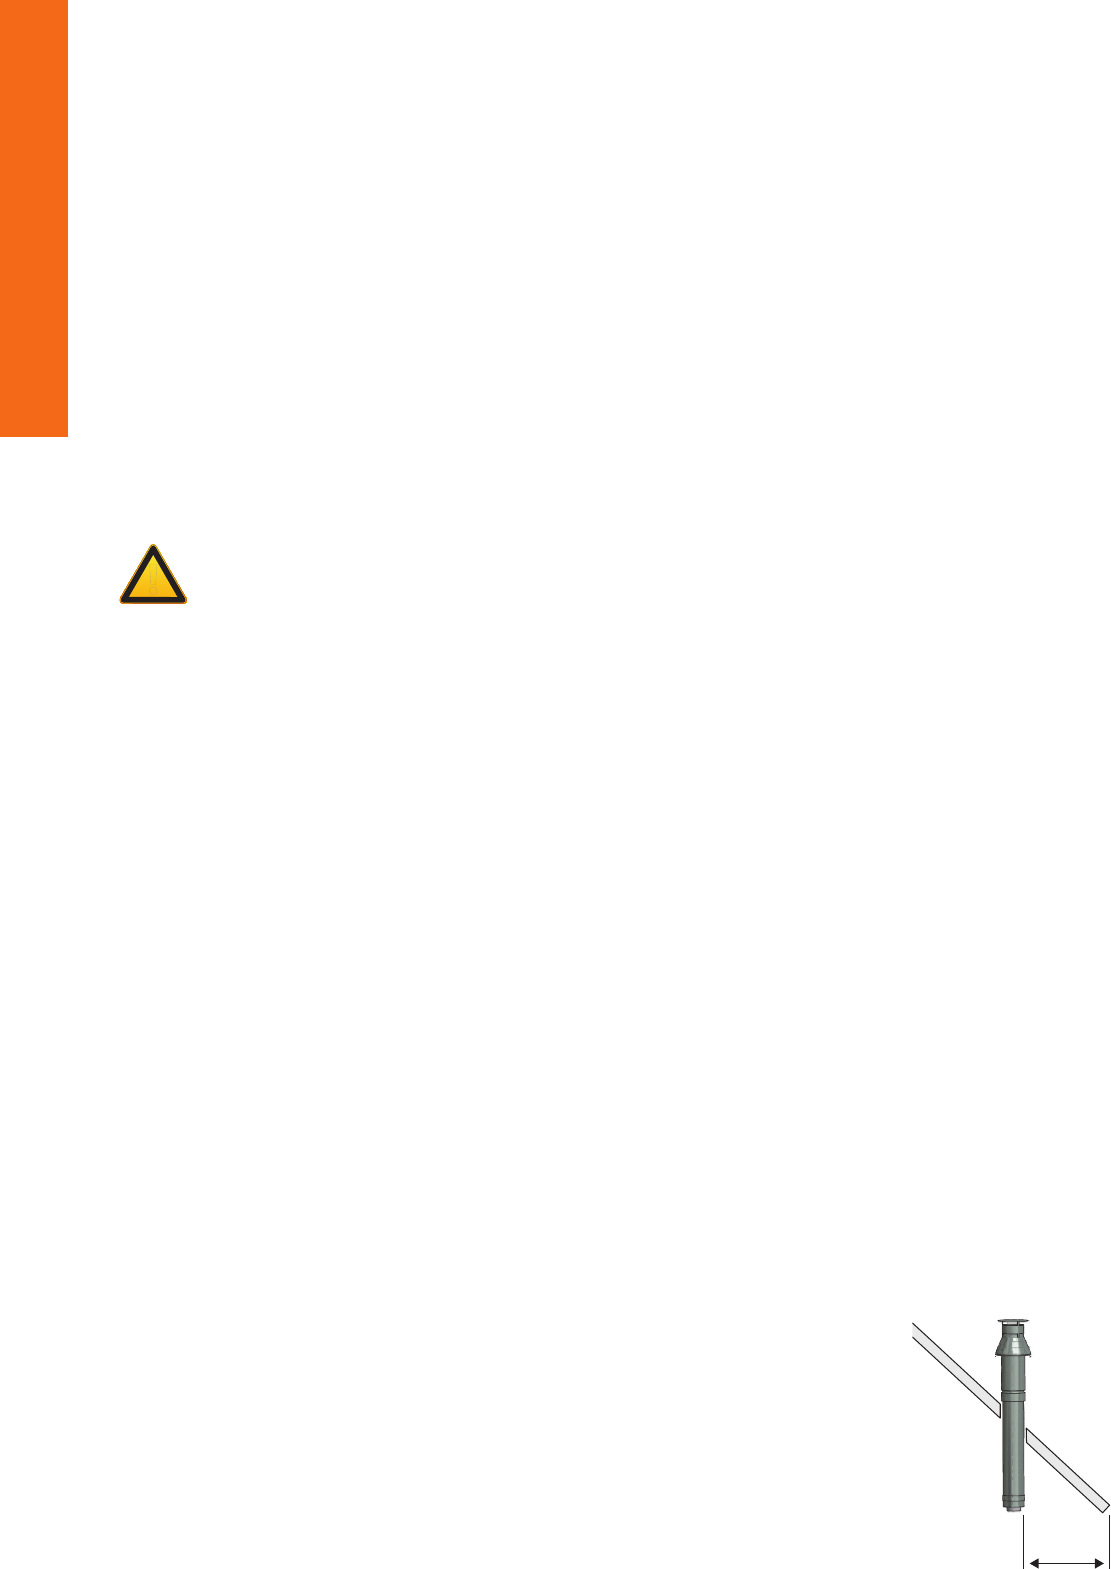
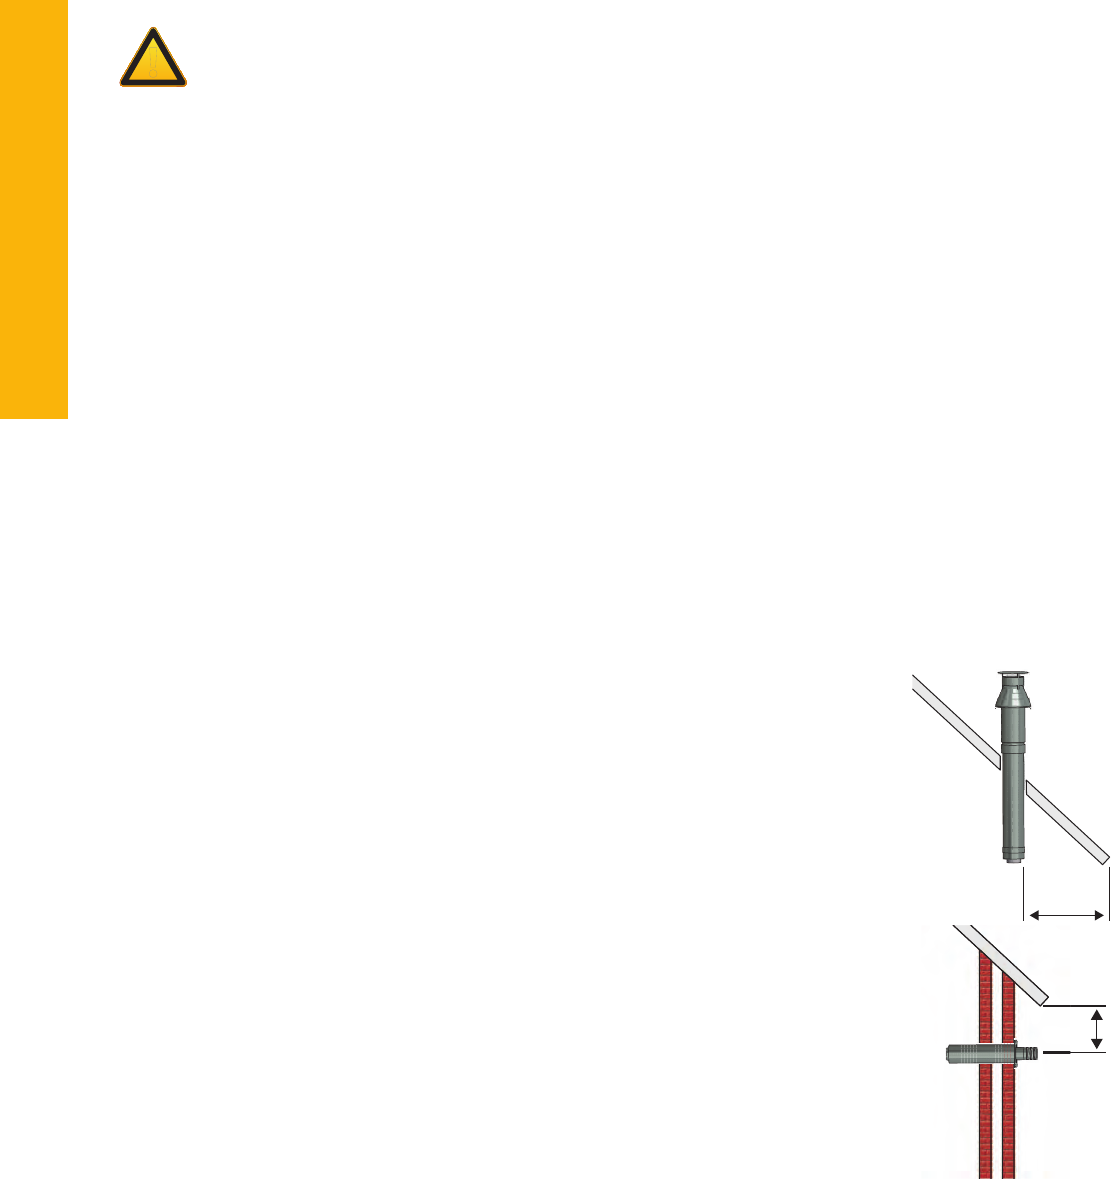
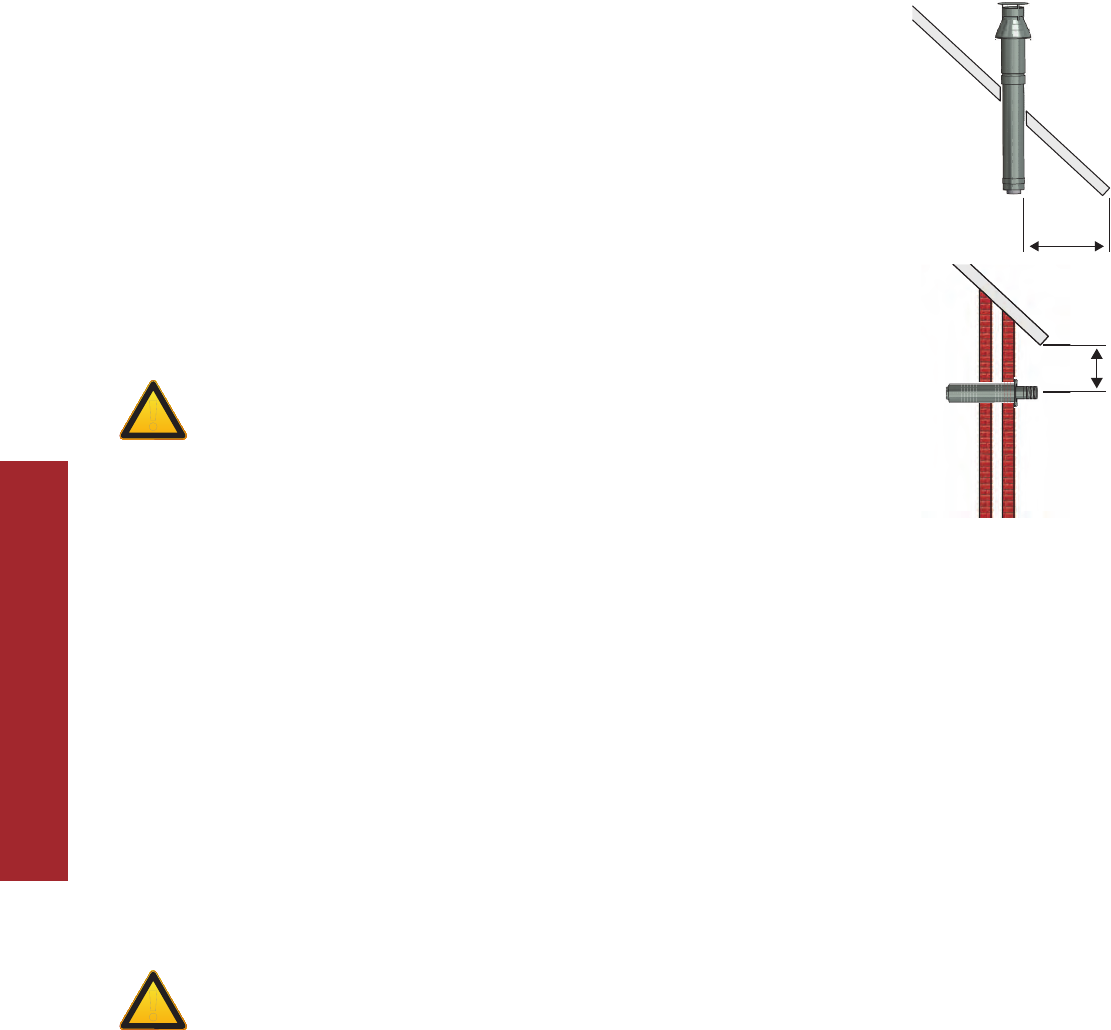
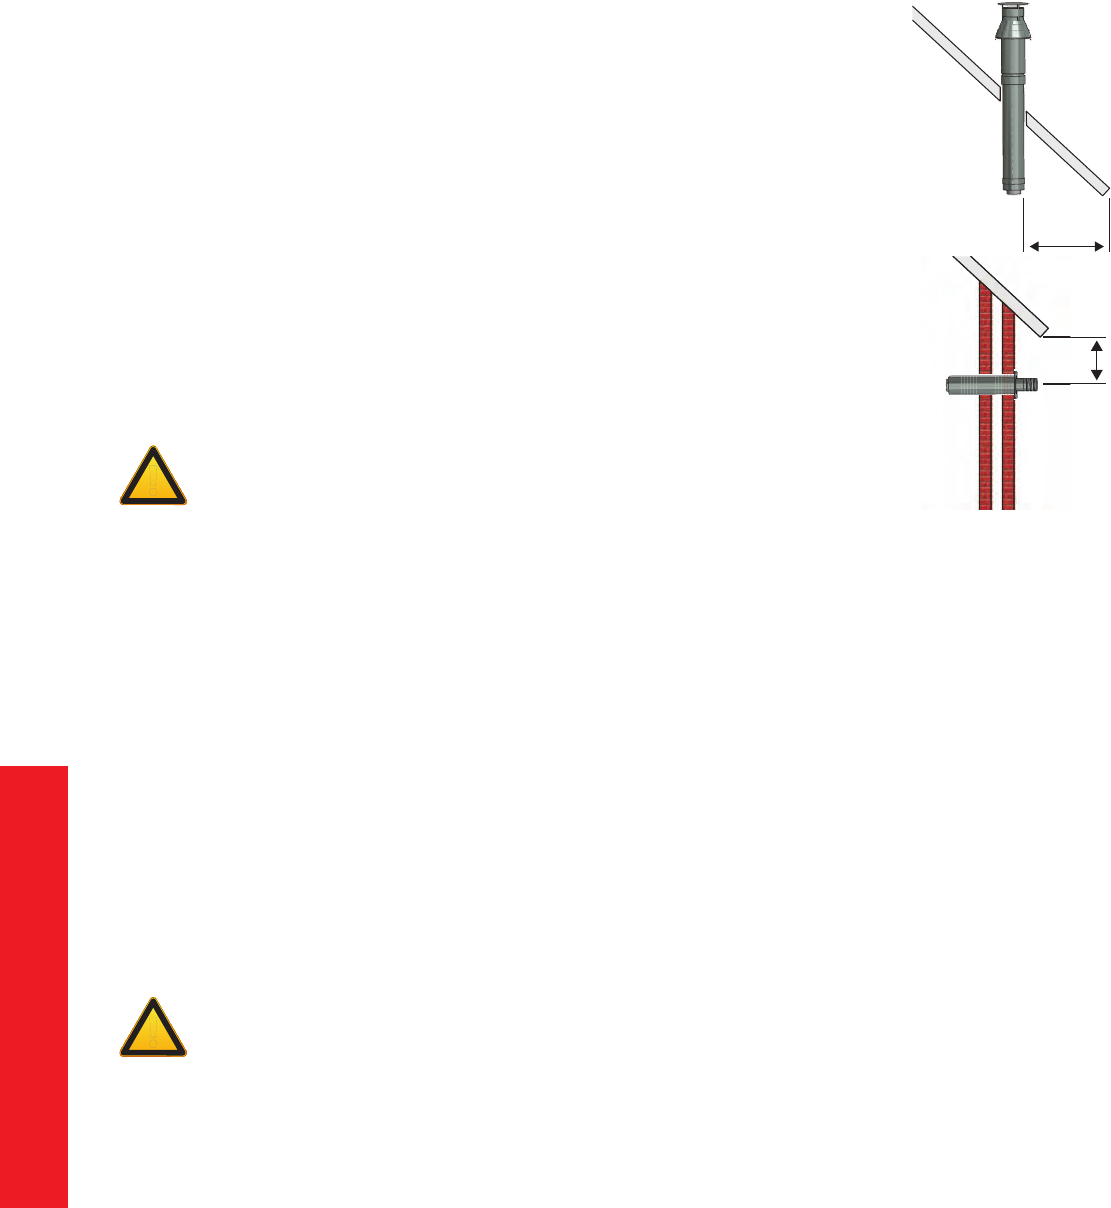
Voorschriften voor het plaatsen van de uitmonding
De uitmonding van het kanalensysteem kan men bovendaks plaatsen, of tegen een
zijgevel.
Uitmonding bovendaks
Bij plaatsing bovendaks, moet de uitmonding minimaal 50 centimeter zijn verwijderd
van dakranden met uitzondering van de eventueel aanwezige nok. Houd ook rekening
met de plaats van de uitmonding ten opzichte van ventilatieopeningen, beweegbare
ramen en verbrandingsluchttoevoervoorzieningen. Raadpleeg de nationale en
regionale voorschriften.
Uitmonding in de gevel
Bij plaatsing in een zijgevel, moet de uitmonding minimaal 50 centimeter zijn
Min.
50 cm
!
11
NL
verwijderd van hoeken van het gebouw, dakoverstekken, dakgoten, balkons en
dergelijke. Die afstand is niet nodig als de uitmonding doorloopt tot tenminste de
voorzijde van het overstekende deel.
Houd ook rekening met de plaats van de uitmonding ten opzichte
van ventilatieopeningen, beweegbare ramen en voorzieningen voor
de verbrandingsluchttoevoer. Raadpleeg de nationale en regionale
voorschriften.
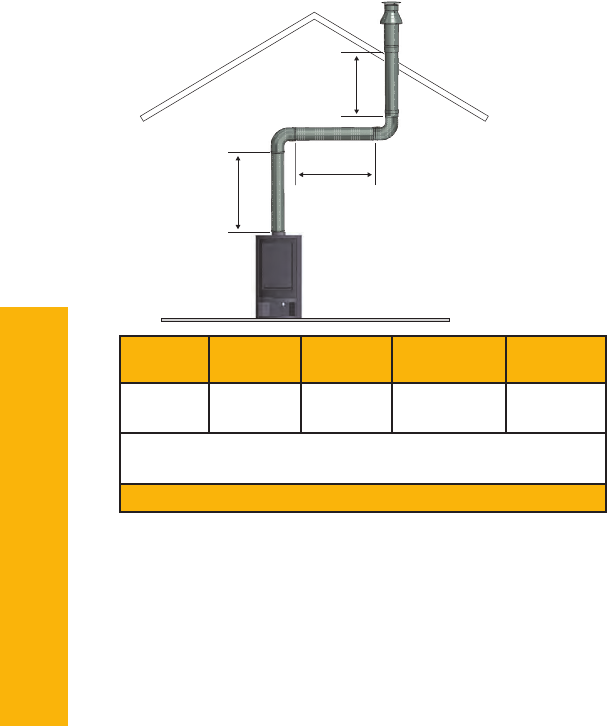
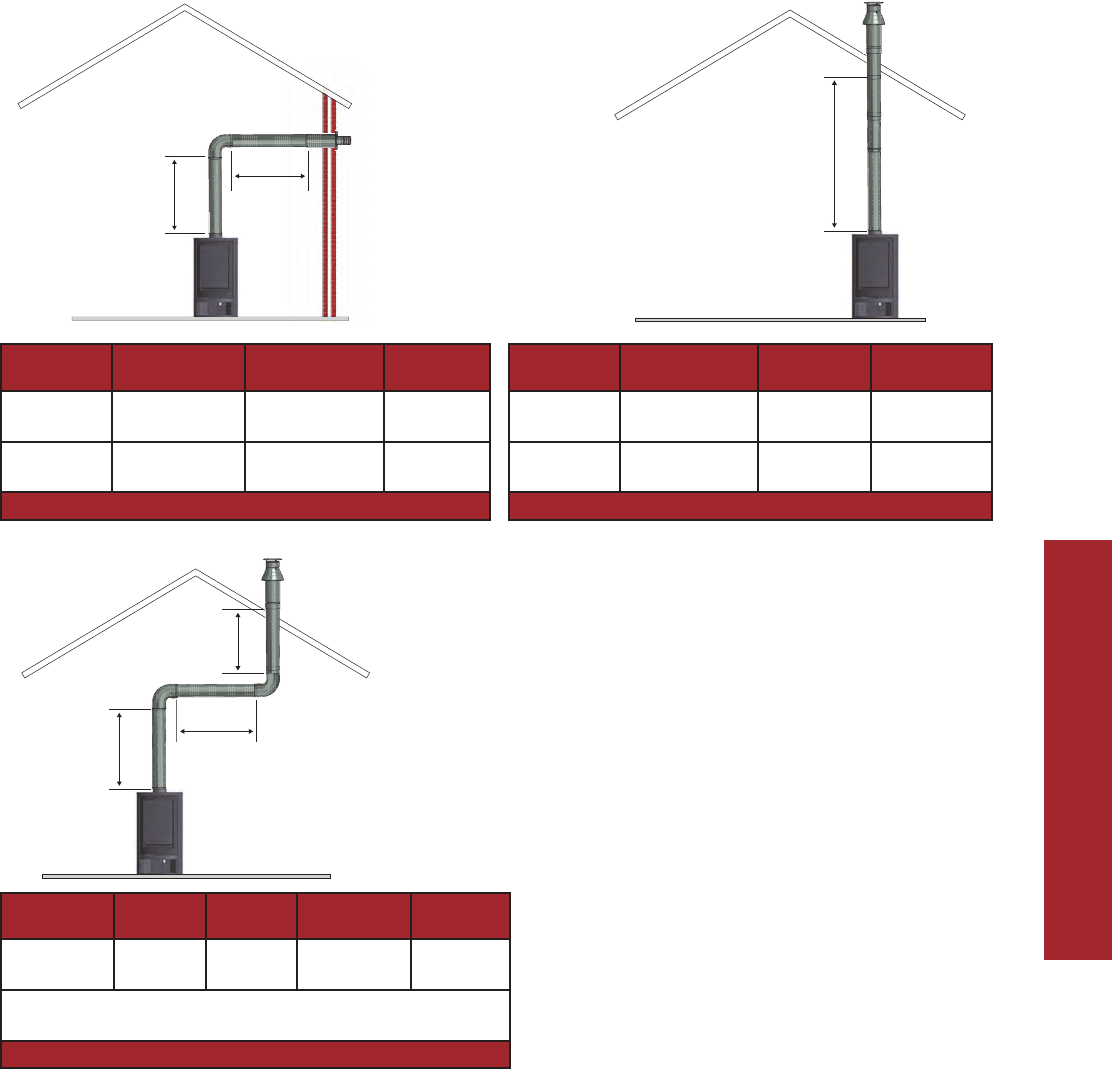
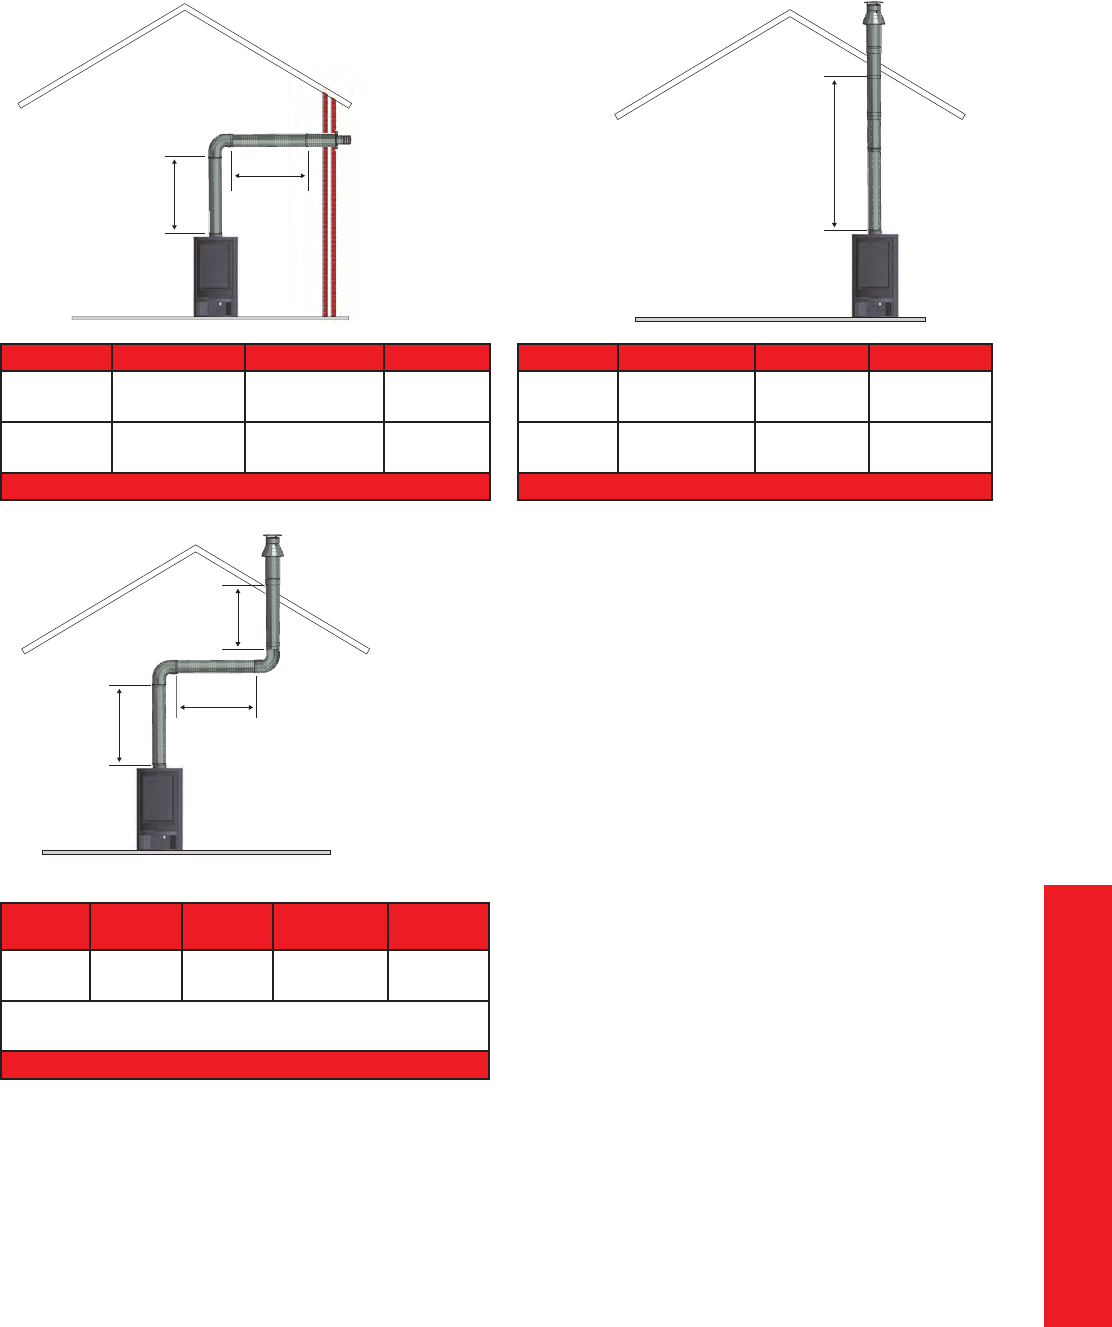
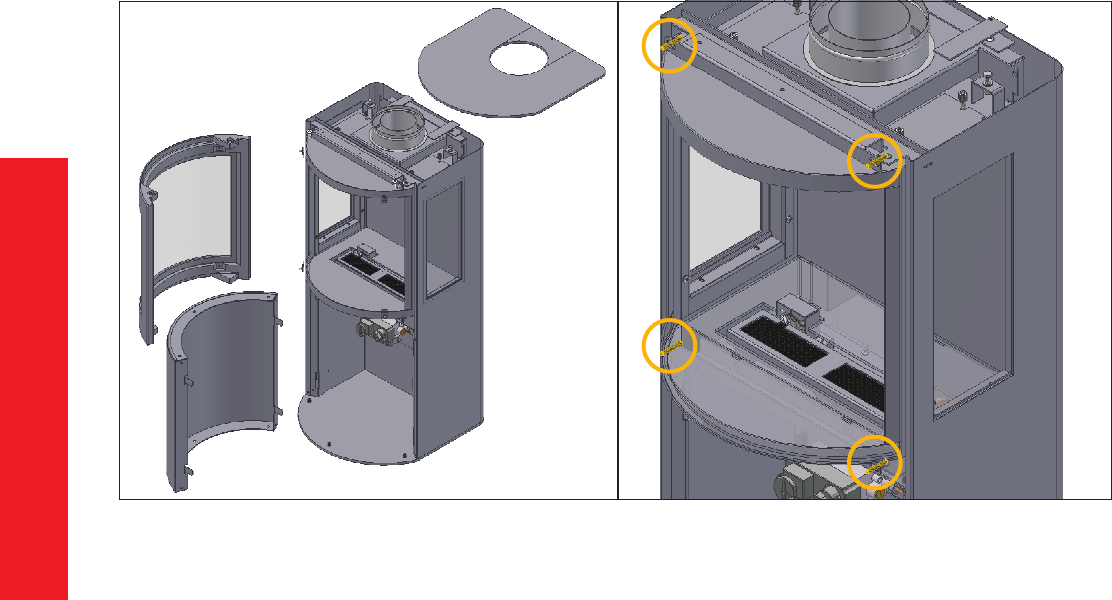
Opstellingsmogelijkheden kanalensysteem
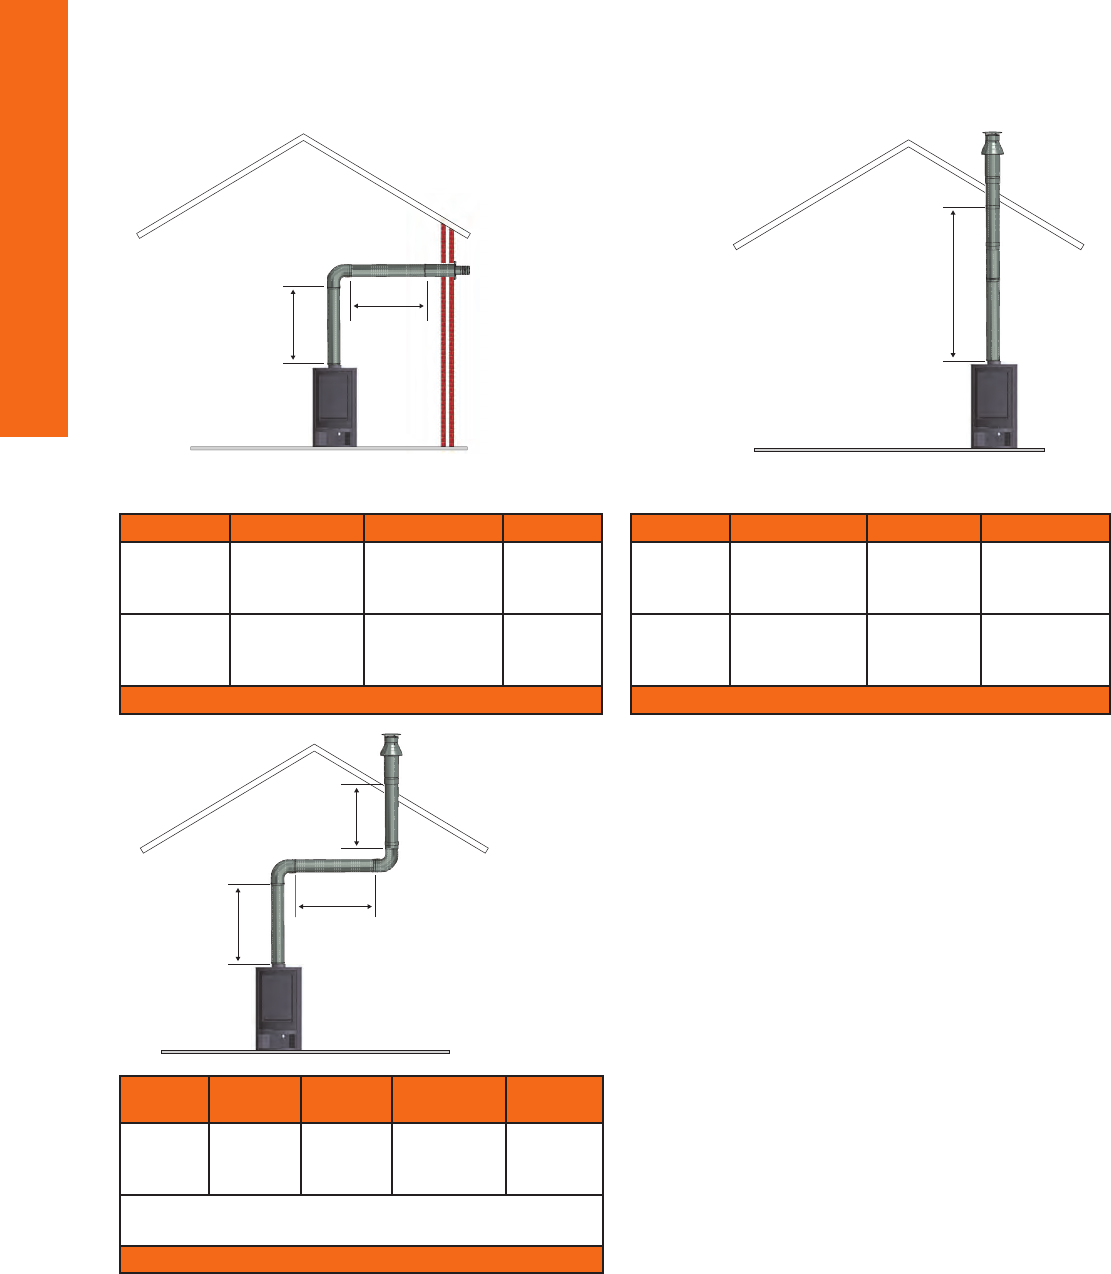
De totale lengte van het kanaalsysteem mag nooit meer zijn dan 10 meter exclusief de doorvoer door de muur
en de uitmonding. De maximale horizontale lengte is 3 meter. Een haakse bocht van 90 graden geldt als een
lengte van 2 meter. Voor een bocht van 45 graden is de rekenlengte 1 meter.
Voor de gecombineerde rookgasafvoer en verbrandingsluchttoevoer moet u één van de volgende
opstellingsmogelijkheden gebruiken van het WANDERS concentrische kanalensysteem: met muurdoorvoer,
met dakdoorvoer of dakdoorvoer met versleping.
In verband met de hoge buitenwand temperaturen (tot ± 150°C) mag men geen brandbare materialen in de
nabijheid van het kanalen systeem toepassen en/of plaatsen. Daarom dient men het gehele concentrisch
kanalen systeem, tussen de plaats waar deze uit het zicht verdwijnt en de uitmonding, na montage te omkokeren
met een hittebestendig materiaal. Ventileer het omkokerd concentrisch kanaal door (per verdieping) nabij de
vloer en plafond een rooster te plaatsen.
Het concentrische kanaal mag niet geisoleerd worden.
Gebruik universele muurbeugels Ø150 mm voor het bevestigen van de omkokering van het concentrische
kanalensysteem [Ø 100 mm - Ø 150 mm].
Maak een keuze uit de aansluitingsmogelijkheden. Bouw dan de eerste meter concentrische pijp op vanaf het
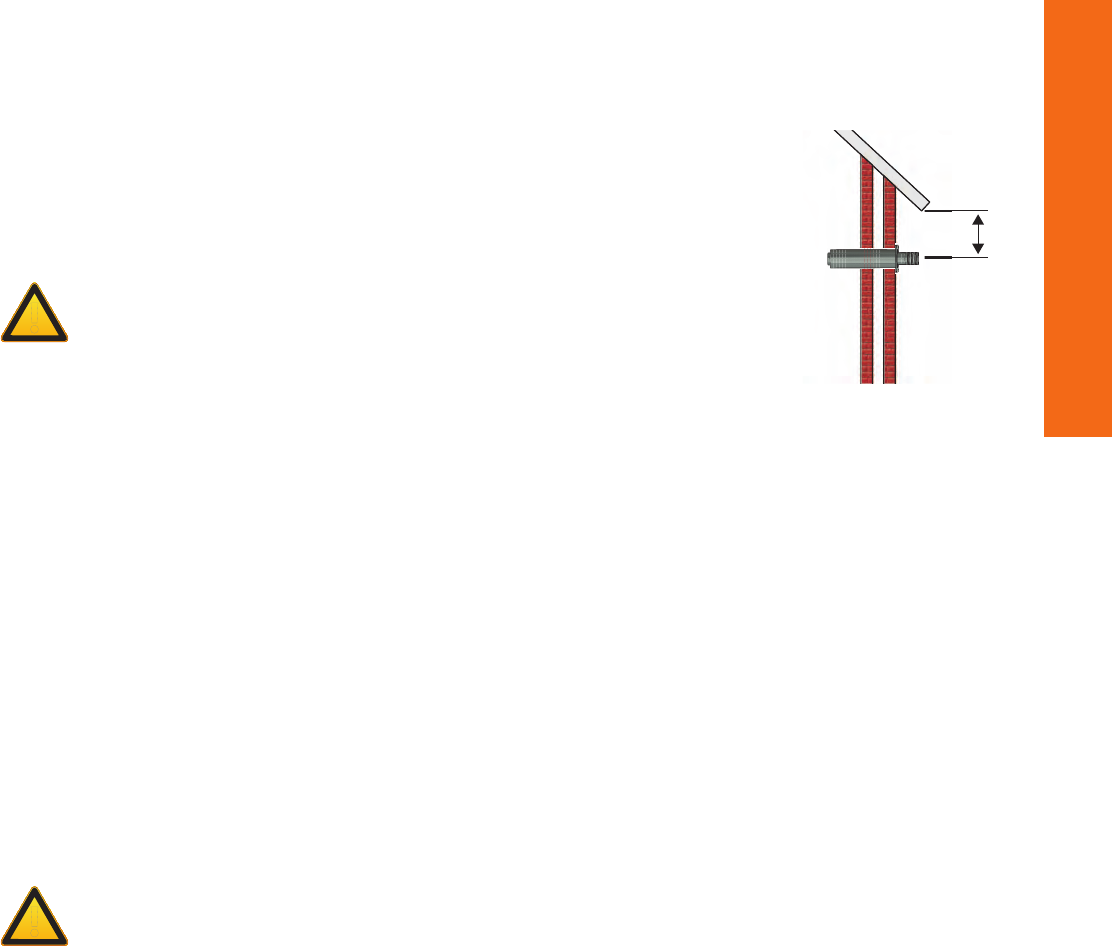
contradeel in het toestel. U weet dat de montage correct is als u van boven af de blauwe, rubberen afdichtring
in de pijp kunt zien. Houd verder een afstand aan van minimaal 5 centimeter tussen de buitenkant van de
concentrische pijp en wand of plafond. Start altijd met 1 meter verticaal.
Let vooral op een juiste montage als -door bouwkundige omstandigheden- een deel van het dubbelwandige
The information contained herein is subject to change without notice. Wanders res & stoves shall not be liable for technical or editorial errors or omissions contained herein.
General 18
Batteries 18
Replacing the batteries of the remote 18
Replacing the batteries of the receiver 18
Setting the remote control handset 18
Setting the time 19
Switching from ºC/24-hour to ºF/12-hour indication 19
Possible settings 19
Setting the temperature 19
Setting the timer function 19
Operation (remote control) 19
Igniting the re 19
Possible error messages 19
Setting the height of the ames 20
Switching o the appliance 20
Failure 20
Control (manual control) 20
Using the hearth for the rst time 21
Maintenance 22
Small maintenance 22
Annual maintenance 22
Safety 22
Possible error messages 22
Guarantee 23
Installation instructions 23
Placing 23
Insulation 24
Gas connection 24
Placing the concentric channel system 24
Instructions for placing the outow 24
Placing possibilities for the pipe system 25
Wall outlet 26
Roof outlet 26
Placing the pipe system rst and then placing the hearth 26
Placing the hearth 26
Opening the stove 27
Mounting the collar shaft 27
Placing the log set 28
Electrical scheme 57
Gasblock 58
Technical drawings 59
Gasdetails 61
17
GB
•Do not use the appliance without glass.
•Do not put ammable substances on the ceramic wood log set
•Do not place highly ammable materials like nylon clothes of ammable uids in the neighbourhood
of the appliance.
•This appliance is not meant for operation by persons (including children) with limited physical or
intellectual faculties, or by persons who are unfamiliar with the operation of gas appliances. Always
ensure that they are supervised when near the appliance.
•Use a re-screen to avoid burning and to protect the above-mentioned children and persons.
•The appliance is secured by a thermocouple interrupter to prevent gas from escaping the mainburner.
•The appliance must be mounted and connected as a ‘closed unit’ by an acknowledge installer in
accordance with the installation instructions and national and currently applicable local regulations
!
Dear Client,
Congratulations on your new WANDERS gas replace. It will be a comfortable source of heat to enjoy for many years
on end.
Your gas hearth is tted with a so-called closed system double-walled ue. The ue gases are directly discharged
through the inner ue. The outer pipe extracts fresh air which produces beautiful and evenly burning ames.
In principle, your gas unit can be installed in all kinds of spaces, even in rooms without any ventilation or with
mechanical ventilation.
When designing this replace we took particular care of the ease of use, the safety and the design. Your gas unit is
developed and produced at our own factory in Netterden (the Netherlands) and is for the greater part handmade.
Only the best materials are used for the construction and comply with current international standards. This will
guarantee that your hearth has a long life.
The rst part of this user’s guide gives you tips and directions about how to use your gas replace correctly and
safely. The second part of the manual contains the installation instructions and the technical specications of the
gas unit. They are of particular importance to the installer.
We advise you to read this manual thoroughly before using your new gas replace and to keep the manual in a
handy place. Your installer may need the manual for the yearly maintenance of your replace.
We wish you much warmth with your new replace!
The WANDERS team
18
General
It is common practice for the dealer where you purchased your gas replace to take also care of installing
it and connecting it to the gas mains. If this is not the case, please ensure that the installation is done by a
certied installer. Connecting gas devices by unqualied persons is prohibited, in which case we cannot give
any guarantee that your gas hearth is functioning properly.
Batteries
The batteries of the remote handset and the receiver will last for about one year. We recommend that you use
alkaline batteries.
You need to replace them when the LED of the remote set becomes dimmer and the word “BATT” appears in
the display. The receiver will warn you if it’s batteries
need to be exchanged. You’ll hear, during ignition, a
beep for 0.8 seconds followed by 0,2 seconds silence.
Replacing the batteries of the remote
Open the lid in the backside cover. Gently remove the
9V block battery and disconnect it from the contact
holder. Avoid pulling the cable. Connect the new
battery, replace the set, and close the lid.
Replacing the batteries of the receiver
Pull the cover carefully from the bottom of the hearth.
Gently pull the whole receiver from the holder in the
base of the stove. Slide the lid open and place 4 new
1.5V batteries (type LR6 of AA). Ensure that you place
the batteries into the receiver correctly. Then place
the receiver again in the replace.
Setting the remote control handset
Once the batteries are placed, you need to set the electronic code (only when using it for the rst time). Press
the reset button on the receiver until you hear 2 acoustic signs, and then
release the reset button. Then press the small ame button within 20
seconds until you hear a long acoustic signal to conrm that the code has
been set.
19
GB
Setting the time
•Press the big-ame button and the small-ame button simultaneously, and the display will show short
ashes to indicate that you are in the set mode.
•When in the set mode, press the big-ame button to set the hours, and press the small-ame button
to set the minutes.
•Wait or press the OFF button to return to manual control.
Switching from ºC/24-hour to ºF/12-hour indication
•Press the OFF button and the small ame button simultaneously (2 sec) to switch from ºF (and the 12-
hour indication) to the ºC (and the 24-hour indication), and vice versa.
Possible settings
•By pressing the SET button you can switch quickly between MANday temperaturelampventilator
night temperaturetimerMAN.
•MAN: this setting allows you to turn the ames manually higher or lower with the big-ame button or the
small-ame button .
•Day temperature (): this mode allows you to set the desired daytime temperature; the remote control set
will function as a thermostat.
•Night temperature (): this mode allows you to set the desired night temperature.
•TIMER: this mode allows you to preset 2 switch-on and 2 switch-o times per 24 hours. If the night setting is
on - - -, the stove will burn on the pilot ame.
Setting the temperature
•Select the day temperature or night temperature by briey pressing SET button .
•Now press SET button longer until the display starts ashing.
•Preset the temperature with buttons or (5 ºC is the minimum day temperature).
•Wait or press OFF button to switch back to the thermostat-controlled system.
•In order to save the batteries you are advised to reset the night-temperature until the display shows the ‘- - -‘
signal.
Setting the timer function
•Select the timer function by briey pressing SET button a few times.
•Now press the SET button longer until P1 () starts ashing.
•Set the hours with button and the minutes with button .
•Briey press SET button for the next timing.
•Once all 4 timings have been set, press OFF button to end the presetting.
Operation (remote control)
Igniting the re
•Open the gas turncock that is xed in the gas pipe leading to the stove.
•Press “O I” switch on the gas control block in the “I” position.
•Turn control button on the gas control block to the ON position.
•Simultaneously press buttons and on the handset. A short acoustic
signal indicates the start, and is followed by short acoustic signals (0.2
sec/signal, 1Hz.) until the pilot ame and the chief burner are ignited.
After the main burner has lit, the ame height will automatically go to
the maximum position.
Possible error messages
•Long signals (0.8 sec. signal with 0.2 sec. interval) during lighting : batteries of the receiver are almost
empty. (After hearing this signal, you can switch on the appliance for about another 10 times.)
•5 seconds continuous signal : error message. One of the cables may not be connected, or the “O I” switch
is not in the “I” position.
•5 short signals (0.2 sec. signal with 0.2 sec. interval) : ignition of the pilot ame and the main burner has
20
failed. Possible cause: air in the pilot burner pipe.
Important: If the pilot ame has gone out you must wait at least 5 MINUTES before repeating the
above-mentioned steps.
Setting the height of the ames
•After igniting the burner, the height of the ames will automatically reach the maximum position.
•Press button continuously to lower the ames and to switch o the burner (putting the re out: “STAND
BY”). Press button briey to gradually lower the ames.
•Press button to increase the ame height. Briey press button to gradually increase the ames.
Switching o the appliance
•Press button to lower the ames and to switch o the burner.
•Then press “OFF” button to switch o the entire unit, including the pilot ame.
•If the appliance is not used for a longer period it is advisable that you turn o the gas valve in the gas pipe.
Important: if the pilot ame has gone out for whatever reason, you must wait at least 5 MINUTES
before lighting the pilot ame again.
Failure
If it looks as if the signals of the remote control are not properly received by the stove (receiver), it may be
caused by:
•Empty batteries: change the batteries.
•An electronic problem: solve it by pressing the “RESET” button on the receiver.
•If the appliance often switches o you should contact your installer.
Control (manual control)
If the batteries are due for replacement or if the receiver is defect, you can also operate the hearth by hand.
To do so, you need to disconnect the ignition (piezo) cable of the receiver and slide it gently onto the piezo
connection of the gas control block.
Lighting the re and putting it out
1. Open the gas stopcock which is mounted in the gas pipe leading to
the appliance.
2. Press “O I” switch on the gas control block in the “I” position.
3. Turn motor switch on the gas control block all the way to the right.
The switch will make a ticking sound.
4. Turn operating switch on the gas control block in the MAN
position; an orice becomes visible.
5. Push the metal pin in the orice with something like a small pen. The
gas will now ow to the pilot.
6. While keeping the metal pin pressed in, press the (square) ignition
fuse (next to the “O I” switch) to ignite the pilot ame. Look through
the glass to see whether the pilot ame is burning.
7. If the pilot ame is burning, keep the metal pin pressed for another
10 seconds and then release it. If the pilot ame dies, wait for another
5 minutes before repeating the above steps.
8. Turn operation knob to the “ON” position.
9. Turn motor switch to the left to ignite the burner and to select the
height of the ames.
!
!
21
GB
10. Turn motor switch all the way to the right to put out the re; the pilot ame will keep burning.
11. If you want to put out the pilot ame as well, turn “O I” switch to the “O” position.
12. Close the gas tap.
Using the hearth for the rst time
When you light your gas hearth for the rst time, the hearth must ‘anneal’. The unit has a heat-resistant lacquer
which must still burn in. Though this may give an unpleasant smell, it is otherwise harmless. It is advisable to
burn the stove at its highest position for about three hours while airing the room well.
Discolouration of walls, ceilings and grates
After lighting your hearth, the walls, ceilings and grates may show some discolouration. This is caused
by the dust particles that burn in the convection cover. This is a natural process for which WANDERS
cannot be held responsible. To minimize discolouring we refer to the advice given for atmospheric
hearths. Your installer can give you more information about this.
Some deposit may form on the ceramic glass of the door of the hearth. You can easily remove this deposit with
a damp cloth when the glass is cold. If necessary you can use a special cleansing agent for ceramic rings. Page
27 shows you how to remove the glass.
Watch out for nger marks!
Make sure to leave no nger marks on the cleaned glass pane when you close the hearth door. Finger
marks leave stains which will burn in the glass.
When you ignite the hearth for the rst time, the hearth calculates how much time is needed to reach the
preset temperature. On this basis, the hearth selects the most ecient way to heat the room.
Ensure that no logs are placed in front of the pilot ame. The gas must be able to ow unobstructed
to the main burner. The main burner is located underneath the log set. See page 28 for placing the
ceramic log set properly.
It is advisable to keep the pilot ame alight in heating season to prevent condensation and possible
calcication on the inside of the door.
Newly-built house or recently renovated?
It is advisable to wait six weeks before lighting the hearth in a newly-built house that has recently
been delivered, or in a space that has recently been drastically renovated. The walls and ceilings still
contain gases, softeners and moist from plasterwork or paint. The warm air-streams may discolour
the dust particles in the space which may stick to walls and ceilings. When the moist in the walls and
ceilings warm up it may also cause yellowish stains.
!
!
!
!
!
22
Maintenance
Small maintenance
Avoid the air in your room to be lled with dust particles from tabacosmoke, candles and oillamps. These
particles, when burned near the appliance may settle as discolloration on the walls and ceiling. Ventilate
the room where the appliance is installed as much as possible. Remove any dirt and dust with a vacuum
cleaner. Clean the outside only when the hearth is cold. If coee or something else has spilt on the ornamental
moulding while the hearth is burning, turn the unit o immediately. When the hearth has cooled o, you can
remove any stains with a damp cloth.
Do not use any aggressive cleaning agents or abrasives and do not apply any stove polish.
Annual maintenance
Your gas hearth needs to be checked and maintained by a certied installer at least once a year. He will check
the following:
•The air-tightness of the exhaust pipes for gas and fumes and the combustion air supply pipe.
•The proper functioning of the gas control block, the thermocouple interrupter (a safety measure against
unexpected outow of gas) and the ignition of the main burner.
•The entire pipe system, including the exterior wall or roof duct and the external outlet.
•Inspection of possible wear and tear of the sealing of the doors and glass panes.
•The following components will be cleaned: the main burner, the pilot light, the ue tube and the supply of
combustion air. Any dust collected in the hearth can be removed with a vacuum cleaner.
Safety
A WANDERS source of heat is more than just a stove in your room; the ue and the exterior wall and/or roof duct
are also part of the heating system. Only when your gas hearth is installed with the concentric ue designed
by WANDERS can we guarantee that your hearth is burning safely.
Every gas hearth by WANDERS is installed with a thermocouple interrupter. This will prevent unexpected gas
ow if the pilot light has gone out.
Here are some recommendations for safely using your gas stove:
•Only use your gas hearth if it is properly closed. If the glass is broken, you must not use the replace.
•Prevent small children or the inrm from getting too close to a burning stove and do not leave them alone in
the room when the stove is burning. You could use a re-screen.
•Put the ignition knob on the ‘small ame’ symbol to put the remote control out of operation while the pilot
ame stays alight. This will ensure that no one can accidentally put the hearth higher or lower.
•Never allow children to play with the remote handset.
•Do not pour or put combustible liquids and materials on the log set, as it may damage the replace beyond
repair.
•Do not place any combustible materials, such as curtains, close to the replace. A minimum distance of 1.5
metres is required.
•The gas hearth must be repaired with original parts only, and by a certied installer.
•If for any reason the pilot light goes out, you must wait 5 minutes before igniting the hearth again.
Possible error messages
If your gas hearth does not function as planned you must contact the seller of your gas hearth or a certied
installer. If the pilot ame does not ignite, you can take action yourself.
•Check whether the gas supply is open. If you are unable to detect it please contact your supplier.
•A possible cause is air in the pilot duct. Wait for ve minutes and re-ignite the hearth. If this fails again you
should contact a certied installer.
!
23
GB
Guarantee
WANDERS Metaalwerken B.V. in Netterden, the Netherlands, gives a ve-year guarantee for your gas replace
after the purchase date, provided that the replace is properly installed and used in accordance with the
instructions in this manual. The guarantee includes all defects which can be reduced to aws in material and
construction, in which case you will receive the new parts free of charge. Labour costs or other expenses are
not covered by the guarantee. You can send defect parts (carriage paid) to WANDERS Metaalproducten B.V.,
Amtweg 4, 7077 AL in Netterden [The Netherlands].
The guarantee does not include: failure due to improper use; non-compliance with the installation and
operating instructions; installation by a non-certied installer; negligence of the apparatus and converting
the hearth to be red with another kind of gas.
WANDERS cannot be held responsible for any cracks in stuccoed walls or discolouration of walls, ceilings and/
or grates after burning the replace. Discolouration is caused by dust particles burning in the convection
cover. To reduce the chance of cracks in stucco and to minimize discolouration we refer to the advice given for
decorative hearths. Your installer can give you more information.
Any complaints will be dealt with after the sales rm, the installer or the gas company has led a complaint
and sent a copy of the purchase receipt with purchase date. Any repairs do not entitle you to extend the
guarantee term. All consequential damages or loss are excluded.
Installation instructions
Your gas hearth must only be installed by a certied installer in combination with WANDERS’ concentric pipe
system. Only then will the hearth be approved according to the European CE standard for gas appliances. We
will not give any guarantees if the gas stove is tted and/or installed in an incomplete or improper manner.
The ue has an inside duct 100 mm in diameter and an outside duct 150 mm in diameter. Flue gases are
discharged by natural draught to the outside air via the 100mm inside duct, while combustion air is supplied
between the 100mm and 150mm channels.
The appliance may only be installed and connected by a certied installer in accordance with the standard
gas installation instructions and the installation requirements mentioned below. Furthermore, the national
and local rules and regulations on placing and using closed gas appliances shall be applicable. Only a certied
installer has the authority to change the setting values (in accordance with the requirements) and to carry out
any other adjustments.
Before installing the appliance, the installer must check whether the information on the type tag of
the replace corresponds with the gas type and gas pressure to which the appliance is connected. If it
does not match, you are not allowed to connect the gas hearth.
Placing
The gas replace can be placed in a crack-free and/or mechanically ventilated home without diculty. There
is no need for extra ventilation for combustion or for a smoke and re vent. Waste gases are discharged by
natural draught via the inner pipe into the open. The oxygen needed for burning the re is supplied from the
space between the pipes. This is the reason that no insulation must be placed between the inner and outer
pipe.
!
24
The Balsa must not be built into the wall, and must be placed on a oor that is solid enough to hold the
appliance. The distance from the Balsa to the rear wall must be at least 10 cm, and there must be a free space
of at least 80 centimetres to the right and left side of the replace. Be sure to place the Balsa on a solid oor
plumb under the ue pipe.
Insulation
Due to the high temperatures of the exterior walls (up to approximately 150 °C or 300 °F) it is prohibited to
have or to place any combustible materials close to the channel system. The entire concentric pipe system
should be encased with reproof material from the place where it is out of sight up to the outlet in the exterior
wall. Ventilate the encased concentric pipe system by placing a grate near the oor and the ceiling on every
oor. Use universal wall clips with a diameter of 150 mm for anchoring the concentric pipe system.
Do not insulate the concentric channel
If an existing chimney is used, rst make sure whether the chimney is su ciently insulated and is wide
enough to accommodate the concentric pipe system. If the chimney was previously used as a wood-burning
or coal- red stove, it must rst be professionally cleaned. You must use special WANDERS connecting sets for
connecting a gas hearth to an existing chimney.
Gas connection
•Use a feed pipe with an approved G3/8” stop cock with coupling.
•De-aerate the supply pipe before tting and fastening the appliance.
•Avoid tension on the operating valve and pipes to avoid gas leakage.
•Check if the connection is gastight.
Placing the concentric channel system
The appliance is approved according to the European CE regulations for gas appliances with the WANDERS
concentric ue systems (Ø 100 / 150 mm) and are to used only in that combination. The warranty will be partly
or entirely invalid if another system is used during installation. The WANDERS concentric system (Ø 100 / 150
mm) can be used with existing situations or newly built situations.
Instructions for placing the out ow
The out ow of the pipe system can be placed on top of the roof or against the side
wall of the house.
Out ow on top of the roof
When placing the out ow on top of the roof, make sure that there is a distance of at
least 50 cm between the out ow and the edges of the roof, with the exception of a
possible existing ridge. You must also take the place of the out ow into account in
relation to the existing ventilation openings, movable windows and combustion air
supply provisions. Please consult the national and local requirements.
Out ow into the wall
When placing the out ow into the side wall, make sure that there is distance of at least
50 cm between the out ow and the corners of the building, eaves, gutters, balconies
and etceteras. You need not have this distance when the out ow runs to at least the
front side of the overhanging part.
!
Min.
50 cm
Min.
50 cm
25
GB
You must also take into consideration the place of the out ow in relation to the existing ventilation
openings, movable windows and combustion air supply provisions. Please consult the national and
local requirements.
Placing possibilities for the pipe system
The total length of the pipe system must never be more than 10 metres excluding the passage through the
wall and the out ow. The maximum horizontal length is 3 metres. A 90° square angle counts as a length of 2
metres. A 45° turn counts as a length of 1 metre.
For the combined ue tube and combustion air supply you must apply one of the following set-up possibilities
of the WANDERS concentric pipe systems: with wall duct, with roof duct, or with roof duct with bend.
Because of the high outer temperatures of the ue system ( around ± 150°C) it’s not allowed to use flammable
materials near the flue system. Therefore it is advised to surround the flue system, on locations where it is not
in direct view, with non-flammable materials. Make sure this construction is sufficiently ventilated (per floor)
by installing ventilation grids near the floor and the ceiling.
It’s not allowed to insulate the concentric ue system.
Use universal wall brackets of Ø 150 mm to attach the surround of the concentric ue system to any construction.
Select one of the connection possibilities. Then build up the rst metre of concentric pipe from the counterpart
in the appliance. If you can see the blue rubber ring in the pipe from above, you will know that the assembly is
correct. Keep a distance of at least 5 centimetres between the outer wall of the concentric pipe and the ceiling.
Always start with 1 meter vertical.
Pay special attention to proper installing when, due to circumstances, a part of the double-walled pipe system
Die Informationen in diesem Dokument können ohne vorherige Ankündigung geändert werden. Wanders res & stoves haftet nicht für technische oder redaktionelle Fehler
oder Auslassungen in diesem Dokument.
Allgemein 45
Batterien 45
Auswechseln der Batterien der Fernbedienung 45
Auswechseln der Batterien des Empfängers 45
Einstellen der Fernbedienung 45
Zeit einstellen 46
Umschalten von °C/24 Std auf °F/12 Std Modus 46
Einstellungsmöglichkeiten 46
Einstellen der Temperatur 46
Einstellen de Timer Funktion 46
Bedienung (Fernbedienung) 46
Anzünden des Feuers 46
Mögliche Fehlmeldungen 46
Einstellen der Flammenhöhe 47
Abschalten des Gerätes 47
Störungen 47
Bedienung (Handbedienung) 47
Erstes Mal Heizen 48
Wartung 49
Kleine Wartung 49
Jährliche Wartung 49
Sicherheitsmaßnahmen 49
Mögliche Fehlermeldungen 50
Garantie 50
Installationsvorschriften 51
Aufstellen 51
Isolierung 51
Gasanschluss 51
Installieren des konzentrischen Kanalsystems 52
Vorschriften zur Installation der Ausmündung 52
Aufstellungsmöglichkeiten des Kanalsystems 52
Mauerdurchführung 53
Dachdurchführung 54
Erst das Rohrsystem anbringen, dann das Gerät aufstellen 54
Das Aufstellen des Ofens 54
Önen des Ofens 55
Montage eines Staus 55
Holzset einlegen 55
Schaltplan 57
Gas Block 58
Technische Zeichnungen 59
Gas Einstellungen 61
44
Lieber Kunde,
Wir beglückwünschen Sie zum Kauf Ihres Gasheizofens von WANDERS. Eine bequeme Wärmequelle, die Ihnen
jahrelang Freude machen wird.
Ihr Gasheizofen hat ein so genanntes Raumluftunabhängiges System mit einem doppelwandigen Rauchabzugkanal.
Die Rauchgase werden direkt durch den inneren Kanal nach außen abgeführt. Der äußere Kanal saugt frische Luft
an, wodurch Sie immer ein schönes Flammenbild haben. Der Gasheizofen kann dadurch in Prinzip sogar in Räumen
ohne Lüftung oder Räumen mit mechanischer Entlüftung aufgestellt werden.
Beim Entwurf dieses Gasheizofens haben wir auf Gebrauchsfreundlichkeit, Betriebssicherheit und Design geachtet.
Ihr Ofen ist in unserer eigenen Fabrik in Netterden entwickelt, hergestellt und großenteils handgemacht. Für den
Bau wurden nur die besten Materiale, die den international gültigen Normen entsprechen, eingesetzt. Damit
gewährleisten wir eine lange Lebensdauer für diesen Gasheizofen.
Im ersten Teil dieser Gebrauchsanweisung erteilen wir Ihnen Tipps und Hinweise, für die richtige und sicher Art Ihren
Gasheizofen zu benutzen. Im zweiten Teil nden Sie die Aufbauvorschriften und technische Spezikationen des
Kaminofens. Diese sind vor allem für den Installateur wichtig
Vor Gebrauch Ihres Gasheizofens bitten wir Sie, die Gebrauchsanweisung sorgfältig zu lesen und Sie dann gut zu
bewahren. Ihr Installateur braucht vielleicht diese Anleitung für die jährliche Wartung.
Wir wünschen Ihnen viel Wärme mit diesem Kauf.
Das Team von WANDERS
•Das Gerät darf nicht ohne Scheibe benutzt werden.
•Es ist verboten, brennbare Substanzen auf das keramische Holzset zu legen.
•Es ist nicht gestattet, leicht brennbare Materiale, sowie Nylonkleidung oder brennbare Flüssigkeiten
in die Nähe des Gerätes zu bringen.
•Das Gerät sollte nicht von Personen (einschließlich Kinder) die geistig oder körperlich behindert
sind, oder die nicht mit der Funktion vertraut sind, benutzt werden. Sorgen Sie immer dafür, dass
diese Personen sich ausschließlich unter Aufsicht in die Nähe des Gerätes begeben.
•Benutzen Sie einen Kaminvorsatz um die oben erwähnten Kinder und Personen vor Verbrennung
zu schützen.
•In jedem Gasofen von WANDERS ist ein Thermokupplungsschutz eingebaut. Dadurch wird
verhindert, dass Gas ausströmt, wenn die Zündamme ausgeht.
•Das Gerät muss von einem anerkannten Installateur aufgestellt und als ein „geschlossenes“ Gerät,
gemäß dieser Installationsvorschrift, sowie auch der nationalen und örtlich geltenden Vorschriften
angeschlossen werden.
!
45
D
Allgemein
Meistens sorgt der Verkäufer, wo sie Ihren Kaminofen für Gas gekauft haben, auch für den Aufbau und den
Anschluss an das Gasnetz. Wenn das nicht der Fall ist, beachten Sie, dass der Aufbau von einem anerkannten
Installateur gemacht wird. Der Anschluss einer Gasanlage durch Unbefugte ist verboten. In dem Fall können
wir Ihnen die gute Funktion Ihres Kaminofens nicht garantieren.
Batterien
Die Batterien der Fernbedienung und des Empfängers haben eine Lebensdauer von etwa einem Jahr. Der
Gebrauch von Alkalien-Batterien wird empfohlen.
Sobald der LED Display der Fernbedienung schwächer leuchtet und das Wort „BATT“ im Display erscheint,
müssen die Batterien ausgewechselt werden. Beim Empfänger werden Sie mittels Töne benachrichtigt das die
Batterien ausgetauscht werden müssen. Sie hören, während der Startprozedur, für 0,8 Sekunden einen Ton,
gefolgt durch 0,2 Sekunden Pause.
Auswechseln der Batterien der
Fernbedienung
Das Kläppchen auf der Rückseite der Fernbedienung
önen. Die 9V-Batterien vorsichtig herausnehmen
und von den Kontaktpunkten lösen. Vermeiden Sie
dabei an den Drähten zu ziehen. Die neuen Batterien
anschließen und das ganze wieder einlegen. Das
Kläppchen schließen.
Auswechseln der Batterien des
Empfängers
Ziehen Sie die Klappe vorsichtig aus dem Kamin
heraus. Ziehen Sie den ganzen Empfänger aus der
Halterung unten im Kamin. Die Schiebeklappe
önen und 4 neue 1,5V-Batterien (Typ LR6 oder
AA) einlegen. Achten Sie darauf, dass die Batterien
korrekt in den Empfänger eingelegt werden. Danach
den Empfänger wieder in den Kaminofen zurücklegen.
Einstellen der Fernbedienung
Wenn die Batterien eingelegt sind, muss der elektronische Kode eingegeben werden (nur bei erster
Ingebrauchnahme). Den Reset Knopf des Empfängers so lange drücken, bis Sie 2 Signale hören. Danach den
Reset Knopf loslassen und innerhalb von 20Sekunden den Knopf mit der kleinen Flamme ‚ drücken, bis Sie
ein langes Signal hören, welches die Bestätigung ist, dass der Kode eingestellt ist.
46
Zeit einstellen
•Durch gleichzeitiges Drücken der Knöpfe große Flamme und kleine
Flamme fängt des Display an zu blinken, das bedeutet, dass Sie in
„Einstell-Modus“ (Set Mode) sind.
•In der „Set Mode“ können Sie die Stunden mit dem Knopf große Flamme
und die Minuten mit dem Knopf kleine Flamme einstellen.
•Warten, oder auf den OFF Knopf drücken um auf Handbedienung
umzuschalten.
Umschalten von °C/24 Std auf °F/12 Std Modus
•Gleichzeitig auf den OFF Knopf und den Knopf kleine Flamme (2
Sekunden) drücken, um von °F (und 12 Std Zeit) auf °C (und 24 Std Zeit)
oder umgekehrt umzustellen.
Einstellungsmöglichkeiten
•Durch drücken des SET Knopfes können Sie schnell zwischen MAN
Gasdetails / Gas details / Donnéen sur les gaz / Gas einstellungen
!
62
63
garantiebewijs / guarantee certicate / certicat de garantie / garantieschein
Wanders res & stoves
Amtweg 4
7077 AL Netterden
The Netherlands
T: +31 (0) 315 - 386 414
F: +31 (0) 315 - 386 201
E: service@wanders.nl
I: www.wanders.com
model / model / modèle / modell
serienummer / serial number
nr. de série / seriennummer
aankoop datum / date of purchase
date de láchat / kaufdatum
s'il vous plaît joindre copie de la preuve d'achatplease enclose copy of proof of purchasebitte kopie vom kaufbeleg beifügenkopie aankoopbewijs bijvoegen aub
Gebruikershandleiding.com neemt misbruik van zijn services uitermate serieus. U kunt hieronder aangeven waarom deze vraag ongepast is. Wij controleren de vraag en zonodig wordt deze verwijderd.
Product:
Spelregels forum
Om tot zinvolle vragen te komen hanteren wij de volgende spelregels:
lees eerst de handleiding door;
controleer of uw vraag al eerder door iemand anders is gesteld;
probeer uw vraag zo duidelijk mogelijk te stellen;
heeft u een probleem en al geprobeerd om dit op te lossen, vermeld dit erbij aub;
heeft u een oplossing gekregen van een bezoeker dan horen wij dat graag in dit forum;
wilt u een reactie geven op een vraag of antwoord, gebruik dan niet dit formulier maar klik op de knop 'reageer op deze vraag';
uw vraag wordt direct op de website gezet; vermijd daarom persoonlijke gegevens in te vullen;
Belangrijk! Als er een antwoord wordt gegeven op uw vraag, dan is het voor de gever van het antwoord nuttig om te weten als u er wel (of niet) mee geholpen bent! Wij vragen u dus ook te reageren op een antwoord.
Belangrijk! Antwoorden worden ook per e-mail naar abonnees gestuurd. Laat uw emailadres achter op deze site, zodat u op de hoogte blijft. U krijgt dan ook andere vragen en antwoorden te zien.
Abonneren
Abonneer u voor het ontvangen van emails voor uw Wanders Balsa 75 bij:
nieuwe vragen en antwoorden
nieuwe handleidingen
U ontvangt een email met instructies om u voor één of beide opties in te schrijven.
Ontvang uw handleiding per email
Vul uw emailadres in en ontvang de handleiding van Wanders Balsa 75 in de taal/talen: Nederlands, Duits, Engels, Frans als bijlage per email.
De handleiding is 9,54 mb groot.
U ontvangt de handleiding per email binnen enkele minuten. Als u geen email heeft ontvangen, dan heeft u waarschijnlijk een verkeerd emailadres ingevuld of is uw mailbox te vol. Daarnaast kan het zijn dat uw internetprovider een maximum heeft aan de grootte per email. Omdat hier een handleiding wordt meegestuurd, kan het voorkomen dat de email groter is dan toegestaan bij uw provider.
Stel vragen via chat aan uw handleiding
Stel uw vraag over deze PDF
Uw handleiding is per email verstuurd. Controleer uw email
Als u niet binnen een kwartier uw email met handleiding ontvangen heeft, kan het zijn dat u een verkeerd emailadres heeft ingevuld of dat uw emailprovider een maximum grootte per email heeft ingesteld die kleiner is dan de grootte van de handleiding.
Er is een email naar u verstuurd om uw inschrijving definitief te maken.
Controleer uw email en volg de aanwijzingen op om uw inschrijving definitief te maken
U heeft geen emailadres opgegeven
Als u de handleiding per email wilt ontvangen, vul dan een geldig emailadres in.
Uw vraag is op deze pagina toegevoegd
Wilt u een email ontvangen bij een antwoord en/of nieuwe vragen? Vul dan hier uw emailadres in.