Die gesetzlichen Rechte des Endverbrauchers werden durch die nachstehenden Garantierichtlinien nicht beeinträchtigt.
Voraussetzungen für den 24monatigen Garantieanspruch:
- Einsatz des Gerätes für den ausschließlichen privaten Gebrauch.
Im gewerblichen Bereich oder Verleihgeschäft reduziert sich die Garantie auf 12 Monate.
- Sachgemäße Behandlung und Beachtung aller Hinweise in der Gebrauchsanweisung, die Bestandteil unserer Garantiebedingungen ist.
- Beachtung der vorgeschriebenen Wartungsintervalle.
- Keine eigenmächtige Änderung der Konstruktion.
- Einbau von Original WOLF Ersatzteilen/Zubehör.
- Vorlage der ausgefüllten Garantiekarte und/oder des Kaufnachweises.
Die Garantie erstreckt sich nicht auf den normalen Verschleiß von Messern, Messerbefestigungsteilen wie Reibscheiben, Keil-/Zahnriemen,
Laufräder/Reifen, Luftfilter, Zündkerzen und Zündkerzenstecker. Bei eigenmächtiger Reparatur erlischt automatisch sofort jeglicher
Garantieanspruch. Auftretende Fehler und Mängel, deren Ursachen auf Material- oder Fertigungsfehler zurückzuführen sind, werden
ausschließlich durch unsere Vertragswerkstätten (der Verkäufer hat das Recht zur Nachbesserung) in Ihrer Nähe oder, falls er näher liegt,
durch den Hersteller beseitigt. Über die Garantieleistung hinausgehende Ansprüche sind ausgeschlossen. Ein Anspruch auf Ersatzlieferung
besteht nicht. Etwaige Transportschäden sind nicht uns, sondern dem zuständigen Transportträger zu melden, da sonst die Ersatzansprüche
an diese Unternehmen verloren gehen.
Garantiebedingungen
Our know-how for your beautiful lawn
Congratulations on your purchase of a WOLF lawn mower. You have thereby chosen a machine built to the latest standards of technology to
provide you with perfect lawn care.
To ensure that you have great pleasure from your lawn, we have included several hints on sowing, refurbishment and care. The seed is important!
A high quality seed is the basis for a beautiful lawn. We recommend two excellent products for sowing new lawns:
WOLF lawn seed >>Supra<<
This high-quality mixture of lawn seeds features an extremely dense growth which doesn‘t give moss or weeds a chance. Another advantage
of >>Supra<< lawns: they grow as well in the shade as in sunny spaces.
WOLF lawn seed >>Loretta<<
>>Loretta<< lawns are extremely rugged and durable and are particularly suitable for heavily used areas. The rapid germination and
regenerative capacity guarantee a dense, hardy lawn in the shortest time .
A new lawn without digging over
Are you dissatisfied with your lawn but don‘t want to tackle the job of sowing a completely new one? - No problem, we can show you how to
transform your lawn quickly and without extensive work into the most beautiful lawn without digging over.
The lawn renewal system „Novaplant
®
“ will quickly and easily provide you with a beautiful, dense and durable lawn which will be the envy of your neighbours.
All that you need are a lawn mower, a cultivator and WOLF Novaplant
®
>>Supra<< (apart from a special kick-start fertiliser, this contains the high-quality
>>Supra<< lawn mixture) or WOLF Novaplant
®
>>Loretta<< (apart from a special kick-start fertiliser, this contains the high-quality >>Loretta<< lawn mixture).
After 5 simple steps and in only 6 weeks, you will have transformed your old lawn into the lawn of your dreams with this unique lawn renewal system.
Perfect lawn care
The following guidelines for lawn care show you how to keep the lawn of your dreams beautiful for a long time.
Mowing:
Important for the density and durability of the lawn. We recommend regular mowing once per week always at the same cutting height: not lower
than 3.4 cm, not higher then 5 cm, 5 cm is ideal in the shade. If the lawn has grown higher than 8 cm, possibly in Spring or after holidays, it
is necessary to cut this back in stages.
Fertilising:
Provides the lawn with the necessary nutrients, keeps it healthy and durable. We recommend 4 x fertilisation per season with a special lawn
fertiliser (please don‘t use general purpose types):
March:WOLF kick-start fertiliser for new lawns May:WOLF lawn fertiliser >>Super<<
July:WOLF lawn fertiliser >>Super<< September: WOLF Vital NK plus
Watering:
An absolute necessity in dry weather. We recommend root-deep watering once to twice per week. The water should penetrate approximately
10 cm into the soil (10 - 15 litres / m
2
). More water is required under trees.
Cultivating:
Important to remove lawn moss and dead vegetation. At least once per year in the early Spring (April/May). Then clear the removed material
completely from the lawn.
Combating weeds:Removes undesired weeds from the lawn
Use WOLF weed killer plus lawn fertiliser as necessary
Best times: The middle of May to the beginning of September
Combating moss:Removes moss from the lawn
Use WOLF moss killer plus lawn fertiliser as necessary
Best times: Spring and Autumn (see instructions)
For heavy moss growth: Remove moss with a cultivator and reseed
Foliage:Deprives the lawn of light and encourages diseases - must be removed from the lawn as quickly as possible.
Correct and regular care of the lawn is particularly important in the shade. The constant deficiency of light weakens the grasses, blade and
root growth are retarded and diseases can spread quickly.
>>SUPRA<< is currently the best lawn for shady areas. Of course, it also grows very well in sunny spots.
We hope you take great pleasure in your beautiful lawn.
Optimum lawn care with products from WOLF-Garten
8
It is important that you read, fully understand and observe the following safety precautions and warnings. Careless or improper use of the
machine may cause serious or fatal injury. The user is responsible for any accidents involving other people or other people‘s property.
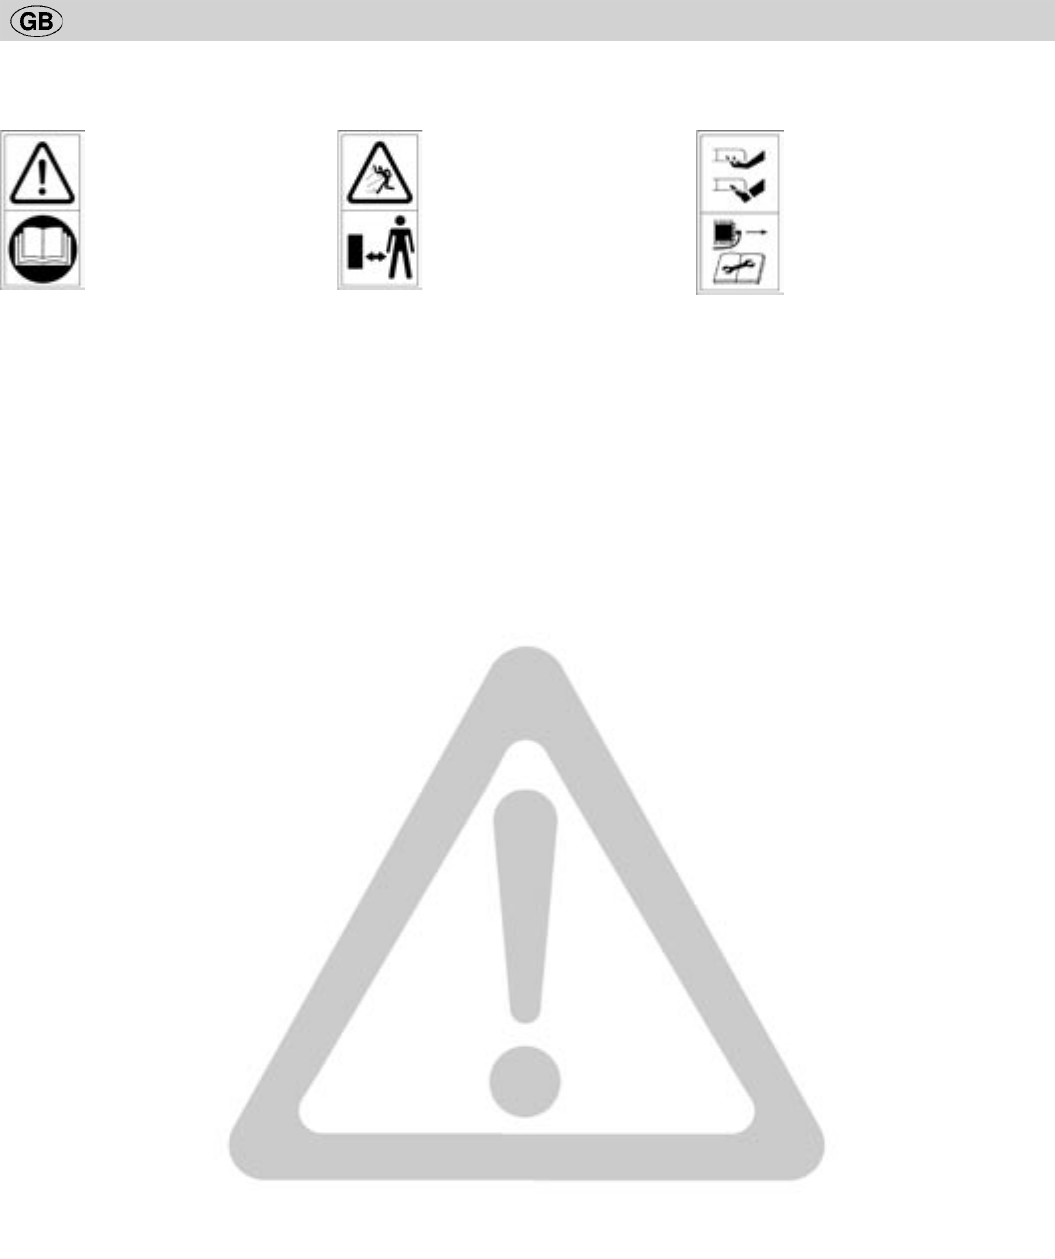
Meaning of the symbols
Attention!
Read Instruction
manual before use!
Keep bystanders away!Sharp tines - Beware
of cutting ngers or toes
- Remove spark plug lead
before maintenance.
1. General Information:
This lawnmower is intended for the care of grass and lawns in private gardens. Because of the physical hazard to the operator the
lawnmower may not be used:
to trim shrubs, hedges and bushes,
- for cutting climbing plants,
- for mowing lawns in roof gardens,
- for trimming plants in balcony boxes,
- for cleaning pavements or other paved areas (vacuuming - blowing away - removing snow),
- for shredding and cutting up tree and hedge cuttings
- as a tractor device (for self-propelled mowers)
- for lawn turning devices, spreading devices, trailers e.g. for passengers, transporting cuttings (except in the grass collection box provided).
• Never let children or other persons who are not familiar with the operating instructions use the
• lawnmower. Juveniles under l6 years may not use the equipment. Local regulations may specify the minimum legal age of the operator.
• Never mow your lawn if persons, particularly children, or animals are in the vicinity.
• Mow only in daylight or with appropriate artificial lighting.
2. Before Mowing:
•Never mow without wearing firm footwear and long trousers: Never mow barefoot or in open sandals.
•Attach the baffle provided and/or grass box. Make certain that it is firmly fitted. Operation without or with damaged protective equipment is
forbidden.
• Examine the area on which the machine is to be used and remove all objects which are capable of being contacted or thrown by the mower
or its blade.
•Check the machine to make certain that all fasteners, bolts & nuts are tightly fitted for damage; check also for signs of damage or serious
wear.
•Observe the installation instructions when replacing parts - if in doubt always refer to your WOLF Service Centre.
•Examine the grass box regularly for wear or damage - replace as necessary.
•Mowers fitted with four-stroke engines must be provided with engine oil before the first start-up (see „Filling Oil“).
•Check the oil level before each use.
•WARNING - petrol is highly inflammable! Do not smoke. Do not refuel in any area where there may be a naked flame.
•Keep fuel only in purpose-designed containers.
•Only refuel outdoors.
• Pour in fuel (REGULAR GRADE FUEL) before starting the engine.
• Always firmly tighten petrol filler cap.
•Do not refuel or remove the tank filler cap while the engine is running or when the machine is hot.
•Do not attempt to start the engine if gasoline spills out. Instead, the machine should be removed from the area where the petrol was spilled. Any
attempt to start the mower should be delayed until the fuel vapours have evaporated.
• Replace the engine exhaust silencer if defective.
•Before use a visual inspection should also be made in order to determine whether the blade, fasteners and the mower deck are worn or damaged.
In order to avoid damaging vibration caused by imbalance, worn out or damaged blades and fittings must only be replaced as a set.
•For safety reasons the fuel filler cap must be replaced when damaged.
• Check the fuel line connections, air filter fittings, etc. for tightness.
3. When starting the engine:
•Only start the engine if your hands and feet are at safe distance from the mower deck and blade.
•Before you start the engine, disengage the drive.
•When starting or switching on the engine the lawnmower must not be tilted, unless the lawnmower must be raised for the procedure. In this case,
you tilt it only so far as is absolutely necessary and only raise the side turned away from the operator.
•Do not let the engine run in closed areas in which dangerous carbon monoxide may accumulate.
•Start the mower on an even surface, not in tall grass.
•Do not start the engine if you are standing in front of the discharge channel.
4. When Mowing – For Your Safety:
•WARNING, DANGER! Rotating blade!
•Do not attempt to touch the blade when it is running.
•Observe the safety distance provided by the handlebars and bail arms.
•Only start the engine if your feet are at a safe distance from the blade.
•Make certain that you have a secure foothold, particularly on slopes. Never run, always walk calmly.
• Always mow slopesalong the contours, not up and down the slope.
•Particular care is required on slopes as you change direction.
•Be particularly careful when you turn the mower and pull it towards you.
• Switch off the mower, if you tilt it, run it dry or when transporting it.
•
Never use the lawnmower with damaged protection guards, safety devices or grilles or without the protection devices attached, e.g. baffle plates and/or
grass box.
•Do not change the governor adjustment of the engine or attempt to adjust it.
•The blade must be stopped if the lawnmower is moved off the lawn.
•Before you raise or carry the mower switch off the engine off and wait until the blade has come to a complete stop.
•Adjust the cutting height only with the engine switched off and with the blade at a standstill.
•Never open the protection flap if the engine is still running.
•Before removing the grass box: Turn off the engine and wait for the blade to stop. Carefully refit the grass box after emptying.
•Never drive over gravel with the engine running - stones can be thrown by contact with the blade!
•Where possible, do not mow in wet grass. If the mower appears to have blocked, turn off the engine, remove the spark plug lead and wait until
the blade comes to a standstill if, for example:
- to free a blockage in the ejection channel
- to examine or clean the mower
- if a foreign body is encountered. Check whether mower deck or blade have been damaged. Then correct or repair the damage before
recommencing mowing.
- if the mower strongly vibrates from imbalance (then switch off immediately and look for the cause).
Safety Instructions
9
•NOTE: Danger when grass box equipment is inappropriately handled.
•
If the mower is a self-propelled version then release the drive clutch bail before you switch on the engine. Do not touch engine or exhaust during
or shortly
after operation. Hot parts can lead to burns or provoke frightened movements which may lead to injuries.
•Turn the engine off if you the leave the lawnmower unattended and before you refuel.
5. After working:
•The throttle should be closed before switching off the engine. If the engine is equipped with a petrol shut-off valve then this be closed after mowing
has been completed.
• Do not leave the mower in closed areas after switching off - allow it to cool off in the open air before storing away.
•Never keep the machine with petrol in the tank within a building in which gasoline vapours may possibly come into contact with naked flames or
sparks. Before leaving the mower remove the spark plug lead and - if fitted - the starting key.
•Lifting and carrying the mower for transport:
•Never attempt to lift the mower with the engine running - nor with a hot engine - always remove the spark plug lead before lifting or carrying.
•When folding the mower handlebars, detach starter cable and make certain that the control cables are not snagged or stretched when folding or
unfolding.
•Always carry out the engine oil change with the fuek tank empty anf filler cap fitted. Th engine should be warmed up prior to draining the oil to
ensure all sludge deposits are drained away with the oil.
6. Maintenance
•Regularly examine all fixing bolts and nuts, particularly those of the cutter bar, for tightness.
•Maintenance and cleaning of the equipment as well as removing the protection device may only be performed with the engine stopped and the
spark plug lead and - if available - the starting key, removed. Note information on the chassis before cleaning and oil change!
•Make certain that all nuts, pins and screws are firmly tightened and that the unit is in a safe operating condition.
•In order to avoid the risk of fire keep the engine, exhaust, battery box and the area around the fuel tank free of grass, leaves or oil.
•If the equipment must be tilted for maintenance work then the fuel must be completely drained from the tank beforehand.
•Clean the equipment after each use with a hand-brush - not with water and do not hose down with a high pressure hose in particular. Make certain
to keep the engine cooling fins and engine cooling air intake clean and free from debris.
•Do not place the equipment in damp areas, near naked flames or where a spark might ignite petrol vapour.
•If the fuel tank is to be emptied then this should be done outdoors. Make sure that no fuel is spilled.
• For safety reasons replace worn out or damaged parts.
• NOTE! Always have blades replaced or sharpened by a WOLF Service Centre, as a blade balance test must be performed in accordance with
safety regulations and the blade retaining bolt must be tightened to a specified torque.
• Wear suitable work gloves when carrying out the above work, especially when handling the blade.
10
Safety Instructions
Operation
Operating times
Please check noise abatement regulations prevailing in your country.
Starter cord assembly (fig. B6/B7/B8)
Lift and hold operator presence bail arm B6/B7 (3). Pull the starter rope slowly to the holding bracket, and twist the cord through
the holder (B8). Always remove the starter cord from the holder before folding the mower handles.
Oil Fill (fig. B1)
Fill crankcase with quality oil HD SAE 15 - W 40 up to the marking „Full“ on dipstick.Capacity approx. 0.5 litre . Lift mower slightly on
the oil filter side whilst pouring oil slowly. To check, do not screw in the dipstick. Check oil level regulary before mowing!
Filling with Petrol (fig. B2)
Do not smoke - no naked flames! Switch off engine. Avoid spilling petrol when engine is warm. Use „low-octane petrol“ (do not
use Super Plus). Avoid petrol spillage. Do not inhale vapour.
Attaching of grassbox (fig. B3)
Lift deflector lid, locate grassbox hook into opening of chassis (see arrow) and replace lid.
Use of heigth adjustment (fig. B4)
Only when mower is stationary and rotating blade has come to complete standstill.
Place hand into handle bar and depress button (A). Lift or lower chassis until it engages into required position (´B).
Selection of Cutting height
If possible, mow when grass is dry in order to protect turf. Do not set cutting position too low when mowing very tall or wet grass. We
recommend an average cutting height of 4,5 cm.
Cold start - 40 H (fig. B5/B6/B8)
Place mower on level ground, not onto high grass. Open petrol valve. Petrol cock B5 (A) in position B5 (b). Accelerator lever
B6 (1) in START position. Lift and hold safety bar B6 (3). Pull starter cord B8 rapidly and return starter grip slowly. After engine
started to run,
move throttle lever to „Betrieb“. To stop engine: Release safety bar B6 (3). Starting or warm engine: Throttle lever
B6 (1) to „Betrieb“
(= running). If engine will not start after secónd attemp, place throttle to „Start“ position and try again.
Cold start - 46 HA fig. B5/B7/B8)
Place mower on level ground, not onto high grass. Open petrol valve. Petrol cock B5 (A) in position B5 (b). Accelerator lever B7
(1) in START position. Lift and hold safety bar B7 (3). Pull starter cord B8 rapidly and return starter grip slowly. After engine started to
run, move throttle lever to „Betrieb“. To engage drive: Lift driving bar B7 (5) Drive OFF: Release driving bar B7 (5). To stop engine:
Release driving bar B7 (5). Release safety bar B7 (3). Starting or warm engine: Throttle lever B7 (1) to „Betrieb „ (= running). If
engine will not start after secónd attemp, place throttle to „Start“ position and try again.
Mowing (fig. B9)
Always mow using throttle lever setting Power. Mow with throttle lever on „Betrieb“ position. Start engine with mower placed on level and firm
ground. Turn mower on lawn area already mown. Do not leave mower standing with engine running for longer than absolutely necessary.
11
Operation
Emptying of Grassbox
The grassbox is full and should be emptied as soon as grass clippings remain uncollected on the ground behind your mower.
Fixing of handle
ATTENTION! Take care that the switch cable does not become caught and crused when fol-ding the handle frame (fig. M1/M2/M3).
Maintenance
Disconnect spark plug cap and starter key before proceeding (fig. W1/W2)
Clean mower thoroughly after each mowing with cloth or brush. Do not spray with water. Keep mower in a dry room.
Change oil only
While engine is warm and fuel tank empty.
Change oil after the first 5 working hours. Thereafter chane engine oil every 25 working hours and at the end of the mowing season.
Change engine oil more frequently if working under extreme and dusty conditions. To drain the engine oil, remove oil filler cap, tilt
machine slowly to side and allow oil to drain from the crankcase through the filler.
Cleaning of Spark Plug
Check and clean regularly, reset plug gap as required (0,70 mm).
Cleaning of air filter
Refer to the engine manufacturer‘s handbook supplied.
Cleaning operations and blade change (fig. W1)
When cleaning the mower and changing blades, lay the mower on its right hand side as illustrated. Pull off the spark plug lead.
Sharpening and changing blade (fig. W3)
Blade should always be sharpened by an approved Service Centre. Change blade according to drawing.
Gloves should be worn at all times when working on the blade. Remove ignition key and spark plug lead when working on
the blade. Information for Service Centre, blade retaining screw to be tightened to: screw = 38-42 Nm.
Adjusting the clutch Bowden cable (Fig. W4/B7)
Lift the drive bar B7 (5) approx. 2 cm and hold. Loosen counternut W4 (A) and turn adjusting screw W4 (B) anticlockwise until the drive
wheels block when the mower is pulled backwards. Tighten counternut W4 (A) firmly.
Winter storage
•Drain fuel tank.
•Drain carburettor
- therefore start engine, keep it runninug until it automaticalli switches off.
•Clean the whole machine thoroughly
•Change oil, 4-stroke engine.
•Prepare engine for winter storage as follows:
- Remove spark plug
- Poor one spoon full of engine oil into spark plug hole
- Replace spark plug but do not connect spark plug lead
- Pull starter rope until resistance is felt (valves are now closed)
•Store mower in a cool and dry place.
We recommend: Have your mower thoroughly checked once a year by approved Service Agent.
Faults and how to remedy
Remedy (X) by:
ProblemPossible cause
WOLF
service
workshop
Yourself
Motor does not start or
has no power:
• Insufcient fuel in the tank
• Spark plug lead not connected
• Spark plug out of order
• Air lter dirty or oily
• Throttle lever not at „Run“
• Blade fastening screw loose
• Clutch linings worn
---
---
---
---
---
X
X
X
X
X
X
X
---
---
Uneven cutting:
• Cutting height misadjusted
• Blunt blades
• Air / duct catcher bag blocked
---
X
---
X
---
X
Drive does not start:• Clutch Bowden cable misadjusted---X
When in doubt, always consult a WOLF service workshop. Important: switch off the mower and disconnect the spark
plug lead before inspecting, cleaning or working on the blades.
15
Utilisation
Démarrage à froid - 40 H (g. B5/B6/B8)
A faire sur ne surface plane, pas dans l ´herbe haute. Ouvrir le robinet d´essence. Soupape d´essence B5 (A) en position B5
(b). Régler la manette des gaz B6 (1) sur Start. Soulever l´étrier de sécurité B6 (3) et le retenir dans cette position. Tirer la corde du
starter B8 et la laisser revenir lentement. Après le démarrage amener la manette des gaz sur „Betrieb“. Pour arrêter le monteur:
Relâcher l´étrier de sécurité B6 (3). Démarrage à chaud: Placer la manette des gaz B6 (1) sur „Betrieb“ . Si le monteur ne démarre
pas après le 2e essai, replacer la manette des gaz sur „Start“ pour démarrer.
Démarrage à froid - 46 HA (g. B5/B7/B8)
A faire sur ne surface plane, pas dans l ´herbe haute. Ouvrir le robinet d´essence. Soupape d´essence B5 (A) en position B5 (b).
Régler la manette des gaz B7 (1) sur Start. Soulever l´étrier de sécurité B7 (3) et le retenir dans cette position. Tirer la corde du
starter B8 et la laisser revenir lentement. Après le démarrage amener la manette des gaz sur „Betrieb“. Mise en route de la traction:
Soulever I´ètrier B7 (5). Pour arrêter le mécanisme d´entráinement: Relâcher l´étrier B7 (5). Pour arrêter le monteur: Relâcher l´étrier
B7 (5). Relâcher l´étrier de sécurité B7 (3). Démarrage à chaud: Placer la manette des gaz B7 (1) sur „Betrieb“. Si le monteur ne
démarre pas après le 2e essai, replacer la manette des gaz sur „Start“ pour démarrer.
Tondre (fig. B9)
La manette des gaz doit se trouver sur la Position "Betrieb" ou. Le nombre de tours du moteur est maintenu automatiquement. Faire
faire demitour à la tondeuse sur une partie déjà tondue. Eviter de laisser votre tondeuse lontemps à arrêt, moteur tournant, sur la
pelouse.
Indication pour vider le bac récolteur
Le bac récolteur est plein lorsque l‘herbe coupée se pose derrière la tondeuse
Fixation du guidon
ATTENTION! En pliant ou dé-pliant le guidon de la tondeuse attention à ne pas écraser le câble (fig. M1/M2/M3).
Entretien
Toujours retirer le capuchon de bougie et la clef de contact au préalable (fig. W1/W2)
Nettoyer la tondeuse avec une brosse ou un chiffon après chaque tonte.
Ne jamais nettoyer la tondeuse au jet d'au. Remiser la tondeuse dans un endroit sec.
Vidange de l’huile moteur
doit toujours être faite quand le moteur est chaud et le réservoir vide. Première vidange après 5 heures de travail. Ensuite
toutes les 25 heures de travail, au plus tard à la fin de la saison de tonte. Dans des conditions de travail dures, par exemple sur
terrain poussiéreux, vidanger plus souvent. Ouvrir l'orifice de remplissage d'huile, pencher lentement la tondeuse sur le côté et laisser
couler l'huile.
Nettoyage de la bougie
L'encrassement de la bougie réduit le rendement du moteur. Nettoyer de temps à autre la bougie et régler l'écartement des électrodes
(0,70 mm).
Nettoyer le filtre à air
Se reporter à la notice d‘utilisation du fabricant du moteur (ci-jointe).
Travaux d‘entretien et remplacement de la lame (g. W1)
Coucher la tondeuse sur le côté droit, comme illustré, pour la nettoyer ou remplacer la lame. Débrancher la bougie d‘allumage.
Affûtage et remplacement du couteau (fig. W2)
Toujours laisser affûter le couteau par un atelier spécialisé. Effectuer le remplacement du couteau selon la figure.
En cas de travaux sur
le couteau, porter des gants de protection, retirer la clé de contact et I‘embout de fil de bougie.
Indication pour les ateliers spécialisés: couple de serrage du boulon 38-42 Nm.
Réglage du câble Bowden d‘embrayage (fig. W4/B7)
Soulever de 2 cm l‘étrier d‘entraînement B7 (5) et le maintenir. Desserrer le contre-écrou W4 (A) et tourner la vis de réglage W4 (B)
vers la gauche jusqu‘à ce que les roues motrices bloquent lorsque la tondeuse recule. Revisser, à bloc, le contre-écrou W4 (A).
Remiser pedant l’hiver
• Vider le réservoir.
• Vider le carburateur en mettant la tondeuse en marche et en la laissant tourner jusqu'à ce qu'elle s'arrête d'ellemême.
• Nettoyer la tondeuse à fond.
• Changer l'huile pour un moteur 4-temps.
• Conserver le moteur comme suit:
- dévisser la bougie, verser une cuillère à soupe d'huile moteur dans l'orifice de celle-ci.
-tirer lentement la corde de starter à fond (répartition de l'huile dans le cylindre), revisser la bougie, ne pas replacer le capuchon de
bougie.
- tirer la corde de starter jusqu'à ce que l'on sente une résistance.
• Remiser la tondeuse dans un endroit frais et sec.
Nous recommandos: Faire réviser la tondeuse dès l'automne par une station-service WOLF agréée.
16
Comment remédier aux pannes
Mesures ŕ prendre (X) par :
DysfonctionnementsCauses possiblesL‘atelier de service
aprčs-vente WOLF
L‘utilisateur
Le moteur ne démarre pas
ou manque de puissance :
• Il n’y a pas assez de carburant dans le réservoir
• La cosse de la bougie n’est pas en contact avec la
• bougie d’allumage
• La bougie d’allumage est défectueuse
• Le ltre ŕ air est encrassé ou plein d’huile
• Le levier des gaz n’est pas en position «Marche»
• La vis de la lame est desserrée
• Les garnitures d’embrayage sont usées
---
---
---
---
---
---
X
X
X
X
X
X
X
X
---
---
La coupe est irréguličre:
• La hauteur de coupe réglée n’est pas appropriée
• La lame est émoussée
• Le canal d’éjection et/ou le bac de ramassage sont
obstrués
---
X
---
X
---
X
L‘entraînement ne
réagit pas :
• Le câble Bowden d’embrayage est mal réglé---X
En cas de doute, consulter toujours l‘atelier de service aprčs-vente WOLF. Attention, arręter la tondeuse avant tout
contrôle, tout nettoyage et tous travaux sur la lame et débrancher la cosse de la bougie d‘allumage.
Conditions de la garantie
La carte de garantie remplie par les vendeurs ou le justificatif d‘achat doivent être conservés avec soin.
La société Wolf-Garten fournit une garantie selon l‘état actuel de la technique et l‘objectif d‘utilisation / le domaine d‘application pour une durée de 24 mois
à partir de la date d‘achat. Les droits légaux du consommateur final ne sont pas entravés par les directives suivantes en matière de garantie.
Conditions préalables à l‘application de la garantie de 24 mois :
- Utilisation de l‘appareil exclusivement à usage privé.
Dans le secteur professionnel ou pour les sociétés de location, la garantie est de 12 mois.
- Manipulation réglementaire et respect de toutes les consignes figurant dans le mode d‘emploi, qui fait partie de nos conditions de garantie.
- Respect de la périodicité prescrite pour la maintenance.
- Pas de modification arbitraire de la construction.
- Montage de pièces détachées / accessoires WOLF originaux.
- Présentation de la carte de garantie remplie et/ou de la preuve d‘achat.
La garantie ne s‘applique pas à l‘usure normale des dents ni aux pièces de fixation de ces dents telles que les disques de friction, les courroies trapézoïdales
/ dentées, les roues/pneus, le(s) filtre(s) à air, les bougies /cosses d‘allumage. En cas de réparation arbitraire, tout droit à la garantie est automatiquement
supprimé. Les défauts et les imperfections dont les causes sont attribuées à un défaut de matériau ou de fabrication sont réparés exclusivement par nos
ateliers partenaires (le vendeur a droit aux améliorations) situés près de chez vous ou le fabricant s‘il est plus proche. Les droits dépassant les limites de
la garantie sont exclus. Un droit à une livraison compensatrice n‘existe pas. Les dommages éventuels survenus pendant le transport ne doivent pas être
communiqués à notre société mais au transporteur concerné pour conserver les droits à indemnité envers cette entreprise.
17
Eccellente cura del prato con i prodotti WOLF-Garten
Il nostro know-how per il Vostro prato ideale
Complimenti per aver scelto un tosaerba WOLF! Con questo acquisto avete optato per un apparecchio estremamente moderno e innovativo, che Vi
consente di realizzare una perfetta cura del tappeto erboso.
Eccovi una serie di consigli per rinnovare e curare il Vostro prato o per modificarne l‘aspetto; solo così potrete davvero godervi al meglio il Vostro prato!
Sono le sementi a fare la differenza!
L‘elemento essenziale per un bel tappeto erboso sono le sementi. Per creare un nuovo tappeto erboso Vi consigliamo due prodotti eccellenti:
Sementi per prato WOLF >>Supra<<
Questa pregiata miscela di speciali sementi per prato si distingue per la straordinaria crescita rigogliosa, così il muschio e le erbe infestanti non
hanno alcuna chance di sopravvivere. Ancora un vantaggio del prato >>Supra<<: cresce sia all‘ombra che al sole.
Sementi per prato WOLF >>Loretta<<
Il prato >>Loretta<< è estremamente resistente al calpestio e alle sollecitazioni; è particolarmente idoneo all‘impiego per superfici molto strapazzate.
Una rapida germinazione e la capacità di rigenerazione assicurano un prato fitto e facile da curare già dopo breve tempo.
Prato nuovo senza vangatura
Non siete soddisfatti del Vostro prato attuale, ma non avete voglia di realizzare un nuovo tappeto erboso? - Non c‘è problema! Noi Vi consigliamo
come trasformare il Vostro tappeto erboso in un prato da sogno anche senza vangatura, in breve tempo e a costi contenuti.
Il sistema di rinnovo del prato „Novaplant
®
“ Vi aiuta ad ottenere in modo semplice e rapido un prato fitto, di bell‘aspetto e ad alta resistenza, che tutti
Vi invidieranno. Tutto ciò di cui avete bisogno sono un tosaerba, un verticolatore e Novaplant
®
>>Supra<< WOLF (oltre ad uno speciale concime
iniziale contiene la pregiata miscela per prato „Supra“) oppure Novaplant
®
>>Loretta<< WOLF (oltre ad uno speciale concime iniziale contiene la
pregiata miscela per prato >>Loretta<<). Dopo 5 fasi di semplice esecuzione, basteranno solo 6 settimane ed il Vostro vecchio prato diventerà un
prato da sogno grazie a questo sistema unico di rinnovo del prato
La perfetta cura del prato
Le seguenti linee guida per la cura del prato Vi suggeriscono come preservare a lungo l‘aspetto gradevole del Vostro prato.
Falciatura:
Importante per la crescita rigogliosa e la resistenza del prato. Consigliamo la falciatura regolare 1 volta a settimana con altezza di taglio uniforme:
non inferiore a 3,4 cm, non superiore a 5 cm, all‘ombra l‘altezza di taglio ideale è di 5 cm. Se in primavera o dopo le ferie la crescita è superiore a
8 cm, è necessaria la falciatura in più stadi.
Concimazione:
Date al prato gli elementi nutritivi, mantenetelo sano e resistente. Consigliamo la concimazione 4 volte per ogni stagione con un concime speciale
per prato (non impiegare blue corn!):
Marzo: concime iniziale WOLF per tappeti erbosi nuovi Maggio:concime per prato WOLF >>Super<<
Luglio:concime per prato WOLF >>Super<< Settembre:WOLF Vital NK plus
Irrigazione a pioggia:
Assolutamente necessaria in caso di aridità. Poi consigliamo un‘irrigazione a pioggia profonda da 1 a 2 volte a settimana. In questo caso l‘acqua
dovrebbe penetrare per ca. 10 cm nel terreno (10 - 15 litri/m
2
). Più elevato il fabbisogno idrico sotto gli alberi.
Taglio in verticale:
Importante per rimuovere feltro e residui di piante morte. Almeno 1 volta all‘anno ad inizio primavera (aprile/maggio). Infine eliminare completamente
le erbe rimosse dal prato.
Diserbo:Elimina le erbe infestanti dal prato
In caso di necessità impiegare il diserbante WOLF con il concime per prato
Periodo migliore: da metà maggio ai primi di settembre
Diserbante per muschio:Elimina il muschio dal prato
In caso di necessità impiegare il diserbante per muschio WOLF con il concime per prato
Periodo migliore: primavera e autunno (attenersi alle Istruzioni per l‘uso)
In presenza di abbondante muschio: tagliare il muschio in verticale e seminare
Fogliame:Sottrae luce al prato, trasmette malattie. Deve essere rimosso il più rapidamente possibile dal prato!
Proprio all‘ombra la cura giusta e costante del prato è importante per la sua sopravvivenza. La costante assenza di luce indebolisce le erbe, la
crescita di foglie e radici si riduce e le malattie si possono diffondere rapidamente.
Attualmente >>SUPRA<< è il prato ideale per le zone ombreggiate. Naturalmente cresce molto bene anche in luoghi soleggiati.
Vi auguriamo buon divertimento nel Vostro bel prato!
I Vostri esperti del prato WOLF
Indicazioni di sicurezza
Leggere attentamente le istruzioni per l‘uso e familiarizzare con gli elementi di comando e con il coretto utilizzo
dell‘apparecchio. L‘utente è responsabile degli incidenti causati ad altre persone o alla loro proprietà. Osservare le
idicazioni, le spiegazioni e le prescrizioni.
Legendasimboli
Attenzione!
Prima dell‘uso leggere
istruzioni!
Allontanare le persone
dalla zona di pericolo!
Attenzione! Lame da taglio
aflate - davanti a servizio
d‘assistenza tirare la estrarre i
cappucci delle candele.
19
Indicazioni di sicurezza
5. Dopo il lavoro:
•Quando il motore si arresta, chiudere la valvola a farfalla. Nel caso il motore possieda un rubinetto di chiusura della benzina, chiuderlo dopo aver
falciato.
•Dopo avere spento l'apparecchio non depositarlo in un luogo chiuso, ma lasciarlo raffreddare all'aperto.
•Non depositare mai l'apparecchiatura con il serbatoio pieno di benzina all'interno di un edificio, dal momento che le esalazioni della benzina
potrebbero venire a contatto con fuoco o scintille.
•Prima di abbandonare l'apparecchio rimuovere il cappuccio delle candele di accensione e – se presente – la chiave di avviamento.
•Sollevamento dell'apparecchio per il trasporto:
mai con motore in funzionamento – non con motore caldo – solo con cappuccio delle candele di accensione staccato.
•Nel rimettere a posto l'apparecchio, sganciare la fune di avviamento e fare attenzione che i cavi Bowden non vengano piegati.
•Eseguire il cambio del motore sempre a serbatoio vuoto e chiuso, e con motore caldo.
6. Manutenzione
•Controllare regolarmente che tutte le viti di fissaggio e i dadi visibili, in particolar modo quelli della lama, siano fissi ed eventualmente serrarli
ancora.
•I lavori di manutenzione e di pulizia all'apparecchio, nonché la rimozione del dispositivo di protezione, possono essere sostenuti solo con motore
fermo e cappuccio delle candele di accensione (ed eventualmente chiave di avviamento) staccato. Prima dei lavori di pulizia e del cambio dell'olio,
fare attenzione alle indicazioni del telaio!
•Verificare che tutti i dadi, i perni e le viti siano serrati a fondo e che l'apparecchio si trovi in uno stato sicuro.
•
Per evitare pericolo di incendio, liberare il motore, lo scarico, il vano batterie e l'area intorno al serbatoio dall'erba, dalle foglie o dal grasso fuoriuscito
(olio).
•Nel caso l'apparecchio debba essere ribaltato su un lato per lavori di riparazione, vuotare completamente il serbatoio del carburante.
•Dopo ogni impiego, pulire l'apparecchio con una scopetta – non con acqua e in particolare non con alta pressione. Mantenere pulite le alette di
raffreddamento del cilindro e le prese d'aria:
•Non riporre l'apparecchio in luoghi umidi o in prossimità di fiamme, e neanche in luoghi dove una scintilla dei gas della benzina potrebbe
infiammarsi.
•Nel caso il serbatoio di benzina debba essere vuotato, effettuare quest'operazione all'aperto. Fare in modo di non spargere il carburante.
•Sostituire per motivi di sicurezza i particolari usurati o danneggiati.
•ATTENZIONE! La sostituzione o l'affilatura della lama va fatta eseguire sempre in officina, poiché, dopo aver allentato i pezzi, è necessario un
controllo dell'equilibratura in base alle norme di sicurezza.
•Nei lavori di riparazione e di pulizia, indossare sempre dei guanti da lavoro.
•Utilizzare solo pezzi di ricambio WOLF, altrimenti non vi è nessuna garanzia che la Vostra falciatrice corrisponda alle normative di sicurezza.
Si prega di osservare le prescrizioni vigenti nei singoli stati.
Tempo d’esercizio
Messa in opera
Montare la fune d’avviamento (fig. B6/B7/B8)
Sollevare e gli archi di sicurezza B6/B7 (3) e tenerli cosi. Tirare la fune lentamente sino all'impugnatura e inserirla nella guida (B8).
Prima di ripiegare l'impugnatura, estrarre la fune d'avviamento.
Olio (fig. B1)
Prima della messa in moto riempire basamento con 0,5 l olio HD SAE 15 - W 40 sino al contrassegno „Full“ dell´asta di livelo,
rispettivamente sino all´orlo del bocchettone. Per il controllo non avvitare l´asta di livello.
Prima di falciare controllare sempre il livello dell'olio.
Rifornimento di carburante (fig. B2)
Non fumante, niente fuochi. Non fare benzina mentre il motore è in moto. A motore caldo non schizzare benzina. Usare solo
benzina basso numero di ottano. Evitare di versare benzina. Non respirare i vapori.
Come agganciare il prendierba (fig. B3)
Alzare il coperchio di protezione, inserire i ganci nelle apposite scanalature (vedi frecce). Riporre il coperchio di protezione.
Regolato l‘altezza di taglio (fig. B4)
Solo a motore spento e lame ferme terme. Premere il pulsante e sollevare o spingere fino all‘altezza voluta.
Altezza di taglio
Tagliare possibilmente su prato asciutto per non danneggiare la cotica erbosa. In caso di prato umido ed erba alta, tagliare con una
maggiore altezza di taglio. Di regola si tosa ad un'altezza di taglio di 4,5 cm.
Avviamento a freddo - 40 H (fig. B5/B6/B8)
Su superficie piana, possibilmente non su erba alta. Aprire il rubinetto della benzina. Rubinetto della benzina B5 (A) in posizione
B5 (b). La leva del gas B6 (1) su Start. Sollavre e gli archi di sicurezza B6 (3) e tenerli cosi. Tiare la maniglia d´avviamento B8 e
riportala indietro sempre con la mano. Quando il motore à avviamento apostare la leva del gas, lentamente, sulla posizione „Betrieb“.
Stop motore: Alltenare gli archi di sicurezza B6 (3). Avviamento a caldo: Leva gas B6 (1) su „Betrieb“ se non parte al secondo
tentativo mettere la leva gas su „Start“ e riprovare.
Avviamento a freddo - 46 HA (fig. B5/B7/B8)
Su superficie piana, possibilmente non su erba alta. Aprire il rubinetto della benzina. Rubinetto della benzina B5 (A) in posizione
B5 (b). La leva del gas B7 (1) su Start. Sollavre e gli archi di sicurezza B7 (3) e tenerli cosi. Tiare la maniglia d´avviamento B8 e
riportala indietro sempre con la mano. Quando il motore à avviamento apostare la leva del gas, lentamente, sulla posizione „Betrieb“.
Per l´avviamento: Sollevare gli archi di azionamento B7 (5). Azionamento disinsertio: Allentare gli archi di azionamento B7 (5).
Stop motore: Allentare gli di azionamento B7 (5). Alltenare gli archi di sicurezza B7 (3). Avviamento a caldo: Leva gas B7 (1) su
„Betrieb“ se non parte al secondo tentativo mettere la leva gas su „Start“ e riprovare.
24
In werking stellen
Koude start - 46 HA (afb. B5/B7/B8)
Oop een egale vlakte, liefstniet in hoog gras. Benzinekraan openen. Benzinekraan B5 (A) in de juiste stand plaasten B5 (b).
Gashendel B7 (1) op Start. Veiligheidsbeugel B7 (3) optillen en vasthouden. Aan startkord B8 trekken en weer langszaam met de
hand terugbrengen. Na het starten de gashandle langzam op „Betrieb“ zetten. Aandrijving inschakelen: Aandrijfbeugel B7 (5)
Gebruikershandleiding.com neemt misbruik van zijn services uitermate serieus. U kunt hieronder aangeven waarom deze vraag ongepast is. Wij controleren de vraag en zonodig wordt deze verwijderd.
Product:
Spelregels forum
Om tot zinvolle vragen te komen hanteren wij de volgende spelregels:
lees eerst de handleiding door;
controleer of uw vraag al eerder door iemand anders is gesteld;
probeer uw vraag zo duidelijk mogelijk te stellen;
heeft u een probleem en al geprobeerd om dit op te lossen, vermeld dit erbij aub;
heeft u een oplossing gekregen van een bezoeker dan horen wij dat graag in dit forum;
wilt u een reactie geven op een vraag of antwoord, gebruik dan niet dit formulier maar klik op de knop 'reageer op deze vraag';
uw vraag wordt direct op de website gezet; vermijd daarom persoonlijke gegevens in te vullen;
Belangrijk! Als er een antwoord wordt gegeven op uw vraag, dan is het voor de gever van het antwoord nuttig om te weten als u er wel (of niet) mee geholpen bent! Wij vragen u dus ook te reageren op een antwoord.
Belangrijk! Antwoorden worden ook per e-mail naar abonnees gestuurd. Laat uw emailadres achter op deze site, zodat u op de hoogte blijft. U krijgt dan ook andere vragen en antwoorden te zien.
Abonneren
Abonneer u voor het ontvangen van emails voor uw WOLF-Garten 2.40 H bij:
nieuwe vragen en antwoorden
nieuwe handleidingen
U ontvangt een email met instructies om u voor één of beide opties in te schrijven.
Ontvang uw handleiding per email
Vul uw emailadres in en ontvang de handleiding van WOLF-Garten 2.40 H in de taal/talen: Nederlands, Duits, Engels, Frans, Italiaans, Pools, Deens, Zweeds, Noors, Fins als bijlage per email.
De handleiding is 0,91 mb groot.
U ontvangt de handleiding per email binnen enkele minuten. Als u geen email heeft ontvangen, dan heeft u waarschijnlijk een verkeerd emailadres ingevuld of is uw mailbox te vol. Daarnaast kan het zijn dat uw internetprovider een maximum heeft aan de grootte per email. Omdat hier een handleiding wordt meegestuurd, kan het voorkomen dat de email groter is dan toegestaan bij uw provider.
Stel vragen via chat aan uw handleiding
Stel uw vraag over deze PDF
Uw handleiding is per email verstuurd. Controleer uw email
Als u niet binnen een kwartier uw email met handleiding ontvangen heeft, kan het zijn dat u een verkeerd emailadres heeft ingevuld of dat uw emailprovider een maximum grootte per email heeft ingesteld die kleiner is dan de grootte van de handleiding.
Er is een email naar u verstuurd om uw inschrijving definitief te maken.
Controleer uw email en volg de aanwijzingen op om uw inschrijving definitief te maken
U heeft geen emailadres opgegeven
Als u de handleiding per email wilt ontvangen, vul dan een geldig emailadres in.
Uw vraag is op deze pagina toegevoegd
Wilt u een email ontvangen bij een antwoord en/of nieuwe vragen? Vul dan hier uw emailadres in.