a) Messgerät ein- und ausschalten ...................................................................................................................12
b) Warnanzeige bei falscher Messbuchsenwahl............................................................................................... 13
c) Wechselspannungsmessung „V “ .........................................................................................................13
m) Kapazitätsmessung ......................................................................................................................................21
a) SELECT-Funktion .........................................................................................................................................22
b) REL-Funktion ................................................................................................................................................22
c) HOLD-Funktion .............................................................................................................................................22
11. Reinigung und Wartung ......................................................................................................................................23
a) Allgemein ......................................................................................................................................................23
b) Reinigung ..................................................................................................................................................... 23
c) Messgerät öffnen ..........................................................................................................................................24
a) Allgemein ......................................................................................................................................................27
b) Entsorgung von gebrauchten Batterien ........................................................................................................27
13. Behebung von Störungen ...................................................................................................................................28
2. Explanation of symbols ...................................................................................................................................... 37
3. Intended use ...................................................................................................................................................... 38
5. Safety information .............................................................................................................................................. 39
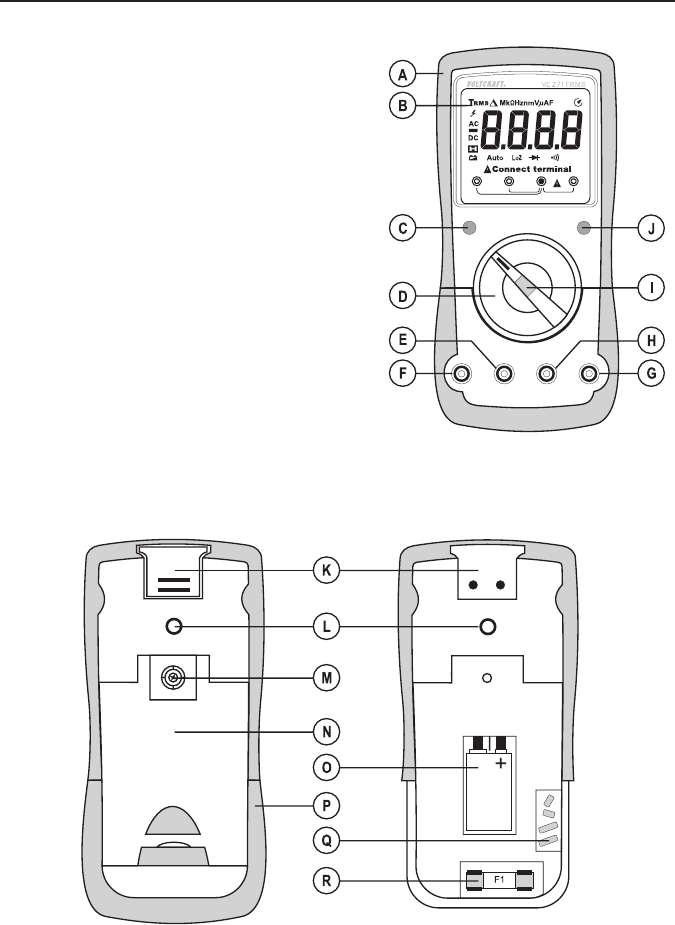
6. Overview of parts ............................................................................................................................................... 41
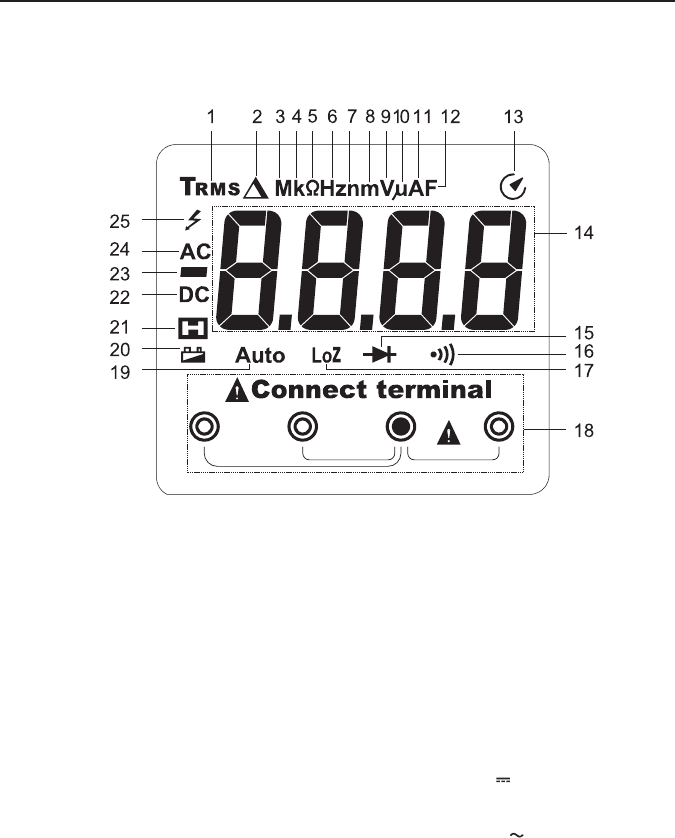
8. Display elements and symbols ..........................................................................................................................43
a) Turning the multimeter on and off ................................................................................................................45
b) Incorrect wiring alarm ..................................................................................................................................46
c) AC voltage mode (“V”) ..........................................................................................................................46
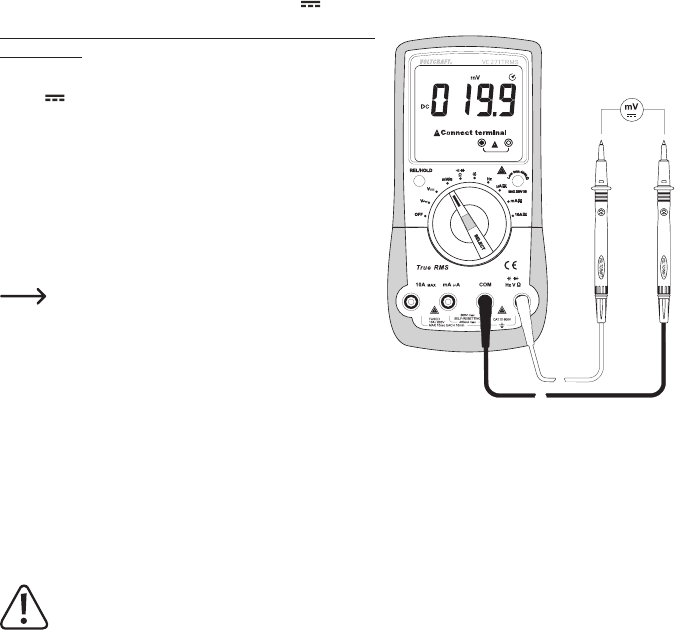
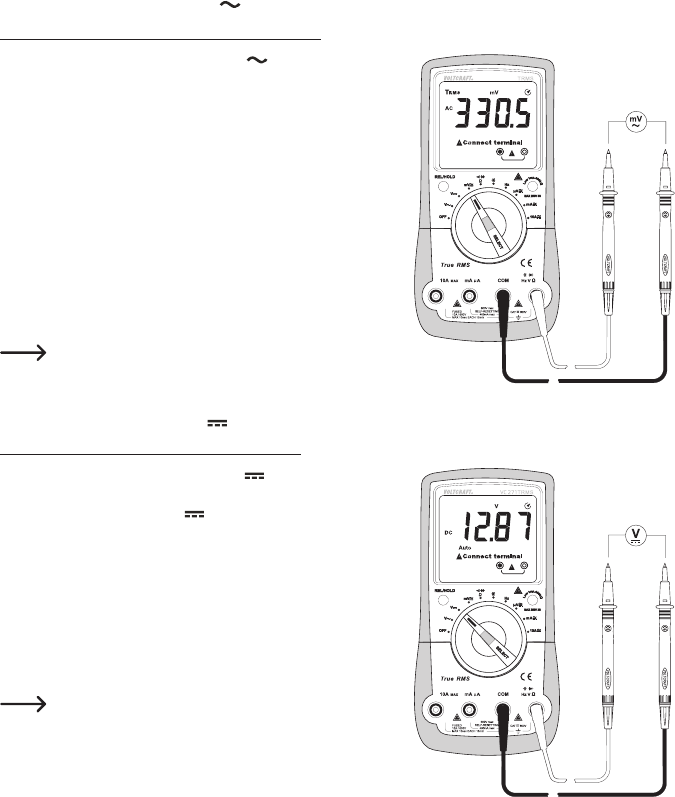
d) AC voltage mode (“mV”) .......................................................................................................................47
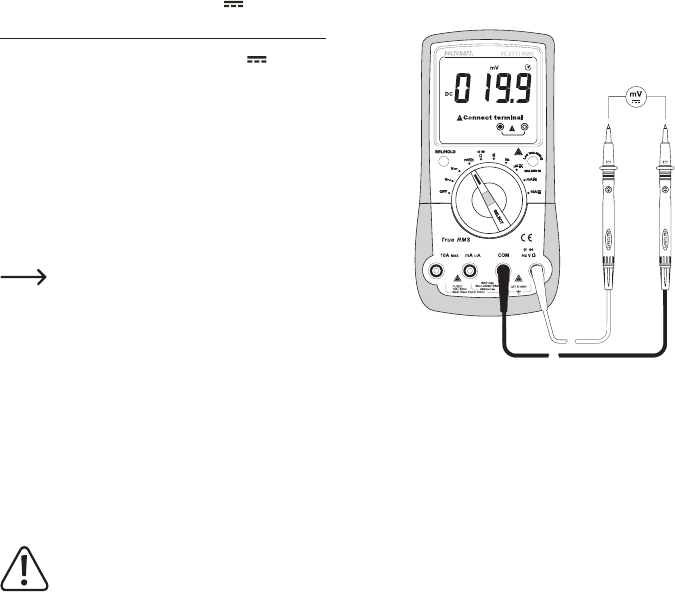
e) DC voltage mode (“V ”) .........................................................................................................................47
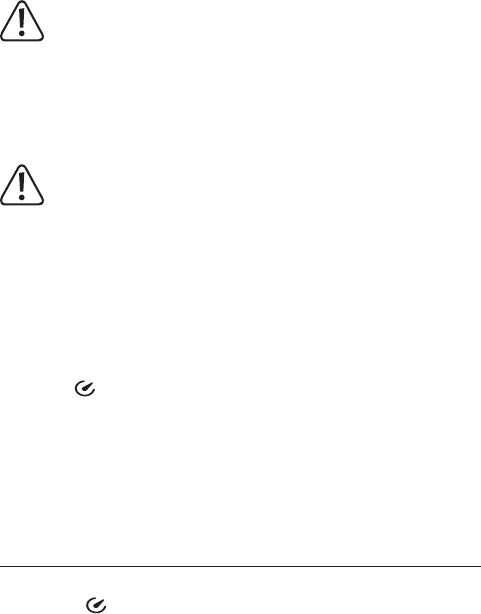
f) DC voltage mode (“mV ”) ......................................................................................................................48
g) LoZ voltage mode ........................................................................................................................................48
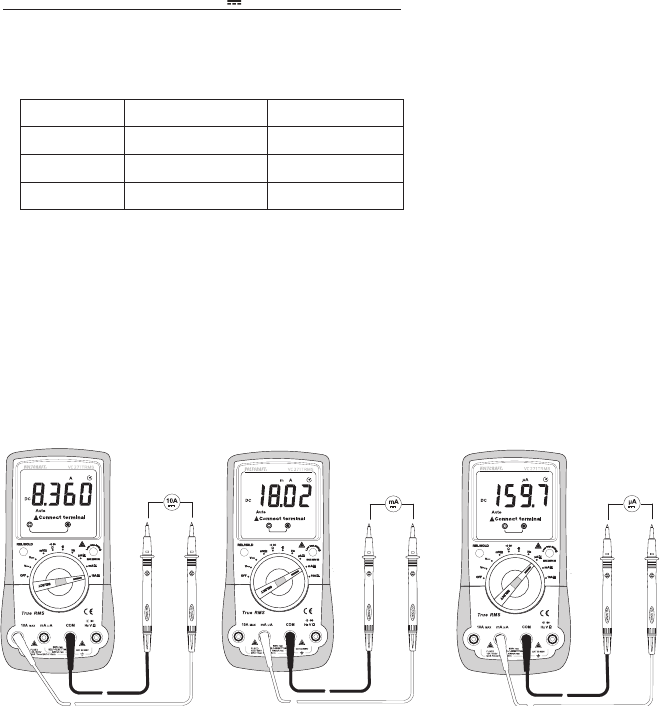
h) Taking current measurements .....................................................................................................................49
i) Measuring frequency ................................................................................................................................... 52
k) Diode test ....................................................................................................................................................54
l) Continuity test .............................................................................................................................................54
m) Measuring capacitance ................................................................................................................................55
a) SELECT function .........................................................................................................................................56
b) REL function ................................................................................................................................................56
c) HOLD function ............................................................................................................................................. 56
d) Auto power-off function ................................................................................................................................56
11. Cleaning and maintenance ................................................................................................................................ 57
a) General information ..................................................................................................................................... 57
b) Cleaning ......................................................................................................................................................57
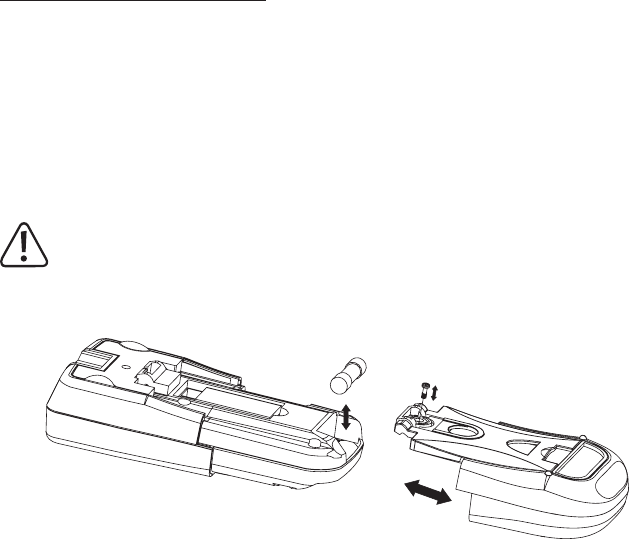
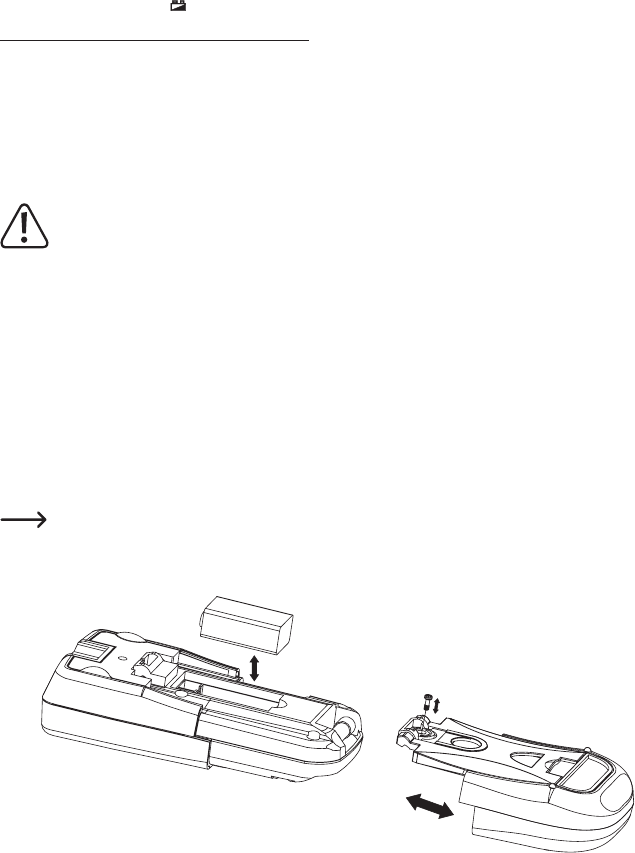
c) Opening the battery/fuse compartment .......................................................................................................57
d) Replacing the 10 A input fuse ......................................................................................................................58
e) Inserting/changing the battery .....................................................................................................................59
36
Page
1. Introduction
Dear customer,
Thank you for purchasing this Voltcraft
®
product.
Voltcraft
®
produces high-quality measuring, charging and network devices that offer outstanding performance and
innovation.
From the ambitious hobby enthusiast to the professional user, Voltcraft
®
products provide the optimal solution for the
most demanding tasks. Moreover, our reliable technology all comes at a very affordable price.
a) General information ..................................................................................................................................... 60
b) Battery disposal ........................................................................................................................................... 60
14. Technical data ....................................................................................................................................................61
37
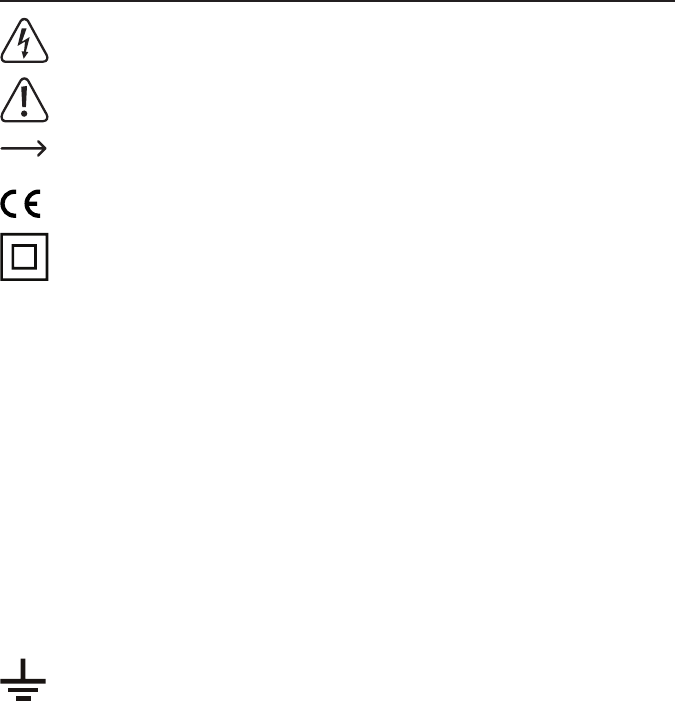
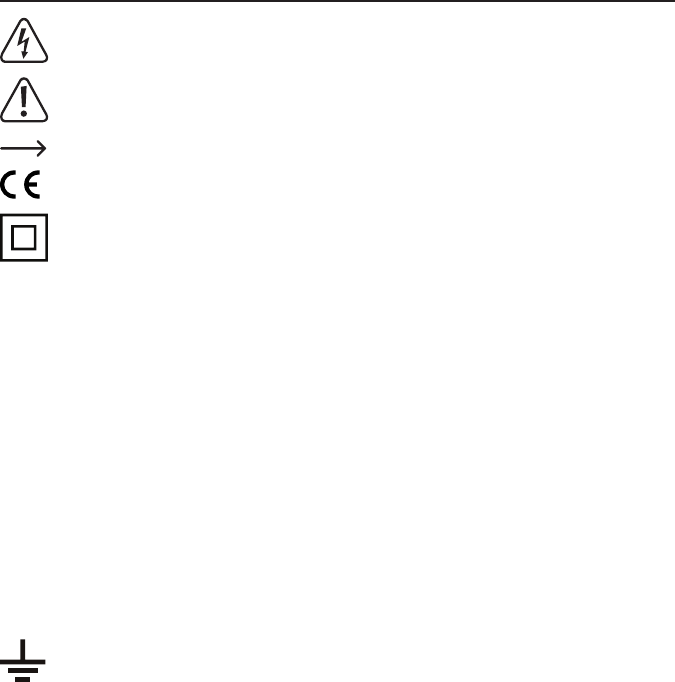
2. Explanation of symbols
The symbol with the lightning in a triangle indicates that there is a risk to your health, e.g. due to an electric
shock.
The symbol with an exclamation mark in a triangle is used to highlight important information in these oper-
ating instructions. Always read this information carefully.
The arrow symbol indicates special information and advice on how to use the product.
This product has been CE tested and complies with the necessary national and European regulations.
Protection class 2 (double or reinforced insulation, protective insulation)
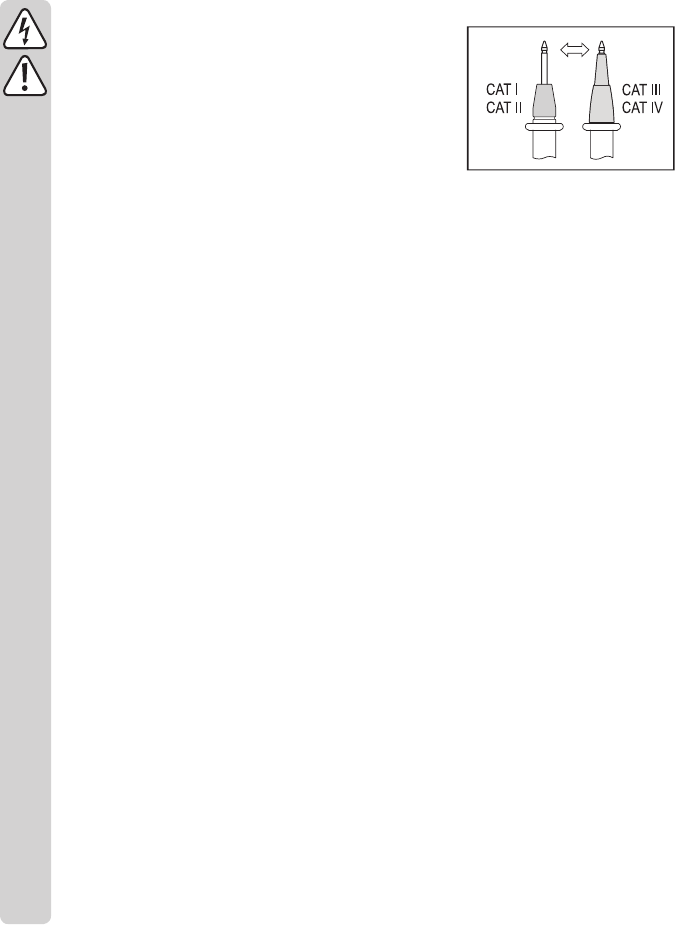
CAT IMeasurement Category I: For measuring circuits of electrical and electronic equipment that is not directly
supplied with a mains voltage (e.g. battery-operated devices, safety extra-low voltage systems, and signal/
control voltages).
CAT IIMeasurement Category II: For measuring electrical and electronic devices that are directly supplied with a
mains voltage via a mains plug. This category also includes all lower categories (e.g. CAT I for measuring
signal and control voltages).
CAT IIIMeasurement Category III: For measuring circuits of installations in buildings (e.g. mains sockets or sub-
distributions). This category also includes all lower categories (e.g. CAT II for measuring electrical devices).
Measuring in CAT III is only permitted with test prods with a maximum free contact length of 4 mm or with
cover caps over the test prods.
CAT IVMeasurement Category IV: For measuring at the origin of a low-voltage installation (e.g. mains distribution,
electricity provider’s transfer points to homes) and outdoors (e.g. when conducting tasks on underground
cables or overhead lines). This category also includes all lower categories. Measuring in CAT IV is only
permitted with test prods with a maximum free contact length of 4 mm or with cover caps over the test
prods.
Earth potential
38
3.Intended use
-
Measures and displays electrical parameters in measurement category CAT III (up to 600 V). Complies with
the EN 61010-1 standard and all lower categories.
-Measures direct and alternating voltages up to 600 V
-Measures direct and alternating currents up to 10 A
-Measures frequency from 10 Hz to 10 MHz (max. 20 Vrms)
-Measures capacitance up to 40 mF
-Measuresresistancesupto40MΩ
-Continuitytests(<10Ωacoustic)
-Diode tests
The measuring mode can be selected using the control dial. The measurement range is selected automatically in most
modes (except continuity test, diode test and current measuring mode).
Effective (True RMS) measurements are displayed when measuring AC voltages/currents with a frequency of up to
400 Hz. This ensures that sinusoidal and non-sinusoidal voltage/currents are measured accurately.
Negative polarity readings are indicated with the (-) sign.
The multimeter features a low-impedance function (LoZ) that enables you to measure the voltage with reduced in-
ternal resistance. This suppresses phantom voltages that may appear in high-impedance measurements. The low-
impedance function must only be used to measure circuits of up to 250 V for a maximum of 3 seconds.
The two current measurement inputs are protected against overload. The voltage in the measuring circuit must not
exceed 600 V.
The 10 A current measuring input is equipped with a ceramic high-performance fuse.
The mA/µA measuring input is equipped with resettable PTC fuses. In the event of an overload, the fuses restrict the
2. Explication des symboles ..................................................................................................................................69
5. Consignes de sécurité .......................................................................................................................................72
6. Désignation des pièces détachées .................................................................................................................... 74
7. Description du produit ........................................................................................................................................ 75
8. Indications apparaissant à l’écran et symboles .................................................................................................76
9. Mode de mesure ................................................................................................................................................ 78
a) Allumer et éteindre l’appareil ....................................................................................................................... 78
b) Avertissement en cas de mauvais choix de borne ......................................................................................79
c) Mesure de la tension alternative « V » ..................................................................................................79
d) Mesure de courant alternatif « mV » ...................................................................................................80
e) Mesure de la tension continue « V» ...................................................................................................... 80
f) Mesure de tension continue « mV » ..................................................................................................... 81
g) Mesure de tension LoZ ................................................................................................................................81
h) Mesure de courant .......................................................................................................................................82
i) Mesure de fréquence ...................................................................................................................................85
j) Mesure de la résistance .............................................................................................................................86
k) Test de diodes .............................................................................................................................................87
l) Essai de continuité .....................................................................................................................................87
m) Mesure de la capacité .................................................................................................................................88
a) Fonction SELECT ........................................................................................................................................ 88
b) Fonction REL ............................................................................................................................................... 89
c) Fonction de maintien - HOLD ...................................................................................................................... 89
d) Fonction de désactivation automatique (Auto-Power-OFF) ........................................................................89
11. Nettoyage et entretien .......................................................................................................................................90
a) Généralités ..................................................................................................................................................90
b) Nettoyage ....................................................................................................................................................90
c) Ouverture de l’instrument de mesure ..........................................................................................................91
d) Remplacement du fusible de 10 A ...............................................................................................................92
e) Mise en place et remplacement de la pile ...................................................................................................93
68
1. Introduction
Cher client,
Avec l’achat de ce produit Voltcraft
®
, vous avez pris une très bonne décision pour laquelle nous souhaitons vous
remercier.
Vous avez acheté un produit de qualité supérieure issu d’une gamme de marque qui se distingue dans le domaine
de la métrologie, de la technique de recharge et de la technologie des réseaux grâce à sa grande compétence et son
innovation permanente.
Voltcraft
®
permet de répondre aux tâches exigeantes du bricoleur ambitieux autant qu’à l’utilisateur professionnel.
a) Généralités ..................................................................................................................................................94
b) Élimination des piles usagées .....................................................................................................................94
2. Verklaring van de symbolen .............................................................................................................................104
3. Doelmatig gebruik ............................................................................................................................................ 105
4. Omvang van de levering .................................................................................................................................. 106
6. Overzicht van de onderdelen ........................................................................................................................... 108
j) Meten van weerstand ...............................................................................................................................120
m) Capaciteitsmeting ...................................................................................................................................... 122
10. Extra functies ................................................................................................................................................... 122
a) SELECT-functie ......................................................................................................................................... 122
b) REL-functie ................................................................................................................................................123
c) HOLD-functie .............................................................................................................................................123
d) Auto power-off functie ................................................................................................................................123
11. Reiniging en onderhoud ...................................................................................................................................124
a) Algemeen ..................................................................................................................................................124
b) Reiniging ....................................................................................................................................................124
c) Meetapparaat openen ...............................................................................................................................125
d) Zekering van 10 A vervangen ....................................................................................................................126
e) De batterij plaatsen en vervangen .............................................................................................................127
103
Pagina
1. Inleiding
Geachte klant,
Met dit Voltcraft
®
-product hebt u een hele goede beslissing genomen, waarvoor we u van harte willen bedanken.
U hebt een hoogwaardig kwaliteitsproduct aangeschaft van een merkenfamilie die gekenmerkt wordt door buitenge-
wone deskundigheid en permanente vernieuwingen op het vlak van meet-, laad- en netwerktechniek.
Met Voltcraft
®
kan zowel de kieskeurige hobbyist als de professionele gebruiker zelfs de moeilijkste taken probleem-
loos uitvoeren. Voltcraft
®
biedt u betrouwbare technologie met een uitstekende prijs-kwaliteitsverhouding.
We zijn ervan overtuigd: Uw keuze voor Voltcraft
®
is tegelijkertijd het begin van een langdurige en prettige samen-
werking.
Veel plezier met uw nieuwe Voltcraft
®
-product!
Bij technische vragen kunt u zich wenden tot onze helpdesk.
Voor meer informative kunt u kijken op www.conrad.nl of www.conrad.be
a) Algemeen ..................................................................................................................................................128
b) Verwijderen van lege batterijen .................................................................................................................128
13. Verhelpen van storingen .................................................................................................................................. 129
Gebruikershandleiding.com neemt misbruik van zijn services uitermate serieus. U kunt hieronder aangeven waarom deze vraag ongepast is. Wij controleren de vraag en zonodig wordt deze verwijderd.
Product:
Spelregels forum
Om tot zinvolle vragen te komen hanteren wij de volgende spelregels:
lees eerst de handleiding door;
controleer of uw vraag al eerder door iemand anders is gesteld;
probeer uw vraag zo duidelijk mogelijk te stellen;
heeft u een probleem en al geprobeerd om dit op te lossen, vermeld dit erbij aub;
heeft u een oplossing gekregen van een bezoeker dan horen wij dat graag in dit forum;
wilt u een reactie geven op een vraag of antwoord, gebruik dan niet dit formulier maar klik op de knop 'reageer op deze vraag';
uw vraag wordt direct op de website gezet; vermijd daarom persoonlijke gegevens in te vullen;
Belangrijk! Als er een antwoord wordt gegeven op uw vraag, dan is het voor de gever van het antwoord nuttig om te weten als u er wel (of niet) mee geholpen bent! Wij vragen u dus ook te reageren op een antwoord.
Belangrijk! Antwoorden worden ook per e-mail naar abonnees gestuurd. Laat uw emailadres achter op deze site, zodat u op de hoogte blijft. U krijgt dan ook andere vragen en antwoorden te zien.
Abonneren
Abonneer u voor het ontvangen van emails voor uw Voltcraft VC271 TRMS bij:
nieuwe vragen en antwoorden
nieuwe handleidingen
U ontvangt een email met instructies om u voor één of beide opties in te schrijven.
Ontvang uw handleiding per email
Vul uw emailadres in en ontvang de handleiding van Voltcraft VC271 TRMS in de taal/talen: Nederlands, Duits, Engels, Frans als bijlage per email.
De handleiding is 5,74 mb groot.
U ontvangt de handleiding per email binnen enkele minuten. Als u geen email heeft ontvangen, dan heeft u waarschijnlijk een verkeerd emailadres ingevuld of is uw mailbox te vol. Daarnaast kan het zijn dat uw internetprovider een maximum heeft aan de grootte per email. Omdat hier een handleiding wordt meegestuurd, kan het voorkomen dat de email groter is dan toegestaan bij uw provider.
Stel vragen via chat aan uw handleiding
Stel uw vraag over deze PDF
Uw handleiding is per email verstuurd. Controleer uw email
Als u niet binnen een kwartier uw email met handleiding ontvangen heeft, kan het zijn dat u een verkeerd emailadres heeft ingevuld of dat uw emailprovider een maximum grootte per email heeft ingesteld die kleiner is dan de grootte van de handleiding.
Er is een email naar u verstuurd om uw inschrijving definitief te maken.
Controleer uw email en volg de aanwijzingen op om uw inschrijving definitief te maken
U heeft geen emailadres opgegeven
Als u de handleiding per email wilt ontvangen, vul dan een geldig emailadres in.
Uw vraag is op deze pagina toegevoegd
Wilt u een email ontvangen bij een antwoord en/of nieuwe vragen? Vul dan hier uw emailadres in.