519838
14
Verklein
Vergroot
Pagina terug
1/21
Pagina verder
iViewer
Monitoring Application for Android Devices
R
CONTENTS
1.GettingStarted......................................................................................................................................3
2. ConfiguringConnectionstoCameras................................................................................................4
2.1 AddingaDirectConnectiontoaNetworkCamera.................................................................................4
2.2 AddingConnectionstoCamerasManagedbyaVASTorST7501Server...............................................6
2.3 EditingPreviouslyAddedCameraConnections......................................................................................8
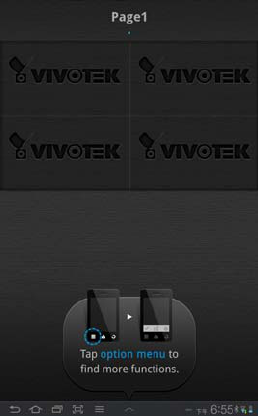
3.ViewingCameraFeedsintheMultiCameraLiveView......................................................................10
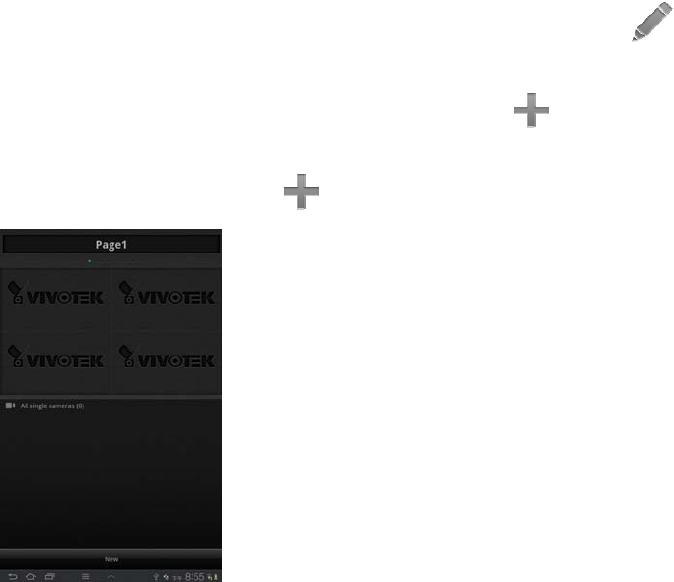
4.ModifyingthelayoutoftheMultiCameraLiveview......................................................................... 11
4.1 Addingcamerafeeds...........................................................................................................................11
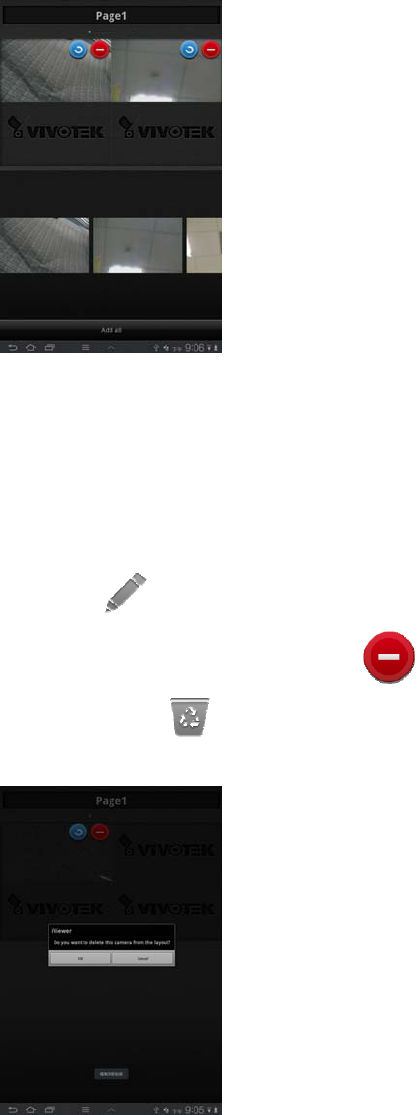
4.2 Removingcamerafeeds.......................................................................................................................12
4.3 Changingthetitleofascreenofcamerafeeds...................................................................................13
5.ViewingacamerafeedintheSingleCameraLivescreen..................................................................13
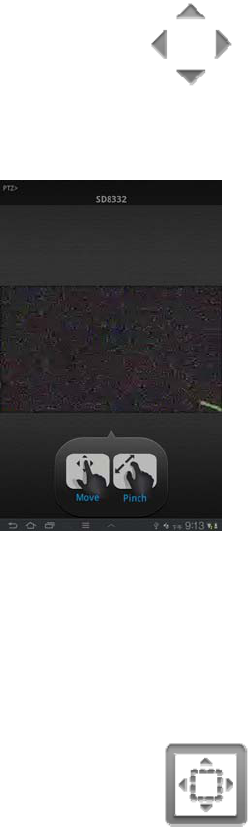
5.1 UsingPTZ..............................................................................................................................................14
5.2 UsingePTZ............................................................................................................................................14
5.3 UsingFisheyeSetup.............................................................................................................................15
5.4 ViewingCameraInfo............................................................................................................................16
5.5 TakingaSnapshotofaCameraFeed....................................................................................................16
5.6 UsingRecordstoViewArchivedVideo.................................................................................................16
IconReferenceGuide..............................................................................................................................19
System Requirements
An established deployment of VAST or ST7501 servers, running version 1.5.2.8 or later, that can be
accessed via a public IP or DNS service.
Network cameras that are managed by the aforementioned VAST or ST7501 software. iViewer supports
direct connections with network cameras via an IP address. However, playback of recorded video from
cameras requires delivery through a VAST or ST7501 server.
An Android device running Android 2.3 or newer.
NOTE
Depending on your particular Android device, the system’s Back and Menu functions may be present as
hardware or onscreen buttons. In Android versions 3.0 and newer, there is no Menu button at all, but all
iViewer options are accessible via the action overflow button on the action bar along the bottom of the
screen. For the sake of readability and consistency, this document assumes the Back and Menu functions
are presented as onscreen buttons.
1.GettingStarted
Tap on the iViewer icon to start iViewer. The Multi-Camera Live view will appear.
Tap on the Menu button to bring up options.
You can add connections to cameras (see section 2) by tapping the layout edit icon, or tap the icon
to display information on the iViewer version installed and access a link to online VIVOTEK technical support.
2. ConfiguringConnectionstoCameras
From the Multi-Camera Live view, the default view when you start iViewer, you can bring up the Configuration
screen to add connections to cameras (see section 2.1 and 2.2), as well as edit settings for previously added
camera connections (see section 2.3).
NOTE
The Configuration screen is displayed in portrait orientation only.
2.1 Adding a Direct Connection to a Network Camera
In the Multi-Camera Live view, tap the Menu button, then the layout edit icon to bring up the
Layout screen.
If you are starting iViewer for the first time, the add device icon will appear immediately. If you
have previously added camera connections to iViewer, tap on the Menu button again in the Layout
screen to bring up options.
Tap on the add device icon, then on New when it appears.
The Configuration screen will appear. Tabs at the top of the screen can be used to switch between
two panes, Camera and Server.
Make sure the Camera pane is displayed. If not, tap on the Camera tab at the top of the
Configuration screen.
Tap in the Name field, then use the onscreen keyboard to enter the desired name. Do the same for
Address, Port, ID, and Password to enter the corresponding information.
Select a stream by number in the Stream tab bar. By default, stream number 3 is selected for its
lower resolution and frame rate (176x144, 5 fps), and is recommended.
When done, tap the Add button to confirm.
Repeat the above process if you wish to add more cameras.
When you are finished, tap the Back button to save settings and return to the Multi-Camera Live
view.
NOTE
The number in parentheses after Add indicates the number of directly-connected network cameras
that have been added to the Multi-Camera Live view screens.
2.2 Adding Connections to Cameras Managed by a VAST or ST7501
Server
In the Multi-Camera Live view, tap the Menu button, then the layout edit icon to bring up the
Layout screen.
If you are starting iViewer for the first time, the add device icon will immediately appear. If you
have previously used iViewer, tap on the Menu button again in the Layout screen to bring up
options. Tap on the add device icon, then on New when it appears.
The Configuration screen will appear. Tabs at the top of the screen can be used to switch between
two panes, Camera and Server.
Tap on Server at the top of the Configuration screen to display the Server pane.
Tap in the Name field, then use the onscreen keyboard to enter the desired name. Do the same for
Address, Port, ID, and Password to enter the corresponding information.
When done, tap the Add button to confirm.
Feeds from all cameras managed by the server you have added will be available for placement in
the Multi-Screen Live view’s video cells.
You can either drag individual feeds into video cells, or tap on Add all to place all feeds in available
cells.
When you are finished, tap the Back button to save settings and return to the Multi-Camera Live
view.
IMPORTANT
If you are connecting over the Internet to a VAST/ST7501 server located behind a firewall or router:
Set port forwarding or “bypass tunnel” by mapping TCP port 3454 (for VAST access) on the
router to your VAST/ST server.
Enter the server’s public IP and port 3454 in iViewer’s Configuration screen.
If you are connecting over the Internet to individual cameras located behind a firewall or router:
Set port forwarding or “bypass tunnel” by mapping TCP port 80 (the camera’s default for
HTTP).
Enter the camera’s public IP and port 80 in iViewer’s Configuration screen.
For further details or to troubleshoot any issues, please consult your network administrator or
the documentation that came with your firewall or broadband router.
For reference, the TCP ports typically used for access to individual network cameras are listed
below:
Network General Settings
HTTPS = 443
Two-way Audio = 5060
FTP = 21
Streaming
HTTP = 80
Secondary HTTP = 8080
RTSP = 554
RTP for video = 5556
RTCP for video = 5557
RTP for audio = 5558
2.3 Editing Previously Added Camera Connections
In the Multi-Camera Live view, tap the Menu button, then the layout edit icon to bring up
options.
Tap the device list icon. A screen with two panes, Camera and Server, will be displayed.
Choose the desired pane by tapping on its title. Note that the Camera pane lists only directly
connected network cameras, and not cameras managed by any servers that have been added.
Tap the edit icon to edit the settings for the corresponding camera or server. Tap the
delete icon to remove the corresponding camera or server.
3.ViewingCameraFeedsintheMulti
CameraLiveView
When iViewer is started, the Multi-Camera Live view is the default view.
There are eight Multi-Camera Live view screens, each with a title at the top.
A series of dots under the title correspond to the eight screens, with the highlighted dot showing the current
screen.
Each Multi-Camera Live view screen has four video cells. Thus, up to 32 camera feeds can be viewed.
Swipe left and right to navigate to different screens of camera feeds.
4.ModifyingthelayoutoftheMulti
CameraLiveview
In the Multi-Camera Live view, which is displayed when you start iViewer, you can add camera feeds (see
section 4.1), remove camera feeds (see section 4.2), and change the title of a screen of camera feed (see
section 4.3). For information on editing camera connection settings, see section 2.3.
4.1 Adding camera feeds
From the Multi-Camera Live view, bring up the Layout screen by tapping the Menu button, then the
layout edit icon.
Tap the add device icon.
To add feeds from directly connected cameras, tap on All single cameras in the list. To add video
feeds from cameras connected to a server, tap on the name of the server. (See section 2 for
information on adding and configuring camera connections).
Available camera feeds will be displayed in a queue of thumbnails. Swipe left or right to view all
camera feeds if the queue extends beyond the edge of the screen.
To add a camera feed to the layout, place your finger on its thumbnail in the queue and drag it onto
a video cell. If all video cells are populated, swipe to a screen with empty video cells. You can also
tap on Add all to place all camera feeds currently in the queue in available video cells.
4.2 Removing camera feeds
From the Multi-Camera Live view, bring up the Layout screen by tapping the Menu button, then the
layout edit icon.
To remove individual feeds, tap the delete icon. To remove all camera feeds from the layout,
tap the remove all icon.
Confirm that you wish to delete the camera feed(s) in the dialog box that appears.
Tap the Back icon to save the layout and return to the Multi-Camera Live view.
4.3 Changing the title of a screen of camera feeds
From the Multi-Camera Live view, bring up the Layout screen by tapping on the Menu button, then
on the layout edit icon.
Tap on the existing title. A cursor will be placed within the text, and the onscreen keyboard will
appear.
Edit the title as desired.
5.ViewingacamerafeedintheSingle
CameraLivescreen
In the Multi-Camera Live view, double-tap on a video cell to bring up the Live Single-Camera screen with a full-
screen view of the selected camera feed.
The Single-Camera Live screen is viewable in either portrait or landscape orientation.
Six options, described below, are displayed if the Menu button is tapped.
5.1 Using PTZ
PTZ provides pan, tilt, and zoom controls for cameras, such as speed domes, with this functionality.
Use swipe and pinch gestures to pan, tilt, or zoom in/out.
NOTE
The PTZ feature is available only if the camera has a PTZ mechanical design, such a speed dome
camera.
5.2 Using ePTZ
ePTZ allows you to navigate around, and zoom in and out of specific regions of the camera’s view
by using swipe and pinch gestures. This feature is especially applicable to fisheye cameras.
Use swipe and pinch gestures to change the view angle or move to an area of interest.
NOTE
The functionality of the ePTZ feature depends on the specific camera feed displayed in iViewer. If
the camera feed’s full field of view is already displayed, zoom in and zoom out are available, but
navigation to an area of interest is not.
14

Hulp nodig? Stel uw vraag in het forum

Spelregels

Misbruik melden

Gebruikershandleiding.com neemt misbruik van zijn services uitermate serieus. U kunt hieronder aangeven waarom deze vraag ongepast is. Wij controleren de vraag en zonodig wordt deze verwijderd.

Product:

Bijvoorbeeld antisemitische inhoud, racistische inhoud, of materiaal dat gewelddadige fysieke handelingen tot gevolg kan hebben.

Bijvoorbeeld een creditcardnummer, een persoonlijk identificatienummer, of een geheim adres. E-mailadressen en volledige namen worden niet als privégegevens beschouwd.

Spelregels forum

Om tot zinvolle vragen te komen hanteren wij de volgende spelregels:

Belangrijk! Als er een antwoord wordt gegeven op uw vraag, dan is het voor de gever van het antwoord nuttig om te weten als u er wel (of niet) mee geholpen bent! Wij vragen u dus ook te reageren op een antwoord.

Belangrijk! Antwoorden worden ook per e-mail naar abonnees gestuurd. Laat uw emailadres achter op deze site, zodat u op de hoogte blijft. U krijgt dan ook andere vragen en antwoorden te zien.

Abonneren

Abonneer u voor het ontvangen van emails voor uw Vivotek IViewer for Android bij:


U ontvangt een email met instructies om u voor één of beide opties in te schrijven.


Ontvang uw handleiding per email

Vul uw emailadres in en ontvang de handleiding van Vivotek IViewer for Android in de taal/talen: Engels als bijlage per email.

De handleiding is 1,1 mb groot.


U ontvangt de handleiding per email binnen enkele minuten. Als u geen email heeft ontvangen, dan heeft u waarschijnlijk een verkeerd emailadres ingevuld of is uw mailbox te vol. Daarnaast kan het zijn dat uw internetprovider een maximum heeft aan de grootte per email. Omdat hier een handleiding wordt meegestuurd, kan het voorkomen dat de email groter is dan toegestaan bij uw provider.

Stel vragen via chat aan uw handleiding

Stel uw vraag over deze PDF

Uw handleiding is per email verstuurd. Controleer uw email

Als u niet binnen een kwartier uw email met handleiding ontvangen heeft, kan het zijn dat u een verkeerd emailadres heeft ingevuld of dat uw emailprovider een maximum grootte per email heeft ingesteld die kleiner is dan de grootte van de handleiding.

Er is een email naar u verstuurd om uw inschrijving definitief te maken.

Controleer uw email en volg de aanwijzingen op om uw inschrijving definitief te maken

U heeft geen emailadres opgegeven

Als u de handleiding per email wilt ontvangen, vul dan een geldig emailadres in.

Uw vraag is op deze pagina toegevoegd

Wilt u een email ontvangen bij een antwoord en/of nieuwe vragen? Vul dan hier uw emailadres in.


Info