476258
6
Verklein
Vergroot
Pagina terug
1/65
Pagina verder
DVR 790HD
3D Digital Camcorder
User Manual
© 2009-2011 Sakar International, Inc. All rights reserved.
Windows and the Windows logo are registered trademarks of Microsoft Corporation.
All other trademarks are the property of their respective companies.
1
Table of Contents
Introduction .................................................................................................................................. 2
What‟s Included ............................................................................................................................ 2
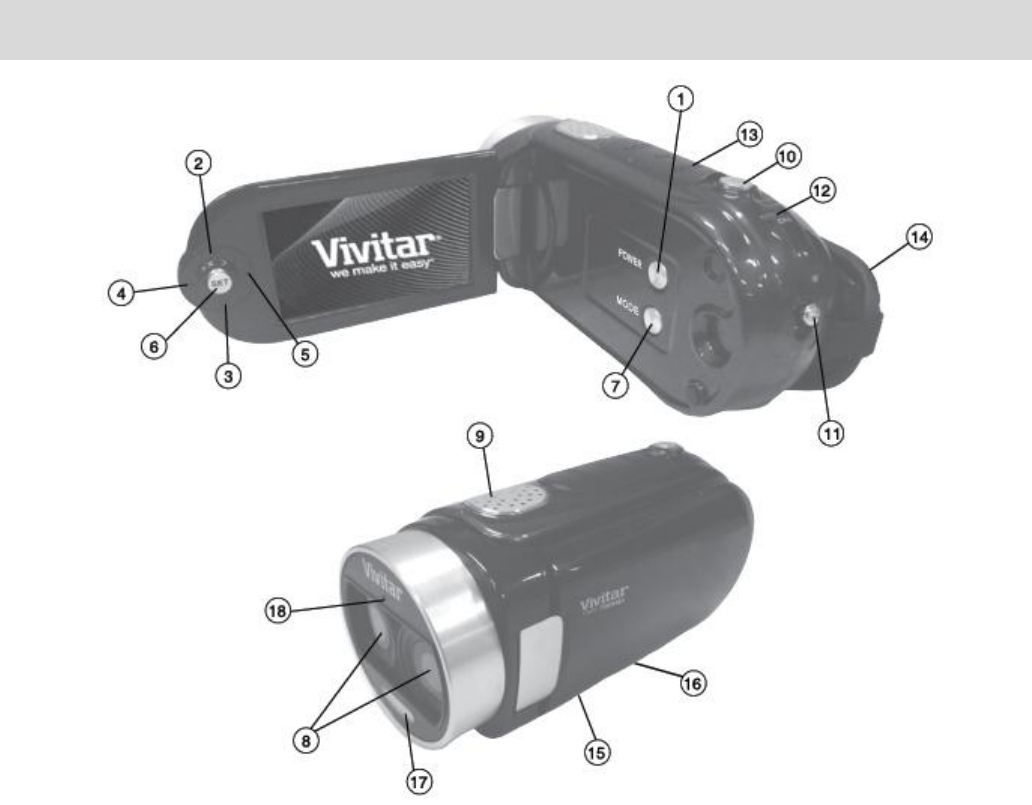
Parts of the Camera ..................................................................................................................... 3
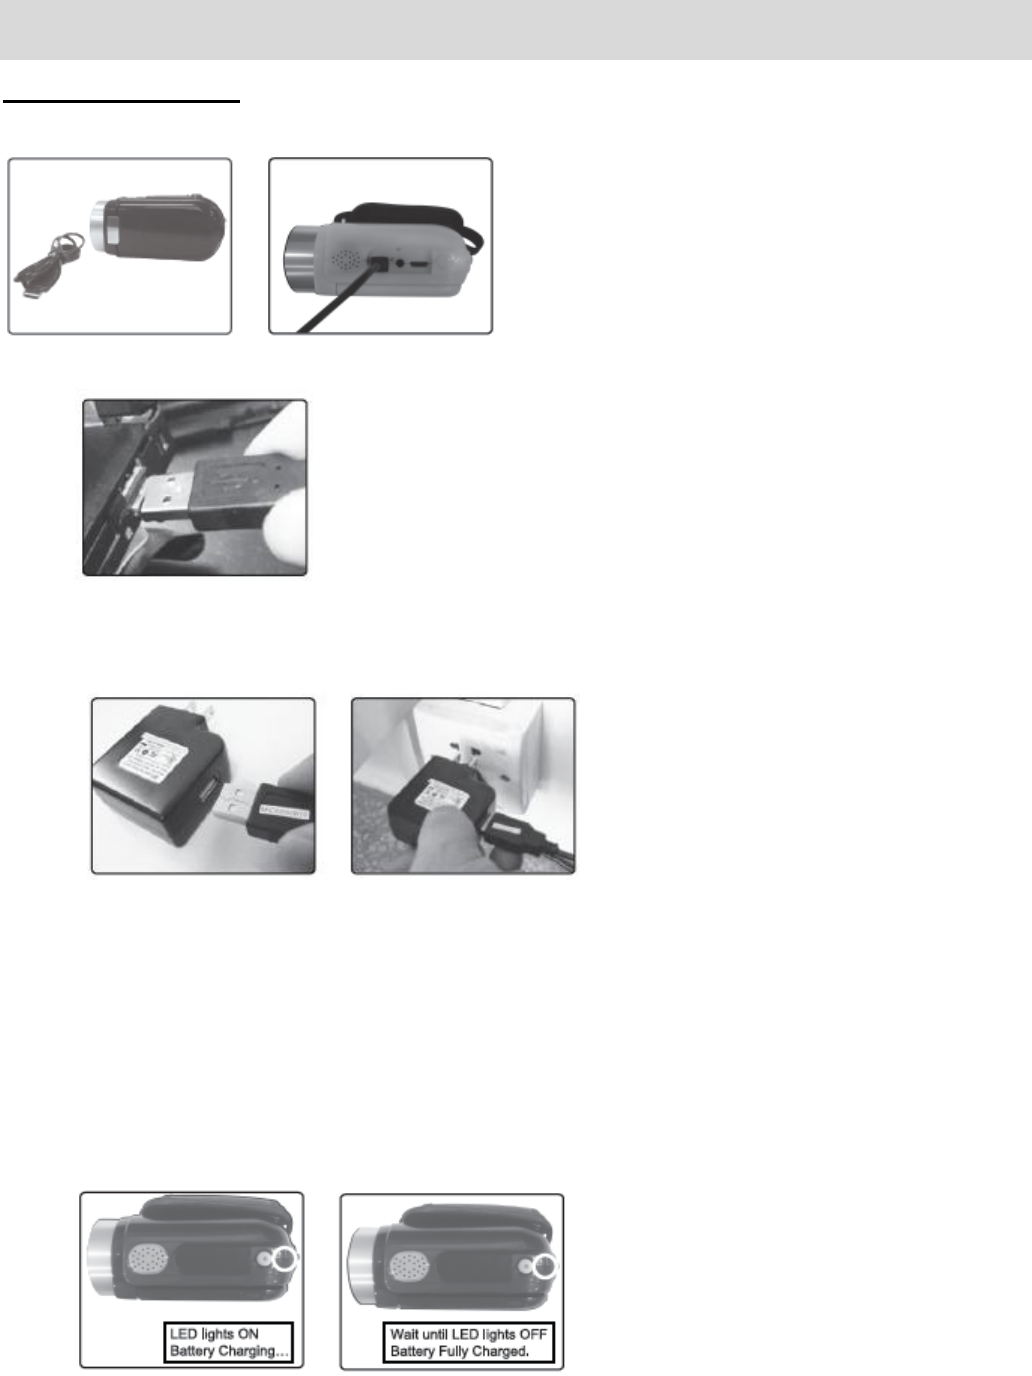
Initial Camera Setup ..................................................................................................................... 4
Main Camera Modes .................................................................................................................... 8
Camera Technical Specifications .................................................................................................. 9
Computer System Requirements ............................................................................................... 10
Powering the Camera On/Off ...................................................................................................... 11
Changing Camcorder Mode ....................................................................................................... 12
Navigating the Menus ................................................................................................................. 13
Video Capture Mode .................................................................................................................. 14
Video Playback Mode ................................................................................................................. 28
Photo Capture Mode .................................................................................................................. 33
Photo Playback Mode ................................................................................................................ 49
Connecting the Camcorder to a TV and HDTV .......................................................................... 55
Installing the Software ................................................................................................................ 57
Connecting the Camcorder to the Computer .............................................................................. 58
Getting Photos and Videos from your Camera to Your Computer .............................................. 59
Get Started! ................................................................................................................................ 60
Transferring Images from my Camera to my Computer Manually .............................................. 60
Camera Maintenance ................................................................................................................. 62
Sakar Warranty Card .................................................................................................................. 62
Technical Support ....................................................................................................................... 63
Troubleshooting .......................................................................................................................... 63
2
Introduction
Thank you for purchasing this camera. Everything you need to take quality digital photos and
videos is included with your camera.
Vivitar makes capturing those special moments as easy as possible.
Please read this manual carefully first in order to get the most out of your digital camcorder.
Note: Your camera needs an SD Memory card (up to 32GB) for normal use.
SD Memory cards are not included and need to be purchased separately.
What’s Included
1. Digital camcorder
2. USB cable
3. Vivitar Experience Image Manager
Software Installation CD
4. AC Adapter
5. AV Cable
6. 3D Glasses
7. Built-in Lithium-Ion
Battery (not shown)
Note: SD Memory Card not included.
3
Parts of the Camera
1. Power Button
10. Shutter Button
2. 2D/3D/Up/Slide Show Button
11. Zoom Out / Zoom In
3. Delete / Down Button
12. Indicator Light
4. LED On-Off / Left Button
13. USB / AV / HDMI Slot
5. ViviLink / Right Button
14. Hand Strap
6. SET / MENU Button
15. Tripod Mount
7. MODE Button
16. SD Memory Card Slot
8. Digital Lens
17. LED Light
9. Speaker
18. Microphone
4
Initial Camera Setup
Charging the Battery
To charge your battery, first connect the USB Cable to your camera.
Then follow one of the steps below:
A)
- Connect one end of the USB cable into the USB port on your camera.
- Connect the other end of the USB cable to the USB port on your computer.
B)
Charge the battery using the USB connection cable (included) and the AC Adapter
(included).
- Connect one end of the USB cable into the USB port on your camera.
- Connect the other end to the AC Adapter and then plug the AC Adapter into a power
socket.
NOTE: While charging the battery, the LED light turns on. The battery is fully charged
when the LED light turns off.
5
Battery Power:
Some features, such as Flash, will not work if the battery power level is low.
When the battery power is low the battery icon turns red and the camera will
automatically turn off a few seconds later.
The energy status of the power is displayed on LCD as shown below:
Full battery power Medium battery power Low battery power
Installing the Memory Card
Make sure an SD card has been properly inserted into
your camera. (SD card not included.)
To properly insert the SD Card:
Push the SD card into the slot in the direction shown on
the camera (see SD icon by the SD card slot). Push the
SD card until you hear a slight clicking sound. This
indicates the SD card has been inserted correctly.
Note:
After the camera is powered on, an SD icon will appear on the LCD display. If you do not see
the SD icon on the display, please check if the card was inserted properly.
Make sure the SD card is not locked (check the lock switch on the side of the SD card). If the SD
card is locked this will prevent the camera from saving captured photos to the SD card.
6

Hulp nodig? Stel uw vraag in het forum

Spelregels

Misbruik melden

Gebruikershandleiding.com neemt misbruik van zijn services uitermate serieus. U kunt hieronder aangeven waarom deze vraag ongepast is. Wij controleren de vraag en zonodig wordt deze verwijderd.

Product:

Bijvoorbeeld antisemitische inhoud, racistische inhoud, of materiaal dat gewelddadige fysieke handelingen tot gevolg kan hebben.

Bijvoorbeeld een creditcardnummer, een persoonlijk identificatienummer, of een geheim adres. E-mailadressen en volledige namen worden niet als privégegevens beschouwd.

Spelregels forum

Om tot zinvolle vragen te komen hanteren wij de volgende spelregels:

Belangrijk! Als er een antwoord wordt gegeven op uw vraag, dan is het voor de gever van het antwoord nuttig om te weten als u er wel (of niet) mee geholpen bent! Wij vragen u dus ook te reageren op een antwoord.

Belangrijk! Antwoorden worden ook per e-mail naar abonnees gestuurd. Laat uw emailadres achter op deze site, zodat u op de hoogte blijft. U krijgt dan ook andere vragen en antwoorden te zien.

Abonneren

Abonneer u voor het ontvangen van emails voor uw Vivitar DVR 790HD bij:


U ontvangt een email met instructies om u voor één of beide opties in te schrijven.


Ontvang uw handleiding per email

Vul uw emailadres in en ontvang de handleiding van Vivitar DVR 790HD in de taal/talen: Engels als bijlage per email.

De handleiding is 1,69 mb groot.


U ontvangt de handleiding per email binnen enkele minuten. Als u geen email heeft ontvangen, dan heeft u waarschijnlijk een verkeerd emailadres ingevuld of is uw mailbox te vol. Daarnaast kan het zijn dat uw internetprovider een maximum heeft aan de grootte per email. Omdat hier een handleiding wordt meegestuurd, kan het voorkomen dat de email groter is dan toegestaan bij uw provider.

Stel vragen via chat aan uw handleiding

Stel uw vraag over deze PDF

Uw handleiding is per email verstuurd. Controleer uw email

Als u niet binnen een kwartier uw email met handleiding ontvangen heeft, kan het zijn dat u een verkeerd emailadres heeft ingevuld of dat uw emailprovider een maximum grootte per email heeft ingesteld die kleiner is dan de grootte van de handleiding.

Er is een email naar u verstuurd om uw inschrijving definitief te maken.

Controleer uw email en volg de aanwijzingen op om uw inschrijving definitief te maken

U heeft geen emailadres opgegeven

Als u de handleiding per email wilt ontvangen, vul dan een geldig emailadres in.

Uw vraag is op deze pagina toegevoegd

Wilt u een email ontvangen bij een antwoord en/of nieuwe vragen? Vul dan hier uw emailadres in.


Info