Remote control Specifications ......................................................... 2
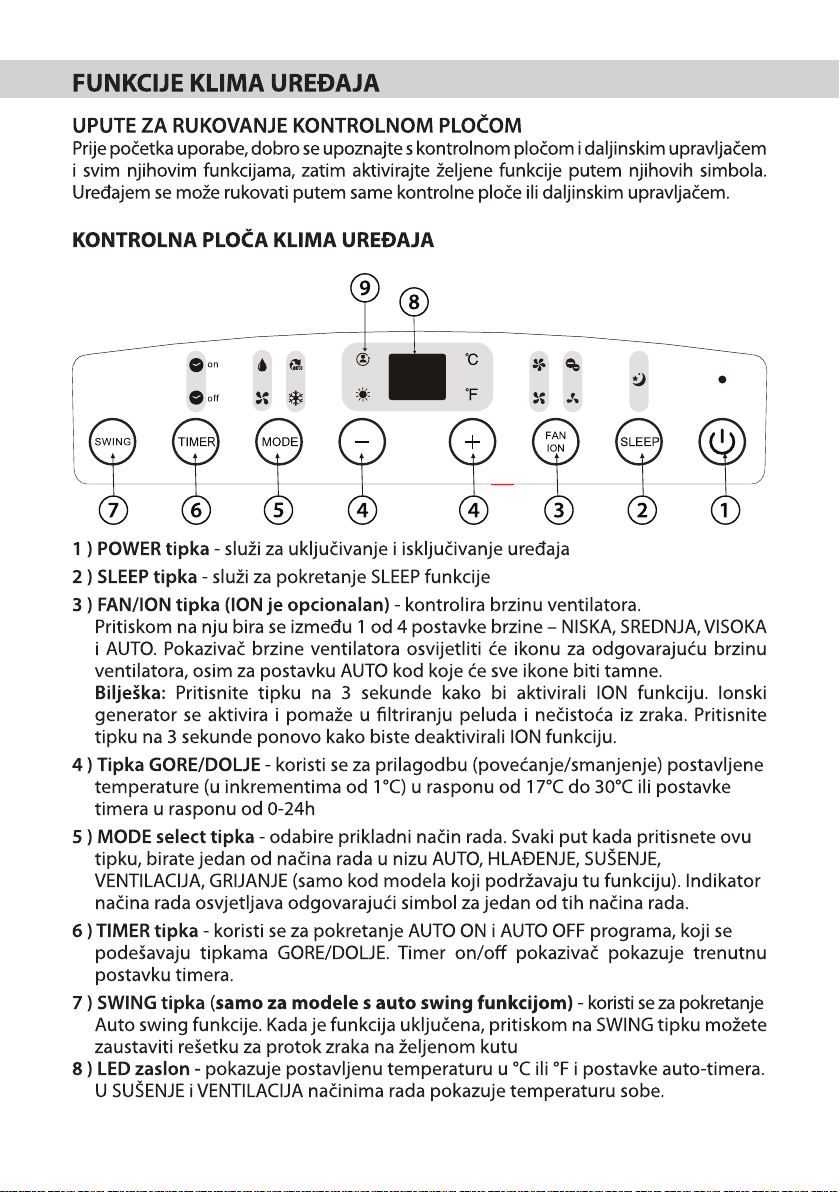
Function buttons.............................................................................. 3
Handling the remote control ............................................................ 4
Remote LED screen indicators ........................................................ 6
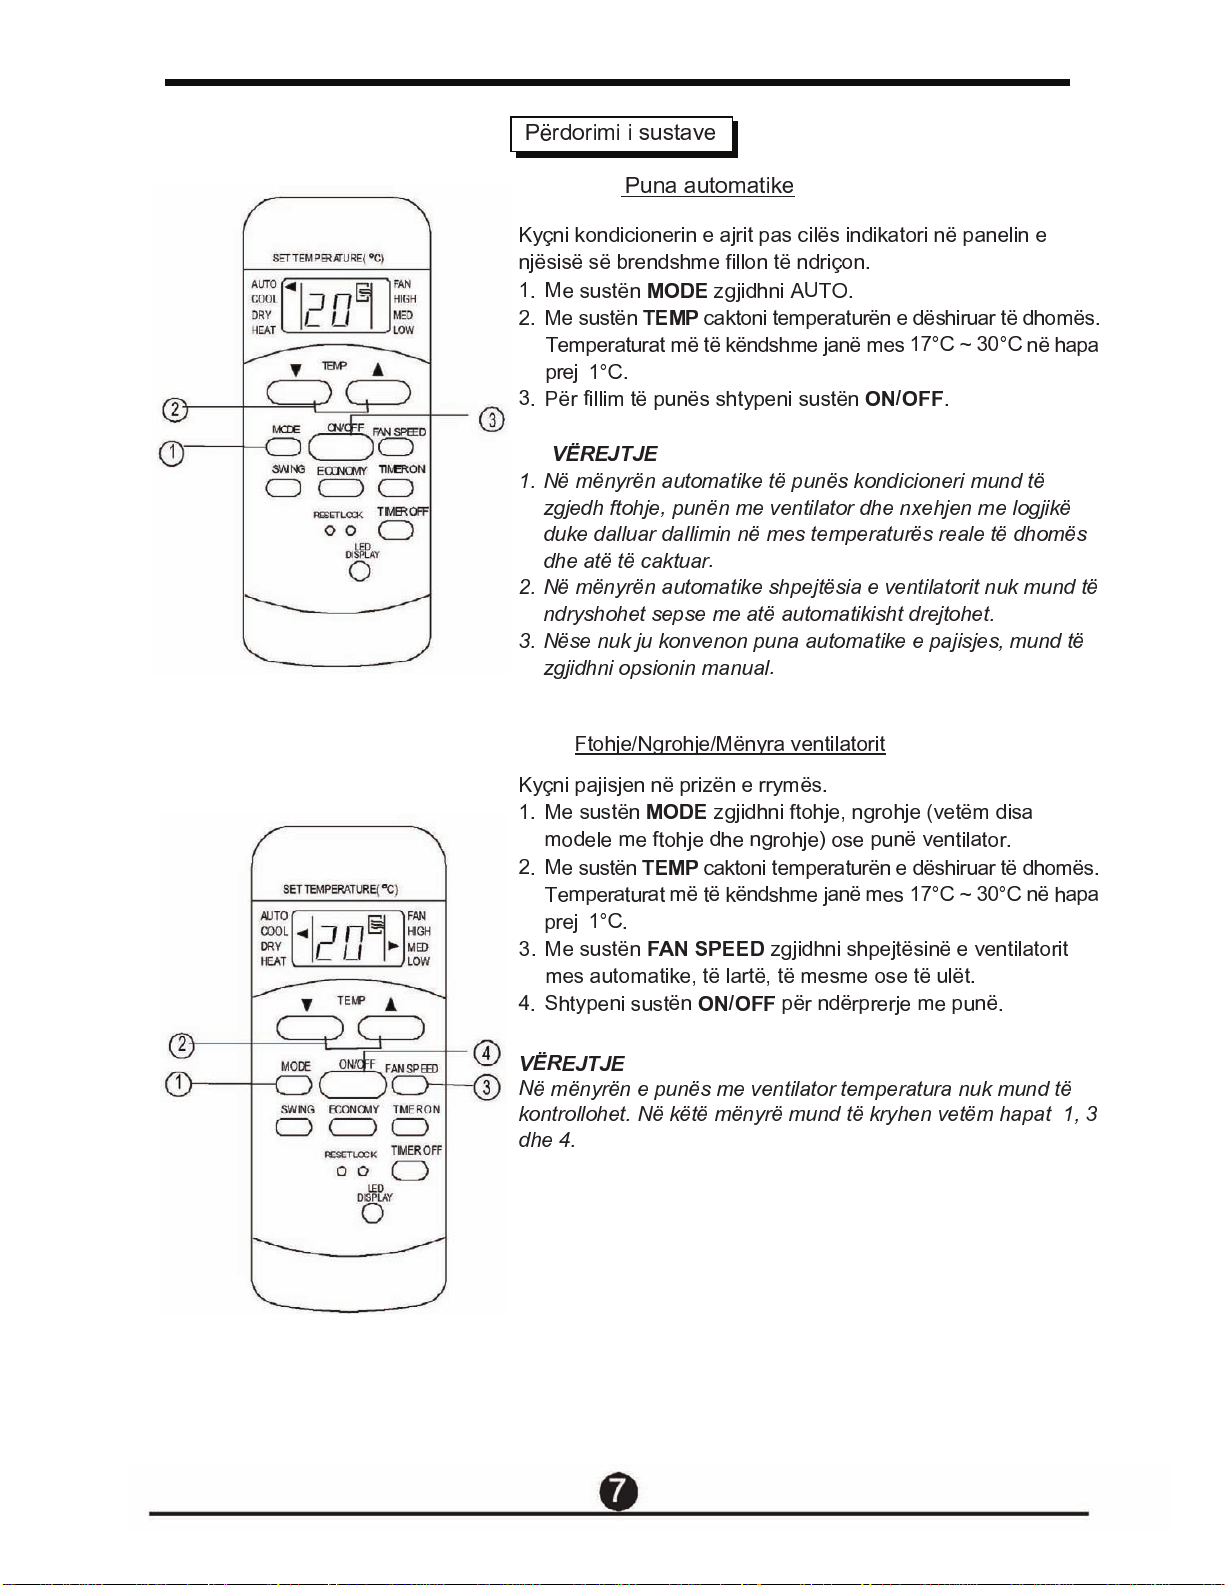
How to use the basic functions ........................................................ 7
How to use the advanced functions ...............................................14
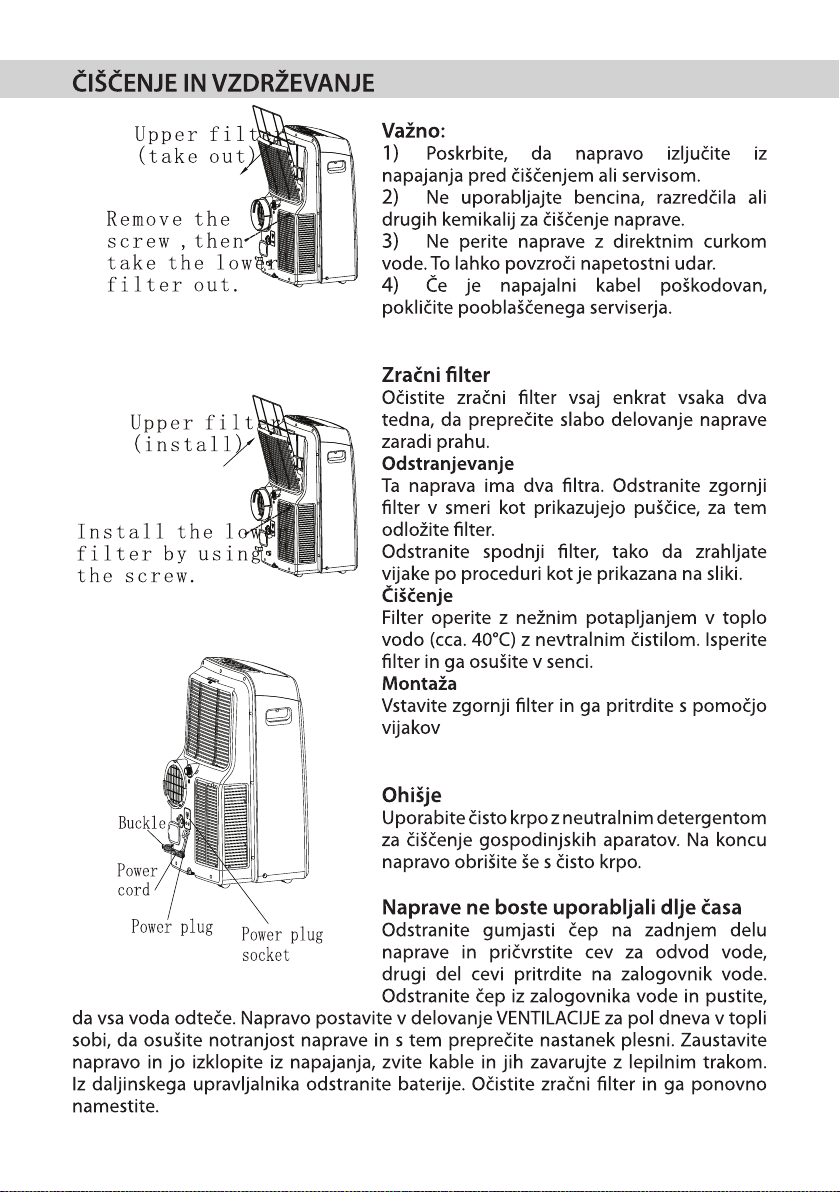
2
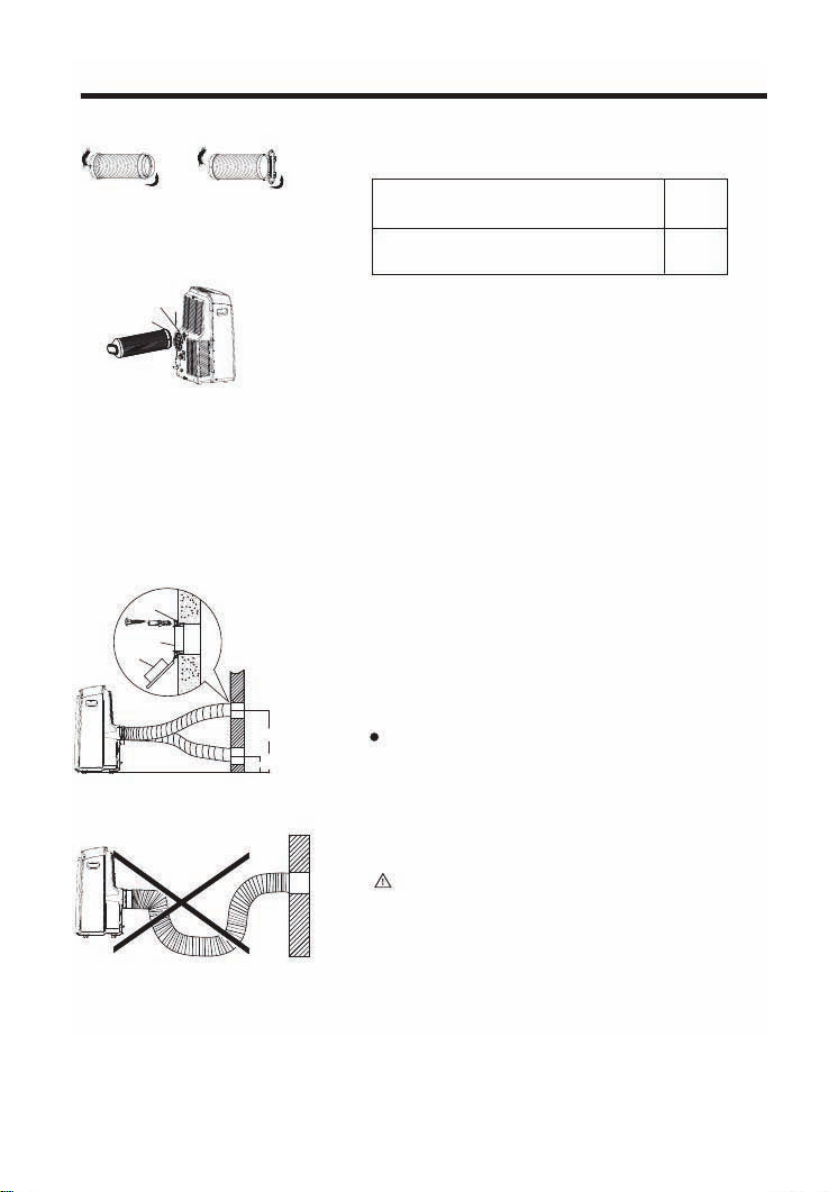
Remote control Specifications
Model
RG57H(B)/BG(C)E;
RG57H1(B)/BG(C)E;
RG57H2(B)/BG(C)EF;
RG57H3(B)/BG(C)EF;
RG57H1(B)/BG(C)EM;
RG57H(B)/BG(C)EU1
Rated Voltage
3.0V(Dry batteries R03/LR03x2)
Signal Receiving Range
8m
Enviroment
-5°C~60°C(23°F~140°F)
RG57H(B)/BG(C)E
RG57H1(B)/BG(C)E;
RG57H2(B)/BG(C)EF
RG57H3(B)/BG(C)EF
RG57H(B)/BG(C)EU1
RG57H1(B)/BG(C)E-M
3
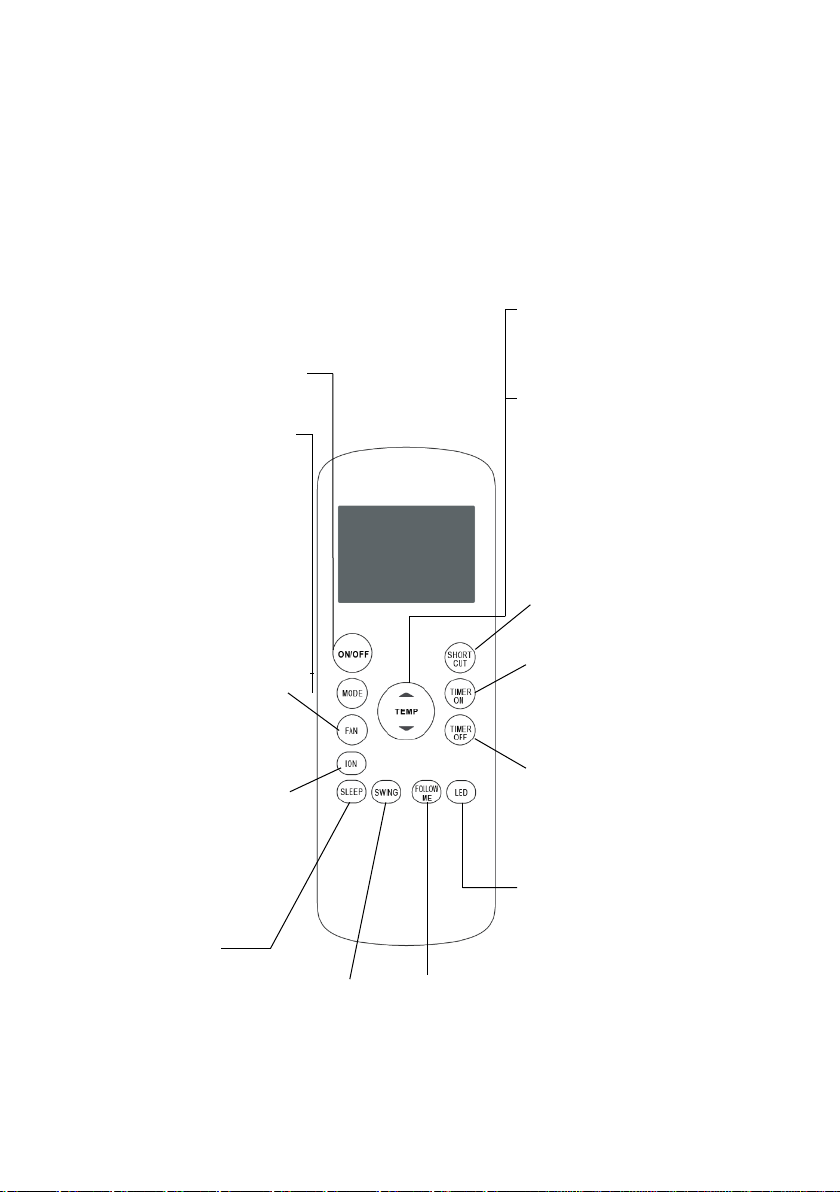
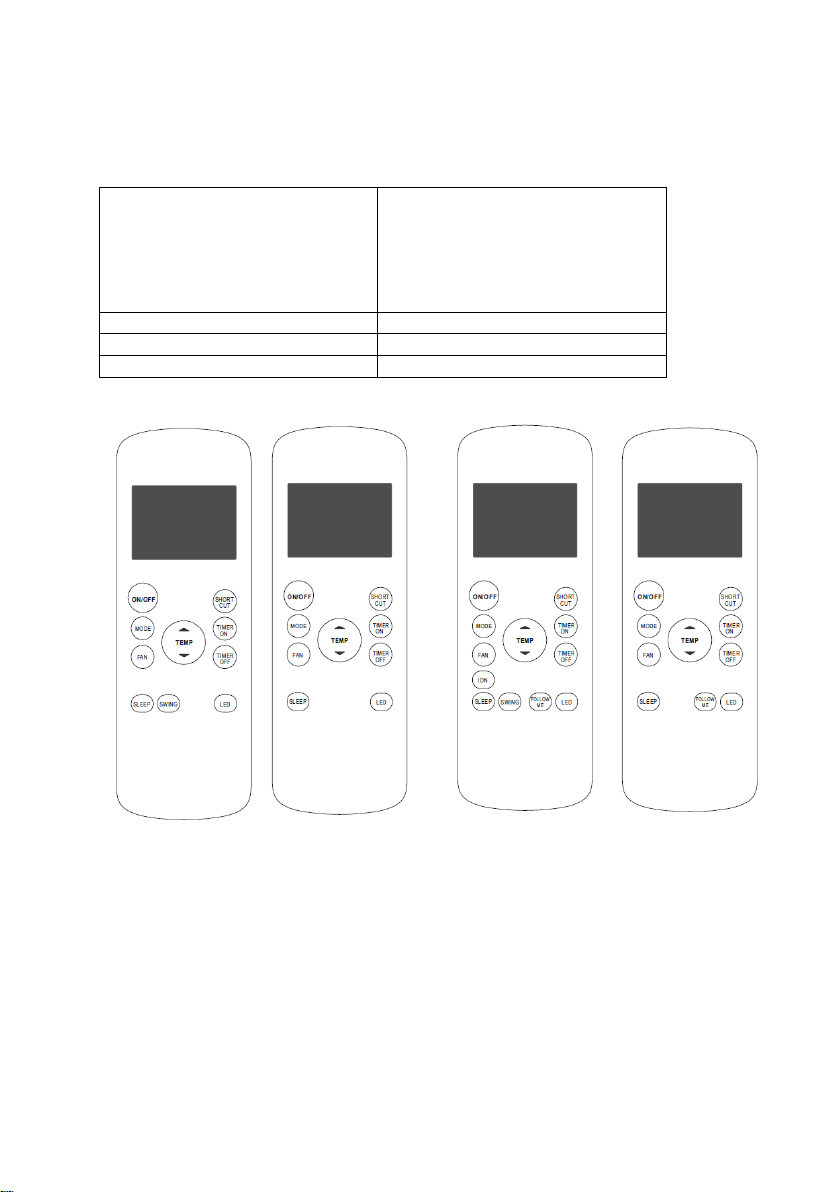
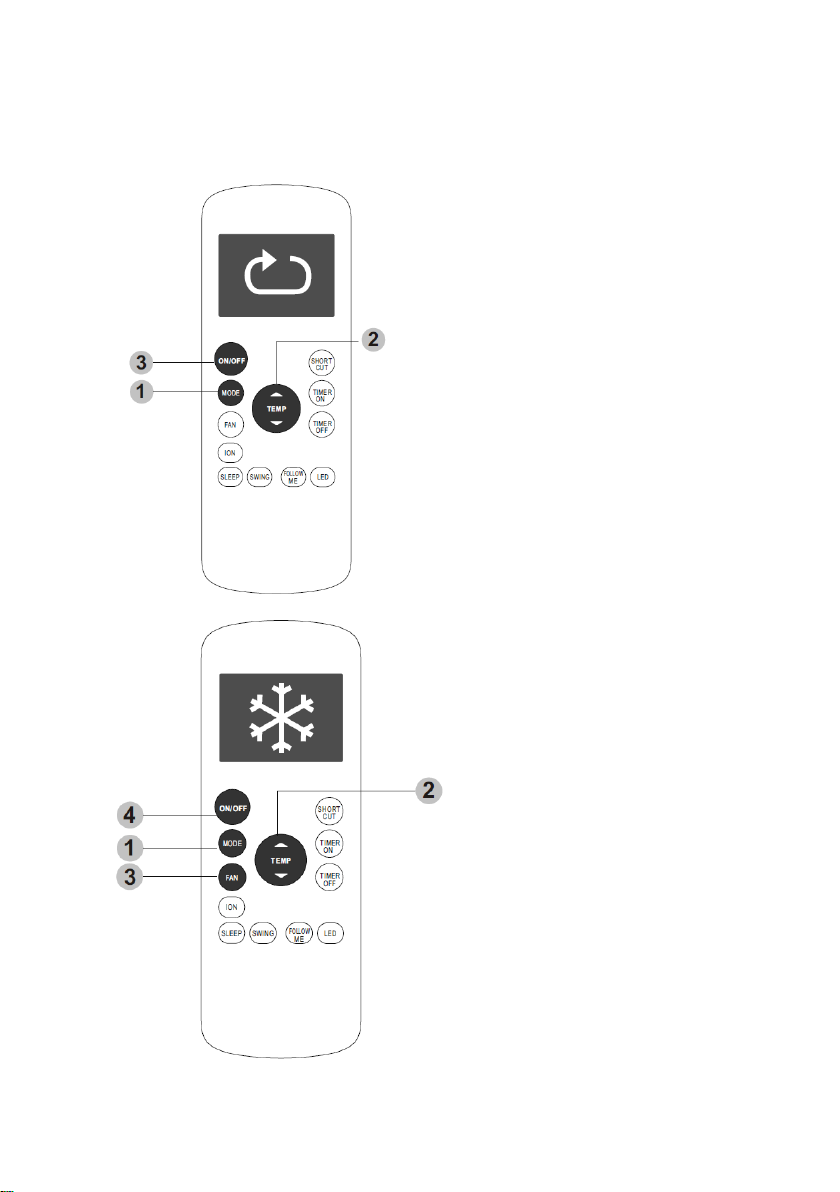
Function buttons
Before you begin using your new air conditioner, make sure to familiarize yourself
with its remote control. The following is a brief introduction to the remote control
itself. For instructions on how to operate your air conditioner, refer to the How to
Use Basic Functions section of this manual.
SHORT CUT
Sets and activates your
favorite pre-settings.
TEMP
Increases temperate in 1°C(1°F)
increments. Max. temperature is
30°C(86°F).
TIMER ON
Sets timer to turn unit on (see
How to UseBasic
Functions for instructions)
TIMER OFF
Sets timer to turn unit
off (see How to Use
Basic Functions for
instructions
LED
Turns indoor unit's LED
display on and off. If you are
sensitive to light when you go
to sleep, you can press the
LED button to turn off the LED
display on the unit. Press the
button again to turn it back on.
TEMP
Decreases temperate in
1°C(1°F)
increments. Min. temperature is
17°C(62°F).
NOTE: Press and hold and
buttons together for 3 seconds
will alternate the temperature
display between the OC & OF
scale.
FOLLOW ME
Temperature
sensing
and room
temperature
display button.
SWING
Starts and
stops louver
movement.
SLEEP
Saves energy
during sleeping
hours.
ION
Press this button, the
Ionizer is energized
And Will help to remove
Pollen and impurities
from the air.
FAN SPEED
Selects fan speeds in
the following order:
AUTO LOW
MED HIGH
ON/OFF
Turns the unit on or off.
MODE
Scrolls through operation
modes as follows:
AUTO COOL DRY
HEAT FAN
NOTE:
Please do not select
HEAT mode if the
machine you purchased
is cooling only type.
Heat mode is not
Supported by the
cooling only appliance.
NOTE:
Swing, Ion and Follow me features are optional. RG57H1(B)/BG(C)E-M without med fan speed.
4
Handling the remote control
NOT SURE WHAT A FUNCTION DOES?
Refer to the How to Use Basic Functions and How to Use Advanced Functions
sections of this manual for a detailed description of how to use your air
conditioner.
SPECIAL NOTE
• Button designs on your unit may differ slightly from the example shown.
• If the unit does not have a particular function, pressing that function' s button
on the remote control will have no effect.
• When there are wide differences between " Remote control Illustration » and "
USER'S MANUAL" on function description, the description of " USER'S
MANUAL" shall prevail
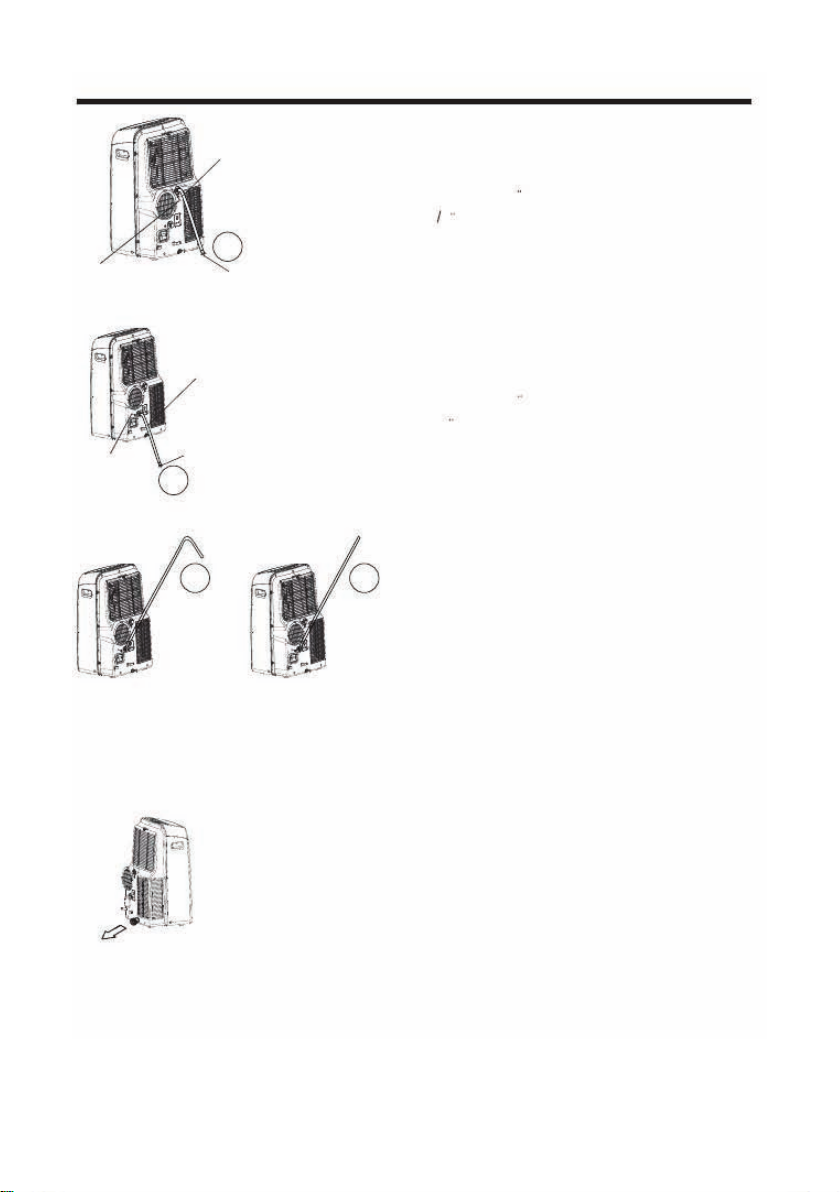
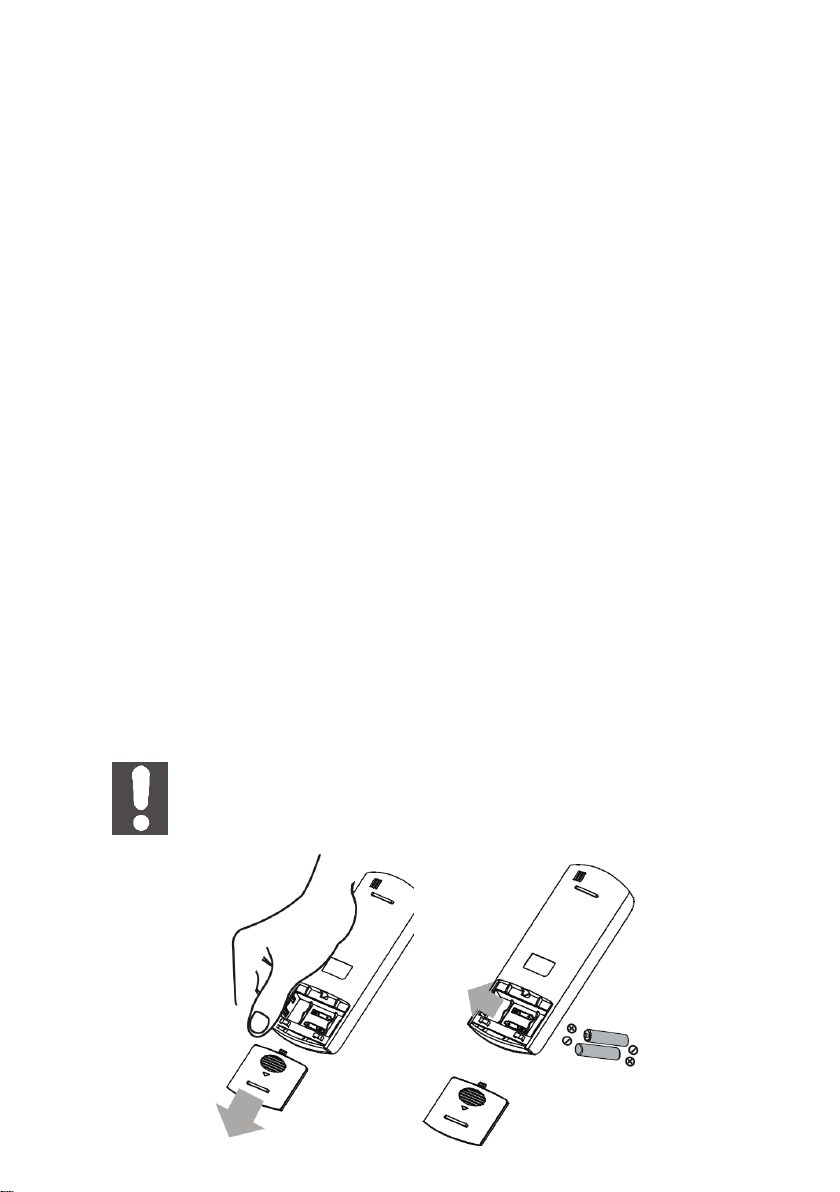
Inserting and Replacing Batteries
Your air conditioning unit comes with two AAA batteries. Put the batteries in the
remote control before use.
1.Slide the back cover from the remote Control downward, exposing the
battery compartment.
2.Insert the batteries, paying attention to match up the (+) and (-) ends of the
batteries with the symbols inside the battery compartment.
3.Slide the battery cover back into place.
BATTERY NOTES
For optimum product performance:
•Do not mix old and new batteries, or batteries of different types.
•Do not leave batteries in the remote control if you don' t plan on
using the device for more than 2 months.
5
BATTERY DISPOSAL
Do not dispose of batteries as unsorted municipal waste. Refer to
local laws for proper disposal of batteries.
TIPS FOR USING REMOTE CONTROL
•The remote control must be used within 8 meters of the unit.
•The unit will beep when remote signal is received.
•Curtains, other materials and direct sunlight can interfere with the infrared
signal receiver.
•Remove batteries if the remote will not be used more than 2 months.
6
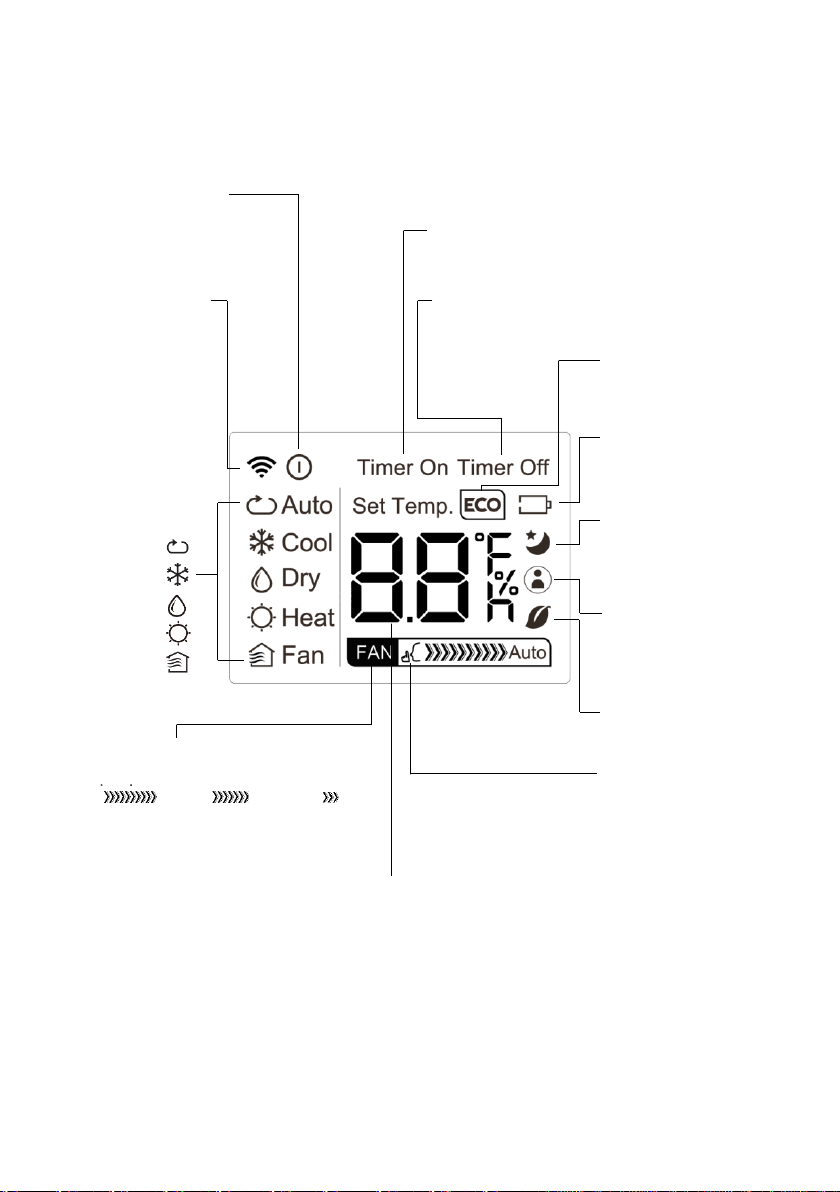
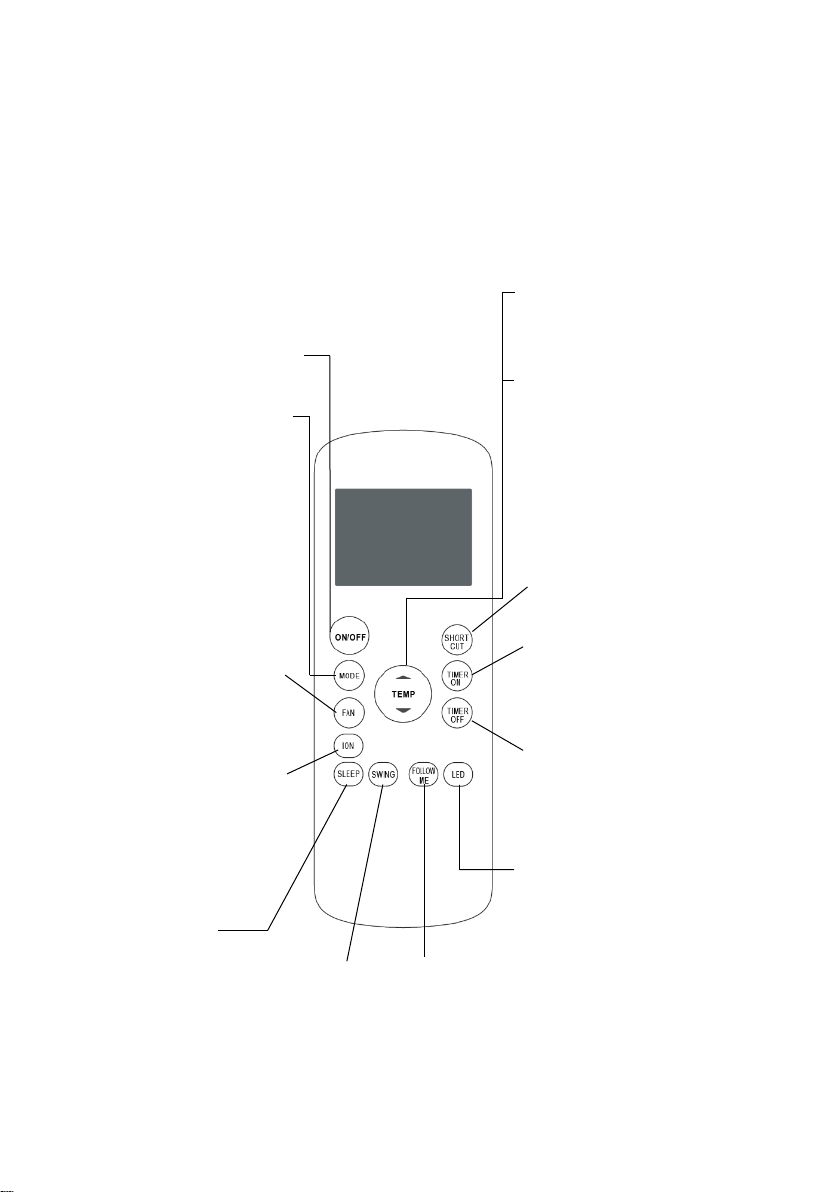
Remote LED screen indicators
FOLLOW ME display
Indicates that
the FOLLOW ME
function is on
Transmission
indicator
Lights up when
remote sends
signal to unit
ON/OFF display
Appears when the unit is
turned on, and disappears
when it is turned off
TIMER ON display
Displays when TIMER
ON is set
TIMER OFF display
Displays when TIMER
OFF is set
ECO display
Not available for
this unit
Battery display
Low battery
detection
SLEEP display
Displays when
SLEEP function
is activated
Not available for
this unit
SILENT display
Not available for
this unit
FAN SPEED display
Displays selected FAN SPEED:
MODE display
Displays the
current mode,
including:
AUTO
COOL
DRY
HEAT
FAN
Temperature/Timer display
Displays the set temperature by default, or timer setting
when using TIMER ON/OFF functions
Temperature range: 17-30°C(62°F-86°F)
Timer setting range: 0-24 hours
This display is blank when operating in FAN mode.
HIGH,
MED, or
LOW
This display is blank when
set to AUTO speed.
7
How to use the basic functions
SETTING TEMPERATURE
The operating temperature range for units is
17-30°C(62°F-86F°). You can increase or
decrease the set temperature in 1°C(1°F)
increments.
AUTO operation
In AUTO mode, the unit will automatically
select the COOL, FAN, HEAT or DRY mode
based on the set temperature.
1. Press the MODE button to select Auto
mode.
2. Set your desired temperature using the
Temp ▼ or ▲Temp button.
3. Press the ON/OFF button to start the unit.
NOTE: FAN SPEED can't be set in Auto
mode
Cool operation
1. Press the MODE button to select
COOL mode.
2. Set your desired temperature
using the Temp ▲ or Temp
▼button.
3. Press the FAN button to select
ThE fan speed: AUTO, LOW,
MED,or HIGH.
4. Press the ON/OFF button to start
the unit.
8
Dry operation (dehumidifying)
1. Press the MODE button to select DRY
mode.
2. Set your desired temperature using the
Temp ▲ or Temp▼
3. Press the ON/OFF button to start the
unit.
NOTE: FAN SPEED can't be set in DRY
mode
FAN operation
1. Press the MODE button to select FAN
mode.
2. Press FAN button to select the fan
speed: AUTO, LOW, MED or HIGH.
3. Press the ON/OFF button to start the
unit.
NOTE: You can't set temperature in FAN
mode. As a result, your remote control's LCD
screen will not display temperature.
9
HEAT operation
1. Press the MODE button to
select HEAT mode.
2. Set your desired temperature
using the Temp ▲ or Temp▼
button.
3. Press the FAN button to select
the fan speed: AUTO, LOW,
MED,or HIGH.
4. Press the ON/OFF button to
start the unit.
NOTE: As outdoor temperature
drops,the performance of your
unit's HEAT function may be
affected. In such instances, we
recommend using this air
conditioner in conjunction with
other heating appliance
10
Setting the TIMER function
Your air conditioning unit has two timer-related functions: TIMER ON- sets the
amount of timer after which the unit will automatically turn on. TIMER OFF- sets the
amount of time after which the unit will automatically turn off.
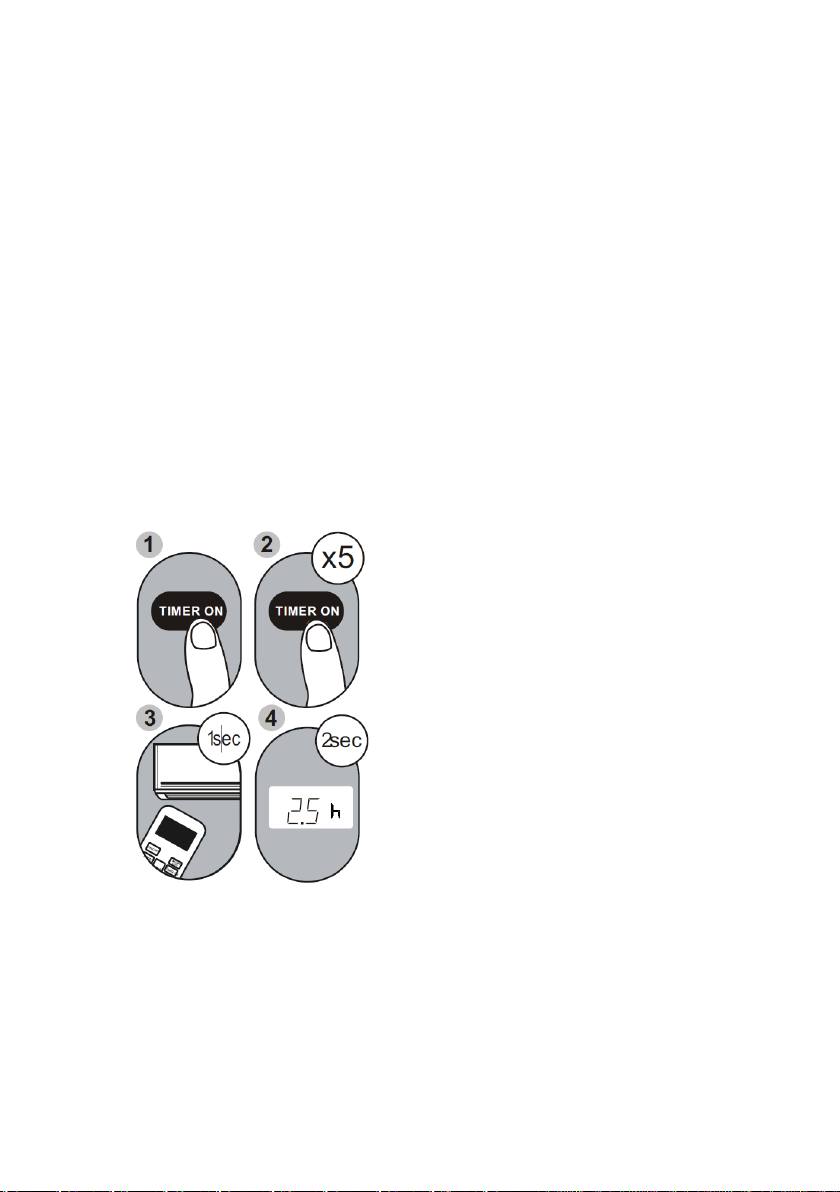
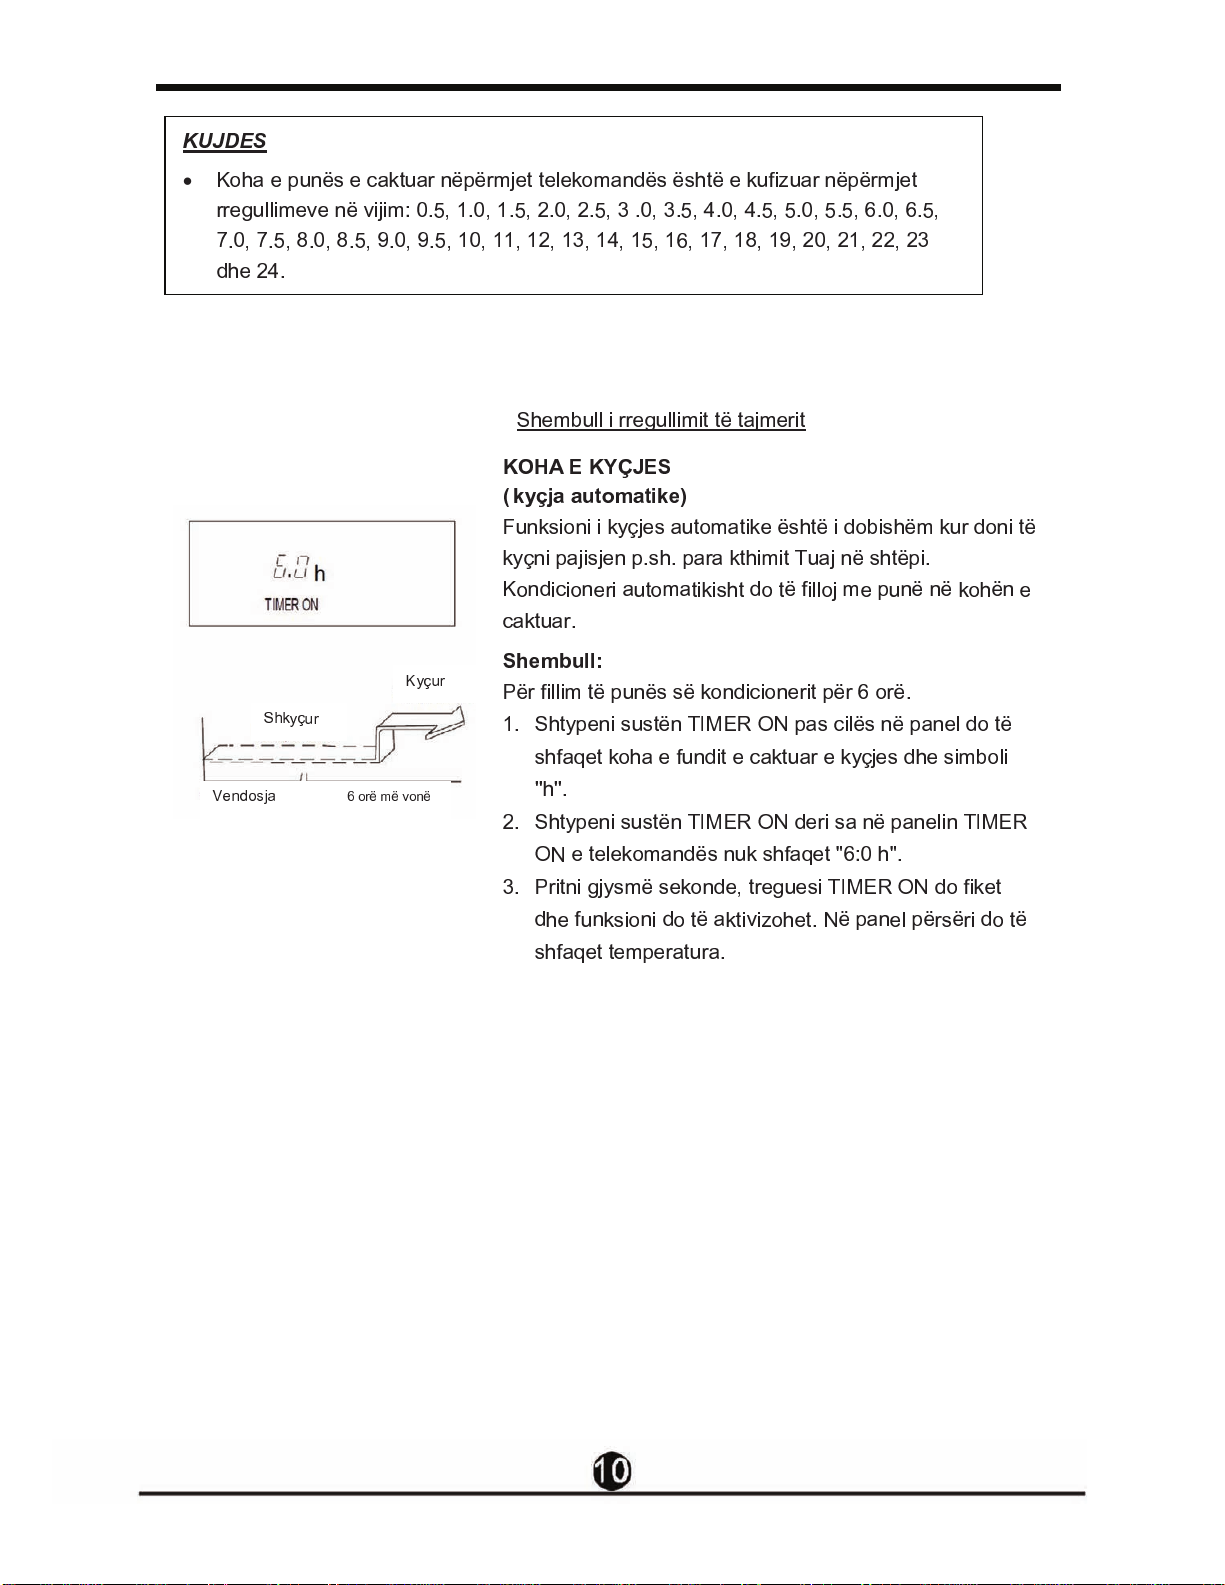
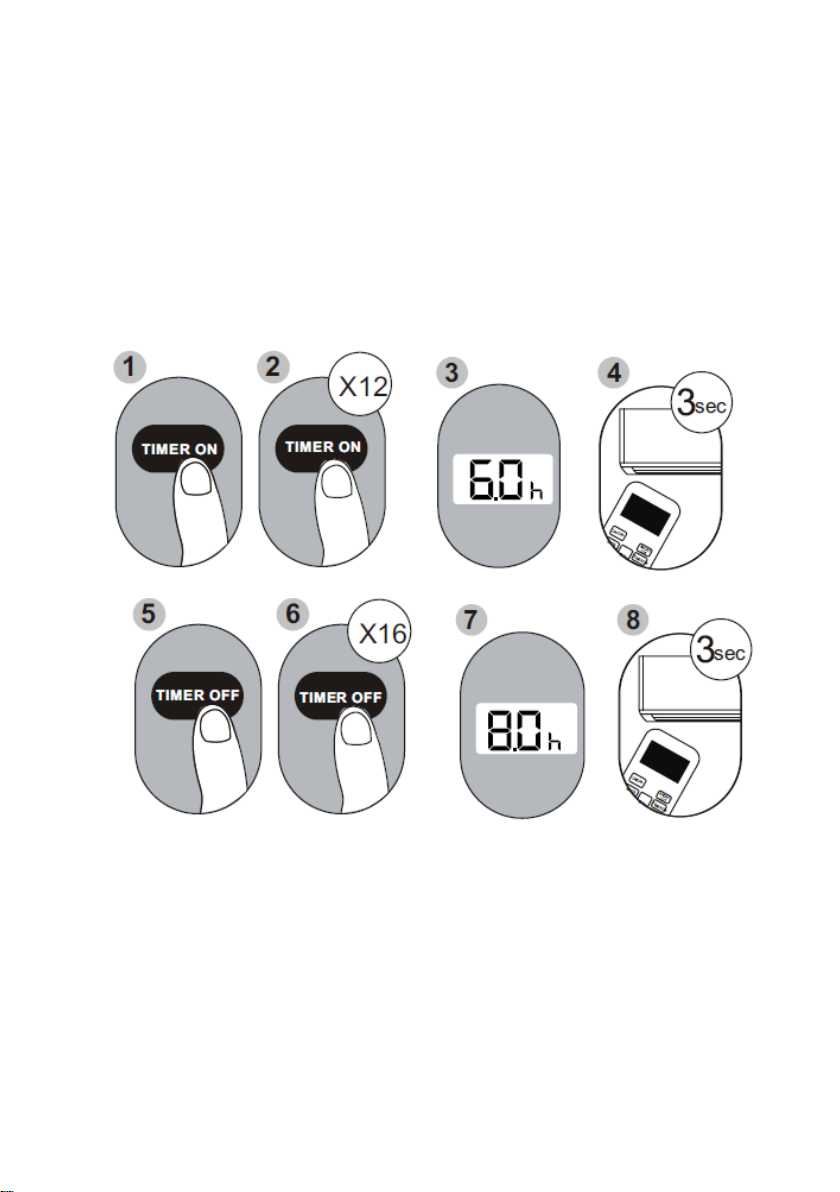
TIMER ON function
The TIMER ON function allows you to set a period of time after which the unit will
automatically turn on, such as when you come home from work.
1.Press the TIMER ON button. By default, the last time period that you
set and an "h" (indicating hours)will appear on the display.
Note: This number indicates the amount of time after the current time that you
want the unit to turn on. For example, if you set TIMER ON for 2 hours, " 2.0h "
will appear on the screen, and the unit will turn on after 2 hours.
2.Press the TIMER ON button repeatedly to set the time when you want the unit to
turn on.
3.Wait 2 seconds, then the TIMER ON function will be activated. The digital display
on your remote control will then return to the temperature display.
Example: Setting unit to turn on after 2.5
hours.
11
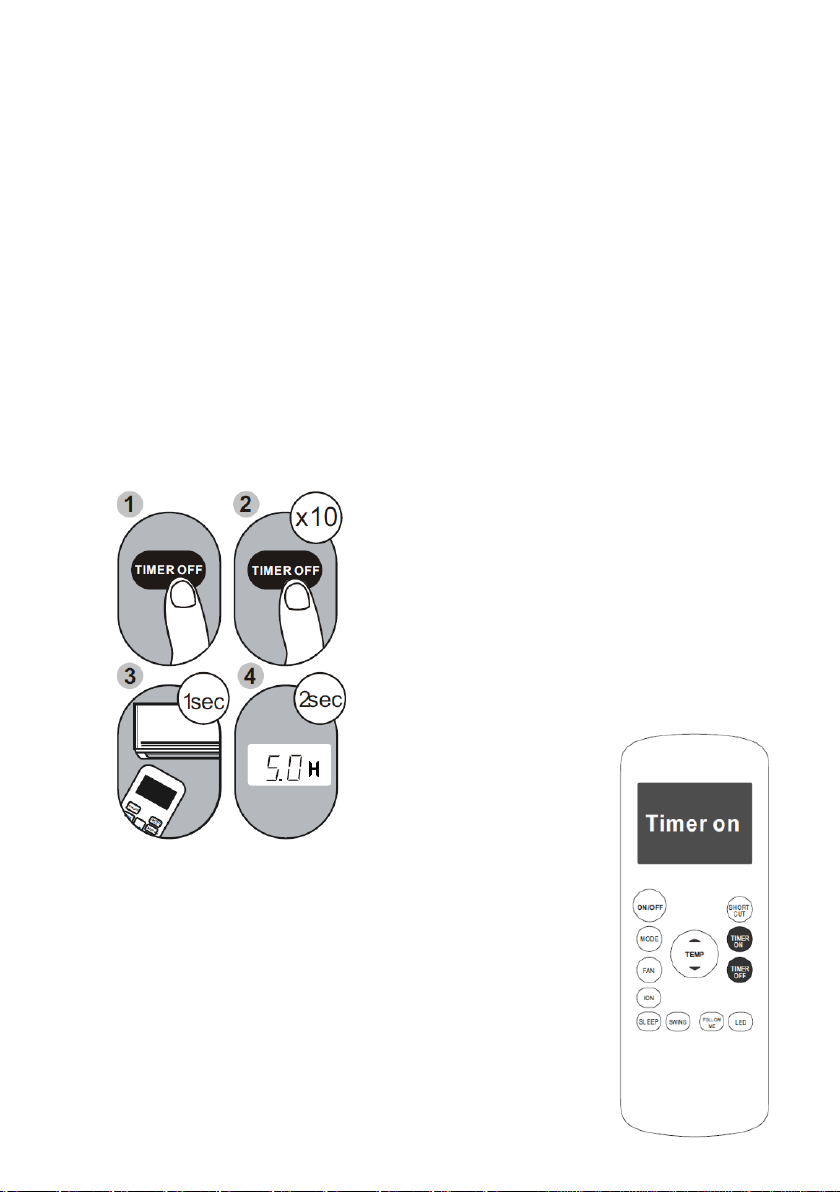
TIMER OFF function
The TIMER OFF function allows you to set a period of time after which the unit will
automatically turn off, such as when you wake up.
1.Press the TIMER OFF button. By default, the last time period that you set and an
"h" (indicating hours) will appear on the display.
Note: This number indicates the amount of time after the current time that you want
the unit to turn off. For example, if you set TIMER OFF for 2 hours, " 2.0h " will
appear on the screen, and the unit will turn off after 2 hours.
2.Press the TIMER OFF button repeatedly to set the time when you want the unit to
turn off.
3. Wait 2 seconds, then the TIMER OFF function will be activated. The digital
display on your remote control will then return to the temperature display.
Example: Setting unit to turn on after 5 hours.
NOTE: When setting the TIMER ON or TIMER
OFF functions, up to 10 hours, the time will
increase in 30 minute increments with each press.
After 10 hours and up to 24, it will increase in 1
hour increments. The timer will revert to zero after
24 hours. You can turn off either function by
setting its timer to " 0.0h ".
Continue to press
TIMER ONor
TIMER OFF until
desired time is
reached.
12
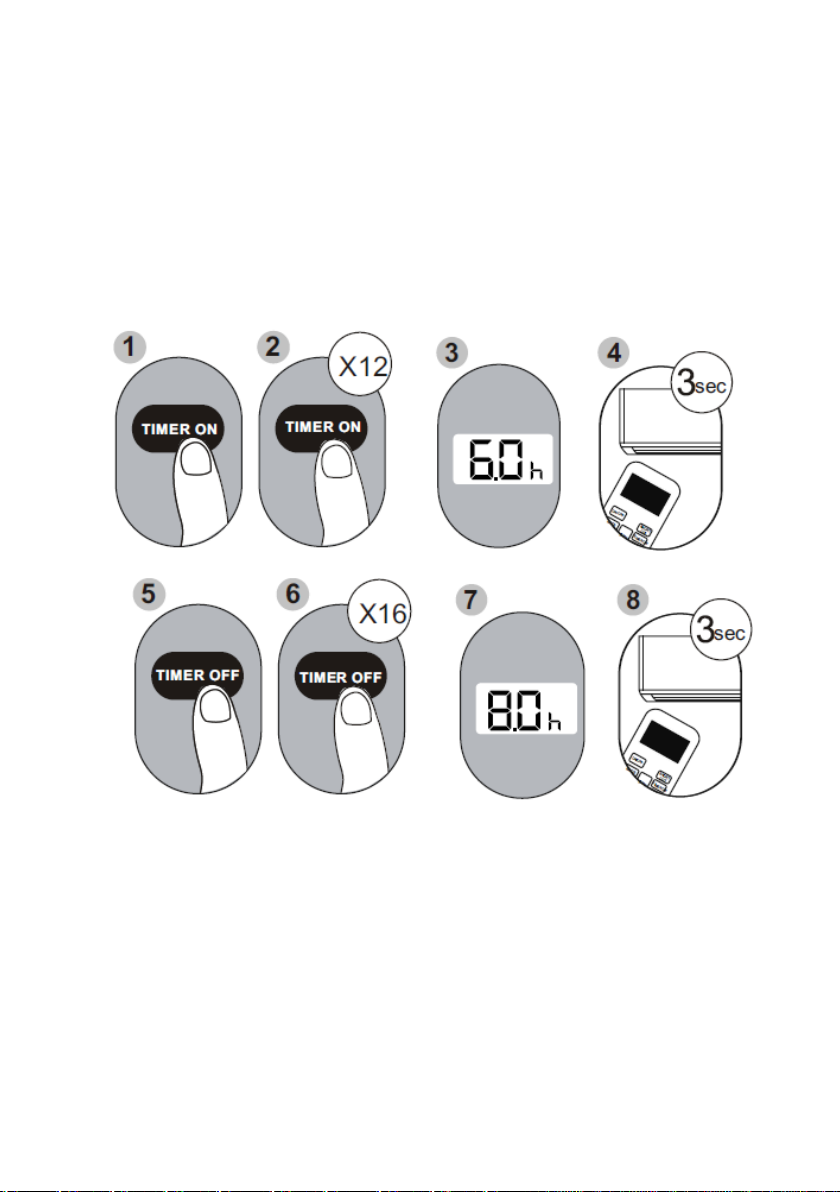
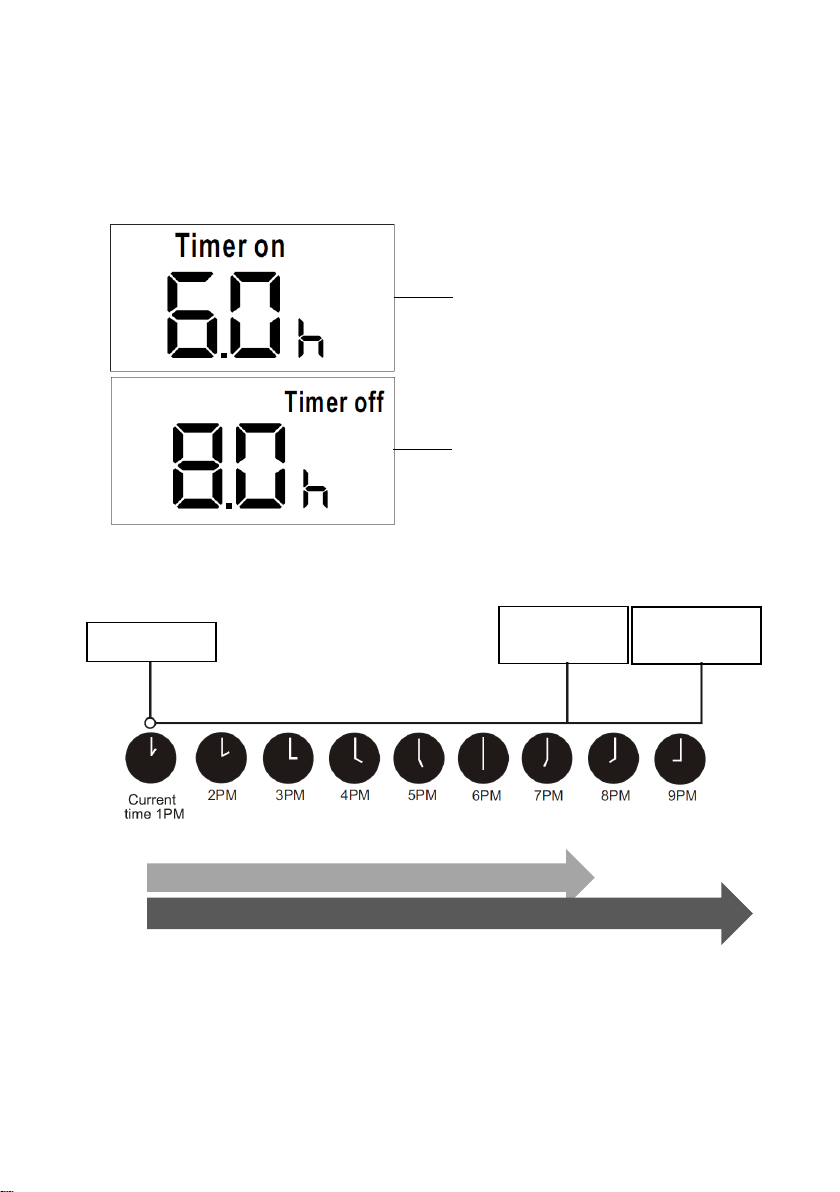
Setting both TIMER ON and TIMER OFF at the same time
Keep in mind that the time periods you set for both functions refer to hours after the
current time. For example, say that the current time is 1:00 PM, and you want the
unit to turn on automatically at 7:00 PM. You want it to operate for 2 hours, then
automatically turn off at 9:00 PM
Do the following:
13
Example: Setting the unit to turn on after 6 hours, operate for 2 hours, then turn off
(see the figure below)
Your remote display
Timer is set To turn ON
6 hours from current time
Timer is set to turn OFF
8 hours from current time
Timer starts
Unit turns
ON
Unit turns
OFF
6 hours later
8 hours later
14
How to use the advanced functions
SLEEP Function
The SLEEP function is used to
decrease energy use while you
sleep (and don t need the same
temperature settings to stay
comfortable). This function can
only be activated via remote
control.
Note: The SLEEP function is
not available in FAN or
DRY mode.
SWING Function
Used to stop or start louver
movement and set the desired
up/down air flow direction. The
louver changes 6 degrees in
angle for each press(some
models without). If keep pushing
more than 2 seconds, the louver
auto swing feature is activated.
FOLLOW ME function
The FOLLOW ME function enables the
remote control to measure the temperature
at its current location. When using AUTO,
COOL, or HEAT functions, measuring
ambient temperature from the remote control
(instead of from the indoor unit itself) will
enable the air conditioner to optimize the
temperature around you and ensure
maximum comfort.
1. Press FOLLOW ME button to activate
function. The remote control will send
temperature signal to the unit every
three minutes.
2. Press FOLLOW ME button again to
turn off this function.
SHORTCUT function
Used to restore the current settings or
resume previous settings.
Push this button when remote controller is
on, the system will automatically revert
back to the previous settings including
operating mode, setting temperature, fan
speed level and sleep feature (if activated).
If pushing more than 2 seconds, the
system will automatically restore the
current operation settings including
operating mode, setting temperature, fan
speed level and sleep feature(if activated).
15
NOTE:
- Buttons design is based on typical model and might be slightly different from
the actual one you purchased, the actual shape shall prevail.
- All the functions described are accomplished by the unit, if the unit has no this
feature, there is no corresponding operation happened when press the
relative button on the remote controller.
- When there are wide differences between Remote controller Illustration"
and"USER'S MANUAL on function description, the description on USERS
MANUAL shall prevail.
- The device could comply with the local national regulations. In Canada, it
should comply with CAN ICES-3(B)/NMB-3(B). In USA, this device complies
with part 15 of the FCC Rules. Operation is subject to the following two
conditions: (1) This device may not cause harmful interfe¬rence, and (2) this
device must accept any interference received, including interference that may
cause undesired operation. -This equipment has been tested and found to
comply with the limits for a Class B digital device, pursuant to part 15 of the
FCC Rules. These limits are designed to provide reasonable protection
against harmful interference in a residential installation. This equipment
generates, uses and can radiate radio frequency energy and, if not installed
and used in accordance with the instructions, may cause harmful interference
to radio communications. However, there is no guarantee that interference will
not occur in a particular installation. If this equipment does cause harmful
interference to radio or television reception, which can be determined by
turning the equipment off and on, the user is encouraged to try to correct the
interference by one or more of the following measures:
Reorient or relocate the receiving antenna. Increase the
separation between the equipment and receiver.
Connect the equipment into an outlet on a circuit different from
that to which the receiver is connected.
Consult the dealer or an experienced radio/TV technician for
help. Changes or modifications not approved by the party
responsible for compliance could void suefs authority to operate
the equipment.
3
4
5
Izjavu o sukladnosti i presliku izvorne Izjave sukladnosti (EC Declaration of Conformity)
možete jednostavno preuzeti na našoj internetskoj stranici www.msan.hr/dokumentacijaartikala
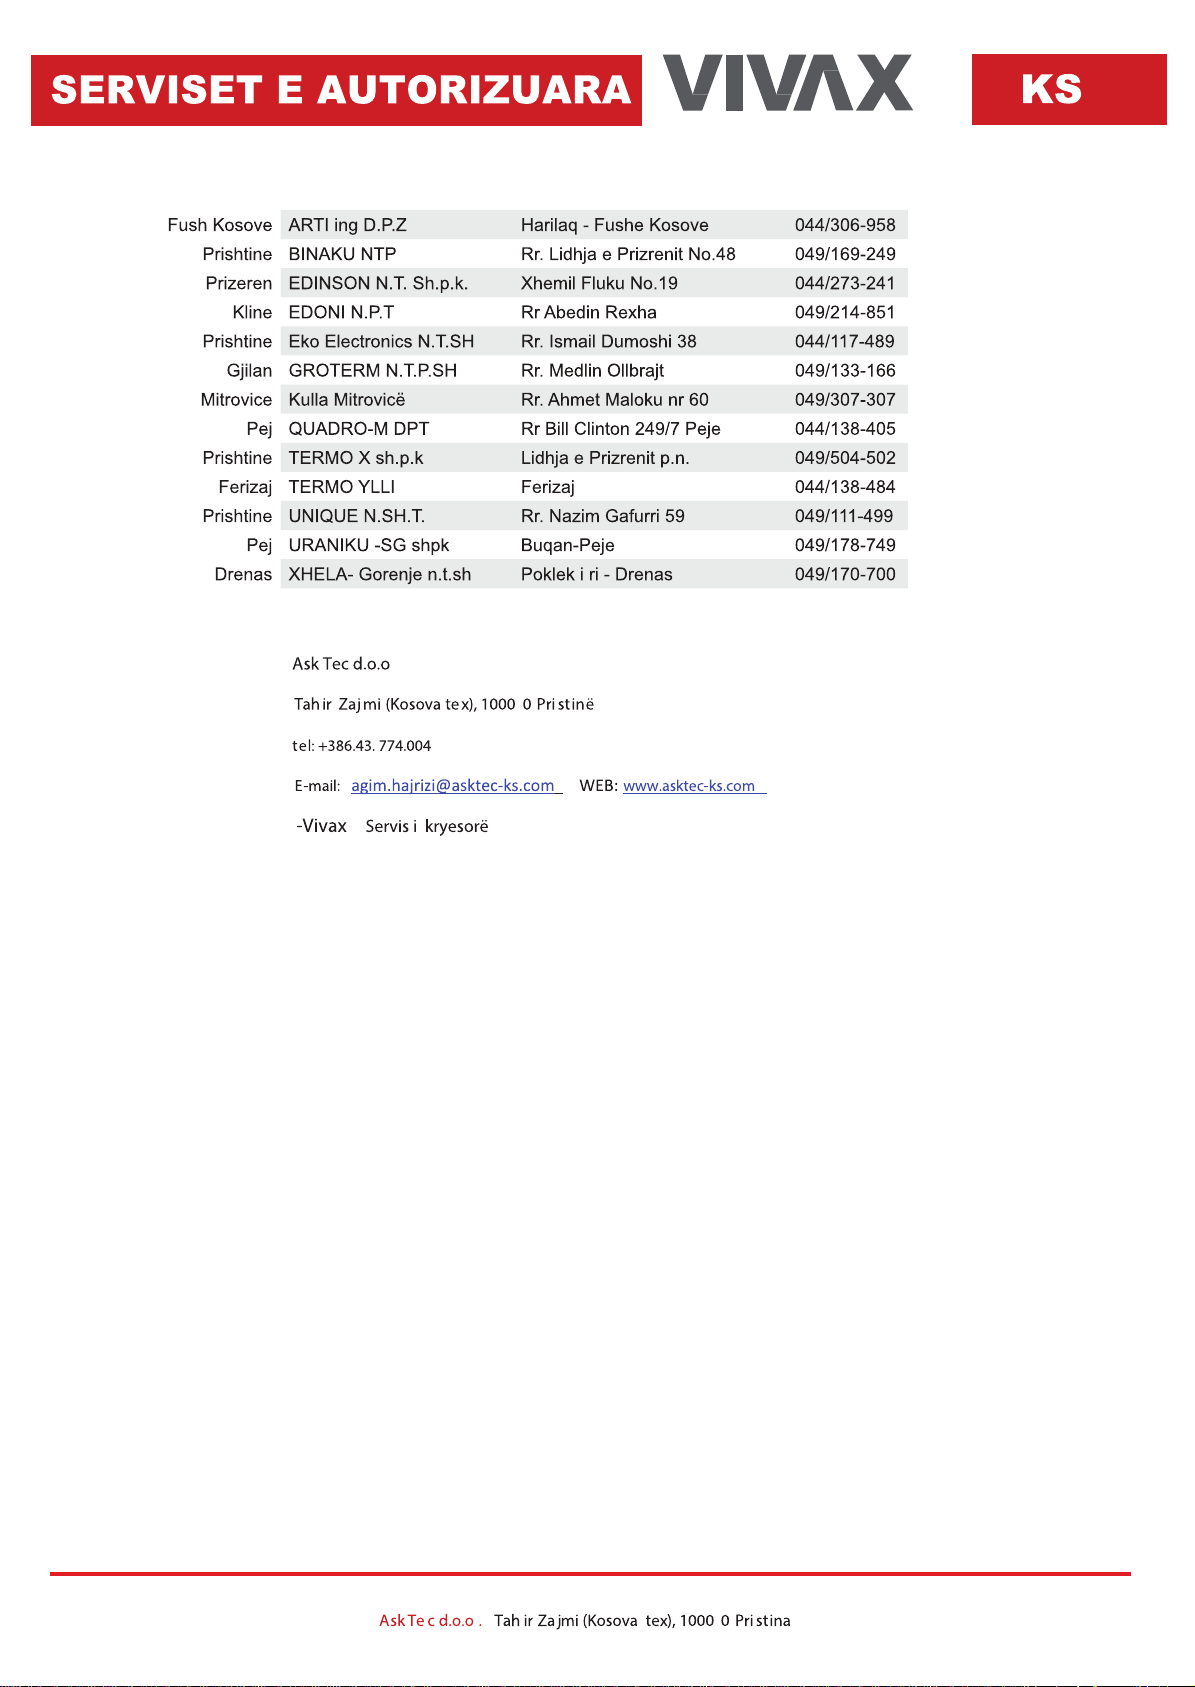
1
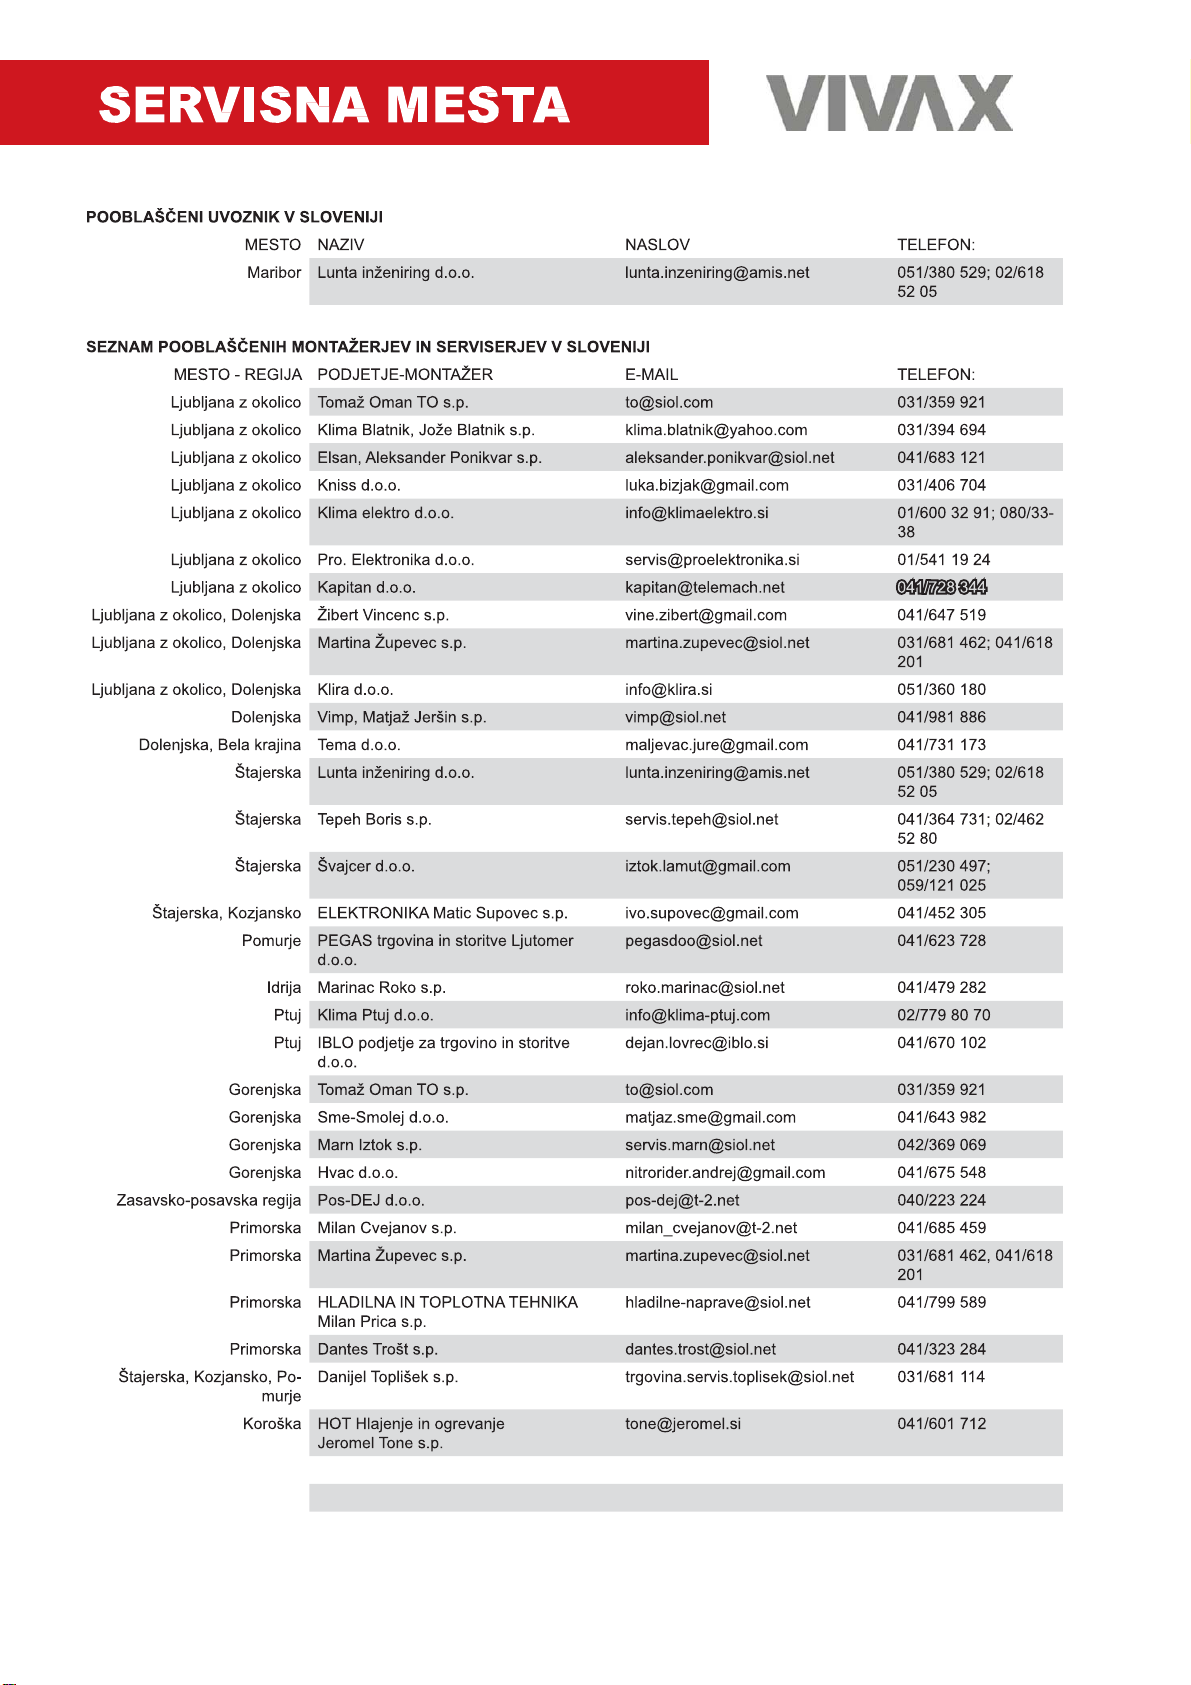
CENTRALNI SERVIS: MR servis d.o.o, Dugoselska cesta 5, 10370 Rugvica
Tel: +385 1 640 1111 Fax: +385 1 365 4982
E-mail za opće upite: info@mrservis.hr, E-mail za prodajne upite: prodaja@mrservis.hr, Web: www.mrservis.hr
Poštovani,
Zahvaljujemo Vam na kupovini proizvoda iz naše distribucije i nadamo se da ćete biti zadovoljni
izborom.
Molimo Vas da pre upotrebe proizvoda pažljivo pročitate tehničku dokumetaciju i da se prilikom
upotrebe pridržavate priloženih uputstava .
REKLAMACIJA U SLUČAJU NESAOBRAZNOSTI PROIZVODA
U slučaju nesaobraznosti proizvoda možete izjaviti reklamaciju prodavcu - trgovcu kod koga ste
uređaj kupili, radi ostvarivanja svojih prava iz člana 52. odnosno člana 56. Zakona o zaštiti
potrošača ( Sl.glasnik 62/14 ).
Trgovac je dužan da Vam odmah, a najkasnije u roku od 8 dana od prijema reklamacije odgovori
na podneti zahtev i predloži rešavanje reklamacije u skladu sa važećim zakonom.
OSNOVNI PODACI O PROIZVODU (popunjava trgovac)
Naziv uređaja
Datum prodaje potrošaču
Broj računa /skalnog isečka
Potpis i pečat trgovca
Oznaka uređaja (p/n)
Serijski broj uređaja (s/n)
M.P.
Uvoznik i distributer:
KIM-TEC d.o.o Beograd, Viline Vode bb, Slobodna zona Beograd
1. Da se pridržava priloženog uputstva za upotrebu i pravilnika o upotrebi proizvoda
2. Da eksploataciju opreme vrši u skladu sa priloženim uputstvom za upotrebu, navedenim u
pripadajućoj tehničkoj dokumentaciji.
3. Da obezbedi odgovarajući uslove u kome će uređaj biti smešten:
• Temperatura vazduha 10-40 0 C
• Relativna vlažnost vazduha od 10 do 90%
• Zaštita od direktnog sunčevog zračenja
• Zaštita od prašine i kondenzacije
• Zaštita od raznih vrsta elektromagnetnih zračenja
4. Da obezbedi stabilan izvor mrežnog napajanja (varijacije napona max. 10%, varijacije
učestanosti max. 30%).
5. Da obezbedi uzemljenu elektroinstalaciju, da bi se izbegle razlike potencijala, naročito ako se
radi o dislociranoj opremi, koja je povezana (LAN mreže, Unix/Xenix terminali i si.).
6. Da po mogućstvu sačuva i dostavi priloženu tehničku dokumentaciju u toku trajanja
reklamacionog roka.
7. Da instalaciju / servis poveri isključivo ovlašćenim licima kao i da pazi da ne ošteti kontrolnu
nalepnicu.
1. Proizvodi imaju propisane, odnosno deklarisane karakteristike kvaliteta.
2. Proizvod će ispravno funkcionisati ako se korisnik pridržava uputstava iz priložene tehničke
dokumentacije
3. Trgovac je dužan je da vodi računa o ispravnom popunjavanju i overi Osnovnih podataka o
proizvodu iz ovog lista
4. Proizvođači denišu kao potrošni materijal proizvode / delove proizvoda kao što su toneri,
kertridži, glave ink jet štampača, valjci za povlačenje,mehanizam za transport papira, baterije i
sve ostalo slično navedenom, a shodno izjavi proizvođača.
OBAVEZE POTROŠAČA
IZJAVA UVOZNIKA/DISTRIBUTERA
Ovlašćeni servis :
KIM-TEC SERVIS d.o.o Beograd,
Viline vode bb, Slobodna zona Beograd L12/3,
Telefon: 011/207-06-84,
E-mail: servis@kimtec.rs
Naziv:Datum prijema:
Datum predaje:
Ser. broj:
Opis kvara:
Servisirao:Opis radova ugrađeni delovi:
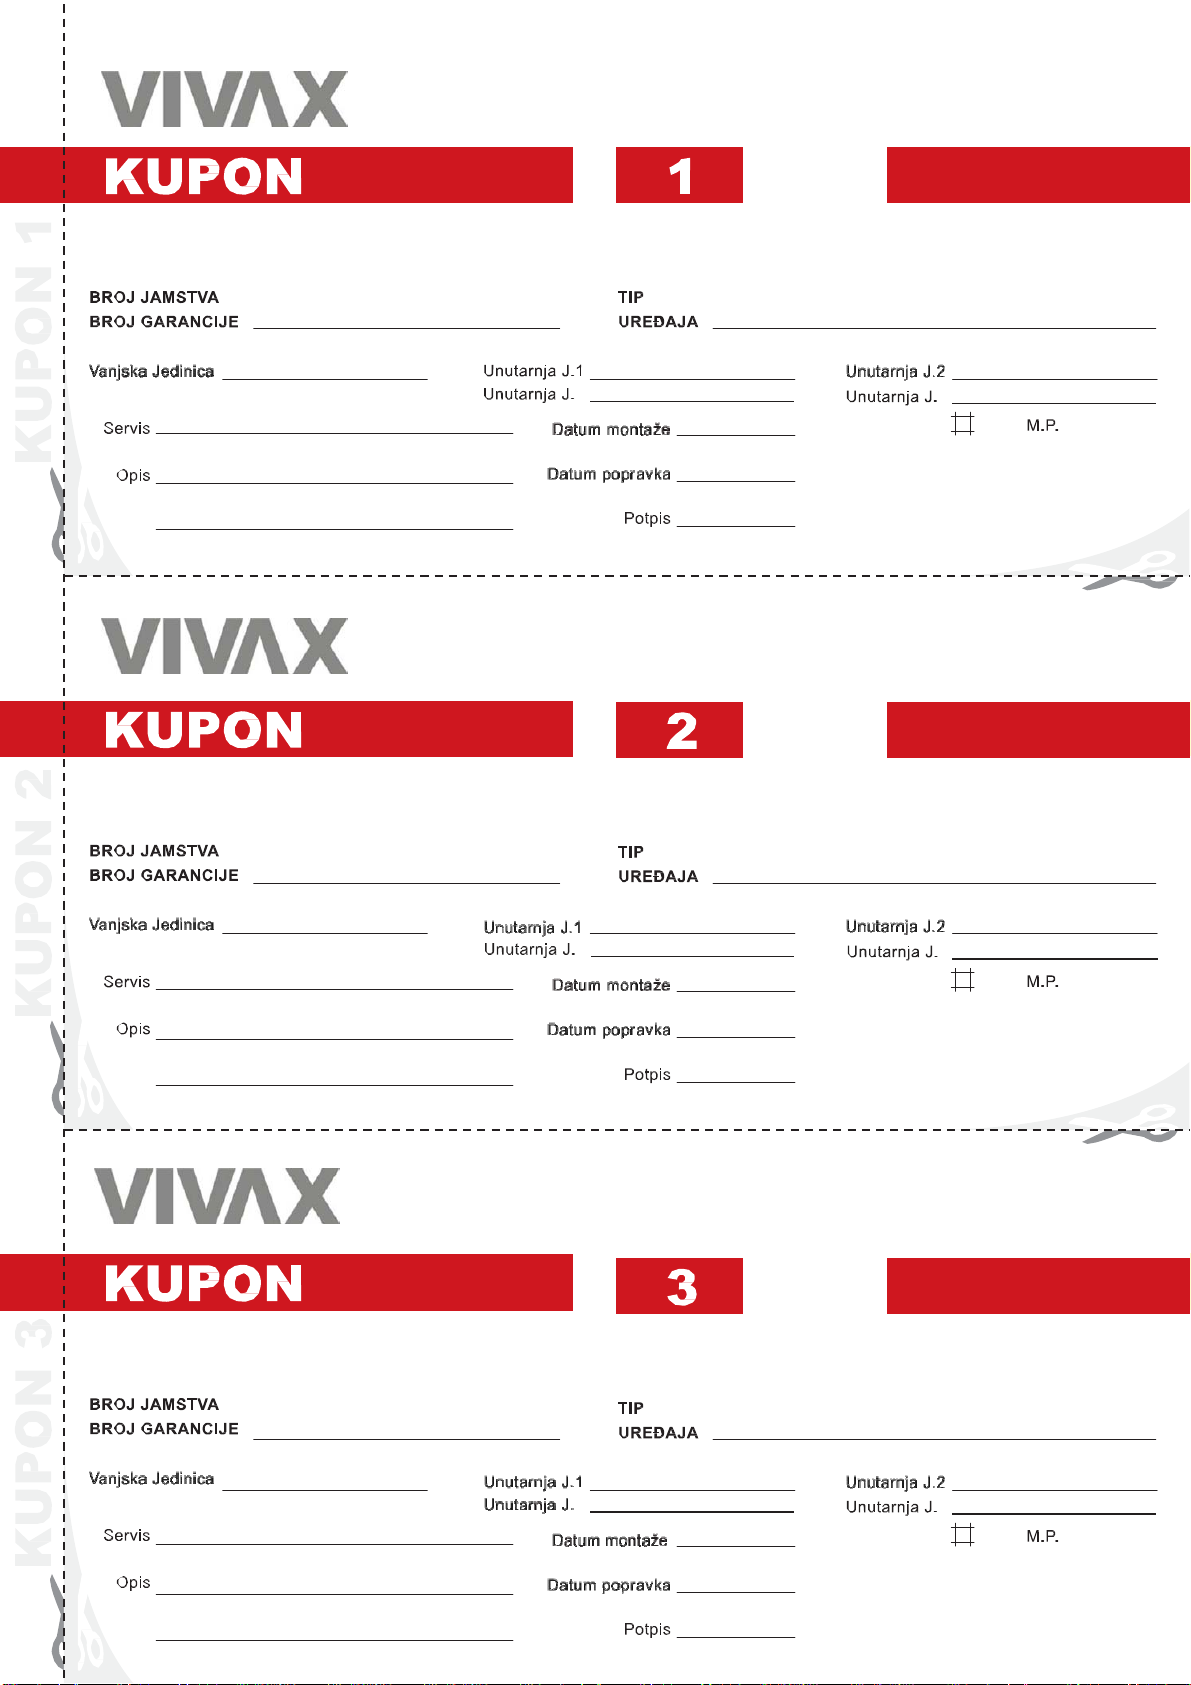
SERVISNI KUPON BR. 1
Naziv:Datum prijema:
Datum predaje:
Ser. broj:
Opis kvara:
Servisirao:Opis radova ugrađeni delovi:
SERVISNI KUPON BR. 1
Naziv:Datum prijema:
Datum predaje:
Ser. broj:
Opis kvara:
Servisirao:Opis radova ugrađeni delovi:
SERVISNI KUPON BR. 1
Za klima uređaje:
Redovni godišnji servis vašeg klima uređaja, omogućava uređaju siguran i kvalitetniji rad.
Godišnji servis korisnik nansira iz sopstvenih sredstava.
Datum:
Servis / Montažer:
Važi do:
S E R V I S N I P R E G L E D
Datum:
Servis / Montažer:
Važi do:
S E R V I S N I P R E G L E D
SERVIS
IZJAVA O SAOBRAZNOSTICG
MODEL UREĐAJA
SERIJSKI BROJ
DATUM PRODAJE
POTPIS I PEČAT PRODAVCA
POŠTOVANI
Zahvaljujemo na kupovini Vivax uređaja i nadamo se da cete bitizadovoljni izborom. Ako u periodu u kojem imate pravo na reklamaciju bude potreban popravak
proizvoda, molim savetujte se sa ovlašćenim prodavačem koji Vam je proizvod prodao il/i nas kontaktirajte na dolje navedene brojeve i adrese.
MOLIMO VAS DA PRIJE UPOTREBE PROIZVODA PAZLJIVOPROCITATE TE HNIČKU DOKUMENTACIJU I UPUTSTVA KOJI SU PRILOZENI UZ PROIZVOD!
BROJ RAČUNA PRODAVCA
• Ovom izjavom o saobraznosti proizvođač proizvoda, preko KIM TEC CG d.o.o., kao uvoznika i davaoca prava u Crnoj Gori osigurava besplatan
popravak istog u skladu s vazećim propisima i u skladu s uslovima opisanim u ovoj izjavi o saobraznosti.
• Ovom izjavom o saobraznosti isticemo da će predmet ovog prava raditi bez greške uzrokovane eventualnom lošom izradom i lošim
materijalom izrade. Svi eventualno nastali kvarovi biće besplatno otklonjeni u ovlašcenom servisu u predvidjenom roku za reklamaciju.
• USLOVI REKLAMACIJE: Rok za reklamaciju počinje teći od dana kupovine proizvoda i traje 24 mjeseca. Dodatnih 12 mjeseci važi uz redovan godišnji servis.
• U sIučaju kvara na proizvodu koji je predmet reklamacije, obavezujemo se da ćemo isti popraviti u najkraćem mogućem roku, a
najkasnije u roku od 15 dana. Ako se proizvod ne moze popraviti ili se ne popravi u roku od 15 dana, biće zamijenjen novim .
, ili uz ovu izjavu o saobraznosti koji mora biti ispravno popunjen odnosno mora
sadrzati datum prodaje, pečat i potpis prodavca.
• Davalac izjave o saobraznosti osigurava servis i rezervne djelove 7 godina od datuma kupovine.
PRAVO NA REKLAMACIJU NE OBUHVATA
• Redovnu provjeru, održavanje uz zamjenu dijelova koji se trose normalnom upotrebom. Prilagođavanje ili promjene za poboljsanje proizvoda za
primjenu koje nijesu opisane u tehnickim uputstvima za koriscenje, osim ako je za te promjene predočena saglasnost KIM TEC CG d.o.o.
Pravo na reklamaciju se ne priznaje u sIjedećim slučajevima:
Ako kupac ne prilozi ispravan reklamni list ili racun o kupovini.
Ako se kupac nije pridrzavao uputstva o koriscenju proizvoda.
Ako je proizvod otvaran, prepravljan ili popravljan od neovlaśtene osobe.
Ako su kvarovi na proizvodu nastali djelovanjem viśe sile kao śto su: udar groma, strujni udaru u elektrićnoj mreži elementarne nepogode i slićno.
Ako su kvarovi nastali ośtećivanjem zbog nepropisane upotrebe ili nepravilnim transportovanjem.
Ako je kvar nastao greškom u sistemu na koji je proizvod prikljućen.
Ova izjava o saobraznosti ne mijenja zakonska potrosacł‹a prava vazeća u Cmoi Gori u odnosu na ona koja propisuje proizvođač.
Naziv davaoca izjave o saobraznosti: Kim Tec CG d.o.o. Ćemovsko polje bb, 81000 Podgorica, Crna Cora
CENTRALNI SERVIS (CALL CENTAR): Kim Tec CG d.o.o., Ćemovsko Polje bb,
Tel: 020/608-251, E-mail za opste upite: servis@kimtec-cq.com
Faleminderit për blerjen tuaj dhe shpresoj se ju do të jenë të kënaqur me përzgjedhjen. Nëse periudha e garancionit është e nevojshme për të riparuar produktin, ju
lutemkonsultohuni me shitësin
Apo me me përsonin i cili jua shet produktin tone
JU LUTEM LEXONI ME KUJDES PARA PËRDORIMIT PRODUKTIT DOKUMENTET TEKNIKE DHE MANUALET CILAT JANË VENDOSUR NË KUTI
FLETGARANCIONI
KS
EMRI PRODUKTIT
LLOJI DHE MODELI
PRODHUESI
EMËRTIMI APO
EMRI I SHITËSIT
NUMRI SERIAL
DATA SHITJES
VULA: NËNSHKRIMI I PËRSONIT ZYRTAR:
Kjo fletgarancion ju garanton që prodhuesi, nëpërmjet AskTec Ltd, si një importues dhe ofrues i sigurisë në Republikën e Kosovës, një riparim të lirë të
njëjtë në përputhje me rregullat e zbatueshme në pajtim me kushtet e përshkruara në këtë fletgarancion .
KUSHTET E GARANCIONIT:
1. Kjo fletgarancion, ne garantojmë se ju do të jetë subjekt i kësaj pune garancisë pa gabime të mundshme të shkaktuara nga mjeshtëri e profesionalizuar dhe të
materialit të dobët. Të gjitha gabimet mund të ndodhin ne do t korrigjohen pa pagesë në një shërbim garancion të autorizuar.
2. PERIUDHA E GARANCIONIT. Garancioni fillon nga dita e blerjes dhe vazhdon deri ……… muaj.
3. Në rast prishjes produktit do të mbulohet nga ky garancion , zotohemi për të rregulluar njëjtin sa më shpejt të jetë e mundur, dhe jo më vonë se 45 ditë. Nëse
produkti nuk mund të riparohet ose nuk riparohet brenda 45 ditëve, ajo do të zëvendësohet.
4. Nëse procedura riparimit zgjat më shumë se 10 ditë, garancioni do të shtyhet për kohëzgjatjen e riparimit.
5. Garancioni është e njohur vetëm me një faturë të shitjes, dhe me kartën e garancionit e cila duhet të plotësohet si duhet dhe duhet të përfshijë datën
e shitjes, vula dhe nënshkrimi shitësit.
6. Prodhuesi ofron pjesë servisi në afat prej 7 vjetësh.
7. GARANCIONI NUK MBULON:
8. Inspektimit të rregullt, mirëmbajtjenndrrimi I pjesve hargjuese.
Rregullim ose ndryshim në përmirësimin e produktit për zbatimin që nuk janë përshkruar në udhëzimet teknike për përdorim, përveç modifikime paraqitura
Me pëlqimi AskTec LLC
8. Garancioni nuk pranohet në këto raste :
Nëse një klienti nuk paraqet kartën e saktë garancionit dhe faturë blerse. Në qoftë se blerësi nuk përmbush udhëzimet mbi përdorimin e produktit.
Nëse produkti është i hapur, modifikuar ose riparuar nga personi i paautorizuar.
Nëse dështimet produktit janë shkaktuar nga forcës madhore, të tilla si rrufeja, electriciteti në fatkeqësitë e rrjetit elektrike .
Nëse dështime shkaktuar dëme nga përdorimi i pavend ose transportit të pahijshme.
Nëse defekt është një defekt në sistemin në të cilën produkti është i lidhur.
Gebruikershandleiding.com neemt misbruik van zijn services uitermate serieus. U kunt hieronder aangeven waarom deze vraag ongepast is. Wij controleren de vraag en zonodig wordt deze verwijderd.
Product:
Spelregels forum
Om tot zinvolle vragen te komen hanteren wij de volgende spelregels:
lees eerst de handleiding door;
controleer of uw vraag al eerder door iemand anders is gesteld;
probeer uw vraag zo duidelijk mogelijk te stellen;
heeft u een probleem en al geprobeerd om dit op te lossen, vermeld dit erbij aub;
heeft u een oplossing gekregen van een bezoeker dan horen wij dat graag in dit forum;
wilt u een reactie geven op een vraag of antwoord, gebruik dan niet dit formulier maar klik op de knop 'reageer op deze vraag';
uw vraag wordt direct op de website gezet; vermijd daarom persoonlijke gegevens in te vullen;
Belangrijk! Als er een antwoord wordt gegeven op uw vraag, dan is het voor de gever van het antwoord nuttig om te weten als u er wel (of niet) mee geholpen bent! Wij vragen u dus ook te reageren op een antwoord.
Belangrijk! Antwoorden worden ook per e-mail naar abonnees gestuurd. Laat uw emailadres achter op deze site, zodat u op de hoogte blijft. U krijgt dan ook andere vragen en antwoorden te zien.
Abonneren
Abonneer u voor het ontvangen van emails voor uw Vivax ACP-09PT25AEF R290 bij:
nieuwe vragen en antwoorden
nieuwe handleidingen
U ontvangt een email met instructies om u voor één of beide opties in te schrijven.
Ontvang uw handleiding per email
Vul uw emailadres in en ontvang de handleiding van Vivax ACP-09PT25AEF R290 in de taal/talen: Engels, Pools als bijlage per email.
De handleiding is 51,45 mb groot.
U ontvangt de handleiding per email binnen enkele minuten. Als u geen email heeft ontvangen, dan heeft u waarschijnlijk een verkeerd emailadres ingevuld of is uw mailbox te vol. Daarnaast kan het zijn dat uw internetprovider een maximum heeft aan de grootte per email. Omdat hier een handleiding wordt meegestuurd, kan het voorkomen dat de email groter is dan toegestaan bij uw provider.
Stel vragen via chat aan uw handleiding
Stel uw vraag over deze PDF
Uw handleiding is per email verstuurd. Controleer uw email
Als u niet binnen een kwartier uw email met handleiding ontvangen heeft, kan het zijn dat u een verkeerd emailadres heeft ingevuld of dat uw emailprovider een maximum grootte per email heeft ingesteld die kleiner is dan de grootte van de handleiding.
Er is een email naar u verstuurd om uw inschrijving definitief te maken.
Controleer uw email en volg de aanwijzingen op om uw inschrijving definitief te maken
U heeft geen emailadres opgegeven
Als u de handleiding per email wilt ontvangen, vul dan een geldig emailadres in.
Uw vraag is op deze pagina toegevoegd
Wilt u een email ontvangen bij een antwoord en/of nieuwe vragen? Vul dan hier uw emailadres in.