FEDERAL COMMUNICATIONS COMMISSION:This device complies with Part 15 of the FCC Rules. Operation is subject to the following two conditions:
(1) this device may not cause harmful interference, and (2) this device must accept any interference received, including interference that may cause und
esired operation.
Rear Camera
(Select Model)**
** For ViewPad G70 model.
2
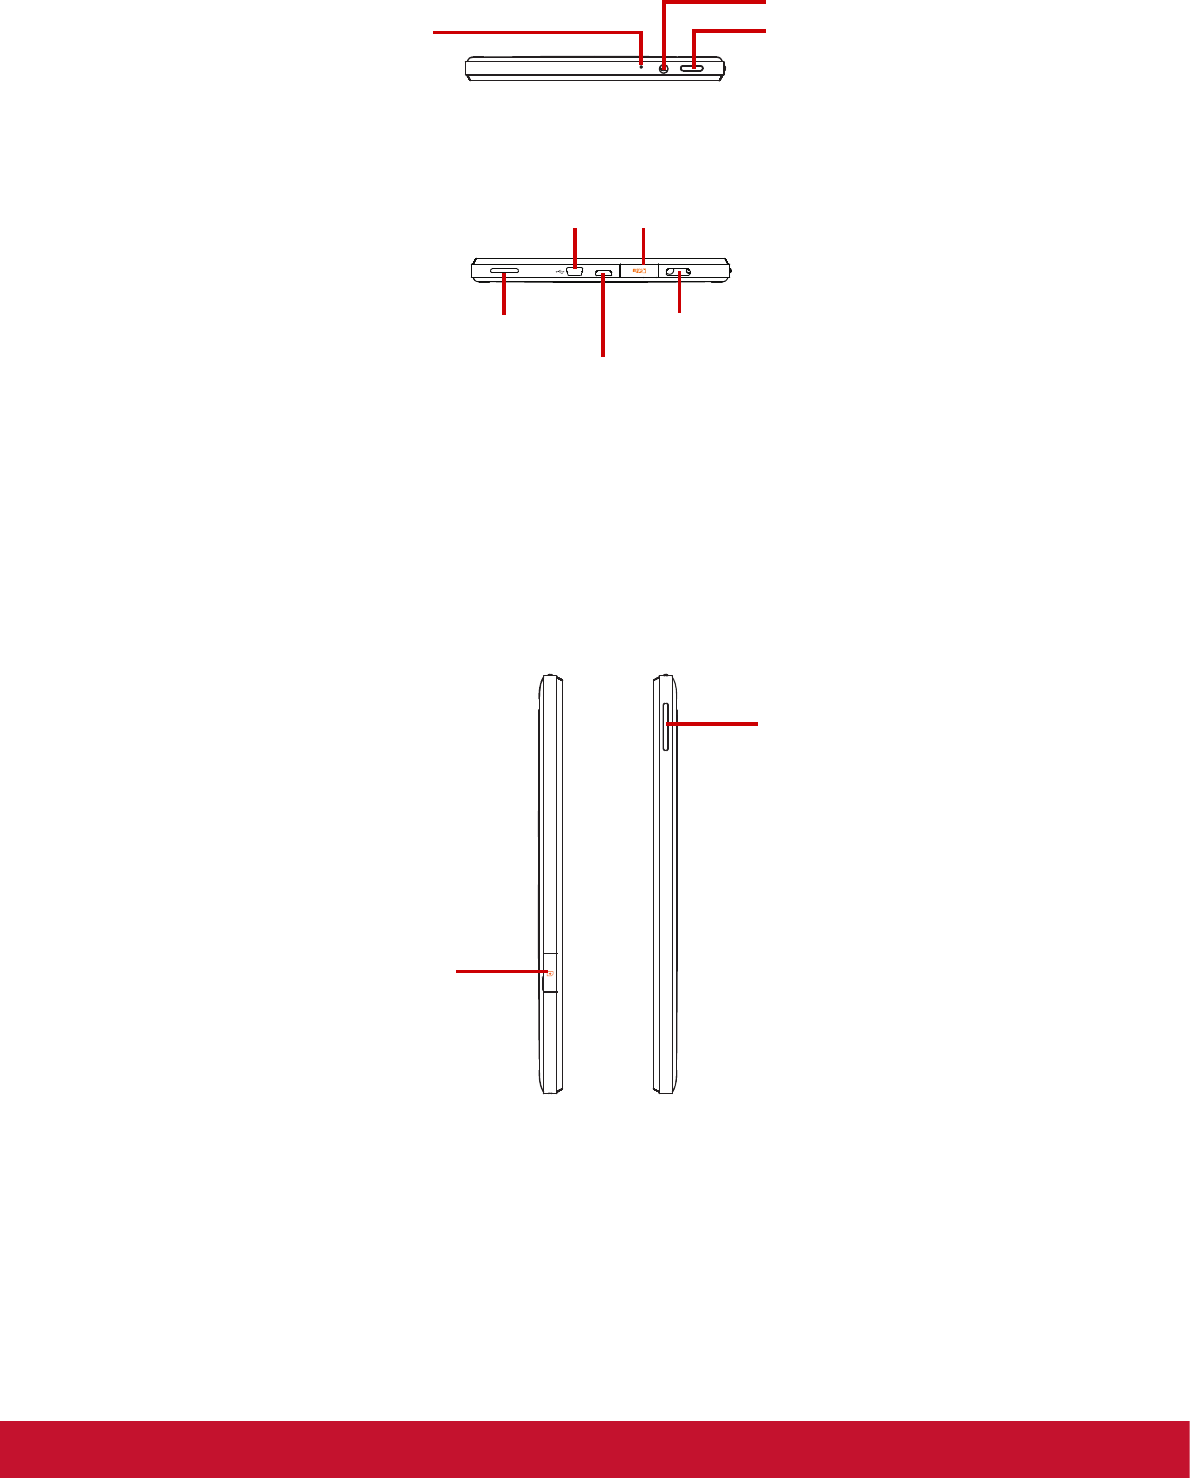
Top
Down
NOTE:
1. Mini USB port is only for host mode: Support keyboard, mouse and memory stick
which are under 500mA usage devices.
2. Micro USB port is only for device mode link to computer and power charging.
Left& Right
1.2 Accessories
Your package comes with the following items. If any of them is missing, please contact
your retailer.
•ViewPad 7”
Power Button
Headphone
Microphones
microSD Card Slot
SpeakerMini HDMI port
Mini USB port
Micro USB port
SIM Card Slot
(Select Model)**
Volume( Up/ Down)
** For ViewPad G70 models.
3
•AC adapter and plugs
•Quick Start Guide
•Compliance information
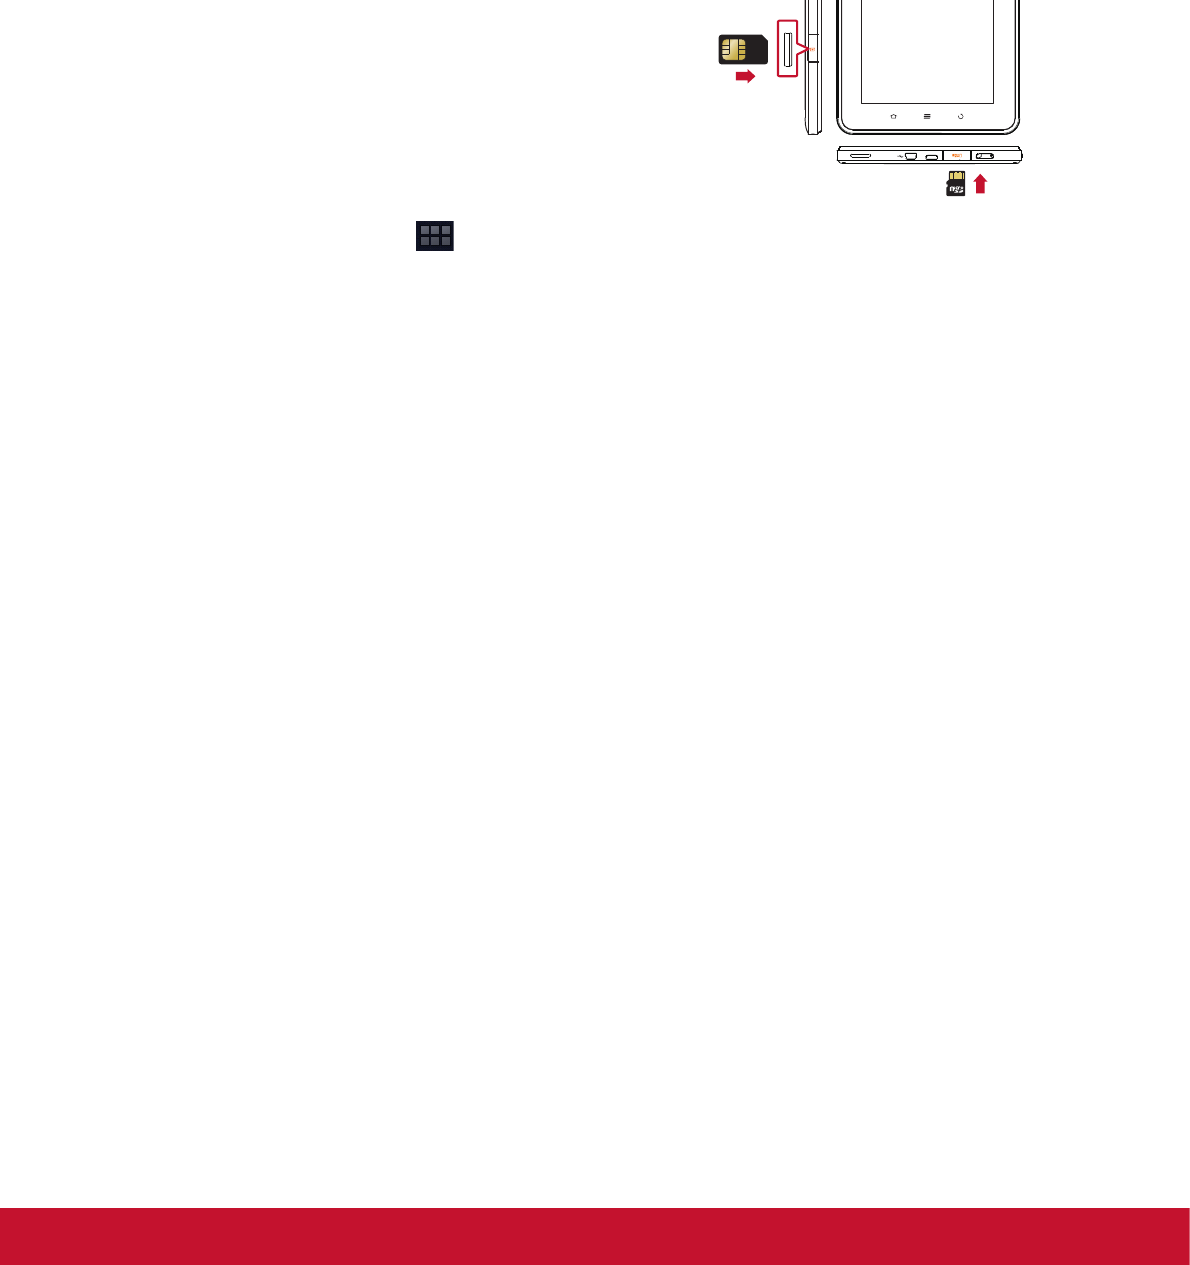
1.3 Installing microSD/SIM Card
You need a microSD
®
card to store photos, music, videos, and other data.
To install the microSD card
1.Open the card cover.
2.Insert the microSD card as shown. Make
sure the gold contacts are facing down.
To remove the microSD card
1.For safe removal, tap > Settings >
Storage > Unmount microSD card.
2.Open the card cover.
3.Push to eject the microSD card from the slot.
NOTE: Do not remove the microSD card while the device is turned on. Sudden
removal of the microSD card may cause data loss or unpredictable system
hang up.
To install the SIM card ( select model )
1.Open the card cover.
2.Insert the SIM card as shown. Make sure the gold contacts are facing down.
To remove the SIM card
1.Open the card cover.
2.Push to eject the SIM card from the slot.
3.Close the card cover.
NOTE: Do not remove the SIM card while the device is turned on. Sudden removal
of the SIM card may cause data loss or unpredictable system hang up.
1.4 Charging Battery
The battery is only partially charged. To fully charge the battery, charge it for 3 hours.
Charge the battery
SIM
Insert the SIM card
towards the
direction indicated
by arrow.
Insert the microSD card
towards the direction
indicated by arrow.
4
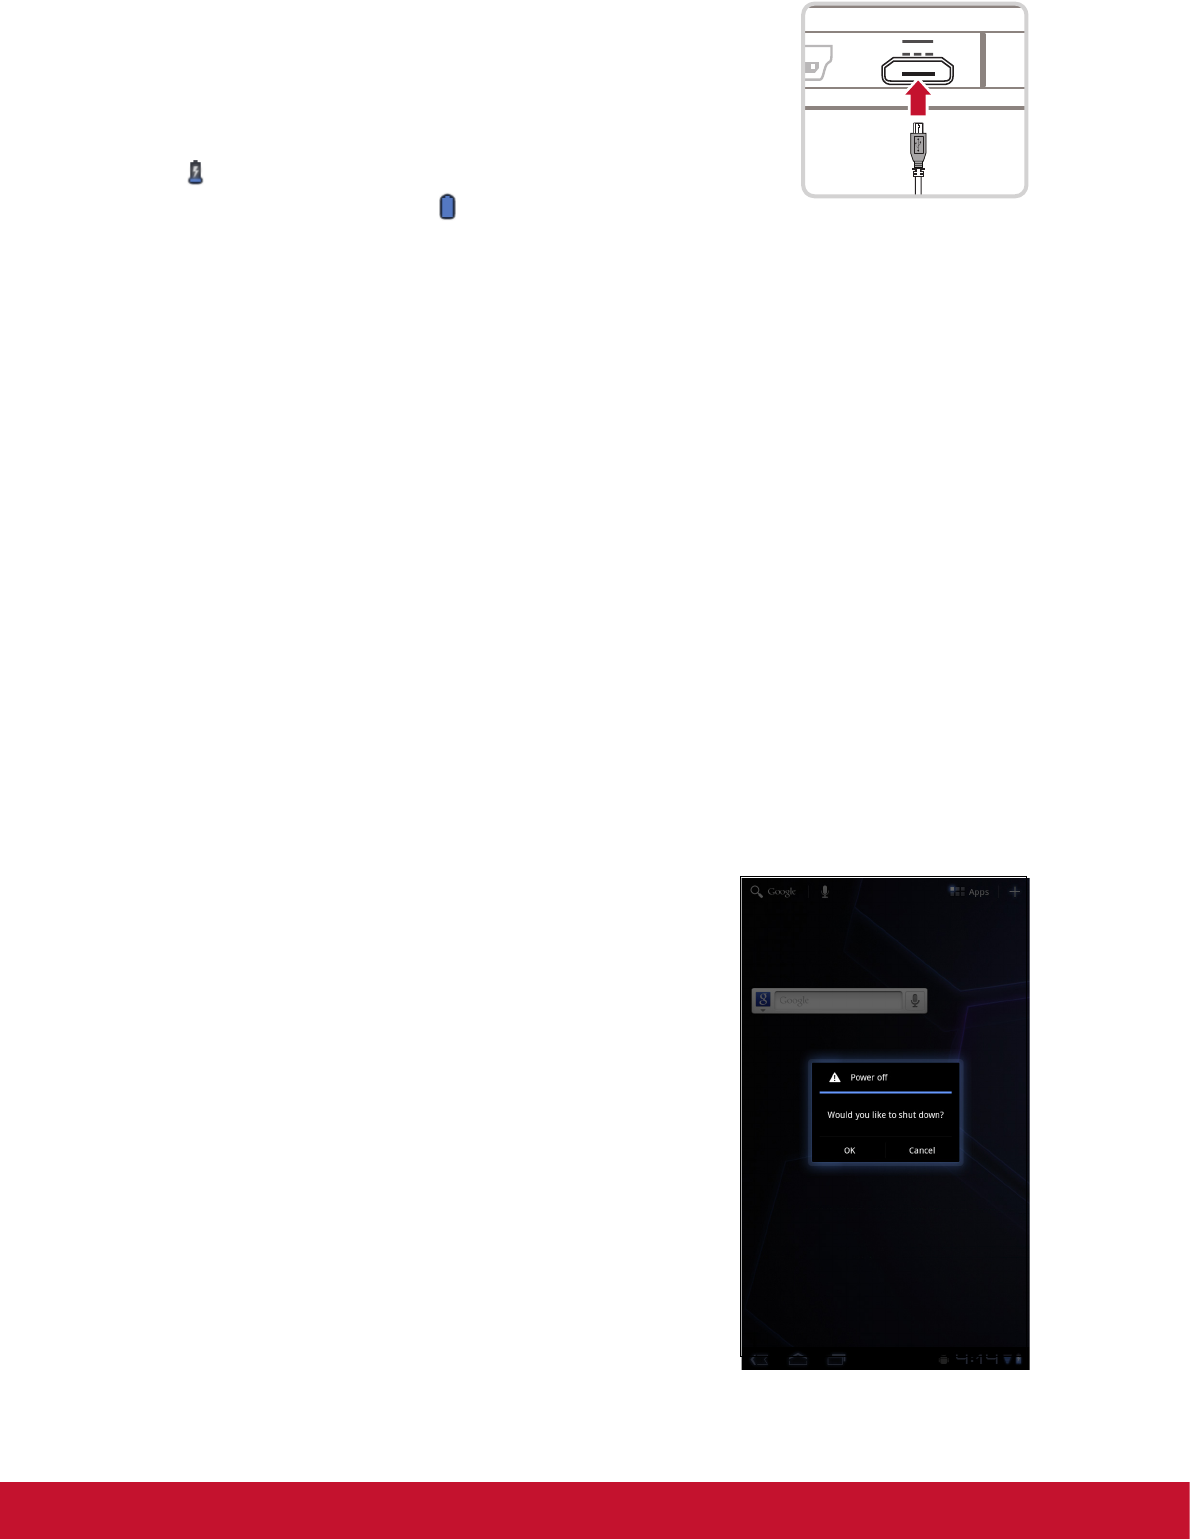
1.Connect one end of the AC adaptor to the Micro USB
port of the device.
2.Plug the other end of the AC adaptor to the wall outlet
to start charging.
When the battery is charging and the device is turned on,
the icon is displayed on the status bar. When the
battery is fully charged, the icon is displayed on the
status bar.
NOTE:The LED indicator will turn to blue when fully power charged.
1.5 Using Headsets
For hands-free conversation or listening to music, plug a headset to the headset jack.
NOTE:
• When using a headset, your ability to hear outside sounds may be limited.
Do not use headset if it will endanger you.
• When using a headset, do not set the volume to its maximum as it may
damage your hearing.
1.6 Turning the Device On or Off
After installing the memory card and charging the battery, the device is ready to be
turned on.
To turn on your device
Press and hold the Power button until the device
blinking purple twice.
To turn off your device
1.Press and hold the Power button for 5 seconds.
2.A pop-up window appears, tap OK to confirm.
To set your device to Sleep mode
To set the device to sleep mode, press the Power
button. This will turn the display off.
To turn the display on, press the Power button again.
5
1.7 Unlocking the Screen
By default, the screen automatically locks after a period of inactivity. You can set the
length of time until the screen locks.
To unlock the screen
1.Press the Power button to turn on the display from Sleep mode.
2.Tap and drag the middle circle () to to unlock the screen.
NOTE: When booting or waking the device, avoid touching the screen until the
Unlock screen briefly shows animated ripples. This is less than one second after the
Unlock screen is displayed upon waking, but allows time for the auto calibration to
take place.
6
Chapter 2: The Basics
2.1 Home Screen
From the Home screen, you can quickly access common features and view
notifications of received messages, battery and connection status.
Extended Home screen
Swipe your finger to the left or right across the Home screen.
The two extensions to the left and to the right of the Home screen provide more space
for icons, widgets, shortcuts, and other items.
7
Shortcut menu
The shortcut menu allows you to easily access an application from the Home screen.
To open an application, tap an icon.
Customizing shortcut menu
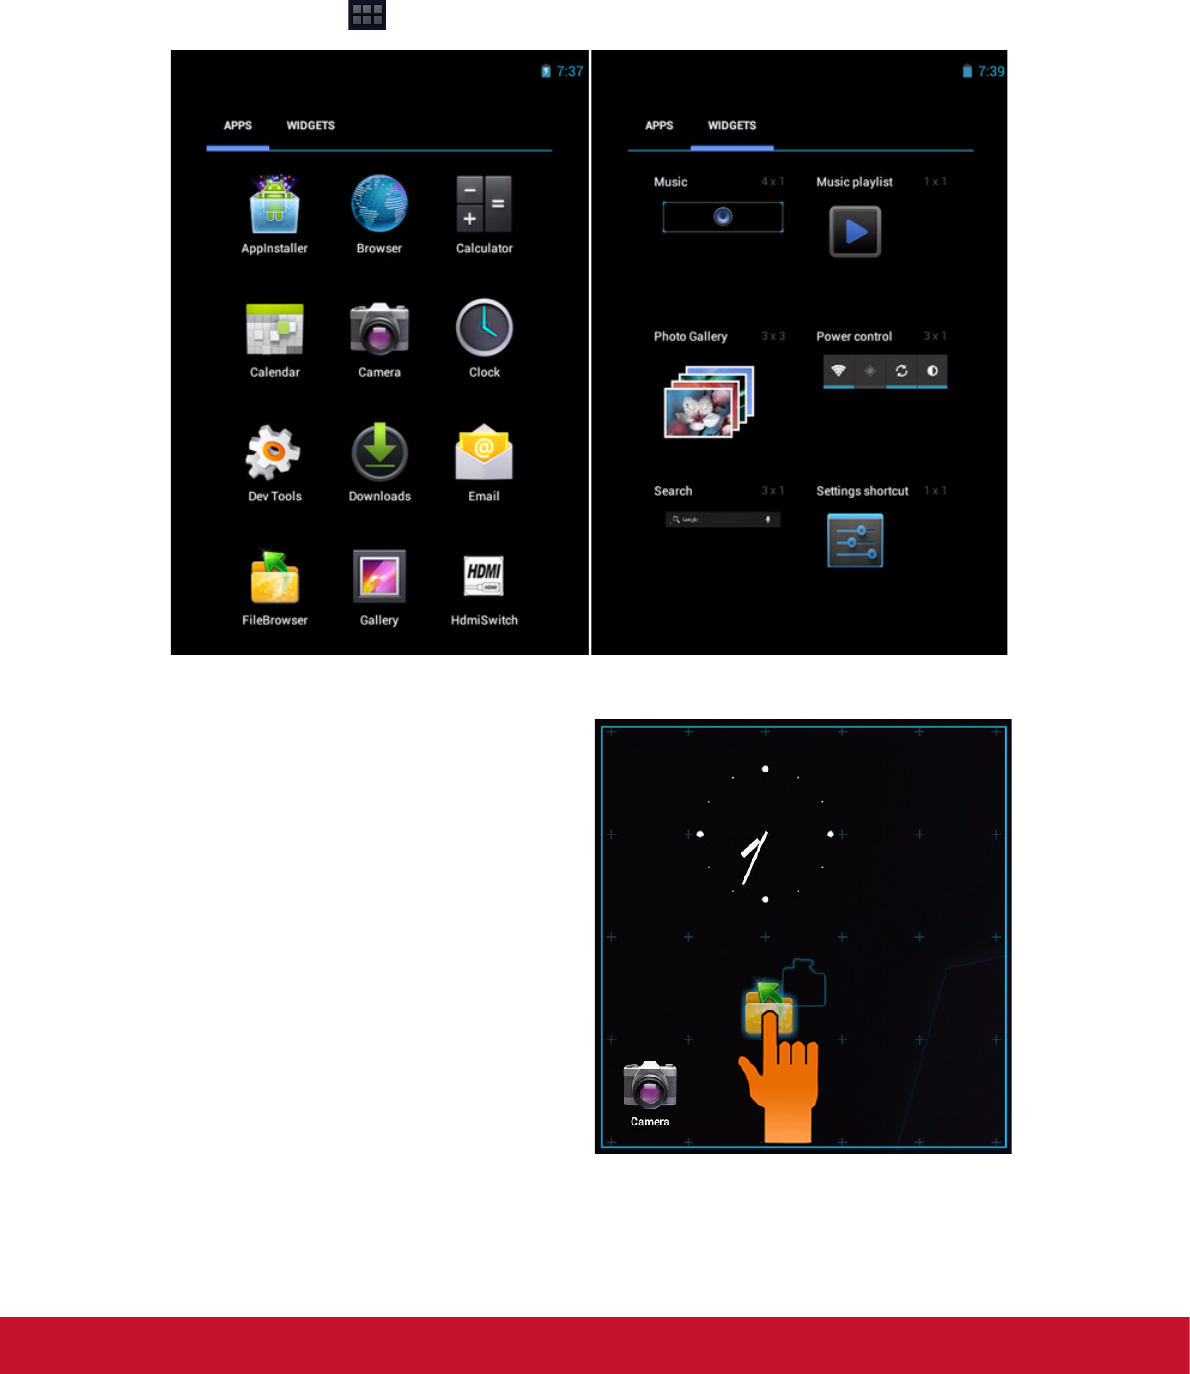
Home screen: Tap You can add apps and widgets to your home screen.
Touch & hold to move icon.
8
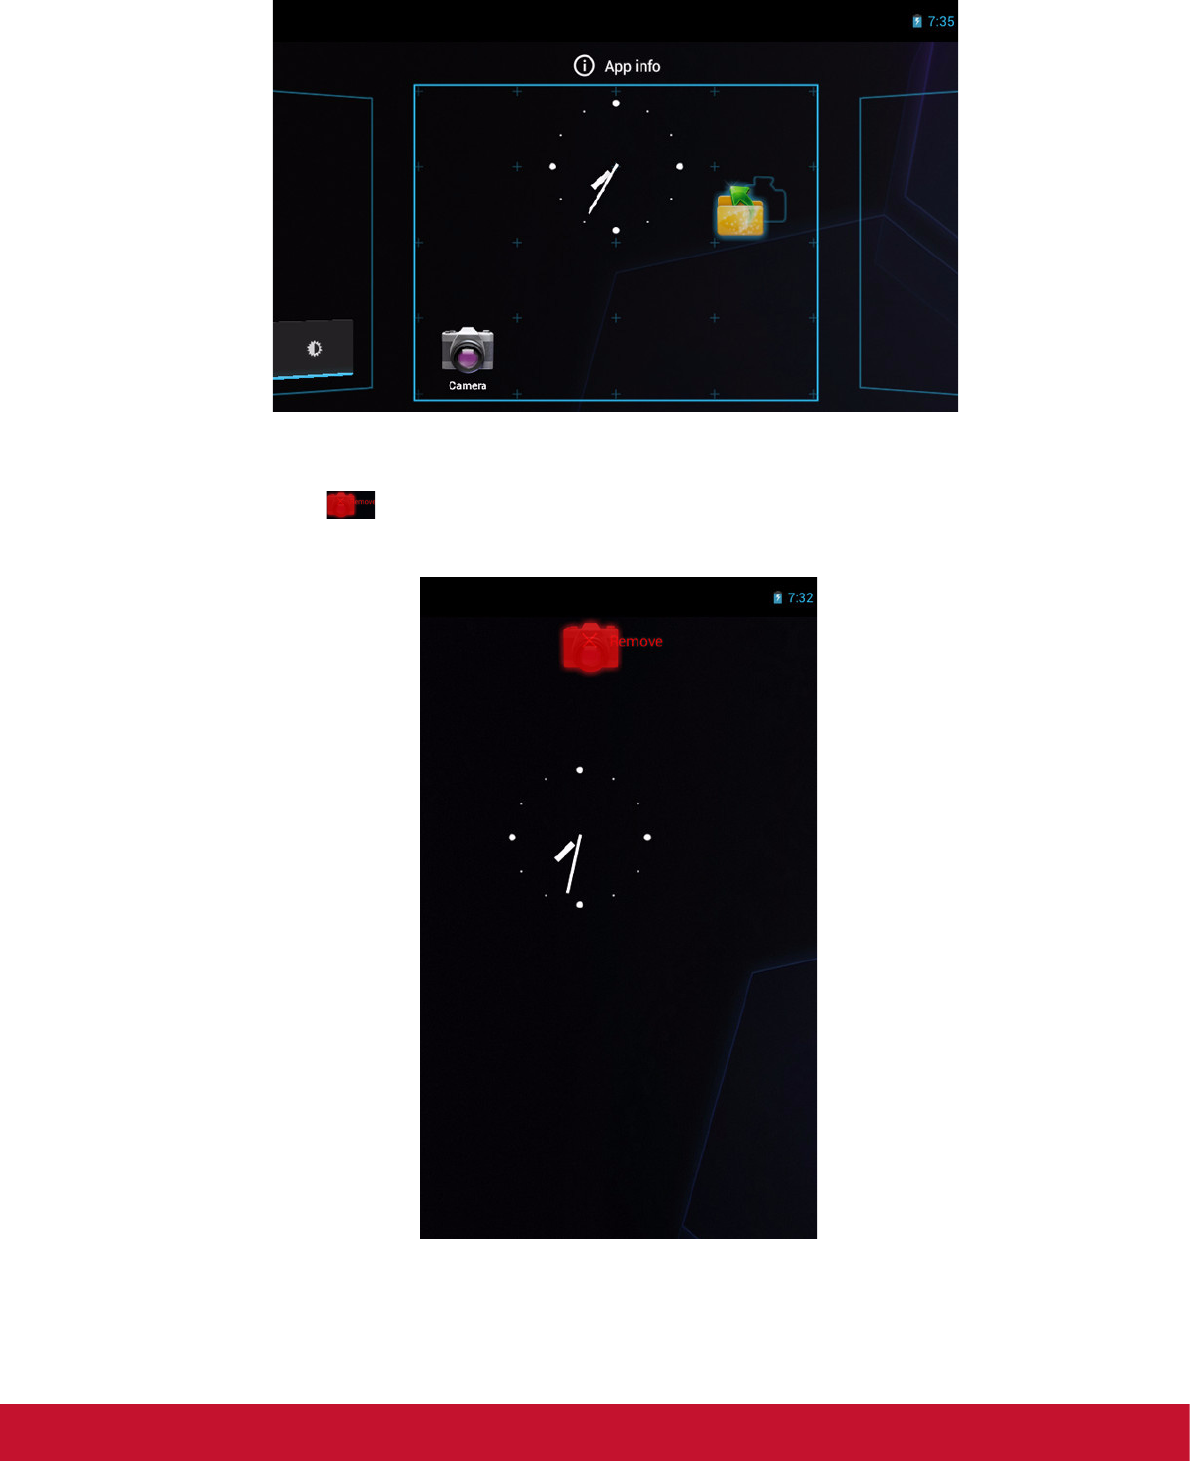
From this screen, you can add items to all home screen panels.Use panels to
organize your Widgets and Apps.
To move or delete something, touch and hold on the icon, then drag it to another panel
or to the trash at of the screen.
9
Using widgets
Save time with live updates right on the Home screen and get all your personalized
updates in one place.
You may add and customize the Widgets on the Home screen as you like.
1.From the Home screen, tap .
All available widgets are displayed.
2.To add widget, drag the widget icon to the specific Home screen.
To remove widgets:
1.From the Home screen, tap and hold the desired widget. The icon
appears on the top right of the Home screen.
2.Drag the widget to icon to delete it from the Home
screen.
10
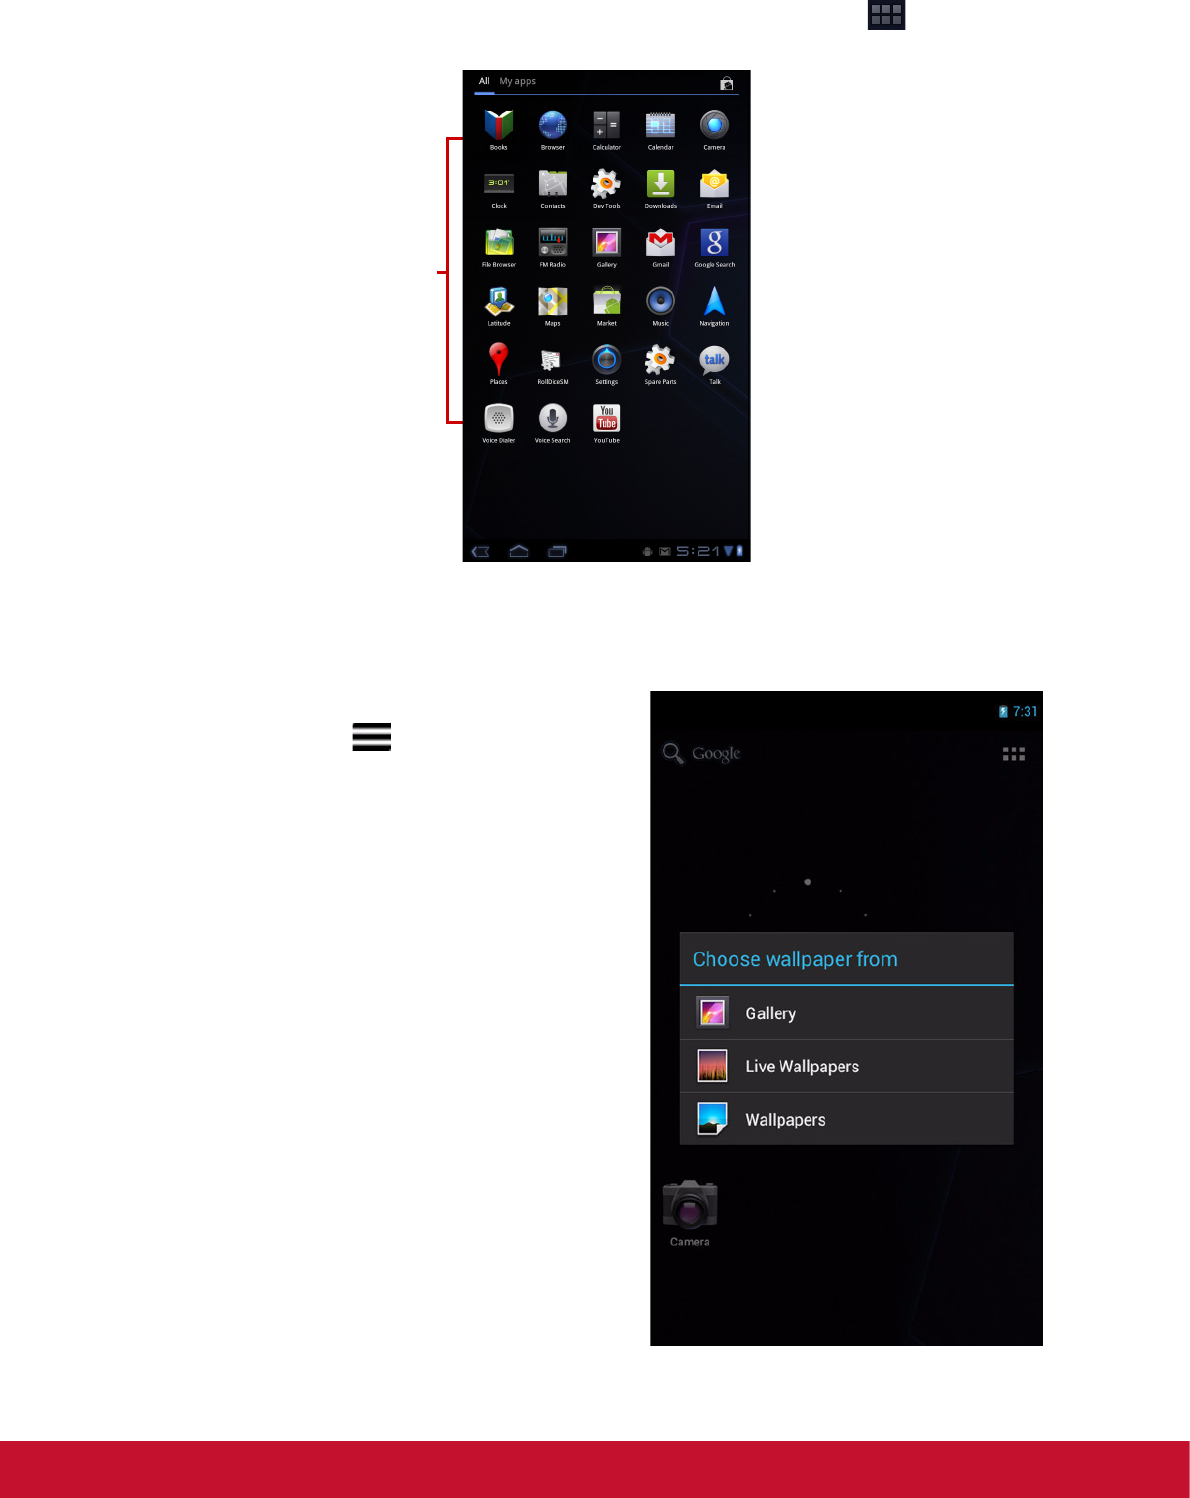
Application drawer
The Application Drawer contains all applications and settings. Tap to open the
menu.
Setting wallpaper
Wallpapers : Long press on empty space
on desktop or tap [Menu / Wallpaper]
to change your wallpaper.
• Tap an icon to
access the
application.
11
2.2 Adjusting Volume
This device features three types of volume which can be adjusted separately:
•Ringervolume: Set the volume for notifications.
•Mediavolume: Set the volume for music and videos.
•Alarmvolume: Set the volume for alarms.
To adjust the volume
1.From the Home screen, tap > Settings >
Sound.
2.Tap Volume.
3.To adjust the volume, do either of the following:
a.Drag the respective volume slider to adjust the
volume.
b.Press the volume button to adjust the volume.
NOTE: When the device is set to silent mode,
all sounds are turned off except media
and alarm.
4.Tap OK to save your settings.
12
2.3 Setting up Wi-Fi
You need to connect to a wireless network before surfing the Internet or using the
related applications that require internet connection.
To turn Wi-Fi on or off
1.From the Home screen, tap > Settings > Wi-Fi.
2.Tap Wi-Fi to turn Wi-Fi function on or off..
To connect to a Wi-Fi network
1.Turn Wi-Fi on.
2.Tap Wi-Fi to start detecting networks.
3.The available networks are listed. Tap a network to connect to or tap ADD
NETWORK to manually add a connection.
4.If you select an unsecured network, the connection is automatically established.
Otherwise, proceed to the next step.
5.When connecting to a secured network, you will be prompted for the password.
Enter the password then tap Connect.
13
Chapter 3: Entering Information
3.1 On-Screen Keyboard
The on-screen keyboard appears when an application requires text input, such as
messaging and writing emails. The keyboard input method is activated by default.
Using the on-screen keyboard
Tap the screen to display the on-screen keyboard.
Setting input method
1.On the on-screen keyboard, tap .
2.Tap Select input method.
3.Change the keyboard settings.
3.2 Configuring Keyboard Settings
Use keyboard aids to set up various input settings.
1.From the Home screen, tap > Settings > Language & input.
2.Tap Default > Android keyboard.
3.Select the applicable options from the following Android keyboard settings:
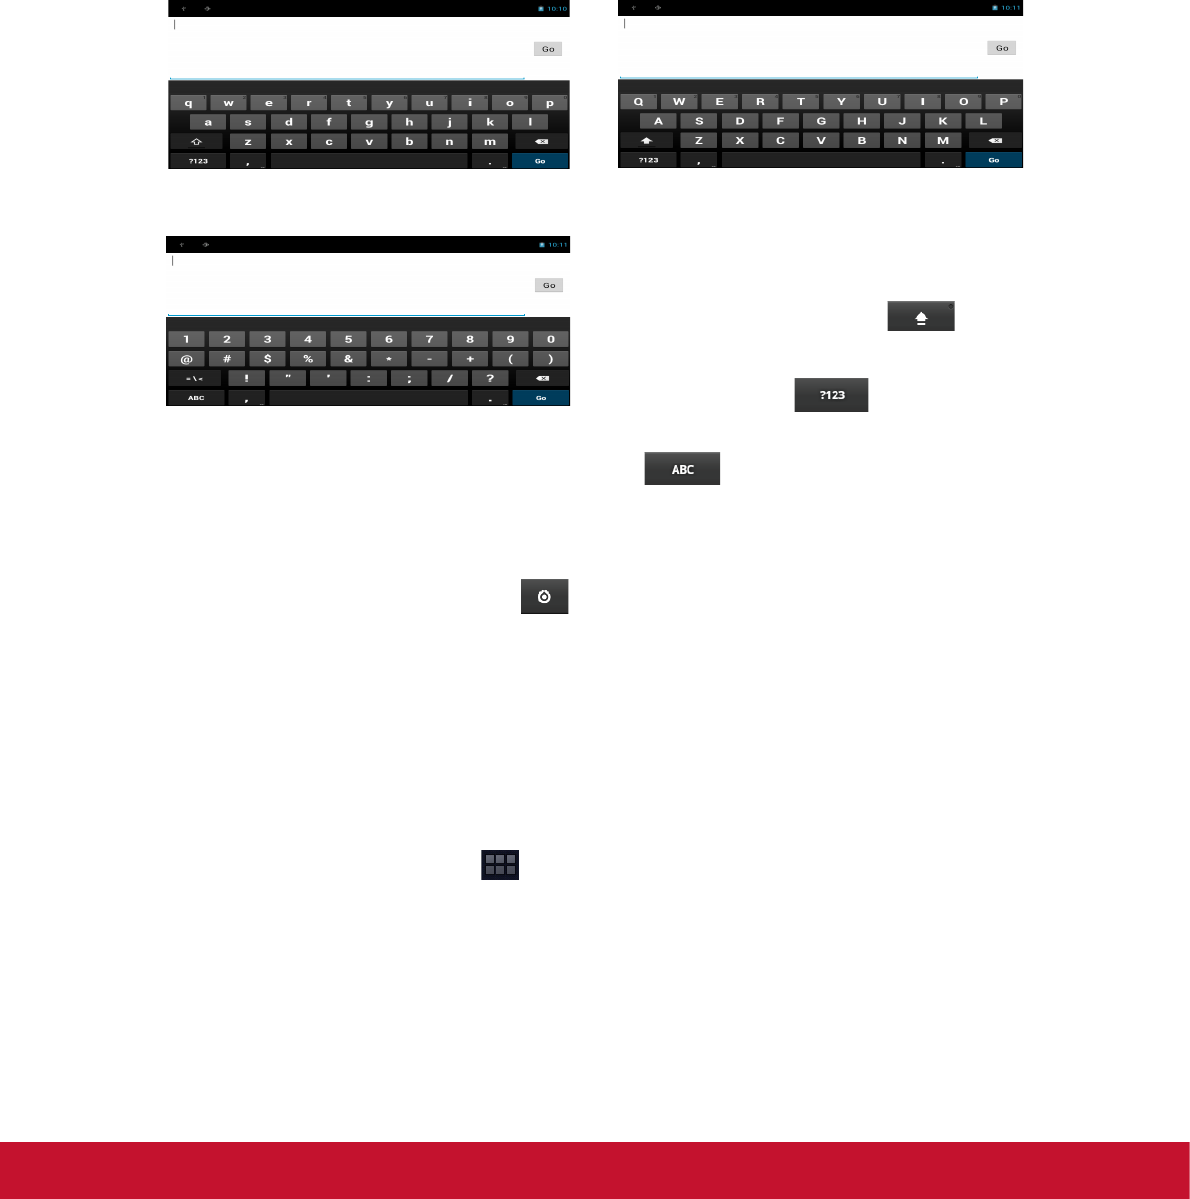
Lowercase keyboardUppercase keyboard
•Tap the keys to enter the characters.
•To toggle between upper and lower
case letter display, tap .
•To display the numeric and symbols
keyboard, tap . To switch
back to lower case letter display, tap
.
Numbers and symbols
14
•Auto-capitalization:Select to automatically
capitalize the first letter of a sentence.
•Vibrate on keypress: Select to activate
vibration when a key is touched.
•Sound on keypress: Select to activate a
clicking sound when a key is touched.
•Popup on keypress: Select to enter a
highlighted word automatically if a space or
punctuation symbol is typed.
•Show settings key: Select to activate a Setting
key on keypad for setting.
•Voice input key : Select to activate voice input
key.
•Auto correction : Select to enter a highlighted
word automatically if a space or punctuation
symbol is typed.
•Show correction suggestions : Select to
display suggested words as you type.
3.3 Using User Dictionary
Select to add user preset words to the dictionary.
Adding Words in the Dictionary
1.From the Home screen, tap > Settings > Language & input.
2.Tap User dictionary.
3.To add a new word, tap > Add.
4.Enter the word you want to add, and touch OK.
Editing Words in the Dictionary
1.From the Home screen, tap > Settings > Language & input.
2.Tap User dictionary.
3.Do one of the following:
•To edit the word, tap a word. Revise the selected word and tap OK.
•To delete the word from the dictionary, tap .
15
Chapter 4: Email
Use Email to send and receive email messages via your internet email accounts.
4.1 Email Accounts
Your device can send and receive emails just as you do with a computer. Your device
supports email accounts provided by an Internet Service Provider (ISP) or web-based
email, such as Hotmail, Yahoo! Mail, etc.
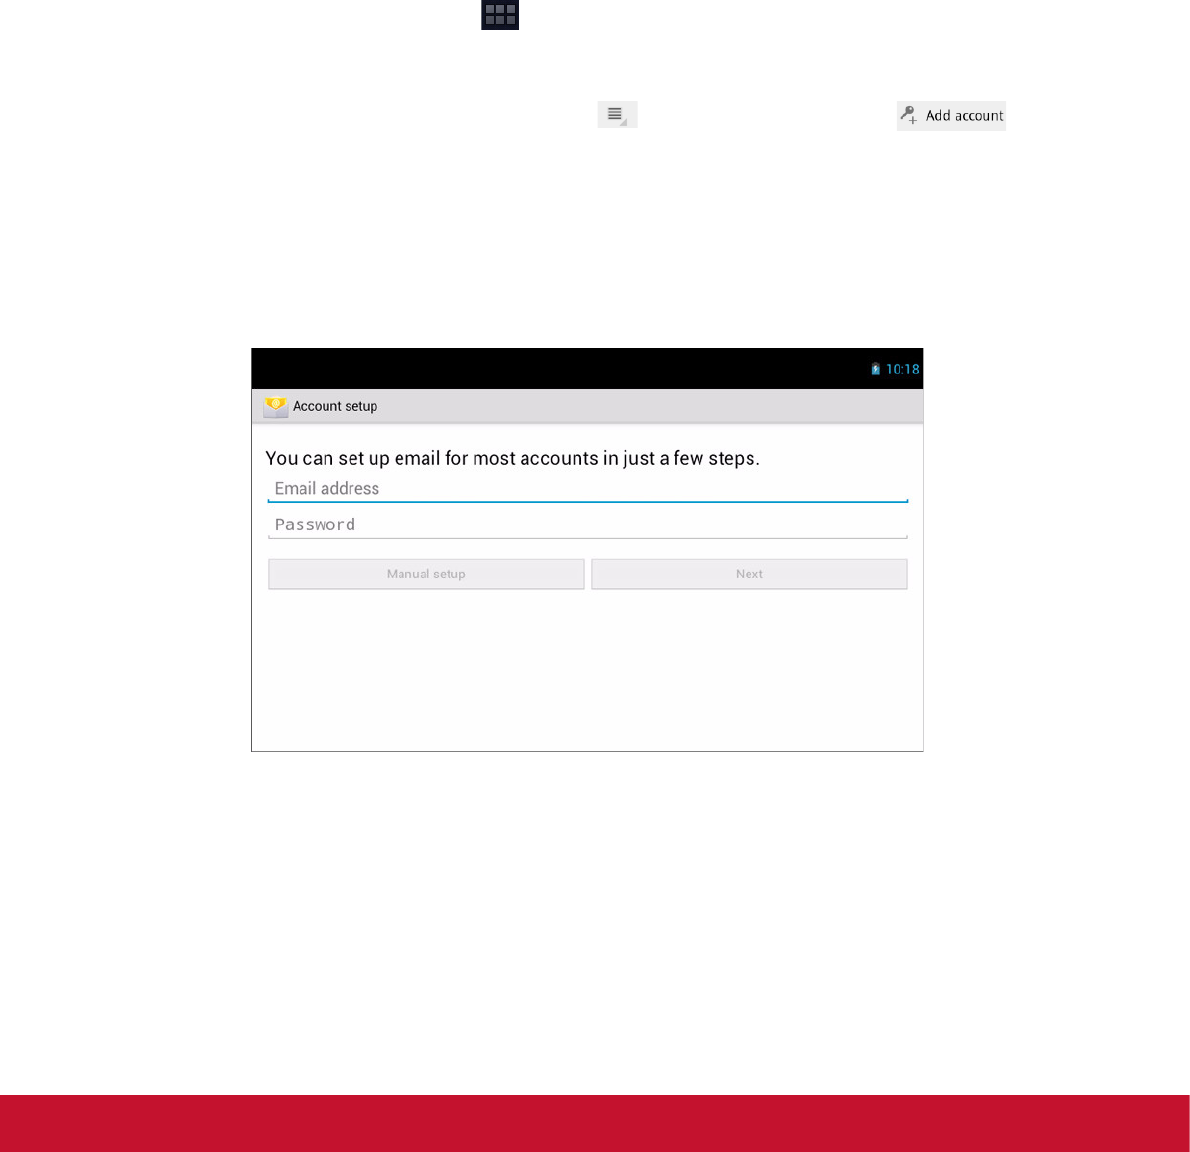
Setting up an Internet email account
1.From the Home screen, tap > Email.
2.Enter your Email address and Password.
3.Tap Next. The device will automatically retrieve the email settings.
•To add another email account, tap > Account settings > .
4.Enter Your Name and Accountdisplay name.
NOTE: The Account display name is the name shown to the recipients of your
emails.
5.Tap Next.
Once the account set up is completed, the device will automatically retrieve your
emails.
16
Viewing email accounts
1.From the Home screen, tap > Email.
2.Tap the account picker box at the top left of the
screen.
3.Tap the account you want to access from the
available email accounts.
Customizing email settings
Configure message settings using the Account
settings menu.
1.From the Home screen, tap > Email.
2.Tap the account you want to access.
3.Tap > Account settings to open the email
setting menu.
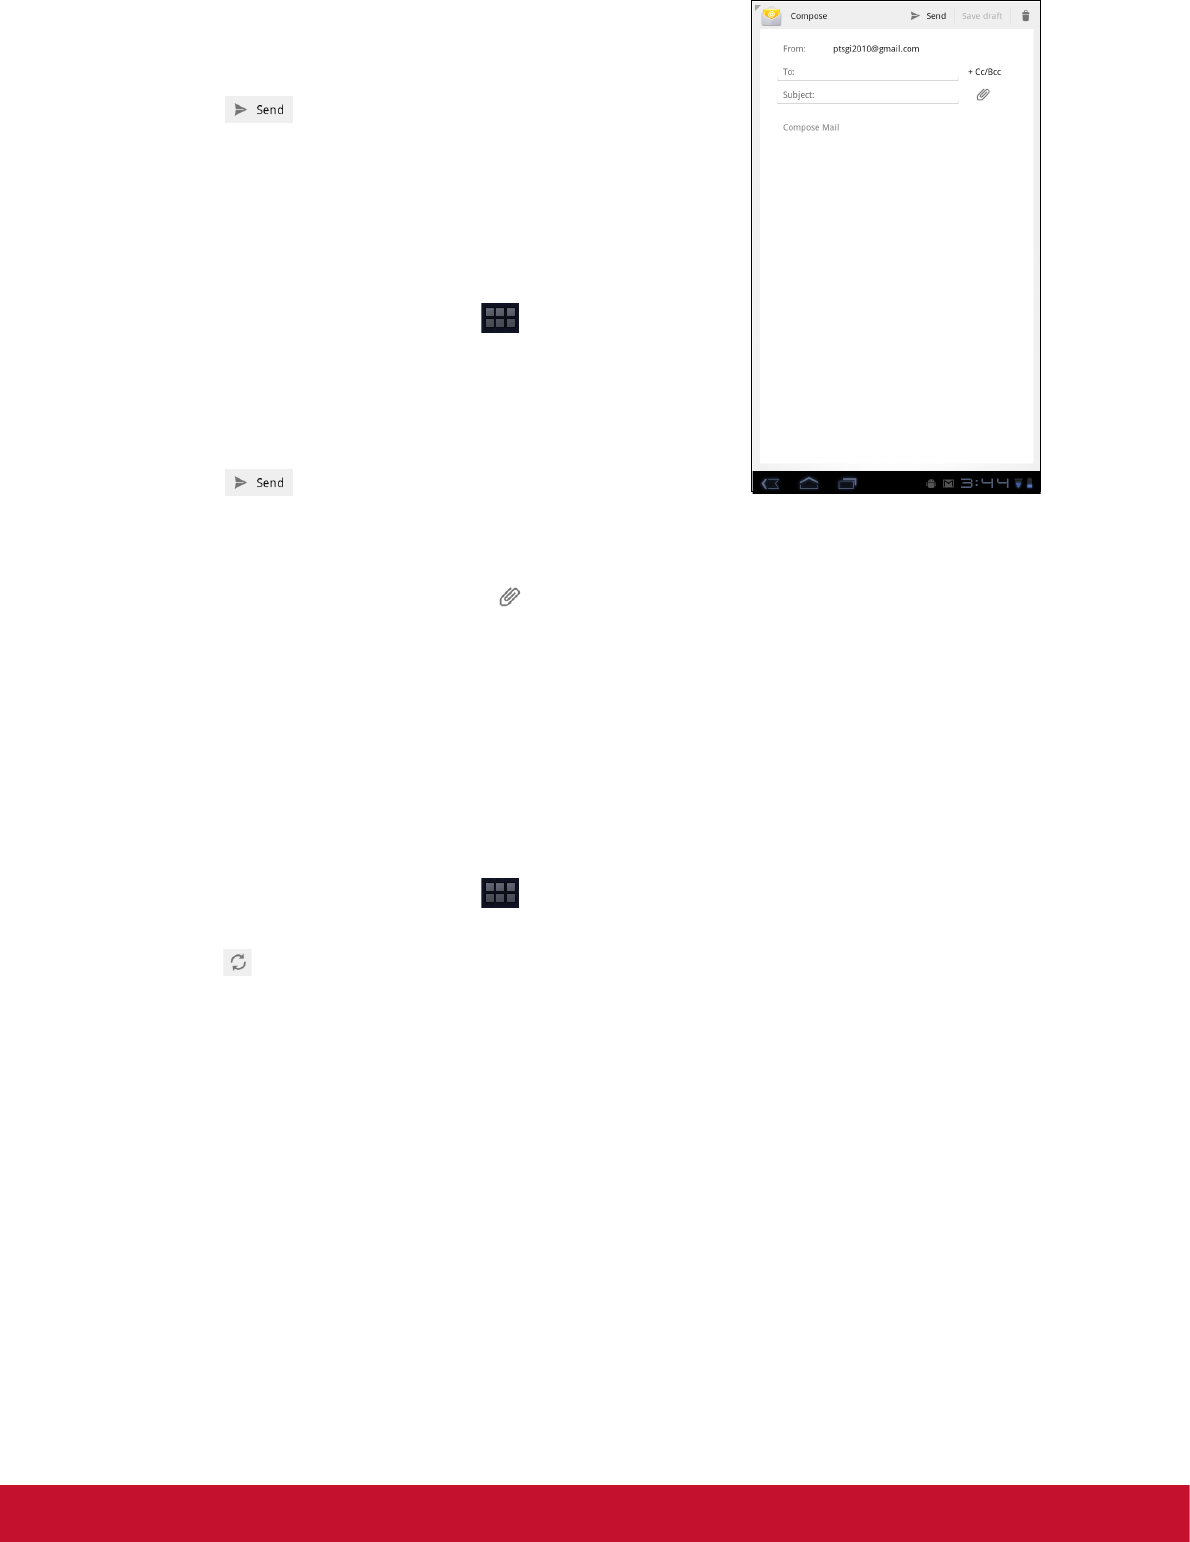
Composing and sending emails
1.From the Home screen, tap > Email.
2.Tap an email account.
3.Tap .
17
4.In the To field, enter the recipient’s email address.
5.Enter a Subject.
6.Compose your email.
7.Tap .
Sending an email from Contacts
You can send an email to a contact with an email
address stored in Contacts.
1.From the Home screen, tap > Contacts.
2.Tap a name to open contact.
3.Tap Email Home or Email Work.
4.Enter a Subject.
5.Compose your email.
6.Tap .
Adding attachments to an email message
1.On the Compose screen, tap .
2.Select the file that you want to attach.
Receiving emails
Emails are automatically received in your Inbox when the device connects to a
wireless network.
To manually receive emails
1.From the Home screen, tap > Email.
2.Tap an email account.
3.Tap .
Reading and replying to emails
Inbox displays email headers. Download the email to view the complete content.
To download attachments
•With POP3 email accounts, attachments are downloaded when you download the
complete message.
•With IMAP4 email accounts, tap the attachment to mark it for download. The
attachment is downloaded the next time you connect to your email server.
NOTE: Only supported file types can be opened on the device.
18
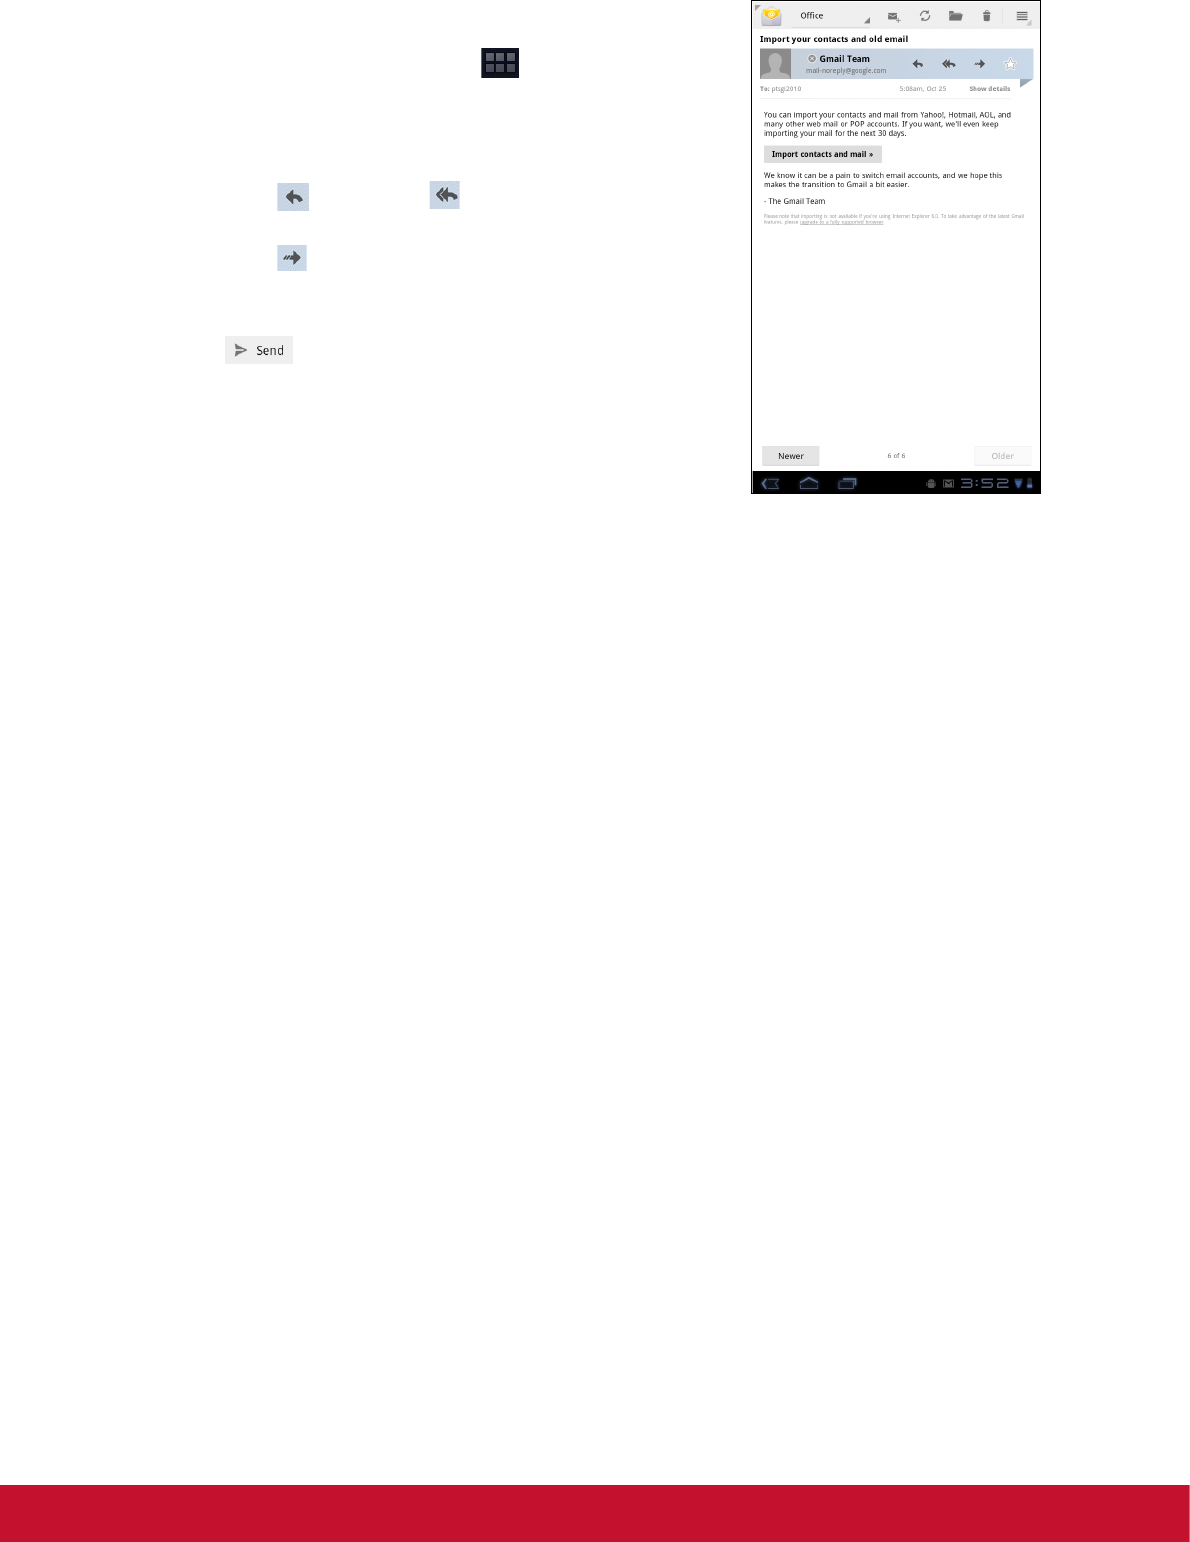
To reply or forward an email
1.From the Home screen, tap > Email.
2.Tap an email account.
3.Tap a message to open.
4.Do any of the following:
•Tap (Reply) or (Reply all) to reply the
email.
•Tap (Forward). Then enter the recipient in
the To field.
5.Compose your message.
6.Tap .
19
Chapter 5: Using Internet
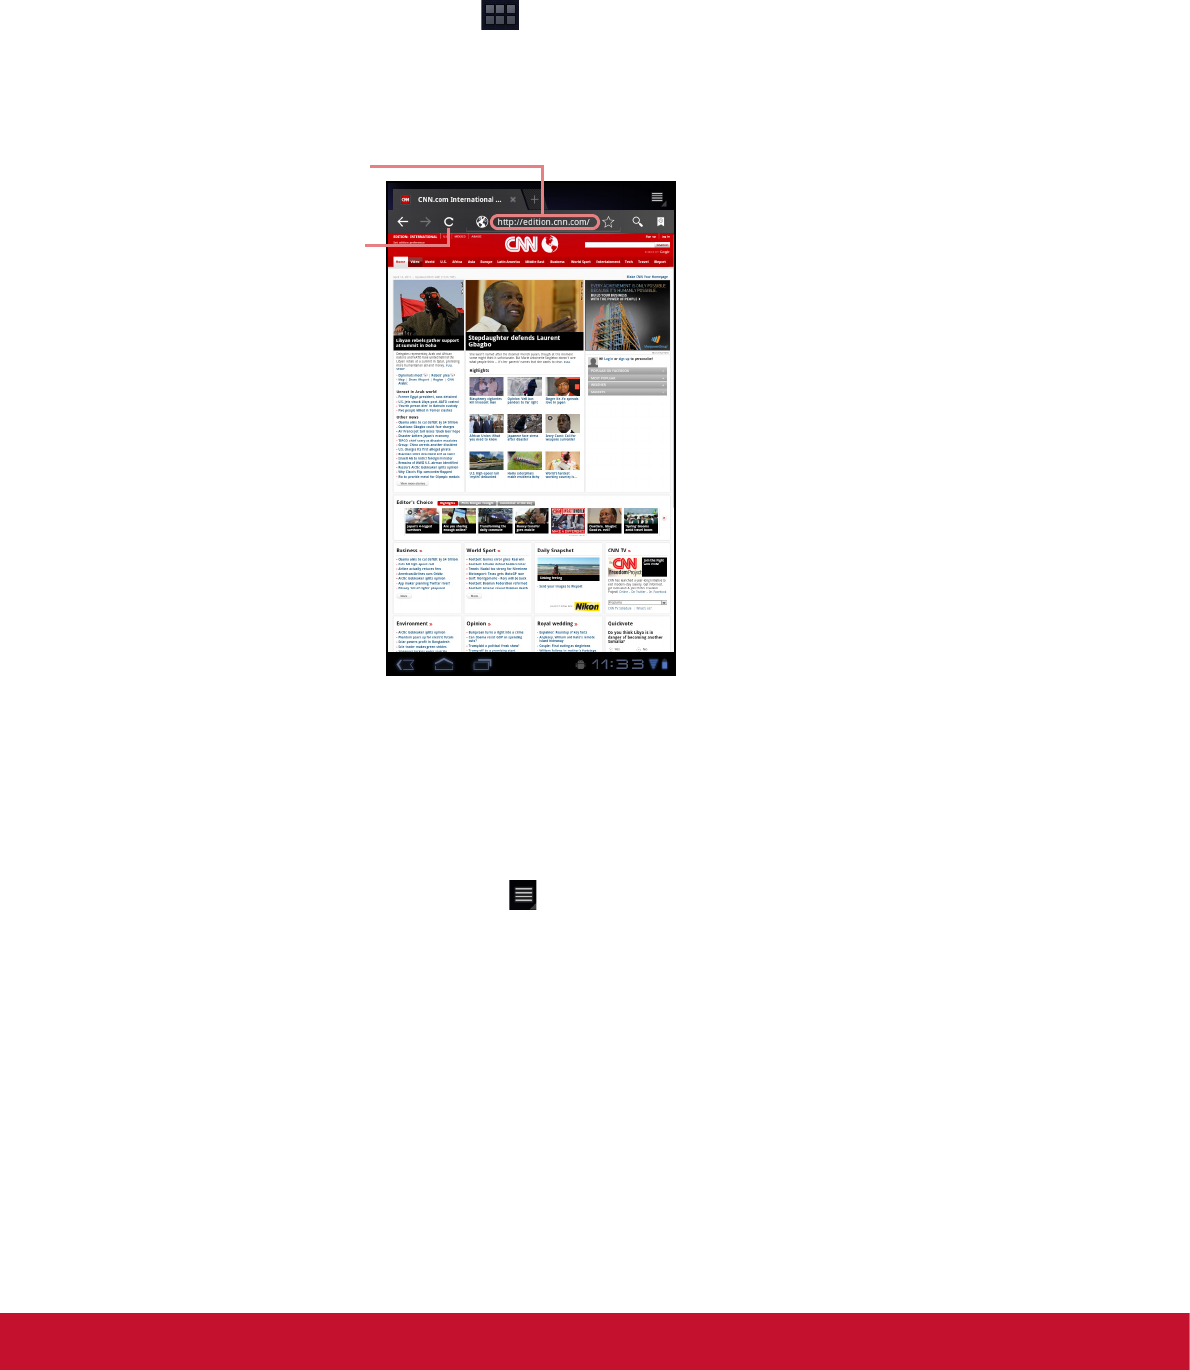
5.1 Browsing Web Pages
1.From the Home screen, tap > Browser.
2.Tap the address bar.
3.Type the URL. As you type, a list of URL suggestions appears on the screen.
4.Tap a match item in the list.
To scroll the page
To scroll up or down, swipe your finger down or up. To scroll left or right, tap and swipe
your finger to the right or left.
To set Home page
1.While viewing a web page, tap > Settings > General > Set home page.
2.Enter the URL of the page that you want to set as home page.
3.Select Current page or Default page.
4.Tap OK to save your settings.
Address bar
Tap to
update the
web page
content.
20
Managing web pages
While viewing a web page, tap to configure the browser settings:
•General: Select to set home page, and configure
sync data and autofill settings.
•Privacy & Security: Select to configure privacy and
security settings including cache, history, cookies,
form data, location, and etc.
•Advanced: Select to set search engine, open in
background, enable JavaScript, enable plug-ins,
advanced settings for individual website, page
content settings, and reset all settings to the factory
default.
21
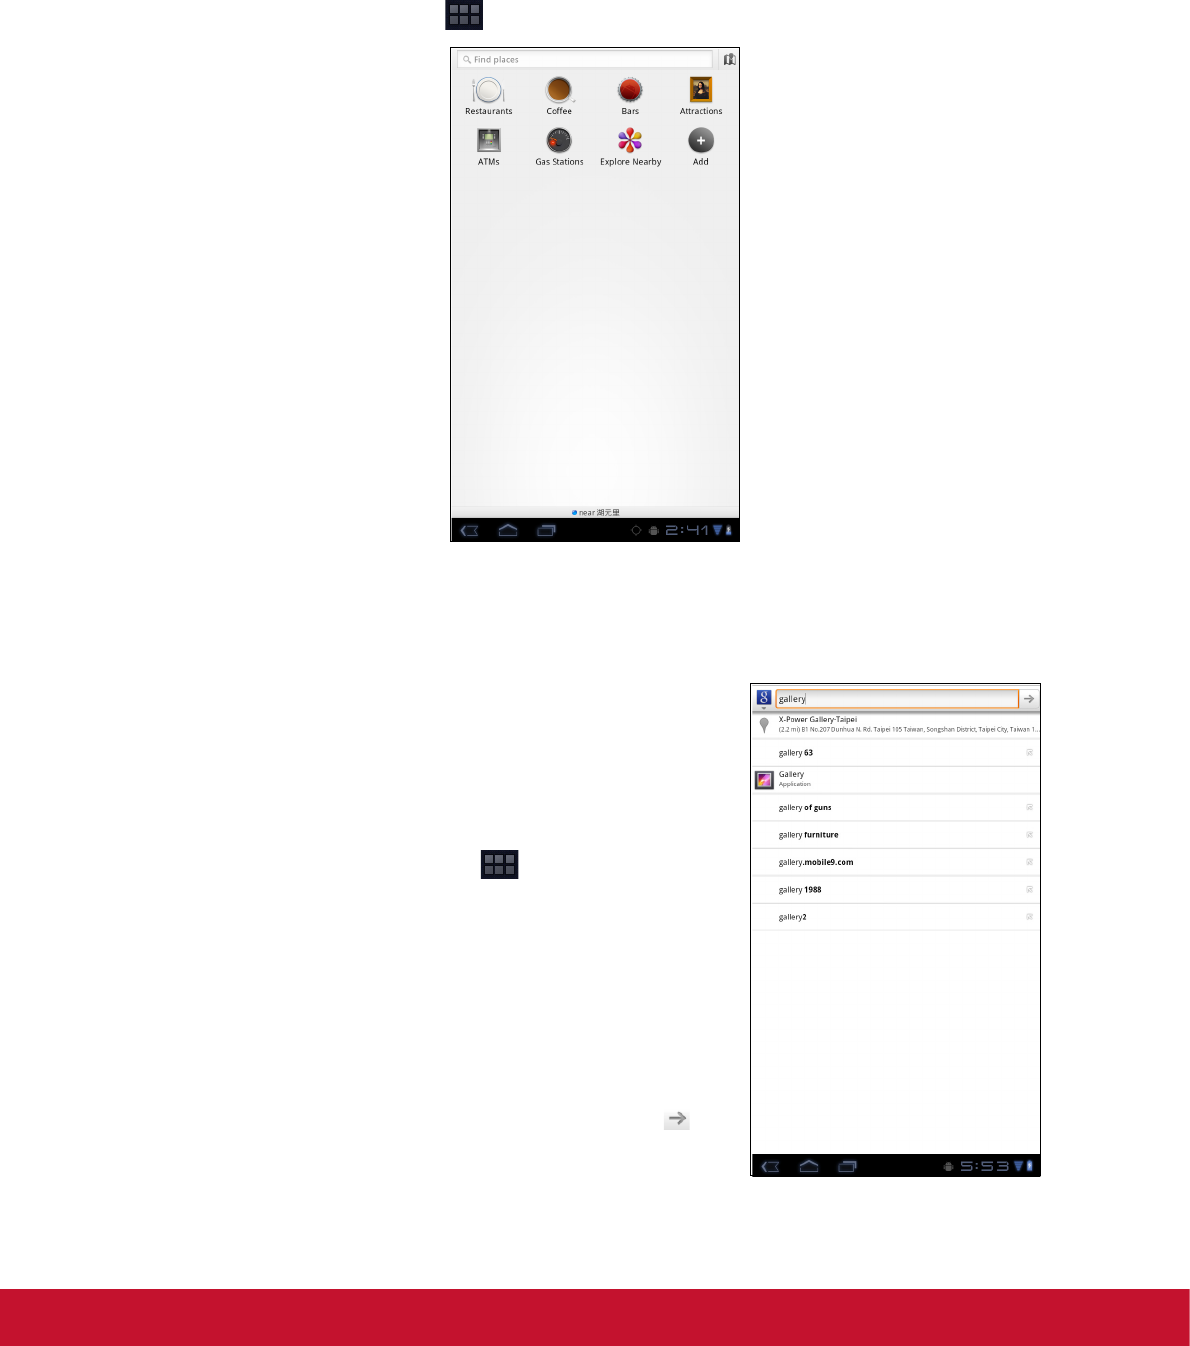
Chapter 6: Google Apps ( Select Model)
The following sections cover Android and Google applications that come pre-installed
on your device depends on models.
NOTE: ViewPad E70 is not available for these Android/ Google applications.
6.1 Gmail
Gmail is the email service provided by Google.
Signing in to Gmail
1.From the Home screen, tap > Gmail.
2.Tap Create or Sign in your Google account.
3.Follow the on-screen instructions to login or create
your Gmail account.
4.Once logged in, you can begin reading and sending
emails from your Gmail account.
Refreshing Gmail
1.From the Home screen, tap > Gmail.
2.Tap Menu > Refresh.
Creating and sending emails
1.From the Home screen, tap > Gmail.
2.Tap Menu > Compose.
3.Enter the recipient.
4.Enter the subject and compose your message.
5.If necessary, do any of the following:
•To add Cc/Bcc, tap Menu > Add Cc/Bcc.
•To attach files, tap Menu > Attach.
•To save as draft, tap or tap Menu > Save
draft.
6.Tap to send the email.
22
Reading and replying to emails
1.From the Home screen, tap > Gmail.
2.Tap an email to read.
3.To reply, tap (Reply) or (Reply all).
4.Compose your message.
5.Tap to send the email.
To preview and download attachments
1.From the Home screen, tap > Gmail.
2.Tap an email to read.
3.Scroll to the end of the email and do any of the
following:
•To preview an attachment, tap Preview.
•To download an attachment, tap Download.
Forwarding emails
1.From the Home screen, tap > Gmail.
2.Tap an email to open.
3.To forward, tap .
4.Enter the recipient.
5.Tap to send the email.
Managing emails
To delete emails
1.From the Home screen, tap > Gmail.
2.Tap and hold an email, then tap Delete.
To add a star to emails
1.From the Home screen,tap > Gmail.
2.Tap the star icon.
To select emails
1.From the Home screen,tap > Gmail.
2.Tap the check icon.
To mark emails as read or unread
1.From the Home screen, tap > Gmail.
2.Tap and hold an email, then tap Mark read or Mark
unread.
23
To place emails in archive
1.From the Home screen, tap > Gmail.
2.Tap and hold an email, then tap Archive.
To mute emails
1.From the Home screen, tap > Gmail.
2.Tap and hold an email, then tap Mute.
To change labels of emails
1.From the Home screen, tap > Gmail.
2.Tap and hold an email, then tap Change labels.
3.Tap a label, then tap OK.
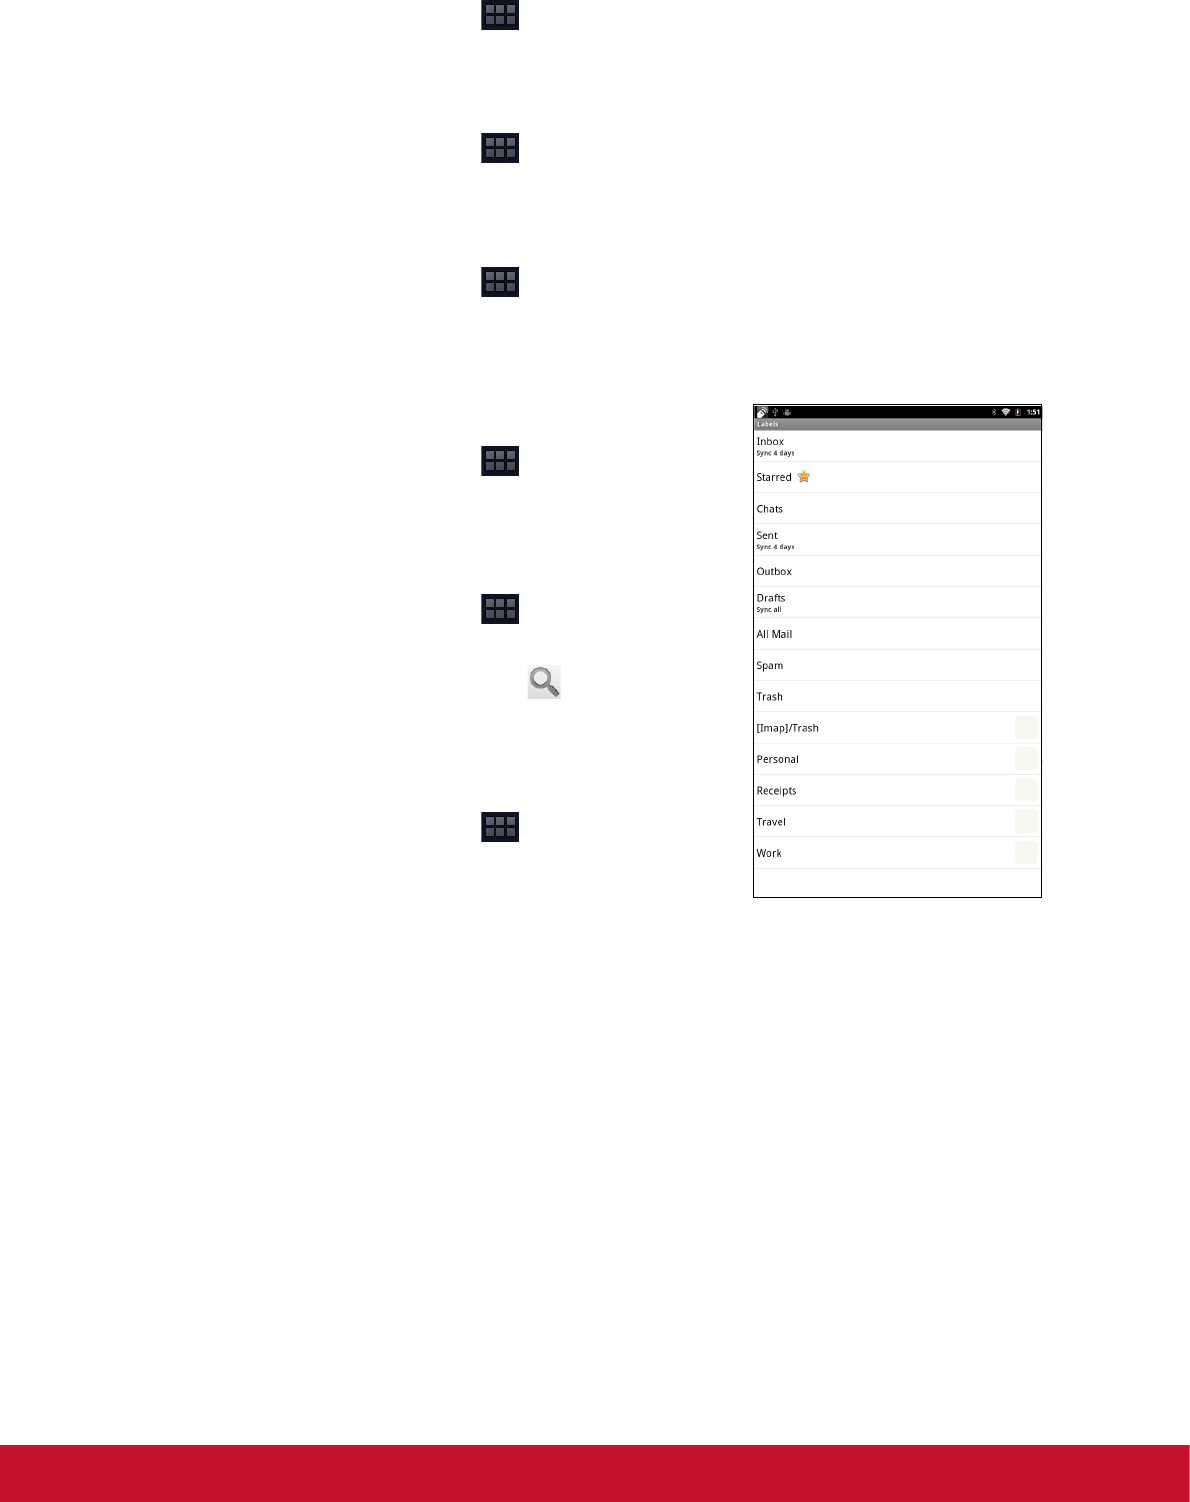
Viewing folder labels
1.From the Home screen, tap > Gmail.
2.Tap Menu > Go to labels.
Searching for emails
1.From the Home screen, tap > Gmail.
2.Tap Menu > Search.
3.Type the text to search, then tap .
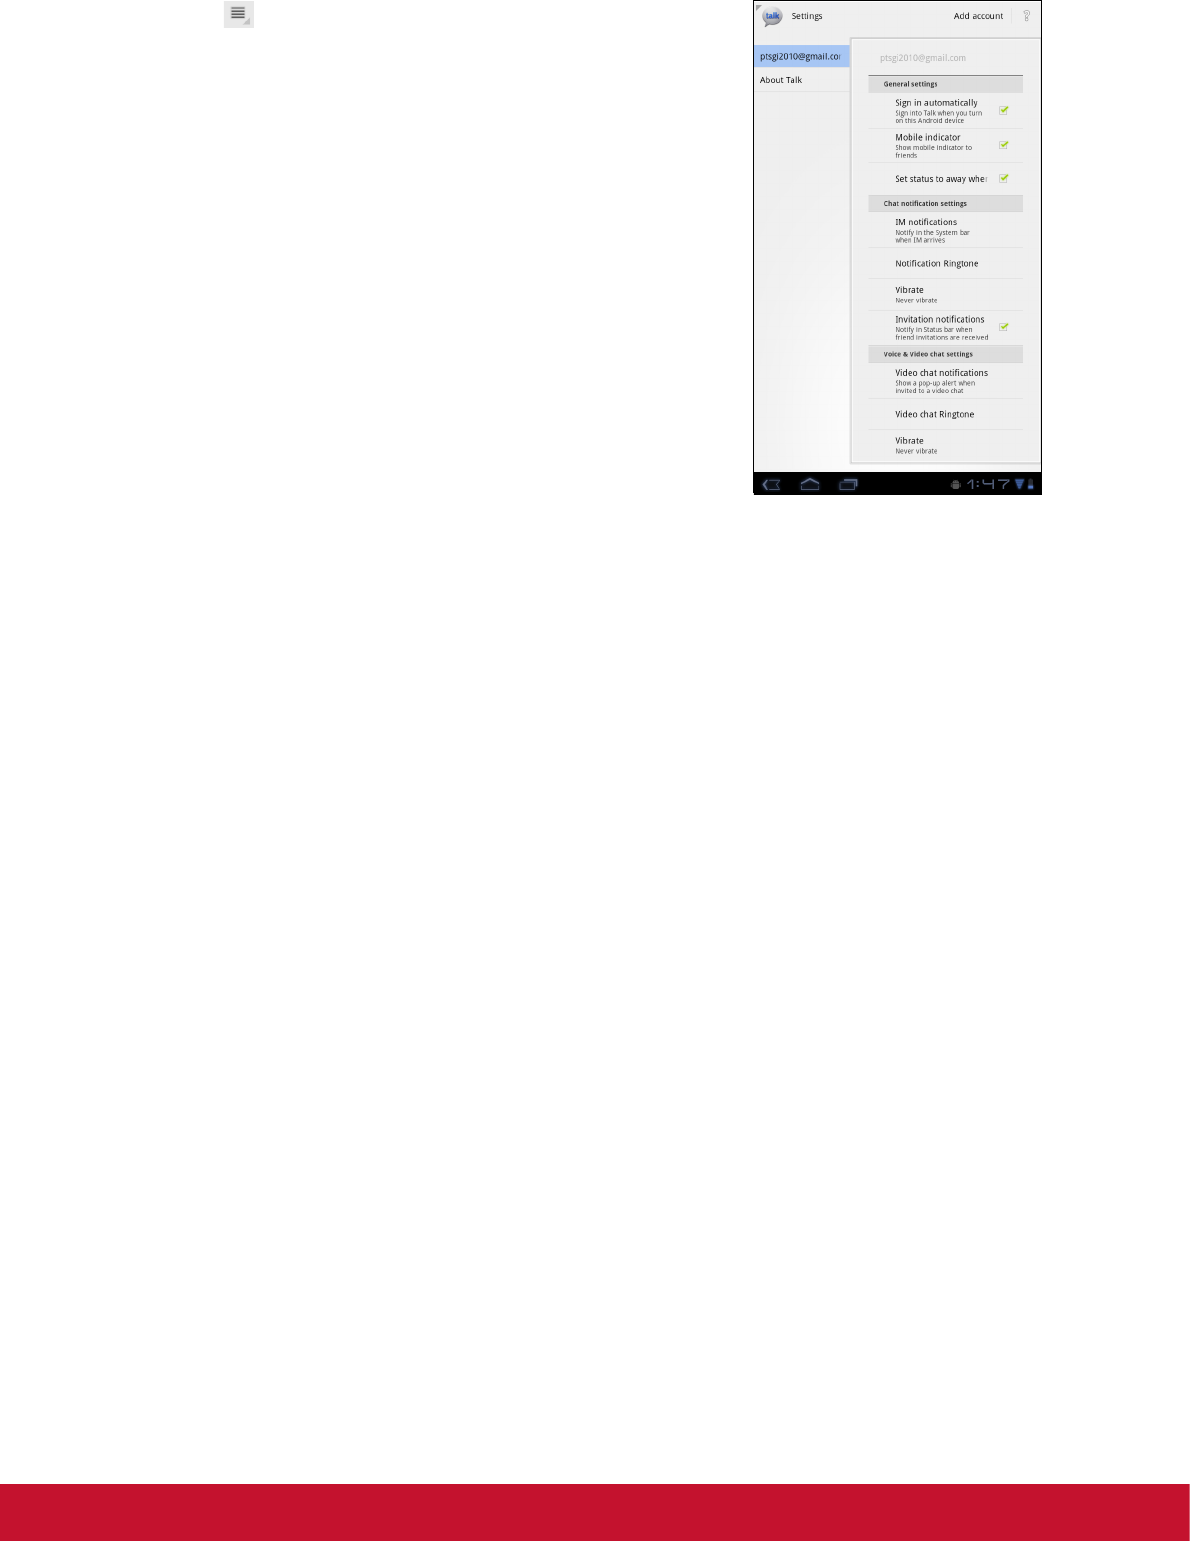
Configuring Gmail settings
1.From the Home screen, tap > Gmail.
2.Tap Menu > More > Settings.
3.Tap one of the following settings:
•Signature: Add a text signature to your outgoing emails.
•Confirm actions: Prompt for confirmation before archiving, deleting, or send-
ing emails.
•Reply all: Make “Reply all” as the default when replying emails.
•Auto-advance: Select which screen to show after you delete or archive a
conversation.
•Message text size: Set the font size used in emails.
•Batch operations: Allow label operations on more than one conversation.
•Clear search history: Remove all the searches you have performed.
•Labels: Select which labels are synchronized.
•Email notifications: Displays a notification icon on the status bar when an
Gebruikershandleiding.com neemt misbruik van zijn services uitermate serieus. U kunt hieronder aangeven waarom deze vraag ongepast is. Wij controleren de vraag en zonodig wordt deze verwijderd.
Product:
Spelregels forum
Om tot zinvolle vragen te komen hanteren wij de volgende spelregels:
lees eerst de handleiding door;
controleer of uw vraag al eerder door iemand anders is gesteld;
probeer uw vraag zo duidelijk mogelijk te stellen;
heeft u een probleem en al geprobeerd om dit op te lossen, vermeld dit erbij aub;
heeft u een oplossing gekregen van een bezoeker dan horen wij dat graag in dit forum;
wilt u een reactie geven op een vraag of antwoord, gebruik dan niet dit formulier maar klik op de knop 'reageer op deze vraag';
uw vraag wordt direct op de website gezet; vermijd daarom persoonlijke gegevens in te vullen;
Belangrijk! Als er een antwoord wordt gegeven op uw vraag, dan is het voor de gever van het antwoord nuttig om te weten als u er wel (of niet) mee geholpen bent! Wij vragen u dus ook te reageren op een antwoord.
Belangrijk! Antwoorden worden ook per e-mail naar abonnees gestuurd. Laat uw emailadres achter op deze site, zodat u op de hoogte blijft. U krijgt dan ook andere vragen en antwoorden te zien.
Abonneren
Abonneer u voor het ontvangen van emails voor uw Viewsonic ViewPad G70 bij:
nieuwe vragen en antwoorden
nieuwe handleidingen
U ontvangt een email met instructies om u voor één of beide opties in te schrijven.
Ontvang uw handleiding per email
Vul uw emailadres in en ontvang de handleiding van Viewsonic ViewPad G70 in de taal/talen: Engels als bijlage per email.
De handleiding is 8,59 mb groot.
U ontvangt de handleiding per email binnen enkele minuten. Als u geen email heeft ontvangen, dan heeft u waarschijnlijk een verkeerd emailadres ingevuld of is uw mailbox te vol. Daarnaast kan het zijn dat uw internetprovider een maximum heeft aan de grootte per email. Omdat hier een handleiding wordt meegestuurd, kan het voorkomen dat de email groter is dan toegestaan bij uw provider.
Stel vragen via chat aan uw handleiding
Stel uw vraag over deze PDF
Uw handleiding is per email verstuurd. Controleer uw email
Als u niet binnen een kwartier uw email met handleiding ontvangen heeft, kan het zijn dat u een verkeerd emailadres heeft ingevuld of dat uw emailprovider een maximum grootte per email heeft ingesteld die kleiner is dan de grootte van de handleiding.
Er is een email naar u verstuurd om uw inschrijving definitief te maken.
Controleer uw email en volg de aanwijzingen op om uw inschrijving definitief te maken
U heeft geen emailadres opgegeven
Als u de handleiding per email wilt ontvangen, vul dan een geldig emailadres in.
Uw vraag is op deze pagina toegevoegd
Wilt u een email ontvangen bij een antwoord en/of nieuwe vragen? Vul dan hier uw emailadres in.