Projector features ...................................................................................................................................1
Using the product ..................................................................................5
Control panel.........................................................................................................................................5
Remote control .......................................................................................................................................8
Installing the batteries ..........................................................................................................................11
Remote control operation .....................................................................................................................12
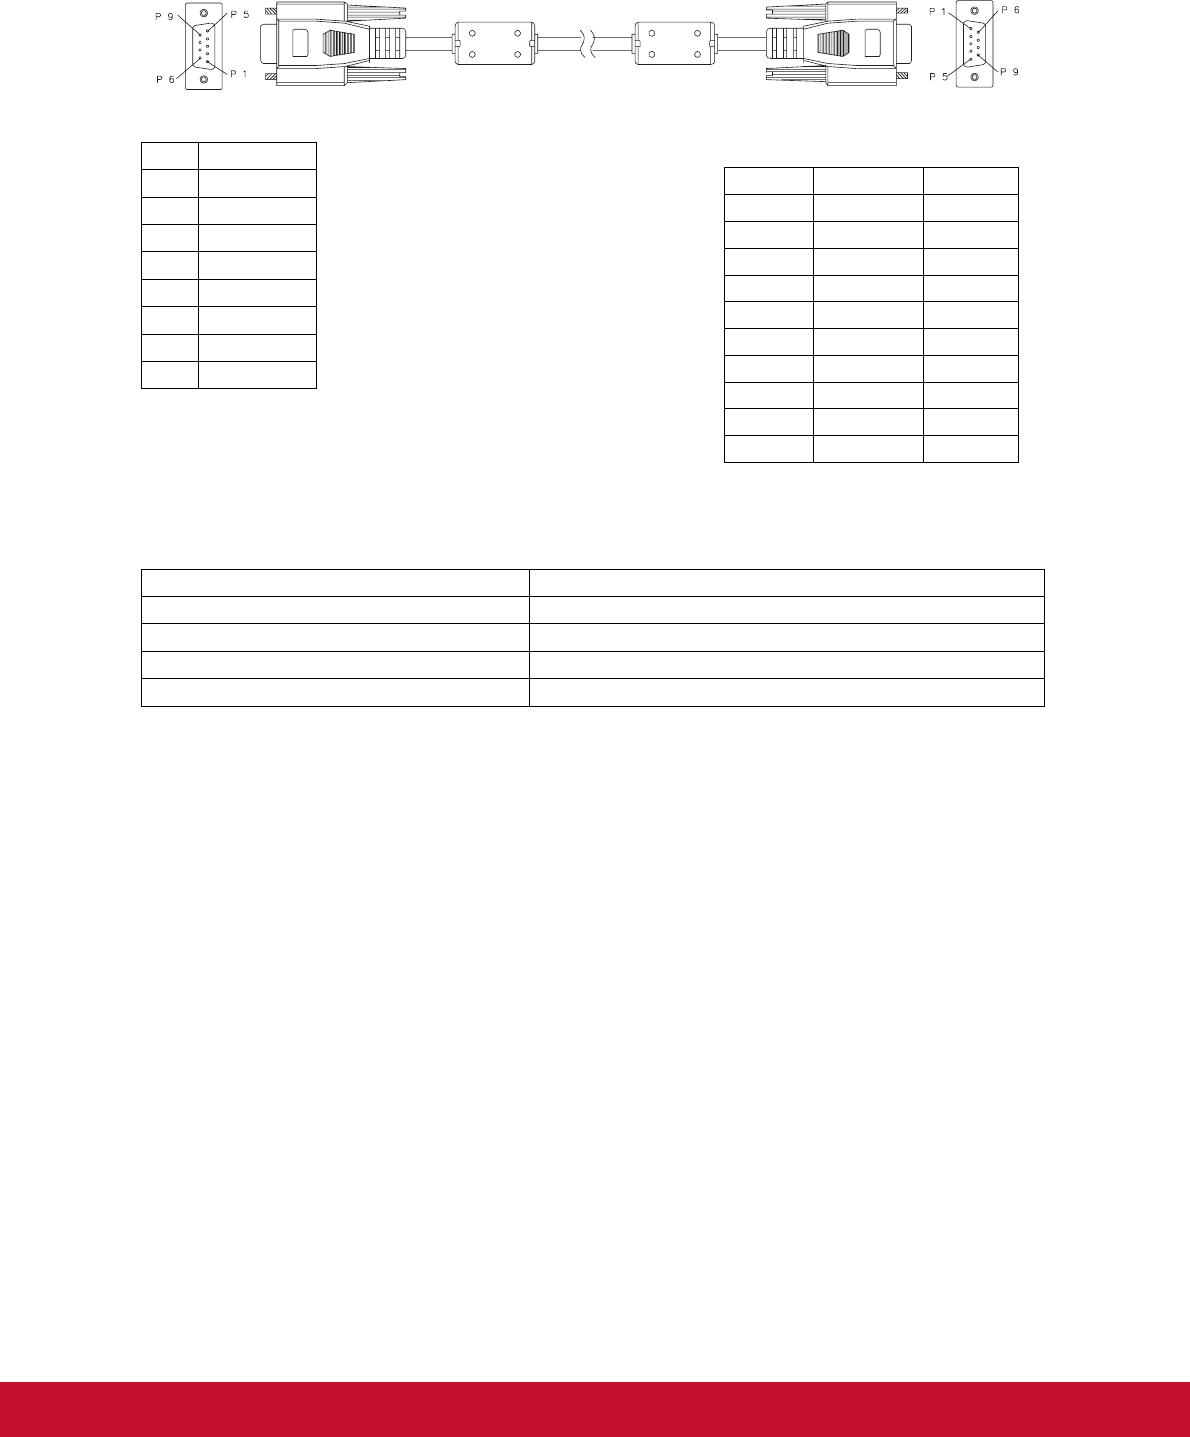
RS-232 command and configuration ...................................................................................................51
IR control table .....................................................................................................................................57
1
Introduction
Projector features
The projector integrates high-performance optical engine projection and a user - friendly
design to deliver high reliability and ease of use.
The projector offers the following features:
•Compatibility with Macintosh
®
computers
•Compatibility with NTSC, PAL, SECAM and HDTV
•D-Sub 15-pin terminal for analog video connectivity
•Equipped with HDMI connection supporting HDCP
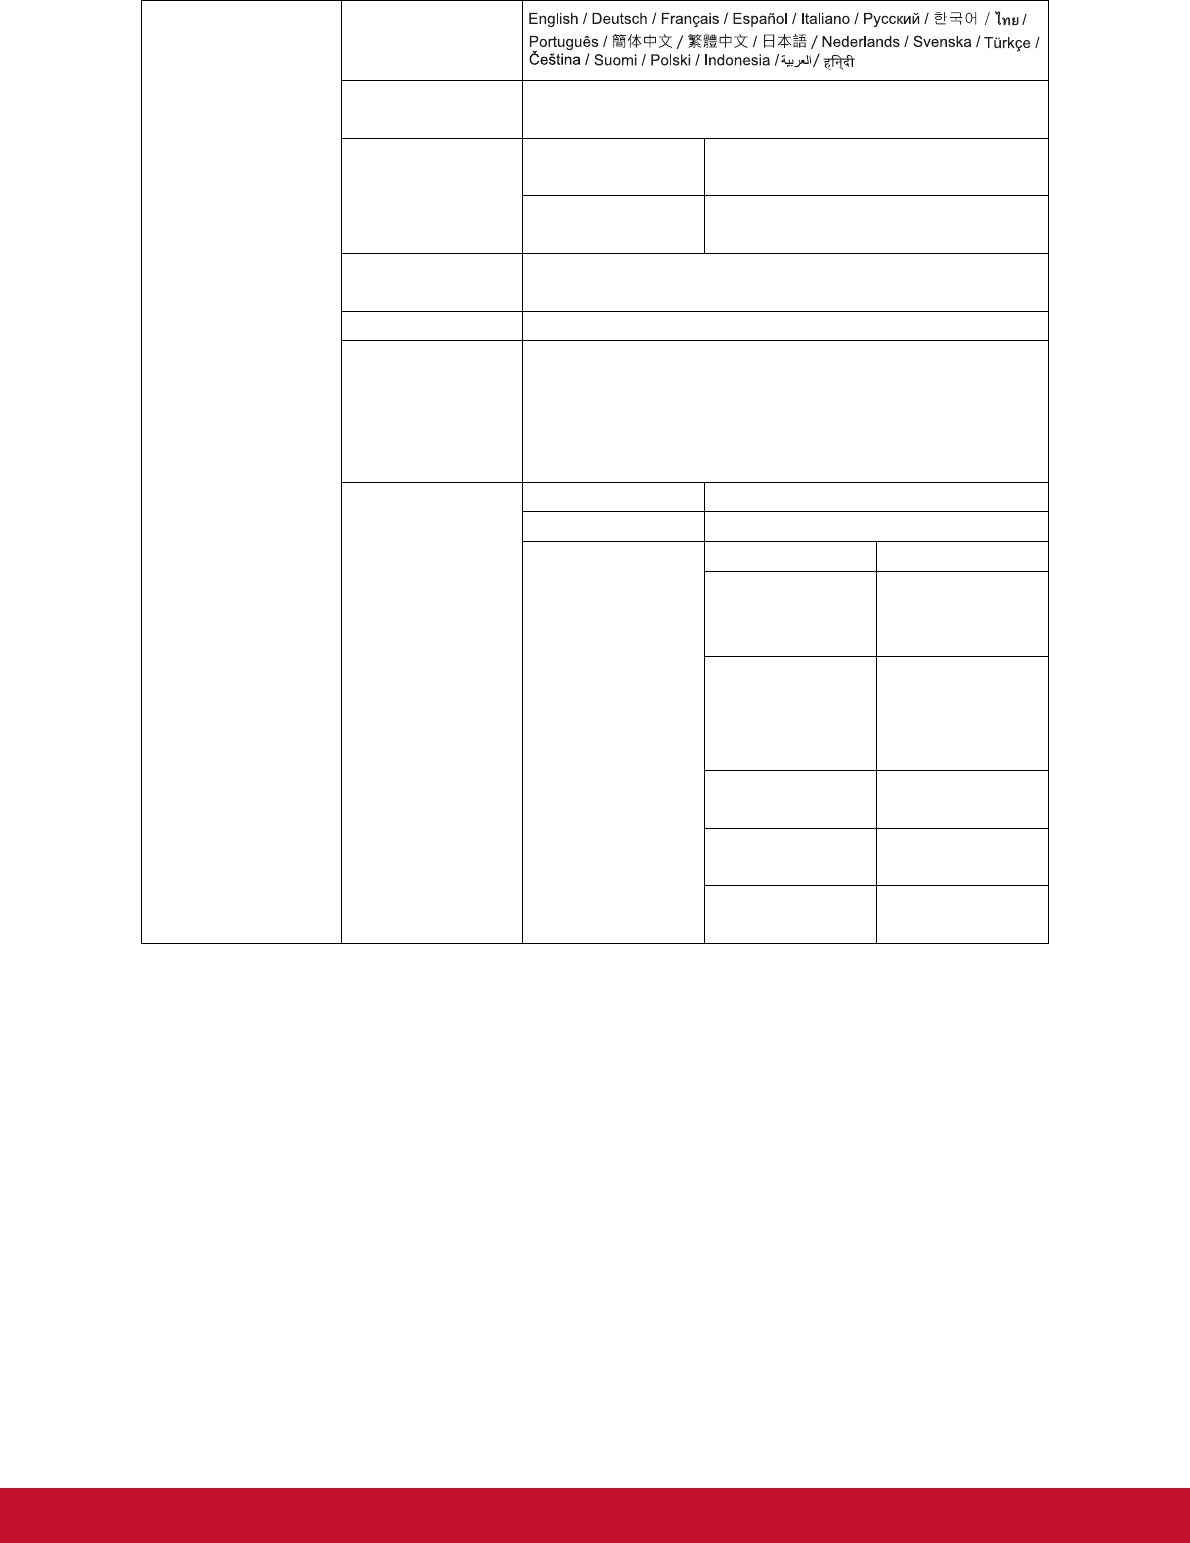
•Multi-language On-Screen Display (OSD) menus
•Digital keystone correction to correct distorted images
•RS-232 connector for serial control
•Power saving function decreasing the power consumption of the lamp by up to 30%
when no input signal can be detected for a set period of time.
•Presentation timer for better control of time during presentations
•Blu-Ray 3D function supported
•Selectable quick power off function
•Color Management allowing color adjustments to your liking
•Screen Color correction allowing projection on surfaces of several predefined colors
•Quick auto search speeding up the signal detecting process
•HDMI CEC (Consumer Electronics Control) function allows synchronized power
ON/OFF operation between the projector and a CEC-compatible DVD player device
connected to the HDMI input of the projector
Note
•The information in this manual is subject to change without notices.
•The reproduction, transfer or copy of all or any part of this document is not permitted
without express written consent.
2
Package contents
When you unpack the projector, make sure you have all these components:
Note
•Contact you dealer immediately if any items are missing, appear damaged, or if the unit
does not work
.
•For maximum protection of the product, please save the original shipping carton and
packing materials and repack your product as it was originally packed at the factory if
you need to ship it.
PJD5155L/PJD5255L/
PJD5555LW projector
PJD5350LS/
PJD5550LWS projector
Remote control (IR) & batteries
(AAA *2 PCS)
AC power cordVGA cable (D-SUB to D-SUB)ViewSonic CD wizard
Optional accessories
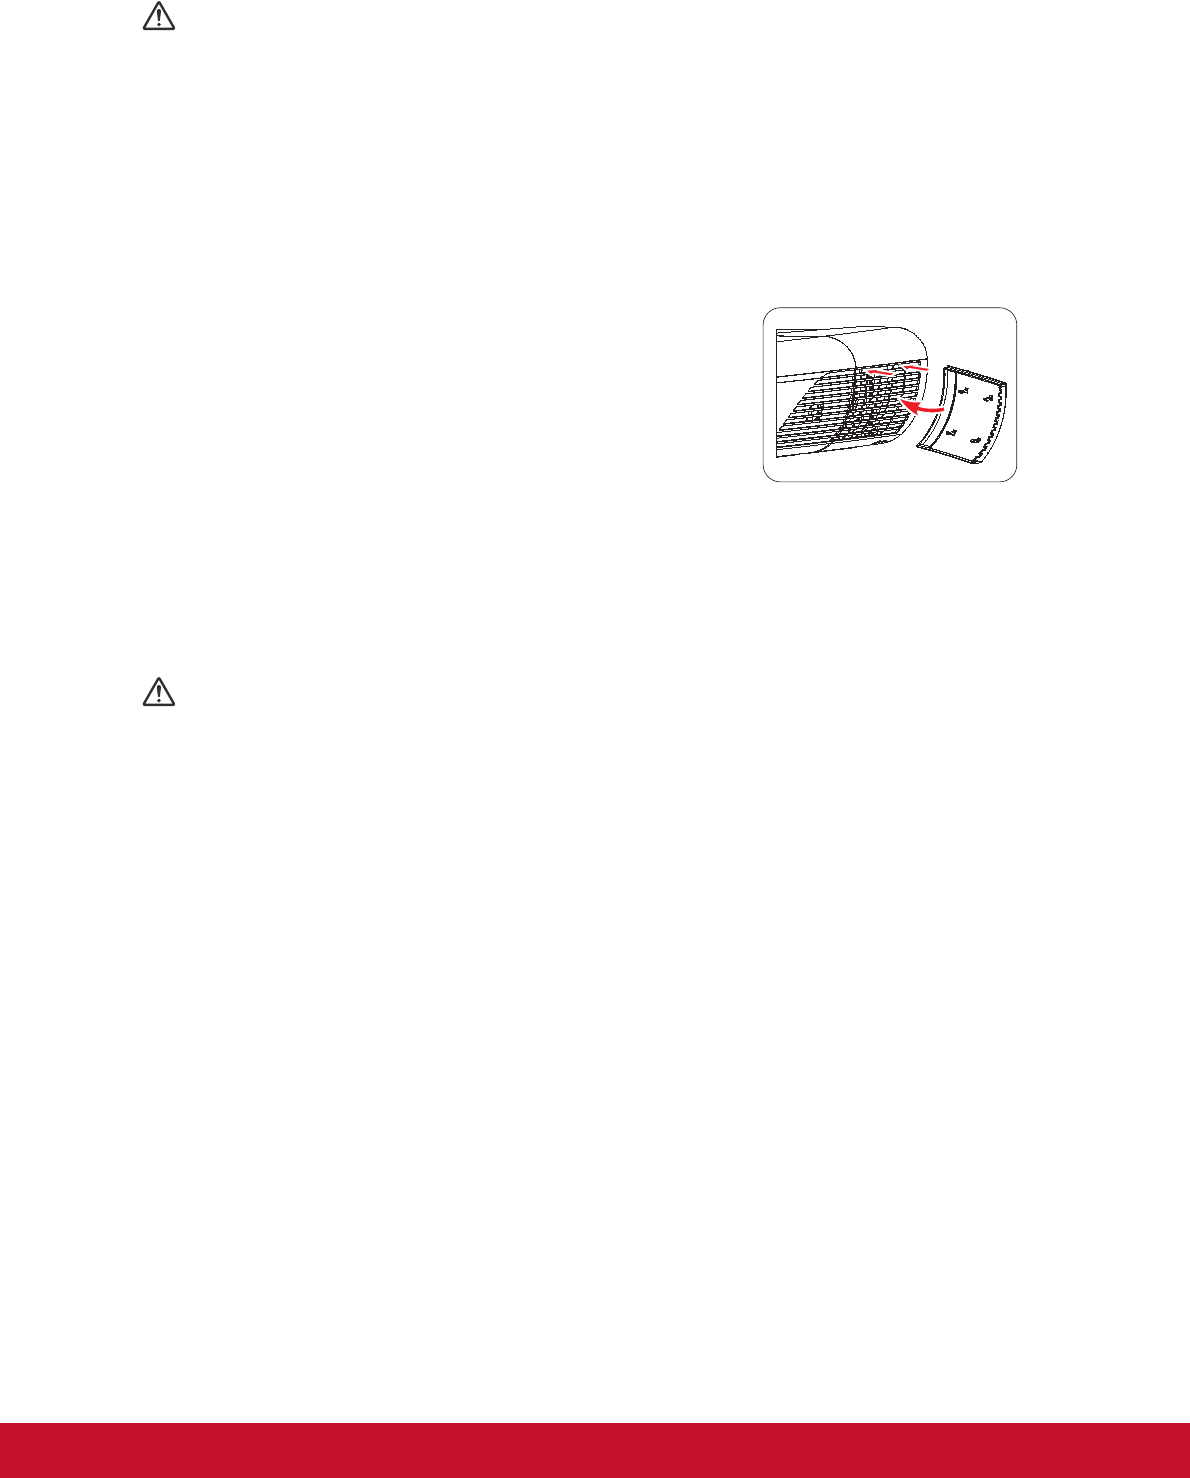
1.Cable management cover (rear cable cover)
2.Carry bag
3.Dust filter
4.Lens cap for PJD5155L/PJD5255L/PJD5555LW
Quick start guide
Power
COMP1COMP2HDMI
Source
Enter
Menu3DExit
PgUp
Mouse
Pattern
Blank
PgDn
ID set12
345
678
Eco
Mode
Color
Mode
RCP01051
Auto
Sync
3
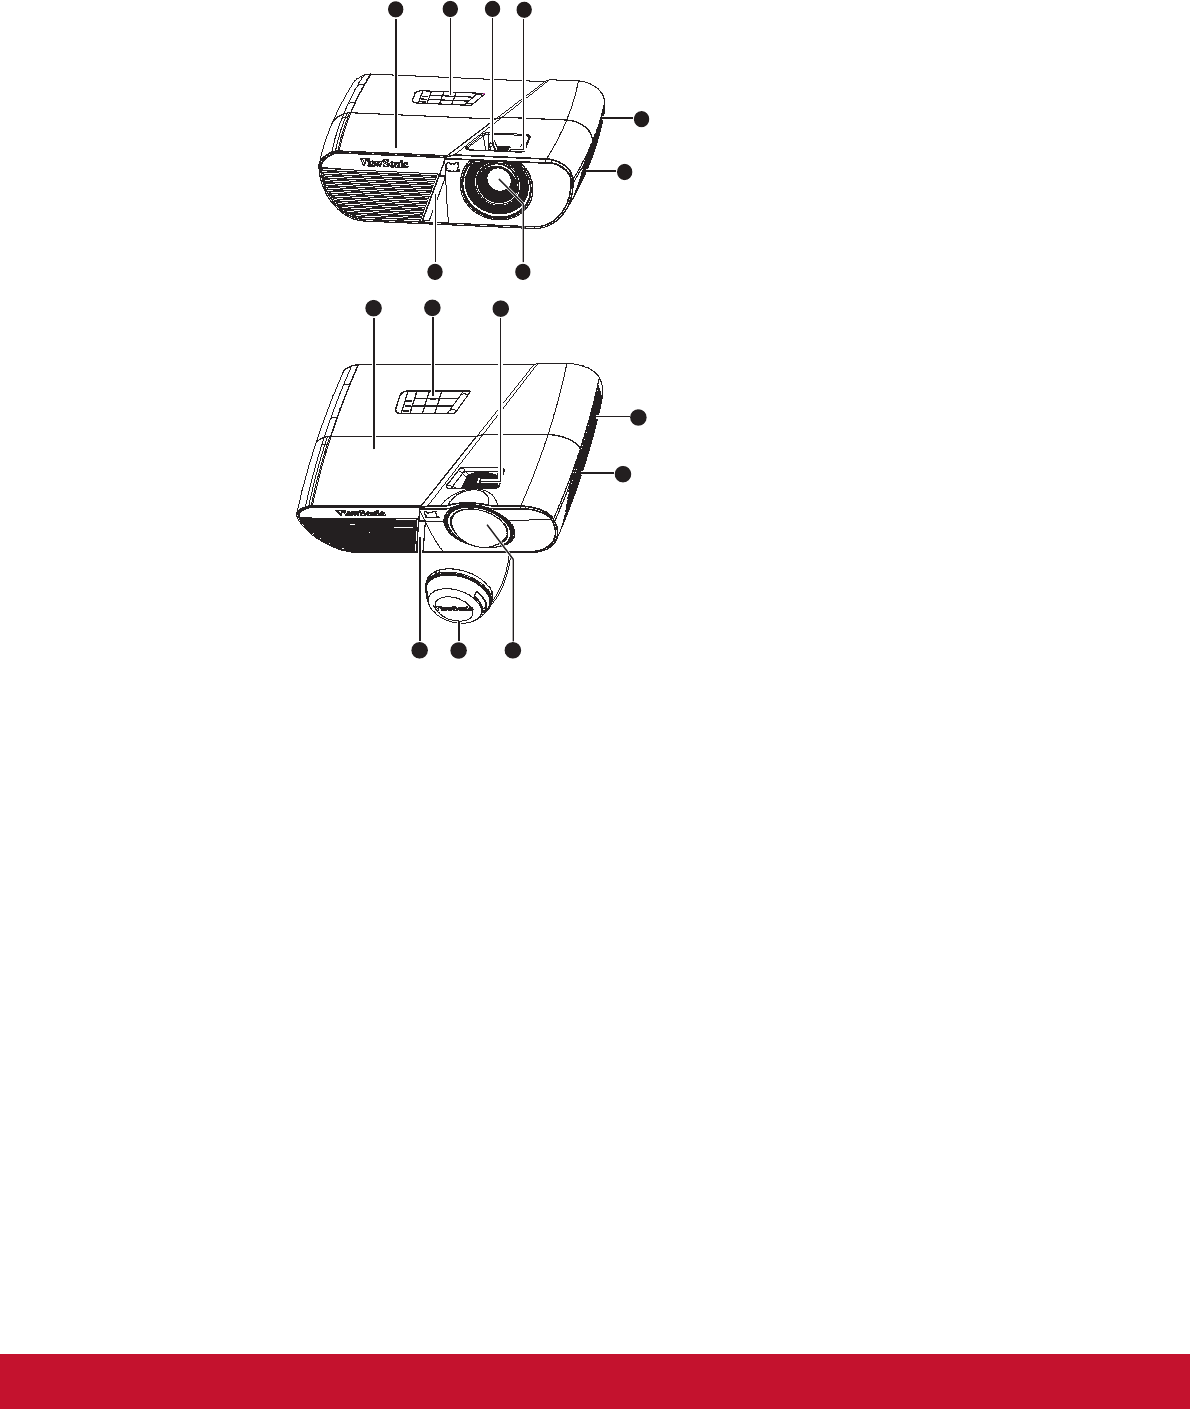
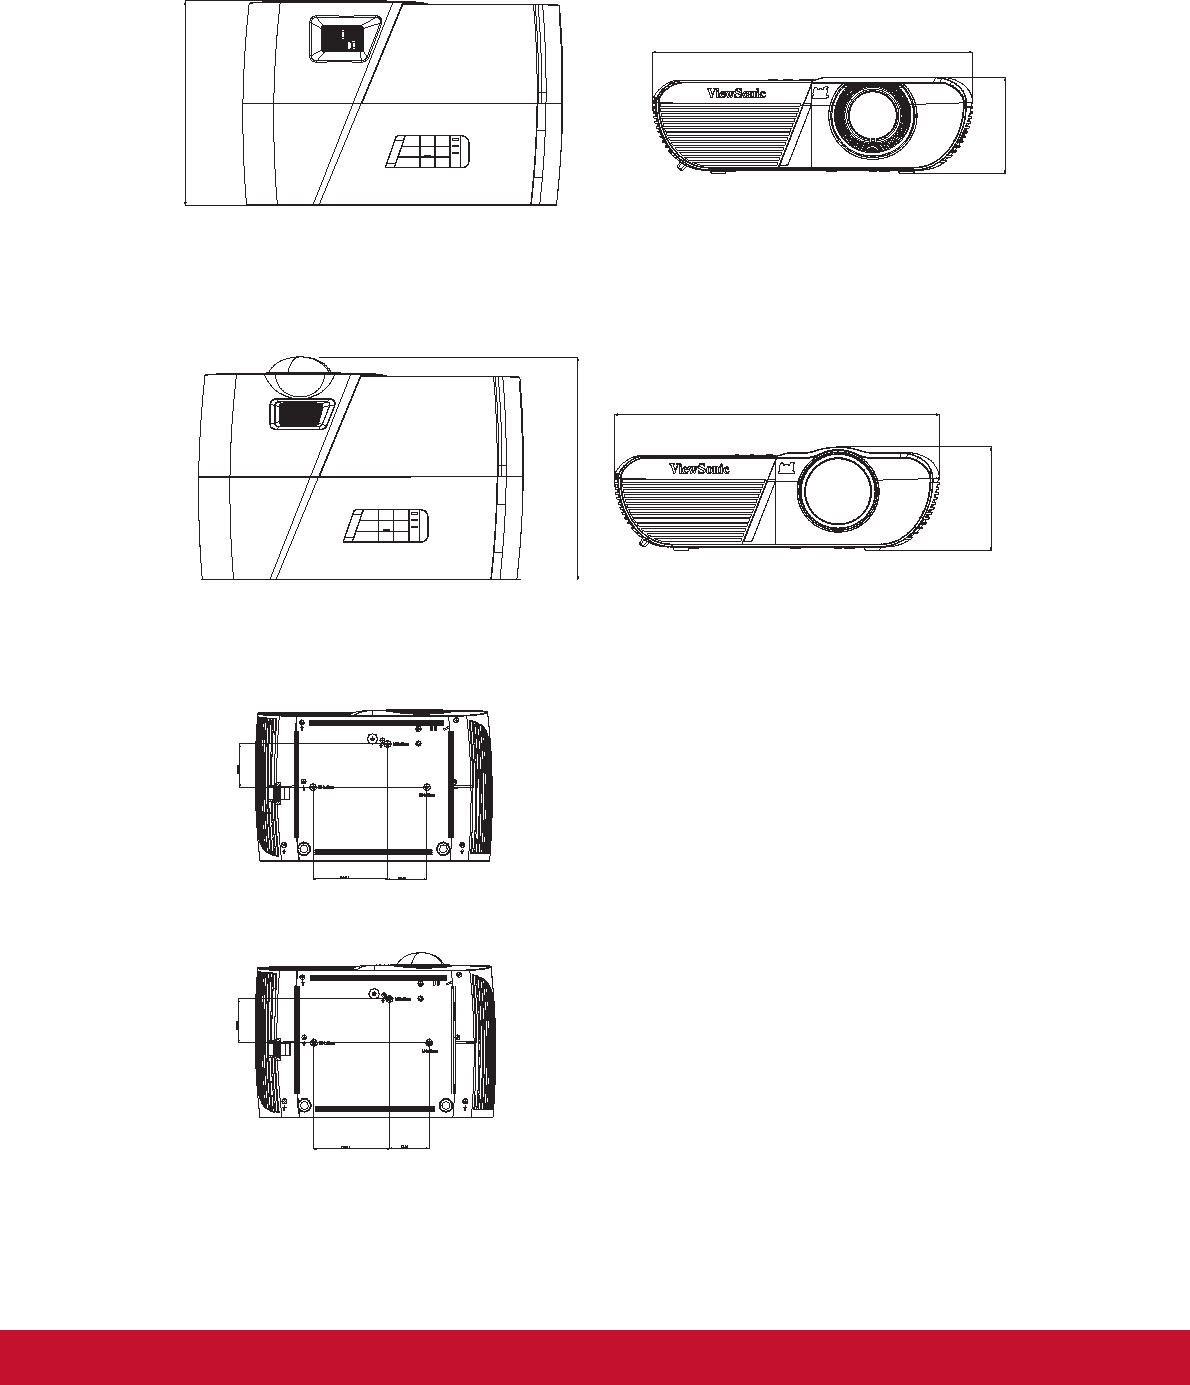
Projector overview
Front view
1.Front IR remote control sensor2.Lens cover
3.Projection lens4.Speaker
5.Ventilation holes 6.Focus ring
7.Zoom ring8.Control panel
9.Lamp cover
6
8
5
1
3
4
9
7
6
8
5
1
3
2
4
9
PJD5155L/PJD5255L/
PJD5555LW
PJD5350LS/PJD5550LWS
4
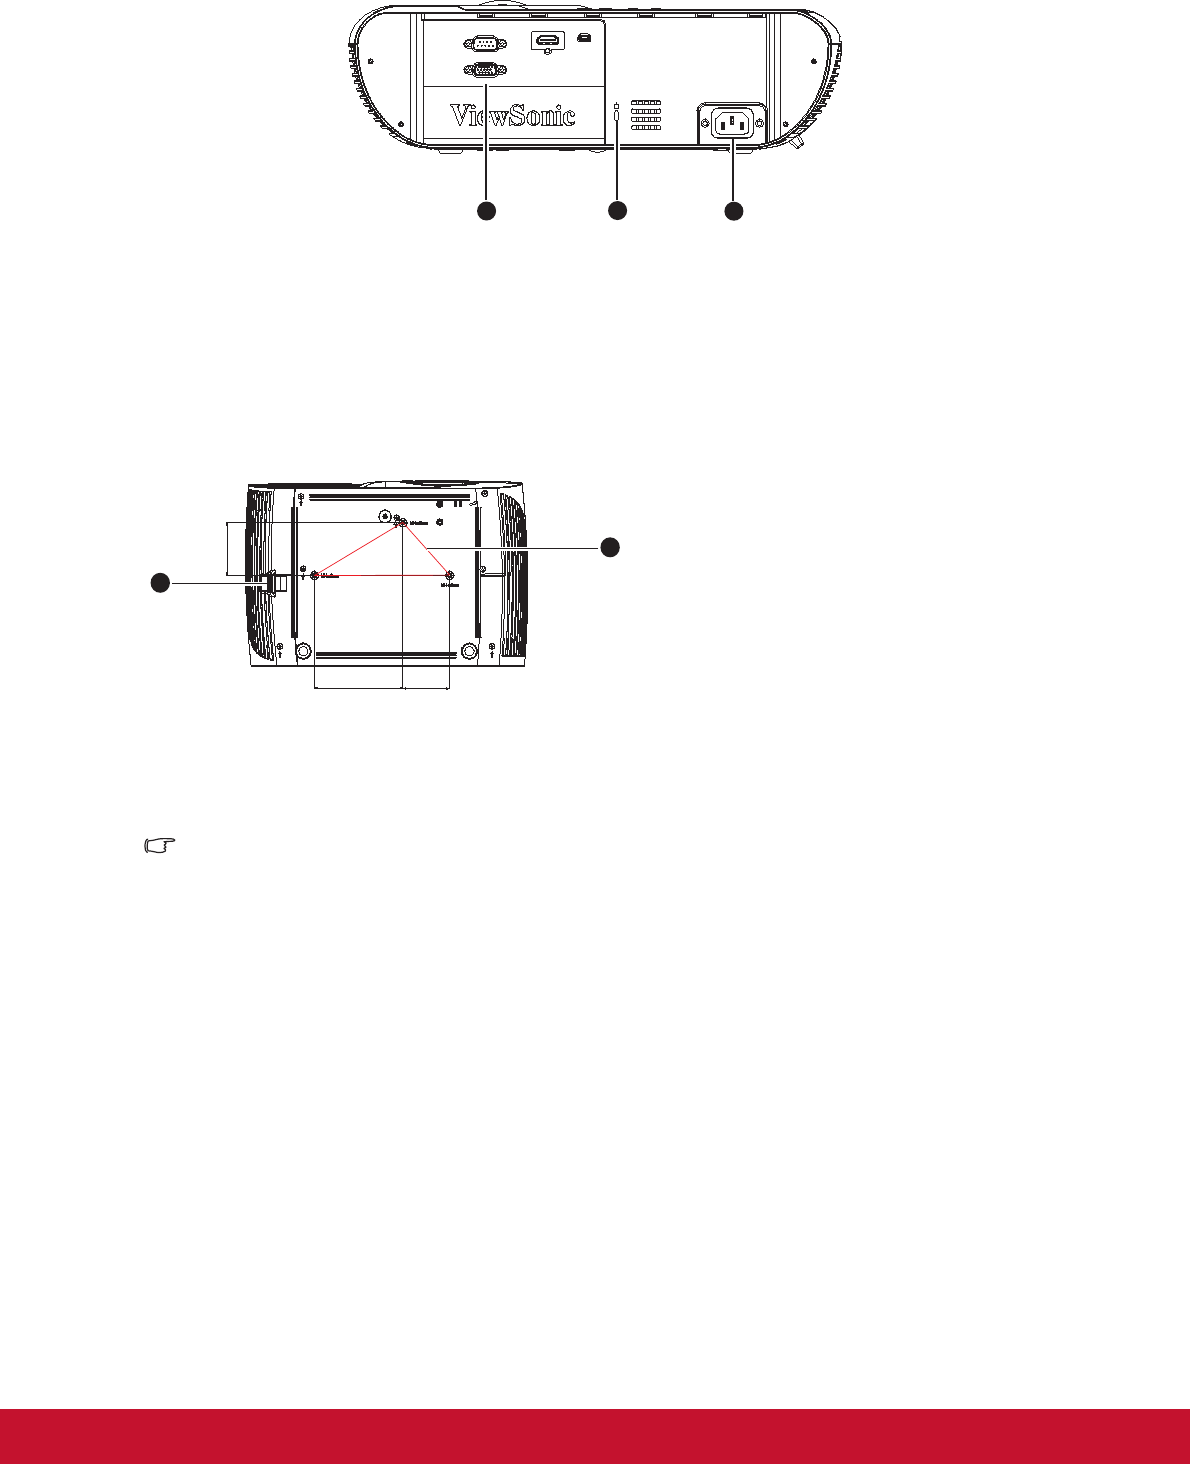
Rear View
Bottom View
Note
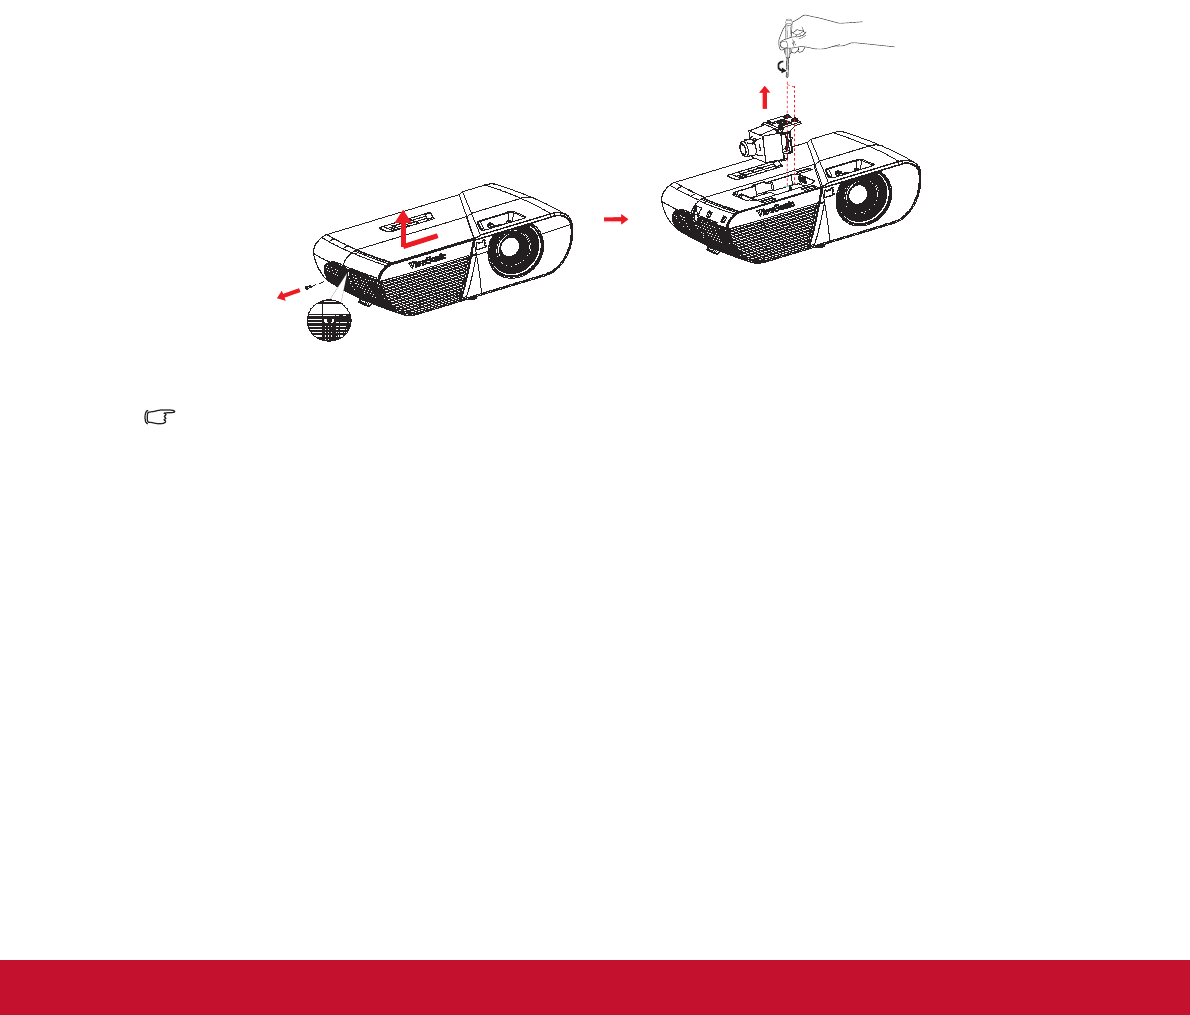
•This projector can be used with a ceiling mount for support. The ceiling mount is not
included in the package.
•Contact your dealer for information to mount the projector on a ceiling.
1.Connection ports2.Kensington lock
3.AC power socket
1.Security bar2.Ceiling mount holes
HDMI
MINI
USB
RS-232
COMPUTER IN
1
2
3
1
2
Ceiling mount screws:
M4 x 8 (Max. L = 8 mm)
Unit: mm
60.01113.54
65.89
5
Using the product
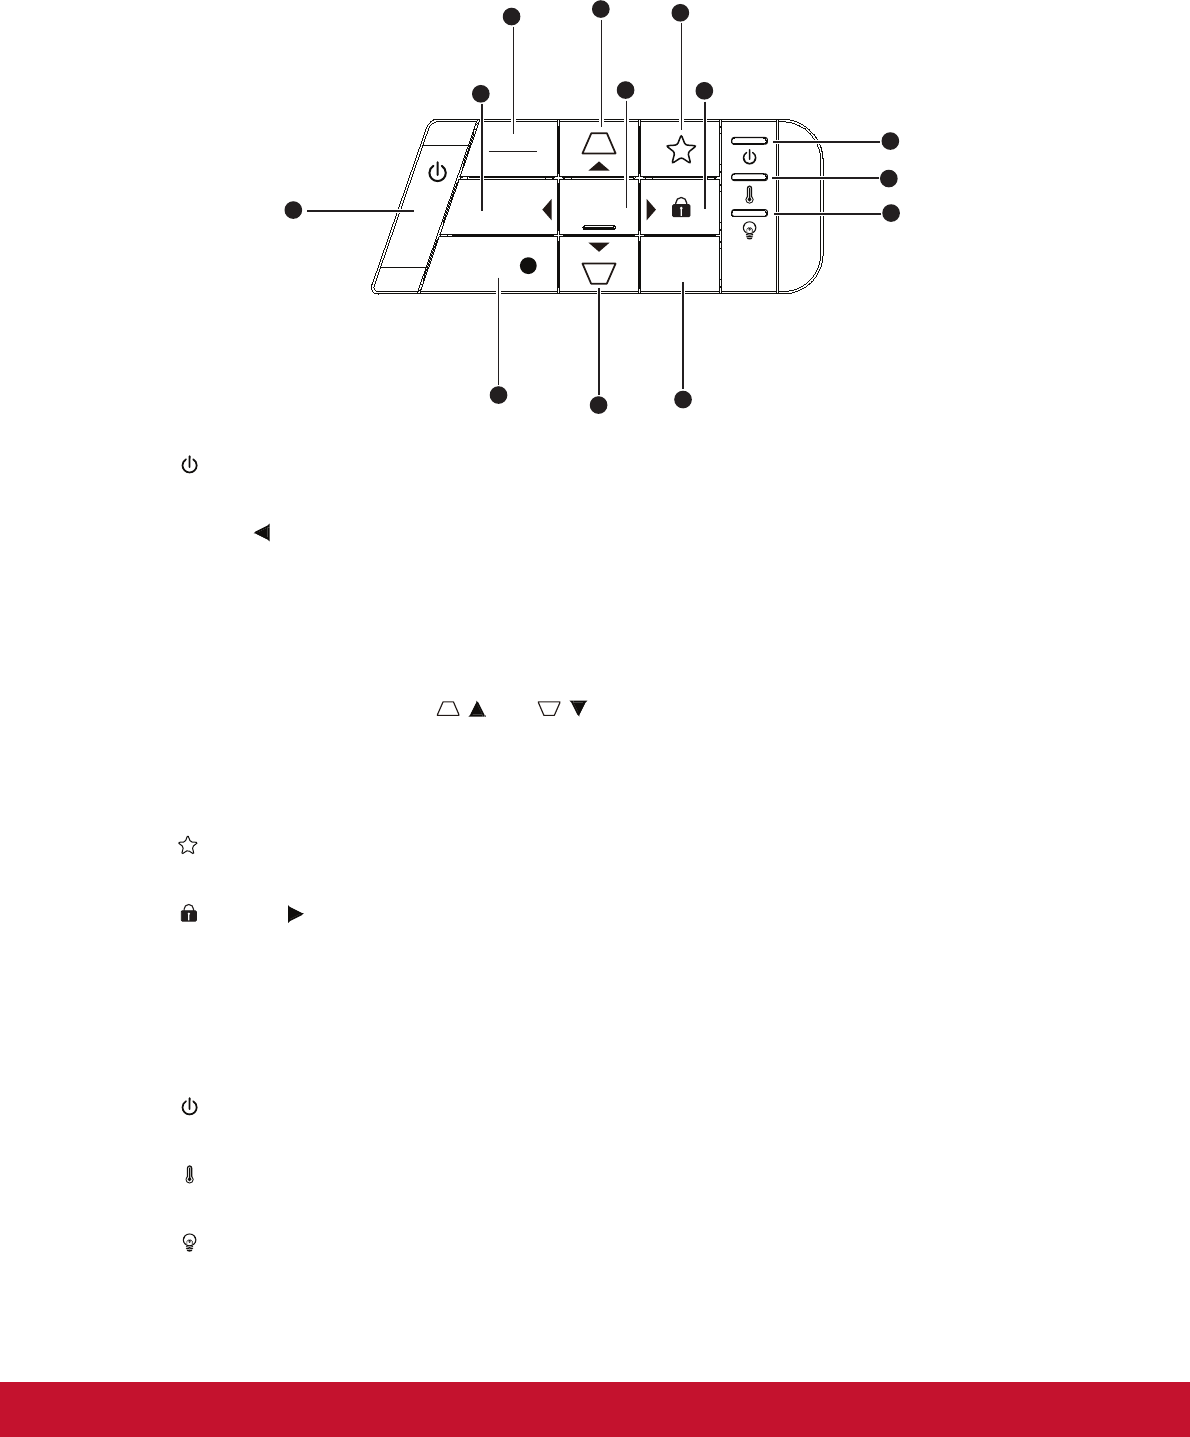
Control panel
1. POWER
Turn the projector on or off.
2.Blank/Left key
Hide the screen picture.
3.Menu/Exit
Menu: Display or exit the on-screen display menus.
Exit: Goes back to previous OSD menu, exits and saves menu settings.
4.Keystone/Arrow keys (/Up, / Down)
Manually correct distorted images resulting from an angled projection.
5.Enter
Enacts the selected On-Screen Display (OSD) menu item.
6. (My Button)
User definable key for customized function.
7. (Lock)/ Right key
Lock: Activates panel key lock or disable panel key lock by a long press for 3 sec-
onds.
Right key: When the On-Screen Display (OSD) menu is activated, #2 #4 and #7
keys are used as directional arrows to select the desired menu items and to make
adjustments.
8. (Power LED indicator)
Refer to “LED Indicator Messages”.
9. (Temp LED indicator)
Refer to “LED Indicator Messages”.
10. (Lamp LED indicator)
Enter
Blank
Power
Color
Mode
Menu
Exit
Source/
?
1
2
3
4
4
5
6
7
8
9
10
11
12
6
Refer to “LED Indicator Messages”.
11.Color Mode
Select the picture setup mode.
12. Source/ (Help)
Source: Display the source selection bar.
Help: Display the HELP menu by a long press for 3 seconds.
?
7
Connection ports
1.COMPUTER IN
Connect image input signal (analog RGB or component) to this jack.
2.RS-232
When operating the projector via a computer, connect this to the controlling com-
puter's RS-232C port.
3.HDMI
Connect HDMI output from video equipment to this jack.
4.MINI USB
This connector is for firmware update and mouse function support.
HDMI
MINI
USB
RS-232
COMPUTER IN
23
4
1
8
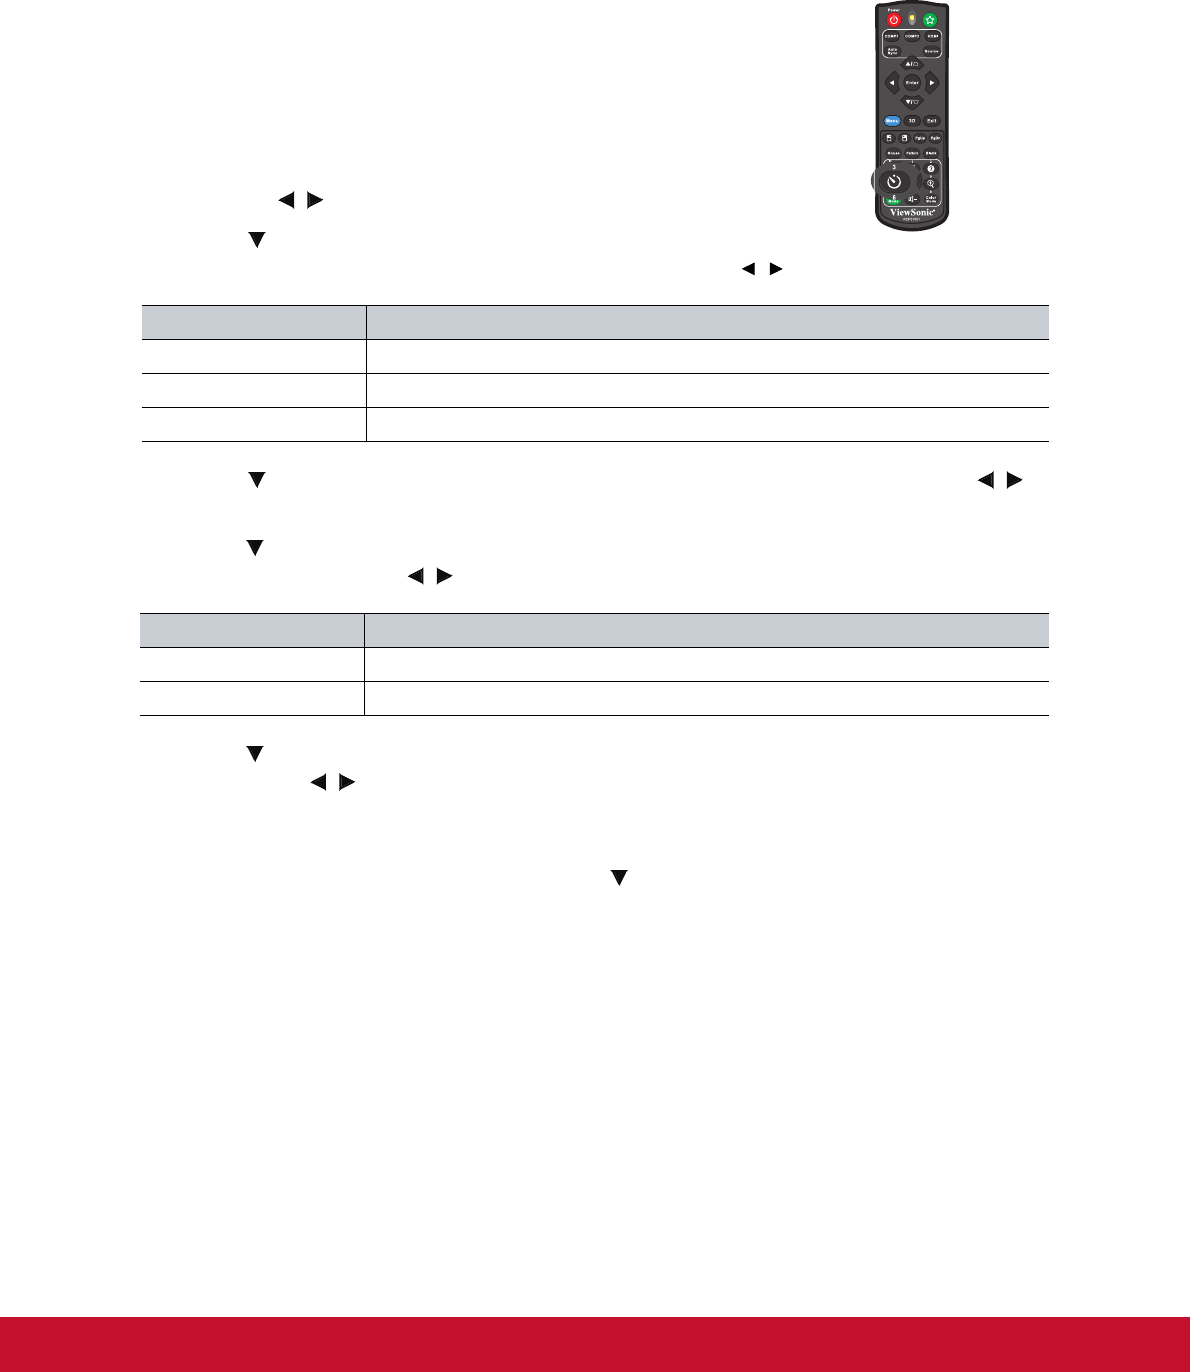
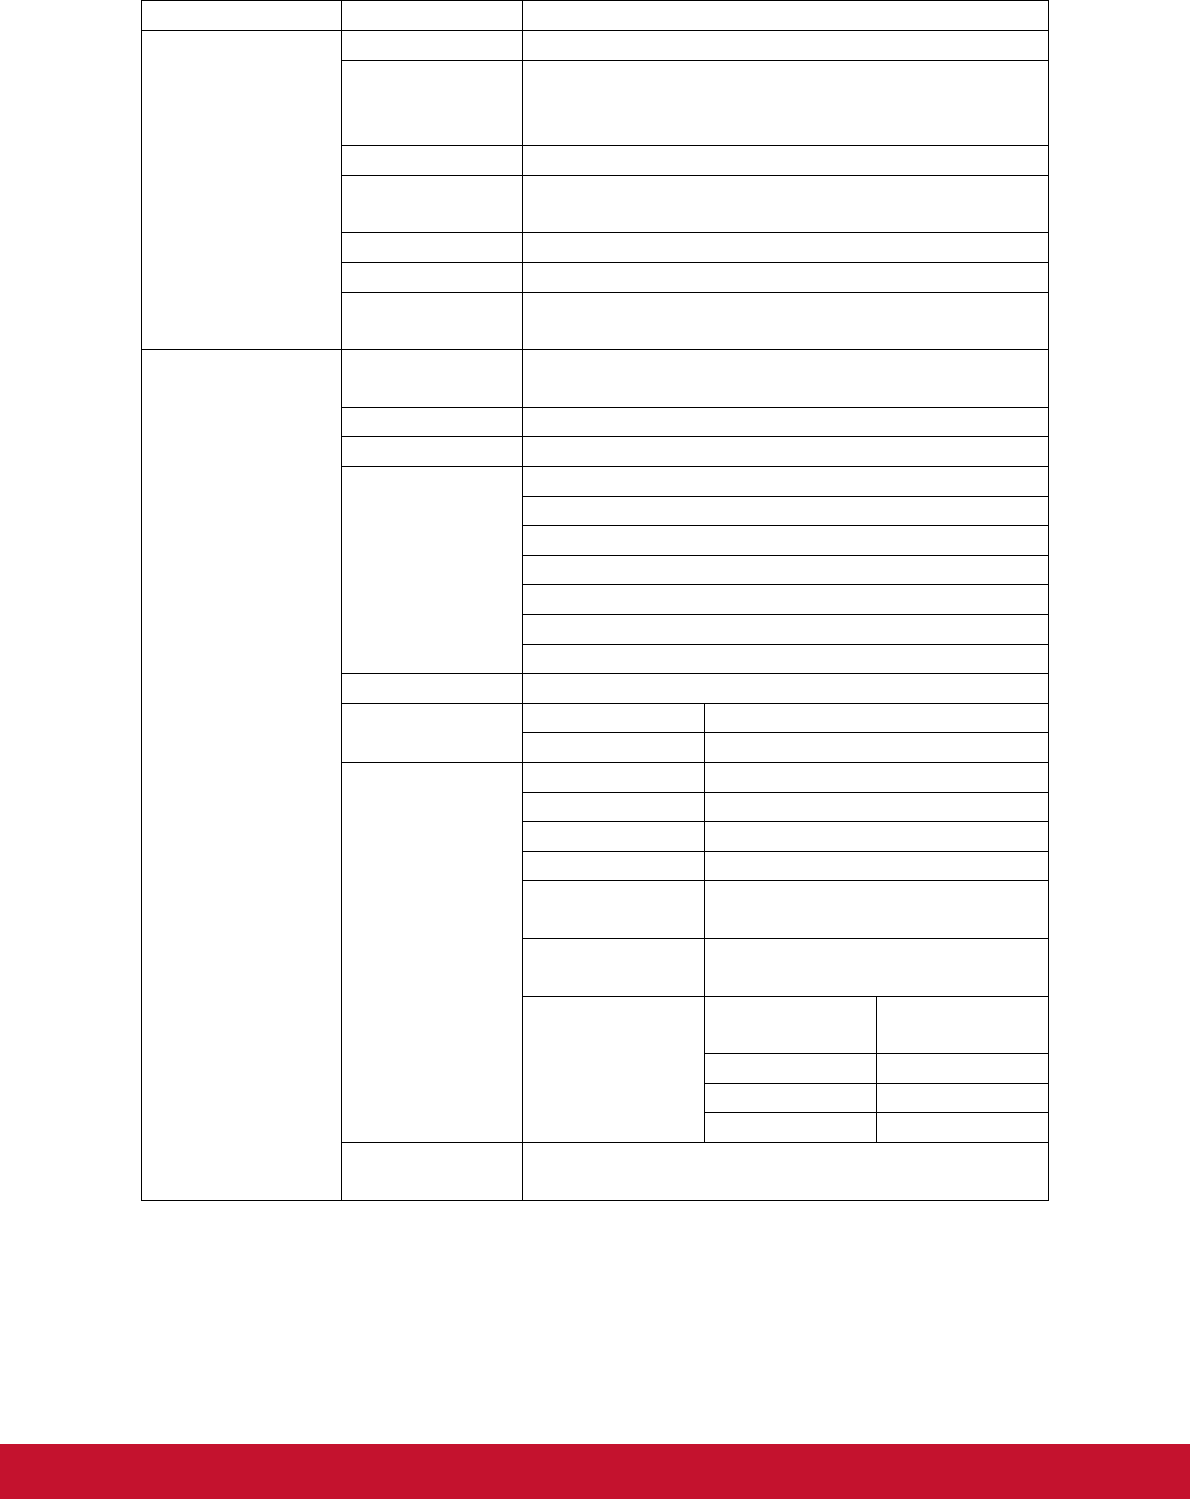
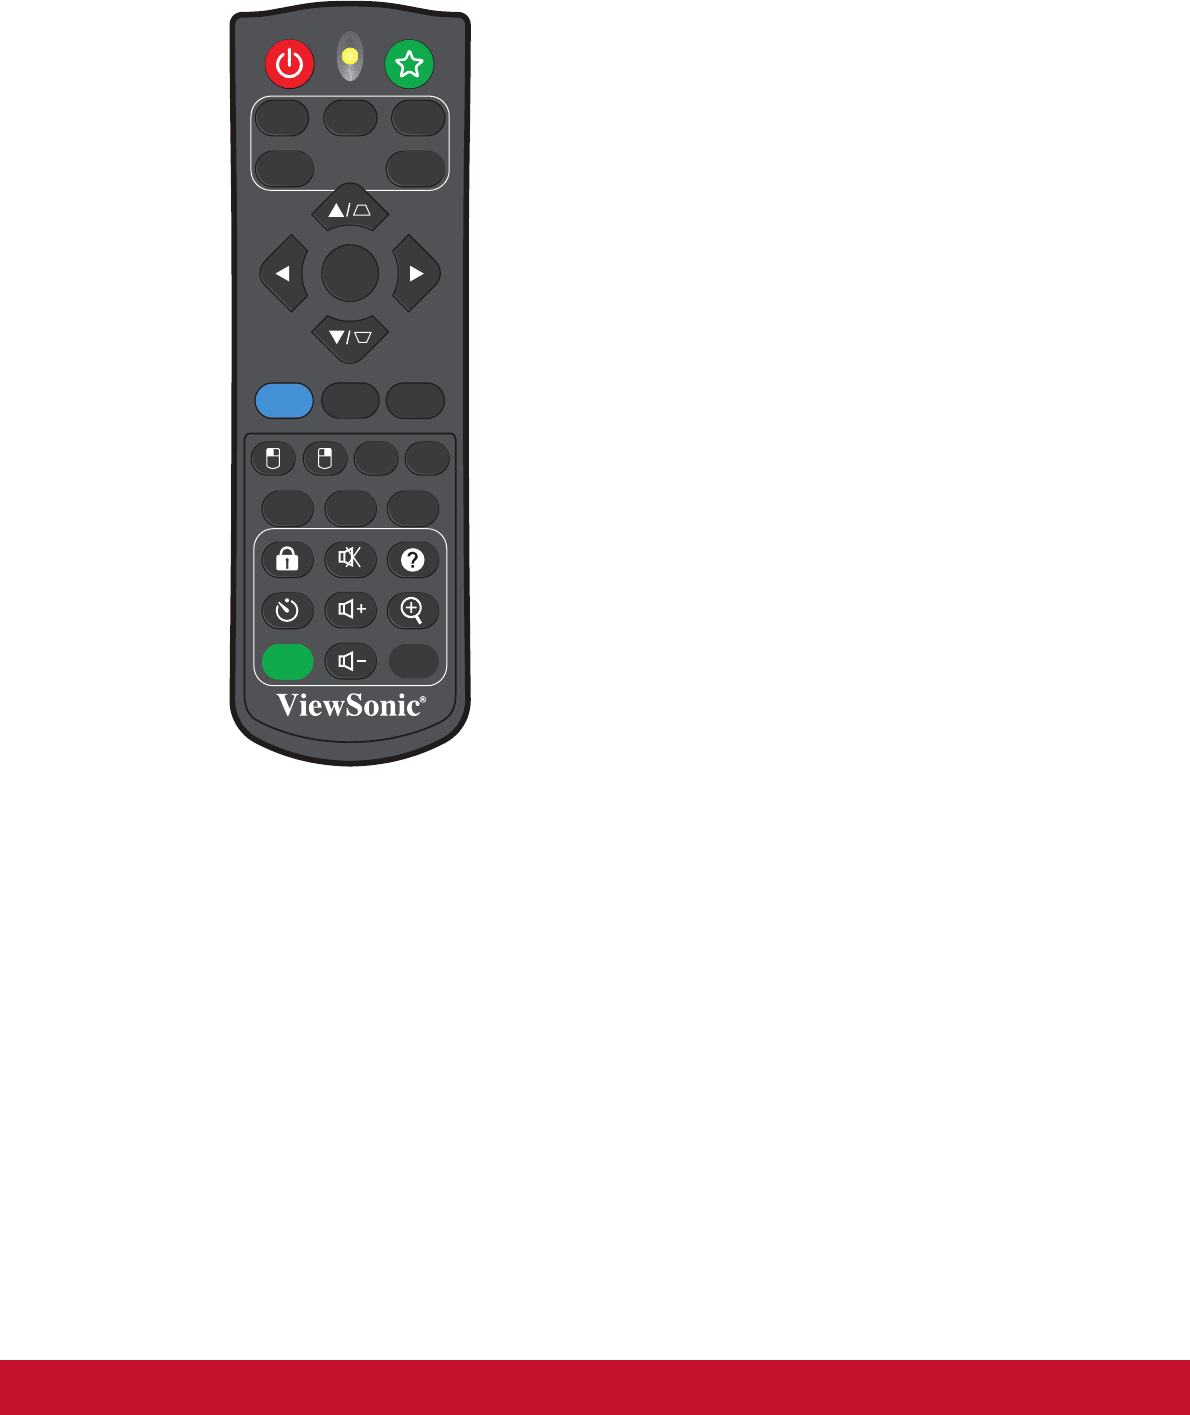
Remote control
1.Power
Turn the projector on or off.
2.COMP1
Display COMPUTER IN 1 signal.
3.Auto Sync
Automatically determines the best picture timings for the displayed image.
4./ (Keystone)
Manually correct distorted images resulting from an angled projection.
5.(Up)/ (Down)/ (Left)/(Right)
When the On-Screen Display (OSD) menu is activated, the #4 and #5 keys are
used as directional arrows to select the desired menu items and to make adjust-
ments.
6.3D
Activates the 3D On-Screen Display (OSD) menu item.
7.Menu
Display on-screen display menus.
8. (Right mouse)
Perform the right button of the mouse when mouse mode is activated.
9. (Left mouse)
Perform the left button of the mouse when mouse mode is activated.
10. Mouse
4
5
7
9
11
12
10
3
8
6
4
13
14
16
17
18
19
20
24
25
5
21
22
23
27
26
28
29
15
9
Switch between the normal and mouse modes.
11. (Lock)/ID Set
Lock: Activates or disables panel key lock.
ID Set: Sets remote control code.
12. (Timer)
Activate P-Timer OSD menu.
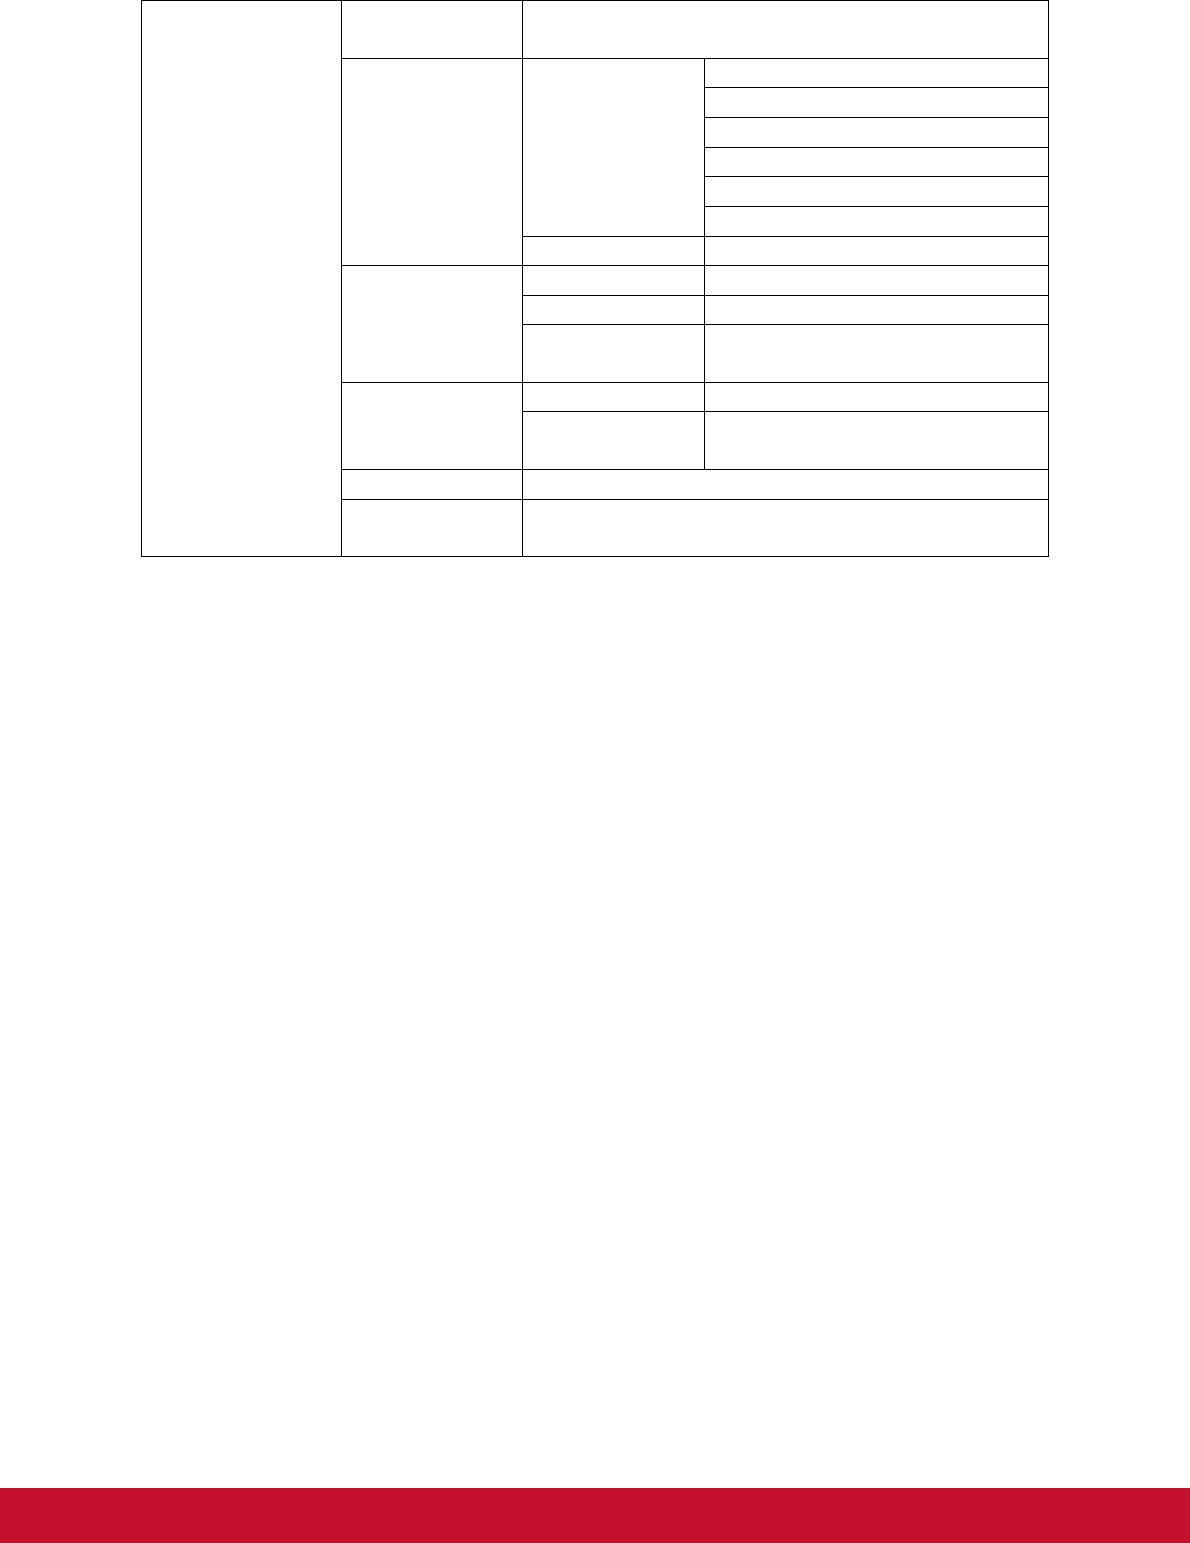
13. (Volume+)
Increase the volume level.
14. Eco Mode
Switch the lamp mode from Normal, Economic, Dynamic to Sleep.
15. (Volume-)
Decrease the volume level.
16. (My Button)
User definable key for customized function.
17. HDMI
Display HDMI signal.
18. COMP2
Not available for PJD5 series.
19. Source
Display the source selection bar.
20. Enter
Enacts the selected On-Screen Display (OSD) menu item.
21. Exit
Goes back to previous OSD menu, exits and saves menu settings.
22.
(Page Up)
Perform page up function when mouse mode is activated.
23.
(Page Down)
Perform page down function when mouse mode is activated.
24. Pattern
Display embedded test pattern.
25. Blank
Hide the screen picture.
26. (Help)
Display the Help menu.
27. (Magnify)
Displays the zoom bar that magnifies or reduces the projected picture size.
28. Color Mode
Select the picture setup mode.
29. (Mute)
Toggles the projector audio between on and off.
?
10
Using the remote mouse control
The capability of operating your computer with the remote control gives you more
flexibility when delivering presentations.
1.Connect the projector to your PC or notebook with a USB cable prior to using the
remote control in place of your computer’s mouse. See "Connecting a computer"
on page 14 for details.
2.Set the input signal to COMPUTER.
3.Press Mouse on the remote control to switch from the normal mode to the mouse
mode. An icon appears on the screen to indicate the activation of the mouse
mode.
4.Perform the desired mouse controls on your remote control.
•To move the cursor on the screen, press / / / .
•To left-click, press .
•To right-click, press .
•To operate your display software program (on a connected PC) which responds
to page up/down commands (like Microsoft PowerPoint), press Page Up/Page
Down.
•To return to the normal mode, press Mouse again or other keys except for the
mouse related multi-function keys.
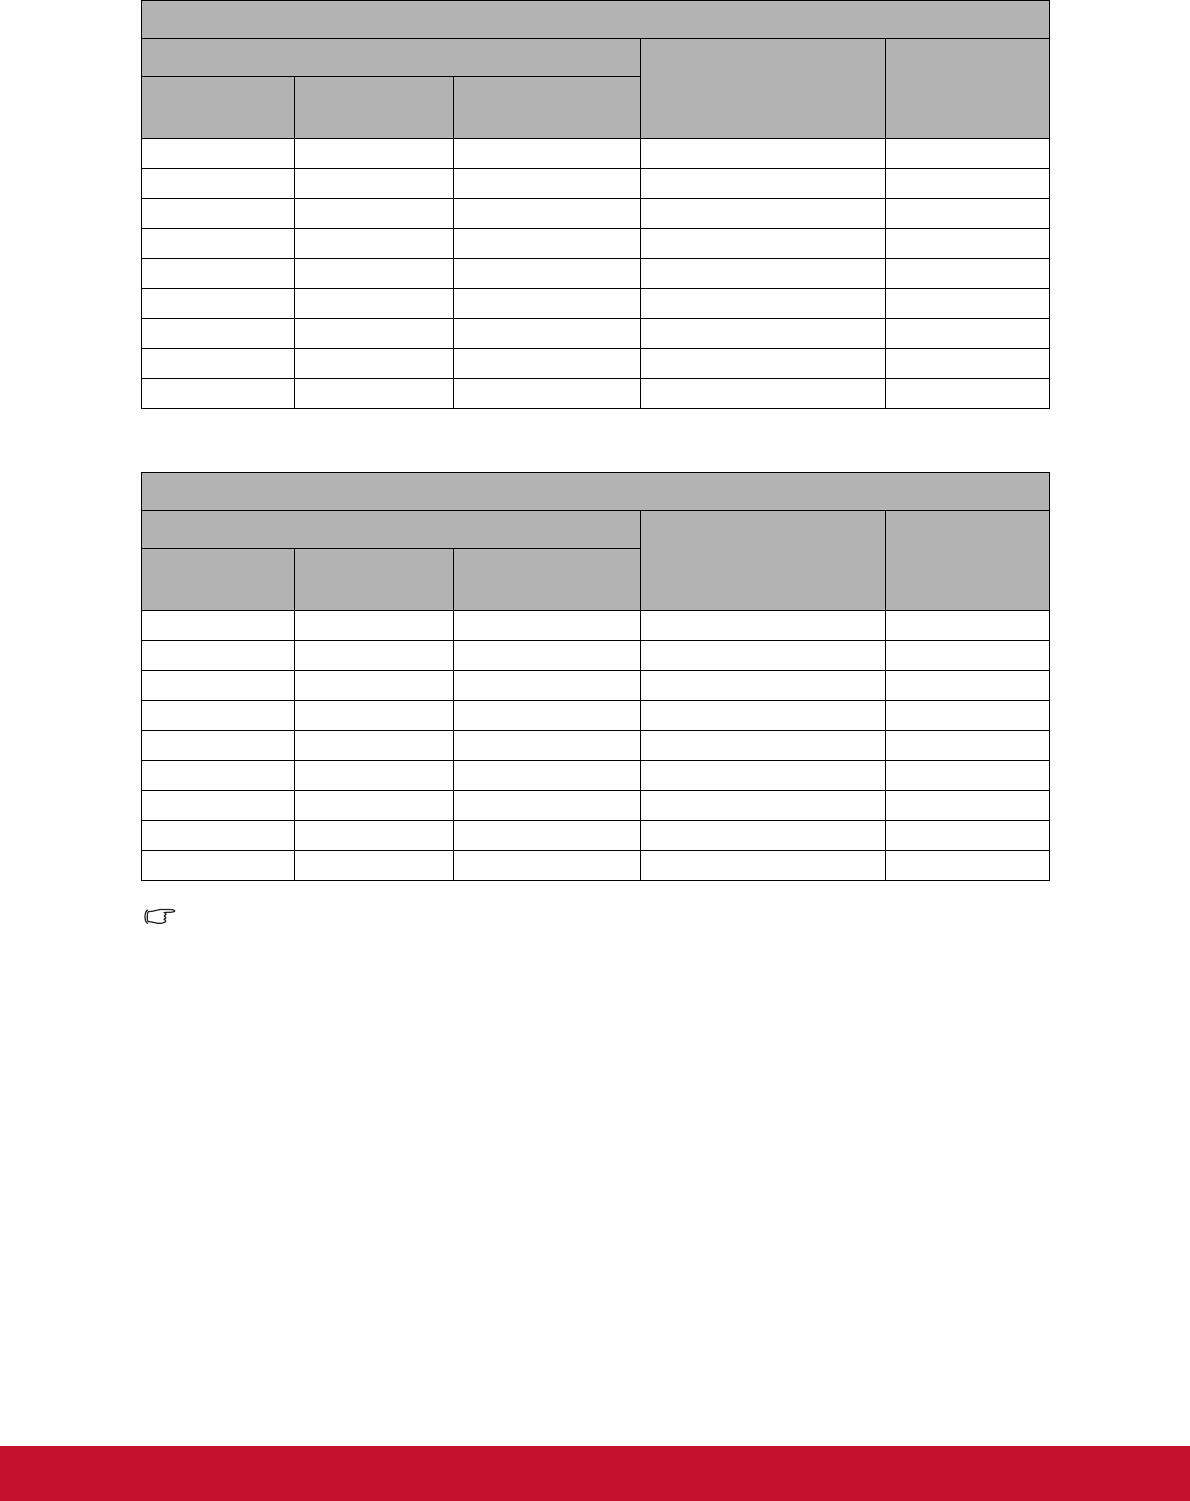
Remote control code
The projector can be assigned to 8 different remote control
codes, 1 to 8. When several adjacent projectors are in
operation at the same time, switching the remote control
codes can prevent interference from other remote
controls. Set the remote control code for the projector first
before changing that for the remote control.
To switch the code for the projector, select from among 1
to 8 in the SYSTEMSETTING: ADVANCED > Remote
Control Code menu.
To switch the code for the remote control, press ID set and the corresponding button
from 1 to 8 buttons on the remote control together for 5 seconds or more. The initial
code is set to1. When the code is switched to 8, the remote control can control every
projector.
Note
•If different codes are set on the projector and remote control, there will be no response
from the remote control. When that happens, switch the code for the remote control
again.
11
Installing the batteries
1.Open the battery cover in the
direction shown.
2.Install batteries as indicated by the
diagram inside the compartment.
3.Close the battery cover into position.
Caution
• Risk of explosion if battery is replaced by an incorrect type.
• Dispose of used batteries according to the instructions.
• Make sure the plus and minus terminals are correctly aligned when loading a battery.
Note
•Keep the battery out of the reach of children.
•Remove batteries from remote control when not using for extended periods.
•Do not recharge the battery or expose the battery to fire or water.
•Do not dispose the used battery along with household waste. Dispose
used batteries
according to local regulations.
•Danger of explosion may happen if batteries are incorrectly replaced. Replace only with
the same type recommended by the manufacturer.
•Battery should not be in or near to fire or water, keep batteries in a dark, cool and dry
place.
•If suspect battery leakage, wipe out the leakage and then replace a new battery. If the
leakage adheres to your body or clothes, rinse well with water immediately.
12
Remote control operation
Point the remote control at the infrared remote sensor and press a button.
•Operating the projector from the
front.
Note
•The remote control may not operate when there is sunlight or other strong light such as
a fluorescent lamp shining on the remote sensor.
•Operate the remote control from a position where the remote sensor is visible.
•Do not drop the remote control or jolt it.
•Keep the remote control out of locations with excessively high temperature or humidity.
•Do not get water on the remote control or place wet objects on it.
•Do not disassemble the remote control.
7m
5m
15
15
8m
13
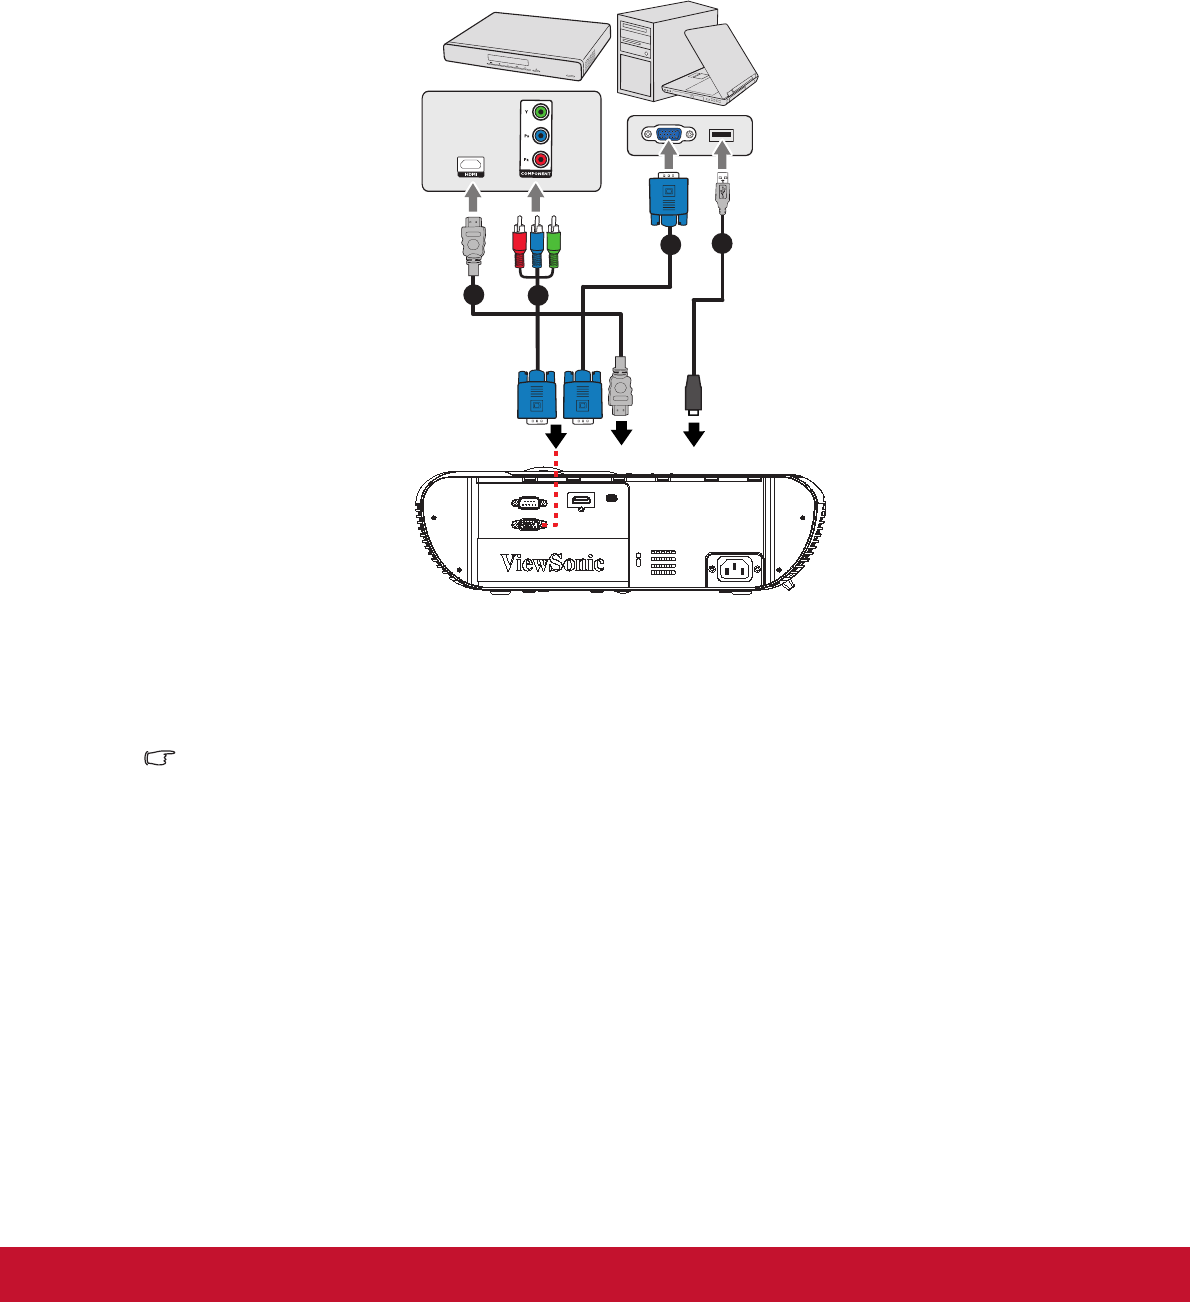
Connection
When connecting a signal source to the projector, be sure to:
1.Turn all equipment off before making any connections.
2.Use the correct signal cables for each source.
3.Ensure the cables are firmly inserted.
Important
•In the connections shown above, some cables may not be included with the projector
(see "Package contents" on page 2). They are commercially available from electronics
stores.
•The connection illustrations above are for reference only. The rear connecting jacks
available on the projector vary with each projector model.
•For detailed connection methods, see pages 14-16.
1.HDMI cable2.VGA (D-Sub) to HDTV (RCA) cable
3.VGA to DVI-A cable4.USB cable
1
2
3
4
HDMI
MINI
USB
RS-232
COMPUTER IN
14
Connecting a computer or monitor
Connecting a computer
The projector provides two VGA input sockets that allow you to connect them to both
IBM
®
compatibles and Macintosh
®
computers. A Mac adapter is needed if you are
connecting legacy version Macintosh computers.
To connect the projector to a notebook or desktop computer:
1.Take the supplied VGA cable and connect one end to the D-Sub output socket of
the computer.
2.Connect the other end of the VGA cable to the COMPUTER signal input socket on
the projector.
Important
•Many notebooks do not turn on their external video ports when connected to a
projector. Usually a key combo like FN + F3 or CRT/LCD key turns the external display
on/off. Locate a function key labeled CRT/LCD or a function key with a monitor symbol
on the notebook. Press FN and the labeled function key simultaneously. Refer to your
notebook's documentation to find your notebook's key combination.
Connecting Video source devices
You need only connect the projector to a Video source device using just one of the
aboveconnecting methods, however each provides a different level of video quality.
The methodyou choose will most likely depend upon the availability of matching
terminals on both theprojector and the Video source device as described below:
Gebruikershandleiding.com neemt misbruik van zijn services uitermate serieus. U kunt hieronder aangeven waarom deze vraag ongepast is. Wij controleren de vraag en zonodig wordt deze verwijderd.
Product:
Spelregels forum
Om tot zinvolle vragen te komen hanteren wij de volgende spelregels:
lees eerst de handleiding door;
controleer of uw vraag al eerder door iemand anders is gesteld;
probeer uw vraag zo duidelijk mogelijk te stellen;
heeft u een probleem en al geprobeerd om dit op te lossen, vermeld dit erbij aub;
heeft u een oplossing gekregen van een bezoeker dan horen wij dat graag in dit forum;
wilt u een reactie geven op een vraag of antwoord, gebruik dan niet dit formulier maar klik op de knop 'reageer op deze vraag';
uw vraag wordt direct op de website gezet; vermijd daarom persoonlijke gegevens in te vullen;
Belangrijk! Als er een antwoord wordt gegeven op uw vraag, dan is het voor de gever van het antwoord nuttig om te weten als u er wel (of niet) mee geholpen bent! Wij vragen u dus ook te reageren op een antwoord.
Belangrijk! Antwoorden worden ook per e-mail naar abonnees gestuurd. Laat uw emailadres achter op deze site, zodat u op de hoogte blijft. U krijgt dan ook andere vragen en antwoorden te zien.
Abonneren
Abonneer u voor het ontvangen van emails voor uw Viewsonic PJD5155L bij:
nieuwe vragen en antwoorden
nieuwe handleidingen
U ontvangt een email met instructies om u voor één of beide opties in te schrijven.
Ontvang uw handleiding per email
Vul uw emailadres in en ontvang de handleiding van Viewsonic PJD5155L in de taal/talen: Engels als bijlage per email.
De handleiding is 6,58 mb groot.
U ontvangt de handleiding per email binnen enkele minuten. Als u geen email heeft ontvangen, dan heeft u waarschijnlijk een verkeerd emailadres ingevuld of is uw mailbox te vol. Daarnaast kan het zijn dat uw internetprovider een maximum heeft aan de grootte per email. Omdat hier een handleiding wordt meegestuurd, kan het voorkomen dat de email groter is dan toegestaan bij uw provider.
Uw handleiding is per email verstuurd. Controleer uw email
Als u niet binnen een kwartier uw email met handleiding ontvangen heeft, kan het zijn dat u een verkeerd emailadres heeft ingevuld of dat uw emailprovider een maximum grootte per email heeft ingesteld die kleiner is dan de grootte van de handleiding.
Er is een email naar u verstuurd om uw inschrijving definitief te maken.
Controleer uw email en volg de aanwijzingen op om uw inschrijving definitief te maken
U heeft geen emailadres opgegeven
Als u de handleiding per email wilt ontvangen, vul dan een geldig emailadres in.
Uw vraag is op deze pagina toegevoegd
Wilt u een email ontvangen bij een antwoord en/of nieuwe vragen? Vul dan hier uw emailadres in.