658731
116
Verklein
Vergroot
Pagina terug
1/162
Pagina verder
V
V
E
E
R
R
A
A
C
C
R
R
Y
Y
P
P
T
T
F R E E O P E N - S O U R C E O N - T H E - F L Y E N C R Y P T I O N
USER’S GUIDE
veracrypt.codeplex.com
Version Information
VeraCrypt User’s Guide, version 1.16
Released by IDRIX on October 7
th
, 2015
Legal Notices
THIS DOCUMENT IS PROVIDED "AS IS" WITHOUT WARRANTY OF ANY KIND, WHETHER EXPRESS, IMPLIED, OR STATUTORY.
THE ENTIRE RISK AS TO THE QUALITY, CORRECTNESS, ACCURACY, OR COMPLETENESS OF THE CONTENT OF THIS
DOCUMENT IS WITH YOU. THE CONTENT OF THIS DOCUMENT MAY BE INACCURATE, INCORRECT, INVALID, INCOMPLETE
AND/OR MISLEADING. IN NO EVENT WILL ANY AUTHOR OF THE SOFTWARE OR DOCUMENTATION, OR ANY APPLICABLE
COPYRIGHT OWNER, OR ANY OTHER PARTY WHO MAY COPY AND/OR (RE)DISTRIBUTE THIS SOFTWARE OR
DOCUMENTATION, BE LIABLE TO YOU OR TO ANY OTHER PARTY FOR ANY DAMAGES, INCLUDING, BUT NOT LIMITED TO,
ANY DIRECT, INDIRECT, GENERAL, SPECIAL, INCIDENTAL, PUNITIVE, EXEMPLARY, OR CONSEQUENTIAL DAMAGES
(INCLUDING, BUT NOT LIMITED TO, CORRUPTION OR LOSS OF DATA, ANY LOSSES SUSTAINED BY YOU OR THIRD PARTIES,
A FAILURE OF THIS SOFTWARE TO OPERATE WITH ANY OTHER PRODUCT, PROCUREMENT OF SUBSTITUTE GOODS OR
SERVICES, OR BUSINESS INTERRUPTION), WHETHER IN CONTRACT, STRICT LIABILITY, TORT (INCLUDING, BUT NOT
LIMITED TO, NEGLIGENCE) OR OTHERWISE, ARISING OUT OF THE USE, COPYING, MODIFICATION, OR (RE)DISTRIBUTION
OF THIS SOFTWARE OR DOCUMENTATION (OR A PORTION THEREOF), OR INABILITY TO USE THIS SOFTWARE OR
DOCUMENTATION, EVEN IF SUCH DAMAGES (OR THE POSSIBILITY OF SUCH DAMAGES) ARE/WERE PREDICTABLE OR
KNOWN TO ANY (CO)AUTHOR, INTELLECTUAL-PROPERTY OWNER, OR ANY OTHER PARTY.
BY INSTALLING, RUNNING, USING, COPYING, (RE)DISTRIBUTING, AND/OR MODIFYING THIS SOFTWARE, INCLUDING, BUT
NOT LIMITED TO, ITS DOCUMENTATION, OR A PORTION THEREOF, YOU ACCEPT AND AGREE TO BE BOUND BY ALL TERMS
AND CONDITIONS OF THE VERACRYPT LICENSE THE FULL TEXT OF WHICH IS CONTAINED IN THE FILE License.txt
INCLUDED IN VERACRYPT BINARY AND SOURCE CODE DISTRIBUTION PACKAGES.
2
CONTENTS
Introduction .......................................................................................................................................... 5
Beginners Tutorial ............................................................................................................................... 7
How to Create and Use a VeraCrypt Container ......................................................................... 7
How to Create and Use a VeraCrypt-Encrypted Partition/Device ........................................... 24
VeraCrypt Volume ................................................................................................................................ 25
Creating a New VeraCrypt Volume ............................................................................................................... 25
Favorite Volumes ........................................................................................................................................... 28
System Favorite Volumes .............................................................................................................................. 30
System Encryption ............................................................................................................................. 32
Hidden Operating System ........................................................................................................ 32
Operating Systems Supported for System Encryption ............................................................. 33
VeraCrypt Rescue Disk ............................................................................................................ 33
Plausible Deniability........................................................................................................................... 36
Hidden Volume .............................................................................................................................................. 37
Protection of Hidden Volumes Against Damage...................................................................... 39
Security Requirements and Precautions Pertaining to Hidden Volumes .................................. 42
Hidden Operating System .............................................................................................................................. 46
Main Program Window ..................................................................................................................... 53
Program Menu............................................................................................................................................... 56
Volumes -> Auto-Mount All Device-Hosted Volumes ............................................................ 56
Volumes -> Dismount All Mounted Volumes ......................................................................... 56
Volumes -> Change Volume Password .................................................................................... 56
Volumes -> Set Header Key Derivation Algorithm ................................................................. 56
Volumes -> Add/Remove Keyfiles to/from Volume Volumes -> Remove All Keyfiles from
Volume ..................................................................................................................................... 57
Favorites -> Add Mounted Volume to Favorites Favorites -> Organize Favorite Volumes
Favorites -> Mount Favorites Volumes .................................................................................... 57
Favorites -> Add Mounted Volume to System Favorites Favorites -> Organize System
Favorite Volumes ..................................................................................................................... 57
System -> Change Password .................................................................................................... 57
System -> Mount Without Pre-Boot Authentication ................................................................ 57
Tools -> Clear Volume History ................................................................................................ 58
Tools -> Traveler Disk Setup ................................................................................................... 58
Tools -> Keyfile Generator ...................................................................................................... 58
Tools -> Backup Volume Header Tools -> Restore Volume Header ...................................... 58
Settings -> Performance and Driver Options ........................................................................... 59
Settings -> Preferences ............................................................................................................. 60
Mounting VeraCrypt Volumes ...................................................................................................................... 62
Cache Password in Driver Memory ......................................................................................... 62
Mount Options.......................................................................................................................... 62
Parallelization ..................................................................................................................................... 63
3
Pipelining ............................................................................................................................................ 63
Hardware Acceleration ...................................................................................................................... 64
Hot Keys .............................................................................................................................................. 66
Keyfiles ................................................................................................................................................ 67
Keyfiles Dialog Window .......................................................................................................... 67
Security Tokens and Smart Cards ............................................................................................ 68
Keyfile Search Path .................................................................................................................. 69
Empty Password & Keyfile ...................................................................................................... 69
Quick Selection ........................................................................................................................ 69
Volumes -> Add/Remove Keyfiles to/from Volume ............................................................... 70
Volumes -> Remove All Keyfiles from Volume...................................................................... 70
Tools -> Keyfile Generator ...................................................................................................... 70
Settings -> Default Keyfiles ..................................................................................................... 70
Security Tokens & Smart Cards ....................................................................................................... 72
Portable Mode ..................................................................................................................................... 73
Tools -> Traveler Disk Setup ................................................................................................... 73
TrueCrypt Support ............................................................................................................................ 75
Converting TrueCrypt volumes and partitions ............................................................................... 75
Note: Converting system partitions encrypted with TrueCrypt is not supported. ...................... 75
Default Mount Parameters ................................................................................................................ 76
Language Packs .................................................................................................................................. 77
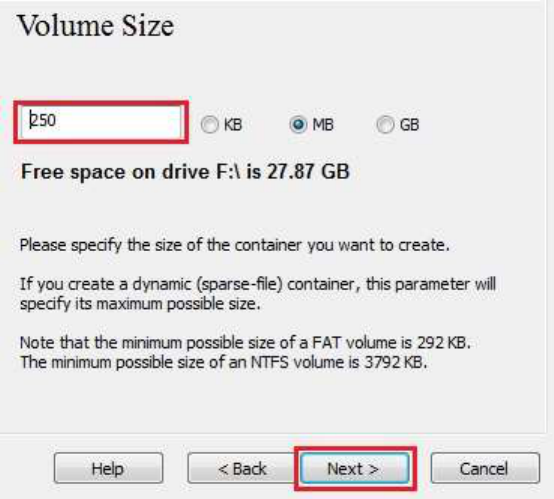
Encryption Algorithms....................................................................................................................... 78
Hash Algorithms ................................................................................................................................. 81
Supported Operating Systems ........................................................................................................... 82
Command Line Usage ........................................................................................................................ 83
Security Model .................................................................................................................................... 88
Security Requirements and Precautions ........................................................................................... 91
Data Leaks ................................................................................................................................ 91
Unencrypted Data in RAM....................................................................................................... 94
Physical Security ...................................................................................................................... 94
Malware .................................................................................................................................... 95
Multi-User Environment .......................................................................................................... 95
Authenticity and Integrity......................................................................................................... 96
Choosing Passwords and Keyfiles ............................................................................................ 96
Changing Passwords and Keyfiles ........................................................................................... 97
Trim Operation ......................................................................................................................... 97
Wear-Leveling .......................................................................................................................... 98
Reallocated Sectors .................................................................................................................. 98
Defragmenting .......................................................................................................................... 99
Journaling File Systems ............................................................................................................ 99
Volume Clones ....................................................................................................................... 100
Additional Security Requirements and Precautions ............................................................... 100
4
How to Back Up Securely ................................................................................................................ 101
Non-System Volumes ............................................................................................................ 101
System Partitions .................................................................................................................... 101
General Notes ......................................................................................................................... 103
Miscellaneous .................................................................................................................................... 104
Using VeraCrypt Without Administrator Privileges .............................................................. 104
Sharing over Network ............................................................................................................ 105
VeraCrypt Background Task .................................................................................................. 101
Volume Mounted as Removable Medium .............................................................................. 102
VeraCrypt System Files & Application Data ......................................................................... 103
How to Remove Encryption ................................................................................................... 105
Uninstalling VeraCrypt .......................................................................................................... 106
Digital Signatures ................................................................................................................... 107
Troubleshooting ................................................................................................................................ 109
Incompatibilities ............................................................................................................................... 118
Known Issues & Limitations ........................................................................................................... 119
Known Issues ......................................................................................................................... 119
Limitations ............................................................................................................................. 119
Frequently Asked Questions ............................................................................................................ 122
Technical Details ............................................................................................................................... 136
Notation ....................................................................................................................................................... 136
Encryption Scheme ..................................................................................................................................... 137
Modes of Operation ..................................................................................................................................... 139
Header Key Derivation, Salt, and Iteration Count ..................................................................................... 140
Random Number Generator ....................................................................................................................... 141
Keyfiles ......................................................................................................................................................... 143
PIM .............................................................................................................................................................. 145
PIM Usage.............................................................................................................................. 145
Changing/clearing the PIM .................................................................................................... 146
VeraCrypt Volume Format Specification ................................................................................................... 149
Compliance with Standards and Specifications .......................................................................................... 151
Source Code ................................................................................................................................................. 151
Contact .............................................................................................................................................. 152
Legal Information ............................................................................................................................ 152
Version History ................................................................................................................................. 153
Acknowledgements ........................................................................................................................... 156
References ......................................................................................................................................... 157
6
PREFACE
Please note that although most chapters of this documentation apply generally to all versions of VeraCrypt,
some sections are primarily aimed at users of the Windows versions of VeraCrypt. Hence, such sections may
contain information that is inappropriate in regards to the Mac OS X and Linux versions of VeraCrypt.
Introduction
VeraCrypt is a software system for establishing and maintaining an on-the-fly-encrypted volume
(data storage device). On-the-fly encryption means that data is automatically encrypted right before
it is saved and decrypted right after it is loaded, without any user intervention. No data stored on an
encrypted volume can be read (decrypted) without using the correct password/keyfile(s) or correct
encryption keys. Entire file system is encrypted (e.g., file names, folder names, contents of every
file, free space, metadata, etc).
Files can be copied to and from a mounted VeraCrypt volume just like they are copied to/from any
normal disk (for example, by simple drag-and-drop operations). Files are automatically being
decrypted on the fly (in memory/RAM) while they are being read or copied from an encrypted
VeraCrypt volume. Similarly, files that are being written or copied to the VeraCrypt volume are
automatically being encrypted on the fly (right before they are written to the disk) in RAM. Note that
this does not mean that the whole file that is to be encrypted/decrypted must be stored in RAM
before it can be encrypted/decrypted. There are no extra memory (RAM) requirements for
VeraCrypt. For an illustration of how this is accomplished, see the following paragraph.
Let’s suppose that there is an .avi video file stored on a VeraCrypt volume (therefore, the video file
is entirely encrypted). The user provides the correct password (and/or keyfile) and mounts (opens)
the VeraCrypt volume. When the user double clicks the icon of the video file, the operating system
launches the application associated with the file type typically a media player. The media player
then begins loading a small initial portion of the video file from the VeraCrypt-encrypted volume to
RAM (memory) in order to play it. While the portion is being loaded, VeraCrypt is automatically
decrypting it (in RAM). The decrypted portion of the video (stored in RAM) is then played by the
media player. While this portion is being played, the media player begins loading another small
portion of the video file from the VeraCrypt-encrypted volume to RAM (memory) and the process
repeats. This process is called on-the-fly encryption/decryption and it works for all file types (not
only for video files).
Note that VeraCrypt never saves any decrypted data to a disk it only stores them temporarily in
RAM (memory). Even when the volume is mounted, data stored in the volume is still encrypted.
When you restart Windows or turn off your computer, the volume will be dismounted and files
stored in it will be inaccessible (and encrypted). Even when power supply is suddenly interrupted
(without proper system shut down), files stored in the volume are inaccessible (and encrypted). To
make them accessible again, you have to mount the volume (and provide the correct password
and/or keyfile).
7
Beginners Tutorial
How to Create and Use a VeraCrypt Container
This chapter contains step-by-step instructions on how to create, mount, and use a VeraCrypt
volume. We strongly recommend that you also read the other sections of this manual, as they
contain important information.
STEP 1:
If you have not done so, download and install VeraCrypt. Then launch VeraCrypt by double-clicking
the file VeraCrypt.exe or by clicking the VeraCrypt shortcut in your Windows Start menu.
STEP 2:
The main VeraCrypt window should appear. Click Create Volume (marked with a red rectangle for
clarity).
8
STEP 3:
The VeraCrypt Volume Creation Wizard window should appear.
In this step you need to choose where you wish the VeraCrypt volume to be created. A VeraCrypt
volume can reside in a file, which is also called container, in a partition or drive. In this tutorial, we
will choose the first option and create a VeraCrypt volume within a file.
As the option is selected by default, you can just click Next.
Note: In the following steps, the screenshots will show only the right-hand part of the Wizard window.
9
STEP 4:
In this step you need to choose whether to create a standard or hidden VeraCrypt volume. In this
tutorial, we will choose the former option and create a standard VeraCrypt volume.
As the option is selected by default, you can just click Next.
10
STEP 5:
In this step you have to specify where you wish the VeraCrypt volume (file container) to be created.
Note that a VeraCrypt container is just like any normal file. It can be, for example, moved or deleted
as any normal file. It also needs a filename, which you will choose in the next step.
Click Select File.
The standard Windows file selector should appear (while the window of the VeraCrypt Volume
Creation Wizard remains open in the background).
11
STEP 6:
In this tutorial, we will create our VeraCrypt volume in the folder F:\Data\ and the
filename of the
volume (container) will be My Volume (as can be seen in the screenshot above).
You may, of
course, choose any other filename and location you like (for example, on a USB
memory stick).
Note that the file My Volume does not exist yet VeraCrypt will create it.
IMPORTANT: Note that VeraCrypt will not encrypt any existing files (when creating a
VeraCrypt file container). If you select an existing file in this step, it will be overwritten and
replaced by the newly created volume (so the overwritten file will be lost, not encrypted).
You will be able to encrypt existing files (later on) by moving them to the VeraCrypt volume
that we are creating now.
*
Select the desired path (where you wish the container to be created) in the file selector.
Type the desired container filename in the File name box.
Click Save.
The file selector window should disappear.
In the following steps, we will return to the VeraCrypt Volume Creation Wizard.
*
Note that after you copy existing unencrypted files to a VeraCrypt volume, you should securely erase (wipe) the original
unencrypted files. There are software tools that can be used for the purpose of secure erasure (many of them are free).
12
STEP 7:
In the Volume Creation Wizard window, click Next.
STEP 8:
Here you can choose an encryption algorithm and a hash algorithm for the volume. If you are not
sure what to select here, you can use the default settings and click Next (for more information, see
chapters Encryption Algorithms and Hash Algorithms).
13
STEP 9:
Here we specify that we wish the size of our VeraCrypt container to be 250 megabyte. You may, of
course, specify a different size. After you type the desired size in the input field (marked with a red
rectangle), click Next.
14
STEP 10:
This is one of the most important steps. Here you have to choose a good volume password.
Read carefully the information displayed in the Wizard window about what is considered a good
password.
After you choose a good password, type it in the first input field. Then re-type it in the input field
below the first one and click Next.
Note: The button Next will be disabled until passwords in both input fields are the same.
15
STEP 11:
Move your mouse as randomly as possible within the Volume Creation Wizard window at least for
30 seconds. The longer you move the mouse, the better. This significantly increases the
cryptographic strength of the encryption keys (which increases security).
Click Format.
Volume creation should begin. VeraCrypt will now create a file called My Volume in the folder
F:\Data\ (as we specified in Step 6). This file will be a VeraCrypt container (it will contain
the
encrypted VeraCrypt volume). Depending on the size of the volume, the volume creation may
take a long time. After it finishes, the following dialog box will appear:
Click OK to close the dialog box.
16
STEP 12:
We have just successfully created a VeraCrypt volume (file container).
In the VeraCrypt Volume Creation Wizard window, click Exit.
The Wizard window should disappear.
In the remaining steps, we will mount the volume we just created. We will return to the main
VeraCrypt window (which should still be open, but if it is not, repeat Step 1 to launch VeraCrypt and
then continue from Step 13.)
17
STEP 13:
Select a drive letter from the list (marked with a red rectangle). This will be the drive letter to which
the VeraCrypt container will be mounted.
Note: In this tutorial, we chose the drive letter M, but you may of course choose any other available
drive letter.
18
STEP 14:
Click Select File.
The standard file selector window should appear.
19
STEP 15:
In the file selector, browse to the container file (which we created in Steps 6-11) and select it.
Click Open (in the file selector window).
The file selector window should disappear.
In the following steps, we will return to the main VeraCrypt window.
20
STEP 16:
In the main VeraCrypt window, click Mount.
Password
prompt dialog window should appear.
STEP 17:
Type the password (which you specified in Step 10) in the password input field (marked with a
red
rectangle).
21
STEP 18:
Select the PRF algorithm that was used during the creation of the volume (SHA-512 is the default
PRF used by VeraCrypt). If you don’t remember which PRF was used, just leave it set to
“autodetection” but the mounting process will take more time. Click OK after entering the
password.
VeraCrypt will now attempt to mount the volume. If the password is incorrect (for example, if you
typed it incorrectly), VeraCrypt will notify you and you will need to repeat the previous step (type
the password again and click OK). If the password is correct, the volume will be mounted.
(Continued on the next page.)
22
FINAL STEP:
We have just successfully mounted the container as a virtual disk M:
The virtual disk is entirely encrypted (including file names, allocation tables, free space, etc.) and
behaves like a real disk. You can save (or copy, move, etc.) files to this virtual disk and they will be
encrypted on the fly as they are being written.
If you open a file stored on a VeraCrypt volume, for example, in media player, the file will be
automatically decrypted to RAM (memory) on the fly while it is being read.
Important: Note that when you open a file stored on a VeraCrypt volume (or when you write/copy a
file to/from the VeraCrypt volume) you will not be asked to enter the password again. You need to
enter the correct password only when mounting the volume.
You can open the mounted volume, for example, by selecting it on the list as shown in the
screenshot above (blue selection) and then double-clicking on the selected item.
(Continued on the next page.)
23
You can also browse to the mounted volume the way you normally browse to any other types of
volumes. For example, by opening the Computer (or My Computer’) list and double clicking the
corresponding drive letter (in this case, it is the letter M).
You can copy files (or folders) to and from the VeraCrypt volume just as you would copy them to
any normal disk (for example, by simple drag-and-drop operations). Files that are being read or
copied from the encrypted VeraCrypt volume are automatically decrypted on the fly in RAM
(memory). Similarly, files that are being written or copied to the VeraCrypt volume are automatically
encrypted on the fly in RAM (right before they are written to the disk).
Note that VeraCrypt never saves any decrypted data to a disk it only stores them temporarily in
RAM (memory). Even when the volume is mounted, data stored in the volume is still encrypted.
When you restart Windows or turn off your computer, the volume will be dismounted and all files
stored on it will be inaccessible (and encrypted). Even when power supply is suddenly interrupted
(without proper system shut down), all files stored on the volume will be inaccessible (and
encrypted). To make them accessible again, you have to mount the volume. To do so, repeat
Steps 13-18.
(Continued on the next page.)
24
If you want to close the volume and make files stored on it inaccessible, either restart your
operating system or dismount the volume. To do so, follow these steps:
Select the volume from the list of mounted volumes in the main VeraCrypt window (marked with a
red rectangle in the screenshot above) and then click Dismount (also marked with a red rectangle
in the screenshot above). To make files stored on the volume accessible again, you will have to
mount the volume. To do so, repeat Steps 13-18.
How to Create and Use a VeraCrypt-Encrypted Partition/Device
Instead of creating file containers, you can also encrypt physical partitions or drives (i.e., create
VeraCrypt device-hosted volumes). To do so, repeat the steps 1-3 but in the step 3 select the
second or third option. Then follow the remaining instructions in the wizard. When you create a
device-hosted VeraCrypt volume within a non-system partition/drive, you can mount it by clicking
Auto-Mount Devices in the main VeraCrypt window. For information pertaining to encrypted system
partition/drives, see the chapter System Encryption.
Important: We strongly recommend that you also read the other chapters of this manual, as
they contain important information that has been omitted in this tutorial for simplicity.
25
VeraCrypt Volume
There are two types of VeraCrypt volumes:
File-hosted (container)
Partition/device-hosted (non-system)
Note: In addition to creating the above types of virtual volumes, VeraCrypt can encrypt a physical
partition/drive where Windows is installed (for more information, see the chapter System
Encryption).
A VeraCrypt file-hosted volume is a normal file, which can reside on any type of storage device. It
contains (hosts) a completely independent encrypted virtual disk device.
A VeraCrypt partition is a hard disk partition encrypted using VeraCrypt. You can also encrypt
entire hard disks, USB hard disks, USB memory sticks, and other types of storage devices.
Creating a New VeraCrypt Volume
To create a new VeraCrypt file-hosted volume or to encrypt a partition/device (requires
administrator privileges), click on ‘Create Volume’ in the main program window. VeraCrypt Volume
Creation Wizard should appear. As soon as the Wizard appears, it starts collecting data that will be
used in generating the master key, secondary key (XTS mode), and salt, for the new volume. The
collected data, which should be as random as possible, include your mouse movements, key
presses, and other values obtained from the system (for more information, please see the section
Random Number Generator). The Wizard provides help and information necessary to successfully
create a new VeraCrypt volume. However, several items deserve further explanation:
Hash Algorithm
Allows you to select which hash algorithm VeraCrypt will use. The selected hash algorithm is used
by the random number generator (as a pseudorandom mixing function), which generates the
master key, secondary key (XTS mode), and salt (for more information, please see the section
Random Number Generator). It is also used in deriving the new volume header key and secondary
header key (see the section Header Key Derivation, Salt, and Iteration Count).
For information about the implemented hash algorithms, see the chapter Hash Algorithms.
Note that the output of a hash function is never used directly as an encryption key. For more
information, please refer to the chapter Technical Details.
Encryption Algorithm
This allows you to select the encryption algorithm with which your new volume will be encrypted.
Note that the encryption algorithm cannot be changed after the volume is created. For more
information, please see the chapter Encryption Algorithms.
26
Quick Format
If unchecked, each sector of the new volume will be formatted. This means that the new volume
will be entirely filled with random data. Quick format is much faster but may be less secure because
until the whole volume has been filled with files, it may be possible to tell how much data it contains
(if the space was not filled with random data beforehand). If you are not sure whether to
enable or
disable Quick Format, we recommend that you leave this option unchecked. Note that
Quick
Format can only be enabled when encrypting partitions/devices.
Important: When encrypting a partition/device within which you intend to create a hidden volume
afterwards, leave this option unchecked.
Dynamic
Dynamic VeraCrypt container is a pre-allocated NTFS sparse file whose physical size (actual disk
space used) grows as new data is added to it. Note that the physical size of the container (actual
disk space that the container uses) will not decrease when files are deleted on the VeraCrypt
volume. The physical size of the container can only increase up to the maximum value that is
specified by the user during the volume creation process. After the maximum specified size is
reached, the physical size of the container will remain constant.
Note that sparse files can only be created in the NTFS file system. If you are creating a container
in the FAT file system, the option Dynamic will be disabled (“grayed out”).
Note that the size of a dynamic (sparse-file-hosted) VeraCrypt volume reported by Windows and by
VeraCrypt will always be equal to its maximum size (which you specify when creating the volume).
To find out current physical size of the container (actual disk space it uses), right-click the container
file (in a Windows Explorer window, not in VeraCrypt), then select Properties and see the
Size on disk value.
WARNING: Performance of dynamic (sparse-file-hosted) VeraCrypt volumes is significantly worse
than performance of regular volumes. Dynamic (sparse-file-hosted) VeraCrypt volumes are also
less secure, because it is possible to tell which volume sectors are unused. Furthermore, if data is
written to a dynamic volume when there is not enough free space in its host file system, the
encrypted file system may get corrupted.
Cluster Size
Cluster is an allocation unit. For example, one cluster is allocated on a FAT file system for a one-
byte file. When the file grows beyond the cluster boundary, another cluster is allocated.
Theoretically, this means that the bigger the cluster size, the more disk space is wasted; however,
the better the performance. If you do not know which value to use, use the default.
VeraCrypt Volumes on CDs and DVDs
If you want a VeraCrypt volume to be stored on a CD or a DVD, first create a file-hosted VeraCrypt
container on a hard drive and then burn it onto a CD/DVD using any CD/DVD burning software (or,
under Windows XP or later, using the CD burning tool provided with the operating system).
Remember that if you need to mount a VeraCrypt volume that is stored on a read-only medium
(such as a CD/DVD) under Windows 2000, you must format the VeraCrypt volume as FAT. The
reason is that Windows 2000 cannot mount NTFS file system on read-only media (Windows XP
and later versions of Windows can).
27
Hardware/Software RAID, Windows Dynamic Volumes
VeraCrypt supports hardware/software RAID as well as Windows dynamic volumes.
Windows Vista or later: Dynamic volumes are displayed in the ‘Select Device’ dialog window
as \Device\HarddiskVolumeN.
Windows XP/2000/2003: If you intend to format a Windows dynamic volume as a VeraCrypt
volume, keep in mind that after you create the Windows dynamic volume (using the Windows Disk
Management tool), you must restart the operating system in order for the volume to be
available/displayed in the ‘Select Device’ dialog window of the VeraCrypt Volume Creation Wizard.
Also note that, in the Select Device’ dialog window, a Windows dynamic volume is not displayed
as a single device (item). Instead, all volumes that the Windows dynamic volume consists of are
displayed and you can select any of them in order to format the entire Windows dynamic volume.
Additional Notes on Volume Creation
After you click the ‘Format’ button in the Volume Creation Wizard window (the last step), there will
be a short delay while your system is being polled for additional random data. Afterwards, the
master key, header key, secondary key (XTS mode), and salt, for the new volume will be
generated, and the master key and header key contents will be displayed.
For extra security, the portions of the randomness pool, master key, and header key can be
prevented from being displayed by unchecking the checkbox in the upper right corner of the
corresponding field:
Note that only the first 128 bits of the pool/keys are displayed (not the entire contents).
You can create FAT (whether it will be FAT12, FAT16, or FAT32, is automatically determined from
the number of clusters) or NTFS volumes (however, NTFS volumes can only be created by users
with administrator privileges). Mounted VeraCrypt volumes can be reformatted as FAT12, FAT16,
FAT32, or NTFS anytime. They behave as standard disk devices so you can right-click the drive
letter of the mounted VeraCrypt volume (for example in the Computer or My Computer list) and
select Format’.
For more information about creating VeraCrypt volumes, see also the section Hidden Volume.
28
Favorite Volumes
Favorite volumes are useful, for example, in any the following cases:
You have a volume that always needs to be mounted to a particular drive letter.
You have a volume that needs to be automatically mounted when its host device gets
connected to the computer (for example, a container located on a USB flash drive or
external USB hard drive).
You have a volume that needs to be automatically mounted when you log on to the
operating system.
You have a volume that always needs to be mounted as read-only or removable medium.
To configure a VeraCrypt volume as a favorite volume, follow these steps:
1.
Mount the volume (to the drive letter to which you want it to be mounted every time).
2.
Right-click the mounted volume in the drive list in the main VeraCrypt window and select
Add to Favorites’.
3.
The Favorite Volumes Organizer window should appear now. In this window, you can set
various options for the volume (see below).
4.
Click OK.
Favorite volumes can be mounted in several ways: To mount all favorite volumes, select
Favorites > Mount Favorite Volumes or press the Mount Favorite Volumes hot key (Settings > Hot
Keys). To mount only one of the favorite volumes, select it from the list contained in the Favorites
menu. When you do so, you are asked for its password (and/or keyfiles) (unless it is cached) and if
it is correct, the volume is mounted. If it is already mounted, an Explorer window is opened for it.
Selected or all favorite volumes can be mounted automatically whenever you log on to
Windows. To set this up, follow these steps:
1.
Mount the volume you want to have mounted automatically when you log on (mount it to
the drive letter to which you want it to be mounted every time).
2.
Right-click the mounted volume in the drive list in the main VeraCrypt window and select
Add to Favorites’.
3.
The Favorites Organizer window should appear now. In this window, enable the option
Mount selected volume upon logon and click OK.
Then, when you log on to Windows, you will be asked for the volume password (and/or keyfiles)
and if it is correct, the volume will be mounted.
Note: VeraCrypt will not prompt you for a password if you have enabled caching of the pre-boot
authentication password (Settings > System Encryption’) and the volumes use the same password
as the system partition/drive.
29
Selected or all favorite volumes can be mounted automatically whenever its host device
gets connected to the computer. To set this up, follow these steps:
1.
Mount the volume (to the drive letter to which you want it to be mounted every time).
2.
Right-click the mounted volume in the drive list in the main VeraCrypt window and select
Add to Favorites’.
3.
The Favorites Organizer window should appear now. In this window, enable the option
Mount selected volume when its host device gets connected and click OK.
Then, when you insert e.g. a USB flash drive on which a VeraCrypt volume is located into the USB
port, you will be asked for the volume password (and/or keyfiles) (unless it is cached) and if it is
correct, the volume will be mounted.
Note: VeraCrypt will not prompt you for a password if you have enabled caching of the pre-boot
authentication password (Settings > System Encryption’) and the volume uses the same password
as the system partition/drive.
A special label can be assigned to each favorite volume. This label is not the same as the
filesystem label and it is shown within the VeraCrypt user interface instead of the volume path. To
assign such a label, follow these steps:
1.
Select Favorites > Organize Favorite Volumes’.
2.
The Favorite Volumes Organizer window should appear now. In this window, select the
volume whose label you want to edit.
3.
Enter the label in the Label of selected favorite volume input field and click OK.
Note that the Favorite Volumes Organizer window (Favorites > Organize Favorite Volumes’) allows
you to set various other options for each favorite volume. For example, any of them can be
mounted as read-only or as removable medium. To set any of these options, follow these steps:
1.
Select Favorites > Organize Favorite Volumes’.
2.
The Favorite Volumes Organizer window should appear now. In this window, select the
volume whose options you want to set.
3.
Set the options and click OK.
The order in which system favorite volumes are displayed in the Favorites Organizer window
(Favorites > Organize Favorite Volumes’) is the order in which the volumes are mounted when
you select Favorites > Mount Favorite Volumes or when you press the Mount Favorite Volumes
hotkey (Settings > Hot Keys). You can use the Move Up and Move Down buttons to change the
order of the volumes.
Note that a favorite volume can also be a partition that is within the key scope of system
encryption mounted without pre-boot authentication (for example, a partition located on the
encrypted system drive of another operating system that is not running). When you mount such a
volume and add it to favorites, you will no longer have to select System > Mount Without Pre-Boot
Authentication or to enable the mount option Mount partition using system encryption without pre-
boot authentication’. You can simply mount the favorite volume (as explained above) without
setting any options, as the mode in which the volume is mounted is saved in the configuration file
containing the list of your favorite volumes
30
Warning: When the drive letter assigned to a favorite volume (saved in the configuration file) is not
free, the volume is not mounted and no error message is displayed.
To remove a volume form the list of favorite volumes, select Favorites > Organize Favorite
Volumes, select the volume, click Remove, and click OK.
System Favorite Volumes
System favorites are useful, for example, in the following cases:
You have volumes that need to be mounted before system and application services
start and before users start logging on.
There are network-shared folders located on VeraCrypt volumes. If you configure these
volumes as system favorites, you will ensure that the network shares will be
automatically restored by the operating system each time it is restarted.
You need each such volume to be mounted as the same drive letter each time the
operating system starts.
Note that, unlike the regular (non-system) favorites, system favorite volumes use the pre-boot
authentication password and, therefore, require your system partition/drive to be encrypted (also
note it is not required to enable caching of the pre-boot authentication password). Moreover, since
the pre-boot password is typed using US keyboard layout (BIOS requirement), the password of
the system favorite volume must be entered during its creation process using the US keyboard
layout by typing the same keyboard keys you type when you enter the pre-boot authentication
password. If the password of the system favorite volume is not identical to the pre-boot
authentication password under the US keyboard layout, then it will fail to mount.
When creating a volume that you want to make a system favorite later, you must explicitly set the
keyboard layout associated with VeraCrypt to US layout and you have to type the same keyboard
keys you type when you enter the pre-boot authentication password.
System favorite volumes can be configured to be available within VeraCrypt only to users
with administrator privileges (select Settings > System Favorite Volumes > Allow only
administrators to view and dismount system favorite volumes in VeraCrypt’). This option should be
enabled on servers to ensure that system favorite volumes cannot be dismounted by users without
administrator privileges. On non-server systems, this option can be used to prevent normal
VeraCrypt volume actions (such as Dismount All’, auto-dismount, etc.) from affecting system
favorite volumes. In addition, when VeraCrypt is run without administrator privileges (the default on
Windows Vista and later), system favorite volumes will not be displayed in the drive letter list in the
main VeraCrypt application window.
To configure a VeraCrypt volume as a system favorite volume, follow these steps:
1.
Mount the volume (to the drive letter to which you want it to be mounted every time).
2.
Right-click the mounted volume in the drive list in the main VeraCrypt window and select
Add to System Favorites’.
3.
The System Favorites Organizer window should appear now. In this window, enable the
option Mount system favorite volumes when Windows starts and click OK.
35
information on how to do so, please refer to the documentation for your BIOS/motherboard or
contact your computer vendor’s technical support team for assistance). Then restart your
computer. The VeraCrypt Rescue Disk screen should appear now. Note: In the VeraCrypt Rescue
Disk screen, you can select ‘Repair Options’ by pressing F8 on your keyboard.
If your Rescue Disk is damaged, you can create a new one by selecting System > Create Rescue
Disk. To find out whether your VeraCrypt Rescue Disk is damaged, insert it into your CD/DVD drive
and select System > Verify Rescue Disk.
36
Plausible Deniability
In case an adversary forces you to reveal your password, VeraCrypt provides and supports two
kinds of plausible deniability:
1.
Hidden volumes (for more information, see the section Hidden Volume below) and hidden
operating systems (see the section Hidden Operating System).
2.
Until decrypted, a VeraCrypt partition/device appears to consist of nothing more than
random data (it does not contain any kind of "signature"). Therefore, it should be impossible
to prove that a partition or a device is a VeraCrypt volume or that it has been encrypted
(provided that the security requirements and precautions listed in the chapter Security
Requirements and Precautions are followed). A possible plausible explanation for the
existence of a partition/device containing solely random data is that you have wiped
(securely erased) the content of the partition/device using one of the tools that erase data by
overwriting it with random data (in fact, VeraCrypt can be used to securely erase a
partition/device too, by creating an empty encrypted partition/device-hosted volume within
it). However, you need to prevent data leaks (see section Data Leaks) and also note that, for
system encryption, the first drive track contains the (unencrypted) VeraCrypt Boot Loader,
which can be easily identified as such (for more information, see the chapter
System Encryption). When using system encryption, plausible deniability can be achieved
by creating a hidden operating system (see the section Hidden Operating System).
Although file-hosted VeraCrypt volumes (containers) do not contain any kind of "signature"
either (until decrypted, they appear to consist solely of random data), they cannot provide
this kind of plausible deniability, because there is practically no plausible explanation for the
existence of a file containing solely random data. However, plausible deniability can still be
achieved with a file-hosted VeraCrypt volume (container) by creating a hidden volume
within it (see above).
Notes
When formatting a hard disk partition as a VeraCrypt volume (or encrypting a partition in
place), the partition table (including the partition type) is never modified (no VeraCrypt
“signature” or “ID” is written to the partition table).
There are methods to find files or devices containing random data (such as VeraCrypt
volumes). Note, however, that this should not affect plausible deniability in any way. The
adversary still should not be able to prove that the partition/device is a VeraCrypt volume or
that the file, partition, or device, contains a hidden VeraCrypt volume (provided that you
follow the security requirements and precautions listed in the chapter Security
Requirements and Precautions and in the subsection Security Requirements and
Precautions Pertaining to Hidden Volumes).
37
Hidden Volume
It may happen that you are forced by somebody to reveal the password to an encrypted volume.
There are many situations where you cannot refuse to reveal the password (for example, due to
extortion). Using a so-called hidden volume allows you to solve such situations without revealing
the password to your volume.
The layout of a standard VeraCrypt volume before and after a hidden volume was created within it.
The principle is that a VeraCrypt volume is created within another VeraCrypt volume (within the free
space on the volume). Even when the outer volume is mounted, it should be impossible to prove
whether there is a hidden volume within it or not
*
, because free space on any VeraCrypt
volume is always filled with random data when the volume is created
and no part of the
(dismounted) hidden volume can be distinguished from random data. Note that VeraCrypt does not
modify the file system (information about free space, etc.) within the outer volume in any way.
The password for the hidden volume must be substantially different from the password for the
outer volume. To the outer volume, (before creating the hidden volume within it) you should copy
some sensitive-looking files that you actually do NOT want to hide. These files will be there for
*
Provided that all the instructions in the VeraCrypt Volume Creation Wizard have been followed and provided that the
requirements and precautions listed in the subsection 'Security Requirements and Precautions Pertaining to Hidden
Volumes' are followed.
Provided that the options Quick Format and Dynamic are disabled and provided that the volume does not contain a
filesystem that has been encrypted in place (VeraCrypt does not allow the user to create a hidden volume within such a
volume). For information on the method used to fill free volume space with random data, see chapter Technical Details,
section VeraCrypt Volume Format Specification.
112
If it does not help, reformat the outer volume again and copy less files/folders to its root
folder than you did last time. If it does not help, keep reformatting and decreasing the
number of files/folders in the root folder. If this is unacceptable or if it does not help,
reformat the outer volume and select a larger cluster size. If it does not help, keep
reformatting and increasing the cluster size, until the problem is solved. Alternatively, try
creating a hidden volume within an NTFS volume.
PROBLEM:
One of the following problems occurs:
A VeraCrypt volume cannot be mounted.
NTFS VeraCrypt volumes cannot be created.
In addition, the following error may be reported: "The process cannot access the file because it is
being used by another process."
PROBABLE CAUSE:
This is probably caused by an interfering application. Note that this is not a bug in VeraCrypt. The
operating system reports to VeraCrypt that the device is locked for an exclusive access by an
application (so VeraCrypt is not allowed to access it).
POSSIBLE SOLUTION:
It usually helps to disable or uninstall the interfering application, which is usually an anti-virus utility,
a disk management application, etc.
PROBLEM:
In the VeraCrypt Boot Loader screen, Im trying to type my password and/or pressing other keys
but the VeraCrypt boot loader is not responding.
PROBABLE CAUSE:
You have a USB keyboard (not a PS/2 keyboard) and pre-boot support for USB keyboards is
disabled in your BIOS settings.
POSSIBLE SOLUTION:
You need to enable pre-boot support for USB keyboards in your BIOS settings. To do so, follow
the below steps:
Restart your computer, press F2 or Delete (as soon as you see a BIOS start-up screen), and wait
until a BIOS configuration screen appears. If no BIOS configuration screen appears, restart (reset)
the computer again and start pressing F2 or Delete repeatedly as soon as you restart (reset) the
computer. When a BIOS configuration screen appears, enable pre-boot support for USB
keyboards. This can typically be done by selecting: Advanced > USB Configuration > Legacy
USB Support (or USB Legacy’) > Enabled. (Note that the word ‘legacy’ is in fact misleading,
because pre-boot components of modern versions of MS Windows require this option to be
enabled to allow user interaction/control.) Then save the BIOS settings (typically by pressing F10)
116

Hulp nodig? Stel uw vraag in het forum

Spelregels

Misbruik melden

Gebruikershandleiding.com neemt misbruik van zijn services uitermate serieus. U kunt hieronder aangeven waarom deze vraag ongepast is. Wij controleren de vraag en zonodig wordt deze verwijderd.

Product:

Bijvoorbeeld antisemitische inhoud, racistische inhoud, of materiaal dat gewelddadige fysieke handelingen tot gevolg kan hebben.

Bijvoorbeeld een creditcardnummer, een persoonlijk identificatienummer, of een geheim adres. E-mailadressen en volledige namen worden niet als privégegevens beschouwd.

Spelregels forum

Om tot zinvolle vragen te komen hanteren wij de volgende spelregels:

Belangrijk! Als er een antwoord wordt gegeven op uw vraag, dan is het voor de gever van het antwoord nuttig om te weten als u er wel (of niet) mee geholpen bent! Wij vragen u dus ook te reageren op een antwoord.

Belangrijk! Antwoorden worden ook per e-mail naar abonnees gestuurd. Laat uw emailadres achter op deze site, zodat u op de hoogte blijft. U krijgt dan ook andere vragen en antwoorden te zien.

Abonneren

Abonneer u voor het ontvangen van emails voor uw VeraCrypt 1.16 bij:


U ontvangt een email met instructies om u voor één of beide opties in te schrijven.


Ontvang uw handleiding per email

Vul uw emailadres in en ontvang de handleiding van VeraCrypt 1.16 in de taal/talen: Engels als bijlage per email.

De handleiding is 2,98 mb groot.


U ontvangt de handleiding per email binnen enkele minuten. Als u geen email heeft ontvangen, dan heeft u waarschijnlijk een verkeerd emailadres ingevuld of is uw mailbox te vol. Daarnaast kan het zijn dat uw internetprovider een maximum heeft aan de grootte per email. Omdat hier een handleiding wordt meegestuurd, kan het voorkomen dat de email groter is dan toegestaan bij uw provider.

Stel vragen via chat aan uw handleiding

Stel uw vraag over deze PDF

Uw handleiding is per email verstuurd. Controleer uw email

Als u niet binnen een kwartier uw email met handleiding ontvangen heeft, kan het zijn dat u een verkeerd emailadres heeft ingevuld of dat uw emailprovider een maximum grootte per email heeft ingesteld die kleiner is dan de grootte van de handleiding.

Er is een email naar u verstuurd om uw inschrijving definitief te maken.

Controleer uw email en volg de aanwijzingen op om uw inschrijving definitief te maken

U heeft geen emailadres opgegeven

Als u de handleiding per email wilt ontvangen, vul dan een geldig emailadres in.

Uw vraag is op deze pagina toegevoegd

Wilt u een email ontvangen bij een antwoord en/of nieuwe vragen? Vul dan hier uw emailadres in.


Info