484773
12
Verklein
Vergroot
Pagina terug
1/23
Pagina verder
1
DESCRIPTION OF THE FUNCTIONS
Top View:
1. L.C.D.
These liquid crystal displays (L.C.D.) indicate the track numbers, time (minutes, seconds, frames), pitch range, and relative playback information.
2. Seamless Loop
There is A, B/LOOP/ EXIT, RELOOP buttons.
i. . A BUTTON---“start point” (A point. Also, Cue 1 could be A point) After setting up the A point, the green Led light up
ii. . B / LOOP EXIT BUTTON: ---“ End point”(B point). Press the B /LOOP button to set up the B point and start the loop playback automatically. Loop
lights on the display and the 3 LEDs flash. Press this button again to exit the LOOP playback.
iii. . Return to the loop playback by pressing the RELOOP while in performance.
iv. . Change “ START POINT” and” END POINT” by pressing the A& B/ LOOP EXIT button again
v. The interval between A and B point must be more than 20 frames; otherwise, the B point will be canceled, then LOOP function disappears and LOOP fades
on the display
3. Instant Reverse
i. When Instant Reverse mode ON, the Brake sound cause by motor reverse will not be heard.
Under this mode, If the track reverses back from 00:50, and switch back to forward play as 00:45. The track will start to play from 00:55
Please note that there is a 10 seconds buffer for this mode, which means the track can reverse 10 seconds backwards from the point you selected.
ii. Hold the Instant Reverse button for 3 seconds and the LED flashing.
Under this mode, the track starts reverse and forward play instantly from the switch point
If the track reverses back from 00:50, and switch back to forward play as 00:45. The track will start to play from 00:45
2
4. Forward/Reverse
Control the direction of the Platter
5. TIME / STOP BUTTON
This button switches the time display between total remaining time, remaining time of the current song, elapsed playing time. The unit will be in the
“stop” mode if you continue pressing the button for 3 seconds.
6. 3 HOT-CUE
This unit will allow you to play from 3 cue points instantly.
a.Set CUE memory: Press the MEMO button first, and then press the CUE button to complete the CUE setting, then this CUE button will light up.
b.Play” CUE” memory: Upon pressing specific CUE button, it will flash about 5 seconds.
Note: This function is not available during perform REVERSE sound effect.
7. Motor ON/OFF
Switch of the Platter Motor
8. BOP BUTTON
The playback will automatically play from the CUE point upon the button is pressed.
9. CONTINUE/SINGLE Button
To press this button it can switch between auto cue single and continue. The selected mode is indicated on the display.
*AUTO CUE SINGLE - After each track, the unit pauses at the beginning of next track. The playback starts from audible point.
*CONTINUE -To play all tracks continually.
*OUTRO - The unit will play the last 30 seconds of each track. Press the button for 3 seconds to switch OUTRO function.
10. CUE BUTTON
The cue function allows the CD returning to the memorized point. In PAUSE mode, pressing the CUE button to set the cue point, and the CUE button
blinks; in PLAY mode, press this button to pause the unit at the memorized point.
11. PLAY/ PAUSE BUTTON
Each press of this button causes the operation to change between PLAY and PAUSE modes.
12. TRACK/FX PARAMETER KNOB
The Knob select the track to be played and FX Parameter adjust
13. SEARCH BUTTON
Pressed the button to switch the function of Jog Dial between SEARCH and PITCH BEND.
When the indicator LED is light, dial the jog for quick search forward and backward.
When the indicator LED is off, dial the jog for pitch bend function.
If the jog is unmoved for 8 seconds, the indicator light will go off.
14. PROGRAM BUTTON
You can program the track you want. While the unit is stopped, press the PROG button first to enter memorized mode, by pressing the skip buttons
to select the tracks you want to order and then press the PROG button again to compete set up per track. The max tracks you can program are 16
tracks per disc. While playing programmed tracks, the LED of PROG lights up. While the unit is stopped, open the tray disc or turn off the power,
the program will be exit.
This button can be used for DISC IDENTIFICATION, please note the point 22
15. PITCH BEND + / - BUTTON
When each of the two CD players is playing, the pitch bend function allows the position of the bass beat to be matched after the pitch has been adjusted. The
pitch will automatically rise up to + 16% from the current setting while pressing the “ + “button. While pressing the “ – “ button, the pitch will automatically drop
to - 16 % from current setting. By the way of changing the pitch the position of the beats can be matched
16. PITCH CONTROL SLIDER
To match the choices of playback speed (8%, 16%, 50%), you can choose what range you want between minimum (up side) and maximum (bottom
side) by moving the pitch control slider.
.
17. KEY ON/OFF SWITCH
Press the button to switch KEY mode on or off.
KEY OFF: The display shows the “KEY” in blinking, and the key changed according to the pitch change. The key parameter adjustment is not in
effect
KEY ON: The “KEY” lights on the display, turning the SCOPE knob to adjust the key. Slide the pitch slider will also change the key.
18. PITCH ON/OFF BUTTON
Press the button to be PITCH ON mode, press it again on the PITCH ON mode, and blinks with unit on the PITCH OFF mode.
19. PITCH % SELECT BUTTON
Select the pitch change range from ±8%, ±16%, ±50%. The playback speed will change when you move the pitch control slider.
20. TONE ARM SECTION
Type: Universal S-Shape tubular arm
3
21. EFFECT SELECT KNOB
a. Flanger:
b. Filter
c. Echo
Please check page.9 for the basic operation and adjustment.
22. Disc Identification (CDDA ONLY)
i. Disc Identification function is workable in Pause Mode only
ii. Press MEMO Key for 2 sec, LCD Display shows “SAVE” and MAIN CUE time.
That means the Main Cue point is saving into EEPROM.
As “SAVE” and “MAIN CUE Time” disappear from LCD after 3 seconds, the Main Cue point save procedure is completed.
iii. When EEPROM recognize that there is the MEMO record, LCD Display shows “CUE“
iv. When EEPROM recognize that there is saved CUE Point in EEPROM. LCD Display shows “LOAD” and “MAIN CUE time”
v. Press MEMO + MAIN CUE to Load the Saved CUE TIME to MICON MAIN CUE
vi. Press TIME Button and Switch the Power ON , Press MEMO for 3 sec in “No disc mode” to clear the Memory from EEPROM
As LCD shows “ RESET ” for 3 seconds, the data is cleared.
23. SLEEP:
Leave the unit unused for 30 minutes; the machine will shut off automatically.
DESCRIPTION OF THE FUNCTIONS
Front View
1. CD/Mix/TT
Switch of CD/Mix/TT mode
2. RPM selector
Selector of 33/45/78 rpm, holds the button for 3 seconds to switch to 78 rpm
3. EJECT BUTTON
Press to eject the disc.
Note: Disc cant be ejected unless the stop or pause button has been pushed first
4. Drive in use light
Light will blink when the disc drive is in use.
5. DISC SLOT
Insert and remove the CDDA disc.
4
LCM INSTRUCTION
This unit can display text information on the display when playing CD text
discs which contain text information in English category.
The CD text disc includes the mark shown at the right.
Note:
This unit can provide a text display of the following types of characters.
Other types of characters will result in “” being displayed.
Alphabet
Numbers
Symbols
1. TOTAL TRACK – the track numbers of the CD or CARD.
2. / The unit is in playing/ paused.
3. CONT / SINGLE – Shows when the unit is set to play the all
tracks continually or play only one track.
4. MP3 – Lights up when the unit is playing MP3 file.
depending on mode setting
5. TIME MODE (ELAPSED, TOTAL, and REMAIN)
Shows the time as it is taking place, how much time is left on full CD
or on a particular track.
6. LOOP lights up when loop effects are active.
7. TIME BAR – Show the time length depending on the setting of
the “TIME” mode.
8. TRACK – Shows the track number that is playing.
9. MINUTES – Shows the minutes elapsed or remaining.
10. SECONDS – Shows the seconds elapsed or remaining
depending on mode setting.
11. FRAMES – The CD Player breaks down a second into 75
frames for accurate cueing. This shows the frames elapsed or
remaining depending on mode setting.
12. PITCH – The pitch change range
13. BPM: Manual BPM mode
: Auto BPM Mode
14. Number of Beat per minute
15. ID3 tag of CD/MP3 : Press “Search” button (above Dial
Wheel) button for 2 seconds to display the ID3 data, file name°B
Folder name°B Artist name°B Title name and Album name, press
this button again to confirm it.
16. PGM-Shows when you program the track you want
5
DESCRIPTION OF THE FUNCTIONS
Rear View
1. PHONO OUT (RCA Jacks)
The audio from Turntable is output from these jacks. Connect to the PHONO input of the mixer.
1. CD OUT (RCA Jacks)
The audio from each CD player is output from these jacks. Connect to the line input of the mixer.
2. DIGITAL OUT
The digital from each CD player is output from these jacks. Connect to the line input of the D/A Amplifier.
3. POWER (Power Switch)
Press the power switch to turn the unit on, and the LED indicator will be light.
To switch the POWER off by pressing the POWER switch again.
4. Relay Connector
This connector is used for connecting to another CD player to allow Relay function to work.
5. Remote
This connector is used for connecting to FADERSTART wire remote control unit.
6. TACT / LOCK / CUE PLAY option
Select the type of switch in the mixer for FADERSTART wire remote control.
7. POWER (Power Switch)
Press the power switch to turn the unit on
8. AC input voltage selector:
Switch between 115V @ 60Hz and 230V @ 50Hz
6
BASIC OPERATION
There are 3 modes for CDJ800TT (control switch on the FRONT PANEL)
1. CD
2. MIX (CD / TURNTABLE)
3. TT (TURNTABLE)
1. CD
1. Under PAUSE Mode, Press PLAY Button to memorize MAIN CUE
2. Select between 33 / 45 rpm/min
3. FORWARD / REVERSE SWITCH: which control CDDA, PLAY, FORWARD / REVERSE
4. MOTOR ON/OFF:
a. When MOTOR LED ON, turntable turns or stop as you press Play or Pause button.
CD disc will follow the turntable turning speed and affect by the Pitch Control setting
b. When MOTOR LED OFF, turntable will stop and CD disc still affect by Pitch Control setting
5. INSTANT REVERSE:
When Instant Reverse mode ON, the Brake sound cause by motor reverse will not be heard.
6. EFFECT:
a. LED ON to start EFFECT Display show EFFECT Parameter for 5 sec back to the last displayed EFFECT
b. Effect Adjustment: EFFECT KEY HOLD Turn the Encoder anti-clockwise to reduce the EFFECT Gain
Turn the Encoder clockwise to increase the EFFECT Gain, PUSH Encoder to switch to Parameter +10 mode
c. EFFECT Setting will be saved before the machine turn off.
7. Under MP3 MODE, press the ENCODER to select Folder and release to enter
2. MIX
Under MIX mode:
1. MOTOR ON/OFF °B PITCH / PITCH SLIDE °B FORWARD / REVERSE
control the Turntable , and other buttons control the CD player
2. Turntable is not able to control CD player
3. There are 3 speed modes for turntable (33 / 45 / 78) , if switch to 78 rpm/min under CD MODE , Turntable rpm will reduce to 45 rpm/min automatically
(only 33/45 for CD mode)
4. EFFECT operation method remain as same as CD MODE’s.
5. No REVERSE function for CD PLAY.
3. Turntable
1. There are 3 speed modes for turntable (33 / 45 / 78), if switch to 78 rpm/min under CD MODE, Turntable rpm will reduce to 45 rpm/min
automatically (only 33/45 for CD mode)
2. Platter does not turn as in MOTOR OFF. As MOTOR ON, press PLAY/PAUSE to start or pause the Platter.
3. PITCH / PITCH SLIDE which control the Turntable speed.
4. No function for all the other buttons except PLAY / PAUSE button
4. Effect Parameter Setting
Turn the Track knob to adjust the Effect parameter as the Effect On
Flanger:
Sync on:1-4~64-1 (default:4-1)
Sync off: 25~800 (default: 400)
Determine the length of FLANGER effect.
SYNC-OFF, 0.25 sec is the shortest, and 8 sec is longest;
SYNC_ON, 1/4 beat is the shortest and 64/1 beats is the longest.
Echo:
Sync: 1-4~64-1 (default: 1-2)
Sync off: 25~400 (default: 50)
Determine the delay time of ECHO effect. SYNC OFF, 0.01 sec is the shortest, and 4 sec is longest; SYNC_ON, 1 beat is the shortest and 4/1 beat is the
longest.
Filter:
Sync: 1-4~64-1 (default: 8-1)
Sync off: 0~100 (default: 50)
Determine the scanning time of FILTER effect. 1/4 beat is the shortest and 64/1 beats is the longest
When Sync off, select the band of frequency. The number increased, the frequency is close to the treble. T
7
ADJUSTMENT OF THE TONEARM BASE HEIGHT
1. Release the three screws first
2. Take off the Tonearm base
3. Screw these three copper cylinders clockwise to increase or anti-clockwise to decrease the height
1
DESCRIPTION DES FONCTIONS INDIVIDUELLES
Vue de dessus :
1. L.C.D. (Écran LCD)
Écran en cristaux liquides (LCD) indique le numéro de la piste, le temps (minutes, secondes, trames), la gamme de réglage de la vitesse du
potentiomètre ("pitch") et les informations relatives à la fonction lecture.
2. Seamless Loop (fonction Seamless Loop boucle continue en temps réel)
Vous trouverez ici les boutons A, B/LOOP/ EXIT et RELOOP.
i. Le bouton A ou “point de départ” (Point A. Point A peut être également CUE). Après avoir réglé le point A, le témoin LED vert s’allume.
ii. Le bouton B / LOOP / EXIT ou “point terminal” (Point B). Appuyez sur le bouton B /LOOP pour régler le point B et lancer la lecture automatique de la boucle.
Trois témoins LED s’allument ainsi que le symbole de la boucle (LOOP) sur l’écran. Si vous souhaitez interrompre la lecture de la boucle, appuyez à nouveau
sur ce bouton.
iii. Pour revenir à la lecture de la boucle, appuyez sur le bouton RELOOP.
iv. Le "point de départ" et le "point terminal" peuvent être modifiés en utilisant à nouveau les boutons A et B/ LOOP EXIT
v. L’intervalle entre le "point de départ" et le "point terminal" doit comporter au minimum vingt trames, faute de quoi le "point terminal" B sera effacé, la fonction
LOOP disparaîtra et le symbole LOOP de la boucle s’éteindra.
3. Instant Reverse (fonction Instant Reverse marche arrière immédiate)
i. Si la fonction Instant Reverse est réglée, on entendra pas le son du frein indiquant le changement du sens de rotation du moteur.
Si, dans ce mode, la piste démarre la lecture en arrière à 00:50, elle passera à nouveau en marche normale à 00:45. Ainsi, la piste sera lancée à 00:55.
Pour cela, l’appareil est équipé d’une mémoire-tampon de 10s. Ce qui signifie que la piste peut être lue en marche arrière pendant 10 s depuis l’endroit que
vous avez sélectionné.
ii. Maintenez le bouton Instant Reverse enfoncé pendant trois secondes, le témoin LED se met à clignoter.
2
Dans ce mode, la lecture de la piste lue en arrière sera lancée immédiatement de l’endroit de passage en marche normale.
Si dans ce mode, la piste est lue en arrière à 00:50 et passe en marche normale à 00:45, elle sera lancée à 00:45.
4. Forward/Reverse (fonction Forward/Reverse marche en avant/en arrière)
Ce bouton commande le sens de rotation du tourne-disque.
5. TIME / STOP (bouton TIME/STOP)
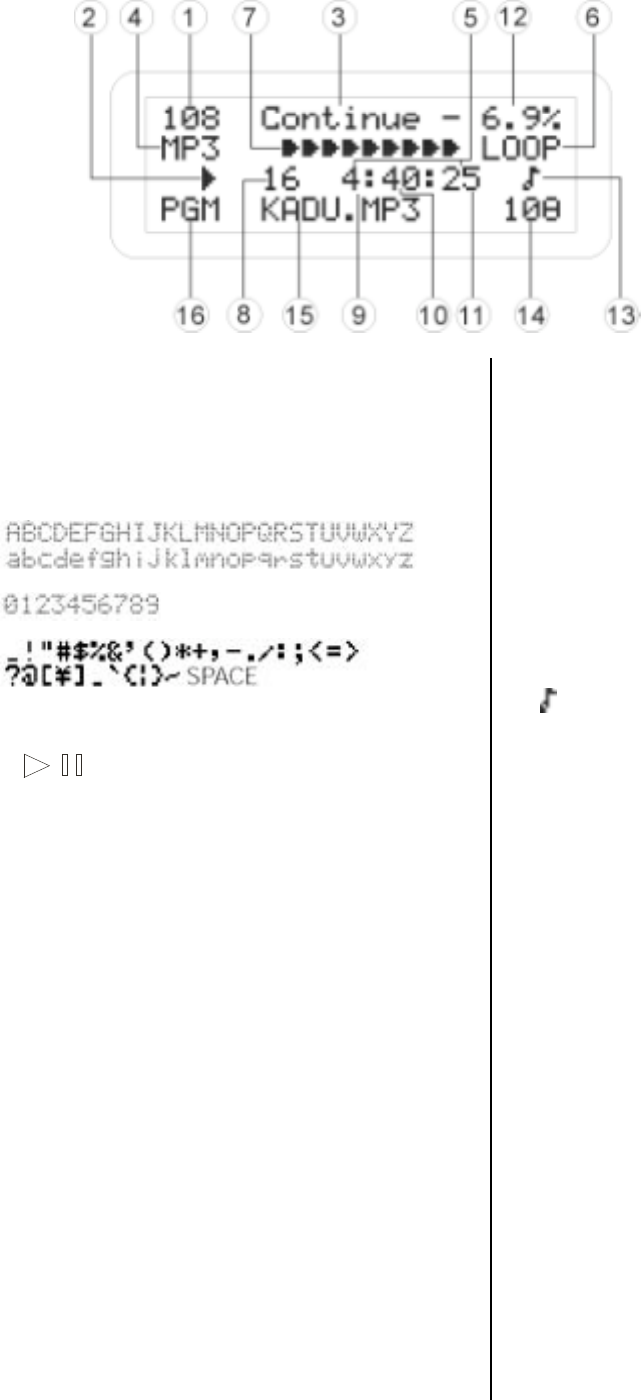
Ce bouton permet de commuter l’indication de temps affichée sur l’écran en affichant soit le temps total restant, le temps restant de la piste lue ou le temps
de lecture écoulé. Lors de la pression répétée de ce bouton pendant trois secondes, l’appareil passe en mode "stop".
6. ! ! ! ! ! ! ! ! ! ! ! ! ! ! ! ! ! ! ! ! ! ! ! ! ! ! ! ! ! 3 HOT-CUE (fonction 3 HOT-CUE)
L’appareil vous permet la lecture immédiate en utilisant trois points de repère (3 HOT-CUE).
a. Réglez la mémoire de la fonction CUE : Tout d’abord, appuyez sur le bouton MEMO, puis sur le bouton correspondant CUE vous permettant de
terminer le réglage du point de repère. Cette opération est indiquée par l’allumage du bouton CUE correspondant.
b. Lecture de la mémoire de la fonction CUE : Après avoir appuyé sur le bouton CUE correspondant, celui-ci clignote pendant environ cinq secondes.
Avertissement : Cette fonction est inutilisable pendant le fonctionnement de l’effet Reverse (mode marche arrière).
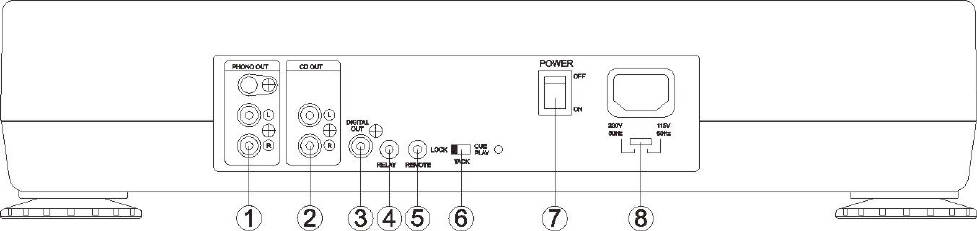
7. Moteur ON/OFF (bouton MOTOR ON / OFF)
Mettez en marche et arrêtez le moteur entraînant le tourne-disque.
8. Bouton BOP
La pression de ce bouton lance la lecture automatique depuis le point de repère (CUE) réglé.
9. Bouton CONTINUE/SINGLE
En pressant ce bouton vous pouvez choisir entre la lecture en mode "auto cue single" et "continue". Le mode sélectionné est signalé sur l’écran.
*AUTO CUE SINGLE – Après la lecture d’une piste individuelle, l’appareil s’arrête avant le début de la piste suivante
*CONTINUE – Les pistes individuelles sont lues sans interruption.
*OUTRO – L’appareil lit les trente dernières secondes de chaque piste. Pour passer en ce mode, maintenez le bouton enfoncé pendant trois secondes.
10. Bouton CUE
Cette fonction permet de remettre le CD au point de départ mémorisé. En mode PAUSE, réglez le point de départ en pressant le bouton CUE, le
bouton se met à clignoter. Si vous appuyez sur ce bouton en mode PLAY, l’appareil s’arrête au point de départ mémorisé.
11. Bouton PLAY/ PAUSE
En appuyant sur ce bouton vous commutez entre les modes PLAY et PAUSE.
12. Bouton TRACK/FX PARAMETER
Ce bouton tournant vous permet de sélectionner les pistes individuelles et de régler les paramètres de l’effet correspondant.
13. Bouton SEARCH
Pressez ce bouton pour sélectionner le réglage de la fonction SEARCH ou de la fonction PITCH BEND.
Si le témoin LED correspondant est allumé, vous pouvez tourner le plateau pour une recherche accélérée en avant et en arrière.
Si le témoin LED correspondant est éteint, réglez en tournant le disque la fonction PITCH BEND.
Si le plateau ne tourne pas pendant plus de huit secondes, le témoin s’éteint automatiquement.
14. Bouton PROGRAM
Ce bouton vous permet de programmer la piste souhaitée. L’appareil arrêté, appuyez sur le bouton PROG pour lancer le mode mémoire. Appuyez
sur le bouton de saut de piste (skip) pour sélectionner la piste correspondante. Ensuite, pour terminer le réglage de la piste, appuyez à nouveau sur le
bouton PROG. Le nombre maximal des pistes à programmer est de seize pour un disque. Si vous passez les pistes programmées, le témoin LED du
bouton PROG s’allume. Lorsque l’appareil est arrêté, retirez le disque ou arrêtez l’appareil. Ainsi vous quittez le programme.
Ce bouton peut être également utilisé pour la fonction DISC IDENTIFICATION, voir ci-après point 22.
15. Bouton PITCH BEND + / -
Si les deux lecteurs CD sont en marche, la fonction PITCH BEND vous permet de comparer la vitesse des pistes lues après le réglage de la vitesse du
potentiomètre.
Après la pression du bouton "+" la vitesse du potentiomètre augmente automatiquement jusqu’à la valeur de + 16% par rapport à l’état initial. Après la
pression du bouton "-" la vitesse du potentiomètre baisse automatiquement jusqu’à la valeur de - 16% par rapport à l’état initial. Les vitesses individuelles
de lecture peuvent être harmonisées en modifiant le réglage du potentiomètre.
16. Curseur PITCH CONTROL (réglage du potentiomètre de vitesse)
Lors de l’harmonisation dans le cadre des vitesses individuelles sélectionnées (8%, 16%, 50%) vous pouvez sélectionner la vitesse demandée entre
la valeur minimale (terminaison supérieure) et la valeur maximale (terminaison inférieure) en déplaçant le curseur.
17. ! ! ! ! ! ! ! ! ! ! ! ! ! ! ! ! ! !!!!!!Bouton KEY ON/OFF (Mise en marche et arrêt du ton)
Appuyez sur ce bouton pour mettre en marche ou arrêter le mode KEY.
KEY OFF : le symbole “KEY” clignote sur l’écran et le ton est modifié en fonction de la modification de la vitesse du potentiomètre. La modification du
3
paramètre du ton n’est pas effective.
KEY ON : Le symbole “KEY” est allumé sur l’écran. Adaptez la hauteur du ton en tournant le bouton SCOPE. Le déplacement du curseur PITCH
CONTROL permet également de modifier le ton.
18. Bouton PITCH ON/OFF (Mise en marche et arrêt de la commande de réglage de la vitesse du
potentiomètre)
Pressez le bouton pour régler la fonction PITCH ON (la commande de réglage de la vitesse du potentiomètre est en marche). Si vous appuyez à
nouveau sur le bouton, la commande de réglage de la vitesse du potentiomètre est arrêtée (l’appareil est en mode PITCH OFF).
19. Bouton PITCH SELECT (Sélection de la gamme de réglage de la vitesse du potentiomètre)
Sélectionnez la gamme de réglage de la vitesse du potentiomètre entre ±8%, ±16%, ±50%. La vitesse de lecture est modifiée lorsque vous déplacez
le curseur PITCH CONTROL.
20. Bras de lecture
Bras de lecture universel cylindrique en forme de S.
21. Bouton EFFECT SELECT (Sélection des effets)
a. Flanger
b. Filter
c. Echo
22. Identification du disque (uniquement la version CDDA)
i. La fonction d’identification du disque est utilisable uniquement en mode PAUSE
ii. Appuyez sur le bouton MEMO pendant deux secondes, l’écran affiche “SAVE” et "MAIN CUE Time".
Ceci signifie que le point de départ MAIN CUE est mémorisé dans EEPROM.
Lorsque les indications “SAVE” et “MAIN CUE Time” disparaissent de l’écran après trois secondes, la procédure de mémorisation est terminée.
iii. Lorsque la mémoire EEPROM reconnaît l’endroit où se trouve l’enregistrement MEMO, l’écran affiche “CUE“
iv. Lorsque la mémoire EEPROM reconnaît qu’à l’intérieur de celle-ci se trouve le point de départ CUE, l’écran affiche “LOAD” et “MAIN CUE time”
v. Appuyez sur MEMO et MAIN CUE pour enregistrer le temps CUE dans MICON MAIN CUE.
vi. Appuyez sur le bouton TIME et allumez l’interrupteur principal ; appuyez sur le bouton MEMO pendant trois secondes en mode “No disc mode”. Cette
opération permet d’effacer la mémoire EEPROM
Lorsque après trois secondes l’écran affiche “ RESET ”, les données ont été effacées.
23. Fonction SLEEP
Si l’appareil n’est pas utilisé pendant trente minutes, il s’arrête automatiquement.
5
DESCRIPTION DE L’ÉCRAN
L’appareil est capable d’afficher l’information textuelle sur l’écran
pendant la lecture des disques CD textuels contenant une information
textuelle dans la catégorie anglaise.
Le CD textuel contient
Avertissement :
L’appareil support l’affichage sur l’écran des symboles suivants. Les
symboles différents s’affichent en tant que ""
Lettres
Numéros
Symboles
1. NOMBRE DE PISTES – nombre de pistes sur le disque ou la
carte.
2. / l’appareil est en mode lecture/pause.
3. CONT / SINGLE – indique si l’appareil est en mode lecture de
toutes les pistes ou d’une piste.
4. MP3 est allumé si l’appareil lit un fichier MP3. Dépend du
réglage.
5. AFFICHAGE DU TEMPS (écoulé, total, restant)
En fonction du mode d’affichage de temps réglé, affiche le temps
restant du disque ou de la piste ou le temps écoulé.
6. LOOP s’allume lorsque les effets boucle sont actifs.
7. TIME BAR – affiche la durée du temps en fonction du réglage du
mode d’affichage du temps.
8. PISTE – Affiche le numéro de la piste en lecture.
9. MINUTES – Affiche les minutes écoulées ou restantes.
10. SECONDES – Affiche les secondes écoulées ou restantes.
11. TRAMES lecteur CD divise chaque seconde à 75 trames,
permettant ainsi de déterminer précisément les points de repère.
Ici sont donc affichées les trames passées ou restantes en
fonction du réglage du mode d’affichage du temps.
12. VITESSE affiche le réglage actuel de la vitesse du
potentiomètre.
13. BPM : mode BPM manuel
: mode BPM automatique
14. Nombre de battements par minute
15. ID3 tag du disque CD/MP3 : maintenez le bouton
“Search” (au-dessus du plateau) enfoncé pendant deux secondes
pour afficher les données ID3, le nom de fichier, du dossier, de
l’interprète, de la composition et le titre de l’album. Appuyez une
nouvelle fois sur ce bouton pour confirmer les indications ci-
dessus.
16. PGM- s’affiche si la piste que vous avez sélectionné est
programmée.
12

Hulp nodig? Stel uw vraag in het forum

Spelregels

Misbruik melden

Gebruikershandleiding.com neemt misbruik van zijn services uitermate serieus. U kunt hieronder aangeven waarom deze vraag ongepast is. Wij controleren de vraag en zonodig wordt deze verwijderd.

Product:

Bijvoorbeeld antisemitische inhoud, racistische inhoud, of materiaal dat gewelddadige fysieke handelingen tot gevolg kan hebben.

Bijvoorbeeld een creditcardnummer, een persoonlijk identificatienummer, of een geheim adres. E-mailadressen en volledige namen worden niet als privégegevens beschouwd.

Spelregels forum

Om tot zinvolle vragen te komen hanteren wij de volgende spelregels:

Belangrijk! Als er een antwoord wordt gegeven op uw vraag, dan is het voor de gever van het antwoord nuttig om te weten als u er wel (of niet) mee geholpen bent! Wij vragen u dus ook te reageren op een antwoord.

Belangrijk! Antwoorden worden ook per e-mail naar abonnees gestuurd. Laat uw emailadres achter op deze site, zodat u op de hoogte blijft. U krijgt dan ook andere vragen en antwoorden te zien.

Abonneren

Abonneer u voor het ontvangen van emails voor uw US Blaster USB 7329 bij:


U ontvangt een email met instructies om u voor één of beide opties in te schrijven.


Ontvang uw handleiding per email

Vul uw emailadres in en ontvang de handleiding van US Blaster USB 7329 in de taal/talen: Engels als bijlage per email.

De handleiding is 0,78 mb groot.


U ontvangt de handleiding per email binnen enkele minuten. Als u geen email heeft ontvangen, dan heeft u waarschijnlijk een verkeerd emailadres ingevuld of is uw mailbox te vol. Daarnaast kan het zijn dat uw internetprovider een maximum heeft aan de grootte per email. Omdat hier een handleiding wordt meegestuurd, kan het voorkomen dat de email groter is dan toegestaan bij uw provider.

Stel vragen via chat aan uw handleiding

Stel uw vraag over deze PDF

Uw handleiding is per email verstuurd. Controleer uw email

Als u niet binnen een kwartier uw email met handleiding ontvangen heeft, kan het zijn dat u een verkeerd emailadres heeft ingevuld of dat uw emailprovider een maximum grootte per email heeft ingesteld die kleiner is dan de grootte van de handleiding.

Er is een email naar u verstuurd om uw inschrijving definitief te maken.

Controleer uw email en volg de aanwijzingen op om uw inschrijving definitief te maken

U heeft geen emailadres opgegeven

Als u de handleiding per email wilt ontvangen, vul dan een geldig emailadres in.

Uw vraag is op deze pagina toegevoegd

Wilt u een email ontvangen bij een antwoord en/of nieuwe vragen? Vul dan hier uw emailadres in.


Info