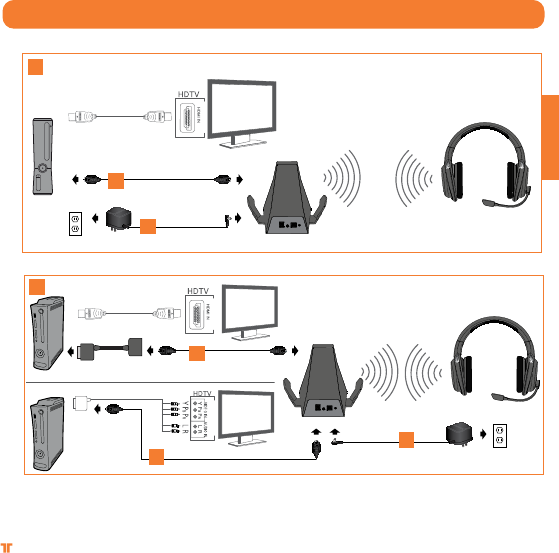
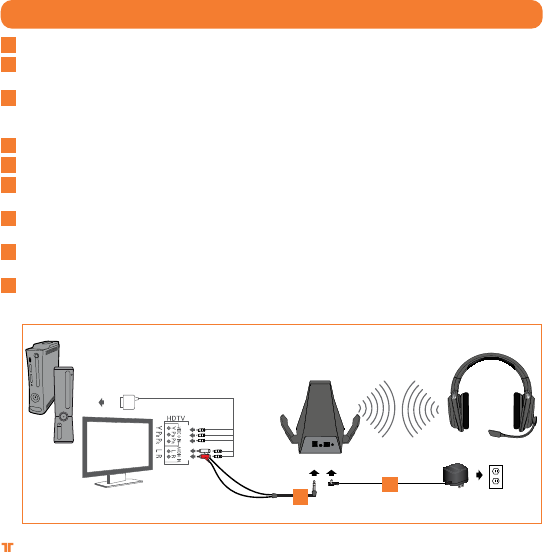
and that the correct input is selected on the Base Station. Check to ensure that the plastic protective caps on the
Optical Cable have been removed.
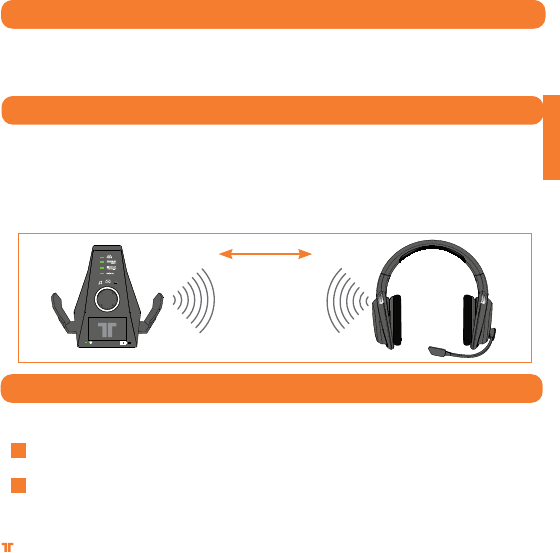
•MovetheHeadsetclosertotheconsole.
•Makesurethebatteryisfreshlycharged.
[19]
ENGLISH
.com
TRITTONUSA
.com
TRITTONUSA
®
®
Warranty
Register your product at TRITTONUSA.COM to receive warranty coverage, news, events and updates.
If you have any issues using this product, please try the following before returning this product to the store:
If people cannot hear you talk, make sure that the mute switch is not enabled.
•To confirm Xbox LIVE settings, press the Xbox Guide Button when a game is loaded, and go to Personal Settings > Voice. Ensure that
“Headset only” is selected.
•For immediate support, visit http://www.trittonusa.com to find the latest documentation, Knowledge Base articles, and software for
your device. You can also chat live with a support technician or submit a trouble ticket.
2-year limited warranty
Mad Catz warrants this product to be free from defects in materials and workmanship for the warranty period. This non-transferable, two- (2) year limited
warranty is only to you, the first end-user purchaser. If a defect covered by this warranty occurs AND you have registered your product with Mad Catz
AND you provide proof of purchase, Mad Catz, at its option, will repair or replace the product at no charge.
The Mad Catz two- (2) year limited warranty is available to North American and European customers. Your sole and exclusive remedy is repair or
replacement of your Mad Catz product. In no event shall Mad Catz liability exceed the original purchase price of the product. This warranty does not
apply to: (a) normal wear and tear or abusive use; (b) industrial, professional or commercial use; (c) if the product has been tampered with or modified.
To receive warranty service you must:
- North America: call Mad Catz Technical Support at 1.800.659.2287 or 1.619.683.2815
- Europe: call Mad Catz Technical Support at +44 (0) 8450-508418
- Obtain a Return Authorization Number from Mad Catz Technical Support
- Ship the product to Mad Catz at your expense for service
- Enclose a copy of the original sales receipt showing a purchase date
- Enclose a full return address with daytime and evening phone numbers
Online Support and User Guides: www.trittonusa.com
North American E-mail: techsupport@madcatz.com
North American telephone: Available 8am - 12pm, 1 - 4pm Pacific Standard Time, Monday
through Friday (excluding holidays) at 1.800.659.2287 (US only) or 1.619.683.2815 (outside US).
European E-mail: techsupporteurope@madcatz.com
European telephone: Available 9 A.M. to 5 P.M. Greenwich Mean Time, Monday through Friday (excluding bank holidays) at +44 (0) 8450-508418
Misuse of batteries within this unit may cause batteries to leak and/or explode and lead to personal injury.
•This product contains small parts that may cause choking if swallowed. Not intended for use by children under 3 years of age.
WARNINGS
- Non-rechargeable batteries are not to be recharged.
- Do not mix old and new or different types of batteries.
- Batteries are to be inserted with the correct polarity.
- Remove exhausted batteries from the product.
- Supply terminals are not to be short-circuited.
- Rechargeable batteries are to be removed from the product before being charged.
- Rechargeable batteries are only to be charged under adult supervision.
- The packaging must be retained since it contains important information.
United States and Canada:
As required, certain of these class B digital devices (the headsets) have been tested by Mad Catz, Inc., 7480 Mission Valley Road, Suite 101, San Diego, CA
92108, and found to comply with part 15 of the FCC rules and the Canadian RSS-210 which sets forth limits designed to provide reasonable protection against
harmful interference in a residential installation. These device(s) use, generate and can radiate radio frequency energy and, if not assembled, installed and
used in accordance with the instructions, may cause harmful interference to radio communications. There is no guarantee that interference will not occur in
any particular location or use. Operation is subject to the following two conditions: (1) this device may not cause harmful interference and (2) this device must
accept any interference received, including interference that may cause undesired operation.
FCC Part 15 section 15.105
Warning: Any changes or modifications made on the system not expressly approved by the manufacturer could void the user’s authority to operate
the equipment.
Exposure to Radio Frequency Radiation:
The radiated output power of the headset is well within FCC radio frequency exposure limits for this type of device when unaltered and used as described in our
instructions and the controller operates within guidelines found in radio frequency safety standards, which reflect the consensus of the scientific community
and therefore, the manufacturer believes the device’s internal wireless radio is safe for use by consumers. The level of energy emitted is far less than the
electromagnetic energy emitted by wireless devices such as mobile phones. However, the use of wireless radios may be restricted in some situations (e.g., on
airplanes). If you are unsure of restrictions that may apply in any situation, you must ask for authorization before turning on, connecting or using the controller.
EU DECLARATION OF CONFORMITY:
As required, certain of these products have been tested and conform to the requirements of the European Union Directives 1999/5/EC, 2002/95/EC,
2002/96/EC, and 2004/108/EC. Authorized signatory of the manufacturer is Mad Catz, Inc., 7480 Mission Valley Road, Suite 101, San Diego, CA 92108.
CAUTION
RISK OF EXPLOSION IF BATTERY IS REPLACED BY AN INCORRECT TYPE.
DISPOSE OF USED BATTERIES ACCORDING TO THE INSTRUCTIONS.
12/11
[21]
.com
TRITTONUSA
.com
TRITTONUSA
®
®
NOTES
[22]
.com
TRITTONUSA
.com
TRITTONUSA
®
®
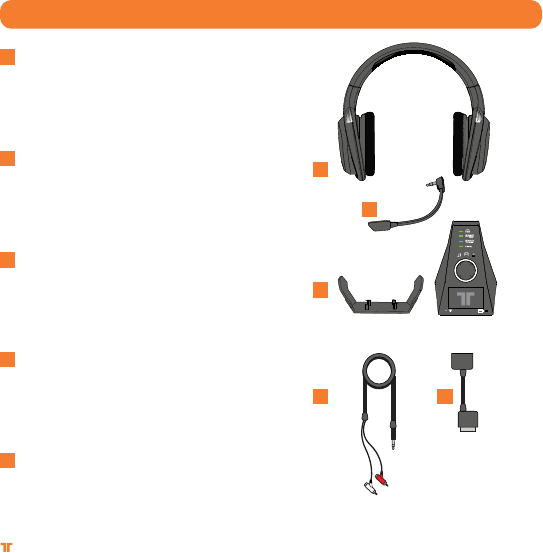
InstallatIon du MIcroPhone
InstallatIon du suPPort de casQue
1
2
Repérez le port jack.
Branchez le microphone.
Mettez le microphone dans la position souhaitée.
1
2
Installez le support de casque sur le socle.
avertIsseMent
Avant d’utiliser ce produit, lisez les manuels de cet accessoire et de la console Xbox 360 (et tout autre manuel pertinent) pour les
consignes de sécurité et les informations importantes concernant la santé. Conservez tous les manuels pour référence future. Pour
obtenir des manuels Xbox de remplacement, allez sur www.xbox.com/support ou appelez le Service client Xbox.
PRÉVENTION CONTRE UNE PERTE DE L’AUDITION
Attention – une perte d’audition permanente risque de se produire si les écouteurs
Ou le casque sont utilisés à un volume élevé pendant des périodes prolongées.
[23]
.com
TRITTONUSA
.com
TRITTONUSA
®
®
FRANÇAIS
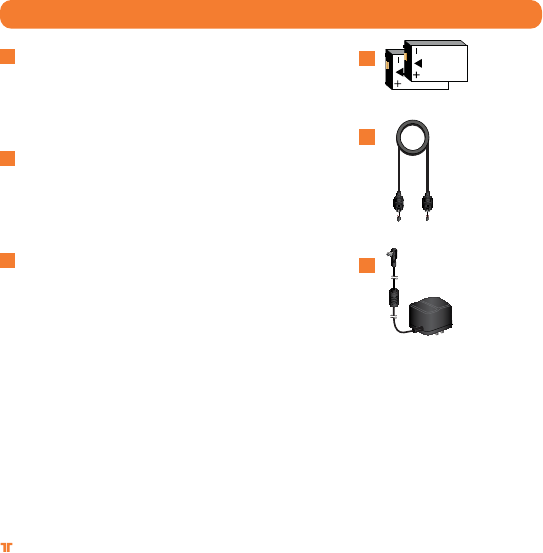
batterIes
Chargez les batteries de votre casque sans fil à son surround Warhead 7.1 avant de l’utiliser
pour la première fois et chaque fois que l’une d’entre elles est déchargée. Pour charger ou
recharger la batterie :
Placez la batterie dans le compartiment du socle.
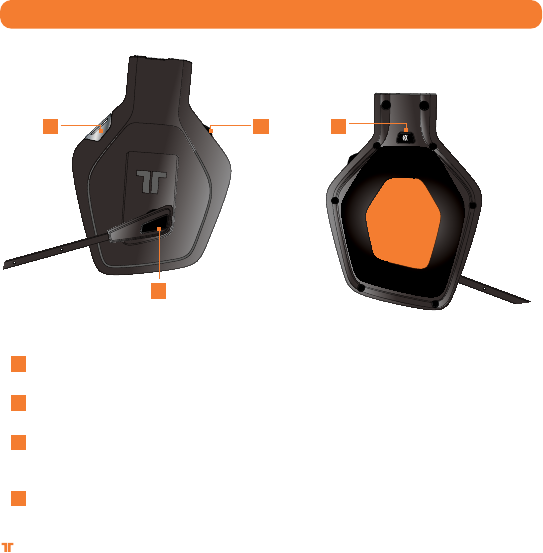
Lorsque la batterie est en charge, le témoin de charge est allumé et de couleur rouge. Une
fois la batterie chargée, le témoin devient vert.
Vous pouvez alors retirer la batterie du socle, ouvrir le compartiment de l’écouteur droit du
casque et placer la batterie à l’intérieur.
Pour vérifier le niveau de charge de la batterie dans le casque, appuyez sur le bouton Xbox
Guide, puis relâchez-le. Le niveau de charge s’affiche à l’écran.
sélectionné l’entrée correspondante sur le socle. Vérifiez que vous avez bien ôté les caches de protection sur le câble optique.
•Rapprochezlecasquedelaconsole.
•Assurez-vousquelabatterieestbienchargée.
[35]
.com
TRITTONUSA
.com
TRITTONUSA
®
®
FRANÇAIS
garantIe
Enregistrez votre produit sur TRITTONUSA.COM pour bénéficier de la couverture de la garantie, de nouveautés, d’évènements et
de mises à jour.
Si vous rencontrez des problèmes lorsque vous utilisez ce produit, veuillez essayer d’appliquer les méthodes suivantes avant de renvoyer ce
produit au magasin:
Si des personnes ne vous entendent pas parler, assurez-vous que l’interrupteur de sourdine n’est pas activé et que le micro est complètement
inséré dans le casque.
•Pour confirmer des paramètres Xbox LIVE, appuyez sur le bouton Xbox Guide lorsqu’un jeu est chargé et rendez-vous dans paramètres
personnels > Voix. Assurez-vous que « Casque seulement » est sélectionné.
•Pour une assistance immédiate, veuillez consulter www.trittonusa.com pour trouver la documentation la plus récente, des
articles de la Base de connaissances et des logiciels pour votre périphérique. Vous pouvez également discuter en direct avec un technicien
du service d’assistance ou soumettre une fiche d’incidence.
Garantie limitée à 2 ans (clients européens seulement)
Mad Catz garantit ce produit contre tout vice de matériau ou de fabrication pendant la période de garantie. Cette garantie est limitée à deux
(2) ans non transférable s’applique à vous uniquement en tant qu’acheteur et premier utilisateur fi nal. Si un vice couvert par cette garantie est
décelé ET que vous avez enregistré votre produit auprès de Mad Catz ET que vous fournissez une preuve d’achat, Mad Catz, à sa seule discré-
tion, réparera ou remplacera le produit gratuitement. La garantie limitée par Mad Catz à deux (2) ans est à la disposition des clients Européens
uniquement. Votre recours exclusif est la réparation ou le remplacement de votre produit Mad Catz. En aucun cas la responsabilité de Mad Catz
ne pourra dépasser le prix d’achat d’origine du produit. Cette garantie ne s’applique pas à : (a) une usure normale ou un mauvais usage ; (b) une
utilisation industrielle, professionnelle ou commerciale ; (c) un produit ayant fait l’objet de modifications.
Pour bénéficier de la garantie, vous devez :
- Pour l’Amérique du Nord : Appeler le service d’assistance technique de Mad Catz au +1.800.659.2287 ou au +1.619.683.2815
- Pour l’Europe : Appeler le service d’assistance technique de Mad Catz au +44 (0) 8450 508418
- Obtenir un numéro d’autorisation de retour auprès du service d’assistance technique de Mad Catz
- Expédier le produit à Mad Catz à vos frais
- Joindre une copie du ticket de caisse original montrant la date d’achat
- Indiquer une adresse complète de retour avec numéros de téléphone où vous joindre dans la journée et en soirée
Aide et Guides de l’utilisateur en ligne : www.madcatz.com
Courrier électronique pour l’Amérique du Nord : techsupport@madcatz.com
Téléphone pour l’Amérique du Nord : disponible de 8 h à 16 h, heure normale du Pacifique, du lundi au vendredi (sauf jours fériés) au +1.800.659.2287 (États-
Unis uniquement) ou au +1.619.683.2815 (depuis l’étranger).
Courrier électronique pour l’Europe : techsupporteurope@madcatz.com
Téléphone pour l’Europe : disponible de 9 h à 17 h, GMT, du lundi au vendredi (sauf jours fériés) au +44 (0) 8450-508418
- Les piles non rechargeables ne doivent pas être rechargées
- Ne mélangez pas les piles usagées avec les piles neuves ou avec d’autres types depiles.
- Les piles doivent être insérées en respectant la polarité appropriée.
- Retirez les piles épuisées du produit.
- Ne court-circuitez pas les bornes d’alimentation
- Les piles rechargeables doivent être retirées du produit avant d’être rechargées.
- Les piles rechargeables doivent uniquement être rechargées sous la surveillance d’un adulte.
- L’emballage doit être conservé car il comporte des informations importantes.
États-Unis et Canada :
Comme requis, certains de ces périphériques numériques de classe B ont été testés par Mad Catz, Inc., 7480 Mission Valley Road, Suite 101, San Diego, CA
92108, et ont été trouvés conformes à la partie 15 des règles FCC et à la directive canadienne RSS-210 qui définisssent les limites de conception pour fournir une
protection raisonnable contre les interférences nuisibles dans une installation résidentielle. Ces périphériques utilisent, génère et peuvent émettre de l’énergie
sous forme de radiofréquences et s’ils ne sont pas montés, installés et utilisés conformément aux instructions, il peut produire des interférences nuisibles aux
communications radio. Il n’y a aucune garantie que des interférences ne se produiront pas dans un emplacement donné ou pour une utilisation particulière.
L’utilisation de l’unité est soumise aux deux conditions suivantes : 1) cet appareil ne doit pas produire d’interférences nuisibles, et (2) cet appareil doit accepter
La puissance des radiations émises par la manette se trouve dans les limites d’expositions aux fréquences radio imposées par la FCC, lorsque l’appareil n’est pas
altéré et qu’il est utilisé conformément aux instructions. De plus, la manette fonctionne selon les directives concernant les normes de sécurité sur les fréquences
radio selon la communauté scientifi que. Le fabricant pense donc raisonnablement que les ondes sans fi l de l’appareil sont sans danger pour les consom-
mateurs. Le niveau d’énergie émis est bien moins important que l’énergie électromagnétique émise par des appareils sans fi l comme les téléphones portables.
Cependant, l’utilisation d’ondes sans fi l peut être restreinte dans certaines situations (dans les avions, par exemple). Si vous ne connaissez pas
les restrictions qui peuvent s’appliquer dans certaines situations, demandez l’autorisation avant d’allumer, connecter ou utiliser la manette.
DÉCLARATION DE CONFORMITÉ DE L’UE
Comme exigé, certains de ces produits ont été testés et sont conformes aux exigences aux directives de l’Union Européenne 1999/5/EC, 2002/95/EC, 2002/96/EC,
et 2004/108/EC. Le signataire autorisé du constructeur est Mad Catz, Inc., 7480 Mission Valley Road, Suite 101, San Diego, CA 92108.
ATTENTION
RISQUE D’EXPLOSION SI LES PILES SONT REMPLACÉES PAR UN TYPE INCORRECT.
JETEZ LES PILES USÉES CONFORMÉMENT AUX INSTRUCTIONS.
12/11
[37]
.com
TRITTONUSA
.com
TRITTONUSA
®
®
NOTES
[38]
.com
TRITTONUSA
.com
TRITTONUSA
®
®
anschluss des MIkrofons
anschluss des headset-stÄnders
1
2
Suchen Sie den Buchsenanschluss.
Schließen Sie das Mikrofon an.
Bringen Sie das Mikrofon in die
gewünschte Position.
1
2
Docken Sie den Headset-Ständer
auf der Basisstation an.
Warnung
Lesen Sie vor Verwendung dieses Produkts die wichtigen Hinweise zu Sicherheit und Gesundheitsschutz in der Dokumentation für die-
ses Zubehör und die Xbox 360-Konsole (sowie auch in anderen relevanten Dokumenten). Bewahren Sie alle Dokumente für zukünftige
Referenzzwecke auf. Wenn Sie Ersatz für Ihre Xbox-Handbücher benötigen, können Sie diesen unter www.xbox.com/support oder
telefonisch vom Xbox-Kundendienst anfordern.
VERMEIDUNG VON HÖRSCHÄDEN
Warnung – werden kopfhörer oder headsets über längere zeiträume bei hoher lautstärke Benutzt, können bleibende
hörschäden auftreten.
[39]
.com
TRITTONUSA
.com
TRITTONUSA
®
®
DEUTSCH
akkus
Laden Sie Akkus Ihres kabellosen Warhead 7.1-Surround-Headsets, bevor Sie sie das erste
Mal verwenden oder immer wenn sie leer sind. So laden Sie die Akkus auf:
Setzen Sie den Akku in den Ladeschacht an der Basisstation ein.
Während der Akku geladen wird, leuchtet die Akkuladeanzeige rot. Sobald der Ladevorgang
abgeschlossen ist, leuchtet die Akkuladeanzeige grün.
Sobald der Akku aufgeladen ist, setzen Sie ihn in das Headset ein, indem Sie die
Akkufachabdeckung an der rechten Hörmuschel entfernen und den Akku in das Fach
einsetzen.
Wenn Sie den derzeitigen Ladezustand des Akkus im Headset überprüfen möchten, drücken
Sie die Xbox Guide-Taste und lassen Sie sie los. Der Ladezustand wird auf dem Bildschirm
- Nicht aufladbare Batterien können nicht wieder aufgeladen werden.
- Alte und neue Batterien sowie Batterien unterschiedlichen Typs sollten nie zusammen verwendet werden.
- Die Batterien sind mit der korrekten Polung einzulegen.
- Entfernen Sie leere Batterien aus dem Produkt.
- Anschlüsse dürfen nicht kurzgeschlossen werden.
- Wiederaufladbare Batterien (Akkus) sind zum Aufladen aus dem Produkt zu nehmen.
- Wiederaufladbare Batterien (Akkus) dürfen nur unter Aufsicht Erwachsener aufgeladen werden.
- Die Verpackung muss aufbewahrt werden, da sie wichtige Informationen enthält.
Vereinigte Staaten und Kanada:
Bestimmte der digitalen Geräte (Controller) wurden von Mad Catz, Inc., 7480 Mission Valley Road, Suite 101, San Diego, CA 92108, getestet und erfüllen die
Anforderungen für digitale Geräte der Klasse B gemäß Teil 15 der FCC-Vorschriften und der kanadischen Norm RSS-210, welche Grenzwerte vorgeben, die
angemessenen Schutz vor schädlichen Störungen gewährleisten sollen. Diese Geräte verwenden, erzeugen und strahlen eventuell Hochfrequenzenergie aus.
Wenn sie nicht gemäß der Anweisungen montiert, installiert und betrieben werden, können sie Störungen der Funkkommunikation verursachen. Störungen
können generell nicht gänzlich ausgeschlossen werden. Der Betrieb dieser Geräte unterliegt den beiden folgenden Bedingungen: (1) Die Geräte dürfen keine
schädlichen Störungen verursachen und (2) die Geräte müssen alle empfangenen Störungen akzeptieren, auch wenn diese eine unerwünschte Beeinflussung
des Betriebs verursachen.
EU-KONFORMITÄTSERKLÄRUNG:
Wie vorgeschrieben wurden bestimmte dieser Produkt getestet und sie erfüllen die Anforderungen der EG-Richtlinien 1999/5/EG, 2002/95/EG,
2002/96/EG, und 2004/108/EG. Der vom Hersteller autorisierte Unterzeichner ist Mad Catz, Inc., 7480 Mission Valley Road, Suite 101, San Diego, CA
92108.
ACHTUNG
EXPLOSIONSGEFAHR BEI VERWENDUNG VON FALSCHEN ERSATZBATTERIEN.
BATTERIEN GEMÄSS DER ANLEITUNG ENTSORGEN.
12/11
[53]
.com
TRITTONUSA
.com
TRITTONUSA
®
®
NOTES
[54]
.com
TRITTONUSA
.com
TRITTONUSA
®
®
InserIMento del MIcrofono
InserIMento del suPPorto Per cuffIe
1
2
Individuare la porta del jack.
Inserire il microfono.
Sistemare il microfono nella posizione
desiderata.
1
2
Inserire il supporto per cuffie nella parte inferiore
della stazione base.
avvertenZa
Prima di utilizzare il prodotto consultare i manuali di questo accessorio e della console Xbox 360, nonché i manuali di altri accessori o
giochi per informazioni importanti sulla sicurezza e sulla tutela della salute. Conservare tutti i manuali per consultazioni successive. Per
i manuali di sostituzione Xbox, visitare il sito
www.xbox.com/support oppure contattare il servizio di Assistenza clienti di Xbox.
PREVENZIONE DELLA PERDITA DELL’UDITO
Attenzione – è possibile incorrere nella perdita permanente dell’udito se le cuffie o Gli auricolari vengono usati a volume elevato per
periodi di tempo prolungati.
[55]
.com
TRITTONUSA
.com
TRITTONUSA
®
®
ITALIANO
batterIe
Caricare le batterie delle cuffie wireless surround Warhead 7.1 prima di usarle per la prima
volta e ogni volta che una delle batterie è scarica. Per caricare o ricaricare la batteria.
Posizionare la batteria nell’alloggiamento per la ricarica della stazione base.
Mentre la batteria è in carica, l’indicatore di carica della batteria diventa rosso. Una volta
completata la carica, l’indicatore di carica della batteria diventa verde.
Una volta caricata la batteria, inserirla nella cuffia rimuovendo il coperchio della batteria
dalla coppa auricolare sinistra e collocando la batteria all’interno del vano.
Per controllare l’attuale livello di carica della batteria nella cuffia, premere e rilasciare il
pulsante Xbox Guide. Lo stato di carica compare sullo schermo.
Teléfono Norteamérica: Desde las 8 hasta las 16 horas, hora del Pacífico, de lunes a viernes (con excepción de los días festivos en EE.UU.), 1.800.659.2287
(sólo desde EE.UU.) o 1.619.683.2815 (desde otros países).
- No mezcle pilas viejas y nuevas o de tipos diferentes.
- Las pilas deben insertarse con la polaridad correcta.
- Retire las pilas gastadas del producto.
- No realice cortocircuitos en terminales de alimentación.
- Las pilas recargables deben extraerse del producto antes de la carga.
- Las pilas recargables solo deben cargarse bajo la supervisión de un adulto.
- Debe conservarse el embalaje dado que contiene información importante.
Estados Unidos y Canadá:
De acuerdo con las disposiciones legales, algunos de estos dispositivos digitales de clase B han sido probados por Mad Catz, Inc., 7480 Mission Valley
Road, Suite 101, San Diego, CA 92108, y cumplen con la sección 15 de las normas FCC y con la norma canadiense RSS-210 que establece los límites para
proporcionar protección razonable frente a interferencias negativas en instalaciones residenciales. Estos dispositivos usan, generan y pueden radiar
energía de radio frecuencia y, si no se instalan y usan de acuerdo a las instrucciones, pueden causar interferencias perjudiciales para las comunicaciones
de radio. No existe ninguna garantía de que no se produzcan interferencias en ningún lugar o con ningún uso en particular. El funcionamiento está sujeto a
las dos condiciones siguientes: (1) este dispositivo no puede causar interferencias perjudiciales y (2) este dispositivo debe aceptar cualquier interferencia
recibida, incluidas aquellas que pueda causar el funcionamiento no deseado.
Exposición a la emisión de frecuencias de radio:
La potencia de salida emitida por el mando se encuentra dentro de los límites de frecuencia de radio de la FCC para este tipo de dispositivo, si no se modifi
ca y se utiliza tan y como se indica en las instrucciones y el mando se maneja según las indicaciones de los estándares de seguridad de frecuencia de
radio, que refl ejan el acuerdo en la comunidad científi ca, y por lo tanto el fabricante confía en que la radio inalámbrica interna del dispositivo es comple-
tamente inofensiva para el usuario. El nivel de energía emitida es muy inferior a la energía electromagnética por dispositivos inalámbricos como teléfonos
móviles. Sin embargo, el uso de radios inalámbricas estará restringido en determinadas situaciones (como en aviones, por ejemplo). Si no está seguro de
las restricciones que se aplican en tu caso, tendrá que solicitar permiso antes de encender, conectar o utilizar el mando.
DECLARACIÓN DE CONFORMIDAD PARA LA U.E.:
Según lo exigido, ciertos productos de éstos han sido probados y están de conformidad con los requerimientos de las directivas de la Unión Europea
1999/5/EC, 2002/95/EC, 2002/96/EC, y 2004/108/EC. El signatario autorizado del fabricante es Mad Catz, Inc., 7480 Mission Valley Road, Suite 101, San Diego,
CA 92108.
PRECAUCIÓN
RIESGO DE EXPLOSIÓN SI LA BATERÍA SE SUSTITUYE POR UN MODELO INCORRECTO.
DESHÁGASE DE LAS BATERÍAS USADAS DE ACUERDO CON LAS INSTRUCCIONES.
12/11
[87]
.com
TRITTONUSA
.com
TRITTONUSA
®
®
NOTES
[88]
.com
TRITTONUSA
.com
TRITTONUSA
®
®
InkoPPlIng av MIkrofon
InkoPPlIng av stÄll fÖr hÖrlurar
1
2
Hitta uttaget.
Sätt i mikrofonen.
Justera mikrofonen till önskat läge.
1
2
Knäpp fast stället för hörlurar på
basstationens nedre del.
varnIng
Innan du använder den här produkten bör du läsa manualerna till både denna tillbehörsutrustning och Xbox 360 (och alla andra tillämp-
liga manualer) för viktig information om säkerhet och hälsa. Spara alla manualer för framtida referens.
Besök www.xbox.com/support eller ring Xbox kundservice för ersättningsmanualer.
FÖRBYGGANDCE AV HÖRSELSKADOR
Varning – permanenta hörselskador kan uppstå om hörlurar används på hög volym under Längre tidsperioder.
[89]
.com
TRITTONUSA
.com
TRITTONUSA
®
®
SVENSK
batterIer
Ladda batterierna för dina trådlösa hörlurar med surroundljud för Warhead 7.1 före du
använder dem första gången, liksom varje gång batterierna laddats ur. Laddning av batteri:
Sätt in batteriet i laddningsfacket på basstationen.
Batteriladdningsindikatorn lyser röd medan batteriet laddas. När laddningen är slutförd lyser
batteriladdningsindikatorn grön.
När batteriet är laddat sätter du i det i hörlurarna genom att öppna batteriluckan på den
högra hörluren och sätta in batteriet i facket.
För att kontrollera batteriets laddningsnivå medan det sitter i hörlurarna, trycker du in och
släpper Xboxens guideknapp. Laddningsstatus visas på skärmen.
Gebruikershandleiding.com neemt misbruik van zijn services uitermate serieus. U kunt hieronder aangeven waarom deze vraag ongepast is. Wij controleren de vraag en zonodig wordt deze verwijderd.
Product:
Spelregels forum
Om tot zinvolle vragen te komen hanteren wij de volgende spelregels:
lees eerst de handleiding door;
controleer of uw vraag al eerder door iemand anders is gesteld;
probeer uw vraag zo duidelijk mogelijk te stellen;
heeft u een probleem en al geprobeerd om dit op te lossen, vermeld dit erbij aub;
heeft u een oplossing gekregen van een bezoeker dan horen wij dat graag in dit forum;
wilt u een reactie geven op een vraag of antwoord, gebruik dan niet dit formulier maar klik op de knop 'reageer op deze vraag';
uw vraag wordt direct op de website gezet; vermijd daarom persoonlijke gegevens in te vullen;
Belangrijk! Als er een antwoord wordt gegeven op uw vraag, dan is het voor de gever van het antwoord nuttig om te weten als u er wel (of niet) mee geholpen bent! Wij vragen u dus ook te reageren op een antwoord.
Belangrijk! Antwoorden worden ook per e-mail naar abonnees gestuurd. Laat uw emailadres achter op deze site, zodat u op de hoogte blijft. U krijgt dan ook andere vragen en antwoorden te zien.
Abonneren
Abonneer u voor het ontvangen van emails voor uw Tritton TRITTON Warhead 7.1 Wireless Surround Headset bij:
nieuwe vragen en antwoorden
nieuwe handleidingen
U ontvangt een email met instructies om u voor één of beide opties in te schrijven.
Ontvang uw handleiding per email
Vul uw emailadres in en ontvang de handleiding van Tritton TRITTON Warhead 7.1 Wireless Surround Headset in de taal/talen: Duits, Engels, Frans, Italiaans als bijlage per email.
De handleiding is 38,29 mb groot.
U ontvangt de handleiding per email binnen enkele minuten. Als u geen email heeft ontvangen, dan heeft u waarschijnlijk een verkeerd emailadres ingevuld of is uw mailbox te vol. Daarnaast kan het zijn dat uw internetprovider een maximum heeft aan de grootte per email. Omdat hier een handleiding wordt meegestuurd, kan het voorkomen dat de email groter is dan toegestaan bij uw provider.
Stel vragen via chat aan uw handleiding
Stel uw vraag over deze PDF
Uw handleiding is per email verstuurd. Controleer uw email
Als u niet binnen een kwartier uw email met handleiding ontvangen heeft, kan het zijn dat u een verkeerd emailadres heeft ingevuld of dat uw emailprovider een maximum grootte per email heeft ingesteld die kleiner is dan de grootte van de handleiding.
Er is een email naar u verstuurd om uw inschrijving definitief te maken.
Controleer uw email en volg de aanwijzingen op om uw inschrijving definitief te maken
U heeft geen emailadres opgegeven
Als u de handleiding per email wilt ontvangen, vul dan een geldig emailadres in.
Uw vraag is op deze pagina toegevoegd
Wilt u een email ontvangen bij een antwoord en/of nieuwe vragen? Vul dan hier uw emailadres in.