532923
35
Verklein
Vergroot
Pagina terug
1/40
Pagina verder
TRELOCK code system
PIN code:
• Every product is delivered with the PIN 0000
• You can protect your cycle computer against
theft by entering your chosen personal PIN
code (page 13). Likewise, you can change the
PIN and PIN time (energy-saving function) at
any time.
You can enter your PIN and PIN time here:
PIN
PIN time
Mandatory entries:
Code number of the speed sensor (BB 2000,
BB 3000, BB 3500, BB 4000)
Speed measurement only works if the code
number which is located on a sticker directly on
the sensor is entered (wheel 1 and wheel 2)
(refer to page 10).
Code number of the pedal frequency sensor
(BB 2000, BB 3000, BB 4000)
Pedal stroke measurement works only if the
code number which is located on a sticker
directly on the sensor is entered (refer to page
10).
Code number of the heart rate sensor
(BB 3000, BB 3500, BB 4000)
Heart rate measurement works only if the code
number which is located on a sticker directly on
the sensor is entered (refer to page 10).
The stickers with the code number of your
sensors can be affixed here
Code no. of the speed sensor.
Wheel 1
Wheel 2
Code no. of the pedal frequency sensor
Code no. of the heart rate sensor
You can alternatively or additionally have your
PIN code and code numbers of the sensors
registered with TRELOCK:
www.trelock.de/Trelock Service
Center/PinCode.
If you change address, please inform us of your
new address.
Check: www.trelock.de for our
international consumer service.
download of product manuals
BIKE & BODY BB 2000/3000/3500/4000
GB MANUAL
The TRELOCK data systems of the
Bike & Body computer line were
developed to specifically cater for
your needs. This line offers you a
multitude of bike, altimeter, pedal
stroke and pulse measurement fun-
ctions, depending on the product
features. The hardware, software
and ergonomics of the products
thoroughly meet the highest
demands in terms of quality, conve-
nience and performance.
An outstanding feature is the fully
digitized data transfer between the
various transmitter modules and the
cycle computer developed by
TRELOCK – RADIO SELECT
®
. The
receiver of the cycle computer
exclusively selects coded system
data – data transfer without any
cross talking effect. Interference due
to mobile phones or training part-
ners' cycle computers is not recei-
ved.
Theft is pointless owing to the PIN
coding.
The wireless wake-up function is a
special function – ride off without
switching on.
Data transfer to a PC via a USB
interface is possible with the acces-
sory set ZF 450.
The visual control system, large
mono keys and the neatly arranged
display with full text displays in
eight languages allow very simple
operation.
PIN
DUAL BIKE
DUAL BIKE
Contents
Scope of delivery
Inserting the batteries
Installation
1. Display structure and operating principle 44
2. General preliminary settings 46
3. "Bike" menu 54
4. "Altimeter" menu 58
5. "Pedal frequency" menu 64
6. "Heart rate" menu 68
7. Training 74
8. Additional information and instructions 76
9. Notes on safety 77
10 . Guarantee and service 77
11 . Frequently asked questions 77
12 . Accessories 78
BB 4000
1. Display structure and operating principle
SET button
Alarm is activated
The audible signal is activated
Display line 1
Incline in %
Change battery
Display line 2
Training intensity status:
above within below theoreti-
cal value
(for pulse rate and pedal frequency)
and above/equal to/below average
value (for speed)
Display line 3
Submenu display
Display line 4
Main menu display
MODE button
44
By pressing the MODE button for 3
seconds, you can toggle between the
main menus "Bike", "Altimeter", "Pedal
frequency" and "Heart rate". (The "Pedal
frequency" and "Heart rate" menus can
only be selected if the corresponding sen-
sor is logged in.)
Pressing the MODE button once takes the
suer to the
submenus MID, MAX, TRIP,
PILOT, TOTAL, DEST and SET.
In order to enter digits (time, meter rea-
dings etc.), press the MODE button several
times until the desired digit appears.
Pressing the SET button confirms the sel-
ection and switches to the next position.
After entering the last position, confirm
again by pressing the SET button.
If you do not wish to make any
entry/modification, you can skip the menu
item by pressing the MODE button. A sel-
ected entry function can be aborted by
pressing the MODE button for 3 seconds.
Any changes made will not be adopted in
this case.
45
8
En
g
lish?
BB 4000
BB 4000
Deutsch?
BB 4000
Francais?
BB 4000
Es
p
aol?
BB 4000
S
p
rache
?
2. General
preliminary settings
After activating the cycle
computer, the user is trans-
ferred to the general prelimi-
nary settings automatically.
If you wish to make changes
here at a later stage, press
the SET and MODE button in
the submenu SET for approx.
3 sec.
2.1 Language selection
Confirm by pressing the
SET button
Select the language (D, GB,
F, NL, E, I, RUS, PL) by
pressing the MODE button
Confirm by pressing the
SET button
46
9
BB 4000
u
n
i
t
s
p
e
e
d?
BB 4000
set bike 1
BB 4000
u
n
i
t
t
em
p
.
?
BB 4000
set bike?
BB 4000
Dimensions?
BB 4000
u
n
i
t
t
em
p
.
?
BB 4000
Dimensions?
2.2 Selection between km/h
and m/h and between C and
F
Confirm by pressing the
MODE button to adopt the
standard values "km/h" and
"°C"
To make changes, press the
SET button and select bet-
ween "km/h" and "m/h" by
pressing the MODE button
Confirm by pressing the SET
button
Choose between "°F" and
"°C" by pressing the MODE
button
• Confirm by pressing the SET
button
IMPORTANT: if you subse-
quently change from "km/h" to
"m/h" or vice versa, the data
recorded in the "Bike" and
"Altimeter" menus will be reset
to "0"!
47
10
BB 4000
bike 1
BB 4000
Code-No. 1
BB 4000
Code-No. 1
BB 4000
Code-No. 1
BB 4000
Code-No. 1
2.4 Settings for wheel 1 and
wheel 2
You can use your cycle com-
puter on two cycles, even if
they have different wheel radii.
An own sensor for each cycle
is required for this purpose.
The switch-over from wheel 1
to wheel 2 is performed auto-
matically.
Switch to "cycle 1" by pres-
sing the SET button
Choose between "cycle 1"
and "cycle 2" by pressing the
MODE button
Confirm by pressing the SET
button
2.4.1 Entry of the code no.
Entry of the code for "cycle
1" and/or "cycle 2" by pres-
sing the MODE button
(repeatedly)
Validate the individual digits
with the SET button
Repeat the process for the
other digits
Please enter the code no. on
page 2 of this operating
manual. The sticker should
subsequently be pulled off the
sensor.
48
11
BB 4000
wheel size 1
BB 4000
wheel size
1
ETRTO WS mm
47-305 16x1.75x2 1272
47-406 20x1.75x2 1590
50-406 20/2.00 1593
60-406 20/2.35 1665
37-540 24x1 3/8 A 1948
47-507 24x1.75x2 1907
50-507 24/2.00 1910
40-559 26x1.5 2026
44-559 26x1.6 2051
47-559 26x1.75x2 2074
50-559 26x1.9 2089
54-559 26x2.00 2114
57-559 26x2.125 2133
37-590 26x1 3/8 2105
20-571 26x3/4 1954
ETRTO
WS mm
60-559 26/2.35 2146
32-630 27x1 1/4 2199
40-622 28x1.5 2224
47-622 28x1.75 2268
40-635 28x1 1/2 2265
37-622 28x1 3/8x1 5/8 2205
18-622 700x18C 2102
23-622 700x23C 2133
25-622 700x25C 2146
28-622 700x28C 2149
32-622 700x32C 2174
37-622 700x35C 2205
40-622 700x40C 2224
50-622 28/2.00 2284
60-622 28/2.35 2340
2.4.2 Adjusting the wheel
size(s)
Determine the wheel size on
the basis of the table below
or calculation of the wheel
circumference
Enter the value for "cycle 1"
and/or "cycle 2" as under
point 2.4.1 and confirm by
pressing the SET button
• Press the MODE button to
continue
Wheel size/wheel circumference (mm)
49
12
BB 4000
Clock/Date?
BB 4000
Clock
BB 4000
Date
BB 4000
Clock
BB 4000
Clock
2.5 Setting the current time
Press the SET button
Change the digits by pres-
sing the MODE button sever-
al times
Confirm the individual digits
by pressing the SET button
Time
Date
Wheel circumference (mm) = 2 x r (mm) x 3.14
Wheel circumference
50
BB 4000
chan
g
e PIN?
13
BB 4000
enter PIN
2.7 Entering and modifying the PIN time –
energy-saving function
If the cycle computer, which is in sleep mode
with the PIN function active (PIN not equal to
0000), is not awakened over a certain period
of time, it can only be reactivated by entering
your PIN. This period of time (PIN time) can
be entered or modified in the "New PIN
time?" window: After you have pressed the
SET button, you will be requested to enter
your PIN. After making a correct entry, you
will be transferred to "PIN TIME", where you
can enter up to 240 min. The factory setting
is 60 min. In sleep mode, only the time will be
displayed until the PIN time elapses. After the
PIN time elapses, the time display will also be
faded out. If the PIN time is set to "0", this
energy-saving function is deactivated and the
time will be permanently displayed.
2.6 Entering and modifying the PIN – anti-theft protection
You can protect your cycle computer against foreign access
with a PIN. Activation of the cycle computer is only possible in
this case if the PIN is entered correctly. After adjusting the time
and date, the user is transferred to the "Change PIN?" window.
You can enter your own PIN here and subsequently modify it if
necessary. If you do not wish to use any PIN, press the MODE
button. Otherwise, after pressing the SET button, you will be
asked to enter the former PIN (the factory setting is "0000"). In
order to do this, press the MODE button until the appropriate
digit appears and subsequently jump to the next position by
pressing the SET button. The PIN is controlled. If the PIN has
been incorrectly entered, "Wrong PIN" appears for approx. 3
seconds and you will be requested to make a new entry. If the
PIN is correct, enter a new PIN of your choice as described
above. After confirming the last position by pressing the SET
button, the PIN must be re-entered. If repetition of the PIN is
incorrect, you will be returned to the "Change PIN?" window. If
you wish to dispense with safeguarding your cycle computer
with a PIN, reset the PIN to "0000".
Please note your personal PIN on page 2, so that you can have
it available if appropriate.
51
14
BB 4000
set PIN-time?
BB 4000
add Cadence?
BB 4000
Code-No.
BB 4000
PIN-time
BB 4000
enter PIN
2.8 Logging in the
pedal frequency
sensor(BB 2000, BB 3000, BB 4000)
Log the pedal frequency sensor in by pres-
sing the SET button
Enter the code no. by pressing the MODE
button (repeatedly)
Confirm the individual digits by pressing the
SET button
Repeat the process for the other
digits
Please enter the code
no. on page 2 of this
operating manual. The
sticker should subse-
quently be pulled off
the sensor.
2.9 Logging in the
heart rate sensor
(BB 3000, BB 3500, BB 4000)
The pulse sensor is logged in as for logging
in the pedal frequency sensor
Please enter the code no. on page 2 of this
operating manual. The sticker should subse-
quently be pulled off the sensor.
52
15
BB 4000
add HR?
BB 4000
Code-No.
BB 4000
Code-No.
BB 4000
Current
BB 4000
g
en.sett
g
s?
BB 4000
Code-No.
53
16
BB 4000
Maximal
BB 4000
Current
BB 4000
Avera
g
e
BB 4000
La
p
01
Start a new trip/leg
Measurement of the current trip/leg is halted
by pressing the SET button. The values will
be saved, the display will be reset to "0" and
a new trip/leg will be started.
Start a new trip/leg
Measurement of the current trip/leg is halted
by pressing the SET button. The values will
be saved, the display will be reset to "0" and
a new trip/leg will be started.
Start a new trip/leg
Measurement of the current trip/leg is halted
by pressing the SET button. All data are
saved and a new trip/leg is begun in the
The "Bike" menu has 15 functions incl. a
temperature display
3.1 Submenu "Current"
3.2 Submenu "Average" MID
3.3 Submenu "Maximum" MAX
3.4 Submenu "Trip" TRIP
Current time
Current speed
Temperature
Current time
Current speed
Average speed of
the current
trip/leg
Current time
Current speed
Maximum speed
in the current
trip/leg
Net cycling time
of the current
trip/leg
Current speed
Trip kilometres
covered
3. "Bike" menu
54
17
BB 4000
Pilot
BB 4000
La
p
01
background. The data of the last trip continue
to be displayed and the trip no.flashes. After
pressing the SET button again, the data of
the current trip/leg are displayed.
Displaying and deleting trip/leg data
Press the SET button for 3 sec.
The display "Show
trips" appears
Selection of
"Show trips" and
"Delete trips" by
pressing the
MODE button
After pressing
the SET button in
"Show trips", the
net cycling times
and trip kilometres of the trips/legs appear
By pressing the SET button for 3 seconds, all
values of the trip/leg which has just been dis-
played will be deleted.
If the SET button is pressed for 3 seconds in
the "Delete trips" window, the data recorded
for
all trips/legs will be deleted and a new
trip/leg will be started.
Pressing the MODE button takes you back to
the submenu "Trip".
3.5 Submenu "Pilot" PILOT
Starting, stopping and resetting the stop-
watch
Start or stop the stopwatch by pressing the
SET button
Zeroing of the stopwatch by pressing the
SET button for 3 seconds
Adjusting the pilot kilometre counter
Press the SET button for 3 seconds
The display "Set km" appears and the first
digit for entry flashes
The display of the kilometre counter can be
modified (only possible with the stopwatch
off)
This function is helpful when you cycle accor-
ding to a roadbook. You can start in the
middle of a trip or correct the kilometre rea-
ding after riding a detour for example.
Stopwatch
Current speed
Pilot kilometre
counter
3 seconds
55
BB 4000
Totall
y
BB 4000
Destination
18
BB 4000
Settin
g
s
3.6 Submenu "Total" TOTAL 3.8 Submenu "Set" SET
Correcting preliminary settings and/or
adjusting further settings
The following appears after pressing the
SET button for 3 seconds:
1. "Alarm on?" – Entry of a wake-up time
possible
2. "Signal on?" – Activation of the audible
alarm
3. "Time/date?"
4. "Wheel size?"(wheel 1 and wheel 2)
5. "Total km?" (wheel 1 and wheel 2)
If you wish to make changes, press the SET
button in the appropriate window and make
your entries as usual by pressing the MODE
and SET buttons.
Adjusting the remaining kilometre counter
Press the SET button for 3 seconds
The display "Set km" appears and the first
digit for entry flashes
Adjust the remaining kilometre counter by
pressing the MODE button repeatedly and
confirming the individual digits by pressing
the SET button
3.7 Submenu "Destination" DEST
Total cycling time
of the current
wheel
Current speed
Total kilometres of
the current wheel
Total cycling time
wheel 1 and
wheel 2
Current speed
Total kilometres
wheel 1 and
wheel 2
Remaining cycling
time (calculated
based on the
distance still to be
covered and the
speed measured
up to now)
Current speed
Remaining kilo-
metres (countdown)
56
19
BB 4000
Settin
g
s
BB 4000
Alarm on?
BB 4000
bee
p
er on?
BB 4000
Clock
/
Date
?
BB 4000
wheel size?
BB 4000
odometer?
BB 4000
Settin
g
s
BB 4000
Current
Pressing the SET and MODE
buttons simultaneously for 3
seconds returns you to the
general preliminary settings
(p. 8, point 2).
Total km wheel 1
and wheel 2
3 seconds SET button for modification SET button for modification
SET button for modification SET button for modification SET button for modification
57
20
BB 4000
La
p
01
BB 4000
Current
BB 4000
Avera
g
e
BB 4000
Maximal
4. Menu "Altimeter"
BB 3500, BB 4000 The "Altimeter" menu provi-
des you highly accurate data and has 10 func-
tions. The measurement values are however
influenced by fluctuations in air pressure. In
order to calculate precise measurement values,
we recommend an altitude adjustment being
performed, e.g. based on maps with altitude
indications.
4.1 Submenu "Current"
Start a new trip/leg in the submenus
"Average" and "Maximum"
Measurement of the current trip/leg is halted by
pressing the SET button. The values will be
saved, the display will be reset to "0" and a new
trip/leg will be started.
4.2 Submenu "Average" MID 4.4 Submenu "Trip" TRIP
4.3 Submenu "Maximum" MAX
Current incline
Current speed
Current altitude
Maximum incline
of the trip
Current speed
Maximum altitude
attained during the
current trip
Net cycling time of
the current trip/leg
Current speed
Total increase in
altitude in the cur-
rent trip
Average incline of
the trip
Current speed
Average increase
in altitude per hour
in the current trip
58
21
BB 4000
La
p
01
BB 4000
Pilot
Starting, stopping and resetting the stop-
watch
Start or stop the stopwatch by pressing the
SET button
Zeroing of the stopwatch by pressing the
SET button for 3 seconds
Adjusting the adding counter of the
increase in altitude
Press the SET button for 3 seconds
The display "Set altitude" appears and the
first digit for entry flashes
The display of the adding counter of the
positive change in altitude can be modified
(only possible with the stopwatch off)
4.5 Submenu "Pilot" PILOTStart a new trip/leg
Measurement of the current trip/leg is halted
by pressing the SET button. All entered data
are saved and a new trip/leg is begun in the
background. The data of the last trip continue
to be displayed and the trip no.flashes. After
pressing the SET button again, the data of the
current trip/leg are displayed.
Displaying and deleting trip/leg data
Press the SET button for 3 sec.
The display "Show trips"
appears
Selection of "Show
trips" and "Delete
trips" by pressing
the MODE button
After pressing the
SET button in
"Show trips", the
net cycling times
and the saved increa-
se in altitude of the
trips/legs appear
By pressing the SET button for 3 seconds, all
values of the trip/leg which has just been dis-
played will be deleted.
If the SET button is pressed for 3 seconds in
the "Delete trips" window, the data recorded
for
all trips/legs will be deleted and a new
trip/leg will be started.
Pressing the MODE button takes you back to
the submenu "Trip".
Stopwatch
Current speed
Daily increase in
altitude
3 seconds
59
22
BB 4000
Totall
y
BB 4000
Destination
BB 4000
Settin
g
s
Total cycling time of
the current wheel
Current speed
Total of the overall
increase in altitude
Starting altitude 1
Current speed
Current altitude
S
Remaining cycling
time (calculated
based on the increa-
se in altitude still to
be attained and the
change in altitude
previously measured)
Current speed
Remaining altitude
(countdown)
4.6 Submenu "Total" TOTAL 4.8 Submenu "Set" SET
4.7 Submenu "Destination" DEST
Adjusting the remaining altitude
Press the SET button for 3 seconds
The display "Set altitude" appears and the
first digit for entry flashes
Adjusting the remaining altitude by pressing
the MODE button repeatedly and confir-
ming the individual digits by pressing the
SET button
When using the device for the first time and
after a battery change, an altitude adjustment
must be performed in order to activate the
altitude measurement function.
Adjusting and setting the current altitude
Press the SET button for 3 seconds
The display "adj. altitude?" appears
Press the SET button to change
Adjustment of the altitude displayed can be
performed (necessary owing to changes in
atmospheric pressure)
An altitude adjustment can be performed in four
ways:
1. "Starting altitude 1?": Rapid adjustment with
starting altitude 1 (e.g. absolute altitude of your
preferred starting point)
2. "Starting altitude 2?": Rapid adjustment with
starting altitude 2 (e.g. absolute altitude of a
second starting point)
3. "Last altitude?": Rapid adjustment with the
altitude attained in the last saved trip
4. "New altitude?": Entry of the actual altitude
according to a topographical map or another
reliable reference
60
23
BB 4000
Settin
g
s
BB 4000
Current
BB 4000
Settin
g
s
BB 4000
Set hei
g
ht?
BB 4000
home 1?
BB 4000
home 2?
BB 4000
last hei
g
ht?
BB 4000
new hei
g
ht?
BB 4000
new hei
g
ht
3 seconds
SET button for modification Accept by pressing the SET button
SET button for modification
61
BB 4000
set home 2?
BB 4000
set home 1?
BB 4000
set hei
g
ht?
BB 4000
Settin
g
s
BB 4000
total hei
g
ht?
24
Adjusting the starting altitudes
Press the SET button for 3
seconds
The display "adj. altitude?"
appears, continue with MODE
button – "set start alt.1?"
appears
Entry of the desired values for
"Start alt.1" and "Start alt.2" as
usual
Confirm by pressing the SET
button
If no change is made, "Total alti-
tude?" appears by pressing the
MODE button
3 seconds
SET BUTTON for modification SET BUTTON for modification
Starting
altitude 1
Starting
altitude 2
62
BB 4000
Current
BB 4000
Settin
g
s
BB 4000
total hei
g
ht
BB 4000
total hei
g
ht?
BB 4000
total hei
g
ht
BB 4000
total hei
g
ht
25
Adjusting the increase in altitu-
de total counter
by confirming with the SET but-
ton, the display of the total alti-
tude gain managed with the
cycle can be modified (e.g. for
adopting the counter reading of
your old cycle computer)
Entry of the digits as usual
Confirm by pressing the SET
button
Pressing the SET and MODE
buttons simultaneously for 3
seconds returns you to the
general preliminary settings
(p. 8, point 2).
n
63
26
BB 4000
Current
BB 4000
Avera
g
e
BB 4000
La
p
01
BB 4000
Maximal
5. Menu "Pedal frequency"
Current heart rate
or current time, if
no heart rate sensor
is used
Current pedal fre-
quency
Current speed
Max. heart rate or
current time, if no
heart rate sensor is
used
Current pedal fre-
quency
maximum pedal fre-
quency
Net cycling time of
the current trip
Current pedal fre-
quency
Revolutions in the
current trip
ø heart rate or cur-
rent time, if no heart
rate sensor is used
Current pedal fre-
quency
Average pedal fre-
quency
BB 2000, BB 3000, BB 4000 The "Pedal fre-
quency" menu has 10 functions. The digital data
transfer functions precisely subject to the condi-
tion that the pedal frequency sensor is correctly
installed on the cycle. Please remember to enter
the code number after installation (refer to page
14).
5.1 Submenu "Current"
Start a new trip/leg in the submenus
"Average" and "Maximum"
Measurement of the current trip/leg is halted by
pressing the SET button. The values will be
saved, the display will be reset to "0" and a new
trip/leg will be started.
5.2 Submenu "Average" MID 5.4 Submenu "Trip" TRIP
5.3 Submenu "Maximum" MAX
64
27
BB 4000
La
p
01
3 Sekunden
BB 4000
Totall
y
BB 4000
Pilot
-
Stopwatch
Current pedal fre-
quency
% time of the pedal
frequency within
the training limits
set
Total cycling time of
the current wheel
Current pedal fre-
quency
Total revolutions
Start a new trip/leg
Measurement of the current trip/leg is halted by
pressing the SET button. All data are saved and
a new trip/leg is begun in the background. The
data of the last trip continue to be displayed and
the trip no.flashes. After pressing the SET button
again, the data of the current trip/leg are display-
ed.
Displaying and deleting trip/leg data
Press the SET button for 3 sec.
The display "Show trips"
appears
Selection of "Show
trips" and "Delete
trips" by pressing
the MODE button
After pressing the
SET button in
"Show trips", the
net cycling times
and the number of
revolutions in all trips/legs
appear
By pressing the SET button for 3 seconds, all
values of the trip/leg which has just been dis-
played will be deleted.
If the SET button is pressed for 3 seconds in the
"Delete trips" window, the data recorded for
all
trips/legs will be deleted and a new trip/leg will
be started.
Pressing the MODE button takes you back to the
submenu "Trip".
Starting, stopping and resetting the stop-
watch
Start or stop the stopwatch by pressing the
SET button
Zeroing of the stopwatch by pressing the SET
button for 3 seconds
5.5 Submenu "Pilot" PILOT
5.6 Submenu "Total" TOTAL
3 seconds
65
28
BB 4000
bee
p
er on?
BB 4000BB 4000
Destination
BB 4000
Settin
g
s
Adjusting the remaining revolution counter
Press the SET button for 3 seconds
The display "Set revs." appears and the first
digit for entry flashes
Adjust the remaining revolution counter by
pressing the MODE button repeatedly and
confirming the individual digits by pressing
the SET button
(De)activating the signal
Press the SET button for 3 seconds
The display "Signal on?" or "Signal off?" appears
By pressing the SET button, the audible signal (on
exceeding or falling below the set training limits)
can be activated or deactivated
= Signal is activated
Entry of the upper and lower training limits of
the pedal frequency
Press the SET button for 3 seconds
The display "Signal on?" or "Signal off?"
appears
By pressing the MODE button, "Set
min/max?" appears
By pressing the SET button, select entry of the
values for "Maximum" and "Minimum"
Entry of the digits as usual
Confirm by pressing the SET button
5.7 Submenu "Destination" DEST
5.8 Submenu "Set" SET
Remaining cycling
time with reference
to the revolutions
still to be pedalled
and the pedal fre-
quency previously
measured
Current pedal fre-
quency
Remaining revoluti-
ons (countdown)
Upper limit of
pedal frequency
Current pedal fre-
quency
Lower limit of
pedal frequency
66
29
BB 4000
Settin
g
s
BB 4000
bee
p
er on?
BB 4000
tar
g
et cad.?
BB 4000
maximum
BB 4000
minimum
BB 4000
total rot.?
BB 4000
total rot.
BB 4000
Settin
g
s
ars
(on
s)
Adjusting the total revolution
counter
By confirming with the SET but-
ton, the display of the total revo-
lution counter can be modified
(e.g. for adopting the counter
reading of your old cycle com-
puter)
Entry of the digits as usual
Confirm by pressing the SET
button
3 seconds SET button for modification
67
30
BB 4000
Current
BB 4000
Avera
g
e
BB 4000
Maximal
BB 3000, BB 3500, BB 4000
The "Heart rate" menu also contains your per-
sonal training manager which helps you to
increase your fitness with a specific training
programme without overtaxing your body.
Before training however, you should neverthe-
less consult your physician who tests your ath-
letic health.
If you wear a pacemaker, you should not use
the heart rate mode without consulting your
general practitioner. Please remember to enter
the code number (refer to page 14).
6. Menu "Heart rate"
Current pedal fre-
quency or current
time, if no pedal
frequency sensor is
used
Current heart rate
Current speed
Max. pedal fre-
quency or current
time, if no pedal
frequency sensor is
used
Current heart rate
Maximum heart rate
ø pedal frequency
or current time, if
no pedal frequen-
cy sensor is used
Current heart rate
Average heart rate
5.1 Submenu "Current"
6.2 Submenu "Average" MID
6.3 Submenu "Maximum" MAX
Start a new trip/leg in the submenus
"Average" and "Maximum"
Measurement of the current trip/leg is halted
by pressing the SET button. The values will be
saved, the display will be reset to "0" and a
new trip/leg will be started.
68
31
BB 4000
La
p
01
BB 4000
La
p
01
BB 4000
Pilot
Net cycling time of
the current trip
Current heart rate
Calories burnt in
the current trip
Stopwatch
Current heart rate
% time of the heart
rate value within the
training limits set
6.4 Submenu "Trip" TRIP
5.5 Submenu "Pilot" PILOT
Start a new trip/leg
Measurement of the current trip/leg is halted
by pressing the SET button.
All entered data are saved and a new trip/leg
is begun in the background. The data of the
last trip continue to be displayed and the trip
no.flashes. After pressing the SET button
again, the data of the current trip/leg are dis-
played.
Displaying and deleting trip/leg data
Press the SET button for 3 sec.
The display "Show
trips" appears
Selection of "Show
trips" and "Delete
trips" by pressing
the MODE button
After pressing the
SET button in
"Show trips", the
net cycling times and
the number of calories
burnt in all trips/legs appear
Starting, stopping and resetting the stop-
watch
Start or stop the stopwatch by pressing the
SET button
Zeroing of the stopwatch by pressing the
SET button for 3 seconds
By pressing the SET button for 3 seconds, all
values of the trip/leg which has just been dis-
played will be deleted.
If the SET button is pressed for 3 seconds in
the "Delete trips" window, the data recorded
for all trips/legs will be deleted and a new
trip/leg will be started.
Pressing the MODE button takes you back to
the submenu "Trip".
3 seconds
69
32
BB 4000
bee
p
er on?
BB 4000
Destination
BB 4000
Totall
y
6.6 Submenu "Total" TOTAL
6.7 Submenu "Destination" DEST
(De)activating the signal
Press the SET button for 3 seconds
The display "Signal on?" or "Signal off?"
appears
By pressing the SET button, the audible signal
(on exceeding or falling below the set training
limits) can be activated or deactivated
= Signal is activated
Entry of the personal user data
Press the SET button for 3 seconds
The display "Signal on?" or "Signal off?"
appears
By pressing the MODE button, "Set cyclist?"
appears - confirm by pressing the SET button
The following personal data can now be
entered as usual:
1. Age
2. Weight ("kg" or "lbs")
3. Sex ("male" or "female")
4. Fitness level ("Set fitness")
Total cycling time of
the current wheel
Current heart rate
Total calories burnt
Remaining cycling
time with reference
to the calories still to
be burnt and the
previously measured
calorie consumption
Current heart rate
Remaining calorie
counter (countdown)
70
Adjusting the remaining calorie counter
Press the SET button for 3 seconds
The display "Set kcal" appears and the first
digit for entry flashes
Adjust the remaining calorie counter by pres-
sing the MODE button repeatedly and confir-
ming the individual digits by pressing the SET
button
Basis: approx. 250 kcal are burnt in 30 minutes
of training.
33
BB 4000
Settin
g
s
BB 4000
bee
p
er on?
BB 4000
set user?
BB 4000
a
g
e
BB 4000
wei
g
ht k
g
?
BB 4000
wei
g
ht
BB 4000
fitn. status
BB 4000
male?
Fitness level
1 = you are untrained
2 = you practice approx.
1 hour of sport 2 to
3 times a week.
3 = you regularly prac-
tice sport with a
high training effect.
3 seconds
SET button for modification
MODE button for
modification
SET button for modification
71
34
BB 4000
HR limits?
BB 4000
maximum
BB 4000
minimum
BB 4000
exercise1
BB 4000
total cal.?
After confirming with the SET but-
ton, the user is transferred to the
"Pulse limits?" window. Before
you now modify the upper heart
rate limit, you should be aware
that "Maximum" displays the
upper heart rate limit with total
exhaustion of your physical perfor-
mance ability. This value is already
calculated on the basis of the per-
sonal data that you have entered.
You should not increase this value,
or have your personal upper heart
rate limit determined by your phy-
sician by means of a stress test.
Calculation formula: 220 – age =
maximum value
Adjusting the heart rate, training intensity and the total calorie counter
In order to view the upper heart rate limit, press the SET button and
accept or correct values
Confirm by pressing the SET button and accept or correct the resting
pulse in the "Minimum" window and confirm by pressing the SET button
The desired training intensity can be selected by pressing the
MODE button:
1 = low (easy training for beginners)
The heart rate lies in the range of 60–70% of the highest value.
2 = moderate (for advanced athletes)
The heart rate lies in the range of 70–80% of the highest value.
3 = high (intensive training only for trained athletes)
The heart rate lies in the range of 80–90% of the highest value.
72
35
BB 4000
exercise2
BB 4000
u
pp
er limit %
BB 4000
lower li
mit
%
BB 4000
total cal.
?
Confirm training intensity by
pressing the SET button
In the "Total kcal?" window the dis-
play of the total calorie• • counter
can now be modified (e.g. in order
to adopt the counter reading of your
old cycle computer or your old
pulse watch)
Entry of the digits as usual and
confirmation with the SET button
Alternatively, by pressing the SET
button for 3 seconds, the automati-
cally calculated training limits can
be viewed or modified by pressing
the MODE button (in %).
Pressing the SET and MODE buttons simultaneously
for 3 seconds returns you to the general preliminary
settings (p. 8, point 2).
3 seconds SET button for modification
73
36
7. Training
7.1 Training manager
Depending on the product features, your
TRELOCK cycle computer offers a wide range
of specific training options. You can, for exam-
ple, determine
how long you wish to train
the minimum number of kilometres you wish to
cycle
the gain in altitude you wish to achieve (BB
3500, BB 4000)
how many calories you wish to burn in a trai-
ning session (BB 3000, BB 3500, BB 4000) or
how many revolutions per minute you wish to
accomplish (BB 2000, BB 3000, BB 4000).
You can view your training status at any time
during training or a pause.
Using the symbols " ", "" and " " on the
display, you can constantly check your training
intensity.
In the menu "Bike":
= your current speed is higher than the aver-
age speed in the current trip/leg.
• = the current speed corresponds to the aver-
age speed in the current trip/leg.
= your current speed is lower than the aver-
age speed in the current trip/leg.
In the "Pedal frequency" menu (BB 2000, BB
3000, BB 4000):
= the current pedal frequency is above the
training limit entered.
• = the current pedal frequency is optimal for
your training.
= the current pedal frequency is below the
training limit entered.
In the "Heart rate" menu (BB 3000, BB 3500,
BB 4000):
= the current heart rate is above the training
limit entered.
• = the heart rate is optimal for your training.
= the heart rate is below the training limit
entered.
74
C
A
1.
2.
B
37
J
30º
7.2 Putting the ZF 460 chest band on (BB
3000, BB 3500, BB 4000)
A Attach the elastic band to the sensor. The
chest band can be adjusted to fit sizes M to
XXL.
B Moisten the inside of both contact points on
the right and left next to the sensor.
C Put the chest band on as illustrated.
The
TRELOCK logo on the transmitter must be
legible and must not be upside down!
Adjust the length of the elastic so that the
chest band fits comfortably, but cannot slip
during training.
Press the MODE button for 2 sec. and repeat
the procedure if necessary until the main menu
"Heart rate" appears on the display. If the chest
band has been put on correctly, the heart sym-
bol will now flash and the current heart rate will
be displayed – you can now start to train.
75
38
7.3 Transferring the training data to your PC
Your can optionally transfer the saved training
data to your PC and analyse, log and manage it
using the TRELOCK software. You need the PC
interface set ZF 450, which also contains the
TRELOCK software in order to be able to per-
form the data transfer. ZF 450 is not included in
the scope of delivery, but is available as an
accessory from your specialist dealer.
8.1 Changing the battery
The night light base and computer power sup-
plies are independent of one another. Failure of
the battery in the night light base does not
impair the function of the computer.
Important: discharged batteries are special
waste and should not be put into the domestic
waste!
Your personal data are still memorized even if
when there are no batteries in your cycle com-
puter.
The user can change the batteries him/herself.
8.2 Reset
If a malfunction occurs, remove the battery from
the cycle computer, wait a short while and rein-
sert.
8.3 Maintenance and care
Your TRELOCK cycle computer is maintenance-
free and does not require any special care.
Simply use a moist cloth for cleaning. The ela-
stic of the chest band (BB 3000, BB 3500, BB
4000) is washable. Please observe the washing
instructions on the label.
Protect the sensors and receivers against extre-
me temperatures. Temperatures under – 20 °C
(– 4 °F) and above 80 °C (176 °F) will damage
the cycle computer.
The operating temperature should be between 5
°C – 50 °C (40 °F – 120 °F).
8.4 Technical data
Speed 0–199.9 km/h
or m/h
Trip/leg 0–999.99 km
Trip/leg time 0–23:59:59
Total kilometres 0–99999 km
Total cycling time 0–9999:59
Heart rate 0–255 beats/min.
Calories/trip 0–9999 kcal
Total calories 0–999999 kcal
Pedal frequency 0–255 revs.
Revolutions/trip 0-999999 revs.
Remaining revolutions 0–39999 revs.
Altitude measurement 0–5999 m / 19999 ft
Daily increase in altitude 0–9999 m / 29999 ft
Total increase in altitude 0–999999 m or ft
Trips/legs 0–40
Wheel circumference 300–2999 mm
Stopwatch 0–23:59:59
8. Additional information and
instructions
76
39
Why can't the cycle computer be
activated?
The battery is flat and needs replacing.
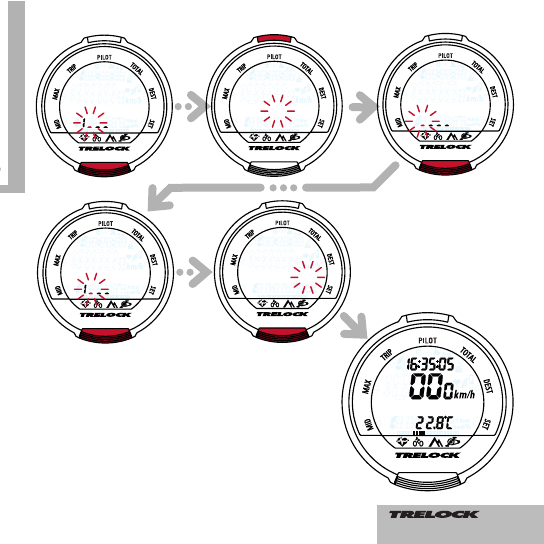
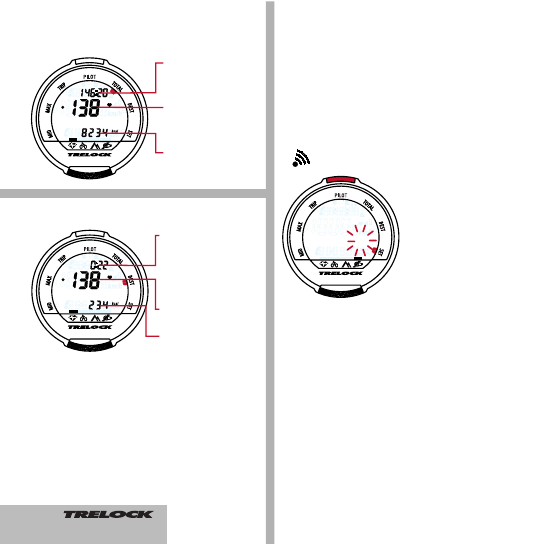
Why are no current data other than the time
displayed?
The cycle computer is in sleep mode – press
any key or simply ride off (wireless wake-up).
Why is the speed incorrectly displayed?
A wrong wheel size has been entered.
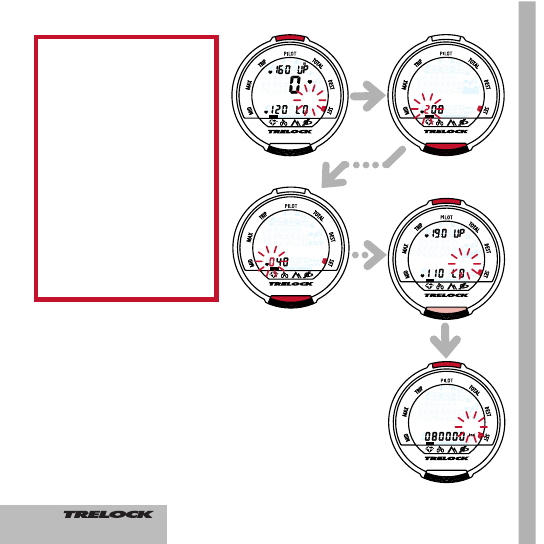
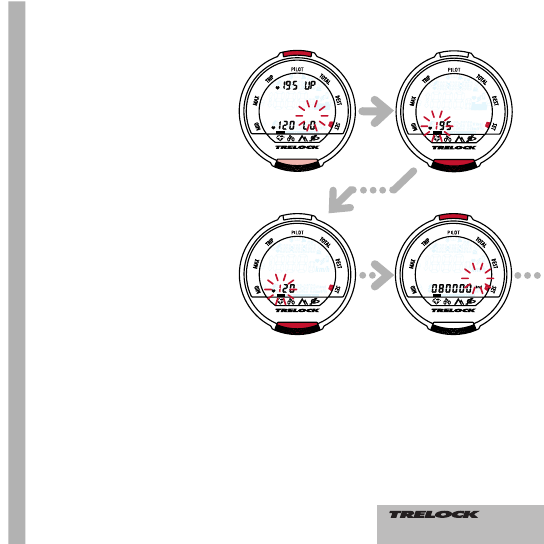
Why is the altitude incorrect?
(BB 3500, BB 4000)
Barometric pressure has changed – altitude
compensation is required.
Why is no speed or pedal frequency (BB
2000, BB 3000, BB 4000) displayed?
The distance between the sensor and the
respective magnet is too great or the battery
in the respective sensor is flat.
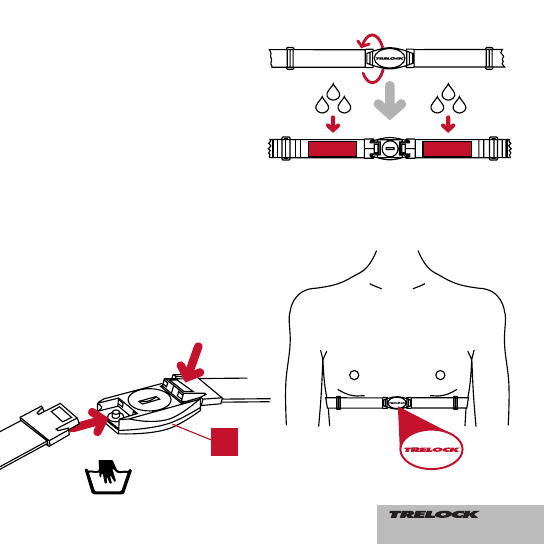
Why isn't the heart rate displayed? (BB 3000,
BB 3500, BB 4000)
a) The chest belt is not correctly positioned.
b) The contact points on the sensor are not
moistened or are dirty.
c) The sensor battery is flat.
Why does the display go dark or react
sluggishly?
The operating temperature (5 °C – 50 °C; 40
°F – 120 °F) is too low or too high.
The current legal regulations apply to the guaran-
tee. We accept liability towards our contractual
partners. Please consult your dealer if you have
any cause for complaint. The TRELOCK Service
Centre remains at your disposal in case of any
enquiries:
TRELOCK GmbH, Postfach 7880, 48042 Münster,
Germany, Tel. 02 51/9 19 99-14, www.trelock.de.
In case of any justified claims under the guaran-
tee, the product will be repaired, or you will recei-
ve a replacement device – the claim is only appli-
cable to the current model at the time of the
claim. The guarantee shall only apply if the pro-
duct has not been forcibly opened or damaged
after purchase. Batteries, storage batteries and
expendable parts are excluded from the guaran-
tee. TRELOCK cannot accept any liability for
defect and consequential damage on the basis of
this guarantee. This guarantee is valid for a period
of 2 years as and from the date of purchase on
presentation of the original purchase slip. The
manufacturer reserves all rights for technical
modifications.
TRELOCK Fast Set Service: You can also have
your dealer configure your cycle computer. Your
dealer will be able to configure your cycle compu-
ter with the TRELOCK Fast Set Box based on the
data indicated by you.
TRELOCK cycle computers are designed for
personal athletic training and are not suitable
for commercial or medical purposes. Persons
wearing pacemakers should not use the heart
rate mode (BB 3000, BB 3500, BB 4000)
without consulting their physician.
9. Notes on safety
10. Guarantee and service
11. Frequently asked questions
77
40
Why is the display pale?
The battery is flat and needs replacing.
Can my training partner's cycle computer inter-
fere with my device?
No. Digital data transfer and the individual
coding of the sensors protect your cycle com-
puter against interference to the greatest pos-
sible extent.
Foreign data are not received.
ZF 410 Art no. 8001094 Night light base
ZF 420 Art no. 8001179 Dual bike set
ZF 50 Art no. 8000831 Universal spoke
magnet
ZF 430 Art no. 8001095 Pedal frequency
set
ZF 435 Art no. 8001310 Cycle transmitter
ZF 440 Art no. 8001126 Chest band
ZF 450 Art no. 8001096 PC Interface set
12. Accessories (optional) /Spares
78
41
79
35

Hulp nodig? Stel uw vraag in het forum

Spelregels

Misbruik melden

Gebruikershandleiding.com neemt misbruik van zijn services uitermate serieus. U kunt hieronder aangeven waarom deze vraag ongepast is. Wij controleren de vraag en zonodig wordt deze verwijderd.

Product:

Bijvoorbeeld antisemitische inhoud, racistische inhoud, of materiaal dat gewelddadige fysieke handelingen tot gevolg kan hebben.

Bijvoorbeeld een creditcardnummer, een persoonlijk identificatienummer, of een geheim adres. E-mailadressen en volledige namen worden niet als privégegevens beschouwd.

Spelregels forum

Om tot zinvolle vragen te komen hanteren wij de volgende spelregels:

Belangrijk! Als er een antwoord wordt gegeven op uw vraag, dan is het voor de gever van het antwoord nuttig om te weten als u er wel (of niet) mee geholpen bent! Wij vragen u dus ook te reageren op een antwoord.

Belangrijk! Antwoorden worden ook per e-mail naar abonnees gestuurd. Laat uw emailadres achter op deze site, zodat u op de hoogte blijft. U krijgt dan ook andere vragen en antwoorden te zien.

Abonneren

Abonneer u voor het ontvangen van emails voor uw Trelock BB 3500i bij:


U ontvangt een email met instructies om u voor één of beide opties in te schrijven.


Ontvang uw handleiding per email

Vul uw emailadres in en ontvang de handleiding van Trelock BB 3500i in de taal/talen: Engels als bijlage per email.

De handleiding is 5,39 mb groot.


U ontvangt de handleiding per email binnen enkele minuten. Als u geen email heeft ontvangen, dan heeft u waarschijnlijk een verkeerd emailadres ingevuld of is uw mailbox te vol. Daarnaast kan het zijn dat uw internetprovider een maximum heeft aan de grootte per email. Omdat hier een handleiding wordt meegestuurd, kan het voorkomen dat de email groter is dan toegestaan bij uw provider.

Stel vragen via chat aan uw handleiding

Stel uw vraag over deze PDF

Andere handleiding(en) van Trelock BB 3500i

Trelock BB 3500i Gebruiksaanwijzing - Nederlands - 40 pagina's

Trelock BB 3500i Gebruiksaanwijzing - Deutsch - 40 pagina's


Uw handleiding is per email verstuurd. Controleer uw email

Als u niet binnen een kwartier uw email met handleiding ontvangen heeft, kan het zijn dat u een verkeerd emailadres heeft ingevuld of dat uw emailprovider een maximum grootte per email heeft ingesteld die kleiner is dan de grootte van de handleiding.

Er is een email naar u verstuurd om uw inschrijving definitief te maken.

Controleer uw email en volg de aanwijzingen op om uw inschrijving definitief te maken

U heeft geen emailadres opgegeven

Als u de handleiding per email wilt ontvangen, vul dan een geldig emailadres in.

Uw vraag is op deze pagina toegevoegd

Wilt u een email ontvangen bij een antwoord en/of nieuwe vragen? Vul dan hier uw emailadres in.


Info