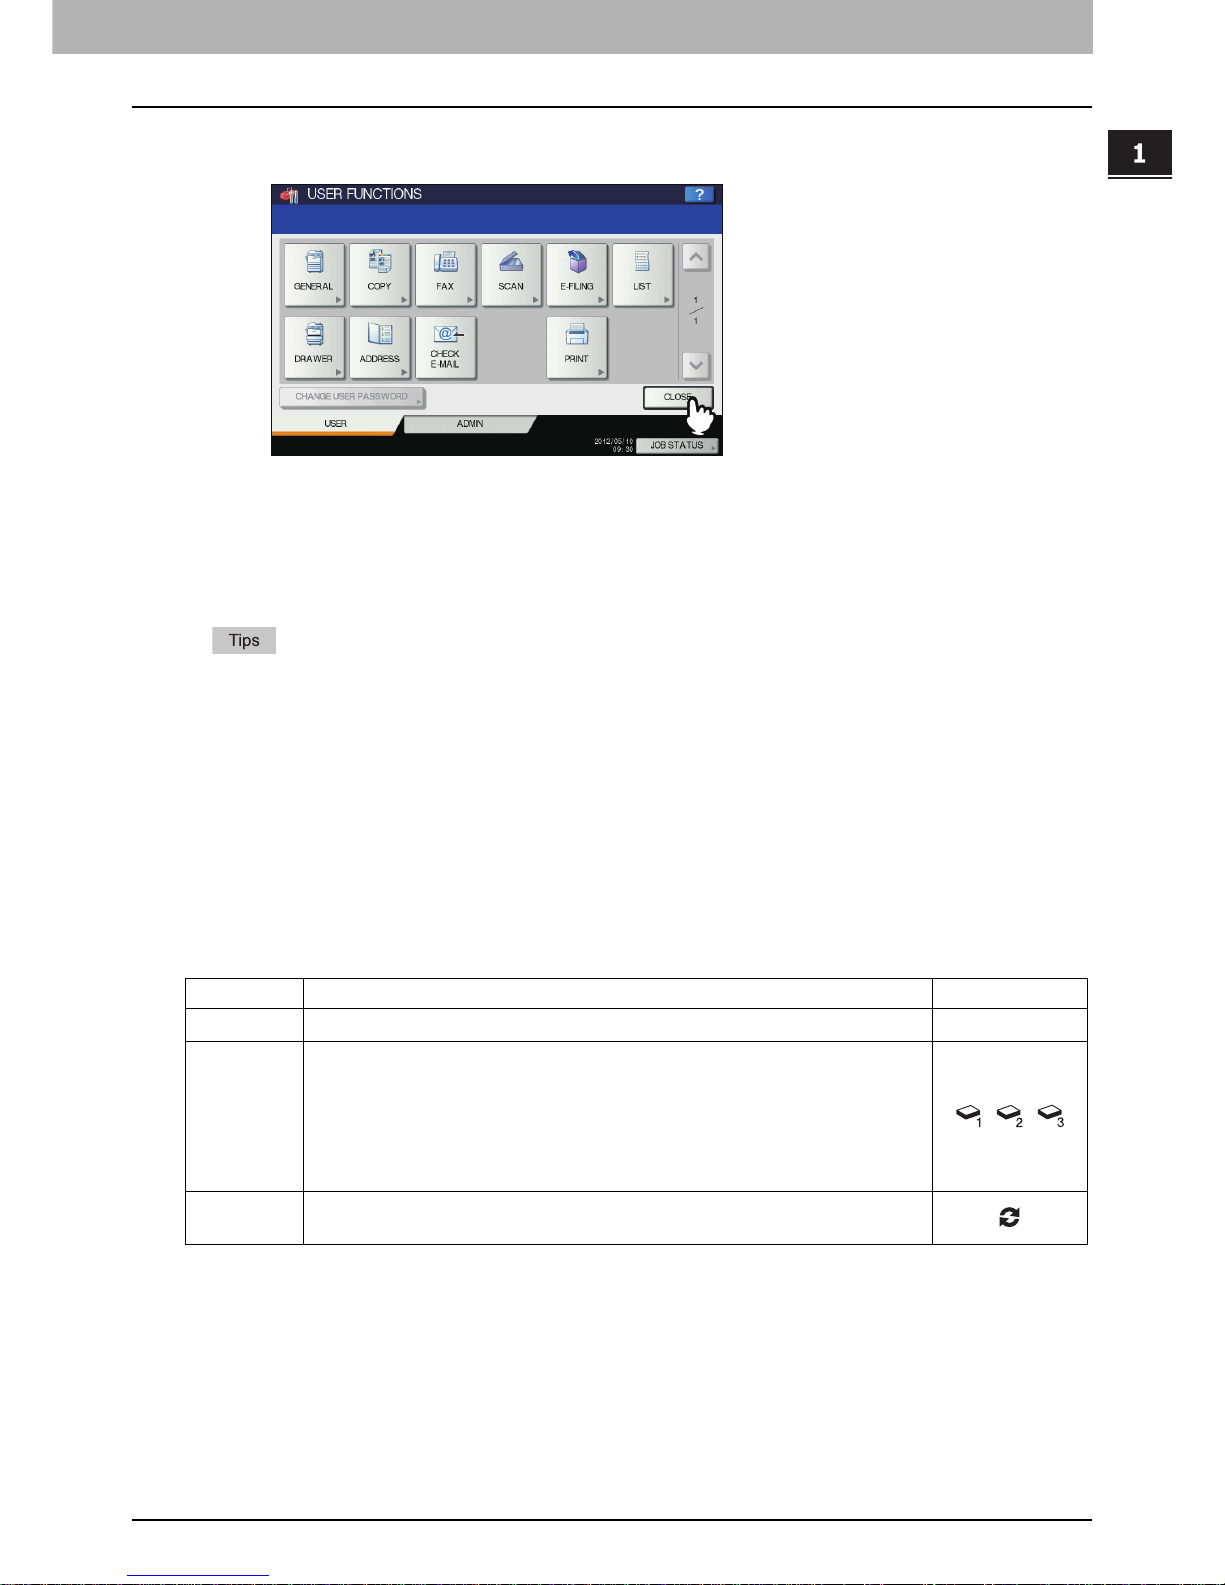
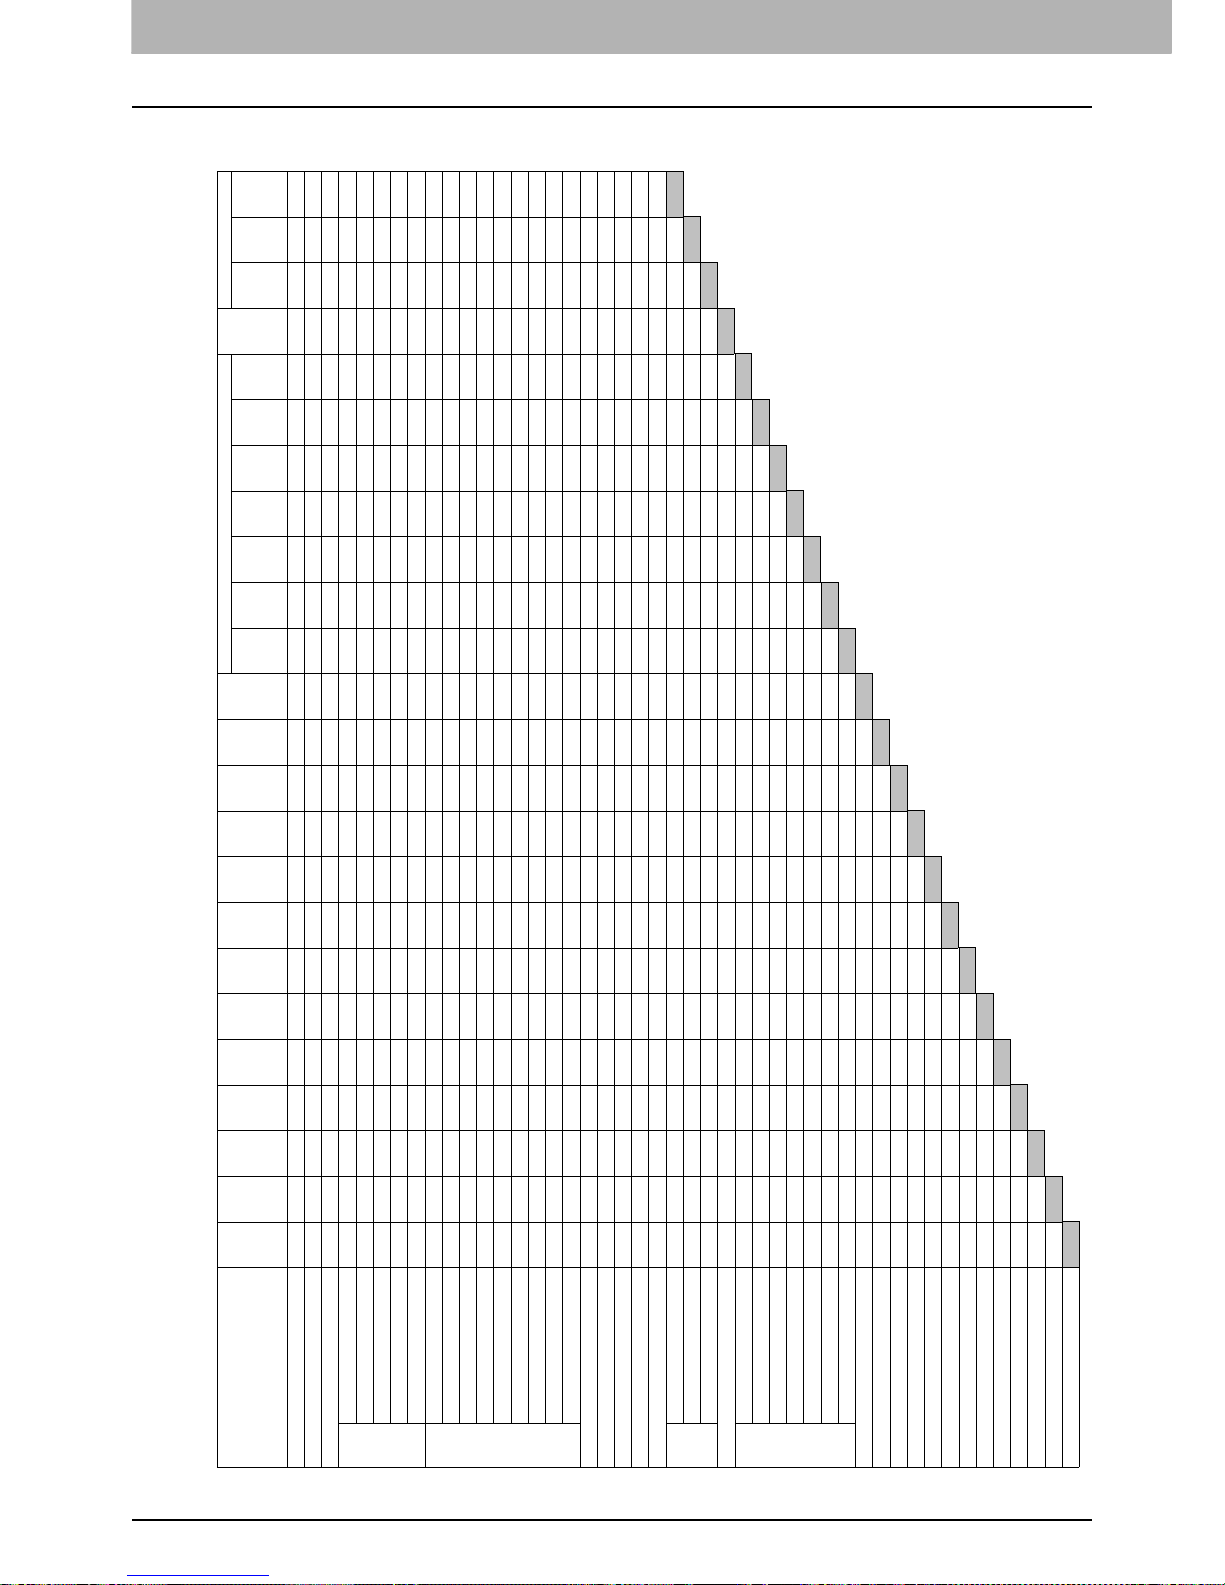
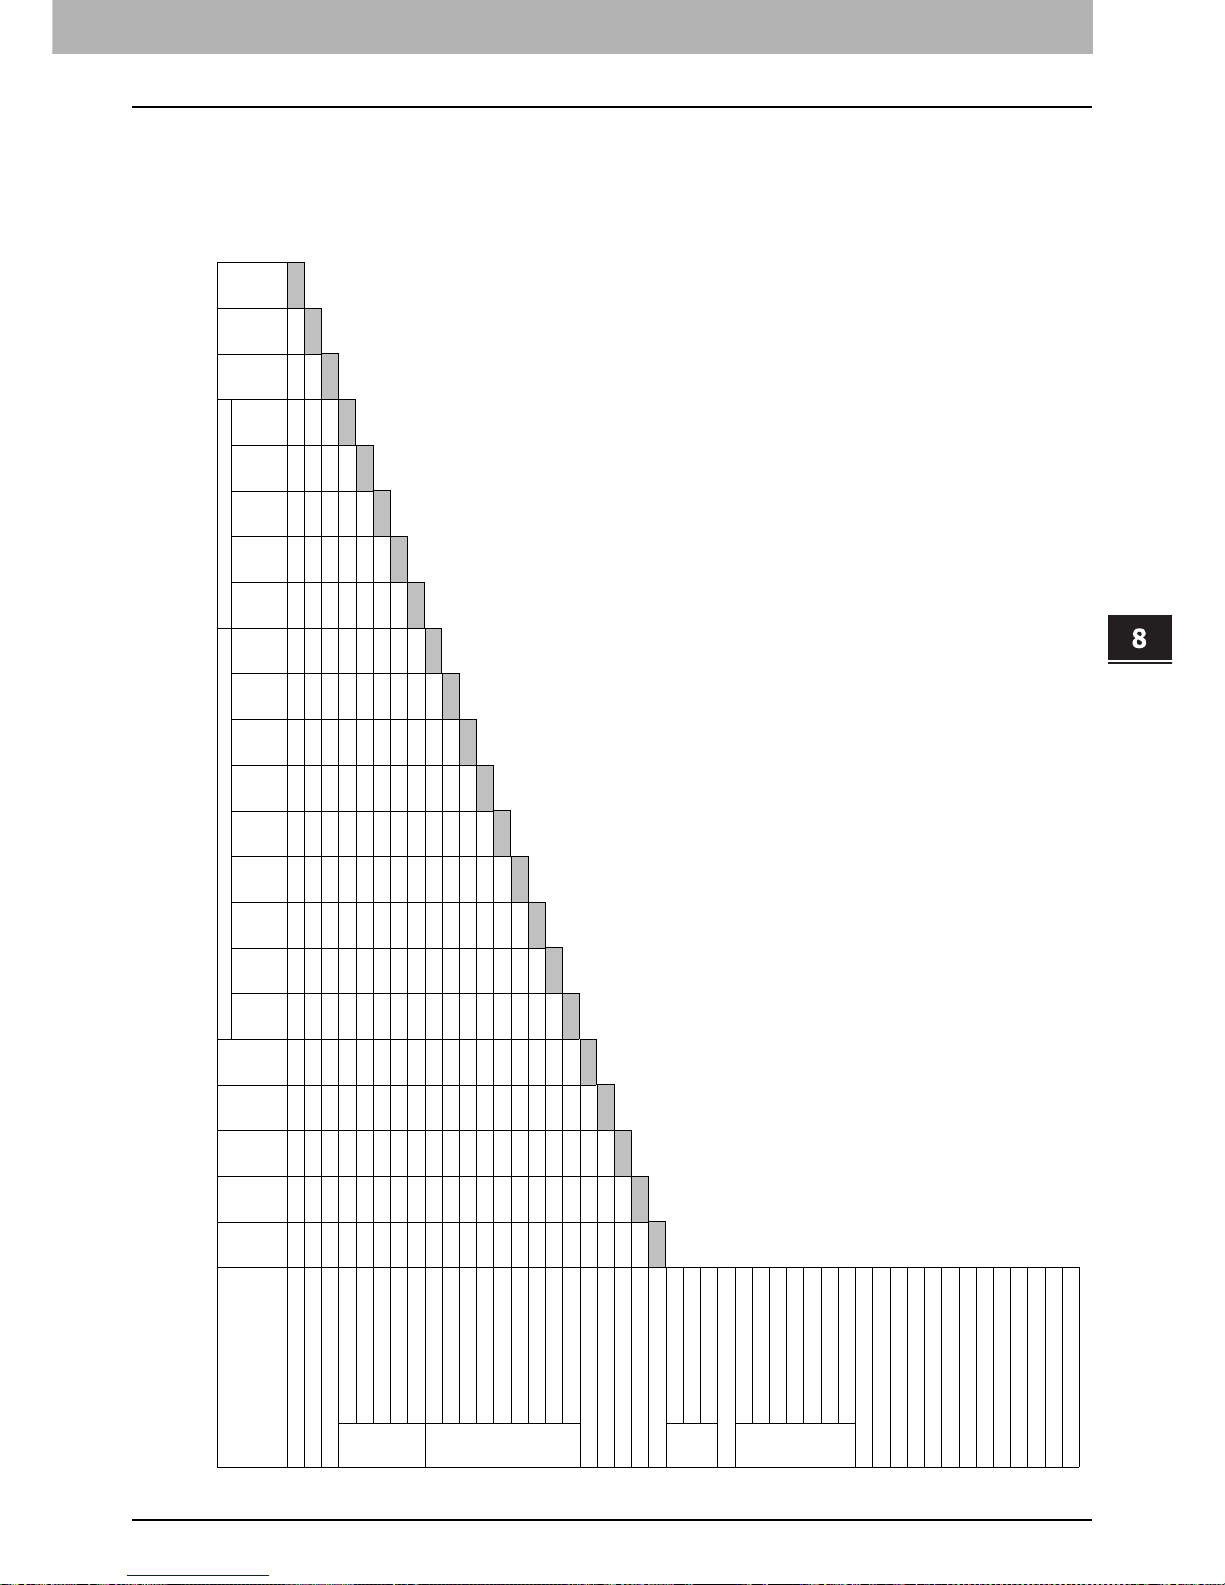
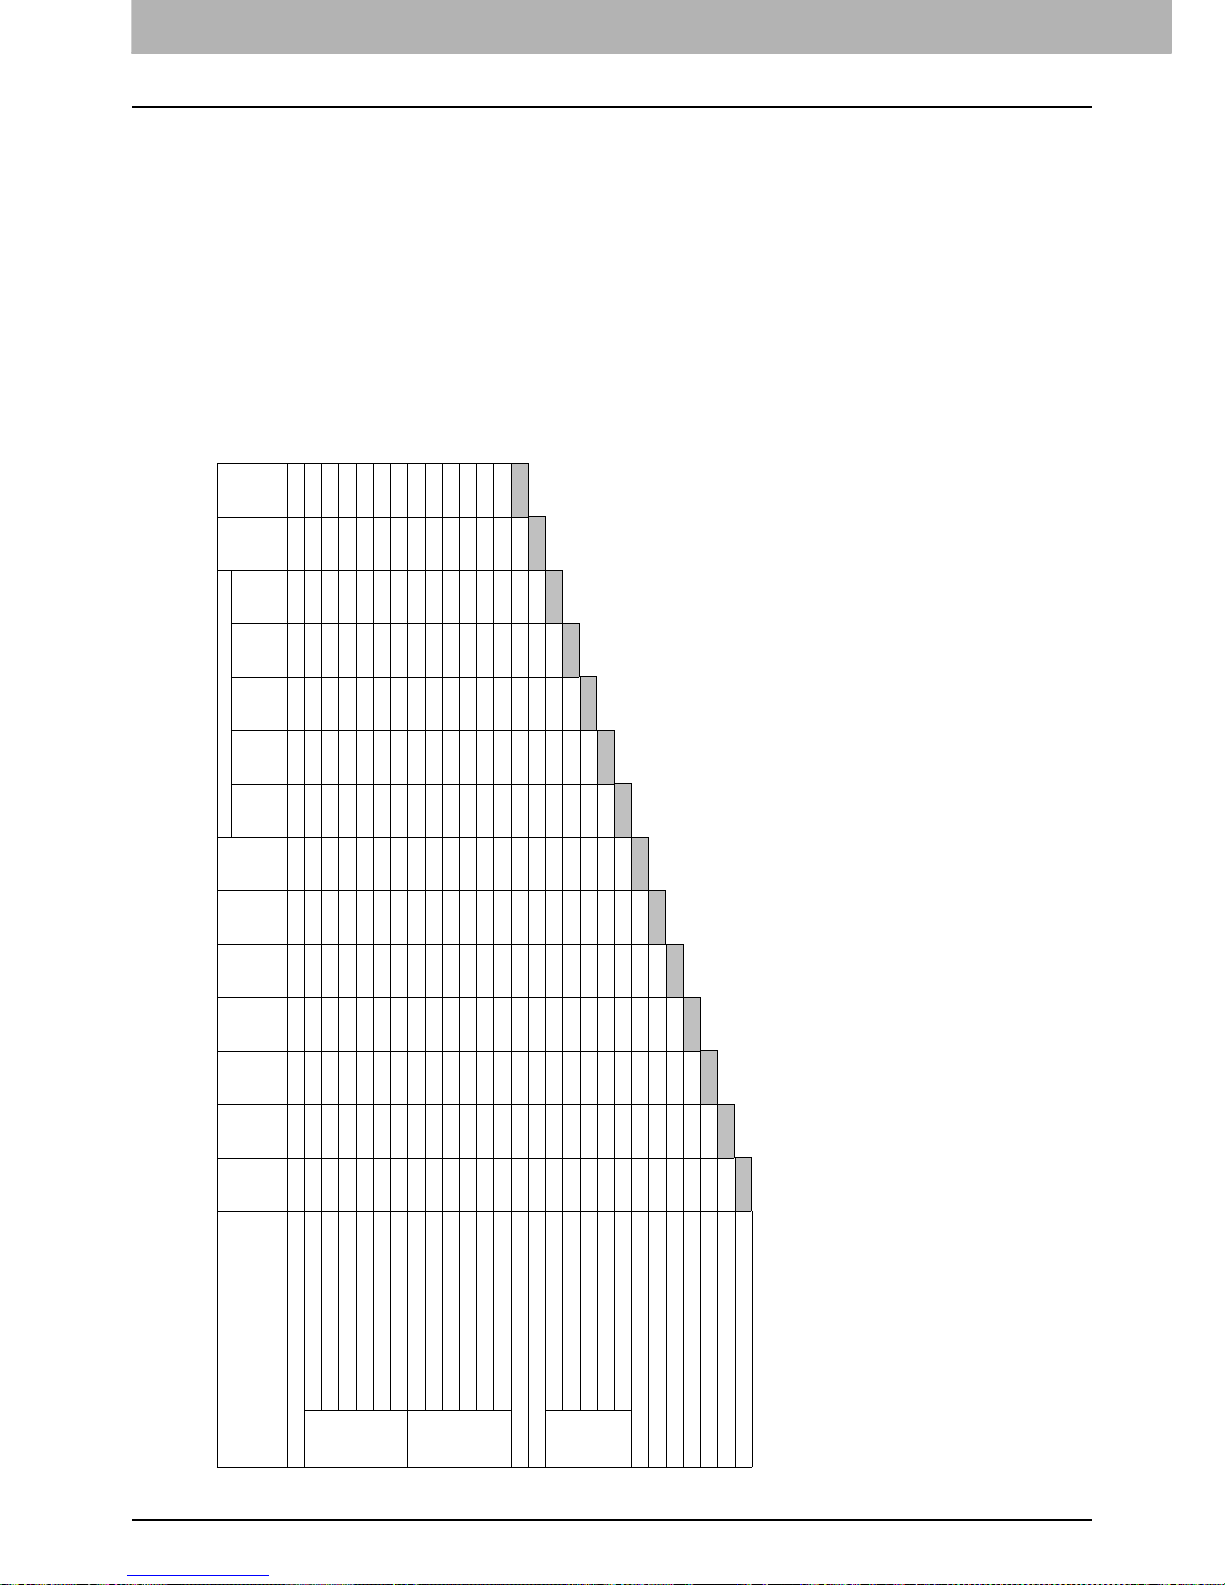
681659
3
Verklein
Vergroot
Pagina terug
1/228
Pagina verder
MULTIFUNCTIONAL DIGITAL COLOR SYSTEMS
Copying Guide
Downloaded from www.Manualslib.com manuals search engine
©2012 -2015 TOSHIBA TEC CORPORATION All rights reserved
Under the copyright laws, this manual cannot be reproduced in any form without prior written permission of TTEC.
Downloaded from www.Manualslib.com manuals search engine
Preface 1
Preface
How to read this manual
Thank you for purchasing TOSHIBA Multifunctional Digital Systems or Multifunctional Digital Color Systems.
This manual describes how to use the copying functions of this equipment. Read this manual before using this
equipment.
Symbols in this manual
In this manual, some important items are described with the symbols shown below. Be sure to read these
items before using this equipment.
Other than the above, this manual also describes information that may be useful for the operation of this
equipment with the following signage:
Description of original/paper direction
Paper or originals of A4, B5 or LT size can be placed either in a portrait direction or in a landscape direction.
In this manual, “-R” is added to this paper size when this size of paper or original is placed in a landscape
direction.
e.g.) A4 size original on the original glass
Paper or originals of A3, B4, LD or LG can only be placed in a landscape direction, therefore “-R” is not added
to these sizes.
Indicates a potentially hazardous situation which, if not avoided, could result in death,
serious injury, or serious damage, or fire in the equipment or surrounding assets.
Indicates a potentially hazardous situation which, if not avoided, may result in minor or
moderate injury, partial damage to the equipment or surrounding assets, or loss of data.
Indicates information to which you should pay attention when operating the equipment.
Describes handy information that is useful to know when operating the equipment.
Pages describing items related to what you are currently doing. See these pages as
required.
Placed in a portrait direction: A4 Placed in a landscape direction: A4-R
Downloaded from www.Manualslib.com manuals search engine
2 Preface
Models
In this manual, each model name is replaced with a series name as shown below:
Options
For the available options, refer to “Options” in the Quick Start Guide for this equipment.
Screens
yThe control panel and screens for e-STUDIO2550C Series are used as examples in this manual. They
may differ from the actual ones depending on the use-environment of the equipment such as the installing
status of options.
yScreens of when paper in the A/B format is used are given in this manual. If you use paper in the LT
format, the display or the order of buttons may differ from that of your equipment.
Trademarks
The company and product names given in this manual or displayed in this software may be the trademarks of
their respective companies.
Model name Series name
e-STUDIO2050C/2550C e-STUDIO2550C Series
e-STUDIO2555C/3055C/3555C/4555C/5055C,
e-STUDIO2555CSE/3055CSE/3555CSE/4555CSE/5055CSE
e-STUDIO5055C Series
Downloaded from www.Manualslib.com manuals search engine
CONTENTS 3
CONTENTS
Preface....................................................................................................................................... 1
Chapter 1 BEFORE USING EQUIPMENT
BASIC Menu for the Copier Function ..................................................................................... 8
Placing Paper.......................................................................................................................... 11
Acceptable copy paper ........................................................................................................ 11
Placing paper in drawers..................................................................................................... 16
Registering paper size......................................................................................................... 22
Setting paper type ............................................................................................................... 23
Placing paper in the Large Capacity Feeder ....................................................................... 27
Chapter 2 HOW TO MAKE COPIES
Before Making Copies............................................................................................................32
Storage of color copies........................................................................................................ 32
Forgery prevention function................................................................................................. 32
Placing Originals .................................................................................................................... 33
Acceptable originals ............................................................................................................33
Placing originals on the original glass ................................................................................. 34
Book-type originals .............................................................................................................. 35
Using the RADF (Reversing Automatic Document Feeder) ................................................ 36
Making Copies ........................................................................................................................ 39
Basic copying procedure ..................................................................................................... 39
Scanning the next original during copying........................................................................... 42
Interrupting copying and making other copies..................................................................... 43
Proof copy ........................................................................................................................... 44
Selecting exit tray ................................................................................................................ 46
Bypass Copying ..................................................................................................................... 47
Bypass copying on standard size paper.............................................................................. 48
Bypass copying on non-standard size paper....................................................................... 58
Chapter 3 BASIC COPY MODES
Before Using Copying Functions.......................................................................................... 64
Default settings.................................................................................................................... 64
Confirming the set functions ................................................................................................ 64
Clearing the set functions .................................................................................................... 65
Restrictions on function combinations ................................................................................. 65
Paper Selection....................................................................................................................... 66
Automatic Paper Selection (APS)........................................................................................ 66
Selecting desired paper manually ....................................................................................... 67
Copying mixed-size originals in one operation .................................................................... 68
Switching Color Modes.......................................................................................................... 70
Setting Original Modes ..........................................................................................................71
Density Adjustment................................................................................................................ 73
Enlargement and Reduction Copying .................................................................................. 74
Automatic Magnification Selection (AMS) ........................................................................... 74
Specifying both the original size and the copy paper size separately ................................. 76
Specifying reproduction ratio manually................................................................................ 78
Downloaded from www.Manualslib.com manuals search engine
4 CONTENTS
Copying photo originals in the optimal reproduction ratio for copy paper size (PHOTO ZOOM)
80
Selecting Finishing Mode ...................................................................................................... 83
Finishing modes and optional finishing devices .................................................................. 83
Sort/Group mode .................................................................................................................87
Rotate sort mode ................................................................................................................. 89
Staple sort mode ................................................................................................................. 90
Magazine sort / Center fold / Saddle stitch.......................................................................... 94
Hole punch mode ................................................................................................................ 97
Manual staple mode ............................................................................................................ 99
Duplex Copying .................................................................................................................... 101
Making a 1-sided copy....................................................................................................... 102
Making a 2-sided copy....................................................................................................... 103
Making a 2-sided copy from a book-type original .............................................................. 104
Performing Copy & File........................................................................................................ 108
Setting share folder ........................................................................................................... 110
Chapter 4 EDITING FUNCTIONS
Displaying EDIT Menu.......................................................................................................... 114
Image Shift ............................................................................................................................ 115
Creating top/bottom margin or left/right margin ................................................................. 115
Creating bookbinding margin............................................................................................. 117
Edge Erase ............................................................................................................................ 119
Book Center Erase ............................................................................................................... 121
Dual Page .............................................................................................................................. 123
2IN1 / 4IN1 ............................................................................................................................. 125
Magazine Sort Mode............................................................................................................. 128
Image Editing ........................................................................................................................ 130
Trimming / Masking ........................................................................................................... 130
Mirror image / Negative/positive reversal .......................................................................... 133
XY Zoom ................................................................................................................................ 134
Cover Sheet........................................................................................................................... 136
Sheet Insertion...................................................................................................................... 139
Time Stamp ........................................................................................................................... 142
Page Number ........................................................................................................................ 143
Job Build ............................................................................................................................... 145
Image Direction..................................................................................................................... 148
Book - Tablet......................................................................................................................... 150
ADF -> SADF ......................................................................................................................... 151
Full Image.............................................................................................................................. 153
Image Repeat ........................................................................................................................ 155
Omit Blank Page ................................................................................................................... 157
Outside Erase ....................................................................................................................... 159
Downloaded from www.Manualslib.com manuals search engine
CONTENTS 5
Chapter 5 IMAGE ADJUSTMENT
Displaying IMAGE Menu ...................................................................................................... 162
Using Image Adjustment Functions ................................................................................... 163
Color balance (YMCK adjustment) .................................................................................... 163
RGB adjustment ................................................................................................................ 164
One-touch adjustment ....................................................................................................... 165
Background adjustment..................................................................................................... 166
Sharpness ......................................................................................................................... 167
Twin color copying............................................................................................................. 168
Mono color copying ........................................................................................................... 173
Hue.................................................................................................................................... 174
Saturation .......................................................................................................................... 175
ADF Scan Noise Reduction............................................................................................... 176
Chapter 6 TEMPLATES
Templates.............................................................................................................................. 178
Displaying template menu ................................................................................................. 178
Using “Useful Templates” .................................................................................................. 179
Registering Templates ......................................................................................................... 181
Registering templates into the public template group........................................................ 181
Creating a new private group ............................................................................................ 184
Registering templates into a private group ........................................................................ 186
Recalling Templates............................................................................................................. 188
Changing Data ...................................................................................................................... 191
Changing private group data ............................................................................................. 191
Changing template data .................................................................................................... 192
Deleting Groups or Templates ............................................................................................ 194
Deleting private groups...................................................................................................... 194
Deleting templates............................................................................................................. 195
Chapter 7 CONFIRMING JOB STATUS
Confirming Copy Job Status ............................................................................................... 200
Confirming jobs in progress or ones in waiting.................................................................. 200
Confirming copy job history ............................................................................................... 205
Confirming drawers ........................................................................................................... 207
Confirming amount of toner remaining .............................................................................. 208
Chapter 8 OTHER INFORMATION
Continuous Copying Speed ................................................................................................ 210
Copying Function Combination Matrix .............................................................................. 216
Combination matrix 1/2...................................................................................................... 216
Combination matrix 2/2...................................................................................................... 217
Image Adjustment Function Combination Matrix.............................................................. 218
Combination matrix 1/2...................................................................................................... 218
Combination matrix 2/2...................................................................................................... 219
Downloaded from www.Manualslib.com manuals search engine
6 CONTENTS
INDEX ................................................................................................................................................................... 221
Downloaded from www.Manualslib.com manuals search engine
1.BEFORE USING EQUIPMENT
This chapter describes what you need to know before using this equipment, such as the composition of the
BASIC menu for the copying functions and how to place copy paper.
BASIC Menu for the Copier Function ..................................................................................... 8
Placing Paper.......................................................................................................................... 11
Acceptable copy paper ......................................................................................................................................... 11
Placing paper in drawers......................................................................................................................................16
Registering paper size..........................................................................................................................................22
Setting paper type ................................................................................................................................................23
Placing paper in the Large Capacity Feeder ........................................................................................................27
Downloaded from www.Manualslib.com manuals search engine
1 BEFORE USING EQUIPMENT
8 BASIC Menu for the Copier Function
BASIC Menu for the Copier Function
The BASIC menu for the copier function shows the following information:
1. Function display
The function being used, such as copying, is displayed.
2. Message indication area
This shows a brief description of the functions or the current status of this equipment in message form.
3. Equipment status indication area ( P.10)
This shows the size, paper type or amount of paper remaining in each drawer.
4. Index tabs (BASIC, EDIT, IMAGE) ( P.11 3 , P.161)
These are for switching between the menus of “BASIC”, “EDIT” and “IMAGE”.
5. Alert message indication area
This shows alert messages such as the replacement timing of the toner cartridges or the waste toner box.
6. [APS] (automatic paper selection) button ( P.66)
This is for changing the mode to automatic paper selection.
7. [ZOOM] button ( P.74)
This is for changing the reproduction ratio of images.
8. [2-SIDED] button ( P.101)
This is for selecting simplex/duplex copying (e.g. 1 -> 2-sided, 2 -> 2-sided).
When this equipment is managed with the user management function and department
management function
In the above case, the job quota assigned to each user or department appears here for approx. 5
seconds after user authentication.
The displayed number is the smaller one of either user ( ) or department ( ).
yThe display may differ depending on the management status of this equipment.
yFor details of the user management function or the department management function, ask your
administrator.
5
4
2
1
3
2021 19 18
15
16
17
14
13
10 126 987 11
Downloaded from www.Manualslib.com manuals search engine
1.BEFORE USING EQUIPMENT
BASIC Menu for the Copier Function 9
1 BEFORE USING EQUIPMENT
9. [FINISHING] button ( P.83)
This is for selecting a sorting mode.
10.[ORIGINAL MODE] button ( P.7 1 )
This is for selecting an original mode.
11.Date and time
12.[JOB STATUS] button ( P.200)
This is for confirming the processing status of copy, fax, scan or print jobs, and also for viewing their
performing history.
13.[PROOF COPY] button ( P.44)
This is for making a proof copy to check an image before making a large amount of copies.
14.Density adjustment buttons ( P.73)
These are for adjusting the density level of images.
15.Color mode buttons ( P.70)
These are for switching color modes.
16.Number of copy sets
17.Number of remaining copy sets
18. (Help) button
This is for viewing the explanation of each function or the buttons on the touch panel.
19.[TEMPLATE] button ( P.177)
This is for the template function.
20.[SETTINGS] button ( P.6 4 )
This is for checking currently set functions.
21.[STORAGE] button ( P.108)
This is for the storage function.
Downloaded from www.Manualslib.com manuals search engine
1 BEFORE USING EQUIPMENT
10 BASIC Menu for the Copier Function
Equipment status indication area
The equipment status indication area shows the following information:
1. Receiving tray indication ( P. 4 6 )
This shows the tray to which copied paper exits.
2. [EXIT TRAY] button ( P.46)
This is for switching receiving (exit) trays.
3. Drawer buttons ( P. 6 7 )
These show the size of paper, amount of paper remaining in each drawer and the paper type set for the
drawer. When you want to use a particular drawer, press the corresponding button.
If the paper size cannot be detected in this equipment, “ ” appears. In this case, check the
following two items.
- Is unacceptable sized paper placed in the drawer?
P.11 “Acceptable copy paper”
- Is the gap between the paper and the side or end guides too big?
P.16 “Placing paper in drawers”
If the indication still remains, contact your service representative.
e-STUDIO2550C Series: The amount of paper remaining in the standard drawer (first drawer) is
displayed as follows.
4. [BYPASS FEED] button ( P.47)
When this button is pressed with paper set in the bypass tray, it will be selected as the paper source.
5. Paper type on the bypass tray ( P. 4 7 )
This shows the type of paper placed on the bypass tray with an icon.
Drawer status Display
Placed
No paper
2
3
5
4
1
Downloaded from www.Manualslib.com manuals search engine
1 BEFORE USING EQUIPMENT
Placing Paper 11
Placing Paper
Acceptable copy paper
The following paper can be placed and used for copying.
The values are valid only when Toshiba-recommended paper is used. For the recommended paper, refer to
the Quick Start Guide.
yDo not place paper with mixed sizes or types in the same drawer.
yBe sure that the height of the stacked paper does not exceed the line indicated on the guides.
yPrinting quality or performance may deteriorate depending on the condition or using environment of the
paper type.
Downloaded from www.Manualslib.com manuals search engine
1 BEFORE USING EQUIPMENT
12 Placing Paper
e-STUDIO2550C Series
*1 For 2-sided printing or printing on the back side of plain paper, use the Automatic Duplexing Unit. If the Automatic Duplexing Unit is
not installed, set paper type to “RECYCLED PAPER”.
*2 Duplex copying is not available.
*3 For making copies on the sticker labels, select “THICK 2” for the paper type. Only Toshiba-recommended sticker labels should be
used.
*4 When the Saddle Stitch Finisher is installed, the envelope exits to the exit tray of the equipment. When the Inner Finisher is installed,
the envelope exits to the receiving tray of the finisher.
Feeder Paper type Maximum sheet
capacity Size
Drawer Plain paper,
recycled paper
(60 - 105 g/m2)
(16 - 28 lb. Bond)
277 sheets (64 g/m2)
(17 lb. Bond)
250 sheets (80 g/m2)
(20 lb. Bond)
231 sheets (81 - 105 g/
m2) (21 - 28 lb. Bond)
A/B format:
A3, A4, A4-R, A5-R, B4, B5, B5-R, FOLIO
LT format:
LD, LG, LT, LT-R, ST-R, COMP, 13"LG, 8.5"SQ
K format:
8K, 16K, 16K-R
THICK 1
(- 163 g/m2)
(- 90 lb. Index)
69 sheets
Paper Feed
Unit
Paper Feed
Pedestal
Additional
Drawer
Module
Plain paper,
recycled paper
(60 - 105 g/m2)
(16 - 28 lb. Bond)
600 sheets (64 g/m2)
(17 lb. Bond)
550 sheets (80 g/m2)
(20 lb. Bond)
500 sheets (81 - 105 g/
m2) (21 - 28 lb. Bond)
THICK 1
(- 163 g/m2)
(- 90 lb. Index)
300 sheets
Large
Capacity
Feeder
Plain paper,
recycled paper
(64 - 105 g/m2)
(17 - 28 lb. Bond)
2360 sheets (64 g/m2)
(17 lb. Bond)
2000 sheets (80 g/m2)
(20 lb. Bond)
1660 sheets (81 - 105
g/m2) (21 - 28 lb. Bond)
A4, LT
Bypass tray Plain paper,
recycled paper *1
(60 - 105 g/m2)
(16 - 28 lb. Bond)
100 sheets (64 - 80 g/
m2) (17 - 20 lb. Bond)
80 sheets (81 - 105 g/
m2) (21 - 28 lb. Bond)
A/B format:
A3, A4, A4-R, A5-R, B4, B5, B5-R, A6-R,
FOLIO
LT format:
LD, LG, LT, LT-R, ST-R, COMP, 13"LG, 8.5"SQ
K format:
8K, 16K, 16K-R
Non-standard size:
Length: 100 - 297 mm (3.9" - 11.7"),
Width: 148 - 432 mm (5.8" - 17")
THICK 1
(- 163 g/m2)
(- 90 lb. Index)
40 sheets
THICK 2 *2
(- 209 g/m2)
(- 110 lb. Index)
30 sheets
Sticker labels *2,
*3
1 sheet
OHP film *2 30 sheets A3, A4, LD, LT
Envelope *2, *4 1 envelope DL (110 mm x 220 mm), COM10 (4 1/8" x 9 1/
2"), Monarch (3 7/8" x 7 1/2"), CHO-3 (120 mm
x 235 mm), YOU-4 (105 mm x 235 mm)
Downloaded from www.Manualslib.com manuals search engine
1.BEFORE USING EQUIPMENT
Placing Paper 13
1 BEFORE USING EQUIPMENT
e-STUDIO5055C Series
Feeder Paper type Maximum sheet
capacity Size
Drawers
Paper Feed
Pedestal
Additional
Drawer
Module*1
Plain paper,
recycled paper
(60 - 105 g/m2)
(16 - 28 lb. Bond)
600 sheets (64 g/m2)
(17 lb. Bond)
550 sheets (80 g/m2)
(20 lb. Bond)
500 sheets (81 - 105 g/
m2) (21 - 28 lb. Bond)
A/B format:
A3, A4, A4-R, A5-R, B4, B5, B5-R, FOLIO, 305
mm x 457 mm *8, 320 mm x 450 mm *8, *12, 320
mm x 460 mm *8, *12
LT format:
LD, LG, LT, LT-R, ST-R, COMP, 13"LG, 8.5"SQ,
12" x 18" *8
K format:
8K, 16K, 16K-R
THICK 1
(- 163 g/m2)
(- 90 lb. Index)
300 sheets
THICK 2
(- 209 g/m2)
(- 110 lb. Index)
250 sheets
THICK 3
(- 256 g/m2)
(- 140 lb. Index)
200 sheets
Large
Capacity
Feeder
Plain paper,
recycled paper
(64 - 105 g/m2)
(17 - 28 lb. Bond)
2360 sheets (64 g/m2)
(17 lb. Bond)
2000 sheets (80 g/m2)
(20 lb. Bond)
1660 sheets (81 - 105
g/m2) (21 - 28 lb. Bond)
A4, LT
Downloaded from www.Manualslib.com manuals search engine
1 BEFORE USING EQUIPMENT
14 Placing Paper
*1 Use the bypass tray when you want to make a copy on the back side of copied Thick 1, Thick 2 or Thick 3 paper.
*2 Duplex copying is not available.
*3 The upper receiving tray of the Finisher or the Saddle Stitch Finisher is used for paper exiting.
*4 The upper receiving tray of the Finisher or the Saddle Stitch Finisher, and the receiving tray of the equipment are used for paper
exiting.
*5 When duplex copying is applied to THICK 4, streaks may appear on the front side of printouts. These streaks may appear clearly
when the copied image is dark or when the density level of the entire image is even.
*6 For making copies on the sticker labels, select “THICK 2” for the paper type. Only Toshiba-recommended sticker labels should be
used.
*7 Duplex copying is available only when waterproof paper supporting it is used.
*8 The second drawer, the Paper Feed Pedestal, or the Additional Drawer Module is used for paper placement.
*9 If a finisher has been installed, the receiving tray of the equipment is not available for paper exiting, but the upper receiving tray of the
Finisher and the Saddle Stitch Finisher are used.
*10 Note that black streaks may appear on the edge of the printed sheets.
*11 If the Finisher or the Saddle Stitch Finisher has been installed, the receiving tray of the equipment is used for paper exiting. If the
Inner Finisher has been installed, the receiving tray of the finisher is used for paper exiting.
*12 If the Inner Finisher has been installed, the duplex copying is not available.
Bypass tray Plain paper,
recycled paper
(60 - 105 g/m2)
(16 - 28 lb. Bond)
100 sheets (64 - 80 g/
m2) (17 - 20 lb. Bond)
80 sheets (81 - 105 g/
m2) (21 - 28 lb. Bond)
A/B format:
A3, A4, A4-R, A5-R, A6-R, B4, B5, B5-R,
FOLIO, 305 mm x 457 mm *9, 320 mm x 450
mm *10, *11, *12, 320 mm x 460 mm *9, *10, *12
LT format:
LD, LG, LT, LT-R, ST-R, COMP, 13"LG, 8.5"SQ,
12" x 18" *9
K format:
8K, 16K, 16K-R
Non-standard size:
Length: 100 - 297 mm (3.9" - 11.7"),
Width: 148 - 432 mm (5.8" - 17")
THIN *2, *3
(52 - 59 g/m2)
(14 - 16 lb. Bond)
1 sheet
THICK 1
(- 163 g/m2)
(- 90 lb. Index)
40 sheets
THICK 2
(- 209 g/m2)
(- 110 lb. Index)
30 sheets
THICK 3
(- 256 g/m2)
(- 140 lb. Index)
30 sheets
THICK 4 *2, *4, *5
(- 280 g/m2)
(- 100 lb. Cover)
30 sheets
Sticker labels *2,
*6
1 sheet
Waterproof paper
*7
(- 230 g/m2)
30 sheets
Coated paper
(106 - 163 g/m2)
(29 - 90 lb. Bond)
40 sheets
OHP film *2 30 sheets A3, A4, LD, LT
Envelope *2, *11 1 envelope DL (110 mm x 220 mm), COM10 (4 1/8" x 9 1/
2"), Monarch (3 7/8" x 7 1/2"), CHO-3 (120 mm
x 235 mm), YOU-4 (105 mm x 235 mm)
Feeder Paper type Maximum sheet
capacity Size
Downloaded from www.Manualslib.com manuals search engine
1.BEFORE USING EQUIPMENT
Placing Paper 15
1 BEFORE USING EQUIPMENT
y“LT format” is the standard size only for use in North America.
y“K format” is a Chinese standard size.
yAbbreviations for paper sizes: LT: Letter, LD: Ledger, LG: Legal, ST: Statement, COMP: Computer, SQ:
Square
Unacceptable copy paper
Do not use the types of paper shown below. This could cause a paper misfeed.
yDamp paper
yFolded paper
yCurled or creased paper
yPaper whose surface is extremely smooth or rough
Do not use the types of paper shown below. This could cause an equipment malfunction.
yPaper whose surface has had special treatment
yPaper once printed with other copiers or printers
ySticker labels shown below
- The released paper is visible since its label has been punched out
- The released paper is visible since a part of its label has peeled off
- A sticker label which has been cut
Precautions for storing copy paper
Make sure of the following when storing copy paper:
yWrap the paper in its wrapping to keep it free from dust.
yAvoid direct sunlight.
yStore in a damp-free space.
yTo prevent paper from being folded or bent, store it in a flat place.
Downloaded from www.Manualslib.com manuals search engine
1 BEFORE USING EQUIPMENT
16 Placing Paper
Placing paper in drawers
Follow the procedure below to place paper in the drawer, Paper Feed Unit, Paper Feed Pedestal, or
Additional Drawer Module. For acceptable copy paper, see the following page:
P.11 “Acceptable copy paper”
e-STUDIO2550C Series
For the Paper Feed Unit, Paper Feed Pedestal, or Additional Drawer Module, see the the following page:
P.19 “e-STUDIO5055C Series, Paper Feed Unit, Paper Feed Pedestal, or Additional Drawer Module”
1
Turn the power of this equipment ON.
2
Pull out a drawer carefully until it comes to a stop.
3
Press down the paper plate.
Press it down until you hear a click sound and it is no longer
lifted up.
4
While holding the green lever of the side guide in the
direction of the arrow, set the side guide to the paper
size (E.g. A4-R).
Adjust the side guides with both hands.
Downloaded from www.Manualslib.com manuals search engine
1.BEFORE USING EQUIPMENT
Placing Paper 17
1 BEFORE USING EQUIPMENT
9
Push the drawer straight into this equipment carefully until it comes to a stop.
Be careful not to let your fingers be caught when pushing the drawer into this equipment.
This could injure you.
5
Place paper in the drawer.
yOne drawer can hold up to 277 sheets (64 g/m2) (17 lb.
Bond). Be sure that the height of the stacked paper does
not exceed the line indicated inside of the side guides.
P.11 “Acceptable copy paper”
yFan and jog the stack of paper well before you place it in
a drawer, or the sheets may not be separated before
being fed. Be careful not to cut your fingers when
fanning.
yPlace paper with its copy side up. The copy side may be
noted on its wrapping paper.
6
Push the lower part of the end guide in the direction
of the arrows to remove it, then reinstall it at the
position of the desired paper size.
7
Check that there is no gap between the paper and the
side guides, as well as the paper and the end guide.
If the gap is too wide, it could cause paper misfeeding, or the
paper size could not be correctly detected.
Between the paper and side guides ("A" in the figure):
Make sure there is no gap. (0.5 mm (0.02") or less on one side,
1.0 mm (0.04") or less in total) However, if paper misfeeding
occurs, make a gap.
Between the paper and end guide ("B" in the figure):
Make sure there is no gap. (0.5 mm (0.02") or less)
8
Change the paper size indicator if required.
A
B
Downloaded from www.Manualslib.com manuals search engine
1 BEFORE USING EQUIPMENT
18 Placing Paper
10
The menu below appears. When the size or type of paper is different from the one that
was in the drawer, press [NO] on the touch panel. When they are the same, press [YES].
yThe menu above may not appear depending on the setting of this equipment. In this case, see
the following pages to change the settings of the paper size and paper type:
P.22 “Registering paper size”
P.23 “Setting paper type”
yIf you want to change the setting for displaying this menu, ask your administrator.
yDuring printing from the Paper Feed Pedestal, if you place paper in another drawer, there may be
a delay in detecting the amount of remaining paper.
If you press [YES], the procedure is completed.
11
Select the size and type of the paper placed in the drawer on the touch panel.
1) Select the paper size.
2) Select the paper type.
3) Press [OK].
When the paper size has been set to [AUTO (mm)] or [AUTO (inch)], it is registered automatically
and its buttons do not appear on this screen. If you want to register the corresponding paper size
manually, see the following page to change the settings.
P.22 “Registering paper size”
Downloaded from www.Manualslib.com manuals search engine
1.BEFORE USING EQUIPMENT
Placing Paper 19
1 BEFORE USING EQUIPMENT
e-STUDIO5055C Series, Paper Feed Unit, Paper Feed Pedestal, or Additional Drawer Module
1
Turn the power of this equipment ON.
2
Pull out a drawer carefully until it comes to a stop.
3
While holding the green lever of the side guide in the
direction of the arrow, set the side guide to the paper
size (E.g. A4-R).
Adjust the side guides with both hands.
4
Place paper in the drawer.
yOne drawer can hold up to 600 sheets (64 g/m2) (17 lb.
Bond).
Be sure that the height of the stacked paper does not
exceed the line indicated inside of the side guides.
P.11 “Acceptable copy paper”
yFan and jog the stack of paper well before you place it in
a drawer, or the sheets may not be separated before
being fed. Be careful not to cut your fingers when
fanning.
yPlace paper with its copy side up. The copy side may be
noted on its wrapping paper.
Downloaded from www.Manualslib.com manuals search engine
1 BEFORE USING EQUIPMENT
20 Placing Paper
When placing 320 mm x 450 mm paper, etc.
When placing the following sizes of paper in the second drawer,
the Paper Feed Pedestal, or the Additional Drawer Module,
remove the green guides 1 and 2, and then insert them in the
front pocket of the drawer.
y305 mm x 457 mm
y320 mm × 450 mm
y320 mm × 460 mm
y12" × 18"
5
Push the lower part of the end guide in the direction
of the arrows to remove it, then reinstall it at the
position of the desired paper size.
6
Check that there is no gap between the paper and the
side guides, as well as the paper and the end guide.
If the gap is too wide, it could cause paper misfeeding, or the
paper size could not be correctly detected.
Between the paper and side guides ("A" in the figure):
Make sure there is no gap. (0.5 mm (0.02") or less on one side,
1.0 mm (0.04") or less in total) However, if paper misfeeding
occurs, make a gap.
Between the paper and end guide ("B" in the figure):
Make sure there is no gap. (0.5 mm (0.02") or less)
7
Change the paper size indicator if required.
1
1
2
2
A
B
Downloaded from www.Manualslib.com manuals search engine
1.BEFORE USING EQUIPMENT
Placing Paper 21
1 BEFORE USING EQUIPMENT
8
Push the drawer straight into this equipment carefully until it comes to a stop.
Be careful not to let your fingers be caught when pushing the drawer into this equipment.
This could injure you.
9
The menu below appears. When the size or type of paper is different from the one that
was in the drawer, press [NO] on the touch panel. When they are the same, press [YES].
yThe menu above may not appear depending on the setting of this equipment. In this case, see
the following pages to change the settings of the paper size and paper type:
P.22 “Registering paper size”
P.23 “Setting paper type”
yIf you want to change the setting for displaying this menu, ask your administrator.
yDuring printing from the Paper Feed Pedestal, if you place paper in another drawer, there may be
a delay in detecting the amount of remaining paper.
If you press [YES], the procedure is completed.
10
Select the size and type of the paper placed in the drawer on the touch panel.
1) Select the paper size.
2) Select the paper type.
3) Press [OK].
When the paper size has been set to [AUTO (mm)] or [AUTO (inch)], it is registered automatically
and its buttons do not appear on this screen. If you want to register the corresponding paper size
manually, see the following page to change the settings.
P.22 “Registering paper size”
Downloaded from www.Manualslib.com manuals search engine
1 BEFORE USING EQUIPMENT
22 Placing Paper
Registering paper size
When you place paper for the first time or you replace the paper with that of a different size, you need to
register the size to this equipment.
2
Press the [USER] tab on the touch panel to display the user setting menu, and then
press [DRAWER].
3
Select the paper size on the touch panel.
1) Select the drawer in which you placed paper.
2) Select the paper size.
3) Press [OK].
To automatically detect the size of paper placed in a drawer:
Select [AUTO (mm)] when A/B format paper is placed and [AUTO (inch)] when LT format paper is
placed instead of selecting a specified paper size. The paper size is automatically registered to the
equipment with the automatic paper size detection function when paper is placed in this drawer.
When paper size is set to be detected automatically:
When [AUTO (mm)] or [AUTO (inch)] has been selected for the paper size, the following procedure is not
required. The paper size is set automatically.
1
Press the [USER FUNCTIONS] button on the control
panel.
Downloaded from www.Manualslib.com manuals search engine
1.BEFORE USING EQUIPMENT
Placing Paper 23
1 BEFORE USING EQUIPMENT
4
Press [CLOSE] on the touch panel or the [USER FUNCTIONS] button on the control
panel.
Setting paper type
When you place any special paper other than plain paper or that not used for normal copying, you need to set
the thickness and attribute into this equipment.
yThe thickness and attribute can be set together.
yWhen the thickness “THICK 1 or 3”, or an attribute other than “NONE” is set for a drawer, the paper
placed in this drawer will not be used for the automatic paper selection mode.
yWhen an attribute other than “NONE” is set for a drawer, the Automatic Change of Paper Source
function (Feeding the same size of paper from a different drawer even if the specified drawer from
which paper is being fed is empty) is disabled for the paper in this drawer.
For how to set Automatic Change of Paper Source, refer to the MFP Management Guide.
yThe set paper type appears on the equipment status indication area with an icon.
P.10 “Equipment status indication area”
Acceptable paper types are as follows:
Thickness
Button Description Icon
PLAIN Plain paper: 60 - 105 g/m2 (16 - 28 lb. Bond)
THICK 1 Thick paper
THICK 1: 106 - 163 g/m2 (29 lb. Bond - 90 lb. Index)
THICK 2: 164 - 209 g/m2 (91 lb. Index - 110 lb. Index) for e-
STUDIO5055C Series only
THICK 3: 210 - 256 g/m2 (111 lb. Index - 140 lb. Index) for e-
STUDIO5055C Series only
, ,
RECYCLE
D PAPER
Recycled paper
Downloaded from www.Manualslib.com manuals search engine
1 BEFORE USING EQUIPMENT
24 Placing Paper
Attribute
*1 Fax transmission and reception is available only when the FAX Unit is installed.
*2 When lists are printed, paper set as “FAX” is used. For printing lists, refer to the MFP Management Guide.
*3 When “ROTATE SORT” is turned ON for RX printing in the FAX menu, “FAX” cannot be set for attribute. For how to set RX printing,
refer to GD-1320/GD-1350/GD-1270/GD-1260 Operator's Manual for FAX Unit.
2
Press the [USER] tab on the touch panel to display the user setting menu, and then
press [DRAWER].
Button Description Icon
NONE No attribute specified
INSERT Sheets used in the sheet insertion mode
P.139 “Sheet Insertion”
Up to 2 types of sheets (Insertion sheets 1 and 2) can be set. To set
Insertion sheet 1 and 2, select the drawer for Insertion sheet 1 and
press [INSERT], and then select a drawer for Insertion sheet 2 and
press [INSERT].
,
COVER Sheets used in the cover sheet mode
P.136 “Cover Sheet”
SPECIAL Colored paper or paper with watermarks, etc.
FAX *1, *2, *3 FAX paper
1SIDE Only 1-sided copy allowed
BLACK Only black and white copy allowed
1SIDE
BLACK
Only 1-sided black and white copy allowed
1
Press the [USER FUNCTIONS] button on the control
panel.
Downloaded from www.Manualslib.com manuals search engine
1.BEFORE USING EQUIPMENT
Placing Paper 25
1 BEFORE USING EQUIPMENT
3
Press [PAPER TYPE].
4
Select the paper type.
1) Select the drawer in which you placed paper.
2) Select the paper type.
3) Press [OK].
[1SIDE] and [1SIDE BLACK] are available only when the Automatic Duplex Unit is installed.
Downloaded from www.Manualslib.com manuals search engine
1 BEFORE USING EQUIPMENT
26 Placing Paper
5
Press [OK].
If thick paper cannot be fed, printing takes a long time after feeding or the quality is poor, turn over
the paper and place it again as shown in the figure or place fewer sheets.
There is no affect on the printing quality though noise may occur during paper feeding depending on
the paper type.
Downloaded from www.Manualslib.com manuals search engine
1.BEFORE USING EQUIPMENT
Placing Paper 27
1 BEFORE USING EQUIPMENT
6
Press [CLOSE] on the touch panel or the [USER FUNCTIONS] button on the control
panel.
Clearing the set paper type
Press the drawer button on the menu in step 4, and then press the paper type whose setting you want
to clear.
If both INSERT 1 and INSERT 2 are set and you clear the setting of only INSERT 1, the setting for
INSERT 2 automatically becomes the setting for INSERT 1.
Placing paper in the Large Capacity Feeder
1
Pull out the drawer of the Large Capacity Feeder
carefully until it comes to a stop.
Do not touch the slide rail (“A” in the figure on the
right).
This could injure you.
2
Place 2 stacks of paper in the right and left trays
correspondingly.
Fan and jog the paper well before placing it. Place it with its
copy side up. Place one stack of paper in the right-hand tray
(shown as “A” in the figure) with its side touching the right
corner of the tray, and place the other stack of paper in the left-
hand tray (shown as “B” in the figure) with its side touching the
left corner of the tray. Paper can be placed neatly if you divide
stacks into small bundles and pile them up on the two trays
alternately.
A
A
B
Downloaded from www.Manualslib.com manuals search engine
1 BEFORE USING EQUIPMENT
28 Placing Paper
yPaper in the right-hand tray is used first. When it runs out, paper in the left-hand tray will be
moved automatically to the right-hand tray and fed.
yA maximum of 2360 sheets (64 g/m2) (17 lb. Bond) can be placed in the 2 trays. However the
stack height of the paper must not exceed the line indicated inside the side guides.
P.11 “Acceptable copy paper”
yThe copy side may be noted on its wrapping paper.
yBe careful not to cut your fingers when fanning the paper.
yWhen placing paper, be sure that the center lever is not open. (See the label attached in the
drawer of the Large Capacity Feeder.)
3
Push the drawer of the Large Capacity Feeder straight into this equipment carefully.
When the drawer is completely inserted, the right-hand tray will move up to the paper feeding position.
Be careful not to let your fingers be caught when pushing the drawer into this equipment.
This could injure you.
4
Change the paper type as required.
P.23 “Setting paper type
Downloaded from www.Manualslib.com manuals search engine
1.BEFORE USING EQUIPMENT
Placing Paper 29
1 BEFORE USING EQUIPMENT
Adding paper in the Large Capacity Feeder during copying
When the paper on the left tray of the Large Capacity Feeder has run out during copying, “Paper for left
drawer can be added.” appears. You can pull out the Large Capacity Feeder and add paper to the left tray
without stopping copying. This is useful when you wish to make a large amount of copies quickly.
3
Push the drawer of the Large Capacity Feeder straight into this equipment carefully.
When the paper on the right tray has run out, that on the left tray will be automatically shifted to the right
tray.
Do not slam the drawer shut. Stacked sheets may collapse and they cannot be transported correctly.
Be careful not to let your fingers be caught when pushing the drawer into this equipment.
This could injure you.
1
Pull out the drawer of the Large Capacity Feeder
carefully until it comes to a stop.
Only the left tray will come out.
Do not touch the slide rail (“A” in the figure on the
right).
This could injure you.
2
Place paper on the left tray.
Place paper aligning to the left-hand side of the tray.
A
Downloaded from www.Manualslib.com manuals search engine
2.HOW TO MAKE COPIES
This chapter explains the basic copying procedures.
Before Making Copies............................................................................................................32
Storage of color copies.........................................................................................................................................32
Forgery prevention function..................................................................................................................................32
Placing Originals.................................................................................................................... 33
Acceptable originals .............................................................................................................................................33
Placing originals on the original glass ..................................................................................................................34
Book-type originals...............................................................................................................................................35
Using the RADF (Reversing Automatic Document Feeder) .................................................................................36
Making Copies........................................................................................................................ 39
Basic copying procedure ......................................................................................................................................39
Scanning the next original during copying............................................................................................................42
Interrupting copying and making other copies......................................................................................................43
Proof copy ............................................................................................................................................................44
Selecting exit tray .................................................................................................................................................46
Bypass Copying ..................................................................................................................... 47
Bypass copying on standard size paper...............................................................................................................48
Bypass copying on non-standard size paper........................................................................................................58
Downloaded from www.Manualslib.com manuals search engine
2 HOW TO MAKE COPIES
32 Before Making Copies
Before Making Copies
Storage of color copies
When storing color copies, be careful of the following:
yAvoid a place exposed to light. The colors may fade when they are stored in such a place for a long time.
yIf copies are stored pressed between plastic sheets made of chloroethylene for a long time, toner may melt
and stick to the plastic. For long-time storage, use polyethylene binders.
yWhen a color copy is folded, toner at the folded part may flake off. Do not fold color copies when storing
them.
yToner on copies may melt if it touches solvent or ink not fully dried. Keep copies away from them.
yWhen copies are left under an extremely high temperature environment such as in the vicinity of a heater,
toner may melt. Store them at room temperature and avoid extreme temperature changes.
Forgery prevention function
This equipment has a forgery prevention function. Therefore, scan or copy function might not operate
correctly.
Downloaded from www.Manualslib.com manuals search engine
2 HOW TO MAKE COPIES
Placing Originals 33
Placing Originals
Acceptable originals
When the RADF (Reversing Automatic Document Feeder) is used, 2-sided originals can be automatically
scanned one sheet after another. When the original glass is used, originals such as OHP films, tracing paper,
booklet or 3-dimensional objects, that cannot be placed on the RADF can be scanned, as well as plain paper.
yAutomatic size detection does not work properly when A/B format originals are used in equipment for
North America. It does not work properly when LT format originals are used in equipment other than
that for North America.
yIn some models, automatic size detection does not work properly when K format paper is used for
printing. (K format is a standard paper size in China.)
yDo not place any heavy objects (4 kg (9 lb.) or over) on the original glass and do not press on it with
force.
yBe sure to place ST-size or A5-size originals in a landscape direction when using the RADF.
yA maximum of 1000 sheets can be scanned per 1 copy job or up until the embedded memory becomes
full. When the hard disk is not installed, the maximum of sheets that can be scanned per 1 copy job is
approx. 180 (when the color mode is "FULL COLOR" or "AUTO COLOR") or approx. 250 (when the
color mode is "BLACK"), or up until the embedded memory becomes full.
Location Maximum size Paper weight Acceptable sizes for
automatic size detection
Original glass
Length: 297 mm
(11.69")
Width: 432 mm
(17.01")
Other than North America:
A3, A4, A4-R, A5-R, B4, B5,
B5-R, 8K, 16K, 16K-R
North America: LD, LG, LT,
LT-R, ST-R
RADF
1-sided originals: 35 -
157 g/m2 (9.3 - 41.8 lb.)
2-sided originals: 50 -
157 g/m2 (13.3 - 41.8 lb.)
Other than North America:
A3, A4, A4-R, A5-R, B4, B5,
B5-R, FOLIO
North America: LD, LG, LT,
LT-R, ST-R, COMP
Downloaded from www.Manualslib.com manuals search engine
2 HOW TO MAKE COPIES
34 Placing Originals
Placing originals on the original glass
The original glass can be used for originals such as OHP films or tracing paper, as well as plain paper, that
cannot be placed on the RADF.
Do not place any heavy objects (4 kg (9 lb.) or over) on the original glass and do not press on it with
force.
Breaking the glass could injure you.
1
Raise the Original Cover or the RADF.
Raise it 60 degrees or more so that the size of the original can be detected correctly.
3
Lower the Original Cover or the RADF carefully.
When it is being closed, the scanner lamp flashes to detect the original size.
2
Place the original with its face down on the original
glass and align it with the left rear corner of the glass.
When you copy highly transparent originals
When you copy highly transparent originals such as OHP films
or tracing paper, place a blank sheet, which is the same size as
the original or larger, over the original.
Downloaded from www.Manualslib.com manuals search engine
2.HOW TO MAKE COPIES
Placing Originals 35
2 HOW TO MAKE COPIES
Book-type originals
You can place book-type originals on the original glass.
Do not place any heavy objects (4 kg (9 lb.) or over) on the original glass and do not press on it with
force.
Breaking the glass could injure you.
1
Raise the Original Cover or the RADF.
3
Lower the Original Cover or the RADF carefully.
yDo not lower the Original Cover or the RADF forcibly when the original is very thick. There will be
no problem in copying even if it is not fully lowered.
yDo not look directly at the original glass because intensive light may escape during copying.
yIf the original size is not detected correctly, press [ZOOM] and select the desired original size.
P.76 “Specifying both the original size and the copy paper size separately”
When it is being closed, the scanner lamp flashes to detect the original size.
2
Open the desired page of the original and place it with
its face down. Align it with the left rear corner of the
original glass.
When you make 2-sided copies from book-type originals in
modes such as book-type original to 2-sided copying or dual
page copying, align the center of the original on the yellow
indicator line of the original glass.
P.104 “Making a 2-sided copy from a book-type original”
P.123 “Dual Page”
Downloaded from www.Manualslib.com manuals search engine
2 HOW TO MAKE COPIES
36 Placing Originals
Using the RADF (Reversing Automatic Document Feeder)
Precautions
Do not use the types of originals 1 to 9 shown below because such originals may cause misfeeding or
damage to the equipment.
1. Badly wrinkled, folded or curled originals
2. Originals with carbon paper
3. Taped, pasted or cut-out originals
4. Originals with multiple perforations such as loose leaf paper
5. Clipped or stapled originals
6. Originals with holes or tears
7. Damp originals
8. OHP films or tracing paper
9. Coated paper (with wax, etc.)
Use the types of originals 10 and 11 shown below with extra care.
10.Originals which resist sliding with the fingers, or surface-treated originals (The sheets of such originals
may not be separated.)
11.Folded or curled originals (They should be fully smoothed out before being used.)
When black streaks appear
If the scanning area or the guide area is dirty, image trouble such as black streaks may occur on printouts.
Weekly cleaning of these areas is recommended. For cleaning, refer to the Quick Start Guide.
1342
67
89
5
10 11
Downloaded from www.Manualslib.com manuals search engine
2.HOW TO MAKE COPIES
Placing Originals 37
2 HOW TO MAKE COPIES
Continuous feed mode
The feeding mode is set at “continuous feed mode” by default. Once you set the originals and then press the
[START] button, they are scanned page by page continuously. It is useful when you want to copy more than
one original at one time.
1
Align all the originals.
Collate the originals in the order that you want them to be copied. The top sheet of the originals will be
copied first.
When there are too many originals to be scanned at one time, divide the originals into several sets before
copying. Place the first set of the originals and then press [CONTINUE] on the touch panel while the data
of this set are being scanned. When this scanning is finished, place the next set of the originals and press
the [START] button on the control panel. (If you press [CONTINUE], this button may not work shortly
before scanning is finished.)
2
Place the originals with their face up and align the
side guides to the original length.
yRegardless of their sizes, originals are acceptable up to
100 sheets (35 to 80 g/m2 (9.3 to 20 lb.)) or 16 mm
(0.62") in height.
yFor mixed-size originals, see the following page:
P.68 “Copying mixed-size originals in one operation”
For long originals
The original stopper prevents the scanned originals from falling
off. Pull it out from the RADF and raise the sub-stopper.
Lower the sub-stopper and slightly lift the original stopper to
push it back in after you have finished using it.
2
1
Downloaded from www.Manualslib.com manuals search engine
2 HOW TO MAKE COPIES
38 Placing Originals
Single feed mode
When the feeding mode is set at “single feed mode”, an original is fed automatically as it is placed on the
RADF. It is useful when you want to copy only 1 original sheet.
P.151 “ADF -> SADF”
3
If there is another original, insert it in the same way.
4
After all the originals are pulled in, press [JOB FINISH].
If you want to stop copying, press [JOB CANCEL].
1
Align the side guides to the original length.
2
Insert the original with its face up and straight along
the side guides.
The original is automatically pulled in and then the menu of step
3 will be displayed on the touch panel.
Be sure to let go of the original when it starts being pulled.
Downloaded from www.Manualslib.com manuals search engine
2 HOW TO MAKE COPIES
Making Copies 39
Making Copies
Basic copying procedure
Make copies following the procedure below.
1
Make sure that paper is placed in the drawer(s).
For the types and sizes of acceptable paper and how to place it, see the following pages:
P.11 “Acceptable copy paper”
P.16 “Placing paper in drawers”
P.27 “Placing paper in the Large Capacity Feeder”
2
Place the original(s).
For the types and sizes of originals and how to place them, see the following pages:
P.33 “Acceptable originals”
P.36 “Using the RADF (Reversing Automatic Document Feeder)”
P.34 “Placing originals on the original glass”
P.35 “Book-type originals”
3
Key in the desired number of copies if you want more than one copy.
Press the [CLEAR] button on the control panel to delete the number keyed in.
4
Select the copy modes as required.
P.63 “BASIC COPY MODES
P.113 “EDITING FUNCTIONS”
P.161 “IMAGE ADJUSTMENT”
2
1
OR
RADF Original glass
534
Downloaded from www.Manualslib.com manuals search engine
2 HOW TO MAKE COPIES
40 Making Copies
5
Press the [START] button on the control panel.
Copying starts. The paper exits with its copied side down.
Be careful because the paper exiting area and the paper itself are hot.
The menu shown below may appear when you are using particular modes.
This menu appears when “SADF (single feed mode)” is set to the document feeder or in modes where
the original is placed on the original glass and the scanned data are temporarily stored in the memory,
such as sort copying or 1-sided to 2-sided copying. When this menu appears, follow the procedure
below.
There are different messages displayed on the upper part of the menu for when the originals are
scanned through the RADF and for when scanning is performed through the original glass.
6
Place the next original, and then press the [START] button on the control panel or
[NEXT COPY] on the touch panel.
Scanning starts. (When “SADF (single feed mode)” is set to the document feeder, an original is fed
automatically when it is placed on the RADF.)
7
Press [JOB FINISH] on the touch panel after all the originals have been scanned.
Copying starts.
yIf you want to stop copying, press [JOB CANCEL].
yWhen the drawer runs out of paper during copying, another drawer can feed paper instead if it
holds paper of the same size and orientation, and copying will not stop. If there is no such
drawer, copying stops and “Add paper” appears on the touch panel. In this case, add paper to the
drawer.
Downloaded from www.Manualslib.com manuals search engine
2.HOW TO MAKE COPIES
Making Copies 41
2 HOW TO MAKE COPIES
Stopping and restarting copying
2
Press [JOB CANCEL] on the touch panel to stop copying. Press [NEXT COPY] on the
touch panel or the [START] button on the control panel to restart.
When you press [JOB CANCEL], the scanned data will be deleted and any waiting jobs will be
performed.
Even if you do not press [JOB CANCEL], the scanned data will be deleted by means of the
automatic function clear.
1
Press the [STOP] button on the control panel.
Copying or scanning stops.
Downloaded from www.Manualslib.com manuals search engine
2 HOW TO MAKE COPIES
42 Making Copies
Scanning the next original during copying
Even if copying is in progress or “READY (WARMING UP)” is displayed on the touch panel, you can scan the
next original (auto job start).
1
Place the original(s).
2
Set the number of copy sets and the copy modes as required.
The new job starts in the copy modes that you previously selected unless you select other modes.
3
Press the [START] button on the control panel.
A maximum of 1000 sheets can be scanned per 1 copy job
or up until the embedded memory becomes full. When the
hard disk is not installed, the maximum of sheets that can be
scanned per 1 copy job is approx. 180 (when the color mode
is "FULL COLOR" or "AUTO COLOR") or approx. 250 (when
the color mode is "BLACK"), or up until the embedded
memory becomes full.
Confirming auto jobs
You can confirm which jobs are in waiting on the touch panel or cancel them as required. For details, see the
following page:
P.200 “Confirming Copy Job Status”
Canceling jobs being scanned
Press the [STOP] button on the control panel to stop a job while
originals are being scanned.
When you press [JOB CANCEL] on the touch panel or the
[FUNCTION CLEAR] button on the control panel while the scanning
is being paused, the scanning will end. (In this case, the data which
were scanned before the job was paused will be copied.) To restart
the scanning, press the [START] button.
Downloaded from www.Manualslib.com manuals search engine
2.HOW TO MAKE COPIES
Making Copies 43
2 HOW TO MAKE COPIES
Interrupting copying and making other copies
You can interrupt the copy job in progress to make other copies (interrupt copying). When restarting the
interrupted job, you do not have to reselect copy modes that have been set because they are memorized in
this equipment.
yThe following functions cannot be used together with interrupt copying:
Cover sheet copying, Sheet insertion copying, Job build, Store to e-Filing, Copy & File
yDuring interrupt copying, the mode cannot be changed to a non-copying one, such as e-Filing,
scanning, printing or fax. To change the mode, first press the [INTERRUPT] button to clear the interrupt
copying.
2
Replace the original with a new one.
3
Select other copy modes as required and then press the [START] button on the control
panel.
4
Press the [INTERRUPT] button again after the interrupt copying has finished.
“Ready to resume job 1” appears and the interrupted job restarts.
1
Press the [INTERRUPT] button on the control panel.
“Job interrupted job 1 saved” appears, and “INTERRUPT” is
displayed on the function display.
If the original is being scanned, the message above appears
after the scanning has finished.
Downloaded from www.Manualslib.com manuals search engine
2 HOW TO MAKE COPIES
44 Making Copies
Proof copy
When you make a large amount of copies, you can check if they will be made exactly as you desire by
copying only one set before copying them all (proof copy). Then you can change the modes or settings (e.g.
the number of copy sets, receiving tray, page number, time stamp, sort/stapling, hole punching) after checking
the proof copy.
If you want to change settings such as the reproduction ratio, density, original mode or 1/2-sided copying,
you must finish the proof copy first. Then change these settings and scan the original again.
1
Place paper in the drawer(s).
2
Place the original(s).
3
Select the number of copy sets and copy modes.
4
Press [PROOF COPY] on the touch panel.
“PROOF COPY is set. Press START button to copy.” appears for approx. 2 seconds.
If [NON-SORT NON-STAPLE] or [GROUP] is selected as a finishing mode, the mode will be
changed to [SORT] automatically.
5
Press the [START] button on the control panel.
Scanning starts. 1 set of copies will be printed out.
Downloaded from www.Manualslib.com manuals search engine
2.HOW TO MAKE COPIES
Making Copies 45
2 HOW TO MAKE COPIES
6
Change the number of copy sets and copy modes as required after checking the proof
copy.
Modes or settings such as the number of copy sets, the receiving tray, page number, time stamp, sort/
stapling and hole punching can be changed.
If you want to change settings such as the reproduction ratio, density, original mode or 1/2-sided
copying, you must finish the proof copy first. Then change these settings and scan the original
again. Press [MEMORY CLEAR] on the touch panel or the [FUNCTION CLEAR] button on the
control panel to end the proof copy.
7
Press the [START] button on the control panel.
If you did not change the number of copies in step 6 above, the number of copies printed out will be one
fewer than that previously set because you have already copied one as a proof copy. (However, if the
number of copies you previously set was 1, another set of copies will be printed out besides the proof
copy.)
Downloaded from www.Manualslib.com manuals search engine
2 HOW TO MAKE COPIES
46 Making Copies
Selecting exit tray
You can select the exit tray if the finisher or the Inner Tray is installed.
yThe available exit tray may be restricted depending on copy modes and paper sizes.
yExit tray selection is set at automatic selection by default.
Changing the exit tray
The exit tray currently selected is displayed on the equipment status indication area. To change the exit tray,
press [EXIT TRAY]. Every time you press this, the display changes from the exit tray of the equipment, each
exit tray of the finisher and Inner Tray, and automatic selection in this order.
Current exit tray
Exit tray auto-selection
indication
[EXIT TRAY] button
Downloaded from www.Manualslib.com manuals search engine
2 HOW TO MAKE COPIES
Bypass Copying 47
Bypass Copying
When you make copies on OHP film, sticker labels, envelopes, Thick 4 paper (only for e-STUDIO5055C
Series), or non-standard size paper, place the copy paper on the bypass tray. Bypass copying is also
recommended for copying on standard size paper which is not set in any of the drawers.
yIf you select the paper size, you can utilize various functions such as the automatic paper selection
(APS) or the automatic magnification selection (AMS). For details, see the following page:
P.216 “Copying Function Combination Matrix”
yIf you place the originals on the RADF for bypass copying and do not set the paper size, the originals
will be copied upside down. Be sure to set the paper size when you wish to do bypass copying.
Open the bypass tray for bypass copying.
If the paper is large, pull out the paper holder.
When placing or removing copy paper, move the paper holding lever
toward the outside. After this, move the paper holding lever back
toward the equipment.
If thick paper cannot be fed, printing takes a long time after feeding
or the quality is poor, turn over the paper and place it again as
shown in the figure or place fewer sheets.
Downloaded from www.Manualslib.com manuals search engine
2 HOW TO MAKE COPIES
48 Bypass Copying
The operating procedure for bypass copying differs depending on the paper size to be used. See the table
below for the operating procedure of each size.
yBypass copying stops when the paper placed on the bypass tray runs out during copying, even if the
paper of the same size is in any of the drawers. Copying restarts when paper is supplied to the bypass
tray.
yWhen bypass copying has been completed, the [FUNCTION CLEAR] button on the control panel
blinks. Press this button to switch bypass copying to normal copying using the drawers.
(Even if you do not press the [FUNCTION CLEAR] button, the bypass copying mode will be cleared
when the automatic function clear mode kicks in after a specified period of time.)
Bypass copying on standard size paper
Copying on A3, A4, B4 and B5 size paper (in equipment other than for North
America) / LD, LT, LG and ST-R size paper (in equipment for North America)
1
Place the original(s).
Paper size Procedure
Standard size
Other than North
America: A3, A4, B4,
B5
North America: LD, LT,
LG, ST-R
P.48 “Copying on A3, A4, B4 and B5 size paper (in equipment
other than for North America) / LD, LT, LG and ST-R size paper (in
equipment for North America)”
Other than the above P.52 “Copying on other than the above standard sizes of paper”
Envelope P.54 “Copying on an envelope
Others (Non-standard sizes) P.58 “Bypass copying on non-standard size paper”
2
Move the paper holding lever toward the outside.
Place paper with its copy side down on the bypass
tray.
2
1
Downloaded from www.Manualslib.com manuals search engine
2.HOW TO MAKE COPIES
Bypass Copying 49
2 HOW TO MAKE COPIES
yThe height of the paper must not exceed the indicator on the side guides.
yWhen you use more than one sheet of paper, fan the sheets well before placing them on the
bypass tray. Be careful not to cut your fingers when fanning.
yDo not push paper into the entrance of the bypass feeder. This could cause a paper misfeed.
4
Select the same size button under “COPY” as that of the paper you placed on the
bypass tray.
The paper size is now set.
If the paper size is not selected in this step, copying may be slowed down.
5
Press [PAPER TYPE] on the touch panel if the paper type of the paper you placed on
the bypass tray is other than plain paper.
3
Align the side guides to the paper length. Move the
paper holding lever toward the equipment.
When paper is placed, the menu for bypass copying appears.
Downloaded from www.Manualslib.com manuals search engine
2 HOW TO MAKE COPIES
50 Bypass Copying
6
Select the paper type.
1) Select the paper type.
2) Press [PRINTED] under "BACK PRINTED" to print on the back side of the paper.
3) Press [OK].
ye-STUDIO2550C Series:
ye-STUDIO5055C Series:
Downloaded from www.Manualslib.com manuals search engine
2.HOW TO MAKE COPIES
Bypass Copying 51
2 HOW TO MAKE COPIES
yIf you select a wrong paper type, this could cause a paper misfeed or significant image trouble.
yWhen you select a paper type, you can confirm it with the icons displayed on the equipment
status indication area as shown below.
* These paper types are available only for e-STUDIO5055C Series.
Paper type Icon Paper type Icon
PLAIN
TRANSPARENCY
PLAIN (BACK
PRINTED) RECYCLED PAPER
THIN RECYCLED PAPER (BACK
PRINTED)
THIN (BACK
PRINTED)
SPECIAL 1*
THICK 1 SPECIAL 1 (BACK PRINTED)*
THICK 1 (BACK
PRINTED)
SPECIAL 2*
THICK 2 SPECIAL 2 (BACK PRINTED)*
THICK 2 (BACK
PRINTED)
SPECIAL 3*
THICK 3*SPECIAL 3 (BACK PRINTED)*
THICK 3 (BACK
PRINTED)*ENVELOPE
THICK 4*ENVELOPE (BACK PRINTED)
THICK 4 (BACK
PRINTED)*
Downloaded from www.Manualslib.com manuals search engine
2 HOW TO MAKE COPIES
52 Bypass Copying
About “BACK PRINTED”
When making 2-sided copies manually, select a paper type for one side and make a copy of it, and then
select the same paper type and press [PRINTED] under "BACK PRINTED" for the other side.
Example: When making a 2-sided copy on THICK 2 paper
ye-STUDIO2550C Series: Automatic 2-sided copying can be applied to plain paper and THICK 1.
ye-STUDIO5055C Series: Automatic 2-sided copying can be applied to plain paper, recycled
paper, THICK 1, THICK 2, THICK 3, and SPECIAL 1.
yFor OHP films (TRANSPARENCY), only 1-sided copying can be performed.
yIf thick paper cannot be fed, printing takes a long time after feeding or the quality is poor, turn
over the paper and place it again or place fewer sheets.
There is no affect on the printing quality though noise may occur during paper feeding depending on
the paper type.
7
After setting the paper size and type, press [OK].
The menu returns to the BASIC menu.
8
Select other copy modes as required, and then press the [START] button on the control
panel.
When you copy on sheets of OHP film, remove the copied OHP film one sheet at a time as they exit
onto the receiving tray. If the sheets of OHP film pile up, they may get curled and may not be
projected properly.
Copying on other than the above standard sizes of paper
1
Place the original(s) and paper in the same procedure noted in steps 1 to 3 in “Copying
on A3, A4, B4 and B5 size paper (in equipment other than for North America) / LD, LT,
LG and ST-R size paper (in equipment for North America)” ( P.48)
2
Press [SIZE SETTING] on the touch panel.
1. Place paper on the bypass tray.
2. Select “THICK 2” for the paper type and start copying.
3. Place the paper copied in step 2 on the bypass tray again with its copied side up.
4. Select "THICK 2" for the paper type and [PRINTED] under "BACK PRINTED", and then start
copying.
Downloaded from www.Manualslib.com manuals search engine
2.HOW TO MAKE COPIES
Bypass Copying 53
2 HOW TO MAKE COPIES
3
Press the button of the same size as the paper you placed on the bypass tray.
The selected size will be registered as an “OTHER” size.
4
Press [OTHER] under “COPY”.
The paper size is now set to the one registered as “OTHER” size.
If the paper size is not selected in this step, copying may be slowed down.
5
Press [PAPER TYPE] if the paper you placed on the bypass tray is other than plain
paper.
Downloaded from www.Manualslib.com manuals search engine
2 HOW TO MAKE COPIES
54 Bypass Copying
6
Select the paper type.
1) Select the paper type.
2) Press [PRINTED] under "BACK PRINTED" to print on the back side of the paper.
3) Press [OK].
ye-STUDIO2550C Series:
ye-STUDIO5055C Series:
yIf you select a wrong paper type, this could cause a paper misfeed or significant image trouble.
yWhen you select a paper type, you can confirm it with the icons displayed on the equipment
status indication area. For details, see the table in step 6 in "Copying on A3, A4, B4 and B5 size
paper (in equipment other than for North America) / LD, LT, LG and ST-R size paper (in
equipment for North America)".( P.48)
7
After setting the paper size and paper type, press [OK].
The menu returns to the BASIC menu.
8
Select other copy modes as required, and then press the [START] button on the control
panel.
Copying on an envelope
yThe acceptable envelope sizes are as follows:
DL (110 mm x 220 mm), COM10 (4 1/8" x 9 1/2"), Monarch (3 7/8" x 7 1/2"), CHO-3 (120 mm x 235
mm), YOU-4 (105 mm x 235 mm)
yRefer to the Quick Start Guide for the recommended envelopes.
Downloaded from www.Manualslib.com manuals search engine
2.HOW TO MAKE COPIES
Bypass Copying 55
2 HOW TO MAKE COPIES
Notes for using envelopes
Do not use the following envelopes as they may cause paper misfeeding or damage to the equipment.
1. Badly curled, wrinkled or folded envelopes
2. Extremely thick or thin envelopes
3. Wet or damp envelopes
4. Torn envelopes
5. Envelopes which include the contents
6. Non-standard size envelopes (ones with a special shape)
7. Envelopes with eyelets or windows
8. Envelopes sealed with adhesive paste or tape
9. Partly-opened or perforated envelopes
10.Envelopes with special coating on the surface
11.Envelopes with glue or double-sided adhesive tape
yStore envelopes at room temperature and away from heat and moisture.
yPaper wrinkling may occur after printing depending on environment or the envelope type or condition.
We recommend printing paper as a sample before doing so in large amounts.
1
Place the original on the original glass.
2
5 6
8
7
3
4
91110
1
ABC
Downloaded from www.Manualslib.com manuals search engine
2 HOW TO MAKE COPIES
56 Bypass Copying
5
Press [SIZE SETTING] on the touch panel.
2
Place the envelope on a flat clean surface and press it
with your hands in the direction of the arrow to expel
any air.
Press it well to prevent the flap from rolling upward.
Correct any bent corners on the envelope.
3
Move the paper holding lever toward the outside.
Place the envelope with its face down on the bypass
tray.
Place the envelope with its flap side at the front.
4
Align the side guides to the length of the envelope.
Move the paper holding lever toward the equipment.
When the envelope is placed, the menu for bypass copying
appears.
2
1
Downloaded from www.Manualslib.com manuals search engine
2.HOW TO MAKE COPIES
Bypass Copying 57
2 HOW TO MAKE COPIES
6
Press the button of the same size as the envelope you placed on the bypass tray.
ye-STUDIO2550C Series:
ye-STUDIO5055C Series:
The size of the selected envelope will be registered as an “OTHER” size.
7
Press [OTHER] under “COPY”.
The paper size is now set to the size of the envelope placed on the bypass tray. The paper type is
automatically set to [ENVELOPE].
8
Select other copy modes as required, and then press the [START] button on the control
panel.
Copying starts. When the Saddle Stitch Finisher is installed, the envelope exits to the exit tray of the
equipment.
When the Inner Finisher is installed, the envelope exits to the receiving tray of the finisher.
Every 10 copies, take the envelopes out from the exit tray.
Downloaded from www.Manualslib.com manuals search engine
2 HOW TO MAKE COPIES
58 Bypass Copying
Bypass copying on non-standard size paper
1
Place the original on the original glass.
yThe height of the paper must not exceed the indicator on the side guides.
yWhen you use more than one sheet of paper, fan the sheets well before placing them on the
bypass tray. Be careful not to cut your fingers when fanning.
yDo not push paper into the entrance of the bypass feeder. This could cause a paper misfeed.
You can use non-standard size paper within the sizes shown on the
right.
2
Move the paper holding lever toward the outside.
Place paper with its copy side down on the bypass
tray.
3
Align the side guides to the paper length. Move the
paper holding lever toward the equipment.
When paper is placed, the menu for bypass copying appears.
100 - 297 mm
(3.9" - 11.7")
148 - 432 mm
(5.8" - 17")
2
1
Downloaded from www.Manualslib.com manuals search engine
2.HOW TO MAKE COPIES
Bypass Copying 59
2 HOW TO MAKE COPIES
4
Press [CUSTOM PAPER] on the touch panel.
5
Key in the dimension.
1) Press [Length] and key in the value. (100 mm to 297 mm (3.94" to 11.69"))
2) Press [Width] and key in the value. (148 mm to 432 mm (5.83" to 17.01"))
3) Press [OK].
To call up the dimension data registered previously, press the desired button from [MEMORY 1] to
[MEMORY 4], and then press [OK].
Length and width are indicated as shown on the right:
Width
Length
Downloaded from www.Manualslib.com manuals search engine
2 HOW TO MAKE COPIES
60 Bypass Copying
To register dimension data into the memory, see the following page:
P.61 “Registering non-standard size in the memory”
6
Select other copy modes as required, and then press the [START] button on the control
panel.
Downloaded from www.Manualslib.com manuals search engine
2.HOW TO MAKE COPIES
Bypass Copying 61
2 HOW TO MAKE COPIES
Registering non-standard size in the memory
1
Follow the same procedure noted in steps 1 to 4 in “Bypass copying on non-standard
size paper” ( P. 58 ).
2
Register dimensions.
1) Select a desired memory number.
2) Press [Length] and key in the value. (100 mm to 297 mm (3.94" to 11.69"))
3) Press [Width] and key in the value. (148 mm to 432 mm (5.83" to 17.01"))
4) Press [MEMORY].
3
Press [OK].
Downloaded from www.Manualslib.com manuals search engine
3.BASIC COPY MODES
This chapter describes the basic copying functions including how to change the reproduction ratio, how to set
sorting modes or how to perform duplex copying.
Before Using Copying Functions ......................................................................................... 64
Default settings.....................................................................................................................................................64
Confirming the set functions.................................................................................................................................64
Clearing the set functions.....................................................................................................................................65
Restrictions on function combinations..................................................................................................................65
Paper Selection ...................................................................................................................... 66
Automatic Paper Selection (APS) ........................................................................................................................66
Selecting desired paper manually ........................................................................................................................67
Copying mixed-size originals in one operation .....................................................................................................68
Switching Color Modes..........................................................................................................70
Setting Original Modes ..........................................................................................................71
Density Adjustment................................................................................................................ 73
Enlargement and Reduction Copying .................................................................................. 74
Automatic Magnification Selection (AMS) ............................................................................................................74
Specifying both the original size and the copy paper size separately ..................................................................76
Specifying reproduction ratio manually.................................................................................................................78
Copying photo originals in the optimal reproduction ratio for copy paper size (PHOTO ZOOM) .........................80
Selecting Finishing Mode...................................................................................................... 83
Finishing modes and optional finishing devices ...................................................................................................83
Sort/Group mode..................................................................................................................................................87
Rotate sort mode..................................................................................................................................................89
Staple sort mode ..................................................................................................................................................90
Magazine sort / Center fold / Saddle stitch...........................................................................................................94
Hole punch mode .................................................................................................................................................97
Manual staple mode .............................................................................................................................................99
Duplex Copying.................................................................................................................... 101
Making a 1-sided copy .......................................................................................................................................102
Making a 2-sided copy .......................................................................................................................................103
Making a 2-sided copy from a book-type original...............................................................................................104
Performing Copy & File ....................................................................................................... 108
Setting share folder ............................................................................................................................................110
Downloaded from www.Manualslib.com manuals search engine
3 BASIC COPY MODES
64 Before Using Copying Functions
Before Using Copying Functions
Default settings
This equipment is under its “default settings” when the power is turned ON, namely, if no setting change has
been applied yet, the equipment’s settings return to the default ones when the energy saving mode is cleared
or the [FUNCTION CLEAR] button on the control panel is pressed. The default settings for basic copy modes
at installation are shown below.
The default settings are changeable. For details, refer to the MFP Management Guide.
Confirming the set functions
If you press [SETTINGS] on the touch panel, the menu shown below is displayed. On this menu, you can view
the functions that are currently set.
Item Default setting
Reproduction ratio 100%
Copy quantity 1
Paper selection Automatic Paper Selection (APS)
Simplex/Duplex 1-sided original -> 1-sided copy
Density adjustment Manual adjustment
Color mode FULL COLOR
Original mode TEXT/PHOTO
Finishing mode When using the original glass:
NON-SORT NON-STAPLE
When using the RADF (Reversing Automatic
Document Feeder):
SORT
Feeding mode when using the RADF Continuous feed mode
Downloaded from www.Manualslib.com manuals search engine
3.BASIC COPY MODES
Before Using Copying Functions 65
3 BASIC COPY MODES
Switching to the function setting menu
To change the functions on the current menu, press the corresponding buttons. The desired setting menu will
then appear.
Clearing the set functions
If you want to clear any copy function setting, press [RESET] on the corresponding setting menu.
However, for FULL IMAGE on the EDIT menu, also press the highlighted button to clear the setting.
P.113 “EDITING FUNCTIONS”
Clearing all settings changed
When you press the [FUNCTION CLEAR] button on the control panel, all the function changes will be cleared.
Even if you do not do so, the changes will be cleared if the equipment is left idle for 45 sec. (default setting).
For how to change this period, refer to the MFP Management Guide.
Restrictions on function combinations
Several copy functions can be used together. However some functions may not be used with other ones. For
details, see the following pages:
P.216 “Copying Function Combination Matrix”
P.218 “Image Adjustment Function Combination Matrix”
Downloaded from www.Manualslib.com manuals search engine
3 BASIC COPY MODES
66 Paper Selection
Paper Selection
Automatic Paper Selection (APS)
This equipment detects the size of an original and selects paper of the same size automatically. This function
is called Automatic Paper Selection (APS). Automatic size detection for originals on the original glass is
available only for e-STUDIO2550C Series / e-STUDIO5055C Series.
yFor the original sizes detectable, see the following page:
P.33 “Acceptable originals”
ySome original sizes may not be detected with this function. In this case, select the desired size
manually.
P.67 “Selecting desired paper manually”
1
Place paper in the drawer(s).
2
Place the original(s).
3
Press [APS] on the touch panel.
The paper selection mode is now set at Automatic Paper Selection.
yThe paper selection mode is set at Automatic Paper Selection by default.
yEven if the direction of the paper placed in the selected drawer differs from that of the original,
this equipment rotates the data of the original by 90 degrees to make copies as long as their
sizes are the same. (This works on A4, B5 or LT paper only.) For example, when an A4 original is
placed in a portrait direction and A4-R paper is placed in the drawer, the data of the A4 original
will be rotated and copied correctly on A4-R paper.
If “Change direction of original” or “CHANGE DRAWER TO CORRECT PAPER SIZE” appears,
follow the directions.
4
Select other copy modes as required, and then press the [START] button on the control
panel.
Downloaded from www.Manualslib.com manuals search engine
3.BASIC COPY MODES
Paper Selection 67
3 BASIC COPY MODES
Selecting desired paper manually
You need to select paper by yourself when copying the following originals whose sizes cannot be detected
correctly:
yHighly transparent originals (e.g. OHP film, tracing paper)
yTotally dark originals or originals with dark borders
yNon-standard size originals (e.g. newspapers, magazines)
When paper of the size you want to use is not in any drawer, place it in a drawer or on the bypass tray.
P.16 “Placing paper in drawers
P.47 “Bypass Copying”
1
Place paper in the drawer(s).
When using bypass copying, be sure to set the paper size.
2
Place the original(s).
3
Press the drawer button corresponding to the desired paper size.
4
Select other copy modes as required, and then press the [START] button on the control
panel.
Downloaded from www.Manualslib.com manuals search engine
3 BASIC COPY MODES
68 Paper Selection
Copying mixed-size originals in one operation
You can copy a set of originals whose sizes are individually different, using the RADF (Reversing Automatic
Document Feeder).
The original sizes that can be mixed are as follows:
North America: LD, LG, LT, LT-R, COMP
Other than North America: A3, A4, A4-R, B4, B5, FOLIO
1
Place paper in the drawer(s).
The bypass tray cannot be used. Use the drawers.
2
Adjust the side guides to the widest original, and then align the originals against the
side guide on the front side.
When copying originals of different widths, the copied image of the smaller one may be skewed
because it does not touch the side guide on the rear side.
3
Press [ZOOM] on the touch panel.
When original widths are the same When original widths are not the same
Downloaded from www.Manualslib.com manuals search engine
3.BASIC COPY MODES
Paper Selection 69
3 BASIC COPY MODES
4
Press [MIXED SIZE].
5
Press [AMS] to make copies on paper in one size. To make copies on paper of the same
size as the originals, press [OK] or [CANCEL] so that the menu returns to the BASIC
menu, and then press [APS].
When [AMS] is selected:
yIn the Automatic Magnification Selection, copy images cannot be enlarged from A4 (portrait), B5
(portrait) or LT (portrait) to A3 (landscape), B4 (landscape), LD (landscape) or LG (landscape). In
this case, place A4, B5 or LT originals in a landscape direction.
yBefore you use Automatic Paper Selection, be sure that all paper sizes corresponding to the
original sizes have been placed in the drawers.
6
Select other copy modes as required, and then press the [START] button on the control
panel.
If “Change direction of original” appears while scanning is in progress, remove the original from the
RADF and change its direction accordingly.
Downloaded from www.Manualslib.com manuals search engine
3 BASIC COPY MODES
70 Switching Color Modes
Switching Color Modes
You can switch the color mode. There are 3 color modes as shown below.
FULL COLOR: All originals are copied in full colors. (Default)
BLACK: All originals are copied in black and white.
AUTO COLOR: The equipment automatically judges the type of each color on originals. Colored originals
are copied in full colors and black-and-white originals are copied in black and white.
Switching color modes
Press any of [FULL COLOR], [BLACK] or [AUTO COLOR] on the touch panel.
When you select [AUTO COLOR], some originals may not be copied exactly as they look, such as the
cases shown below. Select either [FULL COLOR] or [BLACK].
yWhen color originals are copied in black
Example:
- Originals whose colored area is extremely small
- Originals which are completely black
- Originals whose colors are light
yWhen black originals are copied in full colors
Example:
- Yellowish originals
- Originals with a colored background
The sensitivity to detect whether the data scanned in auto color are color or black can be changed. For
details, refer to the MFP Management Guide.
Downloaded from www.Manualslib.com manuals search engine
3 BASIC COPY MODES
Setting Original Modes 71
Setting Original Modes
You can make copies with the optimal image quality by selecting the following modes for your original. The
selectable original mode differs depending on the color mode as shown in the table below. Select the color
mode first, and then the original mode.
TEXT/PHOTO is set by default. The default setting can be changed in each color mode. For details, refer
to the MFP Management Guide.
1
Press [ORIGINAL MODE] on the touch panel.
Original
mode Description
Color mode
FULL
COLOR BLACK AUTO
COLOR
TEXT/PHOTO Originals with text and photographs mixed Yes Yes Yes
TEXT Originals with text (or text and line art) only Yes Yes Yes
PRINTED
IMAGE
Originals with photogravure (e.g. magazine,
brochure) Yes—Yes
PHOTO
Originals with general photographs on
photographic printing paper Yes
Originals with photographs Yes
MAP Originals with fine illustrations or text Yes
IMAGE
SMOOTHING
Originals with text and photographs mixed
(especially originals requiring higher
reproducibility on photos)
—Yes—
Downloaded from www.Manualslib.com manuals search engine
3 BASIC COPY MODES
72 Setting Original Modes
2
Select the original mode, and then press [OK].
The selectable original modes differ depending on the color modes currently set.
Example: When the color mode is “FULL COLOR”
Downloaded from www.Manualslib.com manuals search engine
3 BASIC COPY MODES
Density Adjustment 73
Density Adjustment
This equipment detects the density level of originals and automatically adjusts the density level of the copied
image to the optimal one. Alternatively, you can manually adjust it to the desired level.
Adjusting automatically (automatic density adjustment)
Press [AUTO] on the touch panel.
The default setting of the automatic density adjustment is as follows according to the color modes:
FULL COLOR or AUTO COLOR: OFF
BLACK: ON
Adjusting manually
Press either or to select the desired density level.
Downloaded from www.Manualslib.com manuals search engine
3 BASIC COPY MODES
74 Enlargement and Reduction Copying
Enlargement and Reduction Copying
You can change the reproduction ratio of copied images in the following procedures:
Automatic Magnification Selection (AMS):
You need to specify the copy paper size in advance. Then this equipment will detect the original size and
automatically select the optimal reproduction ratio for the copy paper size. Automatic size detection for
originals on the original glass is available only for e-STUDIO2550C Series / e-STUDIO5055C Series.
Specifying both original size and copy paper size separately:
You need to specify both the original size and the copy paper size separately in advance. According to the
sizes you specified, the optimal reproduction ratio is selected automatically. This feature is used when
Automatic Magnification Selection is not available, such as when copying OHP film originals.
Specifying reproduction ratio manually:
You can select the desired reproduction ratio by pressing [ZOOM] or one-touch zoom buttons on the touch
panel.
Copying photo originals in the optimal reproduction ratio for copy paper size (PHOTO ZOOM)
You can copy photo originals in the reproduction ratio best suited to the copy paper size.
The available range of reproduction ratio differs depending on whether the original is placed on the original
glass or on the RADF (Reversing Automatic Document Feeder).
Original glass: 25 to 400%
RADF: 25 to 200%
Automatic Magnification Selection (AMS)
Specify the copy paper size in advance so that this equipment will detect the original size and automatically
select the optimal reproduction ratio to the copy paper size. Automatic size detection for originals on the
original glass is available only for e-STUDIO2550C Series / e-STUDIO5055C Series.
This function is available when the size of the originals is as follows:
North America: LD, LG, LT, LT-R, ST-R and COMP (COMP is available only when the RADF is used.)
Other than North America: A3, A4, A4-R, A5-R, B4, B5, B5-R, FOLIO (FOLIO is available only when the
RADF is used.)
This function does not work properly for the originals noted below. Select other methods when copying
them.
yHighly transparent originals (e.g. OHP film, tracing paper)
yTotally dark originals or ones with dark borders
yNon-standard size originals (e.g. newspapers, magazines)
1
Place paper in the drawer(s).
Downloaded from www.Manualslib.com manuals search engine
3.BASIC COPY MODES
Enlargement and Reduction Copying 75
3 BASIC COPY MODES
2
Press [ZOOM] on the touch panel.
3
Select the desired paper size, press [AMS] and then [OK].
yIf you want to select a paper size other than the following, you need to register the size as
“OTHER”. Once you register this size, it will be specified every time you press [OTHER] on the
touch panel.
North America: LD, LG, LT, ST
Other than North America: A3, A4, B4, B5
For how to register, see the following page:
P.77 “Registering paper sizes to “OTHER” size”
yPaper sizes can also be registered by pressing the desired drawer button of the equipment
status indication area on the BASIC menu.
4
Place the original(s).
If the original is placed on the original glass, the reproduction ratio is set when the original is placed. If
the original is placed on the RADF, the reproduction ratio is set when the original is scanned.
If “Change direction of original” appears, change it accordingly.
5
Select other copy modes as required, and then press the [START] button on the control
panel.
Downloaded from www.Manualslib.com manuals search engine
3 BASIC COPY MODES
76 Enlargement and Reduction Copying
Specifying both the original size and the copy paper size separately
1
Place paper in the drawer(s).
2
Place the original(s).
3
Press [ZOOM] on the touch panel.
4
Select the desired sizes for the original and copy paper, and then press [OK].
yIf you want to select a size other than the following for the original size and copy paper size, you
need to register the size as “OTHER”. Once you register this size, it will be specified every time
you press [OTHER] on the touch panel.
North America: LD, LG, LT, ST
Other than North America: A3, A4, B4, B5
For how to register, see the following page:
P.77 “Registering paper sizes to “OTHER” size”
yPaper sizes can also be registered by pressing the desired drawer button of the equipment
status indication area on the BASIC menu.
5
Select other copy modes as required, and then press the [START] button on the control
panel.
Downloaded from www.Manualslib.com manuals search engine
3.BASIC COPY MODES
Enlargement and Reduction Copying 77
3 BASIC COPY MODES
Registering paper sizes to “OTHER” size
If you want to select a size other than the following for the original size and copy paper size, you need to
register the size as “OTHER” following the procedures below. Once you register this size, it will be specified
every time you press [OTHER] on the touch panel.
North America: LD, LG, LT, ST
Other than North America: A3, A4, B4, B5
You can register only standard sizes as [OTHER] and cannot register any non-standard sizes.
1
Press [SIZE SETTING] on the touch panel.
2
Select the desired size.
ye-STUDIO2550C Series:
ye-STUDIO5055C Series:
The selected size will be registered as an “OTHER” size.
Downloaded from www.Manualslib.com manuals search engine
3 BASIC COPY MODES
78 Enlargement and Reduction Copying
Specifying reproduction ratio manually
1
Place paper in the drawer(s).
2
Place the original(s).
3
Press [ZOOM] on the touch panel.
4
Press the buttons below to select the desired reproduction ratio.
[ UP] and [ DOWN] buttons
The reproduction ratio changes by 1% every time either of them is pressed. When you hold either
down, the ratio goes up or down automatically.
One-touch zoom buttons
Select the desired ratio from [400%], [200%], [100%], [50%] and [25%].
When the RADF is used, the maximum ratio available is 200%.
Downloaded from www.Manualslib.com manuals search engine
3.BASIC COPY MODES
Enlargement and Reduction Copying 79
3 BASIC COPY MODES
5
Select the desired size, and then press [OK].
yIf you want to select a paper size other than the following, you need to register the size as
“OTHER”. Once you register this size, it will be specified every time you press [OTHER] on the
touch panel.
North America: LD, LG, LT, ST
Other than North America: A3, A4, B4, B5
For how to register, see the following page:
P.77 “Registering paper sizes to “OTHER” size”
yPaper sizes can also be registered by pressing the desired drawer button of the equipment
status indication area on the BASIC menu.
6
Select other copy modes as required, and then press the [START] button on the control
panel.
Downloaded from www.Manualslib.com manuals search engine
3 BASIC COPY MODES
80 Enlargement and Reduction Copying
Copying photo originals in the optimal reproduction ratio for copy paper size
(PHOTO ZOOM)
1
Place paper in the drawer(s).
2
Place the original on the original glass in a landscape direction.
3
Press [ZOOM] on the touch panel.
4
Press [PHOTO ZOOM].
Downloaded from www.Manualslib.com manuals search engine
3.BASIC COPY MODES
Enlargement and Reduction Copying 81
3 BASIC COPY MODES
5
Select the original size.
The actual size for the [3" x 5"] button is 3.5" x 5.0".
When the size of the original is other than the ones below, key in the dimension of the original
manually.
North America: 3" x 5", 4" x 6", 5" x 7" or 8" x 10"
Other than North America: 9 x 13 cm, 10 x 15 cm, 13 x 18 cm or 20 x 30 cm
P.82 “Setting photo originals in other sizes”
6
Select the desired copy paper size, and then press [OK].
If you want to select a paper size other than the following, you need to register the size as “OTHER”
size. In this case, register it in a landscape direction. Once you register this size, it will be specified
every time you press [OTHER] on the touch panel.
North America: LD, LG, LT, ST
Other than North America: A3, A4, B4, A5
For how to register it, see the following page:
P.77 “Registering paper sizes to “OTHER” size
7
Select other copy modes as required, and then press the [START] button on the control
panel.
If “NON-SORT NON-STAPLE” is selected as a sorting mode, scanning of the original starts. If another
sorting mode is selected, follow the procedure below.
Downloaded from www.Manualslib.com manuals search engine
3 BASIC COPY MODES
82 Enlargement and Reduction Copying
8
Place the next original, and then press [NEXT COPY] on the touch panel or the [START]
button on the control panel.
Scanning of the next original starts. If you have more than one original, repeat this step until the
scanning of all the originals is finished.
9
When the scanning of all the originals is finished, press [JOB FINISH] on the touch
panel.
Copying starts.
Setting photo originals in other sizes
1
Press [CUSTOM] on the touch panel.
2
Key in the size of the original.
1) Press [X] on the touch panel and key in its width within 10 to 434 mm (0.39" to 17.09").
2) Press [Y] on the touch panel and key in its length within 10 to 300 mm (0.39" to 11.81").
3) Press [OK] on the touch panel.
Downloaded from www.Manualslib.com manuals search engine
3 BASIC COPY MODES
Selecting Finishing Mode 83
Selecting Finishing Mode
Finishing modes and optional finishing devices
See the table below for each finishing mode.
The available finishing modes differ depending on the type of optional finishing devices (Finisher and Hole
Punch Unit) installed. Finishing devices available for this equipment are as follows:
Finisher
yInner Finisher MJ-1036 (for e-STUDIO2550C Series and e-STUDIO2555C/3055C/3555C)
ySaddle Stitch Finisher MJ-1037 (for e-STUDIO2550C Series)
yFinisher MJ-1107 (for e-STUDIO5055C Series)
ySaddle Stitch Finisher MJ-1108 (for e-STUDIO5055C Series)
Hole Punch Unit
yHole Punch Unit MJ-6007 (for Inner Finisher MJ-1036)
yHole Punch Unit MJ-6008 (for Saddle Stitch Finisher MJ-1037)
yHole Punch Unit MJ-6104 (for Finisher MJ-1107 and Saddle Stitch Finisher MJ-1108)
Inner Tray
yInner Tray MJ-5004 (for e-STUDIO2550C Series)
yInner Tray MJ-5006 (for e-STUDIO5055C Series)
The inner tray cannot be installed when the Inner Finisher MJ-1036 is installed.
Finishing mode Description
Non-sort Non-staple Copies exit without being sorted or stapled.
Sort ( P.87) Copies exit in the same page order as the originals one set after
another.
Group ( P.87) Copies grouped by page exit.
Rotate sort ( P.89) Copies exit set by set alternately in a different direction.
Staple sort ( P.90) Copies exit with their corner stapled.
Magazine sort ( P.94) Copies exit in a book-type page order.
Center fold ( P.94) Copies exit in a book-type page order with their center folded.
Saddle stitch ( P.94) Copies exit in a book-type page order with their center folded and
stapled.
Magazine sort & center fold
( P. 9 4 )
Magazine sort and center fold are used together.
Magazine sort & saddle stitch
( P. 9 4 )
Magazine sort and saddle stitch are used together.
Hole punch ( P.97) Copies exit with their side punched.
Manual staple ( P.99) Copies are stapled manually.
Downloaded from www.Manualslib.com manuals search engine
3 BASIC COPY MODES
84 Selecting Finishing Mode
Use the table below to check the available finishing modes.
Finishing mode
Devices
MJ-1107 &
MJ-6104 MJ-1107 MJ-1108 &
MJ-6104 MJ-1108
MJ-1036
&
MJ-6007
MJ-1036
Non-sort Non-staple Yes Yes Yes Yes Yes Yes
Sort Yes Yes Yes Yes Yes Yes
Group Yes Yes Yes Yes Yes Yes
Rotate sort Yes Yes Yes Yes Yes Yes
Staple sort Yes Yes Yes Yes Yes Yes
Magazine sort Yes Yes Yes Yes Yes Yes
Center fold Yes Yes
Saddle stitch Yes Yes
Magazine sort & center
fold
——YesYes——
Magazine sort & saddle
stitch
——YesYes——
Hole punch Yes Yes Yes
Manual staple Yes Yes Yes Yes
Finishing mode
Devices
MJ-1037
&
MJ-6008
MJ-1037 MJ-5004 MJ-5006 No device
Non-sort Non-staple Yes Yes Yes Yes Yes
Sort Yes Yes Yes Yes Yes
Group Yes Yes Yes Yes Yes
Rotate sort Yes Yes Yes Yes Yes
Staple sort YesYes———
Magazine sort Yes Yes Yes Yes Yes
Center fold —————
Saddle stitch Yes Yes
Magazine sort & center
fold
—————
Magazine sort & saddle
stitch
YesYes———
Hole punch Yes————
Manual staple —————
Downloaded from www.Manualslib.com manuals search engine
3.BASIC COPY MODES
Selecting Finishing Mode 85
3 BASIC COPY MODES
Name of each part of the Finisher
MJ-1036
1. Upper cover
2. Receiving tray
3. Sub-tray
4. Hole Punch Unit MJ-6007
5. Front cover
MJ-1037
1. Upper cover
2. Tray
3. Sub-tray
4. Saddle stitch tray
5. Front cover
6. Hole Punch Unit MJ-6008
MJ-1107
1. Upper receiving tray
2. Tray holder
3. Lower receiving tray
4. Sub-tray
5. Front cover
6. Hole Punch Unit MJ-6104
7. Stapling control section
2
3
1
5
4
6
3
1
2
5
4
17
4
3
2
6
5
Downloaded from www.Manualslib.com manuals search engine
3 BASIC COPY MODES
86 Selecting Finishing Mode
Name of each part of the Inner Tray
MJ-1108
1. Upper receiving tray
2. Tray holder
3. Lower receiving tray
4. Sub-tray
5. Saddle stitch tray
6. Stopper
7. Front cover
8. Hole Punch Unit MJ-6104
9. Stapling control section
Using the tray holder
Open the tray holder when the length of the paper in the exit direction is longer than that of the upper
receiving tray. The holder prevents output paper from falling. Return it to its original position after use.
For consistent paper exiting, make sure you return the tray holder to its original position when using
paper shorter than the upper receiving tray.
MJ-5004
1. Tray
2. Paper stopper
MJ-5006
1. Tray
9
2
4
1
3
8
7
5
6
2
1
1
Downloaded from www.Manualslib.com manuals search engine
3.BASIC COPY MODES
Selecting Finishing Mode 87
3 BASIC COPY MODES
Sort/Group mode
When you make more than one set of copies, they can be made to exit in the same page order as that of the
originals. This mode is called the sort mode. Copies can also be made to exit grouped by page. This mode is
called the group mode.
Sort mode
Group mode
When you use large-size paper, such as A3, B4, LD and LG, pull out the sub-tray in advance so that the
copied paper will not fall off and will be sorted neatly.
1
Place paper in the drawer(s).
2
Place the original(s).
When you place originals on the RADF (Reversing Automatic Document Feeder), the display of the
sorting mode button will change to “SORT”.
3
Press [FINISHING] on the touch panel.
123
123
123
3
2
1
3
3
2
2
1
1
Downloaded from www.Manualslib.com manuals search engine
3 BASIC COPY MODES
88 Selecting Finishing Mode
4
Select [SORT] or [GROUP], and then press [OK].
5
Key in the desired number of copies.
6
Select other copy modes as required, and then press the [START] button on the control
panel.
Downloaded from www.Manualslib.com manuals search engine
3.BASIC COPY MODES
Selecting Finishing Mode 89
3 BASIC COPY MODES
Rotate sort mode
When you make more than one set of copies, one set can be made to exit on top of another set, alternating in
portrait and landscape directions. This mode is called the rotate sort mode. Use 2 drawers and 2 stacks of
paper of the same size. Place one stack of paper in one drawer in a portrait direction and place the other in
another drawer in a landscape direction before you start copying.
yA4, B5 and LT sized paper placed on the drawer or bypass tray can be used.
yThe rotate sort mode is not available when Automatic Paper Selection is selected.
1
Place paper in the drawer(s).
Place one stack of paper in one drawer in a portrait direction and place the other in another drawer
in a landscape direction.
2
Place the original(s).
3
Press [FINISHING] on the touch panel.
Downloaded from www.Manualslib.com manuals search engine
3 BASIC COPY MODES
90 Selecting Finishing Mode
4
Select [ROTATE SORT], and then press [OK].
5
Key in the desired number of copies.
6
Select other copy modes as required, and then press the [START] button on the control
panel.
Staple sort mode
When you make more than one set of copies, the copied paper can be automatically stapled set by set. This
mode is called the staple sort mode. You can choose from 3 different stapling positions.
Example: When [FRONT STAPLE] is selected
ySpecial paper such as OHP film or sticker labels is not applicable.
yCopies in different sizes cannot be stapled unless their length is the same.
1
Place paper in the drawer(s).
When using bypass copying, be sure to set the paper size.
2
Place the original(s).
Downloaded from www.Manualslib.com manuals search engine
3.BASIC COPY MODES
Selecting Finishing Mode 91
3 BASIC COPY MODES
3
Press [FINISHING] on the touch panel.
4
Select the desired stapling position from [FRONT STAPLE], [DOUBLE STAPLE] or
[REAR STAPLE], and then press [OK].
5
Select other copy modes as required, and then press the [START] button on the control
panel.
When the number of sheets exceeds the maximum number of sheets available for stapling, this
equipment automatically enters into the sort mode.
Downloaded from www.Manualslib.com manuals search engine
3 BASIC COPY MODES
92 Selecting Finishing Mode
Maximum number of sheets available for stapling
The maximum number of sheets available for stapling differs depending on the type of the finishing device
installed, paper size or paper weight.
Inner Finisher MJ-1036
y2 cover sheets (e-STUDIO2550C Series: 106 to 209g/m2 (29 lb. Bond to 110 lb. Index), e-
STUDIO5055C Series: 106 to 256 g/m2 (29 lb. Bond to 140 lb. Index)) can be added. In this case, the
number of sheets available includes the 2 cover sheets.
yFor the maximum number of sheets loadable on the tray, refer to the Quick Start Guide.
Saddle Stitch Finisher MJ-1037
y2 cover sheets (106 to 209g/m2 (29 lb. Bond to 110 lb. Index)) can be added. In this case, the number
of sheets available includes the 2 cover sheets.
yFor the maximum number of sheets loadable on the tray, refer to the Quick Start Guide.
Finisher MJ-1107
y2 cover sheets (60 to 256g/m2 (16 lb. Bond to 140 lb. Index)) can be added. In this case, the number of
sheets available includes the 2 cover sheets.
yFor the maximum number of sheets loadable on the tray, refer to the Quick Start Guide.
Paper size
Paper weight
60 - 80 g/m2
(16 - 20 lb. Bond)
81 - 90 g/m2
(21 - 24 lb. Bond)
91 - 105 g/m2
(25 - 28 lb. Bond)
A4, A4-R, B5, B5-R, LT,
LT-R, 8.5"SQ, 16K,
16K-R
50 sheets 50 sheets 30 sheets
A3, B4, FOLIO, LD, LG,
COMP, 13"LG, 8K 30 sheets 30 sheets 15 sheets
Paper size
Paper weight
60 - 80 g/m2
(16 - 20 lb. Bond)
81 - 90 g/m2
(21 - 24 lb. Bond)
91 - 105 g/m2
(25 - 28 lb. Bond)
A4, A4-R, B5, B5-R, LT,
LT-R, 8.5"SQ, 16K,
16K-R
50 sheets 50 sheets 30 sheets
A3, B4, FOLIO, LD, LG,
COMP, 13"LG, 8K 30 sheets 30 sheets 15 sheets
Paper size
Paper weight
60 - 80 g/m2
(16 - 20 lb. Bond)
81 - 90 g/m2
(21 - 24 lb. Bond)
91 - 105 g/m2
(25 - 28 lb. Bond)
A4, B5, LT 50 sheets 50 sheets 30 sheets
A3, A4-R, B4, FOLIO,
LD, LG, LT-R, COMP 30 sheets 30 sheets 15 sheets
Downloaded from www.Manualslib.com manuals search engine
3.BASIC COPY MODES
Selecting Finishing Mode 93
3 BASIC COPY MODES
Saddle Stitch Finisher MJ-1108
y2 cover sheets (60 to 256g/m2 (16 lb. Bond to 140 lb. Index)) can be added. In this case, the number of
sheets available includes the 2 cover sheets.
yFor the maximum number of sheets loadable on the tray, refer to the Quick Start Guide.
Paper size
Paper weight
60 - 80 g/m2
(16 - 20 lb. Bond)
81 - 90 g/m2
(21 - 24 lb. Bond)
91 - 105 g/m2
(25 - 28 lb. Bond)
A4, B5, LT 50 sheets 50 sheets 30 sheets
A3, A4-R, B4, FOLIO,
LD, LG, LT-R, COMP 30 sheets 30 sheets 15 sheets
Downloaded from www.Manualslib.com manuals search engine
3 BASIC COPY MODES
94 Selecting Finishing Mode
Magazine sort / Center fold / Saddle stitch
You can copy more than one original and bind them in a booklet format (Magazine sort).
With the Saddle Stitch Finisher, you can also have the copied booklet folded at its center (Center fold) and
besides stapled (Saddle stitch).
Center folding can be selected only when the Saddle Stitch Finisher MJ-1108 is installed.
Magazine sort mode
Center fold mode
Saddle stitch mode
Magazine sort & center fold mode
Magazine sort & saddle stitch mode
112
94
76
12
3
2
1
58
310
112
76
58
310
112 76
76
12
3
2
1
76
12
3
2
1
Downloaded from www.Manualslib.com manuals search engine
3.BASIC COPY MODES
Selecting Finishing Mode 95
3 BASIC COPY MODES
Requirements for center folding
Saddle Stitch Finisher MJ-1108
*1 1 cover sheet (60 to 256 g/m2 (16 lb. Bond to 140 lb. Index)) can be added. In this case the number of sheets per set shall include
the cover sheet.
Requirements for saddle stitching
Saddle Stitch Finisher MJ-1037
Saddle Stitch Finisher MJ-1108
*1 When the paper weights are mixed, take the value of the heavier one.
*2 1 cover sheet (MJ-1108: 60 to 256 g/m2 (16 lb. Bond to 140 lb. Index), MJ-1037: 106 to 209 g/m2 (29 lb. Bond to 110 lb. Index))
can be added. In this case the number of sheets per set shall include the cover sheet.
Paper size Paper weight
Maximum number of
sheets available for
center folding *1
Maximum number of sets loadable
on the saddle stitch tray
A3, A4-R,
B4, LD, LT-
R, LG
60 - 105 g/m2
(16 - 28 lb. Bond) 25 sheets
21 - 25 sheets/set: 5 sets
16 - 20 sheets/set: 6 sets
11 - 15 sheets/set: 8 sets
6 - 10 sheets/set: 12 sets
Less than 5 sheets/set: 25 sets
Paper size Paper weight *1
Maximum number of
sheets available for
saddle stitching *2
Maximum number of sets loadable
on the saddle stitch tray
A3, A4-R,
B4, LD, LT-
R, LG
60 - 80 g/m2
(16 - 20 lb. Bond) 15 sheets
11 - 15 sheets: 10 sets
6 - 10 sheets: 15 sets
Less than 5 sheets: 20 sets
81 - 90 g/m2
(21 - 24 lb. Bond) 10 sheets 6 - 10 sheets: 10 sets
Less than 5 sheets: 20 sets
91 - 105 g/m2
(25 - 28 lb. Bond) 7 sheets 6 - 10 sheets: 10 sets
Less than 5 sheets: 15 sets
Paper size Paper weight *1
Maximum number of
sheets available for
saddle stitching *2
Maximum number of sets loadable
on the saddle stitch tray
A3, A4-R,
B4, LD, LT-
R, LG
60 - 90 g/m2
(16 - 24 lb. Bond) 15 sheets
11 - 15 sheets: 25 sets (10 sets if
cover sheets are added)
6 - 10 sheets: 30 sets (15 sets if
cover sheets are added)
Less than 5 sheets: 50 sets
91 - 105 g/m2
(25 - 28 lb. Bond) 10 sheets
6 - 10 sheets: 25 sets (15 sets if
cover sheets are added)
Less than 5 sheets: 40 sets (30 sets
if cover sheets are added)
When placing portrait originals in a landscape direction as shown
on the right in the magazine sort mode, the magazine sort &
center fold mode, or the magazine sort & saddle stitch mode, set
the image direction function to ON on the EDIT menu.
P.148 “Image Direction”
Downloaded from www.Manualslib.com manuals search engine
3 BASIC COPY MODES
96 Selecting Finishing Mode
The magazine sort mode can also be selected on the EDIT menu. If you select it on the EDIT menu, you can
adjust the binding margin. For details, see the following page:
P.128 “Magazine Sort Mode”
1
Place paper in the drawer(s).
Special paper such as OHP film or sticker labels is not applicable.
2
Select the desired paper size.
A3, A4-R, A5-R *1, B4 or B5-R *1 size paper can be used.
*1 A5-R and B5-R are acceptable only for the magazine sort mode.
3
Place the original(s).
When placing the originals on the RADF, place them according to the illustration on the previous page.
When placing the originals on the original glass, place them in the following order:
Magazine sort, Magazine sort & center fold, Magazine sort & saddle stitch: Place the first page
of the original first.
Center fold, Saddle stitch: For example, if the total number of pages is 12, place pages 1 and 12
together, and then pages 2 and 11, 10 and 3, 4 and 9, 8 and 5, and finally pages 6 and 7.
4
Press [FINISHING] on the touch panel.
Downloaded from www.Manualslib.com manuals search engine
3.BASIC COPY MODES
Selecting Finishing Mode 97
3 BASIC COPY MODES
5
Select the desired mode from [MAGAZINE SORT], [MAGAZINE SORT & CENTER
FOLD], [MAGAZINE SORT & SADDLE STITCH], [CENTER FOLD] or [SADDLE STITCH].
Then press [OK].
y[MAGAZINE SORT & SADDLE STITCH] and [SADDLE STITCH] are selectable only when the
Saddle Stitch Finisher MJ-1108 or MJ-1037 is installed.
y[MAGAZINE SORT & CENTER FOLD] and [CENTER FOLD] are selectable only when the
Saddle Stitch Finisher MJ-1108 is installed.
6
Select other copy modes as required, and then press the [START] button on the control
panel.
Hole punch mode
You can punch copied paper when the Hole Punch Unit is installed on the Finisher.
yPaper whose size is any of A3, A4, A4-R, B4, B5, B5-R, FOLIO, LD, LG, LT, LT-R, ST-R and COMP, and
whose weight is 60 to 256 g/m2 (16 to 140 lb. Bond) (MJ-6104) or 60 to 128 g/m2 (16 to 34 lb. Bond)
(MJ-6007 / MJ-6008) is available.
ySpecial paper such as OHP film or sticker labels is not applicable.
1
Place paper in the drawer(s).
When using bypass copying, be sure to set the paper size.
2
Place the original(s).
7
Combine the copied paper if the center fold mode or
magazine sort & center fold mode is used.
In the center fold mode, paper is folded at the center for every 5
sheets before exiting. If more than 5 sheets of paper are copied,
combine them as shown in the figure.
11~15
6~10
1~5
1~56~1011~15
Downloaded from www.Manualslib.com manuals search engine
3 BASIC COPY MODES
98 Selecting Finishing Mode
3
Press [FINISHING] on the touch panel.
4
Select [HOLE PUNCH], and then press [OK].
5
Select other copy modes as required, and then press the [START] button on the control
panel.
Downloaded from www.Manualslib.com manuals search engine
3.BASIC COPY MODES
Selecting Finishing Mode 99
3 BASIC COPY MODES
Manual staple mode
You can staple copied paper manually without any copying operation. This is useful when you have forgotten
to set the staple sort mode before starting copying, or when you want to staple originals. (Available only with
the Finisher MJ-1107 or Saddle Stitch Finisher MJ-1108.)
Maximum number of sheets available for manual stapling
Use the buttons on the stapling control section of the Finisher for manual stapling.
1
Press the stapling button on the stapling control section.
The shutter of the paper exit area is opened and this equipment enters into the manual staple mode.
2
Press the stapling position switching button to switch the staple position (front or
rear).
Paper size
Paper weight
60 - 80 g/m2
(16 - 20 lb. Bond)
81 - 90 g/m2
(21 - 24 lb.
Bond)
91 - 105 g/m2
(25 - 28 lb.
Bond)
A4, B5, LT 50 sheets 50 sheets 30 sheets
A3, A4-R, B4, FOLIO,
LD, LG, LT-R, COMP
30 sheets 30 sheets 15 sheets
3
Place paper on the lower receiving tray of the
Finisher.
Fan and jog the paper well. Place it with its face down.
When you staple them at their corner on the front side, place
the sheets of paper aligned to the front side. When you staple
them on the rear side, place the sheets of paper aligned to the
rear side.
The stapling lamp lights when the paper is properly placed. If
it does not light, replace the paper.
Stapling position
button / lamps
Stapling
button / lamp
Downloaded from www.Manualslib.com manuals search engine
3 BASIC COPY MODES
100 Selecting Finishing Mode
4
Let go of the paper, and then press the stapling button.
Stapling starts. When the stapling position switching lamps start blinking, it means the stapling has
finished. Then remove the stapled paper.
Be sure that your hands are away from the paper while stapling is in progress.
Finishing the manual staple mode
Remove the stapled paper from the lower receiving tray, and then press the stapling button. The shutter
of the paper exit area closes. This means that manual stapling is finished. If no operation is performed
for approx. 15 seconds, the manual staple mode will be automatically finished.
Downloaded from www.Manualslib.com manuals search engine
3 BASIC COPY MODES
Duplex Copying 101
Duplex Copying
You can copy a 1-sided original to a 2-sided copy or vice versa, or copy a 2-sided original to a 2-sided copy.
This is useful when you want to save the paper, or when you want to copy a book-type original maintaining the
same page order.
1-sided original -> 1-sided copy ( P.102)
2-sided original -> 1-sided copy ( P.102)
1-sided original -> 2-sided copy ( P.103)
2-sided original -> 2-sided copy ( P.103)
Book-type original -> 2-sided copy ( P.104)
ye-STUDIO2550C Series: Use plain or THICK1 for duplex copying.
ye-STUDIO5055C Series: Use plain, recycled paper, THICK1, THICK 2, THICK 3, or SPECIAL 1 for
duplex copying.
-12- -15-
-13-
-13-
-12-
-13-
-15-
-13-
Downloaded from www.Manualslib.com manuals search engine
3 BASIC COPY MODES
102 Duplex Copying
Making a 1-sided copy
When you copy 2-sided portrait originals which open to the left/right on only 1 side of the paper, use the
image direction function on the EDIT menu so that all the copied paper will exit in the proper direction.
P.148 “Image Direction”
1
Place paper in the drawer(s).
When using bypass copying, be sure to set the paper size.
2
Place the original(s).
3
Press [2-SIDED] on the touch panel.
4
Select the desired mode, and then press [OK].
[1->1 SIMPLEX]: 1-sided original to 1-sided copy
[2->1 SPLIT]: 2-sided original to 1-sided copy
No setting“IMAGE DIRECTION” set
Downloaded from www.Manualslib.com manuals search engine
3.BASIC COPY MODES
Duplex Copying 103
3 BASIC COPY MODES
5
Select other copy modes as required, and then press the [START] button on the control
panel.
Making a 2-sided copy
If 1-sided portrait originals have been placed in a landscape direction and you copy them on both sides of
the paper, copied sheets are usually in the open to top/bottom direction. You can make copies in the open
to left/right direction with the image direction function.
P.148 “Image Direction”
1
Place paper in the drawer(s).
When using bypass copying, be sure to set the paper size.
2
Place the original(s).
3
Press [2-SIDED] on the touch panel.
No setting“IMAGE DIRECTION” set
Downloaded from www.Manualslib.com manuals search engine
3 BASIC COPY MODES
104 Duplex Copying
4
Select the desired mode, and then press [OK].
[1 -> 2 DUPLEX]: 1-sided original to 2-sided copy
[2 -> 2 DUPLEX]: 2-sided original to 2- sided copy
5
Select other copy modes as required, and then press the [START] button on the control
panel.
When placing the original on the original glass, follow steps 6 and 7 on P.39 “Basic copying
procedure”.
Making a 2-sided copy from a book-type original
You can make 2-sided copies from book-type originals such as books or catalog as in the same page order.
A4, B5 and LT sizes are applicable.
1
Place paper in the drawer(s).
When using bypass copying, be sure to set the paper size.
2
Press [2-SIDED] on the touch panel.
Downloaded from www.Manualslib.com manuals search engine
3.BASIC COPY MODES
Duplex Copying 105
3 BASIC COPY MODES
3
Select [Book -> 2].
4
Select the book copying type.
Example: If pages 2 to 6 of a book which opens to the left are to be copied, select [LEFT -> LEFT].
5
Press [OK].
The menu returns to the BASIC menu.
23 67
Downloaded from www.Manualslib.com manuals search engine
3 BASIC COPY MODES
106 Duplex Copying
6
Press the drawer button corresponding to the desired paper size.
Only A4, B5 and LT sizes are applicable.
7
Select other copy modes as required.
If the copy needs a binding space, select the book margin mode on the EDIT menu.
P.117 “Creating bookbinding margin”
Do not place any heavy objects (4 kg (9 lb.) or over) on the original glass and do not press on
it with force.
Breaking the glass could injure you.
9
Press the [START] button on the control panel. Once the pages are scanned, set the
next ones on the original glass.
Repeat this step until all the desired pages have been scanned. If the last page is a single page, press
[COPY FINAL PAGE] on the touch panel, and then press the [START] button on the control panel to
start scanning. The scanned pages will be copied.
8
Place the original on the original glass.
Place the original with its bottom toward you, aligning its center
with the yellow indicator under the original glass.
Downloaded from www.Manualslib.com manuals search engine
3.BASIC COPY MODES
Duplex Copying 107
3 BASIC COPY MODES
10
When all the pages have been scanned, press [FINISHED].
The scanned pages will be copied.
Downloaded from www.Manualslib.com manuals search engine
3 BASIC COPY MODES
108 Performing Copy & File
Performing Copy & File
With the Copy & File function, you can store the copied data in the share folder of the hard disk of this
equipment or a specified PC on a network. The data can be stored in any of PDF, TIFF and XPS formats.
yThe data will be stored as black images. (Resolution: 600 dpi only) The data stored with this function
are suited for printing but not for being imported as an image into your PC. To obtain the optimal image
quality for importing, it is recommended to store the data with the Scan to File function of this
equipment.
yThe network administrator must make settings for Copy & File in advance. For details, refer to the
TopAccess Guide.
yIt is recommended to back up the data stored in the share folder.
When the hard disk is installed, you can store data in an e-Filing box with the Store to e-Filing function. For
details, refer to the e-Filing Guide.
1
Place the original(s).
2
Press [STORAGE] on the touch panel.
3
Press [COPY & FILE] on the touch panel.
Downloaded from www.Manualslib.com manuals search engine
3.BASIC COPY MODES
Performing Copy & File 109
3 BASIC COPY MODES
4
Press the necessary buttons for entering information about the data to be stored. Then
press [OK].
MFP LOCAL: Press this to store the data into the share folder of this equipment.
REMOTE 1, REMOTE 2: Press either of them to store the data into the share folder of a PC that is
connected with this equipment via a network.
yYou can select up to 2 of [MFP LOCAL], [REMOTE 1] and [REMOTE 2]. If the hard disk is not
installed, you cannot select [MFP LOCAL]. Furthermore, you can only select either [REMOTE 1]
or [REMOTE 2]. You can cancel the selected item by pressing the same button again.
yWhen a user who has the privilege of changing the setting of [REMOTE 1] and [REMOTE 2] has
pressed either of them, the menu for specifying a directory appears. In this case, see the
following page to specify the directory:
P.110 “Setting share folder”
FILE NAME: Press this to display the on-screen keyboard. Then enter the file name within 128 letters.
The trailing characters in a file name (maximum 74) may be deleted depending on the type of letters
used.
FILE FORMAT: Select the file format in which the data are stored from PDF, TIFF or XPS. XPS is
available only when the hard disk is installed.
MULTI / SINGLE: These are for selecting whether the data are stored as a multiple page file or a single
page file. If you select “MULTI”, all the scanned data will be stored as one file. If you select
“SINGLE”, a folder is created and each page of the scanned data will be stored individually as one
file in the folder.
5
Press the [START] button on the control panel.
When the original is placed on the RADF (Reversing Automatic Document Feeder), copying and storing
start simultaneously.
When the original is placed on the original glass, follow the procedure below.
6
Place the next original on the original glass, and then press [NEXT COPY] on the touch
panel or the [START] button on the control panel.
Repeat this step until the scanning of all the originals is finished.
Downloaded from www.Manualslib.com manuals search engine
3 BASIC COPY MODES
110 Performing Copy & File
7
When all have been scanned, press [JOB FINISH] on the touch panel.
Copying and storing start.
Setting share folder
When a user who has the privilege of setting a share folder has pressed [REMOTE 1] or [REMOTE 2], the
menu for specifying a directory appears.
The setting items differ depending on the file transfer protocol to be used. FTP, SMB, NetWare IPX/SPX,
NetWare TCP/IP and FTPS are selectable for a file transfer protocol.
FTP / FTPS
When you press any of the buttons below, the on-screen keyboard appears. Enter with the buttons on the
touch panel or the digital keys on the control panel. When you finish the entry, press [OK].
SERVER NAME: Press this to enter the IP address of FTP server. For example, if the data should be
transferred to an FTP folder ftp://10.10.70.101/user01/scan/, key in “10.10.70.101”.
NETWORK PATH: Press this to enter a network path to an FTP folder where the data are to be stored. For
example, if the data should be transferred to an FTP folder ftp://10.10.70.101/user01/scan/, enter
“user01\scan”.
LOGIN USER NAME: Press this to enter a user name to login to the FTP server. Enter this as required.
PASSWORD: Press this to enter a password to login to the FTP server. Enter this as required.
COMMAND PORT: Press this to key in a command port number for executing commands. Normally “-” is
entered in this field, which means that a port number set by the administrator will be used. Change this
only when you want to use any other port number.
Downloaded from www.Manualslib.com manuals search engine
3.BASIC COPY MODES
Performing Copy & File 111
3 BASIC COPY MODES
SMB
When you press any of the buttons below, the on-screen keyboard appears. Enter with the buttons on the
touch panel or the digital keys on the control panel. When you finish the entry, press [OK].
NETWORK PATH: Press this to enter a network path to the folder where the data are to be stored.
LOGIN USER NAME: Press this to enter a user name to access the network folder. Enter this as required.
PASSWORD: Press this to enter a password to access the network folder. Enter this as required.
If you selected [SMB], the settings for [SERVER NAME] and [COMMAND PORT] are not required.
NetWare IPX / NetWare IP
When you press any of the buttons below, the on-screen keyboard appears. Enter with the buttons on the
touch panel or the digital keys on the control panel. When you finish the entry, press [OK].
SERVER NAME: When you select [NetWare IPX], enter either the server name of NetWare server or Tree/
Context (if NDS is usable). When you select [NetWare IP], enter the IP address of NetWare server.
NETWORK PATH: Press this to enter a network path to a NetWare server folder where the data are to be
stored. For example, if the data should be transferred to a folder “sys\scan” of NetWare server, enter
“\sys\scan”.
LOGIN USER NAME: Press this to enter a user name to login NetWare server. Enter this as required.
PASSWORD: Press this to enter a password to login NetWare server. Enter this as required.
Downloaded from www.Manualslib.com manuals search engine
4.EDITING FUNCTIONS
This chapter describes how to use various copying functions on the EDIT menu.
Displaying EDIT Menu.......................................................................................................... 114
Image Shift ............................................................................................................................ 115
Creating top/bottom margin or left/right margin..................................................................................................115
Creating bookbinding margin .............................................................................................................................117
Edge Erase............................................................................................................................ 119
Book Center Erase ............................................................................................................... 121
Dual Page.............................................................................................................................. 123
2IN1 / 4IN1 ............................................................................................................................. 125
Magazine Sort Mode.............................................................................................................128
Image Editing........................................................................................................................ 130
Trimming / Masking ............................................................................................................................................130
Mirror image / Negative/positive reversal ...........................................................................................................133
XY Zoom................................................................................................................................ 134
Cover Sheet .......................................................................................................................... 136
Sheet Insertion ..................................................................................................................... 139
Time Stamp ........................................................................................................................... 142
Page Number ........................................................................................................................ 143
Job Build............................................................................................................................... 145
Image Direction .................................................................................................................... 148
Book - Tablet......................................................................................................................... 150
ADF -> SADF......................................................................................................................... 151
Full Image.............................................................................................................................. 153
Image Repeat........................................................................................................................ 155
Omit Blank Page................................................................................................................... 157
Outside Erase ....................................................................................................................... 159
Downloaded from www.Manualslib.com manuals search engine
4 EDITING FUNCTIONS
114 Displaying EDIT Menu
Displaying EDIT Menu
You can display the EDIT menu by pressing the [EDIT] tab on the touch panel when you want to use various
editing functions.
The EDIT menu has 2 pages. To switch the pages, press or .
Downloaded from www.Manualslib.com manuals search engine
4 EDITING FUNCTIONS
Image Shift 115
Image Shift
You can create a binding margin by shifting an image to the left, right, top or bottom of the copy paper. This
function is called “image shift”. It is useful when you wish to punch or staple a stack of paper after copying it.
With this function you can easily make a binding margin when you copy a book-type original on both sides of
the paper.
You can make a binding margin in the combinations as follows:
yTop/bottom margin and left/right margin
yTop/bottom margin and bookbinding margin
Creating top/bottom margin or left/right margin
1
Place paper in the drawer(s).
When using bypass copying, be sure to set the paper size.
2
Place the original(s).
3
Press [IMAGE SHIFT] on the EDIT menu.
4
Select the type of binding margin.
Downloaded from www.Manualslib.com manuals search engine
4 EDITING FUNCTIONS
116 Image Shift
5
Adjust the width of the binding margin.
1) Press [FRONT MARGIN] and adjust the binding margin width on the front side using [ 0 mm] (0")
and [ 100 mm] (3.94"). (The width on the back side will be also adjusted in the same way.)
2) Press [BACK MARGIN] and adjust the binding margin width on the back side using [ 0 mm] (0")
and [ 100 mm] (3.94"). (Only the width on the back side will be adjusted.)
3) Press [OK].
Note that a left/right binding margin will be created on the opposite side on the back side of paper in
duplex copying. (For example, when a binding margin is created on the right of the front side of the
paper, it will be created on the left of the back side.)
6
Press [OK].
7
Select other copy modes as required, and then press the [START] button on the control
panel.
Downloaded from www.Manualslib.com manuals search engine
4.EDITING FUNCTIONS
Image Shift 117
4 EDITING FUNCTIONS
Creating bookbinding margin
You can easily make a binding margin when you copy a book-type original on both sides of the paper.
P.104 “Making a 2-sided copy from a book-type original”
1
Press [IMAGE SHIFT] on the EDIT menu.
2
Press [BOOK].
3
Adjust the width of the binding margin.
1) Press either [ 0 mm] (0") or [ 30 mm] (1.18").
2) Press [OK].
Downloaded from www.Manualslib.com manuals search engine
4 EDITING FUNCTIONS
118 Image Shift
4
Press [OK].
Select the “Book-type original -> 2-sided copy” mode as well.
P.104 “Making a 2-sided copy from a book-type original”
Downloaded from www.Manualslib.com manuals search engine
4 EDITING FUNCTIONS
Edge Erase 119
Edge Erase
You can whiten the edge of the copied image when a shadow-like dark part appears on it. This function is
called “edge erase”. It is useful when you want to make the copied image neat and clear if the edge of the
original is dirty or torn.
Only standard size originals are applicable.
1
Place paper in the drawer(s).
When using bypass copying, be sure to set the paper size.
2
Place the original(s).
3
Press [EDGE ERASE] on the EDIT menu.
4
Adjust the width of the part to be erased.
1) Press either [ 2 mm] (0.08") or [ 50 mm] (1.97").
2) Press [OK].
Downloaded from www.Manualslib.com manuals search engine
4 EDITING FUNCTIONS
120 Edge Erase
5
Select other copy modes as required, and then press the [START] button on the control
panel.
Downloaded from www.Manualslib.com manuals search engine
4 EDITING FUNCTIONS
Book Center Erase 121
Book Center Erase
You can whiten the center of the copied image when a shadow-like part appears on it. This function is called
“book center erase”. It is useful when you copy book-type originals.
1
Place paper in the drawer(s).
When using bypass copying, be sure to set the paper size.
2
Select the drawer for the desired paper size.
3
Press [BOOK CENTER ERASE] on the EDIT menu.
Book center erase set No setting
Downloaded from www.Manualslib.com manuals search engine
4 EDITING FUNCTIONS
122 Book Center Erase
4
Adjust the width of the part to be erased.
1) Press either [ 2 mm] (0.08") or [ 50 mm] (1.97").
2) Press [OK].
Do not place any heavy objects (4 kg (9 lb.) or over) on the original glass and do not press on
it with force.
Breaking the glass could injure you.
6
Select other copy modes as required, and then press the [START] button on the control
panel.
5
Place the original on the original glass.
Place the original with its bottom toward you, aligning its center
with the yellow indicator under the original glass.
Downloaded from www.Manualslib.com manuals search engine
4 EDITING FUNCTIONS
Dual Page 123
Dual Page
You can copy the 2 facing pages of a book-type original or 2 original sheets placed side by side onto 2
separate sheets of paper or on both sides of 1 sheet of paper. This function is called “dual page”. You do not
have to shift the original on the original glass.
Only A4, B5 and LT sizes are applicable.
1
Place paper in the drawer(s).
2
Press [DUAL PAGE] on the EDIT menu.
3
Press [1 SIDE] or [2 SIDE].
1 SIDE: Copying the 2 facing pages of the original to only 1 side of 2 separate sheets of paper
2 SIDE: Copying the 2 facing pages of the original to 2 sides of 1 sheet of paper
4
Select other copy modes as required.
You can select “image shift” as well.
P.115 “Creating top/bottom margin or left/right margin”
-12- -13- -12- -13-
Downloaded from www.Manualslib.com manuals search engine
4 EDITING FUNCTIONS
124 Dual Page
5
Press the [BASIC] tab to display the BASIC menu, and then select A4, B5 or LT as the
copy paper size.
When using bypass copying, be sure to set the paper size.
Do not place any heavy objects (4 kg (9 lb.) or over) on the original glass and do not press on
it with force.
Breaking the glass could injure you.
7
Press the [START] button on the control panel. When the scanning of the opened pages
is finished, open the next pages and place them.
Repeat this procedure until all the desired pages have been scanned. If the last page is a single page,
press [COPY FINAL PAGE] on the touch panel, and then press the [START] button on the control panel
to start scanning. The scanned pages will be copied.
8
When all the pages have been scanned, press [FINISHED].
The scanned pages will be copied.
6
Open the desired page of the original and place it on
the original glass.
Place the original with its bottom toward you, aligning its center
with the yellow indicator under the original glass.
Downloaded from www.Manualslib.com manuals search engine
4 EDITING FUNCTIONS
2IN1 / 4IN1 125
2IN1 / 4IN1
You can copy 2 or 4 originals to 1 sheet of paper by shrinking them. This function is called “2IN1” or “4IN1”. If
you use this function together with duplex copying, you can make a total of 8 images on 1 sheet of paper.
The illustrations below show how you can arrange the images.
2IN1
4IN1
2IN1 & duplex copying (a: side 1, b: side 2)
4IN1 & duplex copying (a: side 1, b: side 2)
aa
bb
ab
Downloaded from www.Manualslib.com manuals search engine
4 EDITING FUNCTIONS
126 2IN1 / 4IN1
1
Place paper in the drawer(s).
When using bypass copying, be sure to set the paper size.
If you select paper of a different size to that of the original, press [ZOOM] on the BASIC menu. Next
select the desired paper size, press [AMS] and then [OK] in the menu shown below.
2
Place the original(s).
3
Press [2IN1 / 4IN1] on the EDIT menu.
4
Perform 2IN1 / 4IN1 setting.
1) If you want to copy 2 originals on 1 page, select [2IN1]. If you want 4 on 1 page, select [4IN1].
2) Select the duplex mode.
3) Press [OK].
Downloaded from www.Manualslib.com manuals search engine
4.EDITING FUNCTIONS
2IN1 / 4IN1 127
4 EDITING FUNCTIONS
5
Select other copy modes as required, and then press the [START] button on the control
panel.
When the originals are placed on the RADF, scanning and copying start. When they are placed on the
original glass, follow steps 6 and 7.
6
Place the next original, and then press [NEXT COPY] on the touch panel or the [START]
button on the control panel.
Scanning of the next original starts. If you have more than one original, repeat this step until the
scanning of all the originals is finished.
7
When the scanning of all the originals is finished, press [JOB FINISH] on the touch
panel.
Copying starts.
Downloaded from www.Manualslib.com manuals search engine
4 EDITING FUNCTIONS
128 Magazine Sort Mode
Magazine Sort Mode
You can copy more than one original in the book-type page order. This mode is called the magazine sort
mode. Also you can do this as well as fold and staple the copied sheets at their center. This mode is called the
magazine sort & saddle stitch mode.
Magazine sort mode
Magazine sort & saddle stitch mode
The magazine sort mode can also be selected on the BASIC menu. For details, see the following page:
P.94 “Magazine sort / Center fold / Saddle stitch”
1
Place paper in the drawer(s).
Sizes are available as follows:
Magazine sort & saddle stitch: A3, A4-R, B4, LD, LG, LT-R
2
Select the paper size.
Drawer: P.66 “Automatic Paper Selection (APS)”
Bypass tray: P.47 “Bypass Copying”
3
Place the original(s).
When placing portrait originals in a landscape direction as
shown on the right in the magazine sort mode or the
magazine sort & saddle stitch mode, set the image direction
function to ON on the EDIT menu. Otherwise the originals
will not be copied in the proper page order.
P.148 “Image Direction”
12
3
2
1
112
94
76
76
12
3
2
1
Downloaded from www.Manualslib.com manuals search engine
4.EDITING FUNCTIONS
Magazine Sort Mode 129
4 EDITING FUNCTIONS
4
Press [MAGAZINE SORT] on the EDIT menu.
5
Set the saddle stitch mode and the binding margin width as required.
1) When setting the saddle stitch mode, press [STAPLE ON]. If not required, press [STAPLE OFF].
2) Press either [ 2 mm] (0.08") or [ 30 mm] (1.18") to adjust the binding margin width.
3) Press [OK].
For the maximum number of sheets available for saddle stitching, see the following page:
P.94 “Magazine sort / Center fold / Saddle stitch”
6
Select other copy modes as required, and then press the [START] button on the control
panel.
Downloaded from www.Manualslib.com manuals search engine
4 EDITING FUNCTIONS
130 Image Editing
Image Editing
You can select the various editing functions shown below for scanned images.
Trimming: You can select a certain area of an original and copy only the selected area.
Masking: You can mask a certain area of an original and copy only the unmasked area.
Mirror image: You can reverse an image like a mirror.
Negative/Positive reversal: You can reverse the light-and-dark of an image.
Trimming / Masking
You can select the desired area of an original and copy only the selected area (trimming). You can also mask
the desired area of an original and copy only the unmasked area (masking). On both functions you can select
up to 4 areas on 1 original. The selected area should be in a rectangle.
yOnly standard size originals are applicable.
yNote that the entire image of the selected area may not be copied if you do not select proper sizes for
the original and copy paper.
1
Place paper in the drawer(s).
When using bypass copying, be sure to set the paper size.
2
Press [EDITING] on the EDIT menu.
Trimming Masking
Downloaded from www.Manualslib.com manuals search engine
4.EDITING FUNCTIONS
Image Editing 131
4 EDITING FUNCTIONS
3
Select [TRIM] or [MASK].
Do not place any heavy objects (4 kg (9 lb.) or over) on the original glass and do not press on
it with force.
Breaking the glass could injure you.
4
Place the original on the original glass with its face
up.
Place it with its bottom toward you. Align its top left corner
against that of the original glass so that the original will be
aligned with the original scales.
5
Read the following 4 values to specify the area using
the left and top scales on the original glass.
X1: From the top left to the left edge of the selected area
X2: From the top left to the right edge of the selected area
Y1: From the top left to the upper edge of the selected area
Y2: From the top left to the lower edge of the selected area
Note that the marks of the original scales have a 2 mm (0.08")
pitch.
Downloaded from www.Manualslib.com manuals search engine
4 EDITING FUNCTIONS
132 Image Editing
6
Key in the read values.
1) Press [X1], [X2], [Y1] and [Y2], and then key in the read values correspondingly.
2) You can specify up to 4 areas on 1 page. When you want to specify more than one area, press
[AREA 1] to [AREA 4] to switch the area, and then key in the values correspondingly.
3) Press [OK] after you have specified all the areas.
8
Select other copy modes as required, and then press the [START] button on the control
panel.
7
Place the original again on the original glass with its
face down.
Place it with its bottom toward you. Align its top left corner
against that of the original glass.
Downloaded from www.Manualslib.com manuals search engine
4.EDITING FUNCTIONS
Image Editing 133
4 EDITING FUNCTIONS
Mirror image / Negative/positive reversal
You can reverse an image like a mirror (mirror image), or you can reverse light-and-dark of an image
(negative/positive reversal).
Negative/positive reversal is available only when BLACK or FULL COLOR is selected as a color mode.
1
Place paper in the drawer(s).
When using bypass copying, be sure to set the paper size.
2
Place the original(s).
3
Press [EDITING] on the EDIT menu.
4
Select [MIRROR] or [NEG/POS], and then press [OK].
5
Select other copy modes as required, and then press the [START] button on the control
panel.
Mirror image
Negative/Positive reversal
Downloaded from www.Manualslib.com manuals search engine
4 EDITING FUNCTIONS
134 XY Zoom
XY Zoom
You can change the reproduction ratio in both vertical and horizontal directions separately. This function is
called “XY zoom”.
The reproduction ratio is changeable from 25 to 400%. However in the following cases, this range is 25 to
200%.
yWhen the color mode is FULL COLOR or AUTO COLOR
yWhen the original mode is IMAGE SMOOTHING
yWhen the color mode is BLACK and the original mode is PHOTO
yWhen TWIN COLOR COPY is selected
yWhen MONO COLOR is selected
yWhen the original is placed on the RADF
1
Place paper in the drawer(s).
When using bypass copying, be sure to set the paper size.
2
Place the original(s).
3
Press [XY ZOOM] on the EDIT menu.
100%
100%
200%
200%
Downloaded from www.Manualslib.com manuals search engine
4.EDITING FUNCTIONS
XY Zoom 135
4 EDITING FUNCTIONS
4
Set the reproduction ratio in both vertical and horizontal directions.
1) Press [X], and then press either [ 25%] or [ 400%] for a horizontal direction.
2) Press [Y], and then press either [ 25%] or [ 400%] for a vertical direction.
3) Press [OK].
5
Select other copy modes as required, and then press the [START] button on the control
panel.
Downloaded from www.Manualslib.com manuals search engine
4 EDITING FUNCTIONS
136 Cover Sheet
Cover Sheet
You can add a special type of paper such as colored paper as a front cover sheet or a back cover sheet. This
function is called “cover sheet”. In the cover sheet mode, you can select whether or not to copy the front or
back cover sheet as shown in the table below.
Example: Selecting “TOP COPIED” for the front cover and “BLANK” for the back cover
A sheet copied on the top is added as the front cover and a blank sheet as the back cover.
1
Place the paper for the cover sheets.
Place it on the bypass tray or in a drawer previously set for cover sheets. The paper for the cover
sheets must be placed in a different paper source than normal paper.
yWhen placing paper in a drawer for cover sheets, be sure to select “COVER” as the paper type,
and also set the paper size and thickness.
P.23 “Setting paper type”
yWhen placing paper on the bypass tray, be sure to set the paper size and thickness.
P.47 “Bypass Copying”
yPlace the paper for cover sheets of the same size as normal paper in the same direction.
2
Place the normal paper in the drawer(s).
3
Place the original(s).
When placing them on the original glass, they must be placed from the first page.
Front cover Back cover
Mode Description Mode Description
NONE Does not add a sheet as the front
cover
NONE Does not add a sheet as the back
cover
BLANK Adds a blank sheet as the front
cover
BLANK Adds a blank sheet as the back
cover
TOP COPIED Adds a sheet copied on the top
side as the front cover
TOP COPIED Adds a sheet copied on the top
side as the back cover
BOTH
COPIED
Adds a sheet copied on both
sides as the front cover
BOTH
COPIED
Adds a sheet copied on both
sides as the back cover
ONLY BACK
COPIED
Adds a sheet copied on the back
side as the back cover
REPORT
2003
3
2
1
REPORT
2003
Downloaded from www.Manualslib.com manuals search engine
4.EDITING FUNCTIONS
Cover Sheet 137
4 EDITING FUNCTIONS
4
Press [COVER SHEET] on the EDIT menu.
5
Select the front and back cover settings, and then press [OK].
You can select [BOTH COPIED] for the front or back cover sheet only when [1->2 DUPLEX] or [2->2
DUPLEX] is set for the 2-sided copy mode on the basic menu.
6
Press the [BASIC] tab to display the BASIC menu. Then select a drawer in which
normal paper is placed (not the one for the cover sheets).
You must place the normal paper of the same size and direction as that for the cover sheets in advance.
7
Select other copy modes as required, and then press the [START] button on the control
panel.
When the originals are placed on the RADF, scanning and copying start.
When they are placed on the original glass, follow steps 8 and 9.
Downloaded from www.Manualslib.com manuals search engine
4 EDITING FUNCTIONS
138 Cover Sheet
8
Place the next original, and then press [NEXT COPY] on the touch panel or the [START]
button on the control panel.
Scanning of the next original starts. Repeat this procedure until the scanning of all the originals is
finished.
9
When the scanning of all the originals is finished, press [JOB FINISH] on the touch
panel.
Copying starts.
Downloaded from www.Manualslib.com manuals search engine
4 EDITING FUNCTIONS
Sheet Insertion 139
Sheet Insertion
You can insert a special type of paper such as colored paper at the desired page. This function is called “sheet
insertion”. You can insert up to 2 types of sheets for a total of 50 pages. The sheet insertion mode has the
following 2 types:
COPIED: Inserts a copied sheet, replacing the specified page.
BLANK: Inserts a blank sheet before the specified page.
1
Place sheets for sheet insertion.
Place them on the bypass tray or in a drawer previously set for insertion sheets. The paper for the
insertion sheets must be placed in a different paper source than normal paper.
yWhen placing paper in a drawer for sheet insertion, be sure to select “INSERT 1” or “INSERT 2”
as a paper type, and also set the paper size and thickness.
P.23 “Setting paper type”
yWhen placing paper on the bypass tray, be sure to set the paper size and thickness.
P.47 “Bypass Copying”
yPlace the paper for insertion sheets of the same size as normal paper in the same direction.
2
Place the normal paper in the drawer(s).
3
Place the original(s).
When placing them on the original glass, they must be placed from the first page.
4
Press [SHEET INSERTION] on the EDIT menu.
REPORT
2003
1
2
3
4
4
3
REPORT
2003
2
1
3
REPORT
2003
2
1
Downloaded from www.Manualslib.com manuals search engine
4 EDITING FUNCTIONS
140 Sheet Insertion
5
Select either [COPIED] or [BLANK].
6
Select the page where the insertion sheets will be inserted.
1) Select the type of the insertion sheets ([INSERT SOURCE 1] or [INSERT SOURCE 2]).
2) Key in page numbers (1 to 1000) where the insertion sheets will be inserted, and then press [SET].
Repeat steps 1) and 2) if you want to insert sheets at more than one page.
3) Press [OK] after you have keyed in the page numbers.
yIf you selected [COPIED] in step 5, the selected page will be replaced with a copied insertion
sheet. If you selected [BLANK], a blank insertion sheet will be inserted before the selected page.
yUp to 50 pages in total can be selected for [INSERT SOURCE 1] and [INSERT SOURCE 2].
7
Press the [BASIC] tab to display the BASIC menu. Then select the drawer in which
normal paper is placed (not the one for sheet insertion).
You must place the normal paper of the same size and direction as that for the insertion sheets in
advance.
Downloaded from www.Manualslib.com manuals search engine
4.EDITING FUNCTIONS
Sheet Insertion 141
4 EDITING FUNCTIONS
8
Select other copy modes as required, and then press the [START] button on the control
panel.
When the originals are placed on the RADF, scanning and copying start.
When they are placed on the original glass, follow steps 9 and 10.
9
Place the next original, and then press [NEXT COPY] on the touch panel or the [START]
button on the control panel.
Scanning of the next original starts. Repeat this procedure until the scanning of all the originals is
finished.
10
When the scanning of all the originals is finished, press [JOB FINISH] on the touch
panel.
Copying starts.
Downloaded from www.Manualslib.com manuals search engine
4 EDITING FUNCTIONS
142 Time Stamp
Time Stamp
You can add the date and time on the copied paper.
1
Place paper in the drawer(s).
2
Place the original(s).
3
Press [TIME STAMP] on the EDIT menu.
4
Select the direction and position of the time stamp.
1) Select the direction ([SHORT EDGE] or [LONG EDGE]).
2) Select the position ([UPPER] or [LOWER]).
3) Press [OK].
5
Select other copy modes as required, and then press the [START] button on the control
panel.
YYYY.MM.DD 14:54
YYYY.MM.DD 14:54
Printed at the bottom
of a portrait copy
Printed at the top
of a landscape copy
Downloaded from www.Manualslib.com manuals search engine
4 EDITING FUNCTIONS
Page Number 143
Page Number
You can add a page number on the copied paper.
1
Place paper in the drawer(s).
2
Place the original(s).
3
Press [PAGE NUMBER] on the EDIT menu.
4
Select the direction and position of a page number.
1) Select the direction ([SHORT EDGE] or [LONG EDGE]).
2) Select the position ([TOP LEFT], [TOP CENTER], etc.).
3) If you want to specify the page number to start with, press and go to step 5. Otherwise, press
[OK] and go to step 6.
3
2
1
3
2
1
Printed at the bottom center
of a portrait copy
Printed at the top right
of a landscape copy
Downloaded from www.Manualslib.com manuals search engine
4 EDITING FUNCTIONS
144 Page Number
5
Specify the page number you want to start with.
1) Key in the page number.
2) Press [OK].
You can specify the initial page from 1 to 32766.
6
Select other copy modes as required, and then press the [START] button on the control
panel.
Downloaded from www.Manualslib.com manuals search engine
4 EDITING FUNCTIONS
Job Build 145
Job Build
You can scan several stacks of originals whose settings are individually different, and then copy or store them
in one operation. This function is called “job build”. For example, news clips (in the TEXT mode) and
photographs in magazines (in the PHOTO mode) in A3 size and photographs in A4 size can be scanned in
the optimal settings for each, and copied in one operation.
yUp to 1000 pages of originals can be copied in one operation. Or, up to 250 pages of originals in one
operation when the hard disk is not installed. There is no limit for the number of jobs.
ySome settings are not available for job build, and some settings for the first job will be applied to all of
the other jobs. See the table below before setting job build.
Settings not available Settings applied for all jobs Settings changeable for
each job
Automatic Paper Selection
BOOK -> 2 (Book-type
original -> 2-sided copy)
Twin color copying
Editing
XY zoom
Cover sheet
Sheet insertion
Magazine sort
Magazine sort & saddle stitch
2IN1 / 4IN1
Full image
Image repeat
e-Filing / File
Mixed-size originals
Copy paper size
Finishing mode
Photo zoom
Image shift
Book center erase
Time stamp
Page number
Image direction
Book - tablet
Omit blank page
Reproduction ratio
Automatic Magnification
Selection (Default setting for
job build)
Original size
Original mode
Color mode
Simplex/Duplex copying
settings other than Book-type
original -> 2-sided copy (1->1
SIMPLEX, 2->1 SPLIT, 1->2
DUPLEX, 2->2 DUPLEX)
Background adjustment
Sharpness
Edge erase
Dual page
Document feeder (Feeding
mode)
Outside erase
Downloaded from www.Manualslib.com manuals search engine
4 EDITING FUNCTIONS
146 Job Build
1
Press [JOB BUILD] on the EDIT menu.
2
Press [OK].
Job build is now set and the message below appears.
Downloaded from www.Manualslib.com manuals search engine
4.EDITING FUNCTIONS
Job Build 147
4 EDITING FUNCTIONS
3
Place the first stack of originals, and then select settings.
yWhen placing the original on the original glass, remember that 1 page is equal to 1 job.
yWhen placing mixed-size originals on the RADF, see the following page:
P.68 “Copying mixed-size originals in one operation”
yIf you want to use a particular drawer, select it.
yPress [SETTINGS] on the touch panel to confirm the current settings.
yIf you want to change the settings, press the [FUNCTION CLEAR] button on the control panel,
and then restart the procedure from step 1.
4
Press the [START] button on the control panel.
Scanning starts. When the scanning of all the originals is finished, the message below appears.
5
Place the next stack of originals, and then select the settings.
Repeat steps 4 and 5 until all the desired pages have been scanned.
If you do not change any settings, those for the last job will be applied.
6
When the scanning of all the originals is finished, change the number of copy sets as
required. Then press [JOB FINISH] on the touch panel.
Copying starts. If any storing function is set, that will also start.
Downloaded from www.Manualslib.com manuals search engine
4 EDITING FUNCTIONS
148 Image Direction
Image Direction
When you make 1-sided portrait originals to 2-sided copy by placing them in a landscape direction, normally
the copied pages are “open to top”. With this function you can make them “open to left”. This function is called
“image direction”.
When you make 2-sided “open to left” portrait originals to 1-sided copy, normally the copied pages exit in a
different direction alternately. With this function, you can make them all exit in the same direction.
1-sided portrait original (placed in a landscape direction) -> 2-sided copy
2-sided “open to left” portrait original -> 1-sided copy
1
Place paper in the drawer(s).
2
Place the original(s).
3
Set duplex copying setting.
P.101 “Duplex Copying”
4
Press [IMAGE DIRECTION] on the EDIT menu.
No setting“IMAGE DIRECTION” set
Downloaded from www.Manualslib.com manuals search engine
4.EDITING FUNCTIONS
Image Direction 149
4 EDITING FUNCTIONS
5
Press [OK].
Image direction is now set.
6
Select other copy modes as required, and then press the [START] button on the control
panel.
Downloaded from www.Manualslib.com manuals search engine
4 EDITING FUNCTIONS
150 Book - Tablet
Book - Tablet
As for the directions of originals or copied images, “open to left” is called “book” and “open to top” is called
“tablet”. To make 1-sided originals to 2-sided copies, you can choose “tablet” or “book” copy. To make 2-sided
originals to 2-sided copies, you can switch “book” originals to “tablet” copies, and vice versa.
1
Place paper in the drawer(s).
2
Place the original(s).
3
Press [BOOK <->TABLET] on the EDIT menu.
4
Press [OK].
Book - tablet is now set.
5
Select other copy modes as required, and then press the [START] button on the control
panel.
Downloaded from www.Manualslib.com manuals search engine
4 EDITING FUNCTIONS
ADF -> SADF 151
ADF -> SADF
You can switch the feeding mode when the RADF (Reversing Automatic Document Feeder) is used, from
“ADF” to “SADF”. The paper feeding mode has 2 types as follows:
ADF (Continuous feed mode): Feeds originals continuously when you press the [START] button on the
control panel while originals are being placed on the RADF. This is useful when you make more than one
copy in one operation. (Default setting)
SADF (Single feed mode): Feeds originals one by one automatically. This is useful when you usually only
have 1 original.
When the single feed mode (SADF) is set, place originals one sheet at a time. If you place more than one
original, the copied image may be skewed or the originals may misfeed.
1
Place paper in the drawer(s).
2
Press [ADF -> SADF] on the EDIT menu.
3
Press [OK].
The feeding mode is now set at “single feed mode”.
4
Select other copy modes as required.
Downloaded from www.Manualslib.com manuals search engine
4 EDITING FUNCTIONS
152 ADF -> SADF
5
Place the original(s) on the RADF one sheet at a time.
The original is pulled into the RADF automatically, and then the menu below appears.
Repeat step 5 if you have another original. The placed original will be pulled into the RADF
automatically even if you do not press [NEXT COPY] on the touch panel.
6
When the scanning of all the originals is finished, press [JOB FINISH].
If you want to stop copying, press [JOB CANCEL].
Downloaded from www.Manualslib.com manuals search engine
4 EDITING FUNCTIONS
Full Image 153
Full Image
You can copy the entire image of an original including any fine text at its edge. This function is called “full
image”. With this function, the image will be copied with its reproduction ratio reduced by approx. 1 to 5%.
1
Place paper in the drawer(s).
2
Place the original(s).
3
Press [ZOOM] on the touch panel.
4
Select sizes for the original and copy paper.
1) Select the original size.
2) Select the paper size.
3) Press [OK].
The menu returns to the BASIC menu.
5
Press [FULL IMAGE] on the EDIT menu.
Downloaded from www.Manualslib.com manuals search engine
4 EDITING FUNCTIONS
154 Full Image
6
Select other copy modes as required, and then press the [START] button on the control
panel.
Downloaded from www.Manualslib.com manuals search engine
4 EDITING FUNCTIONS
Image Repeat 155
Image Repeat
You can copy a certain area on an original repeatedly in the times that you specified. This function is called
“image repeat”.
yYou can repeat copying up to 8 times.
yOnly standard size originals are available.
When registering this function into a template, be sure to select [DISABLE] of “AUTOMATIC START”. If
[ENABLE] is selected, copies may not be made correctly because the original size is not detected.
P.177 “TEMPLATES”
1
Place paper in the drawer(s).
When using bypass copying, be sure to set the paper size.
2
Press [IMAGE REPEAT] on the EDIT menu.
3
Place the original on the original glass with its face
up.
Place it with its bottom toward you. Align its top left corner
against that of the original glass so that the original will be
aligned with the original scales.
Downloaded from www.Manualslib.com manuals search engine
4 EDITING FUNCTIONS
156 Image Repeat
Do not place any heavy objects (4 kg (9 lb.) or over) on the original glass and do not press on
it with force.
Breaking the glass could injure you.
5
Key in the read values and specify the repeat count.
1) Press [X1], [X2], [Y1] and [Y2], and then key in the read value correspondingly.
2) Change the number of times you repeat the image (repeat count) by pressing either [ 2] or [ 8].
3) Press [OK].
yThe selected area will be copied from the top right corner in a vertical direction.
yIf the repeated image runs over the paper size, that part will not be copied.
7
Select other copy modes as required, and then press the [START] button on the control
panel.
4
Read the following 4 values to specify the area using
the left and top scales on the original glass.
X1: From the top left to the left edge of the selected area
X2: From the top left to the right edge of the selected area
Y1: From the top left to the upper edge of the selected area
Y2: From the top left to the lower edge of the selected area
Note that the marks of the original scale have a 2 mm (0.08")
pitch.
6
Place the original again on the original glass with its
face down.
Place with its bottom toward you. Align its top left corner against
that of the original glass.
Downloaded from www.Manualslib.com manuals search engine
4 EDITING FUNCTIONS
Omit Blank Page 157
Omit Blank Page
You can remove blank sheets included in the scanned originals before copying is started. This function is
called “omit blank page”.
yThis function may not properly detect blank sheets included in the following types of originals:
- Half-tone originals
- Originals including sheets almost blank (e.g. blank pages having only page numbers)
yIf you copy 2-sided originals including blank sheets to 2-sided copy while this function is enabled, the
front and back sides of the originals and the copies will not match.
The sensitivity to detect blank pages can be changed. For details, refer to the MFP Management Guide.
1
Place paper in the drawer(s).
When using bypass copying, be sure to set the paper size.
2
Place the original(s).
3
Press [OMIT BLANK PAGE] on the EDIT menu.
1 3
5 6
1 3
5 6
Downloaded from www.Manualslib.com manuals search engine
4 EDITING FUNCTIONS
158 Omit Blank Page
4
Press [OK].
Omit blank page is now set.
5
Select other copy modes as required, and then press the [START] button on the control
panel.
Scanning and copying start. A message notifying you of the number of the blank sheets appears for
approx. 5 seconds.
Downloaded from www.Manualslib.com manuals search engine
4 EDITING FUNCTIONS
Outside Erase 159
Outside Erase
You can whiten a shadow-like dark part which has appeared outside of the copied image; this has been
caused by a gap between the original glass and the platen sheet. This function is called “outside erase”. It is
useful when you place thick originals such as booklets on the original glass.
yThis function is disabled when you place originals on the RADF or you place them on the original glass
with the RADF or the Original Cover closed fully.
yWhen this function is enabled, the automatic density adjustment is disabled. Adjust the density level
manually.
yOriginals with an intricate outer shape (e.g. an original with cut-out parts on its edge) may not be copied
properly because this function may not detect the border between the original and areas not belonging
to it.
1
Place paper in the drawer(s).
When using bypass copying, be sure to set the paper size.
2
Select the drawer for the desired paper size.
3
Press [OUTSIDE ERASE] on the EDIT menu.
No settingOutside erase set
Downloaded from www.Manualslib.com manuals search engine
4 EDITING FUNCTIONS
160 Outside Erase
4
Set “outside erase”.
1) Press [ON].
2) Adjust the width of the border around the original by pressing either or as required.
When you adjust it to the side, the area to be detected as not belonging to the original is
widened.
When you adjust it to the side, the area to be detected as not belonging to the original is
narrowed.
3) Press [OK].
Do not place any heavy objects (4 kg (9 lb.) or over) on the original glass and do not press on
it with force.
Breaking the glass could injure you.
6
Select other copy modes as required, and then press the [START] button on the control
panel.
5
Place the original on the original glass.
Press [ZOOM] and set the size of the original.
P.76 “Specifying both the original size and the copy paper
size separately”
yWhen placing the original, be sure that the Original Cover
or the RADF is fully raised. If not, this function may not
properly be able to detect the border between the original
and areas not belonging to it.
yDo not directly look at the original glass during copying
since an intense light may leak.
Downloaded from www.Manualslib.com manuals search engine
5.IMAGE ADJUSTMENT
This chapter describes the image adjustment functions allowing you to change the overall color balance of a
copied image, copy an original in a specified color, and so on.
Displaying IMAGE Menu...................................................................................................... 162
Using Image Adjustment Functions................................................................................... 163
Color balance (YMCK adjustment).....................................................................................................................163
RGB adjustment .................................................................................................................................................164
One-touch adjustment ........................................................................................................................................165
Background adjustment......................................................................................................................................166
Sharpness ..........................................................................................................................................................167
Twin color copying..............................................................................................................................................168
Mono color copying ............................................................................................................................................173
Hue.....................................................................................................................................................................174
Saturation ...........................................................................................................................................................175
ADF Scan Noise Reduction................................................................................................................................176
Downloaded from www.Manualslib.com manuals search engine
5 IMAGE ADJUSTMENT
162 Displaying IMAGE Menu
Displaying IMAGE Menu
You can display the IMAGE menu by pressing the [IMAGE] tab on the touch panel when you want to use
various image adjustment functions.
Downloaded from www.Manualslib.com manuals search engine
5 IMAGE ADJUSTMENT
Using Image Adjustment Functions 163
Using Image Adjustment Functions
Color balance (YMCK adjustment)
This function allows you to adjust the overall color balance of the copied image by changing the strength of
YELLOW (Y), MAGENTA (M), CYAN (C) and BLACK (K). This function is available in the full color mode or
the auto color mode.
1
Press [COLOR BALANCE] in the IMAGE menu.
2
Press or of each color to obtain the desired color balance.
After completing the color balance adjustment, press [OK]. This is the end of the setting.
If you want to adjust each color balance on every density area, press [DETAIL] and go to the next step.
3
Press or of the color on each density area to obtain the desired color balance.
For example, when you adjust the high density area of magenta (M) to the side, the magenta in its
high density area becomes darker.
After completing the adjustment, press [OK].
Canceling color balance adjustment
yMove the indicator of the color whose adjustment you want to cancel to the middle, and then press [OK].
yIf you want to cancel the adjustment of all colors, press [RESET], and then [OK].
YELLOW (Y)MAGENTA (M)CYAN (C)BLACK (K)
Downloaded from www.Manualslib.com manuals search engine
5 IMAGE ADJUSTMENT
164 Using Image Adjustment Functions
RGB adjustment
This function allows you to adjust the overall color balance of the copied image by changing the strength of
RED (R), GREEN (G) and BLUE (B). This function is available in the full color mode or the auto color mode.
1
Press [RGB ADJUSTMENT] in the IMAGE menu.
2
Press or of the color to obtain the desired color balance, and then press [OK].
Canceling RGB adjustment
yMove the indicator of the color whose adjustment you want to cancel to the middle, and then press [OK].
yIf you want to cancel the adjustment of all colors, press [RESET], and then [OK].
RED (R)GREEN (G)BLUE (B)
Downloaded from www.Manualslib.com manuals search engine
5.IMAGE ADJUSTMENT
Using Image Adjustment Functions 165
5 IMAGE ADJUSTMENT
One-touch adjustment
This function allows you to obtain the image quality already registered in this equipment. You can select the
image quality from “WARM”, “COOL”, “VIVID”, “CLEAR” and “MARKER”. This function is available only in the
full color mode.
When [MARKER] is selected
Multiple colors drawn with a highlight pen on the original can be copied so as to be distinguished clearly;
however, the color shade may not be the same as that of the original depending on the color of the highlight
pen.
1
Press [ONE TOUCH ADJUSTMENT] in the IMAGE menu.
2
Select the image quality, and then press [OK].
Canceling one-touch adjustment
Press [RESET].
WARM COOL VIVID CLEAR
Downloaded from www.Manualslib.com manuals search engine
5 IMAGE ADJUSTMENT
166 Using Image Adjustment Functions
Background adjustment
This function allows you to adjust the density of the original’s background. It avoids the back side of a 2-sided
original becoming visible on its front side.
This mode cannot be used with the automatic density adjustment function.
P.73 “Density Adjustment”
1
Press [BACKGROUND ADJUSTMENT] in the IMAGE menu.
2
Press [LIGHT] or [DARK] to adjust the density, and then press [OK].
Canceling background adjustment
yMove the indicator to the middle, and then press [OK].
yPress [RESET], and then [OK].
Front Back Not adjusted
Adjusted to have
a lightened
background
Downloaded from www.Manualslib.com manuals search engine
5.IMAGE ADJUSTMENT
Using Image Adjustment Functions 167
5 IMAGE ADJUSTMENT
Sharpness
This function allows you to emphasize or blur the outline of the image.
1
Press [SHARPNESS] in the IMAGE menu.
2
Press [SOFT] or [SHARP] to adjust the sharpness, and then press [OK].
When the sharpness level is adjusted to the [SOFT] side, the moire fringes on the printed photos, etc.
are softened. If it is adjusted to the [SHARP] side, the letters and fine lines become sharper.
Canceling sharpness adjustment
yMove the indicator to the middle, and then press [OK].
yPress [RESET], and then [OK].
Downloaded from www.Manualslib.com manuals search engine
5 IMAGE ADJUSTMENT
168 Using Image Adjustment Functions
Twin color copying
This function allows you to copy a colored original in 2 specified colors. There are 2 types of twin color
copying as follows:
TWIN COLOR SELECTABLE: The black part and the parts other than black in the original are copied in 2
specified colors.
RED & BLACK: The red part in the original is copied in red and the parts other than red are copied in black
and white.
The color may not be correctly reproduced in some originals. In that case, copy them in the full color mode.
Twin color selectable
1
Press [TWIN COLOR COPY] in the IMAGE menu.
2
Press [TWIN COLOR SELECTABLE].
“CHANGE BLACK TO”: BLUE
“SECOND COLOR”: MAGENTA
Downloaded from www.Manualslib.com manuals search engine
5.IMAGE ADJUSTMENT
Using Image Adjustment Functions 169
5 IMAGE ADJUSTMENT
3
Select a color for the parts other than black in the original.
1) Press [SECOND COLOR].
2) Select the desired color.
4
Select a color for the black part in the original.
1) Press [CHANGE BLACK TO].
2) Select the desired color.
After selecting the color, press [OK]. This is the end of the setting.
If you want to adjust the color balance, press [ADJUST] and go to the next step.
yWhen the two colors specified are the combination of black and a color other than black, color
balance adjustment is enabled. When neither of the two colors is black, or when both of them are
black, this adjustment is disabled.
yThe color balance of a color other than black can be adjusted.
Downloaded from www.Manualslib.com manuals search engine
5 IMAGE ADJUSTMENT
170 Using Image Adjustment Functions
5
Press or of the color to obtain the desired color balance.
After completing the adjustment, press [OK]. This is the end of the setting.
If you want to adjust each color balance on every density area, press [DETAIL] and go to the next step.
6
Press or of the color on each density area to obtain the desired color balance.
For example, when you adjust the high density area of magenta (M) to the side, the magenta in its
high density area becomes darker.
After completing the adjustment, press [OK].
Canceling color balance adjustment
yMove the indicator of the color whose adjustment you want to cancel to the middle, and then press [OK].
yIf you want to cancel the adjustment of all colors, press [RESET], and then [OK].
Downloaded from www.Manualslib.com manuals search engine
5.IMAGE ADJUSTMENT
Using Image Adjustment Functions 171
5 IMAGE ADJUSTMENT
RED & BLACK
1
Press [TWIN COLOR COPY] in the IMAGE menu.
2
Press [RED & BLACK].
3
To adjust the red color or the red-and-black area, press [ADJUST]. If you do not want to
adjust the color, press [OK].
If you do not adjust the red color or the red-and-black area, this is the end of the setting.
If you want to adjust it, go to the next step.
Downloaded from www.Manualslib.com manuals search engine
5 IMAGE ADJUSTMENT
172 Using Image Adjustment Functions
4
Adjust the red color or the red-and-black area.
Red in original
Press or of yellow or magenta to adjust the red color balance.
Range Adjustment
Press or to adjust the red-and-black area. When you set the red area to be larger, the area
to be copied in red becomes larger. When you set the black area to be larger, the area to be copied
in black becomes larger.
After completing the adjustment, press [OK]. This is the end of the setting.
If you want to adjust color balance of yellow and magenta on every density area, press [DETAIL] and go
to the next step.
5
Press or on each density area to obtain the desired color balance.
For example, when you adjust the high density area of magenta (M) to the side, the magenta in its
high density area will become darker.
After completing the adjustment, press [OK].
Canceling color balance adjustment
yMove the indicator of the color whose adjustment you want to cancel to the middle, and then press [OK].
yIf you want to cancel the adjustment of all colors, press [RESET], and then [OK].
Downloaded from www.Manualslib.com manuals search engine
5.IMAGE ADJUSTMENT
Using Image Adjustment Functions 173
5 IMAGE ADJUSTMENT
Mono color copying
This function allows you to make copies in a single color except black.
1
Press [MONO COLOR] in the IMAGE menu.
2
Press the button corresponding to the desired color.
Canceling mono color copying
Press [RESET].
BLUE
Downloaded from www.Manualslib.com manuals search engine
5 IMAGE ADJUSTMENT
174 Using Image Adjustment Functions
Hue
This function allows you to adjust the hue of the basic color. This function is available in the full color mode or
the auto color mode.
1
Press [HUE] in the IMAGE menu.
2
Adjust the hue.
1) Adjust the hue of the entire image by pressing or , in section A.
2) Adjust the hue of each basic color by pressing or , in section B.
3) Press [OK].
Canceling hue adjustment
yMove the indicator of the color whose adjustment you want to cancel to the middle, and then press [OK].
yIf you want to cancel the adjustment of all colors, press [RESET], and then [OK].
A
B
Downloaded from www.Manualslib.com manuals search engine
5.IMAGE ADJUSTMENT
Using Image Adjustment Functions 175
5 IMAGE ADJUSTMENT
Saturation
This function enables you to adjust the color saturation of the entire image. This function is available in the full
color mode or the auto color mode.
1
Press [SATURATION] in the IMAGE menu.
2
Press or to adjust the saturation, and then press [OK].
Canceling saturation adjustment
y Move the indicator to the middle, and then press [OK].
y Press [RESET], and then [OK].
Downloaded from www.Manualslib.com manuals search engine
5 IMAGE ADJUSTMENT
176 Using Image Adjustment Functions
ADF Scan Noise Reduction
You can set the scan noise reduction level for scanning originals with the Reversing Automatic Document
Feeder at copying. Scan noise can be reduced if it is conspicuous on images due to fine dust.
1
Press [ADF NOISE REDUCTION] in the IMAGE menu.
2
Press [LOW], [MIDDLE], or [HIGH] to adjust the scan noise reduction level, and then
press [OK].
Fine lines other than scan noise may become faint if you set the scan noise reduction level higher.
Canceling the ADF scan noise reduction
Press [NONE] or [RESET], and then [OK].
Downloaded from www.Manualslib.com manuals search engine
6.TEMPLATES
This chapter describes how to use templates.
Templates.............................................................................................................................. 178
Displaying template menu ..................................................................................................................................178
Using “Useful Templates” ...................................................................................................................................179
Registering Templates ......................................................................................................... 181
Registering templates into the public template group ........................................................................................181
Creating a new private group .............................................................................................................................184
Registering templates into a private group .........................................................................................................186
Recalling Templates............................................................................................................. 188
Changing Data ...................................................................................................................... 191
Changing private group data ..............................................................................................................................191
Changing template data .....................................................................................................................................192
Deleting Groups or Templates ............................................................................................ 194
Deleting private groups.......................................................................................................................................194
Deleting templates..............................................................................................................................................195
Downloaded from www.Manualslib.com manuals search engine
6 TEMPLATES
178 Templates
Templates
You can create a template with several functions that are frequently used so that they can be employed
whenever you want by recalling the template, thus eliminating the need to perform complicated settings every
time. Templates can be used in copying, scanning and sending a fax.
Fax functions are available only when the FAX Unit is installed.
Displaying template menu
You can display the template menu by pressing [TEMPLATE] on the touch panel when you want to register or
recall templates.
2012.5.5
1
2012.5.5
1
2012.5.5
1
2012.5.5
1
=++
Downloaded from www.Manualslib.com manuals search engine
6.TEMPLATES
Templates 179
6 TEMPLATES
Using “Useful Templates”
This equipment has 12 default templates that can be used immediately. They are registered to the group
number 001 “Useful Templates”. For how to recall them, see the following page:
P.188 “Recalling Templates”
Templates with copying functions
Templates with scanning functions *2
Button Function *1
Original size: 2-sided small originals, such as business cards
Paper size: A4 (equipment for the A/B format), LT (equipment for the LT format)
2IN1 / 4IN1: 2IN1
(Place the original on the original glass before recalling the template since the
automatic start is enabled in this template. After scanning the front side and then
the back of the 2-sided original, press [JOB FINISH] to start copying.)
Color mode: AUTO COLOR
2IN1 / 4IN1: 2IN1
Simplex/Duplex: 1 -> 1 SIMPLEX
Color mode: AUTO COLOR
Paper selection: Automatic Paper Selection
Original size: Mixed-size
TWIN/MONO COLOR: TWIN COLOR (BLACK & RED)
Button Function *1
Original: 1-sided
Color mode: FULL COLOR
Original mode: TEXT
Storing method: Stored in the share folder of this equipment as a high-
compression PDF file (multi)
Original: 2-sided
Color mode: FULL COLOR
Original mode: TEXT
Storing method: Stored in the share folder of this equipment as a high-
compression PDF file (multi)
Original: 1-sided
Color mode: BLACK
Original mode: TEXT/PHOTO
Resolution: 400 dpi
Storing method: Stored in the share folder of this equipment as a PDF file (multi)
Downloaded from www.Manualslib.com manuals search engine
6 TEMPLATES
180 Templates
Templates with e-Filing functions *2
*1 Functions other than those noted here are in their default settings.
*2 Available only when the hard disk is installed.
Original: 1-sided
Color mode: AUTO COLOR
Original mode: TEXT
Resolution: 300 dpi
Storing method: Stored in the e-Filing box (public box)
Button Function *1
Color mode: AUTO COLOR
Original mode: TEXT/PHOTO
Simplex/Duplex: 1 -> 1 SIMPLEX
Storing method: Stored in the e-Filing box
No copying
Color mode: AUTO COLOR
Original mode: TEXT/PHOTO
Simplex/Duplex: 2 -> 1 SPLIT
Storing method: Stored in the e-Filing box
No copying
Color mode: AUTO COLOR
Original mode: TEXT/PHOTO
Simplex/Duplex: 1 -> 2 DUPLEX
Storing method: Stored in the e-Filing box
Copying performed
Color mode: AUTO COLOR
Original mode: TEXT/PHOTO
Simplex/Duplex: 1 -> 1 SIMPLEX
Editing function: Dual page
Storing method: Stored in the e-Filing box (public box)
No copying
(The dual page function is available only for A4, LT and B5 sizes.)
Button Function *1
Downloaded from www.Manualslib.com manuals search engine
6 TEMPLATES
Registering Templates 181
Registering Templates
Templates must be registered to either the “public template group” or “private groups”. You can set a
password to restrict the use of registered templates.
Public template group:
Provided by default. Templates in this group can be used by everyone. It is useful to register several
combinations of functions frequently used in the entire office or department. Up to 12 templates can be
registered to the public group. The Admin (administrator) Password is required when you wish to register,
delete or change templates in the public template group.
Private group:
You can create up to 200 private groups. Or, up to 4 private groups when the hard disk is not installed. These
are useful for each department, section or user. Up to 60 templates can be registered per group. Or, up to 12
in a group when the hard disk is not installed. You can set a password to restrict the use of the registered
templates. “Useful Templates” are registered under the group 001 by default.
Registering templates into the public template group
1
Set all the required functions.
Example: Editing function – image shift, reproduction ratio – 90%, number of copy sets –10
2
Press [TEMPLATE] on the touch panel.
The template menu appears.
3
Select the public template group.
1) Press the [REGISTRATION] tab.
2) Press [PUBLIC TEMPLATE GROUP].
3) Press [OPEN].
Downloaded from www.Manualslib.com manuals search engine
6 TEMPLATES
182 Registering Templates
4
Press [PASSWORD].
The on-screen keyboard appears.
5
Enter the Admin Password using the on-screen keyboard or the digital keys. Then
press [OK].
6
Select a template.
1) Press a blank button.
2) Press [SAVE].
To switch the menu
Press or .
Downloaded from www.Manualslib.com manuals search engine
6.TEMPLATES
Registering Templates 183
6 TEMPLATES
7
Enter the necessary information about the template.
NAME 1 & 2: Enter the name of the template. NAME 1 appears above the template button and NAME
2 appears below. Be sure to enter at least one of them. When you press either of them, the on-
screen keyboard appears. Enter within 11 characters.
The symbols below cannot be used.
; : / \ " = | * < > ? + [ ] , .
USER NAME: Enter the name of the template owner as required. When you press it, the on-screen
keyboard appears. Enter within 30 characters.
PASSWORD: Key in a password here, if you want to require a password to recall the template. When
you press it, the on-screen keyboard appears. Key in following the procedure below.
1) Press [PASSWORD] and then enter the password (up to 20 characters) with the buttons on the
touch panel or the digital keys on the control panel. The characters keyed in appear as asterisks (*).
2) Press [RETYPE PASSWORD], and then key in the password again.
3) Press [OK].
The symbols below cannot be used.
' \ % & < > [ ]
AUTOMATIC START: Press [ENABLE] if you want the operation of set functions to start immediately
after pressing a button for the corresponding template. Press [DISABLE] if you do not want it to start
until you press the [START] button on the control panel.
Downloaded from www.Manualslib.com manuals search engine
6 TEMPLATES
184 Registering Templates
Even when the automatic start function is enabled, you need to enter the user name and password
when recalling the template in the following cases. For details of the User Authentication for Scan to
E-mail and the user management function, ask your administrator.
yWhen the User Authentication for Scan to E-mail is enabled and the user management function
is disabled
yWhen both the User Authentication for Scan to E-mail and the user management function are
enabled, but the user names and passwords are different
When you have entered all the necessary items, press [SAVE].
The template is now registered and the menu returns to the one immediately before registration.
Creating a new private group
1
Press [TEMPLATE] on the touch panel.
The template menu appears.
2
Select a group.
1) Press the [REGISTRATION] tab.
2) Select the desired group by pressing its button or keying in its group number (3 digits).
3) Press [OPEN].
To switch the menu
Press or .
Downloaded from www.Manualslib.com manuals search engine
6.TEMPLATES
Registering Templates 185
6 TEMPLATES
3
Enter the necessary information about the group.
NAME: Enter the name of the group. When you press it, the on-screen keyboard appears. Enter within
20 characters. Be sure to enter it.
USER NAME: Enter the name of the group owner as required. When you press it, the on-screen
keyboard appears. Enter within 30 characters.
PASSWORD: Key in a password here, if you want to require a password to view the group or register
templates into the group. When you press it, the on-screen keyboard appears. Key in following the
procedure below.
1) Press [PASSWORD] and then enter the password (up to 20 characters) with the buttons on the
touch panel or the digital keys on the control panel. The characters keyed in appear as asterisks (*).
2) Press [RETYPE PASSWORD], and then key in the password again.
3) Press [OK].
The symbols below cannot be used.
' \ % & < > [ ]
When you have entered all the necessary items, press [OK].
The new group is now registered and the menu moves to the one for registering templates.
4
Press the [FUNCTION CLEAR] button on the control panel.
The menu returns to the BASIC menu.
Downloaded from www.Manualslib.com manuals search engine
6 TEMPLATES
186 Registering Templates
Registering templates into a private group
1
Set all the required functions.
Example: Editing function – image shift, reproduction ratio – 90%, number of copy sets – 10
The [PAPER SIZE] and [PAPER TYPE] functions for bypass copying cannot be set in templates.
2
Press [TEMPLATE] on the touch panel.
The template menu appears.
3
Select the desired group.
1) Press the [REGISTRATION] tab.
2) Select the desired group by pressing its button or keying in its group number (3 digits).
3) Press [OPEN].
To switch the menu
Press or .
Downloaded from www.Manualslib.com manuals search engine
6.TEMPLATES
Registering Templates 187
6 TEMPLATES
4
Key in the password for the selected group. (If no password is set, go to step 5.)
1) Press [PASSWORD] and then enter the password with the buttons on the touch panel or the digital
keys on the control panel.
2) Press [OK].
5
Register a template following steps 6 and 7 on P.181 “Registering templates into the
public template group”.
Downloaded from www.Manualslib.com manuals search engine
6 TEMPLATES
188 Recalling Templates
Recalling Templates
When you recall a template, the functions set in the template will be available automatically. If the automatic
start function is enabled, this equipment will automatically start the operation of each function when you press
the button for the corresponding template.
1
Place paper in the drawer(s).
2
Place the original(s).
3
Press [TEMPLATE] on the touch panel.
The template menu appears.
4
Press the button for the group to which the desired template is registered.
You can also select the group by keying in its group number (3 digits).
To switch the menu
Press or .
Downloaded from www.Manualslib.com manuals search engine
6.TEMPLATES
Recalling Templates 189
6 TEMPLATES
5
Key in the password when you have selected the private group. (If no password is set,
go to step 6.)
1) Press [PASSWORD] and then enter the password with the buttons on the touch panel or the digital
keys on the control panel.
2) Press [OK].
6
Press the button for the desired template.
To switch the menu
Press or .
Templates with the automatic start function enabled can be identified with . If this mark is displayed,
you can press it to immediately start the operation of the functions set in the template.
7
Key in the password for the selected template. (If no password is set, go to step 8.)
1) Press [PASSWORD] and then enter the password with the buttons on the touch panel or the digital
keys on the control panel.
2) Press [OK].
Downloaded from www.Manualslib.com manuals search engine
6 TEMPLATES
190 Recalling Templates
8
Confirm that “Updated the template setting” is displayed on the touch panel.
The message is displayed for approx. 3 seconds.
9
Select other copy modes as required, and then press the [START] button on the control
panel.
Downloaded from www.Manualslib.com manuals search engine
6 TEMPLATES
Changing Data 191
Changing Data
You can change the data of templates or private groups that are already registered, such as the template
name, user name, password and setting of the automatic start function.
The data of the public template group can be changed from the TopAccess menu but this cannot be done
from the control panel. For how to change them from the TopAccess menu, refer to the TopAccess Guide.
Changing private group data
1
In the template menu, select the desired group.
1) Press the [REGISTRATION] tab.
2) Select the desired group by pressing its button or keying in its group number (3 digits).
3) Press [EDIT].
To switch the menu
Press or .
2
Key in the password for the selected group. (If no password is set, go to step 3.)
1) Press [PASSWORD] and then enter the password with the buttons on the touch panel or the digital
keys on the control panel.
2) Press [OK].
3
Change the data following step 3 on P.184 “Creating a new private group”.
4
Press the [FUNCTION CLEAR] button on the control panel.
The menu returns to the BASIC menu.
Downloaded from www.Manualslib.com manuals search engine
6 TEMPLATES
192 Changing Data
Changing template data
1
In the template menu, select the group to which the desired template is registered.
1) Press the [REGISTRATION] tab.
2) Select the desired group by pressing its button or keying in its group number (3 digits).
3) Press [OPEN].
To switch the menu
Press or .
2
Enter the password as follows and then press [OK].
When the public template group is selected: Press [PASSWORD] and then enter the Admin
Password (6 to 64 characters) with the buttons on the touch panel or the digital keys on the control
panel.
When a private group is selected: Press [PASSWORD] and then enter the password (up to 20
characters) with the buttons on the touch panel or the digital keys on the control panel. If no
password is set, go to step 3.
Downloaded from www.Manualslib.com manuals search engine
6.TEMPLATES
Changing Data 193
6 TEMPLATES
3
Select the desired template.
1) Press the button for the corresponding template.
2) Press [EDIT].
To switch the menu
Press or .
4
Key in the password for the selected template. (If no password is set, go to step 5.)
1) Press [PASSWORD] and then enter the password with the buttons on the touch panel or the digital
keys on the control panel.
2) Press [OK].
5
Change the data following step 7 on P.181 “Registering templates into the public
template group”.
Downloaded from www.Manualslib.com manuals search engine
6 TEMPLATES
194 Deleting Groups or Templates
Deleting Groups or Templates
You can delete private groups or templates no longer needed. If a private group is deleted, all the templates in
the private group are also deleted.
The public template group cannot be deleted.
Deleting private groups
1
In the template menu, select the desired private group.
1) Press the [REGISTRATION] tab.
2) Select the desired group by pressing its button or keying in its group number (3 digits).
3) Press [DELETE].
To switch the menu
Press or .
2
Key in the password for the selected group. (If no password is set, go to step 3.)
1) Press [PASSWORD] and then enter the password with the buttons on the touch panel or the digital
keys on the control panel.
2) Press [OK].
Downloaded from www.Manualslib.com manuals search engine
6.TEMPLATES
Deleting Groups or Templates 195
6 TEMPLATES
3
Press [DELETE].
The private group is now deleted.
Deleting templates
1
In the template menu, select the group to which the desired template is registered.
1) Press the [REGISTRATION] tab.
2) Select the desired group by pressing its button or keying in its group number (3 digits).
3) Press [OPEN].
To switch the menu
Press or .
2
Enter the password as follows and then press [OK].
When the public template group is selected: Press [PASSWORD] and then enter the Admin
Password (6 to 64 characters) with the buttons on the touch panel or the digital keys on the control
panel.
Downloaded from www.Manualslib.com manuals search engine
6 TEMPLATES
196 Deleting Groups or Templates
When a private group is selected: Press [PASSWORD] and then enter the password (up to 20
characters) with the buttons on the touch panel or the digital keys on the control panel. If no
password is set, go to step 3.
3
Select the desired template.
1) Press the button for the desired template.
2) Press [DELETE].
To switch the menu
Press or .
4
Key in the password for the selected template. (If no password is set, go to step 5.)
1) Press [PASSWORD] and then enter the password with the buttons on the touch panel or the digital
keys on the control panel.
2) Press [OK].
Downloaded from www.Manualslib.com manuals search engine
6.TEMPLATES
Deleting Groups or Templates 197
6 TEMPLATES
5
Press [DELETE].
The template is now deleted.
Downloaded from www.Manualslib.com manuals search engine
7.CONFIRMING JOB STATUS
This chapter describes how to confirm the processing status and the history of copy jobs performed, and the
amount of toner remaining in the toner cartridges.
Confirming Copy Job Status ............................................................................................... 200
Confirming jobs in progress or ones in waiting...................................................................................................200
Confirming copy job history ................................................................................................................................205
Confirming drawers ............................................................................................................................................207
Confirming amount of toner remaining ...............................................................................................................208
Downloaded from www.Manualslib.com manuals search engine
7 CONFIRMING JOB STATUS
200 Confirming Copy Job Status
Confirming Copy Job Status
You can confirm jobs in progress or ones in waiting, on the touch panel. Also you can delete, pause or resume
jobs in waiting, and change their order. You can also confirm the history of copy jobs performed, the status of
drawers and the amount of toner remaining in the toner cartridges.
When this equipment is managed with the user management function or the department management
function, you can only check jobs or the status of this equipment if you are not logging into this equipment.
When this equipment is managed with the user management function, copy jobs in waiting only for a user
who has logged in can be deleted, paused or their order changed, and the job history only for such a user
is displayed on the print log list.
However, if the user has an administrator privilege, all copy jobs in waiting can be deleted, paused or their
order changed, and the entire job history is displayed on the print log list.
Confirming jobs in progress or ones in waiting
You can confirm the jobs in progress or the ones in waiting, on the touch panel.
To view them, press [JOB STATUS] on the touch panel.
The print job list appears. (Press the [JOBS] tab if another tab menu is displayed.) Copy jobs appear on the
print job list as well as print jobs.
On the print job list, you can confirm the icon of the job type, the name of the user who sent the job, the date
and time the job was sent, the paper size, the number of pages and copy sets and the processing status. 5
jobs appear on 1 page of the print job list. When you press or on the touch panel, the menu will be
changed to the previous one or the next one, so that you can view up to 1000 jobs. Or, up to 500 jobs when
the hard disk is not installed.
Press [CLOSE] when you finish the confirmation. The menu returns to the one shown before you pressed
[JOB STATUS].
Downloaded from www.Manualslib.com manuals search engine
7.CONFIRMING JOB STATUS
Confirming Copy Job Status 201
7 CONFIRMING JOB STATUS
Deleting jobs
You can delete jobs that you no longer need to print.
1
Select the desired job on the print job list, and then press [DELETE]. You can select
more than one job.
2
Press [DELETE].
The job is now deleted.
You cannot use the print job list to delete fax/Internet Fax jobs and E-mail reception print jobs.
Downloaded from www.Manualslib.com manuals search engine
7 CONFIRMING JOB STATUS
202 Confirming Copy Job Status
Pausing jobs
Jobs whose status is “Wait” can be held in the queue (Pausing).
Select the desired job on the print job list, and then press [PAUSE].
The job is now paused. The paused job is not printed even when its turn comes. Printing of the next job starts.
Resuming the paused job
Select the desired job, and then press [RESUME].
Downloaded from www.Manualslib.com manuals search engine
7.CONFIRMING JOB STATUS
Confirming Copy Job Status 203
7 CONFIRMING JOB STATUS
Moving jobs
You can change the order of the jobs in waiting by moving them within the list.
You can only move jobs from and to those whose status is “Wait”.
1
Select the desired job on the print job list, and then press [MOVE].
2
Select the position that you want the job to move to. (It will come under the selected
job.)
Downloaded from www.Manualslib.com manuals search engine
7 CONFIRMING JOB STATUS
204 Confirming Copy Job Status
Confirming the information of a skipped job
Copy jobs may not be performed because the specified paper or staples have run out, etc. These will be
suspended and the next job will be performed (Job Skip function). Check on the touch panel how you can
recover the suspended jobs. Available only when the hard disk is installed.
1
Select the skipped job in the print job list, and press [RECOVERY INFORMATION].
2
Resolve the cause of the skip following the instructions on the screen.
If multiple causes exist, the second cause is displayed after you resolve the first one. Resolve all
causes accordingly.
Downloaded from www.Manualslib.com manuals search engine
7.CONFIRMING JOB STATUS
Confirming Copy Job Status 205
7 CONFIRMING JOB STATUS
Confirming copy job history
You can confirm the history of copy jobs performed on the touch panel.
1
Press [JOB STATUS] on the touch panel.
2
Press the [LOG] tab.
3
Press [PRINT].
The print log list appears. Copy jobs appear on the print log list as well as print jobs.
Downloaded from www.Manualslib.com manuals search engine
7 CONFIRMING JOB STATUS
206 Confirming Copy Job Status
On the print log list, you can confirm the icon of the job type, the name of the user who performed the
job, the date and time the job was printed, the paper size and the number of pages or copy sets. 5 jobs
appear on 1 page of the print log list. When you press or on the touch panel, the menu will be
changed to the previous one or the next one, so that you can view up to 120 jobs.
When you finish the confirmation, press [CLOSE] so that the menu returns to the one in step 3, and
then press [CLOSE]. The menu returns to the one shown before you pressed [JOB STATUS].
Downloaded from www.Manualslib.com manuals search engine
7.CONFIRMING JOB STATUS
Confirming Copy Job Status 207
7 CONFIRMING JOB STATUS
Confirming drawers
You can confirm the size and type-setting of the paper or the amount remaining in the drawers. During printing
you can confirm which drawer is feeding paper.
1
Press [JOB STATUS] on the touch panel.
2
Press the [SUPPLY] tab.
During printing, the button for the drawer from which the paper is fed is highlighted.
Press [CLOSE] when you finish the confirmation. The menu returns to the one shown before you
pressed [JOB STATUS].
When the paper in the drawer has run out during printing, [JOB STATUS] on the touch panel blinks. In this
case, press [JOB STATUS] so that the menu for displaying the printing status will appear and the button for
the drawer whose paper has run out will blink on this menu. Printing resumes when you add paper to this
drawer.
P.11 “Placing Paper”
Downloaded from www.Manualslib.com manuals search engine
7 CONFIRMING JOB STATUS
208 Confirming Copy Job Status
Confirming amount of toner remaining
You can confirm the approximate amount of toner remaining in the toner cartridge.
1
Press [JOB STATUS] on the touch panel.
2
Press the [TONER] tab.
Press [CLOSE] when you finish the confirmation. The menu returns to the one shown before you
pressed [JOB STATUS].
Downloaded from www.Manualslib.com manuals search engine
8.OTHER INFORMATION
Continuous Copying Speed ................................................................................................ 210
Copying Function Combination Matrix .............................................................................. 216
Combination matrix 1/2 ......................................................................................................................................216
Combination matrix 2/2 ......................................................................................................................................217
Image Adjustment Function Combination Matrix ............................................................. 218
Combination matrix 1/2 ......................................................................................................................................218
Combination matrix 2/2 ......................................................................................................................................219
Downloaded from www.Manualslib.com manuals search engine
8 OTHER INFORMATION
210 Continuous Copying Speed
Continuous Copying Speed
Copy speeds under the condition in which originals are placed on the original glass and single-side copies are
made continuously with 100% reproduction ratio in the non-sort mode (unit: sheet/minute).
e-STUDIO2050C
e-STUDIO2550C
Paper size Feeder
Paper type
PLAIN/
RECYCLED
PAPER
THICK1 THICK2
B&W Color *1 B&W Color
*1 B&W Color
*1
A4, A5-R, B5, LT, ST-R,
8.5"SQ
Drawer 20 20 16.5 16.5 16.5 16.5
Bypass tray 20 20 16.5 16.5 16.5 16.5
A4-R, B5-R, LT-R Drawer 15 15 12.5 12.5 12.5 12.5
Bypass tray 15 15 12.5 12.5 12.5 12.5
B4, FOLIO, LG, COMP,
13"LG
Drawer 12 12 10 10 10 10
Bypass tray 12 12 10 10 10 10
A3, LD Drawer 10108888
Bypass tray 10 10 8 8 8 8
Paper size Feeder
Paper type
PLAIN/
RECYCLED
PAPER
THICK1 THICK2
B&W Color *1 B&W Color
*1 B&W Color
*1
A4, A5-R, B5, LT, ST-R,
8.5"SQ
Drawer 25 25 16.5 16.5 16.5 16.5
Bypass tray 25 25 16.5 16.5 16.5 16.5
A4-R, B5-R, LT-R Drawer 18 18 12.5 12.5 12.5 12.5
Bypass tray 18 18 12.5 12.5 12.5 12.5
B4, FOLIO, LG, COMP,
13"LG
Drawer 15 15 10 10 10 10
Bypass tray 15 15 10 10 10 10
A3, LD Drawer 12128888
Bypass tray 12 12 8 8 8 8
Downloaded from www.Manualslib.com manuals search engine
8.OTHER INFORMATION
Continuous Copying Speed 211
8 OTHER INFORMATION
e-STUDIO2555C
Paper size Feeder
Paper type
PLAIN/
RECYCLED
PAPER
THICK1 THICK2 THICK3 THICK4
B&
W
Color
*1
B&
W
Color
*1
B&
W
Color
*1
B&
W
Color
*1
B&
W
Color
*1
A4, A5-R, B5, LT,
ST-R, 8.5"SQ
Drawer 25 25 17.5 17.5 17.5 17.5 17.5 17.5
Bypass
tray 25 25 17.5 17.5 17.5 17.5 17.5 17.5 17.5 17.5
A4-R, B5-R, LT-R Drawer 20 20 12.5 12.5 12.5 12.5 12.5 12.5
Bypass
tray 20 20 12.5 12.5 12.5 12.5 12.5 12.5 12.5 12.5
B4, FOLIO, LG,
COMP, 13"LG
Drawer 17 17 10 10 10 10 10 10
Bypass
tray 17 17 10 10 10 10 10 10 10 10
A3, LD Drawer 15 15 8.5 8.5 8.5 8.5 8.5 8.5
Bypass
tray 15 15 8.5 8.5 8.5 8.5 8.5 8.5 8.5 8.5
305 mm x 457 mm,
320 mm x 450 mm
Drawer
*2 1414888888
Bypass
tray 141488888888
Downloaded from www.Manualslib.com manuals search engine
8 OTHER INFORMATION
212 Continuous Copying Speed
e-STUDIO3055C
Paper size Feeder
Paper type
PLAIN/
RECYCLED
PAPER
THICK1 THICK2 THICK3 THICK4
B&
W
Color
*1
B&
W
Color
*1
B&
W
Color
*1
B&
W
Color
*1
B&
W
Color
*1
A4, A5-R, B5, LT,
ST-R, 8.5"SQ
Drawer 30 30 17.5 17.5 17.5 17.5 17.5 17.5
Bypass
tray 30 30 17.5 17.5 17.5 17.5 17.5 17.5 17.5 17.5
A4-R, B5-R, LT-R Drawer 23 23 12.5 12.5 12.5 12.5 12.5 12.5
Bypass
tray 23 23 12.5 12.5 12.5 12.5 12.5 12.5 12.5 12.5
B4, FOLIO, LG,
COMP, 13"LG
Drawer 19 19 10 10 10 10 10 10
Bypass
tray 19 19 10 10 10 10 10 10 10 10
A3, LD Drawer 16 16 8.5 8.5 8.5 8.5 8.5 8.5
Bypass
tray 16 16 8.5 8.5 8.5 8.5 8.5 8.5 8.5 8.5
305 mm x 457 mm,
320 mm x 450 mm
Drawer
*2 15 15 8 8 8 8 8 8
Bypass
tray 151588888888
Downloaded from www.Manualslib.com manuals search engine
8.OTHER INFORMATION
Continuous Copying Speed 213
8 OTHER INFORMATION
e-STUDIO3555C
Paper size Feeder
Paper type
PLAIN/
RECYCLED
PAPER
THICK1 THICK2 THICK3 THICK4
B&
W
Color
*1
B&
W
Color
*1
B&
W
Color
*1
B&
W
Color
*1
B&
W
Color
*1
A4, A5-R, B5, LT,
ST-R, 8.5"SQ
Drawer 35 35 17.5 17.5 17.5 17.5 17.5 17.5
Bypass
tray 35 35 17.5 17.5 17.5 17.5 17.5 17.5 17.5 17.5
A4-R, B5-R, LT-R Drawer 25 25 12.5 12.5 12.5 12.5 12.5 12.5
Bypass
tray 25 25 12.5 12.5 12.5 12.5 12.5 12.5 12.5 12.5
B4, FOLIO, LG,
COMP, 13"LG
Drawer 21 21 10 10 10 10 10 10
Bypass
tray 21 21 10 10 10 10 10 10 10 10
A3, LD Drawer 18 18 8.5 8.5 8.5 8.5 8.5 8.5
Bypass
tray 18 18 8.5 8.5 8.5 8.5 8.5 8.5 8.5 8.5
305 mm x 457 mm,
320 mm x 450 mm
Drawer
*2 1717888888
Bypass
tray 171788888888
Downloaded from www.Manualslib.com manuals search engine
8 OTHER INFORMATION
214 Continuous Copying Speed
e-STUDIO4555C
e-STUDIO5055C
Paper size Feeder
Paper type
PLAIN/
RECYCLED
PAPER
THICK1 THICK2 THICK3 THICK4
B&
W
Color
*1
B&
W
Color
*1
B&
W
Color
*1
B&
W
Color
*1
B&
W
Color
*1
A4, B5, LT Drawer 45 45 17.5 17.5 17.5 17.5 17.5 17.5
Bypass
tray 45 45 17.5 17.5 17.5 17.5 17.5 17.5 17.5 17.5
A5-R, ST-R, 8.5"SQ Drawer 30 30 17.5 17.5 17.5 17.5 17.5 17.5
Bypass
tray 30 30 17.5 17.5 17.5 17.5 17.5 17.5 17.5 17.5
A6-R Drawer —————————
Bypass
tray 3030———————
A4-R, B5-R, LT-R Drawer 32 32 12.5 12.5 12.5 12.5 12.5 12.5
Bypass
tray 32 32 12.5 12.5 12.5 12.5 12.5 12.5 12.5 12.5
B4, FOLIO, LG,
COMP, 13"LG
Drawer 26 26 10 10 10 10 10 10
Bypass
tray 26 26 10 10 10 10 10 10 10 10
A3, LD Drawer 22 22 8.5 8.5 8.5 8.5 8.5 8.5
Bypass
tray 22 22 8.5 8.5 8.5 8.5 8.5 8.5 8.5 8.5
305 mm x 457 mm,
320 mm x 450 mm
Drawer
*2 22 22 8 8 8 8 8 8
Bypass
tray 222288888888
Paper size Feeder
Paper type
PLAIN/
RECYCLED
PAPER
THICK1 THICK2 THICK3 THICK4
B&
W
Color
*1
B&
W
Color
*1
B&
W
Color
*1
B&
W
Color
*1
B&
W
Color
*1
A4, B5, LT Drawer 50 50 17.5 17.5 17.5 17.5 17.5 17.5
Bypass
tray 50 50 17.5 17.5 17.5 17.5 17.5 17.5 17.5 17.5
A5-R, ST-R, 8.5"SQ Drawer 30 30 17.5 17.5 17.5 17.5 17.5 17.5
Bypass
tray 30 30 17.5 17.5 17.5 17.5 17.5 17.5 17.5 17.5
Downloaded from www.Manualslib.com manuals search engine
8.OTHER INFORMATION
Continuous Copying Speed 215
8 OTHER INFORMATION
*1 FULL COLOR, TWIN COLOR, MONO COLOR, IMAGE SMOOTHING
*2 2nd drawer only
yThe bypass copying speed when the paper size is specified is as listed above.
yPrinting may stop for 2 minutes or so at a low temperature to maintain its quality.
yTOSHIBA-recommended paper is used for the values of the specifications above.
yThese specifications vary depending on the copying conditions and the environment.
A6-R Drawer ——————————
Bypass
tray 3030———————
A4-R, B5-R, LT-R Drawer 36 36 12.5 12.5 12.5 12.5 12.5 12.5
Bypass
tray 36 36 12.5 12.5 12.5 12.5 12.5 12.5 12.5 12.5
B4, FOLIO, LG,
COMP, 13"LG
Drawer 29 29 10 10 10 10 10 10
Bypass
tray 29 29 10 10 10 10 10 10 10 10
A3, LD Drawer 25 25 8.5 8.5 8.5 8.5 8.5 8.5
Bypass
tray 25 25 8.5 8.5 8.5 8.5 8.5 8.5 8.5 8.5
305 mm x 457 mm,
320 mm x 450 mm
Drawer
*2 2424888888
Bypass
tray 242488888888
Paper size Feeder
Paper type
PLAIN/
RECYCLED
PAPER
THICK1 THICK2 THICK3 THICK4
B&
W
Color
*1
B&
W
Color
*1
B&
W
Color
*1
B&
W
Color
*1
B&
W
Color
*1
Downloaded from www.Manualslib.com manuals search engine
8 OTHER INFORMATION
216 Copying Function Combination Matrix
Copying Function Combination Matrix
Combination matrix 1/2
Back -
Only back
copied
Back -
Both
copied
Back - Top
copied
Back -
Blank
Front -
Both
copied
Front - Top
copied
Front -
Blank
Nega/Pos Mirror Trim /
Mask
*1 *1 Yes Yes *1 *1 Yes *1 Yes *4 *1 *1 *3 *3 *3 *3 *3 *3 *3 *3 Yes *1 *1 *1
Yes Yes Yes Yes No Yes Yes Yes Yes *4 No No No No No No No No No No No No No No
No No Yes Yes *3 *3 Yes No No *4 No No Yes Yes Yes Yes Yes Yes Yes Yes *3 Yes Yes Yes
1 - 1 Simplex Yes Yes Yes Yes Yes Yes Yes Yes Yes Yes Yes Yes No *3 Yes Yes *3 Yes Yes Yes Yes Yes Yes
1 - 2 Duplex Yes Yes Yes Yes No Yes Yes
*3
Yes Yes Yes Yes Yes Yes Yes Yes Yes Yes Yes Yes Yes No Yes Yes
2 - 1 Split Yes Yes Yes Yes No Yes Yes *3 Yes Yes Yes Yes Yes No *3 Yes Yes *3 Yes Yes Yes No Yes Yes
2 - 2 Duplex Yes Yes Yes Yes No Yes Yes Yes Yes Yes Yes Yes Yes Yes Yes Yes Yes Yes Yes Yes Yes No Yes Yes
Book - 2 Yes Yes Yes No No No -- No Yes No Yes Yes No No No No No No No No No No No No
Non-sort / Non-staple *3 Yes Yes Yes Yes Yes Yes Yes Yes *4 Yes Yes *3 *3 *3 *3 *3 *3 *3 *3 Yes Yes Yes Yes
Sort Yes Yes Yes Yes Yes Yes Yes Yes Yes *4 Yes Yes Yes Yes Yes Yes Yes Yes Yes Yes Yes Yes Yes Yes
Group Yes Yes Yes Yes Yes Yes Yes Yes Yes *4 Yes Yes No No No No No No No No Yes Yes Yes Yes
Staple sort Yes Yes Yes Yes Yes Yes Yes Yes Yes *4 Yes Yes Yes Yes Yes Yes Yes Yes Yes Yes Yes Yes Yes Yes
Magazine sort No No Yes Yes No No Yes No Yes No Yes Yes No No No No No Yes Yes Yes No No No No
Magazine sort & Saddle stitch No No Yes Yes No No Yes No Yes No Yes Yes No No No No No Yes Yes Yes No No No No
Hole punch Yes Yes Yes Yes No Yes Yes Yes Yes *4 Yes Yes Yes Yes Yes Yes Yes Yes Yes Yes Yes Yes Yes Yes
Saddle stitch Yes Yes Yes No No No Yes No Yes *4 No No No No No No No Yes Yes Yes No No No No
Rotate sort Yes Yes Yes Yes No No Yes Yes Yes *4 Yes Yes No No No No No No No No No Yes Yes Yes
*3 *3 Yes Yes No No Yes No Yes *4 Yes Yes Yes Yes Yes Yes Yes Yes Yes Yes Yes Yes Yes Yes
Yes Yes No Yes No No Yes Yes Yes Yes Yes Yes Yes Yes Yes Yes Yes Yes Yes Yes Yes No No No
Yes Yes Yes Yes No No -- No Yes *4 Yes Yes No No No No No No No No Yes No Yes No
Yes Yes Yes Yes No No -- No Yes Yes Yes Yes No No No No No No No No No No No No
*3 *3 Yes Yes No No Yes No Yes Yes No No No No No No No No No No No No
Trim / Mask Yes Yes No Yes No No Yes Yes Yes No Yes Yes Yes Yes Yes Yes Yes Yes Yes Yes No -- --
Mirror Yes Yes No Yes No Yes Yes Yes Yes No Yes Yes Yes Yes Yes Yes Yes Yes Yes Yes No --
Nega/Pos Yes Yes No Yes No Yes Yes No Yes No Yes Yes Yes Yes Yes Yes Yes Yes Yes Yes No
Yes Yes Yes Yes No Yes Yes Yes Yes No Yes Yes Yes Yes Yes Yes Yes Yes Yes Yes
Front - Blank *3 *3 Yes *3 No No Yes Yes Yes No Yes Yes Yes Yes Yes Yes Yes *3 *3
Front - Top copied *3 *3 Yes *3 No No Yes Yes Yes No Yes Yes Yes Yes Yes Yes Yes *3
Front - Both copied *3 *3 Yes *3 No No Yes Yes Yes No Yes Yes Yes Yes Yes Yes Yes
Back - Blank *3 *3 Yes *3 No No Yes Yes Yes No Yes Yes Yes *3 *3 *3
Back - Top copied *3 *3 Yes *3 No No Yes Yes Yes No Yes Yes Yes *3 *3
Back - Both copied *3 *3 Yes *3 No No Yes Yes Yes No Yes Yes Yes *3
Back - Only back copied *3 *3 Yes *3 No No Yes Yes Yes No Yes Yes Yes
*3 *3 Yes No No No Yes Yes Yes No Yes Yes
*3 *3 Yes Yes No No Yes No Yes *4 Yes
*3 *3 Yes Yes No No Yes No Yes *4
*4 *4 Yes *4 No No Yes *4 *4
Yes Yes Yes Yes *3 Yes Yes Yes *1 Size selection is required.
Yes Yes Yes Yes No Yes Yes *2 Size selection is required for [DOUBLE STAPLE] and [REAR STAPLE].
Yes Yes Yes Yes -- Yes *3 The function set later will be valid.
*3 *3 No Yes No *4 The setting cannot be changed from 2nd job or later.
No No No Yes *5 Bookbinding margin is not available.
Yes Yes Yes
Yes Yes
No
XY zoomCopy &
File
Full image Time
stamp
Book <->
TABLET
2-sided
Book center erase
Image shift
Edge erase
Time stamp
Page number
Editing
Finishing
2IN1 / 4IN1
Copy & File
Store to e-Filing
Job build
Full image
Outside erase
Image repeat
Omit blank page
ADF -> SADF
Book <-> TABLET
Image direction
XY zoom
Dual page
Omit blank
page
Outside
erase
Image
repeat
Job buildADF ->
SADF
EditingImage
direction
Cover sheetSheet
insertion
Sheet insertion
Cover
sheet
Store to e-
Filing
Bypass copy
Photo zoom
Mixed original sizes
Page
number
Yes
Yes No
Downloaded from www.Manualslib.com manuals search engine
8.OTHER INFORMATION
Copying Function Combination Matrix 217
8 OTHER INFORMATION
Combination matrix 2/2
1 - 1 Simplex
1 - 2 Duplex
2 - 1 Split
2 - 2 Duplex
Book - 2
Non-sort / Non-staple
Sort
Group
Staple sort
Magazine sort
Magazine sort & Saddle stitch
Hole punch
Saddle stitch
Rotate sort
Trim / Mask
Mirror
Nega/Pos
Front - Blank
Front - Top copied
Front - Both copied
Back - Blank
Back - Top copied
Back - Both copied
Back - Only back copied
2-sided
Book center erase
Image shift
Edge erase
Time stamp
Page number
Editing
Finishing
2IN1 / 4IN1
Copy & File
Store to e-Filing
Job build
Full image
Outside erase
Image repeat
Omit blank page
ADF -> SADF
Book <-> TABLET
Image direction
XY zoom
Dual page
Sheet insertion
Cover
sheet
Bypass copy
Photo zoom
Mixed original sizes
Rotate sort Saddle
stitch
Hole
punch
Magazine
sort &
Saddle
stitch
Magazine
sort
Staple sort Group Sort Non-sort /
Non-staple
Book - 2 2 - 2
Duplex
2 - 1 Split 1 - 2
Duplex
1 - 1
Simplex
*3 *1 *1 *1 *1 *1 *1 *1 *1 *1 *2 Yes Yes Yes *1 *1 Yes *1 Yes *1 *1
No No No No No No No Yes No No Yes Yes Yes Yes No Yes Yes Yes Yes No
*3 No Yes Yes Yes No *3 Yes *3 *3 Yes Yes Yes Yes No Yes Yes Yes Yes
*3 *3 Yes Yes Yes Yes *3 Yes *3 *3 Yes Yes Yes Yes *3 *3 *3 *3
*3 *3 Yes Yes Yes Yes *3 Yes Yes Yes Yes Yes Yes Yes *3 *3 *3
*3 No No Yes Yes Yes *3 Yes No No Yes Yes Yes Yes *3 *3
*3 No No Yes Yes Yes Yes Yes Yes Yes Yes Yes Yes Yes *3
No No No Yes Yes No *3 Yes No No Yes Yes Yes Yes
Yes Yes Yes Yes Yes *3 *3 Yes *3 *3 *3 *3 *3
Yes Yes Yes Yes Yes *3 *3 Yes *3 *3 *3 *3
Yes Yes Yes Yes Yes *3 *3 Yes *3 *3 *3
Yes Yes Yes Yes Yes *3 *3 Yes *3 *3
No No No Yes No *3 *3 No *3
No No No Yes No *3 *3 No
Yes Yes No Yes Yes No No
No No No Yes No *3
Yes No Yes Yes Yes
Yes *5 Yes Yes
Yes Yes No
No No
No
*1 Size selection is required.
*2 Size selection is required for [DOUBLE STAPLE] and [REAR STAPLE].
*3 The function set later will be valid.
*4 The setting cannot be changed from 2nd job or later.
*5 Bookbinding margin is not available.
2IN1 /
4IN1
Finishing 2-sided Bypass
copy
Image shiftEdge
erase
Dual page Book
center
erase
Photo
zoom
Mixed
original
sizes
Downloaded from www.Manualslib.com manuals search engine
8 OTHER INFORMATION
218 Image Adjustment Function Combination Matrix
Image Adjustment Function Combination Matrix
Combination matrix 1/2
Marker Clear Vivid Cool Warm
Yes Yes Yes Yes Yes Yes *1 Yes Yes Yes Yes Yes Yes Yes
Full color Yes Yes Yes No No Yes Yes Yes Yes Yes Yes Yes Yes Yes
Auto color Yes Yes Yes No No Yes Yes No No No No No Yes Yes
Black Yes No No No No Yes Yes No No No No No No No
Twin color copy ʊ Twin color selectable Yes No No No Yes Yes Yes No No No No No No No
Twin color copy ʊ Red & Black Yes No No Yes Yes Yes Yes No No No No No No No
Mono color Yes No No No No Yes Yes No No No No No No No
Text/Photo Yes Yes Yes Yes Yes Yes Yes Yes Yes Yes Yes Yes Yes Yes
Text Yes Yes Yes Yes Yes Yes Yes Yes Yes Yes Yes Yes Yes Yes
Photo Yes Yes Yes No No Yes Yes Yes Yes Yes Yes Yes Yes Yes
Printed image Yes Yes Yes Yes Yes Yes Yes Yes Yes Yes Yes Yes Yes Yes
Map Yes Yes Yes No No Yes Yes Yes Yes Yes Yes Yes Yes Yes
Image smoothing Yes No No No No Yes Yes No No No No No No No
Yes Yes Yes No No Yes Yes No No No No No No
Yes Yes Yes No No Yes Yes No No No No No
Warm Yes No No No No No No No No No No
Cool Yes No No No No No No No No No
Vivid Yes No No No No No No No No
Clear Yes No No No No No No No
Marker Yes No No No No No No
Yes Yes Yes Yes Yes Yes
Yes Yes Yes Yes Yes
Yes No No Yes
Yes No No
Yes Yes
Yes
*1 Only available with manual adjustment
ޓ
ADF scan
noise
reduction
Saturation
Hue
Color balance
Color mode
Density Manual /Auto
Sharpness
Background adjustment
ADF scan noise reduction
Red & Black range adjustment
One touch
adjustment
Twin color selectable adjustment
RGB adjustment
Original Mode
Color
balance
Sharpness RGB
adjustment
One touch adjustmentTwin color
selectable
adjustment
Background
adjustment
Saturation Hue Red & Black
range
adjustment
Downloaded from www.Manualslib.com manuals search engine
8.OTHER INFORMATION
Image Adjustment Function Combination Matrix 219
8 OTHER INFORMATION
Combination matrix 2/2
Full color
Auto color
Black
Twin color copy ʊ Twin color selectable
Twin color copy ʊ Red & Black
Mono color
Text/Photo
Text
Photo
Printed image
Map
Image smoothing
Warm
Cool
Vivid
Clear
Marker
ޓ
Saturation
Hue
Color balance
Color mode
Density Manual /Auto
Sharpness
Background adjustment
ADF scan noise reduction
Red & Black range adjustment
One touch
adjustment
Twin color selectable adjustment
RGB adjustment
Original Mode
Image
smoothing
Map Printed
image
Photo Text Text/Photo Mono color Twin color
copy ʊ Red
& Black
Twin color
copy ʊ Twin
color
selectable
Black Auto color Full color
Yes Yes Yes Yes Yes Yes Yes Yes Yes Yes Yes Yes
No Yes Yes Yes Yes Yes No No No No No
No No Yes No Yes Yes No No No No
Yes No No Yes Yes Yes No No No
No No Yes No Yes Yes No No
No No Yes No Yes Yes No
No No Yes No Yes Yes
No No No No No
No No No No
No No No
No No
No
*1 Only available with manual adjustment
Color mode Density
Manual
/Auto
Original Mode
Downloaded from www.Manualslib.com manuals search engine
INDEX 221
INDEX
Numerics
2IN1 / 4IN1 ..............................................................125
[2-SIDED] ...................................................................8
A
A/B format .......................................................... 12, 13
Additional Drawer Module .................................... 12, 13
ADF ........................................................................151
ADF -> SADF ..........................................................151
ADF Scan Noise Reduction .......................................176
Alert message indication area .......................................8
AMS (Automatic Magnification Selection) .....................74
[APS] ................................................................... 8, 66
APS (Automatic Paper Selection) ................................66
AUTO COLOR ...........................................................70
Auto job start .............................................................42
Automatic Magnification Selection (AMS) .....................74
Automatic Paper Selection (APS) ................................66
B
BACKGROUND ADJUSTMENT ................................166
BASIC menu ...............................................................8
[BASIC] tab .................................................................8
BLACK .....................................................................70
BOOK - TABLET ......................................................150
BOOK CENTER ERASE ...........................................121
Bypass copying
bypass copying .......................................................47
envelope ................................................................54
non-standard size paper ..........................................58
standard size paper .................................................48
[BYPASS FEED] ........................................................10
Bypass tray ...............................12, 14, 47, 48, 56, 58
C
Center fold ......................................................... 83, 94
Clearing the set functions ............................................65
Coated paper ............................................................14
COLOR BALANCE ..................................................163
Color mode
AUTO COLOR ........................................................70
BLACK ..................................................................70
color mode ...................................................... 64, 70
FULL COLOR .........................................................70
Color mode buttons ......................................................9
Confirmation screen ...................................................64
Continuous feed mode ...............................................37
COPY & FILE ..........................................................108
Copy quantity ............................................................64
Copying
auto job start ......................................................... 42
basic procedure ..................................................... 39
before making copies ............................................. 32
book-type originals ......................................... 35, 104
bypass copying ...................................................... 47
continuous copying speed ..................................... 210
copy & file ........................................................... 108
copy quantity ......................................................... 64
duplex copying ..................................................... 101
envelope ............................................................... 54
interrupting ............................................................ 43
making copies ....................................................... 39
mixed-size originals ................................................ 68
non-standard size paper ......................................... 58
number of copies ................................................... 39
photo originals ....................................................... 80
proof copy ............................................................. 44
reproduction ratio ............................................. 64, 74
restarting ............................................................... 41
stopping ................................................................ 41
Copying function combination matrix ......................... 216
Copying functions
before using copying functions ................................ 64
clearing the set functions ........................................ 65
confirming the set functions ..................................... 64
COVER SHEET ...................................................... 136
D
Default settings ......................................................... 64
Density adjustment .............................................. 64, 73
Density adjustment buttons .......................................... 9
Department management function ................................ 8
Drawer
acceptable copy paper ............................................ 12
Drawer buttons ......................................................... 10
Drawers
acceptable copy paper ............................................ 13
buttons ................................................................. 10
confirming current status ....................................... 207
placing paper ......................................................... 16
DUAL PAGE ........................................................... 123
Duplex copying
1-sided original -> 1-sided copy ............................. 101
1-sided original -> 2-sided copy ............................. 101
2-sided original -> 1-sided copy ............................. 101
2-sided original -> 2-sided copy ............................. 101
book-type original -> 2-sided copy ......................... 101
simplex/duplex setting .......................................... 101
E
EDGE ERASE ........................................................ 119
EDIT menu ............................................................. 114
[EDIT] tab ................................................................... 8
EDITING ................................................................ 130
masking .............................................................. 130
mirror image ........................................................ 133
negative/positive reversal ...................................... 133
trimming .............................................................. 130
Downloaded from www.Manualslib.com manuals search engine
222 INDEX
Editing functions ......................................................113
2IN1 / 4IN1 ...........................................................125
ADF -> SADF .......................................................151
BOOK - TABLET ..................................................150
BOOK CENTER ERASE ........................................121
COVER SHEET ....................................................136
DUAL PAGE ........................................................123
EDGE ERASE ......................................................119
EDITING ..............................................................130
FULL IMAGE ........................................................153
IMAGE DIRECTION ..............................................148
IMAGE REPEAT ...................................................155
IMAGE SHIFT ......................................................115
JOB BUILD ..........................................................145
MAGAZINE SORT ................................................128
OMIT BLANK PAGE .............................................157
OUTSIDE ERASE .................................................159
PAGE NUMBER ...................................................143
SHEET INSERTION ..............................................139
TIME STAMP .......................................................142
XY ZOOM ............................................................134
end guide ..................................................................17
Envelope ......................................................12, 14, 54
Equipment status indication area ............................ 8, 10
[EXIT TRAY] .............................................................10
F
Feeding mode ...........................................................37
Finisher ....................................................................83
Inner Finisher .........................................................83
name of each part ...................................................85
Saddle Stitch Finisher .............................................83
[FINISHING] ................................................................9
Finishing mode
center fold ....................................................... 83, 94
finishing mode ........................................................64
group .............................................................. 83, 87
hole punch ...................................................... 83, 97
magazine sort .................................................. 83, 94
magazine sort & center fold ............................... 83, 94
magazine sort & saddle stitch ............................ 83, 94
manual staple .................................................. 83, 99
non-sort non-staple .................................................83
rotate sort ....................................................... 83, 89
saddle stitch .................................................... 83, 94
selecting ................................................................83
sort ................................................................. 83, 87
staple sort ....................................................... 83, 90
FTP ........................................................................110
FTPS ......................................................................110
FULL COLOR ............................................................70
FULL IMAGE ...........................................................153
[FUNCTION CLEAR] button ...........................48, 64, 65
G
Group ................................................................ 83, 87
H
Help button .................................................................9
Hole punch ......................................................... 83, 97
Hole Punch Unit .........................................................83
HUE .......................................................................174
I
Image adjustment function combination matrix ............218
Image adjustment functions
ADF Scan Noise Reduction ................................... 176
BACKGROUND ADJUSTMENT ............................ 166
COLOR BALANCE ............................................... 163
HUE ................................................................... 174
image adjustment functions ................................... 161
MONO COLOR .................................................... 173
ONE-TOUCH ADJUSTMENT ................................ 165
RGB ADJUSTMENT ............................................ 164
SATURATION ..................................................... 175
SHARPNESS ...................................................... 167
TWIN COLOR COPY ........................................... 168
IMAGE DIRECTION ................................................ 148
IMAGE menu .......................................................... 162
IMAGE REPEAT ..................................................... 155
IMAGE SHIFT ........................................................ 115
IMAGE SMOOTHING ................................................ 71
[IMAGE] tab ........................................................ 8, 162
Inner Tray ................................................................ 83
Inner tray
name of each part .................................................. 86
[INTERRUPT] button ................................................. 43
Interrupting copying ................................................... 43
J
JOB BUILD ............................................................ 145
Job history .............................................................. 205
[JOB STATUS] ........................................................... 9
Job status .............................................................. 200
Job status menu ..................................................... 200
Jobs
confirming ........................................................... 200
deleting ............................................................... 201
moving ................................................................ 203
pausing / resuming ............................................... 202
recovery information ............................................. 204
skipped ............................................................... 204
K
K format ............................................................. 12, 13
L
Large Capacity Feeder ..................................12, 13, 27
Log ........................................................................ 205
LT format ........................................................... 12, 13
M
MAGAZINE SORT .................................................. 128
Magazine sort ..................................................... 83, 94
Magazine sort & center fold .................................. 83, 94
Magazine sort & saddle stitch ............................... 83, 94
Manual staple ..................................................... 83, 99
MAP ........................................................................ 71
Message indication area .............................................. 8
MONO COLOR ....................................................... 173
N
NetWare IP ............................................................ 111
NetWare IPX .......................................................... 111
Non-sort Non-staple .................................................. 83
Number of copies .................................................. 9, 39
Number of remaining copy sets .................................... 9
O
OHP film ............................................... 12, 14, 47, 52
OMIT BLANK PAGE ................................................ 157
ONE-TOUCH ADJUSTMENT ................................... 165
Downloaded from www.Manualslib.com manuals search engine
INDEX 223
Original glass ............................................................34
[ORIGINAL MODE] ............................................... 9, 71
Original mode
IMAGE SMOOTHING ..............................................71
MAP ......................................................................71
original mode ................................................... 64, 71
PHOTO .................................................................71
PRINTED IMAGE ...................................................71
TEXT .....................................................................71
TEXT/PHOTO ........................................................71
Original stopper .........................................................37
Originals
acceptable originals ................................................33
mixed-size originals .................................................68
placing ...................................................................33
using the RADF ......................................................36
OUTSIDE ERASE ....................................................159
P
PAGE NUMBER ......................................................143
Paper
acceptable copy paper ............................................11
amount of paper remaining ......................................10
out of paper ............................................................40
paper type setting ......................................23, 50, 54
placing ......................................................11, 16, 27
precautions for storing copy paper ............................15
registering paper size ..............................................22
unacceptable copy paper .........................................15
Paper Feed Pedestal ........................................... 12, 13
Paper Feed Unit ........................................................12
Paper holder .............................................................47
Paper holding lever ................................ 47, 49, 56, 58
Paper selection ................................................... 64, 66
Paper size indicator ....................................................17
Paper type on the bypass tray .....................................10
Paper type setting .........................................23, 50, 54
PHOTO ....................................................................71
Photo zoom ...............................................................80
Plain paper ......................................................... 12, 13
PRINTED IMAGE ......................................................71
Private group
changing private group data ...................................191
creating ...............................................................184
deleting ................................................................194
private group ........................................................181
registering templates .............................................186
[PROOF COPY] ...........................................................9
Proof copy .................................................................44
Public template group ...............................................181
R
RADF (Reversing Automatic Document Feeder)
precautions ............................................................36
unacceptable originals .............................................36
using the RADF ......................................................36
Receiving tray indication .............................................10
Receiving tray selection ..............................................46
Recommended paper .................................................11
Recycled paper ................................................... 12, 13
Registering paper size ................................................22
Reproduction ratio ............................................... 64, 74
Reversing Automatic Document Feeder (RADF)
precautions ............................................................36
unacceptable originals .............................................36
using the RADF ......................................................36
RGB ADJUSTMENT ................................................ 164
Rotate sort ......................................................... 83, 89
S
Saddle stitch ....................................................... 83, 94
SADF ..................................................................... 151
SATURATION ........................................................ 175
[SETTINGS] ............................................................... 9
Share folder ............................................................ 110
SHARPNESS ......................................................... 167
SHEET INSERTION ................................................ 139
Side guides of the bypass tray ........................49, 56, 58
Side guides of the RADF
(Reversing Automatic Document Feeder) ........... 37, 38
Simplex/duplex setting ............................................... 64
Single feed mode ...................................................... 38
SMB ...................................................................... 111
Sort ................................................................... 83, 87
Staple sort .......................................................... 83, 90
Stapling control section .............................................. 99
[START] button ................................................... 40, 42
Sticker labels ................................................12, 14, 47
[STOP] button ........................................................... 41
[STORAGE] ................................................................ 9
Storage of color copies .............................................. 32
T
[TEMPLATE] ...................................................... 9, 178
Template menu ....................................................... 178
Templates
changing data .............................................. 191, 192
deleting ....................................................... 194, 195
recalling .............................................................. 188
registering ................................................... 181, 186
templates ............................................................ 178
useful templates ................................................... 179
TEXT ....................................................................... 71
TEXT/PHOTO .......................................................... 71
Thick paper ........................................................ 12, 14
Thin paper ................................................................ 14
TIME STAMP ......................................................... 142
Toner remaining amount .......................................... 208
TopAccess ............................................................. 191
Touch panel ............................................................... 8
TWIN COLOR COPY .............................................. 168
U
Useful templates ..................................................... 179
[USER FUNCTIONS] button ....................................... 22
User management function .......................................... 8
W
Waterproof paper ...................................................... 14
X
XY ZOOM .............................................................. 134
Y
YMCK adjustment ................................................... 163
Z
[ZOOM] ................................................................ 8, 75
Downloaded from www.Manualslib.com manuals search engine
224 INDEX
Downloaded from www.Manualslib.com manuals search engine
FC-2050C/2550C
FC-2555C/3055C/3555C/4555C/5055C
OME120004E0
Downloaded from www.Manualslib.com manuals search engine
1-11-1, OSAKI, SHINAGAWA-KU, TOKYO, 141-8562, JAPAN
MULTIFUNCTIONAL DIGITAL COLOR SYSTEMS
Copying Guide
©2012 - 2015 TOSHIBA TEC CORPORATION All rights reserved
Patent; http://www.toshibatec.co.jp/en/patent/
R120120K8505-TTEC
Ver05 F 2015-01
Downloaded from www.Manualslib.com manuals search engine
3

Hulp nodig? Stel uw vraag in het forum

Spelregels

Misbruik melden

Gebruikershandleiding.com neemt misbruik van zijn services uitermate serieus. U kunt hieronder aangeven waarom deze vraag ongepast is. Wij controleren de vraag en zonodig wordt deze verwijderd.

Product:

Bijvoorbeeld antisemitische inhoud, racistische inhoud, of materiaal dat gewelddadige fysieke handelingen tot gevolg kan hebben.

Bijvoorbeeld een creditcardnummer, een persoonlijk identificatienummer, of een geheim adres. E-mailadressen en volledige namen worden niet als privégegevens beschouwd.

Spelregels forum

Om tot zinvolle vragen te komen hanteren wij de volgende spelregels:

Belangrijk! Als er een antwoord wordt gegeven op uw vraag, dan is het voor de gever van het antwoord nuttig om te weten als u er wel (of niet) mee geholpen bent! Wij vragen u dus ook te reageren op een antwoord.

Belangrijk! Antwoorden worden ook per e-mail naar abonnees gestuurd. Laat uw emailadres achter op deze site, zodat u op de hoogte blijft. U krijgt dan ook andere vragen en antwoorden te zien.

Abonneren

Abonneer u voor het ontvangen van emails voor uw Toshiba e-STUDIO 5055cse bij:


U ontvangt een email met instructies om u voor één of beide opties in te schrijven.


Ontvang uw handleiding per email

Vul uw emailadres in en ontvang de handleiding van Toshiba e-STUDIO 5055cse in de taal/talen: Engels als bijlage per email.

De handleiding is 36.36 mb groot.


U ontvangt de handleiding per email binnen enkele minuten. Als u geen email heeft ontvangen, dan heeft u waarschijnlijk een verkeerd emailadres ingevuld of is uw mailbox te vol. Daarnaast kan het zijn dat uw internetprovider een maximum heeft aan de grootte per email. Omdat hier een handleiding wordt meegestuurd, kan het voorkomen dat de email groter is dan toegestaan bij uw provider.

Stel vragen via chat aan uw handleiding

Stel uw vraag over deze PDF

Andere handleiding(en) van Toshiba e-STUDIO 5055cse

Toshiba e-STUDIO 5055cse Gebruiksaanwijzing - Nederlands - 206 pagina's

Toshiba e-STUDIO 5055cse Gebruiksaanwijzing - Deutsch - 84 pagina's


Uw handleiding is per email verstuurd. Controleer uw email

Als u niet binnen een kwartier uw email met handleiding ontvangen heeft, kan het zijn dat u een verkeerd emailadres heeft ingevuld of dat uw emailprovider een maximum grootte per email heeft ingesteld die kleiner is dan de grootte van de handleiding.

Er is een email naar u verstuurd om uw inschrijving definitief te maken.

Controleer uw email en volg de aanwijzingen op om uw inschrijving definitief te maken

U heeft geen emailadres opgegeven

Als u de handleiding per email wilt ontvangen, vul dan een geldig emailadres in.

Uw vraag is op deze pagina toegevoegd

Wilt u een email ontvangen bij een antwoord en/of nieuwe vragen? Vul dan hier uw emailadres in.


Info