USER FUNCTIONS ...............................................................................................................................................8
TopAccess top page.............................................................................................................................................11
Registering from TopAccess.................................................................................................................................12
Setting up from TopAccess...................................................................................................................................14
Maintaining from TopAccess.................................................................................................................................17
Registering from TopAccess.................................................................................................................................17
Software Included in the e-STUDIO Client Utilities CD-ROM.............................................18
1 RESTRICTIONS
6 Operations from the Control Panel
Operations from the Control Panel
The e-STUDIO4520C series machine with the GA-1211 controller attached or e-STUDIO6530C series machine with the
GA-1310 controller attached has several restrictions in the following operations:
P.6 “COPY”
P.6 “SCAN”
P.7 “PRINT”
P.7 “FAX”
P.8 “USER FUNCTIONS”
P.9 “JOB STATUS”
yButtons and items enclosed in red lines on the following screenshots in this section disappear or become dim when
the controller is connected to the equipment.
yAll the touch panel figures in this guide are examples of the e-STUDIO4520C series. Although the size of the
screen differs between the e-STUDIO4520C series and the e-STUDIO6530C series, the displayed objects and
their functions are the same.
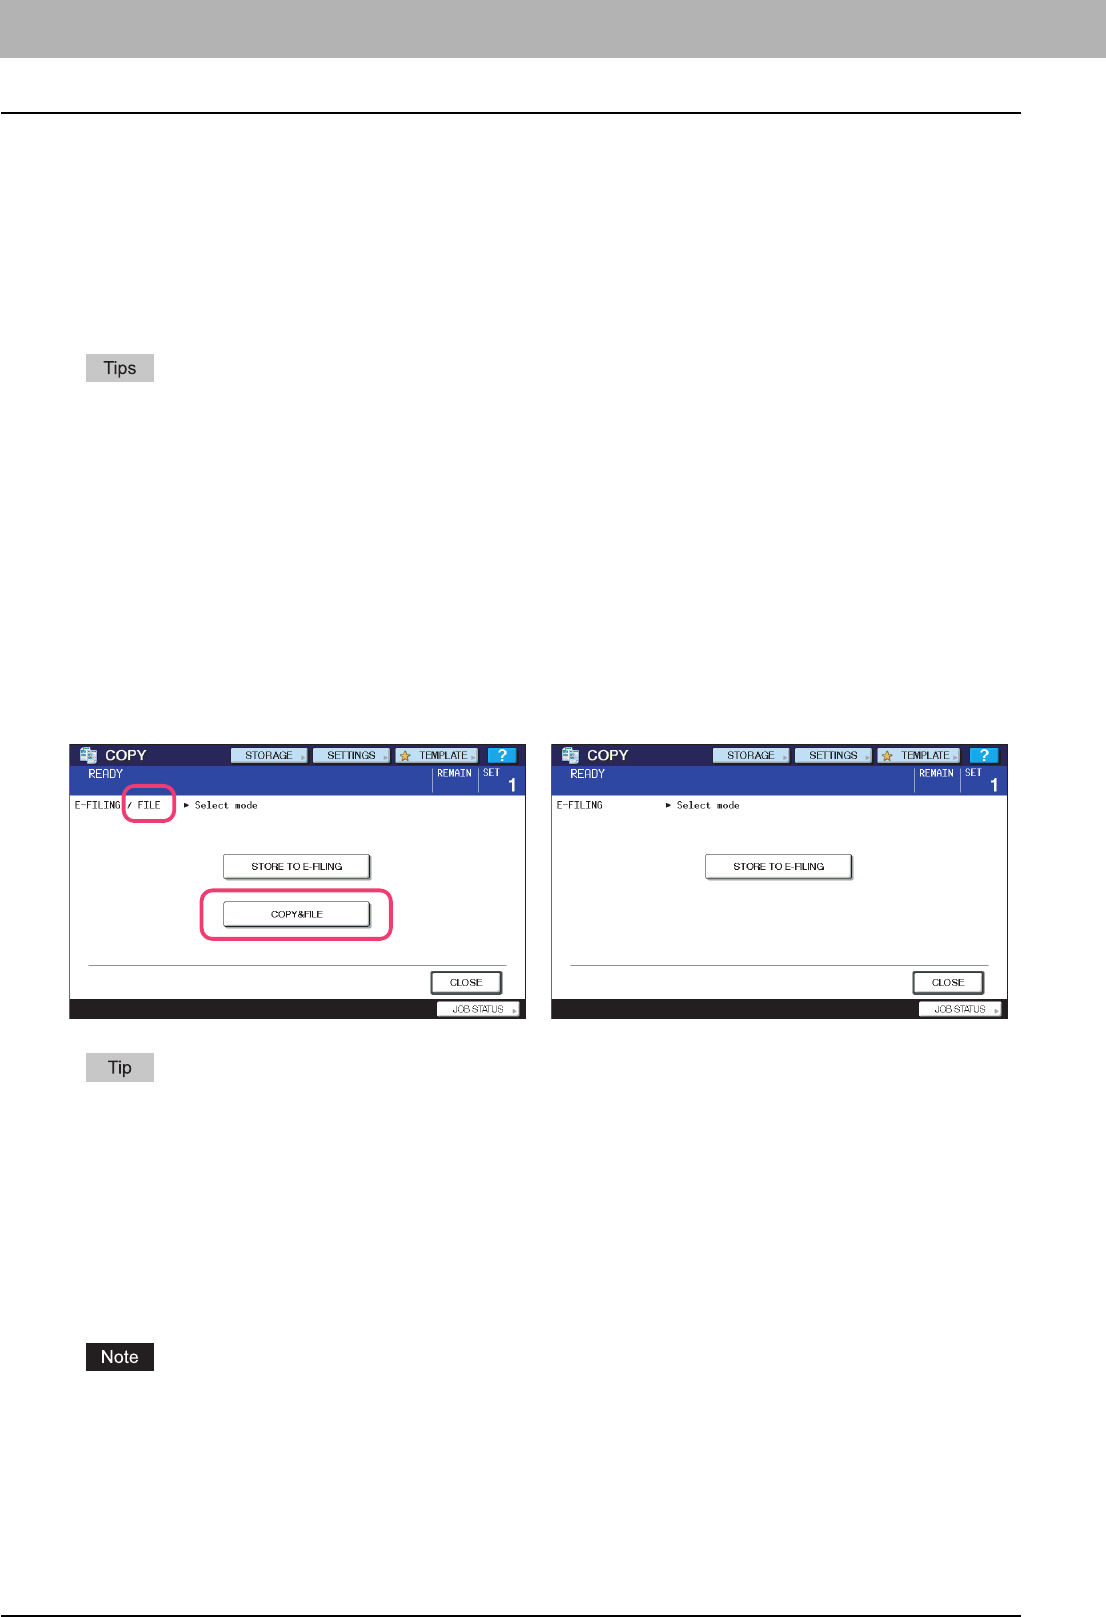
COPY
The following related to the [COPY] button cannot be used when the controller is connected to the equipment:
yThe COPY&FILE function for copying originals and storing the data in the shared folder or a specified network folder at
the same time
To learn more about STORE TO E-FILING, refer to the e-Filing Guide.
SCAN
The following related to the [SCAN] button cannot be used when the controller is connected to the equipment:
yThe Scan to File function for sending and storing scans to a shared folder in the equipment's hard disk or a specified
network folder
yThe Web Service (WS) Scan function for scanning images from a client computer through the network by using the
functions of Windows Vista
The SCAN menu displayed by pressing the [SCAN] button contains the GA-1211/GA-1310 specific functions. For
details, see the following section:
P.21 “SCAN”
e-STUDIO4520C series/e-STUDIO6530C series
e-STUDIO machine with the controller or
e-STUDIO4520C Pro series/e-STUDIO6530C Pro series
1.RESTRICTIONS
Operations from the Control Panel 7
1 RESTRICTIONS
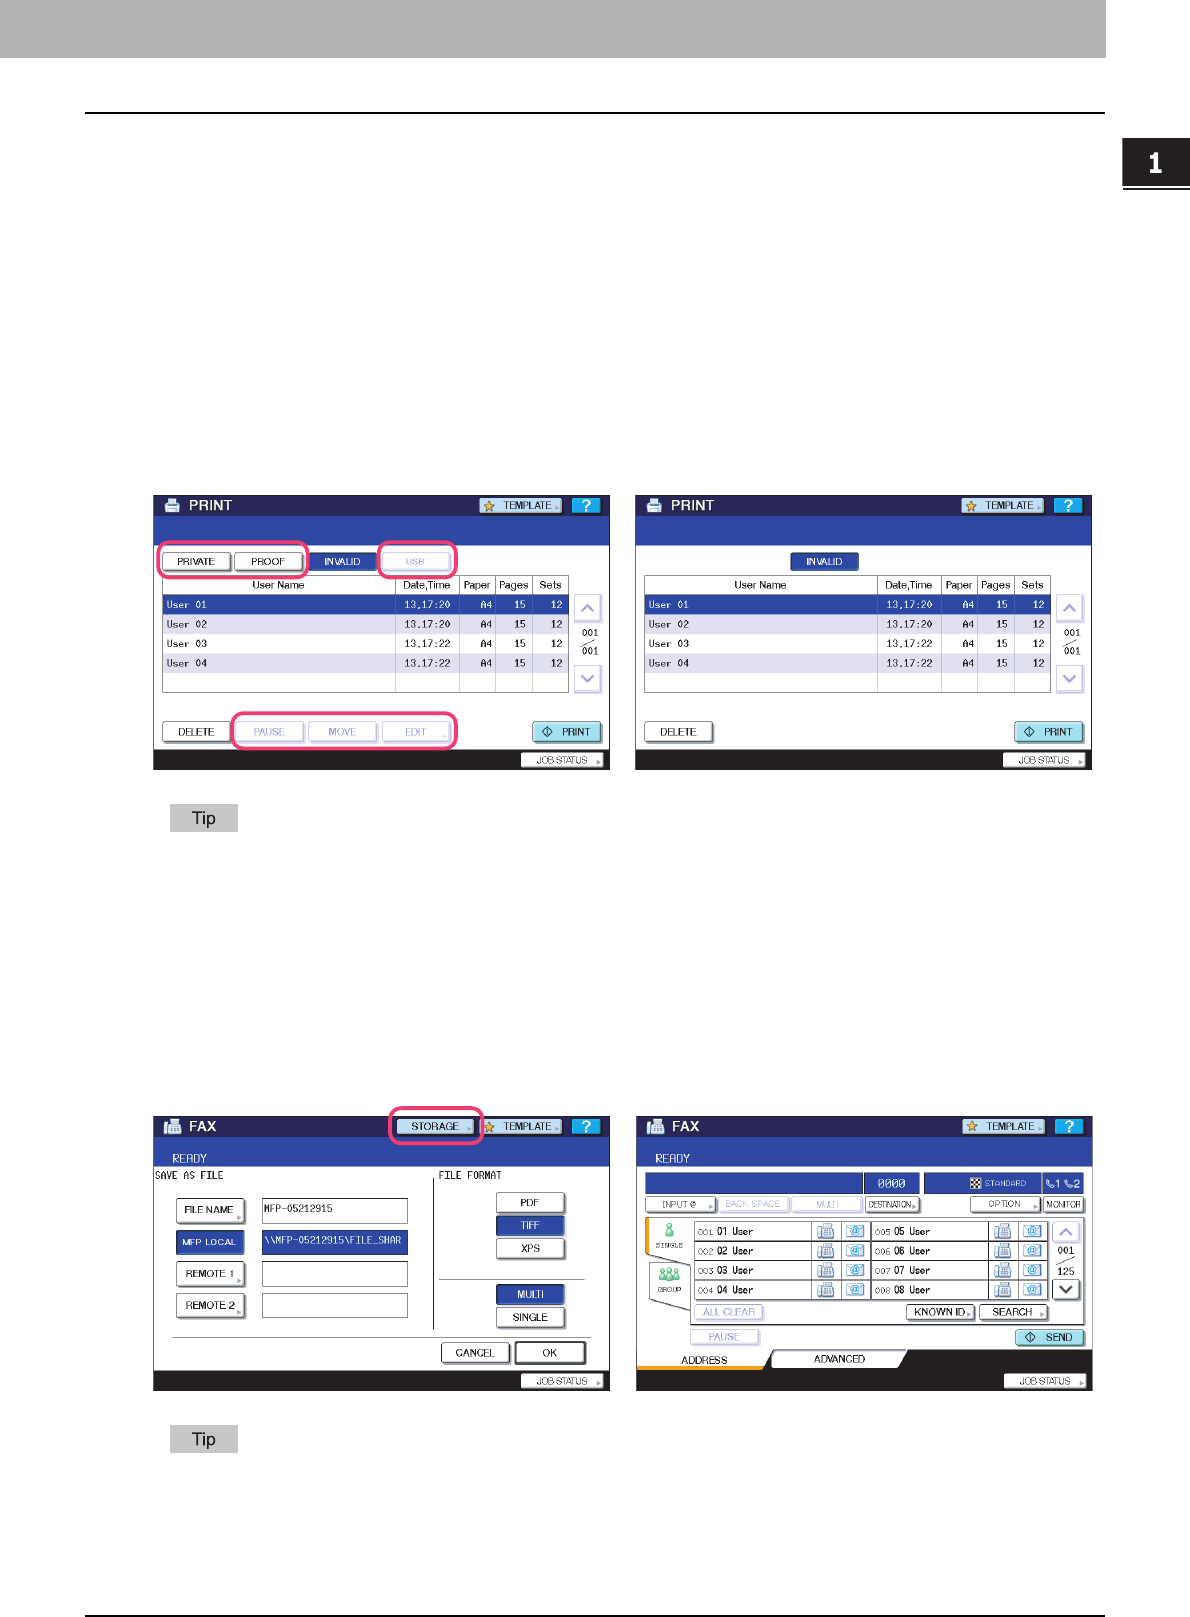
PRINT
The following related to the [PRINT] button cannot be used when the controller is connected to the equipment:
yThe Private Print function for printing a document from a computer on the network only when a set password is keyed
in to the equipment's control panel
yThe Proof Print function for printing only a single copy as a sample and suspending the rest of the job when you print
multiple copies from a computer on the network
yThe USB Direct Print function for printing files saved in a USB storage device that is connected to the USB port on the
equipment
yThe [PAUSE]/[RESUME]] buttons for pausing/resuming jobs in the list
yThe [MOVE] button for changing the order of the jobs by moving them within the list
yThe [EDIT] button for changing the number of copies to print
For details on the PRINT screen, refer to the Printing Guide.
FAX
The following related to the [FAX] button cannot be used when the controller is connected to the equipment:
yThe FAX&FILE function for sending originals and storing the data in the shared folder or a specified network folder at
the same time
For details on the FAX screen, refer to the GD-1250/GD-1260/GD-1270 Operator’s Manual for FAX Unit.
e-STUDIO4520C series/e-STUDIO6530C series
e-STUDIO machine with the controller or
e-STUDIO4520C Pro series/e-STUDIO6530C Pro series
e-STUDIO4520C series/e-STUDIO6530C series
e-STUDIO machine with the controller or
e-STUDIO4520C Pro series/e-STUDIO6530C Pro series
1 RESTRICTIONS
8 Operations from the Control Panel
USER FUNCTIONS
The e-STUDIO4520C series machine with the GA-1211 controller attached or e-STUDIO6530C series machine with the
GA-1310 controller attached has several restrictions in the following operation menus:
P.8 “USER menu in USER FUNCTIONS”
P.8 “ADMIN menu in USER FUNCTIONS”
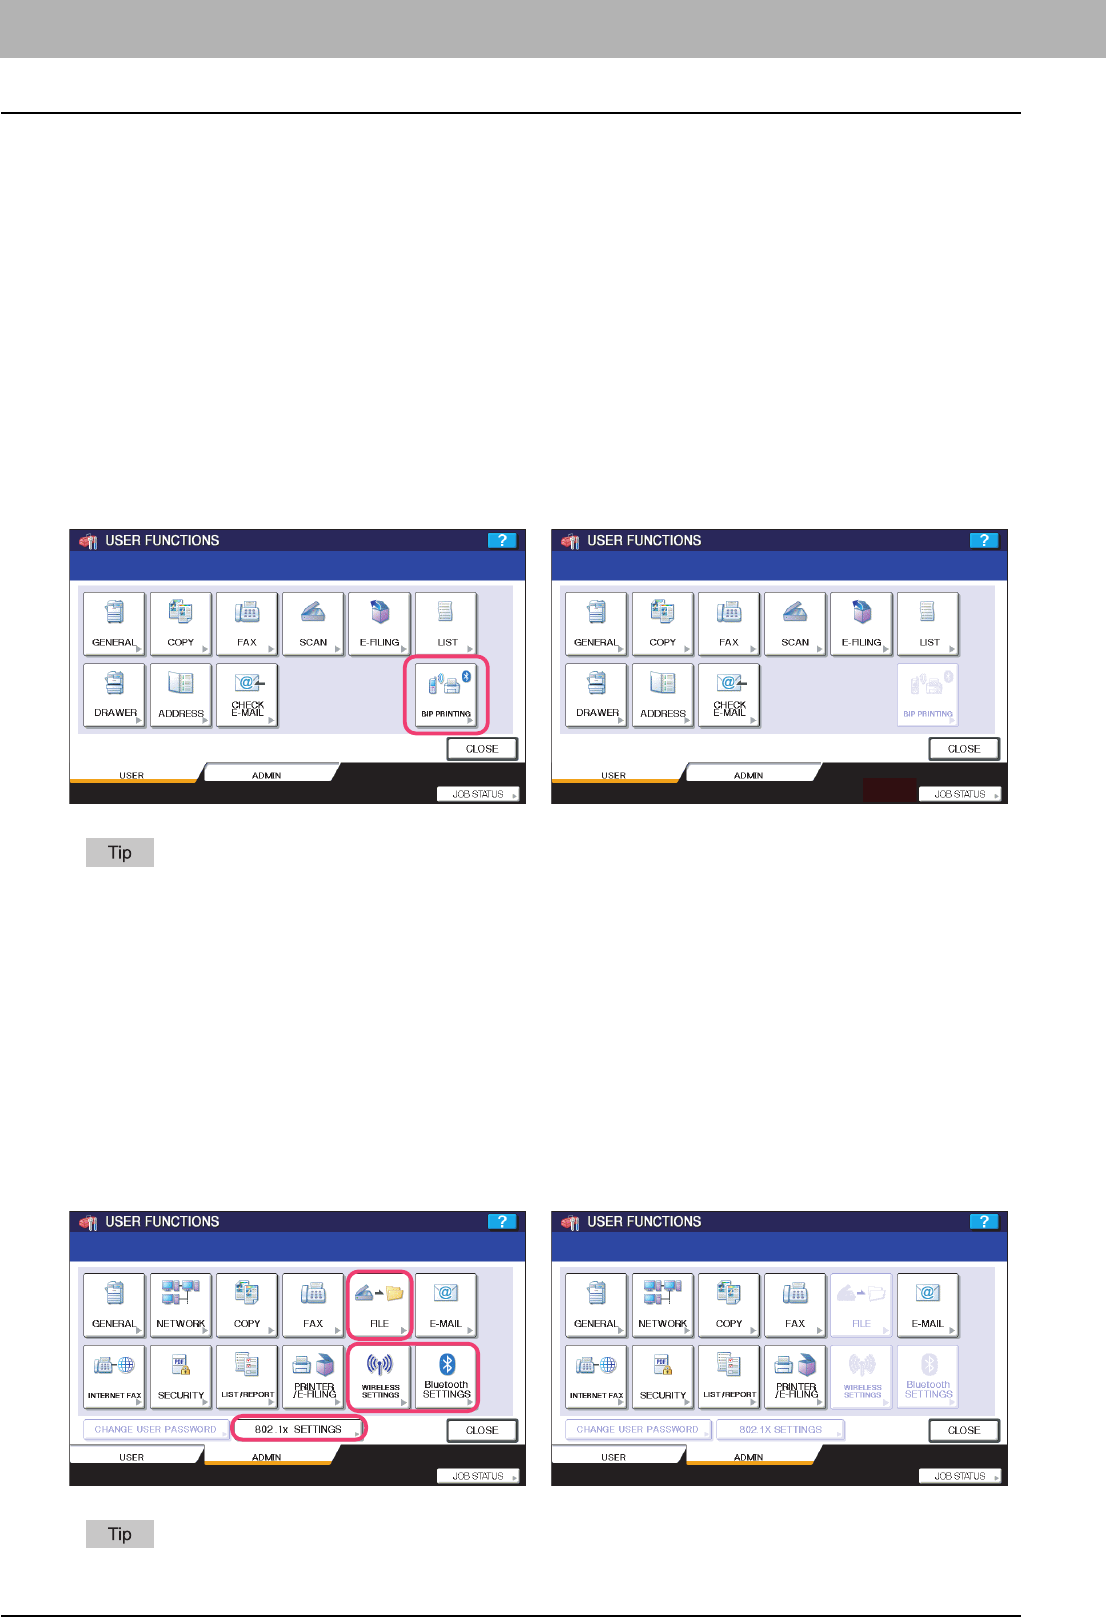
USER menu in USER FUNCTIONS
The following related to the USER menu cannot be used when the controller is connected to the equipment:
yThe BLUETOOTH PRINTING setting that allows you to print an image from any devices, such as mobile phones or
digital cameras, which the Bluetooth module is equipped and standard BIP/OPP/FTP printing is supported
For details on the USER menu in the USER FUNCTIONS screen, refer to the MFP Management Guide.
ADMIN menu in USER FUNCTIONS
The following related to the ADMIN menu cannot be used when the controller is connected to the equipment:
yThe FILE setting that allows you to automatically delete files stored by the Scan to File operation
yThe WIRELESS SETTINGS menu that allows you to set up the equipment for wireless networks
yThe BLUETOOTH SETTINGS menu that allows you to configure the Bluetooth setting options
yThe 802.1X SETTINGS menu that allows you to make settings for IEEE 802.1X authentication that will apply to wired
networks
For details on the ADMIN menu in the USER FUNCTIONS screen, refer to the MFP Management Guide.
e-STUDIO4520C series/e-STUDIO6530C series
e-STUDIO machine with the controller or
e-STUDIO4520C Pro series/e-STUDIO6530C Pro series
e-STUDIO4520C series/e-STUDIO6530C series
e-STUDIO machine with the controller or
e-STUDIO4520C Pro series/e-STUDIO6530C Pro series
1.RESTRICTIONS
Operations from the Control Panel 9
1 RESTRICTIONS
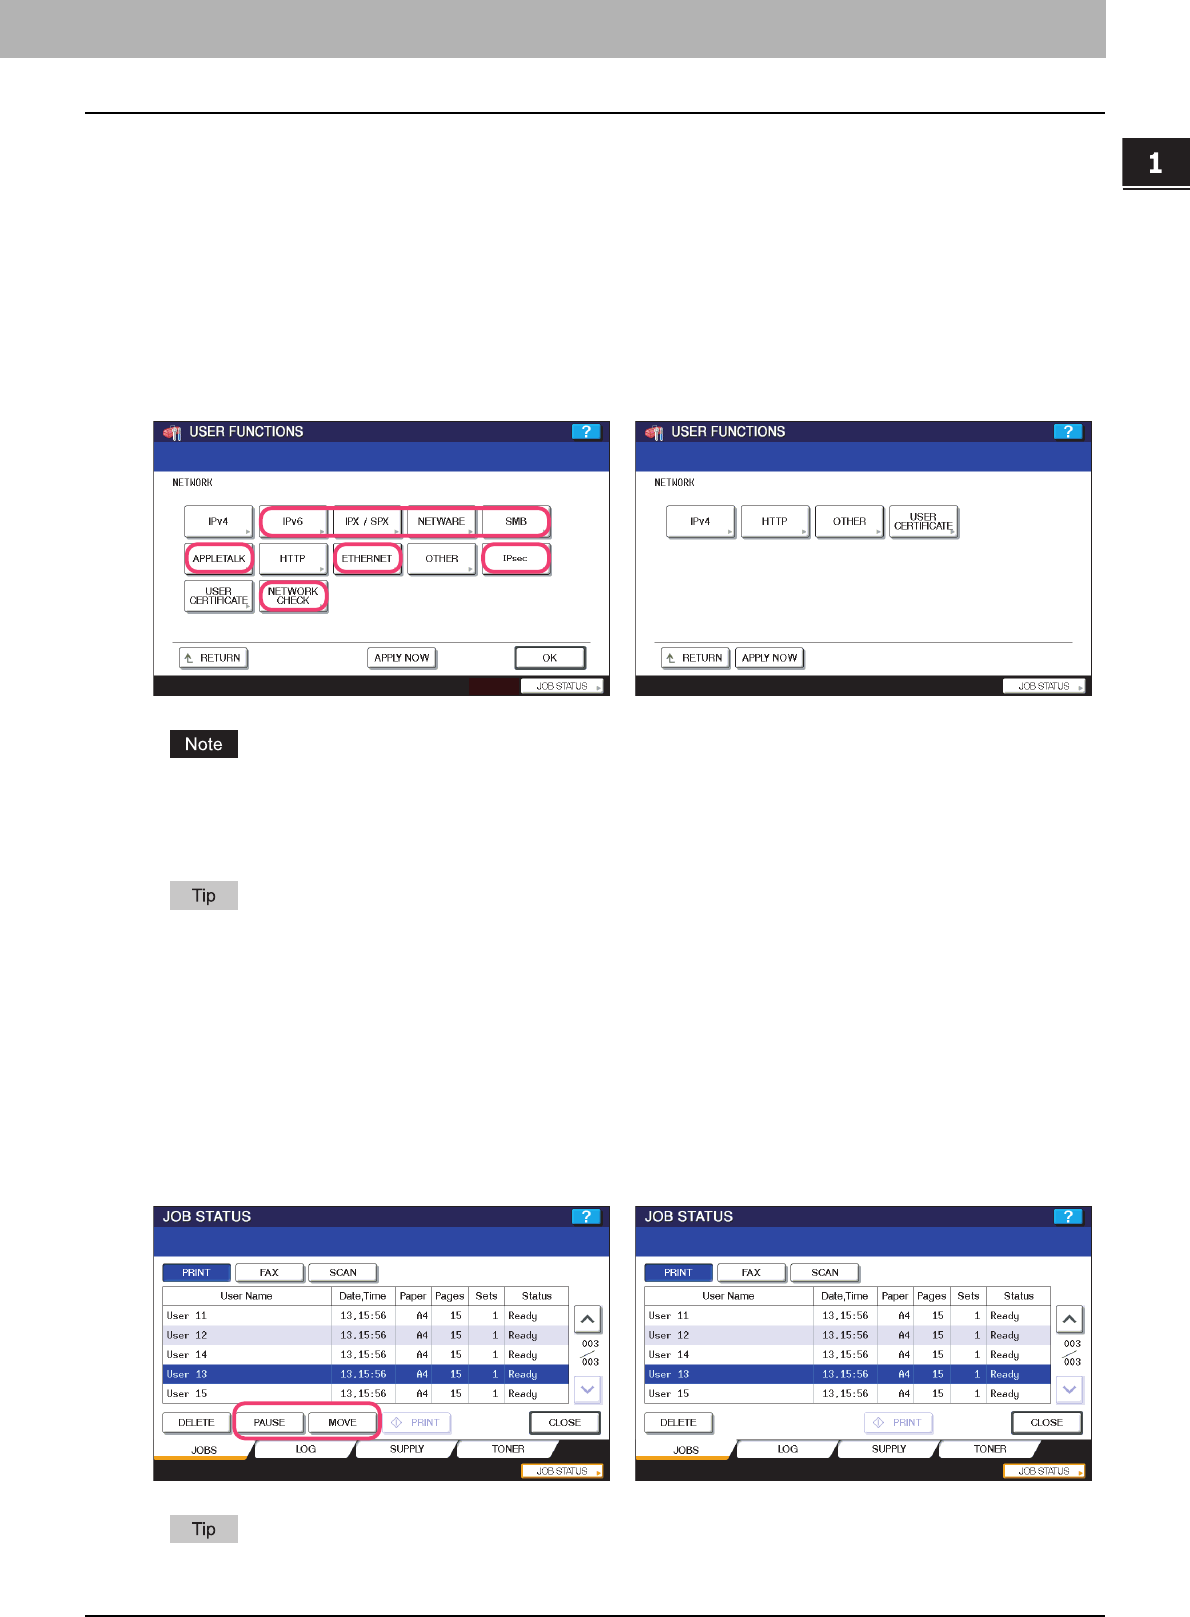
NETWORK menu in ADMIN menu
The following provided for the NETWORK menu are unavailable.
The setting operations for [IPv4] and [HTTP] differ depending on the equipment with or without the controller. For
instructions on how to make settings for [IPv4] and [HTTP] on the equipment with the controller, see the following
section:
P.32 “USER FUNCTIONS”
To learn more about OTHER and USER CERTIFICATE, refer to the MFP Management Guide.
JOB STATUS
The following related to the PRINT JOB STATUS screen cannot be used when the controller is connected to the
equipment:
yThe [PAUSE]/[RESUME]] buttons for pausing/resuming jobs in the list
yThe [MOVE] button for changing the order of the jobs by moving them within the list
For details on the PRINT JOB STATUS screen, refer to the Printing Guide.
y[IPv6]y[IPX/SPX]
y[NETWARE]y[SMB]
y[APPLETALK]y[ETHERNET]
y[IPsec]y[NETWORK CHECK]
e-STUDIO4520C series/e-STUDIO6530C series
e-STUDIO machine with the controller or
e-STUDIO4520C Pro series/e-STUDIO6530C Pro series
e-STUDIO4520C series/e-STUDIO6530C series
e-STUDIO machine with the controller or
e-STUDIO4520C Pro series/e-STUDIO6530C Pro series
1 RESTRICTIONS
10 Operations from the Control Panel
INTERRUPT
The [INTERRUPT] button on the control panel cannot be used while printing is in progress when the controller is
connected to the equipment.
For details on the [INTERRUPT] button, refer to the Copying Guide.
1 RESTRICTIONS
TopAccess USER Mode 11
TopAccess USER Mode
The e-STUDIO4520C series machine with the GA-1211 controller attached or e-STUDIO6530C series machine with the
GA-1310 controller attached has several restrictions in the following TopAccess USER mode operations:
P.11 “Launching TopAccess”
P.11 “TopAccess top page”
P.12 “Registering from TopAccess”
Launching TopAccess
The following methods for launching TopAccess cannot be used when the controller is connected to the equipment:
yLaunching TopAccess by using the TopAccessDocMon link
yLaunching TopAccess from Network Map (Windows Vista)
The operation for launching TopAccess differs depending on the equipment with or without the controller. For
instructions on how to launch TopAccess on the equipment with the controller, see the following section:
P.35 “Launching TopAccess from the WebTools home page”
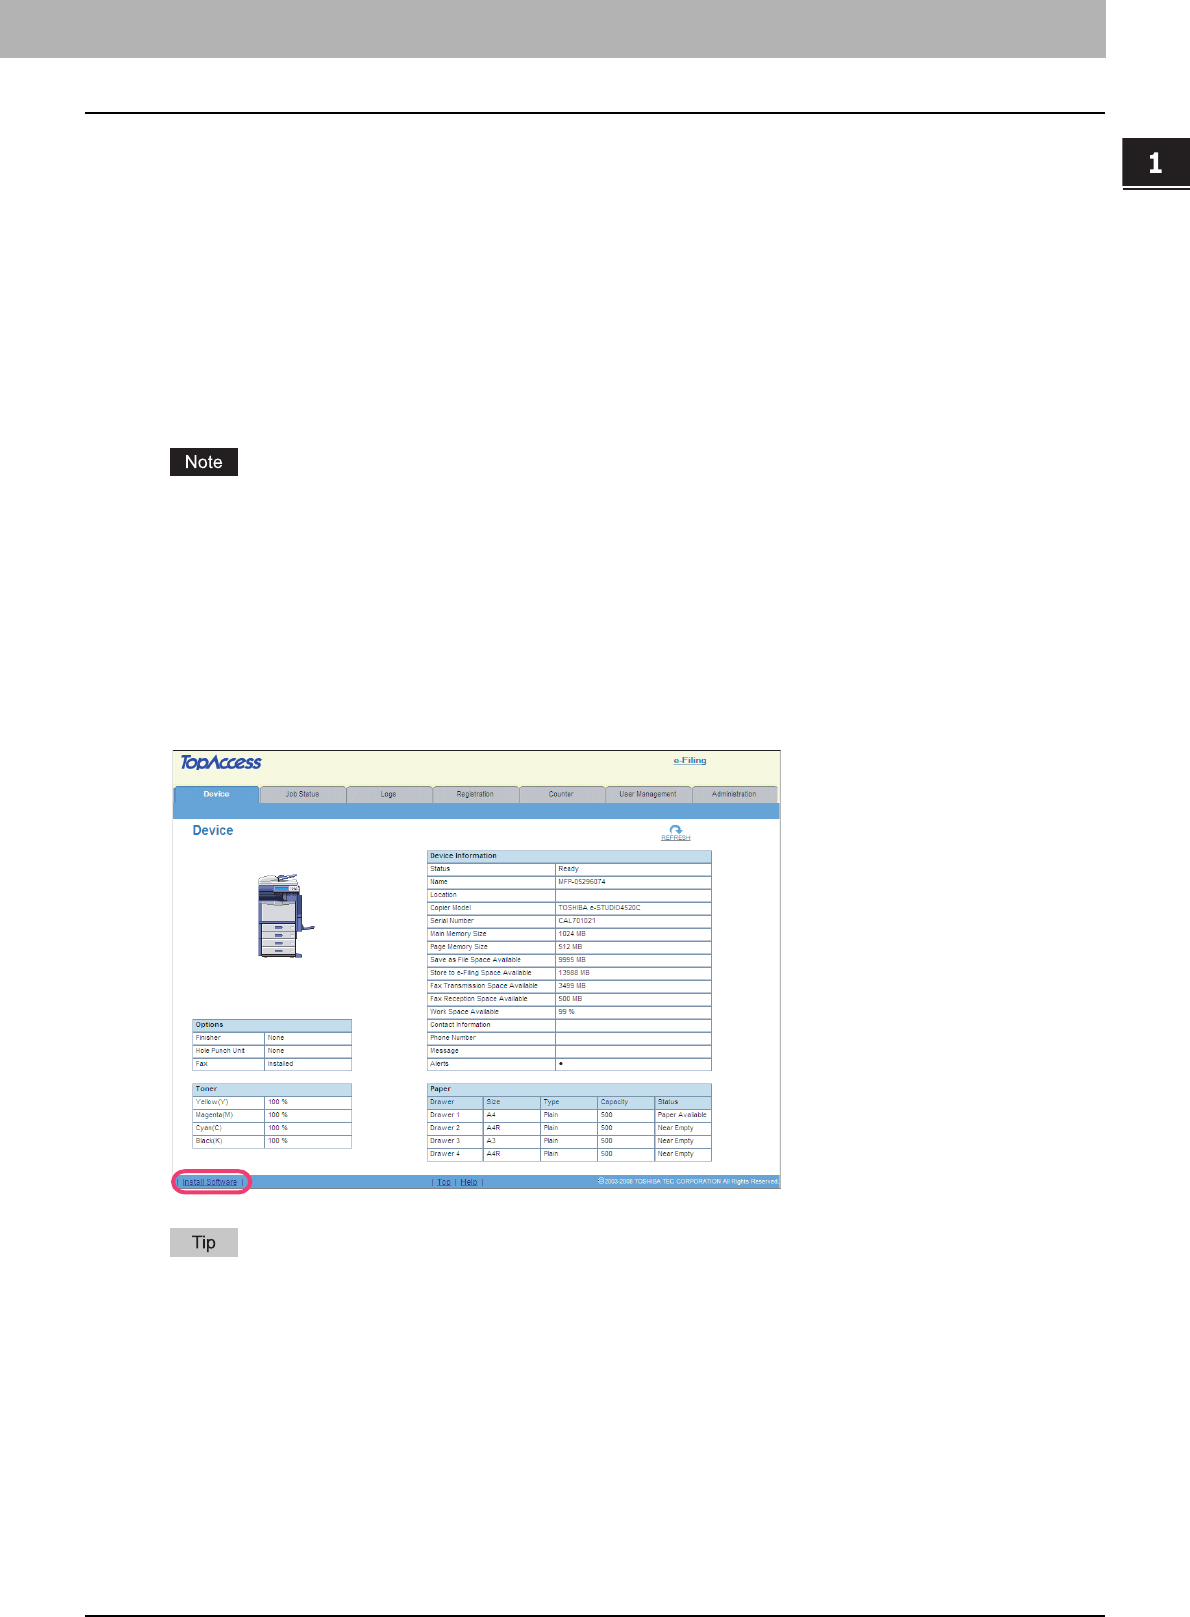
TopAccess top page
The following link for downloading the client software cannot be used when the controller is connected to the equipment:
yThe [Install Software] link
e-STUDIO4520C series/e-STUDIO6530C series
All the screenshots in this manual are examples from Windows Vista.
1 RESTRICTIONS
12 TopAccess USER Mode
e-STUDIO machine with the controller or e-STUDIO4520C Pro series/e-STUDIO6530C Pro series
For details on the TopAccess top page, refer to the TopAccess Guide.
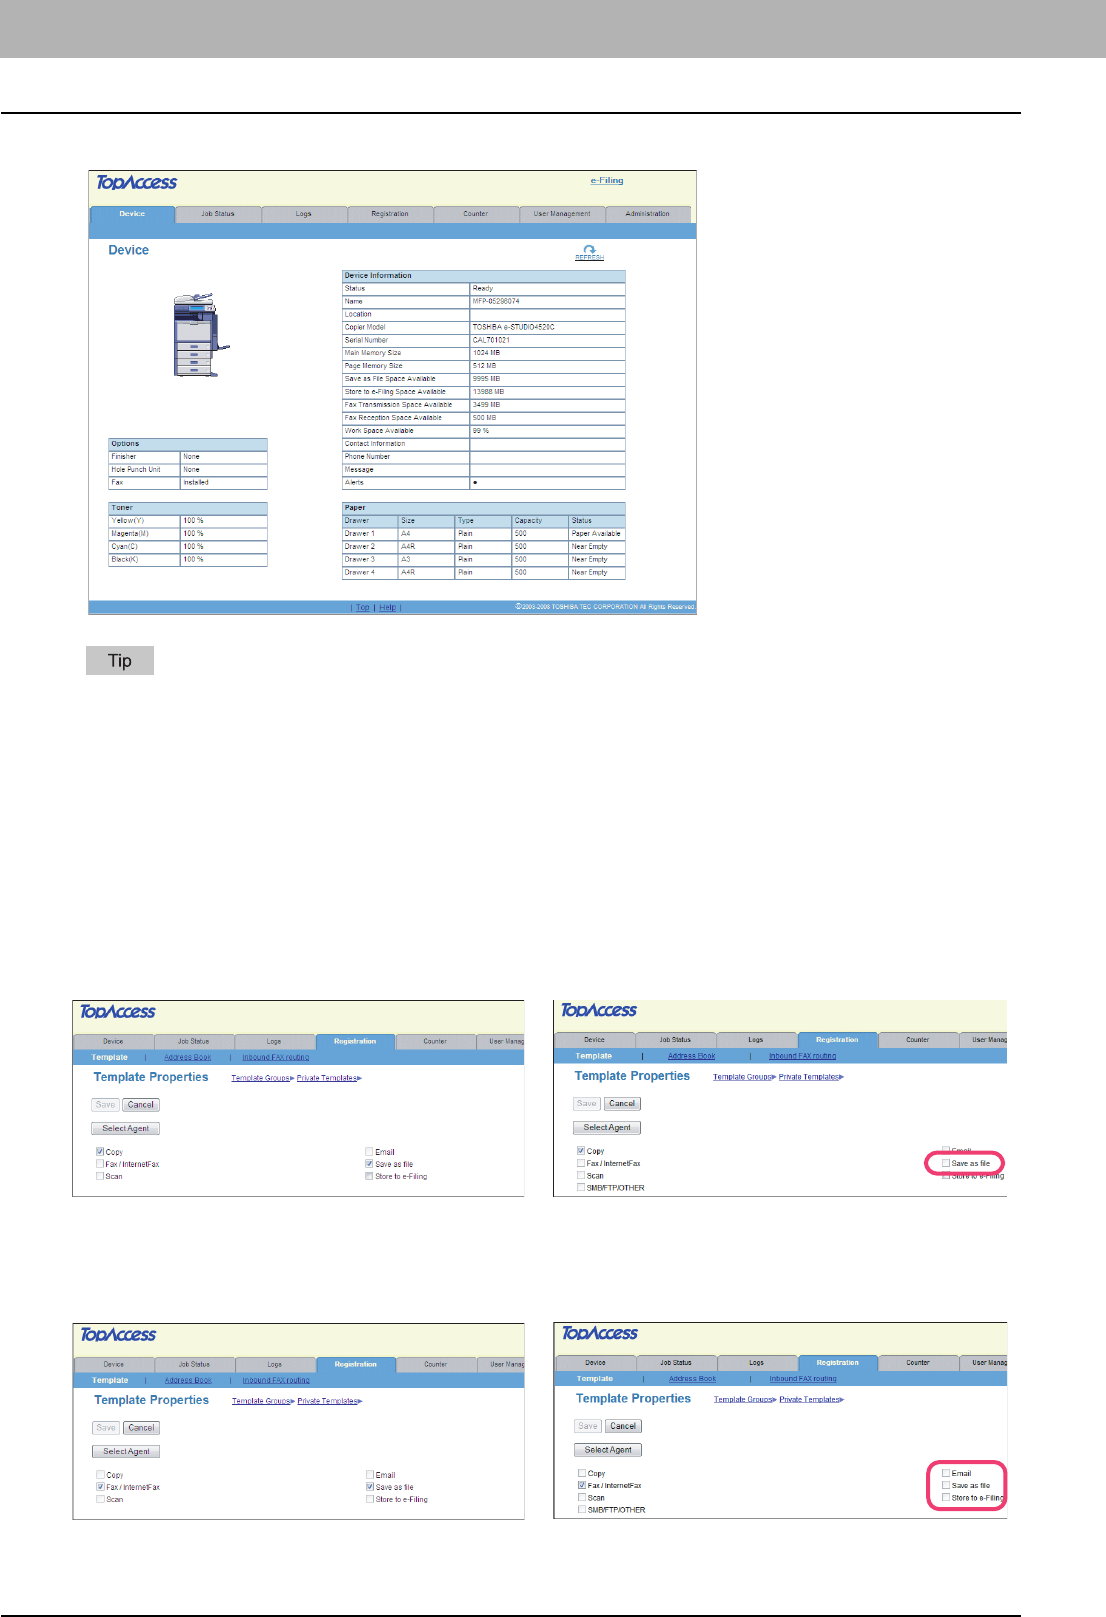
Registering from TopAccess
Registering private templates
The following combinations of private template agents cannot be used when the controller is connected to the equipment:
yThe Copy agent cannot be combined with the Save as file agent.
yThe Fax / InternetFax agent cannot be combined with any other agents.
e-STUDIO4520C series/e-STUDIO6530C series
e-STUDIO machine with the controller or
e-STUDIO4520C Pro series/e-STUDIO6530C Pro series
e-STUDIO4520C series/e-STUDIO6530C series
e-STUDIO machine with the controller or
e-STUDIO4520C Pro series/e-STUDIO6530C Pro series
1.RESTRICTIONS
TopAccess USER Mode 13
1 RESTRICTIONS
When the controller is connected to the equipment, the GA-1211/GA-1310 specific agents ([SMB/FTP/OTHER] check
box) appear in the above page. From this page, you can create the GA-1211/GA-1310 specific private templates. For
instructions on how to create them, see the following section:
P.35 “Registering or editing GA-1211/GA-1310 specific private templates”
Furthermore, the data destination of the Save as file agent is fixed to “Save to USB Media”.
Setting up mailboxes
Creating a Forward mailbox combined with the Save as file agent is unavailable when the controller is connected to the
equipment.
For details on the mailbox setting, refer to the TopAccess Guide.
e-STUDIO4520C series/e-STUDIO6530C series
e-STUDIO machine with the controller or
e-STUDIO4520C Pro series/e-STUDIO6530C Pro series
e-STUDIO4520C series/e-STUDIO6530C series
e-STUDIO machine with the controller or
e-STUDIO4520C Pro series/e-STUDIO6530C Pro series
1 RESTRICTIONS
14 TopAccess ADMIN Mode
TopAccess ADMIN Mode
The e-STUDIO4520C series machine with the GA-1211 controller attached or e-STUDIO6530C series machine with the
GA-1310 controller attached has several restrictions in the following TopAccess ADMIN mode operations:
P.14 “Setting up from TopAccess”
P.17 “Maintaining from TopAccess”
P.17 “Registering from TopAccess”
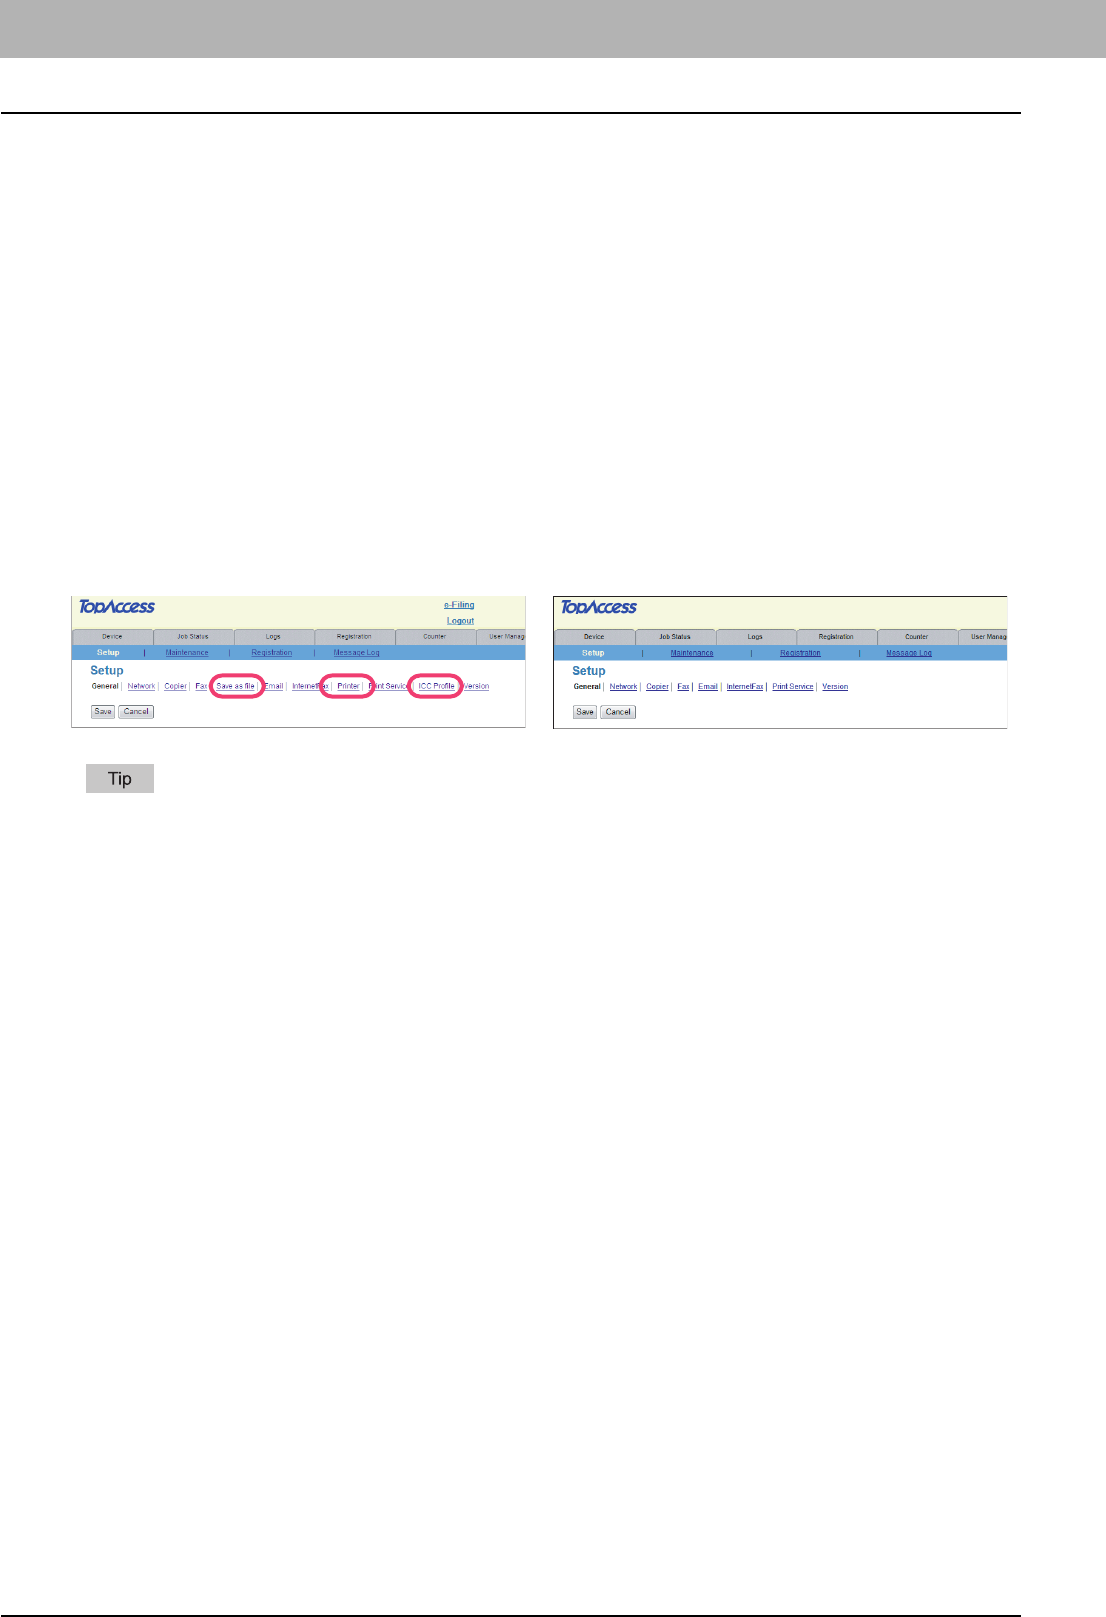
Setting up from TopAccess
Setup page
The following menus are unavailable when the controller is connected to the equipment:
ySave as file
yPrinter
yICC Profile
For details on the Setup page, refer to the TopAccess Guide.
Setting up Network settings
The following provided for the Network submenu are unavailable when the controller is connected to the equipment:
e-STUDIO4520C series/e-STUDIO6530C series
e-STUDIO machine with the controller or
e-STUDIO4520C Pro series/e-STUDIO6530C Pro series
yTCP/IPyFilteringyIPv6
yIPX/SPXyAppleTalkyBonjour
yDDNS SessionySMB SessionyNetWare Session
ySNTP ServiceyFTP ClientySLP Session
yWeb Services SettingyLLTD SessionyIP Security
1.RESTRICTIONS
TopAccess ADMIN Mode 15
1 RESTRICTIONS
Setting up SNMP Network Service
The following provided for the SNMP Network Service are unavailable when the controller is connected to the equipment.
Setting up Security Service
The following related to Security Service cannot be used when the controller is connected to the equipment:
yCertificate for Wireless LAN
yCertificate for IP SEC
yCertificate for IEEE802.1X
e-STUDIO4520C series/e-STUDIO6530C series
e-STUDIO machine with the controller or
e-STUDIO4520C Pro series/e-STUDIO6530C Pro series
yEnable SNMP V3ySNMP V3 User Information/
Number
yEnable SNMP V3 Trap
ySNMP V3 Trap User NameySNMP V3 Trap Authentication
Protocol
ySNMP V3 Trap Privacy
Protocol
yIPX Trap Address
e-STUDIO4520C series/e-STUDIO6530C series
e-STUDIO machine with the controller or
e-STUDIO4520C Pro series/e-STUDIO6530C Pro series
1 RESTRICTIONS
16 TopAccess ADMIN Mode
For details on the Network settings screen, refer to the TopAccess Guide.
Setting up Print Service settings
The following related to Print Service cannot be used when the controller is connected to the equipment:
yRaw TCP Print
yLPD Print
yIPP Print
yFTP Print
yNetWare Print
To learn more about Email Print, refer to the TopAccess Guide.
e-STUDIO4520C series/e-STUDIO6530C series
e-STUDIO machine with the controller or
e-STUDIO4520C Pro series/e-STUDIO6530C Pro series
e-STUDIO4520C series/e-STUDIO6530C series
e-STUDIO machine with the controller or
e-STUDIO4520C Pro series/e-STUDIO6530C Pro series
1.RESTRICTIONS
TopAccess ADMIN Mode 17
1 RESTRICTIONS
Maintaining from TopAccess
The following menus are unavailable when the controller is connected to the equipment:
yUpload Software
yRemove Software
For details on the Maintenance screen, refer to the TopAccess Guide.
Registering from TopAccess
Registering public templates
The restrictions applied for making public templates are the same as those for private templates. For details, see the
following section:
P.12 “Registering private templates”
Registering Fax and Internet Fax received forward
Creating a Forward mailbox combined with the Save as file agent is unavailable when the controller is connected to the
equipment.
For details on the mailbox setting, refer to the TopAccess Guide.
e-STUDIO4520C series/e-STUDIO6530C series
e-STUDIO machine with the controller or
e-STUDIO4520C Pro series/e-STUDIO6530C Pro series
e-STUDIO4520C series/e-STUDIO6530C series
e-STUDIO machine with the controller or
e-STUDIO4520C Pro series/e-STUDIO6530C Pro series
1 RESTRICTIONS
18 Software Included in the e-STUDIO Client Utilities CD-ROM
Software Included in the e-STUDIO Client Utilities CD-ROM
The e-STUDIO Client Utilities CD-ROM contains the drivers and utilities listed below.
However, some of them are unavailable when the controller is connected to the equipment.
Yes: Available, No: Unavailable
yFor instructions on how to install the software shown above, refer to the Software Installation Guide.
yFor details on the Remote Scan driver, refer to the Operator’s Manual for Remote Scan Driver.
yFor details on the WIA driver, refer to the Scanning Guide.
yFor details on the TWAIN driver and File Downloader, refer to the Operator’s Manual for TWAIN Driver/File
Downloader.
yFor details on the e-Filing Backup/Restore Utility, refer to the Operator’s Manual for Backup/Restore Utility.
e-STUDIO4520C series/
e-STUDIO6530C series
e-STUDIO machine with
the controller or
e-STUDIO4520C Pro series/
e-STUDIO6530C Pro series
Client software for the print functions
PCL 6 printer driverYesNo
PS3 printer driverYesNo
XPS printer driverYesNo
PPD file for MacintoshYesNo
AIX filterYesNo
HP-UX filterYesNo
Linux filterYesNo
Open UNIX filterYesNo
Solaris filterYesNo
CUPSYesNo
NDPS GatewayYesNo
Client software for scanning functions
Remote Scan driverYesYes
WIA driverYesYes
Client software for the e-Filing functions
TWAIN driverYesYes
File DownloaderYesYes
e-Filing Backup/Restore UtilityYesYes
Client software for the network fax functions
N/W-Fax driverYesNo
AddressBook ViewerYesNo
2.GA-1211/GA-1310 SPECIFIC FUNCTIONS
This chapter describes the GA-1211/GA-1310 specific functions which are available when the GA-1211 controller is
connected to the e-STUDIO4520C series or GA-1310 controller is connected to the e-STUDIO6530C series.
Operations from the Control Panel.......................................................................................20
Turning power off (Shutdown)..............................................................................................................................20
USER FUNCTIONS .............................................................................................................................................32
TopAccess USER Mode.........................................................................................................35
Launching TopAccess from the WebTools home page.........................................................................................35
Registering or editing GA-1211/GA-1310 specific private templates....................................................................35
Gebruikershandleiding.com neemt misbruik van zijn services uitermate serieus. U kunt hieronder aangeven waarom deze vraag ongepast is. Wij controleren de vraag en zonodig wordt deze verwijderd.
Product:
Spelregels forum
Om tot zinvolle vragen te komen hanteren wij de volgende spelregels:
lees eerst de handleiding door;
controleer of uw vraag al eerder door iemand anders is gesteld;
probeer uw vraag zo duidelijk mogelijk te stellen;
heeft u een probleem en al geprobeerd om dit op te lossen, vermeld dit erbij aub;
heeft u een oplossing gekregen van een bezoeker dan horen wij dat graag in dit forum;
wilt u een reactie geven op een vraag of antwoord, gebruik dan niet dit formulier maar klik op de knop 'reageer op deze vraag';
uw vraag wordt direct op de website gezet; vermijd daarom persoonlijke gegevens in te vullen;
Belangrijk! Als er een antwoord wordt gegeven op uw vraag, dan is het voor de gever van het antwoord nuttig om te weten als u er wel (of niet) mee geholpen bent! Wij vragen u dus ook te reageren op een antwoord.
Belangrijk! Antwoorden worden ook per e-mail naar abonnees gestuurd. Laat uw emailadres achter op deze site, zodat u op de hoogte blijft. U krijgt dan ook andere vragen en antwoorden te zien.
Abonneren
Abonneer u voor het ontvangen van emails voor uw Toshiba TEC e-STUDIO6530C Series GA-1310 bij:
nieuwe vragen en antwoorden
nieuwe handleidingen
U ontvangt een email met instructies om u voor één of beide opties in te schrijven.
Ontvang uw handleiding per email
Vul uw emailadres in en ontvang de handleiding van Toshiba TEC e-STUDIO6530C Series GA-1310 in de taal/talen: Engels als bijlage per email.
De handleiding is 2,4 mb groot.
U ontvangt de handleiding per email binnen enkele minuten. Als u geen email heeft ontvangen, dan heeft u waarschijnlijk een verkeerd emailadres ingevuld of is uw mailbox te vol. Daarnaast kan het zijn dat uw internetprovider een maximum heeft aan de grootte per email. Omdat hier een handleiding wordt meegestuurd, kan het voorkomen dat de email groter is dan toegestaan bij uw provider.
Stel vragen via chat aan uw handleiding
Stel uw vraag over deze PDF
Uw handleiding is per email verstuurd. Controleer uw email
Als u niet binnen een kwartier uw email met handleiding ontvangen heeft, kan het zijn dat u een verkeerd emailadres heeft ingevuld of dat uw emailprovider een maximum grootte per email heeft ingesteld die kleiner is dan de grootte van de handleiding.
Er is een email naar u verstuurd om uw inschrijving definitief te maken.
Controleer uw email en volg de aanwijzingen op om uw inschrijving definitief te maken
U heeft geen emailadres opgegeven
Als u de handleiding per email wilt ontvangen, vul dan een geldig emailadres in.
Uw vraag is op deze pagina toegevoegd
Wilt u een email ontvangen bij een antwoord en/of nieuwe vragen? Vul dan hier uw emailadres in.