61573
42
Verklein
Vergroot
Pagina terug
1/59
Pagina verder
The Users Manual
Personal Video Recorder
TF4000PVR
TF4000PVR CoCI
Please read this User s Manual carefully.
The menu structure and specification can be changed without notice.
TOPFIELD
- Embedded Conax
- Personal Video Recorder
3
This symbol indicates “dangerous voltage”
inside the product that presents a risk of
electric shock or personal injury.
This symbol indicates
important instructions
accompanying the product.
C A U T I O N
RISK ELECTRIC SHOCK
Do NOT OPEN
CAUTION: TO REDUCE THE RISK OF FIRE OR ELECTRIC SHOCK,
DO NOT EXPOSE THIS APPLIANCE TO RAIN OR MOISTURE
INTRODUCTION 5
CONTENTS 5
FEATURES 5
FRONT/ REAR PANELS
1) FRONT PANEL
7
2) REAR PANEL
7
REMOTE CONTROL UNIT(RCU) 8
GETTING STARTED 14
FUNCTION GUIDE 15
MENU OPERATIONS
1) SYSTEM SETTING
18
2) ORGANIZING CHANNEL
28
3) ORGANIZING FAVORITES
30
4) RECORDING
31
5) HDD SERVICE
34
6) INSTALLATION
35
7) INFORMATION
44
8) COMMON INTERFACE
45
9) GAME
46
HOW TO RECORD AND PLAYBACK THE PVR
1) TIME SHIFTING 48
2)
RECORDING WHILE TIME SHIFTING
48
3) RECORDING, CHECKING AND CANCELING
49
4) PLAYBACK A RECORDED SERVICE
51
5) STOP
51
6) PAUSING
52
7)
SLOW MOTION PLAYBACK
52
8)
FAST MOTION PLAYBACK
53
9) FAST FORWARDING AND REWINDING
53
10) REVERSE PLAYBACK
53
11) BOOKMARK
54
12)
RECORDING THE DESCRAMBLED LIVE SERVICE
54
13)
DESCRAMBLING SERVICE
55
14)
COPYING FROM RECORDED SERVICE
55
15)
CUT OUT SELECTED REGION
56
16)
TIME SHIFTING WHILE RECORDING
56
17)
ZAPPING WHILE RECORDING
56
18)
REPEAT MODE
57
TROUBLE SHOOTING(Q & A) 58
SPECIFICATIONS 59
TABLE OF CONTENTS
Warning!
Please do not insert metal or alien substance into the slots
for the Modules and Cards.
In doing so can cause damage to the PVR and reduce its life span.
4
Please read the following recommended safety precautions carefully for your safety.
MAINS SUPPLY : 90-250V AC 50/60 Hz.
OVERLOADING : Do not overload wall outlets, extension cords or adapters
as these can result in fire or electrical shock.
LIQUIDS : Keep liquids away from the PVR.
The apparatus shall not be exposed to dripping or splashing and that no
objects filled with liquids, such as vases, shall be placed on the apparatus.
SMALL OBJECTS : Coins or other small objects must be kept away from the PVR as
they can fall through the ventilation slots of the PVR and cause
serious damage.
CLEANING : Disconnect the PVR from the wall socket before cleaning it.
Use a dry cloth lightly dampened(no solvents) to clean
the exterior of the PVR.
VENTILATION : Do not block the decoder’s ventilation slots.
Ensure that a free airflow is maintained around the PVR.
Never stand the PVR on soft furnishings or carpets.
Do not use or store the PVR where it is exposed to direct
sunlight or near a heater. Never stack other electronic
equipment on top of the PVR.
ATTACHMENTS : Do not use any attachments that are not recommended as these
may cause hazards or damage the equipment .
CONNECTION TO THE SATELLITE DISH LNB :
Disconnect the PVR from the mains before connecting or
disconnecting the cable from the satellite dish.
Failure to do so can damage the LNB.
SERVICING : Do not attempt to service this product by yourself.
Refer all serving to qualified service agents.
LIGHTNING : It is recommended that the PVR should remain connected at all
times to the mains supply and satellite dish (except when
working on the LNB). However, the manufacturer’s
instructions for safeguarding other equipment connected to the
PVR, i, e, TV set, must be followed during lightning storms.
LNB and the modem telephone line are essential.
EARTHING : The LNB cable must be earthed to the system earth for
the satellite dish.
LOCATION : Locate the PVR indoor place properly to prevent lightening,
raining and direct sunlight.
WARNING Warning WARNING Warning WARNING
55
INTRODUCTION
Thank you for purchasing the Personal Video Recorder (PVR).
This PVR is fully compliant with the international DVB standard and thus transmits digital
images, sounds, information guides and teletext directly to your TV through the satellite.
Now you can comfortably see and receive digitally transmitted music, news, movie and sports
satellite broadcasts in your office or at your home. The PVR records and playback satellite
broadcasts. You can enjoy interesting games embedded in PVR.
In the Channel Search section, both the automatic channel search method and the
manual search mode are provided. Also it supports DiSEqC 1.2, enabling you to move your
antenna in order to focus preferred satellite. You can save up to 3500 TV and 1500 Radio
channels and work around with the Favorite, Lock, Delete, Move and Sort functions.
The Menu is very modern and supports different languages. All functions can be carried out
using the remote control and some of the functions can also be carried out using the front panel.
The PVR is easy to use and adaptable for future advances. Please be aware that new
software may change the functions of the PVR.
If you have any difficulties concerning the operation of your PVR, please refer to the
relevant section of this manual, including the ‘Troubleshooting’. This Manual will provide you
with useful information on using the PVR.
Fully Compliant to DVB.
Common Interface for Viaccess,Irdeto,Cryptoworks,Nagravision,Conax and Mediaguard.
Please ensure that the following items are included with the PVR.
1) Remote control unit
2) Batteries (size AAA)
3) User’s Guide (this document)
CONTENTS
FEATURES
66
Antenna/LNB control
- 22KHz mode On/Off
- 0/12V mode selection
- Automatic FEC Detection
- DiSEqC 1.0 & 1.2 compatible
Satellite/Channel support
- 3500 TV channels, 1500 Radio channels storable
Video/Audio
- Automatic PAL/NTSC selection
- Multi-lingual Audio support
- Automatic channel search
OSD (On Screen Display) support
- 256 color support.
- Multi-lingual menu text support.
- GMT and Time Offset support
- 10 favorite channel groups support
- Page Up/Page Down available on your channel list
- PIG ( Picture In Graphic ) support
Recording and playback
- Time shifting playback
- Recording by EPG
- Delayed Recording
- Fast and Slow Playback
- Bookmark
- Repeated Playback for selected interval
- Capable of editing recorded services
- About 12-25 hours recording capacity with a 40GB HDD
2 Tuners
- 2 Tuners for zapping while recording.
- 2 LNB inputs
- 2 RF signal loop through
- Independent LNB control
Teletext
- Software emulation mode with always VBI insertion mode on.
Embedded Conax ................................................................(
Embedded Conax model only)
Games are embedded.
S/PDIF output (Digital Audio Output)
7
1) Front Panel
2)Rear Panel
FRONT / REAR PANELS
DISPLAY
During the STANDBY mode, the
current time is displayed.
When the power is on, the current status
is displayed (TV/ Radio/ Menu).
LED
TV / SAT
REMOTE
STANDBY
VIDEO OUTPUT
Video output (YELLOW)
LNB 1 OUT
Use it to connect to
another PVR or LNB 2 IN.
LNB 2 OUT
Use it to connect to
another STB.
RF IN
Connects the TV.
RF OUT
Connects the TV RF IN (ANT IN).
VCR SCART
Connects the VCR SCART
AUDIO-LEFT OUTPUT
Audio output.(WHITE)
RS232
Upgrades the PVR Program &
software
S/PDIF
Optical output for Digital
Audio
LNB 2 IN
Connects the satellite antenna cable.
LNB 1 IN
Connects the satellite antenna cable.
TV SCART
Connects the TV SCART
AUDIO-RIGHT OUTPUT
Audio output.(RED)
0/12V OUTPUT
Chooses the LNB on the antenna.
POWER ON
/STANDBY
VOLUME
The volume buttons are to change volume.
CHANNEL
The channel buttons are to change channels.
OK
MENU
8
REMOTE CONTROL UNIT (RCU)
MUTE Button ( )
Enables/ Disables the Audio.
POWER Button ( )
Switches the PVR between Operation and Standby mode.
MENU Button (MENU)
Displays the Menu on screen or returns to
previous menu from submenu.
EXIT Button (EXIT)
Returns to the previous menu and the screen.
GUIDE Button (GUIDE)
Displays the EPG (Electronic Program Guide)
on screen only when available.
V+/V- Buttons (V+/V-)
Adjusts the volume (Increase/Decrease).
P+/P- Buttons (P+/P-)
Tunes to the next or previous service.
Services up or down through the available services.
OK Button (OK)
Displays Channel List on screen.
Selects an item in the menu.
Numeric Buttons (0~9)
Selects the TV or Radio service channels
and individual menu options.
RECALL Button ( )
Selects the previously viewed channel.
INFO Button ( )
Displays the program information box on
the screen and removes it.
TV/ Radio Button ( )
Selects the TV/Radio mode.
9
SLEEP Button ( )
Displays sleep time. When sleep time,
the power automatically turns to the OFF
mode and the PVR to the STANDBY mode.
Button
Display the progress bar of time shifting or
playback when no progress bar is displayed.
Fast rewind when the progress bar is displayed.
Button
Playback with normal speed.
Button
Pause
Button
Fast forward or fast motion playback.
Button
Slow motion playback.
Button
Stop playback or recording.
Button
Start recording
Button
Select the period for repeated playback.
TV/SAT Button ( )
Changes the terrestrial TV and Satellite mode.
FAV Button (FAV)
Displays the favorite channel list.
SOUND Button ( )
Selects LEFT/RIGHT/MONO/STEREO
sound function.
SUBTITLE Button ( )
Selects the subtitle language list for the
current service.
TELETEXT Button ( )
Enables the teletext with software
emulation
Button
Display recorded service list.
Button
Add or delete bookmark
Button
Go to the previous bookmark
Button
Display the recording or playback status.
Starts instant playback if time shifting is enabled.
UHF Button (UHF)
Displays and alters the UHF setting in menu.
10
First, connect both the satellite antenna and the TV line to the PVR and switch the
power on.
In this manual there are some of the most common ways to connect the equipment:
TV, VCR and PVR.
There are several ways of connecting the PVR to the existing Audio/TV system.
We recommend one of the following setups.
If you have problems with your connections and need help, contact your dealer or
service provider.
1. Connection to TV, VCR and Hi-Fi
1-2) Connection to the VCR with the SCART Cable.
Connect one end of the SCART cable to the
VCR SCART socket on the PVR and the other
end to a SCART socket on the VCR.
INSTALLATION (Connection)
1-1) Connection to the TV with the SCART Cable.
Connect one end of the SCART cable to the
TV SCART socket on the PVR and the other
end to a SCART socket on the TV.
11
1-3) Connection to the TV with the CINCH Cable.
Connect one end (3 connectors) of the CINCH
cable to the AUDIO-RIGHT (red),
AUDIO-LEFT (white) and the VIDEO
output (yellow) socket on the PVR.
Connect the other end (3 connectors) to the
AUDIO-RIGHT (red), AUDIO-LEFT
(white) and the VIDEO input
(yellow) socket on the TV or Hi-Fi.
1-4) Connection to the TV using the RF cable.
Connect a terrestrial antenna to RF IN socket
on the PVR.
Connect one end of the RF cable to the RF
OUT socket on the PVR.
Connect the other end to the ANT IN socket
on the TV.
2.Connection to the Antenna.
We recommend one of the following installation diagrams because of the LNB
specifications for selecting RF signal band by DC voltage and 22Khz tone.
If the PVR is installed with separated connection type, there is no restriction for
zapping while recording.
12
2-1) Installing the PVR with two separated Antennas.
Installing the PVR with two separated Antennas.
The Connection Type in LNB setting menu
should be set to Separated.
2-2) Installing the PVR with one Antenna.
The Connection Type in LNB setting menu
should be set to Loop Through.
Tuner 1 and 2 can receive the RF signal of
the same polarity and the same band.
2-3) Installing the PVR with one dual LNB Antenna.
The Connection Type in LNB setting
menu should be set to Separated.
13
3.Connection to the other Satellite Receiver.
Connect the satellite cable to the LNB IN socket
on the PVR. With other connector, connect the
LNB OUT socket on the PVR and the LNB IN
socket of the other PVR or STB.
2-4) Installing the PVR with two separated dual LNB
Antennas and DiSEqC switches.
The Connection Type in LNB setting
menu should be set to Separated.
14
GETTING STARTED
Press the Power button to operate the PVR from the STANDBY mode. Now, the
Info Box will appear for a given time and disappear. By pressing the button, the Info
Box will remain on the screen. The display time of the Info Box is adjustable under the
Installationmenu of the Mainmenu.
If the current broadcast has EPG (Electronic Program Guide) with it, press the
button to see not only the current channel’s but also other channel’s EPG without
any time constraints. Also, press button to reserve and save the current service
and to watch the broadcast automatically when it starts.
IMPORTANT: Before taking charge of your new PVR, some important technical
settings are essential.
- First, press the MENU( ) button on the RCU to make the MainMenu appear.
- Go to the LNB Settingmenu under the Channel Searchitem of the
Installation menu and press button.
- The default PIN CODE is 0000.
- Choose the right parameters for Satellite Name, LNB Frequency, 22KHz, 12 V,
DiSEqC 1.0, and Motorized System according to your LNB and satellite settings.
If the right Satellite Name and LNB Frequency were not found in the list, call the
dealer for satellite information.
- Then, press the MENU( ) button and go back to the Channel Search
menu.
- Set the Search Modeto the Automode. (A Manualor Advanced Search
can always be performed later on)
- Select the Start Search...item and press button.
- The search procedure will take a while. Press button when the searching
process is over (100%) to confirm and save the new channel list.
- For further information, please refer to the LNB Settingitem of the MENU
OPERATIONS on this manual.
15
Press button on the RCU to see the program
information. The Information box displays as follows:
. Channel Number
. Channel Name
. Detailed Program Information
. Signal Level & Quality
. Satellite Information
. Information of subtitle and / or teletext
Information Box
EPG (Electronic Program Guide)
Function Guide
To use currently showing TV, and Radio services
as well as to use next program schedules,
press button on the remote control unit.
If EPG is available on programs, you will see
the detailed description of the programs, start/end
time and programs schedules etc. , and
, buttons will be used to move program and
to see next program schedules. The button makes the reservation for the next program.
button shows extended information of the current program.
button will change the contents of EPG between TV and Radio services.
By using , buttons, you can see the EPG of next event. To change volume level in this
mode, press , buttons without no interval.
Press button once more, you can see the extended infomation of the current program.
To remove info box, press button once more.
16
You can choose a language of subtitle using button
on the RCU.
If a broadcaster provides subtitles, you can see
symbol in the Information Box.
Subtitle
You can choose a language of soundtrack using
button on the RCU when a broadcaster supports
various languages of soundtrack.
Also, it is possible to choose a mode among
Stereo,
Mono, Leftand Rightusing the , buttons
on the RCU.
Soundtrack
If a broadcaster supports teletext, you can see symbol in the Information Box.
There are VBI insertion mode and software emulation mode in teletext.
In the VBI insertion mode, which is always on, you can watch the teletext with your TV
using the RCU of your TV. To watch teletext with VBI insertion, your TV must support
teletext.
In the software emulation mode, you can watch the teletext even though your TV does
not support teletext. You can watch the teletext using the RCU of PVR.
Press Teletext( ) button to watch the teletext with software emulation mode.
Press Teletext ( ) button or EXIT( ) button to escape from teletext.
Teletext
17
Now this chapter assumes that the PVR system has been installed correctly,
meaning:
* The satellite dish for the PVR has been installed, connected to the PVR and
correctly adjusted to the proper satellite.
* The PVR is connected to the TV.
* The RCU has batteries and ready to control the PVR.
If the PVR has not been installed or connected properly, please refer to the
INSTALLATION(connection) menu on this manual.
Many of the functions of the PVR are available from the MainMenu. Press the
button to open it.
MENU OPERATIONS
The Conax Conditional Access menu is valid for Embedded Conax model only.
This menu allows you to view the information on the Smart Card and Conax
Conditional Access System. ............................( Embedded Conax model only)
18
I. SYSTEM SETTING
Various time modes can be set, such as the current local time, the Power
On/Off time and the Sleep Time. The exact local present time can be adjusted
by using the GMT, the Time Offsetand the Modesub menus.
PLEASE NOTE: Configure the Local Timebefore adjusting the Wakeup
Time,Power Off Timeor the Sleep Time.
I-1 TIME SETTING
19
Press button at Local Time Setting item in the Time Settingmenu to open the
Local Time Settingmenu. Inside the Local Time Settingmenu, there are 4 sub
menus: Mode, Local Time, GMT and Time Offset.
Mode
By using the , buttons,you can control the Auto/Manualmode. The Auto
mode automatically updates the time settings by adding the GMT received from the
satellite and the Time Offsetvalue you have inserted. The Automode is recommended.
Local Time
The Local Timeis adjustable only when the Modeis on the Manual mode.
Adjust the current time, if necessary, by using the numeric buttons and the ,
buttons.
GMT
GMT is referred to the standard time of Greenwich. This cannot be changed.
Time Offset
The current time of the local area can be inserted. In another words, insert the
time difference of the local time zone from the GMT. For example, if the local area is
Seoul (the time difference from the GMT being 9), insert 9:00. The time is
adjustable by using the , buttons,15 minutes at a time.
A. Local Time Setting
20
Use the , buttons to select the On/Offmode. If the Timeritem
is set to On, the Wakeup Timeitem, the Wakeup Channelitem and the
Power Off Timeitem becomes adjustable.
The Wakeup Timeitem sets up the time the PVR automatically turns
on. Insert the preferable Wakeup Timeby using the numeric buttons and the
, buttons on the RCU. To disable the wakeup funtion, make the Timer
item Off.
The Wakeup Channelitem automatically turns the PVR to the preset
channel when it automatically turns on by the Wakeup function.
B. Timer
C. Wakeup Time
D. Wakeup Channel
21
The Power Off Timemenu sets the time of the PVR automatically turns off.
The Sleep Timeitem is similar to the Power Offmenu. The Sleep
Timefunction turns off after the adjusted sleep time.
E. Power Off Time
F. Sleep Time
22
The age rating control, the PIN(Personal Identification Number) Code and the
passwords to various menus can be configured. The PIN Code box will
automatically appear when this menu is selected. The default PIN Code is 0000.
The Censorshipitem blocks programs according to each specific setting.
Use the , buttons to select the items below.
No Block: Access to everyone.
4~18(age): Inaccessible for viewers within each minimum age limit.
Total Block: Access to no one.
If the channel is limitation free, the block function will not work.
Go to the PIN Codeitem to configure new PIN Code. Press button, and a
box will appear on the screen. Enter the PIN code by using the numeric buttons on your
RCU.
I-2. PARENTAL CONTROL
A. Censorship
B. Change PIN Code
23
The Access Controlmenu controls access to 6 items: Time Setting,
Language Setting, A/V Output Setting, Organizing Channels,
Organizing Favoritesand Installation. Press the , buttons to
Lock/Unlockthe access. Lockingmeans controlling the access to specific
menus with the PIN Code system. The default PIN Code is 0000.
C. Access Control
24
There are many languages available for the menu. The default language is
English.
A. Menu Language
It is an item for changing the language of the Mainmenu.
Select the language which the menus will be shown in.
[English / French / German / Italian / Spanish / Arabic / Greek / Turkish /
Danish / Swedish / Norwegian]
B. Subtitle Language
It is an item for changing the language of the subtitle.
As long as the services support, the subtitle language is changeable by
pressing button on your RCU.
[English / French / German / Italian / Spanish / Arabic / Greek / Turkish /
Danish / Swedish / Norwegian]
I-3. LANGUAGE SETTING
25
C. Audio Language
It is an item for changing the language of the Audio.
The first audio language is set to English. If more than one audio language is
transmitted, you may select one language among several languages transmitted
by pressing button.
[English / French / German / Italian / Spanish / Arabic / Greek / Turkish /
Danish / Swedish / Norwegian]
The PVR has many A/V Outputs. Control this menu properly according to external
components connected to the PVR. Configurations concerning Audio and Video can be
made here.
A. TV Type
Enables the setting of the TV standard. For automatic PAL/NTSC selection, set to
Multi.
B. TV Aspect Ratio
Enables the setting of the screen format of the TV. Select 4:3or 16:9mode by
using , buttons.
I-4. A/V OUTPUT SETTING
26
I-5. OSD Transparency
C. Display Format
Enables the setting of the screen format of the TV. Select the Letter Box
or Center extractmode of 16:9 pictures by using , buttons.
D. Sound Mode
Allows you to configure the sound mode. Select the Stereo, Mono, Leftand
Rightmodes by using the , buttons. The Sound mode is configurable later
on by using the button on your RCU.
E. UHF Type
Allows you to change the UHF Type. Select the PAL G, PAL I, PAL Kmodes
by using the , buttons.
F. UHF Channel
Choose the UHF Channel by using the , buttons. The default UHF channel
is CH36.
Adjusts the OSD transparency level of all kinds of menus. The available levels
are ranging from 0% to 50%.
27
I-6. Info Box Display Time
Adjusts the time-out of the Info Box. Sets the period of time the Info Box is displayed on screen.
The adjustable time is from 0 to 30 seconds.
I-7. Info Box Position
Adjusts the position of the Info Box. Allows you to change the position by using the
, buttons.
28
This mode can be used to rename, reorder, lock, hide and delete TV Services.
A. Browse
Press button. Now, browsing through the Organizing Channelsis possible.
Press assigned buttons on the help message.
B. Rename
Use , buttons to select Renameitem and press the button to move
the cursor to the Channel List. Press button to display keyboard, and rename
the channel. After renaming it, be sure to save it by pressing the button at Save
item.
C. Move
You can reorder and move the service to the preferred position. Mark the desired channel
to move and press button. Use , buttons to choose the Movemode.
D. Lock
You can restrain and lock the services. From here, locking (and later unlocking)
channels in any of the lists is possible e.g. in order to prevent children from watching
it. If a locked service is selected, enter the PIN code in order to enjoy it.
II. ORGANIZING CHANNELS
29
E. Skip
You can hide and skip the services. In order to unlock the skip function, press button
on the skipped channel. The skipped channels will not be visible on channel list.
F. Delete
Press button to delete channels. The delete function differs from the skip
function as it deletes the channel completely. Whereas, the skip function just makes
the channel invisible.
NOTE: Deleted channels are permanently deleted. The only way to reobtain
is to perform a new channel search.
G. Sort
You can sort and rearrange the sequence for the services.
30
This mode is helpful in adding and deleting services to and from the favorite
group.
Under the menu Organizing Favorites, there are three different modes:
Fav List , Fav CHsand Ch List. On the Fav Listmode, four standard lists are
selected as the default menus: News, Sports, Movieand Music. Up to 10 lists
including these lists can be added and renamed.
When deleting a service, select a service in the Fav CHssection and press the
assigned button on the help message.
To add services into Favorites, locate the cursor to the desired service and press
button.
Even in the Favorite CHs, you will see basic satellite & Channel information.
III. ORGANIZING FAVORITES
31
IV. Recording
This menu shows some options for recording.
Press button to display the satellite list. Select a satellite that includes the channel to
be recorded.
IV-1. Satellite
Press button to display the channel list. Select a channel to be recorded.
IV-2. Channel
IV-3 Mode
There are two recording modes.
To record the selected service immediately, select the Quickmode.
To record current event including the data of the time shifting buffer, select Current Event
mode. The Current Eventmode is valid only when the event information of the channel
exists.
To change the duration of the recording time, press or button.
IV-4. Duration
32
To change the file name of the service to be recorded, press button at this item.
IV-5. File Name
To start recording, press button at this item.
IV-6. Start
To stop recording, press button at this item.
IV-7. Stop
In this menu you can reserve delayed recording.
IV-8. Delayed Recording
A. Satellite
Press button to display the satellite list. Select a satellite that includes the
channel to be recorded.
B. Channel
Press button to display the channel list. Select a channel to be recorded.
C. Mode
There are 3 or 4 different modes.
Select One Timeto record the channel only once.
Select Every Dayto record the same channel at the same time of every day.
Select Weeklyto record the same channel at the same time on the same weekday.
Select Every Weekendto record the same channel at the same time on every
weekend. This menu is enabled when the Datemenu is set to Saturday or Sunday.
33
D. Date
To change the recording start date, press or button.
E. Start Time
To change the recording start time, press or button or enter the time using the
numeric buttons
F. Duration
To change the recording duration, press or button.
G. OK
To confirm the setting for the delayed recording, press button.
Be sure to confirm it if you want to register the current setting for delayed recording.
In this menu you can check, edit and cancel the delayed recordings.
A. List
Press button to display the reserved list. Select one of the reserved items.
B. Channel
This item displays the channel name to be recorded.
C. Date
This item displays the recording start date.
IV-9 Edit Reservation
34
D. Mode
There are 3 or 4 different modes.
Select One Timeto record the channel only once.
Select Every Dayto record the same channel at the same time of every day.
Select Weeklyto record the same channel at the same time on the same weekday.
Select Every Weekendto record the same channel at the same time on every
weekend. This menu is enabled when the Datemenu is set to Saturday or Sunday.
E. Start Time
This item displays the recording start time.
F. Duration
This item displays the recording duration.
G. Save
This item enables you to save the reservation.
H. Cancel
To delete the registration of the selected delayed recording, press button at this item.
I. Recording
To go to the Recording menu, press button at this item.
V. HDD Service
You can use this menu to manage the HDD and the functions related to the HDD
35
Refer to IV-9. Edit Reservation.
V-2. Edit Reservation
Refer to IV-8. Delayed Recording.
V-1. Delayed Recording
To format the HDD in PVR, press button at this item.
Format Hard Diskwill delete all the data and the files in HDD permanently.
If a new HDD is installed, it should be formatted by this PVR. The file structure of the
PVR is different from that of PC.
You cannot use the Time shifting, Recording and Playback functions with an
unformatted HDD.
V-3. Format Hard Disk
V-4. Time Shifting
To enable time shifting function, select Enable.
If the Time Shiftingis enabled, this PVR records the current channel in normal play.
And, you can take advantage of the time shifting function.
To disable time shifting function, select Disable. If you don’t want to use time shifting
function, disable the time shifting to reduce the power consumption.
VI. INSTALLATION
36
The Low Noise Blockdown Converter (LNB) amplifies the signal received by
the satellite dish and lowers the frequency of the signal. The signal is then fed from
the LNB at the dish via cable to the PVR.
VI-1. LNB Setting
For the LNB Settings, move the cursor to Installationitem and press button.
Then, move the cursor to the LNB Setting item and press button.
A. Satellite Name
Press the button to display the Satellite List. The Satellite name list is put in
alphabetical order. Select one of the preprogrammed satellites that correspond to the
value of the antenna. If the desired satellite name is not in the list, then select Others.
B. Tuner Select
Select a tuner for channel searching from the selected satellite.
C. Connection Type
If two tuners share one LNB as the diagram 2-2) on page 12, select Loop Through.
If a service is being recoded, the other tuner can receive only the signal of the same band
and polarity as being recorded in this configuration.
If the tuners are connected to separated LNBs (or Dual LNB), select Separated.
There is no restriction as in the Loop Throughconfiguration.
D. LNB Frequency
Select the L.O. Frequency set to antenna. The LNB Frequency of 5150, 9750,
10600, 10750, 11475 MHz or Universal can be selected by using the or button.
37
NOTE: If the Universal LNB is selected, both 9750 and 10600 MHz are
supported at the same time, and therefore the 22 KHz tone setting
is not required.
E. LNB Power
Select LNB power ‘ On’ for internal and ‘ Off ’ for external.
F. 22 KHz
If you are using a 22 KHz tone switch box, make 22 KHz tone switch enable or disable
to select LNB or antenna.
G. 12V
Use it if the switch box is controlled by 12V DC.
H. DiSEqC 1.0
The PVR is designed to be DiSEqC 1.0 compatible. This allows multiple antennas to be
connected to the PVR at the same time. If you are using two or more fixed antennas or
LNBs, then it is recommended to use a DiSEqC 1.0 switch.
Select from 1 of DiSEqC to 4 of DiSEqC, Mini A, Mini Bor Disable
according to the option or the configuration of DiSEqC switch box or antenna.
I. Channel Search
To go to Channel Searchmenu directly from LNB Setting menu, press
button at this item.
VI-2. Channel Search
38
Press the button to display the Satellite List Box. The Satellite name list is put in
alphabetical order. Select one of the preprogrammed satellites that correspond to the value
of the antenna. If the desired satellite name is not in the list, then select Others.
A. Satellite Name
There are 4 search modes, Auto, Manual, Advancedand SMATV. The Auto
mode enables to search using the information the PVR has. On the other hand, there
will be a need to know in advance the frequencies and the symbol rates before using the
Manualmode. On the Advancedmode, enter the Audio PID, Video PID or the PCR
PID. The SMATVmode is used to special purposes on satellite master antenna TV
system.
Enter the Transponder’s Frequency by using the numeric buttons on your RCU.
Enter the Transponder’s Symbol Rate by using the numeric buttons on your RCU.
Choose the type of polarization, either the Horizontalor the Vertical.
This Network Searchitem can be used if the Search modeis set to the
Manual or Automode. If the Network Search item is set to Onand the NIT
(Network Information Table) is available, the Transponder’s information can be found.
Press button to enter Video,Audio and PCR PID’s.
1) Video PID
Insert the Video PID by using the numeric buttons on your RCU.
2) Audio PID
Insert the Audio PID by using the numeric buttons on your RCU.
C. Frequency
D. Symbol Rate
E. Polarization
F. Network Search
B. Search Mode
G. PID
J. Start Search...
39
3) PCR PID
Insert the PCR PID by using the numeric buttons on your RCU.
4) SAVE
To ensure the above Video,Audio and PCR PID change, press button at this item.
Choose your favorable channels among FTA only, CAS only and FTA+CAS.
Select a tuner for channel searching from the selected satellite.
H. FTA/ Scrambled
I. Tuner Select
Searches for digital channels after the configuration of the LNB is over. To stop the
searching process on the way, press either the button or the button.
This menu will be shown as long as the PVR is searching for channels. All channels
found will be listed in two columns on the screen; with TV channels in one column and
Radio channels in the other. Please note that the search procedure may take a few minutes.
When the search procedure is completed, the screen will show how many TV and Radio
channels have been found. Press button to save the channels.
To go to LNB Settingmenu directly from Channel Search menu, press
button at this item.
K. LNB Setting
40
VI-4 . Motorized DiSEqC 1.2
VI-3 . Service Copy
If you have DiSEqC 1.2 motorized system, then you can use the DiSEqC 1.2 functions.
. Satellite Name
A selection of satellite names that will be used to identify a motor position.
. Tuner Select: Select a tuner for channel searching from the selected satellite.
. Frequency: Selects the frequency to catch the strong signal.
. DiSEqC Command Mode : Change the current mode between User and Installer
modes.
-User: This mode is used to fine-tune the position of the motor for better reception.
-Installer: This mode is used to search for the position of a satellite manually.
. Movement: In case of User mode, the movement is adjustable by fine-tuning.
In case of Installer mode, the movement is adjustable by East , West going
command.
This item enables you to copy the service list of one tuner to that of the other.
A. Tuner 1 to Tuner 2
Copy the service list of Tuner 1 to that of Tuner 2.
B. Tuner 2 to Tuner 1
Copy the service list of Tuner 2 to that of Tuner 1.
C. All
Add the service list of Tuner 1 and Tuner 2 and save it to that of Tuner 1 and Tuner 2.
41
VI-5. SAT/Tp Edit
By pressing button, you can see the listed satellite names.
Then, using , , or buttons, you can select satellite.
By pressing button, you can see the all frequencies of transponders of a satellite,
and also you can select a frequency. Or, by pressing , , or buttons,
you can select and view a frequency one by one.
You can see the symbol rate of the specified satellite on the right side of the menu.
C. Symbol Rate
A. Satellite Name
B. Frequency
. Motor Control
- Goto : Moves the motor to the stored position of the selected satellite.
- Store : Stores the current position of the motor for the selected satellite.
- Reset : Resets all stored position of the motor relative to the “0” position (Installer
mode only).
- Recalculate : Recalculates the position of the Stab Rotor motor.
- Limit E , Limit W: Limits east and west position.
- Limit Off: Removes the limitation.
- Goto Ref: Goes to reference.
. Channel Search: After saving the DiSEqC configuration at the highest signal quality,
press button to start channel searching of the selected satellite.
42
You can select the polarization from Horizontal and Vertical.
D. Polarization
E. SAT Name Edit
You can change the name of the satellite by this menu.
Press button to display a keyboard. There are several items such as Other, Save
and Spacein the keyboard.
By selecting Other item, you can see a new alphabet character sets. The Space item
means a space between two characters. And the Save item is used to confirm the new
name of the satellite.
Notes: You can move the cursor in the satellite name row by or and column
by or button.
F. Add New TP
In case of new transponder information is added by broadcaster, you can add new
TP(transponder) information and enjoy new services.
Before adding new TP information, you should know the frequency, symbol rate and
polarization types.
After adding new information, you should confirm the new information by pressing
button at OK item.
G. Delete TP
By selecting this item, you can delete the selected TP (Transponder) information.
H. Add Satellite
Using this menu, you can add new satellite name by keyboard, then it will be added in
the Satellite Name menu.
I. Delete Satellite
By selecting this item, you can delete the selected satellite information.
J. Channel Search
It is used to go to Channel Searchmenu directly from SAT/Tp Edit menu.
43
VI-6. Factory Setting
All the stored data can be reset just like it was manufactured.
VI-7.Transfer Program to Other PVR
It is used to transfer PVR program to other PVR for upgrading the PVR.
Notes: Please proceed this menu with connecting the PVR of same model and
same specification.
VI-8.Transfer Data to Other PVR
It is used to transfer PVR Data such as satellite/TP information to other PVR for
upgrading the PVR.
Notes: Please proceed this menu with connecting the PVR of same model and
same specification.
42

Hulp nodig? Stel uw vraag in het forum

Spelregels
1

Forum

Topfield-TF-4000-PVR
  • Hallo goedenavond ik heb topfield tf4000pvr maar ik nog afstandsbediening de oud werknemers dankzij Gesteld op 2-2-2023 om 16:19

    Reageer op deze vraag Misbruik melden
  • blijft stilstaan op duitse zenders,alleen door herhaaldelijk indrukken schiet hij verder een paar zender plaatsen,euvel doet zich alleen voor vanaf duitsland 1 Gesteld op 2-8-2012 om 21:26

    Reageer op deze vraag Misbruik melden
  • kan dit apparaat ook gebruik worden voor digitenne van kpn? Gesteld op 16-2-2012 om 11:02

    Reageer op deze vraag Misbruik melden
  • O ja, en de EPG werkt ook niet! Is daar een oplossing voor? Groeten, Agnes Gesteld op 11-12-2011 om 13:10

    Reageer op deze vraag Misbruik melden
    • Beste Agnes, Canal digitaal heeft nu zenders met HD en normaal. Als je de zenders download krijg je alle zenders ter beschikking. De HD zenders kun je met je Topfield niet ontvangen (de ontvanger kan het niet vertalen) selecteer dus de normale zenders en blokkeer de andere. Ga via menu naar zenders sorteren en zenders blokkeren of overslaan (overslaan is beter). Ga dan stuk voor stuk de zenders af totdat je in het scherm aan de zijkant ziet wat je wel wilt selecteren.
      Als je een storing in de ontvangst hebt moet je de kaart met evt. de module er even uithalen en weer goed terugdoen. Heb je nog wel een goedwerkende module en goedgekeurd door canadigitaal? Succes!!!! Geantwoord op 11-12-2011 om 14:10

      Waardeer dit antwoord Misbruik melden
  • Ik reageer op de reactie op mijn eerste vraag (d.d. 11-12-2011, 14.10.49 uur). Voor zover ik weet is de module nog goed. Maar ja, het apparaat (en dus ook de module) zijn 6 jaar oud. Ik weet eigenliijk niet het nu nog volstaat. Ik heb op de website van CD gelezen, dat je de stekker van de receiver er gedurende 30 sec. uit moet halen als je een rode balk in beeld krijgt met geen of gecodeerde uitzending, dus dat zal ik morgen eerst proberen. Als dat niet helpt zal ik de kaart met de module er eens uithalen. Volgens de website van CD zijn o.a. SBS6, RTL5 zowel HD-zenders als basiszenders, dus m.i. zou ik die gewoon moeten kunnen ontvangen (zonder HD-ontvanger). Ik wil nog even kwijt, dat CD met een zgn. aanbieding komt; je kunt een HD-ontvanger in bruikleen krijgen als je je abonnement wijzigt naar een entertainmentpakket, gedurende 2 jaar. Ten opzichte van het basispakket betaal je dus € 15,= per maand meer, dat is in 2 jaar tijd € 360,00, terwijl je bij de specialist om de hoek een HD-ontvanger voor € 249,00 kunt aanschaffen. Let wel, die is dan van jezelf! Bij bruikleen moet het apparaat weer terug als je CD als klant verlaat. Afijn, ik zal mij er morgen nog eens in verdiepen. In elk geval hartelijk dank voor het (wel heel snelle) antwoord! Voor zover ik uit uw reactie kan opmaken is voor de Topfield TF4000PVR dus geen software-update beschikbaar? Geantwoord op 12-12-2011 om 23:03

    Waardeer dit antwoord Misbruik melden
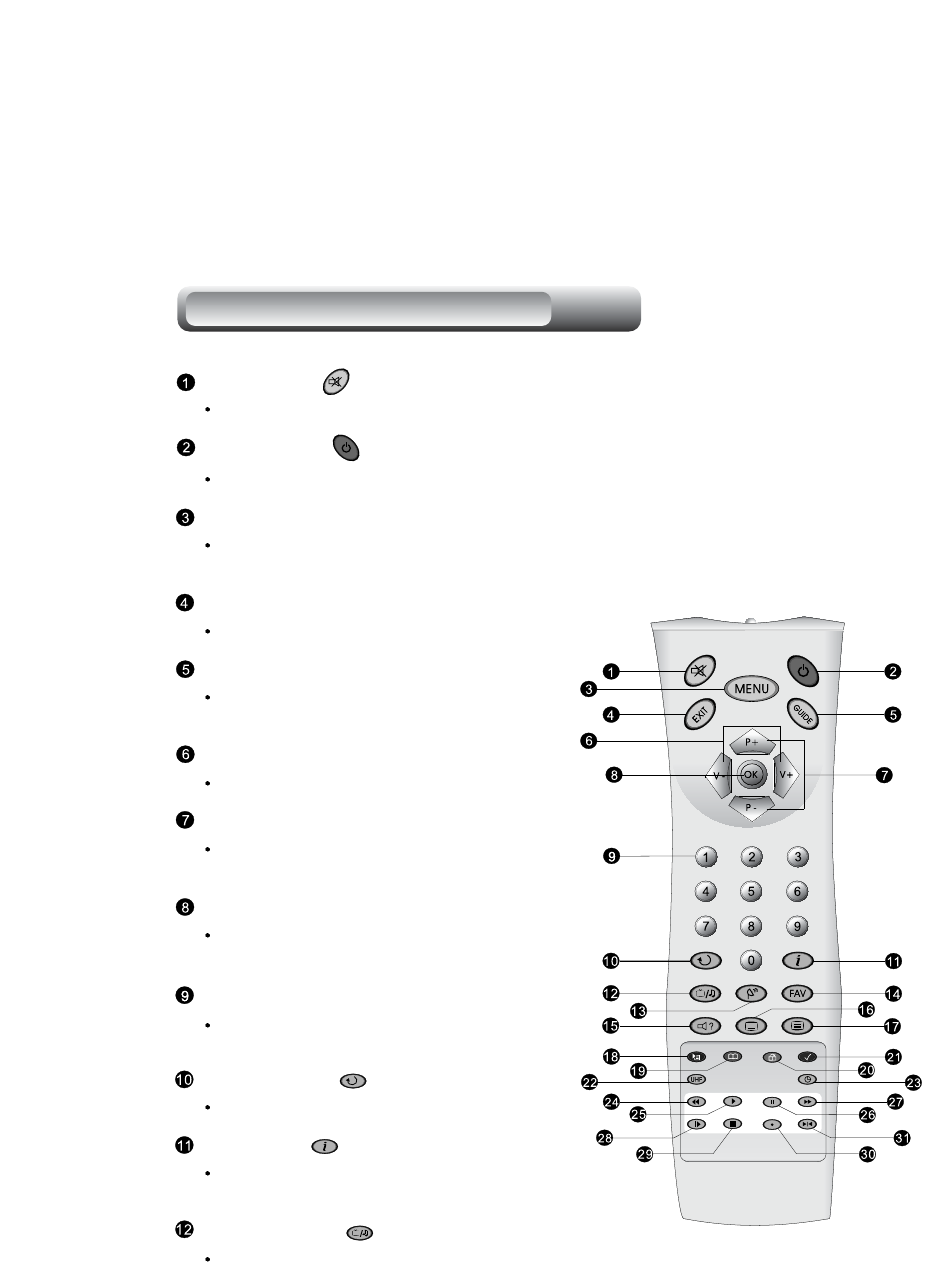
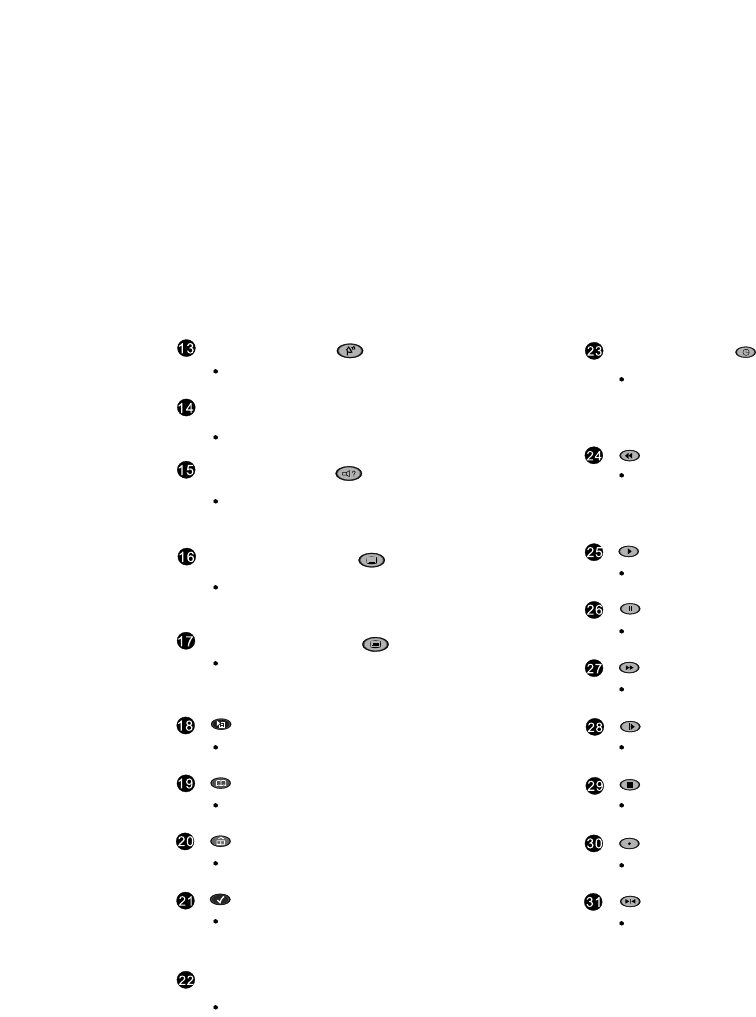
  • ik heb een topfield 4000 maar op de afstand bediening zijn de afbeeldingen op de toetsen niet meer herkanbaar Gesteld op 14-8-2011 om 10:16

    Reageer op deze vraag Misbruik melden
    • Geef me je email adres dan kan ik je een foto van mijn afstandsbediening toe sturen. Je mailadres kun je op deze site/antwoord vermelden. Ik hoop dan dat je dan meer weet. Overigens; op de site van topfield is ook een afbeelding te zien van de afstandsbediening. Succes!!!! Geantwoord op 14-8-2011 om 13:28

      Waardeer dit antwoord (1) Misbruik melden
  • ik ben op zoek naar asrta3 kan ik niet vinden bij instellingen Gesteld op 11-8-2011 om 15:51

    Reageer op deze vraag Misbruik melden
6
  • nieuw in satland, probeer de schotel in te stellen maar valt niet mee... Gesteld op 6-8-2011 om 13:33

    Reageer op deze vraag Misbruik melden
    • Schotel instellen op deze ontvanger is zeer moeilijk omdat naar de percentages van de groene lijnen gekeken moet worden. Advies: Koop via marktplaats o.i.d. een eenvoudige decoder waarop de ontvangst van de schotel wordt aangeduid middels blokken, rood/oranje en groen.
      Heb je groen, dan aansluiten op de Topfield. Geantwoord op 6-8-2011 om 13:49

      Waardeer dit antwoord Misbruik melden
  • waarom blijken alle nederlandse zenders geblokkeerd? kaartje is wel goed, die doet het nl wel in een andere decoder Gesteld op 13-4-2011 om 17:39

    Reageer op deze vraag Misbruik melden
    • Als de kaart het in een andere decoder wel doet is de conclusie dat de kaart niets mankeert. De fout ligt dus aan de Ci-Module. Of deze is stuk of de module is niet geschikt voor de betreffende zendgemachtigde. Succes verder. Geantwoord op 6-8-2011 om 13:44

      Waardeer dit antwoord Misbruik melden
  • hoe kom je aan een andere module? en wat gaat dat kosten Geantwoord op 7-10-2011 om 02:15

    Waardeer dit antwoord Misbruik melden
  • hoe kom je aan een andere module? en wat gaat dat kosten
    heb ook net een gekocht,en sooms werkt het wel en dan, weer niet
    heb er een originele kaartje in van mijn vorige decoder, Geantwoord op 7-10-2011 om 02:21

    Waardeer dit antwoord Misbruik melden

Misbruik melden

Gebruikershandleiding.com neemt misbruik van zijn services uitermate serieus. U kunt hieronder aangeven waarom deze vraag ongepast is. Wij controleren de vraag en zonodig wordt deze verwijderd.

Product:

Bijvoorbeeld antisemitische inhoud, racistische inhoud, of materiaal dat gewelddadige fysieke handelingen tot gevolg kan hebben.

Bijvoorbeeld een creditcardnummer, een persoonlijk identificatienummer, of een geheim adres. E-mailadressen en volledige namen worden niet als privégegevens beschouwd.

Spelregels forum

Om tot zinvolle vragen te komen hanteren wij de volgende spelregels:

Belangrijk! Als er een antwoord wordt gegeven op uw vraag, dan is het voor de gever van het antwoord nuttig om te weten als u er wel (of niet) mee geholpen bent! Wij vragen u dus ook te reageren op een antwoord.

Belangrijk! Antwoorden worden ook per e-mail naar abonnees gestuurd. Laat uw emailadres achter op deze site, zodat u op de hoogte blijft. U krijgt dan ook andere vragen en antwoorden te zien.

Abonneren

Abonneer u voor het ontvangen van emails voor uw Topfield TF 4000 PVR bij:


U ontvangt een email met instructies om u voor één of beide opties in te schrijven.


Ontvang uw handleiding per email

Vul uw emailadres in en ontvang de handleiding van Topfield TF 4000 PVR in de taal/talen: Engels als bijlage per email.

De handleiding is 2,3 mb groot.


U ontvangt de handleiding per email binnen enkele minuten. Als u geen email heeft ontvangen, dan heeft u waarschijnlijk een verkeerd emailadres ingevuld of is uw mailbox te vol. Daarnaast kan het zijn dat uw internetprovider een maximum heeft aan de grootte per email. Omdat hier een handleiding wordt meegestuurd, kan het voorkomen dat de email groter is dan toegestaan bij uw provider.

Stel vragen via chat aan uw handleiding

Stel uw vraag over deze PDF

Andere handleiding(en) van Topfield TF 4000 PVR

Topfield TF 4000 PVR Gebruiksaanwijzing - Nederlands - 61 pagina's

Topfield TF 4000 PVR Gebruiksaanwijzing - Deutsch - 62 pagina's


Uw handleiding is per email verstuurd. Controleer uw email

Als u niet binnen een kwartier uw email met handleiding ontvangen heeft, kan het zijn dat u een verkeerd emailadres heeft ingevuld of dat uw emailprovider een maximum grootte per email heeft ingesteld die kleiner is dan de grootte van de handleiding.

Er is een email naar u verstuurd om uw inschrijving definitief te maken.

Controleer uw email en volg de aanwijzingen op om uw inschrijving definitief te maken

U heeft geen emailadres opgegeven

Als u de handleiding per email wilt ontvangen, vul dan een geldig emailadres in.

Uw vraag is op deze pagina toegevoegd

Wilt u een email ontvangen bij een antwoord en/of nieuwe vragen? Vul dan hier uw emailadres in.


Info