499266
2
Verklein
Vergroot
Pagina terug
1/24
Pagina verder
ATP7483
User Manual
Excellent 8
8”Android 2.3 Tablet
ATP7483Excellent 8
Welcome .......................................................................................................
Important Notices .........................................................................................
Keys and Functions .......................................................................................
I. Getting Started ..........................................................................................
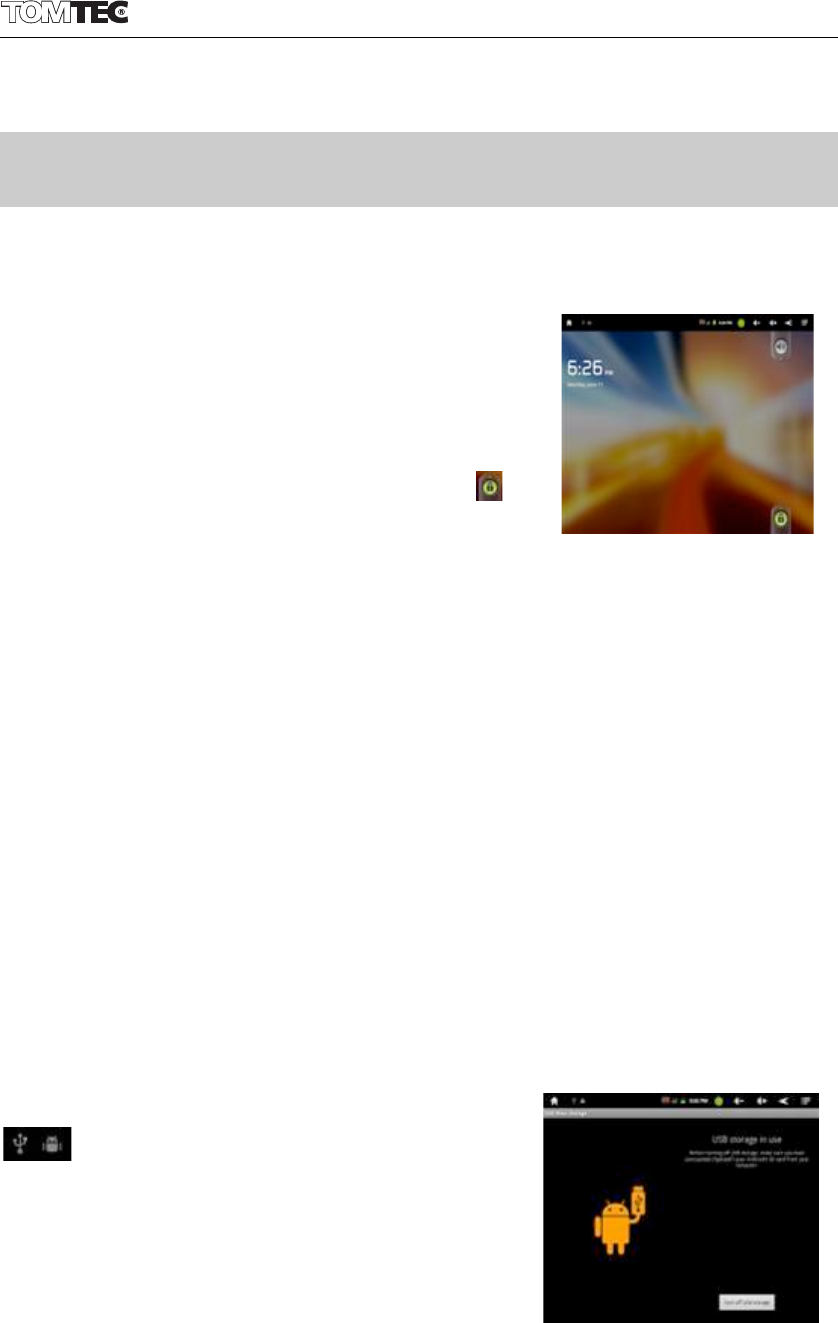
1.1 Turn on/off ........................................................................................
1.1.1 Turn on ....................................................................................
1.1.2 Turn off ....................................................................................
1.2 Lock/unlock the screen (sleep mode) .........................................
1.3 Connect to a computer .................................................................
1.3.1 Connect to PC via USB cable ..............................................
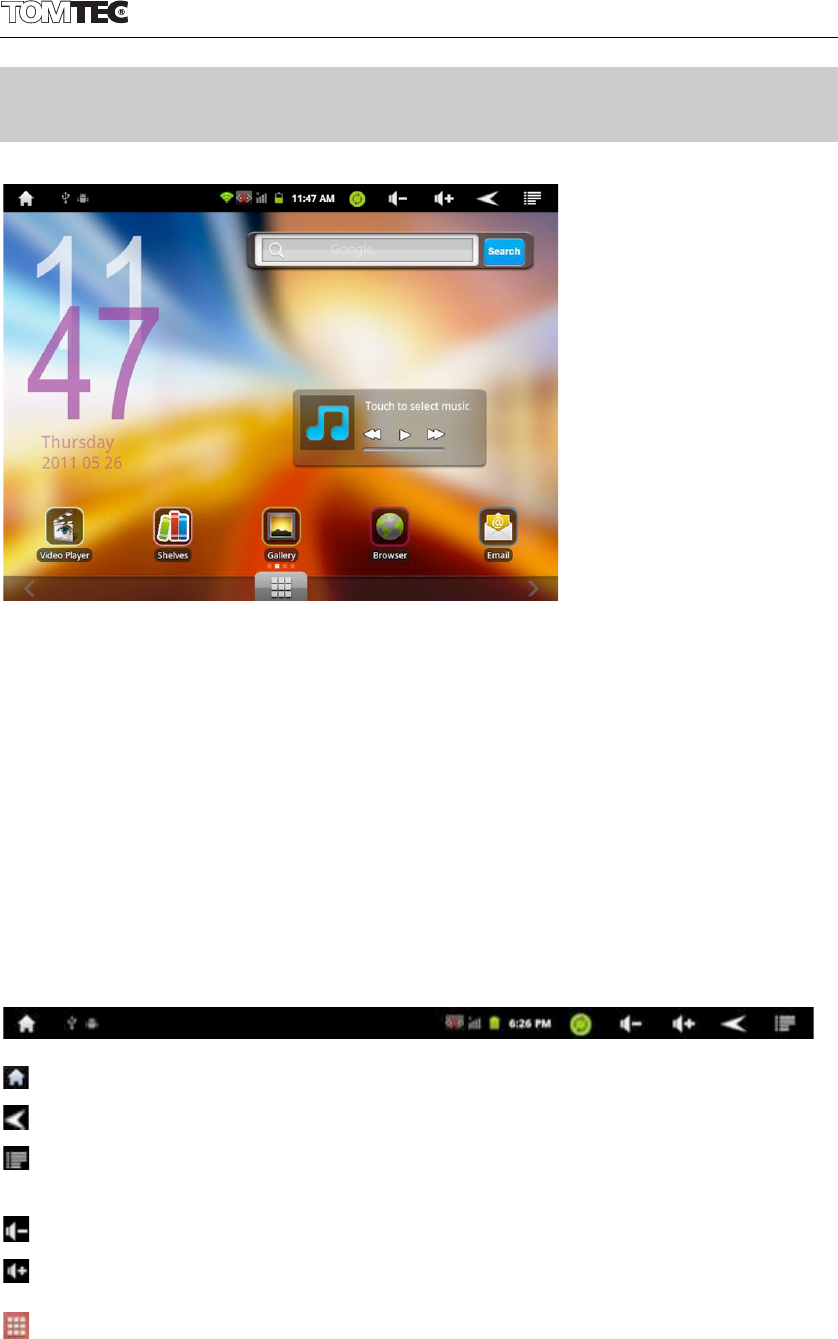
II. Your Home Screen ....................................................................................
2.1 Icons on Home Screen ...................................................................
2.2 Operations on Home Screen .........................................................
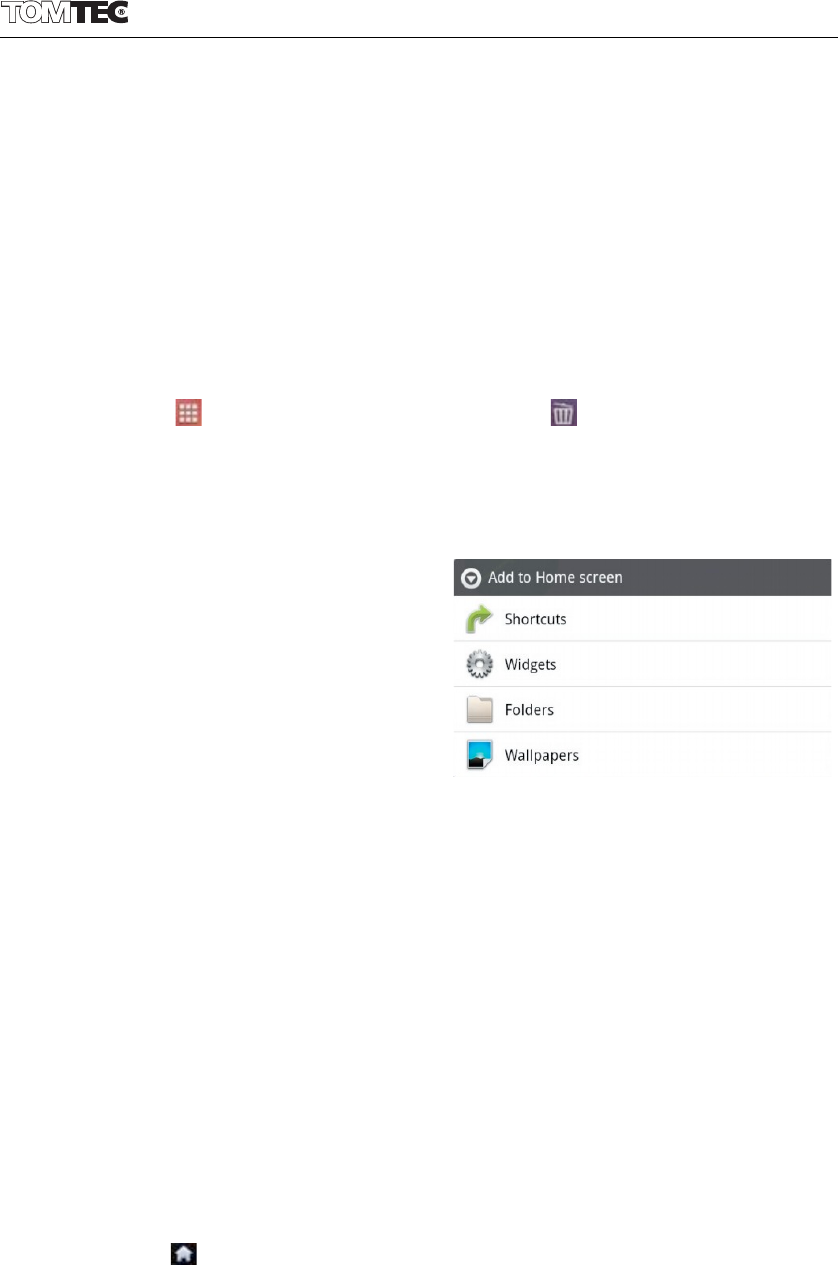
2.2.1 Add app icon to home screen ...........................................
2.2.2 Delete app icon from home screen ...................................
2.2.3 Add widgets to your home screen .....................................
2.2.4 How to set wallpaper ...........................................................
2.2.5 How to hide status bar .........................................................
2.2.6 Find your recent operations .................................................
III. Network Connection ............................................................................ 10
3.1 Wi-Fi ................................................................................................ 10
3.1.1 Turn on Wi-Fi ........................................................................ 10
3.1.2 Turn off Wi-Fi ........................................................................ 10
3.1.3 Add a Wi-Fi network ........................................................... 11
3.1.4 Forget a Wi-Fi network ....................................................... 11
3.2 Tethering & portable hotspot ...................................................... 11
3.2.1 USB tethering ....................................................................... 11
3.2.2 Portable Wi-Fi hotspot ........................................................ 11
3.2.3 Portable Wi-Fi hotspot settings .......................................... 11
3.2.4 Help ...................................................................................... 11
3.3 VPN settings ................................................................................... 12
3.3.1 Add VPN .............................................................................. 12
3.3.2 VPNs ..................................................................................... 12
3.4 Mobile networks ........................................................................... 12
3.4.1 Data enabled ..................................................................... 12
3.4.2 Data roaming ..................................................................... 12
3.4.3 Access Point Names .......................................................... 12
3.4.4 Use only 2G networks ......................................................... 12
3.4.5 Network operators ............................................................. 13
IV. Internet Browsing .................................................................................. 13
4.1 Internet Browsing .......................................................................... 13
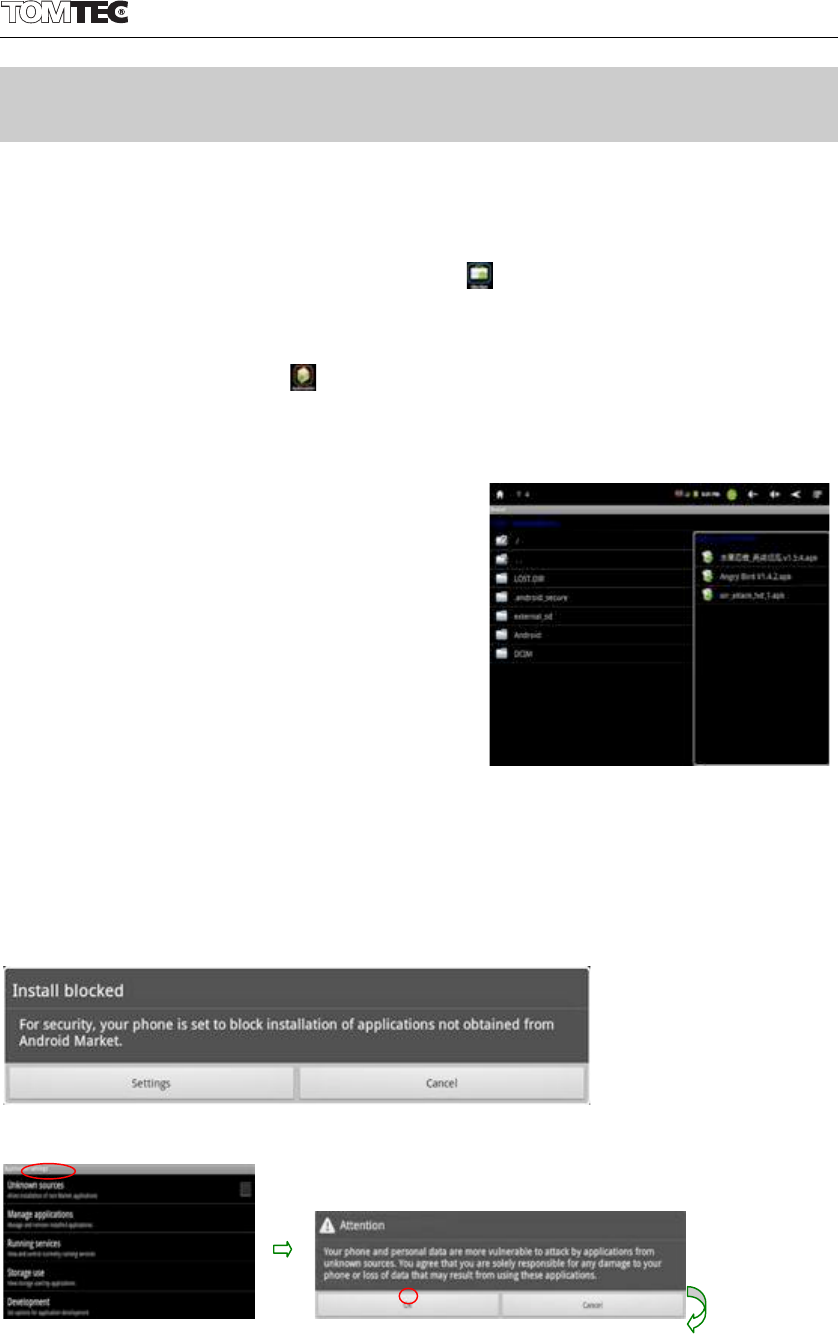
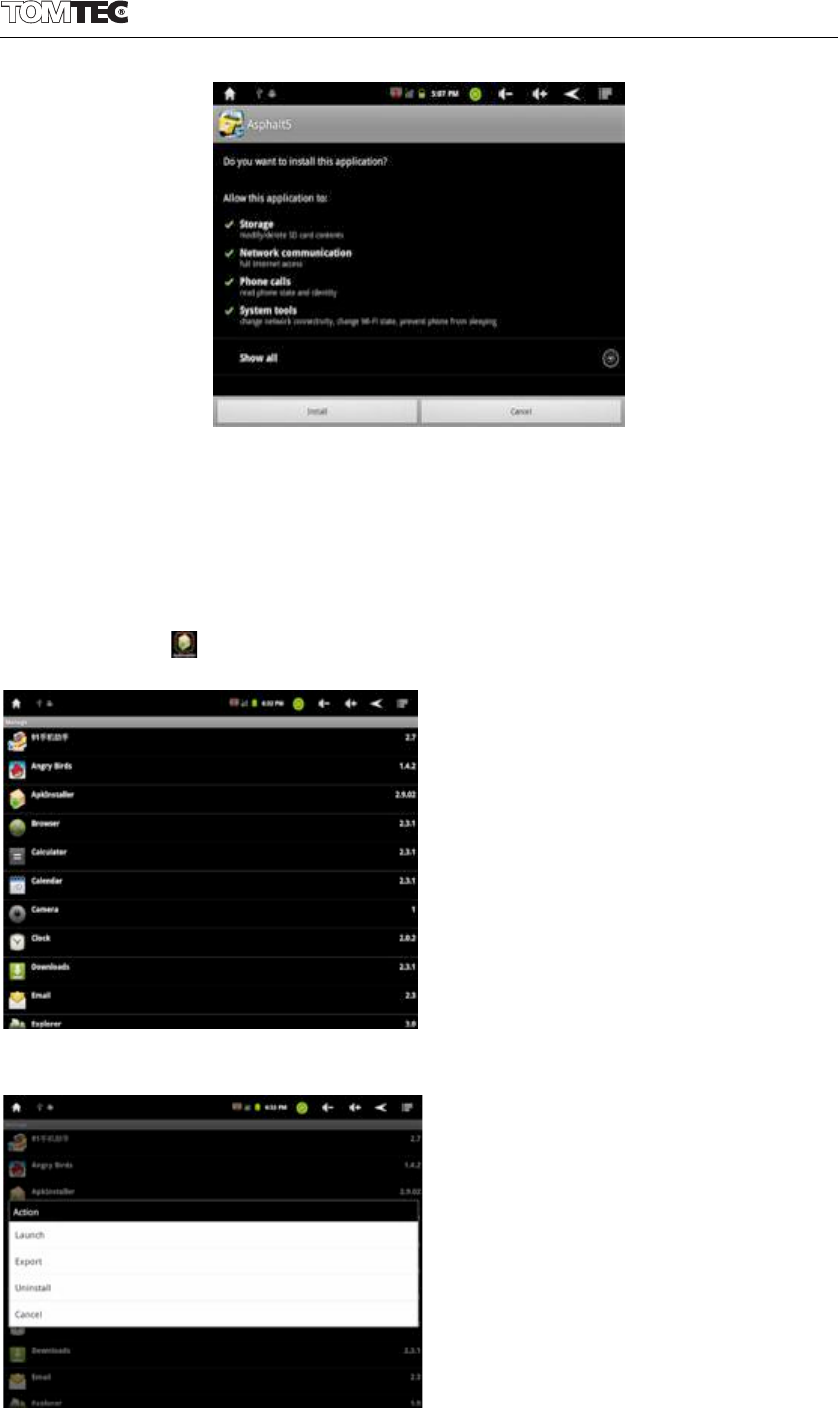
V. Install and Manage Apps ..................................................................... 14
5.1 Install and Manage Apps ............................................................ 14
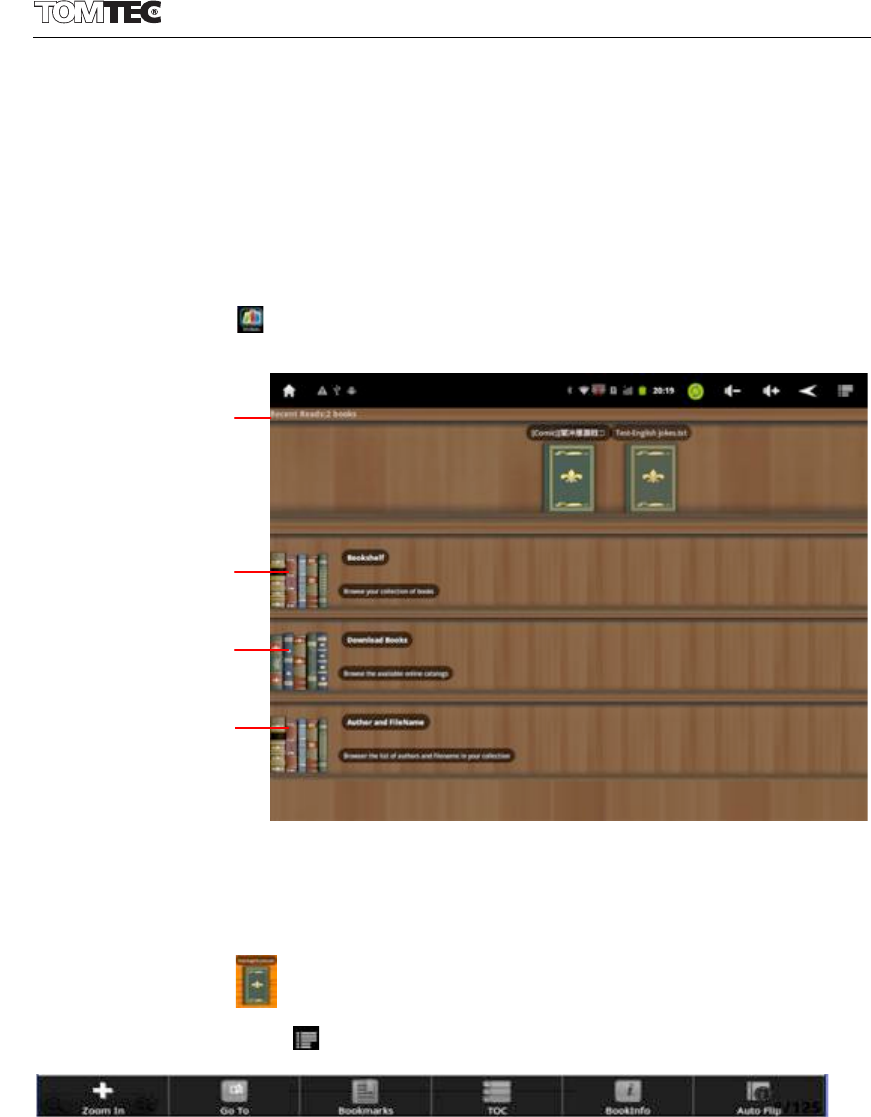
VI. Multi-media Functions ......................................................................... 16
ATP7483Excellent 8
6.1 Music .............................................................................................. 16
6.2 Video ............................................................................................. 16
6.2.1 Video Playback .................................................................. 16
6.3 Gallery ........................................................................................... 17
6.4 Camera ......................................................................................... 18
6.4.1 Take photos ........................................................................ 18
6.4.2 Record videos .................................................................... 18
6.4.3 Turn off camera .................................................................. 19
6.5 E-book reader ............................................................................... 19
6.5.1 Bookshelf ............................................................................. 19
6.5.2 Download Books ................................................................ 19
6.5.3 Author and filename ......................................................... 19
VII. Settings .................................................................................................. 20
7.1 Set display ..................................................................................... 20
7.2 Set applications ............................................................................ 20
7.3 Set language & keyboard .......................................................... 21
7.4 Storage .......................................................................................... 21
7.5 Set location & security ................................................................. 22
VII. Battery ................................................................................................... 22
Troubleshooting ......................................................................................... 24
ATP7483Excellent 8
Welcome
Thank you for purchasing this Excellent 8” (tablet PC) product.
It brings you much convenience for your business (supports Word, Excel,
send & receive e-mails...) and entertainment (supports 3D game, chat
with friends, watch movies, read eBooks.....).
Running on Android 2.3, with a 1.2 GHz processor and highly responsive
capacitive touch screen, it brings you wonderful user experience.
Before beginning, please read this user manual carefully.
As the software of the tablet updates quickly, the user manual may not
cover all aspects of new technologies.
ATP7483Excellent 8
Important Notices
The new battery will be in its best condition after 2-3 times full charge
and discharge.
While using the earphone, if the volume is excessively high it may
cause hearing damage. So please adjust the volume of the player
to a moderate level and balance the time of using.
Do not disconnect the tablet suddenly when formatting or uploading
and downloading, which can lead to program errors.
Do not dismantle the tablet by yourself, and do not use alcohol,
thinner or benzene to clean its surface.
Do not use the tablet while driving or walking.
The tablet is not moisture and water resistant. Please do not use it in a
damp environment.
Do not drop or hit it to hard surface, or the screen may get
damaged.
Do not upgrade the firmware by yourself. This would cause damage
to your tablet.
ATP7483Excellent 8
Keys and Functions
1. Vol-
2. Vol+
3. Menu button
4. ESC button: to go back to previous menu
5. 0.3M Camera
6. USB host: support mouse, keyboard, 3G USB dangle, Ethernet adapter,
USB flash disk / flash drive
7. TF card slot
8. Mini-USB port: connect to computer
9. Earphone jack
10. DC in: connect to 5V adaptor
11. MIC
12. Power button
13. Reset hole
When the tablet is frozen or does not respond to any keys or any
operations, you may use a pin to reset the tablet.
14. Speaker
ATP7483Excellent 8
I. Getting Started
1.1 Turn on/off
1.1.1 Turn on
To start your tablet, press and hold the power
key for 2 seconds. The tablet will start to get
you to the Home screen. Drag the slider
upwards on the lower right hand corner to
unlock the screen.
1.1.2 Turn off
When the tablet is on, to shut off your tablet, press and hold the power
key until the “System options” dialog appears and tap “Power Off”,
then “your device will shut down” dialog appears. Tap “OK”.
1.2 Lock/unlock the screen (sleep mode)
To save battery, you should put your tablet in sleep mode by turning off
the LCD display. To do this, quick press the power key and immediately
release it, the screen will turn dark. Do it again to light screen.
1.3 Connect to a computer
1.3.1 Connect to PC via USB cable
When tethered to PC with a USB cable, the
icon appears at the left side of the
status bar. Hold and slide the icon
downwards, select and tap “USB
connected”, then “Turn on USB storage”,
then “Turn on USB storage” dialog appears.
Tap “OK”.
ATP7483Excellent 8
II. Your Home Screen
2.1 Icons on your home screen
An example of the home screen is shown above. You can fill the space
with any combination of shortcuts, widgets, and folders you like. Some
pre-installed shortcut icons will appear at the bottom, and a Google
Search Widget appears at the top.
When you power on your tablet for the first time, you’ll see the main
home-screen panel. This panel is typically centered; you can access
additional panels on either side of the main one by swiping your finger
left or right.
At the top of the Home Screen is your Status Bar.
-Home: touch it to go back to the home screen
-Return: to return to the previous menu
-Menu: touch to show the submenu (at some interfaces, there may
be not a submenu)
-Vol-: touch it to reduce the volume
-Vol+: touch it to increase the volume
-App Panel: touch it to view all apps
ATP7483Excellent 8
2.2 Operations on Home Screen
2.2.1 Add app icon to home screen
Within the App Panel, touch and hold any icon for about 2 seconds, the
icon will be in the movable status and appear on the home screen.
2.2.2 Delete app icon from home screen
On the main screen, touch and hold undesired icon till it becomes
movable. The panel turns into a trash can . Drag the item to the
trash can and release it when it turns red.
2.2.3 Add widgets to your home screen
To add a widget, tap and hold your
finger on any open space on your
home screen, and select Widgets
from the context menu that opens.
From there, select any of the
available widgets. For instance, you
may add an Analog clock, calendar,
picture frame, and other useful widgets to your Home Screen.
2.2.4 How to set wallpaper
To add a widget, tap and hold your finger on any open space on your
home screen, and select Wallpapers from the context menu that opens.
In the popup “Select wallpaper from” dialog, select a wallpaper from
Gallery, Live wallpapers and Wallpapers.
2.2.5 How to hide status bar
On the home screen, you may hide your status bar or make it reappear
by swiping your finger up or down.
2.2.6 Find your recent operations
Tap and hold in the status bar, your recent operations will pop out.
select to continue.
ATP7483Excellent 8
10
III. Network Connection
3.1 Wi-Fi
Wi-Fi can only be used when it connects with home Wi-Fi Access Point
(AP) or a free unsecured Wi-Fi hotpot. Under “Wireless & networs”, tap
“Wi-Fi settings”. Ensure that both Wi-Fi and Network Notification are
enabled with green check marks. If you need to rescan for available
networks, tap , then tap “scan”. For the secured one, you need to
input password or some other form of access agreement
acknowledgement via a browser.
3.1.1 Turn on Wi-Fi
Within the App Panel, tap “Settings” then “Wireless & networks”
“Wi-Fi” to turn on and scan. Your tablet lists the networks it finds within
range. Tap a network to connect. If necessary, enter Network SSID,
Security, and Wireless password, and tap “Connect”. When your tablet
is connected to the network, the wireless indicator appears in the
status bar. Waves indicate connection strength
3.1.2 Turn off Wi-Fi
To turn off Wi-Fi, uncheck “Wi-Fi” under “Wireless & networks”. Turn off
Wi-Fi when you’re not using it, to extend the life of your battery between
charges.
ATP7483Excellent 8
11
3.1.3 Add a Wi-Fi network
Users may also add a Wi-Fi network under “Wi-Fi settings”. In “Wi-Fi
settings”, tap “Add Wi-Fi network”. Enter the SSID (name) of the network.
If necessary, enter security or other network configuration details. Touch
Save.
3.1.4 Forget a Wi-Fi network
In the Wi-Fi settings screen, touch the name of the network. Touch
“Forget” in the dialog that opens.
Note: Network status icons turn green if you have a Google Account
added to your tablet and the tablet is connected to Google services,
for syncing your Gmail, Calendar events, contacts, for backing up your
settings, and so on.
3.2 Tethering & portable hotspot
3.2.1 USB tethering
Check to share your tablet’s mobile network data connection with your
computer, via a USB connection.
3.2.2 Portable Wi-Fi hotspot
Check to share your tablet’s mobile network data connection as a
portable Wi-Fi hotspot.
3.2.3 Portable Wi-Fi hotspot settings
Opens a screen with settings to turn the hotspot on and off and to set
the SSID (the broadcast name) and security.
3.2.4 Help
Opens a dialog with information about USB tethering, portable Wi-Fi
hotspots, as well as information about where to learn more.
ATP7483Excellent 8
12
3.3 VPN settings
3.3.1 Add VPN
Opens a screen that prompts you to select the type of VPN to add. You
are then prompted for VPN configuration details.
3.3.2 VPNs
The list of VPNs that you’ve previously configured
3.4 Mobile networks
Tap Settings Wireless & networks Mobile networks to show options
for roaming networks, network selection, operator selection, and
access point names.
3.4.1 Data enabled
Uncheck to prevent your tablet from transmitting data on any mobile
network. This is useful if you are traveling in an area where you do not
have a mobile data plan and want to avoid charges for data use on
local carriers’ mobile networks. Unchecking this setting does not prevent
your tablet from transmitting data on other wireless networks, such as
Wi-Fi.
3.4.2 Data roaming
Uncheck to prevent your tablet from transmitting data on other carriers’
mobile networks when you can’t access your own carrier’s mobile
networks.
3.4.3 Access Point Names
(GSM mobile networks only.) Opens the APNs screen, where you can
select mobile access point configurations; or touch the Menu button
in the Application bar to add a new APN. Consult your carrier about
how to use the tools on this screen.
3.4.4 Use only 2G networks
(GSM mobile networks only.) Check to obtain slightly better battery life,
by preventing your tablet from connecting to higher-speed networks.
ATP7483Excellent 8
13
3.4.5 Network operators
(GSM mobile networks only) Opens a screen that searches for and
displays mobile networks that are compatible with your tablet. Consult
your carrier to understand the billing implications of selecting another
carrier.
Notice: The tablet can support 3G USB dongle to use mobile network. Or
you may insert your SIM card when your tablet is with a built-in 3G
module. The indicator appears in the status bar when mobile
network is connected.
IV. Internet Browsing
4.1 Internet Browsing
Before using your browser, make sure Wi-Fi or internet is connected.
On the main screen, tap the Google text field or the
icon to open your browser.
In the address bar, tap the text field
to make the Android keyboard
appear for entry of keywords or URL.
Tap and hold the text field to edit
text or change input method. To get
a required keyboard that perfectly
suits your needs, you may download
and install a .apk file of such
keyboard on your tablet.
Tap tab to see a submenu.
Android 2.3 OS also supports Adobe flash 10.1 and 10.2. That means you
are able to view on-line flash videos.
Opening up to 8 windows at the same time
ATP7483Excellent 8
14
V. Install and Manage Apps
5.1 Install and Manage Apps
If the tablet is preloaded with “Market” , you can search and install
apps here after login with your Google account.
Go to the “ApkInstaller” to install and manage your apps. To install
an application, follow below steps:
1. Copy the .apk file to your tablet via USB cable from your PC.
2. Tap to open the ‘APKInstaller’
‘Install’ then tap “Internal Memory” or
“SD Card”. Available .apk files in SD
card or internal memory then appear at
the right side. Touch the required one to
install it. In case a .apk is already
installed, a “Replace application”
dialog will appear. You can also
download .apk files from third part
software.
Note: Make sure the .apk file is workable on android 2.3, and the suffix
is .apk. e.g. “air_attack_hd_1.apk”.
An “Install blocked” dialog appears as below after your first attempt to
install an .apk file:
Tap “Settings” “Unknown sources” “OK” install once again.
ATP7483Excellent 8
15
In some cases, there may be no icon on in the App Panel after a .apk
file is installed. Possible reasons may be that this app is not compatible
with your OS or the downloaded .apk file is a broken one so you may
need to download a full version.
Where to manage applications? Manage an application in the
“ApkInstaller” . Tap to open the ‘APKInstaller’ then ‘Manage’
Tap an application to launch, export or uninstall it.
ATP7483Excellent 8
16
VI. Multi-media Functions
6.1 Music
After loading your music onto your tablet, tap the music icon (found
by default on your home screen or by opening the App Panel). You’ll
be given the option of selecting by Artist, Song, Album, or custom
Playlist. Tap to select. Your selection will begin to play through the
tablet’s built in speakers or through external headphones if attached
via the headphone port. The media player allows you to shuffle, skip, or
pause your current selection and even displays the album artwork when
available.
In audio playing mode, tap to get more:
6.2 Video
6.2.1 Video Playback
You can play videos stored on your tablet or SD card. To play, tap
Video icon, then select the video you’d like to play. Your selection
ATP7483Excellent 8
17
should begin automatically. Pause or advance your video via the
toolbar along the bottom of the screen.
With the Wi-Fi on, you are also able to view an on-line flash video as the
tablet supports both Adobe flash 10.1 and 10.2.
6.3 Gallery
You can view, show off, and even edit your digital pictures on the
tablet’s full color, high resolution display. After loading your media, tap
Gallery on your home screen or within the App Panel. Tap the
desired picture to display. To scroll through your collection, tap left or
right. By tapping the menu icon, you may delete an image, or share it
via Picasa, or Gmail. You can even set images as your wallpaper. To set
a wall paper tap “Menu” “More” “Set as” .
Tap to get more options:
ATP7483Excellent 8
18
Note: When the submenu hides, you may tap any spot on an image to
make it reappear.
6.4 Camera
Tap the icon in the App Panel to open it.
6.4.1 Take photos
You tablet is provided with built-in 0.3M front camera.
Hold and move the roll ball to the “Camera” icon
Tap the tab on the lower right hand corner each time for
taking a photo.
Where you view the photos?
You may view the photos you have taken by tapping the tab on the
upper right hand corner. Or you may go back to 'Gallery'.
6.4.2 Record videos
Hold and move to the roll ball the recording icon to record videos .
Tap on the lower right hand corner to start recording and tap it
again to stop.
Recorded videos can be viewed in 'Video player'.
Select front/back camera
White balance
Store location
Scene mode, size, quality, etc
ATP7483Excellent 8
19
6.4.3 Turn off camera
When camera is on, press the 'ESC' key to exit the camera interface.
6.5 E-book reader
The tablet supports many eBook formats like PDF, PDB, E-Pub, FB2....
Tap the 'Shelves' icon within the App Panel to open it.
6.5.1 Bookshelf
Here you can read e-book stored in micro SD card or internal flash.
Touch an eBook on the shelf to read it.
In reading, touch the tab to get a submenu as shown below.
6.5.2 Download Books
With Wi-Fi on, or network on, you can download available eBooks.
6.5.3 Author and filename
You’ll be given the option of sorting books by Author or Filename.
Recent read
Bookshelf
Download eBooks
Author and Filename
ATP7483Excellent 8
20
VII. Settings
Within the App Panel, tap the “Settings” icon (or found by default
on your home screen).
What being set here includes Wireless & networks, Sound, Display,
Location & Security, Applications, Accounts & sync, Privacy, Storage,
Language & keyboard, Voice input & output, Accessibility, Date & time
and About phone.
7.1 Set display
Under “Settings”, tap 'Display' to set Brightness, Accelerometer
coordinate system, Animation and Screen time-out.
For some games, special coordinate system may be needed. To do this,
tap “Accelerometer coordinate system” “Special coordinate
system”.
The display has a screen timeout by default set to 1 min. If the unit is left
inactive for that period of time, the screen will go dark as if turned off.
However, it is simply in standby mode. Quick press the power button
and a screen will appear with a green padlock button on the lower left
hand corner. This is your Screen Lock.
7.2 Set applications
Under “Settings”, tap 'Applications'. To view application settings. Tap
"unknown sources" to allow installation of non-market applications; tap
"manage applications" to manage and remove installed applications;
ATP7483Excellent 8
21
tap "running services" to view and control currently running services; tap
"storage use" to view storage used by applications, etc.
7.3 Set language & keyboard
Under “Settings”, tap “Language & keyboard”. You may set your
language or keyboard here. Up to 22 languages are available for your
choice.
7.4 Storage
To view your storage status, tap “Storage” under “Settings”. You can
see your SD card, NAND flash, internal storage status here.
Note: As software takes up your tablet memory, the total memory is
usually less than the actual flash memory.
ATP7483Excellent 8
22
7.5 Set location & security
Here to set up screen lock, and add or remove tablet administrators...
With this setting, you are able to lock the screen with a pattern, PIN or
password so as to avoid your tablet being used without permission.
VII. Battery
Very Low Battery
Full Battery
Charging Battery
’ indicates that the power of Battery is full. When the battery level
becomes too low, a prompt comes up to note you to charge your
tablet.
The tablet can be charged with AC adaptor when it is on or off.
Note: Please charge it by the Adaptor we supplied.
On the lock screen before you pull up the slider , the charge status
can be found on the upper lefthand corner, as shown below.
The tablet may take 4-5 hours to charge to full.
Note: Sometimes 100% charging may not show up, even the tablet has
been charged for a very long time (more than 5 hours). The battery is
actually full, but the charging info is delayed. In this case, you may
unplug the power cable.
Indicating 41% charged
ATP7483Excellent 8
23
Tips on extending battery life
1. Streaming audio or video apps will use a lot of battery life
2. Disable Wireless Network Positioning. You can turn it off from Settings
Location & Security Use wireless networks.
3. Switch off Wi-Fi if you’re not close to a strong Wi-Fi signal for extended
periods of time. This puts strain on the tablet.
4. Use a Quick Screen Timeout. You can alter this option from Settings
Display Screen timeout.
5. Reduce brightness to a comfortable level using a widget (Section IV)
or at Settings Display Brightness.
6. Use Web Widgets wisely. Widgets that access the Web consume
more power than widgets that do not.
Note:
1. Do not use other adaptors to charge your tablet which can cause
damage to the battery.
2. The tablet can not be charged via USB cable when connected to
your PC.
ATP7483Excellent 8
24
Troubleshooting
1. Cannot switch on the tablet
Check the tablet’s power level, please charge it before starting it. In
case your tablet still cannot be switched on, you may reset it before you
switch it on.
2. No sound from earphone
Check if volume is set to ‘0’. Or earphone may be broken, please
change another one.
3. Big noise
Check if there is dust in the earphone or speaker. Check if the file is
broken.
4. Frozen to any operation
Please use a pin to reset and then restart your tablet.
5. Screen drift or unresponsive screen
To correct it, you may carry out panel calibration. Go to Settings
Accessibility Touch panel calibration to calibrate it.
6. Application not workable
Possible reasons may be that this app is not compatible with your OS or
the downloaded .apk file is broken so you may need to download a full
version.
7. How delete a Google account?
If an account is added, the account is shown in “Accounts & snc” of
“Settings”, where you may also add another account. To delete an
undesired account, go to “Settings” “Privacy settings” “Factory
data reset”. Your tablet’s internal storage, downloaded apps, etc. will
also be deleted, except the info in your flash memory. Be careful before
you carry out this operation.
For any questions about your original product or repair during
warranty period please call
HELPDESK
NL: 0900–5624357 (KMBHELP)
BE: 070–650650
UK: 0905-6920022
DE: 01805-080802
FR: 0826-101792
2

Hulp nodig? Stel uw vraag in het forum

Spelregels

Misbruik melden

Gebruikershandleiding.com neemt misbruik van zijn services uitermate serieus. U kunt hieronder aangeven waarom deze vraag ongepast is. Wij controleren de vraag en zonodig wordt deze verwijderd.

Product:

Bijvoorbeeld antisemitische inhoud, racistische inhoud, of materiaal dat gewelddadige fysieke handelingen tot gevolg kan hebben.

Bijvoorbeeld een creditcardnummer, een persoonlijk identificatienummer, of een geheim adres. E-mailadressen en volledige namen worden niet als privégegevens beschouwd.

Spelregels forum

Om tot zinvolle vragen te komen hanteren wij de volgende spelregels:

Belangrijk! Als er een antwoord wordt gegeven op uw vraag, dan is het voor de gever van het antwoord nuttig om te weten als u er wel (of niet) mee geholpen bent! Wij vragen u dus ook te reageren op een antwoord.

Belangrijk! Antwoorden worden ook per e-mail naar abonnees gestuurd. Laat uw emailadres achter op deze site, zodat u op de hoogte blijft. U krijgt dan ook andere vragen en antwoorden te zien.

Abonneren

Abonneer u voor het ontvangen van emails voor uw Tomtec ATP7483 - Excellent 8 Android 2.3 bij:


U ontvangt een email met instructies om u voor één of beide opties in te schrijven.


Ontvang uw handleiding per email

Vul uw emailadres in en ontvang de handleiding van Tomtec ATP7483 - Excellent 8 Android 2.3 in de taal/talen: Engels als bijlage per email.

De handleiding is 2,34 mb groot.


U ontvangt de handleiding per email binnen enkele minuten. Als u geen email heeft ontvangen, dan heeft u waarschijnlijk een verkeerd emailadres ingevuld of is uw mailbox te vol. Daarnaast kan het zijn dat uw internetprovider een maximum heeft aan de grootte per email. Omdat hier een handleiding wordt meegestuurd, kan het voorkomen dat de email groter is dan toegestaan bij uw provider.

Stel vragen via chat aan uw handleiding

Stel uw vraag over deze PDF

Andere handleiding(en) van Tomtec ATP7483 - Excellent 8 Android 2.3

Tomtec ATP7483 - Excellent 8 Android 2.3 Snelstart handleiding - Nederlands - 1 pagina's

Tomtec ATP7483 - Excellent 8 Android 2.3 Aanvulling / aanpassing - Nederlands - 1 pagina's

Tomtec ATP7483 - Excellent 8 Android 2.3 Gebruiksaanwijzing - Nederlands - 28 pagina's

Tomtec ATP7483 - Excellent 8 Android 2.3 Snelstart handleiding - Deutsch - 1 pagina's

Tomtec ATP7483 - Excellent 8 Android 2.3 Gebruiksaanwijzing - Deutsch - 27 pagina's

Tomtec ATP7483 - Excellent 8 Android 2.3 Snelstart handleiding - English - 1 pagina's

Tomtec ATP7483 - Excellent 8 Android 2.3 Snelstart handleiding - Français - 1 pagina's

Tomtec ATP7483 - Excellent 8 Android 2.3 Gebruiksaanwijzing - Français - 26 pagina's


Uw handleiding is per email verstuurd. Controleer uw email

Als u niet binnen een kwartier uw email met handleiding ontvangen heeft, kan het zijn dat u een verkeerd emailadres heeft ingevuld of dat uw emailprovider een maximum grootte per email heeft ingesteld die kleiner is dan de grootte van de handleiding.

Er is een email naar u verstuurd om uw inschrijving definitief te maken.

Controleer uw email en volg de aanwijzingen op om uw inschrijving definitief te maken

U heeft geen emailadres opgegeven

Als u de handleiding per email wilt ontvangen, vul dan een geldig emailadres in.

Uw vraag is op deze pagina toegevoegd

Wilt u een email ontvangen bij een antwoord en/of nieuwe vragen? Vul dan hier uw emailadres in.


Info