628728
52
Verklein
Vergroot
Pagina terug
1/72
Pagina verder
Operating Instructions (UK)
Telephone System
tiptel 1/8 fax clip
tiptel 2/8 clip
(Release 2)
tiptel
2
Table of Contents
Connection of 8 extensions . . . . . . . . . .3
Connection of 7 extensions
and 1 door intercom . . . . . . . . . . . . . . . .4
Terminal connection . . . . . . . . . . . . . . . .5
Wall mounting . . . . . . . . . . . . . . . . . . . . .6
Installation
Reach of the internal wiring . . . . . . . . . . . .7
Telephone numbers of the extension . . . . .7
Initial operation procedure
Factory Pre-set . . . . . . . . . . . . . . . . . . . . .8
Telephone sets
Connection of other telecommunication
equipment . . . . . . . . . . . . . . . . . . . . . . . . .9
Connection of devices with CLIP
function . . . . . . . . . . . . . . . . . . . . . . . . . . .9
Door Intercom
Other options . . . . . . . . . . . . . . . . . . . . .10
Internal calls
Internal dialling, incoming calls,
call retrieval . . . . . . . . . . . . . . . . . . . . . . .11
Internal conference calls . . . . . . . . . . .12
Automatic call-back . . . . . . . . . . . . . . .13
External calls
Dialling, dialling on a specific CO line . . .14
Continued dialling, recall function
on the CO line . . . . . . . . . . . . . . . . . . . . .15
Incoming calls . . . . . . . . . . . . . . . . . . . .16
Placing a call on hold to make
enquiries
Pulse dialling, Tone dialling . . . . . . . . . . .17
Reserving the CO line . . . . . . . . . . . . . .18
Switching between the two CO lines
Pulse/Tone dialling telephones . . . . . . . .19
Transferring calls . . . . . . . . . . . . . . . . .20
Pager call
Table for the pager signals . . . . . . . . . . .21
Urgency call . . . . . . . . . . . . . . . . . . . . .22
Do not disturb function . . . . . . . . . . . . .23
Room monitoring . . . . . . . . . . . . . . . . .24
Call forwarding . . . . . . . . . . . . . . . . . . .25
Delayed ringing . . . . . . . . . . . . . . . . . . .26
Direct connection with the door
intercom . . . . . . . . . . . . . . . . . . . . . . . .27
Tone dialling for data transfer,
music-on-hold . . . . . . . . . . . . . . . . . . . .28
Fax function (for tiptel 1/8 fax clip only)
General information . . . . . . . . . . . . . . . . .29
Fax connection . . . . . . . . . . . . . . . . . . . .30
Fax function on/off . . . . . . . . . . . . . . . . .31
Application . . . . . . . . . . . . . . . . . . . . . . .32
Operating guide . . . . . . . . . . . . . . . . . . .33
Programmable Parameters
Access to the CO line . . . . . . . . . . . . . . .34
Automatic CO line access . . . . . . . . . . . .35
Dialling restrictions/call blocking . . . . . . .37
Activation of dialling restrictions . . . . . . . .38
Deactivation of dialling restrictions . . . . . .38
Activation of external blocking . . . . . . . . .39
Deactivation of external blocking . . . . . . .39
Entering blocked numbers . . . . . . . . . . . .40
Deleting blocked numbers . . . . . . . . . . . .41
Entering exception numbers . . . . . . . . . .41
Deleting exception numbers . . . . . . . . . .43
Transmission of CLIPto telephones . . . .44
Call waiting . . . . . . . . . . . . . . . . . . . . . . .45
Doorbell ring . . . . . . . . . . . . . . . . . . . . . .46
Door opener . . . . . . . . . . . . . . . . . . . . . .47
Day/night mode . . . . . . . . . . . . . . . . . . . .49
Music on hold . . . . . . . . . . . . . . . . . . . . .50
Return to the factory pre-set . . . . . . . . . .51
Short messages (SMS) . . . . . . . . . . . . . .52
Overview functions/code numbers . . . .58
Overview tone and ring signals . . . . . .59
Touble shooting . . . . . . . . . . . . . . . . . .60
Table from programmable parameters .62
Technical Data . . . . . . . . . . . . . . . . . . . .63
Important Information . . . . . . . . . . . . . .64
Appendix . . . . . . . . . . . . . . . . . . . . . . . .65
Index . . . . . . . . . . . . . . . . . . . . . . . . . . .69
3
Connection of 8 extensions
4
Connection of 7 extensions and 1 door intercom
5
Terminal connection
6
Wall mounting
Mount the telephone system near a telephone wall socket in a dry room with an ambient tem-
perature of 0-40° C.
The telephone system includes 2 dowels and 2 screws. This equipment facilitates the wall moun-
ting installation.
1. On a vertical line place two marks
on the wall 17,5 cm apart.
2. Drill two (6 mm) holes into the wall.
Then plug the holes with the
dowels. Be careful not to drill into
any electrical supply network.
3. The upper screw should be
screwed in so that 5 mm remain
showing.
4. Hang the telephone system from
the upper hole on the upper screw.
5. Remove the terminal connection
cover.
6. In the connection area screw in the
lower screw.
7
Installation
Before installing the internal wiring, disconnect the AC adapter and the telephone plug.
Local telephone network restrictions must be observed when installing.
Changes in the telephone system may only be made in so far as they are described in the
operating instructions.
Any equipment (for example, telephones, answering machines, and fax machines) which are to
be connected to the telephone system must be approved by the relevant authorities.
The installation must be completed professionally.
This PABX has a CLIPfunction. It will work solely on networks using the most common CLIP
standard in Europe (e.g. Germany, Austria, Switzerland, France, Belgium).
Reach of the internal wiring
The reach of the internal wiring is dependent on the diameter of the telephone cables used. A
maximum of 60 ohms in both directions are allowed on the line at anyone time. This maximum
of 60 ohms corresponds to an installation wire length of:
0,4 mm diameter : 200 m reach
0,6 mm diameter : 450 m reach
0,8 mm diameter : 800 m reach
Telephone numbers of the extension
Extension 12345678
Number 21 22 23 24 25 26 27 28
8
Initial operation procedure
When connecting the telephone system, the local regulations must be observed.
The telephone system is now ready for use. When you pick up the handset of an extension you
will hear the telephone system’s dial tone. When you dial 0 you will hear the continuous dial
tone of the CO line.
Factory pre-set
When delivered and after a reset, the telephone system has the following configuration:
No. Functions D, A, B, CH, F, NL Portugal
1 automatic CO-line access all OFF all ON
2 CLIP presentation at the telephone all ON all ON
3 SMS-port external line 1 OFF OFF
4 SMS-port external line 2 OFF OFF
5 call transfer OFF OFF
6 do-not-disturb function OFF OFF
7 music-on-hold external line 1 ON ON
8 music-on-hold external line 2 ON ON
9 call waiting ON ON
10 day / night day day
11 call external line 1 all ON all ON
12 access external line 1 all ON all ON
13 call external line 2 all ON all ON
14 access external line 2 all ON all OFF
15 long-distance calls authorised all ON all ON
16 dialling restrictions/call blocking all OFF all OFF
17 door opener duration 3 s 3 s
18 direct connection with door intercom all OFF all OFF
19 door bell ring authorisation all ON all ON
20 door opener authorisation all ON all ON
1. Connect the extensions (1...8) in
correspondence with the connec-
tion diagrams.
2. Plug the AC adaptor into the power
outlet.
3. Plug the CO line in the telephone
wall socket.
Extension 1 and extension 2 (2/8 clip only)
must always be connected, because in the
case of a power failure (or if the AC
adaptor is disconnected) it continues to
function.
In addition, the special features of the tele-
phone system can be programmed from
extension 1.
9
Telephone sets
Telephones with either tone or pulse dialling can be connected. The telephone system will auto-
matically recognise the tone/pulse setting. The telephones, from which you make outgoing calls,
must have the same dialling mode as the local network. If the dialling mode does not correspond
to the telephone network you will only be able to make internal calls. For telephone sets with tone
dialling, a recall button is necessary when placing a call on hold to make inquiries. Telephone
sets with pay-phone indication will display the toll for CO line calls.
Note: When an external call is placed on hold the pay-phone indication will stop, and the toll is
not counted. In this case, the real toll will not correspond with the indicated toll. The
minutes on hold are not counted, but you will be charged for the time placed on hold.
To store an external telephone number in the memory of your telephone you must first enter a
“0”, then a 2 second pause followed by the telephone number. Cordless telephones can be
connected to all extensions.
Connection of other telecommunication equipment
Other telecommunications equipment, for example answering machines, fax machines, tele-
phone computers, modems, etc. can be connected to the extensions 1 through 8. Only type
approved devices have to be connected.
Connection of devices with CLIP function
This PABX supports CLIPfunctionality solely for devices using the most common CLIP standard
in Europe (e.g. Germany, Austria, Switzerland, France, Belgium). Other devices may not work
properly regarding CLIP.
Connection of devices with CNIP function*
This telephone system supports the transmission of names in addition to the phone number. The
FSK-CLIP mode which is most frequently used allover Europe (e. g. Germany, Austria,
Switzerland, France, Belgium) is applied for this purpose (message type 80h, parameter 07h). If
devices are operated that do not work according to this standard, a name will most probably not
be displayed in case of an incoming call. Please note that your network operator also has to
transmit the CNIP information according to this standard.
Connection of devices with MWI-function (message waiting indication)*
This telephone system uses the MWI function of the network operator in order to signal new
messages received by your network-answering machine. The FSK-CLIPmode which is most
frequently used allover Europe (e. g. in Germany, Austria, Switzerland, France, Belgium) is
applied for this purpose (message type 82h, parameter 0Bh). If devices are operated that do not
work according to this standard, a corresponding message will most probably not be displayed
in case of an incomig call. Please note that your network operator also has to transmit MWI-
information according to this standard.
* This function is not available for all country versions of your telephone system. For details, please contact your local retailer or
the importing company.
10
Door intercom
The telephone system can also be connected to a door intercom. (See connection of 7 exten-
sions and 1 door intercom).
This door intercom is available for under and above plaster mounting.
The door intercom replaces extension 8.
The door intercom must be connected to an additional door intercom adapter. This adapter must
be plugged on the main printed circuit board in the telephone system.
With the door intercom equipment the following features are available:
- a doorbell signal at selected extensions.
- direct communication with the door intercom from every extension when 5 is dialled.
- possibility to activate the door opener from every extension when 6 is dialled.
These features can be individually programmed through the telephone system.
Other options
The telephone system can also be connected to the tiptel TSS 3 door intercom. This one has to
be connected directly to an analogue port without using an additional door intercom adapter.
11
Internal calls
Internal dialling
Incoming calls
Call retrieval
You hear another extension ringing and wish to retrieve the call on your extension.
1. Pick up the handset.
2. Dial the internal number, for exam-
ple 24 .
3. The conversation can begin when
the selected phone is picked up.
4. End conversation and replace the
handset.
You hear the telephone system’s dial tone.
The selected telephone rings.
You hear a ringing tone.
If the handset of the selected extension is
off the hook, you will hear a busy tone.
Continue with point 4.
1. Pick up the handset.
2. Hold conversation.
3. End conversation and replace the
handset.
The extension rings with the internal call
ring.
1. Pick up the handset.
2. Dial the program code number 70 .
The call is retrieved.
The connection with the caller is establis-
hed.
12
Internal conference calls
Athird party can be called into an existing conversation. Conference calls are only possible inter-
nally. The door intercom cannot take part in a conference call. Everyone who partakes in the con-
versation can call in another third party. As a conference call is private, no third party can chan-
nel uninvited into the call.
Example: Two parties are talking and wish to have a third party join the conversation and form
a conference call.
1. Dial the internal number of the third
party.
2. Hold conversation.
3. To leave the conference call,
replace the handset.
The third party’s extension rings (maxi-
mum 20 sec.). Both of the original callers
hear the ringing tone.
If the extension is off the hook, a busy tone
will be heard for 3 seconds.
The conference call is established as soon
as the selected extension is picked up.
The conversation can continue.
13
Automatic call-back
If you are trying to reach an extension but it is busy, the telephone system will automatically call
you back once the selected handset has been replaced.
This function is only possible internally.
1. Pick up the handset.
2. Dial the internal number, for exam-
ple 24 .
3. Dial 91 .
4. Replace the handset.
5. Once the selected extension is free,
your extension will ring.
6. Pick up the handset.
7. Hold conversation.
You hear the telephone system’s dial tone.
The selected extension is off the hook. You
hear a busy tone.
You hear an acknowledgement tone.
The automatic call-back is programmed.
The selected extension rings.
You hear the ringing tone.
The selected person picks up.
14
External calls
Dialling
Dialling on a specific CO line (for tiptel 2/8 clip)
You can choose to use one specific CO line. To do so dial the code number 94 for CO line 1
and 95 for CO line 2 instead of the CO line number 0 .
If the specific CO line is being used, you will hear a busy tone.
1. Pick up the handset.
2. Dial the external CO line number 0 .
3. Dial the telephone number, for
example 424502 .
4. When the selected party picks up,
hold conversation.
5. End conversation and replace the
handset.
You hear the telephone system’s dial tone.
You hear the CO line dial tone.
The telephone system automatically seeks
an unoccupied CO line. If none of the CO
lines are in use or if your extension is not
authorised to use the CO line, you will hear
a busy tone.
When dialling in the pulse mode there
should not be a pause longer than
12 seconds between the digits.
After a 12 second pause the dialled
number will be recognised as an internal
number or function. Should you wish to
continue dialling after a 12 second pause,
then you must follow the instructions given
for continued dialling.
15
External calls
Continued dialling (for pulse dialling only)
In order to continue dialling after a 12 second pause, you must dial the continue dialling code
number.
Recall function on the CO line (i. e. for use with call waiting)
In case of a CO-line connection, the telephone system intercepts a flash-signal (R-key) which
therefore is not transferred to the external line. In order to send a flash-signal from a telephone
to the public exchange, this has to be set accordingly within the telephone system before.
The function is only available for a DTMF phone.
The flash time of the telephone has to be below the maximum loop interruption time for the
termination of a connection by the public exchange. The maximum loop interruption time is
500 ms.
Sending
*
on the CO line (i.e. for CLIR)
If you want to send
*
on the CO line to start changing features in the public exchange it is
necessary to wait for 5 seconds after hearing the dial tone of the CO line (automatic or manual
CO-line access). If you press
*
before, the PABX will return to the internal dial tone.
1. Dial the continue dialling code
number 8 .
2. Then continue to dial the number.
1. The extension has a CO-line
connection
2. Press the R-key (flash).
3. Dial # (in Portugal dial the digit 1).
4. Press the R-key (flash).
You are connected to the public exchange.
You hear the dial tone of the telephone
system.
You are connected to the public exchange.
Now, the flash signal is sent to the public
exchange.
16
Incoming calls
Example 1: Your extension sounds with the incoming call ring.
Example 2: Retrieval of call. You hear another telephone ringing and wish to retrieve the call on
your extension.
Example 3: During an internal call a call waiting signal indicates that there is an incoming exter-
nal call. The incoming call can be answered as follows.
1. Pick up the handset.
2. Hold conversation.
3. End conversation and replace the
handset.
1. Pick up the handset.
2. Dial 70 .
3. Hold conversation.
4. End conversation and replace hand-
set.
You hear the telephone system’s dial tone.
The call is retrieved.
The connection with the caller is esta-
blished.
1. End conversation and replace hand-
set.
2. Pick up the handset.
The extension will sound with an external
incoming call ring.
You are connected with the external caller.
During a conversation with the door
intercom, the call waiting signal does not
function.
An external call can be placed on hold. This hold function enables you to make an enquiry in the
room, or to call another internal number. Your telephone partners cannot hear the enquiry. They
will hear music on hold.
Note: - The hold function is dependent on the dialling mode of your telephone.
- The hold function can only be used 12 seconds after the last number was dialled.
- If you replace the handset during the hold function your extension will ring for
45 seconds as a reminder that someone is waiting on hold. If the external call is not
retrived during this time, then the call will be disconnected.
Pulse dialling
Tone dialling
17
Placing a call on hold to make enquiries
1. Dial 1 .
2. To retrieve the external call dial 1
again.
The external call is placed on hold.
You hear the telephone system’s dial tone.
Make your inquiry in the room or make an
internal call.
The extension is reconnected to the exter-
nal call.
1. Press the RECALL button.
2. To retrieve the external call press
the RECALL button again.
The external call is placed on hold.
You hear the telephone system’s dial tone.
Make your enquiry in the room or make an
internal call.
The extension is reconnected to the exter-
nal call.
18
Reserving the CO line
If the CO line is busy, you have the possibility of reserving a CO line. As soon as a CO line is
free, it will be automatically transferred to your extension.
1. Pick up the handset.
2. Dial the CO line code number 0 .
3. Dial 90 to reserve the line.
4. Replace the handset.
5. Your extension will ring when the
CO line is free .
6. Pick up the handset.
7. Dial the telephone number.
You hear the telephone system’s dial tone.
You hear a busy tone.
The CO line is busy.
To confirm the reservation you hear an
acknowledgement signal.
If you do not hear an acknowledgement
signal, this indicates that the CO line has
already been reserved. Only one reser-
vation is possible at a time.
Your extension is connected to the CO
line.
You hear the dial tone.
You do not need to dial the CO line code
number 0 , as you are already connected
to the CO line .
While having a conversation on one CO line you will hear a call waiting signal if there is an
incoming call on the second line. In this case you have the possibility of placing the first call on
hold and answering the incoming call on the second line (switching between the 2 CO lines).
Pulse dialling telephones
Tone dialling telephones
1. Press the RECALL button and then
dial 0 .
2. To switch back to the first line press
the RECALL button and dial 0
again.
After pressing the RECALL button the first
line is on hold. After dialling 0 , the second
line is connected.
You are reconnected to the first line.
19
Switching between the 2 CO lines (for tiptel 2/8 clip only)
1. Dial 0 .
2. To switch back to the first line dial
0 again.
The first line is on hold and second is
connected.
You are reconnected to the first line.
20
Transferring calls
External calls can be transferred to another extension.
Note: The call transfer process is dependent on the dialling mode.
Further possibilities:
You do not need to wait until the selected extension is picked up. After dialling the extension
number replace the handset. The extension will ring and when the selected extension is picked
up they will be directly connected with the external call. Should the extension be busy or not be
picked up after 45 seconds, then your extension will ring again, so that you know that the
connection was not made.
1. With pulse dialling, dial 1 .
with tone dialling, press the
RECALL button.
2. Dial the desired extension number
to which the call should be trans-
ferred.
3. The selected extension phone is
picked up.
4. Replace the handset.
5. The extension is connected with
the external caller.
The CO line is placed on hold.
You hear the telephone system’s dial tone.
The selected extension rings.
You hear a ringing tone.
If the selected extension is busy, you will
hear a busy tone. In this case, dial 1 or
RECALL to retrieve the call and inform the
caller that a call transfer is not possible at
that moment.
Inform the selected person that you would
like to transfer an external call.
21
Pager call
You have the possibility of paging individual people with your tiptel telephone system.
Each user can be assigned an individual pager signal. After dialling the pager code number all
extensions will ring with a special tone. When an individual recognises his personal pager signal
he can pick up the handset and be directly connected to the person who wanted to reach him.
Table for the pager signals
Pager number Pager signal
71
72
73
74
75
76
To activate the pager
1. Pick up the handset.
2. Dial the desired pager number, for
example 72 .
3. The person recognises his pager
signal and picks up the handset.
You hear the telephone system’s dial tone.
The pager signal rings on all extensions.
You hear the same signal from your hand-
set.
The connection is established.
22
Urgency call
If you wish to inform the users of the telephone system of an urgent message, dial the urgent
call code number. The urgent call ring will sound on all extensions ......(without a
pause). This can be a signal for an agreed reaction (for example, a company meeting).
To activate the urgency call
1. Pick up the handset.
2. Dial the urgent call number 77 .
3. The handset of an extension will be
picked up.
You hear the telephone system’s dial tone.
All extensions sound with the urgent call
ring. You hear the same signal from your
handset.
The connection is established.
If no one responds to the urgency call and
you replace the handset then the urgency
call is ended.
23
Do not disturb function
Every extension can be programmed so that it will not ring.
This can be programmed by dialling a code number on the selected extension. Outgoing calls
can still be made.
To activate the do not disturb function
To switch the do not disturb function off
1. Pick up the handset.
2. Dial 78 .
3. Replace the handset.
You hear the telephone system’s dial tone.
You hear the fast signal tone which indica-
tes that the do not disturb function is on.
The extension will not ring for any calls:
external, internal, pager, door intercom.
The caller will hear a normal ringing tone.
1. Pick up the handset.
2. Dial 80 to switch this function Off.
3. Replace the handset.
You hear the fast signal tone which indica-
tes that the do not disturb function is On.
You hear the telephone system’s dial tone.
The extension rings for all calls.
24
Room monitoring
The telephone system enables you to monitor a room, that is to say the area surrounding the
handset. Atelephone must be placed in the room you wish to monitor. Lift the handset and dial
the code number. The handset should be placed directed towards the area to be monitored.
Hereafter, it is possible to call this room monitoring telephone from every extension and to listen.
Note: This is only an internal function. It is only possible to call this room monitoring tele-
phone from an internal extension.
To monitor the room
Hints: If the CO line is programmed to ring on only one extension, this extension should not be
used for the room monitoring function.
The room monitoring function will be ended if the handset of the room monitoring telephone is
replaced.
1. Pick up the handset.
2. Dial 86 .
3. Point the handset in the direction of
the sound that is to be monitored.
You hear the telephone system’s dial tone.
You hear an acknowledgement signal.
The room can now be monitored.
1. Pick up the handset.
2. Dial the number of the room moni-
toring telephone, for example 22 .
3. Replace the handset.
You hear the telephone system’s dial tone.
The connection is established. The sounds
from the room can be heard through your
handset.
25
Call forwarding
The telephone system offers the possibility of forwarding calls to another extension.
To Activate the call forwarding function
To cancel the call forwarding function
1. Pick up the handset.
2. Dial 8 , followed by the extension
number you wish to have calls for-
warded to. For example, if calls are
to be forwarded to extension 3, dial
823 .
3. Replace handset.
You hear the telephone system’s dial tone.
All calls will be forwarded to the selected
extension. As a reminder, you will hear a
fast signal tone through the handset of the
extension whose calls are being forwar-
ded.
1. Pick up the handset.
2. Dial 80 .
3. Replace handset.
You hear the fast signal tone, as a remin-
der that call forwarding is activated.
You hear the telephone system’s dial tone.
The call forwarding function is cancelled.
26
Delayed ringing
With the delayed ringing function, an incoming external call will first ring on extensions 1 and 2.
Extensions 3 to 8 will ring after 15 seconds. This gives you the opportunity to answer the calls
on the extensions 1 and 2 before the call is forwarded to the extensions 3 to 8.
To switch the delayed ringing function On
To switch the delayed ringing function Off
1. Pick up the handset from extension
1.
2. Dial the program code number
19999 .
3. Dial 19 .
4. Replace the handset.
You hear the telephone system’s dial tone.
You hear an acknowledgement signal.
As confirmation you hear an acknowledge-
ment signal.
The delayed ringing function is switched
On. Incoming external calls will ring with a
delay on extensions 3 to 8 15 sec. later.
The programming is finished.
1. Pick up the handset from extension
1.
2. Dial the program code number
19999 .
3. Dial 10 .
4. Replace the handset.
You will hear the telephone system’s dial
tone.
You will hear an acknowledgement signal.
As confirmation you will hear an acknow-
ledgement signal.
The delayed ringing function is switched
Off. Incoming external calls will ring on all
extensions at the same time.
The programming is finished.
27
Direct connection with the door intercom
When the doorbell is pressed, the authorised extensions will ring with the doorbell signal. If an
extension with the direct connection function is picked up, then the extension will be auto-
matically connected with the door intercom. Dialling the door intercom code number 5 is not
necessary.
Messages can be left for visitors if an answering machine is connected to an extension with this
function.
Note: For this extension, the CO line signal must be switched Off, so that external incoming calls
will not be answered by this door intercom answering machine.
To switch the direct connection on and off
Note: With the direct connection function, the door opener (code number 6) cannot be opera-
ted during an already existing connection with the door intercom. The Dutch country
version is able to open the door even if this function is activated (on).
To open the door in this case, replace the handset, pick up the handset, and dial the
number 6.
1. Pick up the handset from extension
1.
2. Dial the program code number
19999 .
3. Dial the desired code number
according to the table below, for ex.
793 , to activate the direct connec-
tion on extension 3.
4. Replace the handset.
You hear the telephone system’s dial tone.
You hear an acknowledgement signal.
As confirmation you hear an acknowledge-
ment signal.
Extension 3 is in direct connection with the
door intercom when the telephone is
picked up after the doorbell rings.
The programming is finished.
Extension 21 22 23 24 25 26 27 28
Direct connection On 791 792 793 794 795 796 797 798 790
Direct connection Off 701 702 703 704 705 706 707 708 700
28
Tone dialling for data transfer, music on hold
Tone dialling for data transfer
This function is only relevant for internal calls.
The reaction of the telephone system to tone dialling signals can be switched off temporarily.
This is important and necessary, for example, when you wish to remotely interrogate your
answering machine with tone dialling or if you wish to transfer data.
To switch Off the tone dialling detection press the (star) button. You can now press tone dial-
ling buttons without having the telephone system interpret them as a code or an extension number.
Music on hold
While on hold an external caller will hear music.
You can listen to this music for 30 seconds from extension 1.
1. Pick up the handset from extension
1.
2. Dial 176 .
You hear the telephone system’s dial tone.
You hear the music for 30 seconds.
29
Fax function (for tiptel 1/8 Fax only)
General information
In addition to the complete functions of a telephone system, the tiptel 1/8 FAX offers the
possibility to handle telephone and fax communications conveniently.
Additional features offered by tiptel 1/8 Fax:
- recognition of the fax signal (CNG)
- silent diversion of automatically sent fax messages
- receipt of manually sent fax messages
FAX function deactivated (default setting):
In case an incoming fax is accepted by a telephone, it is necessary to manually forward this "call"
to extension 4. Then, the telephone can be replaced again.
FAX function activated:
The PABX accepts any incoming call and tries to identify a fax signal (CNG signal). If an
incoming fax is identified, the PABX automatically forwards it to extension 4. If it is a telephone
call, the set extensions are addressed. Meanwhile, the caller is presented with ringing tone
generated by the PABX.
30
Fax function - connection (for tiptel 1/8 fax clip only)
31
Fax function (for tiptel 1/8 fax clip only)
Fax function activated
1. Pick up the handset of extension 1
or 2.
2. Dial the code number 92 .
3. Replace the handset.
Fax function deactivated
1. Pick up the handset.
2. Dial the code number 93 .
3. Replace the handset.
You hear the telephone system’s dial tone.
You hear the confirmation signal.
The fax function is on.
You hear the telephone system’s dial tone.
You hear the confirmation signal.
The fax function is off.
Only applicable for Switzerland
Note: As an extra security measure it is necassary to enter the programming mode first.
Instead of dialling 92 or 93 directly, exclusively the handset of extension 1 has to be
used. On the first place dial 19999 and then 92 or 93 .
32
Fax function (for tiptel 1/8 fax clip only)
Application
Convenient fax reception as well as personal conversation.
Connect the telephone, fax machine and the CO line according to the instructions: fax function
- connection. Switch the fax function on. (see: Fax function on)
*Not available in Austria, Belgium and France.
*
33
Fax function (for tiptel 1/8 fax clip only)
Operation guide
1. When the fax function is on and extension 4 is occupied (for example by an internal
conversation) and if there is an incoming external call, then the fax function will not be
carried out. To ensure correct automatic functioning of the fax function extension 4 should
not be used when the fax function is on.
2. If the fax machine does not function properly, the fax function will be switched off auto-
matically after three unsuccessful attempts.
3. If you wish to send a fax from extension 4, then the fax machine needs to dial the CO line
code 0. Alternatively, it is possible to use automatic CO line access for extension 4.
4. To ensure that machines from various manufacturers function properly with the fax function,
the following requirements need to be fulfilled:
- Automatic connection to the telephone line after 1 or 2 ringing tones
- External calls with CO line code 0
34
Programmable parameters
The functions of the telephone system can be programmed to suit the individual user. All
programmable parameters will be saved in the case of a power failure. The programmable
parameters can only be set and changed from extension 1.
Access to the CO line
There are three forms of access to the CO line.
1. Full authorisation: You can receive and make external calls.
- The CO line access is On.
- The CO line ring is On.
2. Partial authorisation: You can receive external calls. It is not possible to make an external
call. After dialling the CO line number 0 you will hear a busy tone.
- The CO line access is Off.
- The CO line ringing signal is On.
3. No authorisation: You cannot receive externals calls. It is not possible to make an
external call.
- The CO line access is Off.
- The CO line ringing signal is Off.
In the factory pre-set all of the telephone system’s extensions have full authorisation.
Access to the CO line permits making outgoing calls.
For tiptel 2/8 only:1 Access to CO line 1 and CO line 2 can be limited independently for one another.
To set CO line access on or off
1. Pick up the handset from extension
21.
2. Dial the program code number
19999 .
3. Dial the code number for the desired
state of access according to the
table below. For ex. 223 to block
the access to CO line 1 for extension
3. Several code numbers can be
entered one after another.
4. Replace the handset.
You hear the telephone system’s dial tone.
You hear an acknowledgement signal.
As confirmation you hear an acknowledge-
ment signal.
Extension 3 no longer has access to CO
line 1. When the CO line code number 0 is
dialled extension 3 will automatically be
connected to CO line 2.
The programming is finished.
35
Programmable parameters
Extension 21 22 23 24 25 26 27 28 all
Access to CO line 1 On 211 212 213 214 215 216 217 218 210
Access to CO line 1 Off 221 222 223 224 225 226 227 228 220
Access to CO line 2 On 231 232 233 234 235 236 237 238 230
for tiptel 2/8 only
Access to CO line 2 Off 241 242 243 244 245 246 247 248 240
for tiptel 2/8 only
Automatic CO line access on / off
If the automatic CO line access is activated and the handset is picked up, an external
connection is immediately set up. By means of the "star"-key, it is possible to switch from
the external to an internal line within 3 seconds.
The automatic CO line access can be set for each telephone. The function is programmed at
telephone 21. The programming codes are indicated in the below-mentioned table. In the default
setting, the automatic CO line access is deactivated for all telephones.
Example: the automatic CO line access should be programmed for telephone 24
If the handset of telephone 24 is picked up, an external connection is immediately set up.
Telephone 21 22 23 24 25 26 27 28 all
Automatic CO line access on 371 372 373 374 375 376 377 378 370
Automatic CO line access off 381 382 383 384 385 386 387 388 380
1. Pick up the handset of telephone
21.
2. Enter the programming code
19999 .
3. Enter code 374 .
4. Replace the handset
You hear the telephone system’s dial tone.
You hear an acknowledgement signal.
As confirmation you hear an acknowledge-
ment signal.
Telephone 24 has automatic CO line
access.
36
Programmable parameters
Incoming external calls will sound with the CO line ring. This ring can be individually switched
On or Off for each extension.
To switch the CO line ring on or off
* if the CO line ring is “Off” then extension 1 will ring as a safety measure
1. Pick up the handset from extension
21.
2. Dial the program code number
19999 .
3. Dial the code number for the desi-
red state of CO line ring according
to the table below. For ex. 323 to
switch Off the CO line ring of the
CO line 1 for extension 3. Several
code numbers can be entered one
after another.
4. Replace the handset.
You hear the telephone system’s dial tone.
You hear an acknowledgement signal.
As confirmation you hear an acknowledge-
ment signal.
Incoming calls from CO line 1 will no lon-
ger ring on extension 3. However, with the
call retrieval function 70 or call transfer it
is possible to receive an external call.
If the ring is switched Off for all extensions,
then extension 1 will automatically ring as
a safety measure.
The programming is finished.
Extension 21 22 23 24 25 26 27 28 all*
CO line ring line 1 On 311 312 313 314 315 316 317 318 310
CO line ring line 1 Off 321 322 323 324 325 326 327 328 320
CO line ring line 2 On 331 332 333 334 335 336 337 338 330
for tiptel 2/8 only
CO line ring line 2 Off 341 342 343 344 345 346 347 348 340
for tiptel 2/8 only
37
Programmable parameters
Dialling restrictions/call blocking
Your telephone system allows you to block the dialling of certain phone numbers or phone
number sections. 20 blocked numbers and 16 (+ 4 fix ) exception numbers are available for
this purpose. If the dialling restriction function (with exception numbers) is activated, the dialled
phone number will be verified first. If a blocked digit is identified, the connection set-up via CO-
line to the requested party will be interrupted after the last digit and a busy tone can be heard.
The phone numbers within the list of blocked numbers are only applicable in case of external
calls. The CO-line access code (0, 94 or 95 additionally for tiptel 2/8 clip) does not belong to
the phone number in the list of blocked numbers.
The blocked numbers can be neutralised by a list of exception numbers. These exception
numbers have a higher priority than the numbers indicated in the blocked numbers list.
Furthermore, they can be dialled at any time via telephones with CO-line access authorisation.
Example:
The number 0190 is blocked.
The digit sequence 01901 is entered in the list of exception numbers.
Connection set-up with phone number 01902 456789: this dialling attempt is cancelled when
the digit "2" is entered.
Connection set-up with phone number 01901 456789: this dialling attempt is not influenced by
the above entries.
Connection set-up with phone number 0191 456789: this dialling attempt is not influenced by
the above entries.
38
Programmable parameters
Activation of dialling restrictions/call blocking
1. Pick up the handset of extension
21 .
2. Enter the program code number
19999 .
3. Dial the code number 811 m.
m = 1...8: this is the last digit of the
extension concerned.
Example: in order to activate the
call blocking/dialling restrictions
for extension 24, enter the code
number 8114.
4. Replace the handset of extension
21 .
You hear the dial tone of the telephone
system.
You hear the acknowledgement signal.
You hear the acknowledgement signal. For
further entries, proceed with item 3.
Programming is terminated.
Deactivation of dialling restrictions/call blocking
1. Pick up the handset of extension
21 .
2. Enter the program code number
19999 .
3. Dial the code number 810 m.
m = 1...8: this is the last digit of the
extension concerned.
Example: in order to deactivate the
call blocking/ dialling restrictions
for extension 24 , enter the code
number 8104 .
4. Replace the handset of extension
21 .
You hear the dial tone of the telephone
system.
You hear the acknowledgement signal.
You hear the acknowledgement signal. For
further entries, proceed with item 3.
Programming is terminated.
Extension 21 22 23 24 25 26 27 28 all
Dialling restrictions/call blocking ON 8111 8112 8113 8114 8115 8116 8117 8118 8110
Dialling restrictions/call blocking OFF 8101 8102 8103 8104 8105 8106 8107 8108 8100
39
Programmable parameters
1. Pick up the handset of extension
21 .
2. Enter the program code number
19999 .
3. Dial code number 821 m.
m = 1...8: this is the last digit of the
extension concerned.
Example: to activate the call
blocking/dialling restrictions for
extension 24 , enter the code
number 8214 .
4. Replace the handset of extension
21 .
You hear the dial tone of the telephone
system.
You hear the acknowledgement signal.
You hear the acknowledgement signal. For
further entries, proceed with item 3.
Programming is terminated.
Extension 21 22 23 24 25 26 27 28 all
External call blocking ON 8211 8212 8213 8214 8215 8216 8217 8218 8210
External call blocking OFF 8201 8202 8203 8204 8205 8206 8207 8208 8200
Activation of external call blocking
Telephone calls beginning with (0) are blocked.
1. Pick up the handset of extension
21 .
2. Enter the program code number
19999 .
3. Dial code number 820 m.
m = 1...8: this is the last digit of the
extension concerned.
Example: to deactivate the external
call blocking function for extension
24 , enter the code number 8204 .
4. Replace the handset of extension
21 .
You hear the dial tone of the telephone
system.
You hear the acknowledgement signal.
You hear the acknowledgement signal. For
further entries, proceed with item 3.
Programming is terminated.
Deactivation of external call blocking
Telephone calls beginning with (0) can be made.
40
Programmable parameters
1. Pick up the handset of extension
21 .
2. Enter the program code number
19999 .
3. Dial code number 830 nn.
nn = 01...20: this is the consecutive
number of the blocked number.
Example: for blocked number 5 ,
enter code number 830 05 .
4. Enter a blocked number, for example
099 .
5. Replace the handset of extension
21 .
6. Pick up the handset of extension
21 .
7. Replace handset of extension 21 .
You hear the dial tone of the telephone
system.
You hear the acknowledgement signal.
The blocked number may consist of the
digits 1, 2, and of the characters
*
and
#. A maximum of 6 digits is saved. All
additional digits entered will be ignored.
The entry of the blocked number is termi-
nated. You are called back. The saved
blocked number is displayed along with
the indication of the storage location
(index).
You hear the acknowledgement signal.For
further entries, proceed with item 3.
Programming is terminated.
Entering blocked numbers
Blocked numbers are entered via extension 21 at connection 1 of the telephone system.
A DTMF telephone with CLIP function is recommended for this purpose. To allow verification,
the entered phone number is displayed afterwards.
20 blocked numbers with up to 6 digits each can be entered.
41
Programmable parameters
Deleting blocked numbers
1. Pick up the handset of extension
21 .
2. Enter the program code number
19999 .
3. Dial code number 830 nn.
nn = 01...20: this is the consecutive
number of the blocked number.
Example: for blocked number 5 ,
dial code number 830 05 .
4. Replace the handset of extension
21 .
5. Pick up the handset of extension
21 .
6. Replace the handset of extension
21 .
You hear the dial tone of the telephone
system.
You hear the acknowledgement signal.
The blocked number is deleted. You are
called back. The indication of the storage
location (index) is displayed without
blocked number.
You hear the acknowledgement signal. For
further entries, proceed with item 3.
Programming is terminated.
Entering exception numbers
The exception numbers are entered via extension 21 at connection 1 of the telephone system.
A DTMF telephone with CLIP function is recommended for this purpose. To allow verification,
the entered phone number is displayed afterwards.
A list of pre-set exception numbers is available. The last 4 entries in this list cannot be
modified or deleted.
42
Programmable parameters
The following pre-set exception numbers are applicable for the specific countries.
16 exception numbers with up to 17 digits each can be entered.
no. Pre-set exception numbers comments
DACHNLBEFUKGRP
13 3651
14 30
15 0800
16 070245 08365
245 91212
17 110 112 117 112 100 112 112 112 112 112 cannot
be deleted
18 112 122 118 101 15 cannot
be deleted
19 133 144 112 17 cannot
be deleted
20 144 18 cannot
be deleted
1. Pick up the handset of extension
21 .
2. Enter the program code number
19999 .
3. Dial code number 831 nn.
nn = 01...16: this is the consecutive
number of the exception number.
Example: for exception number 8 ,
dial code number 831 08 .
4. Enter the exception number, for
example, 09912345 .
You hear the dial tone of the telephone
system.
You hear the acknowledgement signal.
The exception number may consist of the
digits, 1, 2, and of the characters * and
#. A maximum of 17 digits is saved. All
additional digits entered will be ignored.
43
Programmable parameters
5. Replace the handset of extension
21 .
6. Pick up the handset of extension
21 .
7. Replace the handset of extension
21 .
The entry of the exception number is ter-
minated. You are called back. The saved
exception number is displayed along with
the indication of the storage location
(index).
You hear the acknowledgement signal. For
further entries, proceed with item 3.
Programming is terminated.
Deleting exception numbers
1. Pick up the handset of extension
21 .
2. Dial program code number 19999 .
3. Enter code number 831 nn.
nn = 01...16: this is the consecutive
number of the exception number.
Example: for exception number 5 ,
dial code number 831 05 .
4. Replace the handset of extension
21 .
5. Pick up the handset of extension
21 .
6. Replace the handset of extension
21 .
You hear the dial tone of the telephone
system.
You hear the acknowledgement signal.
The exception number is deleted. You are
called back. The indication of the storage
location (index) is displayed without excep-
tion number.
You hear the acknowledgement signal. For
further entries, proceed with item 3.
Programming is terminated.
Transmission of Clip information to telephones on / off
The transmission of CLIP information can be switched on or off individually for each telephone.
The corresponding activation or deactivation is realised at telephone 21. The programming
codes are indicated in the below-mentioned table. In the default setting, the transmission of
CLIP information is activated for all telephones.
Example: telephone 24 should not receive CLIP information
Now, the transmission of CLIP information has been deactivated for telephone 24.
1. Pick up the handset from extension
21.
2. Dial the program code number
19999 .
3. Dial 364 .
4. Replace the handset.
You hear the telephone system’s dial tone.
You hear an acknowledgement signal.
As confirmation you hear an acknowledge-
ment signal.
Telephone 24 will no longer display CLIP
information.
The programming is finished.
44
telephone 21 22 23 24 25 26 27 28 all
CLIPtransmission on 351 352 353 354 355 356 357 358 350
CLIP transmission off 361 362 363 364 365 366 367 368 360
Programmable parameters
45
Programmable parameters
During a telephone conversation to indicate that an incoming call is waiting on line 1 or 2 you will
hearing a call waiting signal, if this function is On.
Note: When a door intercom adapter is installed and the door bell is pressed, you will hear a
call waiting signal if this function is On.
Call waiting On
Call waiting Off
1. Pick up the handset from extension
21.
2. Dial the program code number
19999 .
3. Dial 86 .
4. Replace the handset.
You hear the telephone system’s dial tone.
You hear an acknowledgement signal.
As confirmation you hear an acknowledge-
ment signal.
You hear a call waiting signal when an
incoming call is waiting on line 1 or 2 and
at least one extension is programmed with
a CO line ring.
The programming is finished.
1. Pick up the handset from extension
21.
2. Dial the program code number
19999 .
3. Dial 87 .
4. Replace the handset.
You hear the telephone system’s dial tone.
You hear an acknowledgement signal.
As confirmation you hear an acknowledge-
ment signal.
No call waiting signal will be emitted when
there is an external incoming call or the
doorbell is pressed.
The programming is finished.
46
Programmable parameters
The doorbell can be signalled on the extensions, when a door intercom adapter is connected in
the telephone system.
This signal can be switched on and off for every extension.
If the door bell is pressed during a telephone conversation you will hear a call waiting signal.
(That is if the call waiting function is activated.)
To switch the doorbell ring on or off
1. Pick up the handset from extension
21.
2. Dial the program code number
19999 .
3. Dial the code number for the desi-
red doorbell ring status according
to the table below. For ex. 503 , to
deactivate the doorbell ring for
extension 23.
4. Replace the handset.
You hear the telephone system’s dial tone.
You hear an acknowledgement signal.
As confirmation you hear an acknowledge-
ment signal.
Extension 3 will not ring when the doorbell
is pressed.
The programming is finished.
Telephone 21 22 23 24 25 26 27 28 all
Doorbell ring On 591 592 593 594 595 596 597 598 590
Doorbell ring Off 501 502 503 504 505 506 507 508 500
47
Programmable parameters
When the door intercom adapter has been connected, the door opener can be activated from
every extension. Authorisation to activate the door opener can be individually switched on or off.
To switch the door opener authorisation on or off
1. Pick up the handset of extension
21.
2. Dial the program code number
19999 .
3. Dial the code number for the desi-
red doorbell authorisation status
according to the table below. For ex.
403 , to deactivate the door opener
authorised for extension 23.
4. Replace the handset.
You hear the telephone system’s dial tone.
You hear an acknowledgement signal.
As confirmation you hear an acknowledge-
ment signal.
Extension 3 is no longer authorised to
open the door. Dialling the door opener
code number 6 the door opener will not
be activated. You hear a busy tone.
The programming is finished.
Extension 21 22 23 24 25 26 27 28 all
Door opener authorisation On 491 492 493 494 495 496 497 498 490
Door opener authorisation Off 401 402 403 404 405 406 407 408 400
48
Programmable parameters
The door opener duration can be set for between 1 and 9 seconds. The telephone system is fac-
tory pre-set for 3 seconds.
To set the door opener duration
1. Pick up the handset from extension
21.
2. Dial the program code number
19999 .
3. Dial the code number for the desi-
red door opener duration according
to the table below, for ex. 65 , for a
time of 5 seconds.
4. Replace the handset.
You hear the telephone system’s dial tone.
You hear the acknowledgement signal.
As confirmation you hear an acknowledge-
ment signal.
The programming is finished.
The door opener will be activated for the
set time when the code number 6 is dial-
led.
Door opener time 1 sec. 2 sec. 3 sec. 4 sec. 5 sec. 6 sec. 7 sec. 8 sec. 9 sec.
Code number 61 62 63 64 65 66 67 68 69
49
Programmable parameters
Once a function has been programmed it will be saved even in the case of a power failure. With
the day/night mode you can store two sets of functions which can be called up as necessary, for
example one program for day and the other for night.
The system is factory pre-set to the day mode.
To switch between day and night mode
The following functions can be programmed:
- door opener authorisation
- doorbell ring
- direct connection with the door intercom
- CO line ring
- CO line access
- Limiting long distance call (0...) access
- Dialling restrictions access
1. Pick up the handset from extension
21.
2. Dial the program code number
19999 .
3. Dial 89 (night program).
4. Dial 88 (day program).
5. Replace the handset.
You hear the telephone system’s dial tone.
You hear the acknowledgement signal.
After switching mode you can program the
functions below and call them up as
necessary.
With this switch you return to the day
mode.
The programming is finished.
50
Programmable parameters
While on hold your telephone partner can hear music. You can switch this music on or off for both
CO lines.
To set music on hold on or off
1. Pick up the handset from extension
21.
2. Dial the program code number
19999 .
3. Dial the code number for the desi-
red music status according to the
table below.
4. Replace the handset.
You hear the telephone system’s dial tone.
You hear the acknowledgement signal.
As confirmation you hear an acknowledge-
ment signal.
The programming is finished.
CO line 1 2
Music on 841 842
Music off 851 852
51
Programmable parameters
The functions of the telephone system can be changed to the factory pre-set by dialling a code
number from extension 1.
Return to the factory pre-set
The call transfer and the do not disturb functions will also be reset.
Operation in case of a power failure.
If there is a power failure or if the AC adapter is disconnected extension 1 remains connected
with CO line 1. For tiptel 2/8, extension 2 remains connected with CO line 2. The other exten-
sions will not function.
The settings and functions will be saved and can be used once the power supply is restored.
1. Pick up the handset from extension
21.
2. Dial the reset code number 10000 .
3. Replace the handset.
You hear the telephone system’s dial tone.
You hear an acknowledgement signal.
The telephone system is now back to the
factory pre-set (for functions see initial
operation procedure).
52
Programmable parameters
Short messages (SMS)
Explanations on the feature "SMS in the fixed network"
The SMS feature allows you to send short text messages to other terminal units or to receive
such messages. The messages are not transferred directly to the requested terminal unit, but
are sent via the service center of your network provider. One message may comprise up to
160 characters. However, in order to profit from the SMS feature, the CLIP function (calling line
identification presentation) must be supported. Then, you simply have to subscribe to your
service center and can start!
In order to be able to send or receive short messages within the fixed network, you have to
subscribe to your network provider correspondingly. Then, you have different possibilities for
sending of SMS text messages. For example, you can send your short message to fax
machines or to other users with terminal units that are not equipped for the receipt of SMS.
In this case, the short message is played back as voice message. Furthermore, it is possible
to have the receipt of a fixed-network-SMS confirmed by the service center. More details and
information on these functions and on additional features can be obtained from your network
provider.
So that short messages (SMS) can be received by and sent to your telephone system, a
terminal unit equipped for the SMS functionality is required, for example tiptel easyDECT 3300
or 5500 or the professional answering machine tiptel 340 clip.
Furthermore, the following pre-conditions have to be observed:
Configuration of the telephone access
Please check whether the features "phone number transfer and phone number presentation
(CLIP for outgoing and incoming calls)" have been activated. Please contact your network
provider whether these features can be provided at your telephone access.
If necessary, please also check whether the CLIPfunction has been activated in the configu-
ration of your telephone system as well as whether the phone number transfer is not restricted
(CLIR function). Especially when subscribing, it is essential that the outgoing phone number is
identical to the phone number by means of which the short message (SMS) should be received
later. If, for example, both external lines of the tiptel 2/8 clip should be used for sending and
receiving of SMS, it is necessary to separately subscribe for both numbers by means of the
targeted CO-line access.
Deactivate the Call Waiting function for the extension so as to avoid that SMS are not
accepted in case several short messages are received simultaneously on both external
lines.
53
Programmable parameters
Subscribing/unsubscribing to the service center*
If a SMS from the fixed network should be received by your telephone system, it is necessary
to have the device registered at the service center of the network provider. In Germany, for
example, the nation-wide number of the service center of the Deutsche Telekom is "0193010".
This number has already been pre-set in the tiptel 340 clip, as well as the service center of
www.sms-im-festnetz.de, phone number "019001504" (SMS center 2).
The subscription process may vary according to the individual provider. Please contact your
network provider at this respect.
With regard to the provider Deutsche Telekom, for example, the single subscription is free-of-
charge *. Send a SMS with the following content:
"ANMELD" to the destination number 8888 (already pre-set in the tiptel 340 clip!).
Then, you receive a free confirmation of the subscription by the service center of Deutsche
Telekom. Now, it is possible to send and receive SMS by means of your tiptel 1/8 fax / 2/8 clip.
If the message "ABMELD" is sent to the destination number 8888, the subscription of your
phone number can be removed. All future SMS addressed to your phone number, will then be
available as voice mail.
* as per August 2002
Important, please note:
If you should not succeed in creating a connection to the service center during the subscription
process (the display shows "dialling ...", and then "No connection"), please check whether your
telephone access has generally been activated for the dialling of this special phone number.
For example, the service center of the Deutsche Telekom cannot be reached from the net-
works of other providers.
Many providers completely block the area code 0190-0. The consequence is that the service
center of www.sms-im-festnetz.de can neither be reached. In this case, please contact your
network provider who can activate the area code (maybe this service is chargeable).
Receiving short messages (SMS)
For each external line, it is possible to determine one access for incoming SMS. Aterminal unit
equipped for SMS communication can then be connected to this access. This device accepts
the incoming short messages.
An individual SMS device can be configured for each external line. Furthermore, it is neces-
sary to assign the CO-line access and the CO-line ring for the SMS connection to the relevant
external lines. Deactivate the call waiting function if only one terminal unit with SMS functio-
nality should be used for both external lines. Otherwise, it is possible that short messages
coming in via the other external line are not accepted in case the SMS terminal unit is busy.
54
Programmable parameters
Setting the SMS extension for CO line 1
Example: configuration of extension 21 for a SMS device for external line 1
Please make sure that only the external line 1 will be signalled at the selected extension (in
this case 21) and that this extension realises the access to the CO-line only via external line
1. To do this, it is possible to use, for example, the targeted CO-line access with "94" instead
of "0". Generally, it is recommended to carry out a clear and unequivocal assignment:
1. Pick up the handset of extension
21 .
2. Enter the program code number
19999 .
3. Dial the code number 39 n.
n = 1...8: this is the last digit of the
SMS extension.
Example: dial the code number 391
for extension 21 .
You hear the dial tone of the telephone
system.
You hear the acknowledgement signal.
The connection for the SMS-device is pro-
grammed.You hear the acknowledgement
signal.
1. For the activation of the CO-line
ring for external line 1, dial code
number 311 .
2. For the deactivation of the CO-line
ring for external line 2, dial code
number 341 .
3. For the activation of the CO-line
access for external line 1, dial code
number 211 .
4. For the deactivation of the CO-line
access for external line 2, dial code
number 241 .
5. Replace the handset of extension
21 .
You hear the acknowledgement signal.
Programming is terminated.
55
Programmable parameters
Setting the SMS extension for CO line 2
Example: configuration of extension 22 for a SMS device for external line 2
Please note that - if necessary - the CO-line ring and the CO-line access have to be re-esta-
blished.
Deleting a SMS extension for CO line 1
1. Pick up the handset of extension
21 .
2. Dial the program code number
19999 .
3. Dial code number 390 .
4. Replace the handset of extension
21 .
You hear the dial tone of the telephone
system.
You hear the acknowledgement signal.
The connection for the SMS device is
deleted. You hear the acknowledgement
signal.
Programming is terminated.
1. Pick up the handset of extension
21 .
2. Dial the program code number
19999 .
3. Dial the code number 30 n.
n = 1...8: this is the last digit of the
SMS extension.
Example: Dial the code number
302 for extension 22 .
You hear the dial tone of the telephone
system.
You hear the acknowledgement signal.
The connection for the SMS-device is pro-
grammed. You hear the acknowledgement
signal.
It is important to make sure that only external line 2 is signalled at the selected extension (in
this case: 22) and that only external line 2 provides a CO line for this extension. For the latter,
it is possible, for example, to use the targeted CO-line access with "95" instead of "0".
Otherwise, it is recommended to carry out a clear and unequivocal assignment:
56
Programmable parameters
Please note: The CO-line ring and the CO-line access possibly have to be re-established.
1. For the activation of the CO-line
ring for external line 2, dial code
number 332 .
2. For the deactivation of the CO-line
ring for external line 1, dial code
number 322 .
3. For the activation of the CO-line
access for external line 2, dial code
number 232 .
4. For the deactivation of the CO-line
access for external line 1, dial code
number 222 .
5. Replace the handset of extension
21 .
You hear the acknowledgement signal.
Programming is terminated.
1. Pick up the handset of extension
21 .
2. Dial the program code number
19999 .
3. Dial code number 300 .
4. Replace the handset of extension
21 .
You hear the dial tone of the telephone
system.
You hear the acknowledgement signal.
The connection for the SMS-device is
deleted. You hear the acknowledgement
tone.
Programming is terminated.
Deleting a SMS extension for CO line 2
57
Programmable parameters
Table of code numbers for the SMS extension
Extension 21 22 23 24 25 26 27 28 OFF
SMS extension for
external line 1 391 392 393 394 395 396 397 398 390
SMS extension for
external line 2 301 302 303 304 305 306 307 308 300
58
Overview of important functions and code numbers
0 Retrieve a CO line . . . . . . . . .14
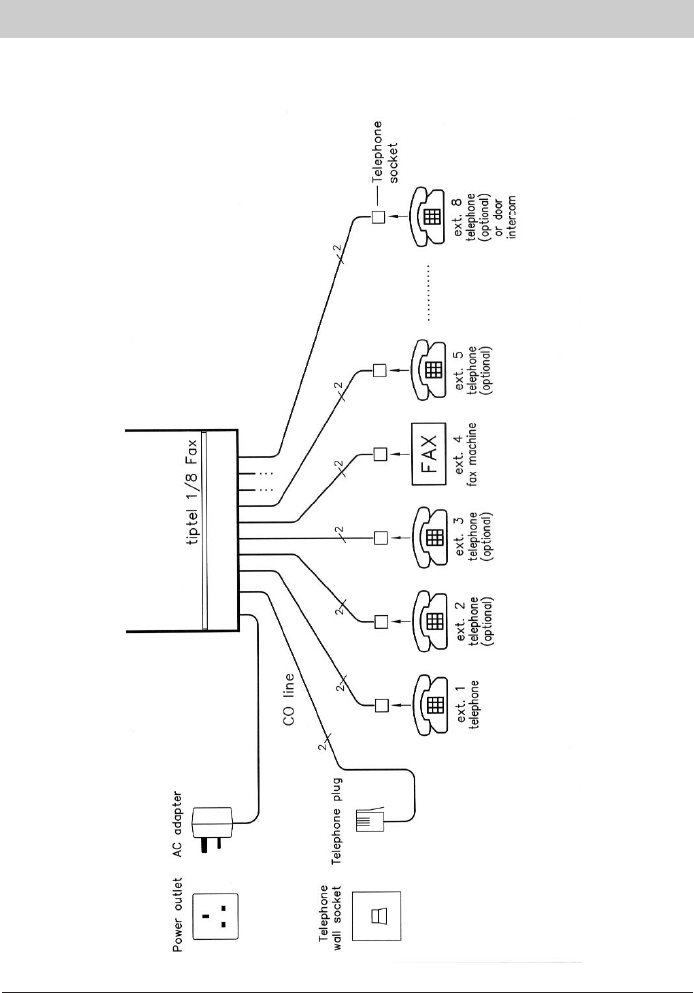
21 Extension 1 . . . . . . . . . . . . . . .11
22 Extension 2 . . . . . . . . . . . . . . .11
23 Extension 3 . . . . . . . . . . . . . .11
24 Extension 4 . . . . . . . . . . . . . . .11
25 Extension 5 . . . . . . . . . . . . . . .11
26 Extension 6 . . . . . . . . . . . . . . .11
27 Extension 7 . . . . . . . . . . . . . . .11
28 Extension 8 . . . . . . . . . . . . . . .11
5 Door intercom . . . . . . . . . . . . .10
6 Door opener . . . . . . . . . . . .43-44
70 Call retrieval . . . . . . . . . . . . .16
71...76 Pager call 1 - 6 . . . . . . . . . . . .21
77 Urgency call . . . . . . . . . . . . . .22
78 Do not disturb On . . . . . . . . . .23
80 Do not disturb Off . . . . . . . . . .23
80 Call forwarding cancelled . . . .25
821...828 Call forwarding to
extension(1...8) . . . . . . . . . . . .25
86 Room monitoring . . . . . . . . . .24
90 Reserving the CO line . . . . . . .18
91 Automatic call-back . . . . . . . . .13
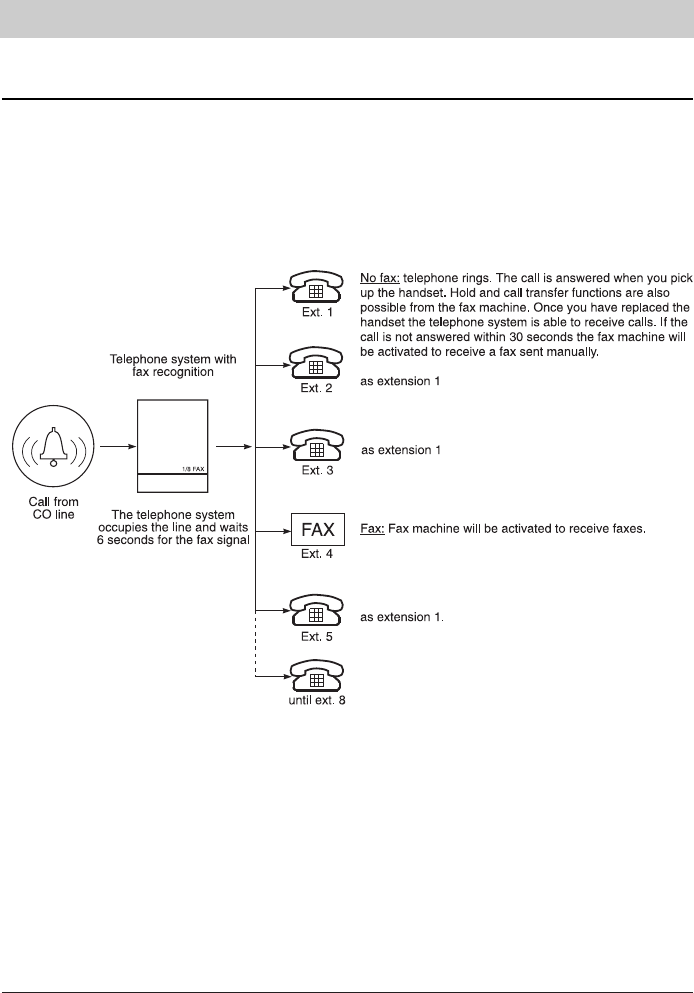
92 Fax function on . . . . . . . . . . . .31
93 Fax function off . . . . . . . . . . . .31
94 Dialling out on CO line 1 . . . . .14
95 Dialling out on CO line 2
(2/8 only) . . . . . . . . . . . . . . . .14
Code numbers for existing calls
1 Hold function
(for pulse dialling ) . . . . . . . . .17
FLASH Hold function (for tone dialling )17
0 Switching between CO lines
(for pulse dialling) (2/8 only) . .19
FLASH+0Switching between CO lines
(for tone dialling) (2/8 only) . . .19
8 Continued dialling
(for pulse dialling ) . . . . . . . . .15
# Flash function on the CO line
(for pulse dialling) . . . . . . . . . .15
* The start signal for the transfer
of tone data . . . . . . . . . . . . . .28
K10 Delayed ringing function Off . .26
K19 Delayed ringing function On . .26
K21 X Access to line 1 On . . . . . . . . .35
K22 X Access to line 1 Off . . . . . . . . .35
K23 X Access to line 2 On (2/8 only) .35
K24 X Access to line 2 Off (2/8 only) .35
K31 X CO line ring for line 1 On . . . .36
K32 X CO line ring for line 1 Off . . . .36
K33 X CO line ring for line 2 On
(2/8 only) . . . . . . . . . . . . . . . .36
K34 X CO line ring for line 2 Off
(2/8 only) . . . . . . . . . . . . . . . .36
K35 X CLIP transmission on . . . . . . .38
K36 X CLIP transmission off . . . . . . .38
K37 X Automatic CO line access
on . . . . . . . . . . . . . . . . . . . . . .35
K38 X Automatic CO line access
off . . . . . . . . . . . . . . . . . . . . . .35
K40 X Door opener authorisation
Off . . . . . . . . . . . . . . . . . . . . .41
K49 X Door opener authorisation
On . . . . . . . . . . . . . . . . . . . . .41
K50 X Doorbell ring Off . . . . . . . . . . .40
K59 X Doorbell ring On . . . . . . . . . . .40
K6 Z Z= Door opener time
(1-9 seconds) . . . . . . . . . . . . .42
K70 X Direct connection with the
door intercom Off . . . . . . . . . .27
K79 X Direct connection with the
door intercom On . . . . . . . . . .27
K811 X Dialling restrictions On . . . . . .37
K821 X Long distance calls blocked
(0...) . . . . . . . . . . . . . . . . . . . .37
K831 X Exception numbers On . . . . . .37
K86 Call waiting signal On . . . . . . .39
K87 Call waiting signal Off . . . . . . .39
K88 Day program . . . . . . . . . . . . . .43
K89 Night program . . . . . . . . . . . . .43
K841 Music on hold on line 1 On . . .44
K842 Music on hold on line 2 On
(2/8 only) . . . . . . . . . . . . . . . .44
K851 Music on hold on line 1 Off . . .44
K852 Music on hold on line 2 Off
(2/8 only) . . . . . . . . . . . . . . . .44
176 Testing the music on hold
function . . . . . . . . . . . . . . . . . .28
10000 Return to the factory pre-set . .45
K = Program code number =
19999
X = Number of the extensions
(1-8)
Z = Door opener duration in
seconds
59
Overview of the tone and ring signals
Telephone system’s dial tone
Fast signal tone
Busy tone
Internal ring
Call-back ring
Acknowledgement signal
Error tone
Doorbell
Pager call signal
Urgency call signal
...
...
...
...
...
...
...
...
60
Trouble Shooting (check)
Description of Problem
-You do not hear a dial tone,
after having picked up the
handset
-You do not receive internal
calls
Possible Cause
-Power failure
-AC adapter is not plugged in
-Faulty telephone plug
-Faulty telephone
-Trouble with the program-
ming of the telephone
system
-Do not disturb function is On
(can be recognised by the
fast signal tone)
-Call forwarding On (can be
recognised by the fast signal
tone)
-AC adapter is not plugged in
-Faulty telephone plug
-Faulty telephone
-Trouble with the program-
ming of the telephone
system
Possible Solutions
-Check if the power outlet
supplies electricity (for
example, by plugging in a
lamp)
-Plug in the AC adapter
-Check the telephone wall
socket, check the connec-
tion
-Test the telephone at ano-
ther telephone wall socket
-Unplug and re-plug the AC
adapter
-Set the factory pre-set On
-Switch the do not disturb
function Off, see operating
instructions
-Switch the call forwarding
function Off, see operating
instructions
-Plug in the AC adapter
-Check the telephone wall
socket, check connection
-Test the telephone at ano-
ther telephone wall socket
-Unplug and re-plug the AC
adapter
61
Trouble Shooting (check)
Description of Problem
-You do not receive external
calls
Possible Cause
-See receiving no internal
calls
-The CO line is not connec-
ted
-Faulty CO line?
-Access to CO line is Off
Possible Solutions
-Solutions as suggested for
receiving no internal calls
-Plug the telephone plug into
the telephone wall socket (?)
-Plug a telephone directly
into the telephone wall
socket to test the CO line
-Unplug the AC adapter and
pick up the handset from
extension 1. If you hear a
CO line dial tone then the
CO line and the connection
are in order.
-Switch access to the CO line
On, see operating instruc-
tions
62
Table for programmable parameters
Extension 1 2 3 4 5 6 7 8
Extension number 21 22 23 24 25 26 27 28
Features
Access to the CO line:
line 1 / line 2
CO line ring: line 1 / line 2
Long distance calls blocked
Dialling restrictions
Door opener authorization
Doorbell ring
Direct connection with the
door intercom
Access to the CO line:
line 1 / line 2
CO line ring: line 1 / line 2
Long distance calls blocked
Dialling restrictions
Door opener authorisation
Doorbell ring
Direct connection with the
door intercom
Music on hold line 1
Music on hold line 2
Door opener duration
Call forwarding
Call waiting
You can have an overview of the features, which you have programmed for the telephone
system , by filling in the table below.
day
night
63
Technical data
CO line
Dielectric strength (Ri = 500) : 20 V - / 10 Sek.:
Call impedance (23 - 54 Hz) : >12 K
Voltage : 24 bis 60 V-
Extension
Supply voltage : 24 V-/ 42 V-*
Supply current : 25 mA + 10%
Call voltage : 52 V + / - 10%, 50 Hz
Frequency of the signal tone : 440 Hz
Reach of wires 0,4 mm Ø : 200 m
0,6 mm Ø : 450 m
0,8 mm Ø : 800 m
Power Supply
Voltage : 230V (+ / - 10%), 50 Hz
Power consumption : 13 VA
Dimensions
L x W x H (measured in mm) : 220 x 180 x 40
Weight : 1,2 kg (inkl. Netzteil)
Length of main circuit cable : 1,6 m
Length of telephone line cable : 3 m
Temperature range
Operation : 0
O
C bis 40
O
C
Storage : - 20
O
C bis + 70
O
C
* depends on country version of the PABX
64
Important information
To operate the telephone system only use the tiptel AC adapter type PS2 Art.-Article. 4569204.
In case of trouble, disconnect the AC adapter and telephone plug. The telephone can be direc-
tly connected to the telephone wall socket to make calls. The telephone system can only be
repaired by an authorised Tiptel technican. The guarantee is no longer valid once an unauthori-
sed repair has been made.
The telephone system may not be used in the following environment:
- in humid or moist rooms
- in direct sunlight
- at temperatures more than 40
O
C and less than 0
O
C
- where strong shakings or vibrations might occor
- in a dusty environment
- in rooms with danger of explosions.
During power failures the telephone system does not work. In this case, extension 1 is connec-
ted directly to CO line 1 and extension 2 to CO line 2.
Please ensure cables are laid safely.
Avoid folding, pulling, and pressing of cables.
Cleaning and maintenance
The telephone system needs little maintenance. The housing surface should only be cleaned
with a soft moist cloth.
Avoid powdery or abrasive detergents.
65
Appendix
Service
You have purchased a modern product by Tiptel which was designed and manufac-tured in
Ratingen near Düsseldorf. The high-tech manufacturing facilities "Made in Germany" grant a
continuous level of the highest quality. This is even underlined by the certification according to
DIN EN ISO 9001.
Guarantee
Please contact your local dealer or importer for details of guarantee for non EC countries.
Within the European Community the following guarantee regulation applies: Your contact for
services arising from guarantee obligations is the authorised dealer where you bought the
device.
Tiptel.com GmbH will grant a guarantee of 2 years from the date of handover for the material
and for the manufacturing of the telecommunications terminal unit.
Initially, the purchaser shall have only the right of subsequent performance. Subsequent
performance entails either repair or the supply of an alternative product. Exchanged devices or
parts shall become the property of the authorised dealer.
If the subsequent performance fails, the purchaser can either demand a reduction in the
purchase price or withdraw from the contract.
The purchaser shall notify the dealer immediately of any defects found. Proof of the guarantee
entitlement shall be furnished by standard proof of purchase (receipt or invoice).
The guarantee entitlement shall expire if the purchaser or an unauthorised third party interferes
with the device. Damage caused by inappropriate handling, operation, storage or by force
majeure or other external influences shall not be covered by the guarantee.
The guarantee shall not cover any consumable material (e.g. batteries) or defects that only
slightly impair the value or the usability of the device.
Claims for damage caused by transport shall be asserted to the delivery company.
Notes on settlement:
Repairs can only be conducted by the Tiptel Service. A warranty repair does not prolong the
warranty period neither for the replaced parts nor for the device. This guarantee is not trans-
ferable and shall expire if the device is sold on to another party. It shall also expire if the
device is interfered with by third parties or if the serial number on the device has been
removed or made illegible. There is a guarantee seal on the tiptel 1/8 fax clip and tiptel
2/8 clip. Please do not damage or remove this seal because otherwise, your guarantee will
expire.
The General Terms and Conditions of Tiptel.com GmbH, which are part of the contract for a
dealer, shall also apply. In the event of a complaint, the defective product shall be sent to the
relevant Tiptel subsidiary, the importer or dealer along with a description of the defect and the
proof of purchase.
66
Appendix
CE sign
This device is approved for the connection and use within the analogue public telephone
networks in all EC countries – according to the European Requirements. Due to technical
deviations in individual countries, we cannot grant an unlimited guarantee for the successful
operation at all types of telephone accesses.
Tiptel.com GmbH hereby declares that the device complies with all fundamental requirements
of the European directive 1999/5/EC. This conformity is confirmed by the CE sign on the
device.
Further details on the declaration of conformity can be found under the following internet
address:
http://www.tiptel.org
Ecological information
During the normal use of the telephone you will not have any contact to substances damaging
to your health. The device is not battery-operated. The plastics used for manufacturing this
device exclusively consist of partially recycled granules. The packaging materials do not
consist of plastics but of partially recycled cardboard and paper.
If you do not have further use of your tiptel 1/8 fax clip or 2/8 clip, Tiptel.com GmbH will take
back the device without any charge. The device will be properly taken to pieces for recycling.
67
Appendix
Index Prefix Blocked numbers (max 6 digits) Comments
01 830 01
02 830 02
03 830 03
04 830 04
05 830 05
06 830 06
07 830 07
08 830 08
09 830 09
10 830 10
11 830 11
12 830 12
13 830 13
14 830 14
15 830 15
16 830 16
17 830 17
18 830 18
19 830 19
20 830 20
List of blocked numbers
68
Appendix
Index Prefix Exception numbers (max 17 digits) Comments
01 831 01
02 831 02
03 831 03
04 831 04
05 831 05
06 831 06
07 831 07
08 831 08
09 831 09
10 831 10
11 831 11
12 831 12
13 831 13 pre-set config.
14 831 14 pres-et config.
15 831 15 pre-set config.
16 831 16 pre-set config.
fix
fix
fix
fix
List of exception numbers
69
Index
Access to CO line . . . . . . . . . . . . . . .34,35
Appendix . . . . . . . . . . . . . . . . . . . . . .65-68
Automatic call-back . . . . . . . . . . . . . . . . .13
Automatic CO line access . . . . . . . . . . . .35
Blocked numbers . . . . . . . . . . . . . . . .40-41
Call blocking . . . . . . . . . . . . . . . . . . .37-39
Call forwarding . . . . . . . . . . . . . . . . . . . .25
Call transfer . . . . . . . . . . . . . . . . . . . . . .20
Call waiting . . . . . . . . . . . . . . . . . . . . . . .45
Ce-Sign . . . . . . . . . . . . . . . . . . . . . . . . .66
Cleaning and maintenance . . . . . . . . . . .64
CLIP . . . . . . . . . . . . . . . . . . . . . . . . . . . .44
CO line ring . . . . . . . . . . . . . . . . . . . . . . .36
Connection . . . . . . . . . . . . . . . . . . . . . .3-5
Connection terminal . . . . . . . . . . . . . . . . .5
Continued dialling . . . . . . . . . . . . . . . . . .15
Day/night mode . . . . . . . . . . . . . . . . . . . .49
Dialling mode . . . . . . . . . . . . . . . . . . . . .14
Dialling on a specific CO line . . . . . . . . . .14
Dialling restrictions . . . . . . . . . . . . . . .37-38
Direct connection with the door intercom .27
Do not disturb . . . . . . . . . . . . . . . . . . . . .23
Door Intercom . . . . . . . . . . . . . . . . . . . .10
Door opener . . . . . . . . . . . . . . . . . . . . . .47
Doorbell ring . . . . . . . . . . . . . . . . . . . . . .46
Ecological information . . . . . . . . . . . . . . .66
Enquiries . . . . . . . . . . . . . . . . . . . . . . . . .17
Exception numbers . . . . . . . . . . . . . .41-43
External calls . . . . . . . . . . . . . . . . . . . . .14
External call blocking . . . . . . . . . . . . . . .39
Factory pre-set . . . . . . . . . . . . . . . . . .8, 51
Flash (Recall) . . . . . . . . . . . . . . . . . .15, 17
Fax function . . . . . . . . . . . . . . . . . . .29 - 33
Guarantee . . . . . . . . . . . . . . . . . . . . . . . .65
Hold function . . . . . . . . . . . . . . . . . . . . . .12
Important information . . . . . . . . . . . . . . .64
Incoming calls . . . . . . . . . . . . . . . . . .11, 16
Installation . . . . . . . . . . . . . . . . . . . . . . . .7
Internal conference call . . . . . . . . . . . . . .12
Internal dialling . . . . . . . . . . . . . . . . . . . .11
International calls . . . . . . . . . . . . . . .11, 16
Music on hold . . . . . . . . . . . . . . . . . .28, 50
Overview functins/code numbers . . . . . . .58
Overview tone and ring signals . . . . . . . .59
Pager call . . . . . . . . . . . . . . . . . . . . . . .21
Programmable Parameters . . . . . . . . .34-57
Pulse dialling mode . . . . . . . . . . . . . . . .17
Reserving the CO line . . . . . . . . . . . . . . .18
Retrieval of calls . . . . . . . . . . . . . . . . . . .11
Return to factory pre-set . . . . . . . . . . . . .51
Room monitoring . . . . . . . . . . . . . . . . . . .24
Service . . . . . . . . . . . . . . . . . . . . . . . . . .65
Service center . . . . . . . . . . . . . . . . . .53, 54
Short messages (SMS) . . . . . . . . . . .52-57
Switching between both CO lines . . . . . .19
Technical data . . . . . . . . . . . . . . . . . . . . .63
Tone dialling for data transfer . . . . . . . . .28
Tone dialling mode . . . . . . . . . . . . . .17, 19
Transmission of CLIPto telephones . . . .35
Trouble shooting . . . . . . . . . . . . . . . .60, 61
Urgency call . . . . . . . . . . . . . . . . . . . . . .22
Wall mounting . . . . . . . . . . . . . . . . . . . . . .6
10/ 07 (UK)
EDV 4932306
Tiptel.com GmbH Business Solutions
Halskestraße 1
D - 40880 Ratingen
Tel.: 0900 100 - 84 78 35*
Vanity Tel.: 0900 100 - TIPTEL*
Internet: www.tiptel.de
International
Internet: www.tiptel.com
*gebührenpflichtig
Tiptel b.v.
Camerastraat 2
NL - 1322 BC Almere
Telefoon: 0900 - BELTIPTEL of
0900 - 2358478
(niet gratis)
Fax: 036 - 53 678 81
E-mail: info@tiptel.nl
Internet: www.tiptel.nl
Tiptel sarl
23, avenue René Duguay Trouin
F - 78960 Voisins le Bretonneux
Tél : 01 - 39 44 63 30
Fax : 01 - 30 57 00 29
E-mail : support@tiptel.fr
Internet : www.tiptel.fr
Tiptel NV/SA
Leuvensesteenweg 510 bus 4
B - 1930 Zaventem
Telefoon: 0903 - 99 333
(1,12 Euro / min)
Fax: 02 - 714 93 34
E-mail: tech@tiptel.be
Internet: www.tiptel.be
Tiptel GmbH
Tenschertstraße 5
A - 1230 Wien
Telefon: 01 - 616 78 71
Fax: 01 - 616 78 71-22
E-mail: office@tiptel.at
Internet: www.tiptel.at
Tiptel AG
Bahnstrasse 46
CH - 8105 Regensdorf
Telefon: 044 - 884 01 80
Fax: 044 - 843 13 23
E-mail: tiptel@tiptel-online.ch
Internet: www.tiptel-online.ch
52

Hulp nodig? Stel uw vraag in het forum

Spelregels

Misbruik melden

Gebruikershandleiding.com neemt misbruik van zijn services uitermate serieus. U kunt hieronder aangeven waarom deze vraag ongepast is. Wij controleren de vraag en zonodig wordt deze verwijderd.

Product:

Bijvoorbeeld antisemitische inhoud, racistische inhoud, of materiaal dat gewelddadige fysieke handelingen tot gevolg kan hebben.

Bijvoorbeeld een creditcardnummer, een persoonlijk identificatienummer, of een geheim adres. E-mailadressen en volledige namen worden niet als privégegevens beschouwd.

Spelregels forum

Om tot zinvolle vragen te komen hanteren wij de volgende spelregels:

Belangrijk! Als er een antwoord wordt gegeven op uw vraag, dan is het voor de gever van het antwoord nuttig om te weten als u er wel (of niet) mee geholpen bent! Wij vragen u dus ook te reageren op een antwoord.

Belangrijk! Antwoorden worden ook per e-mail naar abonnees gestuurd. Laat uw emailadres achter op deze site, zodat u op de hoogte blijft. U krijgt dan ook andere vragen en antwoorden te zien.

Abonneren

Abonneer u voor het ontvangen van emails voor uw Tiptel 1-8 Fax CNIP bij:


U ontvangt een email met instructies om u voor één of beide opties in te schrijven.


Ontvang uw handleiding per email

Vul uw emailadres in en ontvang de handleiding van Tiptel 1-8 Fax CNIP in de taal/talen: Engels als bijlage per email.

De handleiding is 2,34 mb groot.


U ontvangt de handleiding per email binnen enkele minuten. Als u geen email heeft ontvangen, dan heeft u waarschijnlijk een verkeerd emailadres ingevuld of is uw mailbox te vol. Daarnaast kan het zijn dat uw internetprovider een maximum heeft aan de grootte per email. Omdat hier een handleiding wordt meegestuurd, kan het voorkomen dat de email groter is dan toegestaan bij uw provider.

Stel vragen via chat aan uw handleiding

Stel uw vraag over deze PDF

Andere handleiding(en) van Tiptel 1-8 Fax CNIP

Tiptel 1-8 Fax CNIP Gebruiksaanwijzing - Nederlands - 64 pagina's

Tiptel 1-8 Fax CNIP Gebruiksaanwijzing - Deutsch - 72 pagina's

Tiptel 1-8 Fax CNIP Gebruiksaanwijzing - Français - 72 pagina's

Tiptel 1-8 Fax CNIP Gebruiksaanwijzing - Français - 72 pagina's


Uw handleiding is per email verstuurd. Controleer uw email

Als u niet binnen een kwartier uw email met handleiding ontvangen heeft, kan het zijn dat u een verkeerd emailadres heeft ingevuld of dat uw emailprovider een maximum grootte per email heeft ingesteld die kleiner is dan de grootte van de handleiding.

Er is een email naar u verstuurd om uw inschrijving definitief te maken.

Controleer uw email en volg de aanwijzingen op om uw inschrijving definitief te maken

U heeft geen emailadres opgegeven

Als u de handleiding per email wilt ontvangen, vul dan een geldig emailadres in.

Uw vraag is op deze pagina toegevoegd

Wilt u een email ontvangen bij een antwoord en/of nieuwe vragen? Vul dan hier uw emailadres in.


Info