3938
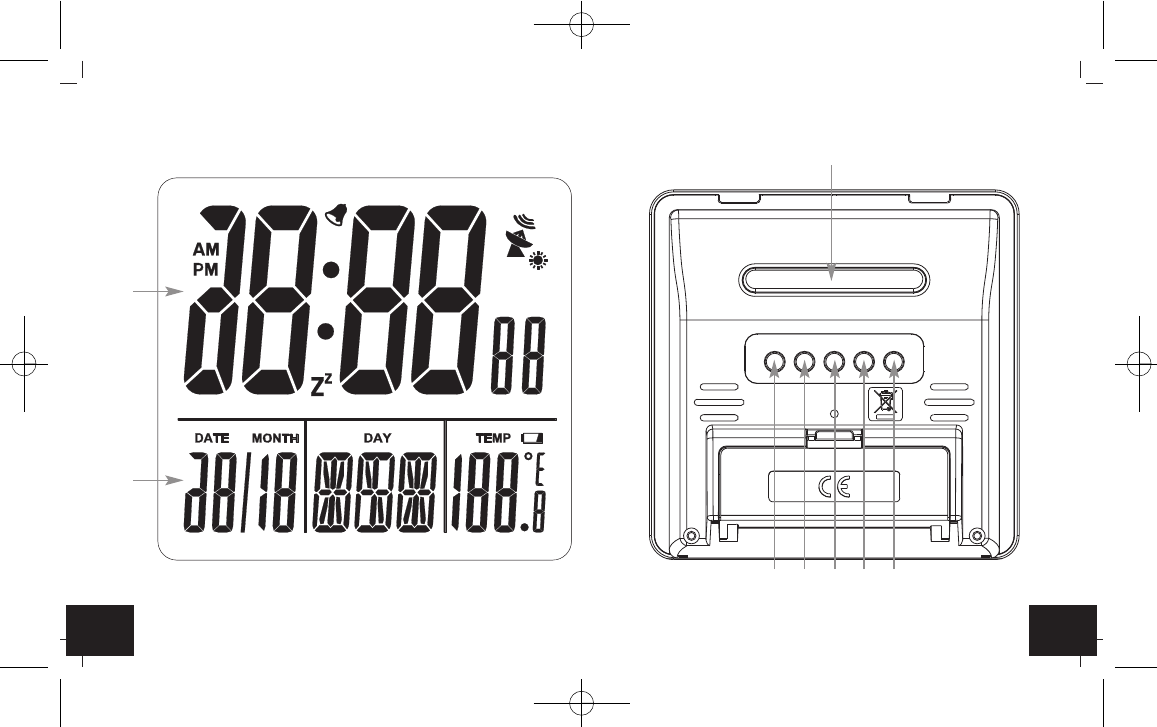
Orologio sveglia radiocontrollato
• All'interno di strutture in cemento armato (seminterrati, sovrastrutture) la ricezio-
ne del segnale è naturalmente più debole. In casi estremi si consiglia di sistema-
re l'unità vicino ad una finestra per ottenere una migliore ricezione del segnale.
• Durante le ore notturne, le interferenze dovute ad agenti atmosferici sono nor-
malmente meno influenti e la ricezione è possibile nella maggior parte dei casi.
Una singola ricezione giornaliera è sufficiente a garantire la precisione e a man-
tenere la deviazione al di sotto di un secondo.
7. Uso
• Tenere premuto il tasto UP o DOWN in modalità impostazione per procedere
velocemente.
• L'apparecchio esce automaticamente dalla modalità impostazione se non si
preme alcun tasto per più di 30 secondi.
7.1 Impostazione manuale dell'ora e della data
• Tenere premuto per 3 secondi il tasto SET nella modalità normale .
• Il formato di visualizzazione 12 o 24 ore inizia a lampeggiare.
• È possibile selezionare con il tasto UP o DOWN il sistema orario di 24 o 12 ore
(in questo caso appare AM o PM sul display).
• Premendo il tasto SET è possibile modificare uno dopo l'altro le impostazioni del
fuso orario (00 l'impostazione predefinita), dell’ora, dei minuti, dell’anno, del
mese, del giorno e del giorno della settimana. Impostare con il tasto UP o
DOWN.
• Confermare con il tasto SET.
• Impostazione della lingua: Tedesco (GER), Inglese (ENG), Italiano (ITA), France-
se (FRE), Olandese (DUT),Spagnolo (SPA) e Danese (DAN).
• In caso di corretta ricezione, l'ora impostata in modalità manuale viene sostituita.
Orologio sveglia radiocontrollato
7.2 Impostazione del fuso orario
• Il fuso orario viene utilizzato dove può essere ricevuto il segnale DCF (+12/-12)
ma il fuso orario differisce da quello tedesco (ad esempio, +1 = un'ora dopo).
• Premere il tasto UP o DOWN.
• Confermare con il tasto SET.
7.3 Regolazione del segnale sveglia
• Tenere premuto per 3 secondi il tasto ALARM nella modalità normale.
• AL e 0:00 (predefinito) o l'ultima ora della sveglia impostata vengono visualizzati
sul display.
• L’indicazione dell’ora inizia a lampeggiare.
• Impostare le ore con il tasto UP o DOWN.
• Confermare con il tasto ALARM e inserire i minuti procedendo nello stesso
modo.
• L'indicazione dei minuti inizia a lampeggiare: inserire i minuti procedendo nello
stesso modo.
• Confermare con il tasto ALARM.
• Sul display viene visualizzata l'ora attuale.
• Premere il tasto ALARM nella modalità normale per disattivare e attivare la fun-
zione sveglia.
• Nel caso in cui la sveglia sia attiva, il simbolo lampeggia. Altrimenti, il simbolo
della sveglia non compare.
• Quando l'orario di allarme inserito viene raggiunto, la sveglia comincia a suonare.
• Il simbolo della sveglia inizia a lampeggiare.
• Per arrestare l’allarme, premere un tasto qualunque.
• Se non viene interrotto, il segnale si disattiva automaticamente dopo pochi minuti
e si riattiva nuovamente alla stessa ora di sveglia.
TFA_No. 60.2525_Anleitung_09_16 14.09.2016 16:02 Uhr Seite 20