658423
16
Verklein
Vergroot
Pagina terug
1/40
Pagina verder
ENGLISH VERSION
WARNING
To reduce the risk of fire or electric shock, do not expose this appliance
to rain or moisture.
CAUTION
This equipment has been tested and found to comply with the limits for
a Class B digital device pursuant to Part 15 of FCC Rules. Operation is
subject to the following two conditions: (1) This device may not cause
harmful interference, and (2) this device must accept any interference
received, including interference that may cause undesired operation.
The lightning symbol within a triangle means, “Electrical
caution!” It indicates the presence of information about
operating voltage and potential risks of electrical shock.
The exclamation point within a triangle means, “Caution!”
Please read the information next to all caution signs.
Introduction .................................................... page 4
Quick Start .......................................................page 6
Using Two VoiceTone Pedals ........................page 11
Front & Back Panel Descriptions ...............page 12
Setup Configurations ....................................page 14
Phantom Power ..............................................................page 14
Standard Setup ................................................................page 15
Stereo Setup .....................................................................page 16
Sound Engineer Setup .................................................page 17
Patches, Performances, & Parts ...................page 18
Performing Applications ...............................page 21
Single Effect Performances ........................................page 21
A/B Effect Performances ............................................page 22
Sequenced Performances ..........................................page 23
Effect & Genre Descriptions .......................page 24
Reverb ..................................................................................page 24
Delay & Tap Tempo .......................................................page 25
μMod ....................................................................................page 26
Transducer .........................................................................page 27
Genre Descriptions ......................................................page 27
Patch List .........................................................page 29
FAQ & Troubleshooting ...............................page 35
Super Edit Mode & Restore ........................page 37
Specifications ..................................................page 38
Tear-Out Section ...........................................page 39
3
Table of Contents
TC Helicon Vocal Technologies Ltd.
Sindalsvej 34, DK-8240 Risskov – info@tcelectronic.com
Manual revision 1.1 – SW – V 1.0 | Prod. No: E60507412
English Version
4
Welcome to VoiceTone Create
VoiceTone Create was built for the performance
minded singer desiring studio quality effects on stage. In
essence, Create is the professional producer and all of
his/her tools, boiled down into one easy to use, and very
portable pedal. The effects in VoiceTone Create are
produced by the very same algorithms used in high-end
studio hardware processors and software plug-ins. In
terms of audio quality (noise floor, harmonic distortion,
and frequency response), Create surpasses anything that
has come before it, and unarguably exceeds even the
most stringent "audiophile" standards. To make your life
as easy as possible, Create presents a wide pallet of
professionally authored sounds, offering singers instant
portholes into the secrets behind producing great
sounds for any music genre. Where out-of-the-box
sounds aren't enough, Create provides powerfully
simple tweak controls, intelligently designed to give you
exactly what you need to find the sound you want.
Many audience members, band members and sound
engineers may be surprised to see a singer taking
control over their sound. We think it's about time!
Features:
o Reverb: halls, rooms, plates, spring, ambience
o Delay: tap tempo, ping pong, slaps, taps
o μMod: microshift, thicken, chorus, flange, phaser
o Transducer: distortion, telephone, megaphone, filters
o 99 music-style-based effect patches
o 5 "favorite" user performances each including flexible
A/B effect switching
o Quick and easy tweaking of patches
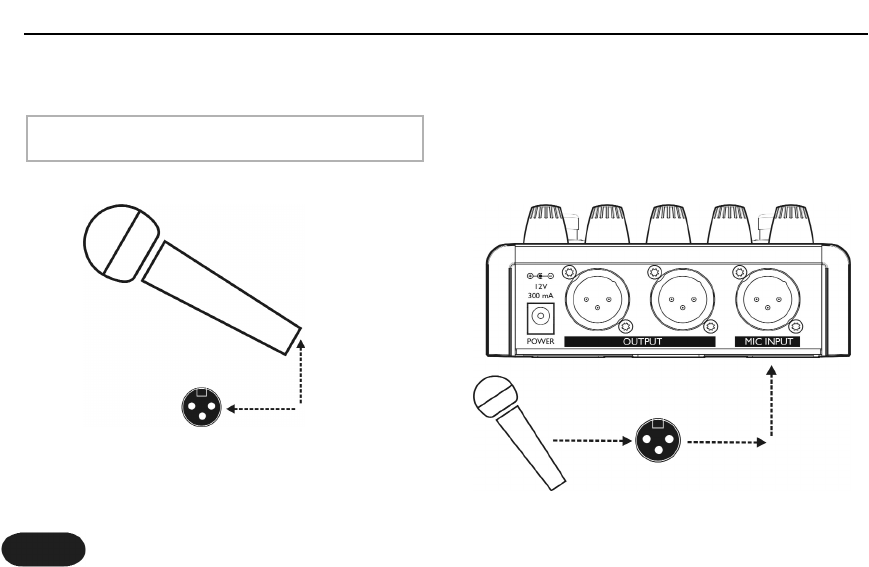
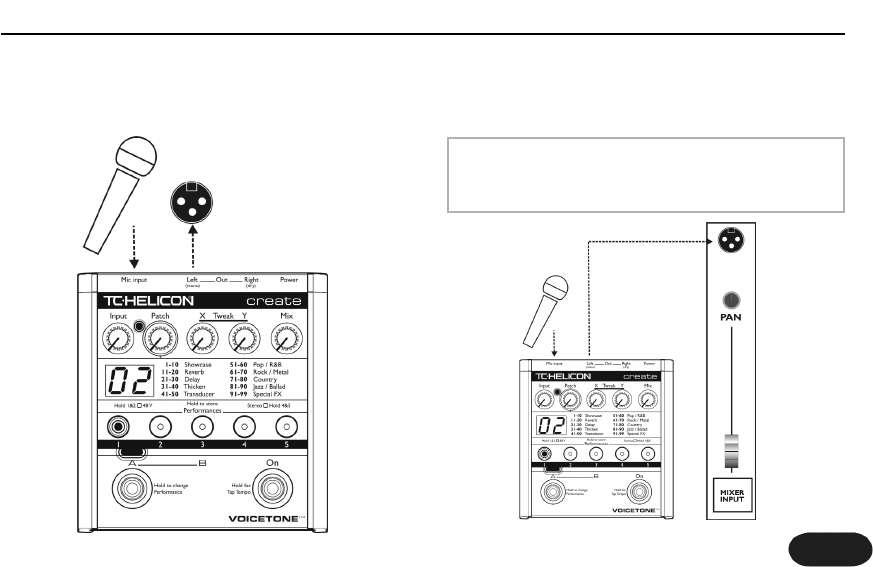
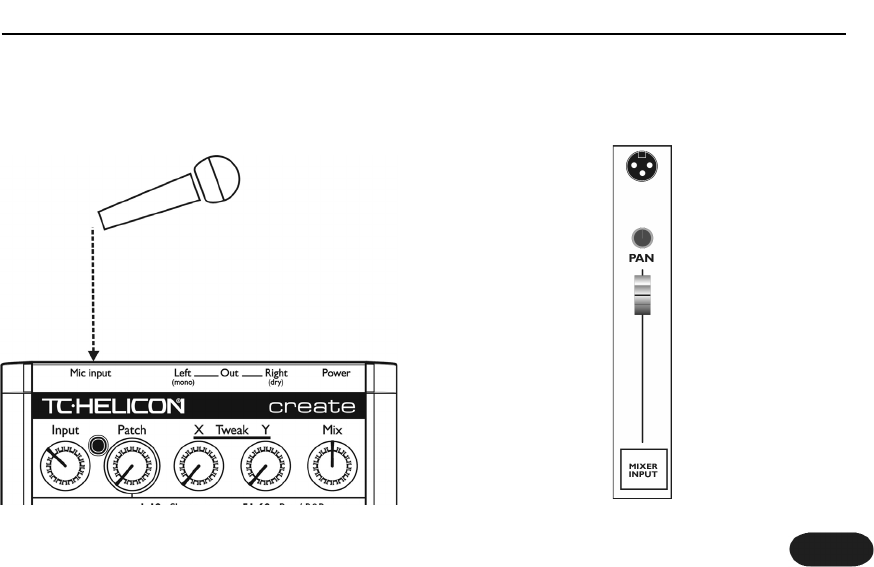
o XLR mic level I/O in stereo or mono
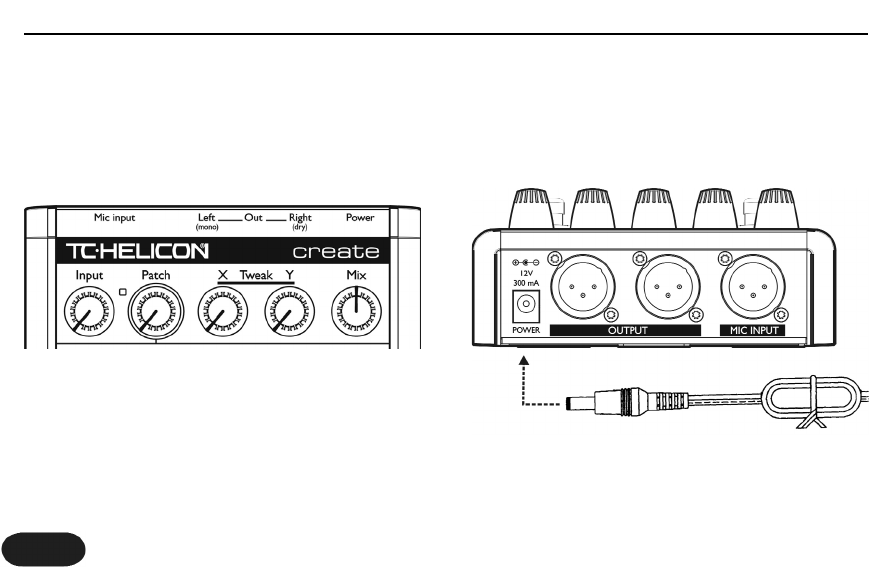
o Clean, studio quality mic preamp with phantom power
Introduction
5
About TC-Helicon
At TC-Helicon we truly believe that the voice is the
world's most beautiful instrument. We don't mean to
degrade other beautiful instruments, but the singing
voice is the anthropological source for all things melodic.
In the words of the founders of TC-Helicon,
"Everything we do is dedicated to this instrument (the
singing voice). We envision a world where those who
work with the voice in live and recording situations can
bring out the very best from any performance, and
where the possibilities of vocal craft are endless."
Our mission was galvanized by a simple question:
"Isn't it time that someone finally provided dedicated
tools and solutions for voice?"
So what does this all mean to singers? It means that you
should know there is a dedicated group of engineers,
researchers and product specialists, based in Victoria, BC,
Canada, who spend every waking moment of their
working lives listening, talking, singing, and interacting
with singers and those who have passion for the singing
voice. All this knowledge and experience is used to
design products respecting and empowering the
modern vocalist. Our products focus on removing
barriers and inspiring creativity in performance. That's
why our products range from near-field personal vocal
monitors to floor-based vocal multi-effects pedals.
Enjoy.
The TC-Helicon Team
a TC Group company
Introduction
6
Step 1:
Connect your microphone to a mic cable
Step 2:
Connect the mic cable to the Mic Input on Create
Quick Start
Make sure Create is not powered.
NOTE:
7
Step 3:
Connect a mic cable to the Left (mono) Output of
Create.
Step 4:
Connect the mic cable from Create to a mic input on
your sound system.
Quick Start
At this point it would be best to turn the gain and/or
volume on your sound system's mic input to off.
NOTE:
8
Step 5:
Set the Input Knob fully left, and the Mix Knob to 12
o'clock.
Step 6:
Connect Create's power adapter to main power and to
the Power Input on Create.
Quick Start
9
Step 7:
While singing through your microphone, raise the Input
Knob until the Input Light turns green, sometimes
orange on louder parts, but never red.
Step 8:
Raise the gain and/or volume on your sound system mic
input channel and master volume until you hear a good
level from your vocals.
Quick Start
10
Step 9:
You're ready to add effects to your voice.
a. Turn the effect on or off with the Right Footswitch.
b. Listen to different patches by slowly turning the
Patch Knob.
Quick Start
You can use two VoiceTone pedals in series. Generally,
VoiceTone Create should be the last device in the chain
before connecting to your PA.
Step 1:
Follow the Quick Start guide for both VoiceTone Pedals.
Step 2:
Instead of connecting your first VoiceTone pedal to the
PA, connect its mono output to the mic input on Create.
Step 3:
Connect the 2nd VoiceTone pedal, in this case Create to
the PA.
Step 4:
Set VoiceTone Create’s Input Knob fully left.
Step 5:
Use the first pedal’s Input Knob to set the microphone
gain.
11
Using Two VoiceTone Pedals
12
1. Input Knob
Controls the microphone pre-amplifier gain. Create can
accept dynamic or condenser microphones.
2. Input Light
Indicates the input level of the microphone. Flashing
green, sometimes orange is good. Flashing red is clipping
- not good!
3. Patch Knob
Selects from the 99 effect patches.
4.Tweak X / Y Knobs
Controls two useful aspects of the selected patch.
5. Mix Knob
Sets the global mix of effects and dry. 12 o'clock is the
default position.
Front & Back Panel Descriptions
1 2 3 4 5
6
8
7
9
10
11
13
6. Numeric Display
Indicates the current patch. When tweaking, temporarily
indicates the tweak value for the last edited Tweak Knob.
7. Phantom Power Light
Indicates phantom power on or off.
8. Performance Button 1 - 5
Displays the current loaded performance.
9. Stereo Light
Indicates stereo mode on or off.
10. Left Footswitch
Switches between part A / B as well as performances.
11. Right Footswitch
Toggles effects on / off and tap tempo.
12. Mic Input
Microphone connection.
13. Left Output (mono)
Connects to a sound system (used for standard mono
setup)
14. Right Output (dry)
Connects to a sound system (used in stereo setup, or
sound engineer setup)
15. Power Input
Input connector for supplied power supply.
Front & Back Panel Descriptions
1213
14
15
14
Phantom Power
Before using any setup configuration, determine the type
of microphone you are using:
Dynamic microphone: phantom power off.
Condenser microphone: phantom power on.
Enabling Phantom Power:
1. Confirm that your sound system master level is off.
2. Connect Create's power adapter to main power
and to the Power Input on Create.
3. Press and hold Performance Buttons 1 and 2
simultaneously until the Phantom Power Light comes on.
To turn phantom power off, repeat this step.
Setup Configurations
Set your sound system level to off when you are
turning phantom power on/off as it can create a
“pop” sound in your speakers.
NOTE:
15
Standard Setup
The standard setup for VoiceTone Create couldn't be
easier - put Create between your microphone and your
microphone input on your sound system. In this
configuration the Right Output is not used. The Left
Output is a mono mix of effects and dry, based on the
setting of the Mix Knob.
Configuring Standard Setup:
1. Connect your microphone to Create's Mic Input.
2. Connect to your sound system as indicated: Left
Output to a mic input channel on your sound system.
3. Connect Create's power adapter to main power
and to the Power Input on Create.
Setup Configurations
The default for Create is stereo mode off (mono). If
the Stereo Light is on, press and hold Performance
Buttons 4 and 5 simultaneously until the Stereo Light
turns off.
NOTE:
16
Stereo Setup
If you run your sound system in stereo, you can enable
stereo mode. In this setup, effect patches have more
spatial effect. In this configuration, the Left and Right
Outputs are connected to two inputs on your sound
system. The Mix Knob controls the balance of stereo
effects and dry.
Configuring Stereo Setup:
1. Connect your microphone to Create's Mic Input.
2. Connect to your sound system as indicated: Left
Output and Right Outputs to two mic input channels on
your sound system. Set the pan pots on your sound
system fully left (from Create's Left Input) and fully right
(from Create's Right Output).
3. Connect Create's power adapter to main power
and to the Power Input on Create.
4. Press and hold Performance Buttons 4 and 5
simultaneously until the Stereo Light comes on.To turn
stereo mode off, repeat this step.
Setup Configurations
16

Hulp nodig? Stel uw vraag in het forum

Spelregels

Misbruik melden

Gebruikershandleiding.com neemt misbruik van zijn services uitermate serieus. U kunt hieronder aangeven waarom deze vraag ongepast is. Wij controleren de vraag en zonodig wordt deze verwijderd.

Product:

Bijvoorbeeld antisemitische inhoud, racistische inhoud, of materiaal dat gewelddadige fysieke handelingen tot gevolg kan hebben.

Bijvoorbeeld een creditcardnummer, een persoonlijk identificatienummer, of een geheim adres. E-mailadressen en volledige namen worden niet als privégegevens beschouwd.

Spelregels forum

Om tot zinvolle vragen te komen hanteren wij de volgende spelregels:

Belangrijk! Als er een antwoord wordt gegeven op uw vraag, dan is het voor de gever van het antwoord nuttig om te weten als u er wel (of niet) mee geholpen bent! Wij vragen u dus ook te reageren op een antwoord.

Belangrijk! Antwoorden worden ook per e-mail naar abonnees gestuurd. Laat uw emailadres achter op deze site, zodat u op de hoogte blijft. U krijgt dan ook andere vragen en antwoorden te zien.

Abonneren

Abonneer u voor het ontvangen van emails voor uw TC Helicon VoiceTone Create bij:


U ontvangt een email met instructies om u voor één of beide opties in te schrijven.


Ontvang uw handleiding per email

Vul uw emailadres in en ontvang de handleiding van TC Helicon VoiceTone Create in de taal/talen: Engels als bijlage per email.

De handleiding is 3,07 mb groot.


U ontvangt de handleiding per email binnen enkele minuten. Als u geen email heeft ontvangen, dan heeft u waarschijnlijk een verkeerd emailadres ingevuld of is uw mailbox te vol. Daarnaast kan het zijn dat uw internetprovider een maximum heeft aan de grootte per email. Omdat hier een handleiding wordt meegestuurd, kan het voorkomen dat de email groter is dan toegestaan bij uw provider.

Stel vragen via chat aan uw handleiding

Stel uw vraag over deze PDF

Andere handleiding(en) van TC Helicon VoiceTone Create

TC Helicon VoiceTone Create Gebruiksaanwijzing - Deutsch - 40 pagina's


Uw handleiding is per email verstuurd. Controleer uw email

Als u niet binnen een kwartier uw email met handleiding ontvangen heeft, kan het zijn dat u een verkeerd emailadres heeft ingevuld of dat uw emailprovider een maximum grootte per email heeft ingesteld die kleiner is dan de grootte van de handleiding.

Er is een email naar u verstuurd om uw inschrijving definitief te maken.

Controleer uw email en volg de aanwijzingen op om uw inschrijving definitief te maken

U heeft geen emailadres opgegeven

Als u de handleiding per email wilt ontvangen, vul dan een geldig emailadres in.

Uw vraag is op deze pagina toegevoegd

Wilt u een email ontvangen bij een antwoord en/of nieuwe vragen? Vul dan hier uw emailadres in.


Info