488889
3
Verklein
Vergroot
Pagina terug
1/284
Pagina verder
openSUSE 12.2
Start-Up
October 02, 2012
Start-Up
Copyright © 2006–2012 Novell, Inc. and contributors. All rights re-
served.
Permission is granted to copy, distribute and/or modify this document
under the terms of the GNU Free Documentation License, Version 1.2
or (at your option) version 1.3; with the Invariant Section being this
copyright notice and license. A copy of the license version 1.2 is includ-
ed in the section entitled GNU Free Documentation License”.
For Novell trademarks, see the Novell Trademark and Service Mark list
http://www.novell.com/company/legal/trademarks/tmlist.html. All
other third party trademarks are the property of their respective own-
ers. A trademark symbol (®, etc.) denotes a Novell trademark; an
asterisk (*) denotes a third party trademark.
All information found in this book has been compiled with utmost at-
tention to detail. However, this does not guarantee complete accuracy.
Neither Novell, Inc., SUSE LINUX Products GmbH, the authors, nor the
translators shall be held liable for possible errors or the consequences
thereof.
Contents
About This Guide ix
1 Available Documentation ... .... .... .... ...... . .. . ... . .. . ... . .. . .. . . .. . .. . . .. . .. ix
2 Feedback .. . .. . ... . .. . ... . .. . .. . . .. . .. . . .. . .. . . .. . .. . . .. . .. . . .. . .. . ... . .. . ... . .. . . x
3 Documentation Conventions ... . .. . . .. . .. . ... . .. . ... . .. . ... . .. . .. . . .. . .. . . .. . .. xi
4 About the Making of This Manual .. . .. . ... . .. . ... . .. . .. . . .. . .. . . .. . .. . . .. . .. . . . xi
5 Source Code .. .. . .. . . .. . .. . ... . .. . ... . .. . ... . .. . .. . . .. . .. . . .. . .. . . .. . .. . . .. . .. . . . xi
6 Acknowledgments ...... . .. . ... . .. . ... . .. . .. . . .. . .. . . .. . .. . . .. . .. . . .. . .. . . .. . .. . . xi
I Installation and Basics 1
1 Installation Quick Start 3
1.1 Welcome to openSUSE .. . .. . ... . .. . ... . .. . .. . . .. . .. . . .. . .. . . .. . .. . . .. . .. . ... . . 3
1.2 System Requirements ... .. . .. . . .. . .. . . .. . .. . ... . .. . ... . .. . ... . .. . ... . .. . .. . . .. 3
1.3 Installing openSUSE .. .. . ... . .. . .. . . .. . .. . . .. . .. . . .. . .. . . .. . .. . ... . .. . ... . .. . .. 3
2 KDE Quick Start 11
2.1 Getting Started .... . ... . .. . .. . . .. . .. . . .. . .. . . .. . .. . . .. . .. . . .. . .. . ... . .. . ... . .. 11
2.2 The Standard KDE Desktop .... . ... . .. . ... . .. . ... . .. . .. . . .. . .. . . .. . .. . . .. . .. . 11
2.3 Starting programs .. . .. . ... . .. . ... . .. . .. . . .. . .. . . .. . .. . . .. . .. . . .. . .. . ... . .. . .. 13
2.4 Handling Media .. . . .. . .. . . .. . .. . . .. . .. . ... . .. . ... . .. . ... . .. . .. . . .. . .. . . .. . .. . . 15
2.5 Adapt your desktop ... ... . .. . ... . .. . .. . . .. . .. . . .. . .. . . .. . .. . . .. . .. . ... . .. . ... 15
2.6 Application of desktop eects ... . .. . . .. . .. . . .. . .. . . .. . .. . . .. . .. . ... . .. . ... . . 21
2.7 Use of virtual desktops .. . . .. . .. . . .. . .. . ... . .. . ... . .. . ... . .. . .. . . .. . .. . . .. . .. 22
2.8 Management of les and folders .... . .. . . .. . .. . . .. . .. . . .. . .. . ... . .. . ... . .. . . 23
2.9 Browsing on the Internet .... . .. . .. . . .. . .. . . .. . .. . . .. . .. . . .. . .. . . .. . .. . ... . .. 27
2.10 Managing Passwords ... . .. . ... . .. . ... . .. . ... . .. . .. . . .. . .. . . .. . .. . . .. . .. . . .. 30
2.11 E-mail and Calendar .... . .. . ... . .. . ... . .. . .. . . .. . .. . . .. . .. . . .. . .. . . .. . .. . ... 31
2.12 Instant Messaging with Kopete ... ... . .. . ... . .. . ... . .. . .. . . .. . .. . . .. . .. . . .. 33
2.13 Starting LibreOce ... ... . .. . ... . .. . ... . .. . .. . . .. . .. . . .. . .. . . .. . .. . . .. . .. . . . 34
2.14 Viewing PDF Files and Other Documents . .. . . .. . .. . . .. . .. . . .. . .. . . .. . .. . .. 34
2.15 Search for data (with Strigi) .. . . .. . .. . . .. . .. . . .. . .. . ... . .. . ... . .. . ... . .. . .. . 35
2.16 Creating a CD or DVD ... . . .. . .. . . .. . .. . . .. . .. . . .. . .. . ... . .. . ... . .. . ... . .. . . 36
2.17 Manage your collection of digital images .. .. . ... . .. . ... . .. . ... . .. . ... . .. . 36
2.18 Managing your music collection .... . ... . .. . ... . .. . .. . . .. . .. . . .. . .. . . .. . .. . 37
2.19 Ending Your Session .. . .. . .. . . .. . .. . . .. . .. . . .. . .. . . .. . .. . . .. . .. . ... . .. . ... . . 38
2.20 For More Information .. . .. . .. . . .. . .. . ... . .. . ... . .. . ... . .. . .. . . .. . .. . . .. . .. . . 39
3 GNOME Quick Start 41
3.1 Getting Started .... . ... . .. . .. . . .. . .. . . .. . .. . . .. . .. . . .. . .. . . .. . .. . ... . .. . ... . .. 41
3.2 The standard GNOME desktop ... .. . . .. . .. . . .. . .. . ... . .. . ... . .. . ... . .. . ... . . 41
3.3 Fallback Mode .. . .. . ... . .. . ... . .. . .. . . .. . .. . . .. . .. . . .. . .. . . .. . .. . ... . .. . ... . .. 47
3.4 "Open Application" dialog box“ ... .. . . .. . .. . . .. . .. . . .. . .. . . .. . .. . ... . .. . ... . 48
3.5 Manage Files, Folders and Media .... . .. . .. . . .. . .. . . .. . .. . . .. . .. . . .. . .. . . .. . . 49
3.6 Customizing your Work Environment ... . .. . . .. . .. . . .. . .. . ... . .. . ... . .. . ... . 52
3.7 Browsing the Internet with Firefox ... .. . . .. . .. . ... . .. . ... . .. . ... . .. . .. . . .. . . 53
3.8 Managing Passwords . .. . . .. . .. . . .. . .. . . .. . .. . . .. . .. . ... . .. . ... . .. . ... . .. . ... . 55
3.9 E-mail and Calendar .. .. . .. . . .. . .. . . .. . .. . . .. . .. . . .. . .. . . .. . .. . ... . .. . ... . .. . 56
3.10 Instant Messaging with Empathy .. . .. . .. . . .. . .. . . .. . .. . . .. . .. . . .. . .. . ... . . 57
3.11 Starting LibreOce ... ... . .. . ... . .. . ... . .. . .. . . .. . .. . . .. . .. . . .. . .. . . .. . .. . . . 58
3.12 Viewing PDF Files and Other Documents . .. . . .. . .. . . .. . .. . . .. . .. . . .. . .. . .. 58
3.13 Managing Your Digital Image Collection ... .. . .. . . .. . .. . ... . .. . ... . .. . ... . . 59
3.14 Managing Your Music and Videos .... . .. . . .. . .. . . .. . .. . . .. . .. . ... . .. . ... . .. 60
3.15 Ending Your Session .. . .. . .. . . .. . .. . . .. . .. . . .. . .. . . .. . .. . . .. . .. . ... . .. . ... . . 61
3.16 For More Information .. . .. . .. . . .. . .. . ... . .. . ... . .. . ... . .. . .. . . .. . .. . . .. . .. . . 62
4 LibreOce Quick Start 63
4.1 Compatibility . . . .. . .. . ... . .. . ... . .. . ... . .. . .. . . .. . .. . . .. . .. . . .. . .. . . .. . .. . ... . 63
4.2 LibreOce Modules ..... . .. . .. . . .. . .. . . .. . .. . . .. . .. . . .. . .. . . .. . .. . ... . .. . ... . 63
4.3 Starting LibreOce .. . ... . .. . ... . .. . ... . .. . .. . . .. . .. . . .. . .. . . .. . .. . . .. . .. . . .. 64
4.4 LibreOce Writer .. . .. . . .. . .. . . .. . .. . . .. . .. . ... . .. . ... . .. . ... . .. . .. . . .. . .. . . . 66
4.5 LibreOce Calc .. ... . .. . ... . .. . ... . .. . .. . . .. . .. . . .. . .. . . .. . .. . . .. . .. . ... . .. . .. 69
4.6 Other LibreOce Modules ... . .. . . .. . .. . ... . .. . ... . .. . ... . .. . ... . .. . .. . . .. . .. 71
4.7 For More Information . .. . . .. . .. . . .. . .. . . .. . .. . ... . .. . ... . .. . ... . .. . ... . .. . .. . . 75
II Managing and Updating Software 77
5 Installing or Removing Software 79
5.1 Denition of Terms .. .. . ... . .. . ... . .. . ... . .. . ... . .. . .. . . .. . .. . . .. . .. . . .. . .. . . . 79
5.2 Using the KDE Interface (Qt) ..... . .. . .. . . .. . .. . . .. . .. . . .. . .. . . .. . .. . . .. . .. . . 80
5.3 Using the GNOME Interface (GTK+) ... .. . .. . . .. . .. . . .. . .. . ... . .. . ... . .. . ... . 86
5.4 Managing Software Repositories and Services ... . .. . . .. . .. . . .. . .. . . .. . .. . . 90
5.5 Keeping the System Up-to-date ... .. . .. . . .. . .. . . .. . .. . . .. . .. . . .. . .. . ... . .. . . 94
6 YaST Online Update 99
6.1 The Online Update Dialog .. .. . . .. . .. . ... . .. . ... . .. . ... . .. . .. . . .. . .. . . .. . .. . . 99
6.2 Installing Patches ... . .. . .. . . .. . .. . . .. . .. . . .. . .. . ... . .. . ... . .. . ... . .. . .. . . .. . 102
6.3 Automatic Online Update .. . .. . ... . .. . ... . .. . .. . . .. . .. . . .. . .. . . .. . .. . . .. . .. 103
7 Installing Packages From the Internet 105
7.1 1-Click Install .. . .. . . .. . .. . ... . .. . ... . .. . ... . .. . .. . . .. . .. . . .. . .. . . .. . .. . . .. . .. 105
7.2 YaST Package Search .. .. . .. . . .. . .. . ... . .. . ... . .. . ... . .. . ... . .. . .. . . .. . .. . . . 106
8 Installing Add-On Products 109
8.1 Add-Ons . . .. . .. . ... . .. . ... . .. . ... . .. . .. . . .. . .. . . .. . .. . . .. . .. . . .. . .. . . .. . .. . .. 109
8.2 Binary Drivers . ... . .. . .. . . .. . .. . . .. . .. . . .. . .. . . .. . .. . . .. . .. . ... . .. . ... . .. . ... 110
9 Managing Software with Command Line Tools 111
9.1 Using Zypper . .. . ... . .. . .. . . .. . .. . . .. . .. . . .. . .. . . .. . .. . ... . .. . ... . .. . ... . .. . . 111
9.2 RPM—the Package Manager ... ... . .. . .. . . .. . .. . . .. . .. . . .. . .. . . .. . .. . . .. . .. 120
III Administration 131
10 Managing Users with YaST 133
10.1 User and Group Administration Dialog . .. . ... . .. . ... . .. . .. . . .. . .. . . .. . .. . 133
10.2 Managing User Accounts .... . .. . ... . .. . ... . .. . ... . .. . .. . . .. . .. . . .. . .. . . .. . 134
10.3 Additional Options for User Accounts ... .. . . .. . .. . . .. . .. . . .. . .. . ... . .. . .. 136
10.4 Changing Default Settings for Local Users .. .. . ... . .. . .. . . .. . .. . . .. . .. . . 141
10.5 Assigning Users to Groups . . .. . . .. . .. . . .. . .. . ... . .. . ... . .. . ... . .. . ... . .. . . 142
10.6 Managing Groups .. .. . .. . . .. . .. . . .. . .. . . .. . .. . ... . .. . ... . .. . ... . .. . ... . .. . . 143
10.7 Changing the User Authentication Method .... ... . .. . ... . .. . .. . . .. . .. . . . 144
11 Changing Language and Country Settings with YaST
145
11.1 Changing the System Language .. .. . ... . .. . ... . .. . ... . .. . .. . . .. . .. . . .. . . 145
11.2 Changing the Country and Time Settings ... . .. . . .. . .. . ... . .. . ... . .. . ... . 149
12 YaST in Text Mode 153
12.1 Navigation in Modules .. .. . ... . .. . ... . .. . ... . .. . .. . . .. . .. . . .. . .. . . .. . .. . . . 154
12.2 Restriction of Key Combinations .. . .. . ... . .. . ... . .. . .. . . .. . .. . . .. . .. . . .. . . 155
12.3 YaST Command Line Options .. .. . . .. . .. . . .. . .. . . .. . .. . . .. . .. . . .. . .. . ... . . 155
13 Setting Up Hardware Components with YaST 157
13.1 Hardware Information . . .. . . .. . .. . . .. . .. . . .. . .. . . .. . .. . ... . .. . ... . .. . ... . .. 157
13.2 Setting Up Sound Cards ... . .. . . .. . .. . . .. . .. . . .. . .. . . .. . .. . . .. . .. . ... . .. . .. 157
13.3 Setting Up a Scanner ... . . .. . .. . . .. . .. . ... . .. . ... . .. . ... . .. . ... . .. . .. . . .. . 160
14 Printer Operation 163
14.1 The Workow of the Printing System ... ... . .. . ... . .. . .. . . .. . .. . . .. . .. . . . 164
14.2 Methods and Protocols for Connecting Printers . . . .. . .. . . .. . .. . . .. . .. . .. 164
14.3 Installing the Software .. . .. . .. . . .. . .. . ... . .. . ... . .. . ... . .. . .. . . .. . .. . . .. . . 165
14.4 Setting Up a Printer ... . .. . . .. . .. . . .. . .. . ... . .. . ... . .. . ... . .. . ... . .. . .. . . .. 165
14.5 Network Printers .. .. . . .. . .. . . .. . .. . . .. . .. . . .. . .. . . .. . .. . ... . .. . ... . .. . ... . . 170
14.6 Printing from the Command Line . .. . . .. . .. . ... . .. . ... . .. . ... . .. . .. . . .. . .. 172
14.7 Special Features in openSUSE .... . .. . .. . . .. . .. . . .. . .. . . .. . .. . . .. . .. . ... . . 172
14.8 Troubleshooting .. .. . ... . .. . .. . . .. . .. . . .. . .. . . .. . .. . . .. . .. . . .. . .. . ... . .. . ... 174
15 Installing and Conguring Fonts for the Graphical User
Interface 181
15.1 Adding Fonts ... . .. . .. . . .. . .. . . .. . .. . . .. . .. . . .. . .. . . .. . .. . ... . .. . ... . .. . ... . 181
16 Upgrading the System and System Changes 183
16.1 Upgrading the System ... . .. . .. . . .. . .. . . .. . .. . . .. . .. . ... . .. . ... . .. . ... . .. . 183
16.2 For More Information .... . .. . .. . . .. . .. . . .. . .. . . .. . .. . ... . .. . ... . .. . ... . .. . . 188
IV The Bash Shell 189
17 Shell Basics 191
17.1 Starting a Shell .. ... . .. . ... . .. . .. . . .. . .. . . .. . .. . . .. . .. . . .. . .. . ... . .. . ... . .. 191
17.2 Entering Commands .. .. . . .. . .. . . .. . .. . . .. . .. . ... . .. . ... . .. . ... . .. . .. . . .. . 192
17.3 Working with Files and Directories .. .. . ... . .. . .. . . .. . .. . . .. . .. . . .. . .. . . .. 195
17.4 Becoming Root . .. . . .. . .. . . .. . .. . . .. . .. . . .. . .. . . .. . .. . ... . .. . ... . .. . ... . .. . 199
17.5 File Access Permissions ... . .. . . .. . .. . ... . .. . ... . .. . ... . .. . ... . .. . .. . . .. . .. 200
17.6 Useful Features of the Shell .. . .. . .. . . .. . .. . . .. . .. . . .. . .. . . .. . .. . ... . .. . .. 205
17.7 Editing Texts ... . .. . .. . ... . .. . ... . .. . ... . .. . ... . .. . .. . . .. . .. . . .. . .. . . .. . .. . . 208
17.8 Searching for Files or Contents .... . . .. . .. . ... . .. . ... . .. . ... . .. . .. . . .. . .. . 209
17.9 Viewing Text Files . .. . ... . .. . .. . . .. . .. . . .. . .. . . .. . .. . . .. . .. . ... . .. . ... . .. . .. 211
17.10 Redirection and Pipes .. . . .. . .. . . .. . .. . . .. . .. . . .. . .. . ... . .. . ... . .. . ... . .. . 211
17.11 Starting Programs and Handling Processes . . .. . . .. . .. . ... . .. . ... . .. . .. 213
17.12 Important Linux Commands ... . .. . .. . ... . .. . ... . .. . ... . .. . ... . .. . .. . . .. . 214
18 Bash and Bash Scripts 225
18.1 What is “The Shell”? .. .. . .. . . .. . .. . . .. . .. . ... . .. . ... . .. . ... . .. . .. . . .. . .. . . 225
18.2 Writing Shell Scripts .... . .. . .. . . .. . .. . . .. . .. . . .. . .. . . .. . .. . . .. . .. . ... . .. . .. 230
18.3 Redirecting Command Events .. .. . .. . . .. . .. . . .. . .. . . .. . .. . ... . .. . ... . .. . . 231
18.4 Using Aliases . .. . .. . . .. . .. . ... . .. . ... . .. . ... . .. . ... . .. . .. . . .. . .. . . .. . .. . . .. 232
18.5 Using Variables in Bash ... . . .. . .. . . .. . .. . . .. . .. . ... . .. . ... . .. . ... . .. . .. . . . 232
18.6 Grouping And Combining Commands ... . .. . ... . .. . .. . . .. . .. . . .. . .. . . .. . . 235
18.7 Working with Common Flow Constructs ... .. . . .. . .. . . .. . .. . ... . .. . ... . .. 235
18.8 For More Information .... . .. . .. . . .. . .. . . .. . .. . . .. . .. . ... . .. . ... . .. . ... . .. . . 236
A Help and Troubleshooting 237
A.1 Help and Documentation ... .. . . .. . .. . . .. . .. . ... . .. . ... . .. . ... . .. . .. . . .. . .. . 237
A.2 Common Problems and Their Solutions .... . .. . ... . .. . ... . .. . .. . . .. . .. . . .. 241
A.3 Legal Notice .. . .. . .. . . .. . .. . . .. . .. . . .. . .. . . .. . .. . ... . .. . ... . .. . ... . .. . ... . .. . 269
A.4 GNU Free Documentation License . . .. . . .. . .. . . .. . .. . . .. . .. . ... . .. . ... . .. . . 269
About This Guide
This manual will see you through your initial contact with openSUSE®. Check out
the various parts of this manual to learn how to install, use and enjoy your system.
Installation and Basics
Guides you through the installation process and the basic conguration of your
system. Introduces YaST, the central tool for installation and conguration of your
system. Learn how to set up or modify key components of your system and how
to connect to the internet.
Basics
This part mainly addresses to users changing to Linux from other operating sys-
tems. It introduces basic Linux concepts such as the user concept, the structure
of the le system and access permissions for les and directories. An introduction
to the shell is also provided, although you hardly ever need the command line to
interact with your system nowadays.
Help and Troubleshooting
Provides an overview of where to nd help and additional documentation in case
you need more information or want to perform specic tasks with your system.
Also nd a compilation of the most frequent problems and annoyances and learn
how to solve these problems on your own.
Many chapters in this manual contain links to additional documentation resources.
This includes documentation that is available on the system as well as documentation
available on the Internet.
For an overview of the documentation available for your product and the latest doc-
umentation updates, refer to http://doc.opensuse.org/ or to the following section.
1 Available Documentation
We provide HTML and PDF versions of our books in dierent languages. The following
manuals for users and administrators are available on this product:
Start-Up (page i)
Guides you step-by-step through the installation of openSUSE from DVD, or from
an ISO image, gives short introductions to the GNOME and KDE desktops including
some key applications running on it. Also gives an overview of LibreOce and its
modules for writing texts, working with spreadsheets, or creating graphics and
presentations.
Reference (↑Reference)
Gives you a general understanding of openSUSE and covers advanced system
administration tasks. It is intended mainly for system administrators and home
users with basic system administration knowledge. It provides detailed information
about advanced deployment scenarios, administration of your system, the inter-
action of key system components and the set-up of various network and le ser-
vices openSUSE oers.
Security Guide (↑Security Guide)
Introduces basic concepts of system security, covering both local and network
security aspects. Shows how to make use of the product inherent security software
like AppArmor (which lets you specify per program which les the program may
read, write, and execute) or the auditing system that reliably collects information
about any security-relevant events.
System Analysis and Tuning Guide (↑System Analysis and Tuning Guide)
An administrator's guide for problem detection, resolution and optimization. Find
how to inspect and optimize your system by means of monitoring tools and how
to eciently manage resources. Also contains an overview of common problems
and solutions and of additional help and documentation resources.
Virtualization with KVM (↑Virtualization with KVM)
This manual oers an introduction to setting up and managing virtualization with
KVM (Kernel-based Virtual Machine) on openSUSE. Also shows how to manage
VM Guests with libvirt and QEMU.
Find HTML versions of most product manuals in your installed system under /usr/
share/doc/manual or in the help centers of your desktop. Find the latest documentation
updates at http://www.suse.com/documentation where you can download PDF or
HTML versions of the manuals for your product.
2 Feedback
Several feedback channels are available:
Bugs and Enhancement Requests
To report bugs for a product component, or to submit enhancement requests,
please use https://bugzilla.novell.com/. For documentation bugs, submit a
bug report for the component Documentation of the respective product.
If you are new to Bugzilla, you might nd the following articles helpful:
http://en.opensuse.org/openSUSE:Submitting_bug_reports
http://en.opensuse.org/openSUSE:Bug_reporting_FAQ
User Comments
We want to hear your comments about and suggestions for this manual and the
other documentation included with this product. Use the User Comments feature
at the bottom of each page in the online documentation or go to http://www.suse
.com/documentation/feedback.html and enter your comments there.
x Start-Up
Mail
For feedback on the documentation of this product, you can also send a mail to
doc-team@suse.de. Make sure to include the document title, the product version
and the publication date of the documentation. To report errors or suggest en-
hancements, provide a concise description of the problem and refer to the respec-
tive section number and page (or URL).
3 Documentation Conventions
The following typographical conventions are used in this manual:
/etc/passwd: directory names and lenames
placeholder
: replace
placeholder
with the actual value
PATH: the environment variable PATH
ls, --help: commands, options, and parameters
user: users or groups
[Alt], [Alt] + [F1]: a key to press or a key combination; keys are shown in upper-
case as on a keyboard
File, File > Save As: menu items, buttons
Dancing Penguins (Chapter Penguins, ↑Another Manual): This is a reference to
a chapter in another manual.
4 About the Making of This Manual
This book is written in Novdoc, a subset of DocBook (see http://www.docbook.org).
The XML source les were validated by xmllint, processed by xsltproc, and converted
into XSL-FO using a customized version of Norman Walsh's stylesheets. The nal PDF
is formatted through XEP from RenderX. The open source tools and the environment
used to build this manual are available in the package daps that is shipped with
openSUSE. The project's home page can be found at http://daps.sf.net/.
5 Source Code
The source code of openSUSE is publicly available. Refer to http://en.opensuse.org/
Source_code for download links and more information.
6 Acknowledgments
With a lot of voluntary commitment, the developers of Linux cooperate on a global
scale to promote the development of Linux. We thank them for their eorts—this
About This Guide xi
distribution would not exist without them. Furthermore, we thank Frank Zappa and
Pawar. Special thanks, of course, goes to Linus Torvalds.
Have a lot of fun!
Your SUSE Team
xii Start-Up
Part I. Installation and Basics
1 Installation Quick Start
Use the following procedures to install a new version of openSUSE® 12.2. This doc-
ument gives a quick overview on how to run through a default installation of open-
SUSE.
1.1 Welcome to openSUSE
For more detailed installation instructions and deployment strategies, see the
openSUSE documentation at http://doc.opensuse.org/.
1.2 System Requirements
Pentium* III 500 MHz or higher processor (Pentium 4 2.4 GHz or higher or any
AMD64 or Intel* EM64T processor recommended)
512 MB physical RAM (1 GB recommended)
3 GB available disk space (more recommended)
800 x 600 display resolution (1024 x 768 or higher recommended)
1.3 Installing openSUSE
Use these instructions if there is no existing Linux system on your machine, or if you
want to replace an existing Linux system.
1 Insert the openSUSE DVD into the drive, then reboot the computer to start
the installation program.
Installation Quick Start 3
2 Select Installation on the boot screen and press [Enter]. This loads the
openSUSE installation program and starts the installation in normal mode.
3 Select the language and the keyboard layout to be used during the instal-
lation and for the installed system.
Read the License Agreement and proceed with Next if you agree. If you
do not agree, press Abort to terminate the installation.
4 Start-Up
4 Select New Installation and proceed with Next.
5 Either use the map or the drop down lists for Region and Time Zone to
select the clock and time zone to use in your system. Proceed with Next.
Installation Quick Start 5
6 Select the desktop system you would like to use. KDE and GNOME, are
powerful graphical desktop environments similar to Windows, alternative
selections are available when checking Other. Proceed with Next.
7 Dene a partition setup for openSUSE in this step. In most cases a reason-
able scheme that can be accepted without change is proposed. Accept
the proposal with Next and proceed with the installation. Experienced
users can also customize the proposal (Edit Partition Setup) or apply their
own partitioning scheme (Create Partition Setup).
6 Start-Up
8 Type your rst and last name in the User’s Full Name eld, your login name
in the Username eld, and your password in the Password eld.
For security reasons, your password should be at least eight characters
long and should contain uppercase and lowercase letters and numbers.
Passwords are case-sensitive. Proceed with Next.
By default, the password you enter here is also used for the system admin-
istrator, root. Uncheck Use this password for system administrator if you
prefer to specify a dierent password for root in the next step.
With automatic login enabled, the system boots straight to your desktop
with no authentication at all. If you store sensitive data on your system,
you should not enable this option as long as the computer can also be
accessed by others.
Installation Quick Start 7
9
Type a password for the system administrator account (called the root
user). This step is skipped in case you had activated Use this Password
for System Administrator in the previous step.
You should never forget the root password. After you enter it here, the
password cannot be retrieved. It can only be reset with administrative
assistance. Proceed with Next.
10 Use the Installation Settings screen to review your choices as well as some
automatically proposed settings. If necessary, change the settings.
Click Install to proceed. Depending on your software selection you may
have to accept additional license agreements by clicking Accept. Before
the actual installation starts you will see the following screen:
8 Start-Up
11 Click Install to start the installation.
12 The installation usually takes between 15 and 30 minutes, depending on
the system performance and the selected software scope. During the in-
stallation you may either view the product presentation, the release notes
containing last-minute information, or the detailed installation log.
13 After completing the installation of all selected software packages and the
basic system setup, the openSUSE installation boots into the new Linux
system, to perform the automatic system conguration. This routine con-
gures your network and Internet access and sets up your hardware. This
process does not need any interaction.
Installation Quick Start 9
14 If you have chosen the automatic login function, the desktop directly starts.
Otherwise you will see the login screen. Select your username, and type
your password in the Password eld. Press [Enter] to log in.
10 Start-Up
2 KDE Quick Start
openSUSE® oers all tools which Linux* users require for their daily activities. The
product is supplied with a user-friendly graphical environment (KDE* Desktop) which
communicates with the basic Linux system in order to access les, folders, and pro-
grams and manage them. openSUSE oers an integrated suite of applications for a
broad range of activities (Oce, multimedia, Internet). The LibreOce suite is also
included. This enables you to edit and save les in many formats. As LibreOce is
available for dierent operating systems, you can use the les you have created
with it on several computer platforms.
2.1 Getting Started
When you start your system, you are usually prompted to enter your user name and
password. If you have not installed your system yourself, ask your system adminis-
trator for the user name and password.
The KDE Desktop appears after rst logging into KDE. Its appearance depends on
whether openSUSE® could activate the 3D functions of your graphics card. Optics
and functionality in both cases are the same, only the operation diers slightly.
2.2 The Standard KDE Desktop
When you log into KDE for the rst time, the KDE desktop is displayed which contains
the following basic elements:
KDE Quick Start 11
Desktop folder: The content of the ~/Desktop Directory is displayed as standard
on the milk glass surface on the top left. Any le placed in this directory also appears
in this view.
Desktop context menu: Right-click on an empty area on the desktop in order to
access the Context menu which you can use to change the appearance of the desktop,
add the desktop control bars or mini programs (widgets), congure desktop settings,
x mini programs in the current position (lock), lock the screen or terminate the
current session.
Toolbox: Click on the icon at the very top right of the desktop with the mouse to
access the menu which you can use to add or lock mini programs.
KDE control bar: As standard, the control bar on the lower edge of the KDE
desktop contains the icon for the Main Menu on the left side and further mini programs
and program icons and the icon for the control bar settings on the right side. A short
description of the icon is displayed when you point the mouse pointer at an icon in
the control bar.
Main menu: Click in the lower control bar on the left to open the main menu. The
Main Menu consists of the following elements: a search function at the top and dif-
ferent tabs below, which oer rapid access to the key menu functions. Your registra-
tion name and the host name of the computer are also displayed in the menu.
12 Start-Up
2.3 Starting programs
Start programs in the Main Menu, in the command line with the help of a shell or the
Execute a command option. Programs can also be launched from the desktop or the
control bar by clicking once on the program icon with the left mouse button.
2.3.1 Using the main menu
To open the Main Menu, click on the Main Menu icon in the control bar or press [Alt]
+ [F2].
A standard selection of pre-programmed shortcuts for quick access is displayed under
Favorites All the applications installed in your system can be seen under Applications.
Click on the relevant entry to navigate through the menu structure. You can return
via the breadcrumb menu (the light gray text directly at the top right above the
menu points). You only need to click on a previous menu point there. To jump back
to Start, select All programs. The Computer and History tabs provide fast access to
frequently used storage locations, applications, and documents. Under Quit you can
nd various options for ending the session, such as logging o, locking the screen
(further access is only possible with a password), shutting down and restarting the
computer. Some computers oer to put your session on RAM or a data medium into
deep sleep mode.
KDE Quick Start 13
If you use a program often and do not want to access it through the menu structure
every time, you can add its icon to the Favorites tab. To do so, right-click on any
other tab in the program and select Add to Favorites.
2.3.2 Use the “Execute command” dialog box“
KRunner is a helper application which lets you quickly start programs. It also oers
a search function to search for applications or storage locations.
Press [Alt] + [F2] to open the Execute command dialog box. Enter a command, for
example dolphin. Even during input, a list of applications or actions is displayed in
the dialog box which match your entry. Select one of the results, or press [Enter] to
start the highlighted application or action. The command to start is often (but not
always) the application name written in lower case letters.
In the Execute command dialog box you can use dierent functions: Click on the
question mark icon to display a list of active functions. To edit or retrieve a list of all
functions, click on the spanner icon. You can use so-called web key shortcuts which
are dened in Konqueror to send search enquiries directly to a search engine without
needing to open the browser beforehand. Another interesting function is the calcula-
tion of a mathematical expression such as =2+2^4-sin(2). The conversion of units,
such as from miles per hours to kilometers per hour, is also very useful. Simply enter
the expression 60 mph in km/h to retrieve the converted value.
2.3.3 Search for Programs
Both the Main Menu and the Execute command dialog box oer a search function
which enables you to start programs quickly, even if you do not know the exact ap-
14 Start-Up
plication name or command. To search for an application, start from the Main Menu
by entering a command or a part of the application name in the Search box or in the
input eld in the Execute command dialog box. Every character entered restricts the
search.
Select the application from the list below the input eld which corresponds to your
query.
2.4 Handling Media
When you place a CD or DVD into the drive, or connect a USB stick or an external
hard drive, the widget opens a small window for device notication which noties
you of the process. Possible actions for the respective type of device are also sug-
gested.
For example, if you connect a digital camera, you can download your photos with
Gwenview (image viewer) or digiKam (image management program). Click on the
device entry in the widget to access the available actions. To securely remove the
device from the computer, click on the icon to the right of the device entry (the cable
icon or the eject button).
2.5 Adapt your desktop
You can tailor the appearance and behavior of your KDE desktop to your personal
requirements.
2.5.1 Fixing and approving desktop objects
Desktop elements can be xed in the current position to prevent them moving to
and from on the desktop. This does not aect the program windows, but only elements
which are directly on the desktop such as the mini programs or program icons. When
the desktop elements are xed, no objects can be added to the desktop, moved or
removed.
KDE Quick Start 15
Click on the Cashew icon (toolbox) in the top right of the desktop to x or release
the desktop elements and select Lock mini programs or Unlock mini programs.
Alternatively, right-click on an empty space on the desktop and select Lock mini
programs or Unlock mini programs.
2.5.2 Changing individual desktop elements
In the following sections you will nd some examples of how individual desktop ele-
ments can be changed.
Procedure 2.1: Adding program icons to the desktop
Proceed as follows to create a link to an application and to place it on the desktop
or the control bar:
1 Click on the Main Menu and search for the desired application.
2 Right-click on the Add to desktop option in the displayed context menu to
select it. If this menu entry is not available, your desktop elements are prob-
ably xed. Release these rst, as described in Section 2.5.1, Fixing and ap-
proving desktop objects” (page 15).
3 To change the position of icon symbol on the desktop, click on the icon with
the left mouse button and drag it to the desired location.
If you want to delete an icon from the desktop, right-click on the program icon and
select Remove icon.
Procedure 2.2: Adding mini programs on the desktop or on the control bar
1 To add mini programs to your desktop Right-click on an empty space
on your desktop and select Add mini programs.
To add a mini program to your control bar Right-click on an empty space
on the control bar and select Control bar Settings > Add mini programs.
If these menu entries are not available, your desktop elements are probably
xed. In this case, rst right-click on the control bar and select Unlock mini
programs.
2 Select a mini program from the displayed list. Search through the available
mini programs with the help of the scroll bar. To restrict the selection of mini
programs either input a search term in the input eld or select a category.
3 To display the selected mini program on the desktop or on the control bar,
click it with the left mouse button, keep the button depressed and drag the
symbol to its envisaged position. Then release the left mouse button again.
The mouse pointer turns into a prohibited symbol in locations where it is im-
possible to place the mini program.
16 Start-Up
4 To remove a mini program from the desktop or the control bar, right-click on
the mini program and select Remove....
Procedure 2.3: Conguring mini programs
1 Hold the mouse pointer over a mini program until a translucent frame appears
around the mini program which displays a row of icons:
If the frame does not appear, your mini programs are probably xed. Release
these rst, as described in Section 2.5.1, “Fixing and approving desktop ob-
jects” (page 15).
2 To change the size of the mini program, click on the ruler symbol in the frame
with the left mouse button and keep the mouse button depressed while you
slowly move the pointer over the desktop.
3 To rotate the mini program in one direction, click on the curved arrow symbol
in the frame with the left mouse button and keep the mouse button depressed
while you drag the mouse pointer in a circular motion over the desktop. There
is a locking limit on the horizontal and vertical positions to which you can
“ax” the mini program if necessary. Of course, you can also place it in any
appropriate position.
4 To change the content, the settings or the properties of a mini program, click
on the spanner icon in the frame with the left mouse button. Determine the
options as desired in the conguration dialog box which is now displayed.
Control bars are available to gain more space for your own programs.
Procedure 2.4: Adding and removing control bars
1 Right-click on an empty space on the desktop, select Add control bar, and a
control bar type from the list.
If these menu entries are not available, your desktop elements are probably
xed. In this case, rst right-click and select Unlock mini programs.
KDE Quick Start 17
2 Click on the Cashew icon at the end of the new control bar to access the
conguration options and adapt the control bar as described in Procedure 2.5,
Conguring control bars” (page 18).
3 To delete a control bar, right-click on an empty space in the control bar for
deletion and select Control bar Settings > Remove "control bar”. At least one
control bar must remain on the desktop in openSUSE.
Procedure 2.5: Conguring control bars
Applications and mini programs can be added in the main control bar or other
control bars. Control bar elements and other control bars can be shifted to dierent
positions or removed if necessary.
1 In order to access options for the current control bar, right-click on an
empty space in the control bar and select Settings for control bar > Control
bar settings. It is quicker if you click on the cashew icon at the very right
of the bar. In any case, the view of the control bar changes and the con-
guration options are displayed.
If the menu entry and the icon is not available, your desktop elements are
probably xed. To unlock, rst right-click on the control bar and select
Unlock mini programs.
2 In order to move objects in the control bar to another position in the control
bar, point to the desired control bar object with the mouse cursor (e.g.
program icon, desktop toggle, task manager, system section for control
bar). The mouse pointer takes the form of a cross. Click on the object and
drag the element to the desired position in the control bar. Click again to
x it in this position.
3 To increase the distance between two mini programs, use Add spacers. A
spacer mini program is displayed on the right hand side. Drag it to the
preferred location and leave it there.
4 To change the width of the control bar, click on the small arrow icon on
the left and right hand side of the settings control bar. With the arrow on
the left hand side you can determine the position of the control bar and
with the arrows on the right hand side you can determine the maximized
and minimized size.
5 To change the height of the control bar, left-click on the Height button and
drag to the desired nal position.
6 With the help of the Screen edge button, position the control bar on one
side of the screen. Drag the control bar into the desired position using
drag and drop.
18 Start-Up
7 If you need additional mini programs in your control bar, you can add them
using the Add mini programs button as described in Procedure 2.2, Adding
mini programs on the desktop or on the control bar (page 16).
8 To remove program icons or mini programs from the control bar, right-
click on the object in question and select the menu entry to remove the
icon or mini program.
The icons in the system section of the control bar normally belong to ap-
plications which are executed in the background. You can therefore only
remove these icons once you have closed these applications (click on the
icon and select End).
9 Further conguration options (e.g. orientation) and further functions (e.g.
automatic masking) can be found under Advanced settings.
10 When all control bar settings meet your requirements, close the control
bar settings with the red button on the right hand side.
Procedure 2.6: Changing the Desktop Background
You can set the desktop background in such a way that images, slide shows, samples
or colors are displayed. Even a world map or the weather forecast can be used as
a desktop background.
1 Right-click on an empty space on the desktop and select Desktop settings. A
conguration window is opened.
2 In the View section select a type from the Background image dropdown list.
Further conguration options are dependent on the object you have selected
for the background.
3 In order to use an image as a background, proceed as follows:
3a Choose the Image option under Background image.
3b Dene the Positioning of the image.
3c Use one of the available background images by selecting the desired
background in the list, or click on Download new background images
to obtain further background images from the Internet.
3d To use a user-dened image, click on Open and select an image le
from the le system.
KDE Quick Start 19
4 Determine the other options in the conguration dialog box according to your
wishes and click on OK to save your changes and close the conguration dialog
box.
2.5.3 Modify personal settings
Apart from changing individual desktop elements, you can adapt your desktop with
KDE to your precise requirements. Options for adapting the entire appearance and
behavior of your desktop can be found in the System settings conguration dialog
box.
Launch System settings in the Main Menu by selecting Favorites > System settings.
The settings are sub-divided into dierent categories. Hover the mouse on an icon
to see further details. You need system administrator rights for some tasks in system
settings (root).
20 Start-Up
Change the settings as desired. Changes only become eective when you click on
Apply. Click on Restore to discard changes in the last view which have not yet been
applied. In order to restore all elements in the last view to standard values, click on
Default settings.
To return to the initial display (with all categories), click in the top left of the dialog
box on Overview. You can also input search terms at the top of the window (for ex-
ample Screensaver) to nd the category which contains options that match the search
text. Each character you enter in the Search eld further restricts the search. The
icon of the category found is highlighted in a dierent color.
For a more simple overview of all categories, you can change to a tree view by
clicking on Create and selecting a dierent View design.
2.6 Application of desktop eects
If your computer supports a 3D graphics card, you can use graphic eects, such as
converting the desktop to a rotating 3D dice, activating translucent or transparent
windows or maximizing and minimizing the desktop screen. You can also use other
window eects such as Shadow, Blending in and Remodeling. If you do not have a
3D graphics card, some eects may be disabled or can slow down your system. If
your system is too slow, disable the eects for the current session by pressing [Alt]
+ [Shift] + [F12].
Congure the eects of your desktop as follows:
1 Start the System settings as described in Section 2.5.3, “Modify personal
settings” (page 20).
KDE Quick Start 21
2 Select Desktop eects from the Desktop appearance and behavior category,
and select Activate desktop eects upon system start. If your graphics card
does not support the 3D function, you are notied accordingly.
3 Optional: Change some options under General settings on the Advanced tab.
4 Select the eects to be activated on the All eects tab. When you click on the
information icon, a short explanation on the respective eect is superimposed.
If an eect is activated, you can obtain access to further conguration options
with the spanner icon (right), for example to assign keyboard shortcuts for
the eect.
5 With Apply you can activate the eects permanently.
2.7 Use of virtual desktops
The desktop environment enables you to organize your programs and tasks on sev-
eral virtual desktops. If you often run a lot of programs simultaneously, this minimizes
the number of windows to arrange on your screen. For example, you can use a
desktop for e-mails and the calendar and another desktop for text processing or
graphic applications.
Procedure 2.7: Moving an application to another virtual desktop
You can display a currently executed application on one or all virtual desktops or
move them to other desktops.
1 Open the application.
2 Right-click on the title bar of the application.
3 Click on On Desktop.
4 Select the desktop where the application should be placed.
5 Click on the desired desktop in the desktop toggle switch in the control bar
in order to change to a certain desktop. Change to the next or previous
desktop by placing the mouse pointer in an empty space on the desktop and
moving the mouse wheel.
Procedure 2.8: Conguring the virtual desktop
You can increase the number of virtual desktops, change standard names, assign
activities, congure eect animations and assign keyboard shortcuts to switch
virtual desktops.
1 To add additional desktops, right-click on the desktop toggle switch in the
control bar and select Add virtual desktop. A new desktop is displayed in the
desktop toggle switch.
22 Start-Up
2 If conguration options are available, right-click on the desktop toggle switch
and select Desktop toggle switch settings.
3 You can congure the appearance of the desktop toggle switch in the control
bar with the options in the General category.
4 Desktop names, key combinations to change between desktops, and the
switchover type can be congured in the Virtual Desktops category.
5 Determine the desired options and click on OK. The changes are adopted and
the conguration dialog box is closed.
2.8 Management of les and folders
In KDE 4, Konqueror has been replaced by Dolphin as a standard le manager. Kon-
queror will continue to be used as a web browser (information regarding this can be
found in Section 2.9, “Browsing on the Internet” (page 27)). Start Dolphin in the main
menu by selecting Favorites > File manager or pressing [Alt] + [F2] and entering
dolphin.
2.8.1 Dolphin main window
The Dolphin main window consists of the following elements:
KDE Quick Start 23
Menu bar: Call the main menu up via the spanner icon. All possible functions are
ready there, such as copying, moving or deletion of les, changing view, starting of
further tools, changing settings and calling up help.
Symbol bar: The symbol bar accelerates the navigation and changing of the display.
The relevant functions can also be called up via the main menu. If the mouse pointer
is positioned over an icon for a moment, a short description of the icon is displayed.
Address bar: The address bar displays the path to the current directory. It is
available in two versions: one displays the path to the current directory with buttons
for each superordinate folder. Click on a directory name in this view in order to change
to this directory. The second version of the address bar displays the path to the
current directory as a text chain which can be edited.
Fields: The Places sidebar is displayed in Dolphin as standard. It enables rapid
access to frequently used places such as your home directory, the root directory of
the le system (/), the Recycle Bin, and removable media. You can add further dif-
ferent control bars in the main menu under View > Side bars .
Display eld (work area): The content of the selected directory or the selected
le is displayed in the display eld. Dolphin shows the content of your home directory
as standard at the start. By clicking on a folder in Dolphin an action is started directly
as standard: Dolphin loads the le into an application or opens the folder for further
processing.
Status bar: Shows the le type and the size of the currently selected object and
enables maximization and minimization of the icons or entries in the display eld
via the slider.
24 Start-Up
2.8.2 Management of folders and les in Dolphin
To perform actions such as copying, moving, creating or deleting les, you require
the relevant rights for the respective folders and les.
To copy, move or delete a le or a folder proceed as follows:
1 To select one or several les and folders in Dolphin move the mouse pointer
over the le or folder, but do not click on it. A green cross appears on the left
upper edge. The object is selected when you click on it. To clear the selection,
click on the red minus sign which is displayed when the object is selected.
Alternatively, press [Ctrl] and click on the objects which should be selected
or unselected.
2 Right-click and select Copy or Cut in the context menu.
3 Navigate to the target folder where you wish to insert the object.
4 To create a new folder at the current location, right-click in the display eld
and select Create > Folder or press [F10]. Enter a folder name in the new
window and press [Enter].
5 In order to insert the copied or cut object in Step 2 (page 25), right-click on
the target folder in the main display eld and select Insert. The object is copied
or moved into this folder.
6 To delete a le or a folder, right-click in the main display eld on the object
and select Send to Recycle Bin in the context menu. The object is moved to
the bin. You can retrieve it from there or permanently delete the object if
necessary.
In order to quickly lter for certain le names in the current directory, press [Ctrl] +
[I] to add the Filter input eld at the bottom of the Dolphin main window. Enter any
part of the le name for which you are searching to see all les in the current direc-
tory which contain the chain of characters searched for. Press [Ctrl] + [F] to use the
desktop search for detailed and advanced search. You can nd further information
on this in Section 2.15, “Search for data (with Strigi)” (page 35).
2.8.3 Conguration of Dolphin
Dolphin oers many options for changing the view and the options as a whole to suit
your preferences.
Procedure 2.9: Changing the view
1 To change from standard view to the editable version of the address bar, press
[F6]. Enter a path to a directory. After inputting an address, press [Enter] or
click the green hook on the right adjacent to the input eld.
KDE Quick Start 25
To delete the content in the address bar click on the right on the black X icon.
To change back to the standard view, press [Ctrl] + [L].
2 To change the view of the currently displayed folder click on one of the relevant
icons in the icon bar (fourth, fth and sixth from the left). Dolphin retains the
selected view for each folder. Press [F3] to display the content of the current
folder in two separate columns. You can now navigate to a dierent directory
in each column and easily drag or position objects or compare the contents
of directories. Press [F3] again to close the split pane.
3 If you want Dolphin to display hidden les, click on the spanner icon to open
the main menu and choose Show hidden les. (If you have enabled the menu
bar, instead use View > Show hidden les.)
4 To display further details on the les (such as access rights or ownership),
select Additional Information in the main menu behind the spanner icon and
activate the relevant options.
5 To add further directories to the Places sidebar, drag a folder from the desktop
into the Places sidebar and position it there Right-click on the context menu
and use it to hide, edit, or remove entries from Places.
6 To add further sidebars to the main window, select Sidebars behind the
spanner icon in the main menu and then further sidebars such as Folders or
Terminals.
26 Start-Up
Separate the sidebars from Dolphin’s main window by clicking the name of the
sidebar and then dragging it to another location on the desktop. If the sidebar has
no title it is locked. In such a case, right-click in a free area on the sidebar and then
select Unlock sidebars. to integrate the sidebar into Dolphin’s main window again,
double-click on the name of the sidebar again.
Procedure 2.10: Changing the overall behavior of Dolphin
To change the behavior or the view of Dolphin as a whole, select Set up Dolphin in
the main menu behind the Spanner icon and view the options oered in Dolphin’s
conguration catalog.
1 If a certain view mode should apply to all folders, click on General in the left
sidebar and activate Use the same view for all folders. Click on Views in the
left sidebar and adapt the options for the dierent views. Click on Apply to
save the changes.
2 If Dolphin displays another directory on startup, or if you want to use the ed-
itable address bar constantly, click on Start in the left sidebar and change the
relevant options.
3 To congure the entries and services displayed in Dolphin’s context menu,
click on General. Activate the entries to be displayed on the Context menu
tab. Click on Services in the left sidebar and activate or disable the relevant
services to be displayed in the context menu.
4 Click on OK to accept the changes and close the Dolphin conguration dialog
box.
2.9 Browsing on the Internet
Apart from Konqueror (the standard KDE web browser) openSUSE also contains the
Firefox web browser. To start Konqueror or Firefox, press [Alt] + [F2] and enter
konqueror or firefox.
Both browsers oer support for modern web standards, the use of tabs, a pop-up
blocker, and download and image management. Simple access to dierent search
engines helps you in searching for required information.
KDE Quick Start 27
Enter the URL in the address eld to start browsing. Press [Ctrl] + [T] to open a new,
empty tab. To open a link in a new tab, click on the link with your middle mouse
button. When you right-click on the tab, a menu with tab options is superimposed.
This menu allows you to create new tabs, reload the content of a certain tab or all
available tabs and close tabs. You can also change the sequence of the tabs by
dragging it to the desired position and leaving it there.
2.9.1 Finding Information
Firefox oers two dierent types of search options: You can search for information
on the web or on the current webpage using certain terms.
Procedure 2.11: Searching the web
1 To start a search on the web, click on the left icon on the right of the search
bar (adjacent to the places bar) to open a list of search engines.
2 Select the desired search engine and enter your search terms into the input
eld.
3 Press [Enter] to start the search process.
4 If you want to search the current webpage with Firefox or Konqueror, press
[Ctrl] + [F] to display a search bar at the bottom of the window. Enter your
search term there and start the search with the buttons below the search bar
in dierent directors or congure the search options, for example Upper/Lower
case.
Konqueror oers predened web key combinations to quickly search the web. To
search for yast, for example, on the web using the Google search engine enter
28 Start-Up
gg:yast in Konqueror’s address bar (or the Execute command dialog box) and press
[Enter].
You can also dene individual Web key combinations in Konqueror and Firefox as
described in Section 2.9.3, Conguring Preferences” (page 29).
2.9.2 Downloading Files from the Web
When you download a le with Firefox or Konqueror, a dialog box is opened in which
you are requested whether you want to save the le or open it with a certain appli-
cation. Also specify whether the selected action should apply to all les of this type.
Firefox saves the le in the folder congured in the Firefox settings as standard and
shows the completed downloads in the Downloads dialog box.
To open the downloaded les directly from there, right-click on Open to select the
option. To clear the history of downloaded les, click on Empty list.
2.9.3 Conguring Preferences
Changing the settings in Konqueror or Firefox. Access the conguration dialog box
in Konqueror by selecting Settings > Set up Konqueror. To change the behavior of
Konqueror as a web browser, select one of the sub-categories in Surng the Internet
in the left navigation area to display the options for the relevant category. For exam-
ple, you can “hide” the true identity of Konqueror and identify Konqueror as another
browser (such as, Internet Explorer*) for certain websites you visit. To do so, select
Browser recognition and click on New in order to add a new, page-specic identica-
tion.
Perhaps you would also like to congure the web key shortcut you can use with
Konqueror (and the Execute command dialog box). Click on Web shortcut in the
conguration dialog box of Konqueror to display the currently dened key shortcut.
KDE Quick Start 29
Click on New to dene new key shortcuts. Press OK to close the conguration dialog
box of Konqueror and apply the changes.
Select Edit > Settings in Firefox to open the Firefox settings. Click on the symbols
in the upper display eld in order to access the options for the relevant category.
For example, change the standard download folder on the General page or change
the blocking of pop-up windows on the Content page. Click on Close to accept the
changes.
Navigate to the website with the desired search eld to congure a web key combi-
nation for a search in Firefox. Right-click on the search eld and select Add keyword
for this search.... Enter a Keyword and close the dialog box by pressing OK.
2.10 Managing Passwords
When you input a password in a KDE application for the rst time (for example in
KMail or in Konqueror), you are asked if you want to save the password. If you click
on Yes, the KWallet assistant starts as standard. KWallet is a password management
tool which can collect all passwords and save them in one or more encrypted les
(so-called “Wallets”).
To activate the KWallet, select Basic set-up, and click on Advanced. Select Yes, I
want to use the KDE digital wallet for my personal information. Then assign a master
password to the standard wallet (kdewallet), which is created in the next step.
WARNING: Protect your password for KWallet
If you forget your master password for a wallet, this password cannot be recreated.
Also, everyone who knows your password can look inside your wallet.
Click on Finish to close the assistant. If you originally started the KWallet assistant
via a dierent application such as Konqueror or KMail, you are requested in KWallet
to re-enter the password so that the password can be saved in the newly created
30 Start-Up
wallet for this application. After the rst conguration you can open KWallet at any
time to display, search for, delete or create entries. Entering passwords manually is
not usually necessary. KDE recognizes when a resource needs to be authenticated
and KWallet starts automatically and asks you to enter your KWallet password.
However, you can also add additional data if you wish. To congure the KWallet op-
tions, press [Alt] + [F2] and enter kwalletmanager. The Service program for digital
wallets is opened. If the window does not appear, take a look at the system section
of the control bar (on the left adjacent to the clock). If necessary, expand all hidden
applications via the small triangle. Then click on the Service program for digital
wallets or on the relevant icon. The window of the application should then open. Select
Settings > Set up digital wallet.
While KWallet is set up in such a way that passwords for dierent KDE applications
are managed centrally, Firefox also oers the option of saving data on a website
when a user name and password are entered. When you accept this, by clicking on
Save the password is saved on your hard drive in an encrypted format. Firefox lls
out the registration errors automatically when this website is next accessed.
To verify or manage your passwords in Firefox, click on Edit > Settings > Security
> Stored passwords....
2.11 E-mail and Calendar
You can use Kontact as your personal information management (PIM) tool to read
and manage your e-mails and events. Kontact combines KDE applications such as
KMail, KOrganizer and KAddressBook in a single interface. This facilitates access to
e-mails, calendar, address book and other PIM functions. Kontact can also manage
several e-mail accounts.
2.11.1 First time start-up of Contact
To start Contact press [Alt] + [F2] and enter Contact. To access one of the components
(e.g. KMail), click on the relevant icon on the left of the sidebar.
KDE Quick Start 31
Before you can send or receive e-mail messages, you must congure an e-mail
identity and an e-mail account:
1 Select Settings > Set up a contact.
2 Click on Identities in the left sidebar under E-mail and select the identity KMail
has automatically created for you. Change this identity by entering your full
name and e-mail address and conrm your changes with OK.
3 Click in the left sidebar under E-Mail on Accesses and select the Add option
on the Receiving and/or Sending of e-mails tab to create at least one account.
(Optionally, you can congure several e-mail accounts.)
4 Select the type of access. To retrieve e-mails, this is usually IMAP or POP3. To
nd out the right values to use, please consult the help pages of your e-mail
provider. Highlight the relevant entry in the list and click OK. KWallet reports
now, to whom you name the (master) password for your wallet. Then ll in
the form which appears. Dependent on the account, options must also be
determined for encryption or authentication. If you are unsure which settings
or objects you should search for, get in touch with your Internet Service
Provider or your system administrator.
5 Click on OK. Set-up is conrmed and the dialog box is closed.
To write a new e-mail in the main window of Contact, click on the Mail icon and press
[Ctrl] + [N] to open the E-mail Editor. When you have nished your e-mail, click on
Send to send it straightaway. If you have congured several e-mail accounts, hold
down the Send button and select the account to send the e-mail from.
32 Start-Up
2.12 Instant Messaging with Kopete
Kopete is an online messenger application which enables you to chat with others
over the Internet. Kopete supports many messenger protocols, such as AOL* Instant
Messenger (AIM), Gadu-Gadu, GroupWise® Messenger, ICQ, Jabber*, SMS, and Ya-
hoo!*. To use Instant Messaging (IM), you need to register with an IM services provider
and then enter this data Kopete accordingly.
To start Kopete, press [Alt] + [F2] and enter kopete. When you start the application
for the rst time, select Settings > Set up. Add an Access here in the Accesses area.
Kopete takes you through the set-up steps, such as selecting the news service, en-
tering the necessary account information (for example, user name/user ID, server
name, port), inputting of registration data (e.g. passwords). If you have not yet reg-
istered with the provider for the selected news service, click on Register New Access.
Enter your user data into the browser window which is now opened to register. Change
back to Kopete and enter the data received upon registration. Close the conguration
of your account by clicking on Finish.
If you want to go online after conguring your account, you can now add contacts
in the main window of Kopete. When the status Offline is displayed in the Kopete
window (in the status bar), rst click on File > Set status > Online and enter your
password as soon as you are requested. When connected, click on File > Add contact
and select the Kopete account for which contacts should be added. Enter the contact
data or search for a contact and click on OK.
To display all contacts, even if these are currently oine, select Settings > Display
Oine Users.
When you want to start a chat, click on the desired contact and enter your message
into the lower section of the chat window. Press [Enter] to send the message. The
upper part of the window displays the messages you have sent and received.
KDE Quick Start 33
2.13 Starting LibreOce
The oce suite LibreOce oers a comprehensive set of oce tools, which includes
a text processor, a spreadsheet application, a slideshow application, a vector
graphics program and a database application and more. As LibreOce is available
for a range of operating systems, you can seamlessly use les created with it on
dierent platforms.
Press [Alt] + [F2] to start and enter libreoffice. When you want to create a new
document, select File > New and then select the desired document type. To open
an existing document, click Open and select the relevant le from the le system.
You can nd further information in LibreOce Quick Start.
2.14 Viewing PDF Files and Other Documents
Documents which need to be approved or printed on several platforms can be saved
as PDF (Portable Document Format) les, for example with the LibreOce-Suite.
Display these documents with Okular, KDE’s standard document display.
2.14.1 Using the Okular document display
Apart from PDF les, you can display a multitude of le formats with Okular, such as
PostScript, dierent image formats, the OpenDocument Format (ODF), some eBook
formats (ePub) and even Microsoft* Compiled HTML Help (CHM). Okular also supports
bookmarks, comments, formula elds and multimedia contents as well as page rota-
tion.
Start Okular in the Main Menu or press [Alt] + [F2] and enter okular.
To open a document select File > Open and select the relevant le from the le
system. Navigate through the document with the up or down navigation icons in the
window. According to which icon you click on the left side of the navigation area, the
sidebar either shows the Content, Preview images of all pages, the Reviews or your
Bookmarks for this le. To lter for text which is listed in the sidebar or in the entire
document, enter a string of characters into the input eld at the top of the sidebar.
If you want to select and copy a text or images from the le in Okular, click on the
Select icon in the toolbar and select one of the options from the context menu. Click
on the Browse icon to return to browsing the document.
Procedure 2.12: Working with bookmarks and comments
With Okular you can verify a document by emphasizing certain passages of text
or adding comments or bookmarks which Okular then adds to the le in the form
of metadata. Note that the added comments and identiers cannot be saved in the
document. Consequently, it is not possible to print them or forward them to other
users.
1 To add a bookmark to a page click on the relevant page in the sidebar or in
the main display eld and click on [Ctrl] + [B]. The page is added to the list
34 Start-Up
of Bookmarks in the left sidebar. Right-click on the bookmark entry to access
a context menu in which you can change to this bookmark, rename it or re-
move it.
2 To create a comment for a page, press [F6] and select one of the comments
tools from the toolbar now displayed. The comment is added to the list of
Reviews and identied with the sign-in name of the user who created it. Use
the symbols at the bottom of the sidebar in order to group the comments by
page or author or to display only the comments for the current page.
3 To open a pop-up note and add a text for a comment (or to remove a com-
ment), right-click on the comment entry in the list of Reviews and select the
relevant menu entry. The comments or identiers added are automatically
added to the le and you do not need to save these.
2.14.2 Using Acrobat Reader
If Acrobat Reader is not installed as standard, install the acroread package with YaST.
To start Acrobat Reader, press [Alt] + [F2] and enter acroread. Click on File > Open,
search for the desired PDF le and click on Open, to display the le.
2.15 Search for data (with Strigi)
The Strigi desktop search not only searches for les, but also for metadata such as
tags, evaluations and even source URLs for downloads. To use desktop search, the
nepomuk and strigi services must be executed. To activate these services, press
[Alt] + [F2] and enter strigi. If necessary, tick all services on the Basic Settings tab
and terminate the dialog box by clicking on Apply and OK.
After activation, you can use KRunner ([Alt] + [F2]) to search for les by inputting a
keyword. An advanced search interface is available in the Dolphin le manager. Press
KDE Quick Start 35
[Ctrl] + [F] in Dolphin to activate the desktop search. You can lter the search results
by File name, Content or place.
2.16 Creating a CD or DVD
If your computer has a CD or DVD burner, you can burn K3b les on CD or DVD. To
create a data CD or DVD, proceed as follows:
1
Press [Alt] + [F2] and enter k3b. K3b is opened.
2 In the main menu select File > New Project > New Data Project.
3 Use the tree view in the upper left section of the window to search for the
les or folders to be burnt to a disc. As soon as this is displayed in the top
right of the window, drag it into the window using Current projects.
4 Place a writable CD or DVD into the device and then click on the Burn icon.
5 Check the settings on the Burn tab. The standard settings should normally
work for almost all les. If desired, you can also change further options, such
as Data medium name, on the File System tab.
6 Click on Burn.
2.17 Manage your collection of digital images
With digiKam, it is easy to manage digital photos: Download your images from the
camera, edit and optimize them, arrange them in albums (or add identications for
36 Start-Up
simple retrieval, regardless of folders or albums) and archive them on CD or DVD or
export them into a gallery with web images.
digiKam also contains a set of useful stacking functions and plug-ins which enable
you to convert several images into dierent formats, rename them or automatically
improve the quality of images with the help of functions such as red eye correction,
retouching and Hot Pixel removal. Dierent plug-ins for lters and eects help you
to make your digital photos into works of art.
To start digiKam, press [Alt] + [F2] and enter digikam. When you start it for the rst
time, the rst time start assistant opens which will guide you through setup. In gen-
eral, you can conrm all questions with Next.
The main window of digiKam contains a tree view on the left hand side and displays
thumbnails of the images on the right hand side. To access your images quickly, use
the sidebar on the left side which enables you to switch between the dierent views
and to sort the photos according to the Albums or Keywords for example. To change
to the display and editing mode of digiKam, double click on the thumbnail of a photo.
2.18 Managing your music collection
With KDE’s Amarok Music Player you can play back dierent audio formats, create
playlists, listen to streaming audio broadcasts on radio stations on the Internet and
subscribe to podcasts. The le types supported vary dependent on the Amarok
module used.
To start Amarok, press the [Alt] + [F2] key and enter amarok. Amarok asks for your
country on rst start-up. Select the relevant country from the dropdown list and then
click on OK. Then select the folder which should be searched for your music les. If
you want to use the suggested le, simply click on Yes.
KDE Quick Start 37
A sidebar with dierent views is displayed in the main window of Amarok: your local
music collection, some addresses for playing back podcasts or streams from the In-
ternet, your playlists and a le browser. In the middle section, the context browser,
information on the current title, the Wikipedia page for interpreters and the song
text is displayed as standard. You can see the current playlist in the right hand section
of the window. To do so, drag the desired elements from any browser of the sidebar
into the area for the playlists. To play back an element, double-click on it in the
playlist.
If your music les have the correct identiers (and contain at least information on
the artist and the album), dierent useful functions of Amarok are available to you.
To automatically retrieve images from Amazon for the album cover, select Extras >
Cover management and click on Retrieve missing cover. The next time you play back
a piece of music from this album, the cover is displayed in the context browser and
on the display. For further information on the artist, click in the middle section on
the Wikipedia button Amarok will then start searching for the relevant Wikipedia ar-
ticle.
To congure the use of another module (or other Amarok functions) select Set up >
Amarok settings.
2.19 Ending Your Session
Log o (while the system continues to be executed), restart the computer or shut it
down.
38 Start-Up
2.19.1 Log o or change user
Click on the Main Menu button in your control bar and select Quit > Log Out. This
terminates your session but the system remains active. To start a parallel session
as a dierent user, instead select the option Quit > Change User.
2.19.2 Restart or switch o the computer
Click on Quit and then select one of the following options:
Sleep
Only available if the computer supports energy management functions. Puts the
computer into sleep mode without logging the user o. All data and the session
data are stored in the main memory.
Hibernate
Only available if the computer supports power management functions. Puts the
computer into sleep mode without logging the user o. All data and session data
are stored on the hard drive before the system goes into hibernation. This protects
the data from being lost if a power failure occurs in the meantime.
Restart
Restarts the computer.
Shut down
Logs you out of the current session, then turns o the computer.
2.20 For More Information
You can also nd more information on KDE and KDE applications at http://www.kde
.org/ and http://www.kde-apps.org/.
KDE Quick Start 39
3 GNOME Quick Start
openSUSE® provides the tools required by Linux* users for their daily activities. It
has a user-friendly graphic environment (the GNOME* Desktop), which communicates
with the Linux base system and allows access to les, folders, and programs, as well
as their management. openSUSE provides an integrated suite of applications for a
wide range of oce, multimedia, and Internet activities. It also contains the LibreOce
Suite which enables editing and saving of les in a variety of formats. The oce suite
is available for several operating systems, meaning you can use the same data across
dierent computing platforms.
3.1 Getting Started
When starting up your system, you will normally be asked to select your user name
and enter your password. If someone else installed your system, ask your system
administrator for your user name and password.
The GNOME desktop appears after you rst log in. Its appearance depends on whether
openSUSE® could activate the 3D functions of your graphics card. Optics and func-
tionality in both cases are the same, only the operation diers slightly.
3.2 The standard GNOME desktop
If openSUSE® could activate the 3D functions, the GNOME desktop noties you. The
largest part is taken up by the initially still empty desktop with the green background
image. You will see a narrow black bar on the top edge of the screen. This so-called
panel allows you to access all functions and applications. Specically, it has the fol-
lowing elements:
GNOME Quick Start 41
Time, calendar, and schedule planner: The current time is ticking in the middle.
When you click on it, a small calendar appears which lists all pending appointments
and events on the right hand side. You can call up time and date settings via the
relevant buttons or start the calendar application directly (Open calendar).
Settings for accessibility: Clicking on the icon with the stylized little man opens
dierent settings for accessibility. You can, for example, increase the contrast, switch
on a screen keyboard or enlarge the font. To activate one of the functions, you must
only right-click beside the slide switch. An illuminated blue i marks a currently active
function. Further settings for accessibility are behind the similarly named point.
Volume: The icon with the loudspeaker represents media volume. The more
semicircles you can see, the louder your loudspeaker becomes. You can adjust the
volume by clicking on the icon and dragging the white slider which appears when
you press down the mouse button to the left or the right. To silence the sound, push
the control all the way to the left. A little cross will be added to the loudspeaker icon.
You can nd additional settings for audio playback via the Sound Settings under the
control.
Network: Clicking on the icon directly to the left beside the user name brings up
a list with all network connections. The individual connections are sorted here accord-
ing to their access type. For wireless connections (Wi-), small curved lines display
the connection quality. A white lock icon indicates that use is only possible after en-
tering a password. You enter it by clicking on the corresponding connection. Whether
a connection is active at all and is used by openSUSE® is indicated by the illuminated
blue I beside to the right. Click on the black switch in order to switch o a connection
or explicitly switch it on again. If special settings for your hardware are needed or if
problems appear, you can also quickly switch to Network Settings on the bottom
edge of the list.
42 Start-Up
User menu: If you click on your name on the top right corner, a menu appears
where you manage your user prole and your computer. If you use the immediate
news program Empathy, you can change your availability status directly below your
name. You can turn o the status messages with the switch underneath. This is
useful if, for example, you want to concentrate on your work. You can save your access
data for Google and Twitter under Online Accounts. You can reach the System Settings
via the following menu points, where you can, for example, lock the screen for the
duration of your lunch break, change to another user account, log o GNOME, or
switch o the computer. You can also restart your PC via the last point. If openSUSE®
can use the energy-saving functions of your computer, the last menu item is called
Readiness. This is how you switch your PC to hibernate mode. To go to the Switch
O menu item, hold down the [Alt] button.
Activities: Clicking Activities on the top left corner of the screen takes you to the
so-called activities overview where you start programs and manage those already
running. You also reach this view by placing the mouse pointer on the top left corner
of the screen or pressing the [Windows] key (also called the [Super] key. You return
to the normal view by clicking on Activities.
Notications panel: Whenever you insert a ash drive, nish downloading or
some other important thing happens in your system, a corresponding message ap-
pears on the bottom edge of the screen. Some of these messages disappear quickly
by themselves, others oer equally suitable actions. You can, for example, eject an
inserted data CD immediately or open your content in a new window. If you do not
wish to do any of the actions, simply click on the title of the message and it will then
disappear from the bottom edge. Some messages deliver only a fragmentary short
text. To nd out more, slide the mouse pointer over the message and it will then
expand completely. You can retrieve messages which have been clicked away or
which have disappeared too early by clicking on Activities in the top left and then
hovering the mouse pointer in the lower-right corner of the screen for a few seconds.
The so-called notications panel then appears. Clicking on one of the messages saved
there is enough to retrieve the list with the matching actions.
GNOME Quick Start 43
3.2.1 Start Programs
To start an application, rst switch to the activities view (click on Activities or press
the [Windows] button). You now have three options:
About the Dash (Favorites bar): Either click on the program icon in the bar on
the left edge of the screen, the so-called Dash (sometimes also inconsistently called
a Dock). If you hover over one of the icons with the mouse pointer, GNOME will tell
you the name of the pertaining application.
Via the applications view: If the desired program is missing in Dash, click on
Applications. GNOME will then show all the installed programs. You can move
downwards in the list by pulling the ruler which is rather dicult to recognize in the
narrow black bar slowly downwards with the left mouse button depressed. If you
have installed a lot of programs or the list appears unclear to you, simply click on
one of the categories on the right edge. GNOME then lters the diagram according
to the corresponding eld of application. For example, if you decide on the Graphics
category, you see only all the available graphics programs.
Via the search box: If you cannot nd what you are looking for or when things
have to get done quickly, the small search box on the right top will help. As soon as
you enter a term there, GNOME will show all the matching applications and system
settings. At the same time, you can also consult Wikipedia or Google via the corre-
sponding buttons on the bottom edge. By the way, you do not have to click on the
search box rst, you can just simply begin typing directly.
44 Start-Up
3.2.2 Manage Window
After you start an application, GNOME automatically switches back to the workplace.
The name of the program and its icon appear in the panel. You can end the application
by clicking on it. The X on the title bar of its window does the same thing.
Procedure 3.1: Maximize Window
To enlarge a window to the screen size, proceed as follows:
1 Bring the mouse to the title bar of the window (with the program name) and
hold and press the left mouse button.
2 Pull the window on the top edge against the panel.
3 As soon as GNOME turns the screen blue, let the mouse button go.
To minimize the window again, follow the same steps but vice versa: Using the mouse,
pull away the title bar of the window from the top edge. Alternatively, you can also
right-click on the title bar. A menu with the corresponding options then appears. But
beware: Dierently from other operating systems, Minimizing the window changes
to Activities view.
You can switch quickly between open windows via the [Ctrl] + [Tab]shortcut. Activities
view gives an overview of all currently open windows. You may need to rst click to
the Window area. Clicking on one of the windows brings it into the foreground, the
X symbol closes it.
GNOME Quick Start 45
3.2.3 Working with Dash
The small Dash in the Activities view not only keeps especially commonly used pro-
grams ready, but it can do even more: As soon as you start an application, an icon
appears for it in the Dash. A light glow indicates that the application is running and
(at least) one window is open.
Right-clicking on an icon opens a small menu which oers dierent actions depending
on the associated program. With Add to Favorites, you can place the application icon
permanently in Dash. To remove a program icon from Dash, select Remove from
Favorites. If you wish to rearrange an icon in the dock, hold the left mouse button
pressed above it and then drag it to its new position.
3.2.4 Using Virtual Desktops
GNOME allows you to organize your program window into several virtual desktops.
If you often run a lot of programs simultaneously, this minimizes the number of
windows to arrange on your screen. You might, for example, use one desktop for e-
mails and the calendar and another for word processing and graphics applications.
Procedure 3.2: Move an Application to Another Virtual Desktop
To move an open window to another virtual desktop, proceed as follows:
1 Open the Activities view.
2 Bring the mouse pointer to the corresponding window and drag it by pressing
and holding the left mouse button on the right edge of the screen.
3 A bar with all existing virtual desktops now opens there. Drag and drop the
window to the desktop where you would like it to be.
46 Start-Up
4 Release the left mouse button.
Procedure 3.3: Switch Virtual Desktops
You can switch between all existing desktops via [Alt] + [Ctrl] + [Arrow up] and
[Alt] + [Ctrl] + [Arrow down]. Alternatively, you can also pull up the activities view:
1 Open the activities view (for example, with the [Windows] key).
2 Bring the mouse to the right edge of the screen. The bar with all existing vir-
tual desktops opens again.
3 Click on the desired virtual desktop on the bar. GNOME now shows all the
windows that are there.
4 Click on the virtual desktop once again to nally switch to it.
Procedure 3.4: Show Window on All Desktops
You can also show a currently open application on all virtual desktops:
1 Right-click on the title bar of the application.
2 Click on Always on the Visible Desktop.
3 You can also very quickly move the window to an entirely specic desktop via
the small menu. To do this, select Move to Another Desktop and then the
corresponding desktop.
3.3 Fallback Mode
If openSUSE® cannot nd or activate any 3D graphics card in your computer, GNOME
will start in the so-called fallback mode. After Closing the corresponding warning in-
struction, the GNOME desktop then appears with the following elements:
GNOME Quick Start 47
Bottom Panel: The desktop includes a panel at the bottom of the screen. All appli-
cations currently open on the desktop appear here. You can access these applications
by clicking on their name. Right-clicking on the icon in the bottom-right corner takes
you to the virtual desktop's Settings. Provided you have created more than one, a
single icon appears for every virtual desktop. In fallback mode, every window has
three buttons in its title bar. Through it you can close the window (from right to left),
blow up to the screen size or minimize. In the last case, the bottom panel takes up
the window.
Applications menu: Click on Applications on the top left corner to open a menu
with all the installed programs. These are classied under dierent categories for a
better overview. Sub-items open automatically as soon as you place the mouse above
them.
Places menu: There is also a small menu behind Places. Its entries open especially
important folders (such as your personal folder or the Download folder), show content
of connected data carriers and establish a connection to another computer (connection
to server).
The Panel: The remaining elements on the top black bar function like their coun-
terparts in the normal GNOME mode already described above. Clicking on the time
opens a small calendar while the name itself leads to the prole and system settings.
3.4 "Open Application" dialog box“
Press [Alt] + [F2] to open a small dialog box. Enter a command, for example
libreoffice, and press [Enter] to start the application. The command to start is often
(but not always) the application name written in lower case letters.
48 Start-Up
3.5 Manage Files, Folders and Media
Use the Nautilus File Manager to create and view folders and documents, run scripts
and create CDs of your data. To open Nautilus, change to the Activities view (with
the [Windows] key for example) and click on the icon with the ling cabinet in Dash.
In fallback mode, instead you open Places followed by Personal Folder. In any case,
a new window appears with the content of your home directory.
The elements of the Nautilus window include the following:
Menu Lets you perform most tasks.
Path bar Lets you nd les and folders.
Side bar Lets you navigate or display information about the selected le or folder.
GNOME Quick Start 49
View pane Displays folders and les. Use the options in the View menu to increase
or decrease the content in the view pane and to display items as a list or as icons.
3.5.1 Handling Media
What happens exactly if you insert a CD or a DVD into the drive or connect a device
(such as a ash drive or a removable disk) depends on the content of the medium.
In the simplest case, GNOME automatically opens Nautilus which, in turn, displays
the content of the media. You have several options available in terms of action. A
message with a corresponding selection appears on the bottom edge. You must then
decide whether you would like to open a DVD with a media player or in a Nautilus
window. In fallback mode, in turn, GNOME asks in a new window what should be
done with the data carrier. You select a matching application in a drop-down list,
Open Folder shows the content of the data carrier in a new Nautilus window. If GNOME
should not show any response contrary to expectation, you must start Nautilus
manually.
The Nautilus window lists all connected or inserted data carriers in the side pane in
the Devices area. By clicking on the arrow icon on the right adjacent to its name you
can eject the CD or the DVD or the connected ash drive.
3.5.2 Creating a CD or DVD
If your system has a CD or DVD burner, use the Nautilus le manager to burn CDs
and DVDs.
1 Insert an empty data medium and open it in the CD/DVD creator. GNOME then
opens a new Nautilus window.
2 Copy the desired les and folders for the CD or DVD into this window.
3 To write data to the CD or DVD, click on Write to CD/DVD.
50 Start-Up
4 Change the corresponding data in the CD/DVD Creator window or accept the
standard settings. Then click on Burn. Now there is no turning back: GNOME
will write the les onto the disk. This could take a few minutes, depending on
the amount of data being copied and the speed of your burner.
To burn data and audio CDs, you can also use the more extensive burning program
Banshee Brasero.
3.5.3 Creating and Unpacking Archives
If you have les you have not used recently but want to keep on your computer, you
can compile and compress them in an archive le.
1 To do so, right-click on the folder to be archived in Nautilus and then select
Compress.
2 Accept the default archive le name or provide a new name.
3 Select a le name extension from the drop-down list beside to the right. At
the same time, you also determine the compression method. Use .zip if you
would like to forward the archive to other people or protect it with a password.
In Linux the .tar.gz format is also widely used.
4 Enter a location for the archive le.
5
If you have decided to use a .zip le, you can still click on the plus sign and
open Other Options and enter a password there. Remember this password
well. If you forget it, you will be unable to access the content of the archive.
6 Then click on Create.
To unpack an archive created in this way, right-click on the le and select Extract
here.
3.5.4 Using Bookmarks
Use bookmarking feature of Nautilus to highlight your favorite folders. A matching
entry then appears for quick access in the side pane.
GNOME Quick Start 51
1 Switch (with a double-click) to the folder for which a bookmark should be
created.
2 Click on Bookmark > Add bookmark. The bookmark is added to the list. The
folder name is used as the bookmark name.
3 To select an item from the bookmarks list, click on Bookmark then click on
the desired bookmark in the list.
You can also organize your bookmarks list by clicking on Bookmark > Edit bookmarks
and making your selection in the dialog box.
To change the order of your bookmarks, click a bookmark shown in the Edit bookmarks
dialog box and drag it to the desired location.
3.6 Customizing your Work Environment
You can nd more precise settings to adjust the overall appearance and behavior of
your desktop in System Settings. There you can also change keyboard and mouse
congurations, regional and language settings, parameters for your Internet and
network usage, and more.
To open System Settings, click on your name in the (top) panel and then on System
Settings.
52 Start-Up
3.6.1 Changing the Desktop Background
1 Then click on Background.
2 If you would like to select a background image from pre-installed images, click
on it from the list on the left pane.
3 To add your own image, click on the plus sign on the bottom left pane corner,
search for the desired image and let it open.
4 To display a colored background, select from the Background images drop-
down list the item Colors and Color Gradients, highlight the single-color rect-
angle in the list, click on the bottom right of the window on the button with
the color and then choose the desired color.
5 You can return to all system settings via the button with the nine small rect-
angles on it in the very top left hand corner of the window.
3.7 Browsing the Internet with Firefox
Firefox* is one of the most popular Web browsers. It works like all other browsers,
but oers additional functions such as tools for security and data protection.
GNOME Quick Start 53
To start Firefox, switch to the activities view (such as via the [Windows] key) and
click on the icon with the globe and the fox in Dash. In fallback mode, you instead
open Applications > Internet > Firefox.
Firefox awaits with all modern web technologies, such as use of tabs, pop-up blockers
and download and image management. Its easy access to dierent search engines
helps you nd the information you need. Enter an Internet address (URL) in the ad-
dress bar to start browsing.
To open a new empty tab in Firefox click on [Ctrl] + [T] or on the “+” beside to the
last tab. Type a new Internet address to browse. To open the page behind a link in
a new tab, click on the link with the middle mouse button. Right-clicking on the tab
displays a small menu. You can create a new tab, reload the content of a specic
tab or all existing tabs, or close a single tab or all tabs. You can also change the order
of the tabs by dragging & dropping them to a new position.
3.7.1 Finding Information
1 To start a Web search type the keywords in the integrated search box on the
right of the address bar, then press [Enter]. Firefox will display the results in
the active tab.
2 If you would like to use a specic search engine, click on the icon with the
small down arrow on the search bar.
3 Click on the desired engine, then press [Enter] to start the search.
To search for words in the current website, press [Ctrl] + [F]. Enter your keywords
in the search bar now shown on the bottom of the window. Use the buttons to the
right of the search box to switch the search direction or to highlight all results in the
text.
54 Start-Up
3.7.2 Downloading Files from the Web
If you download a le with Firefox, the Firefox download manager starts automatically.
It then saves the le in the folder previously set in the Firefox Preferences. By default,
it uses the Downloads folder in your home directory. Firefox shows the nished
downloads in the Downloads window.
Open the downloaded les directly from the Downloads window or from the destination
folder. Click on Clean List to clean up the history of downloaded les.
3.7.3 Conguring Preferences
If you change the standard folder for downloaded les, or activate or want to change
the pop-up blocker, click on Edit > Preferences.
You can congure advanced settings here, such as the appearance, the language,
data protection and the tab options. Click on the icons and set the options on each
page according to your preferences. To apply the changes click on Close.
3.8 Managing Passwords
GNOME allows you to store your passwords and encryption keys in a Keying. This is
especially useful if you want to store passwords for dierent websites.
GNOME Quick Start 55
To create a new key ring, proceed as follows:
1
Press [Alt] + [F2] and enter seahorse.
2 Select File > New.
3 Select Password Key Ring and continue with More.
4 Enter a name for the key ring and click on Add. A new window appears.
5 Enter your password, conrm the password, and click Continue.
You can create as many key rings as you like. For example, you can create one for
private use and a second one for business. To store passwords in your key ring,
proceed as follows:
1
Press [Alt] + [F2] and enter seahorse.
2 Select File > New.
3 Select Save password and continue with More.
4 Select the key ring, enter a description and the password.
5 Finally click on Add.
3.9 E-mail and Calendar
To read and manage your mails, contacts, appointments, and tasks, openSUSEcontains
the program Evolution™, which allows you to conveniently save, organize, and call
up your personal information.
With its extensive support for communications and data interchange standards,
Evolution can work with existing corporate networks and applications, including Ex-
change*.
56 Start-Up
To start Evolution, switch to the activities view (for example, via the [Windows] key)
and click on the letter icon. In fallback mode, select Applications > Internet > Evolution
E-Mail and Calendar.
If you are starting Evolution for the rst time, you will be asked to answer a series
of questions. The queried information is needed to set up your e-mail account and
helps you import e-mail messages from your old e-mail client. It shows you how many
new messages you have and lists upcoming appointments and tasks, as well as the
current weather and news from news feeds. The calendar, address book and e-mail
tools are available on the toolbar on the left side of the program window.
Press [Ctrl] + [N] to open a new item in the area of Evolution where you are working.
This creates a new message in e-mail. In the address book [Ctrl] + [N] creates a new
contact card and a new appointment in the calendar.
If you would like additional information, click in any window on Help > Content.
3.10 Instant Messaging with Empathy
Empathy is a multi-protocol Instant Messaging (IM) client. It is compatible with AOL*
Instant Messenger (AIM), Google Talk, GroupWise® Messenger, ICQ, IRC, MSN Mes-
senger, Jabber/XMPP, Yahoo!* and other networks.
With Empathy, you can log in to multiple accounts on multiple IM networks simulta-
neously. Empathy also supports many features of various networks such as video
chat, le transfer, away messages and typing notication.
To start Empathy, switch to the activities view (for example, via the [Windows] key)
and click on the icon with the speech balloon and the blue smiley in the Dash. In
fallback mode, try Applications > Internet > Empathy Instant Messenger Service.
To add an account to Empathy, use the conguration assistant, then select Edit >
Accounts. Click on the plus symbol, select the desired protocol and enter your regis-
tration information into the relevant elds. Click on Apply and Close, in order to acti-
vate your IM account.
GNOME Quick Start 57
Add contacts by clicking on Chat > Add Contacts. Select the account, the Identier
(ID), and the alias information that is relevant to the new content, and conrm with
Add. However, you must be online and connected to the selected messaging service
to add a contact to your list.
To start a chat, double-click on the desired contact and type your message in the
lower part of the chat window. Press [Enter] to send the message. The upper part of
the window displays the messages you have sent and received.
3.11 Starting LibreOce
LibreOce oers comprehensive and powerful oce programs, including a text
processing program, a table calculation application, a program for the creation of
presentations, a vector graphic program and a database application. Because Libre-
Oce is available for a number of operating systems, you can use the documents
across dierent operating systems.
To start LibreOce switch to the activities view (for example, by pressing the [Win-
dows] key) and then click on the blue document. Alternatively, type writer in the
search box and press [Enter]. In fallback mode, click on Applications > Oce > Libre-
Oce Writer. If you would like to create a new document, click on File > New and
select the document type. To open an existing document, select Open, then select
the le you want from the le system.
3.12 Viewing PDF Files and Other Documents
Documents that need to be shared or printed across platforms are often saves as
PDF (Portable Document Format) les. PDF les can be created using the LibreOce
suite or other applications. The PDF viewer of GNOME is called Evince. It can be used
to view PDFs and many other document formats like PostScript, DjVu, DVI, and multi-
page TIFFs.
To start Evince, press [Alt] + [F2 ] and enter evince.
1 To view a PDF le, double-click on the le you want.
58 Start-Up
2 Use the navigation icons at the top of the window to navigate through the
document. If the PDF document contains bookmarks, you can access them to
the left of the side pane.
3.13 Managing Your Digital Image Collection
Shotwell is a management tool for digital image collections. You can assign various
category tags to your images. It also oers many practical image editing options.
For example, you can remove red eye, crop an image to size as well as adjust
brightness and colors. Shotwell supports all important le formats, such as JPEG,
PNG, TIFF and various manufacturer-specic RAW formats, for example. With Shotwell,
you can also export photos to your Flickr, Picasa or Facebook account.
To access Shotwell, open the activities view (for example, by pressing the [Windows]
key) and then click on the icon with the images in Dash. In fallback mode, you can
nd Shotwell via Applications > Graphics > Shotwell Photo Manager. After you pass
through the welcome window by clicking OK, Shotwell immediately runs through
your image folder and automatically add all the images stored in it to its library.
GNOME Quick Start 59
Shotwell shows thumbnails of the images to the right in the window. As soon as you
click one of them, you can rotate it, re-edit it (enhance it) or publish it in an Internet
service with the buttons on the lower edge. The side bar to the left oers dierent
views of your photo portfolio. Provided the photos were stamped with a date, you
can limit the display to photos from a specic year via Events for example.
You import new photos via File > Import from Folder. Shotwell always copies them
to your image folder. If you would like to set another folder for this, go to Edit >
Preferences and choose the corresponding folder under Import Photos to.
3.14 Managing Your Music and Videos
Use Banshee to import CDs, synchronize your media collection to a digital media
player, play music directly from a digital media player, create playlists with songs
or videos from your library, create audio and data CDs from subsets of your library,
and subscribe to, download, and listen to your favorite podcasts. Banshee also has
an Internet Radio plug-in that allows you to listen to audio streams.
To open Banshee switch to activities view (for example, via the Windows key) and
click on the icon with the b in the form of a note. In fallback mode click on Applications
> Multimedia > Banshee Media Player.
When you start the Banshee for the rst time, you need to import your media to
make them available in the library. From the menu, call up Media > Import Media.
Select an import source and click on Choose Files or Choose Folders. After success-
fully importing your media, you can access them from your library.
60 Start-Up
To play a song or a movie, simply select it in the library and click the play button.
You can also use the buttons in the upper left corner to pause a song or play the
next or previous song. Use the loudspeaker button on the right to adjust the volume.
Banshee has an integrated CD player. When you insert a music CD, your CD title
appears in the left panel. Select the title and click on the Play button to play your
full CD.
To create Audio and MP3 CDs, select the desired song and then click on Edit > Write
CD in the menu .
3.15 Ending Your Session
Once you have nished your work on the computer, you can log out and exit the
system. However, you can also restart the system or shut down the computer.
3.15.1 Logging Out or Switching Users
Click on your user name on the top right in the panel and then select one of the fol-
lowing options:
Log Out... Logs you out of the current session and returns you to the login screen.
Switch User Likewise returns you to the login screen but, in contrast to Log Out,
the applications started continue running in the background. This feature is subse-
quently oered if another person has to log in to your computer for a short while
using his or her own user account.
GNOME Quick Start 61
Lock Screen Switches on the screen saver. You must enter your password to close
it. This prevents unauthorized persons from working on or playing around with your
computer during your absence.
3.15.2 Restarting or Shutting Down the Computer
If openSUSE® can use the power-saving functions of your computer, your PC can
switch to sleep mode via the Suspend item. Otherwise, GNOME oers you Power
O.... Power O... can also be accessed by holding down the [Alt] button while the
menu is open. If you call it up, a new window oers you the following actions:
Power O Logs you out of the current session, then turns o the computer.
Restart Logs you out of the current session, then restarts the computer.
Hibernate This feature puts your computer into power-saving mode. The PC con-
sumes only a small amount of electricity while in this mode. After you switch on the
PC, your work environment as you had left it becomes available again. In particular,
all documents remain open.
3.16 For More Information
Additional information on GNOME and GNOME applications can be found under
http://www.gnome.org/.
62 Start-Up
4 LibreOce Quick Start
The LibreOce Novell Edition contains improved functionality and additional features
not available with the standard version.
4.1 Compatibility
LibreOce can work with documents, spreadsheets, presentations, and databases
in many other formats, including Microsoft Oce. They can be seamlessly opened
like other les and saved back to the original format. Though some work has already
been invested in interoperability, occasionally there are still formatting issues. If you
have problems with your documents, consider opening them in the original application
and resaving them in an open format such as RTF for text documents. In case of
migration problems with spreadsheets however, it is advisable to resave them as
Excel les and use this as intermediate format (with CSV format you would lose all
cell formatting and CSV sometimes leads to incorrect cell type detection for spread-
sheets).
4.2 LibreOce Modules
LibreOce consists of several application modules (subprograms), which are designed
to interact with each other. All modules feature the same graphical user interface
and similar functionality.
Table 4.1: The LibreOce Modules
UsageModule
Text document moduleWriter
Spreadsheet moduleCalc
Presentation moduleImpress
Database moduleBase
Vector graphics moduleDraw
Mathematical equation moduleMath
LibreOce Quick Start 63
4.3 Starting LibreOce
To start the LibreOce suite, press [Alt] + [F2], type libreoffice and press [Enter].
In the Welcome dialog, select the module you want to open. If an LibreOce applica-
tion is open, you can start any of the other applications by clicking File > New >
Name of Application.
4.3.1 Saving LibreOce Files
1 To save a new le, select File > Save or Save as from the Menu Bar or use
the shortcut [Ctrl] + [Shift] + [S].
2 Select the directory where you want to save the le.
3 Enter the lename in the Name box.
4 From the File Type box, select the format in which you want to save the le.
In all modules you can save your documents as native LibreOce les, LibreOce
templates, Microsoft les and StarOce les.
4.3.2 Navigator and Navigation Shortcuts
The Navigator tool displays information about the contents of a document. It also
lets you quickly jump to dierent elements. For example, you can use the Navigator
64 Start-Up
to get a quick overview of all images included in the document. To open the Navigator,
click View > Navigator or with [F5]. The elements listed in the Navigator vary accord-
ing to the LibreOce module being used.
You can also navigate your les with the following shortcuts:
Table 4.2: Navigation Shortcuts
ShortcutAction
[Ctrl] + [Del]Delete to the End of the Word
[Ctrl] + [<—]Delete to the Beginning of the Word
[Ctrl] + [End]End of Document
[End]End of Line
[Ctrl] + [A]Select All
[Home]Start of Line
[Ctrl] + [Home]Top of Document
[Ctrl] + []Word Left
[Ctrl] + []Word Right
4.3.3 Using and Creating Templates
LibreOce comes with a set of predened templates, and you can nd additional
templates on the Internet. If you want to create your own templates, you need to
determine what you want the document to look like and create the styles you need
in that template.
For text document, spreadsheets, presentations, and drawings, you can easily create
a template from an existing document as follows:
1 Start LibreOce and open or create a document that contains the styles that
you want to use as a template.
2 Click File > Templates > Save.
3 Specify a name for the template.
4 In the Categories box, click the category where you want to place the template.
LibreOce Quick Start 65
5 Click OK.
4.4 LibreOce Writer
LibreOce Writer is a full-featured word processor with page and text-formatting
capabilities. It also includes some features that are usually found only in expensive
desktop publishing applications. Many of the LibreOce Writer features apply also
to other LibreOce modules.
4.4.1 Creating a New Document
LibreOce Writer allows you to create a new document in one of the following ways:
From Scratch To create a document from scratch, click File > New > Text
Document and a new empty Writer document is created.
Wizard To use a standard format and predened elements for your own docu-
ments use a wizard. Click File > Wizards > Letter... and follow the steps.
Templates To use a template, click File > New > Templates and Documents
and choose one of the many folders (for example, Business Correspondence)
and a new document based on the style of your selected template is created.
To use a standard format and predened elements for your own documents, try a
wizard (a small utility that lets you make some basic initial decisions and then pro-
duces a ready-made document from a template). For example, to create a business
letter, click File > Wizards > Letter. With the wizard's dialogs, you can create a basic
document that uses a standard format.
Enter text in the document window as desired. Use the Formatting toolbar or the
Format menu to adjust the appearance of the document. Use the File menu or the
relevant buttons in the toolbar to print and save your document. With the options
under Insert, add extra items to your document, such as a table, picture, or chart.
4.4.2 Customizing LibreOce
With LibreOce you can customize the default settings with the Format menu.
Below is a list of the most popular options available in most modules:
Customizing Character Settings
To set all character elements at the same time, select Format > Character.
Customizing Paragraph Settings
To format paragraphs, select Format > Paragraph and select the appropriate tabs
for making changes.
Customizing Alignment
To modify the alignment, select Format > Paragraph and choose the alignment
you want.
66 Start-Up
Inserting Headers and Footers
If you want to add headers and footers, click Insert and select either Header or
Footer.
Inserting Special Characters
If you want to insert special characters, select Insert > Special Character.
Inserting Footnotes
If you want to insert footnotes, click Insert and select Footnote.
Inserting Columns
If you want to insert columns, click Insert and select Section. Then in the Columns
tab, specify the number of columns to use for the current section.
Inserting Indexes and Table of Contents
If you want to insert indexes or a table of contents, click Insert and select Indexes
and Tables.
The Object Toolbar oers additional text formatting options.
Inserting Comments
If you want to comment your text for others or for yourself, click Insert > Comment.
4.4.3 Using Master Documents
If you are working with a very large document (such as a book), you might nd it
easier to manage the book with a master document, rather than keeping the book
LibreOce Quick Start 67
in a single le. A master document enables you to quickly apply formatting changes
to a large document or to jump to each subdocument for editing.
A master document is a Writer document that serves as a container for multiple
Writer les. You can maintain chapters or other subdocuments as individual les
collected in the master document. Master documents are also useful if multiple
people are working on a document. You can separate each person’s relevant part of
the document into subdocuments, allowing multiple writers to work on their subdoc-
uments at the same time without the danger of overwriting each other’s work.
1 Click New > Master Document.
or
Open an existing document and click File > Send > Create Master Document.
2 Insert subdocuments.
3 Click File Save.
The LibreOce help les contain more complete information about working with
master documents. Look for the topic entitled Working with Master Documents and
Subdocuments.
4.4.4 Using Writer as HTML Editor
In addition to being a full-featured word processor, Writer also functions as an HTML
editor. Writer includes HTML tags that can be applied the same way as any other
style in a Writer document. You can view the document as it will appear online, or
you can directly edit the HTML code.
1 Click File > New > HTML Document.
2 Press F11 to open the Styles and Formatting window.
3 Click the arrow at the bottom of the Styles and Formatting window.
4 Select HTML Styles.
5 Create your HTML document, using the styles to tag your text.
6 Click File > Save As.
7 Select the location where you want to save your le, name the le, and select
HTML Document (.html) from the File Type list.
8 Click OK.
If you prefer to edit HTML code directly, or if you want to see the HTML code created
when you edited the HTML le as a Writer document, click View > HTML Source. In
68 Start-Up
HTML Source mode, the Formatting and Styles list is not available. The rst time you
switch to HTML Source mode, you are prompted to save the le as HTML, if you have
not already done so.
4.4.5 Tables
You can include tabular data in the Writer, Impress and Draw module. Insert basic
tables directly into your document either with the following menus items or by using
the toolbar:
Insert > Table,
Table > Insert > Table,
or use the Table icon.
To enter data, select a cell with your mouse pointer and begin typing. To move around
cells, use the arrow keys. [→|] moves to the next cell, skipping over the contents of
the cell and [Shift] + [→|] moves backwards.
You can use Table menu or the Table toolbar to modify the table.
4.5 LibreOce Calc
Calc is the LibreOce spreadsheet and data-plotting module. Spreadsheets consist
of a number of sheets, containing cells which can be lled with elements like text,
numbers, or formulas. A formula can manipulate data from other cells to generate
a value for the cell into which it is inserted. Calc also allows you to dene ranges,
lter and sort the data, or create charts from the data to present it graphically. By
using DataPilots, you can combine, analyze or compare larger amounts of data.
As with the entire LibreOce suite, Calc can be used across a variety of platforms.
It provides a number of exchange formats (including export to PDF documents), and
can also read and save les in Microsoft Excel's format.
LibreOce Quick Start 69
4.5.1 Creating a New Document
Start LibreOce and select File > New > Spreadsheet to create a new spreadsheet.
Access the individual sheets by clicking the respective tabs at the bottom of the
window.
Enter data in the cells as desired. To adjust appearance, either use the Formatting
toolbar or the Format menu—or dene styles. Use the File menu or the relevant
buttons in the toolbar to print and save your document.
4.5.2 Customizing LibreOce Calc
Calc comes with a few built-in cell and page styles to improve the appearance of
your spreadsheets and reports. Although these built-in styles are adequate for many
uses, you will probably nd it useful to create styles for your own frequently-used
formatting preferences.
Procedure 4.1: Creating a Style
1 Click Format > Styles and Formatting.
2 In the Styles and Formatting window, click one of the icons representing either
Paragraph Styles, Character Styles, or Page Styles icon.
3 Right-click in the Styles and Formatting window, then click New.
70 Start-Up
4 Specify a name for your style and use the various tabs to set the desired for-
matting options.
5 Click OK.
Procedure 4.2: Modifying a Style
1 Click Format > Styles and Formatting.
2 In the Styles and Formatting window, click either the Cell Styles or the Page
Styles icon.
3 Right-click the name of the style you want to change, then click Modify.
4 Change the desired formatting options.
5 Click OK.
4.6 Other LibreOce Modules
Besides LibreOce Writer and LibreOce Calc, LibreOce also includes the modules
Impress, Base, Draw, and Math. With these you can create presentations, design
databases, draw up graphics and diagrams and create mathematical formulas.
4.6.1 Using Presentations with Impress
Use LibreOce Impress to create presentations for screen display or printing, such
as slide shows or transparencies. If you have used other presentation software, you
can move comfortably to Impress, which works very similarly to other presentation
software.
Impress can open and save Microsoft Powerpoint presentations, which means you
can exchange presentations with Powerpoint users, as long as you save your presen-
tations in Powerpoint format.
LibreOce allows you to use 3D transitions for your slides. Access the available
transitions by selecting Slide Show > Slide Transitions.
You can either create a brand new presentation (without any preformatted slides)
or use an existing template or presentation for your new document. Impress uses
styles and templates the same way other LibreOce modules do. A wizard leads you
through the options available for creating new presentations.
LibreOce Quick Start 71
4.6.2 Using Databases with Base
LibreOce includes a database module (Base). Use Base to design a database to
store many dierent kinds of information, from a simple address book or recipe le
to a sophisticated document management system.
Tables, forms, queries, and reports can be created manually or using convenient
wizards. For example, the Table Wizard contains a number of common elds for
business and personal use. A wizard guides you through the steps to create a new
database.
LibreOce Base comes with several predened database elds to help you create
a database. A wizard guides you through the steps to create a new database. The
following steps are specic to creating an address book using predened elds, but
it should be easy to use the predened elds for any of the built-in database options.
The process for creating a database can be broken into several subprocesses:
Procedure 4.3: Creating a Database
1 Click File > New > Database.
2 Select Create a new database Next.
3 Click Yes, register the database for me to make your database information
available to other LibreOce modules, select both check boxes in the bottom
half of the dialog, then click Finish.
4 Browse to the directory where you want to save the database, specify a name
for the database, then click OK.
72 Start-Up
Procedure 4.4: Setting Up the Database Table
1 In the Table Wizard, click Personal.
2 The Sample tables list changes to show the predened tables for personal
use. If you had clicked Business, the list would contain predened business
tables.
In the Sample tables list, click Addresses. The available elds for the predened
address book appear in the Available elds menu.
3 In the Available elds menu, click the elds you want to use in your address
book.
You can select one item at a time, or you can shift-click multiple items to select
them.
4 Click the single arrow icon to move the selected items to the Selected elds
menu.
To move all available elds to the Selected elds menu, click the double right-
arrow.
5 Use the arrow keys to adjust the order of the selected elds.
The elds appear in the table and forms in the order in which they are listed.
4.6.3 Creating Graphics with Draw
Use LibreOce Draw to create graphics and diagrams. You can save your drawings
in today’s most common formats and import them into any application that lets you
import graphics, including the other LibreOce modules. You can also create Flash
versions of your drawings.
LibreOce Quick Start 73
LibreOce allows you to import Scalable Vector Graphics (*.svg) and WordPerfect
Graphics (*.wpg). Select File > Open and use the Filter drop-down list to view which
le formats can be opened.
Procedure 4.5: Creating a Graphic
1
Click [Alt] + [F2] and enter oodraw to open LibreOce Draw.
2 Use the toolbar at the bottom of the window to create a graphic.
3 Save the graphic.
To embed an existing Draw graphic into an LibreOce document, select Insert >
Object > OLE Object. Select Create from le and click Search to navigate to the Draw
le to insert. If you insert a le as OLE object, you can easily edit the object later by
double-clicking it.
Procedure 4.6: Opening Draw From Other LibreOce Modules
One particularly useful feature of Draw is the ability to open it from other LibreOce
modules so you can create a drawing that is automatically imported into your
document.
1 From an LibreOce module (for example, from Writer), click Insert > Object
> OLE Object > LibreOce 3.x Drawing > OK. This opens Draw.
2 Create your drawing.
3 Click in your document, outside the Draw frame.
The drawing is automatically inserted into your document.
4.6.4 Creating Mathematical Formulas with Math
It is usually dicult to include complex mathematical formulas in your documents.
The LibreOce Math equation editor lets you create formulas using operators,
functions, and formatting assistants. You can then save those formulas as objects
that can be imported into other documents. Math functions can be inserted into
other LibreOce documents like any other graphic object.
Using Math, you can enter your equation in three dierent ways:
Type markup in the equation editor,
Right-click on the equation editor and select the symbol from the context menu,
or
Select a symbol from the Selection toolbox.
74 Start-Up
NOTE
Math is not a calculator. The functions it creates are graphical objects. Even if
they are imported into Calc, these functions cannot be evaluated.
4.7 For More Information
LibreOce also contains extensive online help. In addition, a large community of
users and developers support it. For more details, see the following links:
http://www.libreoffice.org/download/3-4-new-features-and-fixes/
A list of all new features available with LibreOce.
http://www.libreoffice.org/get-help/documentation/
Ocial LibreOce support page, provides manuals and other documentation
http://www.taming-openoffice-org.com/
Taming LibreOce: Books, news, tips and tricks.
LibreOce Quick Start 75
Part II. Managing and Updating
Software
5 Installing or Removing Software
Use YaST's software management tool to search for software components you want
to add or remove. YaST resolves all dependencies for you. To install packages not
shipped with the installation media, add additional software repositories to your
setup and let YaST manage them. Keep your system up-to-date by managing software
updates with the update applet.
Change the software collection of your system with YaST Software Manager. This
YaST module is available in three toolkit avors: Qt (for KDE desktops), GTK+ (for
GNOME desktops), and ncurses (providing a pseudo-graphical user interface in text
mode). This chapter describes Qt and GTK+ avors—for details on the ncurses YaST,
see Chapter 12, YaST in Text Mode (page 153).
TIP: Changing the Toolkit Flavor
By default, YaST is started with the toolkit matching your desktop (GTK+ under
GNOME, Qt under KDE). To alter this default setting system-wide, change the
variable WANTED_GUI in /etc/sysconfig/yast2 to either qt or gtk.
If you do not want to change the system-wide settings, you can nevertheless start
YaST in the desired avor from command line by using the --gtk or --qt parame-
ter, respectively. For example: yast2 --gtk.
NOTE: Conrmation and Review of Changes
When installing, updating or removing packages, any changes in the Software
Manager are not applied immediately but only after conrming them with Accept
or Apply respectively. YaST maintains a list with all actions, allowing you to review
and modify your changes before applying them to the system.
5.1 Denition of Terms
Repository
A local or remote directory containing packages, plus additional information about
these packages (package meta-data).
(Repository) Alias
A short name for a repository used by various zypper commands. The alias can
be chosen by the user when adding a repository and must be unique.
Installing or Removing Software 79
Product
Represents a whole product, for example openSUSE®.
Pattern
A pattern is an installable group of packages dedicated to a certain purpose. For
example, the Laptop pattern contains all packages that are needed in a mobile
computing environment. Patterns dene package dependencies (such as required
or recommended packages) and come with a preselection of packages marked
for installation. This ensures that the most important packages needed for a
certain purpose are available on your system after installation of the pattern.
However, not necessarily all packages in a pattern are preselected for installation
and you can manually select or deselect packages within a pattern according to
your needs and wishes.
Package
A package is a compressed le in rpm format that contains the les for a particular
program.
Patch
A patch consists of one or more packages and may be applied by means of
deltarpms. It may also introduce dependencies to packages that are not installed
yet.
Resolvable
An generic term for product, pattern, package or patch. The most commonly used
type of resolvable is a package or a patch.
deltarpm
A deltarpm consists only of the binary di between two dened versions of a
package, and therefore has the smallest download size. Before being installed,
the full RPM package is rebuilt on the local machine.
Package Dependencies
Certain packages are dependent on other packages, such as shared libraries. In
other terms, a package may require other packages—if the required packages
are not available, the package cannot be installed. In addition to dependencies
(package requirements) that must be fullled, some packages recommend other
packages. These recommended packages are only installed if they are actually
available, otherwise they are just ignored and the package recommending them
is installed nevertheless.
5.2 Using the KDE Interface (Qt)
The YaST Qt interface is started by default when using the desktops KDE, icewm,
and others. It is also used when invoking YaST from a remote terminal. Start the
software manager from the YaST Control Center by choosing Software > Software
Management.
80 Start-Up
5.2.1 Views for Searching Packages or Patterns
The YaST software manager can install packages or patterns from all currently enabled
repositories. It oers dierent views and lters to make it easier to nd the software
you are searching for. The Search view is the default view of the window. To change
view, click View and select one of the following entries from the drop-down list. The
selected view opens in a new tab.
Patterns
Lists all patterns available for installation on your system.
Package Groups
Lists all packages sorted by groups such as Graphics, Programming, or Security.
RPM Groups
Lists all packages sorted by functionality with groups and subgroups. For example
Networking > Email > Clients.
Languages
Filter to list all packages needed to add a new system language.
Repositories
Filter to list packages by repository. In order to select more than one repository,
hold the [Ctrl] key while clicking on repository names. The “pseudo repository”
@System lists all packages currently installed.
Search
Lets you search for a package according to certain criteria. Enter a search term
and press [Enter]. Rene your search by specifying where to Search In and by
changing the Search Mode. For example, if you do not know the package name
but only the name of the application that you are searching for, try including the
package Description in the search process.
Installing or Removing Software 81
Installation Summary
If you have already selected packages for installation, update or removal, this
view shows the changes that will be applied to your system as soon as you click
Accept. To lter for packages with a certain status in this view, activate or deac-
tivate the respective check boxes. Hit [Shift] + [F1] for details on the status ags.
TIP: Finding Packages not Belonging to an Active Repository
To list all packages that do not belong to an active repository, choose View >
Repositories > @System and then choose Secondary Filter > Unmaintained
Packages. This is useful, for example, if you have deleted a repository and would
like to make sure no packages from that repository remain installed.
5.2.2 Installing and Removing Packages or Patterns
Certain packages are dependent on other packages, such as shared libraries. On the
other hand, some packages cannot coexist with others on the system. If possible,
YaST automatically resolves these dependencies or conicts. If your choice results
in a dependency conict that cannot be automatically solved, you need to solve it
manually as described in Section 5.2.4, Checking Software Dependencies” (page 85).
NOTE: Removal of Packages
When removing any packages, by default YaST only removes the selected pack-
ages. If you want YaST to also remove any other packages that become unneeded
after removal of the specied package, select Options > Cleanup when deleting
packages.
1 Search for packages as described in Section 5.2.1, “Views for Searching
Packages or Patterns” (page 81).
2 The packages found are listed in the right pane. To install a package or remove
it, right-click it and choose Install or Delete. If the relevant option is not
available, check the package status indicated by the symbol in front of the
package name—hit [Shift] + [F1] for help.
TIP: Applying an Action to All Packages Listed
To apply an action to all packages listed in the right pane, choose an action
from Package > All in This List.
3 To install a pattern, right-click the pattern name and choose Install.
4 It is not possible to remove a pattern per se. Instead, select the packages of
a pattern you want to remove and mark them for removal.
5 In order to select more packages, repeat the steps mentioned above.
82 Start-Up
6 Before applying your changes, you can review or modify them by clicking
View > Installation Summary. By default, all packages that will change status,
are listed.
7 In order to revert the status for a package, right-click the package and select
one of the following entries: Keep if the package was scheduled to be deleted
or updated, or Do Not Install if it was scheduled for installation. To abandon
all changes and close the Software Manager, click Cancel and Abandon
8 When you are nished, click Accept to apply your changes.
9 In case YaST found dependencies on other packages, a list of packages that
have additionally been chosen for installation, update or removal is presented.
Click Continue to accept them.
After all selected packages are installed, updated or removed, the YaST Soft-
ware Manager automatically terminates.
NOTE: Installing Source Packages
Installing source packages with YaST Software Manager is not possible at the
moment. Use the command line tool zypper for this purpose. For more information,
see Section 9.1.2.1, “Installing Source Packages” (page 114).
5.2.3 Updating Packages
Instead of updating individual packages, you can also update all installed packages
or all packages from a certain repository. When mass updating packages, the following
aspects are generally considered:
priorities of the repositories that provide the package,
architecture of the package (for example, x86_64, i686, i586),
version number of the package,
package vendor.
Which of the aspects has the highest importance for choosing the update candidates
depends on the respective update option you choose.
1 To update all installed packages to the latest version, choose Package > All
Packages > Update if Newer Version Available from the main menu.
All repositories are checked for possible update candidates, using the following
policy: YaST rst tries to restrict the search to packages with the same archi-
tecture and vendor like the installed one. If the search is positive, the “best”
update candidate from those is selected according to the process below.
However, if no comparable package of the same vendor can be found, the
search is expanded to all packages with the same architecture. If still no
Installing or Removing Software 83
comparable package can be found, all packages are considered and the “best”
update candidate is selected according to the following criteria:
1. Repository priority: Prefer the package from the repository with the highest
priority.
2. If more than one package results from this selection, choose the one with
the “best” architecture (best choice: matching the architecture of the in-
stalled one; otherwise: x86_64 > i686 > i586).
If the resulting package has a higher version number than the installed one,
the installed package will be updated and replaced with the selected update
candidate.
This option tries to avoid changes in architecture and vendor for the installed
packages, but under certain circumstances, they are tolerated.
NOTE: Update Unconditionally
If you choose Package > All Packages > Update Unconditionally instead,
basically the same criteria apply but any candidate package found is in-
stalled unconditionally. Thus, choosing this option might actually lead to
downgrading some packages.
2 To make sure that the packages for a mass update derive from a certain
repository:
2a Choose the repository from which to update as described in Sec-
tion 5.2.1, “Views for Searching Packages or Patterns” (page 81) .
2b On the right hand side of the window, click Switch system packages
to the versions in this repository. This explicitly allows YaST to change
the package vendor when replacing the packages.
As soon as you proceed with Accept, all installed packages will be
replaced by packages deriving from this repository, if available. This
may lead to changes in vendor and architecture and even to down-
grading some packages.
2c To refrain from this, click Cancel switching system packages to the
versions in this repository. Note that you can only cancel this until
you press the Accept button.
3 Before applying your changes, you can review or modify them by clicking
View > Installation Summary. By default, all packages that will change status,
are listed.
4 If all options are set according to your wishes, conrm your changes with Ac-
cept to start the mass update.
84 Start-Up
5.2.4 Checking Software Dependencies
Most packages are dependent on other packages. If a package, for example, uses a
shared library, it is dependent on the package providing this library. On the other
hand some packages cannot coexist with each other, causing a conict (for example,
you can only install one mail transfer agent: sendmail or postx). When installing or
removing software, the Software Manager makes sure no dependencies or conicts
remain unsolved to ensure system integrity.
In case there exists only one solution to resolve a dependency or a conict, it is re-
solved automatically. Multiple solutions always cause a conict which needs to be
resolved manually. If solving a conict involves a vendor or architecture change, it
also needs to be solved manually. When clicking Accept to apply any changes in the
Software Manager, you get an overview of all actions triggered by the automatic re-
solver which you need to conrm.
By default, dependencies are automatically checked. A check is performed every
time you change a package status (for example, by marking a package for installation
or removal). This is generally useful, but can become exhausting when manually
resolving a dependency conict. To disable this function, uncheck Dependencies >
Autocheck. Manually perform a dependency check with Dependencies > Check Now.
A consistency check is always performed when you conrm your selection with Accept.
To review a package's dependencies, right-click it and choose Show Solver Informa-
tion. A map showing the dependencies opens. Packages that are already installed
are displayed in a green frame.
NOTE: Manually Solving Package Conicts
Unless you are very experienced, follow the suggestions YaST makes when han-
dling package conicts, otherwise you may not be able to resolve them. Keep in
mind that every change you make, potentially triggers other conicts, so you can
easily end up with a steadily increasing number of conicts. In case this happens,
Cancel the Software Manager, Abandon all your changes and start again.
Installing or Removing Software 85
Figure 5.1: Conict Management of the Software Manager
5.3 Using the GNOME Interface (GTK+)
The YaST GTK+ interface is started by default when using the desktops GNOME and
XFCE. Start the software manager from the YaST Control Center by clicking Software
> Software Management.
5.3.1 Views for Searching Packages or Patterns
The easiest way to nd a package is to use the search eld in the upper right corner
of the software manager. Enter a search term and press [Enter]. By default it will
86 Start-Up
search package names and summaries. Press the search item to change this lter
and search the le lists, for example.
The software manager also oers dierent views and lters for displaying package
lists. These are available from the pull-down menu in the upper left corner:
Groups
The default view lists all packages sorted by groups such as Admin Tools,
Graphics, Programming, or Security.
RPM Groups
Lists all packages sorted by functionality with groups and subgroups. For example
Networking > Email > Clients.
Repositories
Filter to list packages by repository. In order to select more than one repository,
hold the [Ctrl] key while clicking on repository names. The “pseudo repository”
@System lists all packages currently installed.
To add, edit, or remove available repositories, click Edit Repositories.
Patterns
Lists all patterns available for installation on your system.
Languages
Filter to list all packages needed to add a new system language.
The box in the lower right corner of the dialog also allows to lter for packages that
are Installed, Not Installed or Upgradable. If you select the No Status entry, all
available packages from the congured repositories are displayed, independent of
their status.
5.3.2 Installing and Removing Packages or Patterns
Certain packages are dependent on other packages, such as shared libraries. On
the other hand, some packages cannot coexist with others on the system. If possible,
YaST automatically resolves these dependencies or conicts. If your choice results
in a dependency conict that cannot be automatically solved, you need to solve it
manually as described in Section 5.2.4, “Checking Software Dependen-
cies” (page 85).
1 Search for packages as described in Section 5.3.1, “Views for Searching
Packages or Patterns” (page 86).
2 The packages found are listed in the right pane. To further lter the search
results according to package status (Any Status, Not Installed, Installed,
Upgradable), select one of the entries in the box at the lower left corner of
the dialog. For details about a package, click the package in the list. Informa-
tion like available versions, authors and changelog of the package are dis-
played in the lower right corner of the window.
Installing or Removing Software 87
To mark a package for installation, re-installation, removal, or upgrade, right-
click the package and choose the appropriate action from the menu.
TIP: Applying an Action to All Packages Listed
To apply an action to all packages listed in the right pane, right-click a
package, choose Select All, right-click again and choose an action.
3 To install a pattern, right-click the pattern name and choose Install.
4 It is not possible to remove a pattern per se. Instead, select the packages of
a pattern you want to remove and mark them for removal.
5 In order to select more packages, repeat the steps mentioned above.
6 Before applying your changes, you can review or modify them by clicking
View All Changes at the bottom of the dialog. By default, all packages that
will change status are listed.
7 To revert changes for a package, click the Undo icon with the yellow arrow.
To nish the review, click Close.
8 When you are nished with the selection of packages to install or remove,
Apply your changes.
9 In case YaST found dependencies on other packages, a list of packages that
have additionally been chosen for installation, update or removal is presented.
Click Apply to accept them.
After all selected packages are installed, updated or removed, the YaST Soft-
ware Manager automatically terminates.
NOTE: Installing Source Packages
Installing source packages with YaST Software Manager is not possible at the
moment. Use the command line tool zypper for this purpose. For more information,
see Section 9.1.2.1, “Installing Source Packages” (page 114).
5.3.3 Updating Packages
Instead of updating individual packages, you can also update all installed packages
or all packages from a certain repository. When mass updating packages, the following
aspects are generally considered:
priorities of the repositories that provide the package,
architecture of the package (for example, x86_64, i686, i586),
version number of the package,
88 Start-Up
package vendor.
Which of the aspects has the highest importance for choosing the update candidates
depends on the respective update option you choose.
1 To view the list of packages that can be updated (packages with higher ver-
sions are available), select Upgradable in the bottom left box.
2 To update all packages listed there, click Upgrade All.
To install only upgradable packages for which an ocial patch has been issued,
click Upgrade Patches. Those packages are marked by a patch tag next to
their version number. Choosing this option is equivalent to doing an online
update with YaST as described in Chapter 6, YaST Online Update (page 99).
If no patches have been issued since last applying patches, the button is dis-
abled.
3 To make sure that the packages for a mass update derive from a certain
repository:
3a Choose the repository from which to update as described in Sec-
tion 5.3.1, “Views for Searching Packages or Patterns” (page 86) .
3b On the right hand side of the window, click Switch system packages
to the versions in this repository. This explicitly allows YaST to change
the package vendor when replacing the packages.
All installed packages will be replaced by packages deriving from
this repository, if available. This may lead to changes in vendor and
architecture and even to downgrading some packages.
4 Before applying the changes, you can review or modify them by clicking View
All Changes at the bottom of the dialog. By default, all packages that will
change status are listed.
5 To refrain from switching the system packages to the versions in this reposi-
tory, click the Undo button next to the respective option.
6 If all options are set according to your wishes, conrm your changes with Apply
to start the mass update.
5.3.4 Checking Software Dependencies
Most packages are dependent on other packages. If a package, for example, uses a
shared library, it will be dependent on the package providing this library. On the
other hand, some packages cannot coexist with each other, causing a conict (for
example, you can only install one mail transfer agent: sendmail or postx). When
installing or removing software, the Software Manager makes sure no dependencies
or conicts remain unresolved to ensure system integrity.
Installing or Removing Software 89
In case there exists only one solution to resolve a dependency or a conict, it is re-
solved automatically. Multiple solutions always cause a conict which needs to be
resolved manually. If solving a conict involves a vendor or architecture change, it
also needs to be solved manually. When clicking Apply to apply any changes in the
Software Manager, you get an overview of all actions triggered by the automatic re-
solver which you need to conrm.
By default, dependencies are automatically checked. A check is performed every
time you change a package status (for example, by marking a package for installation
or removal). This is generally useful, but can become exhausting when manually
resolving a dependency conict. To disable this function, uncheck Dependencies >
Autocheck. Manually perform a dependency check with Dependencies > Check Now.
A consistency check is always performed when you conrm your selection with Apply.
NOTE: Manually Solving Package Conicts
Unless you are very experienced, follow the suggestions YaST makes when han-
dling package conicts, otherwise you may not be able to resolve them. Keep in
mind that every change you make, potentially triggers other conicts, so you can
easily end up with a steadily increasing number of conicts. In case this happens,
click Cancel and Quit the software manager. Relaunch it to start again.
Figure 5.2: Conict Management of the Software Manager
5.4 Managing Software Repositories and Services
If you want to install third-party software, add additional software repositories to
your system. By default, the product repositories such as openSUSE-DVD 12.2 and
a matching update repository are automatically congured during the installation.
Depending on the initially selected product, a separate language add-on repository
with translations, dictionaries, etc. might also be congured.
90 Start-Up
To manage repositories, start YaST and select Software > Software Repositories. The
Congured Software Repositories dialog opens. Here, you can also manage subscrip-
tions to so-called Services by changing the View at the right corner of the dialog to
All Services. A Service in this context is a Repository Index Service (RIS) that can
oer one or more software repositories. Such a Service can be changed dynamically
by its administrator or vendor.
Each repository provides les describing content of the repository (package names,
versions, etc.). These repository description les are downloaded to a local cache
that is used by YaST. To ensure their integrity, software repositories can be signed
with the GPG Key of the repository maintainer. Whenever you add a new repository,
YaST oers the ability to import its key.
WARNING: Trusting External Software Sources
Before adding external software repositories to your list of repositories, make
sure this repository can be trusted. openSUSE is not responsible for any potential
problems arising from software installed from third-party software repositories.
5.4.1 Adding Software Repositories
You can either add repositories from a local harddisk, from a removable medium
(like a CD, DVD or a USB mass storage) or from a network.
To add repositories from the Congured Software Repositories dialog in YaST proceed
as follows:
1 Click Add.
2 From the list of available Media Types specify the type matching your reposi-
tory:
For network sources, it is usually sucient to use the default option, Specify
URL.
To add a repository from a removable medium or a local harddisk, choose the
relevant option and insert the medium or connect the USB device to the ma-
chine, respectively.
3 You can choose to Download Repository Description Files now. If the option
is unchecked, YaST will automatically download the les later, if needed. Click
Next to proceed.
4 When adding a repository from the network, enter the data you are prompted
for. Continue with Next.
5 Depending on the repository you have added, you might be asked if you want
to import the GPG key with which it is signed or asked to agree to a license.
Installing or Removing Software 91
After conrming these messages, YaST will download and parse the metadata
and add the repository to the list of Congured Repositories..
6 If needed, adjust the repository Properties as described in Section 5.4.2,
“Managing Repository Properties” (page 92) or conrm your changes with OK
to close the conguration dialog.
Now you can install software from this repository as described in Section 5.2, “Using
the KDE Interface (Qt)” (page 80) or in Section 5.3, “Using the GNOME Interface
(GTK+)” (page 86).
YaST also oers a list of predened popular repositories available under Community
Repositories. Among others, it includes driver repositories for nVidia and ATI graphics
cards, and popular projects from the openSUSE® Build Service, such as the Mozilla
repository (containing packages with the most recent versions of Firefox and Thun-
derbird).
Procedure 5.1: Conguring Community Repositories
1 Start YaST and select Software > Software Repositories.
2 Click Add.
3 Choose Community Repositories and proceed with Next.
4 From the precongured list of repositories choose the ones you want to add
by ticking the respective check boxes. The Mozilla repository, for example, is
listed as openSUSE BuildService - Mozilla.
Conrm with OK.
5 Accept to Import the GPG key. You need to import a key for each repository
you have chosen.
6 The new software repositories are now listed in the Congured Software
Repositories overview. Click OK to leave the software repositories conguration.
5.4.2 Managing Repository Properties
The Congured Software Repositories overview of the Software Repositories lets you
change the following repository properties:
Status
The repository status can either be Enabled or Disabled. You can only install
packages from repositories that are enabled. To turn a repository o temporarily
click Disable. You can also double-click on a repository name to toggle its status.
If you want to remove a repository completely, click Delete.
Refresh
When refreshing a repository, its content description (package names, versions,
etc.) is downloaded to a local cache that is used by YaST. It is sucient to do this
92 Start-Up
once for static repositories such as CDs or DVDs, whereas repositories whose
content changes often should be refreshed frequently. The easiest way to keep
a repository's cache up-to-date is to choose Automatically Refresh. To do a
manual refresh click Refresh and select one of the options.
Keep Downloaded Packages
Packages from remote repositories are downloaded before being installed. By
default, they are deleted upon a successful installation. Activating Keep Down-
loaded Packages prevents the deletion of downloaded packages. The download
location is congured in /etc/zypp/zypp.conf, by default it is /var/cache/zypp/
packages.
Priority
The Priority of a repository is a value between 1 and 200, with 1 being the highest
priority and 200 the lowest priority. Any new repositories that are added with YaST
get a priority of 99 by default. If you do not care about a priority value for a certain
repository, you can also set the value to 0 to apply the default priority to that
repository (99). If a package is available in more than one repository, then the
repository with the highest priority takes precedence. This is useful if you want
to avoid downloading packages unnecessarily from the Internet by giving a local
repository (for example, a DVD) a higher priority.
IMPORTANT: Priority vs. Version
The repository with the highest priority takes precedence in any case. There-
fore, make sure that the update repository always has the highest priority (20
by default), otherwise you might install an outdated version that will not be
updated until the next online update.
If you add repositories providing new versions for programs shipped with
openSUSE (for example a repository with the latest KDE or GNOME version),
make sure they have a higher priority than the standard repositories, otherwise
packages from these repositories will not be installed by default.
Name and URL
To change a repository name or its URL, select it from the list with a single-click
and then click Edit.
5.4.3 Managing Repository Keys
To ensure their integrity, software repositories can be signed with the GPG Key of
the repository maintainer. Whenever you add a new repository, YaST oers to import
its key. Verify it as you would do with any other GPG key and make sure it does not
change. If you detect a key change, something might be wrong with the repository.
Disable the repository as an installation source until you know the cause of the key
change.
Installing or Removing Software 93
To manage all imported keys, click GPG Keys... in the Congured Software Repositories
dialog. Select an entry with the mouse to show the key properties at the bottom of
the window. Add, Edit or Delete keys with a click on the respective buttons.
5.5 Keeping the System Up-to-date
openSUSE oers a continuous stream of software security patches for your product.
The update applet informs you about the availability of patches and lets you easily
install them with just a few clicks.
5.5.1 Using the KDE Software Updater
The Software Updater icon resides in the system tray of your panel depicting a
gearwheel with a green arrow. To start Software Updater manually, choose System
Settings > Software Management > Software Updates from the main menu. Alterna-
tively, press [Alt] + [F2] and enter kpk_update.
NOTE: Icon Visibility
The Software Updater icon is only visible in the system tray, if patches are avail-
able. Hover over the icon to see the number of patches available.
5.5.1.1 Installing Patches
1 Whenever software updates are available, the applet icon appears in the
panel. Left-click the Software Updater icon to launch the Review and Update
software window.
2 Select a patch for installation by ticking its checkbox. Get detailed information
on a patch by clicking on its title. To select all available patches for installation,
tick the checkbox in the table header.
3 Click Apply to start the patch installation.
4 In case you have started the patch installation for the rst time, you will be
asked to enter the root password twice in order to proceed. If you also check
Remember authorization you will never be asked again to provide the pass-
word.
5 The Additional Changes window showing an installation summary opens. Click
Continue to nish the installation.
94 Start-Up
Figure 5.3: KDE Software Updater
The YaST Online Update oers advanced features to customize the patch installation.
Please refer to Chapter 6, YaST Online Update (page 99) for more information.
5.5.1.2 Conguring the KDE Software Updater
By default Software Updater checks for updates every 24 hours, noties you when
patches are available and does not automatically install patches. These settings can
be changed with the Software Management settings. To open the Software Manage-
ment settings choose System Settings > Software Management > Settings from the
main menu. Alternatively, press [Alt] + [F2] and enter kpk_settings. The settings for
Software Updater are available in the Update Settings section.
IMPORTANT: Patch Origin
The Software Management settings also allows you to congure the repositories
(Origin of Packages) to be used. This setting not only applies to Software Updater
but also to the KDE Software Management module (Get and Remove Software).
Make sure the repository Updates for openSUSE 12.2 is always selected—otherwise
you will not receive patches.
5.5.2 Using the GNOME Update Applet
The update applet resides in the notication area of the panel. Its icon changes de-
pending on the availability and relevance of patches and the status of the update.
To invoke the applet manually, choose Computer > More Applications > System >
Software Update.
NOTE: Icon visibility
The applet icon is only visible if the following conditions are met:
patches are available
Installing or Removing Software 95
the GUI was not started as user root
the GUI was not started in a VNC session
To start the update viewer even if no applet icon is visible, press [Alt] + [F2] and
enter gpk-update-viewer.
Open box with a globe
The update applet is busy (for example checking for updates or installing software).
Red Star with Exclamation Mark
Security patches are available.
Orange Star with an Up Arrow
Important patches are available.
Yellow Star with a Down Arrow
Trivial patches are available.
Yellow Triangle with Exclamation Mark
An error has occurred.
5.5.2.1 Installing Patches
Procedure 5.2: Installing Patches
Whenever new patches are available, a notication message will appear and the
Update Applet icon will be visible in the notication area.
1 Either click Install updates in the notication message or click the icon to open
the Software Update window.
2 All security and important patches are preselected. It is strongly recommended
to install these patches. Trivial patches can be manually selected by ticking
the respective check boxes. Get detailed information on a patch by clicking
on its title.
3 Click Install Updates to start the patch installation.
4 The Additional Conrmation Required window showing an installation summary
opens. Click Continue to proceed.
5
Enter the root password in the authentication screen and proceed with Au-
thenticate.
96 Start-Up
Figure 5.4: GNOME Update Applet
The YaST Online Update oers advanced features to customize the patch installation.
Please refer to Chapter 6, YaST Online Update (page 99) for more information.
5.5.2.2 Conguring the Software Update Applet
To congure the update applet, right-click the update icon in the panel and choose
Preferences. The conguration dialog lets you modify the following settings:
Check for Updates
Choose how often a check for updates is performed: Hourly, Daily, Weekly, or
Never.
Automatically Install
Congure whether patches are installed automatically or not (default). Automatic
installation can be chosen for either security patches only or for all patches.
Check for Major Upgrades
Choose how often a check for major upgrades is performed: Daily, Weekly, or
Never.
Check for updates when using mobile broadband
This conguration option is only available on mobile computers. Turned o by
default.
More options are congurable using gconf-editor: apps > gnome-packagekit.
Installing or Removing Software 97
6 YaST Online Update
openSUSE oers a continuous stream of software security updates for your product.
By default, the update applet is used to keep your system up-to-date. Refer to Sec-
tion 5.5, “Keeping the System Up-to-date” (page 94) for further information on the
update applet. This chapter covers the alternative tool for updating software packages:
YaST Online Update.
The current patches for openSUSE® are available from an update software repository,
which is automatically congured during the installation. Alternatively, you can
manually add an update repository from a source you trust. To add or remove
repositories, start the Repository Manager with Software > Software Repositories in
YaST. Learn more about the Repository Manager in Section 5.4, “Managing Software
Repositories and Services” (page 90).
openSUSE provides updates with dierent relevance levels:
Security Updates
Fix severe security hazards and should always be installed.
Recommended Updates
Fix issues that could compromise your computer.
Optional Updates
Fix non-security relevant issues or provide enhancements.
6.1 The Online Update Dialog
The YaST Online Update dialog is available in two toolkit avors: GTK (for GNOME)
and Qt (for KDE). Both interfaces dier in look and feel but basically provide the same
functions. The following sections provide a brief description of each. To open the di-
alog, start YaST and select Software > Online Update. Alternatively, start it from
the command line with yast2 online_update.
6.1.1 KDE Interface (Qt)
The Online Update window consists of four sections.
YaST Online Update 99
Figure 6.1: YaST Online Update—Qt Interface
The Summary section on the left lists the available patches for openSUSE. The
patches are sorted by security relevance: security, recommended, and optional. You
can change the view of the Summary section by selecting one of the following options
from Show Patch Category:
Needed Patches (default view)
Non-installed patches that apply to packages installed on your system.
Unneeded Patches
Patches that either apply to packages not installed on your system, or patches
that have requirements which have already have been fullled (because the rel-
evant packages have already been updated from another source).
All Patches
All patches available for openSUSE.
Each list entry in the Summary section consists of a symbol and the patch name. For
an overview of the possible symbols and their meaning, press [Shift] + [F1]. Actions
required by Security and Recommended patches are automatically preset. These actions
are Autoinstall, Autoupdate and Autodelete.
If you install an up-to-date package from a repository other than the update reposi-
tory, the requirements of a patch for this package may be fullled with this installation.
In this case a check mark is displayed in front of the patch summary. The patch will
be visible in the list until you mark it for installation. This will in fact not install the
patch (because the package already is up-to-date), but mark the patch as having
been installed.
100 Start-Up
Select an entry in the Summary section to view a short Patch Description at the
bottom left corner of the dialog. The upper right section lists the packages included
in the selected patch (a patch can consist of several packages). Click an entry in the
upper right section to view details about the respective package that is included in
the patch.
6.1.2 GNOME Interface (GTK)
The Online Update window consists of four main sections.
Figure 6.2: YaST Online Update—GTK Interface
The upper right section lists the available (or already installed) patches for openSUSE.
To lter patches according to their security relevance, click the corresponding Prior-
ity entry in the upper right section of the window: Security, Recommended, Optional
or Any priority.
If all available patches are already installed, the Package listing in the upper right
section will show no entries. The box in the bottom left-hand section shows the
number of both available and already installed patches and lets you toggle the view
to either Available or Installed patches.
Select an entry in the Package listing section to view a patch description and further
details at the bottom right corner of the dialog. As a patch can consist of several
packages, click the Applies to entry in the lower right section to see which packages
are included in the respective patch.
Click on a patch entry to open a row with detailed information about the patch in the
bottom of the window. Here you can see a detailed patch description as well as the
YaST Online Update 101
versions available. You can also choose to Install optional patches—security and
recommended patches are already preselected for installation.
6.2 Installing Patches
The YaST Online Update dialog allows you to either install all available patches at
once or to manually select the patches that you want to apply to your system. You
may also revert patches that have been applied to the system.
By default, all new patches (except optional ones) that are currently available for
your system are already marked for installation. They will be applied automatically
once you click Accept or Apply.
Procedure 6.1: Applying Patches with YaST Online Update
1 Start YaST and select Software > Online Update.
2
To automatically apply all new patches (except optional ones) that are cur-
rently available for your system, proceed with Apply or Accept to start the
installation of the preselected patches.
3 To rst modify the selection of patches that you want to apply:
3a Use the respective lters and views the GTK and Qt interfaces provide.
For details, refer to Section 6.1.1, KDE Interface (Qt)” (page 99) and
Section 6.1.2, “GNOME Interface (GTK)” (page 101).
3b Select or deselect patches according to your needs and wishes by
activating or deactivating the respective checkbox (GNOME) or by
right-clicking the patch and choosing the respective action from the
context menu (KDE).
IMPORTANT: Always Apply Security Updates
Do not deselect any security-related patches without a very good
reason. These patches x severe security hazards and prevent
your system from being exploited.
3c Most patches include updates for several packages. If you want to
change actions for single packages, right-click a package in the
package view and choose an action (KDE).
3d To conrm your selection and apply the selected patches, proceed
with Apply or Accept.
4 After the installation is complete, click Finish to leave the YaST Online Update.
Your system is now up-to-date.
102 Start-Up
TIP: Disabling deltarpms
By default, updates are downloaded as deltarpms. Since rebuilding rpm packages
from deltarpms is a memory and processor consuming task, certain setups or
hardware congurations might require you to disable the usage of deltarpms for
the sake of performance.
To disable the use of deltarpms, edit the le /etc/zypp/zypp.conf and set
download.use_deltarpm to false.
6.3 Automatic Online Update
YaST also oers the possibility to set up an automatic update with daily, weekly or
monthly schedule. To use the respective module, you need to install the
yast2-online-update-configuration package rst.
Procedure 6.2: Conguring the Automatic Online Update
1 After installation, start YaST and select Software > Online Update Congura-
tion.
Alternatively, start the module with yast2 online_update_configuration from
the command line.
2 Activate Automatic Online Update.
3 Choose whether to update Daily, Weekly, or Monthly.
Some patches, such as kernel updates or packages requiring license agree-
ments, require user interaction, which would cause the automatic update
procedure to stop.
4 To automatically accept any license agreements, activate Agree with Licenses.
5 Select if you also want to Skip Interactive Patches in case you want the update
procedure to proceed fully automatically.
IMPORTANT: Skipping Patches
If you select to skip any packages that require interaction, run a manual
Online Update from time to time in order to install those patches, too.
Otherwise you might miss important patches.
6 Conrm your conguration with OK.
YaST Online Update 103
7 Installing Packages From the
Internet
By default, it is only possible to install packages from congured and enabled
repositories. Apart from the ocial repositories that are congured during the instal-
lation, numerous other repositories exist. The openSUSE® Build Service hosts several
hundred ones and a lot of third party repositories exist, too—see http://en.opensuse
.org/Additional_package_repositories.
openSUSE oers two easy ways to install from these repositories without the need
to rst subscribe to them. The 1-Click Install method allows you to install packages
directly from a Web browser, while the YaST Package Search lets you query almost
all known repositories for openSUSE. You can directly install any package found by
the package search module.
WARNING: Trusting External Software Sources
Before installing from any external software repository, make sure it can be
trusted. openSUSE is not responsible for any potential problems arising from
software installed from third-party software repositories.
7.1 1-Click Install
Installation using 1-Click Install is available from a lot of repositories available on
Web interfaces. A very popular interface is the openSUSE Build Service software
search.
Procedure 7.1: Installing Packages from the openSUSE Build Service via 1-Click
Install
1
Start the openSUSE Build Service search interface at http://software
.opensuse.org/search.
2 Select your system version from the drop-down menu, for example open-
SUSE 12.2.
3 Enter the name of the package you want to install, for example the
OpenStreetMap editor josm.
4 To rene the search, adjust the Search Options according to your wishes.
5 Click Search.
Installing Packages From the Internet 105
6 From the results list select the preferred item by clicking its 1-Click Install
button.
7 In the Web browser's download dialog, select to open the le with the YaST
Meta Package Handler.
The 1-click installer opens the Additional Software Repositories dialog. It
shows the repositories providing the packages you want to install per
1-Click Install. They are activated per default. To proceed with the in-
stallation, keep the repository selection. By default, you remain subscribed
to these repositories after the installation has nished and you will receive
updates from them in the future.
8 If you want to use the new repositories only once instead, uncheck Remain
Subscribed to These Repositories after Installation. Click Next to proceed.
9 Now select the software packages that should be installed. Normally there
is no need to change the default selection. Click Next to proceed.
10 The Proposal screen summarizes the choices you made. Click Customize
to restart the conguration steps from above. Click Next and Yes to proceed
with the installation.
11
Enter the root password to start the installation. In case a new repository
has been added you also need to conrm the import of the repository's
GPG key. During the installation several progress pop-ups appear that do
not need any interaction. After reading the “Installation was successful”
message, click Finish.
TIP: Disabling 1-Click Install Feature
If you want to disable the 1-Click install feature, uninstall the
yast2-metapackage-handler package using YaST. Alternatively, enter the following
command as root:
rpm -e yast2-metapackage-handler
7.2 YaST Package Search
Provided you are connected to the internet, you can also search and install packages
from almost all known repositories for openSUSE directly via YaST's Package Search.
This module is a YaST frontend for the Webpin package search available at http://
packages.opensuse-community.org/. The YaST module is not available by default—you
need to install the package yast2-packager-webpin rst.
Procedure 7.2: Installing Packages Using the YaST Package Search
1 Start the Package Search from the YaST Control Center via Software > Package
Search.
106 Start-Up
2 Search for a software package by entering it's name into the Search Expression
eld and clicking Search.
3 The search result is listed on the Found Packages tab. Click on a package
name to see the repository URL, the package version number and the archi-
tecture in the Package Description pane.
WARNING: Double Check the Package Information
Make sure to double check whether the software is hosted on a repository
you trust before you install it. Also check if the architecture complies with
your system (x86_64 packages can only be installed on 64bit systems).
4 Mark a package for installation by activating its checkbox. You can mark
several packages at once. You can even start a new search for other packages
without losing your current selection, which is always available on the All Se-
lected Packages. Once you have nished the package selection, proceed with
Next.
The Additional Software Repositories dialog shows the repositories providing
the packages you want to install. They are activated per default. To proceed
with the installation, keep the repository selection. By default, you remain
subscribed to these repositories after the installation has nished, so you will
receive updates from them in the future.
5 If instead you want to use the new repositories only once, uncheck Remain
Subscribed to These Repositories after Installation. Click Next to proceed.
6 Now select the software packages that should be installed. Normally there is
no need to change the default selection. Click Next to proceed.
7 The Proposal screen summarizes the choices you made. Click Customize to
restart the conguration steps from above. Click Next and Yes to proceed with
the installation.
8 Conrm the next dialog. In case a new repository is used, you will also need
to conrm the import of the repository's GPG key. During the installation
several progress pop-ups appear that do not need any interaction. After
reading the “Installation was successful” message, click Finish.
Installing Packages From the Internet 107
8 Installing Add-On Products
Add-on products are system extensions. You can install a third party add-on product
or a special system extension of openSUSE® (for example, a CD with support for
additional languages or a CD with binary drivers). To install a new add-on, start YaST
and select Software > Add-On Products . You can select various types of product
media, like CD, FTP, USB mass storage devices (such as USB ash drives or disks)
or a local directory. You can work also directly with ISO les. To add an add-on as
ISO le media, select Local ISO Image then enter the Path to ISO Image. The Repos-
itory Name is arbitrary.
8.1 Add-Ons
To install a new add-on, proceed as follows:
1 In YaST select Software > Add-On Products to see an overview of already in-
stalled add-on products.
2 To install a new add-on product, click Add.
3 From the list of available Media Types specify the type matching your reposi-
tory.
4 To add a repository from a removable medium, choose the relevant option
and insert the medium or connect the USB device to the machine, respectively.
5 You can choose to Download Repository Description Files now. If the option
is unchecked, YaST will automatically download the les later, if needed. Click
Next to proceed.
6 When adding a repository from the network, enter the data you are prompted
for. Continue with Next.
7 Depending on the repository you have added, you may be asked if you want
to import the GPG key with which it is signed or asked to agree to a license.
After conrming these messages, YaST will download and parse the metadata
and add the repository to the list of Congured Repositories..
8 If needed, adjust the repository Properties as described in Section 5.4.2,
“Managing Repository Properties” (page 92) or conrm your changes with OK
to close the conguration dialog.
Installing Add-On Products 109
9 After having successfully added the repository for the add-on media, the
software manager starts and you can install packages. Refer to Chapter 5,
Installing or Removing Software (page 79) for details.
8.2 Binary Drivers
Some hardware needs binary-only drivers to function properly. If you have such
hardware, refer to the release notes for more information about availability of binary
drivers for your system. To read the release notes, open YaST and select Miscellaneous
> Release Notes.
110 Start-Up
9 Managing Software with Command
Line Tools
This chapter describes Zypper and RPM, two command line tools for managing soft-
ware. For a denition of the terminology used in this context (for example, repository,
patch, or update) refer to Section 5.1, Denition of Terms” (page 79).
9.1 Using Zypper
Zypper is a command line package manager for installing, updating and removing
packages as well as for managing repositories. It is especially useful for accomplishing
remote software management tasks or managing software from shell scripts.
9.1.1 General Usage
The general syntax of Zypper is:
zypper [global-options]
command
[command-options][arguments] ...
The components enclosed in brackets are not required. The simplest way to execute
Zypper is to type its name, followed by a command. For example, to apply all needed
patches to the system type:
zypper patch
Additionally, you can choose from one or more global options by typing them just
before the command. For example, --non-interactive means running the command
without asking anything (automatically applying the default answers):
zypper --non-interactive patch
To use the options specic to a particular command, type them right after the com-
mand. For example, --auto-agree-with-licenses means applying all needed patches
to the system without asking to conrm any licenses (they will automatically be ac-
cepted):
zypper patch --auto-agree-with-licenses
Some commands require one or more arguments. When using the install command,
for example, you need to specify which package(s) to install:
zypper install mplayer
Managing Software with Command Line Tools 111
Some options also require an argument. The following command will list all known
patterns:
zypper search -t pattern
You can combine all of the above. For example, the following command will install
the mplayer and amarok packages from the factory repository while being verbose:
zypper -v install --from factory mplayer amarok
The --from option makes sure to keep all repositories enabled (for solving any de-
pendencies) while requesting the package from the specied repository.
Most Zypper commands have a dry-run option that does a simulation of the given
command. It can be used for test purposes.
zypper remove --dry-run MozillaFirefox
9.1.2 Installing and Removing Software with Zypper
To install or remove packages use the following commands:
zypper install
package_name
zypper remove
package_name
Zypper knows various ways to address packages for the install and remove com-
mands:
by the exact package name (and version number)
zypper install MozillaFirefox
or
zypper install MozillaFirefox-3.5.3
by repository alias and package name
zypper install mozilla:MozillaFirefox
Where mozilla is the alias of the repository from which to install.
by package name using wildcards
The following command will install all packages that have names starting with
“Moz”. Use with care, especially when removing packages.
zypper install 'Moz*'
by capability
For example, if you would like to install a perl module without knowing the name
of the package, capabilities come in handy:
zypper install 'perl(Time::ParseDate)'
112 Start-Up
by capability and/or architecture and/or version
Together with a capability you can specify an architecture (such as i586 or x86_64)
and/or a version. The version must be preceded by an operator: < (lesser than),
<= (lesser than or equal), = (equal), >= (greater than or equal), > (greater than).
zypper install 'firefox.x86_64'
zypper install 'firefox>=3.5.3'
zypper install 'firefox.x86_64>=3.5.3'
by path to the RPM le
You can also specify a local or remote path to a package:
zypper install /tmp/install/MozillaFirefox.rpm
zypper install
URL_TO_FIREFOX_RPM
Replace
URL_TO_FIREFOX_RPM
with the actual download URL such as http://
download.opensuse.org/repositories/mozilla/SUSE_Factory/x86_64/
MozillaFirefox-3.5.3-1.3.x86_64.rpm.
To install and remove packages simultaneously use the +/- modiers. To install emacs
and remove vim simultaneously, use:
zypper install emacs -vim
To remove emacs and install vim simultaneously, use:
zypper remove emacs +vim
To prevent the package name starting with the - being interpreted as a command
option, always use it as the second argument. If this is not possible, precede it with
--:
zypper install -emacs +vim # Wrong
zypper install vim -emacs # Correct
zypper install -- -emacs +vim # same as above
zypper remove emacs +vim # same as above
If (together with a certain package) you automatically want to remove any packages
that become unneeded after removing the specied package, use the --clean-deps
option:
rm
package_name
--clean-deps
By default, Zypper asks for a conrmation before installing or removing a selected
package, or when a problem occurs. You can override this behavior using the
--non-interactive option. This option must be given before the actual command
(install, remove, and patch) as in the following:
zypper --non-interactive install
package_name
This option allows the use of Zypper in scripts and cron jobs.
Managing Software with Command Line Tools 113
WARNING: Do not Remove Mandatory System Packages
Do not remove packages such as glibc, zypper, kernel, or similar packages. These
packages are mandatory for the system and, if removed, may cause the system
to become unstable or stop working altogether.
9.1.2.1 Installing Source Packages
If you want to install the corresponding source package of a package, use:
zypper source-install
package_name
That command will also install the build dependencies of the specied package. If
you do not want this, add the switch -D. To install only the build dependencies use
-d.
zypper source-install -D
package_name
# source package only
zypper source-install -d
package_name
# build dependencies only
Of course, this will only work if you have the repository with the source packages
enabled in your repository list (it is added by default, but not enabled). See Sec-
tion 9.1.4, “Managing Repositories with Zypper (page 117) for details on repository
management.
A list of all source packages available in your repositories can be obtained with:
zypper search -t srcpackage
9.1.2.2 Utilities
To verify whether all dependencies are still fullled and to repair missing dependen-
cies, use:
zypper verify
In addition to dependencies that must be fullled, some packages recommend”
other packages. These recommended packages are only installed if actually available
and installable. In case recommended packages were made available after the rec-
ommending package has been installed (by adding additional packages or hardware),
use the following command:
zypper install-new-recommends
This command is very useful after plugging in a webcam or WLAN device. It will install
drivers for the device and related software, if available. Drivers and related software
are only installable if certain hardware dependencies are fullled.
9.1.3 Updating Software with Zypper
There are three dierent ways to update software using Zypper: by installing
patches, by installing a new version of a package or by updating the entire distribu-
114 Start-Up
tion. The latter is achieved with the zypper dist-upgrade command which is discussed
in Section 16.1, “Upgrading the System” (page 183).
9.1.3.1 Installing Patches
To install all ocially released patches applying to your system, just run:
zypper patch
In this case, all patches available in your repositories are checked for relevance and
installed, if necessary. The above command is all you must enter in order to apply
them when needed.
Zypper knows three dierent commands to query for the availability of patches:
zypper patch-check
Lists the number of needed patches (patches, that apply to your system but are
not yet installed)
~ # zypper patch-check
Loading repository data...
Reading installed packages...
5 patches needed (1 security patch)
zypper list-patches
Lists all needed patches (patches, that apply to your system but are not yet in-
stalled)
~ # zypper list-patches
Loading repository data...
Reading installed packages...
Repository | Name | Version | Category | Status
------------------------------------+-----------+---------+----------+-------
Updates for openSUSE 11.3 11.3-1.82 | lxsession | 2776 | security | needed
zypper patches
Lists all patches available for openSUSE, regardless of whether they are already
installed or apply to your installation.
It is also possible to list and install patches relevant to specic issues. To list specic
patches, use the zypper list-patches command with the following options:
--bugzilla[=
number
]
Lists all needed patches for Bugzilla issues. Optionally, you can specify a bug
number if you only want to list patches for this specic bug.
--cve[=
number
]
Lists all needed patches for CVE (Common Vulnerabilities and Exposures) issues,
or only patches matching a certain CVE number, if specied.
To install a patch for a specic Bugzilla or CVE issue, use the following commands:
Managing Software with Command Line Tools 115
zypper patch --bugzilla=
number
or
zypper patch --cve=
number
For example, to install a security patch with the CVE number CVE-2010-2713, execute:
zypper patch --cve=CVE-2010-2713
9.1.3.2 Installing Updates
If a repository contains only new packages, but does not provide patches,
zypper patch does not show any eect. To update all installed packages with newer
available versions, use:
zypper update
To update individual packages, specify the package with either the update or install
command:
zypper update
package_name
zypper install
package_name
A list of all new installable packages can be obtained with the command:
zypper list-updates
Note that this command only packages lists packages that match the following criteria:
has the same vendor like the already installed package,
is provided by repositories with at least the same priority than the already in-
stalled package,
is installable (all dependencies are satised).
A list of all new available packages (regardless whether installable or not) can be
obtained with:
zypper list-updates --all
To nd out why a new package cannot be installed, just use the zypper install or
zypper update command as described above.
9.1.3.3 Upgrading to a New Product Version
To easily upgrade your installation to a new product version (for example, from
openSUSE 11.4 to openSUSE 12.1), rst adjust your repositories to match the current
openSUSE repositories. For details, refer to Section 9.1.4, “Managing Repositories
with Zypper (page 117). Then use the zypper dist-upgrade command with the re-
quired repositories. This command ensures that all packages will be installed from
116 Start-Up
the repositories currently enabled. For detailed instructions, refer to Section 16.1.4,
“Distribution Upgrade with zypper (page 185).
To restrict the distribution upgrade to packages from a certain repository while con-
sidering also the other repositories for satisfying dependencies, use the --from option
and specify the repository by either its alias, its number or URI.
NOTE: Dierences between zypper update and zypper dist-upgrade
Choose zypper update to update packages to newer versions available for your
product version while maintaining system integrity. zypper update will honor the
following rules:
no vendor changes
no architecture changes
no downgrades
keep installed packages
When executing zypper dist-upgrade, all packages will be installed from the
repositories currently enabled. This rule is enforced, so packages might change
vendor or architecture or even might get downgraded. All packages that have
unfullled dependencies after the upgrade will be uninstalled.
9.1.4 Managing Repositories with Zypper
All installation or patch commands of Zypper rely on a list of known repositories. To
list all repositories known to the system, use the command:
zypper repos
The result will look similar to the following output:
Example 9.1: Zypper—List of Known Repositories
# | Alias | Name | Enabled | Refresh
--+-----------------------+-----------------------+---------+--------
1 | Updates | Updates | Yes | Yes
2 | openSUSE 11.2-0 | openSUSE 11.2-0 | No | No
3 | openSUSE-11.2-Debug | openSUSE-11.2-Debug | No | Yes
4 | openSUSE-11.2-Non-Oss | openSUSE-11.2-Non-Oss | Yes | Yes
5 | openSUSE-11.2-Oss | openSUSE-11.2-Oss | Yes | Yes
6 | openSUSE-11.2-Source | openSUSE-11.2-Source | No | Yes
When specifying repositories in various commands, an alias, URI or repository number
from the zypper repos command output can be used. A repository alias is a short
version of the repository name for use in repository handling commands. Note that
the repository numbers can change after modifying the list of repositories. The alias
will never change by itself.
By default, details such as the URI or the priority of the repository are not displayed.
Use the following command to list all details:
Managing Software with Command Line Tools 117
zypper repos -d
9.1.4.1 Adding Repositories
To add a repository, run
zypper addrepo
URIalias
URI
can either be an Internet repository, a network resource, a directory or a CD or
DVD (see http://en.opensuse.org/openSUSE:Libzypp_URIs for details). The
alias
is
a shorthand and unique identier of the repository. You can freely choose it, with
the only exception that is has to be unique. Zypper will issue a warning if you specify
an alias that is already in use.
9.1.4.2 Removing Repositories
If you want to remove a repository from the list, use the command zypper removerepo
together with the alias or number of the repository you want to delete. For example,
to remove the repository listed as third entry in Example 9.1, “Zypper—List of Known
Repositories” (page 117), use the following command:
zypper removerepo 3
9.1.4.3 Modifying Repositories
Enable or disable repositories with zypper modifyrepo. You can also alter the repos-
itory's properties (such as refreshing behavior, name or priority) with this command.
The following command will enable the repository named updates, turn on auto-refresh
and set its priority to 20:
zypper modifyrepo -er -p 20 'updates'
Modifying repositories is not limited to a single repository—you can also operate on
groups:
-a: all repositories
-l: local repositories
-t: remote repositories
-m
TYPE
: repositories of a certain type (where
TYPE
can be one of the following: http,
https, ftp, cd, dvd, dir, file, cifs, smb, nfs, hd, iso)
To rename a repository alias, use the renamerepo command. The following example
changes the alias from Mozilla Firefox to just firefox:
zypper renamerepo 'Mozilla Firefox' firefox
9.1.5 Querying Repositories and Packages with Zypper
Zypper oers various methods to query repositories or packages. To get lists of all
products, patterns, packages or patches available, use the following commands:
118 Start-Up
zypper products
zypper patterns
zypper packages
zypper patches
To query all repositories for certain packages, use search. It works on package names,
or, optionally, on package summaries and descriptions. Using the wildcards * and ?
with the search term is allowed. By default, the search is not case-sensitive.
zypper search firefox # simple search for "firefox"
zypper search "*fire*" # using wildcards
zypper search -d fire # also search in package descriptions and
summaries
zypper search -u firefox # only display packages not already installed
To search for packages which provide a special capability, use the command
what-provides. For example, if you would like to know which package provides the
perl module SVN::Core, use the following command:
zypper what-provides 'perl(SVN::Core)'
To query single packages, use info with an exact package name as an argument. It
displays detailed information about a package. To also show what is required/recom-
mended by the package, use the options --requires and --recommends:
zypper info --requires MozillaFirefox
The what-provides
package
is similar to rpm -q --whatprovides
package
, but rpm is
only able to query the RPM database (that is the database of all installed packages).
Zypper, on the other hand, will tell you about providers of the capability from any
repository, not only those that are installed.
9.1.6 Conguring Zypper
Zypper now comes with a conguration le, allowing you to permanently change
Zypper's behavior (either system-wide or user-specic). For system-wide changes,
edit /etc/zypp/zypper.conf. For user-specic changes, edit ~/.zypper.conf. If ~/
.zypper.conf does not yet exist, you can use /etc/zypp/zypper.conf as template:
copy it to ~/.zypper.conf and adjust it to your liking. Refer to the comments in the
le for help about the available options.
9.1.7 Troubleshooting
In case you have problems to access packages from congured repositories (for ex-
ample, zypper cannot nd a certain package though you know that it exists in one
the repositories), it can help to refresh the repositories with:
zypper refresh
If that does not help, try
Managing Software with Command Line Tools 119
zypper refresh -fdb
This forces a complete refresh and rebuild of the database, including a forced
download of raw metadata.
9.1.8 Zypper Rollback Feature on btrfs File System
If the btrfs le system is used on the root partition and snapper is installed, zypper
automatically calls snapper (via script installed by snapper) when committing changes
to the le system to create appropriate le system snapshots. These snapshots can
be used for reverting any changes made by zypper. For more information about
snapper, see man snapper.
Zypper (and YaST) currently only make snapshots of the root lesystem. Other sub-
volumes cannot be congured. This feature is not supported on the default le system.
9.1.9 For More Information
For more information on managing software from the command line, enter zypper
help, zypper help
command
or refer to the zypper(8) manpage. For a complete and
detailed command reference, including cheat sheets with the most important com-
mands, and information on how to use Zypper in scripts and applications, refer to
http://en.opensuse.org/SDB:Zypper_usage. A list of software changes for the latest
openSUSE version can be found at . [http://en.opensuse.org/openSUSE:Zypper
versions] .
9.2 RPM—the Package Manager
RPM (RPM Package Manager) is used for managing software packages. Its main
commands are rpm and rpmbuild. The powerful RPM database can be queried by the
users, system administrators and package builders for detailed information about
the installed software.
Essentially, rpm has ve modes: installing, uninstalling (or updating) software pack-
ages, rebuilding the RPM database, querying RPM bases or individual RPM archives,
integrity checking of packages and signing packages. rpmbuild can be used to build
installable packages from pristine sources.
Installable RPM archives are packed in a special binary format. These archives consist
of the program les to install and certain meta information used during the installation
by rpm to congure the software package or stored in the RPM database for documen-
tation purposes. RPM archives normally have the extension .rpm.
TIP: Software Development Packages
For a number of packages, the components needed for software development
(libraries, headers, include les, etc.) have been put into separate packages.
These development packages are only needed if you want to compile software
120 Start-Up
yourself (for example, the most recent GNOME packages). They can be identied
by the name extension -devel, such as the packages alsa-devel, gimp-devel, and
libkde4-devel.
9.2.1 Verifying Package Authenticity
RPM packages have a GPG signature. To verify the signature of an RPM package,
use the command rpm --checksig
package
-1.2.3.rpm to determine whether the
package originates from Novell/SUSE or from another trustworthy facility. This is
especially recommended for update packages from the Internet.
9.2.2 Managing Packages: Install, Update, and Uninstall
Normally, the installation of an RPM archive is quite simple: rpm -i
package
.rpm.
With this command the package is installed, but only if its dependencies are fullled
and if there are no conicts with other packages. With an error message, rpm requests
those packages that need to be installed to meet dependency requirements. In the
background, the RPM database ensures that no conicts arise—a specic le can
only belong to one package. By choosing dierent options, you can force rpm to ignore
these defaults, but this is only for experts. Otherwise, you risk compromising the in-
tegrity of the system and possibly jeopardize the ability to update the system.
The options -U or --upgrade and -F or --freshen can be used to update a package
(for example, rpm -F
package
.rpm). This command removes the les of the old version
and immediately installs the new les. The dierence between the two versions is
that -U installs packages that previously did not exist in the system, but -F merely
updates previously installed packages. When updating, rpm updates conguration
les carefully using the following strategy:
If a conguration le was not changed by the system administrator, rpm installs
the new version of the appropriate le. No action by the system administrator
is required.
If a conguration le was changed by the system administrator before the update,
rpm saves the changed le with the extension .rpmorig or .rpmsave (backup le)
and installs the version from the new package (but only if the originally installed
le and the newer version are dierent). If this is the case, compare the backup
le (.rpmorig or .rpmsave) with the newly installed le and make your changes
again in the new le. Afterwards, be sure to delete all .rpmorig and .rpmsave
les to avoid problems with future updates.
.rpmnew les appear if the conguration le already exists and if the noreplace
label was specied in the .spec le.
Following an update, .rpmsave and .rpmnew les should be removed after comparing
them, so they do not obstruct future updates. The .rpmorig extension is assigned if
the le has not previously been recognized by the RPM database.
Managing Software with Command Line Tools 121
Otherwise, .rpmsave is used. In other words, .rpmorig results from updating from a
foreign format to RPM. .rpmsave results from updating from an older RPM to a newer
RPM. .rpmnew does not disclose any information as to whether the system adminis-
trator has made any changes to the conguration le. A list of these les is available
in /var/adm/rpmconfigcheck. Some conguration les (like /etc/httpd/httpd.conf)
are not overwritten to allow continued operation.
The -U switch is not just an equivalent to uninstalling with the -e option and installing
with the -i option. Use -U whenever possible.
To remove a package, enter rpm -e
package
. rpm, which only deletes the package if
there are no unresolved dependencies. It is theoretically impossible to delete Tcl/Tk,
for example, as long as another application requires it. Even in this case, RPM calls
for assistance from the database. If such a deletion is, for whatever reason, impossible
(even if no additional dependencies exist), it may be helpful to rebuild the RPM
database using the option --rebuilddb.
9.2.3 RPM and Patches
To guarantee the operational security of a system, update packages must be installed
in the system from time to time. Previously, a bug in a package could only be elimi-
nated by replacing the entire package. Large packages with bugs in small les could
easily result in this scenario. However the SUSE RPM oers a feature enabling the
installation of patches in packages.
The most important considerations are demonstrated using pine as an example:
Is the patch RPM suitable for my system?
To check this, rst query the installed version of the package. For pine, this can
be done with
rpm -q pine
pine-4.44-188
Then check if the patch RPM is suitable for this version of pine:
rpm -qp --basedon pine-4.44-224.i586.patch.rpm
pine = 4.44-188
pine = 4.44-195
pine = 4.44-207
This patch is suitable for three dierent versions of pine. The installed version in
the example is also listed, so the patch can be installed.
Which les are replaced by the patch?
The les aected by a patch can easily be seen in the patch RPM. The rpm param-
eter -P allows selection of special patch features. Display the list of les with the
following command:
122 Start-Up
rpm -qpPl pine-4.44-224.i586.patch.rpm
/etc/pine.conf
/etc/pine.conf.fixed
/usr/bin/pine
or, if the patch is already installed, with the following command:
rpm -qPl pine
/etc/pine.conf
/etc/pine.conf.fixed
/usr/bin/pine
How can a patch RPM be installed in the system?
Patch RPMs are used just like normal RPMs. The only dierence is that a suitable
RPM must already be installed.
Which patches are already installed in the system and for which package versions?
A list of all patches installed in the system can be displayed with the command
rpm -qPa. If only one patch is installed in a new system (as in this example), the
list appears as follows:
rpm -qPa
pine-4.44-224
If, at a later date, you want to know which package version was originally installed,
this information is also available in the RPM database. For pine, this information
can be displayed with the following command:
rpm -q --basedon pine
pine = 4.44-188
More information, including information about the patch feature of RPM, is available
in the man pages of rpm and rpmbuild.
NOTE: Ocial Updates for openSUSE
In order to make the download size of updates as small as possible, ocial updates
for openSUSE are not provided as Patch RPMs, but as Delta RPM packages. For
details, see Section 9.2.4, Delta RPM Packages” (page 123).
9.2.4 Delta RPM Packages
Delta RPM packages contain the dierence between an old and a new version of an
RPM package. Applying a delta RPM onto an old RPM results in a completely new
RPM. It is not necessary to have a copy of the old RPM because a delta RPM can also
work with an installed RPM. The delta RPM packages are even smaller in size than
patch RPMs, which is an advantage when transferring update packages over the In-
ternet. The drawback is that update operations with delta RPMs involved consume
considerably more CPU cycles than plain or patch RPMs.
Managing Software with Command Line Tools 123
The prepdeltarpm, writedeltarpm and applydeltarpm binaries are part of the delta
RPM suite (package deltarpm) and help you create and apply delta RPM packages.
With the following commands, create a delta RPM called new.delta.rpm. The following
command assumes that old.rpm and new.rpm are present:
prepdeltarpm -s seq -i info old.rpm > old.cpio
prepdeltarpm -f new.rpm > new.cpio
xdelta delta -0 old.cpio new.cpio delta
writedeltarpm new.rpm delta info new.delta.rpm
Finally, remove the temporary working les old.cpio, new.cpio, and delta.
Using applydeltarpm, you can reconstruct the new RPM from the le system if the
old package is already installed:
applydeltarpm new.delta.rpm new.rpm
To derive it from the old RPM without accessing the le system, use the -r option:
applydeltarpm -r old.rpm new.delta.rpm new.rpm
See /usr/share/doc/packages/deltarpm/README for technical details.
9.2.5 RPM Queries
With the -q option rpm initiates queries, making it possible to inspect an RPM archive
(by adding the option -p) and also to query the RPM database of installed packages.
Several switches are available to specify the type of information required. See Ta-
ble 9.1, “The Most Important RPM Query Options” (page 124).
Table 9.1: The Most Important RPM Query Options
Package information
-i
File list
-l
Query the package that contains the
le
FILE
(the full path must be specied
with
FILE
)
-f FILE
File list with status information (implies
-l)
-s
List only documentation les (implies
-l)
-d
List only conguration les (implies -l)-c
124 Start-Up
File list with complete details (to be
used with -l, -c, or -d)
--dump
List features of the package that anoth-
er package can request with --requires
--provides
Capabilities the package requires
--requires, -R
Installation scripts (preinstall, postin-
stall, uninstall)
--scripts
For example, the command rpm -q -i wget displays the information shown in Exam-
ple 9.2, rpm -q -i wget” (page 125).
Example 9.2: rpm -q -i wget
Name : wget Relocations: (not relocatable)
Version : 1.11.4 Vendor: openSUSE
Release : 1.70 Build Date: Sat 01 Aug 2009
09:49:48 CEST
Install Date: Thu 06 Aug 2009 14:53:24 CEST Build Host: build18
Group : Productivity/Networking/Web/Utilities Source RPM:
wget-1.11.4-1.70.src.rpm
Size : 1525431 License: GPL v3 or later
Signature : RSA/8, Sat 01 Aug 2009 09:50:04 CEST, Key ID b88b2fd43dbdc284
Packager : http://bugs.opensuse.org
URL : http://www.gnu.org/software/wget/
Summary : A Tool for Mirroring FTP and HTTP Servers
Description :
Wget enables you to retrieve WWW documents or FTP files from a server.
This can be done in script files or via the command line.
[...]
The option -f only works if you specify the complete lename with its full path. Provide
as many lenames as desired. For example, the following command
rpm -q -f /bin/rpm /usr/bin/wget
results in:
rpm-4.8.0-4.3.x86_64
wget-1.11.4-11.18.x86_64
If only part of the lename is known, use a shell script as shown in Example 9.3,
“Script to Search for Packages” (page 126). Pass the partial lename to the script
shown as a parameter when running it.
Managing Software with Command Line Tools 125
Example 9.3: Script to Search for Packages
#! /bin/sh
for i in $(rpm -q -a -l | grep $1); do
echo "\"$i\" is in package:"
rpm -q -f $i
echo ""
done
The command rpm -q --changelog rpm displays a detailed list of change information
about a specic package (in this case, the rpmpackage), sorted by date.
With the help of the installed RPM database, verication checks can be made. Initiate
these with -V, or --verify. With this option, rpm shows all les in a package that have
been changed since installation. rpm uses eight character symbols to give some hints
about the following changes:
Table 9.2: RPM Verify Options
MD5 check sum
5
File size
S
Symbolic link
L
Modication time
T
Major and minor device numbers
D
Owner
U
Group
G
Mode (permissions and le type)
M
In the case of conguration les, the letter c is printed. For example, for changes to
/etc/wgetrc (wget package):
rpm -V wget
S.5....T c /etc/wgetrc
The les of the RPM database are placed in /var/lib/rpm. If the partition /usr has a
size of 1 GB, this database can occupy nearly 30 MB, especially after a complete
update. If the database is much larger than expected, it is useful to rebuild the
database with the option --rebuilddb. Before doing this, make a backup of the old
database. The cron script cron.daily makes daily copies of the database (packed
with gzip) and stores them in /var/adm/backup/rpmdb. The number of copies is con-
126 Start-Up
trolled by the variable MAX_RPMDB_BACKUPS (default: 5) in /etc/sysconfig/backup. The
size of a single backup is approximately 1 MB for 1 GB in /usr.
9.2.6 Installing and Compiling Source Packages
All source packages carry a .src.rpm extension (source RPM).
NOTE: Installed Source Packages
Source packages can be copied from the installation medium to the hard disk and
unpacked with YaST. They are not, however, marked as installed ([i]) in the
package manager. This is because the source packages are not entered in the
RPM database. Only installed operating system software is listed in the RPM
database. When you “install” a source package, only the source code is added to
the system.
The following directories must be available for rpm and rpmbuild in /usr/src/packages
(unless you specied custom settings in a le like /etc/rpmrc):
SOURCES
for the original sources (.tar.bz2 or .tar.gz les, etc.) and for distribution-specic
adjustments (mostly .diff or .patch les)
SPECS
for the .spec les, similar to a meta Makele, which control the build process
BUILD
all the sources are unpacked, patched and compiled in this directory
RPMS
where the completed binary packages are stored
SRPMS
here are the source RPMs
When you install a source package with YaST, all the necessary components are in-
stalled in /usr/src/packages: the sources and the adjustments in SOURCES and the
relevant .spec le in SPECS.
WARNING
Do not experiment with system components (glibc, rpm, sysvinit, etc.), because
this endangers the stability of your system.
The following example uses the wget.src.rpm package. After installing the source
package, you should have les similar to those in the following list:
Managing Software with Command Line Tools 127
/usr/src/packages/SOURCES/wget-1.11.4.tar.bz2
/usr/src/packages/SOURCES/wgetrc.patch
/usr/src/packages/SPECS/wget.spec
rpmbuild -b
X
/usr/src/packages/SPECS/wget.spec starts the compilation.
X
is a wild
card for various stages of the build process (see the output of --help or the RPM
documentation for details). The following is merely a brief explanation:
-bp
Prepare sources in /usr/src/packages/BUILD: unpack and patch.
-bc
Do the same as -bp, but with additional compilation.
-bi
Do the same as -bp, but with additional installation of the built software. Caution:
if the package does not support the BuildRoot feature, you might overwrite con-
guration les.
-bb
Do the same as -bi, but with the additional creation of the binary package. If the
compile was successful, the binary should be in /usr/src/packages/RPMS.
-ba
Do the same as -bb, but with the additional creation of the source RPM. If the
compilation was successful, the binary should be in /usr/src/packages/SRPMS.
--short-circuit
Skip some steps.
The binary RPM created can now be installed with rpm -i or, preferably, with rpm -U.
Installation with rpm makes it appear in the RPM database.
9.2.7 Compiling RPM Packages with build
The danger with many packages is that unwanted les are added to the running
system during the build process. To prevent this use build, which creates a dened
environment in which the package is built. To establish this chroot environment, the
build script must be provided with a complete package tree. This tree can be made
available on the hard disk, via NFS, or from DVD. Set the position with build --rpms
directory
. Unlike rpm, the build command looks for the .spec le in the source direc-
tory. To build wget (like in the above example) with the DVD mounted in the system
under /media/dvd, use the following commands as root:
cd /usr/src/packages/SOURCES/
mv ../SPECS/wget.spec .
build --rpms /media/dvd/suse/ wget.spec
128 Start-Up
Subsequently, a minimum environment is established at /var/tmp/build-root. The
package is built in this environment. Upon completion, the resulting packages are
located in /var/tmp/build-root/usr/src/packages/RPMS.
The build script oers a number of additional options. For example, cause the script
to prefer your own RPMs, omit the initialization of the build environment or limit the
rpm command to one of the above-mentioned stages. Access additional information
with build --help and by reading the build man page.
9.2.8 Tools for RPM Archives and the RPM Database
Midnight Commander (mc) can display the contents of RPM archives and copy parts
of them. It represents archives as virtual le systems, oering all usual menu options
of Midnight Commander. Display the HEADER with [F3]. View the archive structure
with the cursor keys and [Enter]. Copy archive components with [F5].
A full-featured package manager is available as a YaST module. For details, see
Chapter 5, Installing or Removing Software (page 79).
Managing Software with Command Line Tools 129
Part III. Administration
10 Managing Users with YaST
During installation, you chose a method for user authentication. This method is either
local (via /etc/passwd) or, if a network connection is established, via NIS, LDAP,
Kerberos or Samba (see Section “Create New User (Chapter 1, Installation with
YaST, ↑Reference) . You can create or modify user accounts and change the authen-
tication method with YaST at any time.
Every user is assigned a system-wide user ID (UID). Apart from the users which can
log in to your machine, there are also a number of system users for internal use only.
Each user is assigned to one or more groups. Similar to system users, there are also
system groups for internal use.
10.1 User and Group Administration Dialog
To administer users or groups, start YaST and click Security and Users > User and
Group Management. Alternatively, start the User and Group Administration dialog
directly by running yast2 users & from a command line.
Figure 10.1: YaST User and Group Administration
Managing Users with YaST 133
Depending on the set of users you choose to view and modify with, the dialog (local
users, network users, system users), the main window shows several tabs. These
allow you to execute the following tasks:
Managing User Accounts
From the Users tab create, modify, delete or temporarily disable user accounts
as described in Section 10.2, “Managing User Accounts” (page 134). Learn about
advanced options like enforcing password policies, using encrypted home direc-
tories, using ngerprint authentication, or managing disk quotas in Section 10.3,
Additional Options for User Accounts” (page 136).
Changing Default Settings
Local users accounts are created according to the settings dened on the Defaults
for New Users tab. Learn how to change the default group assignment, or the
default path and access permissions for home directories in Section 10.4,
Changing Default Settings for Local Users” (page 141).
Assigning Users to Groups
Learn how to change the group assignment for individual users in Section 10.5,
Assigning Users to Groups” (page 142).
Managing Groups
From the Groups tab, you can add, modify or delete existing groups. Refer to
Section 10.6, “Managing Groups” (page 143) for information on how to do this.
Changing the User Authentication Method
When your machine is connected to a network that provides user authentication
methods like NIS or LDAP, you can choose between several authentication
methods on the Authentication Settings tab. For more information, refer to Sec-
tion 10.7, Changing the User Authentication Method” (page 144).
For user and group management, the dialog provides similar functionality. You can
easily switch between the user and group administration view by choosing the ap-
propriate tab at the top of the dialog.
Filter options allow you to dene the set of users or groups you want to modify: On
the Users or Group tab, click Set Filter to view and edit users or groups according to
certain categories, such as Local Users or LDAP Users, for instance (if you are part
of a network which uses LDAP). With Set Filter > Customize Filter you can also set
up and use a custom lter.
Depending on the lter you choose, not all of the following options and functions will
be available from the dialog.
10.2 Managing User Accounts
YaST oers to create, modify, delete or temporarily disable user accounts. Do not
modify user accounts unless you are an experienced user or administrator.
134 Start-Up
NOTE: Changing User IDs of Existing Users
File ownership is bound to the user ID, not to the user name. After a user ID
change, the les in the user's home directory are automatically adjusted to reect
this change. However, after an ID change, the user no longer owns the les he
created elsewhere in the le system unless the le ownership for those les are
manually modied.
In the following, learn how to set up default user accounts. For some further options,
such as auto login, login without password, setting up encrypted home directories
or managing quotas for users and groups, refer to Section 10.3, Additional Options
for User Accounts” (page 136).
Procedure 10.1: Adding or Modifying User Accounts
1 Open the YaST User and Group Administration dialog and click the Users tab.
2 With Set Filter dene the set of users you want to manage. The dialog shows
a list of users in the system and the groups the users belong to.
3 To modify options for an existing user, select an entry and click Edit.
To create a new user account, click Add.
4 Enter the appropriate user data on the rst tab, such as Username (which is
used for login) and Password. This data is sucient to create a new user. If
you click OK now, the system will automatically assign a user ID and set all
other values according to the default.
5 Activate Receive System Mail if you want any kind of system notications to
be delivered to this user's mailbox. This creates a mail alias for root and the
user can read the system mail without having to rst log in as root.
6 If you want to adjust further details such as the user ID or the path to the user's
home directory, do so on the Details tab.
If you need to relocate the home directory of an existing user, enter the path
to the new home directory there and move the contents of the current home
directory with Move to New Location. Otherwise, a new home directory is
created without any of the existing data.
7 To force users to regularly change their password or set other password op-
tions, switch to Password Settings and adjust the options. For more details,
refer to Section 10.3.2, “Enforcing Password Policies” (page 137).
8 If all options are set according to your wishes, click OK.
9 Click Expert Options > Write Changes Now to save all changes without exiting
the User and Group Administration dialog. Click OK to close the administration
Managing Users with YaST 135
dialog and to save the changes. A newly added user can now log in to the
system using the login name and password you created.
TIP: Matching User IDs
For a new (local) user on a laptop which also needs to integrate into a network
environment where this user already has a user ID, it is useful to match the (local)
user ID to the ID in the network. This ensures that the le ownership of the les
the user creates oine” is the same as if he had created them directly on the
network.
Procedure 10.2: Disabling or Deleting User Accounts
1 Open the YaST User and Group Administration dialog and click the Users tab.
2 To temporarily disable a user account without deleting it, select the user from
the list and click Edit. Activate Disable User Login. The user cannot log into
your machine until you enable the account again.
3 To delete a user account, select the user from the list and click Delete. Choose
if you also want to delete the user's home directory or if you want to retain
the data.
10.3 Additional Options for User Accounts
In addition to the settings for a default user account, openSUSE® oers further op-
tions, such as options to enforce password policies, use encrypted home directories
or dene disk quotas for users and groups.
10.3.1 Automatic Login and Passwordless Login
If you use the KDE or GNOME desktop environment you can congure Auto Login for
a certain user as well as Passwordless Login for all users. Auto login causes a user
to become automatically logged in to the desktop environment on boot. This func-
tionality can only be activated for one user at a time. Login without password allows
all users to log in to the system after they have entered their username in the login
manager.
WARNING: Security Risk
Enabling Auto Login or Passwordless Login on a machine that can be accessed
by more than one person is a security risk. Without the need to authenticate, any
user can gain access to your system and your data. If your system contains con-
dential data, do not use this functionality.
If you want to activate auto login or login without password, access these functions
in the YaST User and Group Administration with Expert Options > Login Settings.
136 Start-Up
10.3.2 Enforcing Password Policies
On any system with multiple users, it is a good idea to enforce at least basic password
security policies. Users should change their passwords regularly and use strong
passwords that cannot easily be exploited. For local users, proceed as follows:
Procedure 10.3: Conguring Password Settings
1 Open the YaST User and Group Administration dialog and select the Users
tab.
2 Select the user for which to change the password options and click Edit.
3 Switch to the Password Settings tab. The user's last password change is
displayed on the tab.
4 To make the user change his password at next login, activate Force Pass-
word Change.
5 To enforce password rotation, set a Maximum Number of Days for the
Same Password and a Minimum Number of Days for the Same Password.
6 To remind the user to change his password before it expires, set a number
of Days before Password Expiration to Issue Warning.
7 To restrict the period of time the user can log in after his password has
expired, change the value in Days after Password Expires with Usable Login.
8 You can also specify a certain expiration date for a password. Enter the
Expiration Date in
YYYY-MM-DD
format.
9 For more information about the options and about the default values, click
Help.
10 Apply your changes with OK.
10.3.3 Managing Encrypted Home Directories
To protect data in home directories against theft and hard disk removal, you can
create encrypted home directories for users. These are encrypted with LUKS (Linux
Unied Key Setup), which results in an image and an image key being generated for
the user. The image key is protected with the user's login password. When the user
logs into the system, the encrypted home directory is mounted and the contents are
made available to the user.
NOTE: Fingerprint Reader Devices and Encrypted Home Directories
If you want to use a ngerprint reader device, you must not use encrypted home
directories. Otherwise logging in will fail, because decrypting during login is not
possible in combination with an active ngerprint reader device.
Managing Users with YaST 137
With YaST, you can create encrypted home directories for new or existing users. To
encrypt or modify encrypted home directories of already existing users, you need
to know the user's current login password. By default, all existing user data is copied
to the new encrypted home directory, but it is not deleted from the unencrypted di-
rectory.
WARNING: Security Restrictions
Encrypting a user's home directory does not provide strong security from other
users. If strong security is required, the system should not be physically shared.
Find background information about encrypted home directories and which actions
to take for stronger security in Section “Using Encrypted Home Directories” (Chap-
ter 10, Encrypting Partitions and Files, ↑Security Guide).
Procedure 10.4: Creating Encrypted Home Directories
1 Open the YaST User and Group Management dialog and click the Users tab.
2 To encrypt the home directory of an existing user, select the user and click
Edit.
Otherwise, click Add to create a new user account and enter the appropriate
user data on the rst tab.
3 In the Details tab, activate Use Encrypted Home Directory. With Directory Size
in MB, specify the size of the encrypted image le to be created for this user.
4 Apply your settings with OK.
138 Start-Up
5 Enter the user's current login password to proceed if YaST prompts for it.
6 Click Expert Options > Write Changes Now to save all changes without exiting
the administration dialog. Click OK to close the administration dialog and save
the changes.
Procedure 10.5: Modifying or Disabling Encrypted Home Directories
Of course, you can also disable the encryption of a home directory or change the
size of the image le at any time.
1 Open the YaST User and Group Administration dialog in the Users view.
2 Select a user from the list and click Edit.
3 If you want to disable the encryption, switch to the Details tab and disable
Use Encrypted Home Directory.
If you need to enlarge or reduce the size of the encrypted image le for this
user, change the Directory Size in MB.
4 Apply your settings with OK.
5 Enter the user's current login password to proceed if YaST prompts for it.
6 Click Expert Options > Write Changes Now to save all changes without exiting
the User and Group Administration dialog. Click OK to close the administration
dialog and to save the changes.
10.3.4 Using Fingerprint Authentication
If your system includes a ngerprint reader you can use biometric authentication in
addition to standard authentication via login and password. After registering their
ngerprint, users can log into the system either by swiping a nger on the ngerprint
reader or by typing in a password.
Fingerprints can be registered with YaST. Find detailed information about conguration
and use of ngerprint authentication in Chapter 7, Using the Fingerprint Reader
(↑Security Guide). For a list of supported devices, refer to http://www.freedesktop
.org/wiki/Software/fprint/libfprint.
10.3.5 Managing Quotas
To prevent system capacities from being exhausted without notication, system
administrators can set up quotas for users or groups. Quotas can be dened for one
or more le systems and restrict the amount of disk space that can be used and the
number of inodes (index nodes) that can be created there. Inodes are data structures
on a le system that store basic information about a regular le, directory, or other
le system object. They store all attributes of a le system object (like user and group
ownership, read, write, or execute permissions), except le name and contents.
Managing Users with YaST 139
openSUSE allows usage of soft and hard quotas. Soft quotas usually dene a warning
level at which users are informed that they are nearing their limit, whereas hard
quotas dene the limit at which write requests are denied. Additionally, grace intervals
can be dened that allow users or groups to temporarily violate their quotas by certain
amounts.
Procedure 10.6: Enabling Quota Support for a Partition
In order to congure quotas for certain users and groups, you need to enable
quota support for the respective partition in the YaST Expert Partitioner rst.
1 In YaST, select System > Partitioner and click Yes to proceed.
2 In the Expert Partitioner, select the partition for which to enable quotas and
click Edit.
3
Click Fstab Options and activate Enable Quota Support. If the quota package
is not already installed, it will be installed once you conrm the respective
message with Yes.
4 Conrm your changes and leave the Expert Partitioner.
Procedure 10.7: Setting Up Quotas for Users or Groups
Now you can dene soft or hard quotas for specic users or groups and set time
periods as grace intervals.
1 In the YaST User and Group Administration, select the user or the group you
want to set the quotas for and click Edit.
2 On the Plug-Ins tab, select the Manage User Quota entry and click Launch to
open the Quota Conguration dialog.
3 From File System, select the partition to which the quota should apply.
140 Start-Up
4 Below Size Limits, restrict the amount of disk space. Enter the number of 1
KB blocks the user or group may have on this partition. Specify a Soft Limit
and a Hard Limit value.
5 Additionally, you can restrict the number of inodes the user or group may
have on the partition. Below Inodes Limits, enter a Soft Limit and Hard Limit.
6 You can only dene grace intervals if the user or group has already exceeded
the soft limit specied for size or inodes. Otherwise, the time-related input
elds are not activated. Specify the time period for which the user or group
is allowed to exceed the limits set above.
7 Conrm your settings with OK.
8 Click Expert Options > Write Changes Now to save all changes without exiting
the User and Group Administration dialog. Click OK to close the administration
dialog and to save the changes.
openSUSE also ships command line tools like repquota or warnquota with which system
administrators can control the disk usage or send e-mail notications to users ex-
ceeding their quota. With quota_nld, administrators can also forward kernel messages
about exceeded quotas to D-BUS. For more information, refer to the repquota, the
warnquota and the quota_nld man page.
10.4 Changing Default Settings for Local Users
When creating new local users, several default settings are used by YaST. These in-
clude, for example, the primary group and the secondary groups the user belongs
Managing Users with YaST 141
to, or the access permissions of the user's home directory. You can change these
default settings to meet your requirements:
1 Open the YaST User and Group Administration dialog and select the Defaults
for New Users tab.
2 To change the primary group the new users should automatically belong to,
select another group from Default Group.
3 To modify the secondary groups for new users, add or change groups in Sec-
ondary Groups. The group names must be separated by commas.
4
If you do not want to use /home/
username
as default path for new users' home
directories, modify the Path Prex for Home Directory.
5 To change the default permission modes for newly created home directories,
adjust the umask value in Umask for Home Directory. For more information
about umask, refer to Chapter 9, Access Control Lists in Linux (↑Security
Guide) and to the umask man page.
6 For information about the individual options, click Help.
7 Apply your changes with OK.
10.5 Assigning Users to Groups
Local users are assigned to several groups according to the default settings which
you can access from the User and Group Administration dialog on the Defaults for
New Users tab. In the following, learn how to modify an individual user's group as-
signment. If you need to change the default group assignments for new users, refer
to Section 10.4, Changing Default Settings for Local Users” (page 141).
Procedure 10.8: Changing a User's Group Assignment
1 Open the YaST User and Group Administration dialog and click the Users tab.
It shows a list of users and of the groups the users belong to.
2 Click Edit and switch to the Details tab.
3 To change the primary group the user belongs to, click Default Group and
select the group from the list.
4 To assign the user additional secondary groups, activate the corresponding
check boxes in the Additional Groups list.
5 Click OK to apply your changes.
6 Click Expert Options > Write Changes Now to save all changes without exiting
the User and Group Administration dialog. Click OK to close the administration
dialog and save the changes.
142 Start-Up
10.6 Managing Groups
With YaST you can also easily add, modify or delete groups.
Procedure 10.9: Creating and Modifying Groups
1 Open the YaST User and Group Management dialog and click the Groups tab.
2 With Set Filter dene the set of groups you want to manage. The dialog shows
a list of groups in the system.
3 To create a new group, click Add.
4 To modify an existing group, select the group and click Edit.
5 In the following dialog, enter or change the data. The list on the right shows
an overview of all available users and system users which can be members
of the group.
6 To add existing users to a new group select them from the list of possible
Group Members by checking the corresponding box. To remove them from
the group uncheck the box.
7 Click OK to apply your changes.
8 Click Expert Options > Write Changes Now to save all changes without exiting
the User and Group Administration dialog.
In order to delete a group, it must not contain any group members. To delete a group,
select it from the list and click Delete. Click Expert Options > Write Changes Now to
save all changes without exiting the User and Group Administration dialog. Click OK
to close the administration dialog and to save the changes.
Managing Users with YaST 143
10.7 Changing the User Authentication Method
When your machine is connected to a network, you can change the authentication
method you set during installation. The following options are available:
NIS
Users are administered centrally on a NIS server for all systems in the network.
For details, see Chapter 3, Using NIS (↑Security Guide).
LDAP
Users are administered centrally on an LDAP server for all systems in the network.
For details about LDAP, see Chapter 4, LDAP—A Directory Service (↑Security
Guide).
You can manage LDAP users with the YaST user module. All other LDAP settings,
including the default settings for LDAP users, have to be dened with the YaST
LDAP client module as described in Section “Conguring an LDAP Client with
YaST (Chapter 4, LDAP—A Directory Service, ↑Security Guide) .
Kerberos
With Kerberos, a user registers once and then is trusted in the entire network for
the rest of the session.
Samba
SMB authentication is often used in mixed Linux and Windows networks. For de-
tails, see Chapter 19, Samba (↑Reference) and Chapter 5, Active Directory Support
(↑Security Guide).
To change the authentication method, proceed as follows:
1 Open the User and Group Administration dialog in YaST.
2 Click the Authentication Settings tab to show an overview of the available
authentication methods and the current settings.
3 To change the authentication method, click Congure and select the authen-
tication method you want to modify. This takes you directly to the client con-
guration modules in YaST. For information about the conguration of the
appropriate client, refer to the following sections:
NIS: Section “Conguring NIS Clients” (Chapter 3, Using NIS, ↑Security
Guide)
LDAP: Section Conguring an LDAP Client with YaST (Chapter 4, LDAP—A
Directory Service, ↑Security Guide)
4 After accepting the conguration, return to the User and Group Administration
overview.
5 Click OK to close the administration dialog.
144 Start-Up
11 Changing Language and Country
Settings with YaST
Working in dierent countries or having to work in a multilingual environment requires
your computer to be set up to support this. openSUSE® can handle dierent locales
in parallel. A locale is a set of parameters that denes the language and country
settings reected in the user interface.
The main system language was selected during installation and keyboard and time
zone settings were adjusted. However, you can install additional languages on your
system and determine which of the installed languages should be the default.
For those tasks, use the YaST language module as described in Section 11.1,
Changing the System Language” (page 145). Install secondary languages to get op-
tional localizations if you need to start applications or desktops in languages other
than the primary one.
Apart from that, the YaST timezone module allows you to adjust your country and
timezone settings accordingly. It also lets you synchronize your system clock against
a time server. For details, refer to Section 11.2, “Changing the Country and Time
Settings” (page 149).
11.1 Changing the System Language
Depending on how you use your desktop and whether you want to switch the entire
system to another language or just the desktop environment itself, there are several
ways to achieve this:
Changing the System Language Globally
Proceed as described in Section 11.1.1, “Modifying System Languages with
YaST (page 146) and Section 11.1.2, “Switching the Default System Lan-
guage” (page 148) to install additional localized packages with YaST and to set
the default language. Changes are eective after relogin. To ensure that the entire
system reects the change, reboot the system or close and restart all running
services, applications, and programs.
Changing the Language for the Desktop Only
Provided you have previously installed the desired language packages for your
desktop environment with YaST as described below, you can switch the language
of your desktop using the desktop's control center. After the X server has been
restarted, your entire desktop reects your new choice of language. Applications
Changing Language and Country Settings with YaST 145
not belonging to your desktop framework are not aected by this change and
may still appear in the language that was set in YaST.
Temporarily Switching Languages for One Application Only
You can also run a single application in another language (that has already been
installed with YaST). To do so, start it from the command line by specifying the
language code as described in Section 11.1.3, “Switching Languages for Individ-
ual Applications” (page 148).
11.1.1 Modifying System Languages with YaST
YaST knows two dierent language categories:
Primary Language
The primary language set in YaST applies to the entire system, including YaST
and the desktop environment. This language is used whenever available unless
you manually specify another language.
Secondary Languages
Install secondary languages to make your system multilingual. Languages installed
as secondary languages can be selected manually for a specic situation. For
example, use a secondary language to start an application in a certain language
in order to do word processing in this language.
Before installing additional languages, determine which of them should be the default
system language (primary language) after you have installed them.
To access the YaST language module, start YaST and click System > Language. Al-
ternatively, start the Languages dialog directly by running yast2 language & as user
root from a command line.
146 Start-Up
Procedure 11.1: Installing Additional Languages
When installing additional languages, YaST also allows you to set dierent locale
settings for the user root, see Step 4 (page 147). The option Locale Settings for
User root determines how the locale variables (LC_*) in the le /etc/sysconfig/
language are set for root. You can either set them to the same locale as for normal
users, keep it unaected by any language changes or only set the variable
RC_LC_CTYPE to the same values as for the normal users. This variable sets the lo-
calization for language-specic function calls.
1 To add additional languages in the YaST language module, select the Sec-
ondary Languages you wish to install.
2 To make a language the default language, set it as Primary Language.
3 Additionally, adapt the keyboard to the new primary language and adjust the
time zone, if appropriate.
TIP
For advanced keyboard or time zone settings, select Hardware > Keyboard
Layout or System > Date and Time in YaST to start the respective dialogs.
For more information, refer to Section 11.2, “Changing the Country and
Time Settings” (page 149).
4
To change language settings specic to the user root, click Details.
Changing Language and Country Settings with YaST 147
Set Locale Settings for User root to the desired value. For more infor-
mation, click Help.
4a
4b
Decide if you want to Use UTF-8 Encoding for root or not.
5 If your locale was not included in the list of primary languages available, try
specifying it with Detailed Locale Setting. However, some of these localizations
may be incomplete.
6 Conrm your changes in the dialogs with OK. If you have selected secondary
languages, YaST installs the localized software packages for the additional
languages.
The system is now multilingual. However, to start an application in a language other
than the primary one, you need to set the desired language explicitly as explained
in Section 11.1.3, “Switching Languages for Individual Applications” (page 148).
11.1.2 Switching the Default System Language
1 To globally switch the default system language, start the YaST language
module.
2 Select the desired new system language as Primary Language.
IMPORTANT: Deleting Former System Languages
If you switch to a dierent primary language, the localized software pack-
ages for the former primary language will be removed from the system. If
you want to switch the default system language but want to keep the former
primary language as additional language, add it as Secondary Language
by enabling the respective checkbox.
3 Adjust the keyboard and time zone options as desired.
4 Conrm your changes with OK.
5 After YaST has applied the changes, restart any X sessions (for example, by
logging out and logging in again) to make YaST and the desktop applications
reect your new language settings.
11.1.3 Switching Languages for Individual Applications
After you have installed the respective language with YaST, you can run a single
application in another language.
Standard X and GNOME Applications
Start the application from the command line by using the following command:
LANG=
languageapplication
148 Start-Up
For example, to start f-spot in German, run LANG=de_DE f-spot. For other lan-
guages, use the appropriate language code. Get a list of all language codes
available with the locale -av command.
KDE Applications
Start the application from the command line by using the following command:
KDE_LANG=
languageapplication
For example, to start digiKam in German, run KDE_LANG=de digikam. For other
languages, use the appropriate language code.
11.2 Changing the Country and Time Settings
Using the YaST date and time module, adjust your system date, clock and time zone
information to the area you are working in. To access the YaST module, start YaST
and click System > Date and Time. Alternatively, start the Clock and Time Zone dialog
directly by running yast2 timezone & as user root from a command line.
First, select a general region, such as Europe. Choose an appropriate country that
matches the one you are working in, for example, Germany.
Depending on which operating systems run on your workstation, adjust the hardware
clock settings accordingly:
If you run another operating system on your machine, such as Microsoft Win-
dows*, it is likely your system does not use UTC, but local time. In this case,
uncheck Hardware Clock Set To UTC.
Changing Language and Country Settings with YaST 149
If you only run Linux on your machine, set the hardware clock to UTC and have
the switch from standard time to daylight saving time performed automatically.
You can change the date and time manually or opt for synchronizing your machine
against an NTP server, either permanently or just for adjusting your hardware clock.
Procedure 11.2: Manually Adjusting Time and Date
1 In the YaST timezone module, click Change to set date and time.
2 Select Manually and enter date and time values.
3 Conrm your changes with Accept.
Procedure 11.3: Setting Date and Time With NTP Server
1 Click Change to set date and time.
2 Select Synchronize with NTP Server.
3 Enter the address of an NTP server, if not already populated.
4 Click Synchronize Now, to get your system time set correctly.
5 If you want to make use of NTP permanently, enable Save NTP Conguration.
6 With the Congure button, you can open the advanced NTP conguration. For
details, see Section Conguring an NTP Client with YaST (Chapter 17, Time
Synchronization with NTP, ↑Reference).
150 Start-Up
7 Conrm your changes with Accept.
Changing Language and Country Settings with YaST 151
12 YaST in Text Mode
This section is intended for system administrators and experts who do not run an X
server on their systems and depend on the text-based installation tool. It provides
basic information about starting and operating YaST in text mode.
YaST in text mode uses the ncurses library to provide an easy pseudo-graphical user
interface. The ncurses library is installed by default. The minimum supported size of
the terminal emulator in which to run YaST is 80x25 characters.
Figure 12.1: Main Window of YaST in Text Mode
When you start YaST in text mode, the YaST Control Center appears (see Figure 12.1).
The main window consists of three areas. The left frame features the categories to
which the various modules belong. This frame is active when YaST is started and
therefore it is marked by a bold white border. The active category is highlighted. The
right frame provides an overview of the modules available in the active category.
The bottom frame contains the buttons for Help and Quit.
When you start the YaST Control Center, the category Software is selected automat-
ically. Use [] and [] to change the category. To select a module from the category,
activate the right frame with [] and then use [] and [] to select the module. Keep
the arrow keys pressed to scroll through the list of available modules. The selected
module is highlighted. Press [Enter] to start the active module.
Various buttons or selection elds in the module contain a highlighted letter (yellow
by default). Use [Alt] + [highlighted_letter] to select a button directly instead of nav-
igating there with [Tab]. Exit the YaST Control Center by pressing [Alt] + [Q] or by
selecting Quit and pressing [Enter].
YaST in Text Mode 153
12.1 Navigation in Modules
The following description of the control elements in the YaST modules assumes that
all function keys and [Alt] key combinations work and are not assigned to dierent
global functions. Read Section 12.2, “Restriction of Key Combinations” (page 155) for
information about possible exceptions.
Navigation among Buttons and Selection Lists
Use [Tab] to navigate among the buttons and frames containing selection lists.
To navigate in reverse order, use [Alt] + [Tab] or [Shift] + [Tab] combinations.
Navigation in Selection Lists
Use the arrow keys ([] and []) to navigate among the individual elements in
an active frame containing a selection list. If individual entries within a frame
exceed its width, use [Shift] + [] or [Shift] + [] to scroll horizontally to the right
and left. Alternatively, use [Ctrl] + [E] or [Ctrl] + [A]. This combination can also
be used if using [] or [] results in changing the active frame or the current
selection list, as in the Control Center.
Buttons, Radio Buttons, and Check Boxes
To select buttons with empty square brackets (check boxes) or empty parentheses
(radio buttons), press [Space] or [Enter]. Alternatively, radio buttons and check
boxes can be selected directly with [Alt] + [highlighted_letter]. In this case, you
do not need to conrm with [Enter]. If you navigate to an item with [Tab], press
[Enter] to execute the selected action or activate the respective menu item.
Function Keys
The F keys ([F1] through [F12]) enable quick access to the various buttons.
Available F key shortcuts are shown in the bottom line of the YaST screen. Which
function keys are actually mapped to which buttons depend on the active YaST
module, because the dierent modules oer dierent buttons (Details, Info, Add,
Delete, etc.). Use [F10] for Accept, OK, Next, and Finish. Press [F1] to access the
YaST help.
Using Navigation Tree in ncurses Mode
Some YaST modules use a navigation tree in the left part of the window to select
conguration dialogs. Use the arrow keys ([] and []) to navigate in the tree.
Use [Space] to open or close tree items. In ncurses mode, [Enter] must be pressed
after a selection in the navigation tree in order to show the selected dialog. This
is an intentional behavior to save time consuming redraws when browsing through
the navigation tree.
154 Start-Up
Figure 12.2: The Software Installation Module
12.2 Restriction of Key Combinations
If your window manager uses global [Alt] combinations, the [Alt] combinations in
YaST might not work. Keys like [Alt] or [Shift] can also be occupied by the settings
of the terminal.
Replacing [Alt] with [Esc]
[Alt] shortcuts can be executed with [Esc] instead of [Alt]. For example, [Esc]
[H] replaces [Alt] + [H]. (First press [Esc], then press [H].)
Backward and Forward Navigation with [Ctrl] + [F] and [Ctrl] + [B]
If the [Alt] and [Shift] combinations are occupied by the window manager or the
terminal, use the combinations [Ctrl] + [F] (forward) and [Ctrl] + [B] (backward)
instead.
Restriction of Function Keys
The F keys are also used for functions. Certain function keys might be occupied
by the terminal and may not be available for YaST. However, the [Alt] key combi-
nations and function keys should always be fully available on a pure text console.
12.3 YaST Command Line Options
Besides the text mode interface, YaST provides a pure command line interface. To
get a list of YaST command line options, enter:
yast -h
12.3.1 Starting the Individual Modules
To save time, the individual YaST modules can be started directly. To start a module,
enter:
yast <module_name>
YaST in Text Mode 155
View a list of all module names available on your system with yast -l or yast --list.
Start the network module, for example, with yast lan.
12.3.2 Installing Packages from the Command Line
If you know a package name and the package is provided by any of your active in-
stallation repositories, you can use the command line option -i to install the package:
yast -i <package_name>
or
yast --install <package_name>
package_name
can be a single short package name, for example gvim, which is installed
with dependency checking, or the full path to an rpm package, which is installed
without dependency checking.
If you need a command-line based software management utility with functionality
beyond what YaST provides, consider using zypper. This new utility uses the same
software management library that is also the foundation for the YaST package
manager. The basic usage of zypper is covered in Section 9.1, “Using Zyp-
per (page 111).
12.3.3 Command Line Parameters of the YaST Modules
To use YaST functionality in scripts, YaST provides command line support for individ-
ual modules. Not all modules have command line support. To display the available
options of a module, enter:
yast <module_name> help
If a module does not provide command line support, the module is started in text
mode and the following message appears:
This YaST module does not support the command line interface.
156 Start-Up
13 Setting Up Hardware Components
with YaST
YaST allows you to congure hardware items at installation time as well as on an
already-installed system. Congure audio hardware, printers or scanner support or
learn which hardware components are connected to your computer by using the
YaST Hardware Information module.
TIP: Graphics card, monitor, mouse and keyboard settings
Graphics card, monitor, mouse and keyboard can be congured with either KDE
or GNOME tools.
13.1 Hardware Information
Use the YaST hardware information module if you want to know more about your
hardware or if you need to nd out details like vendor and model of a certain piece
of hardware to be able to properly congure it.
1 Start YaST and click Hardware > Hardware Information. Hardware probing
starts immediately and it will take some time until you see the hardware in-
formation tree in a separate window.
2 In the hardware information tree recursively click on the entries to expand
the information about a specic device.
3 Click Save to File... to save the output to a le.
4 Click Close to leave the hardware information overview.
13.2 Setting Up Sound Cards
YaST detects most sound cards automatically and congures them with the appropri-
ate values. If you want to change the default settings, or need to set up a sound card
that could not be congured automatically, use the YaST sound module. There, you
can also set up additional sound cards or switch their order.
To start the sound module, start YaST and click Hardware > Sound. Alternatively,
start the Sound Conguration dialog directly by running yast2 sound & as user root
from a command line.
Setting Up Hardware Components with YaST 157
The dialog shows all sound cards that could be detected.
Procedure 13.1: Conguring Sound Cards
If you have added a new sound card or YaST could not automatically congure an
existing sound card, follow the steps below. For conguring a new sound card, you
need to know your sound card vendor and model. If in doubt, refer to your sound
card documentation for the required information. For a reference list of sound cards
supported by ALSA with their corresponding sound modules, see http://www.alsa
-project.org/main/index.php/Matrix:Main.
During conguration, you can choose between the following setup options:
Quick Automatic Setup
You are not required to go through any of the further conguration steps—the
sound card is congured automatically. You can set the volume or any options
you want to change later.
Normal Setup
Allows you to adjust the output volume and play a test sound during the con-
guration.
Advanced setup with possibility to change options
For experts only. Allows you to customize all parameters of the sound card.
IMPORTANT: Advanced Conguration
Only use this option if you know exactly what your are doing. Otherwise leave
the parameters untouched and use the normal or the automatic setup options.
158 Start-Up
1 Start the YaST sound module.
2 To congure a detected, but Not Congured sound card, select the respective
entry from the list and click Edit.
To congure a new sound card, click Add. Select your sound card vendor and
model and click Next.
3 Choose one of the setup options and click Next.
4 If you have chosen Normal Setup, you can now Test your sound conguration
and make adjustments to the volume. You should start at about ten percent
volume to avoid damage to your hearing or the speakers.
5 If all options are set according to your wishes, click Next.
The Sound Conguration dialog shows the newly congured or modied sound
card.
6 To remove a sound card conguration that you no longer need, select the
respective entry and click Delete.
7 Click OK to save the changes and leave the YaST sound module.
Procedure 13.2: Modifying Sound Card Congurations
1 To change the conguration of an individual sound card (for experts only!),
select the sound card entry in the Sound Conguration dialog and click Edit.
This takes you to the Sound Card Advanced Options where you can ne-tune
a number of parameters. For more information, click Help.
2 To adjust the volume of an already congured sound card or to test the sound
card, select the sound card entry in the Sound Conguration dialog and click
Other. Select the respective menu item.
NOTE: YaST Mixer
The YaST mixer settings provide only basic options. They are intended for
troubleshooting (for example, if the test sound is not audible). Access the
YaST mixer settings from Other > Volume. For everyday use and ne-tuning
of sound options, use the mixer applet provided by your desktop or the
alsasound command line tool.
3 For playback of MIDI les, select Other > Start Sequencer.
4
When a supported sound card is detected (like a Creative Soundblaster Live,
Audigy or AWE sound card), you can also install SoundFonts for playback of
MIDI les:
Setting Up Hardware Components with YaST 159
4a Insert the original driver CD-ROM into your CD or DVD drive.
4b Select Other > Install SoundFonts to copy SF2 SoundFonts™ to your
hard disk. The SoundFonts are saved in the directory /usr/share/
sfbank/creative/.
5 If you have congured more than one sound card in your system you can adjust
the order of your sound cards. To set a sound card as primary device, select
the sound card in the Sound Conguration and click Other > Set as the Primary
Card. The sound device with index 0 is the default device and thus used by
the system and the applications.
6 Per default, openSUSE uses the PulseAudio sound system. It is an abstraction
layer that helps to mix multiple audio streams, bypassing any restrictions the
hardware may have. To enable or disable the PulseAudio sound system, click
Other > PulseAudio Conguration. If enabled, PulseAudio daemon is used to
play sounds. Disable PulseAudio Support in case you want to use something
else system-wide.
The volume and conguration of all sound cards are saved when you click OK and
leave the YaST sound module. The mixer settings are saved to the le /etc/asound
.state. The ALSA conguration data is appended to the end of the le /etc/modprobe
.d/sound and written to /etc/sysconfig/sound.
13.3 Setting Up a Scanner
You can congure a USB or SCSI scanner with YaST. The sane-backends package
contains hardware drivers and other essentials needed to use a scanner. Scanners
connected to a parallel port cannot be congured with YaST. If you own a HP All-In-
One device, see Section 13.3.1, Conguring an HP All-In-One Device” (page 161),
instructions on how to congure a network scanner are available at Section 13.3.3,
“Scanning over the Network” (page 161).
Procedure 13.3: Conguring a USB or SCSI Scanner
1 Connect your USB or SCSI scanner to your computer and turn it on.
2 Start YaST and select Hardware > Scanner. YaST builds the scanner database
and tries to detect your scanner model automatically.
If a USB or SCSI scanner is not properly detected, try Other > Restart Detection.
3 To activate the scanner select it from the list of detected scanners and click
Edit.
4 Choose your model form the list and click Next and Finish.
5 Use Other > Test to make sure you have chosen the correct driver.
160 Start-Up
6 Leave the conguration screen with OK.
13.3.1 Conguring an HP All-In-One Device
An HP All-In-One device can be congured with YaST even if it is connected to the
parallel port or is made available via the network. If you own a USB HP All-In-One
device, start conguring as described in Procedure 13.3, Conguring a USB or SCSI
Scanner (page 160). If it is detected properly and the Test succeeds, it is ready to
use.
If your USB device is not properly detected, or your HP All-In-One device is connected
to the parallel port or the network, run the HP Device Manager:
1 Start YaST and select Hardware > Scanner. YaST loads the scanner database.
2 Start the HP Device Manager with Other > Run hp-setup and follow the on-
screen instructions. After having nished the HP Device Manager, the YaST
scanner module automatically restarts the auto detection.
3 Test it by choosing Other > Test.
4 Leave the conguration screen with OK.
13.3.2 Sharing a Scanner over the Network
openSUSE allows the sharing of a scanner over the network. To do so, congure your
scanner as follows:
1 Congure the scanner as described in Section 13.3, “Setting Up a Scan-
ner (page 160).
2 Choose Other > Scanning via Network.
3 Enter the hostnames of the clients (separated by a comma) that should be
allowed to use the scanner under Server Settings > Permitted Clients for
saned and leave the conguration dialog with OK.
13.3.3 Scanning over the Network
To use a scanner that is shared over the network, proceed as follows:
1 Start YaST and select Hardware > Scanner.
2 Open the network scanner conguration menu by Other > Scanning via Net-
work.
3 Enter the hostname of the machine the scanner is connected to under Client
Settings > Servers Used for the net Metadriver
Setting Up Hardware Components with YaST 161
4 Leave with OK. The network scanner is now listed in the Scanner Conguration
window and is ready to use.
162 Start-Up
14 Printer Operation
openSUSE® supports printing with many types of printers, including remote network
printers. Printers can be congured manually or with YaST. For conguration instruc-
tions, refer to Section 14.4, “Setting Up a Printer” (page 165). Both graphical and
command line utilities are available for starting and managing print jobs. If your
printer does not work as expected, refer to Section 14.8, “Troubleshooting” (page 174).
CUPS (Common Unix Printing System) is the standard print system in openSUSE.
Printers can be distinguished by interface, such as USB or network, and printer lan-
guage. When buying a printer, make sure that the printer has an interface (like USB
or parallel port) that is available on your hardware and a suitable printer language.
Printers can be categorized on the basis of the following three classes of printer
languages:
PostScript Printers
PostScript is the printer language in which most print jobs in Linux and Unix are
generated and processed by the internal print system. If PostScript documents
can be processed directly by the printer and do not need to be converted in addi-
tional stages in the print system, the number of potential error sources is reduced.
Standard Printers (Languages Like PCL and ESC/P)
Although these printer languages are quite old, they are still undergoing expansion
to address new features in printers. In the case of known printer languages, the
print system can convert PostScript jobs to the respective printer language with
the help of Ghostscript. This processing stage is referred to as interpreting. The
best-known languages are PCL (which is mostly used by HP printers and their
clones) and ESC/P (which is used by Epson printers). These printer languages are
usually supported by Linux and produce an adequate print result. Linux may not
be able to address some special printer functions. Except for HP developing HPLIP
(HP Linux Imaging and Printing), there are currently no printer manufacturers
who develop Linux drivers and make them available to Linux distributors under
an open source license.
Proprietary Printers (Also Called GDI Printers)
These printers do not support any of the common printer languages. They use
their own undocumented printer languages, which are subject to change when
a new edition of a model is released. Usually only Windows drivers are available
for these printers. See Section 14.8.1, “Printers without Standard Printer Language
Support” (page 174) for more information.
Before you buy a new printer, refer to the following sources to check how well the
printer you intend to buy is supported:
Printer Operation 163
http://www.linuxfoundation.org/collaborate/workgroups/openprinting/database/
databaseintro
The OpenPrinting home page with the printer database. The database shows the
latest Linux support status. However, a Linux distribution can only integrate the
drivers available at production time. Accordingly, a printer currently rated as
“perfectly supported” may not have had this status when the latest openSUSE
version was released. Thus, the database may not necessarily indicate the correct
status, but only provide an approximation.
http://pages.cs.wisc.edu/~ghost/
The Ghostscript Web page.
/usr/share/doc/packages/ghostscript/catalog.devices
List of included drivers.
14.1 The Workow of the Printing System
The user creates a print job. The print job consists of the data to print plus information
for the spooler, such as the name of the printer or the name of the printer queue,
and optionally, information for the lter, such as printer-specic options.
At least one dedicated printer queue exists for every printer. The spooler holds the
print job in the queue until the desired printer is ready to receive data. When the
printer is ready, the spooler sends the data through the lter and back-end to the
printer.
The lter converts the data generated by the application that is printing (usually
PostScript or PDF, but also ASCII, JPEG, etc.) into printer-specic data (PostScript,
PCL, ESC/P, etc.). The features of the printer are described in the PPD les. A PPD
le contains printer-specic options with the parameters needed to enable them on
the printer. The lter system makes sure that options selected by the user are en-
abled.
If you use a PostScript printer, the lter system converts the data into printer-specic
PostScript. This does not require a printer driver. If you use a non-PostScript printer,
the lter system converts the data into printer-specic data. This requires a printer
driver suitable for your printer. The back-end receives the printer-specic data from
the lter then passes it to the printer.
14.2 Methods and Protocols for Connecting Printers
There are various possibilities for connecting a printer to the system. The conguration
of the CUPS print system does not distinguish between a local printer and a printer
connected to the system over the network. For more information about the printer
connection, read the article CUPS in a Nutshell in the Support Database at http://
en.opensuse.org/SDB:CUPS_in_a_Nutshell.
164 Start-Up
WARNING: Changing Cable Connections in a Running System
When connecting the printer to the machine, do not forget that only USB devices
can be plugged in or unplugged during operation. To avoid damaging your system
or printer, shut down the system before changing any connections that are not
USB.
14.3 Installing the Software
PPD (PostScript printer description) is the computer language that describes the
properties of a printer, like resolution, and options, such as the availability of a duplex
unit. These descriptions are required for using various printer options in CUPS.
Without a PPD le, the print data would be forwarded to the printer in a raw” state,
which is usually not desired. During the installation of openSUSE, many PPD les are
preinstalled.
To congure a PostScript printer, the best approach is to get a suitable PPD le. Many
PPD les are available in the package manufacturer-PPDs, which is automatically in-
stalled within the scope of the standard installation. See Section 14.7.2, PPD Files
in Various Packages” (page 173) and Section 14.8.2, “No Suitable PPD File Available
for a PostScript Printer” (page 175).
New PPD les can be stored in the directory /usr/share/cups/model/ or added to the
print system with YaST as described in Section 14.4.1.1, Adding Drivers with
YaST (page 167). Subsequently, the PPD le can be selected during the printer setup.
Be careful if a printer manufacturer wants you to install entire software packages.
First, this kind of installation may result in the loss of the support provided by open-
SUSE and second, print commands may work dierently and the system may no
longer be able to address devices of other manufacturers. For this reason, the instal-
lation of manufacturer software is not recommended.
14.4 Setting Up a Printer
YaST can be used to congure a local printer that is directly connected to your ma-
chine (normally with USB or parallel port) and to set up printing with network printers.
It is also possible to share printers over the network.
In YaST, click Hardware > Printer to start the printer module. By default it opens in
the Printer Congurations view, displaying a list of all printers that are available and
congured. This is especially useful when having access to a lot of printers via the
network. From here you can also Print a Test Page and congure local printers.
14.4.1 Conguring Local Printers
Usually a local USB printer is automatically detected. There are two possible reasons
why a USB printer is not automatically detected:
Printer Operation 165
The USB printer is switched o.
The communication between printer and computer is not possible. Check the
cable and the plugs to make sure that the printer is properly connected. If this
is the case, the problem may not be printer-related, but rather a USB-related
problem.
Conguring a printer is basically a three-step process: Specify the connection type,
choose a driver, and name the printing queue for this setup.
For many printer models, several drivers are available. When conguring the printer,
YaST defaults to the one marked recommended as a general rule. Normally it is not
necessary to change the driver—the recommended one should produce the best results.
However, if you want a color printer to print only in black and white, it is most conve-
nient to use a driver that does not support color printing, for example. If you experi-
ence performance problems with a PostScript printer when printing graphics, it may
help to switch from a PostScript driver to a PCL driver (provided your printer under-
stands PCL).
If no driver for your printer is listed, try to select a generic driver with an appropriate
standard language from the list. Refer to your printer's documentation to nd out
which language (the set of commands controlling the printer) your printer under-
stands. If this does not work, refer to Section 14.4.1.1, Adding Drivers with
YaST (page 167) for another possible solution.
A printer is never used directly, but always through a print queue. This ensures that
simultaneous jobs can be queued and processed one after the other. Each printer
queue is assigned to a specic driver, and a printer can have multiple queues. This
makes it possible to set up a second queue on a color printer that prints black and
white only, for example. Refer to Section 14.1, “The Workow of the Printing Sys-
tem” (page 164) for more information about print queues.
Procedure 14.1: Adding a New Local Printer
1 Start the YaST printer module with Hardware > Printer.
2 In the Printer Congurations screen click Add.
3
If your printer is already listed under Specify the Connection, proceed with
the next step. Otherwise, try to Detect More or start the Connection Wizard.
4
In the input box under Find and Assign a Driver enter the vendor name and
the model name and click Search for.
5 Choose the driver marked as recommended that best matches your printer.
If no suitable drivers is displayed:
5a Check your search term
5b Broaden your search by clicking Find More
166 Start-Up
5c Add a driver as described in Section 14.4.1.1, Adding Drivers with
YaST (page 167)
6
Specify the Default paper size.
7 In the Set Arbitrary Name eld enter a unique name for the printer queue.
8 The printer is now congured with the default settings and ready to use. Click
OK to return to the Printer Congurations view. The newly congured printer
is now visible in the list of printers.
14.4.1.1 Adding Drivers with YaST
If no suitable driver is available in the Find and Assign a Driver dialog when adding
a new printer, no PPD (PostScript Printer Description) le for your model is available.
For more information about PPD les, refer to Section 14.3, “Installing the Soft-
ware” (page 165).
Get PPD les directly from your printer vendor or from the driver CD of a PostScript
printer. For details, see Section 14.8.2, “No Suitable PPD File Available for a PostScript
Printer” (page 175). Alternatively, nd PPD les at http://www.linuxfoundation.org/
collaborate/workgroups/openprinting/database/databaseintro, the “OpenPrinting.org
printer database”. When downloading PPD les from OpenPrinting, keep in mind that
it always shows the latest Linux support status, which is not necessarily met by
openSUSE.
Procedure 14.2: Adding a PPD le
1 Start the YaST printer module with Hardware > Printer.
2 In the Printer Congurations screen click Add.
3
In the Find and Assign a Driver section click Driver Packages.
4
Enter the full path to the PPD le into the input box under Make a Printer
Description File Available. Alternatively, choose the le from a dialog box
by clicking Browse.
5
Click OK to return to the Add New Printer Configuration screen.
6 In order to directly use this PPD le, proceed as described in Procedure 14.1,
Adding a New Local Printer (page 166). Otherwise, click Cancel.
14.4.1.2 Editing a Local Printer Conguration
By editing an existing conguration for a local printer you can not only change basic
settings as connection type and driver, but also adjust the default settings for paper
size, resolution, media source, etc. You can change the identier of the printer by
altering the printer descriptions.
Printer Operation 167
Procedure 14.3: Editing a Local Printer
1 Start the YaST printer module with Hardware > Printer.
2 In the Printer Congurations screen, choose a local printer from the list and
click Edit.
3 Change the connection type or the driver as described in Procedure 14.1,
Adding a New Local Printer” (page 166). This should only be necessary in case
you have problems with the current conguration.
4 Make this printer the default by checking Default Printer.
5 Adjust the default settings by clicking All Options for the Current Driver. To
change a setting, expand the list of options by clicking the relative + sign.
Change the default by clicking an option. Apply your changes with OK.
14.4.2 Conguring Printing via the Network with YaST
Network printers are not detected automatically. They must be congured manually
using the YaST printer module. Depending on your network setup, you can print to
a print server (CUPS, LPD, SMB, or IPX) or directly to a network printer (preferably
via TCP). Access the conguration view for network printing by choosing Printing via
Network from the left pane in the YaST printer module.
14.4.2.1 Using CUPS
In a Linux environment CUPS is usually used to print via the network. The simplest
setup is to only print via a single CUPS server which can directly be accessed by all
clients. Printing via more than one CUPS server requires a running local CUPS daemon
that communicates with the remote CUPS servers.
Procedure 14.4: Printing via a Single CUPS Server
1 Start the YaST printer module with Hardware > Printer.
2 From the left pane launch the Print via Network screen.
3 Check Do All Your Printing Directly via One Single CUPS Server and specify
the name or IP address of the server.
4 Click Test Server to make sure you have chosen the correct name or IP address.
5 Click OK to return to the Printer Congurations screen. All printers available
via the CUPS server are now listed.
Procedure 14.5: Printing via Multiple CUPS Servers
1 Start the YaST printer module with Hardware > Printer.
2 From the left pane launch the Print via Network screen.
168 Start-Up
3 Check Accept Printer Announcements from CUPS Servers.
4
Under General Settings specify which servers to use. You may accept con-
nections from all networks available, from the local network, or from specic
hosts. If you choose the latter option, you need to specify the hostnames or
IP addresses.
5 Conrm by clicking OK and then Yes when asked to start a local CUPS server.
After the server has started YaST will return to the Printer Congurations
screen. Click Refresh list to see the printers detected by now. Click this button
again, in case more printer are to be available.
14.4.2.2 Using Print Servers other than CUPS
If your network oers print services via print servers other than CUPS, start the YaST
printer module with Hardware > Printer and launch the Print via Network screen from
the left pane. Start the Connection Wizard and choose the appropriate Connection
Type. Ask your network administrator for details on conguring a network printer in
your environment.
14.4.3 Sharing Printers Over the Network
Printers managed by a local CUPS daemon can be shared over the network and so
turn your machine into a CUPS server. Usually you share a printer by enabling CUPS'
so-called “browsing mode”. If browsing is enabled, the local printer queues are made
available on the network for listening to remote CUPS daemons. It is also possible
to set up a dedicated CUPS server that manages all printing queues and can directly
be accessed by remote clients. In this case it is not necessary to enable browsing.
Procedure 14.6: Sharing Printers
1 Start the YaST printer module with Hardware > Printer.
2 Launch the Share Printers screen from the left pane.
3 Select Allow Remote Access. For more detailed conguration, additional options
are available:
Check For computers within the local network and enable browsing mode
by also checking Publish printers by default within the local network.
Add the network interface to be used by the CUPS server. If you want to
share your printers via specied network interfaces, add those in the input
box below.
To restrict access to your CUPS server to certain networks or IP addresses,
specify these via the two input boxes.
4 Click OK to restart the CUPS server and to return to the Printer Congurations
screen.
Printer Operation 169
5
Regarding CUPS and rewall settings, see http://en.opensuse.org/SDB:CUPS
_and_SANE_Firewall_settings.
14.5 Network Printers
A network printer can support various protocols, some of them even concurrently.
Although most of the supported protocols are standardized, some manufacturers
modify the standard. Manufacturers then provide drivers for only a few operating
systems. Unfortunately, Linux drivers are rarely provided. The current situation is
such that you cannot act on the assumption that every protocol works smoothly in
Linux. Therefore, you may have to experiment with various options to achieve a
functional conguration.
CUPS supports the socket, LPD, IPP and smb protocols.
socket
Socket refers to a connection in which the plain print data is sent directly to a
TCP socket. Some of the socket port numbers that are commonly used are 9100
or 35. The device URI (uniform resource identier) syntax is: sock-
et://
IP.of.the.printer
:
port
, for example: socket://192.168.2.202:9100/.
LPD (Line Printer Daemon)
The LPD protocol is described in RFC 1179. Under this protocol, some job-related
data, such as the ID of the printer queue, is sent before the actual print data is
sent. Therefore, a printer queue must be specied when conguring the LPD
protocol. The implementations of diverse printer manufacturers are exible enough
to accept any name as the printer queue. If necessary, the printer manual should
indicate what name to use. LPT, LPT1, LP1 or similar names are often used. The
port number for an LPD service is 515. An example device URI is
lpd://192.168.2.202/LPT1.
IPP (Internet Printing Protocol)
IPP is a relatively new protocol (1999) based on the HTTP protocol. With IPP, more
job-related data is transmitted than with the other protocols. CUPS uses IPP for
internal data transmission. The name of the print queue is necessary to congure
IPP correctly. The port number for IPP is 631. Example device URIs are
ipp://192.168.2.202/ps and ipp://192.168.2.202/printers/ps.
SMB (Windows Share)
CUPS also supports printing on printers connected to Windows shares. The protocol
used for this purpose is SMB. SMB uses the port numbers 137, 138 and 139. Exam-
ple device URIs are smb://user:password@workgroup/smb.example.com/printer,
smb://user:password@smb.example.com/printer, and
smb://smb.example.com/printer.
The protocol supported by the printer must be determined before conguration. If
the manufacturer does not provide the needed information, the command nmap (which
170 Start-Up
comes with the nmap package) can be used to ascertain the protocol. nmap checks a
host for open ports. For example:
nmap -p 35,137-139,515,631,9100-10000
printerIP
14.5.1 Conguring CUPS with Command Line Tools
CUPS can be congured with command line tools like lpinfo, lpadmin and lpoptions.
You need a device URI consisting of a back-end, such as parallel, and parameters.
To determine valid device URIs on your system use the command lpinfo -v | grep
":/":
# lpinfo -v | grep ":/"
direct usb://ACME/FunPrinter%20XL
direct parallel:/dev/lp0
With lpadmin the CUPS server administrator can add, remove or manage print queues.
To add a print queue, use the following syntax:
lpadmin -p
queue
-v
device-URI
-P
PPD-file
-E
Then the device (-v) is available as
queue
(-p), using the specied PPD le (-P). This
means that you must know the PPD le and the device URI to congure the printer
manually.
Do not use -E as the rst option. For all CUPS commands, -E as the rst argument
sets use of an encrypted connection. To enable the printer, -E must be used as shown
in the following example:
lpadmin -p ps -v parallel:/dev/lp0 -P \
/usr/share/cups/model/Postscript.ppd.gz -E
The following example congures a network printer:
lpadmin -p ps -v socket://192.168.2.202:9100/ -P \
/usr/share/cups/model/Postscript-level1.ppd.gz -E
For more options of lpadmin, see the man page of lpadmin(8).
During printer setup, certain options are set as default. These options can be modied
for every print job (depending on the print tool used). Changing these default options
with YaST is also possible. Using command line tools, set default options as follows:
1 First, list all options:
lpoptions -p
queue
-l
Example:
Resolution/Output Resolution: 150dpi *300dpi 600dpi
The activated default option is identied by a preceding asterisk (*).
Printer Operation 171
2
Change the option with lpadmin:
lpadmin -p
queue
-o Resolution=600dpi
3 Check the new setting:
lpoptions -p
queue
-l
Resolution/Output Resolution: 150dpi 300dpi *600dpi
When a normal user runs lpoptions, the settings are written to ~/.cups/lpoptions.
However, root settings are written to /etc/cups/lpoptions.
14.6 Printing from the Command Line
To print from the command line, enter lp -d
queuename filename
, substituting the
corresponding names for
queuename
and
filename
.
Some applications rely on the lp command for printing. In this case, enter the correct
command in the application's print dialog, usually without specifying
filename
. For
example: lp -d
queuename
.
14.7 Special Features in openSUSE
A number of CUPS features have been adapted for openSUSE. Some of the most
important changes are covered here.
14.7.1 CUPS and Firewall
After having performed a default installation of openSUSE, SuSEFirewall2 is active
and the network interfaces are congured to be in the External Zone which blocks
incoming trac. More information about the SuSEFirewall2 conguration is available
in Section “SuSErewall2” (Chapter 13, Masquerading and Firewalls, ↑Security Guide)
and at http://en.opensuse.org/SDB:CUPS_and_SANE_Firewall_settings.
14.7.1.1 CUPS Client
Normally, a CUPS client runs on a regular workstation located in a trusted network
environment behind a rewall. In this case it is recommended to congure the network
interface to be in the Internal Zone, so the workstation is reachable from within the
network.
14.7.1.2 CUPS Server
If the CUPS server is part of a trusted network environment protected by a rewall,
the network interface should be congured to be in the Internal Zone of the rewall.
It is not recommended to set up a CUPS server in an untrusted network environment
172 Start-Up
unless you take care that it is protected by special rewall rules and secure settings
in the CUPS conguration.
14.7.2 PPD Files in Various Packages
The YaST printer conguration sets up the queues for CUPS using the PPD les in-
stalled in /usr/share/cups/model. To nd the suitable PPD les for the printer model,
YaST compares the vendor and model determined during hardware detection with
the vendors and models in all PPD les. For this purpose, the YaST printer congura-
tion generates a database with the vendor and model information extracted from
the PPD les.
The conguration using only PPD les and no other information sources has the ad-
vantage that the PPD les in /usr/share/cups/model can be modied freely. For ex-
ample, if you only have PostScript printers, normally you do not need the Foomatic
PPD les in the cups-drivers package or the Gutenprint PPD les in the gutenprint
package. Instead, the PPD les for your PostScript printers can be copied directly to
/usr/share/cups/model (if they do not already exist in the manufacturer-PPDs package)
to achieve an optimum conguration for your printers.
14.7.2.1
CUPS PPD Files in the cups Package
The generic PPD les in the cups package have been complemented with adapted
Foomatic PPD les for PostScript level 1 and level 2 printers:
/usr/share/cups/model/Postscript-level1.ppd.gz
/usr/share/cups/model/Postscript-level2.ppd.gz
14.7.2.2
PPD Files in the cups-drivers Package
Normally, the Foomatic printer lter foomatic-rip is used together with Ghostscript
for non-PostScript printers. Suitable Foomatic PPD les have the entries *NickName:
... Foomatic/Ghostscript driver and *cupsFilter: ... foomatic-rip. These PPD
les are located in the cups-drivers package.
YaST generally prefers a manufacturer-PPD le. However, when no suitable
manufacturer-PPD le exists, a Foomatic PPD le with the entry *NickName: ...
Foomatic ... (recommended) is selected.
14.7.2.3
Gutenprint PPD Files in the gutenprint Package
Instead of foomatic-rip, the CUPS lter rastertogutenprint from Gutenprint (formerly
known as GIMP-Print) can be used for many non-PostScript printers. This lter and
suitable Gutenprint PPD les are available in the gutenprint package. The Gutenprint
PPD les are located in /usr/share/cups/model/gutenprint/ and have the entries
*NickName: ... CUPS+Gutenprint and *cupsFilter: ... rastertogutenprint.
Printer Operation 173
14.7.2.4
PPD Files from Printer Manufacturers in the manufacturer-PPDs
Package
The manufacturer-PPDs package contains PPD les from printer manufacturers that
are released under a suciently liberal license. PostScript printers should be cong-
ured with the suitable PPD le of the printer manufacturer, because this le enables
the use of all functions of the PostScript printer. YaST prefers a PPD le from the
manufacturer-PPDs, but YaST cannot use a PPD le from the manufacturer-PPDs
package if the model name does not match. This may happen if the manufacturer-PPDs
package contains only one PPD le for similar models, like Funprinter 12xx series.
In this case, select the respective PPD le manually in YaST.
14.8 Troubleshooting
The following sections cover some of the most frequently encountered printer hard-
ware and software problems and ways to solve or circumvent these problems. Among
the topics covered are GDI printers, PPD les and port conguration. Common network
printer problems, defective printouts, and queue handling are also addressed.
14.8.1 Printers without Standard Printer Language Support
These printers do not support any common printer language and can only be ad-
dressed with special proprietary control sequences. Therefore they can only work
with the operating system versions for which the manufacturer delivers a driver. GDI
is a programming interface developed by Microsoft* for graphics devices. Usually
the manufacturer delivers drivers only for Windows, and since the Windows driver
uses the GDI interface these printers are also called GDI printers. The actual problem
is not the programming interface, but the fact that these printers can only be ad-
dressed with the proprietary printer language of the respective printer model.
Some GDI printers can be switched to operate either in GDI mode or in one of the
standard printer languages. See the manual of the printer whether this is possible.
Some models require special Windows software to do the switch (note that the Win-
dows printer driver may always switch the printer back into GDI mode when printing
from Windows). For other GDI printers there are extension modules for a standard
printer language available.
Some manufacturers provide proprietary drivers for their printers. The disadvantage
of proprietary printer drivers is that there is no guarantee that these work with the
installed print system or that they are suitable for the various hardware platforms.
In contrast, printers that support a standard printer language do not depend on a
special print system version or a special hardware platform.
Instead of spending time trying to make a proprietary Linux driver work, it may be
more cost-eective to purchase a printer which supports a standard printer language
(preferably PostScript). This would solve the driver problem once and for all, elimi-
nating the need to install and congure special driver software and obtain driver
updates that may be required due to new developments in the print system.
174 Start-Up
14.8.2 No Suitable PPD File Available for a PostScript Printer
If the manufacturer-PPDs package does not contain a suitable PPD le for a PostScript
printer, it should be possible to use the PPD le from the driver CD of the printer
manufacturer or download a suitable PPD le from the Web page of the printer
manufacturer.
The PPD le is provided as a zip archive (.zip) or a self-extracting zip archive (.exe).
Unpack the zip archive with unzip. First, review the license terms of the PPD le.
Then use the cupstestppd utility to check if the PPD le complies with Adobe
PostScript Printer Description File Format Specication, version 4.3.” If the utility
returns “FAIL,” the errors in the PPD les are serious and are likely to cause major
problems. The problem spots reported by cupstestppd should be eliminated. If nec-
essary, ask the printer manufacturer for a suitable PPD le.
14.8.3 Network Printer Connections
Identifying Network Problems
Connect the printer directly to the computer. For test purposes, congure the
printer as a local printer. If this works, the problems are related to the network.
Checking the TCP/IP Network
The TCP/IP network and name resolution must be functional.
Checking a Remote lpd
Use the following command to test if a TCP connection can be established to lpd
(port 515) on
host
:
netcat -z
host
515 && echo ok || echo failed
If the connection to lpd cannot be established, lpd may not be active or there
may be basic network problems.
As the user root, use the following command to query a (possibly very long) status
report for
queue
on remote
host
, provided the respective lpd is active and the
host accepts queries:
echo -e "\004queue" | netcat -w 2 -p 722
host
515
If lpd does not respond, it may not be active or there may be basic network
problems. If lpd responds, the response should show why printing is not possible
on the queue on host. If you receive a response like that shown in Example 14.1,
“Error Message from lpd (page 175), the problem is caused by the remote lpd.
Example 14.1: Error Message from lpd
lpd: your host does not have line printer access
lpd: queue does not exist
printer: spooling disabled
printer: printing disabled
Printer Operation 175
Checking a Remote cupsd
A CUPS network server can broadcast its queues by default every 30 seconds on
UDP port 631. Accordingly, the following command can be used to test whether
there is a broadcasting CUPS network server in the network. Make sure to stop
your local CUPS daemon before executing the command.
netcat -u -l -p 631 & PID=$! ; sleep 40 ; kill $PID
If a broadcasting CUPS network server exists, the output appears as shown in
Example 14.2, “Broadcast from the CUPS Network Server” (page 176).
Example 14.2: Broadcast from the CUPS Network Server
ipp://192.168.2.202:631/printers/queue
The following command can be used to test if a TCP connection can be established
to cupsd (port 631) on
host
:
netcat -z
host
631 && echo ok || echo failed
If the connection to cupsd cannot be established, cupsd may not be active or there
may be basic network problems. lpstat -h
host
-l -t returns a (possibly very
long) status report for all queues on
host
, provided the respective cupsd is active
and the host accepts queries.
The next command can be used to test if the
queue
on
host
accepts a print job
consisting of a single carriage-return character. Nothing should be printed. Possi-
bly, a blank page may be ejected.
echo -en "\r" | lp -d queue -h
host
Troubleshooting a Network Printer or Print Server Box
Spoolers running in a print server box sometimes cause problems when they have
to deal with multiple print jobs. Since this is caused by the spooler in the print
server box, there no way to resolve this issue. As a work-around, circumvent the
spooler in the print server box by addressing the printer connected to the print
server box directly with the TCP socket. See Section 14.5, “Network Print-
ers” (page 170).
In this way, the print server box is reduced to a converter between the various
forms of data transfer (TCP/IP network and local printer connection). To use this
method, you need to know the TCP port on the print server box. If the printer is
connected to the print server box and turned on, this TCP port can usually be
determined with the nmap utility from the nmap package some time after the print
server box is powered up. For example, nmap
IP-address
may deliver the following
output for a print server box:
Port State Service
23/tcp open telnet
80/tcp open http
515/tcp open printer
9100/tcp open jetdirect
176 Start-Up
This output indicates that the printer connected to the print server box can be
addressed via TCP socket on port 9100. By default, nmap only checks a number of
commonly known ports listed in /usr/share/nmap/nmap-services. To check all
possible ports, use the command nmap -p
from_port
-
to_port IP-address
. This
may take some time. For further information, refer to the man page of nmap.
Enter a command like
echo -en "\rHello\r\f" | netcat -w 1 IP-address port
cat file | netcat -w 1 IP-address port
to send character strings or les directly to the respective port to test if the
printer can be addressed on this port.
14.8.4 Defective Printouts without Error Message
For the print system, the print job is completed when the CUPS back-end completes
the data transfer to the recipient (printer). If further processing on the recipient fails
(for example, if the printer is not able to print the printer-specic data) the print
system does not notice this. If the printer is not able to print the printer-specic data,
select a PPD le that is more suitable for the printer.
14.8.5 Disabled Queues
If the data transfer to the recipient fails entirely after several attempts, the CUPS
back-end, such as USB or socket, reports an error to the print system (to cupsd). The
back-end determines how many unsuccessful attempts are appropriate until the
data transfer is reported as impossible. As further attempts would be in vain, cupsd
disables printing for the respective queue. After eliminating the cause of the problem,
the system administrator must reenable printing with the command cupsenable.
14.8.6 CUPS Browsing: Deleting Print Jobs
If a CUPS network server broadcasts its queues to the client hosts via browsing and
a suitable local cupsd is active on the client hosts, the client cupsd accepts print jobs
from applications and forwards them to the cupsd on the server. When cupsd on the
server accepts a print job, it is assigned a new job number. Therefore, the job number
on the client host is dierent from the job number on the server. As a print job is
usually forwarded immediately, it cannot be deleted with the job number on the
client host This is because the client cupsd regards the print job as completed as
soon as it has been forwarded to the server cupsd.
When it becomes desirable to delete the print job on the server, use a command
such as lpstat -h cups.example.com -o to determine the job number on the server,
provided the server has not already completed the print job (that is, sent it completely
to the printer). Using this job number, the print job on the server can be deleted:
cancel -h cups.example.com
queue-jobnumber
Printer Operation 177
14.8.7 Defective Print Jobs and Data Transfer Errors
If you switch the printer o or shut down the computer during the printing process,
print jobs remain in the queue. Printing resumes when the computer (or the printer)
is switched back on. Defective print jobs must be removed from the queue with
cancel.
If a print job is defective or an error occurs in the communication between the host
and the printer, the printer prints numerous sheets of paper with unintelligible
characters, because it is unable to process the data correctly. To rectify this situation,
follow these steps:
1 To stop printing, remove all paper from the printer or open its paper trays.
High-quality printers have a button for canceling the current printout.
2 The print job may still be in the queue, because jobs are only removed after
they are sent completely to the printer. Use lpstat -o or lpstat -h
cups.example.com -o to check which queue is currently printing. Delete the
print job with cancel
queue
-
jobnumber
or cancel -h cups.example.com
queue
-
jobnumber
.
3 Some data may still be transferred to the printer even though the print job
has been deleted from the queue. Check if a CUPS back-end process is still
running for the respective queue and terminate it. For example, for a printer
connected to the parallel port, the command fuser -k /dev/lp0 can be used
to terminate all processes that are still accessing the printer (more precisely:
the parallel port).
4 Reset the printer completely by switching it o for some time. Then insert the
paper and turn on the printer.
14.8.8 Debugging the CUPS Print System
Use the following generic procedure to locate problems in the CUPS print system:
1
Set LogLevel debug in /etc/cups/cupsd.conf.
2
Stop cupsd.
3
Remove /var/log/cups/error_log* to avoid having to search through very
large log les.
4
Start cupsd.
5 Repeat the action that led to the problem.
6
Check the messages in /var/log/cups/error_log* to identify the cause of the
problem.
178 Start-Up
14.8.9 For More Information
Solutions to many specic problems are presented in the SUSE Support Database
(http://en.opensuse.org/Portal:Support_database). Locate the relevant articles
with a text search for SDB:CUPS.
Printer Operation 179
15 Installing and Conguring Fonts
for the Graphical User Interface
The installation of additional fonts in openSUSE® is very easy. Simply copy the fonts
to any directory located in the X11 font path. To enable the use of the fonts, the in-
stallation directory should be a subdirectory of the directories congured in /etc/
fonts/fonts.conf or included into this le with /etc/fonts/suse-font-dirs.conf.
The following is an excerpt from /etc/fonts/fonts.conf. This le is the standard
conguration le that should be appropriate for most congurations. It also denes
the included directory /etc/fonts/conf.d. In this directory, all les or symbolic links
starting with a two digit number are loaded by fontcong. For a more detailed expla-
nation of this functionality, have a look at /etc/fonts/conf.d/README.
<!-- Font directory list -->
<dir>/usr/share/fonts</dir>
<dir>/usr/X11R6/lib/X11/fonts</dir>
<dir>/opt/kde3/share/fonts</dir>
<dir>/usr/local/share/fonts</dir>
<dir>~/.fonts</dir>
/etc/fonts/suse-font-dirs.conf is automatically generated to pull in fonts that ship
with (mostly third party) applications like OpenOce.org, Java or Adobe Acrobat
Reader. A typical entry would look like the following:
<dir>/usr/lib/Adobe/Reader9/Resource/Font</dir>
<dir>/usr/lib/Adobe/Reader9/Resource/Font/PFM</dir>
15.1 Adding Fonts
To install additional fonts system wide, manually copy the font les to a suitable di-
rectory (as root), such as /usr/share/fonts/truetype. Alternatively, the task can be
performed with the KDE font installer in the System Settings. The result is the same.
Instead of copying the actual fonts, you can also create symbolic links. For example,
you may want to do this if you have licensed fonts on a mounted Windows partition
and want to use them. Subsequently, run SuSEconfig --module fonts.
SuSEconfig --module fonts executes the script /usr/sbin/fonts-config, which
handles the font conguration. For more information on this script, refer to its man-
ual page (man fonts-config).
Installing and Conguring Fonts for the Graphical User Interface 181
The procedure is the same for bitmap fonts, TrueType and OpenType fonts, and
Type 1 (PostScript) fonts. All these font types can be installed into any directory
known to fonts-config.
182 Start-Up
16 Upgrading the System and
System Changes
You can upgrade an existing system without completely reinstalling it. There are two
types of renewing the system or parts of it: updating individual software packages
and upgrading the entire system. Updating individual packages is covered in Chap-
ter 5, Installing or Removing Software (page 79) and Chapter 6, YaST Online Up-
date (page 99). Two ways to upgrade the system are discussed in the following
sections— see Section 16.1.3, “Upgrading with YaST (page 184) and Section 16.1.4,
“Distribution Upgrade with zypper (page 185).
16.1 Upgrading the System
Software tends to “grow” from version to version. Therefore, take a look at the
available partition space with df before updating. If you suspect you are running
short of disk space, secure your data before you update and repartition your system.
There is no general rule regarding how much space each partition should have. Space
requirements depend on your particular partitioning prole, the software selected,
and the version numbers of the system.
16.1.1 Preparations
Before upgrading, copy the old conguration les to a separate medium (such as
removable hard disk or USB ash drive) to secure the data. This primarily applies to
les stored in /etc as well as some of the directories and les in /var. You may also
want to write the user data in /home (the HOME directories) to a backup medium. Back
up this data as root. Only root has read permission for all local les.
Before starting your update, make note of the root partition. The command df / lists
the device name of the root partition. In Example 16.1, List with df -h (page 183),
the root partition to write down is /dev/sda3 (mounted as /).
Example 16.1: List with df -h
Filesystem Size Used Avail Use% Mounted on
/dev/sda3 74G 22G 53G 29% /
udev 252M 124K 252M 1% /dev
/dev/sda5 116G 5.8G 111G 5% /home
/dev/sda1 39G 1.6G 37G 4% /windows/C
/dev/sda2 4.6G 2.6G 2.1G 57% /windows/D
Upgrading the System and System Changes 183
16.1.2 Possible Problems
If you upgrade a default system from the previous version to this version, YaST works
out the necessary changes and performs them. Depending on your customizations,
some steps (or the entire upgrade procedure) may fail and you must resort to copying
back your backup data. Check the following issues before starting the system update.
16.1.2.1 Checking passwd and group in /etc
Before upgrading the system, make sure that /etc/passwd and /etc/group do not
contain any syntax errors. For this purpose, start the verication utilities pwck and
grpck as root to eliminate any reported errors.
16.1.2.2 Shut Down Virtual Machines
If your machine serves as a VM Host Server for KVM or Xen, make sure to properly
shut down all running VM Guests prior to the update. Otherwise you may not be able
to acces the guests after the update.
16.1.2.3 PostgreSQL
Before updating PostgreSQL (postgres), dump the databases. See the manual page
of pg_dump. This is only necessary if you actually used PostgreSQL prior to your update.
16.1.3 Upgrading with YaST
Following the preparation procedure outlined in Section 16.1.1, “Prepara-
tions” (page 183), you can now upgrade your system:
1 Boot the system as for the installation, described in Section “System Start-Up
for Installation (Chapter 1, Installation with YaST, ↑Reference). In YaST,
choose a language and select Update in the Installation Mode dialog. Do not
select New Installation. Also add repositories to make sure to get all available
software updated whenever possible. Find more information about installation
repositories in Section Add-On Products” (Chapter 1, Installation with YaST,
↑Reference).
2 YaST determines if there are multiple root partitions. If there is only one,
continue with the next step. If there are several, select the right partition and
conrm with Next (/dev/sda3 was selected in the example in Section 16.1.1,
“Preparations” (page 183)). YaST reads the old fstab on this partition to analyze
and mount the le systems listed there.
WARNING: Persistent Device Names
All entries in /etc/fstab that specify partitions to be mounted using the
kernel-device name must be changed to any of the other supported
methods prior to performing an update. Kernel-device names are not per-
sistent and are therefore unreliable for use during the update process. This
184 Start-Up
can be done using the YaST System Partitioner by changing the method
used in the fstab options settings.
3 Check the previously used repositories, if there are any. Enable all the
repositories you still want to use and from where you want to update third-
party software. Click the Toggle Status for every list item, if appropriate.
4 If you added repositories during the upgrade procedure as recommended
above, you now can activate those you are actually interested in.
5 In the Installation Settings dialog, adjust the settings according to your require-
ments. Normally, you can leave the default settings untouched. If you intend
to enhance your system, however, check the packages and patterns oered
in the Packages and Update Options submenus, or add support for additional
languages.
You also have the possibility to make backups of various system components.
Selecting backups slows down the upgrade process. Use this option if you do
not have a recent system backup.
6 Conrm the upgrade by clicking Start Update.
Once the basic upgrade installation is nished, YaST reboots the system. Finally,
YaST updates the remaining software, if any and displays the release notes, if
wanted.
16.1.4 Distribution Upgrade with zypper
With the zypper command line utility you can upgrade to the next version of the
distribution. Most importantly, you can initiate the system upgrade process from
within the running system.
This feature is attractive for advanced users who want to run remote upgrades or
upgrades on many similarly congured systems.
16.1.4.1 Before Starting the Upgrade with zypper
To avoid unexpected errors during the upgrade process using zypper, minimize risky
constellations.
Upgrade from the previous version (e.g., 11.3) to this version (11.4)—do not skip
any minor version inbetween (this means, do not upgrade from 11.2 or earlier to
11.4 in one go). Make sure all available 11.3 online updates are successfully applied.
Close as many applications and unneeded services as possible and log out all regular
users.
Disable third party or openSUSE Build Server repositories before starting the upgrade,
or lower the priority of these repositories to make sure packages from the default
system repositories will get preference. Enable them again after the upgrade and
Upgrading the System and System Changes 185
edit their version string to match the version number of the distribution of the up-
graded now running system.
For more information, see http://en.opensuse.org/SDB:System_upgrade.
16.1.4.2 The Upgrade Procedure
WARNING: Check Your System Backup
Before actually starting the upgrade procedure, check that your system backup
is up-to-date and restorable. This is especially important because you must enter
many of the following steps manually.
1 Run the online update to make sure the software management stack is up-
to-date. For more information, see Chapter 6, YaST Online Update (page 99).
2 Congure the repositories you want to use as an update source. Getting this
right is essential. Either use YaST (see Section 5.4, “Managing Software
Repositories and Services” (page 90)) or zypper (see Section 9.1, “Using
Zypper (page 111)). The name of the repositories as used in the following
steps could vary a little bit depending on your customizations.
To view your current repositories enter:
zypper lr -u
TIP: zypper command names
zypper supports long and short command names. For example, you can
abbreviate zypper install as zypper in. In the following text, the short
variant is used.
2a Increase the version number of the system repositories from 11.3 to
11.4; add the new 11.4 repositories with commands such as:
server=http://download.opensuse.org
new_ver=11.4
zypper ar $server/distribution/$new_ver/repo/oss/
openSUSE-$new_ver-Oss
zypper ar $server/update/$new_ver/ openSUSE-$new_ver-Update
And remove the old repositories:
old_ver=11.3
zypper rr openSUSE-$old_ver-Oss
zypper rr openSUSE-$old_ver-Update
2b Disable third party repositories or other openSUSE Build Server
repositories, because zypper dup is guaranteed to work with the de-
186 Start-Up
fault repositories only (replace
repo-alias
with the name of the
repository you want to disable):
zypper mr -d
repo-alias
Alternatively, you can lower the priority of these repositories.
NOTE: Handling of Unresolved Dependencies
zypper dup will remove all packages having unresolved dependen-
cies, but it keeps packages of disabled repositories as long as
their dependencies are satised.
zypper dup ensures that all installed packages come from one of the
available repositories. It does not consider the version, architecture,
or vendor of the installed packages; thus it emulates a fresh installa-
tion. Packages that are no longer available in the repositories are
considered orphaned. Such packages get uninstalled if their depen-
dencies can not be satised. If they can be satised, such packages
stay installed.
2c Once done, check your repository conguration with:
zypper lr -d
3
Refresh local metadata and repository contents with zypper ref.
4 Pull in zypper and the package management stack from the 11.4 repository
with zypper up zypper.
5
Run the actual distribution upgrade with zypper dup. You are asked to conrm
the license.
6
Perform basic system conguration with SuSEconfig.
7
Reboot the system with shutdown -r now.
16.1.5 Updating Individual Packages
Regardless of your overall updated environment, you can always update individual
packages. From this point on, however, it is your responsibility to ensure that your
system remains consistent.
Use the YaST software management tool to update packages as described in Chap-
ter 5, Installing or Removing Software (page 79). Select components from the YaST
package selection list according to your needs. If a newer version of a package exists,
the version numbers of the installed and the available versions are listed in blue
color in the Installed (Available) column. If you select a package essential for the
Upgrading the System and System Changes 187
overall operation of the system, YaST issues a warning. Such packages should be
updated only in the update mode. For example, many packages contain shared li-
braries. Updating these programs and applications in the running system may lead
to system instability.
16.2 For More Information
Problems and special issues of the various versions are published online as they are
identied. See the links listed below. Important updates of individual packages can
be accessed using the YaST Online Update. For more information, see Chapter 6,
YaST Online Update (page 99).
Refer to the Product highlights (http://en.opensuse.org/Product_highlights and
the Bugs article in the openSUSE wiki at http://en.opensuse.org/openSUSE:Most
_annoying_bugs for information about recent changes and issues.
188 Start-Up
Part IV. The Bash Shell
17 Shell Basics
When working with Linux these days, you can communicate with the system almost
without ever requiring a command line interpreter (the shell). After booting your
Linux system, you are usually directed to a graphical user interface that guides you
through the login process and the following interactions with the operating system.
The graphical user interface in Linux (the X Window System or X11) is initially cong-
ured during installation. Both KDE and GNOME desktop (and other window managers
you can install) use it for interaction with the user.
Nevertheless, it is useful to have some basic knowledge of working with a shell be-
cause you might encounter situations where the graphical user interface is not
available. For example, if some problem with the X Window System occurs. If you
are not familiar with a shell, you might feel a bit uncomfortable at rst when entering
commands, but the more you get used to it, the more you will realize that the com-
mand line is often the quickest and easiest way to perform some daily tasks.
For UNIX or Linux several shells are available which dier slightly in behavior and in
the commands they accept. The default shell in openSUSE® is Bash (GNU Bourne-
Again Shell).
The following sections will guide you through your rst steps with the Bash shell and
will show you how to complete some basic tasks via the command line. If you are
interested in learning more or rather feel like a shell “power user” already, refer to
Chapter 18, Bash and Bash Scripts (page 225).
17.1 Starting a Shell
Basically, there are two dierent ways to start a shell from the graphical user interface
which usually shows after you have booted your computer:
you can leave the graphical user interface or
you can start a terminal window within the graphical user interface.
While the rst option is always available, you can only make use of the second option
when you are already logged in to a desktop such as KDE or GNOME. Whichever way
you choose, there is always a way back and you can switch back and forth between
the shell and the graphical user interface.
If you want to give it a try, press [Ctrl] + [Alt] + [F2] to leave the graphical user inter-
face. The graphical user interface disappears and you are taken to a shell which
prompts you to log in. Type your username and press [Enter]. Then type your pass-
Shell Basics 191
word and press [Enter]. The prompt now changes and shows some useful information
as in the following example:
tux@linux:~>
Your login.
The hostname of your computer.
Path to the current directory. Directly after login, the current directory usually is
your home directory, indicated by the ~ symbol (tilde) .
When you are logged in at a remote computer the information provided by the prompt
always shows you which system you are currently working on.
When the cursor is located behind this prompt, you can pass commands directly to
your computer system. For example, you can now enter ls -l to list the contents of
the current directory in a detailed format. If this is enough for your rst encounter
with the shell and you want to go back to the graphical user interface, you should
log out from your shell session rst. To do so, type exit and press [Enter]. Then press
[Alt] + [F7] to switch back to the graphical user interface. You will nd your desktop
and the applications running on it unchanged.
When you are already logged in to the GNOME or the KDE desktop and want to start
a terminal window within the desktop, press [Alt] + [F2] and enter konsole (for KDE)
or gnome-terminal (for GNOME). This opens a terminal window on your desktop. As
you are already logged in to your desktop, the prompt shows information about your
system as described above. You can now enter commands and execute tasks just
like in any shell which runs parallel to your desktop. To switch to another application
on the desktop just click on the corresponding application window or select it from
the taskbar of your panel. To close the terminal window press [Alt] + [F4].
17.2 Entering Commands
As soon as the prompt appears on the shell it is ready to receive and execute com-
mands. A command can consist of several elements. The rst element is the actual
command, followed by parameters or options. You can type a command and edit it
by using the following keys: [], [], [Home], [End], [<—] (Backspace), [Del], and
[Space]. You can correct typing errors or add options. The command is not executed
until you press [Enter].
IMPORTANT: No News Is Good News
The shell is not verbose: in contrast to some graphical user interfaces, it usually
does not provide conrmation messages when commands have been executed.
Messages only appear in case of problems or errors —or if you explicitly ask for
them by executing a command with a certain option.
192 Start-Up
Also keep this in mind for commands to delete objects. Before entering a command
like rm (without any option) for removing a le, you should know if you really want
to get rid of the object: it will be deleted irretrievably, without conrmation.
17.2.1 Using Commands without Options
In Section 17.5.1, Permissions for User, Group and Others” (page 200) you already
got to know one of the most basic commands: ls, which used to list the contents of
a directory. This command can be used with or without options. Entering the plain
ls command shows the contents of the current directory:
tux@knox:~> ls
bin Desktop Documents public_html tux.txt
tux@knox:~>
Files in Linux may have a le extension or a sux, such as .txt, but do not need to
have one. This makes it dicult to dierentiate between les and folders in this
output of the ls. By default, the colors in the Bash shell give you a hint: directories
are usually shown in blue, les in black.
17.2.2 Using Commands with Options
A better way to get more details about the contents of a directory is using the ls
command with a string of options. Options modify the way a command works so that
you can get it to carry out specic tasks. Options are separated from the command
with a blank and are usually prexed with a hyphen. The ls -l command shows the
contents of the same directory in full detail (long listing format):
tux@knox:~> ls -l
drwxr-xr-x 1 tux users 48 2006-06-23 16:08 bin
drwx---r-- 1 tux users 53279 2006-06-21 13:16 Desktop
drwx------ 1 tux users 280 2006-06-23 16:08 Documents
drwxr-xr-x 1 tux users 70733 2006-06-21 09:35 public_html
-rw-r--r-- 1 tux users 47896 2006-06-21 09:46 tux.txt
tux@knox:~>
This output shows the following information about each object:
drwxr-xr-x 1 tux users 48 2006-06-23 16:08 bin
Type of object and access permissions. For further information, refer to Sec-
tion 17.5.1, “Permissions for User, Group and Others” (page 200).
Number of hard links to this le.
Owner of the le or directory. For further information, refer to Section 17.5.1,
“Permissions for User, Group and Others” (page 200).
Group assigned to the le or directory. For further information, refer to Sec-
tion 17.5.1, “Permissions for User, Group and Others” (page 200).
File size in bytes.
Date and time of the last change.
Shell Basics 193
Name of the object.
Usually, you can combine several options by prexing only the rst option with a
hyphen and then write the others consecutively without a blank. For example, if you
want to see all les in a directory in long listing format, you can combine the two
options -l and -a (show all les) for the ls command. Executing ls -la shows also
hidden les in the directory, indicated by a dot in front (for example, .hiddenfile).
The list of contents you get with ls is sorted alphabetically by lenames. But like in
a graphical le manager, you can also sort the output of ls -l according to various
criteria such as date, le extension or le size:
For date and time, use ls -lt (displays newest rst).
For extensions, use ls -lx (displays les with no extension rst).
For le size, use ls -lS (displays largest rst).
To revert the order of sorting, add -r as an option to your ls command. For example,
ls -lr gives you the contents list sorted in reverse alphabetical order, ls -ltr shows
the oldest les rst. There are lots of other useful options for ls. In the following
section you will learn how to investigate them.
17.2.3 Getting Help
Nobody is expected to know all options of all commands by heart. If you remember
the command name but are not sure about the options or the syntax of the command,
choose one of the following possibilities:
--help option
If you only want to look up the options of a certain command, try entering the
command followed by a space and --help. This --help option exists for many
commands. For example, ls --help displays all the options for the ls command.
Manual Pages
To learn more about the various commands, you can also use the manual pages.
Manual pages also give a short description of what the command does. They can
be accessed with man followed by the name of the command, for example, man ls.
The man pages are displayed directly in the shell. To navigate them, move up
and down with [Page ] and [Page ]. Move between the beginning and the end
of a document with [Home] and [End]. End this viewing mode by pressing [Q].
Learn more about the man command itself with man man.
Info Pages
Info pages usually provide even more information about commands. To view the
info page for a certain command, enter info followed by the name of the command
(for example, info ls). You can browse an info page with a viewer directly in the
shell and display the dierent sections, called nodes.” Use [Space] to move for-
194 Start-Up
ward and [<—] to move backwards. Within a node, you can also browse with
[Page ] and [Page ] but only [Space] and [<—] will take you also to the previous
or subsequent node. Like for the man pages, press [Q] to end the viewing mode.
Note that man pages and info pages do not exist for all commands. Sometimes both
are available (usually for key commands), sometimes only a man page or an info
page exists, and sometimes neither of them are available.
17.2.4 Bash Shortcut Keys
After having entered several commands, your shell will begin to ll up with all sorts
of commands and the corresponding outputs. In the following table, nd some useful
shortcut keys for navigating and editing in the shell.
FunctionShortcut Key
Clears the screen and moves the cur-
rent line to the top of the page.
[Ctrl] + [L]
Aborts the command which is currently
being executed.
[Ctrl] + [C]
Scrolls upwards.[Shift] + [Page ]
Scrolls downwards.[Shift] + [Page ]
Deletes from cursor position to start of
line.
[Ctrl] + [U]
Deletes from cursor position to the end
of line.
[Ctrl] + [K]
Closes the shell session.[Ctrl] + [D]
Browses in the history of executed
commands.
[], []
17.3 Working with Files and Directories
To address a certain le or directory, you must specify the path leading to that direc-
tory or le. As you may know from MS DOS or Mac OS already, there are two ways
to specify a path:
Absolute Path
Enter the entire path from the root directory to the relevant le or directory.
Shell Basics 195
Relative Path
Enter a path to the relevant le or directory by using the current directory as a
starting point. This implies to give the levels you have to move up or down in the
le system tree to reach the target directory of le, starting from the current di-
rectory.
Paths contain lenames, directories or both, separated by slashes. Absolute paths
always start with a slash. Relative paths do not have a slash at the beginning, but
can have one or two dots.
When entering commands, you can choose either way to specify a path, depending
on your preferences or the amount of typing, both will lead to the same result. To
change directories, use the cd command and specify the path to the directory.
NOTE: Handling Blanks in Filenames or Directory Names
If a lename or the name of a directory contains a space, either escape the space
using a back slash (\) in front of the blank or enclose the lename in single quotes.
Otherwise Bash interprets a lename like My Documents as the names of two les
or directories, My and Documents in this case.
When specifying paths, the following “shortcuts” can save you a lot of typing:
The tilde symbol (~) is a shortcut for home directories. For example, to list the
contents of your home directory, use ls ~. To list the contents of another user's
home directory, enter ls ~
username
(or course, this will only work if you have
permission to view the contents, see Section 17.5, “File Access Permis-
sions” (page 200)). For example, entering ls ~tux would list the contents of the
home directory of a user named tux. You can use the tilde symbol as shortcut
for home directories also if you are working in a network environment where
your home directory may not be called /home but can be mapped to any directory
in the le system.
From anywhere in the le system, you can reach your home directory by entering
cd ~ or by simply entering cd without any options.
When using relative paths, refer to the current directory with a dot (.). This is
mainly useful for commands such as cp or mv by which you can copy or move
les and directories.
The next higher level in the tree is represented by two dots (..). In order to
switch to the parent directory of your current directory, enter cd .., to go up
two levels from the current directory enter cd ../.. etc.
To apply your knowledge, nd some examples below. They address basic tasks you
may want to execute with les or folders using Bash.
196 Start-Up
17.3.1 Examples for Working with Files and Directories
Suppose you want to copy a le located somewhere in your home directory to a
subdirectory of /tmp that you need to create rst.
Procedure 17.1: Creating and Changing Directories
From your home directory create a subdirectory in /tmp:
1 Enter
mkdir /tmp/test
mkdir stands for “make directory”. This command creates a new directory
named test in the /tmp directory. In this case, you are using an absolute path
to create the test directory.
2 To check what happened, now enter
ls -l /tmp
The new directory test should appear in the list of contents of the /tmp direc-
tory.
3 Switch to the newly created directory with
cd /tmp/test
Procedure 17.2: Creating and Copying Files
Now create a new le in a subdirectory of your home directory and copy it to /tmp/
test. Use a relative path for this task.
IMPORTANT: Overwriting of Existing Files
Before copying, moving or renaming a le, check if your target directory already
contains a le with the same name. If yes, consider changing one of the lenames
or use cp or mv with options like -i, which will prompt before overwriting an ex-
isting le. Otherwise Bash will overwrite the existing le without conrmation.
1 To list the contents of your home directory, enter
ls -l ~
It should contain a subdirectory called Documents by default. If not, create this
subdirectory with the mkdir command you already know:
mkdir ~/Documents
2
To create a new, empty le named myfile.txt in the Documents directory,
enter
Shell Basics 197
touch ~/Documents/myfile.txt
Usually, the touch command updates the modication and access date for an
existing le. If you use touch with a lename which does not exist in your
target directory, it creates a new le.
3 Enter
ls -l ~/Documents
The new le should appear in the list of contents.
4 To copy the newly created le, enter
cp ~/Documents/myfile.txt .
Do not forget the dot at the end.
This command tells Bash to go to your home directory and to copy myfile.txt
from the Documents subdirectory to the current directory, /tmp/test, without
changing the name of the le.
5 Check the result by entering
ls -l
The le myfile.txt should appear in the list of contents for /tmp/test.
Procedure 17.3: Renaming and Removing Files or Directories
Now suppose you want to rename myfile.txt into tuxfile.txt. Finally you decide
to remove the renamed le and the test subdirectory.
1 To rename the le, enter
mv myfile.txt tuxfile.txt
2 To check what happened, enter
ls -l
Instead of myfile.txt, tuxfile.txt should appear in the list of contents.
mv stands for move and is used with two options: the rst option species the
source, the second option species the target of the operation. You can use
mv either
to rename a le or a directory,
to move a le or directory to a new location or
to do both in one step.
198 Start-Up
3 Coming to the conclusion that you do not need the le any longer, you can
delete it by entering
rm tuxfile.txt
Bash deletes the le without any conrmation.
4
Move up one level with cd .. and check with
ls -l test
if the test directory is empty now.
5
If yes, you can remove the test directory by entering
rmdir test
17.4 Becoming Root
root, also called the superuser, has privileges which authorize him to access all parts
of the system and to execute administrative tasks. He or she has the unrestricted
capacity to make changes to the system and has unlimited access to all les.
Therefore performing some administrative tasks or running certain programs such
as YaST requires root permissions.
17.4.1 Using su
In order to temporarily become root in a shell, proceed as follows:
1
Enter su. You are prompted for the root password.
2
Enter the password. If you mistyped the root password, the shell displays a
message. In this case, you have to re-enter su before retyping the password.
If your password is correct, a hash symbol # appears at the end of the prompt,
signaling that you are acting as root now.
3 Execute your task. For example, transfer ownership of a le to a new user
which only root is allowed to do:
chown wilber kde_quick.xml
4
After having completed your tasks as root, switch back to your normal user
account. To do so, enter
exit
The hash symbol disappears and you are acting as normal” user again.
Shell Basics 199
17.4.2 Using sudo
Alternatively, you can also use sudo (superuser “do”) to execute some tasks which
normally are for roots only. With sudo, administrators can grant certain users root
privileges for some commands. Depending on the system conguration, users can
then run root commands by entering their normal password only. Due to a timestamp
function, users are only granted a “ticket” for a restricted period of time after having
entered their password. The ticket usually expires after a few minutes. In openSUSE,
sudo requires the root password by default (if not congured otherwise by your
system administrator).
For users, sudo is convenient as it prevents you from switching accounts twice (to
root and back again). To change the ownership of a le using sudo, only one command
is necessary instead of three:
sudo chown wilber kde_quick.xml
After you have entered the password which you are prompted for, the command is
executed. If you enter a second root command shortly after that, you are not
prompted for the password again, because your ticket is still valid. After a certain
amount of time, the ticket automatically expires and the password is required again.
This also prevents unauthorized persons from gaining root privileges in case a user
forgets to switch back to his normal user account again and leaves a root shell open.
17.5 File Access Permissions
In Linux, objects such as les or folders or processes generally belong to the user
who created or initiated them. There are some exceptions to this rule. For more in-
formation about the exceptions, refer to Chapter 9, Access Control Lists in Linux
(↑Security Guide). The group which is associated with a le or a folder depends on
the primary group the user belongs to when creating the object.
When you create a new le or directory, initial access permissions for this object are
set according to a predened scheme. As an owner of a le or directory, you can
change the access permissions for this object. For example, you can protect les
holding sensitive data against read access by other users and you can authorize the
members of your group or other users to write, read, or execute several of your les
where appropriate. As root, you can also change the ownership of les or folders.
17.5.1 Permissions for User, Group and Others
Three permission sets are dened for each le object on a Linux system. These sets
include the read, write, and execute permissions for each of three types of users—the
owner, the group, and other users.
The following example shows the output of an ls -l command in a shell. This com-
mand lists the contents of a directory and shows the details for each le and folder
in that directory.
200 Start-Up
Example 17.1: Access Permissions For Files and Folders
-rw-r----- 1 tux users 0 2006-06-23 16:08 checklist.txt
-rw-r--r-- 1 tux users 53279 2006-06-21 13:16 gnome_quick.xml
-rw-rw---- 1 tux users 0 2006-06-23 16:08 index.htm
-rw-r--r-- 1 tux users 70733 2006-06-21 09:35 kde-start.xml
-rw-r--r-- 1 tux users 47896 2006-06-21 09:46 kde_quick.xml
drwxr-xr-x 2 tux users 48 2006-06-23 16:09 local
-rwxr--r-- 1 tux users 624398 2006-06-23 15:43 tux.sh
As shown in the third column, all objects belong to user tux. They are assigned to
the group users which is the primary group the user tux belongs to. To retrieve the
access permissions the rst column of the list must be examined more closely. Let's
have a look at the le kde-start.xml:
Permissions for
Others
Group PermissionsUser PermissionsType
r--r--rw--
The rst column of the list consists of one leading character followed by nine charac-
ters grouped in three blocks. The leading character indicates the le type of the object:
in this case, the hyphen () shows that kde-start.xml is a le. If you nd the character
d instead, this shows that the object is a directory, like local in Example 17.1, Access
Permissions For Files and Folders” (page 201).
The next three blocks show the access permissions for the owner, the group and
other users (from left to right). Each block follows the same pattern: the rst position
shows read permissions (r), the next position shows write permissions (w), the last
one shows execute permission (x). A lack of either permission is indicated by -. In
our example, the owner of kde-start.xml has read and write access to the le but
cannot execute it. The users group can read the le but cannot write or execute it.
The same holds true for the other users as shown in the third block of characters.
17.5.2 Files and Folders
Access permissions have a slightly dierent impact depending on the type of object
they apply to: le or directory. The following table shows the details:
Table 17.1: Access Permissions For Files And Directories
FolderFileAccess Permission
Users can view the con-
tents of the directory.
Users can open and read
the le.
Read (r)
Without this permission,
users cannot list the con-
Shell Basics 201
FolderFileAccess Permission
tents of this directory
with ls -l, for example.
However, if they only
have execute permission
for the directory, they
can nevertheless access
certain les in this direc-
tory if they know of their
existence.
Users can create, rename
or delete les in the direc-
tory.
Users can change the
le: They can add or drop
data and can even delete
Write (w)
the contents of the le.
However, this does not
include the permission to
remove the le complete-
ly from the directory as
long as they do not have
write permissions for the
directory where the le is
located.
Users can change into
the directory and execute
Users can execute the
le. This permission is
Execute (x)
les there. If they do notonly relevant for les like
have read access to thatprograms or shell scripts,
directory they cannot listnot for text les. If the
the les but can accessoperating system can ex-
them nevertheless if they
know of their existence.
ecute the le directly,
users do not need read
permission to execute
the le. However, if the
le must me interpreted
like a shell script or a perl
program, additional read
permission is needed.
Note that access to a certain le is always dependent on the correct combination of
access permissions for the le itself and the directory it is located in.
17.5.3 Modifying File Permissions
In Linux, objects such as les or folder or processes generally belong to the user who
created or initiated them. The group which is associated with a le or a folder depends
202 Start-Up
on the primary group the user belongs to when creating the object. When you create
a new le or directory, initial access permissions for this object are set according to
a predened scheme. For further details refer to Section 17.5, File Access Permis-
sions” (page 200).
As the owner of a le or directory (and, of course, as root), you can change the access
permissions to this object.
To change object attributes like access permissions of a le or folder, use the chmod
command followed by the following parameters:
the users for which to change the permissions,
the type of access permission you want to remove, set or add and
the les or folders for which you want to change permissions separated by
spaces.
The users for which you can change le access permissions fall into the following
categories: the owner of the le (user, u), the group that own the le (group, g) and
the other users (others, o). You can add, remove or set one or more of the following
permissions: read, write or execute.
As root, you can also change the ownership of a le: with the command chown
(change owner) you can transfer ownership to a new user.
17.5.3.1 Examples for Changing Access Permissions and Ownership
The following example shows the output of an ls -l command in a shell.
Example 17.2: Access Permissions For Files and Folders
-rw-r----- 1 tux users 0 2006-06-23 16:08 checklist.txt
-rw-r--r-- 1 tux users 53279 2006-06-21 13:16 gnome_quick.xml
-rw-rw---- 1 tux users 0 2006-06-23 16:08 index.htm
-rw-r--r-- 1 tux users 70733 2006-06-21 09:35 kde-start.xml
-rw-r--r-- 1 tux users 47896 2006-06-21 09:46 kde_quick.xml
drwxr-xr-x 2 tux users 48 2006-06-23 16:09 local
-r-xr-xr-x 1 tux users 624398 2006-06-23 15:43 tux.jpg
In the example above, user tux owns the le kde-start.xml and has read and write
access to the le but cannot execute it. The users group can read the le but cannot
write or execute it. The same holds true for the other users as shown by the third
block of characters.
Procedure 17.4: Changing Access Permissions
Suppose you are tux and want to modify the access permissions to your les:
1
If you want to grant the users group also write access to kde-start.xml, enter
chmod g+w kde-start.xml
Shell Basics 203
2
To grant the users group and other users write access to kde-start.xml, enter
chmod go+w kde-start.xml
3 To remove write access for all users, enter
chmod -w kde-start.xml
If you do not specify any kind of users, the changes apply to all users— the
owner of the le, the owning group and the others. Now even the owner tux
does not have write access to the le without rst reestablishing write permis-
sions.
4
To prohibit the usersgroup and others to change into the directory local,
enter
chmod go-x local
5
To grant others write permissions for two les, for kde_quick.xml and gnome
_quick.xml, enter
chmod o+w kde_quick.xml gnome_quick.xml
Procedure 17.5: Changing Ownership
Suppose you are tux and want to transfer the ownership of the le kde_quick.xml
to an other user, named wilber. In this case, proceed as follows:
1
Enter the username and password for root.
2 Enter
chown wilber kde_quick.xml
3 Check what happened with
ls -l kde_quick.xml
You should get the following output:
-rw-r--r-- 1 wilber users 47896 2006-06-21 09:46 kde_quick.xml
4 If the ownership is set according to your wishes, switch back to your normal
user account.
204 Start-Up
17.6 Useful Features of the Shell
As you probably noticed in the examples above, entering commands in Bash can
include a lot of typing. In the following, get to know some features of the Bash that
can make your work a lot easier and save a lot of typing.
History
By default, Bash remembers” commands you have entered. This feature is called
history. You can browse through commands that have been entered before, select
one you want to repeat and then execute it again. To do so, press [] repeatedly
until the desired command appears at the prompt. To move forward through the
list of previously entered commands, press []. For easier repetition of a certain
command from Bash history, just type the rst letter of the command you want
to repeat and press [Page ].
You can now edit the selected command (for example, change the name of a le
or a path), before you execute the command by pressing [Enter]. To edit the
command line, just move the cursor to the desired position using the arrow keys
and start typing.
You can also search for a certain command in the history. Press [Ctrl] + [R] to
start an incremental search function. showing the following prompt:
(reverse-i-search)`':
Just type one or several letters from the command you are searching for. Each
character you enter narrows down the search. The corresponding search result
is shown on the right side of the colon whereas your input appears on the left of
the colon. To accept a search result, press [Esc]. The prompt now changes to its
normal appearance and shows the command you chose. You can now edit the
command or directly execute it by pressing [Enter].
Completion
Completing a lename or directory name to its full length after typing its rst
letters is another helpful feature of Bash. To do so, type the rst letters then press
[→|] (Tabulator). If the lename or path can be uniquely identied, it is completed
at once and the cursor moves to the end of the lename. You can then enter the
next option of the command, if necessary. If the lename or path cannot be
uniquely identied (because there are several lenames starting with the same
letters), the lename or path is only completed up to the point where it becomes
ambiguous again. You can then obtain a list of them by pressing [→|] a second
time. After this, you can enter the next letters of the le or path then try comple-
tion again by pressing [→|]. When completing lenames and paths with the help
of [→|], you can simultaneously check whether the le or path you want to enter
really exists (and you can be sure of getting the spelling right).
Wild Cards
You can replace one or more characters in a lename with a wild card for path-
name expansion. Wild cards are characters that can stand for other characters.
There are three dierent types of these in Bash:
Shell Basics 205
FunctionWild Card
Matches exactly one arbitrary charac-
ter
?
Matches any number of characters
*
Matches one of the characters from
the group specied inside the square
[
set
]
brackets, which is represented here
by the string
set
.
17.6.1 Examples For Using History, Completion and Wildcards
The following examples illustrate how to make use of these convenient features of
Bash.
Procedure 17.6: Using History and Completion
If you already did the example Section 17.3.1, “Examples for Working with Files
and Directories” (page 197) your shell buer should be lled with commands which
you can retrieve using the history function.
1
Press [] repeatedly until cd ~ appears.
2 Press [Enter] to execute the command and to switch to your home directory.
By default, your home directory contains two subdirectories starting with the
same letter, Documents and Desktop.
3
Enter cd D and press [→|].
Nothing happens since Bash cannot identify to which one of the subdirectories
you want to change.
4 Press [→|] again to see the list of possible choices:
tux@knox:~> cd D Desktop/ Documents/ tux@knox:~> cd D
5 The prompt still shows your initial input. Type the next character of the subdi-
rectory you want to go to and press [→|] again.
Bash now completes the path.
6 You can now execute the command with [Enter].
206 Start-Up
Procedure 17.7: Using Wildcards
Now suppose that your home directory contains a number of les with various le
extensions. It also holds several versions of one le which you saved under dierent
lenames myfile1.txt, myfile2.txt etc. You want to search for certain les accord-
ing to their properties.
1 First, create some test les in your home directory:
1a
Use the touch command to create several (empty) les with dierent
le extensions, for example .pdf, .xml and .jpg.
You can do this consecutively (do not forget to use the Bash history
function) or with only one touch command: simply add several le-
names separated by a space.
1b Create at least two les that have the same le extension, for exam-
ple .html.
1c To create several versions” of one le, enter
touch myfile{1..5}.txt
This command creates ve consecutively numbered les:
myfile1.txt,…,myfile5.txt
1d List the contents of your home directory. It should look similar to this:
-rw-r--r-- 1 tux users 0 2006-07-14 13:34 foo.xml
-rw-r--r-- 1 tux users 0 2006-07-14 13:47 home.html
-rw-r--r-- 1 tux users 0 2006-07-14 13:47 index.html
-rw-r--r-- 1 tux users 0 2006-07-14 13:47 toc.html
-rw-r--r-- 1 tux users 0 2006-07-14 13:34 manual.pdf
-rw-r--r-- 1 tux users 0 2006-07-14 13:49 myfile1.txt
-rw-r--r-- 1 tux users 0 2006-07-14 13:49 myfile2.txt
-rw-r--r-- 1 tux users 0 2006-07-14 13:49 myfile3.txt
-rw-r--r-- 1 tux users 0 2006-07-14 13:49 myfile4.txt
-rw-r--r-- 1 tux users 0 2006-07-14 13:49 myfile5.txt
-rw-r--r-- 1 tux users 0 2006-07-14 13:32 tux.png
2 With the help of wild cards, select certain subsets of the les according to
various criteria:
2a
To list all les with the .html extension, enter
ls -l *.html
Shell Basics 207
2b
To list all versions” of myfile.txt, enter
ls -l myfile?.txt
Note that you can only use the ? wild card here because the number-
ing of the les is single-digit. As soon as you have a le named
myfile10.txt you must to use the * wild card to view all versions of
myfile.txt (or add another question mark, so your string looks like
myfile??.txt).
2c
To remove, for example, version 1-3 and version 5 of myfile.txt,
enter
rm myfile[1-3,5].txt
2d Check the result with
ls -l
Of all myfile.txt versions only myfile4.txt should be left.
You can also combine several wild cards in one command. In the example above, rm
myfile[1-3,5].* would lead to the same result as rm myfile[1-3,5].txt because
there are only les with the extension .txt available.
NOTE: Using Wildcards in rm Commands
Wildcards in a rm command can be very useful but also dangerous: you might
delete more les from your directory than intended. To see which les would be
aected by the rm, run your wildcard string with ls instead of rm rst.
17.7 Editing Texts
In order to edit les from the command line, you will need to know the vi editor. vi
is a default editor which can be found on nearly every UNIX/Linux system. It can run
several operating modes in which the keys you press have dierent functions. This
does not make it very easy for beginners, but you should know at least the most
basic operations with vi. There may be situations where no other editor than vi is
available.
Basically, vi makes use of three operating modes:
command mode
In this mode, vi accepts certain key combinations as commands. Simple tasks
such as searching words or deleting a line can be executed.
insert mode
In this mode, you can write normal text.
208 Start-Up
extended mode
In this mode, also known as colon mode (as you have to enter a colon to switch
to this mode), vi can execute also more complex tasks such as searching and
replacing text.
In the following (very simple) example, you will learn how to open and edit a le with
vi, how to save your changes and quit vi.
17.7.1 Example: Editing with vi
NOTE: Display of Keys
In the following, nd several commands that you can enter in vi by just pressing
keys. These appear in uppercase as on a keyboard. If you need to enter a key
in uppercase, this is stated explicitly by showing a key combination including
the [Shift] key.
1 To create and open a new le with vi, enter
vi textfile.txt
By default, vi opens in command mode in which you cannot enter text.
2 Press [I] to switch to insert mode. The bottom line changes and indicates that
you now can insert text.
3 Write some sentences. If you want to insert a new line, rst press [Esc] to
switch back to command mode. Press [O] to insert a new line and to switch
to insert mode again.
4 In the insert mode, you can edit the text with the arrow keys and with [Del].
5 To leave vi, press [Esc] to switch to command mode again. Then press [:]
which takes you to the extended mode. The bottom line now shows a colon.
6
To leave vi and save your changes, type wq (w for write; q for quit) and press
[Enter]. If you want to save the le under a dierent name, type w
filename
and press [Enter].
To leave vi without saving, type q! instead and press [Enter].
17.8 Searching for Files or Contents
Bash oers you several commands to search for les and to search for the contents
of les:
locate
This utility is only available if you have installed the findutils-locate package.
With this command you can nd out in which directory a specied le is located.
Shell Basics 209
If desired, use wild cards to specify lenames. The program is very quick, because
it uses a database specically created for the purpose (rather than searching
through the entire le system). This very fact, however, also results in a major
drawback: locate is unable to nd any les created after the latest update of its
database. The database can be generated by root running updatedb.
find
With find, search for a le in a given directory. The rst argument species the
directory in which to start the search. The option -name must be followed by a
search string, which may also include wild cards. Unlike locate, which uses a
database, find scans the actual directory.
grep
The grep command nds a specic search string in the specied text les. If the
search string is found, the command displays the line in which searchstring was
found, along with the lename. If desired, use wild cards to specify lenames.
17.8.1 Examples for Searching
The KDE and GNOME desktops store user-specic application data in hidden direc-
tories, for example .kde and .gnome.
1 To locate these directories on your computer, enter
locate .kde
if you have installed KDE desktop or
locate .gnome
if you have installed GNOME desktop.
You will see that locate displays all le names in the database that contain
the string .kde or .gnome anywhere. To learn how to modify this behavior refer
to the man page of locate.
2 To search your home directory for all occurrences of lenames that contain
the le extension .txt, use
find ~ -name '*.txt' -print
3 To search a directory (in this case, your home directory) for all occurrences
of les which contain, for example, the word music, enter
grep music ~/*
Note that grep is case-sensitive— unless you use it with the -i option. With
the command above you will not nd any les containing Music.
210 Start-Up
If you want to use a search string which consists of more than one word, en-
close the string in double quotation marks, for example:
grep "music is great" ~/*
17.9 Viewing Text Files
When searching for the contents of a le with grep, the output gives you the line in
which the searchstring was found along with the lename. Often this contextual
information is still not enough information to decide whether you want to open and
edit this le. Bash oers you several commands to have a quick look at the contents
of a text le directly in the shell, without opening an editor.
head
With head you can view the rst lines of a text le. If you do not specify the
command any further, head shows the rst 10 lines of a text le.
tail
The tail command is the counterpart of head. If you use tail without any further
options it displays the last 10 lines of a text le. This can be very useful to view
log les of your system, where the most recent messages or log entries are usu-
ally found at the end of the le.
less
With less, display the whole contents of a text le. To move up and down half a
page use [Page ] and [Page ]. Use [Space] to scroll down one page. [Home]
takes you to the beginning, and [End] to the end of the document. To end the
viewing mode, press [Q].
more
Instead of less, you can also use the older program more. It has basically the
same function—however, it is less convenient because it does not allow you to
scroll backwards. Use [Space] to move forward. When you reach the end of the
document, the viewer closes automatically.
cat
The cat command displays the contents of a le, printing the entire contents to
the screen without interruption. As cat does not allow you to scroll it is not very
useful as viewer but it is rather often used in combination with other commands.
17.10 Redirection and Pipes
Sometimes it would be useful if you could write the output of a command to a le
for further editing or if you could combine several commands, using the output of
one command as the input for the next one. The shell oers this function by means
of redirection or pipes.
Shell Basics 211
Normally, the standard output in the shell is your screen (or an open shell window)
and the standard input is the keyboard. With the help of certain symbols you can
redirect the input or the output to another object, such as a le or another command.
Redirection
With > you can forward the output of a command to a le (output redirection),
with < you can use a le as input for a command (input redirection).
Pipe
By means of a pipe symbol | you can also redirect the output: with a pipe, you
can combine several commands, using the output of one command as input for
the next command. In contrast to the other redirection symbols > and <, the use
of the pipe is not constrained to les.
17.10.1 Examples for Redirection and Pipe
1
To write the output of a command like ls to a le, enter
ls -l > filelist.txt
This creates a le named filelist.txt that contains the list of contents of
your current directory as generated by the ls command.
However, if a le named filelist.txt already exists, this command overwrites
the existing le. To prevent this, use >> instead of >. Entering
ls -l >> filelist.txt
simply appends the output of the ls command to an already existing le
named filelist.txt. If the le does not exist, it is created.
2 Redirections also works the other way round. Instead of using the standard
input from the keyboard for a command, you can use a le as input:
sort < filelist.txt
This will force the sort command to get its input from the contents of filelist
.txt. The result is shown on the screen. Of course, you can also write the result
into another le, using a combination of redirections:
sort < filelist.txt > sorted_filelist.txt
3
If a command generates a lengthy output, like ls -l may do, it may be useful
to pipe the output to a viewer like less to be able to scroll through the pages.
To do so, enter
ls -l | less
The list of contents of the current directory is shown in less.
212 Start-Up
The pipe is also often used in combination with the grep command in order
to search for a certain string in the output of another command. For example,
if you want to view a list of les in a directory which are owned by the user
tux, enter
ls -l | grep tux
17.11 Starting Programs and Handling Processes
As you have seen in Section 17.7, “Editing Texts” (page 208), programs can be
started from the shell. Applications with a graphical user interface need the X Window
System and can only be started from a terminal window within a graphical user in-
terface. For example, if you want to open a le named vacation.pdf in your home
directory from a terminal window in KDE or GNOME, simply run okular ~/vacation.pdf
(or evince ~/vacation.pdf) to start a PDF viewer displaying your le.
When looking at the terminal window again you will realize that the command line
is blocked as long as the PDF viewer is open, meaning that your prompt is not
available. To change this, press [Ctrl] + [Z] to suspend the process and enter bg to
send the process to the background. Now you can still have a look at vacation.pdf
while your prompt is available for further commands. An easier way to achieve this
is by sending a process to the background directly when starting it. To do so, add
an ampersand at the end of the command:
okular ~/vacation.pdf &
If you have started several background processes (also named jobs) from the same
shell, the jobs command gives you an overview of the jobs. It also shows the job
number in brackets and their status:
tux@linux:~> jobs
[1] Running okular book.opensuse.startup-xep.pdf &
[2]- Running okular book.opensuse.reference-xep.pdf &
[3]+ Stopped man jobs
To bring a job to the foreground again, enter fg
job_number
.
Whereas job only shows the background processes started from a specic shell, the
ps command (run without options) shows a list of all your processes—those you
started. Find an example output below:
tux@linux:~> ps
PID TTY TIME CMD
15500 pts/1 00:00:00 bash
28214 pts/1 00:00:00 okular
30187 pts/1 00:00:00 kwrite
30280 pts/1 00:00:00 ps
Shell Basics 213
In case a program cannot be terminated in the normal way, use the kill command
to stop the process (or processes) belonging to that program. To do so, specify the
process ID (PID) shown by the output of ps. For example, to shut down the KWrite
editor in the example above, enter
kill 30187
This sends a TERM signal that instructs the program to shut itself down.
Alternatively, if the program or process you want to terminate is a background job
and is shown by the jobs command, you can also use the kill command in combi-
nation with the job number to terminate this process. When identifying the job with
the job number, you must prex the number with a percent character (%):
kill %
job_number
If kill does not help—as is sometimes the case for “runaway” programs—try
kill -9
PID
This sends a KILL signal instead of a TERM signal, bringing the specied process to
an end in most cases.
This section is intended to introduce the most basic set of commands for handling
jobs and processes. Find an overview for system administrators in Section Processes”
(Chapter 2, System Monitoring Utilities, ↑System Analysis and Tuning Guide).
17.12 Important Linux Commands
This section gives insight into the most important commands. There are many more
commands than listed in this chapter. Along with the individual commands, parame-
ters are listed and, where appropriate, a typical sample application is introduced. To
learn more about the various commands, use the manual pages, accessed with man
followed by the name of the command, for example, man ls.
Man pages are displayed directly in the shell. To navigate them, move up and down
with [Page ] and [Page ]. Move between the beginning and the end of a document
with [Home] and [End]. End this viewing mode by pressing [Q]. Learn more about
the man command itself with man man.
In the following overview, the individual command elements are written in dierent
typefaces. The actual command and its mandatory options are always printed as
command option. Specications or parameters that are not required are placed in
[square brackets].
Adjust the settings to your needs. It makes no sense to write ls file if no le named
file actually exists. You can usually combine several parameters, for example, by
writing ls -la instead of ls -l -a.
214 Start-Up
17.12.1 File Commands
The following section lists the most important commands for le management. It
covers everything from general le administration to the manipulation of le system
ACLs.
17.12.1.1 File Administration
ls [options] [files]
If you run ls without any additional parameters, the program lists the contents
of the current directory in short form.
-l
Detailed list
-a
Displays hidden les
cp [options] source target
Copies source to target.
-i
Waits for conrmation, if necessary, before an existing target is overwritten
-r
Copies recursively (includes subdirectories)
mv [options] source target
Copies source to target then deletes the original source.
-b
Creates a backup copy of the source before moving
-i
Waits for conrmation, if necessary, before an existing targetfile is overwrit-
ten
rm [options] files
Removes the specied les from the le system. Directories are not removed by
rm unless the option -r is used.
-r
Deletes any existing subdirectories
-i
Waits for conrmation before deleting each le
ln [options] source target
Creates an internal link from source to target. Normally, such a link points directly
to source on the same le system. However, if ln is executed with the -s option,
Shell Basics 215
it creates a symbolic link that only points to the directory in which source is locat-
ed, enabling linking across le systems.
-s
Creates a symbolic link
cd [options] [directory]
Changes the current directory. cd without any parameters changes to the user's
home directory.
mkdir [options] directory
Creates a new directory.
rmdir [options] directory
Deletes the specied directory if it is already empty.
chown [options] username[:[group]] files
Transfers ownership of a le to the user with the specied username.
-R
Changes les and directories in all subdirectories
chgrp [options] groupname files
Transfers the group ownership of a given file to the group with the specied
group name. The le owner can change group ownership only if a member of
both the current and the new group.
chmod [options] mode files
Changes the access permissions.
The mode parameter has three parts: group, access, and access type. group accepts
the following characters:
u
User
g
Group
o
Others
For access, grant access with + and deny it with -.
The access type is controlled by the following options:
r
Read
w
Write
216 Start-Up
x
Execute—executing les or changing to the directory
s
Setuid bit—the application or program is started as if it were started by the
owner of the le
As an alternative, a numeric code can be used. The four digits of this code are
composed of the sum of the values 4, 2, and 1—the decimal result of a binary
mask. The rst digit sets the set user ID (SUID) (4), the set group ID (2), and the
sticky (1) bits. The second digit denes the permissions of the owner of the le.
The third digit denes the permissions of the group members and the last digit
sets the permissions for all other users. The read permission is set with 4, the
write permission with 2, and the permission for executing a le is set with 1. The
owner of a le would usually receive a 6 or a 7 for executable les.
gzip [parameters] files
This program compresses the contents of les using complex mathematical algo-
rithms. Files compressed in this way are given the extension .gz and need to be
uncompressed before they can be used. To compress several les or even entire
directories, use the tar command.
-d
Decompresses the packed gzip les so they return to their original size and
can be processed normally (like the command gunzip)
tar options archive files
tar puts one or more les into an archive. Compression is optional. tar is a quite
complex command with a number of options available. The most frequently used
options are:
-f
Writes the output to a le and not to the screen as is usually the case
-c
Creates a new tar archive
-r
Adds les to an existing archive
-t
Outputs the contents of an archive
-u
Adds les, but only if they are newer than the les already contained in the
archive
-x
Unpacks les from an archive (extraction)
Shell Basics 217
-z
Packs the resulting archive with gzip
-j
Compresses the resulting archive with bzip2
-v
Lists les processed
The archive les created by tar end with .tar. If the tar archive was also com-
pressed using gzip, the ending is .tgz or .tar.gz. If it was compressed using
bzip2, the ending is .tar.bz2.
locate patterns
This command is only available if you have installed the findutils-locate pack-
age. The locate command can nd in which directory a specied le is located.
If desired, use wild cards to specify lenames. The program is very fast, because
it uses a database specically created for the purpose (rather than searching
through the entire le system). This very fact, however, also results in a major
drawback: locate is unable to nd any les created after the latest update of its
database. The database can be generated by root with updatedb.
updatedb [options]
This command performs an update of the database used by locate. To include
les in all existing directories, run the program as root. It also makes sense to
place it in the background by appending an ampersand (&), so you can immedi-
ately continue working on the same command line (updatedb &). This command
usually runs as a daily cron job (see cron.daily).
find [options]
With find, search for a le in a given directory. The rst argument species the
directory in which to start the search. The option -name must be followed by a
search string, which may also include wild cards. Unlike locate, which uses a
database, find scans the actual directory.
17.12.1.2 Commands to Access File Contents
file [options] [files]
With file, detect the contents of the specied les.
-z
Tries to look inside compressed les
cat [options] files
The cat command displays the contents of a le, printing the entire contents to
the screen without interruption.
-n
Numbers the output on the left margin
218 Start-Up
less [options] files
This command can be used to browse the contents of the specied le. Scroll half
a screen page up or down with [PgUp] and [PgDn] or a full screen page down with
[Space]. Jump to the beginning or end of a le using [Home] and [End]. Press [Q]
to exit the program.
grep [options] searchstring files
The grep command nds a specic search string in the specied les. If the search
string is found, the command displays the line in which searchstring was found
along with the lename.
-i
Ignores case
-H
Only displays the names of the relevant les, but not the text lines
-n
Additionally displays the numbers of the lines in which it found a hit
-l
Only lists the les in which searchstring does not occur
diff [options] file1 file2
The diff command compares the contents of any two les. The output produced
by the program lists all lines that do not match. This is frequently used by pro-
grammers who need only to send their program alterations and not the entire
source code.
-q
Only reports whether the two les dier
-u
Produces a “unied” di, which makes the output more readable
17.12.1.3 File Systems
mount [options] [device] mountpoint
This command can be used to mount any data media, such as hard disks, CD-
ROM drives, and other drives, to a directory of the Linux le system.
-r
Mount read-only
-t filesystem
Specify the le system, commonly ext2 for Linux hard disks, msdos for MS-DOS
media, vfat for the Windows le system, and iso9660 for CDs
For hard disks not dened in the le /etc/fstab, the device type must also be
specied. In this case, only root can mount it. If the le system needs to also be
Shell Basics 219
mounted by other users, enter the option user in the appropriate line in the /etc/
fstab le (separated by commas) and save this change. Further information is
available in the mount(1) man page.
umount [options] mountpoint
This command unmounts a mounted drive from the le system. To prevent data
loss, run this command before taking a removable data medium from its drive.
Normally, only root is allowed to run the commands mount and umount. To enable
other users to run these commands, edit the /etc/fstab le to specify the option
user for the relevant drive.
17.12.2 System Commands
The following section lists a few of the most important commands needed for retriev-
ing system information and controlling processes and the network.
17.12.2.1 System Information
df [options] [directory]
The df (disk free) command, when used without any options, displays information
about the total disk space, the disk space currently in use, and the free space on
all the mounted drives. If a directory is specied, the information is limited to the
drive on which that directory is located.
-h
Shows the number of occupied blocks in gigabytes, megabytes, or kilobytes—in
human-readable format
-T
Type of le system (ext2, nfs, etc.)
du [options] [path]
This command, when executed without any parameters, shows the total disk
space occupied by les and subdirectories in the current directory.
-a
Displays the size of each individual le
-h
Output in human-readable form
-s
Displays only the calculated total size
free [options]
The command free displays information about RAM and swap space usage,
showing the total and the used amount in both categories. See Section “The free
Command” (Chapter 11, Special System Features, ↑Reference) for more informa-
tion.
220 Start-Up
-b
Output in bytes
-k
Output in kilobytes
-m
Output in megabytes
date [options]
This simple program displays the current system time. If run as root, it can also
be used to change the system time. Details about the program are available in
the date(1) man page.
17.12.2.2 Processes
top [options]
top provides a quick overview of the currently running processes. Press [H] to
access a page that briey explains the main options for customizing the program.
ps [options] [process_ID]
If run without any options, this command displays a table of all your own programs
or processes—those you started. The options for this command are not preceded
by hyphen.
aux
Displays a detailed list of all processes, independent of the owner
kill [options] process_ID
Unfortunately, sometimes a program cannot be terminated in the normal way.
In most cases, you should still be able to stop such a runaway program by exe-
cuting the kill command, specifying the respective process ID (see top and ps).
kill sends a TERM signal that instructs the program to shut itself down. If this
does not help, the following parameter can be used:
-9
Sends a KILL signal instead of a TERM signal, bringing the specied process
to an end in almost all cases
killall [options] processname
This command is similar to kill, but uses the process name (instead of the process
ID) as an argument, killing all processes with that name.
17.12.2.3 Network
ping [options] hostname_or_IP address
The ping command is the standard tool for testing the basic functionality of TCP/IP
networks. It sends a small data packet to the destination host, requesting an im-
mediate reply. If this works, ping displays a message to that eect, which indicates
that the network link is basically functioning.
Shell Basics 221
-c
number
Determines the total number of packages to send and ends after they have
been dispatched (by default, there is no limitation set)
-f
ood ping: sends as many data packages as possible; a popular means, re-
served for root, to test networks
-i
value
Species the interval between two data packages in seconds (default: one
second)
host [options] hostname [server]
The domain name system resolves domain names to IP addresses. With this tool,
send queries to name servers (DNS servers).
ssh [options] [user@]hostname [command]
SSH is actually an Internet protocol that enables you to work on remote hosts
across a network. SSH is also the name of a Linux program that uses this protocol
to enable operations on remote computers.
17.12.2.4 Miscellaneous
passwd [options] [username]
Users may change their own passwords at any time using this command. The
administrator root can use the command to change the password of any user on
the system.
su [options] [username]
The su command makes it possible to log in under a dierent username from a
running session. Specify a username and the corresponding password. The
password is not required from root, because root is authorized to assume the
identity of any user. When using the command without specifying a username,
you are prompted for the root password and change to the superuser (root). Use
su - to start a login shell for a dierent user.
halt [options]
To avoid loss of data, you should always use this program to shut down your
system.
reboot [options]
Does the same as halt except the system performs an immediate reboot.
clear
This command cleans up the visible area of the console. It has no options.
222 Start-Up
17.12.3 For More Information
There are many more commands than listed in this chapter. For information about
other commands or more detailed information, the O'Reilly publication Linux in a
Nutshell is recommended.
Shell Basics 223
18 Bash and Bash Scripts
These days many people use computers with a graphical user interface (GUI) like
KDE or GNOME. Although they oer lots of features, their use is limited when it comes
to the execution of automated tasks. Shells are a good addition to GUIs and this
chapter gives you an overview of some aspects of shells, in this case Bash.
18.1 What is “The Shell”?
Traditionally, the shell is Bash (Bourne again Shell). When this chapter speaks about
“the shell” it means Bash. There are actually more available shells than Bash (ash,
csh, ksh, zsh, …), each employing dierent features and characteristics. If you need
further information about other shells, search for shell in YaST.
18.1.1 Knowing The Bash Conguration Files
A shell can be invoked as an:
1. interactive login shell. This is used when logging in to a machine, invoking Bash
with the --login option or when logging in to a remote machine with SSH.
2. ordinary” interactive shell. This is normally the case when starting xterm, kon-
sole, gnome-terminal or similar tools.
3. non-interactive shell. This is used when invoking a shell script at the commandline.
Depending on which type of shell you use, dierent conguration les are being
read. The following tables show the login and non-login shell conguration les.
Table 18.1: Bash Conguration Files for Login Shells
DescriptionFile
Do not modify this le, otherwise your
modications can be destroyed during
your next update!
/etc/profile
Use this le if you extend /etc/profile/etc/profile.local
Contains system-wide conguration les
for specic programs
/etc/profile.d/
Bash and Bash Scripts 225
DescriptionFile
Insert user specic conguration for lo-
gin shells here
~/.profile
Table 18.2: Bash Conguration Files for Non-Login Shells
Do not modify this le, otherwise your
modications can be destroyed during
your next update!
/etc/bash.bashrc
Use this le to insert your system-wide
modications for Bash only
/etc/bash.bashrc.local
Insert user specic conguration here
~/.bashrc
Additionally, Bash uses some more les:
Table 18.3: Special Files for Bash
DescriptionFile
Contains a list of all commands you
have been typing
~/.bash_history
Executed when logging out
~/.bash_logout
18.1.2 The Directory Structure
The following table provides a short overview of the most important higher-level di-
rectories that you nd on a Linux system. Find more detailed information about the
directories and important subdirectories in the following list.
Table 18.4: Overview of a Standard Directory Tree
ContentsDirectory
Root directory—the starting point of the
directory tree.
/
Essential binary les, such as com-
mands that are needed by both the
/bin
system administrator and normal users.
226 Start-Up
ContentsDirectory
Usually also contains the shells, such
as Bash.
Static les of the boot loader.
/boot
Files needed to access host-specic
devices.
/dev
Host-specic system conguration les.
/etc
Holds the home directories of all users
who have accounts on the system.
/home
However, root's home directory is not
located in /home but in /root.
Essential shared libraries and kernel
modules.
/lib
Mount points for removable media.
/media
Mount point for temporarily mounting
a le system.
/mnt
Add-on application software packages.
/opt
Home directory for the superuser root./root
Essential system binaries.
/sbin
Data for services provided by the sys-
tem.
/srv
Temporary les.
/tmp
Secondary hierarchy with read-only da-
ta.
/usr
Variable data such as log les.
/var
Bash and Bash Scripts 227
ContentsDirectory
Only available if you have both Micro-
soft Windows* and Linux installed on
/windows
your system. Contains the Windows
data.
The following list provides more detailed information and gives some examples of
which les and subdirectories can be found in the directories:
/bin
Contains the basic shell commands that may be used both by root and by other
users. These commands include ls, mkdir, cp, mv, rm and rmdir. /bin also contains
Bash, the default shell in openSUSE.
/boot
Contains data required for booting, such as the boot loader, the kernel, and other
data that is used before the kernel begins executing user-mode programs.
/dev
Holds device les that represent hardware components.
/etc
Contains local conguration les that control the operation of programs like the
X Window System. The /etc/init.d subdirectory contains scripts that are executed
during the boot process.
/home/
username
Holds the private data of every user who has an account on the system. The les
located here can only be modied by their owner or by the system administrator.
By default, your e-mail directory and personal desktop conguration are located
here in the form of hidden les and directories. KDE users nd the personal con-
guration data for their desktop in .kde4 and GNOME users nd it in .gconf.
NOTE: Home Directory in a Network Environment
If you are working in a network environment, your home directory may be
mapped to a directory in the le system other than /home.
/lib
Contains the essential shared libraries needed to boot the system and to run the
commands in the root le system. The Windows equivalent for shared libraries
are DLL les.
/media
Contains mount points for removable media, such as CD-ROMs, USB sticks and
digital cameras (if they use USB). /media generally holds any type of drive except
228 Start-Up
the hard drive of your system. As soon as your removable medium has been in-
serted or connected to the system and has been mounted, you can access it from
here.
/mnt
This directory provides a mount point for a temporarily mounted le system. root
may mount le systems here.
/opt
Reserved for the installation of third-party software. Optional software and larger
add-on program packages can be found here.
/root
Home directory for the root user. The personal data of root is located here.
/sbin
As the s indicates, this directory holds utilities for the superuser. /sbin contains
the binaries essential for booting, restoring and recovering the system in addition
to the binaries in /bin.
/srv
Holds data for services provided by the system, such as FTP and HTTP.
/tmp
This directory is used by programs that require temporary storage of les.
IMPORTANT: Cleaning up /tmp at Boot Time
Data stored in /tmp are not guaranteed to survive a system reboot. It depends,
for example, on settings in /etc/sysconfig/cron.
/usr
/usr has nothing to do with users, but is the acronym for UNIX system resources.
The data in /usr is static, read-only data that can be shared among various hosts
compliant with the Filesystem Hierarchy Standard (FHS). This directory contains
all application programs and establishes a secondary hierarchy in the le system.
KDE4 and GNOME are also located here. /usr holds a number of subdirectories,
such as /usr/bin, /usr/sbin, /usr/local, and /usr/share/doc.
/usr/bin
Contains generally accessible programs.
/usr/sbin
Contains programs reserved for the system administrator, such as repair functions.
/usr/local
In this directory the system administrator can install local, distribution-independent
extensions.
Bash and Bash Scripts 229
/usr/share/doc
Holds various documentation les and the release notes for your system. In the
manual subdirectory nd an online version of this manual. If more than one lan-
guage is installed, this directory may contain versions of the manuals for dierent
languages.
Under packages nd the documentation included in the software packages installed
on your system. For every package, a subdirectory /usr/share/doc/
packages/
packagename
is created that often holds README les for the package
and sometimes examples, conguration les or additional scripts.
If HOWTOs are installed on your system /usr/share/doc also holds the howto
subdirectory in which to nd additional documentation on many tasks related to
the setup and operation of Linux software.
/var
Whereas /usr holds static, read-only data, /var is for data which is written during
system operation and thus is variable data, such as log les or spooling data. For
an overview of the most important log les you can nd under /var/log/, refer
to Table A.2, Log Files” (page 242).
/windows
Only available if you have both Microsoft Windows and Linux installed on your
system. Contains the Windows data available on the Windows partition of your
system. Whether you can edit the data in this directory depends on the le system
your Windows partition uses. If it is FAT32, you can open and edit the les in this
directory. For NTFS, openSUSE also includes write access support. However, the
driver for the NTFS-3g le system has limited functionality. Learn more in Sec-
tion Accessing Files on Dierent OS on the Same Computer” (Chapter 27,
Copying and Sharing Files, ↑Reference).
18.2 Writing Shell Scripts
Shell scripts are a convenient way of doing all sorts of tasks: collecting data,
searching for a word or phrase in a text and many other useful things. The following
example shows a small shell script that prints a text:
Example 18.1: A Shell Script Printing a Text
#!/bin/sh
# Output the following line:
echo "Hello World"
The rst line begins with the Shebang characters (#!) which is an indicator that
this le is a script. The script is executed with the specied interpreter after the
Shebang, in this case /bin/sh.
The second line is a comment beginning with the hash sign. It is recommended
to comment dicult lines to remember what they do.
The third line uses the built-in command echo to print the corresponding text.
230 Start-Up
Before you can run this script you need some prerequisites:
1. Every script should contain a Shebang line (this is already the case with our ex-
ample above.) If a script does not have this line, you have to call the interpreter
manually.
2. You can save the script wherever you want. However, it is a good idea to save
it in a directory where the shell can nd it. The search path in a shell is determined
by the environment variable PATH. Usually a normal user does not have write
access to /usr/bin. Therefore it is recommended to save your scripts in the users'
directory ~/bin/. The above example gets the name hello.sh.
3. The script needs executable permissions. Set the permissions with the following
command:
chmod +x ~/bin/hello.sh
If you have fullled all of the above prerequisites, you can execute the script in the
following ways:
1. As Absolute Path The script can be executed with an absolute path. In our
case, it is ~/bin/hello.sh.
2.
Everywhere If the PATH environment variable contains the directory where the
script is located, you can execute the script just with hello.sh.
18.3 Redirecting Command Events
Each command can use three channels, either for input or output:
Standard Output This is the default output channel. Whenever a command
prints something, it uses the standard output channel.
Standard Input If a command needs input from users or other commands, it
uses this channel.
Standard Error Commands use this channel for error reporting.
To redirect these channels, there are the following possibilities:
Command > File
Saves the output of the command into a le, an existing le will be deleted. For
example, the ls command writes its output into the le listing.txt:
ls > listing.txt
Command >> File
Appends the output of the command to a le. For example, the ls command ap-
pends its output to the le listing.txt:
Bash and Bash Scripts 231
ls >> listing.txt
Command < File
Reads the le as input for the given command. For example, the read command
reads in the content of the le into the variable:
read a < foo
Command1 | Command2
Redirects the output of the left command as input for the right command. For
example, the cat command outputs the content of the /proc/cpuinfo le. This
output is used by grep to lter only those lines which contain cpu:
cat /proc/cpuinfo | grep cpu
Every channel has a le descriptor: 0 (zero) for standard input, 1 for standard output
and 2 for standard error. It is allowed to insert this le descriptor before a < or >
character. For example, the following line searches for a le starting with foo, but
suppresses its errors by redirecting it to /dev/null:
find / -name "foo*" 2>/dev/null
18.4 Using Aliases
An alias is a shortcut denition of one or more commands. The syntax for an alias
is:
alias
NAME
=
DEFINITION
For example, the following line denes an alias lt which outputs a long listing (option
-l), sorts it by modication time (-t) and prints it in reverse order while sorting (-r):
alias lt='ls -ltr'
To view all alias denitions, use alias. Remove your alias with unalias and the cor-
responding alias name.
18.5 Using Variables in Bash
A shell variable can be global or local. Global variables, or environment variables,
can be accessed in all shells. In contrast, local variables are visible in the current
shell only.
To view all environment variables, use the printenv command. If you need to know
the value of a variable, insert the name of your variable as an argument:
printenv PATH
A variable, be it global or local, can also be viewed with echo:
echo $PATH
232 Start-Up
To set a local variable, use a variable name followed by the equal sign, followed by
the value:
PROJECT="SLED"
Do not insert spaces around the equal sign, otherwise you get an error. To set an
environment variable, use export:
export NAME="tux"
To remove a variable, use unset:
unset NAME
The following table contains some common environment variables which can be used
in you shell scripts:
Table 18.5: Useful Environment Variables
the home directory of the current user
HOME
the current host name
HOST
when a tool is localized, it uses the lan-
guage from this environment variable.
English can also be set to C
LANG
the search path of the shell, a list of di-
rectories separated by colon
PATH
species the normal prompt printed
before each command
PS1
species the secondary prompt printed
when you execute a multi-line com-
mand
PS2
current working directory
PWD
the current user
USER
18.5.1 Using Argument Variables
For example, if you have the script foo.sh you can execute it like this:
foo.sh "Tux Penguin" 2000
Bash and Bash Scripts 233
To access all the arguments which are passed to your script, you need positional
parameters. These are $1 for the rst argument, $2 for the second, and so on. You
can have up to nine parameters. To get the script name, use $0.
The following script foo.sh prints all arguments from 1 to 4:
#!/bin/sh
echo \"$1\" \"$2\" \"$3\" \"$4\"
If you execute this script with the above arguments, you get:
"Tux Penguin" "2000" "" ""
18.5.2 Using Variable Substitution
Variable substitutions apply a pattern to the content of a variable either from the
left or right side. The following list contains the possible syntax forms:
${VAR#pattern}
removes the shortest possible match from the left:
file=/home/tux/book/book.tar.bz2
echo ${file#*/}
home/tux/book/book.tar.bz2
${VAR##pattern}
removes the longest possible match from the left:
file=/home/tux/book/book.tar.bz2
echo ${file##*/}
book.tar.bz2
${VAR%pattern}
removes the shortest possible match from the right:
file=/home/tux/book/book.tar.bz2
echo ${file%.*}
/home/tux/book/book.tar
${VAR%%pattern}
removes the longest possible match from the right:
file=/home/tux/book/book.tar.bz2
echo ${file%%.*}
/home/tux/book/book
${VAR/pattern_1/pattern_2}
substitutes the content of
VAR
from the
pattern_1
with
pattern_2
:
file=/home/tux/book/book.tar.bz2
echo ${file/tux/wilber}
/home/wilber/book/book.tar.bz2
234 Start-Up
18.6 Grouping And Combining Commands
Shells allow you to concatenate and group commands for conditional execution. Each
command returns an exit code which determines the success or failure of its operation.
If it is 0 (zero) the command was successful, everything else marks an error which
is specic to the command.
The following list shows, how commands can be grouped:
Command1 ; Command2
executes the commands in sequential order. The exit code is not checked. The
following line displays the content of the le with cat and then prints its le
properties with ls regardless of their exit codes:
cat filelist.txt ; ls -l filelist.txt
Command1 && Command2
runs the right command, if the left command was successful (logical AND). The
following line displays the content of the le and prints its le properties only,
when the previous command was successful (compare it with the previous entry
in this list):
cat filelist.txt && ls -l filelist.txt
Command1 || Command2
runs the right command, when the left command has failed (logical OR). The fol-
lowing line creates only a directory in /home/wilber/bar when the creation of the
directory in /home/tux/foo has failed:
mkdir /home/tux/foo || mkdir /home/wilber/bar
funcname(){ ... }
creates a shell function. You can use the positional parameters to access its argu-
ments. The following line denes the function hello to print a short message:
hello() { echo "Hello $1"; }
You can call this function like this:
hello Tux
which prints:
Hello Tux
18.7 Working with Common Flow Constructs
To control the ow of your script, a shell has while, if, for and case constructs.
Bash and Bash Scripts 235
18.7.1 The if Control Command
The if command is used to check expressions. For example, the following code tests
whether the current user is Tux:
if test $USER = "tux"; then
echo "Hello Tux."
else
echo "You are not Tux."
fi
The test expression can be as complex or simple as possible. The following expression
checks if the le foo.txt exists:
if test -e /tmp/foo.txt ; then
echo "Found foo.txt"
fi
The test expression can also be abbreviated in angled brackets:
if [ -e /tmp/foo.txt ] ; then
echo "Found foo.txt"
fi
Find more useful expressions at http://www.cyberciti.biz/nixcraft/linux/docs/
uniqlinuxfeatures/lsst/ch03sec02.html.
18.7.2 Creating Loops With the For Command
The for loop allows you to execute commands to a list of entries. For example, the
following code prints some information about PNG les in the current directory:
for i in *.png; do
ls -l $i
done
18.8 For More Information
Important information about Bash is provided in the man pages man bash. More about
this topic can be found in the following list:
http://tldp.org/LDP/Bash-Beginners-Guide/html/index.html—Bash Guide for
Beginners
http://tldp.org/HOWTO/Bash-Prog-Intro-HOWTO.html—BASH Programming - In-
troduction HOW-TO
http://tldp.org/LDP/abs/html/index.html—Advanced Bash-Scripting Guide
http://www.grymoire.com/Unix/Sh.html—Sh - the Bourne Shell
236 Start-Up
A Help and Troubleshooting
A.1 Help and Documentation
openSUSE® comes with various sources of information and documentation, many
of which are already integrated into your installed system.
Documentation in /usr/share/doc
This traditional help directory holds various documentation les and release notes
for your system. It contains also information of installed packages in the subdirec-
tory packages. Find more detailed information in Section A.1.1, Documentation
Directory” (page 237).
Man Pages and Info Pages for Shell Commands
When working with the shell, you do not need to know the options of the com-
mands by heart. Traditionally, the shell provides integrated help by means of
man pages and info pages. Read more in Section A.1.2, “Man Pages” (page 239)
and Section A.1.3, “Info Pages” (page 240).
Desktop Help Centers
The help centers of both the KDE desktop (KDE help center) and the GNOME
desktop (Help) provide central access to the most important documentation re-
sources on your system in searchable form. These resources include online help
for installed applications, man pages, info pages, and the Novell/SUSE manuals
delivered with your product.
Separate Help Packages for Some Applications
When installing new software with YaST, the software documentation is installed
automatically (in most cases) and usually appears in the help center of your
desktop. However, some applications, such as GIMP, may have dierent online
help packages that can be installed separately with YaST and do not integrate
into the help centers.
A.1.1 Documentation Directory
The traditional directory to nd documentation on your installed Linux system is
/usr/share/doc. Usually, the directory contains information about the packages in-
stalled on your system, plus release notes, manuals, and more.
NOTE: Contents Depends on Installed Packages
In the Linux world, many manuals and other kinds of documentation are available
in the form of packages, just like software. How much and which information you
nd in /usr/share/docs also depends on the (documentation) packages installed.
If you cannot nd the subdirectories mentioned here, check if the respective
packages are installed on your system and add them with YaST, if needed.
A.1.1.1 Novell/SUSE Manuals
We provide HTML and PDF versions of our books in dierent languages. In the manual
subdirectory, nd HTML versions of most of the Novell/SUSE manuals available for
your product. For an overview of all documentation available for your product refer
to the preface of the manuals.
If more than one language is installed, /usr/share/doc/manual may contain dierent
language versions of the manuals. The HTML versions of the Novell/SUSE manuals
are also available in the help center of both desktops. For information on where to
nd the PDF and HTML versions of the books on your installation media, refer to the
openSUSE Release Notes. They are available on your installed system under /usr/
share/doc/release-notes/ or online at your product-specic Web page at http://
www.suse.com/documentation/.
A.1.1.2 HOWTOs
If the howto package is installed on your system, /usr/share/doc also holds the howto
subdirectory, where you nd additional documentation for many tasks relating to
the setup and operation of Linux software.
A.1.1.3 Package Documentation
Under packages, nd the documentation that is included in the software packages
installed on your system. For every package, a subdirectory /usr/share/doc/
packages/
packagename
is created. It often contains README les for the package and
sometimes examples, conguration les, or additional scripts. The following list in-
troduces typical les to be found under /usr/share/doc/packages. None of these
entries are mandatory and many packages might just include a few of them.
AUTHORS
List of the main developers.
BUGS
Known bugs or malfunctions. Might also contain a link to a Bugzilla Web page
where you can search all bugs.
CHANGES , ChangeLog
Summary of changes from version to version. Usually interesting for developers,
because it is very detailed.
COPYING , LICENSE
Licensing information.
FAQ
Question and answers collected from mailing lists or newsgroups.
238 Start-Up
INSTALL
How to install this package on your system. As the package is already installed
by the time you get to read this le, you can safely ignore the contents of this
le.
README, README.*
General information on the software. For example, for what purpose and how to
use it.
TODO
Things that are not implemented yet, but probably will be in the future.
MANIFEST
List of les with a brief summary.
NEWS
Description of what is new in this version.
A.1.2 Man Pages
Man pages are an essential part of any Linux system. They explain the usage of a
command and all available options and parameters. Man pages can be accessed
with man followed by the name of the command, for example, man ls.
Man pages are displayed directly in the shell. To navigate them, move up and down
with [Page ] and [Page ]. Move between the beginning and the end of a document
with [Home] and [End]. End this viewing mode by pressing [Q]. Learn more about
the man command itself with man man. Man pages are sorted in categories as shown
in Table A.1, “Man Pages—Categories and Descriptions” (page 239) (taken from the
man page for man itself).
Table A.1: Man Pages—Categories and Descriptions
DescriptionNumber
Executable programs or shell com-
mands
1
System calls (functions provided by the
Kernel)
2
Library calls (functions within program
libraries)
3
Special les (usually found in /dev)
4
Help and Troubleshooting 239
DescriptionNumber
File formats and conventions (/etc/
fstab)
5
Games6
Miscellaneous (including macro pack-
ages and conventions), for example,
man(7), gro(7)
7
System administration commands
(usually only for root)
8
Kernel routines (nonstandard)9
Each man page consists of several parts labeled NAME , SYNOPSIS , DESCRIPTION ,
SEE ALSO , LICENSING , and AUTHOR . There may be additional sections available
depending on the type of command.
A.1.3 Info Pages
Info pages are another important source of information on your system. Usually, they
are more detailed than man pages. To view the info page for a certain command,
enter info followed by the name of the command, for example, info ls. You can
browse an info page with a viewer directly in the shell and display the dierent sec-
tions, called “nodes”. Use [Space] to move forward and [<—] to move backwards.
Within a node, you can also browse with [Page ] and [Page ] but only [Space] and
[<—] will take you also to the previous or subsequent node. Press [Q] to end the
viewing mode. Not every man page comes with an info page and vice versa.
A.1.4 Online Resources
In addition to the online versions of the openSUSE manuals installed under /usr/
share/doc, you can also access the product-specic manuals and documentation on
the Web. For an overview of all documentation available for openSUSE check out
your product-specic documentation Web page at http://doc.opensuse.org.
If you are searching for additional product-related information, you can also refer to
the following Web sites:
openSUSE Wiki
Detailed information about lots of dierent aspects of the openSUSE system can
be found in our Wiki at http://en.opensuse.org. You may also contribute to each
Wiki page and change or add new pages.
240 Start-Up
openSUSE Support Database
The openSUSE Support Database (SDB) can be found at http://en.opensuse.org/
Portal:Support_database. It features articles written as solutions for technical
problems with openSUSE. They cover issues from installation and conguration,
to workarounds for bugs and missing features.
openSUSE Forums
There are several openSUSE forums where you can dive in on discussions about
openSUSE, or get support. See http://en.opensuse.org/openSUSE:Forums_list
for a list.
KDE Documentation
Find documentation for many aspects of KDE suitable for users and administrators
at http://www.kde.org/documentation/.
GNOME Documentation
Documentation for GNOME users, administrators and developers is available at
http://library.gnome.org/.
The Linux Documentation Project
The Linux Documentation Project (TLDP) is run by a team of volunteers who write
Linux-related documentation (see http://www.tldp.org). It's probably the most
comprehensive documentation resource for Linux. The set of documents contains
tutorials for beginners, but is mainly focused on experienced users and profes-
sional system administrators. TLDP publishes HOWTOs, FAQs, and guides (hand-
books) under a free license. Parts of the documentation from TLDP is also available
on openSUSE
You may also want to try general-purpose search engines. For example, use search
terms Linux CD-RW help or OpenOffice file conversion problem if you have trouble
with burning CDs or LibreOce le conversion. Google™ also has a Linux-specic
search engine at http://www.google.com/linux that you might nd useful.
A.2 Common Problems and Their Solutions
This chapter describes a range of potential problems and their solutions. Even if your
situation is not precisely listed here, there may be one Even if your situation is not
precisely listed here, there may be one similar enough to oer hints to the solution
of your problem.
A.2.1 Finding and Gathering Information
Linux reports things in a very detailed way. There are several places to look when
you encounter problems with your system, most of which are standard to Linux sys-
tems in general, and some of which are relevant to openSUSE systems. Most log les
can be viewed with YaST (Miscellaneous > Start-Up Log).
A list of the most frequently checked log les follows with the description of their
typical purpose. Paths containing ~ refer to the current user's home directory.
Help and Troubleshooting 241
Table A.2: Log Files
DescriptionLog File
Messages from the desktop applications
currently running.
~/.xsession-errors
Log les from AppArmor, see
Part “Conning Privileges with App-
/var/log/apparmor/
Armor” (↑Security Guide) for detailed
information.
Messages from the kernel reported
during the boot process.
/var/log/boot.msg
Messages from the mail system.
/var/log/mail.*
Ongoing messages from the kernel and
system log daemon (when running).
/var/log/messages
Log le from NetworkManager to collect
problems with network connectivity
/var/log/NetworkManager
Directory containing Samba server and
client log messages.
/var/log/samba/
Hardware messages from the SaX dis-
play and KVM system.
/var/log/SaX.log
All messages from the kernel and sys-
tem log daemon with the “warning”
level or higher.
/var/log/warn
Binary le containing user login records
for the current machine session. View
it with last.
/var/log/wtmp
Various start-up and runtime logs from
the X Window system. It is useful for
debugging failed X start-ups.
/var/log/Xorg.*.log
Directory containing YaST's actions and
their results.
/var/log/YaST2/
242 Start-Up
DescriptionLog File
Log le of zypper.
/var/log/zypper.log
Apart from log les, your machine also supplies you with information about the running
system. See Table A.3: System Information With the /proc File System
Table A.3: System Information With the /proc File System
DescriptionFile
Contains processor information, includ-
ing its type, make, model, and perfor-
mance.
/proc/cpuinfo
Shows which DMA channels are current-
ly being used.
/proc/dma
Shows which interrupts are in use, and
how many of each have been in use.
/proc/interrupts
Displays the status of I/O (input/output)
memory.
/proc/iomem
Shows which I/O ports are in use at the
moment.
/proc/ioports
Displays memory status.
/proc/meminfo
Displays the individual modules.
/proc/modules
Displays devices currently mounted.
/proc/mounts
Shows the partitioning of all hard disks.
/proc/partitions
Displays the current version of Linux.
/proc/version
Apart from the /proc le system, the Linux kernel exports information with the sysfs
module, an in-memory lesystem. This module represents kernel objects, their at-
tributes and relationships. For more information about sysfs, see the context of udev
in Chapter 12, Dynamic Kernel Device Management with
udev
(↑Reference). Table A.4
contains an overview of the most common directories under /sys.
Help and Troubleshooting 243
Table A.4: System Information With the /sys File System
DescriptionFile
Contains subdirectories for each block
device discovered in the system. Gener-
ally, these are mostly disk type devices.
/sys/block
Contains subdirectories for each physi-
cal bus type.
/sys/bus
Contains subdirectories grouped togeth-
er as a functional types of devices (like
graphics, net, printer, etc.)
/sys/class
Contains the global device hierarchy.
/sys/device
Linux comes with a number of tools for system analysis and monitoring. See Chap-
ter 2, System Monitoring Utilities (↑System Analysis and Tuning Guide) for a selection
of the most important ones used in system diagnostics.
Each of the following scenarios begins with a header describing the problem followed
by a paragraph or two oering suggested solutions, available references for more
detailed solutions, and cross-references to other scenarios that are related.
A.2.2 Installation Problems
Installation problems are situations when a machine fails to install. It may fail entirely
or it may not be able to start the graphical installer. This section highlights some of
the typical problems you may run into, and oers possible solutions or workarounds
for these kinds of situations.
A.2.2.1 Checking Media
If you encounter any problems using the openSUSE installation media, check the in-
tegrity of your installation media. Boot from the media and choose Check Installation
Media from the boot menu. In a running system, start YaST and choose Software >
Media Check. Media problems are more probable with the media you burn yourself.
Burning the media at a low speed (4x) helps avoiding problems.
A.2.2.2 Hardware Information
Display detected hardware and technical data using Hardware > Hardware Informa-
tion. Click any node of the tree for more information about a device. This module is
especially useful, when submitting a support request for which you need information
about your hardware.
Save the displayed hardware information to a le by clicking Save to File. Select the
desired directory and lename then click Save to create the le.
244 Start-Up
A.2.2.3 No Bootable DVD Drive Available
If your computer does not contain a bootable DVD-ROM drive or if the one you have
is not supported by Linux, there are several options you can install your machine
without a built-in DVD drive:
Using an External Boot Device
If it is supported by your BIOS and the installation kernel, boot from external DVD
drives or USB storage devices.
Network Boot via PXE
If a machine lacks a DVD drive, but provides a working ethernet connection,
perform a completely network-based installation. See Section “Remote Installation
via VNC—PXE Boot and Wake on LAN” (Chapter 2, Remote Installation, ↑Refer-
ence) and Section “Remote Installation via SSH—PXE Boot and Wake on LAN”
(Chapter 2, Remote Installation, ↑Reference) for details.
External Boot Devices
Linux supports most existing DVD drives. If the system has neither a DVD drive nor
a oppy disk, it is still possible that an external DVD drive, connected through USB,
FireWire, or SCSI, can be used to boot the system. This depends mainly on the inter-
action of the BIOS and the hardware used. Sometimes a BIOS update may help if
you encounter problems.
When installing from a KDE or GNOME Live CD, you can also create a Live USB stick”
to boot from. Refer to http://en.opensuse.org/Live_USB_stick for detailed instruc-
tions.
A.2.2.4 Booting from Installation Media Fails
One reason why a machine does not boot the installation media can be an incorrect
boot sequence setting in BIOS. The BIOS boot sequence must have DVD drive set as
the rst entry for booting. Otherwise the machine would try to boot from another
medium, typically the hard disk. Guidance for changing the BIOS boot sequence can
be found the documentation provided with your motherboard, or in the following
paragraphs.
The BIOS is the software that enables the very basic functions of a computer. Moth-
erboard vendors provide a BIOS specically made for their hardware. Normally, the
BIOS setup can only be accessed at a specic time—when the machine is booting.
During this initialization phase, the machine performs a number of diagnostic hard-
ware tests. One of them is a memory check, indicated by a memory counter. When
the counter appears, look for a line, usually below the counter or somewhere at the
bottom, mentioning the key to press to access the BIOS setup. Usually the key to
press is one of [Del], [F1], or [Esc]. Press this key until the BIOS setup screen appears.
Procedure A.1: Changing the BIOS Boot Sequence
1 Enter the BIOS using the proper key as announced by the boot routines and
wait for the BIOS screen to appear.
Help and Troubleshooting 245
2 To change the boot sequence in an AWARD BIOS, look for the BIOS FEATURES
SETUP entry. Other manufacturers may have a dierent name for this, such
as ADVANCED CMOS SETUP. When you have found the entry, select it and
conrm with [Enter].
3 In the screen that opens, look for a subentry called BOOT SEQUENCE or BOOT
ORDER. The boot sequence looks something like C,A or A,C. In the former
case, the machine rst searches the hard disk (C) then the oppy drive (A) to
nd a bootable medium. Change the settings by pressing [PgUp] or [PgDown]
until the sequence is A,CDROM,C.
4 Leave the BIOS setup screen by pressing [Esc]. To save the changes, select
SAVE & EXIT SETUP, or press [F10]. To conrm that your settings should be
saved, press [Y].
Procedure A.2: Changing the Boot Sequence in a SCSI BIOS (Adaptec Host Adapter)
1 Open the setup by pressing [Ctrl] + [A].
2 Select Disk Utilities. The connected hardware components are now displayed.
Make note of the SCSI ID of your DVD drive.
3 Exit the menu with [Esc].
4 Open Congure Adapter Settings. Under Additional Options, select Boot Device
Options and press [Enter].
5 Enter the ID of the DVD drive and press [Enter] again.
6 Press [Esc] twice to return to the start screen of the SCSI BIOS.
7 Exit this screen and conrm with Yes to boot the computer.
Regardless of what language and keyboard layout your nal installation will be using,
most BIOS congurations use the US keyboard layout as depicted in the following
gure:
Figure A.1: US Keyboard Layout
246 Start-Up
A.2.2.5 Fails to Boot
Some hardware types, mainly very old or very recent ones, fail to install. In many
cases, this may happen because support for this type of hardware is missing in the
installation kernel, or due to certain functionality included in this kernel, such as
ACPI, that can still cause problems on some hardware.
If your system fails to install using the standard Installation mode from the rst in-
stallation boot screen, try the following:
1 With the DVD still in the drive, reboot the machine with [Ctrl] + [Alt] + [Del]
or using the hardware reset button.
2 When the boot screen appears, press [F5], use the arrow keys of your keyboard
to navigate to No ACPI and press [Enter] to launch the boot and installation
process. This option disables the support for ACPI power management tech-
niques.
3 Proceed with the installation as described in Chapter 1, Installation with YaST
(↑Reference).
If this fails, proceed as above, but choose Safe Settings instead. This option disables
ACPI and DMA support. Most hardware will boot with this option.
If both of these options fail, use the boot options prompt to pass any additional pa-
rameters needed to support this type of hardware to the installation kernel. For more
information about the parameters available as boot options, refer to the kernel doc-
umentation located in /usr/src/linux/Documentation/kernel-parameters.txt.
TIP: Obtaining Kernel Documentation
Install the kernel-source package to view the kernel documentation.
There are various other ACPI-related kernel parameters that can be entered at the
boot prompt prior to booting for installation:
acpi=off
This parameter disables the complete ACPI subsystem on your computer. This
may be useful if your computer cannot handle ACPI at all or if you think ACPI in
your computer causes trouble.
acpi=force
Always enable ACPI even if your computer has an old BIOS dated before the year
2000. This parameter also enables ACPI if it is set in addition to acpi=off.
acpi=noirq
Do not use ACPI for IRQ routing.
acpi=ht
Run only enough ACPI to enable hyper-threading.
Help and Troubleshooting 247
acpi=strict
Be less tolerant of platforms that are not strictly ACPI specication compliant.
pci=noacpi
Disable PCI IRQ routing of the new ACPI system.
pnpacpi=off
This option is for serial or parallel problems when your BIOS setup contains wrong
interrupts or ports.
notsc
Disable the time stamp counter. This option can be used to work around timing
problems on your systems. It is a recent feature, if you see regressions on your
machine, especially time related or even total hangs, this option is worth a try.
nohz=off
Disable the nohz feature. If your machine hangs, this option may help. Otherwise
it is of no use.
Once you have determined the right parameter combination, YaST automatically
writes them to the boot loader conguration to make sure that the system boots
properly next time.
If unexplainable errors occur when the kernel is loaded or during the installation,
select Memory Test in the boot menu to check the memory. If Memory Test returns
an error, it is usually a hardware error.
A.2.2.6 Fails to Launch Graphical Installer
After you insert the medium into your drive and reboot your machine, the installation
screen comes up, but after you select Installation, the graphical installer does not
start.
There are several ways to deal with this situation:
Try to select another screen resolution for the installation dialogs.
Select Text Mode for installation.
Do a remote installation via VNC using the graphical installer.
Procedure A.3: Change Screen Resolution for Installation
1 Boot for installation.
2 Press [F3] to open a menu from which to select a lower resolution for installa-
tion purposes.
3 Select Installation and proceed with the installation as described in Chapter 1,
Installation with YaST (↑Reference).
248 Start-Up
Procedure A.4: Installation in Text Mode
1 Boot for installation.
2 Press [F3] and select Text Mode.
3 Select Installation and proceed with the installation as described in Chapter 1,
Installation with YaST (↑Reference).
Procedure A.5: VNC Installation
1 Boot for installation.
2 Enter the following text at the boot options prompt:
vnc=1 vncpassword=
some_password
Replace
some_password
with the password to use for VNC installation.
3 Select Installation then press [Enter] to start the installation .
Instead of starting right into the graphical installation routine, the system
continues to run in a text mode, then halts, displaying a message containing
the IP address and port number at which the installer can be reached via a
browser interface or a VNC viewer application.
4 If using a browser to access the installer, launch the browser and enter the
address information provided by the installation routines on the future open-
SUSE machine and hit [Enter]:
http://
ip_address_of_machine
:5801
A dialog opens in the browser window prompting you for the VNC password.
Enter it and proceed with the installation as described in Chapter 1, Installation
with YaST (↑Reference).
IMPORTANT
Installation via VNC works with any browser under any operating system,
provided Java support is enabled.
Provide the IP address and password to your VNC viewer when prompted. A
window opens, displaying the installation dialogs. Proceed with the installation
as usual.
A.2.2.7 Only Minimalistic Boot Screen Started
You inserted the medium into the drive, the BIOS routines are nished, but the system
does not start with the graphical boot screen. Instead it launches a very minimalistic
text-based interface. This may happen on any machine not providing sucient
graphics memory for rendering a graphical boot screen.
Help and Troubleshooting 249
Although the text boot screen looks minimalistic, it provides nearly the same func-
tionality as the graphical one:
Boot Options
Unlike the graphical interface, the dierent boot options cannot be selected using
the cursor keys of your keyboard. The boot menu of the text mode boot screen
oers some keywords to enter at the boot prompt. These keywords map to the
options oered in the graphical version. Enter your choice and hit [Enter] to launch
the boot process.
Custom Boot Options
After selecting a boot option, enter the appropriate keyword at the boot prompt
or enter some custom boot options as described in Section A.2.2.5, “Fails to
Boot” (page 247). To launch the installation process, press [Enter].
Screen Resolutions
Use the F keys to determine the screen resolution for installation. If you need to
boot in text mode, choose [F3].
A.2.3 Boot Problems
Boot problems are situations when your system does not boot properly (does not
boot to the expected runlevel and login screen).
A.2.3.1 Fails to Load the GRUB Boot Loader
If the hardware is functioning properly, it is possible that the boot loader is corrupted
and Linux cannot start on the machine. In this case, it is necessary to repair the boot
loader. To do so, you need start the Rescue System as described in Section A.2.7,
“Recovering a Corrupted System” (page 263) and follow the instructions at Section
“Modifying and Reinstalling the Boot Loader (page 266).
Other reasons for the machine not booting may be BIOS-related:
BIOS Settings
Check your BIOS for references to your hard drive. GRUB may simply not be
started if the hard drive itself cannot be found with the current BIOS settings.
BIOS Boot Order
Check whether your system's boot order includes the hard disk. If the hard disk
option was not enabled, your system may install properly, but fails to boot when
access to the hard disk is required.
A.2.3.2 No Graphical Login
If the machine comes up, but does not boot into the graphical login manager, antic-
ipate problems either with the choice of the default runlevel or the conguration of
the X Window System. To check the runlevel conguration, log in as the root user
and check whether the machine is congured to boot into runlevel 5 (graphical
desktop). A quick way to check this is to examine the contents of /etc/inittab, as
follows:
250 Start-Up
tux@mercury:~> grep "id:" /etc/inittab
id:5:initdefault:
The returned line indicates that the machine's default runlevel (initdefault) is set
to 5 and that it should boot to the graphical desktop. If the runlevel is set to any
other number, use the YaST Runlevel Editor module to set it to 5.
IMPORTANT
Do not edit the runlevel conguration manually. Otherwise SuSEcong (run by
YaST) will overwrite these changes on its next run. If you need to make manual
changes here, disable future SuSEcong changes by setting
CHECK_INITTAB
in
/etc/sysconfig/suseconfig to no.
If the runlevel is set to 5, your desktop or X Windows software is probably miscong-
ured or corrupted. Examine the log les at /var/log/Xorg.*.log for detailed messages
from the X server as it attempted to start. If the desktop fails during start, it may log
error messages to /var/log/messages. If these error messages hint at a conguration
problem in the X server, try to x these issues. If the graphical system still does not
come up, consider reinstalling the graphical desktop.
TIP: Starting X Window System Manually
One quick test: the startx command should force the X Window System to start
with the congured defaults if the user is currently logged in on the console. If
that does not work, it should log errors to the console.
A.2.4 Login Problems
Login problems are those where your machine does, in fact, boot to the expected
welcome screen or login prompt, but refuses to accept the username and password,
or accepts them but then does not behave properly (fails to start the graphic desktop,
produces errors, drops to a command line, etc.).
A.2.4.1 Valid Username and Password Combinations Fail
This usually occurs when the system is congured to use network authentication or
directory services and, for some reason, is unable to retrieve results from its cong-
ured servers. The root user, as the only local user, is the only user that can still log
in to these machines. The following are some common reasons why a machine ap-
pears functional but is unable to process logins correctly:
The network is not working. For further directions on this, turn to Section A.2.5,
“Network Problems” (page 257).
DNS is not working at the moment (which prevents GNOME or KDE from working
and the system from making validated requests to secure servers). One indication
that this is the case is that the machine takes an extremely long time to respond
Help and Troubleshooting 251
to any action. Find more information about this topic in Section A.2.5, “Network
Problems” (page 257).
If the system is congured to use Kerberos, the system's local time may have
drifted past the accepted variance with the Kerberos server time (this is typically
300 seconds). If NTP (network time protocol) is not working properly or local
NTP servers are not working, Kerberos authentication ceases to function because
it depends on common clock synchronization across the network.
The system's authentication conguration is miscongured. Check the PAM
conguration les involved for any typographical errors or misordering of direc-
tives. For additional background information about PAM and the syntax of the
conguration les involved, refer to Chapter 2, Authentication with PAM (↑Secu-
rity Guide).
The home partition is encrypted. Find more information about this topic in Sec-
tion A.2.4.3, “Login to Encrypted Home Partition Fails” (page 255).
In all cases that do not involve external network problems, the solution is to reboot
the system into single-user mode and repair the conguration before booting again
into operating mode and attempting to log in again. To boot into single-user mode:
1 Reboot the system. The boot screen appears, oering a prompt.
2
Enter 1 at the boot prompt to make the system boot into single-user mode.
3
Enter the username and password for root.
4 Make all the necessary changes.
5
Boot into the full multiuser and network mode by entering telinit 5 at the
command line.
A.2.4.2 Valid Username and Password Not Accepted
This is by far the most common problem users encounter, because there are many
reasons this can occur. Depending on whether you use local user management and
authentication or network authentication, login failures occur for dierent reasons.
Local user management can fail for the following reasons:
The user may have entered the wrong password.
The user's home directory containing the desktop conguration les is corrupted
or write protected.
There may be problems with the X Window System authenticating this particular
user, especially if the user's home directory has been used with another Linux
distribution prior to installing the current one.
To locate the reason for a local login failure, proceed as follows:
252 Start-Up
1 Check whether the user remembered his password correctly before you start
debugging the whole authentication mechanism. If the user may not remember
his password correctly, use the YaST User Management module to change
the user's password. Pay attention to the [Caps Lock] key and unlock it, if
necessary.
2
Log in as root and check /var/log/messages for error messages of the login
process and of PAM.
3 Try to log in from a console (using [Ctrl] + [Alt] + [F1]). If this is successful,
the blame cannot be put on PAM, because it is possible to authenticate this
user on this machine. Try to locate any problems with the X Window System
or the desktop (GNOME or KDE). For more information, refer to Section A.2.4.4,
“Login Successful but GNOME Desktop Fails” (page 255) and Section A.2.4.5,
“Login Successful but KDE Desktop Fails” (page 256).
4 If the user's home directory has been used with another Linux distribution,
remove the Xauthority le in the user's home. Use a console login via [Ctrl]
+ [Alt] + [F1] and run rm .Xauthority as this user. This should eliminate X
authentication problems for this user. Try graphical login again.
5 If graphical login still fails, do a console login with [Ctrl] + [Alt] + [F1]. Try to
start an X session on another display—the rst one (:0) is already in use:
startx -- :1
This should bring up a graphical screen and your desktop. If it does not, check
the log les of the X Window System (/var/log/Xorg.
displaynumber
.log) or
the log le for your desktop applications (.xsession-errors in the user's home
directory) for any irregularities.
6 If the desktop could not start because of corrupt conguration les, proceed
with Section A.2.4.4, Login Successful but GNOME Desktop Fails” (page 255)
or Section A.2.4.5, “Login Successful but KDE Desktop Fails” (page 256).
The following are some common reasons why network authentication for a particular
user may fail on a specic machine:
The user may have entered the wrong password.
The username exists in the machine's local authentication les and is also pro-
vided by a network authentication system, causing conicts.
The home directory exists but is corrupt or unavailable. Perhaps it is write pro-
tected or is on a server that is inaccessible at the moment.
The user does not have permission to log in to that particular host in the authen-
tication system.
The machine has changed hostnames, for whatever reason, and the user does
not have permission to log in to that host.
Help and Troubleshooting 253
The machine cannot reach the authentication server or directory server that
contains that user's information.
There may be problems with the X Window System authenticating this particular
user, especially if the user's home has been used with another Linux distribution
prior to installing the current one.
To locate the cause of the login failures with network authentication, proceed as
follows:
1 Check whether the user remembered their password correctly before you
start debugging the whole authentication mechanism.
2 Determine the directory server which the machine relies on for authentication
and make sure that it is up and running and properly communicating with the
other machines.
3 Determine that the user's username and password work on other machines
to make sure that his authentication data exists and is properly distributed.
4 See if another user can log in to the misbehaving machine. If another user
can log in without diculty or if root can log in, log in and examine the /var/
log/messages le. Locate the time stamps that correspond to the login attempts
and determine if PAM has produced any error messages.
5 Try to log in from a console (using [Ctrl] + [Alt] + [F1]). If this is successful,
the problem is not with PAM or the directory server on which the user's home
is hosted, because it is possible to authenticate this user on this machine. Try
to locate any problems with the X Window System or the desktop (GNOME or
KDE). For more information, refer to Section A.2.4.4, “Login Successful but
GNOME Desktop Fails” (page 255) and Section A.2.4.5, “Login Successful but
KDE Desktop Fails” (page 256).
6 If the user's home directory has been used with another Linux distribution,
remove the Xauthority le in the user's home. Use a console login via [Ctrl]
+ [Alt] + [F1] and run rm .Xauthority as this user. This should eliminate X
authentication problems for this user. Try graphical login again.
7 If graphical login still fails, do a console login with [Ctrl] + [Alt] + [F1]. Try to
start an X session on another display—the rst one (:0) is already in use:
startx -- :1
This should bring up a graphical screen and your desktop. If it does not, check
the log les of the X Window System (/var/log/Xorg.
displaynumber
.log) or
the log le for your desktop applications (.xsession-errors in the user's home
directory) for any irregularities.
8 If the desktop could not start because of corrupt conguration les, proceed
with Section A.2.4.4, Login Successful but GNOME Desktop Fails” (page 255)
or Section A.2.4.5, “Login Successful but KDE Desktop Fails” (page 256).
254 Start-Up
A.2.4.3 Login to Encrypted Home Partition Fails
It is recommended to use an encrypted home partition for laptops. If you cannot log
in to your laptop, the reason is usually simple: your partition could not be unlocked.
During the boot time, you have to enter the passphrase to unlock your encrypted
partition. If you do not enter it, the boot process continues, leaving the partition
locked.
To unlock your encrypted partition, proceed as follows:
1 Switch to the text console with [Ctrl] + [Alt] + [F1].
2
Become root.
3 Restart the unlocking process again with:
/etc/init.d/boot.crypto restart
4 Enter your passphrase to unlock your encrypted partition.
5 Exit the text console and switch back to the login screen with [Alt] + [F7].
6 Log in as usual.
A.2.4.4 Login Successful but GNOME Desktop Fails
If this is the case, it is likely that your GNOME conguration les have become cor-
rupted. Some symptoms may include the keyboard failing to work, the screen geom-
etry becoming distorted, or even the screen coming up as a bare gray eld. The im-
portant distinction is that if another user logs in, the machine works normally. It is
then likely that the problem can be xed relatively quickly by simply moving the
user's GNOME conguration directory to a new location, which causes GNOME to
initialize a new one. Although the user is forced to recongure GNOME, no data is
lost.
1 Switch to a text console by pressing [Ctrl] + [Alt] + [F1].
2 Log in with your user name.
3 Move the user's GNOME conguration directories to a temporary location:
mv .gconf .gconf-ORIG-RECOVER
mv .gnome2 .gnome2-ORIG-RECOVER
4 Log out.
5 Log in again, but do not run any applications.
Help and Troubleshooting 255
6 Recover your individual application conguration data (including the Evolution
e-mail client data) by copying the ~/.gconf-ORIG-RECOVER/apps/ directory
back into the new ~/.gconf directory as follows:
cp -a .gconf-ORIG-RECOVER/apps .gconf/
If this causes the login problems, attempt to recover only the critical application
data and recongure the remainder of the applications.
A.2.4.5 Login Successful but KDE Desktop Fails
There are several reasons why a KDE desktop would not allow users to login. Corrupt-
ed cache data can cause login problems as well as corrupt KDE desktop conguration
les.
Cache data is used at desktop start-up to increase performance. If this data is cor-
rupted, start-up is slowed down or fails entirely. Removing them forces the desktop
start-up routines to start from scratch. This takes more time than a normal start-up,
but data is intact after this and the user can login.
To remove the cache les of the KDE desktop, issue the following command as root:
rm -rf /tmp/kde-
user
/tmp/ksocket-
user
Replace
user
with your username. Removing these two directories just removes the
corrupted cache les. No real data is harmed using this procedure.
Corrupted desktop conguration les can always be replaced with the initial congu-
ration les. If you want to recover the user's adjustments, carefully copy them back
from their temporary location after the conguration has been restored, using the
default conguration values.
To replace a corrupted desktop conguration with the initial conguration values,
proceed as follows:
1 Switch to a text console by pressing [Ctrl] + [Alt] + [F1].
2 Log in with your username.
3
Move the KDE conguration directory and the .skel les to a temporary loca-
tion:
For KDE3 use these commands:
mv .kde .kde-ORIG-RECOVER
mv .skel .skel-ORIG-RECOVER
For KDE4 use these commands:
mv .kde4 .kde4-ORIG-RECOVER
mv .skel .skel-ORIG-RECOVER
256 Start-Up
4 Log out.
5 Log in again.
6 After the desktop has started successfully, copy the user's own congurations
back into place:
cp -a
KDEDIR
/share .kde/share
Replace
KDEDIR
with the directory from Step 3 (page 256).
IMPORTANT
If the user's own adjustments caused the login to fail and continue to do
so, repeat the procedure as described above, but do not copy the .kde/
share directory.
A.2.5 Network Problems
Many problems of your system may be network-related, even though they do not
seem to be at rst. For example, the reason for a system not allowing users to log
in may be a network problem of some kind. This section introduces a simple check
list you can apply to identify the cause of any network problem encountered.
Procedure A.6: How to Identify Network Problems
When checking the network connection of your machine, proceed as follows:
1 If you use an ethernet connection, check the hardware rst. Make sure that
your network cable is properly plugged into your computer and router (or hub,
etc.). The control lights next to your ethernet connector are normally both be
active.
If the connection fails, check whether your network cable works with another
machine. If it does, your network card causes the failure. If hubs or switches
are included in your network setup, they may be faulty, as well.
2 If using a wireless connection, check whether the wireless link can be estab-
lished by other machines. If not, contact the wireless network's administrator.
3 Once you have checked your basic network connectivity, try to nd out which
service is not responding. Gather the address information of all network servers
needed in your setup. Either look them up in the appropriate YaST module or
ask your system administrator. The following list gives some of the typical
network servers involved in a setup together with the symptoms of an outage.
DNS (Name Service)
A broken or malfunctioning name service aects the network's functional-
ity in many ways. If the local machine relies on any network servers for
authentication and these servers cannot be found due to name resolution
issues, users would not even be able to log in. Machines in the network
Help and Troubleshooting 257
managed by a broken name server would not be able to “see” each other
and communicate.
NTP (Time Service)
A malfunctioning or completely broken NTP service could aect Kerberos
authentication and X server functionality.
NFS (File Service)
If any application needs data stored in an NFS mounted directory, it will
not be able to start or function properly if this service was down or miscon-
gured. In the worst case scenario, a user's personal desktop conguration
would not come up if their home directory containing the .gconf or .kde
subdirectories could not be found due to a faulty NFS server.
Samba (File Service)
If any application needs data stored in a directory on a faulty Samba
server, it will not be able to start or function properly.
NIS (User Management)
If your openSUSE system relies on a faulty NIS server to provide the user
data, users will not be able to log in to this machine.
LDAP (User Management)
If your openSUSE system relies on a faulty LDAP server to provide the user
data, users will not be able to log in to this machine.
Kerberos (Authentication)
Authentication will not work and login to any machine fails.
CUPS (Network Printing)
Users cannot print.
4 Check whether the network servers are running and whether your network
setup allows you to establish a connection:
IMPORTANT
The debugging procedure described below only applies to a simple network
server/client setup that does not involve any internal routing. It assumes
both server and client are members of the same subnet without the need
for additional routing.
4a
Use ping
IP address
or
hostname
(replace
hostname
with the host-
name of the server) to check whether each one of them is up and
responding to the network. If this command is successful, it tells you
that the host you were looking for is up and running and that the
name service for your network is congured correctly.
If ping fails with destination host unreachable, either your system
or the desired server is not properly congured or down. Check
258 Start-Up
whether your system is reachable by running ping
IP address
or
your_hostname
from another machine. If you can reach your machine
from another machine, it is the server that is not running at all or not
congured correctly.
If ping fails with unknown host, the name service is not congured
correctly or the hostname used was incorrect. For further checks on
this matter, refer to Step 4b (page 259). If ping still fails, either your
network card is not congured correctly or your network hardware
is faulty.
4b
Use host
hostname
to check whether the hostname of the server you
are trying to connect to is properly translated into an IP address and
vice versa. If this command returns the IP address of this host, the
name service is up and running. If the host command fails, check all
network conguration les relating to name and address resolution
on your host:
/etc/resolv.conf
This le is used to keep track of the name server and domain you
are currently using. It can be modied manually or automatically
adjusted by YaST or DHCP. Automatic adjustment is preferable.
However, make sure that this le has the following structure and
all network addresses and domain names are correct:
search
fully_qualified_domain_name
nameserver
ipaddress_of_nameserver
This le can contain more than one name server address, but at
least one of them must be correct to provide name resolution to
your host. If needed, adjust this le using the YaST Network Set-
ting module (Hostname/DNS tab).
If your network connection is handled via DHCP, enable DHCP to
change hostname and name service information by selecting
Change Hostname via DHCP and Update Name Servers and Search
List via DHCP in the YaST DNS and Hostname module.
/etc/nsswitch.conf
This le tells Linux where to look for name service information. It
should look like this:
...
hosts: files dns
networks: files dns
...
The dns entry is vital. It tells Linux to use an external name server.
Normally, these entries are automatically managed by YaST, but
it would be prudent to check.
Help and Troubleshooting 259
If all the relevant entries on the host are correct, let your system
administrator check the DNS server conguration for the correct
zone information. For detailed information about DNS, refer to
Chapter 15, The Domain Name System (↑Reference). If you have
made sure that the DNS conguration of your host and the DNS
server are correct, proceed with checking the conguration of
your network and network device.
4c If your system cannot establish a connection to a network server and
you have excluded name service problems from the list of possible
culprits, check the conguration of your network card.
Use the command ifconfig
network_device
(executed as root) to
check whether this device was properly congured. Make sure that
both inet address and Mask are congured correctly. An error in the
IP address or a missing bit in your network mask would render your
network conguration unusable. If necessary, perform this check on
the server as well.
4d If the name service and network hardware are properly congured
and running, but some external network connections still get long
time-outs or fail entirely, use traceroute
fully_qualified_domain_name
(executed as root) to track the network
route these requests are taking. This command lists any gateway
(hop) that a request from your machine passes on its way to its
destination. It lists the response time of each hop and whether this
hop is reachable at all. Use a combination of traceroute and ping to
track down the culprit and let the administrators know.
Once you have identied the cause of your network trouble, you can resolve it
yourself (if the problem is located on your machine) or let the system administrators
of your network know about your ndings so they can recongure the services or
repair the necessary systems.
A.2.5.1 NetworkManager Problems
If you have a problem with network connectivity, narrow it down as described in
Procedure A.6, How to Identify Network Problems” (page 257). If NetworkManager
seems to be the culprit, proceed as follows to get logs providing hints on why Net-
workManager fails:
1
Open a shell and log in as root.
2 Restart the NetworkManager:
rcnetwork restart -o nm
3
Open a web page, for example, http://www.opensuse.org as normal user to
see, if you can connect.
260 Start-Up
4
Collect any information about the state of NetworkManager in /var/log/
NetworkManager.
For more information about NetworkManager, refer to Chapter 25, Using Network-
Manager (↑Reference).
A.2.6 Data Problems
Data problems are when the machine may or may not boot properly but, in either
case, it is clear that there is data corruption on the system and that the system needs
to be recovered. These situations call for a backup of your critical data, enabling you
to recover the system state from before your system failed. openSUSE oers dedi-
cated YaST modules for system backup and restoration as well as a rescue system
that can be used to recover a corrupted system from the outside.
A.2.6.1 Managing Partition Images
Sometimes you need to perform a backup from an entire partition or even hard disk.
Linux comes with the dd tool which can create a exact copy of your disc. Combined
with gzip you save some space.
Procedure A.7: Backing up and Restoring Harddisks
1
Start a Shell as user root.
2
Select your source device. Typically this is something like /dev/sda (labeled
as
SOURCE
).
3
Decide where you want to store your image (labeled as
BACKUP_PATH
). It must
be dierent from your source device. In other words: if you make a backup
from /dev/sda, your image le must not to be stored under /dev/sda.
4 Run the commands to create a compressed image le:
dd if=/dev/
SOURCE
| gzip > /
BACKUP_PATH
/image.gz
5 Restore the hard disk with the following commands:
gzip -dc /
BACKUP_PATH
/image.gz | dd of=/dev/
SOURCE
If you only need a partition to backup, replace the
SOURCE
placeholder with your re-
spective partition. In this case, your image le can lie on the same hard disk, but on
a dierent partition.
A.2.6.2 Backing Up Critical Data
System backups can be easily managed using the YaST System Backup module:
1
As root, start YaST and select System > System Backup.
Help and Troubleshooting 261
2 Create a backup prole holding all details needed for the backup, lename of
the archive le, scope, and type of the backup:
2a Select Prole Management > Add.
2b Enter a name for the archive.
2c Enter the path to the location of the backup if you want to keep a
local backup. For your backup to be archived on a network server
(via NFS), enter the IP address or name of the server and the direc-
tory that should hold your archive.
2d Determine the archive type and click Next.
2e Determine the backup options to use, such as whether les not be-
longing to any package should be backed up and whether a list of
les should be displayed prior to creating the archive. Also determine
whether changed les should be identied using the time-consuming
MD5 mechanism.
Use Expert to enter a dialog for the backup of entire hard disk areas.
Currently, this option only applies to the Ext2 le system.
2f Finally, set the search constraints to exclude certain system areas
from the backup area that do not need to be backed up, such as lock
les or cache les. Add, edit, or delete items until your needs are
met and leave with OK.
3 Once you have nished the prole settings, you can start the backup right
away with Create Backup or congure automatic backup. It is also possible
to create other proles tailored for various other purposes.
To congure automatic backup for a given prole, proceed as follows:
1 Select Automatic Backup from the Prole Management menu.
2 Select Start Backup Automatically.
3 Determine the backup frequency. Choose daily, weekly, or monthly.
4 Determine the backup start time. These settings depend on the backup fre-
quency selected.
5 Decide whether to keep old backups and how many should be kept. To receive
an automatically generated status message of the backup process, check
Send Summary Mail to User root.
6 Click OK to apply your settings and have the rst backup start at the time
specied.
262 Start-Up
A.2.6.3 Restoring a System Backup
Use the YaST System Restoration module to restore the system conguration from
a backup. Restore the entire backup or select specic components that were corrupted
and need to be reset to their old state.
1 Start YaST > System > System Restoration.
2 Enter the location of the backup le. This could be a local le, a network
mounted le, or a le on a removable device, such as a oppy or a DVD. Then
click Next.
The following dialog displays a summary of the archive properties, such as
the lename, date of creation, type of backup, and optional comments.
3 Review the archived content by clicking Archive Content. Clicking OK returns
you to the Archive Properties dialog.
4 Expert Options opens a dialog in which to ne-tune the restore process. Return
to the Archive Properties dialog by clicking OK.
5 Click Next to open the view of packages to restore. Press Accept to restore
all les in the archive or use the various Select All, Deselect All, and Select
Files buttons to ne-tune your selection. Only use the Restore RPM Database
option if the RPM database is corrupted or deleted and this le is included in
the backup.
6 After you click Accept, the backup is restored. Click Finish to leave the module
after the restore process is completed.
A.2.7 Recovering a Corrupted System
There are several reasons why a system could fail to come up and run properly. A
corrupted le system following a system crash, corrupted conguration les, or a
corrupted boot loader conguration are the most common ones.
A.2.7.1 Using the Rescue System
openSUSE contains a rescue system. The rescue system is a small Linux system that
can be loaded into a RAM disk and mounted as root le system, allowing you to access
your Linux partitions from the outside. Using the rescue system, you can recover or
modify any important aspect of your system:
Manipulate any type of conguration le.
Check the le system for defects and start automatic repair processes.
Access the installed system in a “change root” environment.
Check, modify, and reinstall the boot loader conguration.
Recover from a badly installed device driver or unusable kernel.
Help and Troubleshooting 263
Resize partitions using the parted command. Find more information about this
tool at the GNU Parted website http://www.gnu.org/software/parted/parted
.html.
The rescue system can be loaded from various sources and locations. The simplest
option is to boot the rescue system from the original installation medium:
1 Insert the installation medium into your DVD drive.
2 Reboot the system.
3 At the boot screen, press [F4] and choose DVD-ROM. Then choose Rescue
System from the main menu.
4
Enter root at the Rescue: prompt. A password is not required.
If your hardware setup does not include a DVD drive, you can boot the rescue
system from a network source (including the openSUSE FTP server). The following
example applies to a remote boot scenario—if using another boot medium, such
as a DVD, modify the info le accordingly and boot as you would for a normal in-
stallation.
1 Enter the conguration of your PXE boot setup and add the lines
install=
protocol
://
instsource
and rescue=1. If you need to start the repair
system, use repair=1 instead. As with a normal installation,
protocol
stands
for any of the supported network protocols (NFS, HTTP, FTP, etc.) and
instsource
for the path to your network installation source.
2 Boot the system using “Wake on LAN”, as described in Section “Wake on LAN”
(Chapter 2, Remote Installation, ↑Reference).
3
Enter root at the Rescue: prompt. A password is not required.
Once you have entered the rescue system, you can make use of the virtual consoles
that can be reached with [Alt] + [F1] to [Alt] + [F6].
A shell and many other useful utilities, such as the mount program, are available in
the /bin directory. The sbin directory contains important le and network utilities
for reviewing and repairing the le system. This directory also contains the most
important binaries for system maintenance, such as fdisk, mkfs, mkswap, mount,
mount, init, and shutdown, and ifcong, ip, route, and netstat for maintaining the
network. The directory /usr/bin contains the vi editor, nd, less, and ssh.
To see the system messages, either use the command dmesg or view the le /var/
log/messages.
264 Start-Up
Checking and Manipulating Conguration Files
As an example for a conguration that might be xed using the rescue system,
imagine you have a broken conguration le that prevents the system from booting
properly. You can x this using the rescue system.
To manipulate a conguration le, proceed as follows:
1 Start the rescue system using one of the methods described above.
2
To mount a root le system located under /dev/sda6 to the rescue system,
use the following command:
mount /dev/sda6 /mnt
All directories of the system are now located under /mnt
3 Change the directory to the mounted root le system:
cd /mnt
4 Open the problematic conguration le in the vi editor. Adjust and save the
conguration.
5 Unmount the root le system from the rescue system:
umount /mnt
6 Reboot the machine.
Repairing and Checking File Systems
Generally, le systems cannot be repaired on a running system. If you encounter
serious problems, you may not even be able to mount your root le system and the
system boot may end with a “kernel panic”. In this case, the only way is to repair
the system from the outside. The rescue system provides all tools needed for a
manual le system check or repair. It contains the utilities to check and repair the
btrfs, ext2, ext3, ext4, reiserfs, xfs, dosfs, and vfat le systems.
Accessing the Installed System
If you need to access the installed system from the rescue system, you need to do
this in a change root environment. For example, to modify the boot loader congura-
tion, or to execute a hardware conguration utility.
To set up a change root environment based on the installed system, proceed as fol-
lows:
1 First mount the root partition from the installed system and the device le
system (change the device name to your current settings):
Help and Troubleshooting 265
mount /dev/sda6 /mnt
mount --bind /dev /mnt/dev
2 Now you can “change root” into the new environment:
chroot /mnt
3
Then mount /proc and /sys:
mount /proc
mount /sys
4 Finally, mount the remaining partitions from the installed system:
mount -a
5 Now you have access to the installed system. Before rebooting the system,
unmount the partitions with umount -a and leave the “change root” environ-
ment with exit.
WARNING: Limitations
Although you have full access to the les and applications of the installed system,
there are some limitations. The kernel that is running is the one that was booted
with the rescue system, not with the change root environment. It only supports
essential hardware and it is not possible to add kernel modules from the installed
system unless the kernel versions are exactly the same. Always check the version
of the currently running (rescue) kernel with uname -r and then nd out if a
matching subdirectory exists in the /lib/modules directory in the change root
environment. If yes, you can use the installed modules, otherwise you need to
supply their correct versions on other media, such as a USB stick. Most often the
rescue kernel version diers from the installed one then you cannot simply
access a sound card, for example. It is also not possible to start a graphical user
interface.
Also note that you leave the “change root” environment when you switch the
console with [Alt] + [F1] to [Alt] + [F6].
Modifying and Reinstalling the Boot Loader
Sometimes a system cannot boot because the boot loader conguration is corrupted.
The start-up routines cannot, for example, translate physical drives to the actual lo-
cations in the Linux le system without a working boot loader.
To check the boot loader conguration and reinstall the boot loader, proceed as fol-
lows:
266 Start-Up
1 Perform the necessary steps to access the installed system as described in
Section Accessing the Installed System” (page 265).
2 Check whether the following les are correctly congured according to the
GRUB conguration principles outlined in Chapter 9, The Boot Loader GRUB
(↑Reference) and apply xes if necessary.
/etc/grub.conf
/boot/grub/device.map
/boot/grub/menu.lst
/etc/sysconfig/bootloader
3 Reinstall the boot loader using the following command sequence:
grub --batch < /etc/grub.conf
4 Unmount the partitions, log out from the “change root” environment, and re-
boot the system:
umount -a
exit
reboot
Fixing Kernel Installation
A kernel update may introduce a new bug which can impact the operation of your
system. For example a driver for a piece of hardware in your system may be faulty,
which prevents you from accessing and using it. In this case, revert to the last
working kernel (if available on the system) or install the original kernel from the in-
stallation media.
TIP: How to Keep Last Kernels after Update
To prevent failures to boot after a faulty kernel update, use the kernel multiversion
feature and tell libzypp which kernels you want to keep after the update.
For example to always keep the last two kernels and the currently running one,
add
multiversion.kernels = latest,latest-1,running
to the /etc/zypp/zypp.conf le.
A similar case is when you need to reinstall or update a broken driver for a device
not supported by openSUSE. For example when a hardware vendor uses a specic
device, such as a hardware RAID controller, which needs a binary driver to be recog-
Help and Troubleshooting 267
nized by the operating system. The vendor typically releases a Driver Update Disk
with the xed or updated version of the required driver.
In both cases you need to access the installed system in the rescue mode and x
the kernel related problem, otherwise the system may fail to boot correctly:
1 Boot from the openSUSE installation media.
2 If you are recovering after a faulty kernel update, skip this step. If you need
to use a driver update disk (DUD), press [F6] to load the driver update after
the boot menu appears, and choose the path or URL to the driver update and
conrm with Yes.
3 Choose Rescue System from the boot menu and press [Enter]. If you chose
to use DUD, you will be asked to specify where the driver update is stored.
4
Enter root at the Rescue: prompt. A password is not required.
5 Manually mount the target system and “change root” into the new environ-
ment. For more information, see Section Accessing the Installed Sys-
tem” (page 265).
6 If using DUD, install/reinstall/update the faulty device driver package. Always
make sure the installed kernel version exactly matches the version of the
driver you are installing.
If xing faulty kernel update installation, you can install the original kernel
from the installation media with the following procedure.
6a
Identify your DVD device with hwinfo --cdrom and mount it with
mount /dev/sr0 /mnt.
6b Navigate to the directory where your kernel les are stored on the
DVD, for example cd /mnt/suse/x86_64/.
6c
Install required kernel-*, kernel-*-base, and kernel-*-extra pack-
ages of your avor with the rpm -i command.
6d After the installation nishes, check that a new menu entry relevant
for the newly installed kernel was added to the boot loader congu-
ration le (/boot/grub/menu.lst for grub).
7 Update conguration les and reinitialize the boot loader if needed. For more
information, see Section “Modifying and Reinstalling the Boot Load-
er (page 266)
8 Remove any bootable media from the system drive and reboot.
268 Start-Up
A.3 Legal Notice
Copyright© 2006–2012 Novell, Inc. and contributors. All rights reserved.
Permission is granted to copy, distribute and/or modify this document under the
terms of the GNU Free Documentation License, Version 1.2 or (at your option) version
1.3; with the Invariant Section being this copyright notice and license. A copy of the
license version 1.2 is included in the section entitled GNU Free Documentation Li-
cense”.
For Novell trademarks, see the Novell Trademark and Service Mark list http://www
.novell.com/company/legal/trademarks/tmlist.html. All other third party trademarks
are the property of their respective owners. A trademark symbol (®, etc.) denotes
a Novell trademark; an asterisk (*) denotes a third party trademark.
All information found in this book has been compiled with utmost attention to detail.
However, this does not guarantee complete accuracy. Neither Novell, Inc., SUSE
LINUX Products GmbH, the authors, nor the translators shall be held liable for possible
errors or the consequences thereof.
GNU Free Documentation License
Copyright (C) 2000, 2001, 2002 Free Software Foundation, Inc. 51 Franklin St, Fifth Floor, Boston, MA 02110-1301 USA. Everyone is permitted to
copy and distribute verbatim copies of this license document, but changing it is not allowed.
0. PREAMBLE
The purpose of this License is to make a manual, textbook, or other functional and useful document "free" in the sense of freedom: to assure ev-
eryone the eective freedom to copy and redistribute it, with or without modifying it, either commercially or noncommercially. Secondarily, this
License preserves for the author and publisher a way to get credit for their work, while not being considered responsible for modications made
by others.
This License is a kind of "copyleft", which means that derivative works of the document must themselves be free in the same sense. It complements
the GNU General Public License, which is a copyleft license designed for free software.
We have designed this License in order to use it for manuals for free software, because free software needs free documentation: a free program
should come with manuals providing the same freedoms that the software does. But this License is not limited to software manuals; it can be used
for any textual work, regardless of subject matter or whether it is published as a printed book. We recommend this License principally for works
whose purpose is instruction or reference.
1. APPLICABILITY AND DEFINITIONS
This License applies to any manual or other work, in any medium, that contains a notice placed by the copyright holder saying it can be distributed
under the terms of this License. Such a notice grants a world-wide, royalty-free license, unlimited in duration, to use that work under the conditions
stated herein. The "Document", below, refers to any such manual or work. Any member of the public is a licensee, and is addressed as "you". You
accept the license if you copy, modify or distribute the work in a way requiring permission under copyright law.
A "Modied Version" of the Document means any work containing the Document or a portion of it, either copied verbatim, or with modications
and/or translated into another language.
A "Secondary Section" is a named appendix or a front-matter section of the Document that deals exclusively with the relationship of the publishers
or authors of the Document to the Document's overall subject (or to related matters) and contains nothing that could fall directly within that overall
subject. (Thus, if the Document is in part a textbook of mathematics, a Secondary Section may not explain any mathematics.) The relationship
could be a matter of historical connection with the subject or with related matters, or of legal, commercial, philosophical, ethical or political position
regarding them.
The "Invariant Sections" are certain Secondary Sections whose titles are designated, as being those of Invariant Sections, in the notice that says
that the Document is released under this License. If a section does not t the above denition of Secondary then it is not allowed to be designated
as Invariant. The Document may contain zero Invariant Sections. If the Document does not identify any Invariant Sections then there are none.
The "Cover Texts" are certain short passages of text that are listed, as Front-Cover Texts or Back-Cover Texts, in the notice that says that the
Document is released under this License. A Front-Cover Text may be at most 5 words, and a Back-Cover Text may be at most 25 words.
A "Transparent" copy of the Document means a machine-readable copy, represented in a format whose specication is available to the general
public, that is suitable for revising the document straightforwardly with generic text editors or (for images composed of pixels) generic paint programs
or (for drawings) some widely available drawing editor, and that is suitable for input to text formatters or for automatic translation to a variety of
formats suitable for input to text formatters. A copy made in an otherwise Transparent le format whose markup, or absence of markup, has been
Help and Troubleshooting 269
arranged to thwart or discourage subsequent modication by readers is not Transparent. An image format is not Transparent if used for any sub-
stantial amount of text. A copy that is not "Transparent" is called "Opaque".
Examples of suitable formats for Transparent copies include plain ASCII without markup, Texinfo input format, LaTeX input format, SGML or XML
using a publicly available DTD, and standard-conforming simple HTML, PostScript or PDF designed for human modication. Examples of transparent
image formats include PNG, XCF and JPG. Opaque formats include proprietary formats that can be read and edited only by proprietary word processors,
SGML or XML for which the DTD and/or processing tools are not generally available, and the machine-generated HTML, PostScript or PDF produced
by some word processors for output purposes only.
The "Title Page" means, for a printed book, the title page itself, plus such following pages as are needed to hold, legibly, the material this License
requires to appear in the title page. For works in formats which do not have any title page as such, "Title Page" means the text near the most
prominent appearance of the work's title, preceding the beginning of the body of the text.
A section "Entitled XYZ" means a named subunit of the Document whose title either is precisely XYZ or contains XYZ in parentheses following text
that translates XYZ in another language. (Here XYZ stands for a specic section name mentioned below, such as "Acknowledgements", "Dedications",
"Endorsements", or "History".) To "Preserve the Title" of such a section when you modify the Document means that it remains a section "Entitled
XYZ" according to this denition.
The Document may include Warranty Disclaimers next to the notice which states that this License applies to the Document. These Warranty Disclaimers
are considered to be included by reference in this License, but only as regards disclaiming warranties: any other implication that these Warranty
Disclaimers may have is void and has no eect on the meaning of this License.
2. VERBATIM COPYING
You may copy and distribute the Document in any medium, either commercially or noncommercially, provided that this License, the copyright notices,
and the license notice saying this License applies to the Document are reproduced in all copies, and that you add no other conditions whatsoever
to those of this License. You may not use technical measures to obstruct or control the reading or further copying of the copies you make or distribute.
However, you may accept compensation in exchange for copies. If you distribute a large enough number of copies you must also follow the conditions
in section 3.
You may also lend copies, under the same conditions stated above, and you may publicly display copies.
3. COPYING IN QUANTITY
If you publish printed copies (or copies in media that commonly have printed covers) of the Document, numbering more than 100, and the Document's
license notice requires Cover Texts, you must enclose the copies in covers that carry, clearly and legibly, all these Cover Texts: Front-Cover Texts
on the front cover, and Back-Cover Texts on the back cover. Both covers must also clearly and legibly identify you as the publisher of these copies.
The front cover must present the full title with all words of the title equally prominent and visible. You may add other material on the covers in
addition. Copying with changes limited to the covers, as long as they preserve the title of the Document and satisfy these conditions, can be
treated as verbatim copying in other respects.
If the required texts for either cover are too voluminous to t legibly, you should put the rst ones listed (as many as t reasonably) on the actual
cover, and continue the rest onto adjacent pages.
If you publish or distribute Opaque copies of the Document numbering more than 100, you must either include a machine-readable Transparent
copy along with each Opaque copy, or state in or with each Opaque copy a computer-network location from which the general network-using public
has access to download using public-standard network protocols a complete Transparent copy of the Document, free of added material. If you use
the latter option, you must take reasonably prudent steps, when you begin distribution of Opaque copies in quantity, to ensure that this Transparent
copy will remain thus accessible at the stated location until at least one year after the last time you distribute an Opaque copy (directly or through
your agents or retailers) of that edition to the public.
It is requested, but not required, that you contact the authors of the Document well before redistributing any large number of copies, to give them
a chance to provide you with an updated version of the Document.
4. MODIFICATIONS
You may copy and distribute a Modied Version of the Document under the conditions of sections 2 and 3 above, provided that you release the
Modied Version under precisely this License, with the Modied Version lling the role of the Document, thus licensing distribution and modication
of the Modied Version to whoever possesses a copy of it. In addition, you must do these things in the Modied Version:
A. Use in the Title Page (and on the covers, if any) a title distinct from that of the Document, and from those of previous versions (which should,
if there were any, be listed in the History section of the Document). You may use the same title as a previous version if the original publisher
of that version gives permission.
B. List on the Title Page, as authors, one or more persons or entities responsible for authorship of the modications in the Modied Version, together
with at least ve of the principal authors of the Document (all of its principal authors, if it has fewer than ve), unless they release you from
this requirement.
C. State on the Title page the name of the publisher of the Modied Version, as the publisher.
D. Preserve all the copyright notices of the Document.
E. Add an appropriate copyright notice for your modications adjacent to the other copyright notices.
F. Include, immediately after the copyright notices, a license notice giving the public permission to use the Modied Version under the terms of
this License, in the form shown in the Addendum below.
G. Preserve in that license notice the full lists of Invariant Sections and required Cover Texts given in the Document's license notice.
H. Include an unaltered copy of this License.
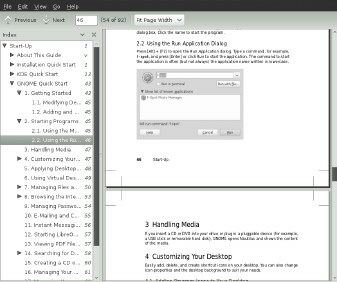
270 Start-Up
I. Preserve the section Entitled "History", Preserve its Title, and add to it an item stating at least the title, year, new authors, and publisher of the
Modied Version as given on the Title Page. If there is no section Entitled "History" in the Document, create one stating the title, year, authors,
and publisher of the Document as given on its Title Page, then add an item describing the Modied Version as stated in the previous sentence.
J. Preserve the network location, if any, given in the Document for public access to a Transparent copy of the Document, and likewise the network
locations given in the Document for previous versions it was based on. These may be placed in the "History" section. You may omit a network
location for a work that was published at least four years before the Document itself, or if the original publisher of the version it refers to gives
permission.
K. For any section Entitled "Acknowledgements" or "Dedications", Preserve the Title of the section, and preserve in the section all the substance
and tone of each of the contributor acknowledgements and/or dedications given therein.
L. Preserve all the Invariant Sections of the Document, unaltered in their text and in their titles. Section numbers or the equivalent are not considered
part of the section titles.
M. Delete any section Entitled "Endorsements". Such a section may not be included in the Modied Version.
N. Do not retitle any existing section to be Entitled "Endorsements" or to conict in title with any Invariant Section.
O. Preserve any Warranty Disclaimers.
If the Modied Version includes new front-matter sections or appendices that qualify as Secondary Sections and contain no material copied from
the Document, you may at your option designate some or all of these sections as invariant. To do this, add their titles to the list of Invariant Sections
in the Modied Version's license notice. These titles must be distinct from any other section titles.
You may add a section Entitled "Endorsements", provided it contains nothing but endorsements of your Modied Version by various parties--for
example, statements of peer review or that the text has been approved by an organization as the authoritative denition of a standard.
You may add a passage of up to ve words as a Front-Cover Text, and a passage of up to 25 words as a Back-Cover Text, to the end of the list of
Cover Texts in the Modied Version. Only one passage of Front-Cover Text and one of Back-Cover Text may be added by (or through arrangements
made by) any one entity. If the Document already includes a cover text for the same cover, previously added by you or by arrangement made by
the same entity you are acting on behalf of, you may not add another; but you may replace the old one, on explicit permission from the previous
publisher that added the old one.
The author(s) and publisher(s) of the Document do not by this License give permission to use their names for publicity for or to assert or imply
endorsement of any Modied Version.
5. COMBINING DOCUMENTS
You may combine the Document with other documents released under this License, under the terms dened in section 4 above for modied versions,
provided that you include in the combination all of the Invariant Sections of all of the original documents, unmodied, and list them all as Invariant
Sections of your combined work in its license notice, and that you preserve all their Warranty Disclaimers.
The combined work need only contain one copy of this License, and multiple identical Invariant Sections may be replaced with a single copy. If
there are multiple Invariant Sections with the same name but dierent contents, make the title of each such section unique by adding at the end
of it, in parentheses, the name of the original author or publisher of that section if known, or else a unique number. Make the same adjustment to
the section titles in the list of Invariant Sections in the license notice of the combined work.
In the combination, you must combine any sections Entitled "History" in the various original documents, forming one section Entitled "History";
likewise combine any sections Entitled "Acknowledgements", and any sections Entitled "Dedications". You must delete all sections Entitled "Endorse-
ments".
6. COLLECTIONS OF DOCUMENTS
You may make a collection consisting of the Document and other documents released under this License, and replace the individual copies of this
License in the various documents with a single copy that is included in the collection, provided that you follow the rules of this License for verbatim
copying of each of the documents in all other respects.
You may extract a single document from such a collection, and distribute it individually under this License, provided you insert a copy of this License
into the extracted document, and follow this License in all other respects regarding verbatim copying of that document.
7. AGGREGATION WITH INDEPENDENT WORKS
A compilation of the Document or its derivatives with other separate and independent documents or works, in or on a volume of a storage or distri-
bution medium, is called an "aggregate" if the copyright resulting from the compilation is not used to limit the legal rights of the compilation's users
beyond what the individual works permit. When the Document is included in an aggregate, this License does not apply to the other works in the
aggregate which are not themselves derivative works of the Document.
If the Cover Text requirement of section 3 is applicable to these copies of the Document, then if the Document is less than one half of the entire
aggregate, the Document's Cover Texts may be placed on covers that bracket the Document within the aggregate, or the electronic equivalent of
covers if the Document is in electronic form. Otherwise they must appear on printed covers that bracket the whole aggregate.
8. TRANSLATION
Translation is considered a kind of modication, so you may distribute translations of the Document under the terms of section 4. Replacing Invariant
Sections with translations requires special permission from their copyright holders, but you may include translations of some or all Invariant Sections
in addition to the original versions of these Invariant Sections. You may include a translation of this License, and all the license notices in the Doc-
ument, and any Warranty Disclaimers, provided that you also include the original English version of this License and the original versions of those
Help and Troubleshooting 271
notices and disclaimers. In case of a disagreement between the translation and the original version of this License or a notice or disclaimer, the
original version will prevail.
If a section in the Document is Entitled "Acknowledgements", "Dedications", or "History", the requirement (section 4) to Preserve its Title (section
1) will typically require changing the actual title.
9. TERMINATION
You may not copy, modify, sublicense, or distribute the Document except as expressly provided for under this License. Any other attempt to copy,
modify, sublicense or distribute the Document is void, and will automatically terminate your rights under this License. However, parties who have
received copies, or rights, from you under this License will not have their licenses terminated so long as such parties remain in full compliance.
10. FUTURE REVISIONS OF THIS LICENSE
The Free Software Foundation may publish new, revised versions of the GNU Free Documentation License from time to time. Such new versions
will be similar in spirit to the present version, but may dier in detail to address new problems or concerns. See http://www.gnu.org/copyleft/.
Each version of the License is given a distinguishing version number. If the Document species that a particular numbered version of this License
"or any later version" applies to it, you have the option of following the terms and conditions either of that specied version or of any later version
that has been published (not as a draft) by the Free Software Foundation. If the Document does not specify a version number of this License, you
may choose any version ever published (not as a draft) by the Free Software Foundation.
ADDENDUM: How to use this License for your
documents
Copyright (c) YEAR YOUR NAME.
Permission is granted to copy, distribute and/or modify this document
under the terms of the GNU Free Documentation License, Version 1.2
or any later version published by the Free Software Foundation;
with no Invariant Sections, no Front-Cover Texts, and no Back-Cover Texts.
A copy of the license is included in the section entitled “GNU
Free Documentation License”.
If you have Invariant Sections, Front-Cover Texts and Back-Cover Texts, replace the “with...Texts.” line with this:
with the Invariant Sections being LIST THEIR TITLES, with the
Front-Cover Texts being LIST, and with the Back-Cover Texts being LIST.
If you have Invariant Sections without Cover Texts, or some other combination of the three, merge those two alternatives to suit the situation.
If your document contains nontrivial examples of program code, we recommend releasing these examples in parallel under your choice of free
software license, such as the GNU General Public License, to permit their use in free software.
272 Start-Up
3

Hulp nodig? Stel uw vraag in het forum

Spelregels
1

Forum

Suse-openSUSE-12.2

Misbruik melden

Gebruikershandleiding.com neemt misbruik van zijn services uitermate serieus. U kunt hieronder aangeven waarom deze vraag ongepast is. Wij controleren de vraag en zonodig wordt deze verwijderd.

Product:

Bijvoorbeeld antisemitische inhoud, racistische inhoud, of materiaal dat gewelddadige fysieke handelingen tot gevolg kan hebben.

Bijvoorbeeld een creditcardnummer, een persoonlijk identificatienummer, of een geheim adres. E-mailadressen en volledige namen worden niet als privégegevens beschouwd.

Spelregels forum

Om tot zinvolle vragen te komen hanteren wij de volgende spelregels:

Belangrijk! Als er een antwoord wordt gegeven op uw vraag, dan is het voor de gever van het antwoord nuttig om te weten als u er wel (of niet) mee geholpen bent! Wij vragen u dus ook te reageren op een antwoord.

Belangrijk! Antwoorden worden ook per e-mail naar abonnees gestuurd. Laat uw emailadres achter op deze site, zodat u op de hoogte blijft. U krijgt dan ook andere vragen en antwoorden te zien.

Abonneren

Abonneer u voor het ontvangen van emails voor uw Suse openSUSE 12.2 bij:


U ontvangt een email met instructies om u voor één of beide opties in te schrijven.


Ontvang uw handleiding per email

Vul uw emailadres in en ontvang de handleiding van Suse openSUSE 12.2 in de taal/talen: Engels als bijlage per email.

De handleiding is 14 mb groot.


U ontvangt de handleiding per email binnen enkele minuten. Als u geen email heeft ontvangen, dan heeft u waarschijnlijk een verkeerd emailadres ingevuld of is uw mailbox te vol. Daarnaast kan het zijn dat uw internetprovider een maximum heeft aan de grootte per email. Omdat hier een handleiding wordt meegestuurd, kan het voorkomen dat de email groter is dan toegestaan bij uw provider.

Stel vragen via chat aan uw handleiding

Stel uw vraag over deze PDF

Andere handleiding(en) van Suse openSUSE 12.2

Suse openSUSE 12.2 Gebruiksaanwijzing - English - 530 pagina's


Uw handleiding is per email verstuurd. Controleer uw email

Als u niet binnen een kwartier uw email met handleiding ontvangen heeft, kan het zijn dat u een verkeerd emailadres heeft ingevuld of dat uw emailprovider een maximum grootte per email heeft ingesteld die kleiner is dan de grootte van de handleiding.

Er is een email naar u verstuurd om uw inschrijving definitief te maken.

Controleer uw email en volg de aanwijzingen op om uw inschrijving definitief te maken

U heeft geen emailadres opgegeven

Als u de handleiding per email wilt ontvangen, vul dan een geldig emailadres in.

Uw vraag is op deze pagina toegevoegd

Wilt u een email ontvangen bij een antwoord en/of nieuwe vragen? Vul dan hier uw emailadres in.


Info