12
UTILISATION GENERALE
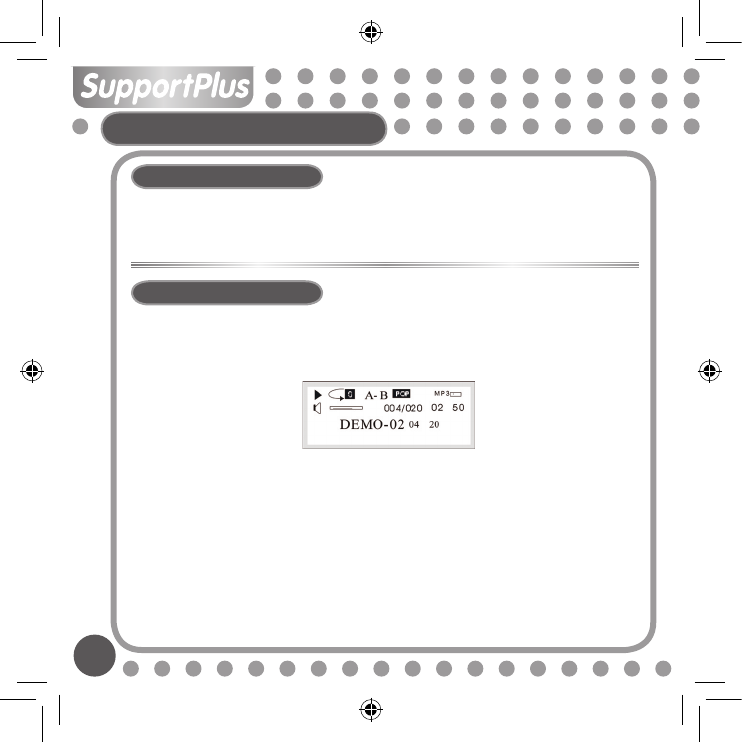
● Appuyez à nouveau sur MODE pour quitter.
Comment copier des chansons et des fichiers vers votre lecteur
Selon le modèles le CD driver (pilote) fourni avec le lecteur MP3 N’EST PAS nécessaire si
votre PC fonctionne sous environnement Windows XP ou 2000 (vous n’avez besoin du CD
que si votre PC est sous Windows 98). Pour une installation rapide, veuillez vous conformer
aux instructions ci-dessous.
1. Connectez le câble USB à votre lecteur MP3 et insérez l’autre extrémité du cordon sur la
fiche USB de votre PC.
2. Le PC devrait reconnaître le lecteur MP3 et faire apparaître une fenêtre Nouveau Maté
riel Détecté (New Hardware Found) sur l’écran.
3. Si vous allez sous “Mon Ordinateur” et que vous visualisez la liste des périphériques
disponibles sur le Bureau de votre PC, vous devriez désormais voir apparaître un nou
veau périphérique nommé Disque Amovible (Removable Disk), suivi de la lettre attribuée
à ce périphérique.
4. A l’aide de l’application Windows Explorer, vous pouvez à présent copier les fichiers de
musique de votre PC vers le périphérique “Disque amovible” et les fichiers seront ensuite
enregistrés sur le lecteur MP3.
5. Pour ce faire, trouvez l’application Windows Explorer (habituellement dans le menu de
démarrage, ‘tous les programmes’, sous ‘accessoires’). Ensuite, il vous suffit simplement
de déplacer vos fichiers de musique du dossier de votre PC vers le périphérique “Disque
amovible”. Utilisez l’Aide Windows de votre PC pour obtenir des instructions sur comment
copier des fichiers.
Veuillez bien noter que ce lecteur MP3
ne contient pas de logiciel de téléchargement ou
de copiage de musique, de quelque nature que ce soit. Vous devez posséder les fichiers de
musique sur votre PC pour pouvoir ensuite les copier vers votre lecteur MP3. Notez aussi
que le lecteur MP3 ne reconnaîtra que des fichiers au format .MP3 ou .WMA. Il ne sera par
exemple pas en mesure de lire des fichiers de type .WAV. Les fichiers codés avec DRM
(gestion des droits numériques), tels les fichiers achetés sur Internet, ne fonctionneront
qu’avec les modèles capables de gérer DRM (Dépend du modèle).