Gerät in Betrieb nehmen .................................................................................................................................................................................................................................. 9
Description of the device............................................................................................................................................................................................................................... 18
Installing the device ....................................................................................................................................................................................................................................... 19
Starting up the device .................................................................................................................................................................................................................................... 22
Dismantling the device .................................................................................................................................................................................................................................. 27
Disposing of the device ................................................................................................................................................................................................................................. 27
Technical data ................................................................................................................................................................................................................................................ 27
EU declaration of conformity ........................................................................................................................................................................................................................ 28
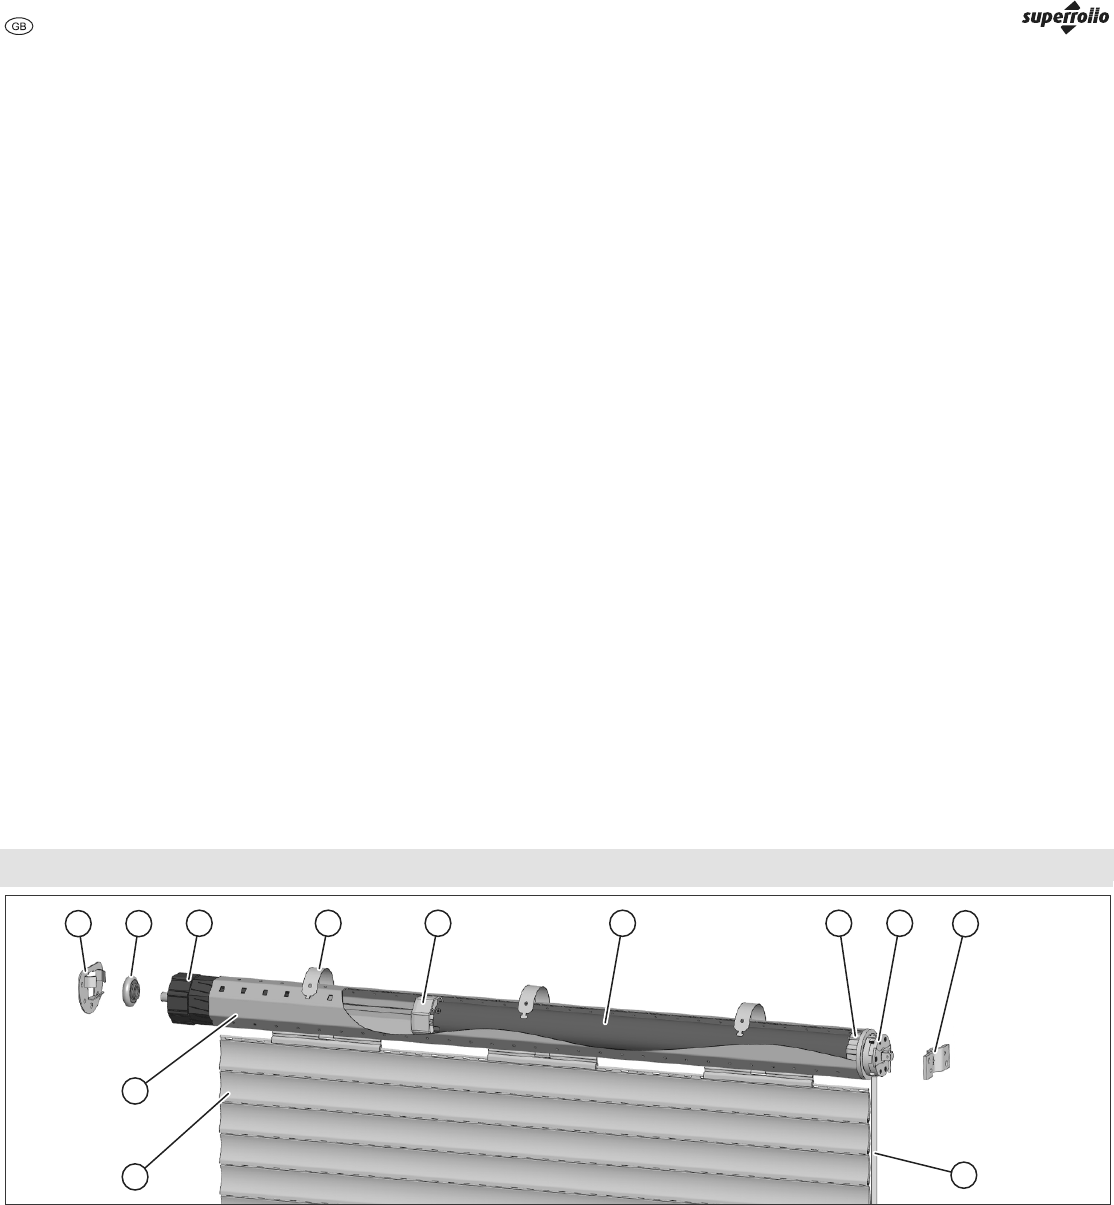
Overview
21
3456
8
7
9
10
11
12
8 Counter bearing* = Adapter
9 Ball bearing* < Driving head
A Roller capsule* ; Drive bearing
@ Securing spring* UT Motor cable
? Driver UBRoller shutter curtain*
> Tubular motor UD Winding shaft*
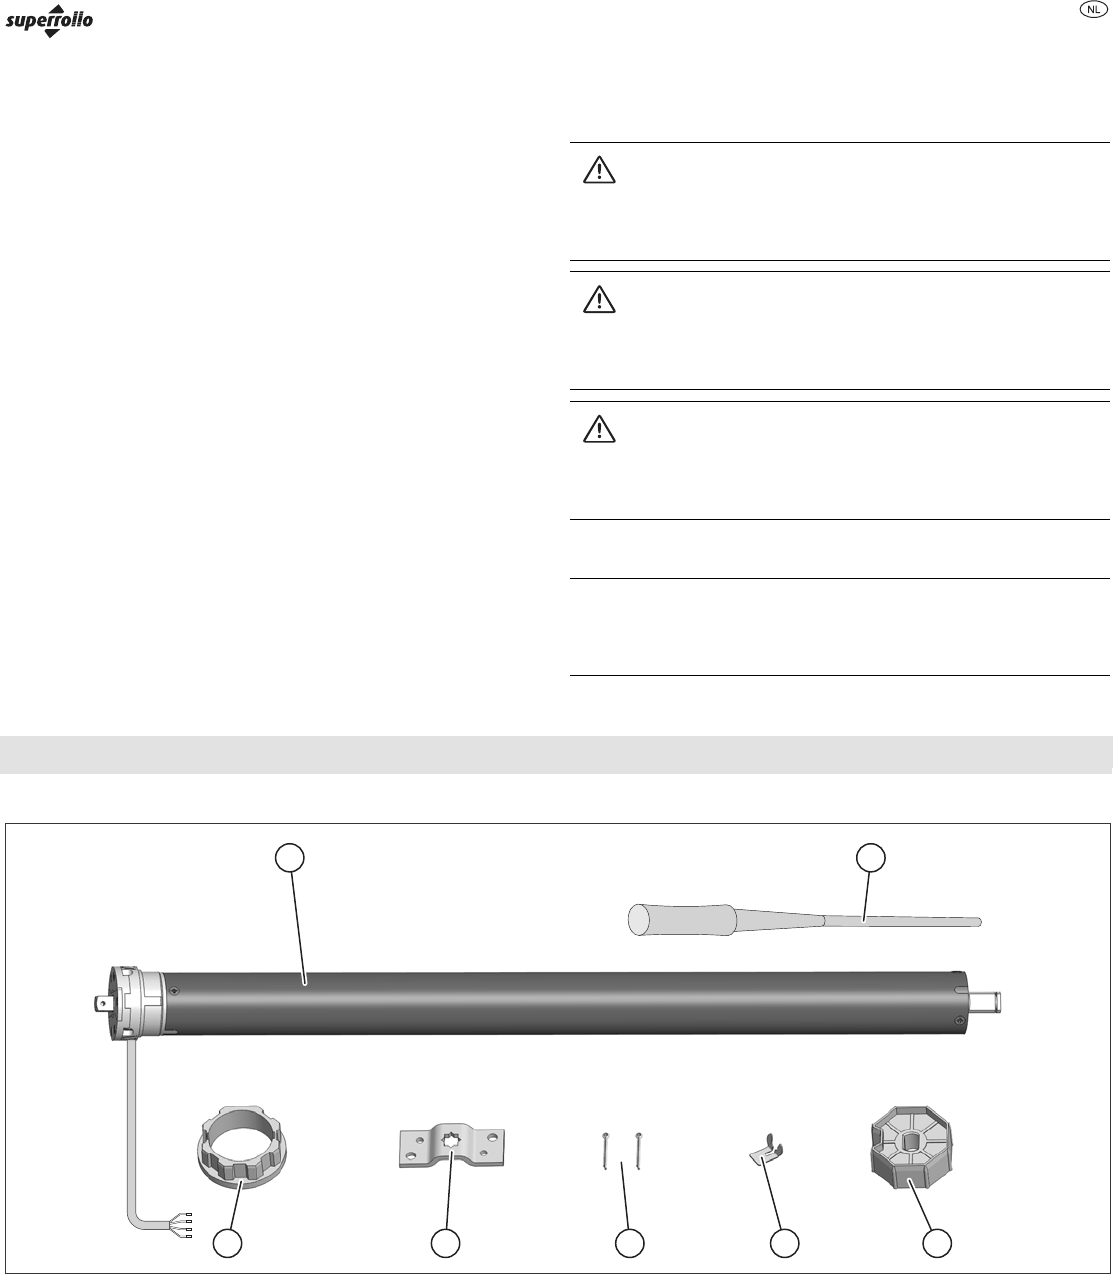
The figure shows the tubular motor in its installation situation. The parts marked * do not form part of the scope of delivery.
Preface
17
Preface
These operating instructions describe the installation, the electrical connection
and the operation of the RM10MS/RM10MM/
RM20MM/RM30MM electronic tubular motors. Read through these operating
instructions carefully prior to installation and initial operation and, in particular,
follow the safety instructions!
These instructions help you to make
■proper,
■safe and
■advantageous
use of the RM10MS/RM10MM/RM20MM/RM30MM electronic tubular motors,
briefly referred to as the motor.
These instructions describe the installation and use of the tubular motor with the
necessary superrollo accessories. The term device is used in these instructions
for the tubular motor in combination with the accessories.
These operating instructions are intended for the following persons:
■Persons who install this device,
■Persons who connect this device,
■Persons who operate this device,
■Persons who maintain this device or
■Persons who dispose of this device.
Each of these persons must have read and understood the entire content of these
operating instructions.
All activities on and with this device may only be carried out to the extent that they
are described in these operating instructions.
The warranty expires in the event of damage caused by non-observance of these
instructions. superrollo accepts no liability for subsequent damage.
Availability
These operating instructions form part of the product. Always store these
operating instructions in the vicinity of the device. Pass the operating instructions
on if you sell the device or forward it an any other manner.
Structural features of these operating instructions
Defined structural features are assigned to the various elements within the
operating instructions. You can therefore easily determine the type of text which
this involves:
Normal text,
Cross references,
DIRECTIONS OF ROTATION OF THE ADJUSTER SCREWS,
■Lists or
¾Action steps.
Notices with this symbol contain information on economical use of the
device.
Basic safety instructions
Proper use
The device is used exclusively for raising and lowering smoothly running roller
shutters and awnings.
Avoiding electric shocks
■Have connection to the mains and all work on the voltage supply carried out by
a qualified, trained specialist electrician only.
■Only connect the device to a 230 V~50 Hz current connection which is fused in
the building.
■Carry out all installation and connection work in voltage-free condition.
■If cables or electrical facilities which are not required are present at the
installation location, remove these or decommission them.
■Before installing the motor, remove all cables and electrical facilities which are
not required for operation or decommission them.
■If you install a switch which is set to OFF as default, install this within visual
range of the tubular motor at a height of between 1.5 m and 1.8 m.
■Install the switch which is set to OFF as default directly on the driving head and
a sufficient distance away from moving parts.
■Route the motor cable internally in the empty tube, observing the local electrical
regulations, up to the junction box.
■In the event of malfunctions, disconnect the device from the mains power
supply.
■Before opening the roller shutter box, disconnect the device from the mains
power supply.
■Prior to cleaning work on the roller shutter, disconnect the device from the
mains power supply.
■Do not store the motor together with acid, alkaline substances or dirty or eroded
materials.
■Make sure that the device does not become moist and is not located in a
vapourous environment during transportation, storage and use.
■Do not use the motor for garage doors in public buildings.
■Do not touch the mains power cable with moist hands.
■Never unscrew the device's housing.
■Never use a defective device. If your device is defective, contact the customer
service.
■In the event of use in damp rooms, observe DIN VDE 0100, Parts 701 and 702.
Avoiding risk of injury
■Make sure that the roller shutter box is closed when the device is in operation.
■Make sure that no persons are located beneath the roller shutter when the roller
shutter is being lowered.
■Make sure that children do not play with the roller shutter control system.
■Make sure that no persons can be injured by the roller shutter slipping down
during installation work.
■Lower the roller shutter completely prior to installation work or support the roller
shutter.
■Only use the device with roller shutters whose weight is appropriate for the
tubular motor. Information on this can be found in the section entitled
Permissible roller shutter areas and weights from page 19
■Regularly check the device for imbalance, damage and worn cables and
springs.
■Only use the device in flawless condition.
■Do not start the motor too frequently, and do not overload it.
■Only turn the adjustment knob or the drive bushing in operating mode.
Description of the device
18
■Use only genuine replacement parts and accessories from superrollo.
Information on this can be found in the chapter entitled Accessories from
page 28
■Make sure that repairs on the device are only carried out by the superrollo
customer service.
■In particular, observe DIN 12045 - additional protective facilities and
terminations for facades and wall openings which are equipped with windows
and French windows.
Avoiding being locked out
■Make sure that you are located inside the building when a door's roller shutter is
automatically closed.
Avoiding damage
■Use the device in dry rooms only.
■Only connect the device to a 230 V~50 Hz current connection which is fused in
the building.
■Use the device with smoothly running roller shutters only.
■Use only genuine replacement parts and accessories from superrollo.
Structural features of the information on dangers
The following categories of information on dangers are contained in these
operating instructions:
DANGER
Notices containing the word DANGER warn of a hazardous
situation which leads to death or severe injuries.
WARNING
Notices containing the word WARNING warn of a hazardous
situation which may possibly lead to death or severe injuries.
CAUTION
Notices containing the word CAUTION warn of a situation which
leads to slight or moderate injuries.
Structural features of notices regarding material and
environmental damage
ATTENTION
These notices warn of a situation which leads to material or
environmental damage.
Description of the device
Scope of delivery
12
34567
8 Tubular motor ?2 x cotter pin
9 Adjustment tool > Drive bearing
A Driver = Adapter
@ Securing clip
Installing the
device
19
Functions
The device can be used to open and close roller shutters and awnings.
In order to carry out these functions, the tubular motor must be installed together
with the following superrollo accessories in the roller shutter box:
■Winding shaft
■Roller capsule
■Ball bearing
■Counter bearing
■Securing springs.
Information on the superrollo accessories can be found in the chapter entitled
Accessories from page 28.
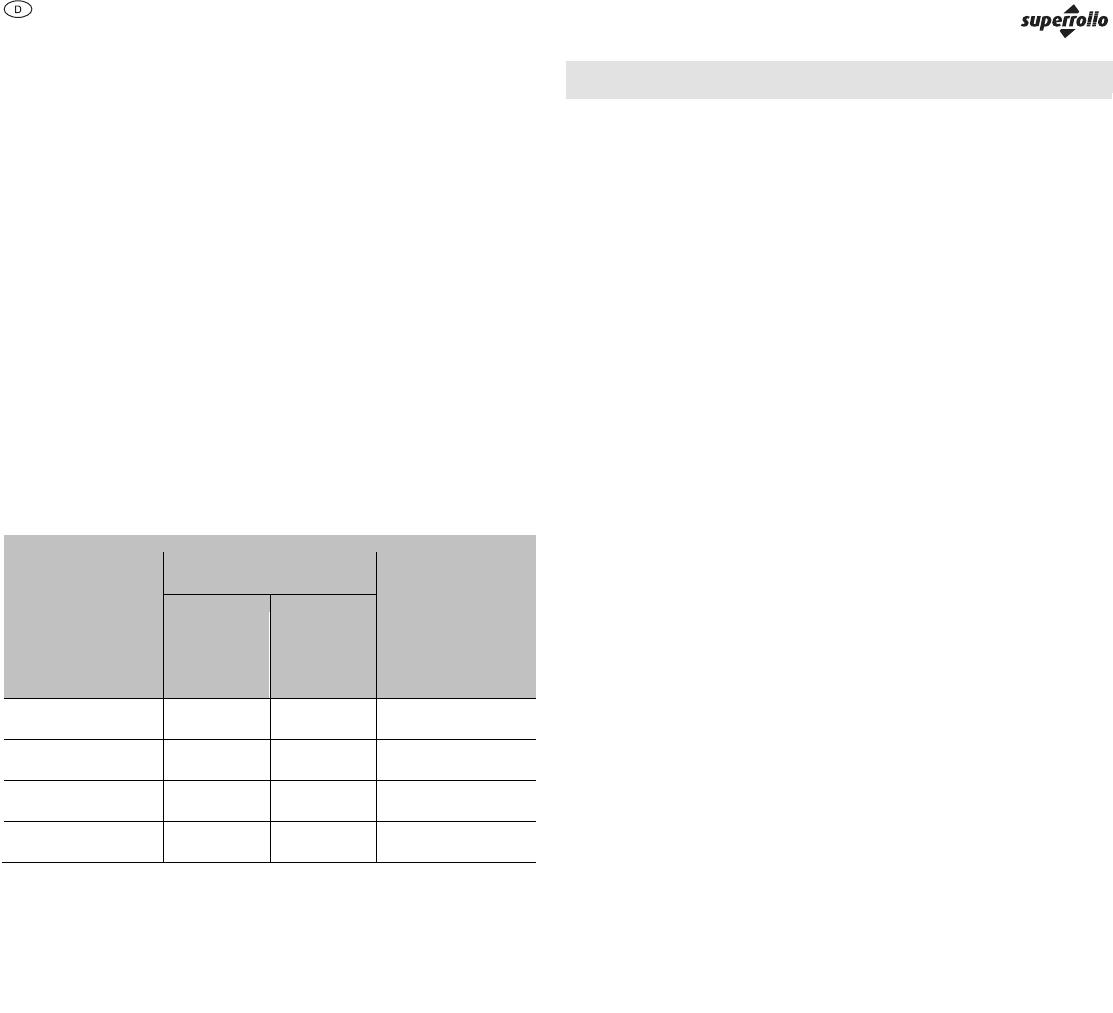
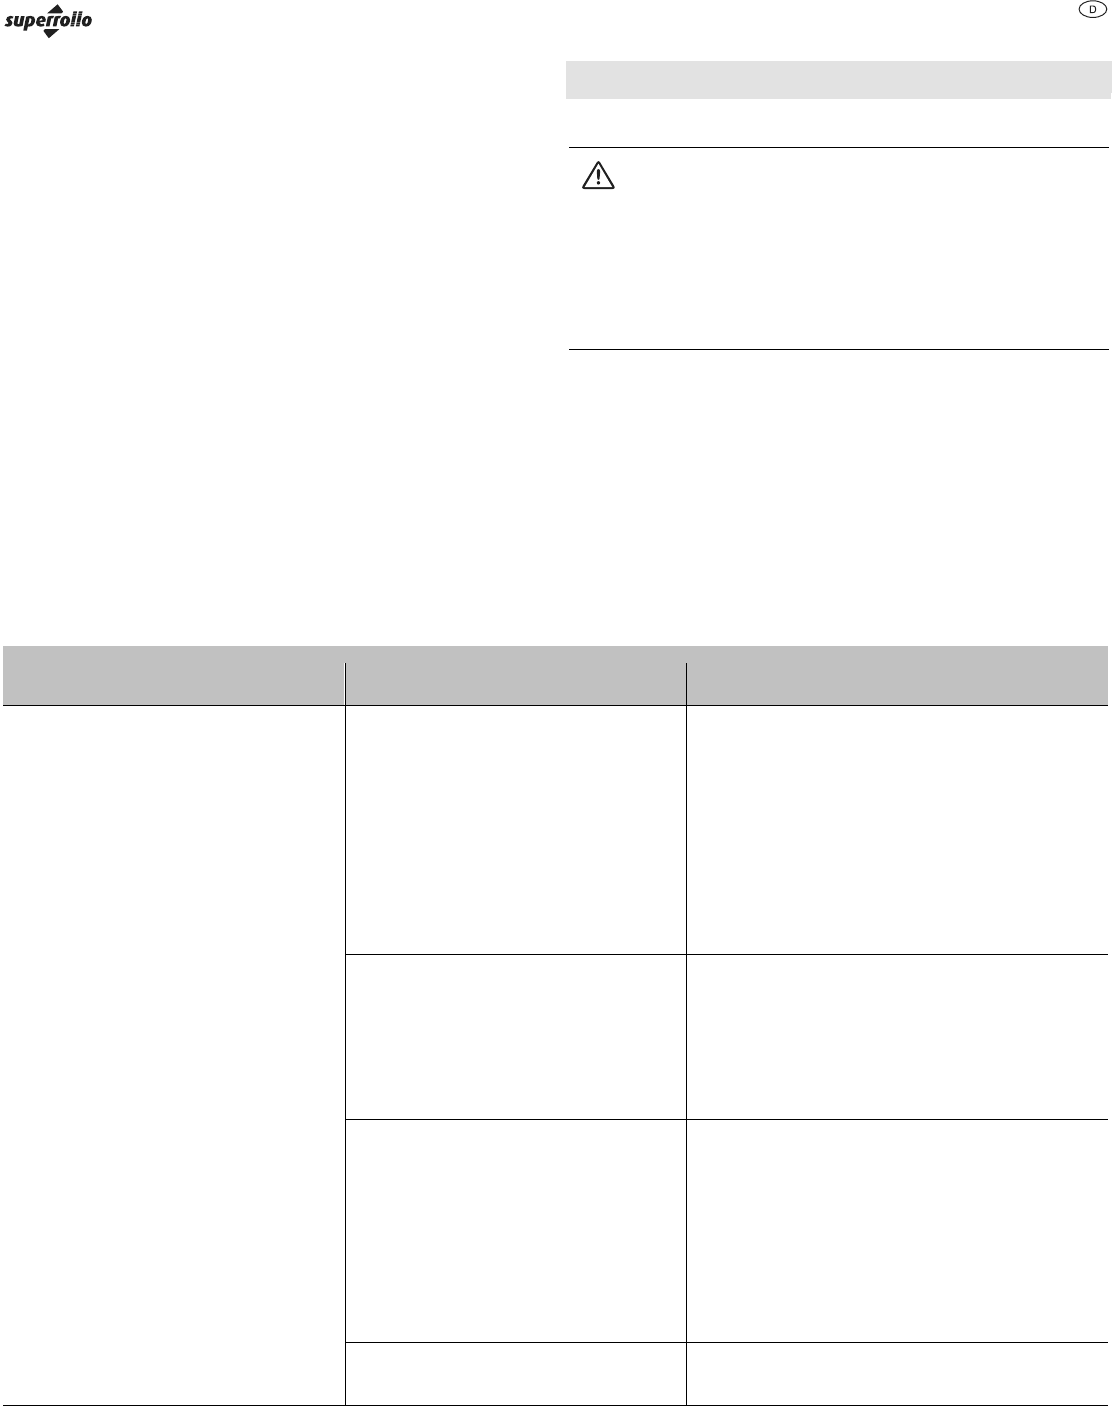
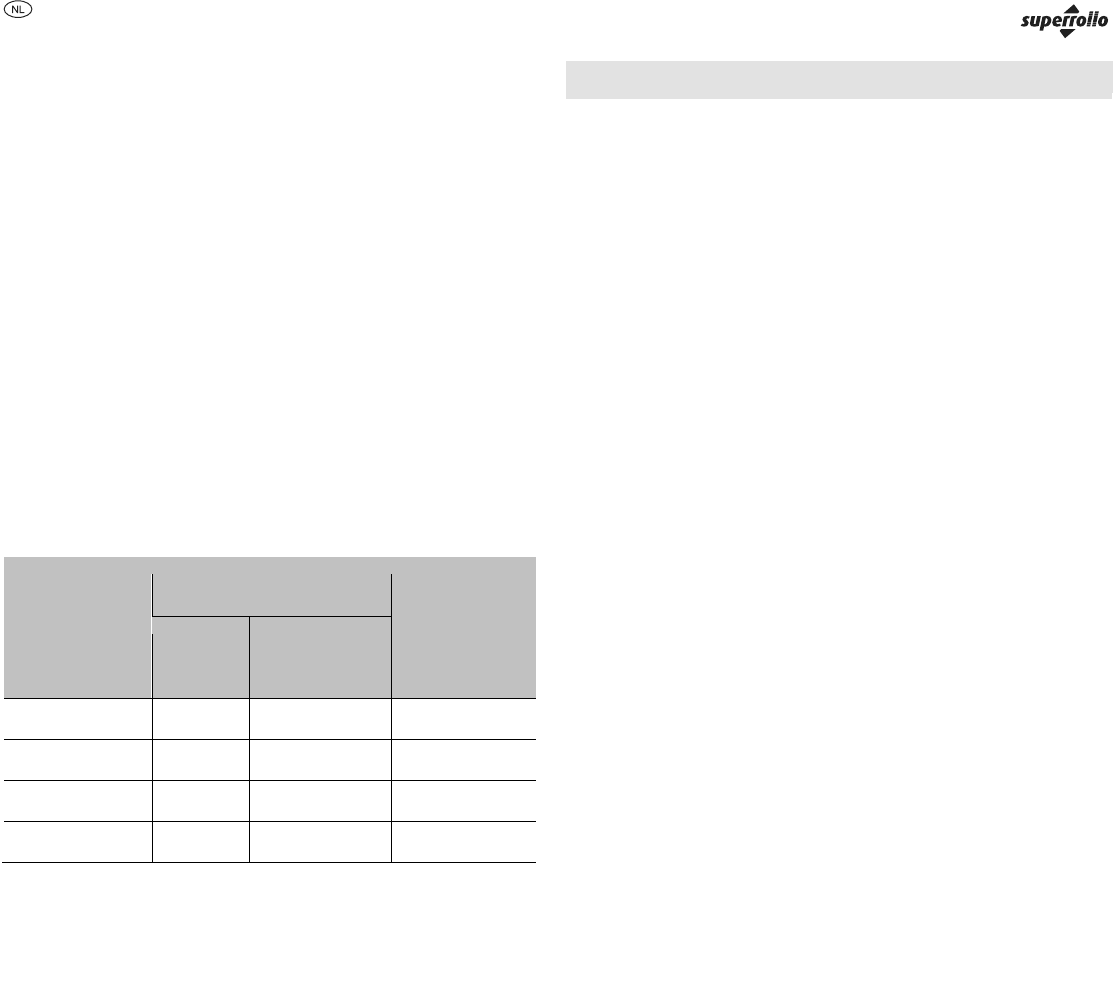
Permissible roller shutter areas and weights
The following table shows the roller shutter area permissible for the relevant motor
depending on the profile weight. The maximum roller shutter weight is additionally
listed.
Article No. Max. roller shutter area (m²) Max. roller
shutter weight
(kg)
4 kg/m²
(plastic)
7 kg/m²
(aluminium/wood)
RM10MS 4.2 2.8 22
RM10MM 4.2 2.8 22
RM20MM 8 5 44
RM30MM 12 8 66
¾Make sure that the maximum roller shutter area and the maximum roller shutter
weight are not exceeded.
Safety functions
The tubular motor is designed for short-term operation (four minutes). In order to
avoid damage to the motor, the motor shuts off automatically on exceeding this
period of time or in the event of frequent switching.
Safety shut-off may be attributable to various causes. Before the device is started
up again, you may have to rectify the cause. Information on possible causes and
their rectification can be found in the chapter entitled Rectifying malfunctions from
page 24.
¾Rectify the cause if necessary.
¾Allow the motor to cool for approx. 20 minutes.
If function remains impossible following these measures, contact the superrollo
customer service.
Installing the device
Prior to installation
The following prerequisites must be met in order to be able to install the device:
■The roller shutter box cover must be easily accessible and removable.
■A 230 V~50 Hz current connection with an isolating facility (fuse) in the building
must be available at the installation location.
■The weight of the roller shutter must be appropriate for the tubular motor.
Information on the permissible roller shutter weight can be found in the section
entitled Permissible roller shutter areas and weights from page 19.
■The required superrollo accessories must be available. Information on the
superrollo accessories can be found in the chapter entitled Accessories from
page 28.
¾Check the scope of delivery for damage.
¾Do not operate the device if you discover damage on the device.
¾If damage is discovered on the device, contact the superrollo customer service.
Required tools
The following tools and fasteners are required to install the device:
■Folding meter rule or measuring tape
■Pencil
■Spirit level
■Metal cutting saw
■File
■Drill
■8 mm masonry drill bit
■8 mm plugs
■Screws
■Phillips screwdriver
■Enclosed adjustment tool.
Installing the bearings
The motor's driving head can be installed on the right- or left-hand side of the
roller shutter box. Installation on the right-hand side is described in these
instructions.
The following points must be observed when installing the bearings:
■The bearings must be aligned horizontally.
■The roller shutter must be able to run vertically in the guide rail.
■The roller shutter curtain must have sufficient space on all sides when rolled up
in the roller shutter box.
■The tubular motor adjuster screws must be easily accessible following
installation.
■In order to allow water to drip off, the motor cable must be routed downwards in
a loop directly before the motor.
Installing the device
20
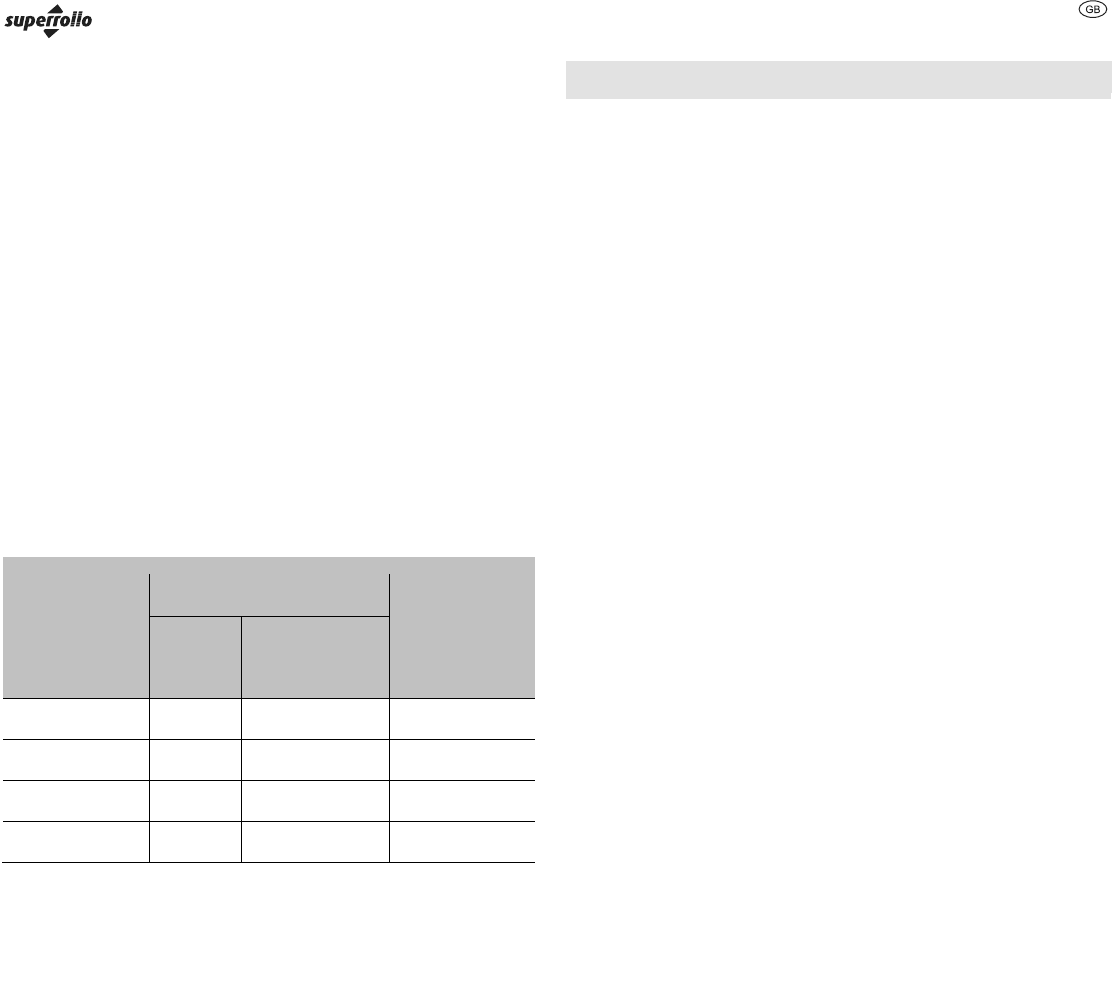
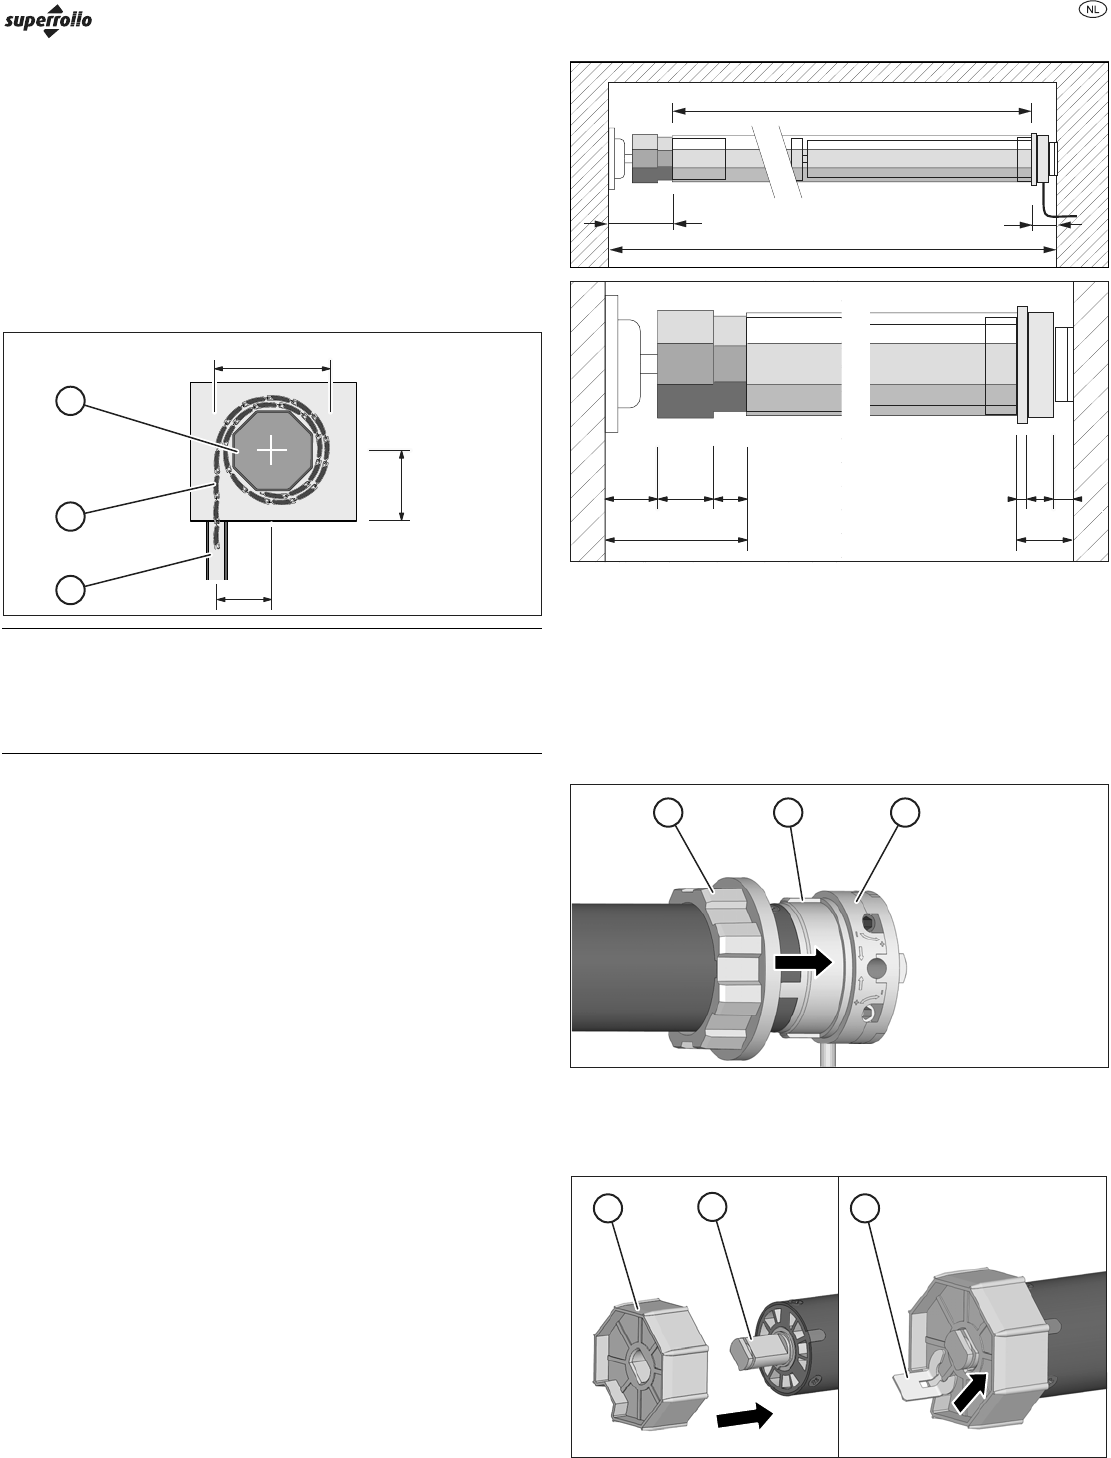
In order to determine bearing position P in the roller shutter box, measure and
calculate the following dimensions:
DDiameter of the rolled up roller shutter
XD/2Distance between the bearing position P and the
centre of the guide rail (3)
Y>XDistance between the bearing position P and the
bottom of the roller shutter box. So that the roller
shutter has sufficient clearance, Y must be greater
than X.
D
X
Y
1
2
3
P
ATTENTION
Damage to the tubular motor due to the roller shutter being rolled
up slanted.
¾Make sure that the device is installed horizontally.
¾Using a pencil, mark the bearing positions P on the right and left inner sides of
the roller shutter box.
¾Make sure that the marks are aligned horizontally.
¾Hold the bearings centrally on the marks.
¾Mark the holes to be drilled using a pencil.
¾Drill the holes using an 8 mm drill bit.
¾Insert the plugs.
¾Screw the bearings down tightly.
Sawing the winding shaft to length
In order to determine the length L of the winding shaft, measure and calculate the
following dimensions:
AClear width of the roller shutter box
Bb1+b2+b3
b1Depth of the counter bearing
b2Width of the roller capsule limit stop
b31/3 of the roller capsule shaft length
Cc1+c2+c3
c1Depth of the adapter limit stop
c2Depth of the driving head
c3Depth of the drive bearing
LA-(B+C)
L
B
C
A
b1c1c2c3b2
b3
BC
¾Using a pencil, mark the length L on the winding shaft.
¾Saw the winding shaft to length at a right angle using a metal cutting saw.
¾Deburr the inner and outer edges using a file.
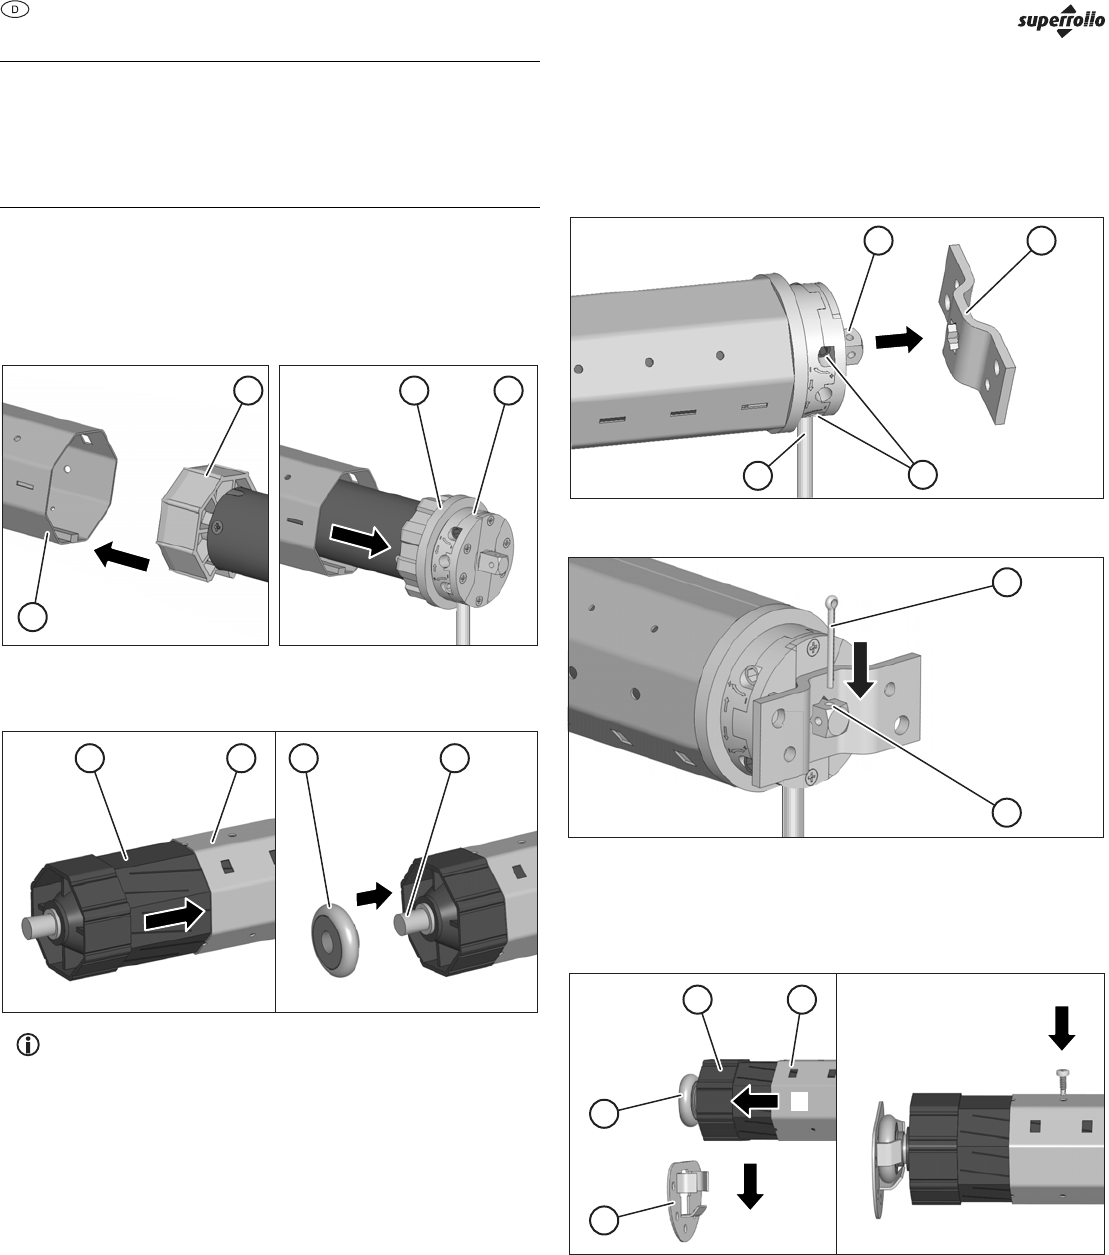
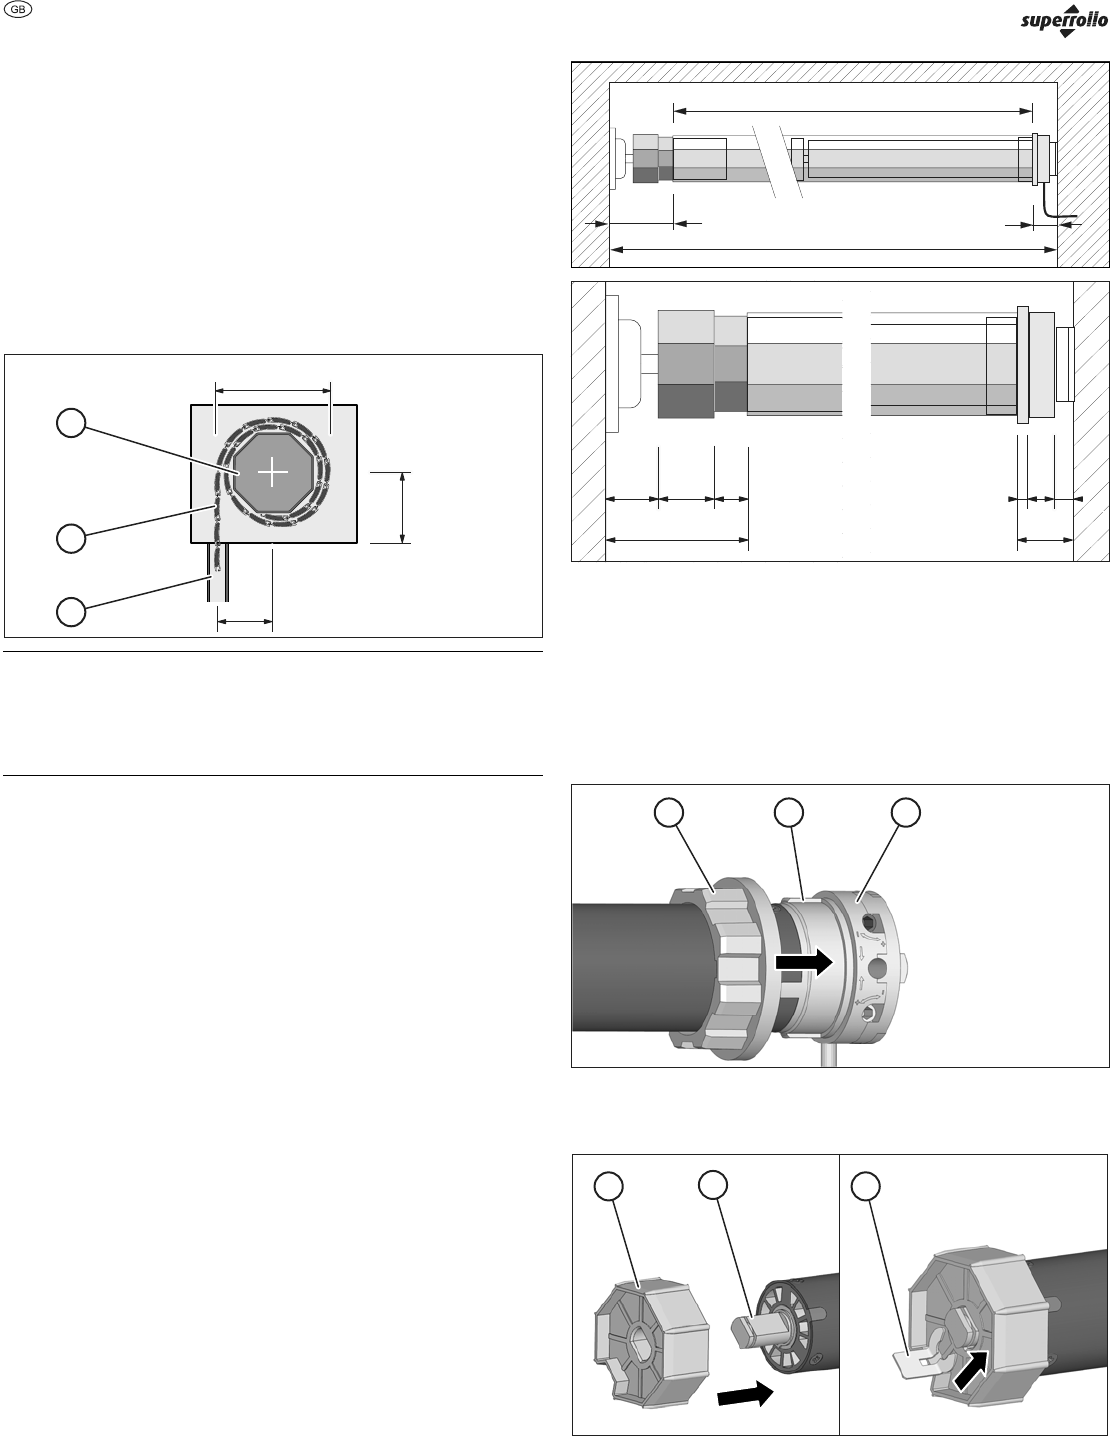
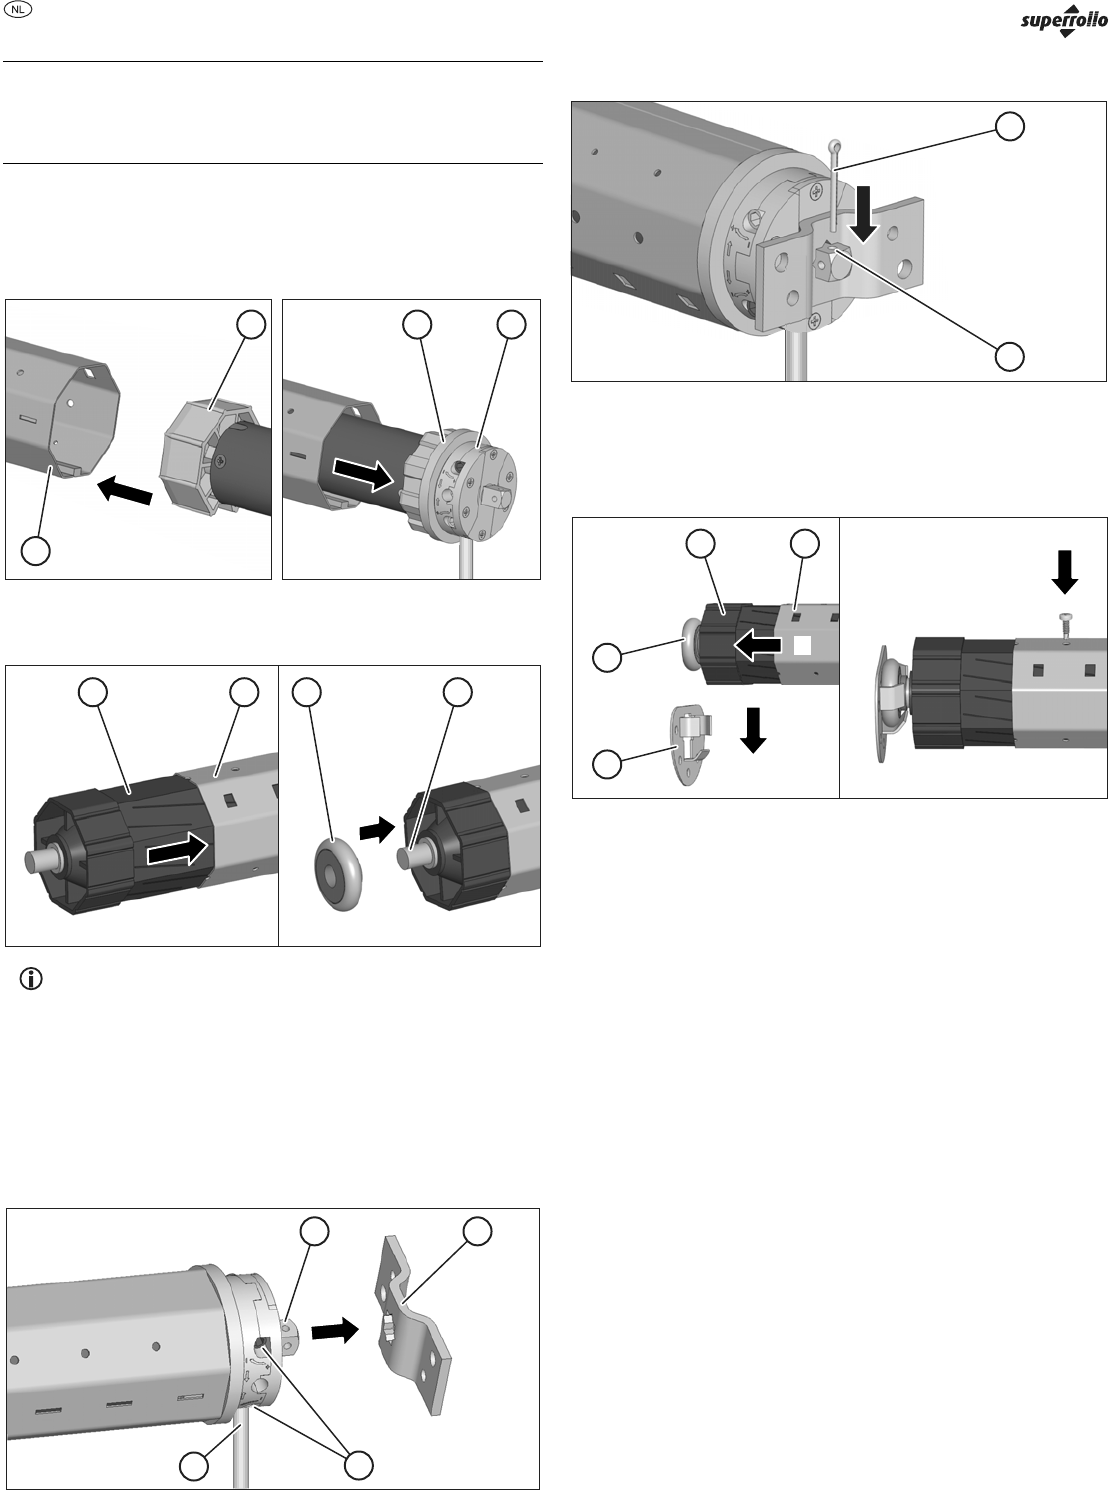
Assembling the device
¾Slide the adapter (1) with the groove over the limit ring (2) spring on the driving
head (3).
123
¾1. Slide the driver (1) up to the limit stop onto the tubular motor's axle pin (2).
¾2. Secure the driver with the enclosed securing clip (3).
1
1.2.
2
3
Installing the
device
21
ATTENTION
Damage to the tubular motor due to forcefully driving into the
winding shaft.
¾Never drive the tubular motor into the winding shaft using force.
¾1. Slide the tubular motor with the driver (1) into the winding shaft (2).
¾2. Slide the winding shaft up to the adapter's limit stop (3) on the driving head
(4).
¾Make sure that the adapter does not slip from the driving head limit ring.
134
2.1.
2
¾1. Slide the roller capsule (1) up to the limit stop in the winding shaft (2).
¾2. Place the ball bearing (3) onto the roller capsule axle pin (4).
134
2.1.
2
In order to be able to install the device in the roller shutter box, the roller
capsule must first be inserted up to the limit stop into the winding shaft. It
is then pulled out until the device fits precisely into the roller shutter box.
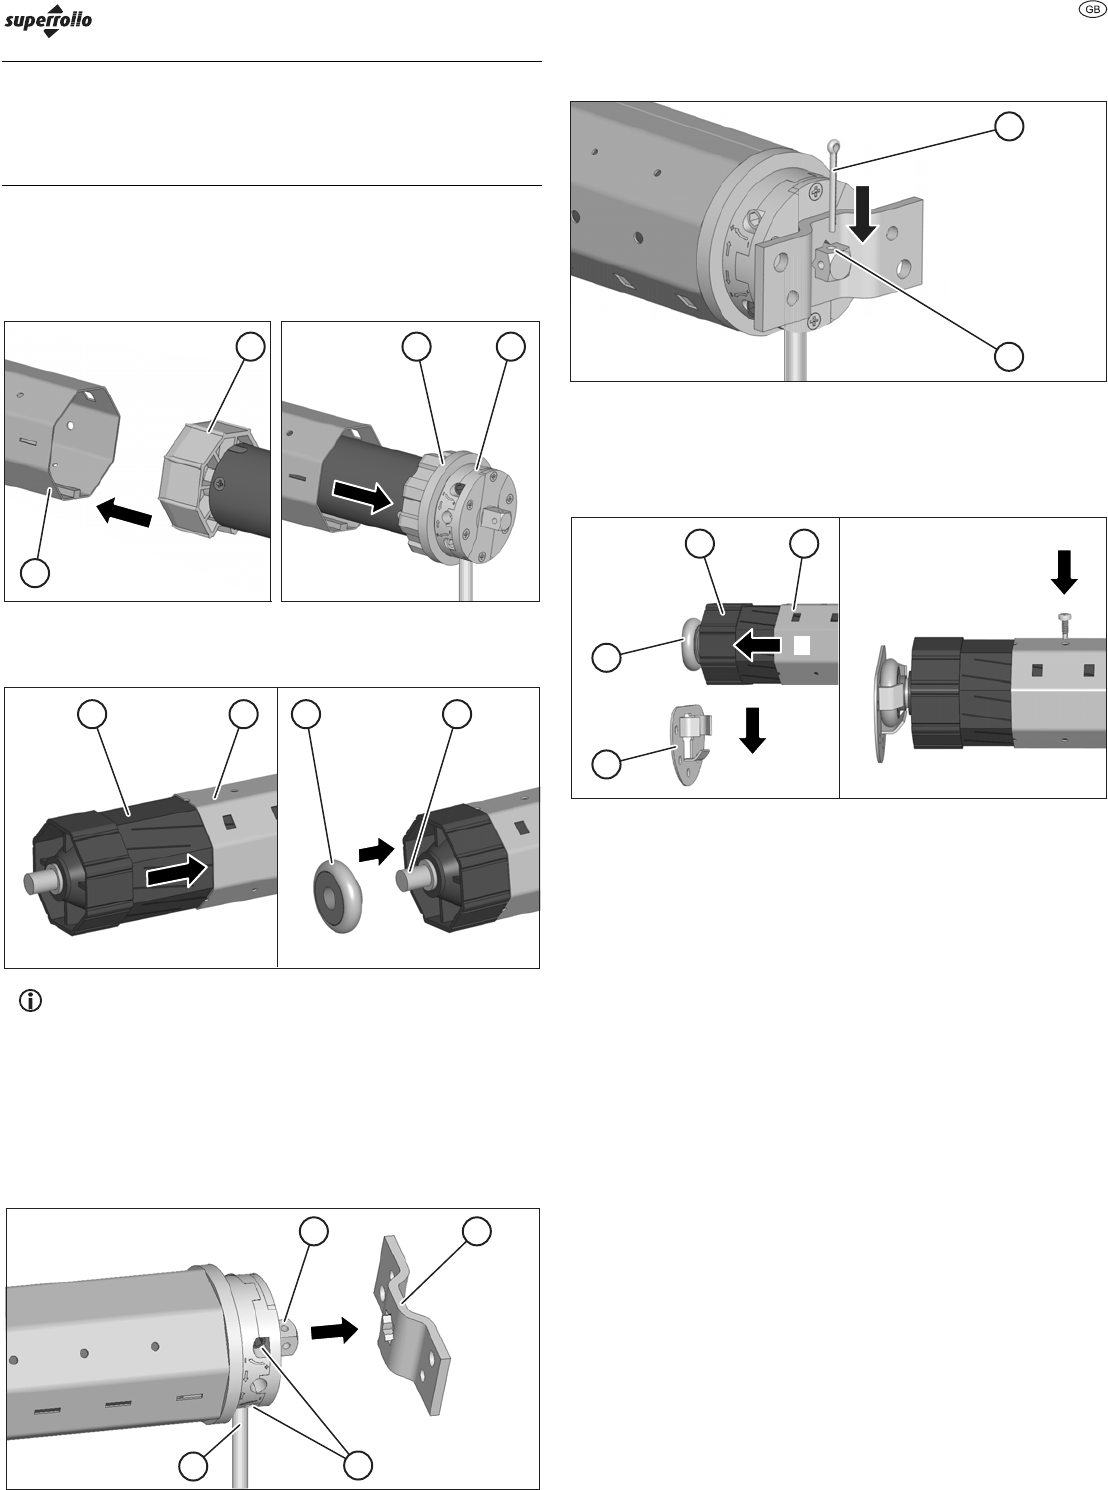
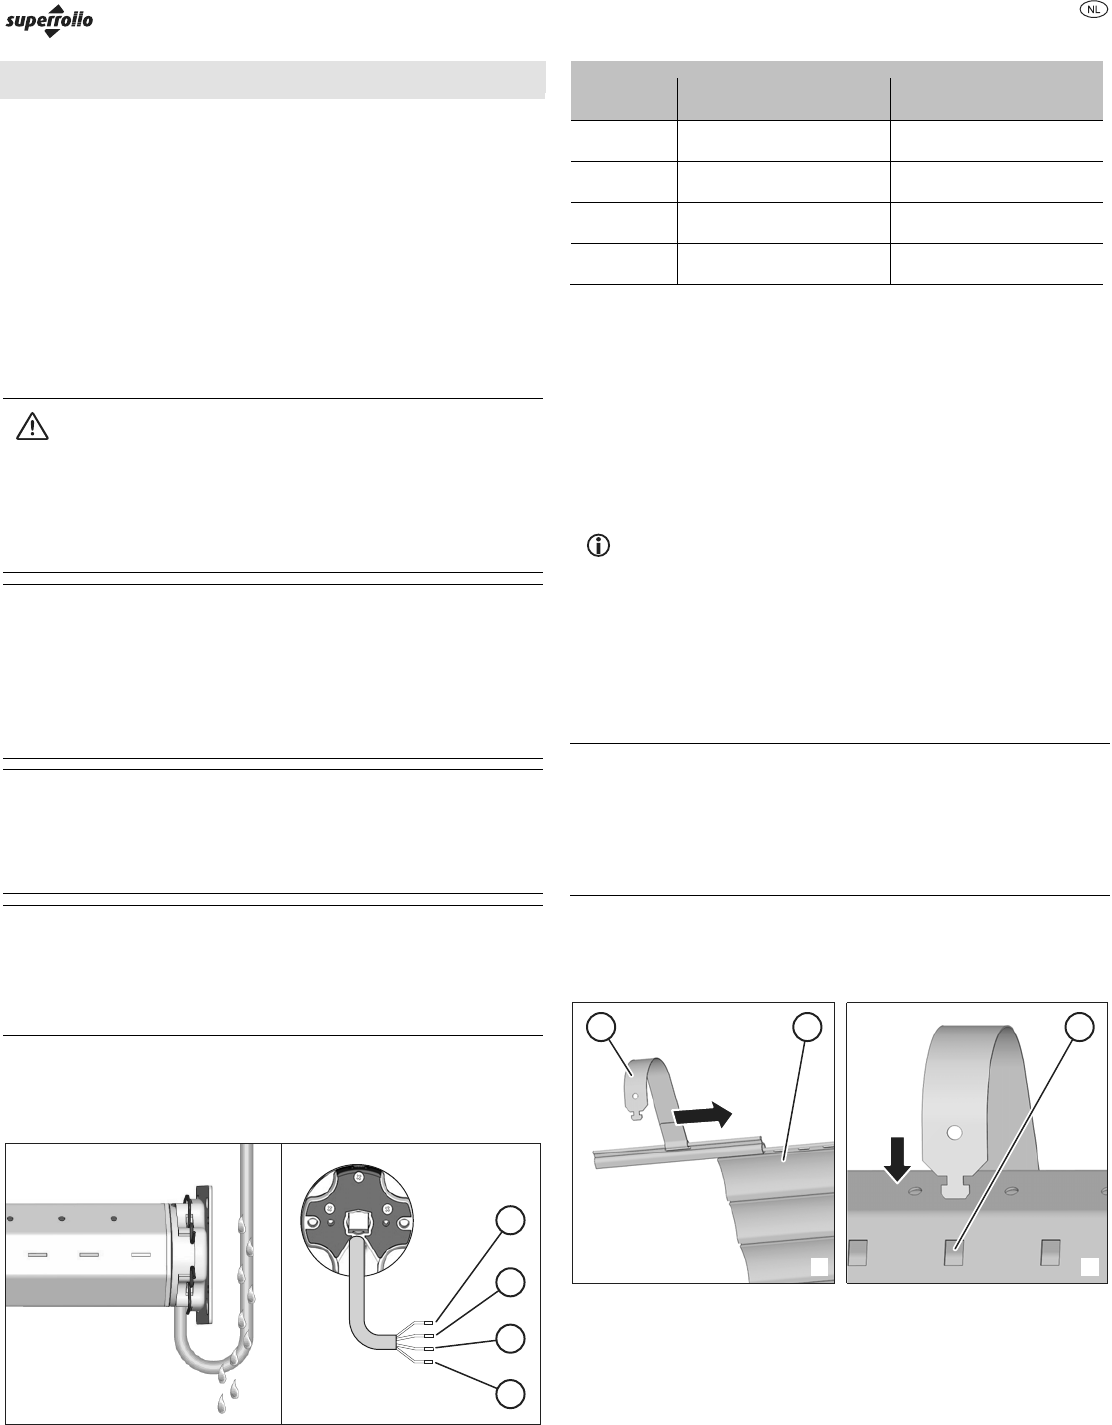
Installing the device in the roller shutter box
¾Insert the driving head axle pin (1) into the hole in the drive bearing (2).
¾Make sure that the adjuster screws (3) are accessible.
¾Make sure that the motor cable (4) is routed downwards.
12
3
4
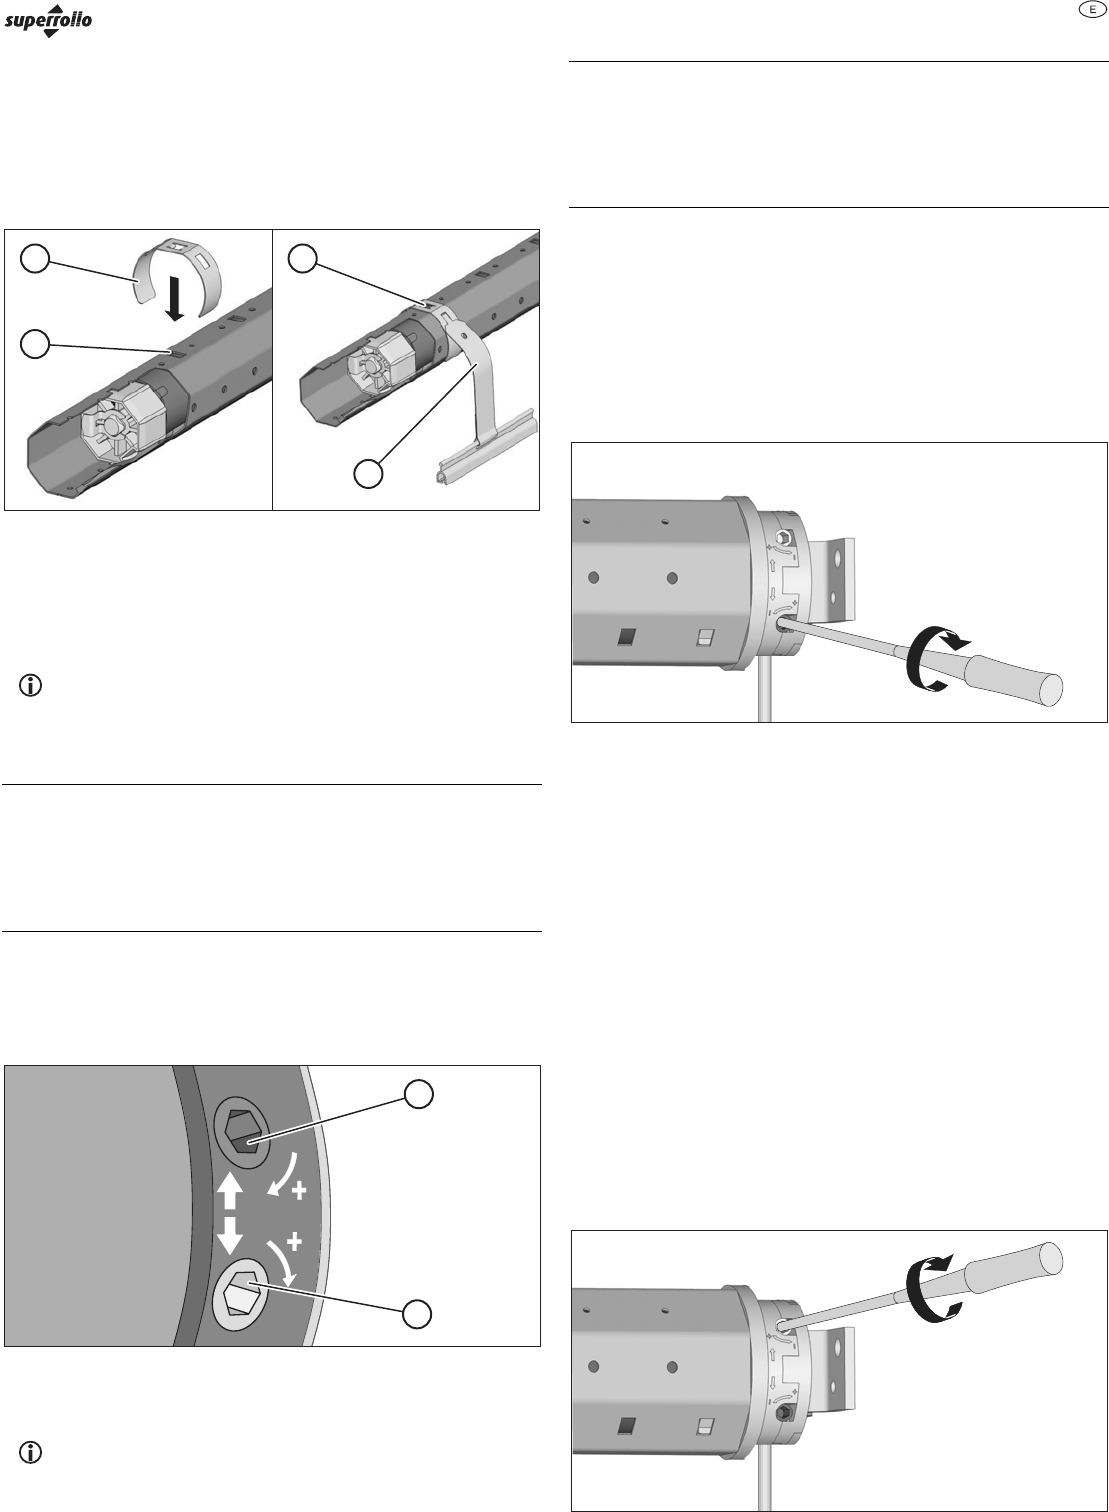
¾Insert the cotter pin (1) through the securing hole (2) in the axle pin.
1
2
¾1. Pull the roller capsule (1) out of the winding shaft (2) until the ball bearing (4)
fits into the counter bearing (3).
¾2. Insert the ball bearing into the counter bearing.
¾3. Screw the winding shaft down tightly on the roller capsule.
1
1.
3.
2.
3
4
2
¾Make sure that the winding shaft is installed horizontally.
Starting up the device
22
Starting up the device
Before the device can be used, the following steps must be carried out:
■Connect the motor cable to the intended junction or switch box
■Carry out a test run
■Mount the roller shutter curtain on the winding shaft
■Set the upper and lower terminal stop point.
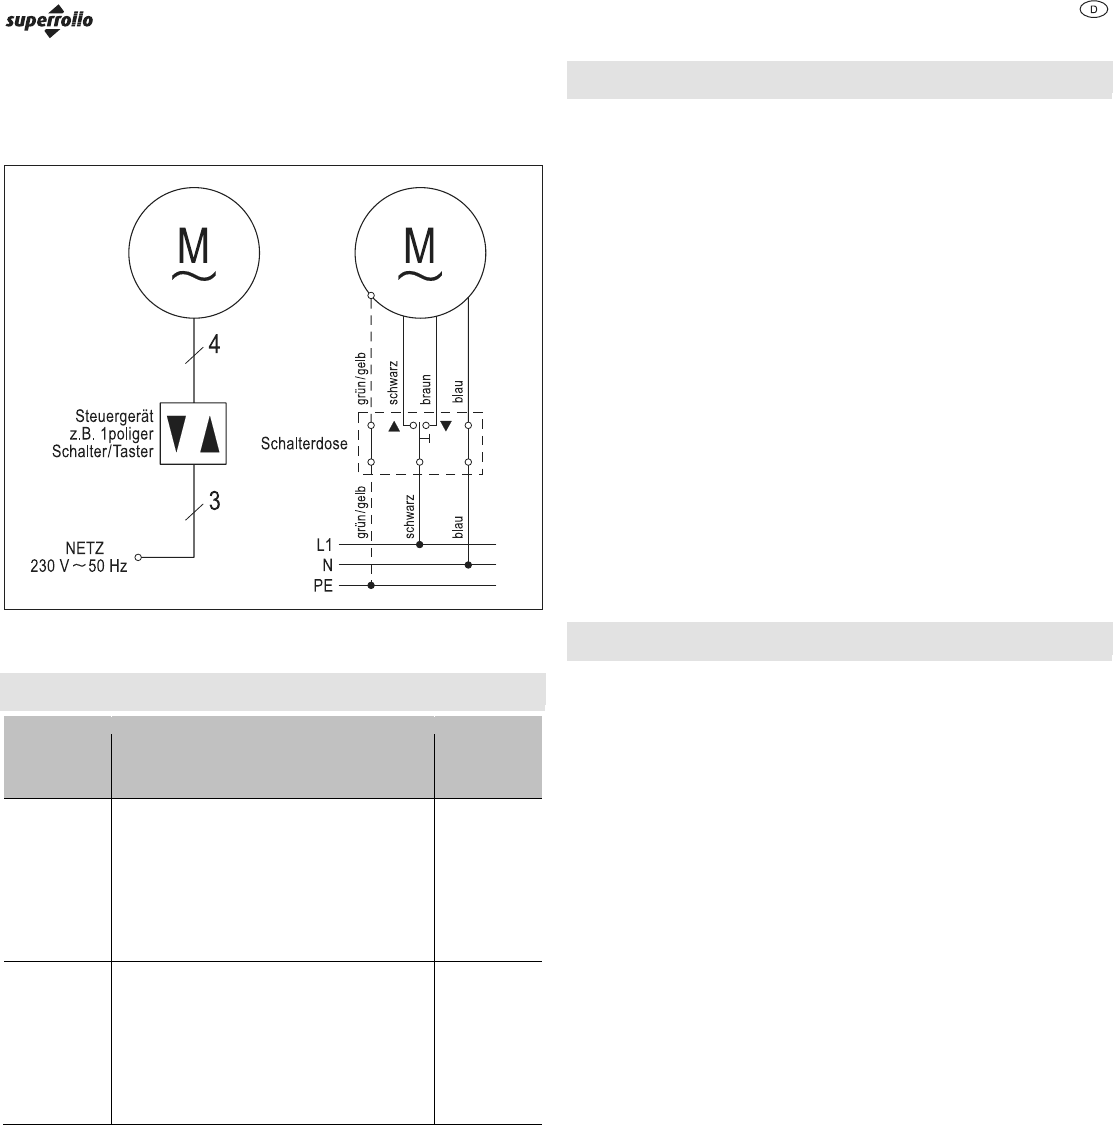
Connecting the device
Connection of the tubular motor to the mains power and all work on electrical
systems may only be carried out by a certified specialist electrician according to
the connection schematics contained in these instructions.
DANGER
Fatal electric shock due to coming into contact with live
components.
¾Do not carry out any connection work on the device when it is
connected to the current supply.
¾Make sure that the device is disconnected from the mains power
supply.
ATTENTION
Malfunctions or damage to the motor due to incorrect mains
voltage.
¾Compare the information on the model plate with that of your local
mains power supply.
¾Make sure that the device is only connected to a 230 V ~ 50 Hz
mains power supply.
ATTENTION
Short-circuit due to damaged cables.
¾Make sure that the cable cannot be damaged by moving parts in
the roller shutter box.
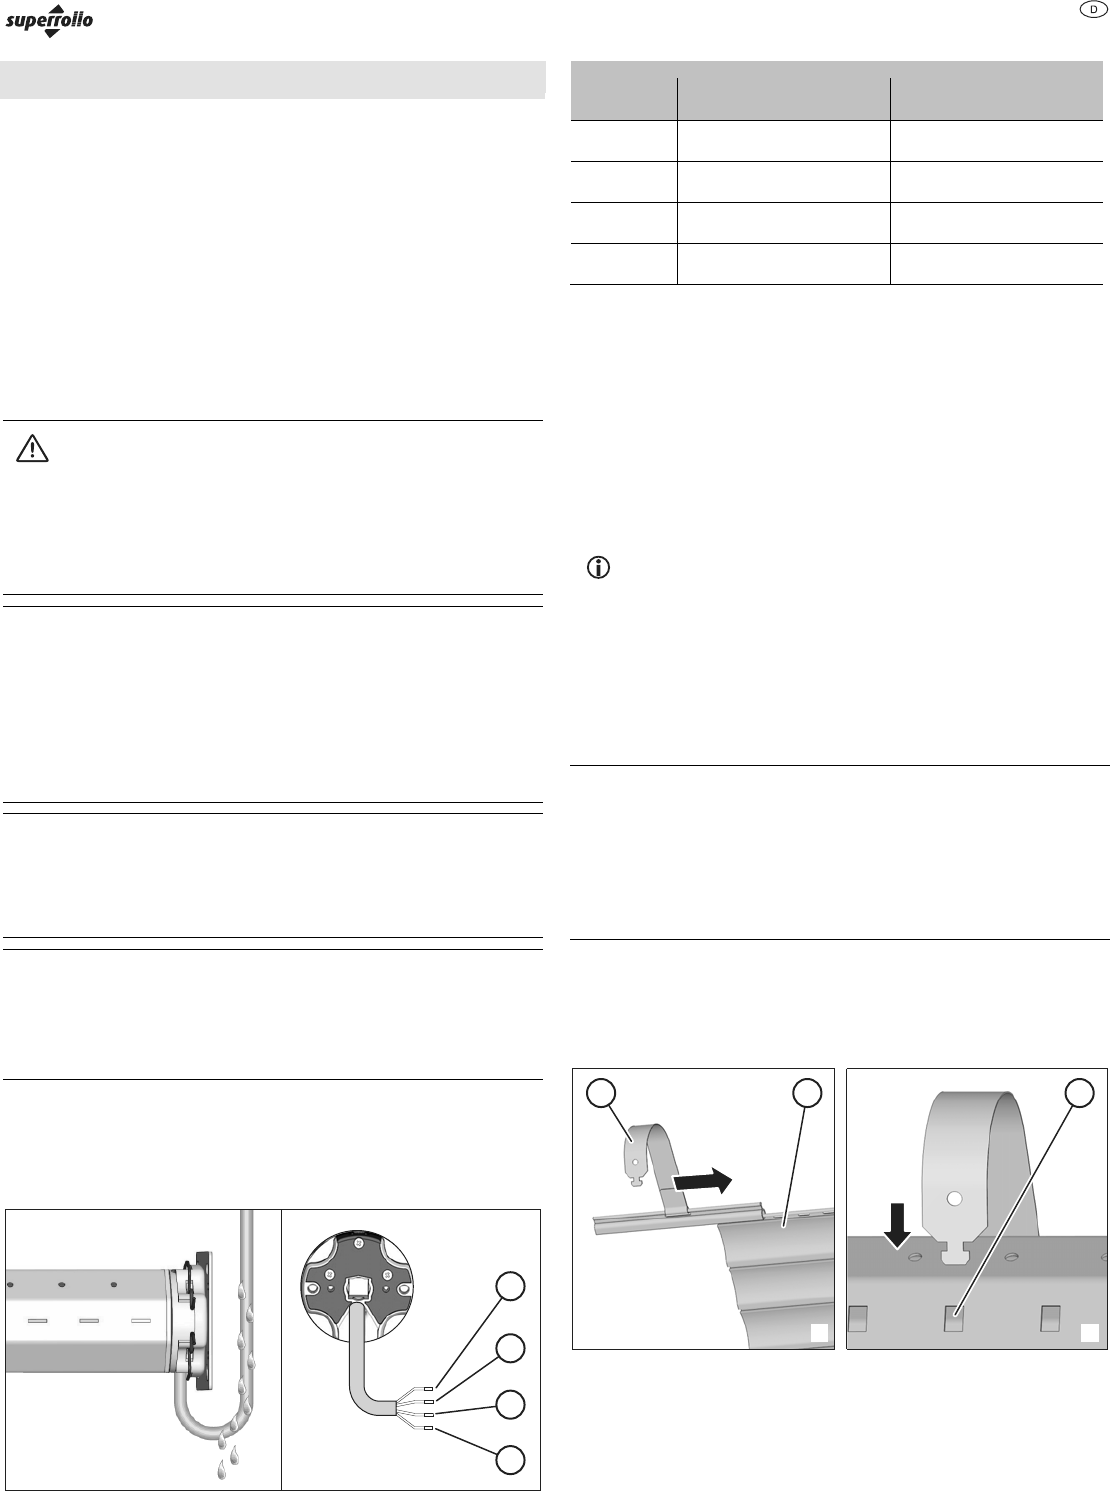
ATTENTION
Short-circuit due to water in the motor on routing cables
incorrectly.
¾Never route the cable vertically upwards.
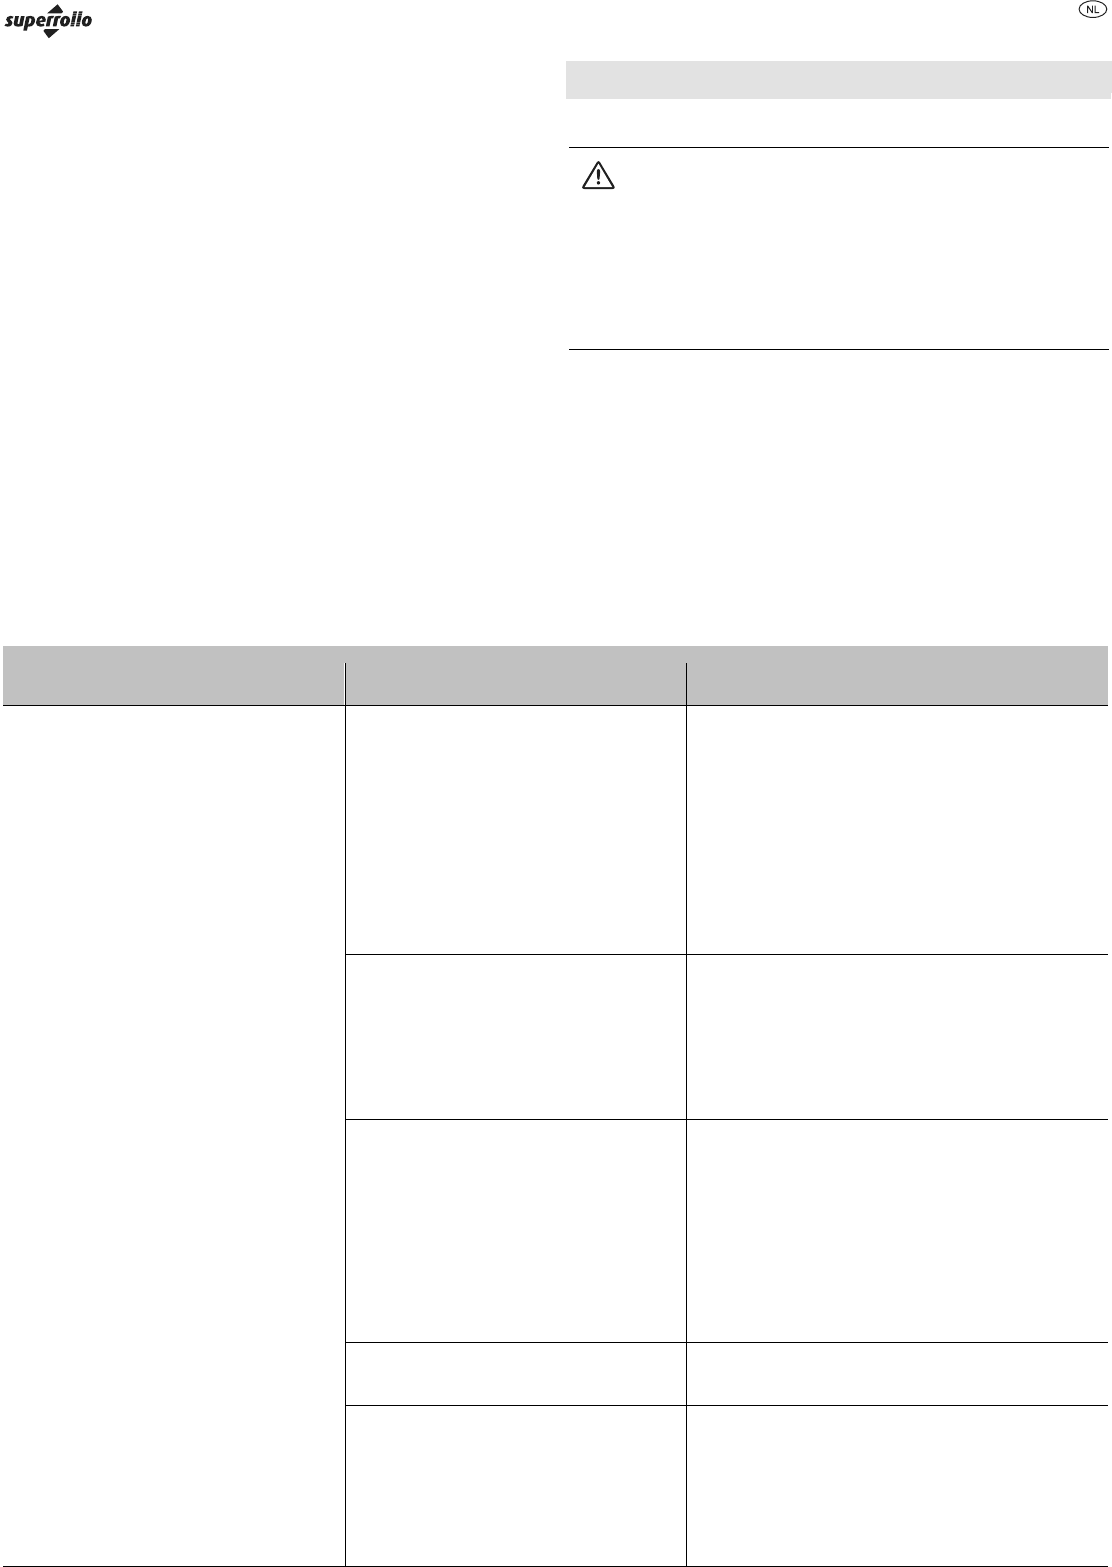
¾Always route the cable in a loop.
Routing the cable in a loop enables the water to drip off (1.).
¾Connect the motor cable to the junction or switch box (2.) intended for this
purpose.
1
2.1.
2
3
4
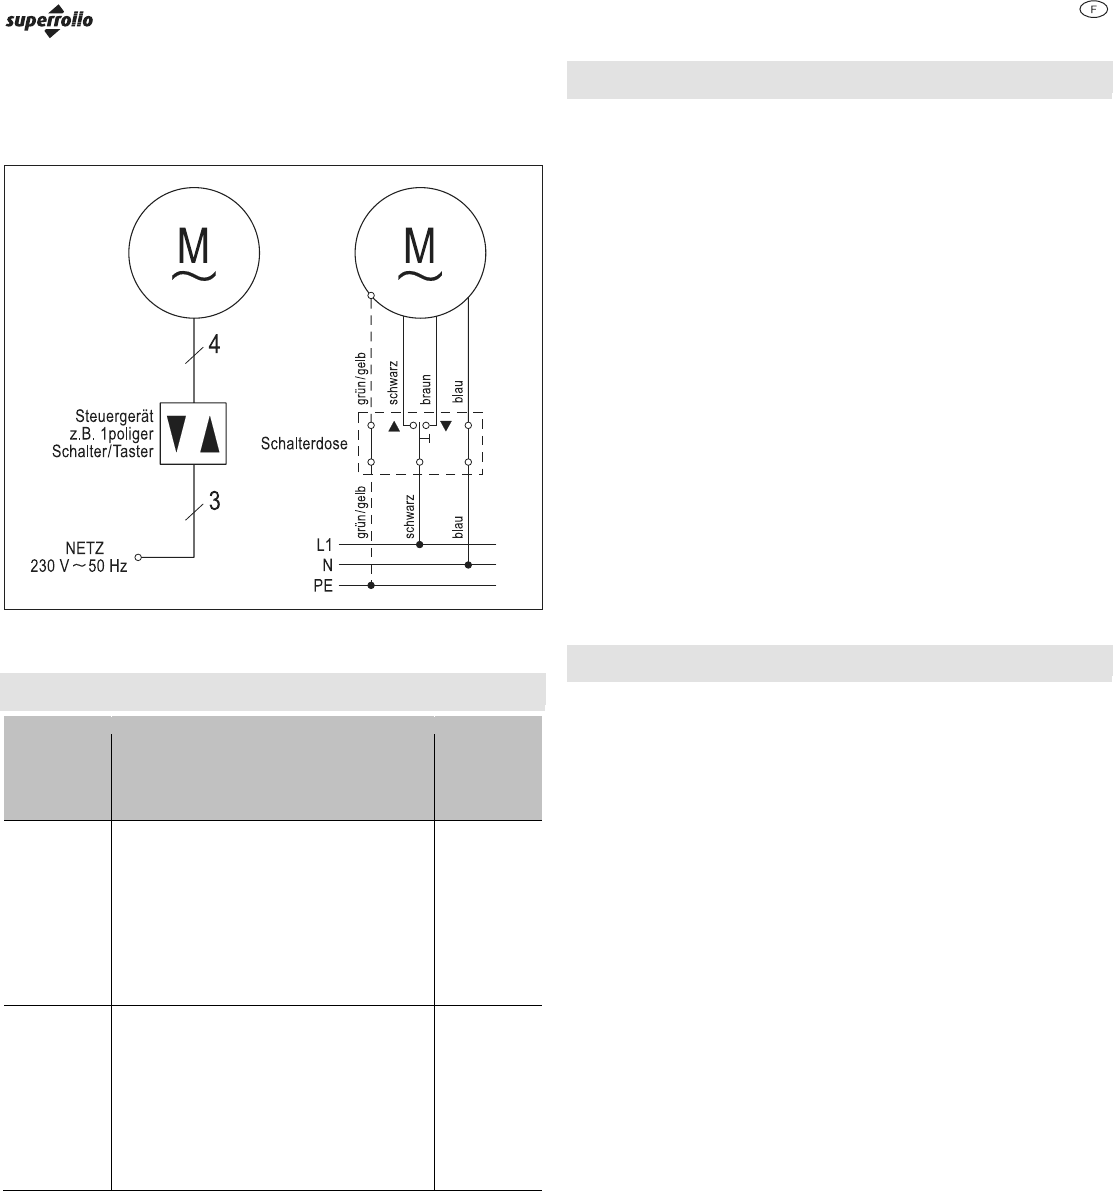
Item No. Motor cable wire colour Function
1 Black Direction of rotation 1
2 Brown Direction of rotation 2
3 Blue Neutral conductor
4 Green/yellow Earth
Carry out a test run to check whether the motor's direction of rotation corresponds
to the switch position.
¾Operate the motor to lower the roller shutter.
¾Check whether the motor runs in the downwards direction.
If the motor does not run in the downwards direction, the cable assignment must
be changed.
¾Swap the motor cable's brown wire over with the black wire.
¾Make sure that the direction of rotation corresponds to the switch position.
In order to connect the device to a single-pin roller shutter switch,
observe the installation plan on page 28.
Installing the roller shutter curtain
The following prerequisites must be met in order to be able to install the roller
shutter curtain:
■The roller shutter curtain must lie in the guide rail.
■The tubular motor must be run all the way down.
ATTENTION
Damage to the tubular motor due to drilling or screwing.
¾Never drill or screw the winding shaft in the area of the tubular
motor.
¾Use only the holes available in the winding shaft to secure the roller
shutter curtain.
¾1. Approx. every 40 cm, slide a securing spring (1) onto the top slat of the roller
shutter curtain (2).
¾2. Insert the securing springs into the rectangular holes (3) in the winding shaft.
2
1.2.
13
Starting up
the device
23
If SW40 winding shafts with exterior fold are used, attaching clips are additionally
required.
¾1. Approx. every 40 cm, slide an attaching clip (1) over the winding shaft (2)
from above.
¾2. Insert the securing springs (4) into the rectangular holes in the attaching clips
(3).
13
4
2
1.2.
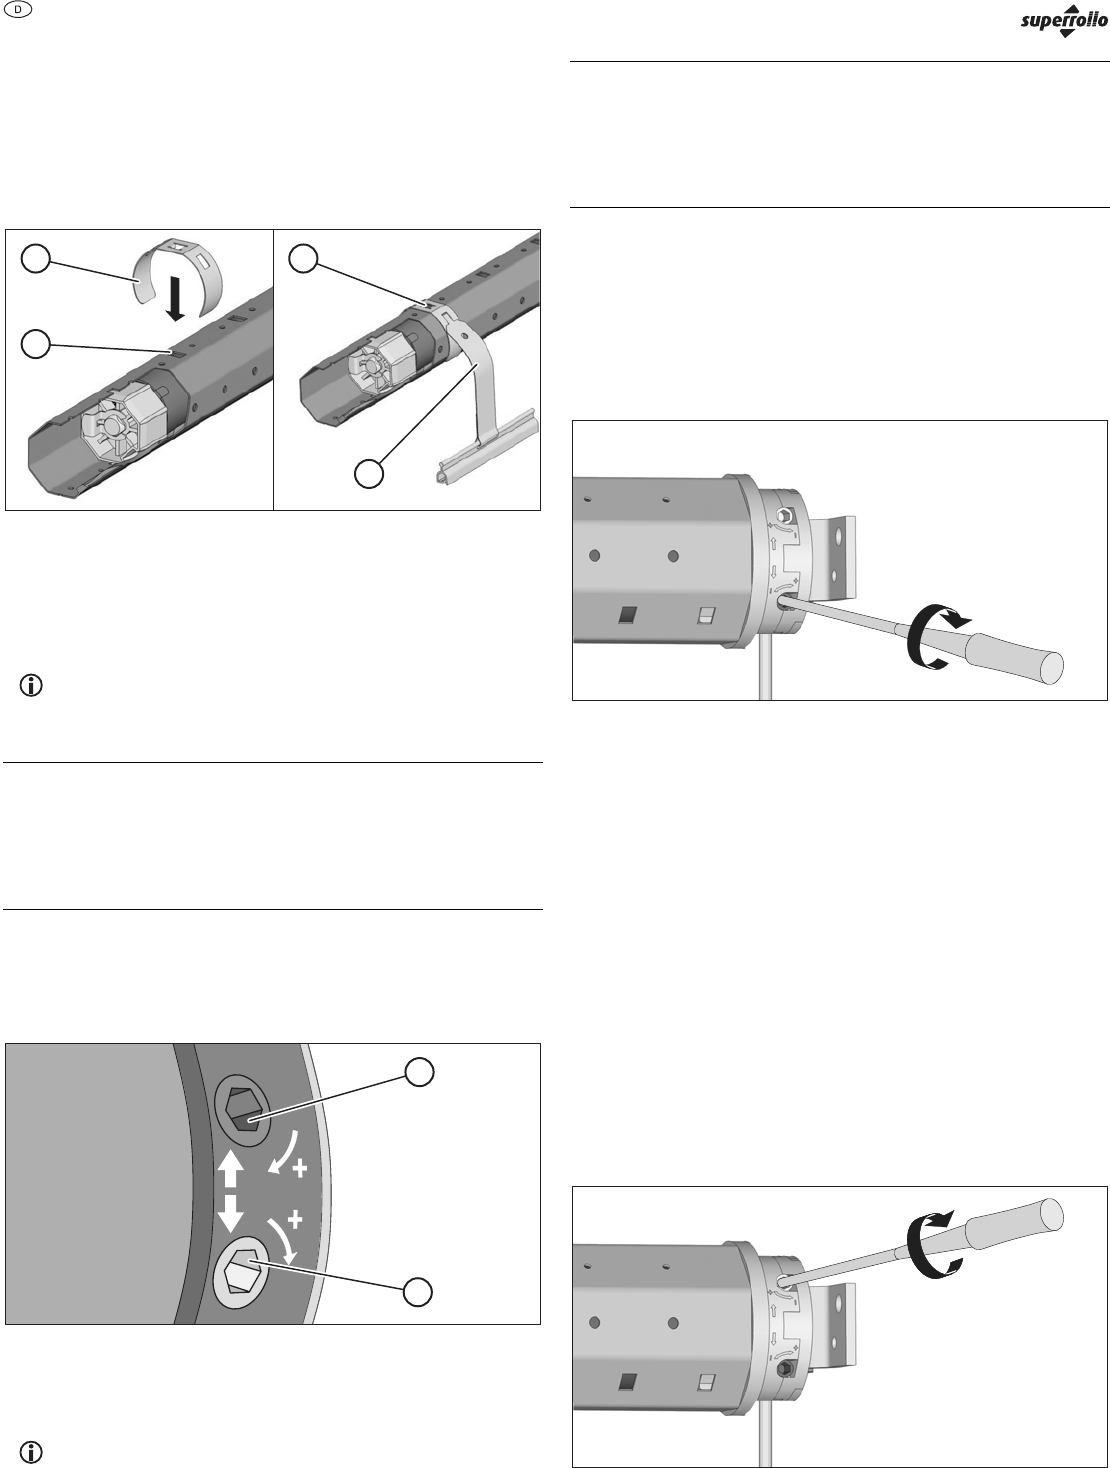
Setting the terminal points
Setting the terminal points defines the upper and lower terminal positions for
raising and lowering the roller shutter. These settings can be subsequently
changed at any time.
The tubular motor is designed for short-term operation (four minutes). In
order to avoid damage due to heating, the motor shuts off automatically
on exceeding this period of time or in the event of frequent switching.
Allow the motor to cool for approx. 20 minutes in this case.
ATTENTION
Malfunctions due to missing or incorrect terminal point settings.
¾Make sure that the device is only used with correctly set terminal
points.
The adjuster screws are located on the tubular motor's driving head.
¾Use the upper screw (1) to set the lower terminal point.
¾Use the lower screw (2) to set the upper terminal point.
1
2
¾In order to extend the travel, turn the screw in the PLUS direction.
¾In order to shorten the travel, turn the screw in the opposite direction (MINUS).
The direction of rotation of the adjuster screws may vary depending on
the model. Pay attention to the labelling on the driving head.
ATTENTION
Damage to the device due to roller shutter curtain shortening as
a result of temperature fluctuations.
¾Set the terminal points so that the roller shutter curtain stoppers
have approx. 2-3 cm clearance from the limit stops.
Proceed as follows to set the upper terminal point:
¾Operate the motor to raise the roller shutter.
If the motor stops before the desired terminal point is reached, proceed as follows:
¾Leave the timer or the switch set to the raise position.
¾Use the adjustment tool to carefully turn the lower adjuster screw in the PLUS
direction until the motor has reached the desired terminal point.
If the motor passes by the desired terminal point, proceed as follows:
¾Stop the motor.
¾Operate the motor to lower the roller shutter.
¾Stop beneath the desired terminal point.
¾Use the adjustment tool to carefully turn the lower adjuster screw in the MINUS
direction.
¾Operate the motor to raise the roller shutter in order to check the terminal point
which has now been set.
¾If necessary, repeat the steps described above until the desired terminal point
is reached.
Proceed as follows to set the lower terminal point:
¾Operate the motor to lower the roller shutter.
If the motor stops before the desired terminal point is reached, proceed as follows:
¾Leave the timer or the switch set to the lower position.
¾Use the adjustment tool to carefully turn the upper adjuster screw in the PLUS
direction until the motor has reached the desired terminal point.
Rectifying malfunctions
24
If the motor passes by the desired terminal point, proceed as follows:
¾Stop the motor.
¾Operate the motor to raise the roller shutter.
¾Stop the motor above the desired terminal point.
¾Use the adjustment tool to carefully turn the upper adjuster screw in the MINUS
direction.
¾Operate the motor to lower the roller shutter in order to check the terminal point
which has now been set.
¾If necessary, repeat the steps described above until the desired terminal point
is reached.
Proceed as follows to change the terminal point settings:
¾Move the roller shutter approximately to the centre position.
¾Set the terminal points as described above.
Rectifying malfunctions
Rectifying total failure
DANGER
Fatal electric shock due to coming into contact with live
components.
¾Do not carry out any repairs on the device.
¾Never open the device.
¾If the device is defective, contact the superrollo customer service.
The cause of a total failure may possibly be a defective motor. A defective motor
may be attributable to the following causes:
■The motor has been severely overloaded due to a fault in the mechanical
system.
■The roller shutter has been blocked due to icing, resulting in motor overload.
If the tubular motor is defective, the device must be dismantled and repaired by
the superrollo customer service. Proceed as follows to do this:
¾Dismantle the device in accordance with the instructions in the chapter entitled
Dismantling the device from page 27.
¾Have the device checked by the superrollo customer service.
Malfunction characteristics and remedies
Characteristic Possible cause Remedy
The motor does not run (total failure). There is no mains voltage. Make sure that the supply voltage (230 V) is available.
Make sure that the device is connected correctly.
Information on this can be found in the section entitled
Connecting the device from page 22.
Have work on the voltage supply carried out by a qualified,
trained specialist electrician only.
Device malfunctions. Make sure that the device is disconnected from the mains
power supply.
Remove the device.
Information on this can be found in the chapter entitled
Dismantling the device from page 27.
Motor overload due to sluggish roller shutter as a
result of displaced slats.
Make sure that the device is disconnected from the mains
power supply.
Make sure that the slats are horizontal.
Establish the current supply.
Move the roller shutter up and down.
Lubricate sluggish areas with wax.
Motor overload due to sluggish roller shutter as a
result of icing.
Clear away the icing.
The maximum operating time (four minutes) has
been exceeded.
Allow the device to cool for approx. 20 minutes.
Make sure that the device is operated correctly.
Make sure that the terminal points are set correctly.
Make sure that the roller shutter runs smoothly.
Rectifying malfunctions
25
Characteristic Possible cause Remedy
The motor does not run (total failure). The connections have not been carried out
correctly.
Make sure that the device is connected correctly.
Information on connecting the device can be found in the
section entitled Connecting the device from page 22.
Have work on the voltage supply carried out by a qualified,
trained specialist electrician only.
The device does not stop. The adapter has slipped from the limit ring. Make sure that the device is disconnected from the mains
power supply.
Remove the device.
Information on removing the device can be found in the
chapter entitled Dismantling the device from page 27.
Make sure that the adapter is seated flush on the driving
head with the groove over the spring.
Install the device in reverse order again.
The roller capsule is not connected to the
winding shaft correctly.
Move the roller shutter down completely.
Make sure that the device is disconnected from the mains
power supply.
Remove the roller shutter from the winding shaft.
Make sure that the roller capsule is screwed firmly to the
winding shaft.
The winding shaft is too short. Make sure that the device is disconnected from the mains
power supply.
Remove the device.
Information on removing the device can be found in the
chapter entitled Dismantling the device from page 27.
Install a new winding shaft.
Information on sawing the winding shaft to length and
installing it can be found as of the section entitled Sawing the
winding shaft to length from page 20.
Install the device in reverse order again.
The roller shutter does not move up completely
following installation.
The upper terminal point setting is incorrect. Set the upper terminal point
Information on this can be found in the section entitled
Setting the terminal points from page23.
Rectifying malfunctions
26
Characteristic Possible cause Remedy
The roller shutter blocks on raising or lowering. The roller shutter slats have become displaced. Make sure that all slats are horizontal.
Lubricate sluggish areas with wax.
In order to pull the roller shutter free, briefly switch the drive
on in the opposite direction.
The roller shutter scrapes in the roller shutter
box due to a lack of pressure rollers on the
window frame.
Open the roller shutter box.
Install the pressure rollers.
The roller shutter has been rolled up at a slant
as the device has not been installed horizontally.
Make sure that the device is disconnected from the mains
power supply.
Remove the device.
Information on removing the device can be found in the
chapter entitled Dismantling the device from page 27.
Install the device horizontally again.
Information on this can be found as of the section entitled
Installing the bearings from page 19.
Insulating material has come loose in the roller
shutter box and is blocking the roller shutter.
Open the roller shutter box.
Remove the insulating material.
Contact the manufacturer as regards professional insulation
of the roller shutter box.
The roller shutter is too light. Make sure that all slats are horizontal.
Weight the roller shutter e.g. with an appropriate piece of flat
iron.
Push the piece of flat iron into the bottom slat.
In order to pull the roller shutter free, briefly switch the drive
on in the opposite direction.
The direction of rotation is incorrect. The device is not connected correctly. Make sure that the device is disconnected from the mains
power supply.
Swap the brown and the black wires over.
Information on changing the cable assignment can be found
in the section entitled Connecting the device from page 22.
Have work on the voltage supply carried out by a qualified,
trained specialist electrician only.
Dismantling the
device
27
Dismantling the device
Proceed as follows to remove the tubular motor:
¾Operate the motor to lower the roller shutter, until the roller shutter is no longer
hanging by the springs and these can be easily released from the winding shaft.
DANGER
Fatal electric shock due to coming into contact with live
components.
¾Do not carry out any connection work on the device when it is
connected to the current supply.
¾Make sure that the device is disconnected from the mains power
supply.
¾Disconnect the cable from the junction or switch box.
¾Release the securing springs from the winding shaft.
¾Pull the cotter pin out from the securing hole in the drive bearing's axle pin.
¾Loosen the screws with which the roller capsule and the winding shaft are
screwed together.
¾Slide the roller capsule up to the limit stop in the winding shaft.
¾Pull the device out of the bearings.
¾Pull the tubular motor out of the winding shaft.
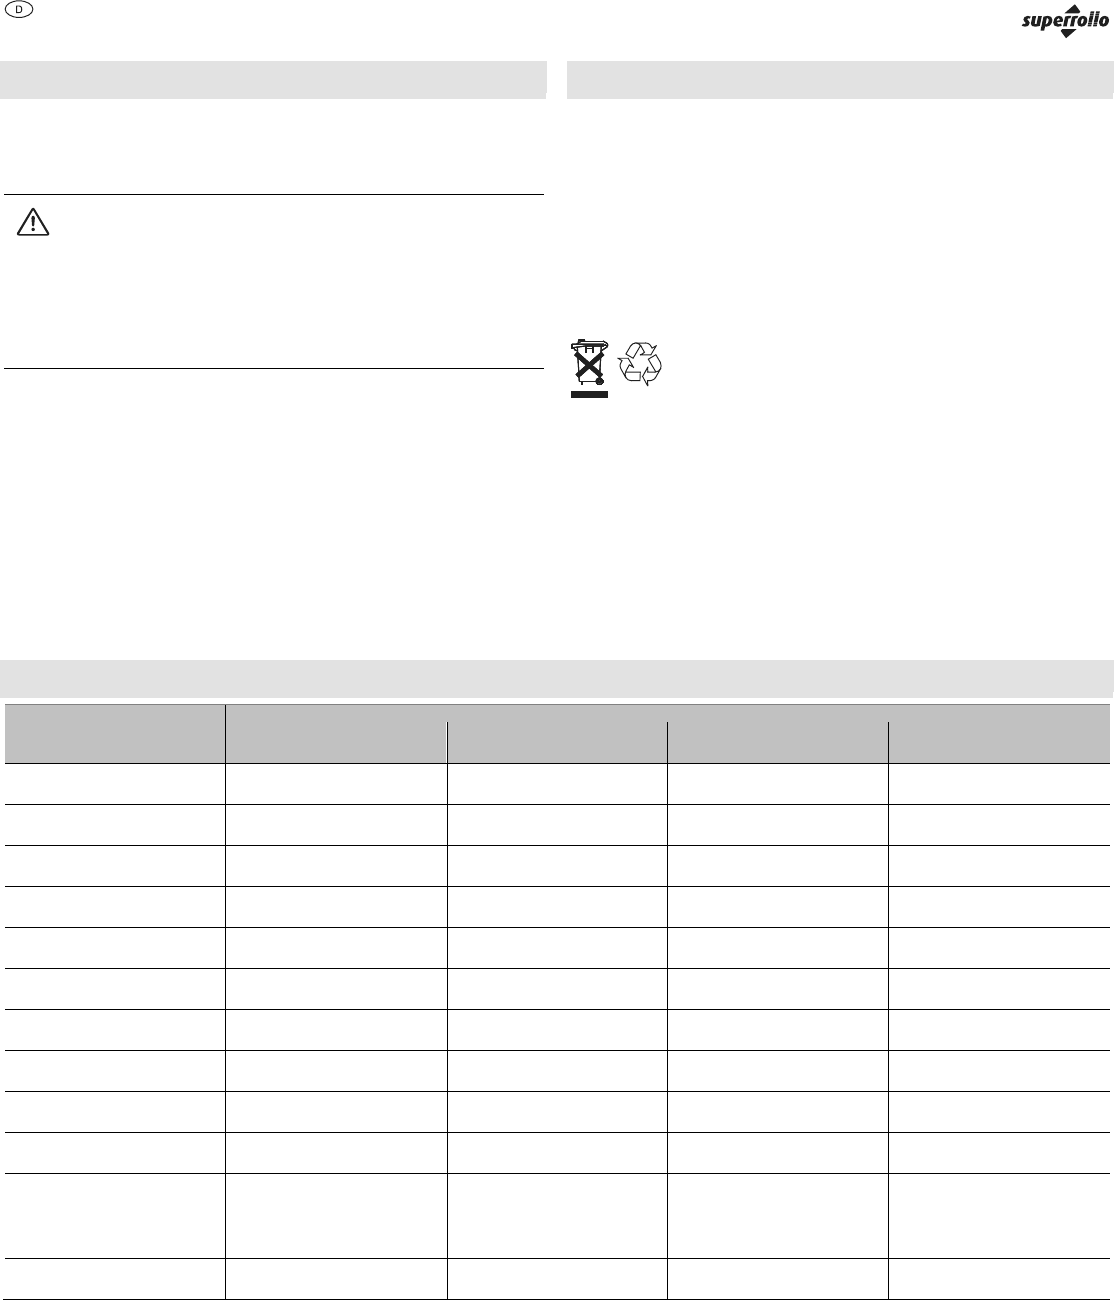
Disposing of the device
The environmentally friendly disposal of operating material, electronic assemblies,
recyclable materials and other parts of the device is regulated by national and
regional laws.
¾Contact the responsible local authority to obtain precise information on
disposal.
¾Dispose of the device according to the legal regulations via a specialist disposal
company.
¾Dispose of electronic components according to the legal regulations in
accordance with the German Electrical and Electronic Equipment Act
Consignes de sécurité de base..................................................................................................................................................................................................................... 30
Description de l'appareil ................................................................................................................................................................................................................................ 31
Mettre l'appareil en service ........................................................................................................................................................................................................................... 35
Solutionner les problèmes ............................................................................................................................................................................................................................ 37
Conditions de garantie .................................................................................................................................................................................................................................. 41
Déclaration de conformité CE ....................................................................................................................................................................................................................... 41
Vue d’ensemble
21
3456
8
7
9
10
11
12
8 Contre-support* = Adaptateur
9Roulement à bille* < Tête d'entraînement
A Capsule du cylindre* ; Support d'entraînement
@Ressort de fixation* UTCâble du moteur
? Pièce d'entraînement UBTablier du volet roulant*
> Moteur tubulaire UD Arbre enrouleur*
L'illustration représente le moteur tubulaire installé. Les pièces signalées par une * ne sont pas fournies.
A
vant-Propos
30
Avant-Propos
Cette notice d'utilisation décrit le montage, le branchement électrique et
l'utilisation des moteurs tubulaires électroniques RM10MS/RM10MM/
RM20MM/RM30MM. Avant de procéder au montage et à la mise en service,
veuillez lire attentivement cette notice d'utilisation pour pouvoir respecter
notamment les consignes de sécurité !
Cette notice a pour but de vous aider
■à utiliser correctement,
■en toute sécurité et
■avantageusement
les moteurs tubulaires RM10MS/RM10MM/RM20MM/RM30MM, désignés plus
brièvement Moteur.
Cette notice décrit le montage et l'utilisation du moteur tubulaire avec les
accessoires superrollo nécessaires. Pour désigner le moteur tubulaire
conjointement à ses 'accessoires, on utilisera le terme Appareil.
Cette notice d'utilisation s'adresse aux personnes suivantes :
■Les personnes qui montent cet appareil,
■Les personnes qui raccordent cet appareil,
■Les personnes qui utilisent cet appareil,
■Les personnes qui entretiennent cet appareil ou
■Les personnes qui évacuent cet appareil lorsqu'il est usagé.
Toutes ces personnes doivent avoir lu et compris l’intégralité de la notice
d’utilisation.
Toutes les opérations effectuées sur et avec cet appareil doivent impérativement
être effectuées conformément à la notice d'utilisation.
La garantie s'annule en cas de dommages dus au non-respect des instructions
figurant dans cette notice. La société superrollo ne pourra nullement être tenue
responsable des préjudices qui en découleraient.
Disponibilité
Cette notice d'utilisation fait partie de l'appareil. Conservez cette notice
d’utilisation toujours à proximité de l'appareil. Si vous vendez l'appareil ou si vous
le remettez à un tiers, vous devez remettre la notice d'utilsiation en même temps.
Repères dans le texte de ce mode d’emploi
Certains passages de ce mode d’emploi sont signalés par des repères. Vous
pouvez ainsi facilement reconnaître s’il s’agit :
de texte normal,
de renvois,
SENS DE ROTATION DES VIS DE REGLAGE,
■d'énumérations ou
¾des étapes d'une opération.
Les passages précédés de ce symbole vous donnent des explications
pour garantir une utilisation économique de l'appareil.
Consignes de sécurité de base
Utilisation conforme
L'appareil est exclusivement destiné à lever et abaisser des volets roulants et des
stores aisément manoeuvrables.
Eviter les électrocutions
■Le raccordement au secteur et toutes les opérations liées à l'alimentation
électrique doivent impérativement être confiées à un électricien formé et
qualifé.
■Branchez l'appareil uniquement sur une prise de courant 230 V~50 Hz avec
fusible (non fourni).
■Effectuez toutes les opérations de montage et de raccordement hors tension.
■S'il y a sur site des fils ou des dispositifs électriques inutiles, démontez-les ou
mettez les hors service.
■Avant de monter le moteur, démontez tous les fils et les dispositifs électriques
qui ne servent pas ou mettez-les hors service.
■Si vous posez un interrupteur avec un préréglage ARRET, mettez-le à visibilité
du moteur tubulaire à 1,5 - 1,8 m de hauteur.
■Installez l'interrupteur avec préréglabe ARRET directement sur la tête
d'entraînement et à une distance suffisante des pièces mobiles.
■Posez le câble moteur à l'intérieur de la gaine en respectant les prescriptions
électriques locales jusqu'à la boîte de dérivation.
■Débranchez l'appareil du secteur en cas d'anomalies.
■Débranchez l'appareil du secteur avant d'ouvrir le coffre du volet roulant.
■Débranchez l'appareil du secteur avant de nettoyer le volet roulant.
■Ne rangez pas le moteur à proximité d'acides, de substances alcalines, de
matériaux corrosifs ou sales.
■Veillez à ce que pendant le transport, le stockage et l'utilisation, l'appareil ne
soit pas humide et ne se trouve pas dans un environnement poussiéreux.
■N'utilisez pas le moteur pour des portes de garages de bâtiments publics.
■Ne touchez pas le câble de secteur si vous avez les mains mouillées.
■Ne dévissez jamais le coffre de l'appareil.
■N'utilisez jamais l'appareil s'il est défectueux. Si votre appareil est défectueux,
contactez le service après-vente.
■Pour une utilisation dans des pièces humides, respectez les normes DIN VDE
0100, sections 701 et 702.
Eviter les blessures
■Assurez-vous que le coffre du volet roulant est fermé lorsque l'appareil
fonctionne.
■Assurez-vous que personne ne se trouve sous le volet roulant lorsque le volet
roulant est abaissé.
■Assurez-vous qu'aucun enfant ne joue avec la commande du volet roulant.
■Assurez-vous que personne ne risque d'être blessé par le dérapage du volet
roulant pendant les travaux de montage.
■Abaissez le volet roulant intégralement avant les opérations de montage et
maintenez le volet roulant.
■Utilisez l'appareil uniquement avec un volet roulant dont le poids est adapté au
moteur tubulaire. Vous trouverez des explications dans le paragraphe Surfaces
et poids autorisés des volets roulants à partir de la page 32
■Vérifiez régulièrement que les câbles et les ressorts ne présentent pas de
déséquilibre, ni de détérioration, ni d'usure.
■Utilisez l'appareil uniquement s'il est en parfait état.
■Evitez les démarrages intempestifs du moteur et ne le sollicitez pas trop.
■Tournez le bouton de réglage ou le manchon d'entraînement uniquement en
fonctionnement.
Description
de l'appareil
31
■Utilisez uniquement des pièces de rechange et des accessoires superrollo.
Vous trouverez des explications à ce sujet dans le chapitre Accessoires à
partir de la page 41
■Veillez à ce que les réparations sur l'appareil soient uniquement effectuées par
le service après-vente superrollo.
■Respectez notamment la norme DIN 12045 - Dispositifs de protection et
fermetures rajoutés pour façades et ouvertures dans la maçonnerie qui
comportent des fenêtres et portes-fenêtres..
Eviter le blocage
■Veillez à vous trouver dans le bâtiment lorsque le volet roulant d'une porte est
fermé automatiquement.
Eviter les dégâts matériels
■Utilisez l'appareil uniquement dans des locaux secs.
■Branchez l'appareil uniquement sur une prise de courant 230 V~50 Hz avec
fusible (non fourni).
■Utilisez l'appareil uniquement avec des volets roulants qui se manoeuvrent
aisément.
■Utilisez uniquement des pièces de rechange et des accessoires superrollo.
Repères dans le texte pour les signalements de dangers
Cette notice d'utilisation comporte différents types de remarques sur les dangers :
Danger
Les indications précédées du mot DANGER signalent une
situation dangereuse qui provoque de graves blessures ou qui
entraîne la mort.
AVERTISSEMENT
Les indications précédées du mot AVERTISSEMENT signalent
une situation dangereuse qui peut éventuellement provoquer de
graves blessures ou entraîner la mort.
PRUDENCE
Les indications précédées du mot PRUDENCE signalent une
situation entraînant des blessures légères ou moyennement
graves.
Repères dans le texte pour les consignes relatives aux
dangers matériels et aux risques de pollution
Attention
Ces indications signalent une situation entraînant des dégâts
matériels ou une pollution de l’environnement.
Description de l'appareil
Contenu de la livraison
12
34567
8 Moteur tubulaire ? 2 goupilles
9 Outil de réglage > Support d'entraînement
A Pièce d'entraînement = Adaptateur
@Clip de sécurité
Monter l'appareil
32
Fonctions
L'appareil permet d'ouvrir et de fermer les volets roulants et les stores.
Pour exécuter ces fonctions, le moteur tubulaire avec les accessoires superrollo
suivants doit être installé dans le coffre du volet roulant.
■Arbre enrouleur
■Capsule du cylindre
■Roulement à bille
■Contre-support
■Ressort de fixation.
Vous trouverez des explications sur les accessoires superrollo dans le chapitre
Accessoires à partir de la page 41.
Surfaces et poids autorisés des volets roulants
Le tableau ci-dessous indique la surface de volet roulant autorisée pour le moteur
correspondant en fonction du poids du profilé. Il indique également le poids
maximal du volet roulant.
N d'article Surface max. du volet roulant
(m²)
Poids max. du
volet roulant (kg)
4 kg/m²
(plastique)
7 kg/m²
(aluminium/bois)
RM10MS 4,2 2,8 22
RM10MM 4,2 2,8 22
RM20MM 8 5 44
RM30MM 12 8 66
¾Veillez à ne pas dépasser la surface maximale ou le poids maximal du volet
roulant.
Fonctions de sécurité
Le moteur tubulaire est étudié pour un fonctionnement de courte durée (4
minutes). Pour éviter d'être abîmer, le moteur se coupe automatiquement lorsque
ce laps de temps est dépassé ou en cas d'actionnement intempestif.
La coupure de sécurité peut avoir plusieurs causes. Avant de remettre l'appareil
en service, vous devez si nécessaire éliminer la cause du problème. Vous
trouverez des explications sur les causes possibles des problèmes et les solutions
dans le chapitre Solutionner les anomalies à partir de la page 37.
¾Eliminer la cause le cas échéant.
¾Laissez le moteur refroidir pendant 20 minutes environ.
Si, après ces opérations, l'appareil ne fonctionne toujours pas, veuillez contacter
le service après-vente superrollo.
Monter l'appareil
Avant le montage
Pour pouvoir monter l'appareil, les conditions suivantes doivent être remplies :
■Le couvercle du coffre du volet roulant doit être aisément manoeuvrable et
amovible.
■Le lieu d'installation doit comporter une prise de courant 230 V~50 Hz avec un
dispositif de coupure fourni par le client (fusible).
■Le poids du volet roulant doit être adapté au moteur tubulaire. Vous trouverez
des explications sur le poids autorisé du volet roulant dans le paragraphe
Surfaces et poids autorisés des volets roulants à partir de la page 32
■Les accessoires superrollo nécessaires doivent être en place. Vous trouverez
des explications sur les accessoires superrollo dans le chapitre Accessoires à
partir de la page 41
¾Vérifiez que tous les éléments fournis sont en parfait état.
¾Ne mettez pas l'appareil en service si vous constatez que l'appareil est abîmé.
¾Si vous constatez que l'appareil est abîmé, adressez-vous au service après-
vente superrollo.
Outils nécessaires
Outils et éléments de fixation nécessaires pour le montage de l'appareil :
■Mètre pliant ou mètre ruban
■Crayon
■Niveau à bulle
■Scie à métaux
■Lime
■Perceuse
■8 mm Foret à pierre
■8 mm Chevilles
■Vis
■Tournevis cruciforme
■Outil de réglage fourni.
Monter le support
Vous pouvez monter la tête d'entraînement du moteur sur le côté droit ou le côté
gauche du coffre du volet roulant. Dans cette notice, le montage est présenté pour
le côté droit.
Pour monter le support, vous devez veiller aux différents points suivants :
■Le support doit être ajusté horizontalement.
■Le volet roulant doit pouvoir s'insérer verticalement dans le rail de guidage.
■Le tablier du volet roulant doit avoir suffisamment de place de tous côtés
lorsque le volet est enroulé dans le coffre.
■Les vis de réglage du moteur tubulaire doivent être aisément accessibles après
montage.
■Pour que l'eau puisse s'écouler, le câble du moteur doit être posé dans une
boucle dirigée vers le bas directement devant le moteur.
Monter l'appareil
33
Pour déterminer la position du support P dans le coffre du volet roulant, mesurez
et calculez les cotes suivantes :
DDiamètre du volet roulant enroulé
XD/2Distance entre la position du support P et le milieu du
rail de guidage (3)
Y>XDistance entre la position du support P et le fond du
coffre du volet roulant. Pour que le volet roulant ait
suffisamment de place, Y doit être supérieur à X.
D
X
Y
1
2
3
P
Attention
Le moteur tubulaire risque d'être abîmé si le volet roulant est
enroulé de travers.
¾Assurez-vous que l’appareil est monté horizontalement.
¾Marquez au crayon les positions du support P sur les côtés intérieurs droit et
gauche du coffre du volet roulant.
¾Assurez-vous que les repères sont bien ajustés à l'horizontale.
¾Maintenez le support au milieu sur les repères.
¾Marquez des repères pour les trous de perçage au crayon.
¾Percer les trous avec un foret de 8 mm.
¾Insérez les chevilles.
¾Vissez le support.
Scier l'arbre enrouleur
Pour déterminer la longueur L de l'arbre enrouleur, mesurez et calculez les cotes
suivantes :
ALargeur intérieure du coffre du volet roulant
Bb1+b2+b3
b1Profondeur du contre-support
b2Largeur de la butée de la capsule du cylindre
b31/3 de la longueur de la tige de la capsule du cylindre
Cc1+c2+c3
c1Profondeur de la butée de l'adaptateur
c2Profondeur de la tête d'entraînement
c3Profondeur du support d'entraînement
LA-(B+C)
L
B
C
A
b1c1c2c3b2
b3
BC
¾Marquez d'un repère au crayon la longueur L sur l'arbre enrouleur.
¾Sciez à angle droit l'arbre enrouleur à l'aide d'une scie à métaux.
¾Ebavurez les bords à l'intérieur et l'extérieur avec une lime.
Assembler l'appareil
¾Insérez l'adaptateur (1) avec la rainure sur le ressort de la bague limite (2) sur
la tête d'entraînement (3).
123
¾1. Poussez la pièce d'entraînement (1) jusqu'à la butée sur l'axe du moteur
tubulaire (2).
¾2. Sécurisez la pièce d'entraînement avec le clip de sécurité fourni (3).
1
1.2.
2
3
Monter l'appareil
34
Attention
Une insertion brutale dans l'arbre enrouleur risque d'abîmer le
moteur tubulaire.
¾Ne tapez jamais avec force sur le moteur tubulaire pour l'insérer
dans l'arbre enrouleur.
¾1. Insérez le moteur tubulaire avec la pièce d'entraînement (1) dans l'arbre
enrouleur (2).
¾2. Insérez l'arbre enrouleur jusqu'à la butée de l'adaptateur (3) sur la tête
d'entraînement (4).
¾Assurez-vous que l'adaptateur ne dérape pas de la bague limite de la tête
d'entraînement.
134
2.1.
2
¾1. Insérez la capsule du cylindre (1) jusqu'à la butée dans l'arbre enrouleur (2).
¾2. Emboîtez le roulement à bille (3) sur l'axe de la capsule du cylindre (4).
134
2.1.
2
Pour pouvoir monter l'appareil dans le coffre du volet roulant, la capsule
du cylindre doit d'abord s'emboîter jusqu'à la butée dans l'arbre
enrouleur. Puis il faut la retirer jusqu'à ce que l'appareil s'adapte
exactement dans le coffre du volet roulant.
Monter l'appareil dans le coffre du volet roulant
¾Emboîtez l'axe (1) de la tête d'entraînement dans le trou du support
d'entraînement (2).
¾Assurez-vous que toutes les vis de réglage (3) sont accessibles.
¾Assurez-vous que le câble du moteur (4) est dirigé vers le bas.
12
3
4
¾Emboîtez la goupille (1) dans le trou du fusible (2) sur l'axe.
1
2
¾1. Sortez la capsule du cylindre (1) de l'arbre entouleur (2) pour que le
roulement à bille (4) entre dans le contre-support (3).
¾2. Insérez le roulement à bille dans le contre-support.
¾3. Vissez l'arbre enrouleur sur la capsule du cylindre.
1
1.
3.
2.
3
4
2
¾Assurez-vous que l’arbre enrouleur est monté horizontalement.
Mettre l'appareil
en service
35
Mettre l'appareil en service
Avant de pouvoir utiliser l'apapreil, vous devez effectuer les opérations suivantes :
■Brancher le câble moteur sur la boîte de dérivation ou du commutateur prévue
à cet effet
■effectuer un essai
■Monter le tablier du volet roulant sur l'arbre enrouleur
■Régler le point de butée final du haut et celui du bas.
Brancher l'appareil
Le raccordement au secteur du moteur tubulaire et toutes les opérations sur les
équipements électriques doivent impérativement être effectués par un électricien
agréé selon les plans de connexion figurant dans cette notice.
Danger
Risque d'électrocution mortelle en cas de contact avec les
composants sous tension.
¾N'effectuez aucun raccordement sur l'appareil lorsque l'alimentation
électrique est raccordée.
¾Assurez-vous que l’appareil est débranché du secteur.
Attention
Risque de dysfonctionnement ou de dégradation du moteur si la
tension du secteur n'est pas la bonne.
¾Comparez les indications figurant sur la plaque signalétique avec
celles du secteur local.
¾Assurez-vous que l'appareil est branché uniquement sur une prise
de secteur de 230 V ~ 50 Hz.
Attention
Risque de court-circuit si le câble est abîmé.
¾Assurez-vous que le câble ne risque pas d'être abîmé par des
pièces mobiles dans le coffre du volet roulant.
Attention
Risque de court-circuit lors de la pénétration d'eau dans le
moteur si les fils sont mal positionnés.
¾Ne placez jamais le câble verticalement vers le haut.
¾Posez toujours le câble dans une boucle.
En posant le câble dans une boucle, l'eau peut s'écouler (1.).
¾Brancher le câble du moteur sur la boîte de dérivation ou du commutateur
prévue à cet effet (2).
1
2.1.
2
3
4
N° de
position
Couleur des fils du câble
moteur
Fonction
1 noir Sens de rotation 1
2 brun Sens de rotation 2
3 bleu Fil neutre
4 vert/jaune Terre
Pour contrôler si le sens de rotation du moteur correspond à la position du
commutateur, effectuez un essai.
¾Faitez tourner le moteur pour la descente.
¾Vérifiez si le moteur tourne en sens contraire.
Si le moteur tourne en sens contraire, vous devez changer la position du câble.
¾Intervertissez le fil brun du câble moteur avec le fil noir.
¾Assurez-vous que le sens de rotation correspond à la position du commutateur.
Pour brancher l'appareil sur un bouton monopôle de volet roulant,
respectez le plan d'installation de la page 41.
Monter le tablier du volet roulant
Pour pouvoir monter le tablier du volet roulant, les conditions suivantes doivent
être remplies :
■Le tablier du volet roulant doit être dans le rail de guidage.
■Le moteur tubulaire doit être amené totalement vers le bas.
Attention
Le moteur tubulaire serait abîmé en cas de perçage ou de
vissage.
¾Ne percez jamais et ne vissez jamais l'arbre enrouleur au niveau
du moteur tubulaire.
¾Utilisez impérativement les trous existants dans l'arbre enrouleur
pour fixer le tablier du volet roulant.
¾1. Insérez environ tous les 40 cm un ressort de fixation (1) sur la lamelle
supérieure du tablier du volet roulant (2).
¾2. Mettez le ressort de fixation dans les trous rectangulaires (3) de l'arbre
enrouleur.
2
1.2.
13
Mettre l'appareil en service
36
Si vous utilisez les arbres enrouleurs SW40 avec pli extérieur, il vous faut en outre
des pinces d'accrochage.
¾1. Insérez environ tous les 40 cm une pince (1) depuis le haut sur l'arbre
enrouleur (2).
¾2. Mettez les ressorts de fixation (4) dans les trous rectangulaires des pinces
(3).
13
4
2
1.2.
Régler les points de fin de course
Par le réglage des points de fin de course, déterminez la position de fin de course
du haut et celle du bas pour remonter et descendre le volet roulant. Vous pourrez
modifier ces réglages ultérieurement si vous le souhaitez.
Le moteur tubulaire est étudié pour un fonctionnement de courte durée (4
minutes). Pour éviter toute détérioration par échauffement, il se coupe
automatiquement lorsque ce laps de temps est dépassé ou en cas
d'actionnement intempestif. Dans un tels cas, laissez le moteur refroidir
pendant 20 minutes environ.
Attention
Risque de dysfonctionnements en cas de mauvais réglage des
points de fin de course.
¾Assurez-vous que l'appareil est utilisé uniquement avec des points
de fin de course correctement réglés.
Les vis de réglage se trouvent sur la tête d'entraînement du moteur tubulaire.
¾Pour régler le point de fin de course du bas, utilisez la vis du haut (1).
¾Pour régler le point de fin de course du haut, utilisez la vis du bas (2).
1
2
¾Pour prolonger la trajectoire, tournez dans le sens PLUS.
¾Pour raccourcir la trajectoire, tournez dans le sens contraire (MOINS).
Le sens de rotation des vis de réglage peut varier d'un modèle à l'autre.
Reportez-vous aux indications figurant sur la tête d'entraînement.
Attention
Risque de détérioration de l'appareil en cas de raccourcissement
du tablier du volet roulant sous l'effet des variations thermiques.
¾Réglez les points de fin de course de sorte que les arrêts du tablier
du volet roulant aient un jeu de 2-3 cm avant les butées.
Pour régler le point de fin de course du haut, procédez de la façon suivante :
¾Faites tourner le moteur pour la remontée.
Si le moteur s'arrête avant que le point de fin de course souhaité soit atteint,
procédez de la façon suivante :
¾Laissez la minuterie ou le commutateur sur la position Remontée.
¾Tournez à l'aide de l'outil de réglage la vis de réglage du bas avec précaution
dans le sens PLUS jusqu'à ce que le moteur ait atteint le point de fin de course
souhaité.
Si le moteur dépasse le point de fin de course souhaité, procédez de la façon
suivante :
¾Arrêtez le moteur.
¾Faites tourner le moteur pour la descente.
¾Arrêtez sous le point de fin de course souhaité.
¾Tournez à l'aide de l'outil de réglage la vis de réglage du bas avec précaution
dans le sens MOINS.
¾Pour contrôler le point de fin de course désormais réglé, faites tourner le
moteur pour la remontée.
¾Répétez le cas échéant l'étape expliquée ci-dessus jusqu'à ce que le point de
fin de course souhaité soit atteint.
Pour régler le point de fin de course du bas, procédez de la façon suivante :
¾Faites tourner le moteur pour la descente.
Si le moteur s'arrête avant que le point de fin de course souhaité soit atteint,
procédez de la façon suivante :
¾Laissez la minuterie ou le commutateur sur la position Descente.
¾Tournez à l'aide de l'outil de réglage la vis de réglage du haut avec précaution
dans le sens PLUS jusqu'à ce que le moteur ait atteint le point de fin de course
souhaité.
Solutionner les
problèmes
37
Si le moteur dépasse le point de fin de course souhaité, procédez de la façon
suivante :
¾Arrêtez le moteur.
¾Faites tourner le moteur à haut régime.
¾Arrêtez le moteur au-dessus du point de fin de course souhaité.
¾Tournez à l'aide de l'outil de réglage la vis de réglage du haut avec précaution
dans le sens MOINS.
¾Pour contrôler le point de fin de course désormais réglé, faites tourner le
moteur pour la remontée.
¾Répétez le cas échéant l'étape expliquée ci-dessus jusqu'à ce que le point de
fin de course souhaité soit atteint.
Pour modifier les réglages des points de fin de course, procédez de la façon
suivante :
¾Amenez le volet roulant environ à mi parcours.
¾Réglez les points de fin de course conformément à la description ci-dessus
Solutionner les problèmes
Réparer une panne totale
Danger
Risque d'électrocution mortelle en cas de contact avec les
composants sous tension.
¾N'effectuez aucune réparation sur l'appareil.
¾N'ouvrez jamais l'appareil.
¾Adressez-vous au service après-vente superrollo si l'appareil est
défectueux.
Une panne totale peut être due à un problème de moteur. Les situations suivantes
peuvent provoquer un problème sur le moteur :
■Le moteur a été sur-sollicité du fait d'une anomalie dans le système mécanique.
■Le volet roulant s'est bloqué pour cause de rouille et a sollicité trop fortement le
moteur.
Lorsque le moteur tubulaire est défectueux, vous devez démonter l'appareil et le
faire réparer par le service après-vente superrollo. Procédez de la manière
suivante :
¾Démontez l'appareil conformément aux instructions du chapitre Démonter
l'appareil à partir de la page 40.
¾Faites vérifier l'appareil par le service après-vente superrollo.
Descriptif des problèmes et solution
Descriptif Cause possible Solution
Le moteur ne marche pas (panne totale). Pas de tension du secteur. Assurez-vous qu'il y a de la tension du secteur (230 V).
Assurez-vous que l’appareil est correctement raccordé.
Vous trouverez des explications à ce sujet dans le
paragraphe Raccordez l'appareil à partir de la page 35.
Confiez les interventions sur l’alimentation électrique
uniquement à un électricien professionnel qualifié et formé.
Dysfonctionnements de l'appareil Assurez-vous que l’appareil est débranché du secteur.
Démontez l'appareil.
Vous trouverez des explications à ce sujet dans le chapitre
Démonter l'appareil à partir de la page 40.
Sollicitation excessive du moteur du fait de
volets roulants difficilement manoeuvrables en
raison de lamelles déplacées.
Assurez-vous que l’appareil est débranché du secteur.
Assurez-vous que les lamelles sont horizontales.
Rétablissez l'alimentation électrique.
Faites monter et descendre le volet roulant.
Graissez les points grippés avec de la cire de glissement.
Sollicitation excessive du moteur du fait de
volets roulants difficilement manoeuvrables en
raison de rouille.
Eliminez la rouille.
La durée maximale de fonctionnement (4
minutes) est dépassée.
Laissez l'appareil refroidir pendant 20 minutes environ.
Assurez-vous que l’appareil est utilisé correctement.
Assurez-vous que les points de fin de course sont
correctement réglés.
Assurez-vous que le volet roulant est facile à manoeuvrer.
Solutionner les problèmes
38
Descriptif Cause possible Solution
Le moteur ne marche pas (panne totale). Les branchements ne sont pas corrects. Assurez-vous que l’appareil est correctement raccordé.
Vous trouverez des explications pour brancher l'appareil
dans le paragraphe Raccorder l'appareil à partir de la
page 35.
Confiez les interventions sur l’alimentation électrique
uniquement à un électricien professionnel qualifié et formé.
L'appareil ne s'arrête pas. L'adaptateur a glissé de la bague limite. Assurez-vous que l’appareil est débranché du secteur.
Démontez l'appareil.
Vous trouverez des explications pour démonter l'appareil
dans le chapitre Démonter l'appareil à partir de la page 40.
Assurez-vous que l'adaptateur avec la rainure au-dessus du
ressort est affleurant sur la tête d'entraînement.
Remontez l'appareil dans l'ordre inverse.
La capsule du cylindre n'est pas correctement
raccordée à l'arbre enrouleur.
Faites descendre le volet roulant complètement jusqu'en
bas.
Assurez-vous que l’appareil est débranché du secteur.
Retirez le volet roulant de l'arbre enrouleur.
Assurez-vous que la capsule du cylindre est bien vissée sur
l’arbre enrouleur.
L'arbre enrouleur est trop court. Assurez-vous que l’appareil est débranché du secteur.
Démontez l'appareil.
Vous trouverez des explications pour démonter l'appareil
dans le chapitre Démonter l'appareil à partir de la page 40.
Montez un nouvel arbre enrouleur.
Vous trouverez des explications pour scier et monter l'arbre
enrouleur à partir du paragraphe Scier l'arbre enrouleur à
partir de la page 33.
Remontez l'appareil dans l'ordre inverse.
Le volet roulant ne remonte pas complètement
après le montage.
Le point de fin de course du haut est mal réglé. Réglez le point de fin de course du haut.
Vous trouverez des explications à ce sujet dans le
paragraphe Régler les points de fin de course à partir de la
page36.
Solutionner les
problèmes
39
Descriptif Cause possible Solution
Le volet roulant se bloque en descendant ou en
remontant.
Les lamelles du volet roulant se sont déplacées. Assurez-vous que toutes les lamelles sont horizontales.
Graissez les points grippés avec de la cire de glissement.
Pour débloquer le volet roulant, faites fonctionner brièvement
l'entraînement en sens inverse.
Le volet roulant frotte dans le coffre car il n'y a
pas de rouleaux de pression sur le cadre de
fenêtre.
Ouvrez le coffre du volet roulant.
Montez les rouleaux de pression.
Le volet roulant est enroulé de travers car
l'appareil n'est pas monté horizontalement.
Assurez-vous que l’appareil est débranché du secteur.
Démontez l'appareil.
Vous trouverez des explications pour démonter l'appareil
dans le chapitre Démonter l'appareil à partir de la page 40.
Remontez l'appareil horizontalement.
Voustrouverez des explications à ce sujet à partir du
paragraphe Monter le support à partir de la page 32.
Le matériau isolant s'est défait du coffre du volet
roulant et bloque le volet roulant.
Ouvrez le coffre du volet roulant.
Retirez le matériau isolant.
Pour assurer une isolation correcte du coffre du volet roulant,
veuillez vous adresser au fabricant.
Le volet roulant est trop léger. Assurez-vous que toutes les lamelles sont horizontales.
Lestez le volet roulant par exemple avec un fer plat adapté.
Insérez le fer plat dans la lamelle la plus basse.
Pour débloquer le volet roulant, faites fonctionnement
brièvement l'entraînement en sens inverse.
Mauvais sens de rotation. L'appareil n'est pas correctement raccordé. Assurez-vous que l’appareil est débranché du secteur.
Intervertissez les fils brun et noir.
Vous trouverez des explications pour poser le câble
l'appareil dans le paragraphe Raccorder l'appareil à partir de
la page 35.
Confiez les interventions sur l’alimentation électrique
uniquement à un électricien professionnel qualifié et formé.
Démonter l'appareil
40
Démonter l'appareil
Pour démonter le moteur tubulaire, procédez de la façon suivante :
¾Faites tourner le moteur pour descendre le volet roulant jusqu'à ce qu'il ne soit
plus dans les ressorts et que ceux-ci puissent être facilement retirés de l'arbre
enrouleur.
Danger
Risque d'électrocution mortelle en cas de contact avec les
composants sous tension.
¾N'effectuez aucun raccordement sur l'appareil lorsque l'alimentation
électrique est raccordée.
¾Assurez-vous que l’appareil est débranché du secteur.
¾Débranchez le câble de la boîte de dérivation ou du commutateur.
¾Défaites les ressorts de fixation de l'arbre enrouleur.
¾Tirez la goupille du trou du fusible dans l'axe du support d'entraînement.
¾Dévissez les vis avec lesquelles la capsule du cylindre et l'arbre enrouleur sont
vissés ensemble.
¾Insérez la capsule du cylindre jusqu'à la butée dans l'arbre enrouleur.
¾Retirez l'appareil des supports.
¾Retirez le moteur tubulaire de l'arbre enrouleur.
Jeter l'appareil lorsqu’il est usagé
L’élimination conforme à la protection de l’environnement des produits servant à la
production, des modules électroniques, des matières recyclables et autres
composants de l'appareil est réglementée par des lois nationales et régionales.
¾Renseignez-vous auprès de votre mairie pour obtenir des renseignements
précis sur la règlementation d'élimination des déchets.
¾Jetez l'appareil usagé conformément à la législation en vigueur auprès d'une
société spécialisée dans l'enlèvement des déchets.
¾Jetez les composants électroniques conformément à la loi relative aux déchets
Plan d'installation du commutateur monopôle du volet roulant
Le plan d'installation suivant est valable pour le montage de la tête d'entraînement
sur le côté droit.
Accessoires
pour le
moteur
tubulaire
Article N° d'article
RM10MS Entraînement de volet roulant ensemble
d'accessoires pour le modèle SW40,
comprenant :
■1 roulement à bille
■1 contre-support
■1 capsule du cylindre
■3 ressorts de fixation
SR50450
RM10MM
RM20MM
RM30MM
Entraînement de volet roulant ensemble
d'accessoires pour le modèle SW60,
comprenant :
■1 roulement à bille
■1 contre-support
■1 capsule du cylindre
■4 ressorts de fixation
SR50560
Conditions de garantie
superrollo Hausautomatisierung GmbH accorde une garantie de 5 ans sur les
appareils neufs qui ont été montés conformément aux instructions de la notice. La
garantie couvre toutes les défauts de conception, vices de matériaux et vices de
fabrication.
Sont exclus de la garantie :
■Mauvais montage ou mauvaise installation
■Non respect des consignes de la notice
■Utilisation ou sollicitation non conforme
■Effets extérieurs tels que des coups, chocs ou intempéries
■Réparations et modifications effectuées par des tiers non habilités
■Utilisation d'accessoires inadaptés
■Détériorations dues à des surtensions (par ex. foudre)
■Dysfonctionnements dus à des superpositions de radiofréquences et autres
radioparasites.
En cas de défaut survenant au cours de la période de garantie, superrollo assure
gratuitement la réparation ou le remplacement des pièces concernées ou la
livraison d'un appareil de même type ou d'un nouvel appareil. La livraison de
remplacement ou la réparation effectuée dans le cadre de la garantie ne prolonge
nullement la période de garantie initiale.
Déclaration de conformité CE
Marquage CE et conformité
Les moteurs tubulaires superrollo RM10MS/RM10MM/RM20MM/RM30MM
répondent aux exigences de la directive sur la basse tension 2006/95/CEE, de la
directive sur la compatibilité électromagnétique 2004/108 CEE ainsi que de toutes
les directives nationales et européennes applicables. La conformité a été certifiée.
Les déclarations et documents correspondants sont disponibles auprès du
fabricant.
42
Motor tubular RM10MS/RM10MM/RM20MM/RM30MM
Índice de contenidos
Esquema general ............................................................................................................................................................................................................................................ 42
Indicaciones de seguridad básicas .............................................................................................................................................................................................................. 43
Descripción del aparato................................................................................................................................................................................................................................. 44
Montaje del aparato ........................................................................................................................................................................................................................................ 45
Puesta en funcionamiento del aparato ........................................................................................................................................................................................................ 48
Reparación de fallos ...................................................................................................................................................................................................................................... 50
Desmontaje del aparato ................................................................................................................................................................................................................................. 53
Eliminación del aparato ................................................................................................................................................................................................................................. 53
Datos técnicos ................................................................................................................................................................................................................................................ 53
Condiciones de garantía ................................................................................................................................................................................................................................ 54
Declaración de conformidad CE ................................................................................................................................................................................................................... 54
Esquema general
21
3456
8
7
9
10
11
12
8 Contrasoporte* = Adaptador
9Rodamiento de bolas* < Cabeza motriz
A Cápsula cilíndrica* ; Soporte del motor
@Resorte de sujeción* UTCable del motor
? Arrastrador UBRollo de la persiana*
> Motor tubular UD Tubo enrollador*
El esquema muestra el motor tubular en su posición de montaje. Las piezas marcadas con * no forman parte del volumen de entrega.
Introducción
43
Introducción
Este manual incluye las instrucciones de montaje, de la conexión eléctrica y del
manejo de los motores tubulares electrónicos RM10MS/RM10MM/
RM20MM/RM30MM. Antes de montar y poner el motor en funcionamiento, por
favor, ¡lea y siga estas instrucciones, en particular el capítulo de seguridad!
Estas instrucciones le ayudan a utilizar
■correctamente,
■con seguridad y
■rentabilidad
los motores tubulares electrónicos RM10MS/RM10MM/RM20MM/RM30MM,
denominados únicamente "motor" de forma abreviada.
Estas instrucciones describen el montaje y el uso del motor tubular junto cel
accesorio de superrollo requerido. En estas instrucciones hablaremos de
"aparato" para referirnos al motor tubular combinado con el accesorio.
Estas instrucciones están dirigidas a:
■las personas encargadas del montaje del aparato,
■las personas encargadas de la conexión del aparato,
■las personas encargadas del manejo del aparato,
■las personas encargadas del mantenimiento del aparato,
■las personas encargadas de la eliminación del aparato.
Todas esas personas tienen que haber leído y comprendido estas instrucciones
en su totalidad.
Todas las actividades a realizar en el aparato o con su ayuda deberán ser
ejecutadas tal y como se describe en estas instrucciones de uso.
Los daños causados por incumplimiento de estas instruciones suponen una
anulación de la garantía. Superrollo no asume ninguna garantía por los daños
secundarios.
Disponibilidad
Estas instrucciones de uso son parate integrante del producto. Conserve estas
instrucciones de uso siempre cerca del aparato. Entregue las instrucciones de
uso junto con el aparato en caso de venta u otro tipo de transferencia del mismo.
Características descriptivas de estas instrucciones
Algunas partes de este manual están marcadas con unas características
determinadas. Esto le permite identificar fácilmente del tipo de texto del que se
trata:
texto normal
referencias
SENTIDO DE GIRO DE LOS TORNILLOS DE AJUSTE
■enumeraciones o
¾pasos de una operación
Las notas señaladas con este símbolo contienen datos para facilitar el
uso económico del aparato.
Indicaciones de seguridad básicas
Uso conforme
Este aparato sirve únicamente para subir y bajar persianas o toldos de marcha
suave.
Evitar descargas eléctricas
■Avise siempre a un técnico electricista especializado para realizar las
operaciones necesarias en la alimentación de tensión.
■Conecte el aparato únicamente en tomas de corriente de 230 V~50 Hz con
fusible a disponer por el propietario.
■Realice todas las tareas de montaje y conexión con el aparato desconectado
de la tensión.
■Cuando haya cables o dispositivos eléctricos innecesarios en el lugar de
instalación, desmonte estos o póngalos fuera de servicio.
■Antes de instalar el motor, desmonte todos los cables y dispositivos eléctricos
innecesarios para el funcionamiento o póngalos fuera de servicio.
■Cuando tenga que instalar un interruptor con preajuste de APAGADO, realice
su instalación al alcance de la vista del motor tubular y a una altura entre 1,5 m
y 1,8 m.
■Instale el interruptor con preajuste de APAGADO directamente junto a la
cabeza motriz y con suficiente distancia de las piezas móviles.
■Disponga el cable del motor dentro del tubo vacío hasta la caja de derivación
teniendo en cuenta la normativa local sobre instalaciones eléctricas.
■En caso de fallo desconecte el aparato de la red eléctrica.
■Desconecte siempre el aparato de la red eléctrica antes de abrir la caja de la
persiana.
■Desconecte siempre el aparato de la red eléctrica antes de limpiar la persiana.
■No guarde nunca el motor junto con ácidos, sustancias alcalinas, materiales
sucios o erosionables.
■Asegúrese de que el aparato no esté en contacto con humedad durante el
transporte, el almacenamiento o el uso, ni se encuentre en un entorno de
humos o vapores.
■No utilice el motor en puertas de garaje de edificios públicos.
■No toque el cable de la red con las manos húmedas.
■No abra nunca la carcasa del aparato.
■No utilice nunca un aparato defectuoso. Si su aparato está defectuoso póngase
en contacto con el servicio técnico.
■Observe la norma DIN VDE 0100, partes 701 y 702 para los usos en espacios
con humedad.
Evitar riesgos de accidente
■Asegúrese de que la caja de la persiana está cerrada cuando ponga el aparato
en funcionamiento.
■Asegúrese de que no haya ninguna persona debajo de la persianna al bajarla.
■Asegúrese de que los niños no jueguen con el control de la persiana.
■Asegúrese de que nadie pueda ser lesionado durante la instalación en caso de
deslizamiento de la persiana.
■Baje la persiana totalmente antes de realizar el montaje o coloque un apoyo.
■Utilice el aparato únicamente para persianas cuyo peso se adapte a la
capacidad del motor. Encontrará información al respecto en el capítulo
Superficies y pesos admisibles de las persianas a partir de la página 45
■Compruebe con regularidad el desequilibrio, los daños y el desgaste de cables
y resortes.
■Utilice el aparato sólo en perfecto estado.
■No arranque el motor con demasiada frecuencia y no lo sobrecargue.
■Gire el botón de regulación o el casquillo del motor sólo en el modo de
funcionamiento.
Descripción del aparato
44
■Utilice únicamente piezas de repuesto y accesorios originales de superrollo.
Encontrará información al respecto en el capítulo Accesorios a partir de la
página 54
■Asegúrese de que sólo el servicio técnico de superrollo realiza las reparaciones
en el aparato.
■Siga siempre las disposiciones de la norma DIN 12045 sobre dispositivos
adicionales de protección y remates para fachadas y huecos en muros
equipados con ventanas y puertaventanas.
Evitar cerrar estando fuera
■Asegúrese de encontrarse dentro del edificio cuando las persianas o una
puerta se cierren automáticamente.
Evitar daños
■Utilice el aparato únicamente en espacios sin humedad.
■Conecte el aparato únicamente a una toma de corriente de 230 V~50 Hz con
fusible a diponer por el propietario.
■Utilice el aparato únicamente para persianas de marcha suave.
■Utilice únicamente piezas de repuesto y accesorios originales de superrollo.
Descripción de las indicaciones de peligro
Tipos de indicaciones de peligro utilizados en estas instrucciones:
PELIGRO
Las indicaciones marcadas con la palabra PELIGRO señalan
situaciones peligrosas que causan lesiones graves o muerte.
AVISO
Las indicaciones marcadas con la palabra AVISO señalan
situaciones peligrosas que puedan causar lesiones graves o
muerte.
CUIDADO
Las indicaciones marcadas con la palabra CUIDADO señalan
situaciones peligrosas que causan lesiones de gravedad media o
leve.
Descripción las indicaciones sobre daños materiales y
medioambientales
ATENCIÓN
Estas indicaciones señalan situaciones que causan daños
materiales o medioambientales.
Descripción del aparato
Volumen de entrega
12
34567
8 Motor tubular ? 2 pasadores
9Herramienta de ajuste > Soporte del motor
A Arrastrador = Adaptador
@Clip de seguridad
Montaje del
aparato
45
Funciones
El aparato sirve para abrir y cerrar persianas y toldos.
Para poder realizar esas funciones, el motor tubular tiene que estar montado en la
caja de la persiana junto con los siguientes accesorios de superrollo:
■Tubo enrollador
■Cápsula cilíndrica
■Rodamiento de bolas
■Contrasoporte
■Resorte de sujeción
Encontrará información sobre los accesorios de superrollo en el capítulo
Accesorios a partir de la página 54.
Superficies y pesos admisibles para las persianas
La tabla siguiente muestra la superficie de la persiana admisible para cada motor
en función del peso. Incluye también el peso máximo admisible de las persianas.
Referencia Superficie máx. de la persiana
(m²)
Peso máx. de la
persiana (kg)
4 kg/m²
(plástico)
7 kg/m²
(aluminio/madera)
RM10MS 4,2 2,8 22
RM10MM 4,2 2,8 22
RM20MM 8 5 44
RM30MM 12 8 66
¾Asegúrese de no utilizar persianas que excedan la superficie o el peso
máximos admisibles.
Funciones de seguridad
El motor tubular está diseñado para el funcionamiento de corta duración (cuatro
minutos). Para evitar daños en el motor éste se desconecta automáticamente si
se sobrepasa ese tiempo o en caso de conmutaciones frecuentes.
Una desconexión de seguridad puede tener diferentes causas. Antes de poner el
aparato de nuevo en funcionamiento tiene que buscar la causa y repararla.
Encontrará más información sobre las posibles causas y su reparación en el
capítulo Reparación de fallos a partir de la página 50.
¾Repare la causa si es preciso.
¾Deje enfriar el motor unos 20 minutos.
Si después de estas medidas aún no es posible poner el motor en funcionamiento
avise al servicio técnico de superrollo.
Montaje del aparato
Antes del montaje
Para poder montar el aparato deben cumplirse los siguientes requisitos:
■La tapa de la caja de la persiana tiene que estar accesible y poder ser retirada.
■En el lugar de montaje debe disponerse de una conexión eléctrica de 230 V~50
Hz con dispositivo de desconexión (fusible) a disponer por el propietario.
■El peso de la persiana debe ser el adecuado para el motor tubular. Encontrará
información sobre el peso admisible de la persiana en el capítulo Superficies y
pesos admisibles de las persianas a partir de la página 45
■Debe disponerse de los accesorios de superrollo requeridos. Encontrará
información sobre los accesorios de superrollo en el capítulo Accesorios a
partir de la página 54.
¾Compruebe si el envío recibido presenta daños.
¾No ponga el aparato en funcionamiento si constata la existencia de algún daño.
¾Si constata la existencia de daños en el aparato póngase en contacto con el
servicio técnico.
Herramientas necesarias
Para el montaje del aparato necesita las siguientes herramientas y elementos de
fijación:
■metro plegable o cinta métrica
■lápiz
■nivel
■sierra para metales
■limas
■taladradora
■broca de 8 mm
■taco de 8 mm
■tornillos
■destornillador de ranura cruzada
■herramienta de ajuste adjunta
Montaje del soporte
La cabeza motriz del motor puede ser montada al lado derecho o izquierdo de la
caja de la persiana. En estas instrucciones se encuentra montado en el lado
derecho.
Para montar el soporte tiene que observar los siguientes puntos:
■El soporte tiene que estar alineado en horizontal.
■La persiana tiene que poder entrar verticalmente en el canal guía.
■El rollo de la persiana tiene que disponer de suficiente espacio en todos los
lados cuando se encuentre enrollado en la caja.
■Los tornillos de regulación del motor tubular tienen que estar perfectamente
accesibles después del montaje.
■Para que el agua pueda escurrir el cable del motor tiene que formar un lazo
hacia abajo directamente delante del motor.
Montaje del aparato
46
Para determinar la posición del soporte P dentro de la caja de la persiana mida y
calcule los siguientes parámetros:
DDiámetro de la persiana enrollada
XD/2Distancia de la posición del soporte P desde el
centro del canal guía (3)
Y>XDistancia de la posición del soporte P desde el
fondo de la caja de la persiana. Para que la persiana
tenga suficiente espacio Y tiene que ser superior a X.
D
X
Y
1
2
3
P
ATENCIÓN
Un enrollamiento torcido de la persiana puede dañar el motor
tubular.
¾Asegúrese de que el aparato esté bien nivelado en horizontal.
¾Marque con un lápiz la posición del soporte P en la parte interior derecha e
izquierda de la caja de la persiana.
¾Asegúrese de que las marcas estén alineadas entre sí.
¾Sujete el soporte centrado entre las marcas.
¾Marque los orificios con un lápiz.
¾Perfore los orificios con una broca de 8 mm.
¾Coloque los tacos.
¾Atornille el soporte.
Corte del tubo enrollador
Para determinar la longitud L del tubo enrollador mida y calcule los siguientes
parámetros:
AAnchura interior de la caja de la persiana
Bb1+b2+b3
b1Profundidad del contrasoporte
b2Anchura del tope de la cápsula cilíndrica
b31/3 de la longitud del vástago de la cápsula cilíndrica
Cc1+c2+c3
c1Profundidad del tope del adaptador
c2Profundidad de la cabeza motriz
c3Profundidad del soporte del motor
LA-(B+C)
L
B
C
A
b1c1c2c3b2
b3
BC
¾Marque la longitud L con un lápiz sobre el tubo enrollador.
¾Corte el tubo enrollador perpendicularmente con una sierra para metales.
¾Lime los bordes por el interior y el exterior con la lima.
Ensamblaje del aparato
¾Inserte el adaptador (1) con la ranura sobre la chaveta del anillo limitador (2) en
la cabeza motriz (3).
123
¾1. Introduzca el arrastrador (1) hasta el tope sobre el vástago del eje del motor
tubular (2).
¾2. Asegure el arrastrador con el clip de seguridad adjunto (3).
1
1.2.
2
3
Montaje del
aparato
47
ATENCIÓN
Los golpes con fuerza en el tubo enrollador pueden dañar el
motor tubular.
¾No golpee nunca con fuerza el motor tubular en el tubo enrollador.
¾1. Introduzca el motor tubular con el arrastrador (1) en el tubo enrollador (2).
¾2. Introduzca el tubo enrollador hasta el tope del adaptador (3) de la cabeza
motriz (4).
¾Asegúrese de que el adaptador no se mueve del anillo limitador de la cabeza
motriz.
134
2.1.
2
¾1. Introduzca la cápsula cilíndrica (1) hasta el tope en el tubo enrollador (2).
¾2. Coloque el rodamiento de bolas (3) en el vástago del eje de la cápsula (4).
134
2.1.
2
Para poder montar el aparato en la caja de la persiana tiene que
introducir primero la cápsula en el tubo enrollador hasta el tope. A
continuación extraerlo hasta que el aparato quepa exactamente en la
caja de la persiana.
Montaje del aparato en la caja de la persiana
¾Introduzca el vástago del eje (1) de la cabeza motriz en el orificio del soporte
del motor (2).
¾Asegúrese de que los tornillos de ajuste (3) queden accesibles.
¾Asegúrese de que el cable del motor (4) queda orientado hacia abajo.
12
3
4
¾Introduzca el pasador (1) por el agujero de seguridad (2) del vástago del eje.
1
2
¾1. Extraiga la cápsula cilíndrica (1) del tubo enrollador (2) hasta que el
rodamiento de bolas (4) quepa en el contrasoporte (3).
¾2. Introduzca el rodamiento de bolas en el contrasoporte.
¾3. Atornille el tubo enrollador a la cápsula cilíndrica.
1
1.
3.
2.
3
4
2
¾Asegúrese de que el tubo enrollador esté nivelado
Puesta en funcionamiento del aparato
48
Puesta en funcionamiento del aparato
Antes de poder utilizar el aparato hay que ejecutar los siguientes pasos:
■Conectar el cable del motor en la caja de derivación o del interruptor prevista
para ello.
■Llevar a cabo una prueba de funcionamiento.
■Montar el rollo de la persiana en el tubo enrollador.
■Ajustar el punto de tope final superior e inferior.
Conexión del aparato
La conexión del motor tubular a la red, así como todas las intervenciones en
equipos eléctricos, sólo pueden ser ejecutados por técnicos electricistas
autorizados y de conformidad con los esquemas de conexiones incluidos en estas
instrucciones.
PELIGRO
Descarga eléctrica mortal por contacto con componentes
conductores de tensión.
¾No realice ningún trabajo de conexión en el aparato cuanto esté
conectado a la alimentación de corriente.
¾Asegúrese de que el aparato esté desenchufado de la red
eléctrica.
ATENCIÓN
La aplicación de una tensión inadecuada puede causar fallos de
funcionamiento o daños en el motor.
¾Compare los datos indicados en la placa de características con los
de la red eléctrica local.
¾Asegúrese de que el aparato es conectado únicamente a una red
de 230 V ~ 50 Hz.
ATENCIÓN
Cortocircuito por cables dañados.
¾Asegúrese de que el cable no puede ser dañado por las piezas
móviles en la caja de la persiana.
ATENCIÓN
Cortocircuito por presencia de agua en el motor debido a una
colocación erróna del cable.
¾No disponga nunca el cable vertical hacia arriba.
¾El cable tiene que formar siempre un lazo.
El lazo del cable permite que el agua se escurra (1).
¾Conecte el cable del motor a la caja de derivación o del interruptor prevista
para ello (2).
1
2.1.
2
3
4
N° posición Color del conductor en el
cable del motor
Función
1 negro sentido de giro 1
2 marrón sentido de giro 2
3 azul conductor neutro
4 verde/ amarillo tierra
Para comprobar si el sentido de giro del motor coincide con la posición del
interruptor lleve a cabo una prueba de funcionamiento.
¾Cambie el motor al movimiento de bajada.
¾Controle si el motor se mueve en el sentido de bajada.
Si el motor no se mueve en el sentido de bajada tendrá que modificar la
disposición de los cables.
¾Intercambie el conductor marrón del cable del motor con el conductor negro.
¾Asegúrese de que el sentido de giro coincide con la posición del interruptor.
Para conectar el aparato a un interruptor de persianas de un sólo polo
consulte el plano de instalación adjunto en la página 54.
Montaje del rollo de la persiana
Para poder montar el rollo de la persiana deben cumplirse los siguientes
requisitos:
■El rollo de la persiana tiene que encontrarse dentro del canal guía.
■El motor tubular tiene que estar desplazado totalmente hacia abajo.
ATENCIÓN
Al perforar o atornillar se pueden provocar daños en el motor
tubular.
¾No perfore ni atornille nunca el tubo enrollador en la zona del motor
tubular.
¾Utilice únicamente los orificios disponibles en el tubo enrollador
para fijar el rollo de la persiana.
¾1. Instale un resorte de sujeción (1) en la lama superior del rollo de la persiana
(2) aproximadamente cada 40 cm.
¾2. Fije los resortes de sujeción en los orificios cuadrados (3) del tubo de
enrollado.
2
1.2.
13
Puesta en funcionamiento del aparato
49
Si utiliza tubos en enrollado SW40 con ranura exterior necesitará además
abrazaderas de suspensión.
¾1. Coloque una abrazadera de suspensión (1) por arriba sobre el tubo de
enrollado (2) aproximadamente cada 40 cm.
¾2. Fije los resortes de sujeción (4) en los orificios cuadrados de las
abrazaderas (3).
13
4
2
1.2.
Ajuste de los puntos finales
El ajuste de los puntos finales sirve para determinar la posición final superior e
inferior de subida y bajada de la persiana. Esos puntos pueden ser modificados
en cualquier momento.
El motor tubular está diseñado para el funcionamiento de corta duración
(cuatro minutos). Para evitar daños por calentamiento el motor se
desconecta automáticamente si se sobrepasa ese tiempo o en caso de
conmutaciones frecuentes. En ese caso deje enfriar el motor unos 20
minutos.
ATENCIÓN
Fallos de funcionamiento por falta de ajuste o por ajuste erróneo
de los puntos finales.
¾Asegúrese de que sólo se pone en funcionamiento el aparato con
los puntos finales correctamente ajustados.
Los tornillos de ajuste se encuentran en la cabeza motriz del motor tubular.
¾Para ajustar el punto final inferior utilice el tornillo superior (1).
¾Para ajustar el punto final superior utilice el tornillo inferior (2).
1
2
¾Para alargar el recorrido de avance gire en el sentido de MÁS.
¾Para acortar el recorrido de avance gire en el sentido contrario (MENOS).
El sentido de giro de los tornillos de ajuste puede variar de unos modelos
a otros. Preste atención a los símbolos impresos sobre la cabeza motriz.
ATENCIÓN
El acortamiento del rollo de la persiana debido a oscilaciones de
temperatura puede causar daños en el aparato.
¾Ajuste los puntos finales de modo que el tope del rollo de la
persiana tenga unos 2-3 cm de juego antes del final.
Para ajustar el punto final superior proceda del siguiente modo:
¾Cambie el motor al movimiento de subida.
Si el motor se detiene antes de llegar al punto final deseado proceda de este
modo:
¾Deje el temporizador o el interruptor en la posición de subida.
¾Gire el tornillo de ajuste inferior con cuidado en dirección a MÁS, con ayuda de
la herramienta de ajuste adjunta, hasta que el motor llegue al punto final
deseado.
Si el motor se pasa del punto final deseado proceda de este modo:
¾Pare el motor.
¾Cambie el motor al movimiento de bajada.
¾Pare el motor por debajo del punto final deseado.
¾Gire el tornillo de ajuste inferior con cuidado en dirección de MENOS con
ayuda de la herramienta de ajuste.
¾Para controlar el nuevo punto final ajustado cambie el motor al movimiento de
subida.
¾Si es necesario repita los pasos anteriores hasta lograr ajustar el punto final
deseado.
Para ajustar el punto final inferior proceda del siguiente modo:
¾Cambie el motor al movimiento de bajada.
Si el motor se detiene antes de llegar al punto final deseado proceda de este
modo:
¾Deje el temporizador o el interruptor en la posición de movimiento hacia abajo.
¾Gire el tornillo de ajuste superior con cuidado en dirección a MÁS, con ayuda
de la herramienta de ajuste adjunta, hasta que el motor llegue al punto final
deseado.
Reparación de fallos
50
Si el motor se pasa del punto final deseado proceda de este modo:
¾Pare el motor.
¾Cambie el motor al movimiento de subida.
¾Pare el motor por encima del punto final deseado.
¾Gire el tornillo de ajuste superior con cuidado en dirección de MENOS con
ayuda de la herramienta de ajuste.
¾Para controlar el nuevo punto final ajustado cambie el motor al movimiento de
bajada.
¾Si es necesario repita los pasos anteriores hasta lograr ajustar el punto final
deseado.
Para modificar el ajuste de los puntos finales proceda del siguiente modo:
¾Mueva la persiana hasta la posición central.
¾Ajuste los puntos finales como se ha indicado más arriba.
Reparación de fallos
Reparación de fallo total
PELIGRO
Descarga eléctrica mortal por contacto con componentes
conductores de tensión.
¾No realice ninguna reparación en el aparato.
¾No abra nunca el aparato.
¾Cuando el aparato esté defectuoso avise al servicio técnico de
superrollo.
La causa de un fallo total sea posiblemente un defecto en el motor. Causas
posibles de un motor defectuoso:
■El motor ha sido fuertemente sobrecargado por un error en la mecánica.
■La persiana ha quedado bloqueada debido a la formación de hielo y ha
sobrecargado el motor.
Cuando el motor tubular esté defectuoso tiene que desmontar el aparato y
encargar su reparación al servicio técnico de superrollo. Para ello proceda como
sigue:
¾Desmonte el aparato conforme a las instrucciones indicadas en el capítulo
Desmontaje del aparato a partir de la página 53.
¾Solicite una revisión del aparato al servicio técnico de superrollo.
Descripción de fallos y su reparación
Fallo Causa posible Reparación
El motor no funciona (fallo total). Falla la tensión de red. Asegúrese de que se dispone de la tensión de alimentación
(230 V).
Asegúrese de que el aparato esté correctamente conectado.
Encontrará información al respecto en el capítulo Conexión
del aparato a partir de la página 48.
Contacte siempre a un técnico electricista especializado
para realizar las operaciones en la alimentación de tensión.
Fallos de funcionamiento del aparato Asegúrese de que el aparato esté desenchufado de la red
eléctrica.
Desmonte el aparato.
Encontrará información al respecto en el capítulo
Desmontaje del aparato a partir de la página 53.
Sobrecarga del motor por dureza en la marcha
de la persiana debido a un desplazamiento de
las lamas.
Asegúrese de que el aparato esté desenchufado de la red
eléctrica.
Asegúrese de que las lamas estén niveladas.
Conecte la alimentación de corriente.
Mueva la persiana en ambas direcciones.
Engrase los puntos de dureza con cera de deslizamiento.
Sobrecarga del motor por dureza en la marcha
de la persiana debido a un desplazamiento de
las lamas.
Elimine los puntos con hielo.
Reparación de
fallos
51
Fallo Causa posible Reparación
El motor no funciona (fallo total). Se ha sobrepasado la duración máxima de
funcionamiento (cuatro minutos).
Deje enfriar el aparato unos 20 minutos.
Asegúrese de que el aparato sea manejado correctamente.
Asegúrese de que los puntos finales estén correctamente
ajustados.
Asegúrese de que la persiana se mueve con suavidad.
Las conexiones no son correctas. Asegúrese de que el aparato esté correctamente conectado.
Encontrará información al respecto en el capítulo Conexión
del aparato a partir de la página 48.
Contacte siempre a un técnico electricista especializado
para realizar las operaciones en la alimentación de tensión.
El aparato no se para. El adaptador se ha deslizado del anillo limitador. Asegúrese de que el aparato esté desenchufado de la red
eléctrica.
Desmonte el aparato.
Encontrará información al respecto en el capítulo
Desmontaje del aparato a partir de la página 53.
Asegúrese de que la ranura del adaptador esté enrasado
sobre la chaveta en la cabeza motriz.
Monte el aparato de nuevo en orden inverso.
La cápsula cilíndrica no está correctamente
unida con el tubo enrollador.
Mueva la persiana totalmente hasta abajo.
Asegúrese de que el aparato esté desenchufado de la red
eléctrica.
Extraiga la persiana del tubo enrollador.
Asegúrese de que la cápsula cilíndrica esté atornillada al
tubo enrollador.
El tubo enrollador es demasiado corto. Asegúrese de que el aparato esté desenchufado de la red
eléctrica.
Desmonte el aparato.
Encontrará información al respecto en el capítulo
Desmontaje del aparato a partir de la página 53.
Monte un nuevo tubo enrollador.
Encontrará información sobre el modo de cortar y montar el
tubo enrollador a partir del capítulo Corte del tubo enrollador
a partir de la página 46.
Monte el aparato de nuevo en orden inverso.
Después de montar la persiana, ésta no se
desplaza totalmente hasta arriba.
El ajuste del punto final superior no es correcto. Ajuste el punto final superior.
Encontrará información al respecto en el capítulo Ajuste de
los puntos finales a partir de la página 49.
Reparación de fallos
52
Fallo Causa posible Reparación
La persiana se bloquea al subir o al bajar. Las lamas de la persiana se han desplazado. Asegúrese de que todas las lamas estén niveladas.
Engrase los puntos de dureza con cera de deslizamiento.
Para poder tirar de la persiana libremente active el motor por
un momento en la dirección contraria.
La persiana roza la caja por la falta de rodillos
de presión en el marco de la ventana.
Abra la caja de la persiana.
Monte los rodillos de presión.
La persiana se ha enrollado torcida porque el
aparato no está nivelado.
Asegúrese de que el aparato esté desenchufado de la red
eléctrica.
Desmonte el aparato.
Encontrará información al respecto en el capítulo
Desmontaje del aparato a partir de la página 53.
Monte el aparato de nuevo en posición horizontal nivelada.
Encontrará información al respecto en el capítulo Montaje
del soporte a partir de la página 45.
El material aislante se ha soltado dentro de la
caja de la persiana y la bloquea.
Abra la caja de la persiana.
Retire el material aislante.
Por favor, consulte con el fabricante cual es el aislamiento
correcto para la caja de la persiana.
La persiana es demasiado ligera. Asegúrese de que todas las lamas estén niveladas.
Cargue la persiana por ejemplo con un hierro plano
adecuado.
Coloque el peso en la lama inferior.
Para poder tirar de la persiana libremente active el motor por
un momento en la dirección contraria.
El sentido de giro es erróneo. La conexión del aparato es errónea. Asegúrese de que el aparato esté desenchufado de la red
eléctrica.
Intercambie el conductor marrón y el negro.
Encontrará información sobre la disposición de los
conductores del cable en el capítulo Conexión del aparato a
partir de la página 48.
Contacte siempre a un técnico electricista especializado
para realizar las operaciones en la alimentación de tensión.
Desmontaje del
aparato
53
Desmontaje del aparato
Para desmontar el motor tubular proceda del siguiente modo:
¾Cambie el motor al movimiento de bajada hasta que la persiana ya no esté
suspendida de los resortes y pueda ser soltada fácilmente del tubo enrollador.
PELIGRO
Descarga eléctrica mortal por contacto con componentes
conductores de tensión.
¾No realice ningún trabajo de conexión en el aparato cuanto esté
conectado a la alimentación de corriente.
¾Asegúrese de que el aparato esté desenchufado de la red
eléctrica.
¾Desconecte el cable de la caja de derivación o del interruptor.
¾Suelte los resortes de sujeción del tubo enrollador.
¾Extraiga el pasador del orificio de seguridad en el vástago del eje del soporte
del motor.
¾Afloje los tornillos con los que están unidos entre sí la cápsula cilíndrica y el
tubo enrollador.
¾Introduzca la cápsula cilíndrica hasta el tope en el tubo enrollador.
¾Extraiga el aparato de los soportes.
¾Extraiga el motor tubular del tubo enrollador.
Eliminación del aparato
La eliminación ecológicamente correcta del material de producción, módulos
electrónicos, materiales reciclables y otras partes integrantes del aparato está
regulada por la legislación nacional y regional.
¾Diríjase a la autoridad local competente para obtener información detallada
sobre la eliminación.
¾Lleve el aparato a una compañía de recogida de desechos conforme a las
disposiciones legales.
¾Elimine los componentes electrónicos de acuerdo con las disposiciones legales
establecidas por la ley ElektroG (ley de aparatos eléctricos).
Apparaat in gebruik nemen ........................................................................................................................................................................................................................... 61
EG-verklaring van overeenstemming ........................................................................................................................................................................................................... 67
Overzicht
21
3456
8
7
9
10
11
12
8 Tegenlager* = Adapter
9 Kogellager* < Aandrijfkop
A Wikkelbuiskap* ; Aandrijflager
@ Bevestigingsveer* UT Motorkabel
? Meenemer UB Rolluikpantser*
> Buismotor UD Wikkelbuis*
De afbeelding toont de buismotor in een inbouwsituatie. De met * gekenmerkte onderdelen behoren niet tot de leveringsomvang.
Voorwoord
56
Voorwoord
Deze handleiding beschrijft de montage, de elektrische aansluiting en de
bediening van de elektrische buismotoren RM10MS/RM10MM/
RM20MM/RM30MM. Lees deze handleiding vóór de montage en de eerste
ingebruikname zorgvuldig door en neem vooral de veiligheidsinstructies in acht!
Deze handleiding helpt u bij het
■doelmatige,
■veilige en
■economische
gebruik van de elektronische buismotoren
RM10MS/RM10MM/RM20MM/RM30MM, kort 'motor' genoemd.
Deze handleiding beschrijft de montage en het gebruik van de buismotor met het
daarvoor vereiste superrollo-toebehoren. Voor de buismotor in combinatie met het
toehoren wordt in deze handleiding het begrip 'apparaat' gebruikt.
Deze handleiding richt zich tot de volgende personen:
■personen die dit apparaat monteren;
■personen die dit apparaat aansluiten;
■personen die dit apparaat bedienen;
■personen die dit apparaat onderhouden of
■personen die dit apparaat verwijderen.
Elk van deze personen moet de complete inhoud van deze handleiding gelezen
en begrepen hebben.
Alle werkzaamheden aan en met het apparaat mogen alleen in de omvang
worden uitgevoerd die in de handleiding beschreven staat.
In geval van schade die terug te voeren is op het negeren van deze handleiding
komt de garantie te vervallen. superrollo is niet aansprakelijk voor vervolgschade.
Beschikbaarheid
Deze handleiding is onderdeel van het product. Bewaar deze handleiding altijd in
de buurt van het apparaat. Geef ook deze handleiding door als u het apparaat
verkoopt of op andere wijze doorgeeft.
Opmaak van deze handleiding
Verschillende elementen van de gebruiksaanwijzing zijn voorzien van een
vastgelegde opmaak. Zo kunt u eenvoudig vaststellen of het gaat om:
normale tekst,
verwijzingen,
DRAAIRICHTING VAN DE INSTELSCHROEVEN,
■opsommingen of
¾arbeidsstappen.
Aanwijzigen met dit teken bevatten gegevens over het economisch
gebruik van het apparaat.
Fundamentele veiligheidsinstructies
Doelmatig gebruik
Het apparaat is uitsluitend bedoeld voor het omhoog trekken en neerlaten van
soepel lopende rolluiken en markiezen.
Gevaar voor elektrische schokken vermijden
■Laat de netaansluiting en alle werkzaamheden aan de spanningsvoorziening
alleen uitvoeren door een gekwalificeerde, opgeleide elektromonteur.
■Het apparaat mag alleen worden aangesloten op een 230V~ 50 Hz
stroomaansluiting met voorhanden zekering.
■Voer alle montage- en aansluitwerkzaamheden uit in spanningsvrije toestand.
■Als op de montageplaats niet-vereiste leidingen of elektrische inrichtingen
voorhanden zijn, dient u deze te demonteren of buiten bedrijf te stellen.
■Demonteer vóór de montage van de motor alle niet voor het gebruik vereiste
leidingen en elektrische inrichtingen of stel deze buiten bedrijf.
■Als u een schakelaar met UIT-voorinstelling wilt inbouwen, monteert u deze op
zichtafstand van de buismotor op een hoogte tussen 1,5 m en 1,8 m.
■Monteer de schakelaar met UIT-voorinstelling direct aan de aandrijfkop en met
voldoende afstand van bewegende onderdelen.
■Leg de motorkabel binnenliggend in een lege buis tot aan de aftakdoos en
neem hiervoor de van toepassing zijnde elektrische voorschriften in acht.
■Onderbreek in geval van storingen onmiddellijk de stroomtoevoer naar het
apparaat.
■Onderbreek de stroomtoevoer naar het apparaat voordat u de rolluikkast opent.
■Onderbreek vóór reinigingswerkzaamheden aan het rolluik de stroomtoevoer
naar het apparaat.
■Bewaar de motor niet samen met zuur, alkalische substanties, vuile of
geërodeerde materialen.
■Waarborg dat het apparaat tijdens het transport, de opslag en het gebruik niet
vochtig wordt en zich niet in een dampige omgeving bevindt.
■Gebruik de motor niet voor garagedeuren van openbare gebouwen.
■Raak de netkabel nooit met vochtige handen aan.
■Schroef nooit de behuizing van het apparaat open.
■Gebruik nooit een defect apparaat. Als het apparaat defect is, dient u contact
op te nemen met de klantenservice.
■Neem bij het gebruik in vochtige ruimten DIN VDE 0100, deel 701 en 702 in
acht.
Gevaar voor letsel vermijden
■Waarborg dat de rolluikkast gesloten is als het apparaat in bedrijf is.
■Waarborg dat zich geen personen onder het rolluik bevinden als het rolluik
neergelaten wordt.
■Waarborg dat kinderen niet met de rolluikbesturing spelen.
■Waarborg dat tijdens de montagewerkzaamheden geen personen gewond
kunnen raken door een naslippend rolluik.
■Laat het rolluik vóór montagewerkzaamheden volledig naar beneden of steun
het rolluik dienovereenkomstig.
■Gebruik het apparaat alleen met rolluiken waarvan het gewicht bij de buismotor
past. Voor informatie verwijzen wij naar het punt 'Toegestane
rolluikoppervlakken en -gewichten' vanaf pagina 58
■Controleer het apparaat regelmatig op onbalans, schade en slijtage aan kabels
en veren.
■Gebruik het apparaat alleen in optimale staat.
■Start de motor niet te vaak en overbelast hem niet.
■Draai de instelknop of de aandrijfbus alleen in de bedrijfsmodus.
A
pparaatbeschrijving
57
■Gebruik alleen originele reserveonderdelen en toebehoren van superrollo. Voor
informatie verwijzen wij naar het hoofdstuk 'Toebehoren' vanaf pagina 67
■Laat reparaties aan het apparaat alleen uitoeren door de superrollo-
klantenservice.
■Neem vooral NEN 12045 - 'Aangedreven luiken en zonneschermen -
Aanvullende veiligheidsinrichtingen en afsluitingen voor gevels en
muuropeningen die met ramen en raamdeuren zijn uitgerust' in acht.
Buitensluiten vermijden
■Waarborg dat u zich in het gebouw bevindt als het rolluik van een deur
automatisch gesloten wordt.
Beschadigingen vermijden
■Gebruik het apparaat alléén in droge ruimten.
■Het apparaat mag alleen worden aangesloten op een 230V~ 50 Hz
stroomaansluiting met voorhanden zekering.
■Gebruik het apparaat alléén met soepel lopende rolluiken.
■Gebruik alleen originele reserveonderdelen en toebehoren van superrollo.
Opmaak van de gevareninstructies
In deze handleiding vindt u de volgende categorieën gevareninstructies:
GEVAAR
Instructies met het woord GEVAAR waarschuwen voor een
gevaarlijke situatie die de dood of zware verwondingen tot
gevolg heeft.
WAARSCHUWING
Instructies met het woord WAARSCHUWING waarschuwen voor
een gevaarlijke situatie die mogelijkerwijs de dood of zware
verwondingen tot gevolg heeft.
VOORZICHTIG
Instructies met de uitdrukking VOORZICHTIG waarschuwen voor
een situatie die lichte of middelzware verwondingen tot gevolg
kan hebben.
Opmaak van de instructies m.b.t. materiële - en milieuschade
OPGELET
Deze instructies waarschuwen voor een situatie die tot materiële
of milieuschade leidt.
Apparaatbeschrijving
Leveringsomvang
12
34567
8 Buismotor ?2 x splitpen
9 Instelgereedschap > Aandrijflager
A Meenemer = Adapter
@ Borgclip
A
pparaat monteren
58
Functies
Met het apparaat kunt u rolluiken en markiezen openen en sluiten.
De buismotor moet met de volgende superrollo-toebehoren in de rolluikkast
worden ingebouwd om de beschreven functies uit te kunnen voeren:
■wikkelbuis
■wikkelbuiskap
■kogellager
■tegenlager
■ophangbeugels.
Voor informatie over het superrollo-toebehoren verwijzen wij naar het hoofdstuk
'Toebehoren' vanaf pagina 67.
Toegestane rolluikoppervlakken en -gewichten
De onderstaande tabel geeft het voor de desbetreffende motor geoorloofde
rolluikoppervlak weer in relatie tot het profielgewicht. Bovendien wordt hier het
maximale gewicht van het rolluik vermeld.
Artikelnr. max. rolluikoppervlak (m²) max.
rolluikgewicht
(kg)
4 kg/m²
(kunststof)
7 kg/m²
(aluminium/hout)
RM10MS 4,2 2,8 22
RM10MM 4,2 2,8 22
RM20MM 8 5 44
RM30MM 12 8 66
¾Waarborg dat het max. rolluikoppervlak resp. het max. rolluikgewicht niet wordt
overschreden.
Veiligheidsfuncties
De buismotor is ontworpen voor kortstondig bedrijf (vier minuten). Ter vermijding
van schade schakelt de motor bij overschrijding van deze tijd of bij vaak
omschakelen automatisch uit.
De veiligheidsuitschakeling kan verschillende oorzaken hebben. Voordat u het
apparaat weer in gebruik neemt, moet u eventueel de oorzaak verhelpen. Voor
informatie over mogelijke oorzaken en het verhelpen daarvan verwijzen wij naar
het hoofdstuk 'Storingen verhelpen' vanaf pagina 63.
¾Verhelp zo nodig de oorzaak.
¾Laat de motor ca. 20 minuten afkoelen.
Als na deze maatregelen nog steeds geen functie mogelijk is, neemt u contact op
met de superrollo-klantenservice.
Apparaat monteren
Vóór de montage
Voor de montage van het apparaat moeten de volgende voorwaarden zijn vervuld:
■Het deksel van de rolluikkast moet goed toegankelijk en verwijderbaar zijn.
■Op de montageplaats moet een 230 V~ 50 Hz stroomaansluiting met
vrijschakelvoorziening (zekering) voorhanden zijn.
■Het rolluikgewicht moet bij de buismotor passen. Voor informatie over het
toegestane rolluikgewicht verwijzen wij naar het punt 'Toegestane
rolluikoppervlakken en -gewichten' vanaf pagina 58.
■Het vereiste superrollo-toebehoren moet voorhanden zijn. Voor informatie over
het superrollo-toebehoren verwijzen wij naar het hoofdstuk 'Toebehoren' vanaf
pagina 67
¾Controleer de levering op beschadigingen.
¾Neem het apparaat niet in gebruik als u schade aan het apparaat constateert.
¾Neem contact op met de superrollo-klantenservice als u schade aan het
apparaat constateert.
Vereist gereedschap
Voor de montage van het apparaat hebt u het volgende gereedschap en de
vermelde bevestigingselementen nodig:
■duimstok of meetband
■potlood
■waterpas
■ijzerzaag
■vijl
■boormachine
■8 mm steenboor
■8 mm pluggen
■schroeven
■kruiskopschroevendraaier
■bijgeleverd instelgereedschap.
Lager monteren
U kunt de aandrijfkop van de motor aan de rechter- of linkerzijde van de rolluikkast
monteren. In deze handleiding wordt de montage voor de rechterzijde
beschreven.
Bij de montage van de lagers dient u de volgende punten in acht te nemen:
■de uitlijning van de lagers moet horizontaal zijn.
■het rolluik moet verticaal in de geleiderail kunnen lopen.
■het rolluikpantser moet in opgerolde toestand aan alle zijden in de rolluikkast
voldoende ruimte hebben.
■de instelschroeven van de buismotor moeten na de montage goed toegankelijk
zijn.
■de motorkabel moet direct vóór de motor in een lus naar beneden worden
gelegd, zodat het water kan afdruipen.
A
pparaat
monteren
59
Voor de bepaling van de lagerpositie P in de rolluikkast moet u de volgende
afmetingen uitmeten en berekenen:
Ddiameter van het opgerolde rolluik
XD/2afstand van de lagerpositie P van het midden van de
geleiderail (3)
Y>Xafstand van de lagerpositie P van de bodem van de
rolluikkast. Om te waarborgen dat het rolluik
voldoende speling heeft, moet Y groter zijn dan X .
D
X
Y
1
2
3
P
OPGELET
Beschadiging aan de buismotor door een scheef opgerold
rolluik.
¾Waarborg dat het apparaat horizontaal is ingebouwd.
¾Markeer met behulp van een potlood de lagerpositie P op de rechter en linker
binnenzijde van de rolluikkast.
¾Zorg ervoor dat de markeringen horizontaal zijn uitgelijnd.
¾Houd de lagers in het midden op de markeringen.
¾Markeer de boorgaten met behulp van een potlood.
¾Boor de gaten met een 8 mm-boor.
¾Steek de pluggen erin.
¾Schroef de lagers vast.
Wikkelbuis op maat zagen
Voor de bepaling van de lengte L van de wikkelals moet u de volgende
afmetingen uitmeten en berekenen:
Abinnenwerkse maat van de rolluikkast
Bb1+b2+b3
b1diepte van het tegenlager
b2breedte van de aanslag van de wikkelbuiskap
b31/3 van de schachtlengte van de wikkelbuiskap
Cc1+c2+c3
c1diepte van de aanslag van de adapter
c2diepte van de aandrijfkop
c3diepte van het aandrijflager
LA-(B+C)
L
B
C
A
b1c1c2c3b2
b3
BC
¾Markeer de lengte L met een potlood op de wikkelbuis.
¾Zaag de wikkelbuis met behulp van een ijzerzaag recht op maat.
¾Ontbraam de randen aan de binnen- en buitenzijde met een vijl.
Apparaat monteren
¾Schuif de adapter (1) met de groef over de veer van de limietring (2) van de
aandrijfkop (3).
123
¾1. Schuif de meenemer (1) tot aan de aanslag op de asstift van de buismotor
(2).
¾2. Borg de meenemer met de bijgeleverde borgclip (3).
1
1.2.
2
3
A
pparaat monteren
60
OPGELET
Schade aan de buismotor door te hard inslaan in de wikkelbuis.
¾Sla de buismotor nooit met geweld in de wikkelbuis.
¾1. Schuif de buismotor met de meenemer (1) in de wikkelbuis (2).
¾2. Schuif de wikkelbuis tot aan de aanslag van de adapter (3) van de
aandrijfkop (4).
¾Waarborg dat de adapter niet door de limietring van de aandrijfkop glijdt.
134
2.1.
2
¾1. Schuif de wikkelbuiskap (1) tot aan de aanslag in de wikkelbuis (2).
¾2. Steek het kogellager (3) op de asstift van de wikkelbuiskap (4).
134
2.1.
2
De wikkelbuiskap moet eerst tot aan de aanslag in de wikkelbuis steken,
voordat u het apparaat in de rolluikkast kunt monteren. Vervolgens moet
de capsule zo ver eruit worden getrokken dat het apparaat exact in de
rolluikkast past.
Apparaat in de rolluikkast monteren
¾Steek de asstift (1) van de aandrijfkop in het gat van het aandrijflager (2).
¾Waarborg dat de instelschroeven (3) toegankelijk zijn.
¾Waarborg dat de motorkabel (4) naar beneden verloopt.
12
3
4
¾Steek de splitpen (1) door het borggat (2) in de asstift.
1
2
¾1. Trek de wikkelbuiskap (1) zover uit de wikkelbuis (2) dat het kogellager (4) in
het tegenlager (3) past.
¾2. Steek het kogellager in het tegenlager.
¾3. Schroef de wikkelbuis vast aan de wikkelbuiskap.
1
1.
3.
2.
3
4
2
¾Waarborg dat de wikkelbuis horizontaal is ingebouwd.
A
pparaat
in gebruik nemen
61
Apparaat in gebruik nemen
Voordat u het apparaat kunt gebruiken, moet u de volgende stappen uitvoeren:
■sluit de motorkabel aan op de daarvoor bestemde aftak- of schakelaardoos.
■voer een proefdraai uit
■monteer het rolluikpantser aan de wikkelbuis
■stel het bovenste en onderste eindaanslagpunt in.
Apparaat aansluiten
De netaansluiting van de buismotor en alle werkzaamheden aan elektrische
installaties mogen alleen aan de hand van de aansluitschema's worden
uitgevoerd door een erkende elektromonteur.
GEVAAR
Dodelijke elektrische schokken door het aanraken van onder
spanning staande onderdelen.
¾Voer geen aansluitwerkzaamheden aan het apparaat uit als het op
de stroomvoorziening is aangesloten.
¾Waarborg dat de stroomtoevoer naar het apparaat onderbroken is.
OPGELET
Functiestoringen of motorschade door verkeerde netspanning.
¾Vergelijk de gegevens op het typeplaatje met de gegevens van het
stroomnet ter plekke.
¾Waarborg dat het apparaat alleen wordt aangesloten op een
stroomnet met 230 V ~ 50 Hz.
OPGELET
Kortsluiting door beschadigde kabels.
¾Waarborg dat de kabel niet kan worden beschadigd door
bewegende onderdelen in de rolluikkast.
OPGELET
Kortsluiting door water in de motor bij verkeerde kabelgeleiding.
¾Leg de kabel nooit verticaal naar boven.
¾Leg de kabel altijd in een lus.
Als de kabel in een lus wordt gelegd, kan het water afdruipen (1).
¾Sluit de motorkabel aan op de daarvoor bestemde aftak- of schakelaardoos (2).
1
2.1.
2
3
4
Positienr. Aderkleur motorkabel Functie
1 zwart draairichting 1
2 bruin draairichting 2
3 blauw neutrale geleider
4 groen/geel aarding
Voer een proefdraai uit om te controleren of de looprichting van de motor
overeenstemt met de stand van de schakelaar.
¾Stuur de motor in neerwaartse richting.
¾Controleer of de motor in neerwaartse richting loopt.
Als de motor niet in neerwaartse richting loopt, moet u de kabeltoewijzing
veranderen.
¾Verwissel de bruine ader van de motorkabel met de zwarte ader.
¾Waarborg dat de looprichting overeenstemt met de stand van de schakelaar.
Neem het installatieschema op pagina 67 in acht om het apparaat op
een eenpolige rolluikschakelaar aan te sluiten.
Rolluikpantser monteren
Voor de montage van het rolluikpantser moeten de volgende voorwaarden vervuld
zijn:
■het rolluikpantser moet in de geleiderail liggen.
■de buismotor moet helemaal omlaag gestuurd zijn.
OPGELET
Beschadiging van de buismotor door boren of schroeven.
¾Boor of schroef de wikkelbuis nooit in de buurt van de buismotor.
¾Gebruik uitsluitend de voorhanden gaten in de wikkelbuis om het
rolluikpantser te bevestigen.
¾1. Schuif ongeveer om de 40 cm een ophangbeugel (1) op de bovenste lamel
van het rolluikpantser (2).
¾2. Plaats de ophangbeugel in de rechthoekige gaten (3) van de wikkelbuis.
2
1.2.
13
A
pparaat in gebruik nemen
62
Als u wikkelbuizen SW40 met felsrand aan de buitenzijde gebruikt, hebt u
bovendien klembeugel nodig.
¾1. Schuif ongeveer om de 40 cm een klembeugel (1) vanaf bovenaf over de
wikkelbuis (2).
¾2. Plaats de ophangbeugels (4) in de rechthoekige gaten (3) van de
klembeugels (3).
13
4
2
1.2.
Eindpunten instellen
Door de instelling van de eindpunten legt u de bovenste en onderste eindpositie
vast voor het omhoog en omlaag sturen van het rolluik. Deze instelling kunt u later
nog wijzigen.
De buismotor is ontworpen voor kortstondig bedrijf (vier minuten). Ter
vermijdign van schade door verwarming schakelt de motor bij
overschrijding van deze tijd of bij vaak omschakelen automatisch uit. Laat
de motor in dit geval ca. 20 minuten afkoelen.
OPGELET
Functiestoringen door ontbrekende of verkeerde instelling van
de eindpunten.
¾Waarborg dat het apparaat alleen wordt gebruikt met correct
ingestelde eindpunten.
De instelschroeven bevinden zich aan de aandrijfkop van de buismotor.
¾Gebruik de bovenste schroef (1) om het onderste eindpunt in te stellen.
¾Gebruik de onderste schroef (2) om het bovenste eindpunt in te stellen.
1
2
¾Draai richting PLUS om de loopweg te verlengen.
¾Draai in de tegenovergestelde richting (MINUS) om de loopweg te verkorten.
De draairichting van de instelschroeven kan modelgebonden variëren.
Let op het opschrift aan de aandrijfkop.
OPGELET
Beschadigingen van het apparaat door verkorting van het
rolluikpantser op grond van temperatuurschommelingen.
¾Stel de eindpunten zodanig in dat de stoppers van het
rolluikpantser ca. 2 -3 cm speling hebben vóór de aanslagen.
Ga als volgt te werk om het bovenste eindpunt in te stellen:
¾stuur de motor in opwaartse richting.
Als de motor stopt voordat het gewenste eindpunt bereikt is, gaat u als volgt te
werk:
¾laat de tijdschakelklok of de schakelaar in de stand opwaartse richting staan.
¾draai met het instelgereedschap de onderste instelschroef voorzichtig in de
richting PLUS totdat de motor het gewenste eindpunt heeft bereikt.
Als de motor het gewenste eindpunt passeert, gaat u als volgt te werk:
¾stop de motor.
¾stuur de motor in neerwaartse richting.
¾stop onder het gewenste eindpunt.
¾draai de onderste instelschroef met het instelgereedschap voorzichtig in richting
MINUS.
¾stuur de motor in opwaartse richting om het nu ingestelde eindpunt te
controleren.
¾Herhaal zo nodig de hierboven vermelde stappen totdat het gewenste eindpunt
bereikt is.
Ga als volgt te werk om het onderste eindpunt in te stellen:
¾stuur de motor in neerwaartse richting.
als de motor stopt voordat het gewenste eindpunt bereikt is, gaat u als volgt te
werk.
¾laat de tijdschakelklok of de schakelaar in de stand neerwaartse richting staan.
¾draai met het instelgereedschap de bovenste instelschroef voorzichtig in de
richting PLUS tot de motor het gewenste eindpunt heeft bereikt.
Storingen
verhelpen
63
Als de motor het gewenste eindpunt passeert, gaat u als volgt te werk:
¾stop de motor.
¾stuur de motor in opwaartse richting.
¾stop de motor boven het gewenst eindpunt.
¾draai de bovenste instelschroef met het instelgereedschap voorzichtig in
richting MINUS.
¾stuur de motor in neerwaartse richting om het nu ingestelde eindpunt te
controleren.
¾herhaal zo nodig de hierboven vermelde stappen totdat het gewenste eindpunt
is bereikt.
Ga als volgt te werk om de instellingen van de eindpunten te vervangen:
¾stuur het rolluik ongeveer tot in de middenstand.
¾stel de eindpunten in zoals tevoren beschreven.
Storingen verhelpen
Totale uitval verhelpen
GEVAAR
Dodelijke elektrische schokken door het aanraken van onder
spanning staande onderdelen.
¾Voer geen reparaties uit aan het apparaat.
¾Open het apparaat nooit.
¾Neem contact op met de superrollo-klantenservice als het apparaat
defect is.
De oorzaak voor een totale uitval is mogelijkerwijs een defecte motor. Een defecte
motor kan de volgende oorzaken hebben:
■de motor werd door een fout in de mechanische eenheid sterk overbelast.
■het rolluik werd door bevriezing geblokkeerd en de motor overbelast.
Als de buismotor defect is, moet u het apparaat demonteren en door de
superrollo-klantenservice laten repareren. Ga hierbij als volgt te werk:
¾demonteer het apparaat conform de instructies in het hoofdstuk 'Apparaat
demonteren' vanaf pagina 66.
¾Laat het apparaat repareren door de superrollo-klantenservice.
Storingskenmerken en maatregelen
Kenmerk Mogelijke oorzaak Maatregel
De motor loopt niet (totale uitval). De netspanning ontbreekt. Waarborg dat de verzorgingsspanning (230 V) beschikbaar
is.
Waarborg dat het apparaat correct is aangesloten.
Voor informatie verwijzen wij naar het punt 'Apparaat
aansluiten' vanaf pagina 61.
Laat werkzaamheden aan de spanningsvoorziening alleen
uitvoeren door een gekwalificeerde, opgeleide
elektromonteur.
Storing in de apparaatfunctie Waarborg dat de stroomtoevoer naar het apparaat
onderbroken is.
Demonteer het apparaat.
Voor informatie verwijzen wij naar het hoofdstuk 'Apparaat
demonteren' vanaf pagina 66.
Motoroverbelasting door moeilijk lopende
rolluiken op grond van verschoven lamellen.
Waarborg dat de stroomtoevoer naar het apparaat
onderbroken is.
Waarborg dat de lamellen horizontaal zijn ingebouwd.
Breng de stroomtoevoer tot stand.
Stuur het rolluik omhoog en omlaag.
Smeer de moeilijk lopende punten in met glijwas.
Motoroverbelasting door moeilijk lopende
rolluiken op grond van bevriezing.
Verwijder de bevriezingen.
De maximale bedrijfsduur (vier minuten) is
overschreden.
Laat het apparaat ca. 20 minuten afkoelen.
Waarborg dat het apparaat vakkundig bediend wordt.
Waarborg dat de eindpunten correct zijn geplaatst.
Waarborg dat het rolluik soepel loopt.
Storingen verhelpen
64
Kenmerk Mogelijke oorzaak Maatregel
De motor loopt niet (totale uitval). De aansluitingen zijn niet correct uitgevoerd. Waarborg dat het apparaat correct is aangesloten.
Voor informatie over het aansluiten van het apparaat
verwijzen wij naar het punt 'Apparaat aansluiten' vanaf
pagina 61.
Laat werkzaamheden aan de spanningsvoorziening alleen
uitvoeren door een gekwalificeerde, opgeleide
elektromonteur.
Het apparaat stopt niet. De adapter is van de limietring geslipt. Waarborg dat de stroomtoevoer naar het apparaat
onderbroken is.
Demonteer het apparaat.
Voor informatie over de demontage van het apparaat
verwijzen wij naar het hoofdstuk 'Apparaat demonteren'
vanaf pagina 66.
Waarborg dat de adapter met de groef over de veer vlak
tegen de aandrijfkop zit.
Monteer het apparaat in omgekeerde volgorde.
De wikkelbuiskap is niet goed met de wikkelbuis
verbonden.
Stuur het rolluik helemaal naar beneden.
Waarborg dat de stroomtoevoer naar het apparaat
onderbroken is.
Verwijder het rolluik van de wikkelbuis.
Waarborg dat de wikkelbuiskap vast op de wikkelbuis
geschroefd is.
De wikkelbuis is te kort. Waarborg dat de stroomtoevoer naar het apparaat
onderbroken is.
Demonteer het apparaat.
Voor informatie over de demontage van het apparaat
verwijzen wij naar het hoofdstuk 'Apparaat demonteren'
vanaf pagina 66.
Monteer de nieuwe wikkelbuis.
Voor informatie over het op maat zagen en de montage van
de wikkelbuis verwijzen wij naar het punt 'Wikkelbuis op
maat zagen' vanaf pagina 59.
Monteer het apparaat in omgekeerde volgorde.
Het rolluik stuurt na de montage niet helemaal
omhoog.
De instelling van het bovenste eindpunt klopt
niet.
Stel het bovenste eindpunt in.
Voor informatie verwijzen wij naar het punt 'Eindpunten
instellen' vanaf pagina62.
Storingen verhelpen
65
Kenmerk Mogelijke oorzaak Maatregel
Het rolluik blokkeert bij het omhoog en omlaag
sturen.
De lamellen van het rolluik zijn verschoven. Waarborg dat alle lamellen horizontaal zijn ingebouwd.
Smeer de moeilijk lopende punten in met glijwas.
Schakel de aandrijving kort in de tegengestelde richting in
om het rolluik vrij te sturen.
Het rolluik schuurt in de rolluikkast omdat
aandrukrollen aan het raamkozijn ontbreken.
Open de rolluikkast.
Monteer de aandrukrollen.
Het rolluik is scheef opgerold omdat het
apparaat niet horizontaal werd gemonteerd.
Waarborg dat de stroomtoevoer naar het apparaat
onderbroken is.
Demonteer het apparaat.
Voor informatie over de demontage van het apparaat
verwijzen wij naar het hoofdstuk 'Apparaat demonteren'
vanaf pagina 66.
Monteer het apparaat horizontaal.
Voor informatie hiervoor verwijzen wij naar het punt 'Lager
monteren' vanaf pagina 58.
In de rolluikkast is isolatiemateriaal losgeraakt
en blokkeert nu de rolluiken.
Open de rolluikkast.
Verwijder het isolatiemateriaal.
Neem contact op met de fabrikant voor een vakkundige
isolatie van de rolluikkast.
Het rolluik is te licht. Waarborg dat alle lamellen horizontaal zijn ingebouwd.
Verzwaar het rolluik met bijv. een passend platijzer.
Schuif het platijzer in de onderste lamel.
Schakel de aandrijving kort in de tegengestelde richting in
om het rolluik vrij te sturen.
De draairichting is verkeerd. Het apparaat is niet correct aangesloten. Waarborg dat de stroomtoevoer naar het apparaat
onderbroken is.
Verwissel de bruine en de zwarte ader.
Voor informatie over de verandering van de kabeltoewijzing
verwijzen wij naar het punt 'Apparaat aansluiten' vanaf
pagina 61.
Laat werkzaamheden aan de spanningsvoorziening alleen
uitvoeren door een gekwalificeerde, opgeleide
elektromonteur.
A
pparaat demonteren
66
Apparaat demonteren
Ga als volgt te werk om de buismotor te demonteren:
¾stuur de motor in de neerwaartse richting totdat het rolluik niet meer aan de
veren hangt en deze eenvoudig van de wikkelbuis kunnen worden verwijderd.
GEVAAR
Dodelijke elektrische schokken door het aanraken van onder
spanning staande onderdelen.
¾Voer geen aansluitwerkzaamheden aan het apparaat uit als het op
de stroomvoorziening is aangesloten.
¾Waarborg dat de stroomtoevoer naar het apparaat onderbroken is.
¾verwijder de kabel uit de aftak- of schakelaardoos.
¾draai de bevestigingsveren los van de wikkelas.
¾trek de splitpen uit het borggat in de asstift van het aandrijflager.
¾draai de schroeven los waarmee de wikkelbuiskap en de wikkelbuis met elkaar
verbonden zijn.
¾schuif de wikkelbuiskap tot aan de aanslag in de wikkelas.
¾trek het apparaat uit de lagers.
¾trek de buismotor uit de wikkelbuis.
Apparaat afvoeren
De milieuvriendelijke afvoer van bedrijfsmiddelen, elektrotechnische modules,
herbruikbare materialen en andere apparaatonderdelen wordt geregeld door
nationale en regionale wetten.
¾Neem contact op met de verantwoordelijke instantie voor exacte informatie over
de afvoer.
¾Verwijder het apparaat conform de wettelijke bepalingen via een
afvalverwijderingsbedrijf.
¾Verwijder de elektrotechnische onderdelen volgens de bepalingen conform de
richtlijn inzake elektrische en elektronische apparaten.
Gebruikershandleiding.com neemt misbruik van zijn services uitermate serieus. U kunt hieronder aangeven waarom deze vraag ongepast is. Wij controleren de vraag en zonodig wordt deze verwijderd.
Product:
Spelregels forum
Om tot zinvolle vragen te komen hanteren wij de volgende spelregels:
lees eerst de handleiding door;
controleer of uw vraag al eerder door iemand anders is gesteld;
probeer uw vraag zo duidelijk mogelijk te stellen;
heeft u een probleem en al geprobeerd om dit op te lossen, vermeld dit erbij aub;
heeft u een oplossing gekregen van een bezoeker dan horen wij dat graag in dit forum;
wilt u een reactie geven op een vraag of antwoord, gebruik dan niet dit formulier maar klik op de knop 'reageer op deze vraag';
uw vraag wordt direct op de website gezet; vermijd daarom persoonlijke gegevens in te vullen;
Belangrijk! Als er een antwoord wordt gegeven op uw vraag, dan is het voor de gever van het antwoord nuttig om te weten als u er wel (of niet) mee geholpen bent! Wij vragen u dus ook te reageren op een antwoord.
Belangrijk! Antwoorden worden ook per e-mail naar abonnees gestuurd. Laat uw emailadres achter op deze site, zodat u op de hoogte blijft. U krijgt dan ook andere vragen en antwoorden te zien.
Abonneren
Abonneer u voor het ontvangen van emails voor uw Superrollo RM10MM bij:
nieuwe vragen en antwoorden
nieuwe handleidingen
U ontvangt een email met instructies om u voor één of beide opties in te schrijven.
Ontvang uw handleiding per email
Vul uw emailadres in en ontvang de handleiding van Superrollo RM10MM in de taal/talen: Nederlands, Duits, Engels, Frans, Spaans als bijlage per email.
De handleiding is 5,27 mb groot.
U ontvangt de handleiding per email binnen enkele minuten. Als u geen email heeft ontvangen, dan heeft u waarschijnlijk een verkeerd emailadres ingevuld of is uw mailbox te vol. Daarnaast kan het zijn dat uw internetprovider een maximum heeft aan de grootte per email. Omdat hier een handleiding wordt meegestuurd, kan het voorkomen dat de email groter is dan toegestaan bij uw provider.
Stel vragen via chat aan uw handleiding
Stel uw vraag over deze PDF
Uw handleiding is per email verstuurd. Controleer uw email
Als u niet binnen een kwartier uw email met handleiding ontvangen heeft, kan het zijn dat u een verkeerd emailadres heeft ingevuld of dat uw emailprovider een maximum grootte per email heeft ingesteld die kleiner is dan de grootte van de handleiding.
Er is een email naar u verstuurd om uw inschrijving definitief te maken.
Controleer uw email en volg de aanwijzingen op om uw inschrijving definitief te maken
U heeft geen emailadres opgegeven
Als u de handleiding per email wilt ontvangen, vul dan een geldig emailadres in.
Uw vraag is op deze pagina toegevoegd
Wilt u een email ontvangen bij een antwoord en/of nieuwe vragen? Vul dan hier uw emailadres in.