549826
1
Verklein
Vergroot
Pagina terug
1/5
Pagina verder
Instruction manual
M
I
S
T
HRS
TIMER
0
/
0
RELATIVE HUMIDITY
EMPTY
WARM MIST
IONIZER
IR REC EIV ER
IO N IZER
O N /O FF H EA T
SPR A Y
-
H U M ID ITY
+
TIM ER IO N IZER
I O N
S P R A Y
-
H
E A T
T I M E R
O
N /
O
F
F
H U M
+
Monsun 300
ultrasonic / warm mist humidifier
14
Model Klimatronic
Monsun 300
(with ionizer)
Wattage:
Ultrasonic:40W,
Heat: 130W
Voltage: 230V
Water Tank Capacity:
7 Liters
Hertz: 50Hz Airflow: 100-450ml/hr
Timer
setting
9 hrs maximum
Relative Humidity %
Sensor Function
Included
Safety precautions and advice
1. Make sure children are kept out of reach of the humidifier.
2. Please do not put the humidifier near other electrical appliance products or at any
place under high temperature.
3. Place the appliance on a waterproof ground and keep clear of the furniture.
4. When you clean the appliance or it is not in use, unplug the appliance from the
mains and drain away any residual water.
5. Never operate while the water tank is empty.
6. Never immerse the appliance in any liquid.
7. Unplug the appliance from the mains when adding water or moving it.
8. Never use hot water.
9. Clean and sterilize the water tank periodically.
10. Under appropriate environment, the relative humidity sensor will operate in
optimum effect. It is not recommended to put the humidifier under air conditioning
environment, as the rate of RH% will be affected.
11. This relative humidity % function is only for reference purpose but cannot be
treated as actual RH% as under different environment, the rate of RH% will be
different.
Adding water
1. The user is recommended to operate with distilled water for the first time. (Please
follow the instructions given in Cleaning section)
2. Hold the water tank upside-down.
3. Unscrew the water tank cover anti-clockwise.
4. Add cool water into water tank.
5. Screw the water tank cover carefully and check that it is properly locked without
leakage.
6. Hold the water tank vertically and then place back the base.
7. Put the mist outlet/nuzzle on the hole of the water tank surface.
15
Attention:
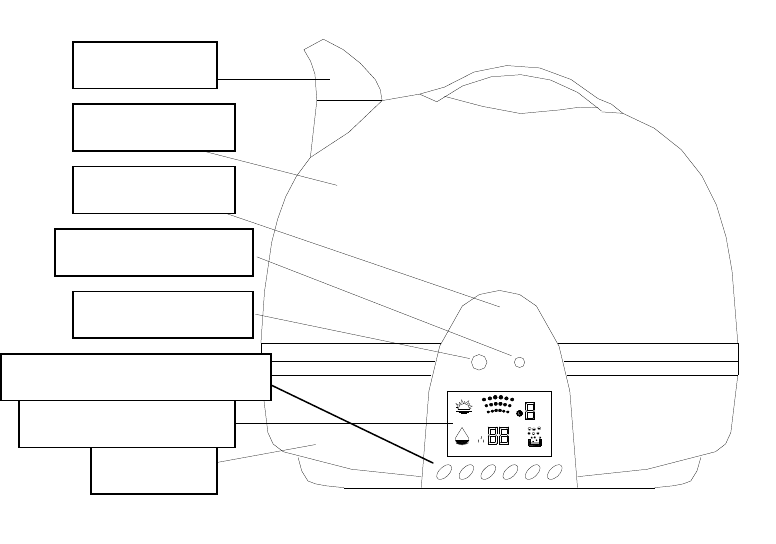
1. Use the under-side care handle when carrying the fully filled water tank and
place another hand under for assistance.
2. Do not put water into the base directly otherwise it will be damaged or cause
danger.
3. Do not move the appliance when the water tank is fully filled with water.
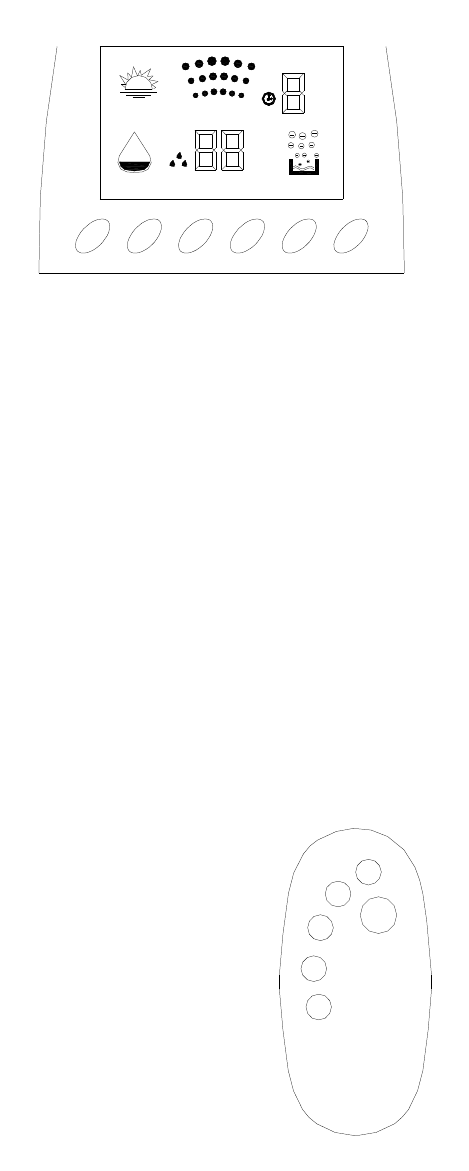
Operation method
All the features of this humidifier can be controlled from the control button in the
control panel or the remote control.
To turn On/ Off the humidifier
Gently press the ”On/ Off” button on the “control button in the control panel” or the
remote control to turn on the humidifier. The moisture will be sprayed from the nozzle.
The moisture-spraying signal will be shown on screen. Press the “On/ Off” button a
second time to turn off the humidifier.
How to set the Relative Humidity %
Gently press the “Hum / Spray +” button on the control panel or remote control first, it
will enter the Relative Humidity setting control. By pressing the “Hum / Spray +” button,
you can set the desired relative humidity % (RH) to increase RH%. While pressing the
“Hum/ Spray –“ button on the control panel or remote control, you can decrease RH%
to set the desired RH. The “setting RH%” signal is displayed on the screen.
Continuously press the button over one second, it can continuously increase or
decrease RH%. If not press the button over 4 seconds, the actual RH% will be shown
on the screen panel again. When the actual RH% is greater than the desired setting
RH% over 3%, the humidifiers will be automatically stop.
How to set the Spray Level
Gently press “Hum/ Spray -” button on the control panel or remote control first, it will
enter the Spray level setting control. By pressing “Hum/ Spray +”, the user can
increase the spray level. The spray level is from 1 (minimum) to 9 (maximum). While
pressing the “Hum/ Spray –“ button on the control panel or remote control, you can
decrease the spray level. The spray level signal is displayed on the screen. By
continuously pressing the button over one second, you can continuously increase or
decrease the spray level. If not press the button over 4 seconds, the actual RH% will
be shown on the screen panel again.
16
How to set the Timer
This humidifier has a 9 timer setting,
from 1 hour up to 9 hours. To use this
feature, simply press the “Timer” button
on the control panel or remote control.
Press once: 1 hour
Press twice: 2 hours…
Press 9 times: 9 hours
The timer setting signal is displayed on
the screen. After setting 9 hours, press
the timer button, it will turn off the timer setting function.
How to operate the warm mist feature
Gently press the Warm Mist button on the control panel or remote control, the
moisture temperature will be gradually increased and will be become warm mist. The
warm mist signal is displayed on the screen. Press the warm mist button a second
time to turn this function off.
How to operate the ionizer function
The Ionizer function, can be operated independently without using the humidifying
function. Simply press the Ionizer button on the control panel or remote control, the
Ionizer function will operate. The ionizer signal is displayed on the screen. Press the
ionizer button a second time to turn off this function.
Water empty signal
When the water tank is empty, there will be water empty sign
shown on the screen. The humidifier will be turned off
automatically. You need to refill water when red empty signal is
shown.
Attention:
1. To avoid electric shock, do not touch the mains when your
hands are wet.
2. Do not cover the mist outlet/nuzzle, mist must not be
obstructed.
3. If the power cord or the product is damaged, please do not use the product
immediately. It must be replaced in order to avoid a hazard.
RELATIVE HUMIDITY
SP RA Y
-
O N /O FF
H U M ID ITY
+
EMPTY
WARM MIST
IO N IZER
TIM E R
H EA T
0
/
0
IONIZER
TIMER
T
M
S
I
HRS
ION
HUM
+
SPRAY
-
HEAT
TIMER
ON/OFF
17
Cleaning
Cleaning the appliance at least once a week (2 Steps).
Step I:
1. Remove the water tank.
2. The base may be cleaned with mild soap and warm water, brush the shake
implement and etc slightly.
Step II - Sterilization (base and water tank)
Mix 1 teaspoon of bleaching agent with 5 liters of water, leave for 20 minutes, shake
the water tank for every few seconds.
Attention: Do not scrub the appliance surface of the base or the tank as this will leave
permanent scratches.
Change the ultrasonic transducer chip
The ultrasonic transducer chip is the main component to produce the mist. When
operating by using hard water, there will be mineral deposition on the transducer chip.
Even when the product is equipped with an water filter the chip has to be cleaned
periodically. When mineral deposition is too serious, which affected the operation of
the device, the transducer chip should be changed. One spare pack of the transducer
chip is included in this package. To change the chip, first turn off the power and
remove the plug from the main supply, and then remove the water tank, empty the
water in the base, dry the base with a soft dry cloth. Use the tool provided in the spare
pack to remove the malfunction chip, and then replace it by the spare one. The white
side of the chip should be facing out. Use the tool to screw the cover tightly.
Product drawing
红外线接收头
显示屏
底座
电气板
负离子发射头
M
RELATIVE HUMIDITY
EMPTY
WARM MIST
0
IONIZER
TIMER
I
S
T
/
0
HRS
开关板
喷嘴
水箱
Nozzle
Water Tank
Control Panel
Remote receiver
Ionizer
Control Panel button
Colour screen display
Base
1

Hulp nodig? Stel uw vraag in het forum

Spelregels

Misbruik melden

Gebruikershandleiding.com neemt misbruik van zijn services uitermate serieus. U kunt hieronder aangeven waarom deze vraag ongepast is. Wij controleren de vraag en zonodig wordt deze verwijderd.

Product:

Bijvoorbeeld antisemitische inhoud, racistische inhoud, of materiaal dat gewelddadige fysieke handelingen tot gevolg kan hebben.

Bijvoorbeeld een creditcardnummer, een persoonlijk identificatienummer, of een geheim adres. E-mailadressen en volledige namen worden niet als privégegevens beschouwd.

Spelregels forum

Om tot zinvolle vragen te komen hanteren wij de volgende spelregels:

Belangrijk! Als er een antwoord wordt gegeven op uw vraag, dan is het voor de gever van het antwoord nuttig om te weten als u er wel (of niet) mee geholpen bent! Wij vragen u dus ook te reageren op een antwoord.

Belangrijk! Antwoorden worden ook per e-mail naar abonnees gestuurd. Laat uw emailadres achter op deze site, zodat u op de hoogte blijft. U krijgt dan ook andere vragen en antwoorden te zien.

Abonneren

Abonneer u voor het ontvangen van emails voor uw Suntec Wellness Monsun 300 bij:


U ontvangt een email met instructies om u voor één of beide opties in te schrijven.


Ontvang uw handleiding per email

Vul uw emailadres in en ontvang de handleiding van Suntec Wellness Monsun 300 in de taal/talen: Engels als bijlage per email.

De handleiding is 0,17 mb groot.


U ontvangt de handleiding per email binnen enkele minuten. Als u geen email heeft ontvangen, dan heeft u waarschijnlijk een verkeerd emailadres ingevuld of is uw mailbox te vol. Daarnaast kan het zijn dat uw internetprovider een maximum heeft aan de grootte per email. Omdat hier een handleiding wordt meegestuurd, kan het voorkomen dat de email groter is dan toegestaan bij uw provider.

Stel vragen via chat aan uw handleiding

Stel uw vraag over deze PDF

Uw handleiding is per email verstuurd. Controleer uw email

Als u niet binnen een kwartier uw email met handleiding ontvangen heeft, kan het zijn dat u een verkeerd emailadres heeft ingevuld of dat uw emailprovider een maximum grootte per email heeft ingesteld die kleiner is dan de grootte van de handleiding.

Er is een email naar u verstuurd om uw inschrijving definitief te maken.

Controleer uw email en volg de aanwijzingen op om uw inschrijving definitief te maken

U heeft geen emailadres opgegeven

Als u de handleiding per email wilt ontvangen, vul dan een geldig emailadres in.

Uw vraag is op deze pagina toegevoegd

Wilt u een email ontvangen bij een antwoord en/of nieuwe vragen? Vul dan hier uw emailadres in.


Info