767661
14
Verklein
Vergroot
Pagina terug
1/122
Pagina verder
Installation 3 in 1
Depending on your needs, three different appliances can be installed from this product. The following used
numbers refer to those of the segment „Components“ of each appliance.
a) Installation of fan with humidifier:
Place the humidifier body (12) on the big base (9) and fix them by using the fixing screw (10) from below.
Next, place the fan head (1) on the humidifier and fix them by using the small fixing screw (4) from
behind and the fixing clip (13) at the front. The fan with humidifier is installed (see pic. 1).
b) Installation of fan:
Place the small base (6) on the big base (7) and fix them by using the fixing screw (8) from below. Next,
place the fan head (1) on the base and fix both by using the small fixing screw (5) from behind and the
fixing clip (9) at the front. The fan is installed (see pic. 2).
c) Installation of humidifier:
The humidifier can be used without the big base. For better stability it is recommended to place the
humidifier body (7) on the big base and to fix both by using the fixing screw for the base from below (see
installation of fan). Place the lid with air outlet (1) on the humidifier body (7) and fix both parts with the
fixing clip (8). The humidifier is installed (see pic. 3).
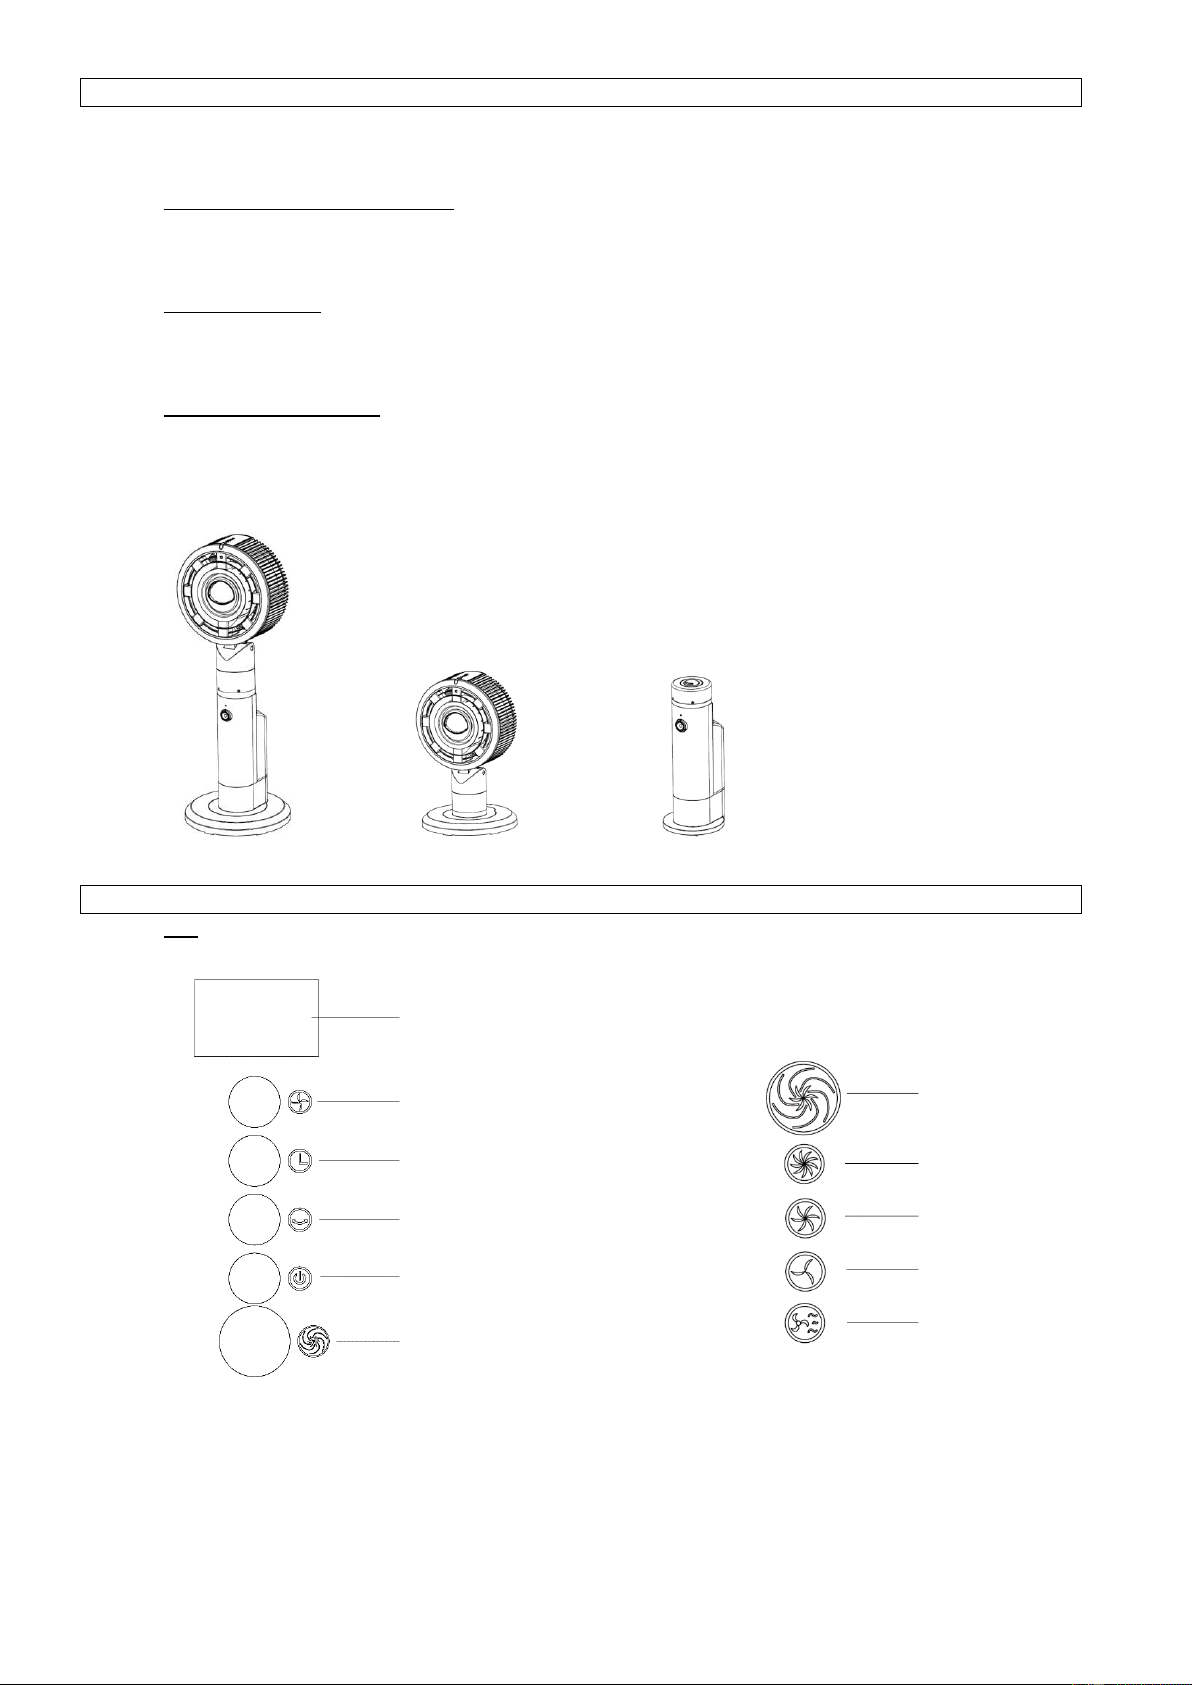
Pic. 1 Pic. 2 Pic. 3
Operation
Fan:
o Control panel: Indicating lights of fan speeds:
LED display
Turbo mode
Fan speed
Timer High
Oscillation Medium
On/Off Low
Very low
Turbo mode
o Connect the appliance’s power plug to the power supply.
o Press the on/off button on the control panel to turn on the appliance.
o By pressing the fan speed button you can choose between four speeds (very low, low, medium,
high) which are indicated by their corresponding indicating lights on the LED display.
o Press the timer button to set the timer between 1 and 8 hours. When the set time is over, the
appliance will turn off automatically.
o By pressing the oscillation button the fan head will turn from left to right continously until you
press the button again.
o Press the turbo mode button to activate the turbo mode; press the fan speed button to deactivate.
14

Hulp nodig? Stel uw vraag in het forum

Spelregels

Misbruik melden

Gebruikershandleiding.com neemt misbruik van zijn services uitermate serieus. U kunt hieronder aangeven waarom deze vraag ongepast is. Wij controleren de vraag en zonodig wordt deze verwijderd.

Product:

Bijvoorbeeld antisemitische inhoud, racistische inhoud, of materiaal dat gewelddadige fysieke handelingen tot gevolg kan hebben.

Bijvoorbeeld een creditcardnummer, een persoonlijk identificatienummer, of een geheim adres. E-mailadressen en volledige namen worden niet als privégegevens beschouwd.

Spelregels forum

Om tot zinvolle vragen te komen hanteren wij de volgende spelregels:

Belangrijk! Als er een antwoord wordt gegeven op uw vraag, dan is het voor de gever van het antwoord nuttig om te weten als u er wel (of niet) mee geholpen bent! Wij vragen u dus ook te reageren op een antwoord.

Belangrijk! Antwoorden worden ook per e-mail naar abonnees gestuurd. Laat uw emailadres achter op deze site, zodat u op de hoogte blijft. U krijgt dan ook andere vragen en antwoorden te zien.

Abonneren

Abonneer u voor het ontvangen van emails voor uw Suntec Klimatronic CoolBreeze 3500 Monsun Vario bij:


U ontvangt een email met instructies om u voor één of beide opties in te schrijven.


Ontvang uw handleiding per email

Vul uw emailadres in en ontvang de handleiding van Suntec Klimatronic CoolBreeze 3500 Monsun Vario in de taal/talen: Nederlands, Duits, Engels, Frans, Italiaans, Portugees, Spaans, Pools als bijlage per email.

De handleiding is 1,8 mb groot.


U ontvangt de handleiding per email binnen enkele minuten. Als u geen email heeft ontvangen, dan heeft u waarschijnlijk een verkeerd emailadres ingevuld of is uw mailbox te vol. Daarnaast kan het zijn dat uw internetprovider een maximum heeft aan de grootte per email. Omdat hier een handleiding wordt meegestuurd, kan het voorkomen dat de email groter is dan toegestaan bij uw provider.

Stel vragen via chat aan uw handleiding

Stel uw vraag over deze PDF

loading

Uw handleiding is per email verstuurd. Controleer uw email

Als u niet binnen een kwartier uw email met handleiding ontvangen heeft, kan het zijn dat u een verkeerd emailadres heeft ingevuld of dat uw emailprovider een maximum grootte per email heeft ingesteld die kleiner is dan de grootte van de handleiding.

Er is een email naar u verstuurd om uw inschrijving definitief te maken.

Controleer uw email en volg de aanwijzingen op om uw inschrijving definitief te maken

U heeft geen emailadres opgegeven

Als u de handleiding per email wilt ontvangen, vul dan een geldig emailadres in.

Uw vraag is op deze pagina toegevoegd

Wilt u een email ontvangen bij een antwoord en/of nieuwe vragen? Vul dan hier uw emailadres in.


Info