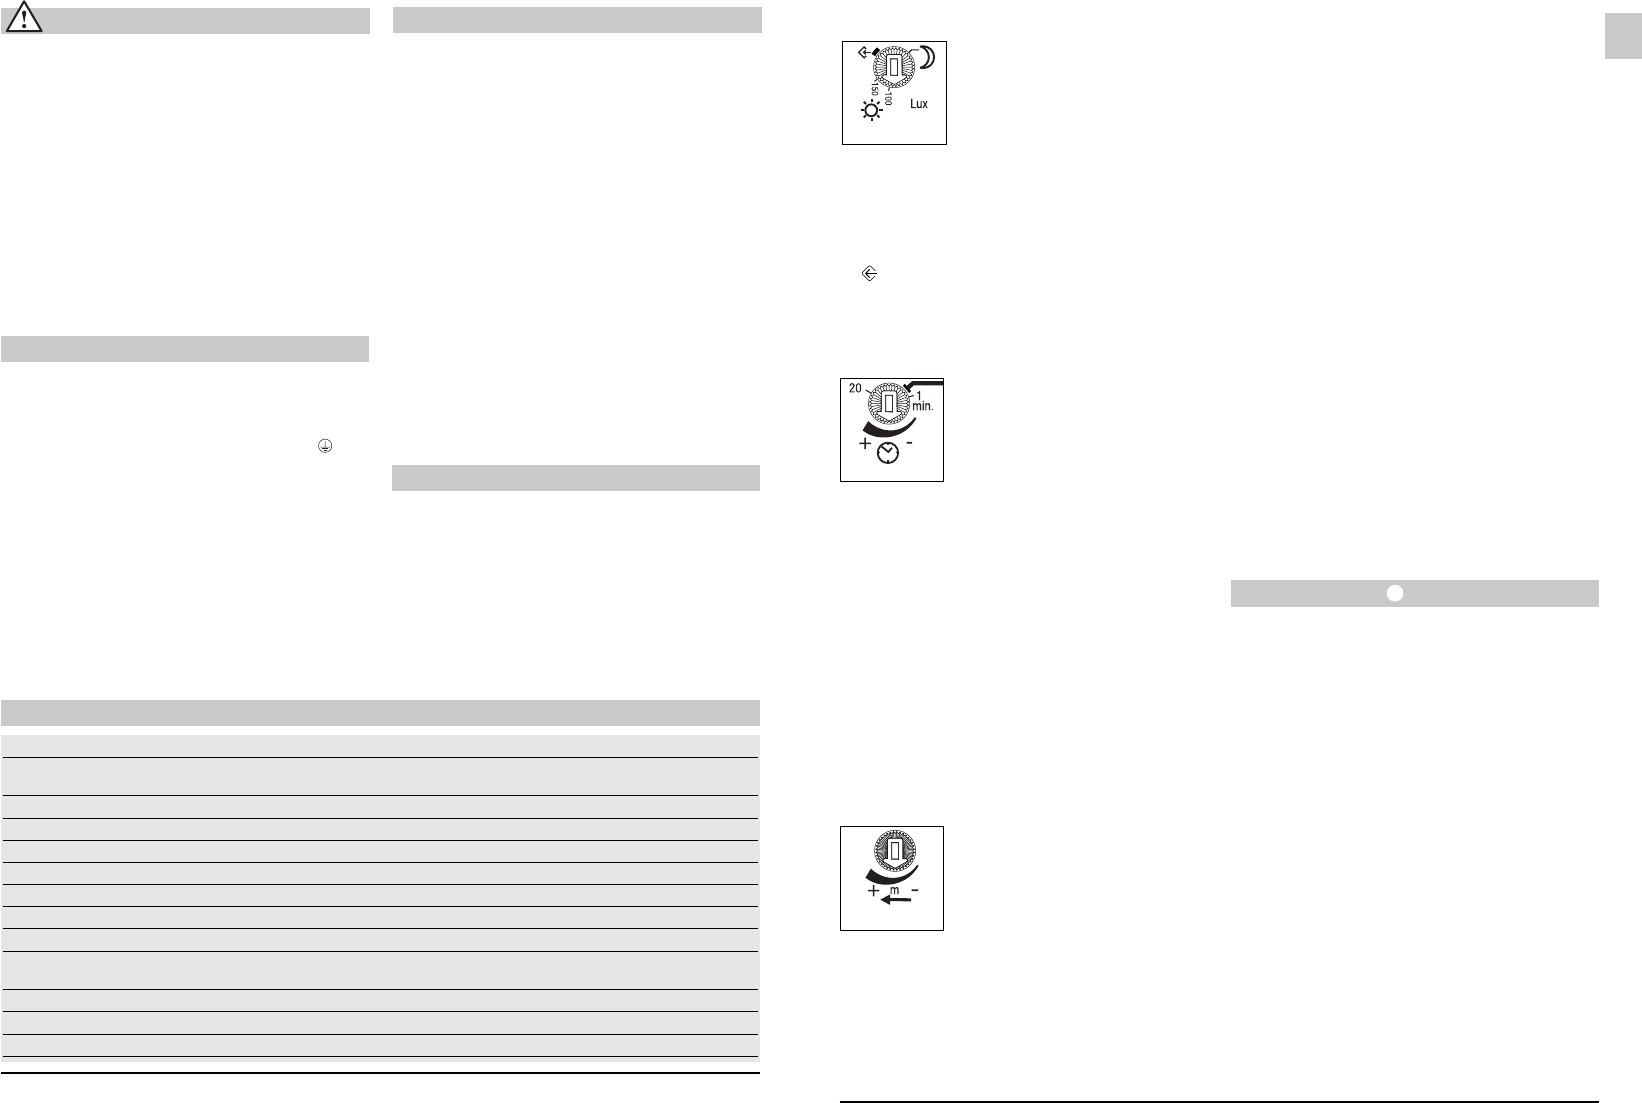
Twilight setting (response threshold)
The light's chosen response thresh-
old can be infinitely varied from
approx. 2 – 2000 lux (10 – 2000 lux:
RS PRO 500 only). Turn control
fully anticlockwise to select night-
time operation at about 2 lux. Turn
control fully clockwise to select
teach mode, shortly before this position means day-
light operation at about 2000 lux. (The light leaves the
factory set to daylight operation.)
Teach mode:
At the light level at which you want the SensorLight
to respond to movement, the control should be set
to . After 10 sec. the value of the ambient bright-
ness is saved. Before this time elapses, the glass
shade must be applied. There must be no LED
module switched on.
Time setting (switch-off delay)
The chosen light ON time can be
varied continuously from approx.
1 min. to a maximum of 20 min.
(The light leaves the factory set to
the shortest time.) Any movement
detected before this time elapses
will re-start the timer.
Note: After the light switches OFF, it takes approx.
1 sec. before it is able to start detecting movement
again. The light will only switch on in response to
movement once this period has elapsed.
Install mode:
If the setting below 1 is selected, the device will
switch to "install mode". The light switches on for
3 sec. as soon as motion is detected. Unnecessary
waiting time can therefore be avoided during adjust-
ment. Since the lamp is subject to heavy wear in this
mode, the fixture quits the mode automatically after
10 min. The minimum time (1 min.) applies in this case.
The glass shade should also be applied in this mode.
Important: Teach mode and Install mode cannot be
used at the same time. The wireless module must not
be plugged in when using the Install mode.
Reach setting (sensitivity)
Reach is the term used to describe the
diameter of the more or less circular
detection zone produced on the ground
after mounting the sensor light at a
height of 2.5 m. Turn the reach control
fully anticlockwise to select minimum
reach (approx. 1 m dia.), and fully
clockwise to select maximum reach (approx. 8 m dia.).
(The light leaves the factory set to maximum reach.)
By inserting the shrouds supplied, the reaches can
be reduced in four directions (see drawing ).
Note: During adjustment, use the "install mode"
(see time setting).
If a mains switch is installed in the mains supply lead,
the light is capable of the following functions in addition
to the simple ON/OFF function:
Sensor operation
1) Switch light ON (when light is OFF):
Turn switch OFF and ON once.
Light stays ON for the period selected.
2) Switch light OFF (when light is ON):
Turn switch OFF and ON once.
The light goes out or switches over to sensor mode.
Manual override
1) Activate manual override:
Turn switch OFF and ON twice. The light is set to
manual override for 4 hours.
2) Deactivate manual override:
Switch OFF and ON once. The light goes out or
switches over to sensor mode.
Important:
The switch should be actuated in rapid succession
(in the 0.5 – 1 sec. range).
Manual override
- 13 -
* only applies to RS PRO 500/1000/2000 Sensor
Installation
Installation *
1
Connecting the mains power supply lead (see Fig.).
The mains lead consists of a 3-phase cable.
L = phase conductor (usually black or brown)
N = neutral conductor (usually blue)
PE = protective earth conductor (green/yellow)
If you are in any doubt, identify the conductors using
a voltage tester; then switch off the power again. The
cables must also be fitted with the heat-resistant wire
insulator. Connect the phase conductor (L) and neutral
conductor (N) to the terminal block. The protective
earth conductor may be sealed off with insulation tape.
Important: Reversing the connections will result in a
short-circuit in the light unit or in your fuse box later
on. In this case, you must identify the individual con-
ductors once again and re-connect them. A mains
switch for switching the unit ON and OFF may of
course be installed in the mains power supply lead.
Technical specifications
RS PRO 500 Sensor/Slave RS PRO 1000 Sensor/Slave RS PRO 2000 Sensor/Slave
Wattage: 2 x 13 W (GU 24-Q1) only 2 x 18 W (GU 24-Q2) only 2 x 26 W (GU 24-Q3) only
additionally max. 800 W additionally max. 800 W additionally max. 800 W
Voltage: 230 – 240 V/50 Hz
Installation site: indoors, wall/ceiling mounting
HF-system *
1
: 5.8 GHz CW radar, ISM band
Transmitter output *
1
: approx. 1 mW
Detection *
1
: 360°, 160° angle of aperture, if necessary through glass, wood and stud walls
Reach *
1
: 1 – 8 m dia., infinitely variable
Time setting *
1
: 1 – 20 min.
Twilight setting *
1
: 2 – 2000 lux *
2
Teach mode
Manual override *
1
: selectable (4 hours). Provided switch is connected in mains supply lead
IP rating: IP 44
Power consumption *
1
: approx. 0.9 W
- 12 -
Important: Make sure the installation site is
not
subject to
vibration. Always fit the sealing plugs to
prevent insects (spiders etc.) getting inside and
activating the light.
Connecting a dimmer will result in damage to the
SensorLight.
Connection of an additional load
An additional load with max. 800 W can be connected
to the SensorLight, switched by the electronics. The
models RS Pro 500 SLAVE and RS Pro 1000 SLAVE
have been developed for this purpose, which create
a uniform appearance and offer additional functions
at the same time. Screw the live conductor to the live
fixture to the terminal marked L’ on the SensorLight.
First remove the protective cap with a pair of pliers.
The cables must also be fitted with
the heat-resistant
wire
insulator. Clamp the neutral conductor in the ter-
minal marked N together with the neutral conductor
of the mains power supply lead. If the connected light
fixture requires a protective earth conductor, this is to
be connected with a "flying terminal".
Please observe the connection diagrams with regard
to use of the accessory modules.
*
1
only applies to RS PRO 500/1000/2000 Sensor
*
2
artificial light not identified with conventional ballast
Safety warnings
n Disconnect the power supply before attempting
any work on the unit.
n During installation, the electrical wiring you are
connecting must be dead. Therefore, switch off the
power first and use a voltage tester to make sure
the wiring is off circuit.
n Installing the SensorLight involves work on the
mains voltage supply. This work must therefore
be carried out professionally in accordance with
applicable national wiring regulations and electrical
operating conditions. (
D
-VDE 0100,
A
-ÖVE /
ÖNORM E8001-1,
-SEV 1000)
n Only use genuine replacement parts.
n Repairs may only be carried out by specialist
workshops.
n Disconnect the power supply before changing
the lamp.
After the wall mount/ceiling holder has been
installed and the mains connection has been made,
the SensorLight can be used for the first time. When
the light is turned ON manually at the light switch, it
switches off after 10 secs. for the calibration phase
and is then activated for operation in the sensor
mode. It is not necessary to operate the light switch
a second time.
Functions *
1
Recommendation:
Fluorescent tube manufacturers recommend season-
ing, or burning in, new tubes for 100 hours so as not
to restrict tube service life. To follow this recommen-
dation and to ensure trouble-free sensor operation
particularly at low ambient temperatures, new fluores-
cent tubes should undergo the following seasoning
procedure.
1. Connect light and switch ON.
2. Turn all 3 setting controls fully clockwise, then turn
the middle setting control fully anticlockwise and
fully clockwise again (within 10 sec.).
3. The seasoning process is confirmed by switching
the light OFF twice and then back ON again.
4. Now turn all controls to the chosen settings.
5. The light is now left ON for 100 hours without sen-
sor function. Do not disconnect the light from the
mains power supply during this period.
6. The luminaire automatically returns to sensor
mode after 100 hours.
Note:
When fluorescent tubes are new or at low ambient
temperatures, the sensor may not switch the light
OFF as it might be detecting gas moving inside
the tubes. In this case, switch the light OFF and,
for the time being, drastically reduce the reach set-
ting. Please only use high-quality branded lamps.
Otherwise, we cannot guarantee that the high-
precision sensor will operate reliably.
GB
2-2000 lux
1-20 min.
1 m - 8 m dia.