720397
14
Verklein
Vergroot
Pagina terug
1/52
Pagina verder
Operating instructions
Gebrauchsanweisung
Mode d‘emploi
Istruzioni per l‘uso
Manual de instrucciones
Gebruiksaanwijzing
Brugsanvisning
ytohje
Bruksanvisning
Bruksanvisning
Инструкция по эксплуатации
Theo
Theo
1
12
2
J
A
H
R
E
G
A
R
A
N
T
I
E
2
Y
E
A
R
S
W
A
R
R
A
N
T
Y
2
A
N
N
É
E
S
D
E
G
A
R
A
N
T
I
E
8
7
9
10
13
11
8
56
34
14
2
Stadler Form Aktiengesellschaft, Chamerstrasse 174, 6300 Zug, Switzerland
Phone +41 41 720 48 48, Fax +41 41 720 48 44, www.stadlerform.com/contact
Share your feedback about Theo on:
Teilen Sie Ihr Feedback von Theo auf:
Partagez votre commentaire sur Theo :
www.stadlerform.com/Reviews
Download instruction manual:
Bedienungsanleitung hier herunterladen:
Téléchargez le mode d’emploi :
www.stadlerform.com/Theo/manual
For frequently asked questions go to:
Für häufig gestellte Fragen besuchen Sie:
Trouvez la foire aux questions sur :
www.stadlerform.com/Theo/support
Watch the video of Theo:
Schauen Sie sich das Video zu Theo an:
Regardez la vidéo du Theo :
www.stadlerform.com/Theo/video
Congratulations! You have just purchased the exceptional air dehumidifier
THEO. It will give you great pleasure and improve the indoor air for you.
As with all domestic electrical appliances, particular care is needed with
this model also, in order to avoid injury, fire damage or damage to the appli-
ance. Please study these operating instructions carefully before using the
appliance for the first time and follow the safety advice on the appliance
itself.
Description of the appliance
The appliance consists of the following main components:
1. Housing
2. Control panel
3. On/off switch
4. Hygrostat (40 % / 50 % / 60 % / Continuous use)
5. Timer (1–7 h)
6. Integrated automatic defrost function
7. Red LED = water tank full
8. Air outlet (flap must always be open during operation!)
9. Air intake
10. Air filter
11. Water t ank
12. Power cable
13. Hose for drainage operation
14. Hidden handle for easy carrying of the appliance
Important safety instructions
Please read through the operating instructions carefully before you use the
appliance for the first time and keep them safely for later reference; if nec-
essary pass them on to the next owner.
Stadler Form refuses all liability for loss or damage that arises as a result
of failure to follow these operating instructions.
The appliance is only to be used in the home for the purposes described
in these instructions. Unauthorised use and technical modifications to the
appliance can lead to danger to life and health.
Prior to any maintenance, cleaning and after each use, switch off the ap-
pliance and unplug the mains cable from the socket.
For indoor use only.
Do not store the appliance outdoors.
English
This appliance can be used by children aged from 8 years and above
and persons with reduced physical, sensory or mental capabilities or
lack of experience and knowledge if they have been given supervision or
instruction concerning use of the appliance in a safe way and understand
the hazards involved. Children shall not play with the appliance. Cleaning
and user maintenance shall not be made by children without supervision.
If the supply cord is damaged, it must be replaced by the manufacturer,
or its service agent, or a qualified person in order to avoid a hazard.
Place the dehumidifier on a firm, even, waterproof surface. Make sure it
is standing securely so that the dehumidifier cannot tip over or fall down.
If it tipped over, please pull out the plug at once. Water can damage fur-
niture and floor coverings.
Unwind the cord completely. An incompletely unwound cord can lead to
overheating and cause a fire.
Do not immerse the dehumidifier into water or any other liquids and do
not pour water or any other liquids onto the appliance or into the air intake
and air outflow vents.
Do not use the appliance in immediate vicinity of a bath tub, a shower or a
swimming pool (observe a minimum distance of 3 m). Place the appliance
such that a person in the bath tub cannot touch the appliance.
Do not place the appliance near a heat source. Do not subject the power
cord to direct heat (such as a heated hotplate, open flames, hot iron sole
plates or heaters for example). Protect power cords from oil.
Do not use the dehumidifier if it is faulty or could show signs of damage,
or if it is not functioning correctly. Disconnect the plug from the power
socket.
Never insert your fingers or any other objects into the air inlet or outlet.
Do not cover the appliance during operation.
Do not sit or stand on the appliance.
Discard of the water in the water tank when the tank is full.
Do not operate the appliance in a closed area such as inside a closet, as
it may cause a fire.
If using the appliance with the drainage hose, make sure the end of the
hose is lower than the spout, otherwise the water will not drain and flood-
ing may occur.
If any parts of the appliance are damaged, please contact the retailer or
a designated repair shop.
Details of type and rating of fuses: T, 250 V AC,2 A.
Seting up / operation
1. Place Theo on a flat surface in the desired area. Plug the power cable
(12) into an electric socket.
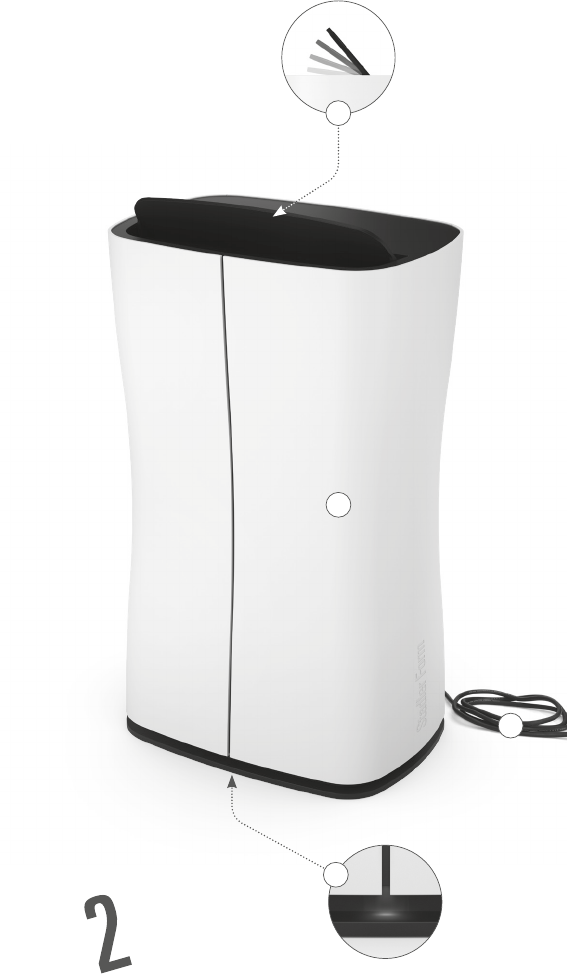
2. Open the flap for the air outlet (8). This flap must always be open during
operation. A closed flap can lead to a technical defect.
3. Press the on/off switch (3) to turn on the dehumidifier.
4. The desired humidity level can be set using the hygrostat (4) (40 % /
50 % / 60 % / Con = continuous). When the desired humidity has been
reached, the appliances switches off and then checks the humidity at
intervals by briefly switching on the fan.
5. By pressing the button for the timer (5) you can set the operating time
for between 1 and 7 hours (for example, 3 h = 1 h and 2 h LEDs lit, 7 h
= 1 h, 2 h and 4 h LEDs lit). Press once to set the operating time to 1 h,
press the button again for 2 h, and so on. The remaining time is indi-
cated by the illuminated numbers. The unit switches off automatically
after the set operating time has elapsed.
6. The appliance is equipped with an automatic defrost function. When
the room temperature is low, the appliance automatically switches on
the defrost function “Auto Defrost. This prevents ice from forming in
the device during operation.
7. When the water tank (11) is full, the red LED (7) on the bottom of the ap-
pliance lights up. The dehumidifier switches off automatically. Please
empty the water tank. When you reinsert it, the dehumidifier will auto-
matically switch back on.
8. If desired, it is possible to connect a drainage hose to the unit for per-
manent water drainage. In this case connect the hose (13) to the unit
through the hole in the back of the dehumidifier and place the end of
the drainage in a water outlet. Please make sure the end of the hose is
lower than the spout, otherwise the water will not drain and flooding
may occur.
Cleaning
Prior to any maintenance, cleaning and after each use, switch off (3) the
appliance and unplug the mains cable (12) from the socket.
Attention: Never immerse the appliance in water (danger of short-circuit).
To clean the appliance, only wipe it down with a damp cloth and then dry
it carefully.
Make sure that the air inlet (9) and air outlet (8) are cleaned regularly to
prevent the build-up of dust. The air outlet (8) can be cleaned with a dry
brush or a vacuum cleaner. The air inlet screen (9) is fitted with an air filter
(10) which can be removed and cleaned with a damp cloth.
Repairs
Repairs to electrical appliances must only be carried out by a qualified
electrical technician. If improper repairs are carried out, the warranty
lapses and all liability is refused.
Never operate the appliance if the adaptor or plug is damaged, after it has
malfunctioned, if it has been dropped or has been damaged in any other
way (cracks/breaks in the casing).
Do not push any object into the appliance.
If the appliance is beyond repair, make it unusable immediately by cutting
through the cable and hand it in at the collection point provided for the
purpose.
In the event of a repair, the following points must be observed before the
appliance is shipped or taken to the dealer: completely empty the water
in the appliance (water tray or water tank), and allow the appliance to dry
completely. Appliances containing residual water may be damaged during
transport, invalidating the warranty.
Disposal
The European directive 2012 / 19 / CE on Waste Electrical and Electronic
Equipment (WEEE), requires that old household electrical appliances must
not be disposed in the normal unsorted municipal waste stream. Old appli-
ances must be collected separately in order to optimize the recovery and
recycling of the materials they contain and reduce the impact on human
health and the environment. The crossed out “wheeled bin” symbol on the
product reminds you of your obligation, that when you dispose of
the appliance it must be separately collected. Consumers should
contact their local authority or retailer for information concerning
the correct disposal of their old appliance.
Specifications
Rated voltage 220 ~ 240 V
Power output 280 W
Dimensions 305 x 516 x 216 mm
(width x height x depth)
Weight 11.4 kg
Tank capacity 2.1 L
Sound level 42 dB(A)
Complies with EU
regulations CE / WEEE / RoHS / EAC
All rights for any technical modifications are reserved
Gratulation! Sie haben soeben den aussergewöhnlichen Luftentfeuchter
THEO erworben. Er wird Ihnen viel Freude machen und die Raumluft für Sie
verbessern.
Wie bei allen elektrischen Haushaltsgeten wird auch bei diesem Gerät zur
Vermeidung von Verletzungen, Brand- oder Geräteschäden besondere Sorg-
falt verlangt. Bitte studieren Sie die vorliegende Betriebsanleitung vor der
Inbetriebnahme und beachten Sie die Sicherheitshinweise auf dem Gerät.
Gerätebeschreibung
Das Gerät besteht aus den folgenden Komponenten:
1. Gehäuse
2. Bedienelement
3. Ein/Aus-Knopf
4. Hygrostat (40 % / 50 % / 60 % / Dauerbetrieb)
5. Timer (1–7h)
6. Integrierte automatische Enteisungsfunktion
7. Rote LED = Wassertank voll
8. Luftauslass (Klappe muss bei Betrieb immer offen sein!)
9. Lufteinlass
10. Luftfilter
11. W a s s e r ta n k
12. Stromkabel
13. Schlauch für den Drainage-Betrieb
14. Versteckter Handgriff für einfache Umplatzierung
Wichtige Sicherheitshinweise
Bitte lesen Sie die Gebrauchsanleitung genau durch, bevor Sie das Gerät das
erste Mal in Betrieb nehmen und bewahren Sie sie zum späteren Nachschla-
gen gut auf, geben Sie sie ggf. an den Nachbesitzer weiter.
r Schäden, die durch Nichtbeachten dieser Gebrauchsanleitung entste-
hen, lehnt Stadler Form jegliche Haftung ab.
Das Gerät ist nur im Haushalt für die in dieser Gebrauchsanweisung
beschriebenen Zwecke zu benutzen. Ein nicht bestimmungsgemässer
Gebrauch sowie technische Veränderungen am Gerät können zu Gefahren
r Gesundheit und Leben führen.
Deutsch
Dieses Gerät kann von Kindern ab 8 Jahren und Personen mit einge-
schränkten körperlichen, sensorischen oder geistigen Fähigkeiten, aber
auch von unerfahrenen und unwissenden Personen verwendet werden,
sofern diese das Gerät unter Aufsicht verwenden oder von einer anderen
Person über die sichere Verwendung des Gerätes unterwiesen wurden
und sich der damit verbundenen Gefahren bewusst sind. Kinder dürfen
nicht mit dem Gerät spielen. Kinder dürfen das Gerät nur unter Aufsicht
reinigen und warten.
Wenn das Netzkabel beschädigt ist, muss es vom Hersteller oder in einer
vom Hersteller zugelassenen Werkstatt oder von ähnlich qualifizierten
Personen ersetzt werden, um Gefahren zu vermeiden.
prüft danach in Intervallen die Feuchtigkeit durch jeweilige kurzzeitige
Einschaltung des Ventilators.
5. Durch Dcken der Timer Taste (5) können Sie die Betriebsdauer wahl-
weise von 1–7 h einstellen (z.B. 3 h = LED 1 h + 2 h aktiv / 7 h = LED
1 h, 2 h, 4 h aktiv) . Bei einmaligem Drücken ist 1h Betriebsdauer einge-
stellt, bei nochmaligem Drücken 2 h Betriebszeit usw. Die verbleibende
Restlaufzeit wird anhand der leuchtenden Zahlen angezeigt. Das Gerät
schaltet automatisch aus, nachdem die eingestellte Betriebszeit abge-
laufen ist.
6. Das Gerät ist mit einer automatischen Enteisungsfunktion ausgestat-
tet. Bei einer tiefen Raumtemperatur schaltet das Gerät automatisch
die Enteisungsfunktion „Auto Defrost“ ein. Damit wird verhindert, dass
sich während dem Betrieb Eis im Get bildet.
7. Ist der Wassertank (11) voll, leuchtet die rote LED (7) unten am Gerät.
Der Entfeuchter schaltet sich automatisch ab. Bitte entleeren Sie den
Wassertank. Wenn Sie diesen wieder einsetzen, schaltet sich der Ent-
feuchter automatisch wieder ein.
8. Wenn Sie das Gerät direkt mit dem Abfluss verbinden wollen, haben
Sie die Möglichkeit den Drainage-Schlauch (13) am Gerät einzustecken
und diesen direkt in einen Abfluss zu leiten. Bitte beachten Sie, dass
das Schlauchende tiefer als der Anfang liegen muss, ansonsten kann
das Wasser nicht abfliessen.
Reinigung
Vor jeder Wartung, Reinigung und nach jedem Gebrauch das Gerät ausschal-
ten (3) und das Netzkabel (12) von der Steckdose trennen.
Achtung: Das Gerät nie ins Wasser tauchen (Kurzschlussgefahr).
Zur Reinigung nur mit einem feuchten Lappen abreiben und danach gut
trocknen.
Darauf achten, dass Lufteinlass (9) und Luftaustritt (8) regelmässig gerei-
nigt werden, um eine Staubansammlung zu vermeiden. Den Luftaustritt
(8) mit einem trockenen Pinsel oder Staubsauger reinigen. Das Luftein-
lassgitter (9) ist mit einem Luftfilter (10) ausgestattet, der abnehmbar ist
und mit einem feuchten Lappen gereinigt werden kann.
Reparaturen
Reparaturen an Elektrogeräten (Wechseln des Netzkabels) dürfen nur
von instruierten Fachkräften durchgeführt werden. Bei unsachgemässen
Reparaturen erlischt die Garantie und jegliche Haftung wird abgelehnt.
Nehmen Sie das Gerät nie in Betrieb, wenn ein Kabel oder Stecker be-
schädigt ist, nach Fehlfunktionen des Gerätes, wenn dieses herunterge-
fallen ist oder auf eine andere Art beschädigt wurde (Risse/Brüche am
Gehäuse).
Nicht mit irgendwelchen Gegensnden in das Gerät eindringen.
Ausgedientes Gerät sofort unbrauchbar machen (Netzkabel durchtren-
nen) und bei der dafür vorgesehenen Sammelstelle abgeben.
Im Falle einer Reparatur müssen folgende Punkte beachtet werden, bevor
das Gerät verschickt oder zum Händler gebracht wird: das Wasser im Ge-
t komplett ausleeren (Wasserwanne bzw. Wassertank) und das Gerät
vollständig trocknen lassen. Geräte mit Restwasser werden während des
Transports beschädigt. Die Garantie erlischt in diesem Falle.
Pour éviter tout danger, faites remplacer le cordon d‘alimentation endom-
magé par le fabricant, un agent agé ou une personne qualifiée.
Pour usage intérieur uniquement.
L’appareil ne doit pas être conservé à lextérieur.
Placez le déshumidificateur d’air sur une surface plane, solide et résis-
tante à l’eau. Veillez à une bonne stabilité afin que le déshumidificateur
d’air ne puisse ni se renverser ni tomber. L’eau peut endommager les
meubles et les retements de sol.
Déroulez complètement le cordon d’alimentation. Si le cordon n’est pas
déroulé complètement, il peut y avoir surchauffe, ce qui peut entraîner
un incendie.
Ne plongez le déshumidificateur d’air ni dans l’eau ni dans dautres li-
quides et ne versez pas d’eau ni d’autres liquides sur lappareil ou dans les
orifices d’ente et de sortie d’air.
Ne pas utiliser l’appareil à proximité immédiate d’une baignoire, d’une
douche ou d’une piscine (respecter une distance minimum de 3 m). Placer
l’appareil de telle façon à ce que personne ne puisse le toucher à partir
de la baignoire.
Ne pas placer l’appareil à proximité directe d‘ une source de chaleur. Ne
pas exposer le câble d’alimentation à la chaleur (comme p. ex. une plaque
chaude de cuisinière, flammes nues, semelle chaude de fer à repasser ou
poêles). Proger le câble d’alimentation de tout contact avec de l‘huile.
Ne mettez pas ce déshumidificateur d’air en marche s’il est endommagé
ou susceptible de l’être ou s’il ne fonctionne pas correctement. Retirez la
fiche secteur de la prise de courant.
N’introduisez jamais ni vos doigts ni d’autres objets dans les orifices
d’arrivée ou de sortie d‘air. Ne recouvrez pas l’appareil durant son fonc-
tionnement.
Il est interdit de monter ou de s’asseoir sur lappareil.
Videz le réservoir d’eau lorsqu’il est plein.
Ne mettez pas lappareil en service dans un endroit fermé, par ex. dans
une armoire vu que cela peut entraîner un incendie.
Si l’appareil est connecté à un tuyau de drainage, veuillez-vous assurer
que lextmité du tuyau côté évacuation est plus basse que celle du côté
alimentation, autrement l’eau ne sera pas évacuée et des inondations
risquent de se produire.
Si des pièces de l’appareil sont endommaes, veuillez contacter le re-
vendeur ou un atelier de réparation agé.
Type et performance des fusibles : T, 250 V AC,2 A.
Mise en marche / Manipulation
1. Placez Theo sur une surface plate sur la zone de votre choix. Branchez
le câble d’alimentation (12) dans une prise électrique.
2. Ouvrez le cache de la sortie d‘air (8). Ce cache doit toujours être ouvert
lorsque l’appareil fonctionne. La fermeture du cache pendant le fonc-
tionnement peut entraîner un dommage technique.
3. Appuyez sur l’interrupteur M/A (3) pour mettre le déshumidificateur en
route.
4. Avec l’hygrostat (4) vous pouvez régler le niveau d’humidité de votre
choix ( 40 % / 50 % / 60 % / Con = Fonctionnement continu). Si le dés-
humidificateur atteint l’humidité sélectione, il s’éteindra et vérifiera
14

Hulp nodig? Stel uw vraag in het forum

Spelregels

Misbruik melden

Gebruikershandleiding.com neemt misbruik van zijn services uitermate serieus. U kunt hieronder aangeven waarom deze vraag ongepast is. Wij controleren de vraag en zonodig wordt deze verwijderd.

Product:

Bijvoorbeeld antisemitische inhoud, racistische inhoud, of materiaal dat gewelddadige fysieke handelingen tot gevolg kan hebben.

Bijvoorbeeld een creditcardnummer, een persoonlijk identificatienummer, of een geheim adres. E-mailadressen en volledige namen worden niet als privégegevens beschouwd.

Spelregels forum

Om tot zinvolle vragen te komen hanteren wij de volgende spelregels:

Belangrijk! Als er een antwoord wordt gegeven op uw vraag, dan is het voor de gever van het antwoord nuttig om te weten als u er wel (of niet) mee geholpen bent! Wij vragen u dus ook te reageren op een antwoord.

Belangrijk! Antwoorden worden ook per e-mail naar abonnees gestuurd. Laat uw emailadres achter op deze site, zodat u op de hoogte blijft. U krijgt dan ook andere vragen en antwoorden te zien.

Abonneren

Abonneer u voor het ontvangen van emails voor uw Stadler Form Theo bij:


U ontvangt een email met instructies om u voor één of beide opties in te schrijven.


Ontvang uw handleiding per email

Vul uw emailadres in en ontvang de handleiding van Stadler Form Theo in de taal/talen: Nederlands, Duits, Engels, Frans, Italiaans, Spaans, Deens, Zweeds, Noors als bijlage per email.

De handleiding is 1,35 mb groot.


U ontvangt de handleiding per email binnen enkele minuten. Als u geen email heeft ontvangen, dan heeft u waarschijnlijk een verkeerd emailadres ingevuld of is uw mailbox te vol. Daarnaast kan het zijn dat uw internetprovider een maximum heeft aan de grootte per email. Omdat hier een handleiding wordt meegestuurd, kan het voorkomen dat de email groter is dan toegestaan bij uw provider.

Stel vragen via chat aan uw handleiding

Stel uw vraag over deze PDF

Uw handleiding is per email verstuurd. Controleer uw email

Als u niet binnen een kwartier uw email met handleiding ontvangen heeft, kan het zijn dat u een verkeerd emailadres heeft ingevuld of dat uw emailprovider een maximum grootte per email heeft ingesteld die kleiner is dan de grootte van de handleiding.

Er is een email naar u verstuurd om uw inschrijving definitief te maken.

Controleer uw email en volg de aanwijzingen op om uw inschrijving definitief te maken

U heeft geen emailadres opgegeven

Als u de handleiding per email wilt ontvangen, vul dan een geldig emailadres in.

Uw vraag is op deze pagina toegevoegd

Wilt u een email ontvangen bij een antwoord en/of nieuwe vragen? Vul dan hier uw emailadres in.


Info