DECLARATION OF CONFORMITY ...............................................................111
RELA NOW
Relaxxnow 5
DE
Unsere Video Tutorials für
dich!
In 3 einfachen Schritten zum schnellen
und sicheren Start:
1. QR-Code scannen
2. Videos anschauen
3. schnell und sicher
starten
Aufbau
Benutzung
Abbau
Link zu den Videos:
https://service.innovamaxx.de/vtx300_video
6 Relaxxnow
TECHNISCHE ANGABEN
16“ Standventilator
Leistung: 55 W
Maße: 46.5*43.5*124CM
Nettogewicht: 5,3kg
Spannung: 220-240V~,50Hz
• 5 starke und geräuschsarme Propellerflügel
• horizontale Oszillation um 120°
• 4 Geschwindigkeitsstufen: Eco / Low / Medium und High Speed
• 7,5 h Digital Timer
• mit Remote Control
• mit WiFI
• Kopf des Ventilators kann manuell nach oben gekippt werden (max 90°).
• Luxus-Vollkunststoffgehäuse mit Patentschließfachsystem, einfache Montage und
Demontage, kein Werkzeug erforderlich.
• Gewichteter runder Standfuß, leicht zu montierendes Standrohr.
Lieferumfang:
• 1x Ventilator VTX300
• 1x Fernbedienung
• 1x Bedienungsanleitung
Relaxxnow 7
DE
ALLGEMEINE HINWEISE
Bitte lesen Sie diese Bedienungsanleitung sorgfältig vor Gebrauch des Gerätes und bewahren Sie
sie an einem sicheren Ort auf. Benutzen Sie das Gerät nur wie beschrieben und machen Sie sich
vor dem Benutzen des Produktes mit allen Bedien- und Sicherheitshinweisen vertraut.
Entfernen Sie die Verpackung und prüfen Sie, ob das Produkt unbeschädigt ist. Wenn an der
Unversehrtheit Zweifel besteht, verwenden Sie das Produkt nicht und treten Sie mit Ihrem Verkäufer
in Kontakt.
• Stecken Sie niemals Objekte wie Finger, Stifte etc. durch das Schutzgitter, während das
Gerät in Betrieb ist
• Trennen Sie das Gerät vom Stromnetz, wenn Sie es verstellen oder sauber machen wollen.
• Stellen Sie sicher, dass das Gerät während des Gebrauchs auf einem stabilen, ebenen
Untergrund steht, damit es nicht umkippt.
• Stellen Sie das Gerät NICHT an ein Fenster. Regen kann einen elektrischen Schlag
verursachen. Tauchen Sie das Gerät, den Stecker oder das Kabel nicht in Wasser und
besprühen Sie es nicht mit Flüssigkeiten.
• Lassen Sie Kinder und Tiere nicht unbeaufsichtigt mit dem aktiven Gerät. Lassen Sie das
Kabel nicht vom Tisch o.ä.herunterhängen.
• Verwenden Sie das Gerät nicht, wenn Kabel oder Stecker beschädigt sind, wenn das Gerät
defekt oder hinunter gefallen ist oder auf andere Art und Weise beschäfigt worden ist.
Wenden Sie sich in diesem Fall an einen qualifizierten Elektriker.
• Verwenden Sie den Ventilator nicht ohne den Standfuß. Das Gerät muss bei Betrieb aufrecht
stehen.
• Verwenden Sie den Ventilator nicht in der Nähe von Vorhängen, Pflanzen
Fensterdekorationen oder anderen Dingen, die in den Propeller gelangen können. Um
ihn vom Strom abzuschließen, ziehen Sie den Stecker aus der Steckdose. Ziehen Sie
nie am Kabel.
• Verlegen Sie das Kabel nicht unter einem Teppich. Decken Sie das Kabel nicht mit
Teppichen, Läufern oder ähnlichem ab. Verlegen Sie das Kabel so, dass niemand darüber
stolpern kann.
• Um das Gerät vom Strom zu trennen, ziehen Sie den Stecker aus der Steckdose. Ziehen
Sie dafür am Netzstecker, NIEMALS am Kabel.
8 Relaxxnow
WARNHINWEISE
• Nutzen Sie dieses Gerät nur für den privaten Zweck.
• Jede Wartung, die über die normale Pflege und den normalen Gebrauch hinaus geht,
sollte von einem autorisierten Fachmann vorgenommen werden.
• Tauchen Sie das Gerät nicht in Wasser.
• Entnehmen Sie keine Teile und nehmen Sie das Gehäuse nicht ab, um das Risiko eines
Feuers oder Elektroschocks zu vermeiden.
• Lassen Sie das Gerät nur von einem autorisierten Fachmann reparieren.
• Wenn die Netzschlussanleitung dieses Gerätes beschädigt wird, muss Sie von dem
Hersteller oder dem zuständigen Kundendienst oder einer ähnlich qualifizierten Person
ersetzt werden, um Gefährdungen zu vermeiden.
MONTAGEANLEITUNG
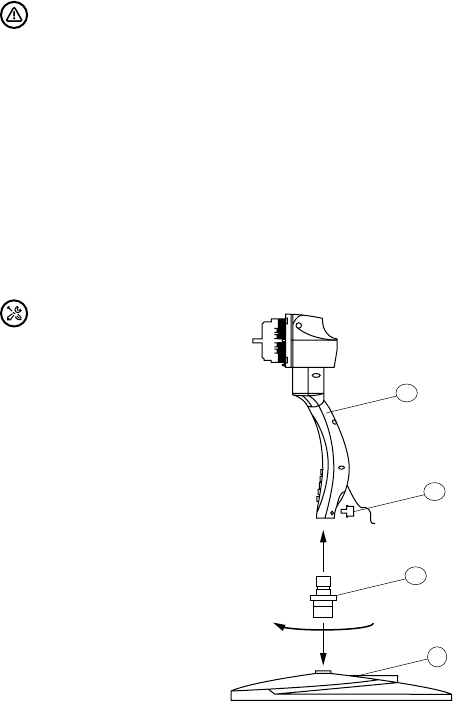
Installation und Verwendung
Für den Tischventilator
1. Stellen Sie den Standfuß (15) auf
einen Tisch, stecken Sie den Adapter
(19) hinein und befestigen Sie ihn,
indem Sie den Adapter (19) im Uhr-
zeigersinn drehen.
2. Setzen Sie die obere Säule (8) auf
den Verbindungsadapter (19). Ziehen Sie
den oberen Knopf der Säule an (11).
19
15
8
11
Relaxxnow 9
DE
Befestigung der Schutzgitter
1. Entfernen und entsorgen Sie die Kunststoffverpackung an der Motorwelle (6).
2. Führen Sie das hintere Gitter mit Griff (5) entlang der Motorwelle (6) gegen die Vorderseite des
Motorgehäuses (7). Stellen Sie sicher, dass der Griff an der Rückseite des hinteren Gitters (5)
nach oben zeigt und dass alle Führungszapfen am Motorgehäuse (7) mit den Aussparungen am
hinteren Gitter ausgerichtet sind.
3. Befestigen Sie das hintere Gitter (5) mit der Kunststoffmutter (4). Ziehen Sie die Mutter im
Uhrzeigersinn am Motorgehäuse fest.
4. Installieren Sie den Lüfterflügel (3) an der Motorwelle (6), bis die dafür vorgesehenen
Aussparungen in die Kunststoffmutter (4) greifen. Setzen Sie die Drehschraube (2) nach dem
Lüfterflügel (3) auf die Motorwelle (6). Zum Befestigen ziehen Sie die Drehschraube (2) gegen
den Uhrzeigersinn fest.
5. Montieren Sie das vordere Gitter (1) gegen das hintere Gitter (5), indem Sie die Markierungen
auf der Oberseite entsprechend ausrichten. Verbinden Sie nun beide Teile mit Hilfe der Haken am
vorderen Gitter (1) und der Schlitze am hinteren Gitter (5). Der Schnappverschlussstift sollte nun
in der richtigen Position einrasten.
15
8
9
10
11
12
1 3
6
7
21
20
2
4 5
19
10 Relaxxnow
Hinweis:
Um das Frontgitter zu demontieren, ziehen Sie den Schnappverschlussstift leicht nach außen,
während Sie das Frontgitter gegen den Uhrzeigersinn drehen.
INBETRIEBNAHME
Elektrischer Anschluss
• Bevor Sie den Stecker in die Steckdose stecken, stellen Sie sicher, dass die Spannung Ihrer
Hauptversorgung mit der Spannung auf dem Etikett des Produkts übereinstimmt.
• Schließen Sie den Ventilator nur an eine vorschriftsmäßig installierte, 220-240 V ~ 50/60
Hz
Kontaktsteckdose an.
Verwendung des Kontrollschalters und der Fernbedienung
Dieser Ventilator ist mit 4 Geschwindigkeitsstärken, einem Timer und einer Fernbedienung
ausgestattet. Die Knöpfe auf der Schaltfläche haben dieselbe Funktion wie die auf der
Fernbedienung.
WICHTIG:
Bitte beachten Sie bei der Inbetriebnahme des Gerätes die Mindestabstände zu Wänden und
Gegenständen (30cm in ALLE Richtungen).
Vor Inbetriebnahme überprüfen Sie den einwandfreien Zustand des Netzkabels. Wenn Sie Zweifel
am Zustand haben, wenden Sie sich an den Hersteller.
Positionieren Sie das Gerät in aufrechter UND standfester Position.
Vermeiden Sie beim Verlegen des Netzkabels (bei Positionierung in der Raummitte) s. g.
„Stolperstellen“. Wir empfehlen die Verwendung von Kabelbrücken.
Achten Sie darauf, dass das Netzkabel vollständig abgerollt ist.
Stellen Sie sicher, dass mögliche Gegenstände (z.B. Vorhänge, Kleidung o. ä.) den Luftstrom nicht
behindern.
Setzen Sie die Batterien in die Fernbedienung ein. Sind die Batterien ab Werk bereits in die
Fernbedienung eingelegt, so müssen Sie noch die Schutzfolie entfernen.
Relaxxnow 11
DE
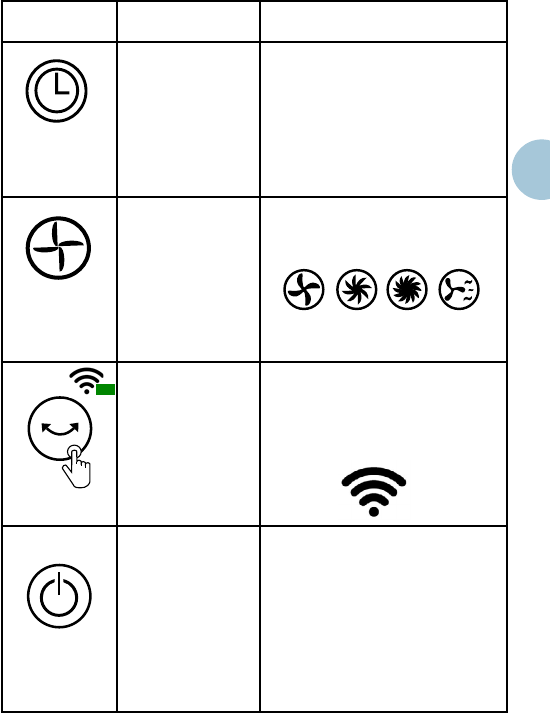
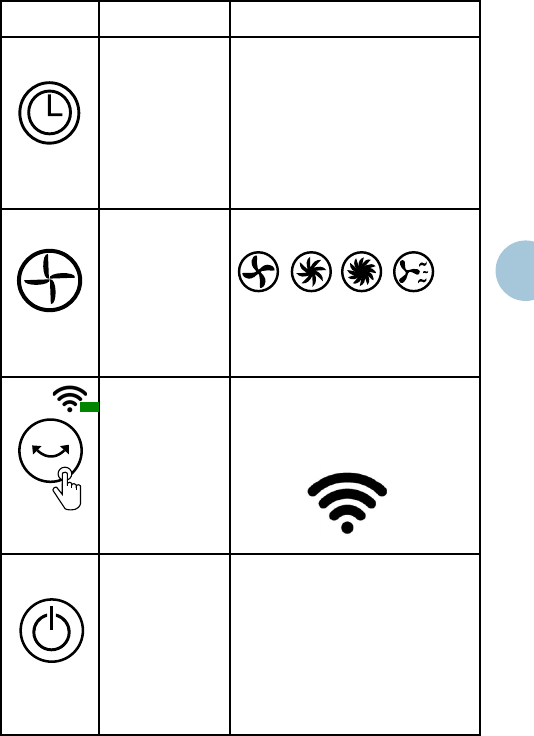
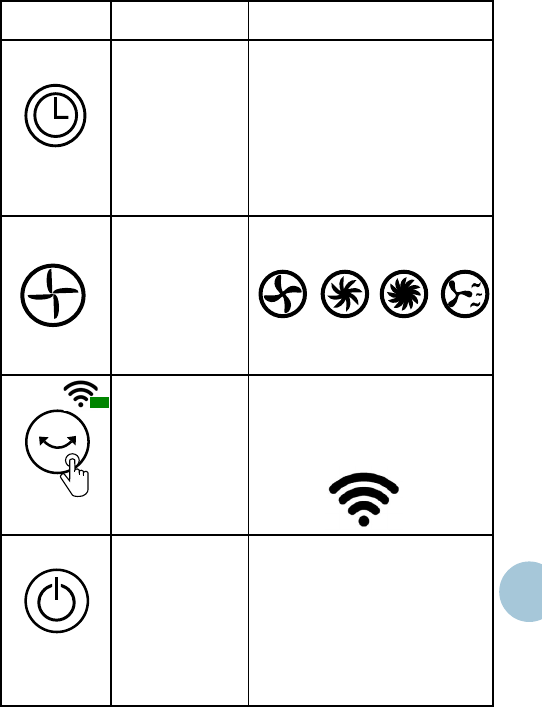
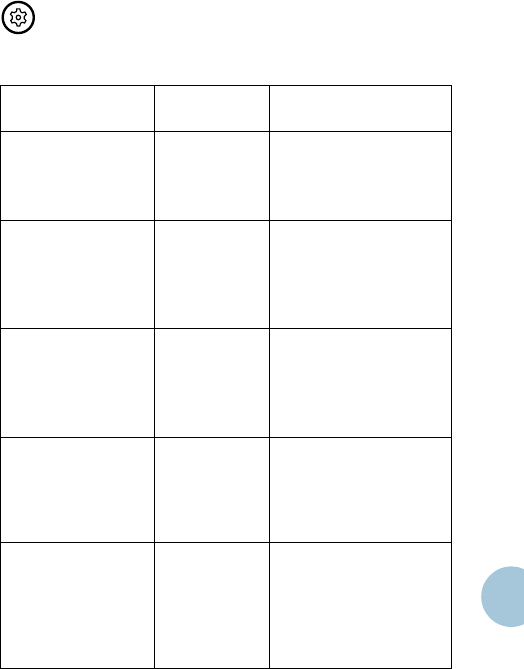
TASTEFUNKTION ANZEIGE
Timer
Mit diesem Knopf können
Sie den Timer auf 0.5 bis
zu 7.5 Stunden einstellen.
Nachdem der Timer ab-
gelaufen ist, geht der
Ventilator automatisch aus.
0.5 h, 1 h, 2 h, 4 h
Beispiel 1: auf 0.5 h eingestellt wird der Timer
nach 30 min ablaufen.
Beispiel 2: auf 0.5 h und 2 h eingestellt wird der
Timer nach 2.5 h ablaufen.
Beispiel 3: auf 0.5 h, 1 h, 2 h, und 4 h ein-
gestellt wird der Timer nach 7.5 h ablaufen.
Geschwindig-
keit
Mit diesem Knopf wird
der Ventilator durch 4
Komfort-Geschwindigkeiten
geleitet (High/Medium/
Low/Eco). Dieser Knopf
kann in jedem Modus
benutzt werden.
Diese Icons zeigen die ausgewählten Geschwin-
digkeitsstufen an:
Oszillation
Um eine breite Brisen-
verteilung zu aktivieren,
drücken Sie diese Oszilla-
tionstaste einmal.
Die W-Lan Funtion wird
eingeschaltet, nachdem
der Knopf drei Sekun-
den gedrückt wurde.
Das Oszillationslicht am Lüfter leuchtet, wenn
die Funktion aktiviert ist. Um die Funktion wieder
auszuschalten, drücken Sie diese Taste erneut.
Die Oszillation kann gesteuert werden, während
der Lüfter in Betrieb ist.
Power
ON/OFF
Mit diesem Knopf schalten
Sie den Ventilator an
und aus.
3 sec.
ON
LowMediumHighEco
12 Relaxxnow
Bedienung der Fernbedienung
Der Betrieb unterliegt den folgenden beiden Bedingungen:
(1) Dieses Gerät darf nicht zu Interferenzen führen und (2) dieses Gerät muss alle
Interferenzen akzeptieren, einschließlich Interferenzen, die möglicherweise zu un-
erwünschtem Betrieb des Gerätes führen können.
Um die Bedienung zu erleichtern verfügt die Fernbedienung über die gleichen Tasten
wie der Kontrollschalter. Folgen Sie den gleichen Anweisungen wie unter Verwen-
dung des Kontrollschalters und der Fernbedienung.
Hinweis: Entfernen Sie die Plastikisolierfolie unter der Batterie, bevor Sie die
Fermbedienung verwenden.
• Die Fernbedienung muss auf den Receiver auf dem Ventilator gerichtet sein,
um zu funktionieren.
• Die Reichweite der Fernbedienung beträgt 5 Meter. Wenn die Fernbedienung
nicht auf den Receiver gerichtet ist, verringert sich diese Reichweite.
• Die Fernbedienung darf nicht in Räumen verwendet werden, in denen schwere
Maschinen in Betrieb sind.
• Die Sichtlinie zwischen Fernbedienung und Receiver darf nicht blockiert sein.
• Gehen Sie mit der Fernbedienung vorsichtig um. Lassen Sie sie nicht fallen
und schlagen Sie sie nicht gegen harte Gegenstände.
Richtlinien für die Verwendung der Batterien der Fernbedienung
• Wenn die Fernbedienung über einen längeren Zeitraum nicht benutzt wird,
entfernen Sie die Batterien aus der Fernbedienung.
• Reinigen Sie die Batteriekontakte und die des Gerätes, bevor Sie die Batterie
in die Fernbedienung legen.
• Vergewissern Sie sich, dass die Batterien korrekt eingelegt wurden, in Bezug
auf die Polarität (Anpassung der
+
/
-
Seiten der Batterie).
• Entfernen Sie gebrauchte und beschädigte/entladene Batterien sofort.
Relaxxnow 13
DE
Einstellmöglichkeiten für eine verbesserte Luftzirkulation
Dieser Ventilator hat zwei Funktionen, die Ihnen ermöglichen, den Luftkomfort besser
anzupassen und die Luftzirkulation im Raum zu verbessern.
A. Oszillation:
Um die Oscillation Funktion für eine großflächige Windverteilung zu aktivieren,
drücken Sie die Taste. Um die Funktion für eine gezielte Windstärkeeinstellung
auszuschalten, erneut drücken. Die Steuerung der Oszillation kann durchgeführt
werden, während der Ventilator in Betrieb ist. Dieser Ventilator hat eine verbesserte
Weitwinkelschwingung für eine bessere Zirkulation.
B. Neigung:
Um den Kopf des Ventilators auf einen bestimmten Winkel einzustellen, schalten Sie
den Ventilator aus und halten Sie das Motorgehäuse mit einer Hand fest. Greifen
Sie das Schutzgitter mit der anderen Hand. Kippen Sie den Kopf des Ventilators
vorsichtig, bis er den gewünschten Winkel erreicht. Neigen Sie den Kopf nicht weiter
nach hinten, als vorgesehen, da dies zum Schäden am Gerät führen kann. Maximal
kann er fast bis in die horizontale Position geneigt werden.
Hinweis: Der Ventilator muss ausgeschaltet sein, wenn Sie diese Einstellung vor-
nehmen.
SPEZIFIKATIONEN
MODEL/ SKUVTX300
SPANNUNG (V)220-240 V AC, 50/60 HZ
WATTLEISTUNG (W)55 W
VORSICHT: Um einen Stromschlag zu vermeiden, stellen Sie sicher, dass der
Stecker stets richtig an der Steckdose angeschlossen ist.
14 Relaxxnow
Hinweis: Diese App wird nur von 2.4Hz WiFi Netzwerk unterstützt. Bitte stellen Sie
sicher, dass Ihr Mobiltelefon mit einem 2.4Hz WiFi Netzwerk verbunden ist.
Schritt 1: Downloaden Sie die App.
Suchen und downloaden Sie die „Tuya Smart“ in einem App Store.
Schritt 2: Registrierung
Nachdem Sie die App heruntergeladen haben, öffnen Sie die App und registrieren
Sie sich entsprechend der Anleitung.
Schritt 3: Verbinden Sie die App mit dem Ventilator
1. Stecken Sie den Stecker des Ventilators in eine 220-240V Steckdose. Der
Ventilator befindet sich nun im Standby Modus.
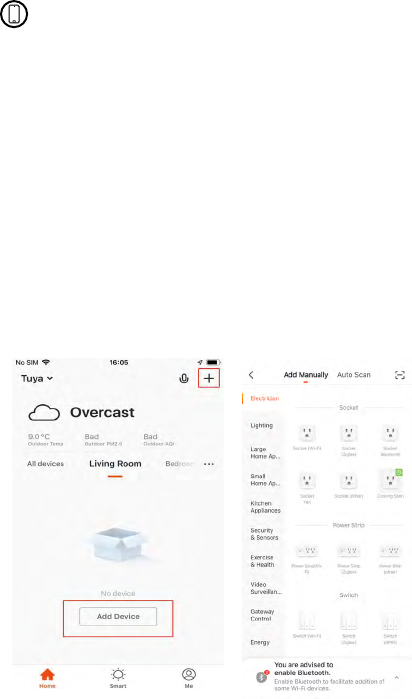
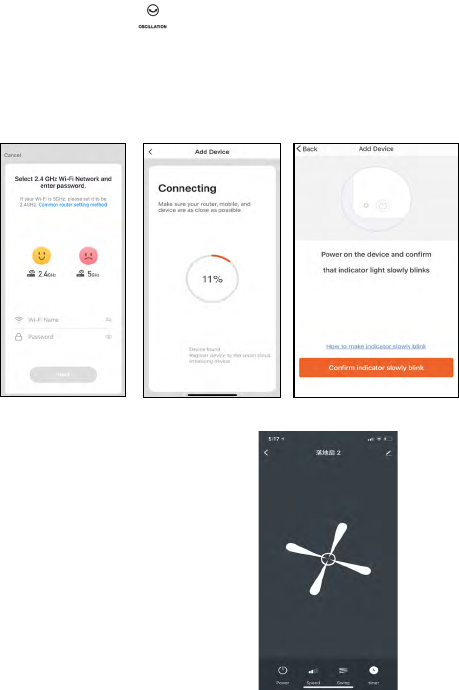
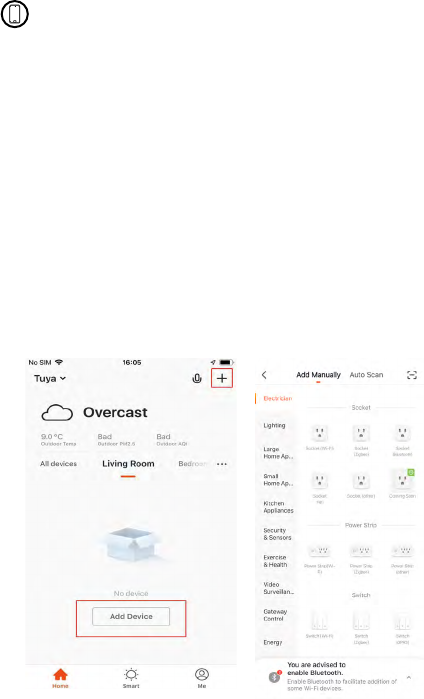
2. Drücken Sie „Add Device“ oder „+“ in der oberen rechten Ecke auf der Homesei-
te der App, siehe Bild unten.
APP FUNKTION
Relaxxnow 15
DE
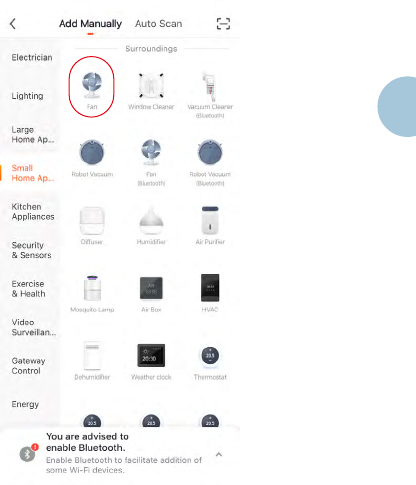
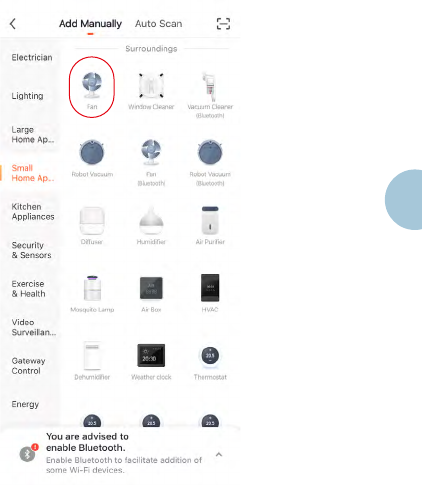
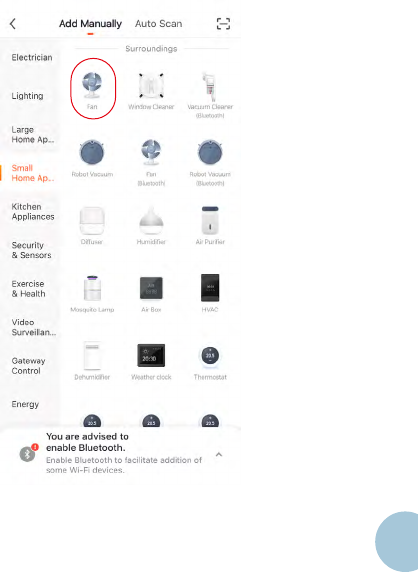
3. Drücken Sie auf „Small Home Appliances“ und auf „Ventilator“ („Fan“), wie im
unteren Bild dargestellt.
16 Relaxxnow
5. Wenn Ihr Mobiltelefon eine Verbindung an-
zeigt und der WiFi Indikator auf dem Ventilator
aufhört zu leuchten, ist die App mit dem
Ventilator verbunden.
Bei einer erfolgreichen Verbindung können Sie
den Ventilator mit der App steuern.
4. Drücken Sie den OSC Knopf auf dem Bedienungsfeld des Ventilators für 5
Sekunden, bis der WiFi Indikator auf dem Display anfängt schnell zu blinken. Drücken
Sie dann „Confirm indicator rapidly blink“ auf dem Mobiltelefon.
Hinweis: Wenn die Verbindung fehlschlägt, drücken Sie „AP Mode“ (rechts oben)
und „Confirm indicator slowly blink“ auf dem Mobiltelefon wie auf dem unteren Bild
dargestellt.
Relaxxnow 17
DE
AMAZON ALEXA
Wenn Sie Alexa nutzen wollen, drücken Sie „ME“ (rechts unten).
Wählen Sie dann „More Services“ und dann „Alexa“.
Dort finden Sie, wie Sie Alexa nutzen.
Um den Ventilator an- oder auszuschalten nutzen Sie den Sprachbefehl „Alexa,
schalte den Ventilator an/aus“.
Alternativ können Sie Ihrem Gerät über die Geräteeinstellungen der Alexa-App auch
einen individuellen Namen geben, den Sie dann für die Sprachsteuerung verwenden.
18 Relaxxnow
REINIGUNG & AUFBEWAHRUNG
Bevor Sie den Ventilator reinigen, sollte unbedingt darauf
geachtet werden, dass das Gerät ausgeschaltet und
Adapter von der Steckdose gezogen ist!
Pflege:
Darauf ist zu achten:
Lassen Sie während der Säuberung kein Wasser in den Motor kommen. Reinigen Sie den Propeller
und die Schutzgitter mit einem weichen, feuchten Tuch und trocknen Sie sie anschließend ab.
Verwenden Sie zum Reinigen des Ventilators keinen Verdünner, Alkohol oder andere chemische
Flüssigkeiten.
Aufbewahrung:
Tragen Sie ein paar Tropfen Schmiermittel auf die Motorwelle auf, um Korrosion zu vermeiden.
Entfernen Sie Öl und Flecken von dem Körper, um Schäden an dem Ventilator zu vermeiden.
Nehmen Sie den Ventilator nach der Aufbauanleitung in umgekehrter Reihenfolge auseinander,
legen Sie ihn zurück in den Karton und lagern Sie ihn an einem trockenen Ort.
Relaxxnow 19
DE
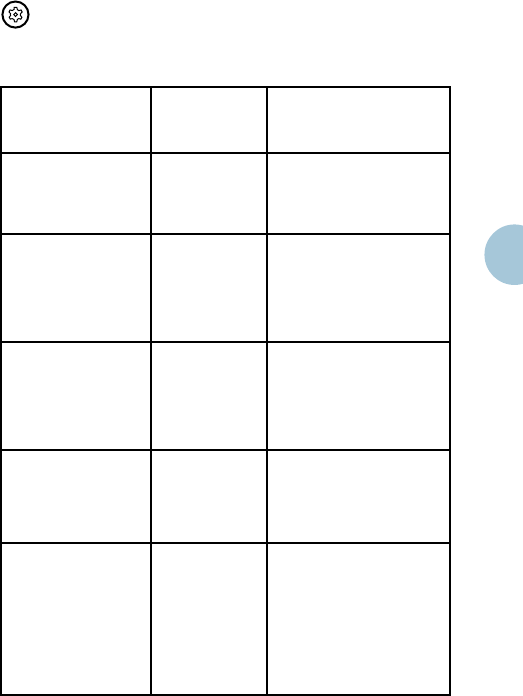
FEHLERBEHEBUNG
Wenn der Ventilator nicht mehr funktionieren sollte,
befolgen Sie bitte die folgenden Schritte, bevor Sie den Kundenservice kontaktieren:
PROBLEM
MÖGLICHE
URSACHE
LÖSUNG
Der Ventilator
geht nicht an.
Ventilator ist nicht
an eine 220-240V
AC, 50 / 60 Hz
Steckdose ange-
schlossen.
Schließen Sie Ihn an die entsprechende
Steckdose an und schalten Sie Ihn
erneut an.
Der Ventilator
ist plötzlich ausgegangen.
Der Timer ist ab-
gelaufen und der
Ventilator hat sich
automatisch aus-
geschaltet.
Vergewissern Sie sich, dass alle Timer
Lichter am Kontrollschalter aus sind.
Wenn eines der Lichter leuchtet, drü-
cken Sie den „Timer- Knopf“ bis alle
LEDs aus sind.
Die Oszillation-Funktion
funktioniert nicht.
Die Oszillations-
Funktion wurde
nicht angeschaltet.
Stellen Sie sicher, dass die entspre-
chende LED für die Oszillations-Funk-
tion leuchtet. Wenn nicht, drücken Sie
den Knopf, um die Funktion zu starten.
Das kann auch getan werden,
während der Ventilator in Betrieb ist.
Der Ventilator ist an,
aber der Wind nicht stark
genug.
Es hat sich hinten
am Ventilator Staub
abgelegt.
Schalten Sie den Ventilator aus und
ziehen Sie den Stecker. Säubern Sie
das hintere Schutzgitter mit einem
weichen, trockenen Tuch. Stecken Sie
den Stecker wieder an und schalten
Sie das Gerät wieder ein.
Die Fernbedienung
funktioniert nicht.
Die Batterien sind
zu schwach.
Die Fernbedienung
ist zu weit vom
Gerät entfernt.
Folgen Sie den Richtlinien für die
Verwendung der Batterien und der
Fernbedienung.
20 Relaxxnow
Hinweise zum Elektro- und Elektronikgerätegesetz (ElektroG)
Wir weisen Besitzer von Elektro- und Elektronikaltgeräten darauf hin, dass Elektroaltgeräte gemäß den geltenden gesetzlichen Vorschriften, einer vom Siedlungs
-
abfall getrennten Erfassung zuzuführen sind. Das dargestellte und auf Elektro- und Elektronikaltgeräten aufgebrachte Symbol einer durchgestrichenen Abfalltonne
weist zusätzlich auf die Pflicht zur getrennten Erfassung hin:
Nach dem ElektroG sind wir als Vertreiber von Elektrogeräten nach § 17 Abs. 2 ElektroG in Verbindung mit § 17 Abs. 1 ElektroG verpflichtet, bestimmte Elektro-
und Elektronikaltgeräte unentgeltlich zurückzunehmen. Dieser gesetzlichen Verpflichtung kommen wir über die DR Deutsche Recycling Service GmbH/take-e-way
GmbH nach. Daneben können Sie Elektroaltgeräte an den Sammelstellen der öffentlich-rechtlichen Entsorgungsträger abgeben. Sie leisten einen wichtigen
Beitrag zur Wiederverwendung, zum Recycling und zur sonstigen Verwertung von Altgeräten, dadurch dass sie Ihre Altgeräte einer getrennten Erfassung in den
richtigen Sammelgruppen zuführen.
Für die Löschung personenbezogener Daten auf den zu entsorgenden Elektroaltgeräten sind Sie als Endnutzer vor der Abgabe selbst verantwortlich.
Hinweis zum Batteriegesetz (BattG)
Batterien und Akkus dürfen nicht im Hausmüll entsorgt werden. Als Endnutzer sind Sie zur Rückgabe von Altbatterien gesetzlich verpflichtet. Nutzen Sie dafür die
offiziellen Rücknahmestellen wie etwa die Sammelstellen öffentlich-rechtlicher Entsorgungsträger.
Unabhängig davon weisen wir auf Folgendes hin:
Altbatterien enthalten Schadstoffe, die bei nicht sachgemäßer Lagerung oder Entsorgung die Umwelt oder Ihre Gesundheit schädigen können. Batterien enthalten
aber auch wichtige Rohstoffe wie z.B. Eisen, Zink, Mangan oder Nickel und können verwertet werden.
Das Zeichen mit der durchgekreuzten Abfalltonne bedeutet, dass Batterien und Akkus nicht im Hausmüll entsorgen dürfen.
Recyclingkreislauf
Verpackungsmaterialien können wieder dem Rohstoffkreislauf zugeführt werden.
Entsorgen Sie die Verpackung gemäß den aktuellen Bestimmungen. Informationen erhalten Sie bei den Rückgabe- und Sammelsystemen Ihrer Gemeinde.
B. Hinweise zur Entsorgung und Symbolik für ein Elektrogerät mit entnehmbarer Batterie:
Relaxxnow 21
Dear customer,
We are pleased you chose a device from the RELAXXNOW product range. With equipment from
RELAXXNOW you get the highest quality and latest technology.
In order to fully use the potential of your device and be able to enjoy it for many years, please read
this manual carefully before starting up and beginning of training, and use the device according to
the instructions. The operational safety and function of the device can only be guaranteed if the
legal provisions on general safety and accident prevention as well as the safety instructions in this
user manual are observed. We shall not assume any liability for damages resulting from improper
use or incorrect operation.
i
Please ensure that all persons using the device have read and understood the user
manual.
Keep the user manual in a safe place to be able to access it at any
FONCTION DE L‘APPLICATION ..................................................................68
NETTOYAGE ET STOCKAGE ......................................................................72
RÉSOLUTION DES PROBLÈMES ............................................................... 73
DECLARATION OF CONFORMITY ...............................................................111
Relaxxnow 59
FR
Nos
tutoriels vidéo
pour vous!
3 étapes simples pour un démarrage
rapide et sécurisé:
1. Scannez le code QR
2. Regarder les vidéos
3. Démarrez rapidement et en
toute sécurité.
construction
utilisation
réduction
Lien vers les vidéos:
https://service.innovamaxx.de/vtx300_video
60 Relaxxnow
f
DONNÉES TECHNIQUES
Ventilateur sur pied : 16“
Puissance : 55 W
Dimensions : 46,5*43,5*124CM
Poids net : 5,3kg
Tension : 220-240V~,50Hz
• 5 pales hélicoïdales robustes et silencieuses
• Oscillation horizontale de 120°
• 4 vitesses : Eco / Faible /
• Moyenne et grande vitesse
• Minuterie numérique jusqu’à 7,5 h
• Avec télécommande
• Avec WiFi
• La tête du ventilateur peut être inclinée manuellement vers le haut (max 90°).
• Structure de luxe en plastique plein avec système de fermeture breveté, montage et
démontage simple, aucun outil requis.
• Pied rond lesté, tube facile à monter.
Contenu de la livraison :
1x ventilateur VTX300
1x télécommande
1x mode d‘emploi
Relaxxnow 61
FR
INFORMATIONS GÉNÉRALES
Veuillez lire attentivement ce mode d‘emploi avant d‘utiliser l‘appareil et conservez-le dans un
endroit sûr. N‘utilisez l‘appareil que comme décrit et familiarisez-vous avec toutes les instructions
d‘utilisation et de sécurité avant d‘utiliser l‘appareil.
Retirer l‘emballage et vérifier que le produit n‘est pas endommagé. En cas de doute, n‘utilisez pas
le produit et contactez votre revendeur.
• Ne jamais insérer d‘objets étrangers tels que doigts, stylos, etc. à travers la grille de
protection lorsque l‘appareil est en marche.
• Débranchez l‘appareil de l‘alimentation électrique si vous souhaitez le déplacer ou le
nettoyer.
• Veillez à ce que l‘appareil soit positionné sur une surface stable et plane lors de l‘utilisation
afin qu‘il ne se renverse pas.
• NE PAS placer l‘appareil à une fenêtre. La pluie peut provoquer une électrocution. Ne pas
immerger l‘appareil, la fiche ou le câble dans l‘eau ou les pulvériser avec des liquides.
• Ne laissez pas les enfants et les animaux sans surveillance avec l‘appareil en marche. Ne
laissez pas le câble pendre d‘une table ou à d‘un comptoir.
• N‘utilisez pas l‘appareil si le câble ou la fiche sont endommagés, si l‘appareil est défec-
tueux, s‘il est tombé ou s‘il a été endommagé d‘une quelconque autre manière. Dans ce
cas, contactez un électricien qualifié.
• Ne pas utiliser le ventilateur sans le pied. L‘appareil doit rester debout pendant le
fonctionnement.
• N‘utilisez pas le ventilateur à proximité de rideaux, de plantes, de décorations de fenêtres
ou d‘autres objets qui pourraient pénétrer dans l‘hélice. Pour le débrancher du secteur,
débranchez-le de la prise murale. Ne tirez jamais sur le câble.
• Ne posez pas le câble sous un tapis. Ne recouvrez pas le câble avec des tapis, des patins
ou similaires. Posez le câble de façon à ce que personne ne puisse se prendre les pieds
dedans.
• Pour débrancher l‘appareil du secteur, retirez la fiche de la prise murale. Pour cela tirez
sur la fiche secteur, NE tirez JAMAIS sur le câble.
62 Relaxxnow
AVERTISSEMENTS
• N‘utilisez cet appareil qu‘à des fins privées.
• Tout entretien qui va au-delà de l‘entretien et de l‘utilisation normale doit être effectué par
un technicien autorisé.
• Ne pas immerger l‘appareil dans l‘eau.
• N‘enlevez aucune pièce ni le boîtier pour éviter tout risque d‘incendie ou de choc
électrique.
• Faites réparer l‘appareil uniquement par un spécialiste agréé.
• Si le manuel de branchement secteur de cet appareil est endommagé, il doit être
remplacé par le fabricant ou le service après-vente responsable ou par une personne
qualifiée afin d‘éviter tout danger.
NOTICE DE MONTAGE
Installation et utilisation
Pour le ventilateur de table
1. Placer le pied (15) sur une table,
insérer l‘adaptateur (19) et serrer en
tournant l‘adaptateur (19) dans le sens
des aiguilles d‘une montre.
2. Placer la colonne supérieure (8) sur
l‘adaptateur de connexion (19). Serrer le
bouton supérieur de la colonne (11).
19
15
8
11
Relaxxnow 63
Fixation des grilles de protection
1. Retirez et jetez l‘emballage en plastique de l‘arbre moteur (6).
2. Guidez la grille arrière avec la poignée (5) le long de l‘arbre moteur (6) vers l‘avant du boîtier
du moteur (7). Assurez-vous que la poignée à l‘arrière de la grille arrière (5) soit dirigée vers le
haut et que tous les ergots sur le boîtier du moteur (7) soient alignés avec les encoches sur la
grille arrière.
3.Sécurisez la grille arrière avec la poignée (5), avec l‘écrou plastique (4).Pour ce faire, fixez
fermement l‘écrou plastique (#4) sur le boîtier du moteur (#8) en le serrant dans le sens des
aiguilles d‘une montre.
4. Guidez les pales du ventilateur (3) le long de l‘arbre du moteur (6) contre l‘écrou plastique
(4). Tournez avec précaution l‘hélice du ventilateur (3) dans la bonne position jusqu‘à ce que les
encoches prévues à cet effet s‘engagent dans l‘écrou plastique (4). Placez maintenant la plaque
rotative (2) sur l‘arbre moteur. La fixation se fait en serrant la plaque rotative (2) dans le sens
inverse des aiguilles d‘une montre.
5. Montez la grille avant (1) contre la grille arrière (5) en alignant les marques sur le dessus et en
les faisant correspondre. Reliez maintenant les deux parties en utilisant les crochets de la grille
avant (1) et les encoches de la grille arrière (5). La goupille de la fermeture à ressort (20) devrait
maintenant s‘engager dans la bonne position.
15
8
9
10
11
12
1 3
6
7
21
20
2
4 5
19
FR
64 Relaxxnow
MISE EN MARCHE
Raccordement électrique
• Avant d‘insérer la fiche dans la prise, assurez-vous que la tension de votre alimentation
principale corresponde à celle indiquée sur l‘étiquette du produit.
• Raccordez le ventilateur uniquement à une prise de contact installée correctement (220-
240 V ~ 50/60 Hz).
INSTRUCTION DE MONTAGE
Ce ventilateur dispose de 4 vitesses, d‘une minuterie et d‘une télécommande. Les touches du
tableau de commande ont les mêmes fonctions que celles de la télécommande.
IMPORTANT:
S‘il vous plaît lors de la mise en service, respectez les distances minimales entre le ventilateur et les
murs et objets aux alentours (30 cm dans toutes les directions).
Avant la mise en service, vérifiez que le cordon d‘alimentation soit en parfait état. Si vous avez des
doutes sur l‘état, contactez le fabricant.
Placez l‘appareil dans une position verticale ET stable.
Afin d‘éviter les „risques de trébuchement“ que pourrait occasionner le câble d‘alimentation (le
ventilateur positionné au centre de la pièce). Nous recommandons l‘utilisation d‘une goulotte au sol.
Veillez à ce que le câble d‘alimentation soit complètement déroulé.
Assurez-vous que d‘éventuels objets n‘obstruent pas le flux d‘air (par ex. rideaux, vêtements, etc...).
Insérez les piles dans la télécommande. Si les piles sont déjà insérées dans la télécommande à
l‘usine, vous devez retirer le film de protection.
Conseil:
Pour retirer la grille avant, tirez légèrement la goupille de la fermeture à ressort vers l‘extérieur
tout en tournant la grille avant dans le sens contraire des aiguilles d‘une montre.
Serrez la vis de blocage pour sécuriser la goupille de la fermeture à ressort.
Relaxxnow 65
FR
BOUTONFONCTIONAFFICHÉ
Minuteur
Avec ce bouton
vous pouvez régler le
minuteur de 0,5 à 7,5
heures. Lorsque le
temps sélectionné
avec la minuterie est
écoulé, le ventilateur
s‘arrête automatique-
ment.
0.5 h, 1 h, 2 h, 4 h
Exemple 1 : réglé sur 0,5 h, la
minuterie expire après 30 min.
Exemple 2 : réglage sur 0,5 h et 2 h
la minuterie expirera après 2,5 heures.
Exemple 3 : réglée la minuterie sur 0,5 h
sur 1 h, 2 h et 4 h et elle s‘arrêtera au
bout de 7,5 h.
Vitesse
Ce bouton pilote la
vitesse du ventilateur
à travers 4 vitesses de
confort (Haut/Moyen/
Faible/Eco). Ce bouton
peut être utilisé dans
n‘importe quel mode.
Ces icônes indiquent les différents niveaux de
vitesse sélectionnés:
Oscillation
Pour activer une large
répartition de la brise,
appuyez une fois sur
cette touche Oscillation.
La fonction W-Lan est
activée après trois
secondes d‘appui sur
la touche.
Le témoin d‘oscillation du ventilateur s‘allume, si
la fonction est activée. Pour désactiver la fonction,
appuyez de nouveau sur cette touche. L‘oscillation
peut être contrôlée lorsque le ventilateur est en
marche.
ON/OFF
Utilisez ce bouton pour
allumer et éteindre le
ventilateur.
ON
3 sec.
LenteMoyenneHaute
Eco
66 Relaxxnow
Utilisation de la télécommande
L‘utilisation est soumise aux deux conditions suivantes :
(1) Cet appareil ne doit pas causer d‘interférences nuisibles, et (2) cet
appareil doit supporter toutes les interférences reçues, y compris
celles qui peuvent causer un fonctionnement non désiré.
Pour faciliter l‘utilisation, la télécommande possède les mêmes
touches que le tableau de commande. Suivez les mêmes instructions
que dans le mode d‘emploi.
REMARQUE: Enlevez le film isolant en plastique sous la batterie avant
d‘utiliser la télécommande.
• Pour fonctionner, la télécommande doit être dirigée vers le récepteur du
ventilateur.
• La portée de la télécommande est de 5 mètres. Si la télécommande n‘est pas
dirigée vers le récepteur, la portée est réduite.
• La télécommande ne doit pas être utilisée dans des locaux où des machines-
lourdes sont en service.
• La ligne de visée entre la télécommande et le récepteur ne doit pas être
bloquée.
• Manipulez la télécommande avec précaution. Ne la laissez pas tomber et ne
frappez pas la télécommande contre des objets durs.
Directives pour l‘utilisation des piles de la télécommande
• Si la télécommande n‘est pas utilisée pendant une longue période, retirez les
piles de la télécommande.
• Nettoyez les contacts des piles et ceux de l‘appareil avant de placer la pile
dans la télécommande.
• Veillez à ce que la pile soit correctement insérée, en particulier en ce qui
concerne la polarité, en ajustant les côtés +/- de la pile aux indicateurs
correspondants sur la télécommande.
• Retirez immédiatement les piles usagées, endommagées ou déchargées.
Relaxxnow 67
FR
Possibilités de réglage pour une meilleure circulation de l‘air
Ce ventilateur a deux fonctions qui vous permettent de mieux régler le confort de l‘air
et d‘améliorer la circulation de l‘air dans la pièce.
A. Oscillation :
Pour activer la fonction Oscillation qui permet une plus grande surface de
distribution du vent, appuyez sur la touche .Pour désactiver la fonction et
obtenir un réglage spécifique de la force du vent, appuyez à nouveau sur la
touche. Le contrôle de l‘oscillation peut être effectué pendant que le ventilateur
fonctionne. Ce ventilateur a un angle améliorée et large d‘oscillation pour une
meilleure circulation.
B. Inclinaison
Pour régler la tête du ventilateur à un certain angle, éteindre le ventilateur et tenir le
boîtier du moteur avec une main. Saisissez la grille de protection de l‘autre main.
Inclinez la tête du ventilateur jusqu‘à ce qu‘il atteigne l‘angle désiré. N‘inclinez pas la
tête trop en arrière car cela pourrait endommager l‘appareil. L‘angle maximum est
presque horizontal.
REMARQUE: Le ventilateur doit être éteint lorsque vous effectuez ce
réglage.
SPÉCIFICATIONS
MODÈLE/ SKUVTX300
TENSION (V)220-240 V AC, 50/60 HZ
UISSANCE (W)55 vations
ATTENTION: Pour éviter tout électrocution, ajustez le bord large du connecteur à la
fente large. Insérez complètement la fiche dans la prise.
68 Relaxxnow
REMARQUE: Cette application n‘est prise en charge que par le réseau WiFi 2,4
Hz. Veuillez-vous assurer que votre téléphone mobile est connecté à
un réseau WiFi 2,4 Hz.
Pas Étape 1 :télécharger l‘application.
Recherchez et téléchargez „Tuya Smart“ sur un grand marché d‘applications.
Étape 2 : inscription
Après avoir téléchargé l‘application, ouvrez la et enregistrez-vous en suivant les
instructions.
Étape 3 : connecter l‘application au ventilateur
1. Insérez la fiche du ventilateur dans une prise 220-240V. Le ventilateur est
en mode veille.
2. Appuyez sur „Add Device“ ou „+“ dans le coin supérieur droit de la page
d‘accueil de l‘application, voir image ci-dessous.
FONCTION DE L‘APPLICATION
Relaxxnow 69
FR
3. Appuyez sur „Small Home Appliances“ et sur le ventilateur („Fan“), comme indiqué
sur l‘image ci-dessous.
70 Relaxxnow
4. Appuyez sur le bouton OSC du tableau de commande du ventilateur
pendant 5 secondes jusqu‘à ce que l‘indicateur WiFi de l‘écran commence à
clignoter rapidement. Appuyez ensuite sur le bouton „Confirm indicator rapidly
blink / Confirmer l‘indicateur clignote rapidement“ sur le téléphone mobile.
Remarque: En cas d‘échec de la connexion, appuyez sur „AP Mode“ (en haut à
droite) et le voyant „Confirm indicator slowly blink / Confirmer l‘indicateur clignote
lentement „ sur letéléphone mobile comme indiqué dans l‘image ci-dessous.
5. Lorsque votre téléphone mobile affiche
une connexion et que l‘indicateur WiFi du
ventilateur cesse de clignoter, l‘application
est connectée au ventilateur.
Si la connexion est réussie, vous pouvez
contrôler le ventilateur avec l‘application.
Relaxxnow 71
FR
AMAZON ALEXA
Si vous voulez utiliser Alexa, appuyez sur „ME“ (en bas à droite).
Sélectionnez ensuite „More Services / plus de services“ et ensuite „Alexa“. Vous y
trouverez comment utiliser Alexa.
Pour allumer ou éteindre le ventilateur, vous pouvez dire „Alexa allumer/éteindre le
ventilateur“.
Vous pouvez également donner un nom individuel à votre appareil via les paramètres
de l‘application Alexa, que vous pouvez ensuite utiliser pour la commande vocale.
72 Relaxxnow
NETTOYAGE ET STOCKAGE
Avant de nettoyer le ventilateur, assurez-vous que
l‘appareil est éteint et que l‘adaptateur est débranché de
la prise de courant !
Entretien:
Ceci doit être respecté:
Ne laissez pas de l‘eau pénétrer dans le moteur pendant le nettoyage. Nettoyer l‘hélice et les
grilles de protection avec un chiffon doux et humide et les sécher ensuite. N‘utilisez pas de diluant,
d‘alcool ou d‘autres liquides chimiques pour nettoyer le ventilateur.
Stockage:
Appliquer quelques gouttes de lubrifiant sur le moteur pour prévenir la corrosion. Enlevez l‘huile
et les taches sur le corps pour éviter d‘endommager le ventilateur. Démonter le ventilateur dans
l‘ordre inverse des instructions de montage, le remettre dans le carton et le conserver dans un
endroit sec.
Relaxxnow 73
FR
RÉSOLUTION DES PROBLÈMES
ISi le ventilateur cesse de fonctionner, veuillez suivre les étapes suivantes avant de contacter le
service clientèle.
PROBLÈMECAUSE
POSSIBLE
SOLUTION
Le ventilateur ne s‘allume
pas.
Le ventilateur n‘est
pas branché à une
prise 220-249 V AC,
50/60 Hz.
Branchez-le sur la prise de
courant appropriée et remettez-le
sous tension.
La fonction d‘oscillation ne
marche pas.
La fonction d‘oscillation
n‘a pas été allumée.
Assurez-vous que tous les voy-
ants de la minuterie du tableau
de commande sont éteints.
Lorsque l‘une des lumières est
allumée, appuyez sur le bouton
„minuterie / timer“ jusqu‘à ce
que toutes les lumières de la
minuterie soient éteintes.
No funciona la oscilación.La función Oscilación
no está activada.
Veillez à ce que la touche
correspondante à la fonction
oscillation soit allumée. Si ce
n‘est pas le cas, appuyez sur la
touche pour lancer la fonction.
Ceci peut également être fait
pendant que le ventilateur est
en marche.
Le ventilateur est en marche,
mais le vent n‘est pas
assez fort.
De la poussière s‘est
déposée à l‘arrière du
ventilateur.
Éteindre le ventilateur et débran-
cher la fiche. Nettoyez la grille
de protection arrière avec un
chiffon doux et sec. Rebranchez
la fiche et remettez l‘appareil
sous tension.
La télécommande ne
fonctionne pas.
Les piles sont trop
faibles. La télécom-
mande est trop loin de
l‘appareil. La télécom-
mande n‘envoie pas de
signal à l‘appareil.
Respectez le fonctionnement
de la télécommande et les
instructions d‘utilisation des
piles de la télécommande.
74 Relaxxnow
Information relative à la législation sur les équipements électriques et électroniques (ElektroG)
Nous tenons à signaler aux propriétaires de vieux équipements électriques et électroniques que conformément aux dispositions légales applicables, les vieux
équipements électriques doivent être collectés séparément des déchets municipaux. Le symbole d'une poubelle sur roues, barrée d'une croix, et qui est apposé
sur les anciens équipements électriques et électroniques, indique également l'obligation de collecte séparée.
Selon l'ElektroG, en application de l'article 17 paragraphe 2 et en liaison avec l'article 17 paragraphe 1, nous sommes tenus en tant que distributeur d'équipe-
ments électriques, de reprendre gratuitement certains appareils électriques et électroniques usagés. Nous remplissons cette obligation légale par l'intermédiaire
de DR Deutsche Recycling Service GmbH/take-e-way GmbH. En outre, vous pouvez déposer vos anciens équipements électriques et électroniques dans les
points de collecte des services publics d'élimination des déchets. Vous apportez une contribution importante à la réutilisation, au recyclage et aux autres formes de
valorisation des vieux équipements en envoyant ces derniers à la collecte sélective appropriée.
En tant qu'utilisateur final, vous êtes responsable de la suppression des données personnelles figurant sur les anciens équipements électriques à éliminer avant
qu'ils ne soient mis au rebut.
Information relative à la législation sur les piles (BattG)
Les piles et les batteries ne doivent pas être éliminées avec les ordures ménagères. En tant qu'utilisateur final, vous êtes légalement tenu de rapporter les piles
usagées. Utilisez pour cela les points de collecte officiels tels que les points de collecte des organismes publics d'élimination des déchets.
Indépendamment de cela, nous voudrions attirer votre attention sur les points suivants :
Les piles usagées contiennent des substances nocives qui peuvent nuire à l'environnement ou à votre santé si elles ne sont pas stockées ou éliminées correcte-
ment. Cependant, les piles contiennent également des matières premières de valeur telles que le fer, le zinc, le manganèse ou le nickel et peuvent être recyclées.
Le pictogramme de la poubelle barrée signifie que les piles et les batteries ne doivent pas être jetées avec les ordures ménagères.
Chaîne du recyclage
Les matériaux d‘emballage peuvent être transportés vers le cycle des matières premières. La disposition des matériaux d‘emballage, conformément aux
dispositions légales. Les informations peuvent être récupérées à partir des systèmes de retour ou de collections.
B. Instructions et symboles pour l'élimination d'un appareil électrique à piles amovibles:
Relaxxnow 75
MANUALE D’USO
ITALIANO
IT
Gentile cliente,
Siamo lieti che abbiate scelto un dispositivo della gamma RELAXXNOW. Con le attrezzature di
RELAXXNOW potrete usufruire della più alta qualità e della più recente tecnologia.
Per sfruttare a pieno il potenziale del dispositivo e poterlo utilizzare per molti anni, raccomandiamo
di leggere attentamente questo manuale prima di iniziare l’allenamento e di utilizzare il dispositivo
seguendo le istruzioni. La sicurezza e la funzionalità del dispositivo possono essere garantite solo se
vengono rispettate le disposizioni legali sulla sicurezza generale e per la prevenzione degli incidenti
nonché le istruzioni di sicurezza contenute nel presente manuale d'uso. Non ci assumiamo alcuna
responsabilità per i danni derivanti da un uso improprio o da un uso errato del dispositivo.
i
Assicurarsi che tutte le persone che utilizzano il dispositivo abbiano letto e com-
preso il manuale dell'utente.
Tenere il manuale dell'utente in un luogo sicuro per potervi accedere
in qualsiasi momento, ove necessario.
Salvo errori e modificazioni.
RELA NOW
DATI TECNICI .........................................................................................78
DECLARATION OF CONFORMITY ...............................................................111
Relaxxnow 77
IT
Il nostro
Video Tutorial
per te!
3 semplici passaggi per un inizio
veloce e sicuro:
1. Scannerizza il QR-Code
2. Guarda il Video
3. Inizia ad allenarti!
Montaggio
Utilizzo
Smontaggio
Link per il Video:
https://service.innovamaxx.de/vtx300_video
78 Relaxxnow
f
DATI TECNICI
Ventilatore standard da 16“
Potenza: 55 W
Dimensioni: 46.5*43.5*124CM
Peso lordo: 5,3kg
Voltaggio: 220-240V~,50Hz
• Silenzioso a 5 pale
• Angolo 120° oscillazione orizzontale
• 4 livelli di velocità: Eco/bassa/media/alta
• 7,5 h Digital Timer0
• con controllo remoto e WiFI
• Il ventilatore può essere regolato verso l’alto manualmente (max 90°).
• Alloggiamento Luxus interamente in plastica con
• sistema di chiusura brevettato, montaggio e smontaggio facili da eseguire senza
alcun attrezzo necessario.
• Piedini d’appoggio rotondi, facile da montare al supporto principale.
Contenuto di spedizione:
1x ventilatore
1x telecomando
1x istruzioni di funzionamento
Relaxxnow 79
ISTRUZIONI GENERALI
Leggere attentamente questo manuale prima di utilizzare il dispositivo e conservarlo in un luogo
sicuro. Utilizzare il dispositivo solo come descritto e familiarizzare con tutte le istruzioni operative e
di sicurezza prima di utilizzare il prodotto.
Rimuovere la confezione e verificare che il prodotto non sia danneggiato. In caso di dubbio, non
utilizzare il prodotto encontattare il venditore.
• Non inserire mai oggetti estranei come dita, spilli, ecc. Attraverso la griglia protettiva
mentre l‘apparecchio è in funzione.
• Disconnettere il dispositivo dall‘alimentazione se si desidera regolarlo o pulirlo.
• Assicurarsi che il dispositivo sia posizionato su una superficie piana e stabile quando è in
uso, in modo che non si ribalti.
• NON posizionare l‘unità vicino a una finestra. La pioggia può causare una scossa elettrica.
• Non immergere il dispositivo, la spina o il cavo nell‘acqua e non spruzzarlo con liquidi.
• Non lasciare bambini e animali incustoditi con il dispositivo attivo. Non lasciare il cavo
appeso al tavolo o al bancone.
• Non utilizzare il dispositivo se il cavo o la spina sono danneggiati, se il dispositivo è
• difettoso, è caduto o è stato altrimenti messo in gabbia. In questo caso, contattare un
elettricista qualificato. NOTA: se la riparazione viene effettuata da un elettricista non
qualificato, si perderà la garanzia per questo prodotto.
• Non usare la ventilatore senza il piedistallo. Il dispositivo deve stare in piedi durante il
funzionamento.
• Non utilizzare la ventilatore vicino a tende, decorazioni delle finestre degli impianti o altre
cose che potrebbero penetrare nell‘elica.
• Non posare il cavo sotto un tappeto. Non coprire il cavo con tappeti, corridori o simili.
• Posare il cavo in modo che nessuno possa inciamparvi sopra
• Per scollegare il dispositivo dalla rete, scollegare la spina dalla presa. Trare direttamente la
spina e MAI il cavo.
IT
80 Relaxxnow
AVVERTENZE
• Utilizzare questo dispositivo solo per uso personale.
• Qualsiasi manutenzione oltre la normale cura e l‘uso deve essere eseguita da un
professionista autorizzato
• Non immergere il dispositivo in acqua.
• Non rimuovere alcuna parte o la custodia per evitare il rischio di incendi o scosse
elettriche.
• Lasciar riparare il dispositivo solo da uno specialista autorizzato.
• Se il cablaggio di alimentazione di questa unità è danneggiato, deve essere sostituito dal
produttore, da un addetto all’assistenza o da personale qualificato per evitare pericoli.
ISTRUZIONI DI MONTAGGIO
Installazione eutilizzo
Per il ventilatore da tavolo
Mettete il ventilatore (15) sul tavolo, colle-
gare l‘adattatore (19) in senso orario.
Mettere la colonna superiore (8) sull’adat-
tatore di collegamento (19).
Premere il bpttone superiore della colonna
(11).
19
8
11
Relaxxnow 81
Fissaggio della gabbia di protezione
1. Rimuovere e gettare l‘imballaggio di plastica (6).
2. Guida la griglia posteriore con presa (5) lungo l‘albero del motore (6) la parte anteriore
dell‘alloggiamento motore (7). Accertarsi che la presa della griglia posteriore (5) sia rivolta verso
l‘alto e che tutti i perni guida sull‘alloggiamento del motore (7) siano allineati con gli incavi sulla
griglia posteriore.
3. Fissare la griglia con la presa (5) utilizzando il dado di plastica (4). Per fare ciò, fissare il dado
di plastica in senso orario (4) all‘alloggiamento del motore.
4. Guidare la ventola (3) lungo l‘albero motore (6) contro il dado di plastica (4). Ruotare con
cautela la ventola (3) per fissarla nella posizione corretta fino a quando gli incavi previsti non si
incastrino nel dado di plastica (4).Ora posizionare il girante (2) sull‘albero motore, fissandolo in
senso antiorario.
5. Montare la griglia anteriore #1) ala griglia posteriore (5) allineando i segni sulla parte superiore.
Ora collegare entrambe le parti utilizzando i ganci sulla griglia anteriore (1) e le fessure sulla griglia
posteriore (5). Il perno (20) dovrebbe quindi bloccarsi nella posizione corretta.
15
8
9
10
11
12
1 3
6
7
21
20
2
4 5
19
IT
82 Relaxxnow
Nota:
Per smontare la griglia anteriore, tirare delicatamente il perno di bloccaggio verso l‘esterno mentre
si ruota la griglia in senso antiorario.
Stringere la vite di bloccaggio per fissare il perno.
MESSA IN SERVIZIO
Allacciamento elettrico
• Prima di collegare la spina, assicurarsi che la tensione dell‘alimentazione principale
corrisponda alla tensione sull‘etichetta del prodotto.
• Collegare la ventilatore solo a una presa di contatto installata correttamente (220-240 V
~50/60 Hz).
MANUALE PER L‘USO
Questo ventilatore è dotato di 4 livelli di velocità, un timer e un telecomando. I pulsanti sul pulsante
hanno la stessa funzione di quelli sul telecomando.
IMPORTANTE:
Durante l‘installazione del dispositivo, rispettare le distanze minime da pareti e oggetti
(30 cm in TUTTE le direzioni).
Prima dell‘avvio, controllare le condizioni del cavo di alimentazione. In caso di dubbi sulla buona
condizione del prodotto spedito si prega di contattare il produttore.
Posizionare il dispositivo in posizione verticale E stabile.
Evitare di posare il cavo di alimentazione (quando si posiziona al centro della stanza) in mezzo onde
evitare di inciampare. Raccomandiamo l‘uso di ponticelli per cavi.
Assicurarsi che il cavo di alimentazione sia completamente srotolato.
Assicurarsi che eventuali oggetti (come tende, indumenti, ecc.) Non ostruiscano il flusso d‘aria.
Inserire le batterie nel telecomando. Se le batterie sono già inserite nel telecomando è necessario
rimuovere la pellicola protettiva.
Relaxxnow 83
IT
BOTTONEFUNZIONEDISPLAY
Timer
Con questo pulsante
è possibile impostare
il TImer su 0,5 - 7,5
ore. dopo il timer è
scaduto è, la ventilatore
si spegne
automaticamente.
0,5 h, 1 h, 2 h, 4 h
Esempio 1: impostato su 0,5 h, il timer scade
dopo 30 minuti.
Esempio 2: impostato su 0,5 ore e 2 ore il
timer scadrà dopo 2,5 ore.
Esempio 3: a 0,5 h, 1 ora, 2 ore e 4 h il
timer viene impostato dopo 7,5 h drenare.
Velocità
Con questo pulsante, la
ventilatore viene guidata
attraverso 4 velocità di
comfort (alta / media /
bassa / bassa). Questo
pulsante può essere
utilizzato in qualsiasi
modalità.
Queste icone mostrano i livelli di velocità
selezionati bassa, media, alta ed eco.
Oscillazione
Per attivare un‘ampia
distribuzione della
brezza, premere una
volta questo pulsante di
oscillazione.
La funzione W-Lan
si attiva dopo che il
tasto è stato premuto
per tre secondi.
La luce di oscillazione sulla ventilatore
si accende, quando la funzione è attivata. Per
spegnerlo di nuovo, premere nuovamente
questo tasto. L‘oscillazione può essere con-
trollata mentre il ventilatore è in funzione.
ON/OFF
Con questo tasto
accendete e spegnete il
ventilatore.
ON
3 sec.
BassaMediaAltaEco
84 Relaxxnow
Utilizzo e telecomando
Il funzionamento avviene se vi sono due condizioni:
Questo dispositivo non deve causare interferenze e (2) questo dispositivo deve
accettare qualsiasi interferenza, incluse le interferenze che potrebbero causare un
funzionamento indesiderato del
dispositivo.
Per facilitare l‘operazione, il telecomando ha gli stessi pulsanti dell‘interruttore di
controllo. Seguire le stesse istruzioni delle istruzioni operative.
CONSIGLIO: Rimuovere la pellicola di plastica sotto la batteria prima di utilizzare il
telecomando.
• Il telecomando deve essere puntato verso il ricevitore sulla ventola per
funzionare.
• La portata del telecomando è di 5 metri. Se il telecomando non è rivolto al
ricevitore, il raggio sarà ridotto.
• Il telecomando non deve essere utilizzato in locali in cui sono in funzione
macchinari pesanti.
• La linea di vista tra il telecomando e il ricevitore non deve essere bloccata.
• Maneggiare il telecomando con cura. Non lasciarli cadere e non colpirli contro
oggetti duri.
Istruzioni di utilizzo delle batterie del telecomando
• Il telecomando deve essere puntato verso il ricevitore sulla ventilatore per
funzionare.
• La portata del telecomando è di 5 metri. Se il telecomando non è rivolto al
ricevitore, il
• raggio sarà ridotto.
• Il telecomando non deve essere utilizzato in locali in cui sono in funzione
macchinari
• pesanti.
• La linea di vista tra il telecomando e il ricevitore deve essere libera.
• Maneggiare con cura il telecomando. Non lasciarlo cadere.
Relaxxnow 85
IT
Regolazione per migliorare la circolazione dell’aria
Questo ventilatore ha due funzioni che consentono di regolare meglio il comfort
dell‘aria e migliorare la circolazione dell‘aria nella stanza.
A. Oscillazione:
Per attivare la funzione di oscillazione per una grande distribuzione del vento,
premere il tasto .
Per disattivare la funzione per una regolazione specifica della velocità del vento, pre-
mere di nuovo. Il controllo dell‘oscillazione può essere eseguito mentre il ventilatore
è in funzione. Questa ventilatore ha migliorato le vibrazioni grandangolari per una
migliore circolazione.
B. Esempio:
Per regolare la testa della ventilatore in una certa angolazione, spegnere la ventilatore
e tenere l‘alloggiamento del motore con una mano. Afferra la griglia protettiva con
l‘altra mano. Inclinare la testa della ventilatore
Con attenzione fino a raggiungere l‘angolo desiderato. Non inclinare la testa più del
previsto, in quanto ciò potrebbe danneggiare il dispositivo. Massimo può essere
inclinato quasi in posizione orizzontale.
NOTA: la ventilatore deve essere spenta se si effettua questa impostazione
SPECIFICHE
MODELLO/ SKUVTX300
VOLTAGGIO (V)220-240 V AC, 50/60 HZ
WATT (W)55 vations
ATTENZIONE: Per evitare scosse elettriche, adattare il bordo largo del connettore
allo slot largo. Inseriscilo completamente nella presa.
86 Relaxxnow
REMARQUE: Cette application n‘est prise en charge que par le réseau WiFi 2,4
Hz. Veuillez-vous assurer que votre téléphone mobile est connecté à
un réseau WiFi 2,4 Hz.
Passaggio 1: scarica l‘app
Recherchez et téléchargez „Tuya Smart“ sur un grand marché d‘applications.
Passaggio 2: registrazione
Dopo aver scaricato l‘app, apri l‘app e registrati come da istruzioni.
Passaggio 3: collegare l‘app alla ventilatore
1. Inserire la spina della ventilatore in una presa da 220-240 V. La ventilatore è in
modalità standby.
2. Premere „Aggiungi dispositivo“ o „+“ nell‘angolo in alto a destra sulla home page
dell‘app come mostrato di seguito.
FUNZIONE APP
Relaxxnow 87
IT
3. Cliccare su „Small Home Appliances“ e su ventilatore („Fan“), come mostrato in
figura.
88 Relaxxnow
4. Premere il tasto OSC per 5 secondi, fino a che l’icona WiFi sul display si
illumina. Premere quindi „Confirm indicator rapidly blink“ sul vostro telefono.
Attenzione: se rilevate errori di collegamento cliccate su „AP Mode“ (in alto a
destra) e „Confirm indicator slowly blink“ sul vostro telefono come indicato sulla foto
di sotto.
5. Quando il vostro tetefono si collega e l’icona
wifi non si illumina più, l’app è correttamente
collegata al ventilatore.
L’apparecchio si può quindi regolare tramite app.
Relaxxnow 89
AMAZON ALEXA
Se vuoi usare Alexa, premi „ME“ (in basso a destra).
Quindi scegli „More Services“ e successivamente „Alexa“.
Li troverete come utilizzare Alexa.
Per accendere o spegnere la ventilatore, puoi premere su „Alexa attiva / disattiva la
ventola.“
In alternativa, è anche possibile assegnare al proprio apparecchio un nome individua-
le tramite le impostazioni dell‘apparecchio dell‘app Alexa, che si può poi utilizzare per
il controllo vocale.
IT
90 Relaxxnow
PULIZIA & CUSTODIA
Prima di procedere alla pulizia del ventilatore è
necessarioassicurarsi che il dispositivo sia spento e che
l’adattatore non sia collegato alla presa!
Manutenzione:
Osservare attentamente le seguenti istruzioni:
Non fare entrare acqua nel motore durante la pulizia. Pulire l‘elica e la protezione con
un panno morbido inumidito e quindi asciugare. Non usare diluente, alcol o altri liquidi
chimici per pulire la ventola.
Conservazione del prodotto:
Applicare alcune gocce di lubrificante sull‘albero motore per prevenire la corrosione.
Rimuovere l‘olio e le macchie dal corpo per evitare danni alla ventola. Smontare il
ventilatore e rimetterlo nella scatola, conservandolo in un luogo asciutto.
Relaxxnow 91
RISOLUZIONE ERRORE
Se il ventilatore non funzione più allora provate a fare come segue prima di contattare il servizio
clienti:
PROBLEMAPOSSIBILE
CAUSA
SOLUZIONE
Il ventilatore non si
accende.
Il ventilatore non è
collegato ad una
presa da 220-249 V
AC, 50/60 Hz.
Collegatelo alla presa corretta e
riavviate il dispositivo.
Il ventilatore si è spento di
colpo.
Il timer è scaduto e il
ventilatore si è
spento automatica-
mente.
Controllare che tutte le luci del
timer e dell’interruttore di controllo
siano spente.
Se è ancora accesa una luce
premere l’apposito pulsante fino a
che non si spengono tutte.
Il ventilatore non oscilla
più.
La funzione di
oscillazione non è
stata inserita
Assicuratevi che il tasto oscillazione
sia illuminato. In caso contrario
premetelo per attivare la funzione. Il
pulsante può essere premuto anche
quando il dispositivo è in
funzione.
Il ventilatore è acceso ma
la ventilazione non è
abbastanza forte.
Presenza di polvere
sul retro del
ventilatore.
Spegnere il ventilatore e staccare
la presa.
Pulire bene il retro della griglia con
un panno umido e rimuovere il
ventilatore dalla corrente.
Ricollegare e riaccendere il
dispositivo.
Il telecomando non funziona.Le batterie sono
troppo deboli. Il
telecomando è
troppo lontano dal
dispositivo e non
invia il segnale
correttamente.
Seguire le istruzioni d’uso del
telecomando e le norma per
l’utilizzo delle batterie del
telecomando.
IT
92 Relaxxnow
Avviso sulla legge degli apparecchi elettrici ed elettronici (ElektroG)
Desideriamo far notare ai proprietari di vecchie apparecchiature elettriche ed elettroniche che le apparecchiature elettriche devono essere raccolte separatamente
dai rifiuti urbani, in conformità con le norme di legge vigenti. Il simbolo di un bidone della spazzatura su ruote barrato, apposto su vecchie apparecchiature
elettriche ed elettroniche, indica anch’esso, l'obbligo di raccolta differenziata:
Secondo la ElektroG, noi, in qualità di distributori di apparecchi elettrici, siamo obbligati a ritirare gratuitamente i rifiuti di apparecchi elettrici ed elettronici ai sensi
della legge § 17 comma 2 assieme alla legge § 17 comma 1 della ElektroG. Rispettiamo questo obbligo legale tramite la DR Deutsche Recycling Service GmbH/
take-e-way GmbH. Inoltre, è possibile consegnare i vecchi apparecchi elettrici ed elettronici presso i punti di raccolta delle autorità pubbliche di smaltimento dei
rifiuti. Darete un importante contributo al riutilizzo, al riciclaggio ed ad altri tipi di recupero di vecchie apparecchiature, inviando le vostre vecchie apparecchiature
alla raccolta differenziata, nei corretti punti di raccolta.
L'utente finale è responsabile della cancellazione dei dati personali relativi ai rifiuti di apparecchiature elettriche ed elettroniche da smaltire prima della consegna.
Avviso sulla legge sulla batteria (BattG)
Le pile e le batterie ricaricabili non devono essere smaltite nei rifiuti domestici. Come utente finale, siete legalmente obbligati a restituire le batterie usate. Si prega
di utilizzare i punti di raccolta ufficiali come ad esempio, le aziende pubbliche di smaltimento dei rifiuti.
Indipendentemente da ciò, vi avvisiamo che:
Le batterie esauste contengono sostanze nocive che possono danneggiare l'ambiente o la vostra salute, se non vengono conservate o smaltite correttamente.
Tuttavia, le batterie contengono anche importanti materie prime come ferro, zinco, manganese o nichel e possono essere riciclate.
Il simbolo con la pattumiera barrata significa che non è consentito smaltire pile o batterie, nei rifiuti domestici.
Riciclaggio dei rifiuti
Il materiale di imballaggio può essere trasportato di nuovo al ciclo delle materie prime. Smaltire il materiale di imballaggio in conformità alle disposizioni di legge.
Le informazioni possono essere recuperate dai sistemi di ritorno o di raccolta della vostra comunità.
B. Avviso sullo smaltimento e sui simboli di un apparecchio elettrico con batteria rimovibile:
Relaxxnow 93
NL
GEBRUIKSAANWIJZING
NEDERLANDS
Geachte klant,
We zijn blij dat je een apparaat uit het RELAXXNOW-assortiment hebt gekozen. RELAXXNOW biedt
je de hoogste kwaliteit en de nieuwste technologie.
Lees vóór gebruik deze gebruikershandleiding aandachtig door en gebruik het apparaat zoals aan
-
gegeven. Zo zul je ten volle van de prestaties van het apparaat kunnen profiteren en er vele jaren
geniet van hebben. De bedrijfsveiligheid en de werking van het apparaat kunnen alleen worden
gegarandeerd als zowel de algemene wettelijke veiligheidsinstructies en ongevallenpreventievoor
-
schriften als de veiligheidsinstructies in deze gebruiksaanwijzing in acht worden genomen. We
aanvaarden geen aansprakelijkheid voor schade veroorzaakt door oneigenlijk gebruik of verkeerde
bediening.
i
Zorg ervoor dat alle personen die het apparaat gebruiken de gebruikershandleiding
hebben gelezen en begrepen.
Bewaar de gebruikershandleiding op een veilige plaats zodat deze kan worden ge
Gebruikershandleiding.com neemt misbruik van zijn services uitermate serieus. U kunt hieronder aangeven waarom deze vraag ongepast is. Wij controleren de vraag en zonodig wordt deze verwijderd.
Product:
Spelregels forum
Om tot zinvolle vragen te komen hanteren wij de volgende spelregels:
lees eerst de handleiding door;
controleer of uw vraag al eerder door iemand anders is gesteld;
probeer uw vraag zo duidelijk mogelijk te stellen;
heeft u een probleem en al geprobeerd om dit op te lossen, vermeld dit erbij aub;
heeft u een oplossing gekregen van een bezoeker dan horen wij dat graag in dit forum;
wilt u een reactie geven op een vraag of antwoord, gebruik dan niet dit formulier maar klik op de knop 'reageer op deze vraag';
uw vraag wordt direct op de website gezet; vermijd daarom persoonlijke gegevens in te vullen;
Belangrijk! Als er een antwoord wordt gegeven op uw vraag, dan is het voor de gever van het antwoord nuttig om te weten als u er wel (of niet) mee geholpen bent! Wij vragen u dus ook te reageren op een antwoord.
Belangrijk! Antwoorden worden ook per e-mail naar abonnees gestuurd. Laat uw emailadres achter op deze site, zodat u op de hoogte blijft. U krijgt dan ook andere vragen en antwoorden te zien.
Abonneren
Abonneer u voor het ontvangen van emails voor uw Sportstech VTX300 bij:
nieuwe vragen en antwoorden
nieuwe handleidingen
U ontvangt een email met instructies om u voor één of beide opties in te schrijven.
Ontvang uw handleiding per email
Vul uw emailadres in en ontvang de handleiding van Sportstech VTX300 in de taal/talen: Nederlands, Duits, Engels, Frans, Italiaans, Spaans als bijlage per email.
De handleiding is 1,75 mb groot.
U ontvangt de handleiding per email binnen enkele minuten. Als u geen email heeft ontvangen, dan heeft u waarschijnlijk een verkeerd emailadres ingevuld of is uw mailbox te vol. Daarnaast kan het zijn dat uw internetprovider een maximum heeft aan de grootte per email. Omdat hier een handleiding wordt meegestuurd, kan het voorkomen dat de email groter is dan toegestaan bij uw provider.
Stel vragen via chat aan uw handleiding
Stel uw vraag over deze PDF
Uw handleiding is per email verstuurd. Controleer uw email
Als u niet binnen een kwartier uw email met handleiding ontvangen heeft, kan het zijn dat u een verkeerd emailadres heeft ingevuld of dat uw emailprovider een maximum grootte per email heeft ingesteld die kleiner is dan de grootte van de handleiding.
Er is een email naar u verstuurd om uw inschrijving definitief te maken.
Controleer uw email en volg de aanwijzingen op om uw inschrijving definitief te maken
U heeft geen emailadres opgegeven
Als u de handleiding per email wilt ontvangen, vul dan een geldig emailadres in.
Uw vraag is op deze pagina toegevoegd
Wilt u een email ontvangen bij een antwoord en/of nieuwe vragen? Vul dan hier uw emailadres in.