Conserver les informations, adresses et numéros de téléphone pour consultation ultérieure. Le contenu peut différer des
images. Un adulte doit régulièrement examiner ce jouet afin de s’assurer qu’il ne présente pas de dommage ni de risque.
En cas de problème, ne plus l’utiliser. Les enfants doivent être surveillés lorsqu’ils jouent. Spin Master se réserve le droit
de supprimer le site Internet www.airhogs.com à tout moment. FABRIQUÉ EN CHINE.
20073110 REV 0
T44589.0001_20073110 GBL IS R1
a
Warning: CHOKING HAZARD – Small Parts.
a
Attention ! RISQUE D’ÉTOUFFEMENT – Contient de petits éléments.
This device complies with Industry Canada Licence-exempt RSS-210. Operation is subject to the following two conditions: (1) this device may
not cause interference, and (2) this device must accept any interference, including interference that may cause undesired operation of the
device.
Le présent appareil est conforme au CNR-210 d'Industrie Canada applicable aux appareils radio exempts de licence. L'utilisation est autorisée
aux deux conditions suivantes : (1) l'appareil ne doit pas produire de brouillage, et (2) l'appareil doit accepter tout brouillage radioélectrique
subi, même si le brouillage est susceptible d'en compromettre le fonctionnement.
TM
6
TM
a
WARNING:
CHOKING HAZARD –
Small parts.
Not for children under 3 years.
a ATTENTION !
RISQUE D’ÉTOUFFEMENT –
Contient de petits
éléments. Ne convient pas aux enfants de moins
de 3 ans.
CAUTION:
HAIR ENTANGLEMENT
—
Tie back and cover hair and secure
loose clothing prior to play.
a
MISE EN GARDE :
LES CHEVEUX PEUVENT SE COINCER
—
Attacher les cheveux et les couvrir, et maintenir les
vêtements amples à l'écart du jouet.
a
BATTERY NOT INCLUDED
PILES NON FOURNIES
x AA
6
ON – OFF (CHG)
X-Wing
TM
Charger Status / Statut du chargeur
Charging
En charge
Charging Complete
Charge terminée
Charge Error
Problème de charge
(LED Alternating)
(DEL en alternance)
ONOFF
Red / Rouge
Red / RougeRed / Rouge
Green / Vert
INSTRUCTION GUIDE / MODE D’EMPLOI
IR BATTLE “LASERS”
« LASERS » DE COMBAT INFRAROUGES
IR BATTLE “LASERS”
« LASERS » DE COMBAT INFRAROUGES
ON – OFF (CHG)
ACTIVE GYRO
STABILIZATION
GYROSTABILISATION
ACTIVE
STATUS LED
VOYANT INDICATEUR D’ÉTAT
CHARGE PORT
PORT DE CHARGE
Battery requirement for DEATH STAR™: / Caractéristiques de la batterie de la DEATH STAR™ :
Power Supply: / Alimentation :
Rating: DC 3.7 V, 200mAh /
Puissance nominale : 3,7 V CC, 200mAh
CHARGE PORT
PORT DE CHARGE
POWER LIGHT
VOYANT D’ALIMENTATION
STABILIZER
STABILISATEUR
SELF-GUIDED FLIGHT AND AUTO
FIRING SYSTEM
VOL AUTOGUIDÉ ET SYSTÈME DE
TIR AUTOMATIQUE
ROTORS
HÉLICES
Batteries: 1 x 3.7 V LiPo Rechargeable Battery Pack /
Piles : 1 batterie rechargeable LiPo de 3,7 V
Requires 1 x 3.7 V LiPo Rechargeable Battery Pack (included) /
Fonctionne avec 1 batterie rechargeable LiPo de 3,7 V (fournie)
?
+
www.
WWW.SPINMASTER.COM
DO NOT RETURN TO THE STORE.
NE PAS RETOURNER AU DISTRIBUTEUR.
NORTH AMERICA • AMÉRIQUE DU NORD
1-800-622-8339, CUSTOMERCARE@SPINMASTER.COM
UK – 0800 206 1191, SERVICEUK@SPINMASTER.COM
IRELAND - 1800 992 249
FRANCE – 0800 909 150, SERVICEFR@SPINMASTER.COM
eFCC Statement: This device complies with Part 15 of the FCC rules. Operation is subject to the following two conditions: (1) This device may not cause
harmful interference, and (2) This device must accept any interference received, including interference that may cause undesired operation. This
equipment has been tested and found to comply with the limits for Class B digital devices pursuant to Part 15 of the FCC rules. These limits are designed
to provide reasonable protection against harmful interference to radio communications. This equipment generates, uses and can radiate radio frequency
energy and, if not installed and used in accordance with the instruction, may cause harmful interference to radio communication. However, there is no
guarantee that interference will not occur in a particular installation. If this toy does cause interference to radio or television reception (you can check this
by turning the toy off and on while listening for the interference), one or more of the following measures may be useful: • Reorient or relocate the receiving
antenna • Increase the separation between the toy and the radio or the TV • Consult the dealer or an experienced TV-radio technician for help. Shielded
cables must be used with this unit to ensure compliance with the Class B FCC limits. NOTE: Changes, adjustments or modifications to this unit, including
but not limited to, replacement of any transmitter component (crystal, semiconductor, etc.) could result in a violation of FCC rules under part 15 and/or 95
and must be expressly approved by Spin Master Ltd. or they could void the user’s authority to operate the equipment.
fDéclaration de la FCC : Le présent appareil est conforme à l’article 15 de la réglementation de la FCC. L'utilisation est autorisée aux deux conditions
suivantes : (1) l'appareil ne doit pas produire de brouillage, et (2) l'appareil doit accepter tout brouillage radioélectrique subi, même si le brouillage est
susceptible d'en compromettre le fonctionnement. Cet équipement a été testé et jugé conforme aux limites de la classe B pour les équipements
numériques en vertu de l’article 15 de la réglementation de la FCC. Ces limites ont été instaurées pour assurer une protection raisonnable contre toute
interférence nuisible avec les communications radio. Cet équipement génère, utilise et peut émettre de l’énergie de fréquence radio. S’il n’est pas installé et
utilisé selon le mode d’emploi, il peut causer des interférences nuisibles aux communications radio. Cependant, il n'existe aucune garantie contre ces
interférences dans le cas où l'installation ne serait pas conforme. Si ce jouet cause des interférences à la réception radio ou télévisée (ce qui est vérifiable
en l’éteignant, puis en le rallumant tout en écoutant s’il y a des interférences), suivre une ou plusieurs des recommandations suivantes : • Réorienter ou
déplacer l’antenne réceptrice • Augmenter la distance entre le jouet et la radio ou la télévision • Consulter le revendeur ou demander l’aide d’un technicien
radio/T.V. expérimenté. Pour respecter les limites de la classe B de la réglementation de la FCC, cet appareil doit être utilisé avec des câbles blindés.
REMARQUE : tout changement, réglage ou modification de cet appareil, incluant mais ne se limitant pas au remplacement de tout composant du
transmetteur (cristal, semi-conducteur, etc.), pourrait constituer une violation de l’article 15 et/ou 95 de la règlementation de la FCC, et doit être
expressément approuvé par Spin Master Ltd., sous peine d’entraîner l’annulation du droit de l’utilisateur d’exploiter l’équipement.
CAN ICES-3(B)/NMB-3(B)
8+
YRS
ANS
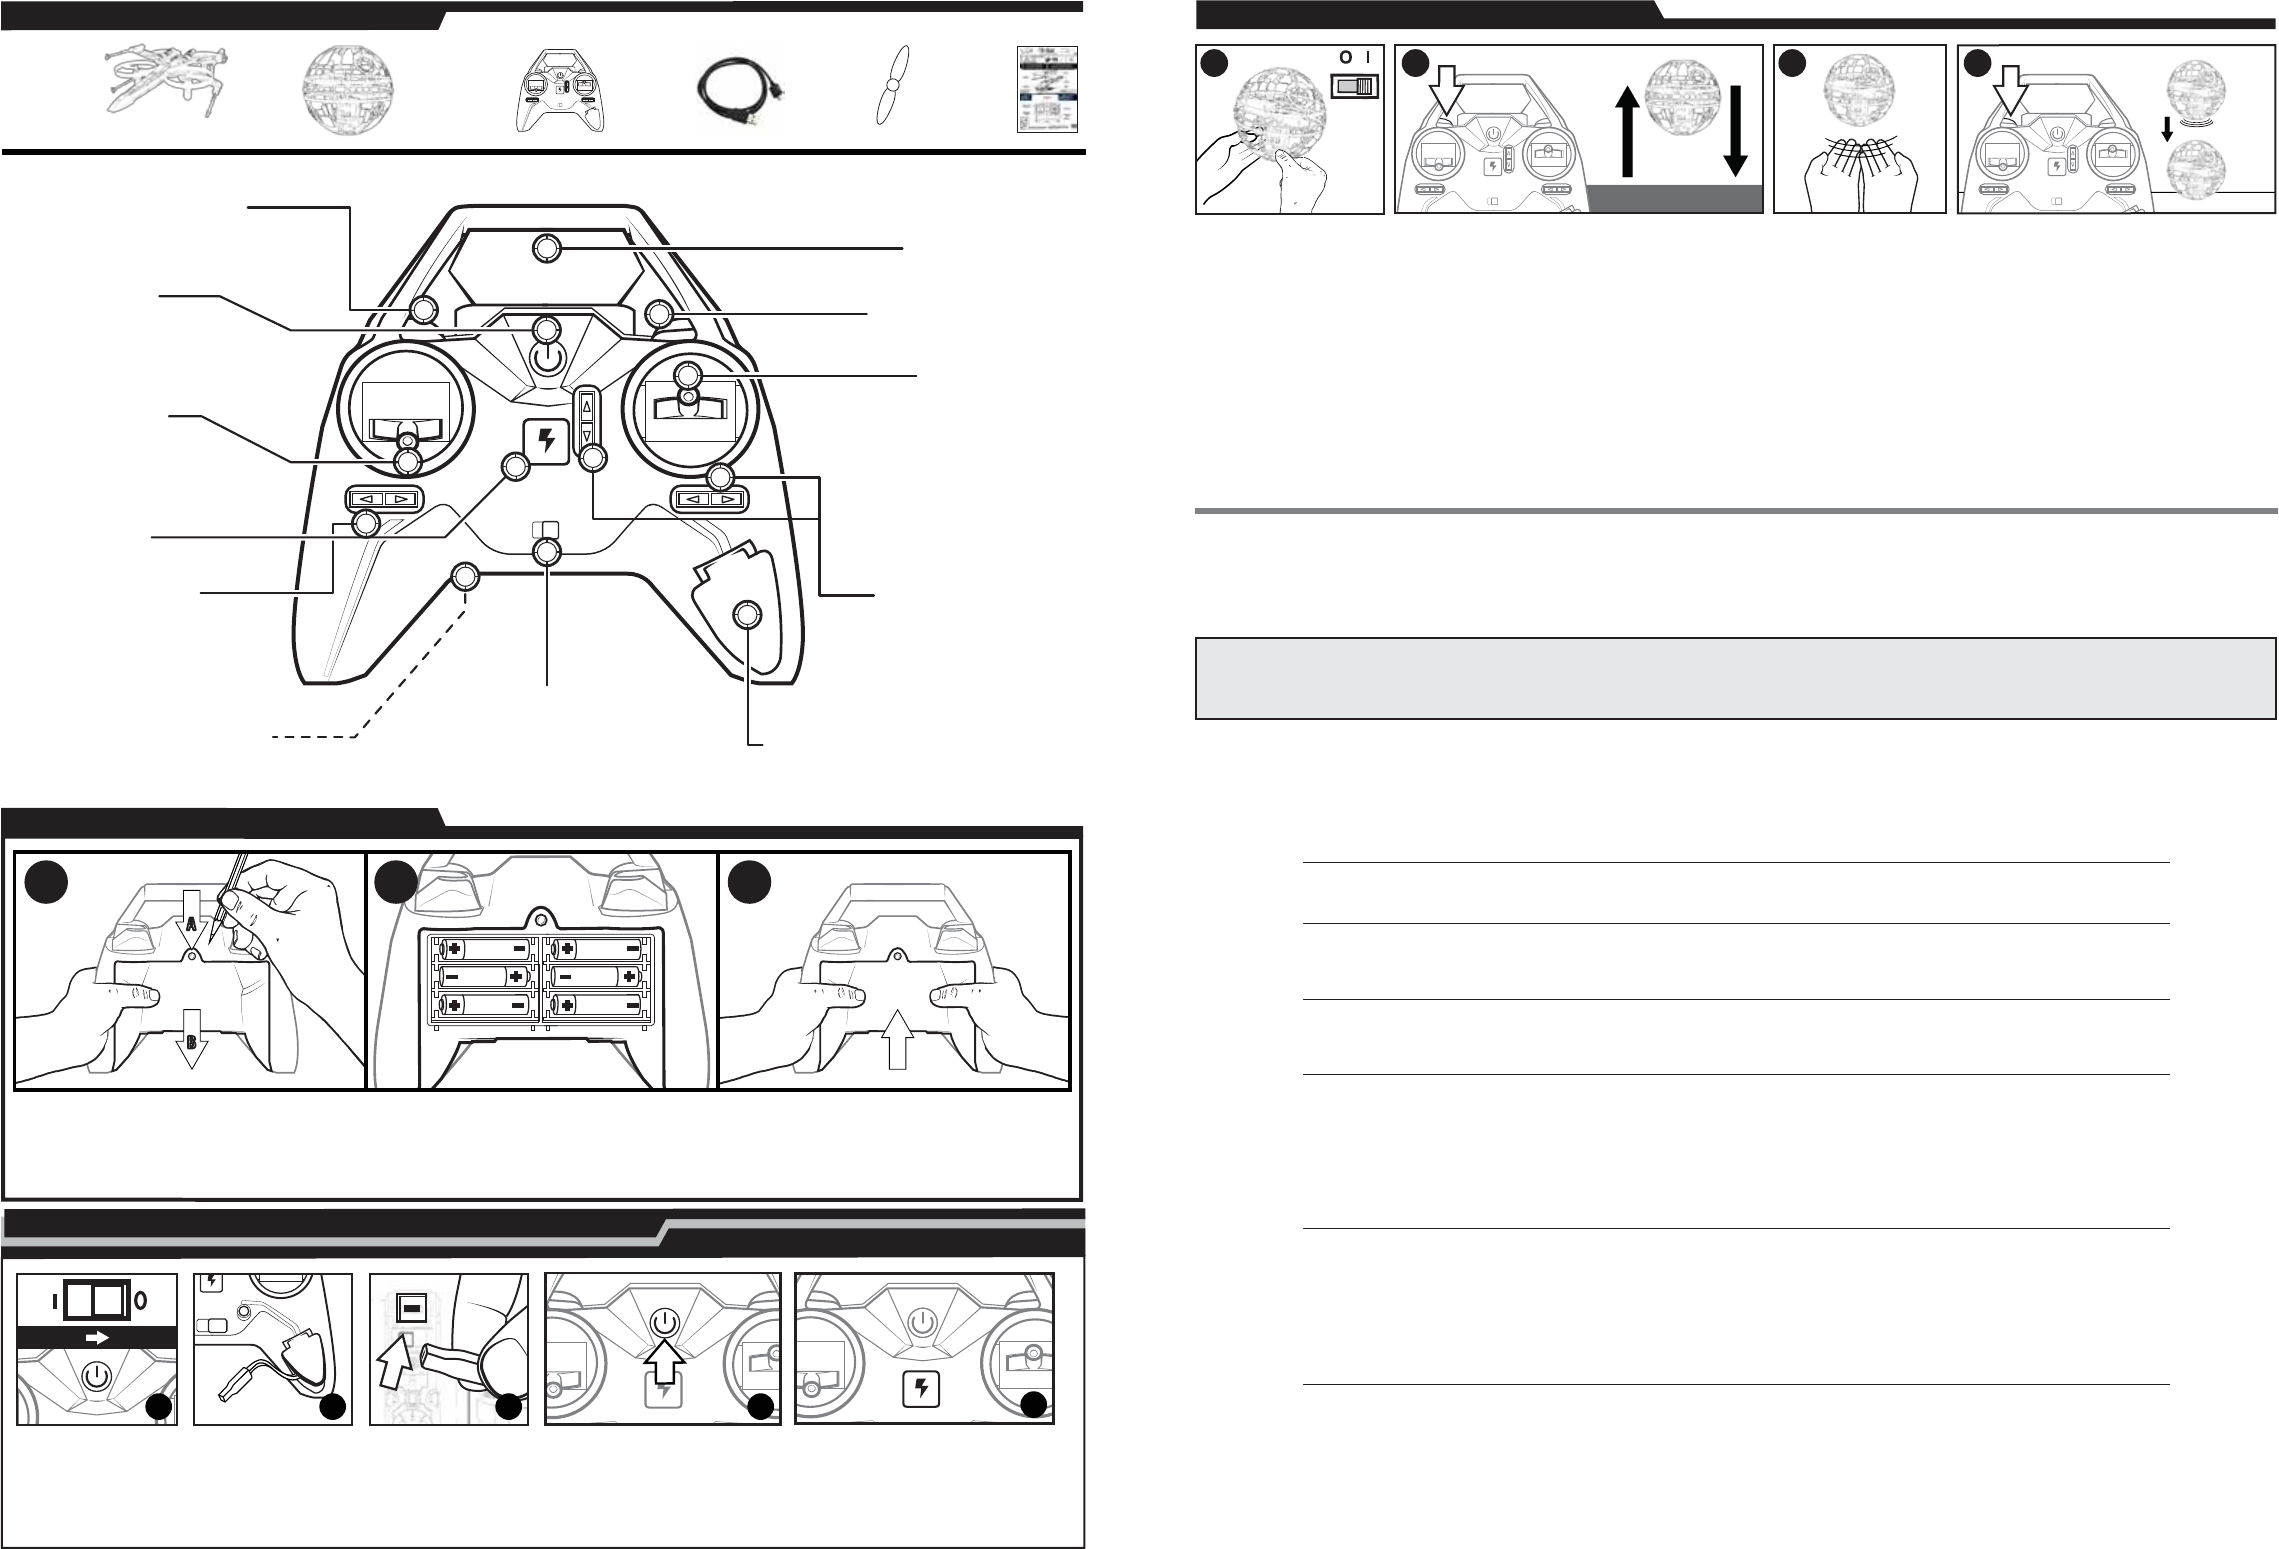
ROTOR REPLACEMENT
REMPLACEMENT DU ROTOR
For Video Tutorial go to: AIRHOGS.COM
Didacticiel vidéo disponible sur AIRHOGS.COM
For safe use, the room where the toy is used must be sufficiently large.
Pour des raisons de sécurité, utiliser le jouet dans une grande pièce uniquement.
FOR INDOOR USE
UTILISATION EN INTÉRIEUR
CHARGE VIA MICRO USB / CHARGE PAR CÂBLE MICRO USB
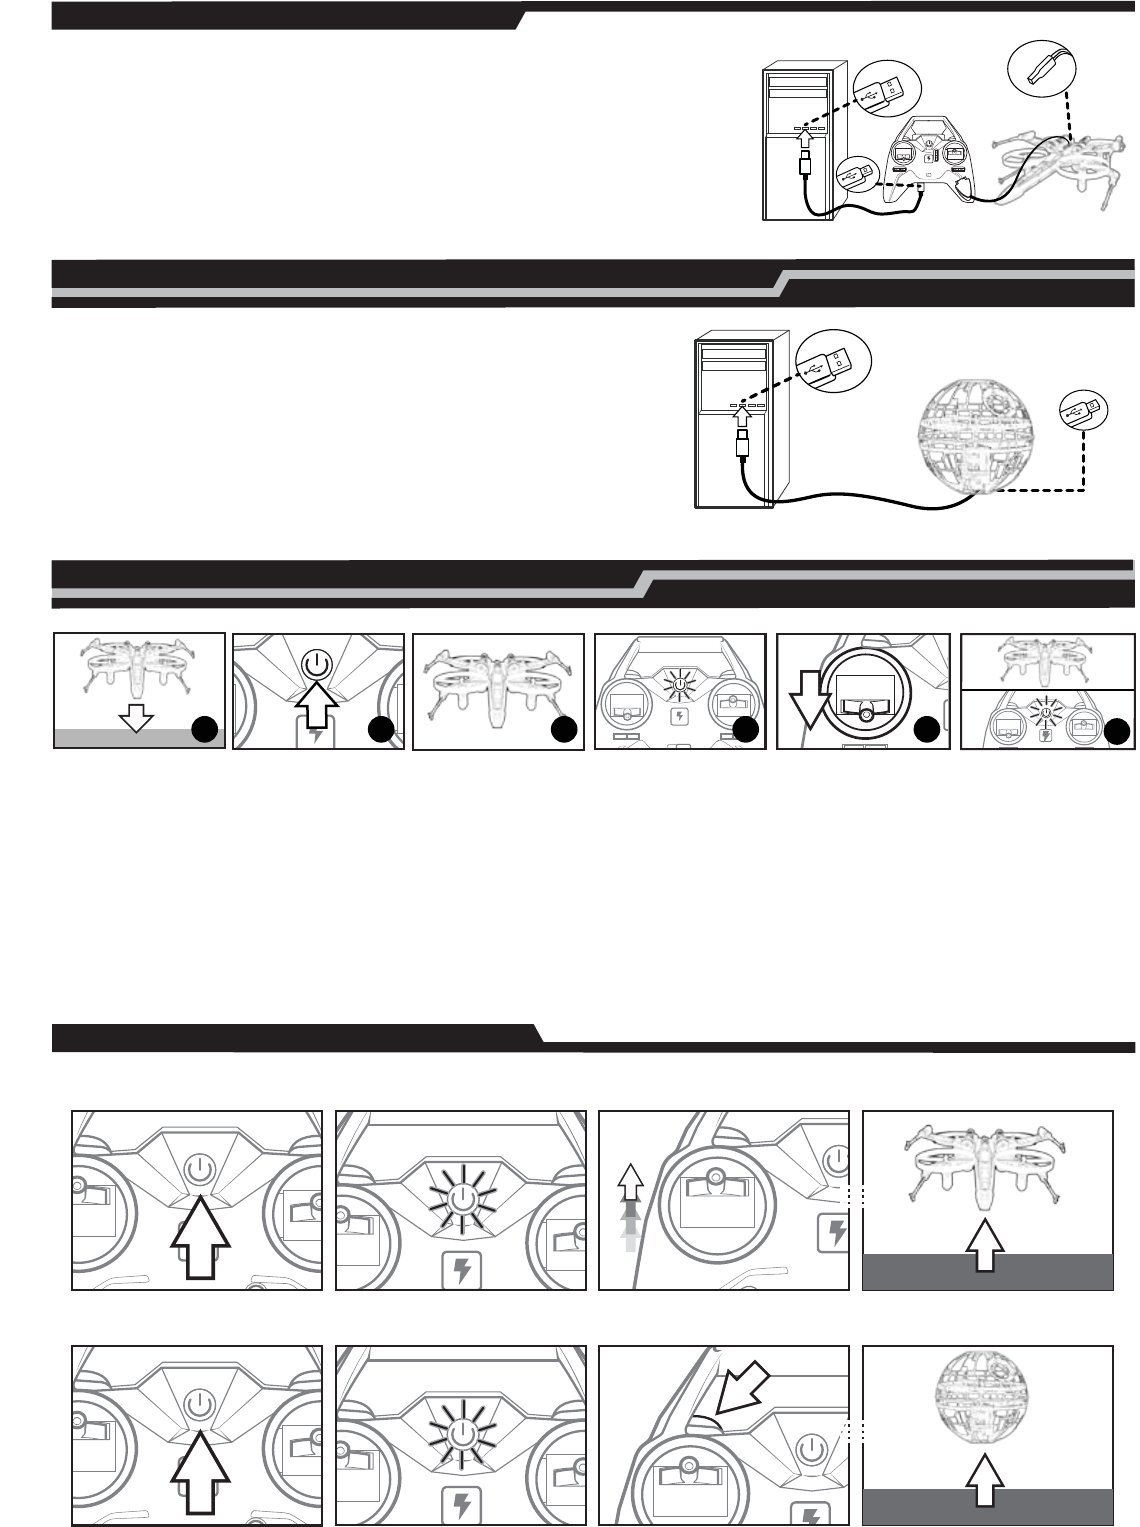
e1. Turn off the vehicle. 2. Plug the USB cable into a computer. 3. Carefully plug the other end of the USB cable into the Remote
Control. 4. Insert charge plug into vehicle. 5. The Charging Indicator will blink RED when charging. 6. The Charging Indicator will turn
solid GREEN when fully charged. 7. Once fully charged, remove the charging wire and store back in the controller. Things to
remember: Before you recharge the battery, wait 10-15 minutes to let the battery cool down. Chargers used with the toy are to be
regularly examined for damage to the cord, plug, enclosure and other parts. In the event of damage, the toy must not be used with the
charger until the damage has been repaired.
f 1.Éteindre le véhicule. 2. Brancher le câble USB sur un ordinateur. 3. Brancher soigneusement l'autre extrémité du câble USB sur
la radiocommande. 4. Brancher la prise de charge sur le véhicule. 5. Le voyant de charge clignotera en ROUGE pendant la charge. 6.
Le voyant de charge s'allumera en VERT une fois la charge terminée.7. Lorsque la charge est terminée, débrancher le câble de charge
et le ranger dans la radiocommande. Important : avant de recharger la batterie, la laisser refroidir durant 10 à 15 minutes. Les
chargeurs utilisés avec le jouet doivent être vérifiés régulièrement afin de repérer tout dommage éventuel du cordon, de la prise, du
boîtier ou d'une autre partie. En cas de problème, ne plus utiliser le chargeur tant que la partie endommagée n'a pas été réparée.
HOW TO FLY / UTILISATION
LINKING (PAIRING) PROCESS / RÉALISATION DE L’APPARIEMENT
==
LAUNCH SEQUENCE / LANCEMENT
X-WING STARFIGHTER™
DEATH STAR™
e1. Turn vehicle ON and place on a level, stable surface. 2.Turn controller ON.
3. Once it is on a stable surface the vehicle’s LEDs will begin flashing. Once
calibration is complete it will start looking for your Controller.
4. When it Links the LED on the controller will blink green until the throttle is ‘armed’.
5. To ‘arm’/enable the throttle, move the left stick to the minimum position.
6. The LED will glow solid when throttle is enabled - you are ready to fly.
f1. Mettre le véhicule en marche et le placer sur une surface stable. 2. Placer
l’interrupteur de la radiocommande sur ON.3. Une fois le véhicule posé sur une
surface stable, ses DEL clignoteront. Une fois l’opération de calibrage terminée, le
véhicule recherche la fréquence de la radiocommande. 4. Lors de l’appariement, le
voyant de la radiocommande clignote en vert jusqu’à ce que l'accélérateur soit activé.
5. Pour activer l’accélérateur, pousser la commande de gauche jusqu’à la position
d’accélération minimale.
6. Les DEL du véhicule s'allumeront fixement lorsque l'accélérateur est activé.
L'appareil est prêt à être utilisé.
REMARQUE : Lorsque la batterie est faible, la DEL du véhicule clignote en continu. Il
est alors nécessaire de le recharger. REMARQUE : Si la DEL d'alimentation de la
radiocommande commence à clignoter, il est temps de changer les piles AA.
NOTE: If the LED on the vehicle flashes continuously the battery is low. Recharge
when this happens.
NOTE: If the Power LED on controller starts to blink slowly, replace the AA batteries.
1245
6
3
==
CHARGE VIA MICRO USB / CHARGE PAR CÂBLE MICRO USB
HOW TO CHARGE YOUR DEATH STAR™ / MISE EN CHARGE DU DEATH STAR™
e1.Switch vehicle and controller to “OFF”. 2. Plug one end of the micro USB into a computer or wall
adapter. Plug the other end into the charge port on the side of the vehicle. 3. Vehicle is charging when
Engine LED is flashing. 4. Vehicle charged when Engine LED turns ON.
Things to remember: Before you recharge the battery, wait 10-15 minutes to let the battery cool down.
f1. Placer les interrupteurs du véhicule et de la radiocommande sur OFF. 2. Brancher l’extrémité large
du câble micro USB sur un ordinateur ou un adaptateur mural. Brancher l'autre extrémité du câble dans
le port de charge situé sur le côté du véhicule. 3. La charge du véhicule est en cours lorsque la DEL du
moteur clignote. 4. La charge du véhicule est terminée lorsque la DEL du moteur s'éteint.
Rappel : Avant de recharger la batterie, la laisser refroidir de 10 à 15 minutes.
3
ea CAUTION: Never fly near your face. Keep rotor away from your fingers, hair, eyes and other body
parts. Always lift off from a flat surface. Never hold the flying toy in your hand when lifting off. DO NOT
launch toy near people or animals. Stay away from obstacles and electrical hazards.
fa MISE EN GARDE : Ne jamais faire voler près du visage. Toujours maintenir les hélices à l’écart des
doigts, des cheveux, des yeux ou des autres parties du corps. Toujours décoller à partir d’une surface
plane. Ne jamais tenir le jouet dans les mains lors du décollage. NE PAS faire décoller le jouet à proximité
de personnes ou d’animaux. Se tenir à distance des obstacles et de tout danger électrique.
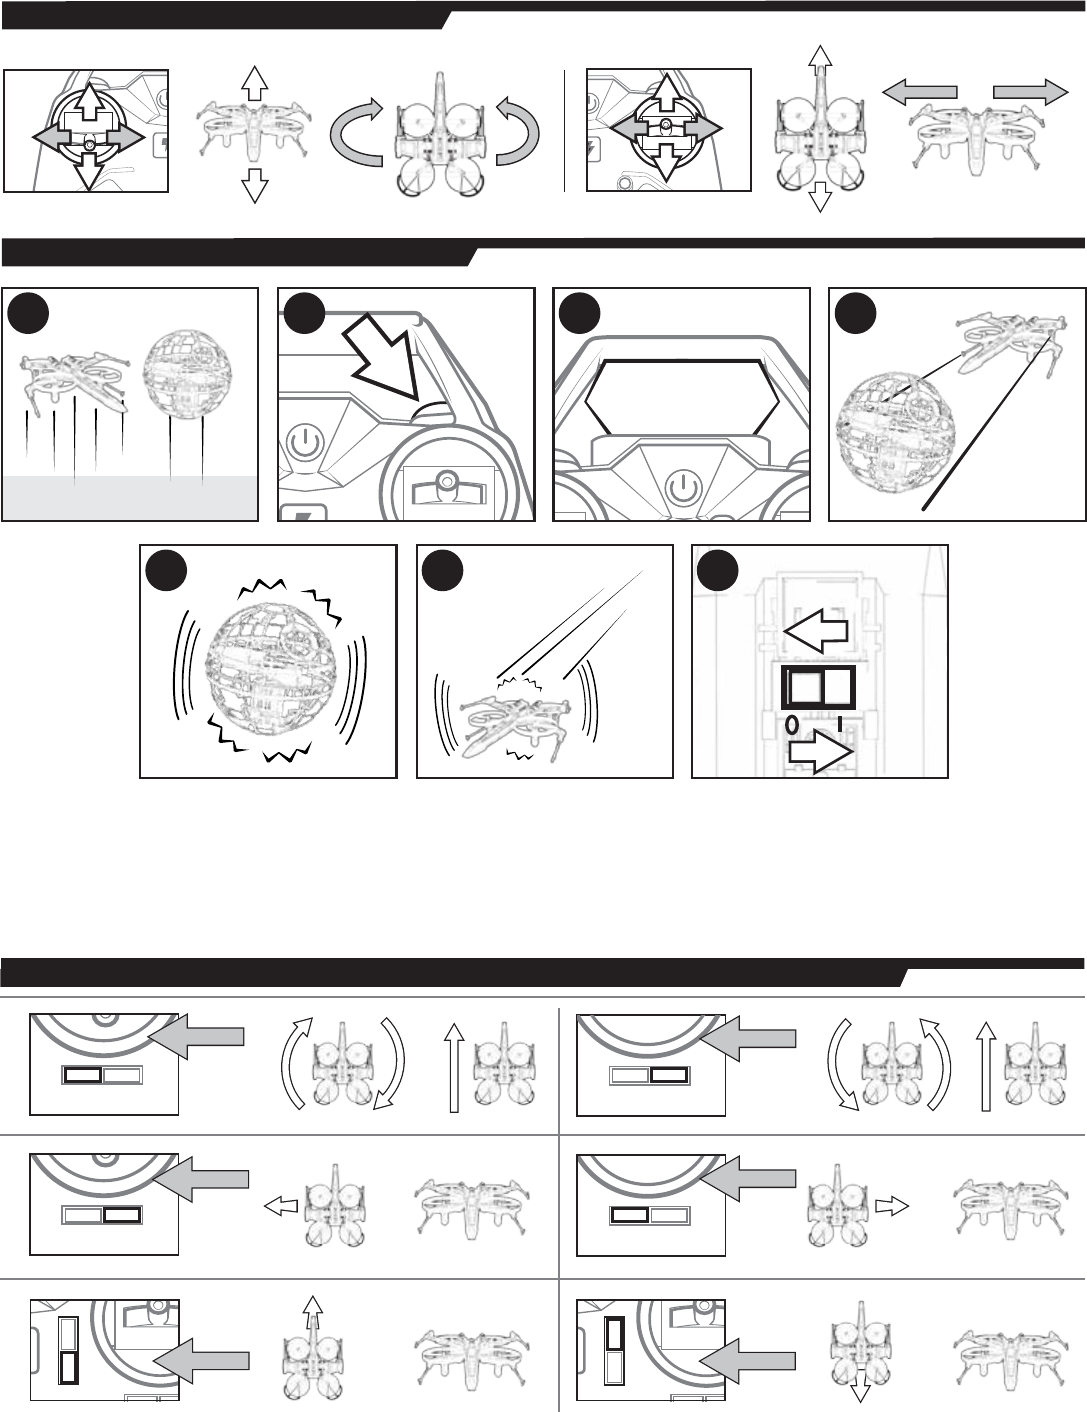
CONTINUOUSLY TURNING OR DRIFTING? / QUE FAIRE SI LE VÉHICULE DÉVIE INVARIABLEMENT DE SA TRAJECTOIRE ?
=
=
RIGHT STICK
BOUTON
DROIT
=
=
RIGHT STICK
BOUTON
DROIT
LEFT STICK
BOUTON GAUCHE
LEFT STICK
BOUTON GAUCHE
=
RIGHT STICK
BOUTON
DROIT
RIGHT STICK
BOUTON
DROIT
=
BATTLING ACTION / COMBAT
e1.
Turn on and launch both vehicles. 2. Press the FIRE “LASERS” TRIGGER
to shoot your laser cannons.
3.
The HEADS UP DISPLAY will flash (color)
when lasers firing.
4.
Try to shoot down the DEATH STAR™ before it shoots
you down.
5.
When a vehicle is successfully hit the HEADS UP DISPLAY will
flash (color) and the vehicle will wobble in the air.
6.
Three (3) successful hits
will cause the vehicle to be shot down and land gently.
7.
To play again turn
the vehicle OFF then ON again to reset.
f1.
Mettre en marche et lancer les deux véhicules. 2. Appuyer sur la GÂCHETTE DES
« LASERS » pour tirer avec les canons laser. 3. L'AFFICHAGE HUD clignote (en
couleur) lors des tirs de laser. 4. Abattre le vaisseau DEATH STAR™ avant de se faire
détruire. 5. Lorsqu'un véhicule est touché, il est secoué dans les airs et l'AFFICHAGE
HUD clignote (en couleur). 6. Au bout de trois (3) coups, le véhicule abattu descend au
sol et atterrit en douceur. 7. Pour rejouer, éteindre le véhicule, puis le rallumer afin de
le réinitialiser.
123
567
4
4
DIRECTIONAL CONTROL / COMMANDE DE DIRECTION
For “TROUBLESHOOTING” questions and solutions, please visit our website: /
En cas de problème, consulter la section « DÉPANNAGE » du site Internet sur :
www.airhogs.com
eNOTE: If normal function of the product is disturbed or interrupted, strong electro-
magnetic interference may be causing the issue. To reset product, turn it completely off, then turn it
back on. If normal operation does not resume, move the product to another location and try again.
To ensure normal performance, change the batteries, as low batteries may not allow full function.
fREMARQUE : De fortes interférences électromagnétiques peuvent perturber ou interrompre le
fonctionnement normal du produit. Pour le réinitialiser, l’éteindre complètement et le rallumer. Si le produit
ne f
onctionne toujours pas normalement, changer de lieu d’utilisation et réessayer. Des piles faibles peuvent
empêcher le produit de fonctionner correctement. Pour des performances optimales, remplacer les piles.
eSafety Precautions: - Keep hands, hair and loose clothing away from the rotors when power switch is turned ON.
- Turn off controller and toy when not in use. - Remove battery(s) from controller when not in use. - Parental guidance
is recommended for the flight. - Keep your toy in your sight so that you can supervise it all the time. - New alkaline
batteries are recommended for use in controller to obtain maximum performance. - Users should keep strict
accordance with the instruction manual while operating the product. - Your controller/charger is tailor-made for the
LiPo rechargeable battery used in your toy. Do not use it to charge any battery other than that in the toy.
fMesures de sécurité : - S’assurer que les mains, cheveux et vêtements ne se trouvent pas à proximité des hélices
lorsque le jouet est en marche. - Éteindre la radiocommande et le jouet lorsqu’ils ne sont pas utilisés. - Retirer les piles
de la radiocommande lorsqu’elle n’est pas utilisée. - La surveillance des parents est recommandée pendant
l'utilisation. - Toujours garder le jouet dans le champ de vision pour le surveiller à tout moment.
- Pour des performances optimales, il est recommandé d’utiliser des piles alcalines neuves dans la radiocommande.
- Les utilisateurs du produit doivent scrupuleusement respecter les consignes de ce mode d’emploi.
- La radiocommande/chargeur a été conçue spécialement pour être utilisée avec la batterie rechargeable LiPo
du véhicule. Ne pas l’utiliser pour recharger une autre batterie.
eThis item is equipped with a Lithium Polymer battery. SPECIAL LiPo BATTERY INSTRUCTIONS: Never
charge battery unattended. - Charge battery in an isolated area. Keep away from flammable materials.
- Do not expose to direct sunlight. There is a risk of the batteries exploding, overheating, or igniting.
- Do not disassemble, modify, heat, or short circuit the batteries. Do not place them in fires or leave them in hot
places. - Do not drop or subject to strong impacts. - Do not allow the batteries to get wet. - Only charge the
batteries with t
he specified Spin Master™ battery charger. - Only use the batteries in the device specified by Spin
Master™. - Carefully read the instruction guide and use the batteries correctly. - In the unlikely event of leakage or
explosion use sand or a chemical fire extinguisher for the battery. - Batteries must be recycled or disposed of properly.
fCe jouet fonctionne avec une batterie au lithium polymère. INSTRUCTIONS SPÉCIALES CONCERNANT LA
BATTERIE LiPo : - Toujours surveiller la batterie lors de la mise en charge. - Recharger la batterie sur une surface
isolée. Maintenir à l’écart de tout matériau inflammable. - Ne pas exposer aux rayons directs du soleil. La batterie
peut exploser, surchauffer, ou prendre feu. - Ne pas démonter, modifier, chauffer ou court-circuiter. Ne pas jeter au
feu ni entreposer dans un endroit chaud. Ne pas faire tomber la batterie ni lui faire subir d’impacts. - Ne pas
mouiller la batterie. - Ne recharger la batterie qu’avec le chargeur indiqué par Spin Master™. - N’utiliser la batterie
que dans l’appareil indiqué par Spin Master™. - Lire attentivement le mode d’emploi et utiliser correctement la
batterie. - En cas de fuite ou d’explosion, utiliser du sable ou un extincteur chimique. - La batterie doit être
correctement recyclée ou éliminée.
eNote: Parental guidance is recommended when installing or replacing batteries.
In an environment with electrostatic discharge, the toy may malfunction and require user to reset the toy.
fRemarque : Il est recommandé aux parents d’aider les enfants lors de l’installation et du remplacement
des piles. Les décharges électrostatiques peuvent perturber le fonctionnement du jouet et conduire
l’utilisateur à le réinitialiser.
eSpecial Note to Adults: Regularly examine for damage to the plug, enclosure and other parts. In the event of
any damage, the toy must not be used with the controller until the damage has been repaired. This toy is not
intended for children under 3 years old. This toy must only be used with the recommended controller.
fRemarque à l’attention des adultes : Vérifier régulièrement que la prise, la structure et les autres pièces ne
comportent aucun dommage. Dans le cas contraire, le jouet et la radiocommande ne doivent pas être utilisés
jusqu’à ce qu'ils soient réparés. Ce jouet ne convient pas aux enfants de moins de 3 ans. Ce jouet ne doit être
utilisé qu’avec la radiocommande recommandée.
eCare and Maintenance: Always remove batteries from the toy when it is not being used for a long
period of time (controller/charger only). Wipe the toy gently with a clean damp cloth. Keep the toy away
from direct heat. Do not submerge the toy in water. This can damage the electronic assemblies.
fEntretien et maintenance : Toujours retirer les piles lorsque le jouet n’est pas utilisé pendant une longue
période (radiocommande/chargeur uniquement). Nettoyer délicatement le jouet avec un chiffon humide et
propre. Conserver le jouet à l’écart de toute source de chaleur. Ne pas plonger le jouet dans l’eau ; les
Gebruikershandleiding.com neemt misbruik van zijn services uitermate serieus. U kunt hieronder aangeven waarom deze vraag ongepast is. Wij controleren de vraag en zonodig wordt deze verwijderd.
Product:
Spelregels forum
Om tot zinvolle vragen te komen hanteren wij de volgende spelregels:
lees eerst de handleiding door;
controleer of uw vraag al eerder door iemand anders is gesteld;
probeer uw vraag zo duidelijk mogelijk te stellen;
heeft u een probleem en al geprobeerd om dit op te lossen, vermeld dit erbij aub;
heeft u een oplossing gekregen van een bezoeker dan horen wij dat graag in dit forum;
wilt u een reactie geven op een vraag of antwoord, gebruik dan niet dit formulier maar klik op de knop 'reageer op deze vraag';
uw vraag wordt direct op de website gezet; vermijd daarom persoonlijke gegevens in te vullen;
Belangrijk! Als er een antwoord wordt gegeven op uw vraag, dan is het voor de gever van het antwoord nuttig om te weten als u er wel (of niet) mee geholpen bent! Wij vragen u dus ook te reageren op een antwoord.
Belangrijk! Antwoorden worden ook per e-mail naar abonnees gestuurd. Laat uw emailadres achter op deze site, zodat u op de hoogte blijft. U krijgt dan ook andere vragen en antwoorden te zien.
Abonneren
Abonneer u voor het ontvangen van emails voor uw SpinMaster Air Hogs X-Wing vs Death Star Rebel Assault - Star Wars bij:
nieuwe vragen en antwoorden
nieuwe handleidingen
U ontvangt een email met instructies om u voor één of beide opties in te schrijven.
Ontvang uw handleiding per email
Vul uw emailadres in en ontvang de handleiding van SpinMaster Air Hogs X-Wing vs Death Star Rebel Assault - Star Wars in de taal/talen: Engels, Frans als bijlage per email.
De handleiding is 1,63 mb groot.
U ontvangt de handleiding per email binnen enkele minuten. Als u geen email heeft ontvangen, dan heeft u waarschijnlijk een verkeerd emailadres ingevuld of is uw mailbox te vol. Daarnaast kan het zijn dat uw internetprovider een maximum heeft aan de grootte per email. Omdat hier een handleiding wordt meegestuurd, kan het voorkomen dat de email groter is dan toegestaan bij uw provider.
Stel vragen via chat aan uw handleiding
Stel uw vraag over deze PDF
Uw handleiding is per email verstuurd. Controleer uw email
Als u niet binnen een kwartier uw email met handleiding ontvangen heeft, kan het zijn dat u een verkeerd emailadres heeft ingevuld of dat uw emailprovider een maximum grootte per email heeft ingesteld die kleiner is dan de grootte van de handleiding.
Er is een email naar u verstuurd om uw inschrijving definitief te maken.
Controleer uw email en volg de aanwijzingen op om uw inschrijving definitief te maken
U heeft geen emailadres opgegeven
Als u de handleiding per email wilt ontvangen, vul dan een geldig emailadres in.
Uw vraag is op deze pagina toegevoegd
Wilt u een email ontvangen bij een antwoord en/of nieuwe vragen? Vul dan hier uw emailadres in.