granite or other mineral-based construction materials). If this material is
metal, it must be at least 1 mm thick.
The flooring must be fastened down and secured against sideward movement.
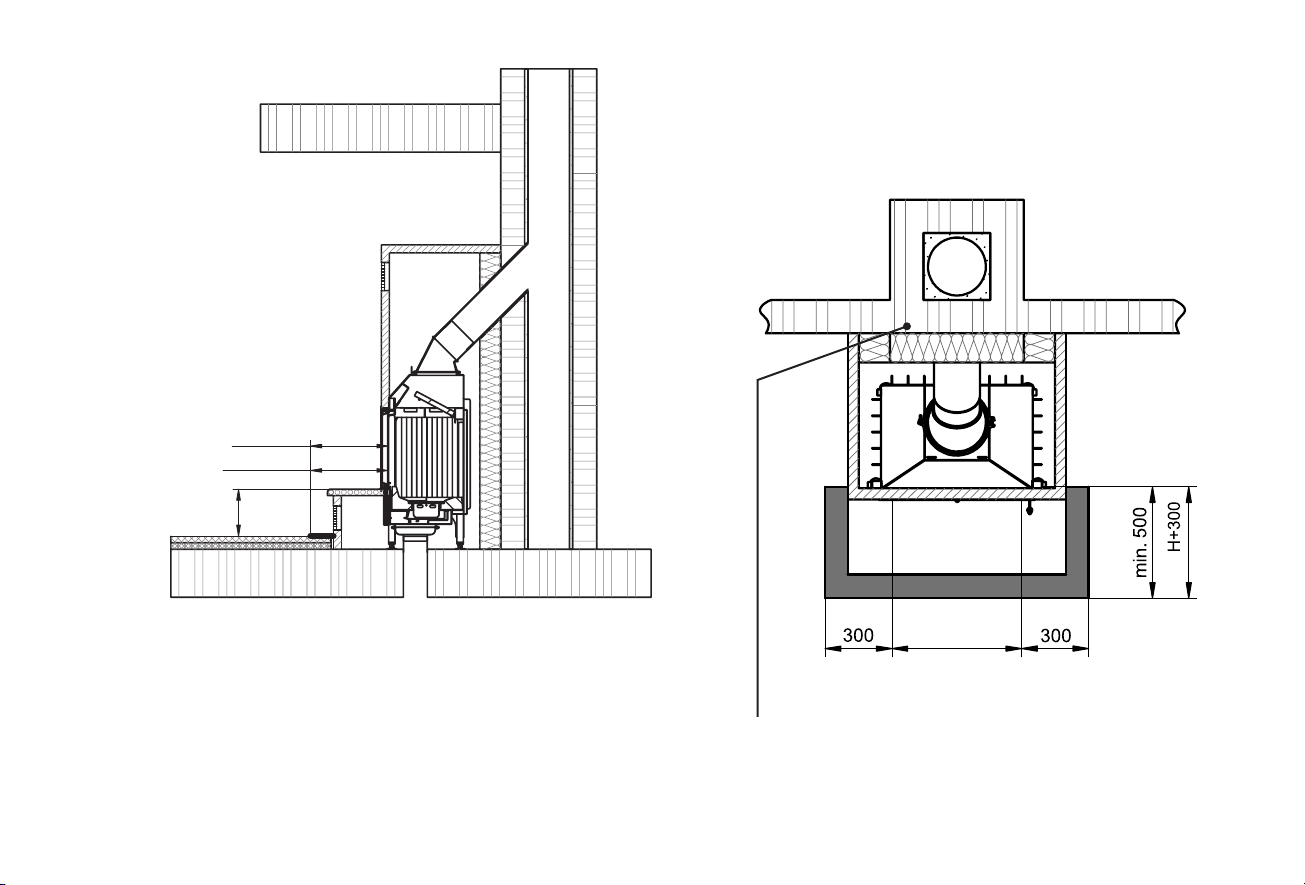
The spark protector must face forwards and be the same height as the fire
area base (height of fire table) H plus 300 mm, but at least a total of 500 mm
in length.
GB 12
The extent and manner to and in which the sides of your fireplace insulate the
installation location are things you must discuss with your fireplace installer
and chimney sweep.
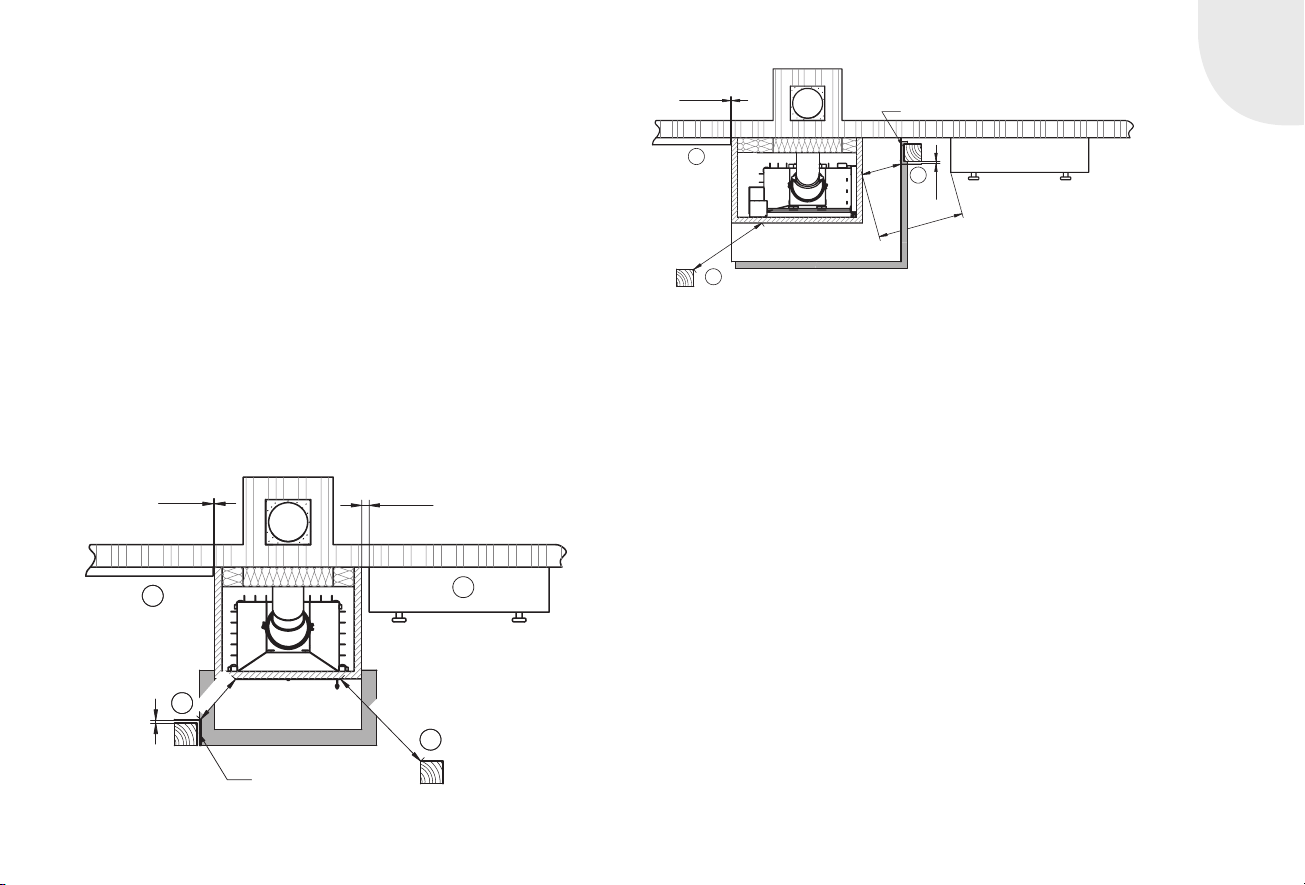
In addition, this area, starting from the direct radiant area, from the effective
combustion chamber opening must be protected out to 300 mm to left and
right (see Fig.).
The figure illustrates a typical installation situation showing a
Varia 1V-51-4S and this applies for each fireplace unit.
H
bzw.H+300
min.500
The figure illustrates a typical installation situation showing
a Varia 1V-51-4S and this applies for each fireplace unit.Width of opening
resp.
resp.
GB
GB 13
4.4.2 SPECIAL PRECAUTIONS FOR THE FIRE PRO-
TECTION OF ADJACENT COMPONENTS CON-
STRUCTED OF FLAMMABLE MATERIALS
1. A distance of at least 5 cm has to be maintained between built-in furniture
(e.g. cupboards) and the fireplace cladding.
2. A clearance of at least 1 cm is recommended for components with small
contact areas (wall, floor or ceiling cladding). Wallpapers are not considered
to be combustible construction materials.
3. A clearance of at least 80 cm must be maintained between the front and
sides of the firebox opening and all flammable fixtures or built-in furniture
units, unless stated otherwise in component-specific safety instructions.
4. When arranging ventilated thermal radiation protection down both sides (S),
a distance of just 40 cm is sufficient. The ventilated distance to the radiant
heat protecting device must be (S) at least 2 cm.2. A clearance of at least 1 cm is recommended for components with small
contact areas (wall, floor or ceiling cladding).
3. A clearance of at least 80 cm must be maintained between the front and
sides of the firebox opening and all flammable fixtures and built-in furniture
items, unless stated otherwise in component-specific safety instructions.
4. When arranging ventilated thermal radiation protection down both sides (S),
a distance of just 40 cm is sufficient. The ventilated distance to the radiant
heat protecting device must be (S) at least 2 cm.
4.5 GLASS CLEANING CLEANING THE GLASS
CERAMIC PANES ON SLIDING DOORS
All cleaning of the glass ceramic pane must be carried out while it is cold
(fireplace unit not burning and cooled down, no hot ash in the combustion
chamber).
40 cm
80 cm
2cm
1cm5cm
1
2
3
4
(S)
The figure illustrates a typical installation situation showing
a Varia 1V-51-4S and this applies for each fireplace unit.
2
3
4
40 cm
80 cm
1cm
2cm
80 cm
(S)
This Figure shows a typical installation situation for a Varia
2R-80h-4S and this applies to every fireplace insert.
GB 14
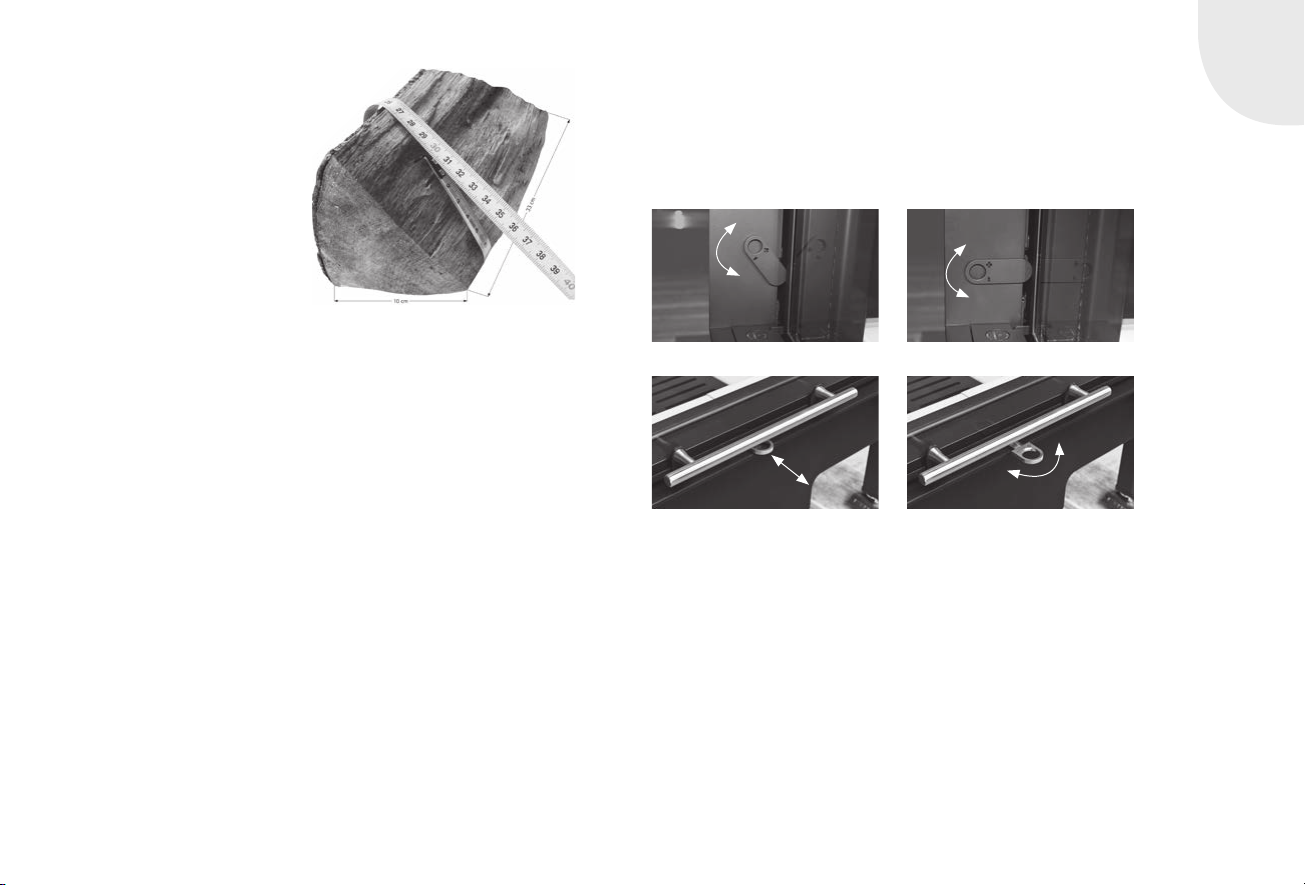
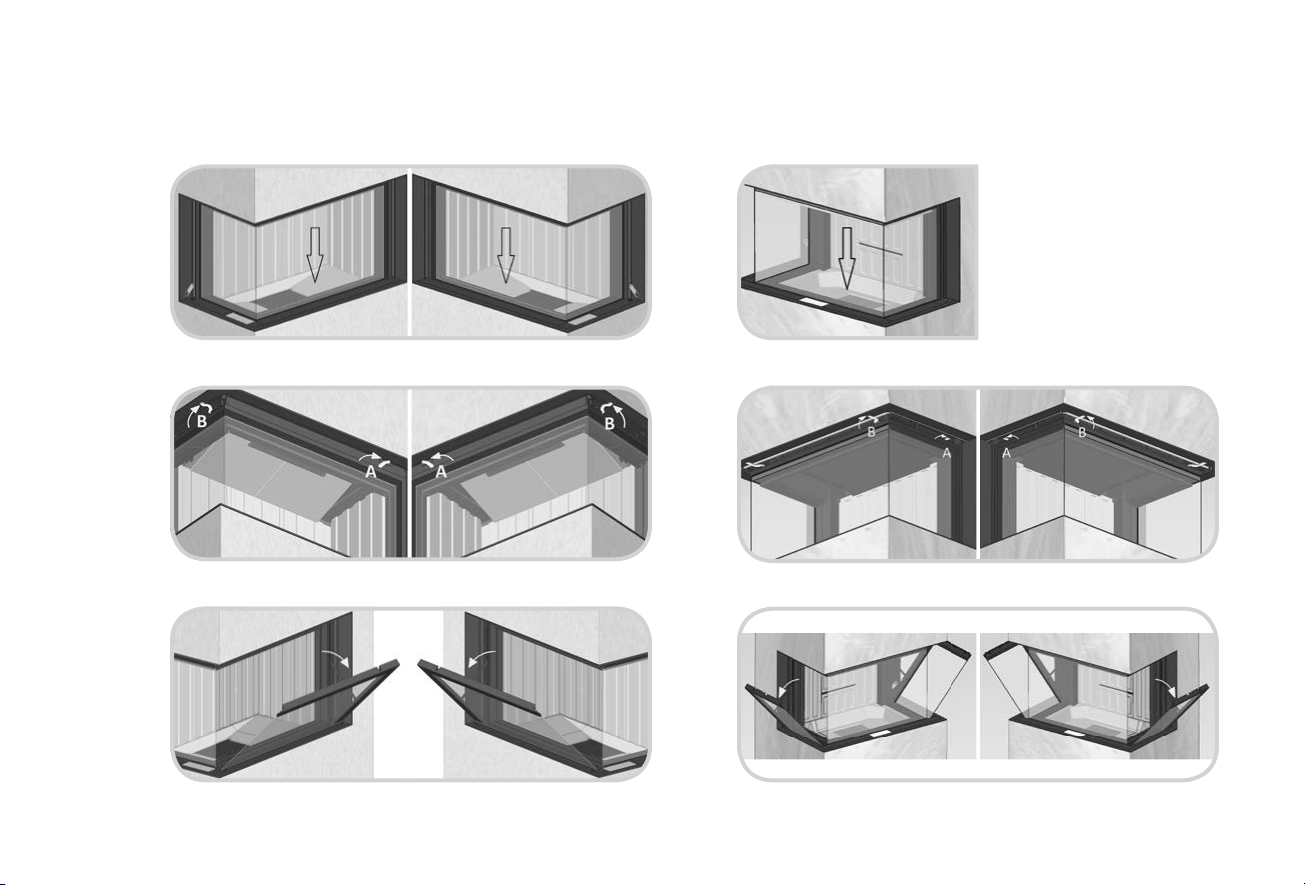
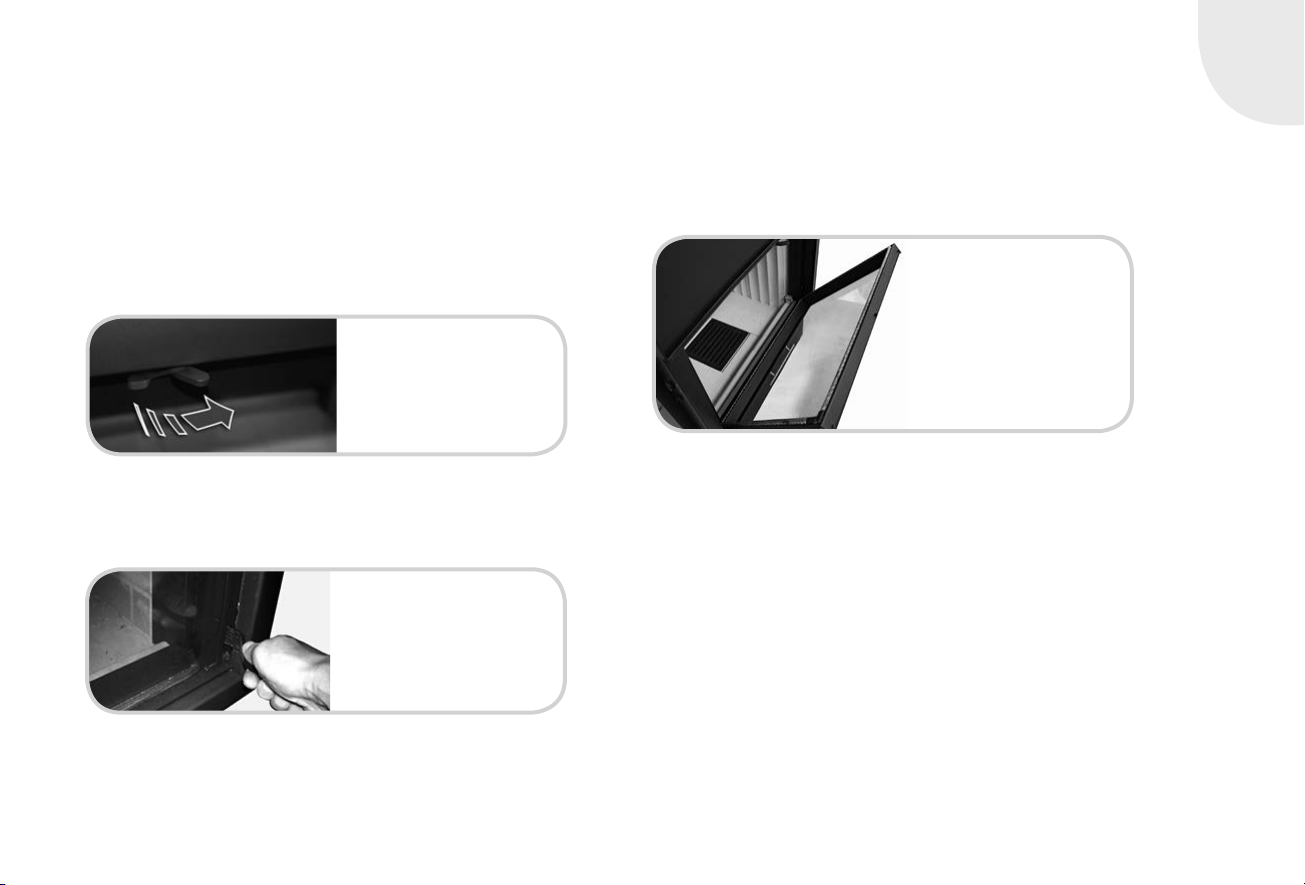
4.5.1 LASS CLEANING OF PREMIUM FIRE PLACES
(2-SIDED)
1. Push door completely downwards!
2. Unlock A+B completely by moving the levers.
3. Tilt side glass for cleaning.
When closing proceed in reverse order.
4.5.2 GLASS CLEANING OF PREMIUM FIRE PLACES
(3-SIDED)
1. Push door completely downwards!
2. Unlock A+B completely by moving the levers.
3. Tilt side glass for cleaning.
When closing proceed in reverse order.
GB
GB 15
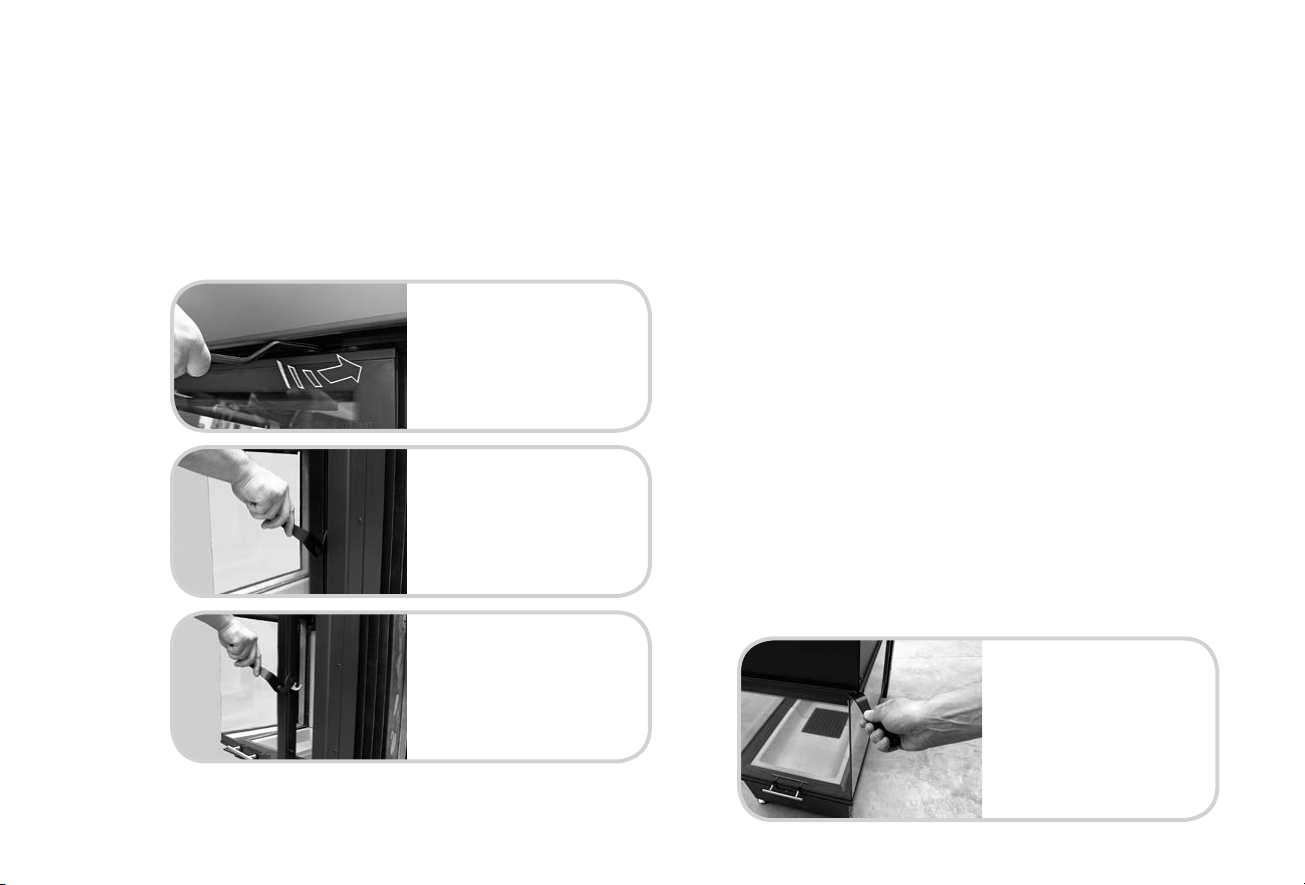
Linear 4S or Prestige versions::
1. With one hand on the door handle, gently tip the fire door downwards, at
the same time supporting it with the other hand.
The glass window can now be cleaned in accordance with the operating
instructions.
1.Move the ‘cold hand’ to the right-hand
side of the door and, positioning it on
the lock, turn the lock fully downwards.
Now open the door fully
until it rests against its stop.
Undo the lock by rotating it clockwise.
Closing the fire door:
1. Carefully close the fire door.
2. Move the lock above the door using the ‘cold hand’, turning the lock fully
backwards to its limit position. This is important since otherwise the lock
can scrape against the hood and the door will not seal properly
3. Test the function of the door by sliding it upwards and re-check the upper
lock to ensure that the locking mechanism is fully closed, i.e. at its limit
position.
Caution: When opening and closing the door, only touch the door frame.
Never exert pressure on the window panels. (risk of
breakage!)
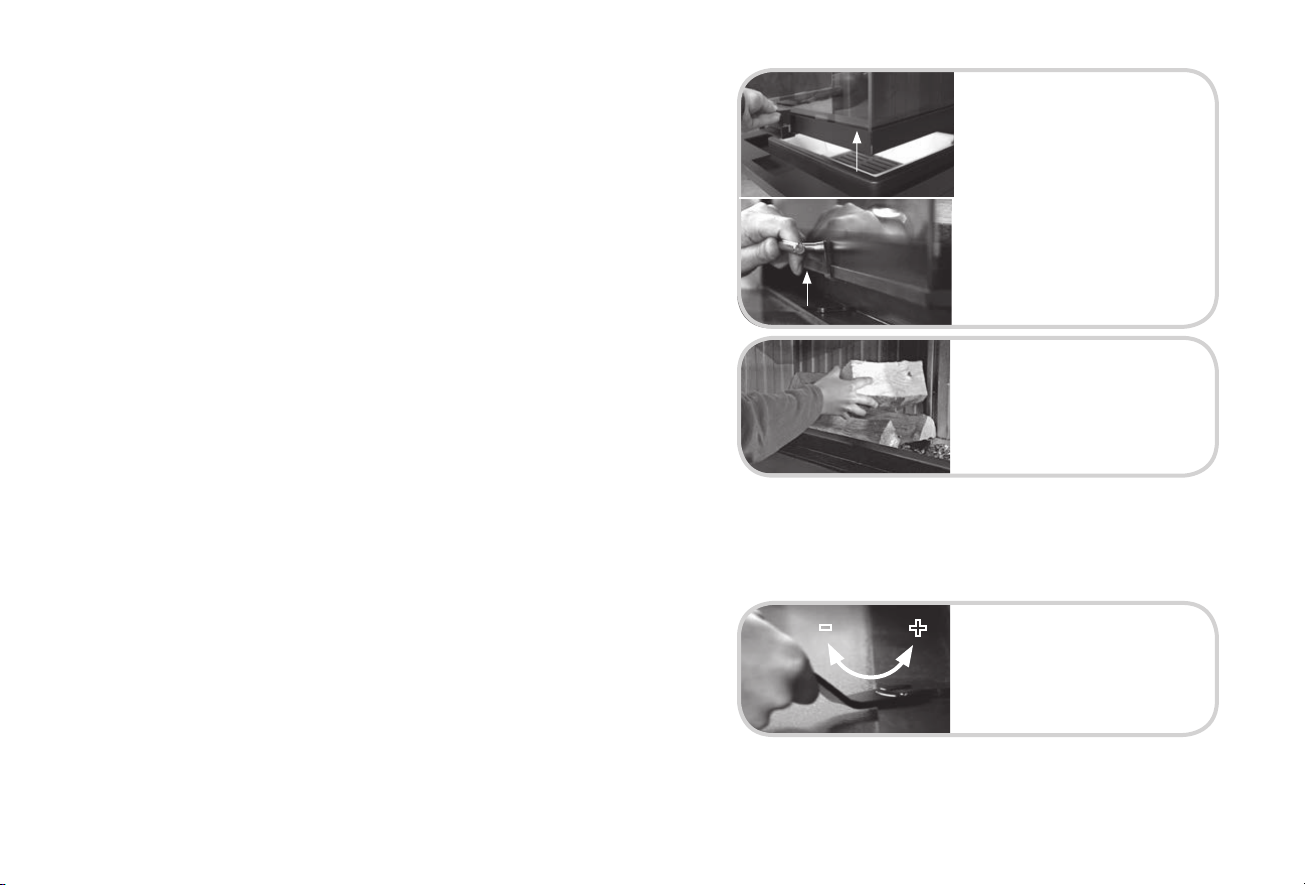
4.5.3 CLEANING OF VERTICALLY-ORIENTED SLIDING
DOORS
Cleaning should be carried out when cold and in accordance with the following
versions.
Opening of the fire door:
1. Close the firebox door (pull it fully downwards!).
2. Move the ‘cold hand’ from the left-hand side to the central locking position
above the firebox door.
3. The door can now be tilted up. Observe the specific instructions relating to
the Linear 3S and Linear 4S or Prestige version!
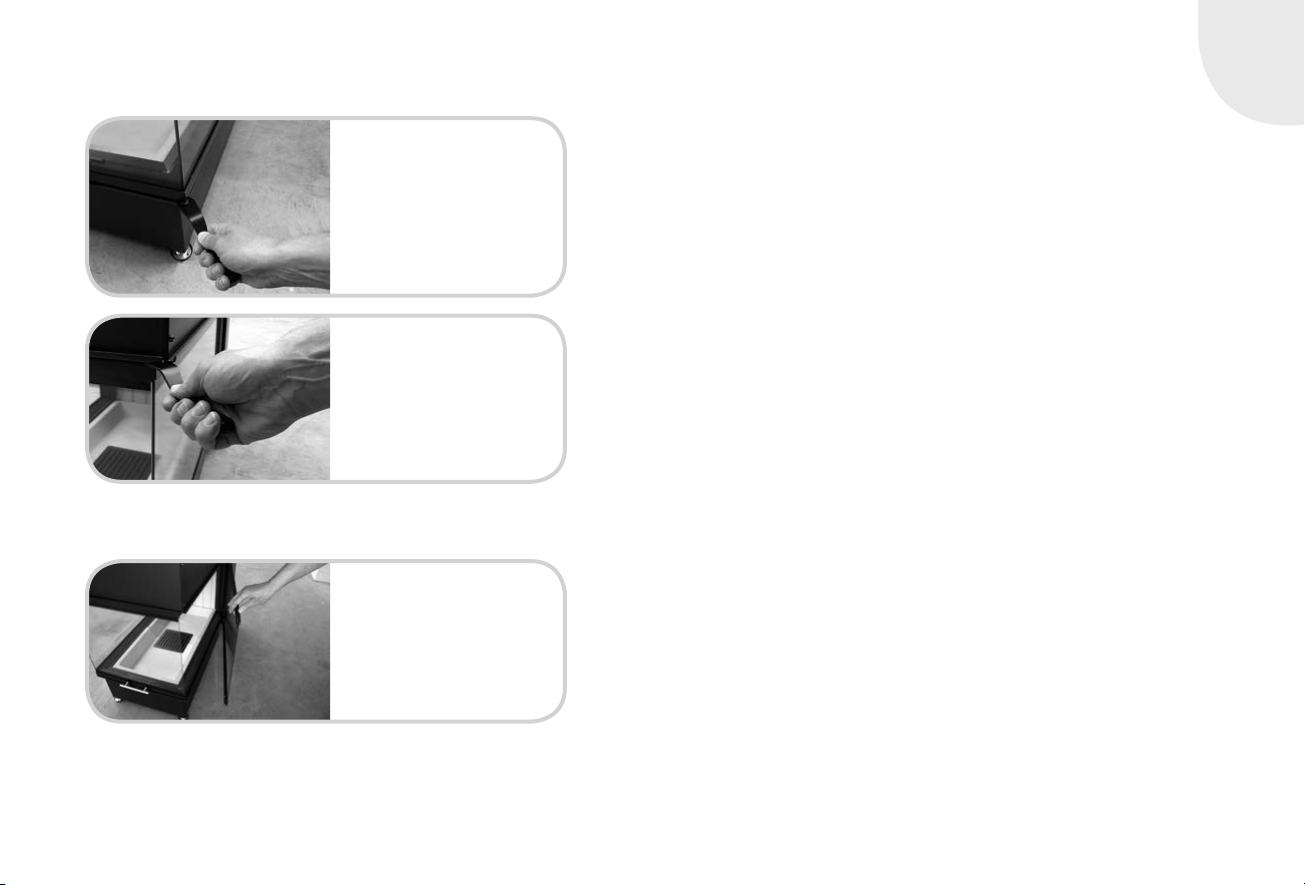
Linear 3S-Ausführung:
2. Press the ‘cold hand’ downwards at, at the same time, use the other hand
to hold up the fire door. That enables the door to tilt slightly. Now remove
the ‘cold hand’ from the support to prevent damage to the bench and to
prevent injuries. Now tilt the door fully upwards until it rests against its stop.
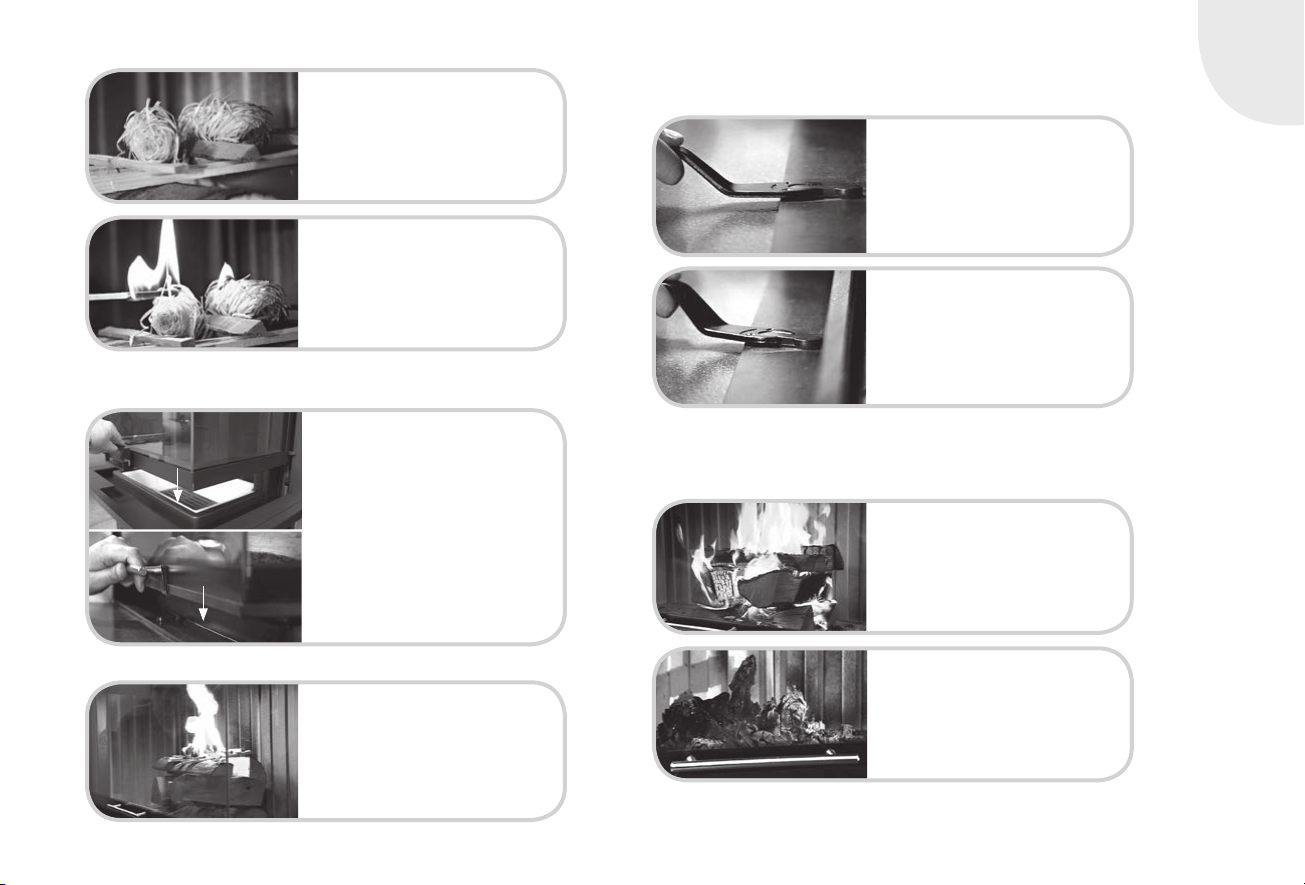
GB 16
Move the ‘cold hand’ to the right-hand side
of the door on the support/lock and turn it
fully upwards.
Swing the door open for cleaning purposes.
Turn the locking mechanism clockwise in
order to lock the sliding rails.
There is a second bolt on the opposite
side.
Closing the firebox door:
1. Close the firebox door carefully and keep it lightly pressed in.
2. Move the ‘cold hand’ to the right-hand side of the door and, positioning it
on the lock, turn the lock fully downwards.
3. Turn the locking mechanism anti-clockwise in order to free the sliding rails.
4. Test the function of the door by sliding it upwards and re-check that the
locking mechanism is fully closed, i.e. at its limit position.
After cleaning, re-close the firebox door, replace the ‘cold hand’ on the square
nut, close the door by pressing on the frame (not on the glass) and lock it by
turning the ‘cold hand’ fully downwards. Do not forget to reset the slide rail
locking mechanism.
4.5.5 CLEANING ANGLED DOORS
(THE 3-SIDED ARTE MODEL)
Cleaning must always be executed in a cooled-down state!
Opening of the fire door:
1. Close the firebox door (slide it fully downwards!).
2. Swivel out the locking mechanism on the sliding rail lock using the ‘cold
hand’ above the firebox door, to right and left. The door is now locked in
its lowest position.
4.5.4 CLEANING OF ROUND OR ANGLED VERTICALLY
SLIDING DOORS
Close the firebox door (pull it fully downwards). Place the ‘cold hand’ on the
sliding rail lock above the firebox door. (Caution! One-sided or two-sided,
depending on model)
With a clockwise turning motion, you slide the retaining bolt on the lock
through 90 degrees to the front (below the door cover).
GB
GB 17
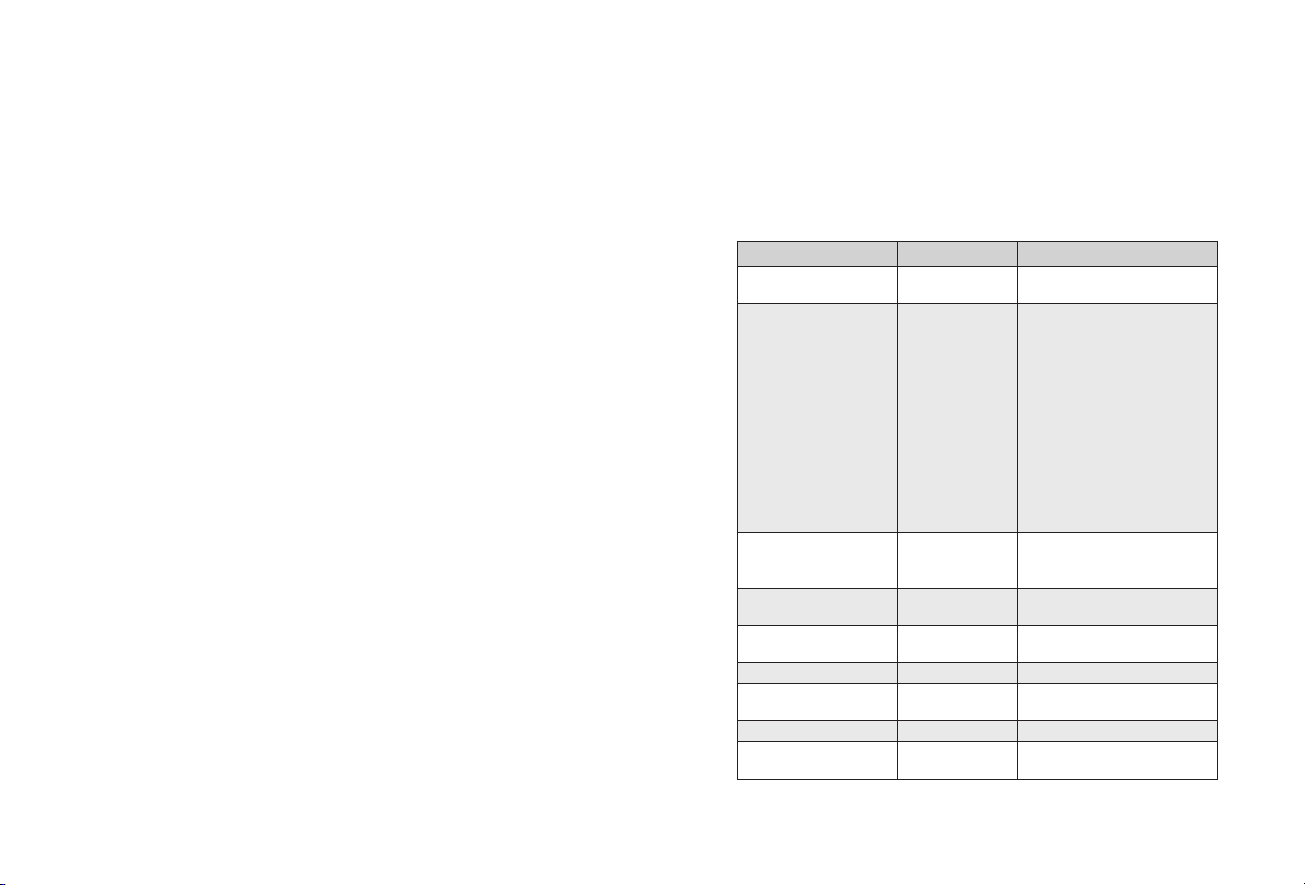
Then turn and open the upper opening.
Only touch the frame of the door
First unfasten the lower fastening
3. Unlock the side door locks by hand or with the help of the ‘cold hand’ using
a turning movement, paying attention to the sequence of actions!
4. Swivel the fireplace doors to left and/or right. The glass window can now be
cleaned in accordance with the operating instructions.
Closing the firebox door:
1. Close the firebox door carefully, lifting the door slightly while doing so and
pressing it against the fixed-position glass element.
2. Lock the top and bottom door locks by hand or with the help of the ‘cold
hand’. Remove the ‘cold hand’. Important: First fasten the top lock, then
the bottom one.
3. Turn the locks on the sliding rails above the door back to their limit stops.
Caution: When opening and closing the door, only grip the door
frame. Never exert pressure on the window panels. (risk
of breakage!)
GB 18
5. SERVICE AND MAINTENANCE
CAUTION! Never clean your fireplace insert while it is hot or warm.
5.1 TYPE PLATE
The type plate can be found on your warranty certificate and on your fireplace
insert below the ash pan and/or the ash box. It includes technical data and
information. The type plate must not be removed as it confirms the testing of
the device and is required for the acceptance procedure and annual inspec-
tions by the chimney sweep.
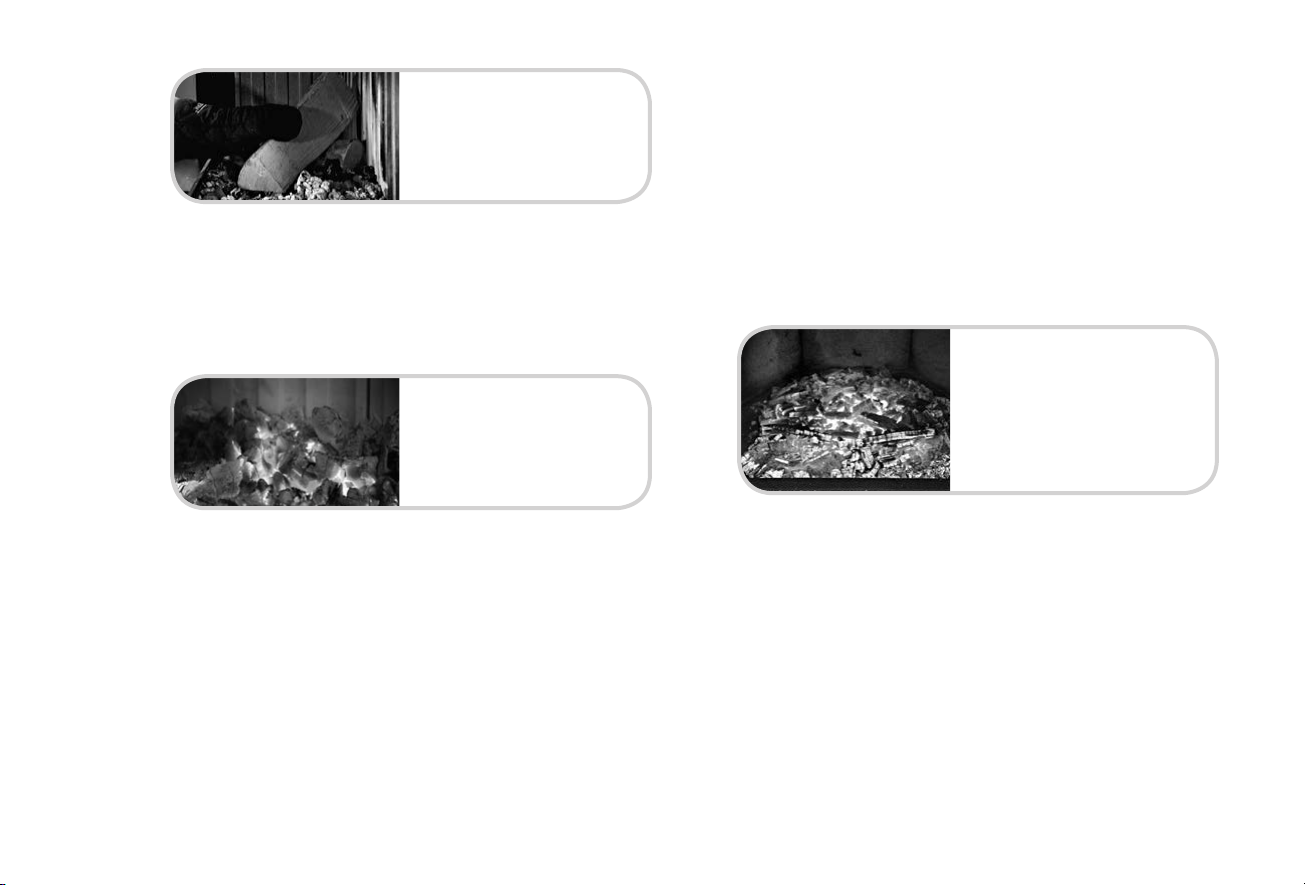
5.2 ASH PAN AND GRATE
• Clean and empty the grate and ash pan at regular intervals, adapted to
suit your use of the fireplace. CAUTION! Ash can keep embers hot for up
to 24 hrs.
• The ash cone in the ash pan must not reach or block the slots in the grate.
• Always have the engraved side of grate facing downwards, located in the
recess in the bottom of the fireplace insert.
5.3 WINDOW
The way to ensure that your window panel remains soot free for as long as
possible is
• to use dry firewood (chapter „2.1.2 Types of wood“).
• to control combustion through adjustments to the flow of combustion air
(chapter „3. Burning“).
• to keep the fireplace insert at the highest possible combustion temperature
• to have the correct amount of draught in the chimney
• to add the right amount of wood for the operating range.
Gradual sooting up of the window is entirely normal and does not constitute
grounds for a complaint. Clean the inside of the window regularly using the
window cleaning agent provided to prevent particles of soot from burning in too
much (after approx. 8-12 operating hours)!
5.4 CLEANING AND MAINTENANCE
The fire area, the hot gas draught and the flue should be cleaned at regular
intervals. Specifically, whenever there is any extended interruption in opera-
tion of the fireplace, ensure that the chimney is not blocked.
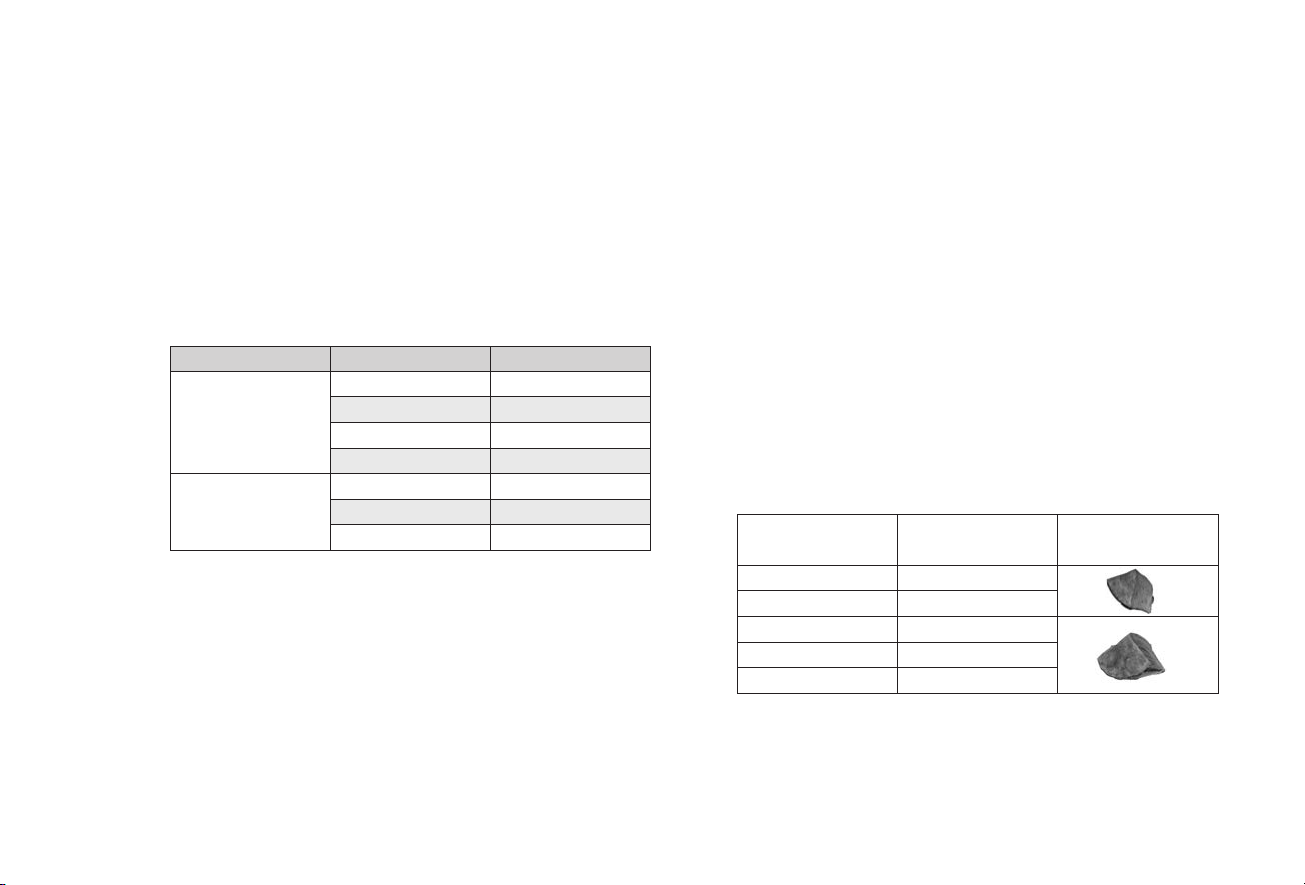
For other conditions, refer to table:
WhatHow oftenWhat with?
Outside of fireplace insert and
heating chamber
as required,
min. once a year
Brush, vacuum cleaner or
ash extractor
Glass panebased on fire
behaviour, for
optimum visibility, we
recommend after 8-12
hours of operation
You can easily clean the glass panel
with a commercially available cleaning
agent for fireplace glass.
Use dry cloth to wipe. No scouring.
Please do avoid that excess cleaning
agent enters between door frame and
glass panel. This might cause the
hardening of the sealing compound
between glass panel and door frame. A
hardened sealing compound might lead
to damages of door and glass.
Suitable cleaning agents for fireplace
glass are available at your specialist
dealer.
Decor finishes in
chrome or gold
as requiredUse dilute soapy lye and soft cloth. Do
not use abrasive agents. Do not polish!
Stainless steel surfacesas requiredStainless steel cleaning product and a
soft cloth.
Painted surfacesas requiredDamp cloth without cleaning agent with
abrasive substances.
Hot air grilleas requiredDuster or vacuum cleaner
Ash pan and grateas requiredEmpty by hand or using special ash
extractor
Air space below ash panas requiredVacuum cleaner or ash extractor
Adapter between fireplace
insert and chimney
as required
min. once a year
Brush, ash extractor
GB
GB 19
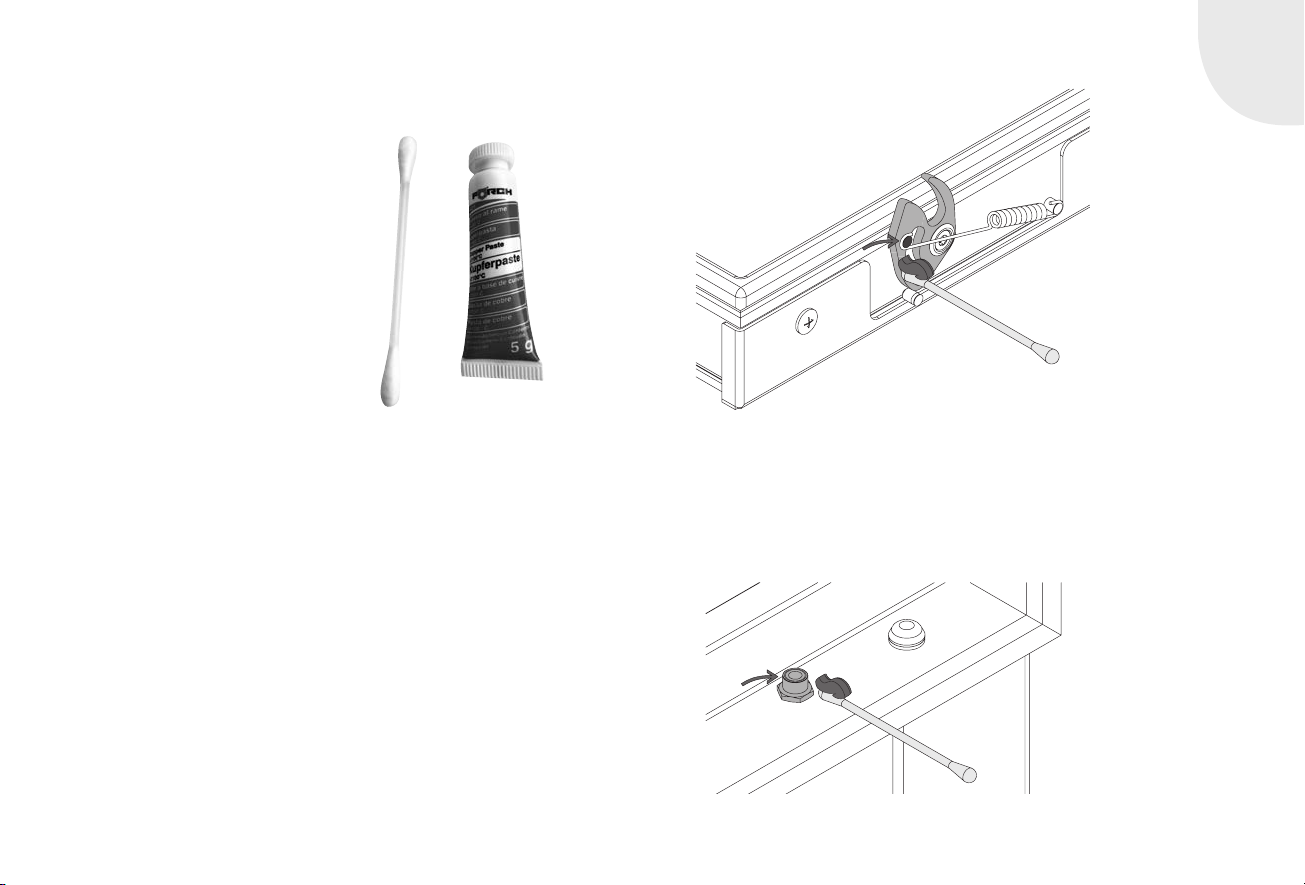
5.5 SMARTCLOSE DOOR LOCK
Fireplace inserts with SmartClose door
locking mechanisms must be lubricated
at regular intervals to assure prob-
lem-free operation (once per heating
season). Upon delivery, the package
includes a tube of special stove lubricat-
ing compound.
This lubricating compound is applied to
facilitate ease of movement of heavy fire
doors, and to prevent noise caused by
opening and closing those fire doors.
The lubricating compound must be
applied at least once a year to the spring
connection on the SmartClose and its associated roller. Fireplaces used fre-
quently or very frequently, it may be necessary to shorten this lubrication
interval. Depending on the type of fireplace insert, the door lock springs may
be located below and/or above the fire door. In order to lubricate the lock, you
may use a standard cotton swab as an aid.
To apply the lubricant compound, proceed as follows:
Open and secure the fire door; Apply a little lubricant compound to the cotton
swab and use it to coat the spring support on the door lock; Turn the locating
roller on the body of the stove during this application process. Open and close
the fire door a few times and, if necessary, apply the lubricant compound
once again.
Caution: Ensure that no copper lubricant compound makes contact
with cladding parts or similar items! Remove dirt and grime
straightaway with a cotton cloth. Never operate the equip-
ment during intervening periods.
GB 20
6. HELP
ProblemCause, explanationChapter, noteSolution
Glass becomes
sooted heavily,
rapidly and
unevenly.
You did not use the correct combustion materials.2.Use natural, bulky bits of timber compliant with BImSchV §3 (German legislation).
The ambient temperature is above about 15°C. The weather conditions are unfavorable
(e.g. fog). These weather conditions occur most frequently in spring and fall.4.1Fill the fireplace with a small amount of fuel and light it with the damper fully open
(max. air flow).
There is a temperature inversion. That means that the upper layers of the atmosphere
are warmer than the lower layers.4.1Fill the fireplace with a small amount of fuel and light it with the damper fully open
(max. air flow).
The combustion air controller is not fully opened.3.2.1Move the air actuating lever into its far right-hand position.
The external combustion air line is not free.4.3Clean the combustion air line.
Combustion air is too heavily restricted. This means that soot accumulates quickly,
within just half an hour. (it is normal for the fireplace unit to become progressively dirtier
from operation. When driving, a car window becomes dirty, too!)
3.2.1Check the position of the air lever and, if necessary, open up the combustion air flow rate
fully to bring the fireplace unit up to operating temperature.
The seating of a gasket / door seal is not perfect.-Check all seals, e.g. open the fire door and press the seal fully into the door profile.
The wood is not dry enough.2.Measure the residual humidity in the wood used with a humidity detector. The recom-
mended residual humidity is 20% or less.
Not enough wood has been added. (an insufficient amount of wood can result in temper-
atures in the stove not being high enough).2.1.3The proper amount of wood per hour can be found in the technical data.
The chimney draught is too strong / too weak.-Observe the situation. The draught characteristics can be affected by the prevailing
weather pattern. If the glass continues to soot up badly, inform your chimney sweep.
Fire is difficult to
ignite
You did not use the correct combustion materials.2.Use natural, bulky bits of timber compliant with BImSchV §3 (German legislation).
The wood is not dry enough.2.Measure the residual humidity in the wood used with a humidity detector. The recom-
mended residual humidity is 20% or less.
The wood too thick.2.
Use small-sized timber to light the fire. For firewood, use only split wood that is not
thicker than about 8 cm at its thickest point. The optimum length of firewood is approx-
imately 20 - 25 cm. In the case of prolonged heating, do not add too much wood.
Instead, it is better to add smaller quantities of wood.
A sufficient air supply is not assured.3.For heating or for adding more firewood, move the actuating lever fully to the right.
The ambient temperature is above about 15°C. The weather conditions are unfavorable
(e.g. fog). This is referred to as an intervening period.4.1Fill the fireplace with a small amount of fuel and light it with the damper fully open
(max. air flow).
There is a temperature inversion. That means that the upper layers of the atmosphere
are warmer than the lower layers.4.1Fill the fireplace with a small amount of fuel and light it with the damper fully open
(max. air flow).
The combustion air controller is not fully opened.3.2.1Move the air actuating lever into its far right-hand position.
The external combustion air line is not free.4.3Clean the combustion air line.
The chimney is not free.-Inform the chimney sweep.
There is not enough vacuum in the chimney.-Light a small fire in the fireplace, following advice from your fireplace installer or
chimney sweep.
GB
GB 21
ProblemCause, explanationChapter, noteSolution
Smoke escapes
when adding wood
Air-extracting equipment is switched on, e.g. kitchen extractor fan.3.1Ensure that all air-extracting equipment is switched off.
Wood added prematurely, on top of unburned wood.3.3Do not add fresh firewood until there is a bed of hot embers in the combustion chamber.
The chimney is not free.-Inform the chimney sweep.
Your fireplace has not already reached its operating temperature.3.2.1Burn down remaining wood until it forms a bed of hot embers, then add smaller pieces
of firewood.
The door has been opened too wide.3.3Open the door slowly and carefully.
Excessively rapid
burn-up / rate of
wood consumption
is too high.
The diameter of your stack of wood is too small.2.1.3The ideal diameter for a stack of wood is about 25 cm.
The chimney draught is too strong.-Inform the chimney sweep. Perhaps increase combustion air flow to counteract choking
action.
The combustion air flow has not been reduced.3.2.1Leave the actuating lever in about its center position.
Ever since the initial blaze, the fire door has been slightly open.3.2.1Close the fire door!
The recommended wood feed rate has not been observed.2.1.3The proper amount of wood feed per hour for your stove can be found in the technical
data.
GB 22
7. GENERAL WARRANTY CONDITIONS
7.1 GENERAL
Spartherm Feuerungstechnik GmbH / the “manufacturer” offers end customers
/ consumers as well as their dealers and intermediaries a temporary warranty
of durability for the products it produces in accordance with the conditions and
scope described below.
The manufacturer warranty offered shall apply without prejudice to manda-
tory statutory liability provisions, e.g. product liability law, in cases of intent
or gross negligence or as a result of injury to life, limb or health caused by
Spartherm or its vicarious agents. This applies in addition to the statutory
warranty which the seller is obliged to guarantee its consumer.
A consumer as defined by this manufacturer warranty is any natural person
who is the owner of the product and who has not purchased the product to
resell it or to install it at third-party premises within the scope of commercial
or self-employment activities. The initial purchaser is the consumer who firstly
bought the product from Spartherm Feuerungstechnik GmbH, a dealer or
another natural person or corporate entity who, within the scope of commer-
cial or self-employment activities, resells or installs the product.
Spartherm produces high-quality products according to state-of-the-art
technology. The materials used have been carefully selected and - like the
production process - are subject to on-going quality control. Specialist knowl-
edge is required when assembling and installing the products. Our products
must, therefore, only be installed and started up by specialist technical staff,
in compliance with current statutory provisions.
7.2 WARRANTY PERIOD/SCOPE
The general warranty terms apply exclusively within Germany and the Euro-
pean Union.
The warranty applies to products purchased after 1 July 2016 (proof of
purchase).
Spartherm guarantees that its products are free from material defects,
production and design errors. Claims for compensation for consequential
losses or on the basis of product liability only apply in accordance with legal
provisions. Within the scope of this warranty, defects that have been shown
to be due to a material defect or a production/design error shall be remedied
A warranty period of 5 years as of the date of purchase by the initial
purchaser, and a maximum of 6 years after production, shall apply to the
following products.
• Fireplace insert body
• Fireplace body
• Fireplace cassette body
• Fireplace door body
A 24-month warranty period is offered as of the date of purchase by the
initial customer for the following products:
• Vertical sliding technology
• Control elements such as handles, actuating levers, shock absorbers
• Electric and electronic components such as fans, speed regulators, orig-
inal parts
• All purchased articles and safety equipment
Spartherm offers a 6-month warranty as of the date of purchase by the
initial customer for
• Wearing parts in the fire area such as the fireclay, vermiculite, fire grates,
seals and glass ceramic.
The warranty period is not extended as a result of the provision of services
within the scope of this warranty, unless the product has been replaced
completely.
GB
GB 23
7.3 WARRANTY EXTENSION TO 10 YEARS FOR THE
INITIAL PURCHASERS OF THE FIREPLACE INSERT
BODY.
Spartherm Feuerungstechnik GmbH has extended the warranty time of the
body of fireplace insert for initial purchasers from 5 to 10 years. This requires,
however, that the fireplace insert is registered online using the serial number
within six months of purchase on the homepage www.spartherm.com/Service/
7.4 WARRANTY EXCLUSION
The following in particular is excluded from the warranty:
• Product wear
• Fireclay/vermiculite
These are natural products that are subject to expansion and shrinking each
time they are heated. This can cause cracks to appear. The combustion cham-
ber linings will remain fully functional, provided they are still in position and
are not broken.
The surfaces:
• Discolouration of the coating or galvanic surfaces due to excessive thermal
loading or overheating.
The vertical sliding mechanism:
• Failure to comply with installation guidelines, resulting in overheating of
the guide rollers and bearings.
The seals:
• Reductions in sealing strength due to seal hardening as a result of thermal
loading.
The viewing panes:
• Contamination due to soot or other burnt-on residue of combustion mate-
rials and visual deterioration due to thermal loading.
Gebruikershandleiding.com neemt misbruik van zijn services uitermate serieus. U kunt hieronder aangeven waarom deze vraag ongepast is. Wij controleren de vraag en zonodig wordt deze verwijderd.
Product:
Spelregels forum
Om tot zinvolle vragen te komen hanteren wij de volgende spelregels:
lees eerst de handleiding door;
controleer of uw vraag al eerder door iemand anders is gesteld;
probeer uw vraag zo duidelijk mogelijk te stellen;
heeft u een probleem en al geprobeerd om dit op te lossen, vermeld dit erbij aub;
heeft u een oplossing gekregen van een bezoeker dan horen wij dat graag in dit forum;
wilt u een reactie geven op een vraag of antwoord, gebruik dan niet dit formulier maar klik op de knop 'reageer op deze vraag';
uw vraag wordt direct op de website gezet; vermijd daarom persoonlijke gegevens in te vullen;
Belangrijk! Als er een antwoord wordt gegeven op uw vraag, dan is het voor de gever van het antwoord nuttig om te weten als u er wel (of niet) mee geholpen bent! Wij vragen u dus ook te reageren op een antwoord.
Belangrijk! Antwoorden worden ook per e-mail naar abonnees gestuurd. Laat uw emailadres achter op deze site, zodat u op de hoogte blijft. U krijgt dan ook andere vragen en antwoorden te zien.
Abonneren
Abonneer u voor het ontvangen van emails voor uw Spartherm Linear Front bij:
nieuwe vragen en antwoorden
nieuwe handleidingen
U ontvangt een email met instructies om u voor één of beide opties in te schrijven.
Ontvang uw handleiding per email
Vul uw emailadres in en ontvang de handleiding van Spartherm Linear Front in de taal/talen: Engels als bijlage per email.
De handleiding is 1.24 mb groot.
U ontvangt de handleiding per email binnen enkele minuten. Als u geen email heeft ontvangen, dan heeft u waarschijnlijk een verkeerd emailadres ingevuld of is uw mailbox te vol. Daarnaast kan het zijn dat uw internetprovider een maximum heeft aan de grootte per email. Omdat hier een handleiding wordt meegestuurd, kan het voorkomen dat de email groter is dan toegestaan bij uw provider.
Uw handleiding is per email verstuurd. Controleer uw email
Als u niet binnen een kwartier uw email met handleiding ontvangen heeft, kan het zijn dat u een verkeerd emailadres heeft ingevuld of dat uw emailprovider een maximum grootte per email heeft ingesteld die kleiner is dan de grootte van de handleiding.
Er is een email naar u verstuurd om uw inschrijving definitief te maken.
Controleer uw email en volg de aanwijzingen op om uw inschrijving definitief te maken
U heeft geen emailadres opgegeven
Als u de handleiding per email wilt ontvangen, vul dan een geldig emailadres in.
Uw vraag is op deze pagina toegevoegd
Wilt u een email ontvangen bij een antwoord en/of nieuwe vragen? Vul dan hier uw emailadres in.