564473
29
Verklein
Vergroot
Pagina terug
1/217
Pagina verder
Interchangeable Lens Digital Camera ILCE-5100
How to Use
Before Use
Names of parts
Checking the camera and the supplied items [1]
Identifying parts [2]
Identifying parts Lens E PZ 16–50 mm F3.5–5.6 OSS (supplied with ILCE-5100L/ILCE-
5100Y) [3]
Identifying parts Lens E 55-210 mm F4.5-6.3 OSS (supplied with ILCE-5100Y) [4]
Icons and indicators
List of icons on the screen [5]
List of focus range finder frames [6]
Using the strap
Using the shoulder strap [7]
In-Camera guide
About the [In-Camera Guide] [8]
About the shooting advice [9]
Preparing the camera
Charging the battery pack
Charging the battery pack while it is inserted in the camera [10]
Charging by connecting to a computer [11]
Inserting the battery pack into the camera [12]
Battery life and the number of images that can be recorded/played back using a battery
pack [13]
Supplying power using a wall outlet (wall socket) [14]
Removing the battery pack [15]
Inserting a memory card (sold separately)
Inserting a memory card [16]
Removing the memory card [17]
Attaching a lens
Attaching a lens [18]
Removing the lens [19]
Attaching the lens hood [20]
Notes on changing the lens [21]
Setting the date and time
Setting the date and time [22]
Confirming the operation method
Using the control wheel [23]
Using the touch panel [24]
Using MENU items [25]
Shooting
Shooting still images/movies
Shooting still images [26]
Shooting movies [27]
Selecting a shooting mode
List of shooting modes [28]
Intelligent Auto [29]
Superior Auto [30]
About Scene Recognition [31]
The advantages of automatic shooting [32]
Program Auto [33]
Sweep Panorama [34]
Scene Selection [35]
Shutter Priority [36]
Aperture Priority [37]
Manual Exposure [38]
BULB [39]
Movie [40]
Using shooting functions
Using the zoom
Zoom [41]
The zoom features available with this product [42]
Zoom Setting [43]
About zoom scale [44]
Using the flash
Using flash [45]
Flash Mode [46]
Flash Comp. [47]
Selecting a screen display mode
Switching the screen display (Shooting) [48]
Selecting still image size/image quality
Image Size (still image) [49]
Aspect Ratio (still image) [50]
Quality (still image) [51]
Panorama: Size [52]
Panorama: Direction [53]
Adjusting the focus
Focus Mode [54]
Focus Area [55]
Focal plane phase detection AF [56]
Center Lock-on AF [57]
Focus-lock [58]
Manual Focus [59]
Direct manual focus (DMF) [60]
MF Assist (still image) [61]
Focus Magnifier [62]
Focus Magnif. Time [63]
Peaking Level [64]
Peaking Color [65]
Pre-AF (still image) [66]
AF/MF control [67]
AF Illuminator (still image) [68]
AF Micro Adj. [69]
Disp. cont. AF area [70]
AF On [71]
Eye AF [72]
AF drive speed (movie) [73]
AF Track Duration (movie) [74]
Deleting images
Deleting a displayed image [144]
Deleting multiple selected images [145]
Playing back movies
Playing back movies [146]
Viewing panoramic images
Playing back panoramic images [147]
Printing
Specify Printing [148]
Using viewing functions
View Mode [149]
Display Rotation [150]
Slide Show [151]
Rotate [152]
Protect [153]
4K Still Image PB [154]
Viewing images on a TV
Viewing images on an HD TV [155]
Viewing images on a “BRAVIA” Sync-compatible TV [156]
Changing settings
Setup menu
Monitor Brightness [157]
Volume Settings [158]
Audio signals [159]
Upload Settings(Eye-Fi) [160]
Tile Menu [161]
Delete confirm. [162]
Pwr Save Start Time [163]
PAL/NTSC Selector [164]
Demo Mode [165]
HDMI Resolution [166]
CTRL FOR HDMI [167]
HDMI Info. Display [168]
USB Connection [169]
USB LUN Setting [170]
Language [171]
Date/Time Setup [172]
Area Setting [173]
Format [174]
File Number [175]
Select REC Folder [176]
New Folder [177]
Folder Name [178]
Recover Image DB [179]
Display Media Info. [180]
Version [181]
Certification Logo (Overseas model only) [182]
Setting Reset [183]
Using Wi-Fi functions
Connecting this product and a Smartphone
PlayMemories Mobile [184]
Connecting an Android smartphone to this product [185]
Connecting the product to an iPhone or iPad [186]
Messages
Messages
Warning messages [303]
Situations this product has difficulty handling
Situations this product has difficulty handling [304]
[1] How to Use Before Use Names of parts
Checking the camera and the supplied items
First check the model name of your camera. The accessories supplied differ depending on
the model.
The number in parentheses indicates the number of pieces.
Supplied with all models:
Camera (1)
NP-FW50 Rechargeable battery pack (1)
Micro USB Cable (1)
AC-UB10C/UB10D AC Adaptor (1)
Shoulder strap (1)
Instruction Manual (1)
Wi-Fi Connection/One-touch (NFC) Guide (1)
ILCE-5100
Body cap (1) (Attached on the camera)
ILCE-5100L
E16-50 mm zoom lens (1) (Attached on the camera)/Front lens cap (1) (Attached on the
lens)
ILCE-5100Y
E16-50 mm zoom lens (1) (Attached on the camera)/Front lens cap (1) (Attached on the
lens)
E55-210 mm zoom lens (1)/Front lens cap (1)/Rear lens cap (1)/Lens hood (1)
[2] How to Use
Before Use Names of parts
Identifying parts
When the lens is removed
Use this when using an AC-PW20 (sold separately). Insert the connection plate into
the battery compartment, and then pass the cord through the connection plate cover
as shown below.
Make sure that the cord is not pinched when you close the cover.
5. Speaker
6. Tripod socket hole
Use a tripod with a screw less than 5.5 mm (7/32 inches) long. Otherwise, you
cannot firmly secure the camera, and damage to the camera may occur.
[3] How to Use Before Use Names of parts
Identifying parts Lens E PZ 16–50 mm F3.5–5.6 OSS
(supplied with ILCE-5100L/ILCE-5100Y)
1. Zooming/Focusing ring
2. Zooming lever
3. Mounting index
4. Lens contacts*
*
Do not touch this part directly.
[4] How to Use Before Use Names of parts
Identifying parts Lens E 55-210 mm F4.5-6.3 OSS
(supplied with ILCE-5100Y)
then press on the center.
The shooting advice is displayed.
You can scroll the screen by pressing the up/down side of the control wheel.
Hint
To view all the shooting advice, select MENU (Camera Settings) → [Shooting Tip
List].
[10] How to Use
Preparing the camera Charging the battery pack
Charging the battery pack while it is inserted in the
camera
When using the camera for the first time, be sure to charge the battery pack. The charged
battery pack will discharge little by little, even if you do not use it. To avoid missing a
shooting opportunity, charge the battery pack before shooting.
1. Turn the power OFF.
2. Connect the camera with the battery pack inserted to the AC Adaptor (supplied) using
the micro USB cable (supplied), and connect the AC Adaptor to the wall outlet (wall
socket).
For customers in the U.S.A. and Canada
For customers in countries/regions other than the U.S.A.
and Canada
29

Hulp nodig? Stel uw vraag in het forum

Spelregels
1

Forum

Sony-ILCE-5100
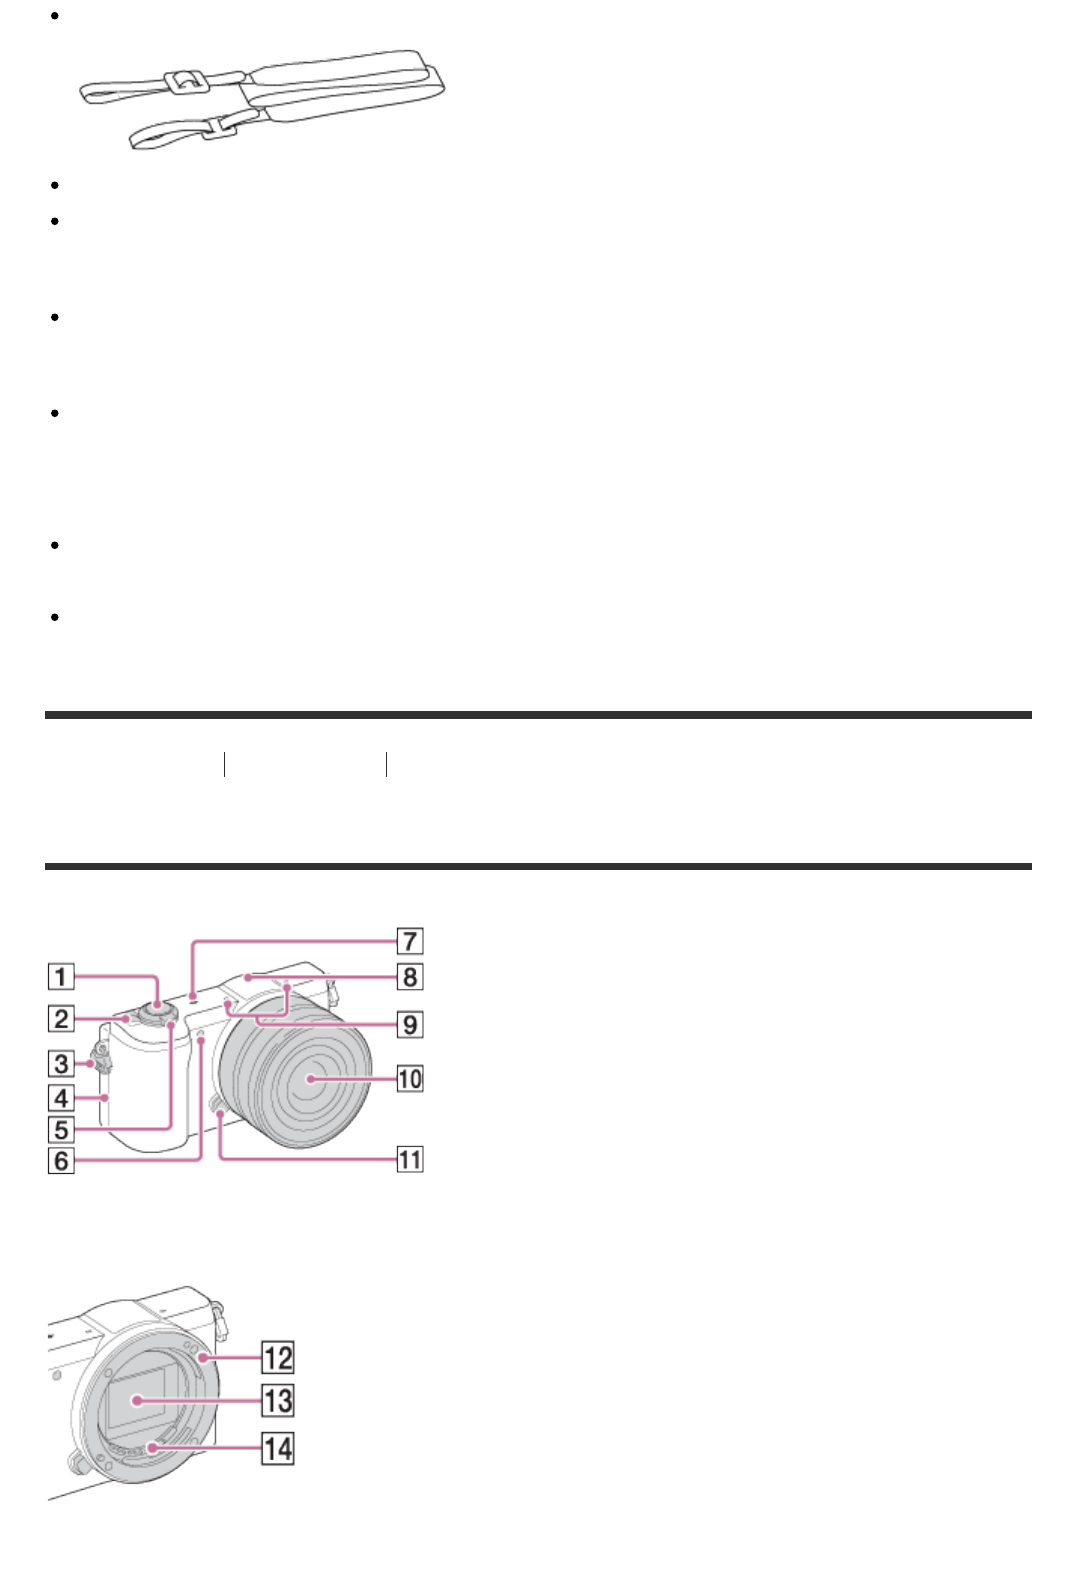
  • Onze camera de sonu ILCE 5100 heeft het de hele dag goed gedaan. Toen wilde ik nog een foto maken en toen stond er op het scherm “lens niet herkend goed aanbrengen”.
    De lens is er niet afgeweest.
    We hebben de lens eraf gehaald en er opnieuw op gedraaid tot hij klik zegt. Wat kunnen we hier mee? Gesteld op 8-9-2020 om 17:23

    Reageer op deze vraag Misbruik melden
  • Waarom is het geluid zo slecht bij film afspelen op de camera? Heb het volume op 15 staan maar erg slecht geluid.
    En hoe kan ik de filmpje terug kijken op TV camera is met WiFi verbonden maar kan alleen foto's zien op tv maar geen filmpje Gesteld op 2-7-2015 om 19:11

    Reageer op deze vraag Misbruik melden

Misbruik melden

Gebruikershandleiding.com neemt misbruik van zijn services uitermate serieus. U kunt hieronder aangeven waarom deze vraag ongepast is. Wij controleren de vraag en zonodig wordt deze verwijderd.

Product:

Bijvoorbeeld antisemitische inhoud, racistische inhoud, of materiaal dat gewelddadige fysieke handelingen tot gevolg kan hebben.

Bijvoorbeeld een creditcardnummer, een persoonlijk identificatienummer, of een geheim adres. E-mailadressen en volledige namen worden niet als privégegevens beschouwd.

Spelregels forum

Om tot zinvolle vragen te komen hanteren wij de volgende spelregels:

Belangrijk! Als er een antwoord wordt gegeven op uw vraag, dan is het voor de gever van het antwoord nuttig om te weten als u er wel (of niet) mee geholpen bent! Wij vragen u dus ook te reageren op een antwoord.

Belangrijk! Antwoorden worden ook per e-mail naar abonnees gestuurd. Laat uw emailadres achter op deze site, zodat u op de hoogte blijft. U krijgt dan ook andere vragen en antwoorden te zien.

Abonneren

Abonneer u voor het ontvangen van emails voor uw Sony ILCE-5100 bij:


U ontvangt een email met instructies om u voor één of beide opties in te schrijven.


Ontvang uw handleiding per email

Vul uw emailadres in en ontvang de handleiding van Sony ILCE-5100 in de taal/talen: Engels als bijlage per email.

De handleiding is 1,6 mb groot.


U ontvangt de handleiding per email binnen enkele minuten. Als u geen email heeft ontvangen, dan heeft u waarschijnlijk een verkeerd emailadres ingevuld of is uw mailbox te vol. Daarnaast kan het zijn dat uw internetprovider een maximum heeft aan de grootte per email. Omdat hier een handleiding wordt meegestuurd, kan het voorkomen dat de email groter is dan toegestaan bij uw provider.

Stel vragen via chat aan uw handleiding

Stel uw vraag over deze PDF

Andere handleiding(en) van Sony ILCE-5100

Sony ILCE-5100 Gebruiksaanwijzing - Nederlands - 491 pagina's

Sony ILCE-5100 Gebruiksaanwijzing - Nederlands - 230 pagina's

Sony ILCE-5100 Gebruiksaanwijzing - Deutsch - 231 pagina's

Sony ILCE-5100 Gebruiksaanwijzing - Français - 229 pagina's


Uw handleiding is per email verstuurd. Controleer uw email

Als u niet binnen een kwartier uw email met handleiding ontvangen heeft, kan het zijn dat u een verkeerd emailadres heeft ingevuld of dat uw emailprovider een maximum grootte per email heeft ingesteld die kleiner is dan de grootte van de handleiding.

Er is een email naar u verstuurd om uw inschrijving definitief te maken.

Controleer uw email en volg de aanwijzingen op om uw inschrijving definitief te maken

U heeft geen emailadres opgegeven

Als u de handleiding per email wilt ontvangen, vul dan een geldig emailadres in.

Uw vraag is op deze pagina toegevoegd

Wilt u een email ontvangen bij een antwoord en/of nieuwe vragen? Vul dan hier uw emailadres in.


Info