


-
Hoe moet ik mijn sonos play 5 connecten met mijn Samsung Galaxy a 53
Reageer op deze vraag Misbruik melden
Gesteld op 25-8-2023 om 10:07 -
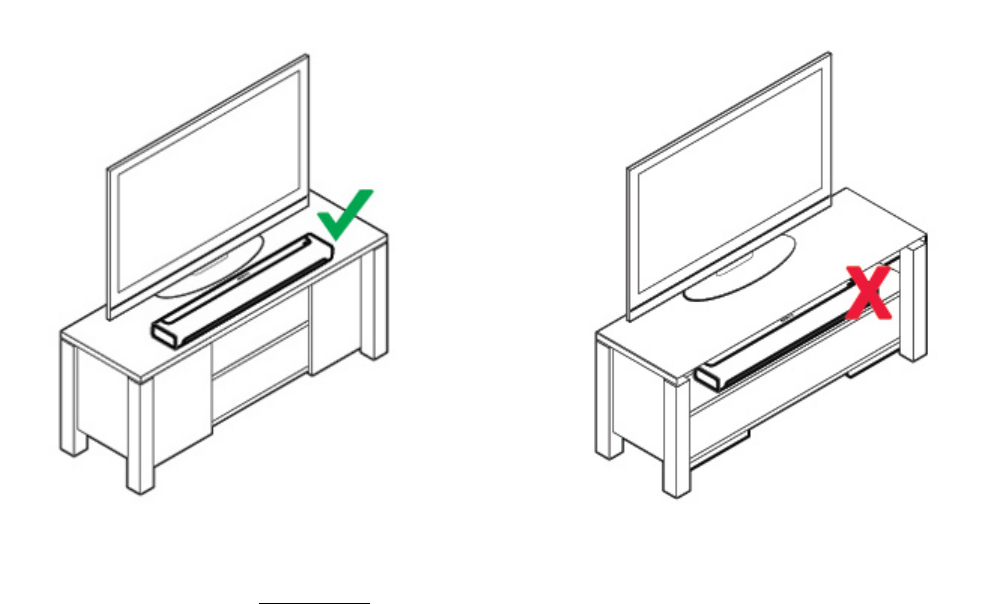
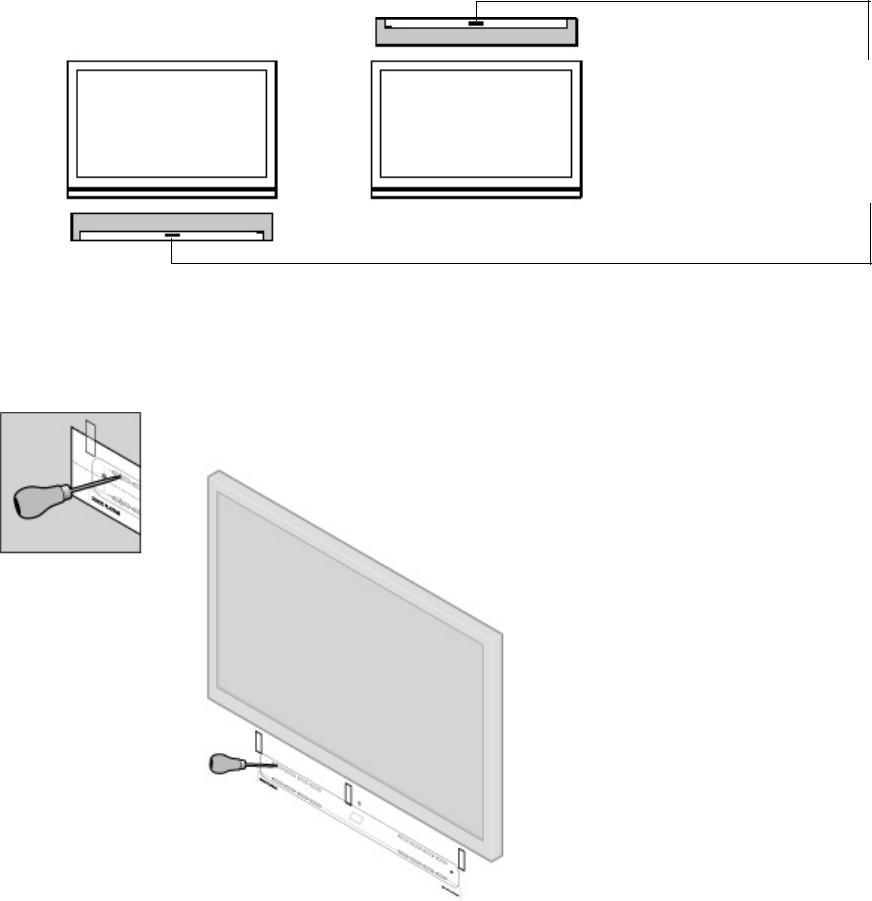
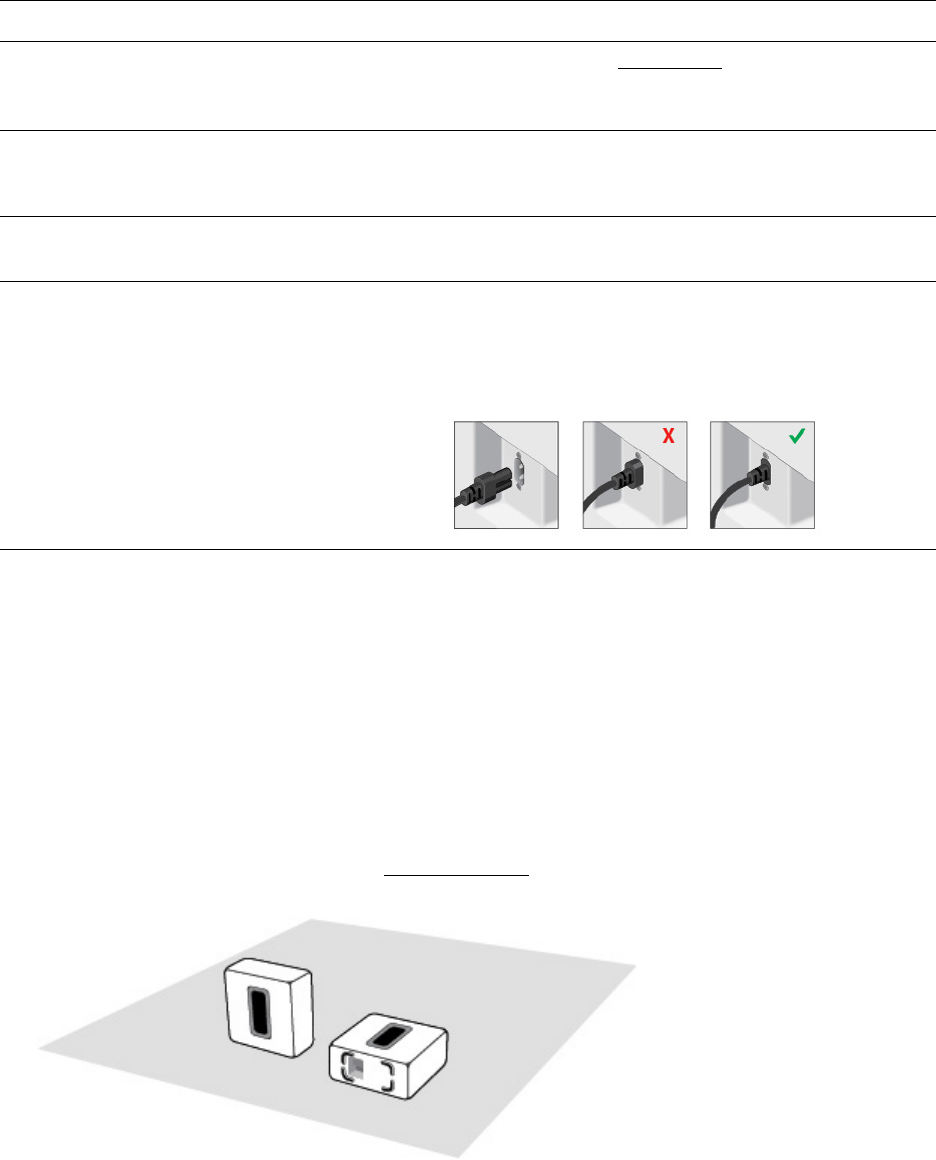
Kan de Sonos play 5 alleen horizontaal staan of ook verticaal. Gesteld op 24-11-2021 om 11:48
Reageer op deze vraag Misbruik melden -
Afgelopen week heb ik de stekker van mn Sonos play 5 ( eerste gen ) eruit gehaald en na opnieuw verbinden krijg ik geen verbinding meer met bijv NAS en Spotify
Reageer op deze vraag Misbruik melden
Wat moet ik doen? De eerste app( zwart )is vervangen door een nieuwe app
Ik kan hem vanaf mn iPad niet meer bedienen Gesteld op 24-11-2021 om 11:47 -
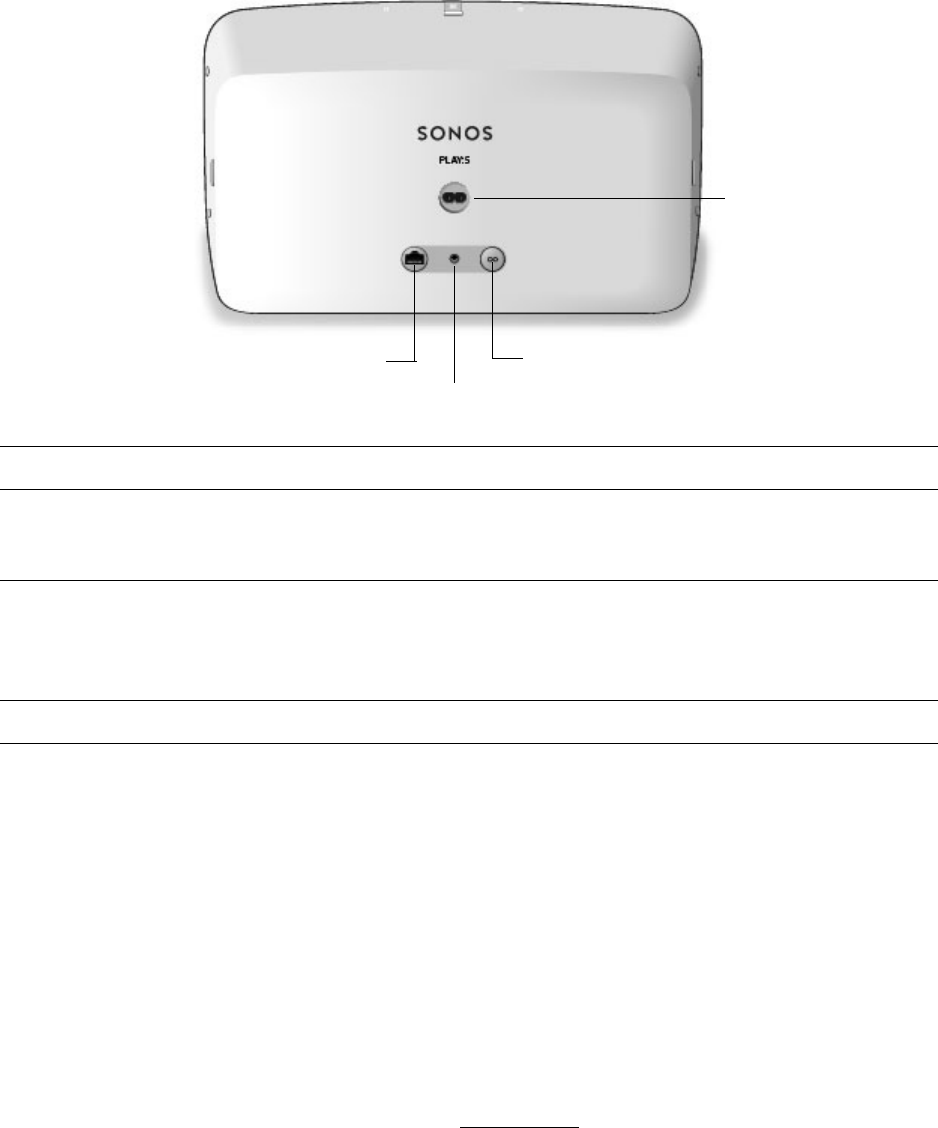
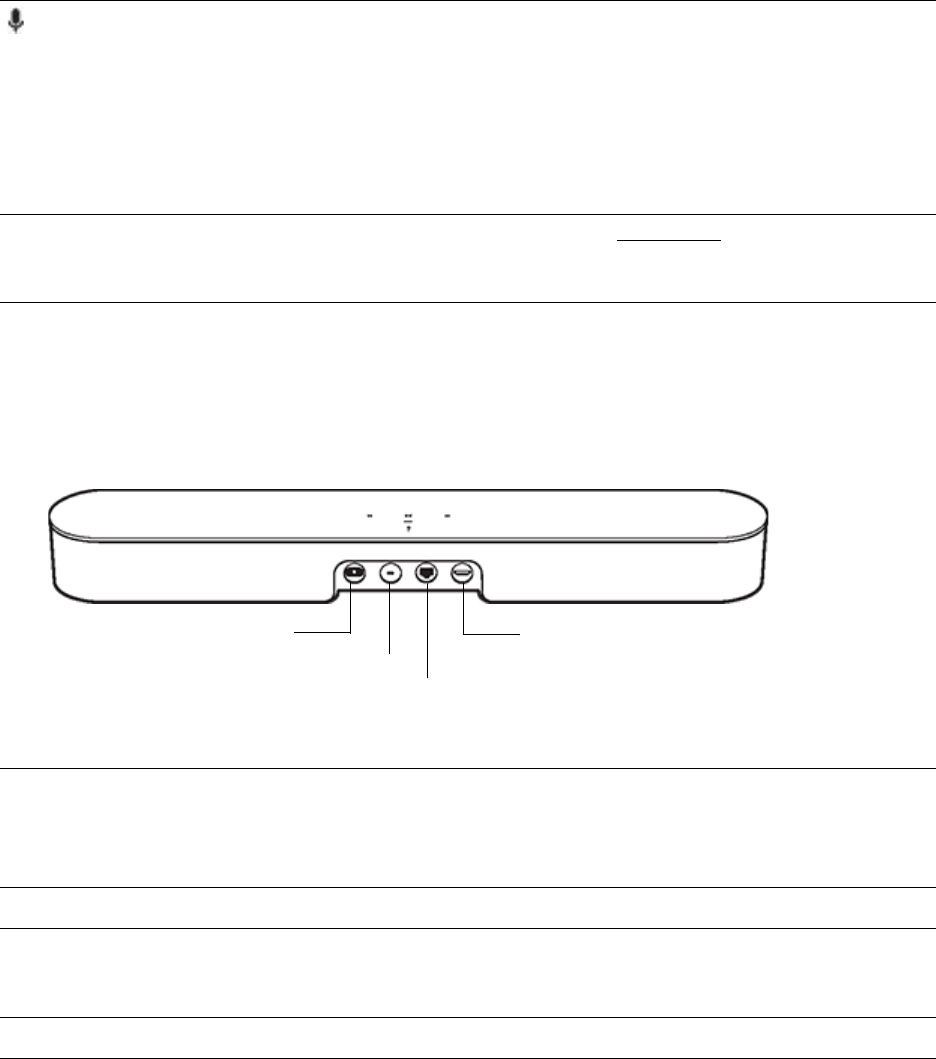
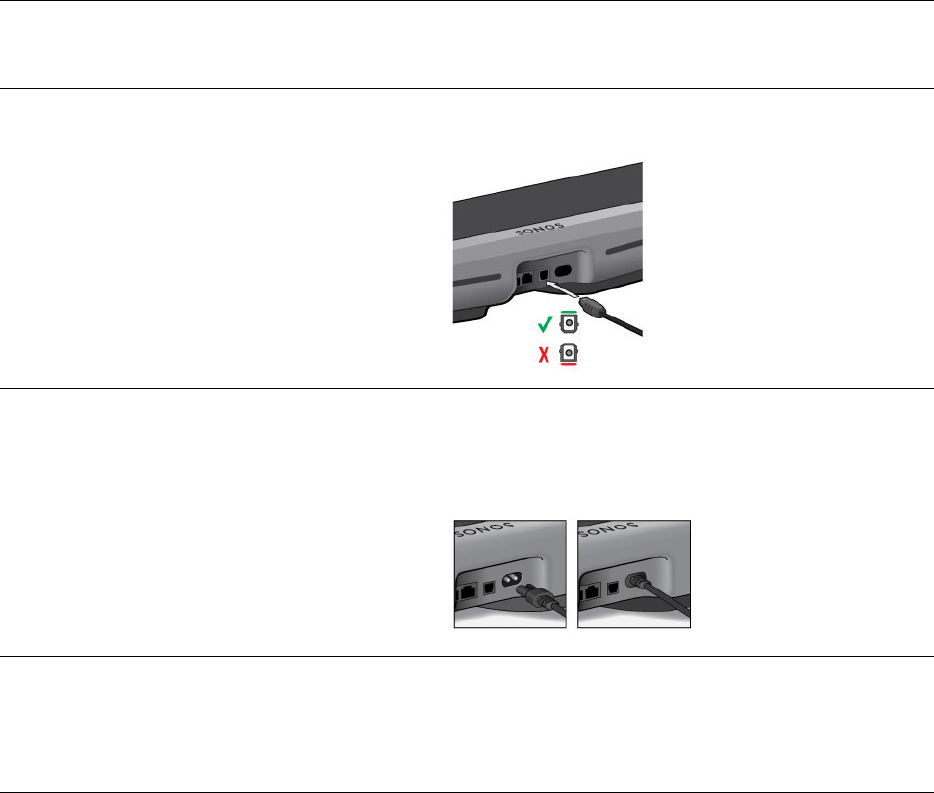
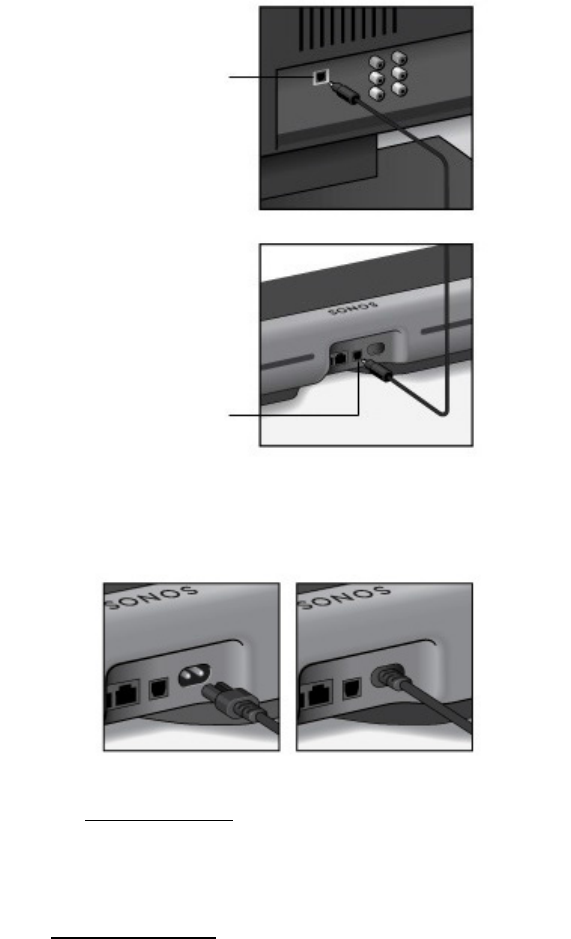
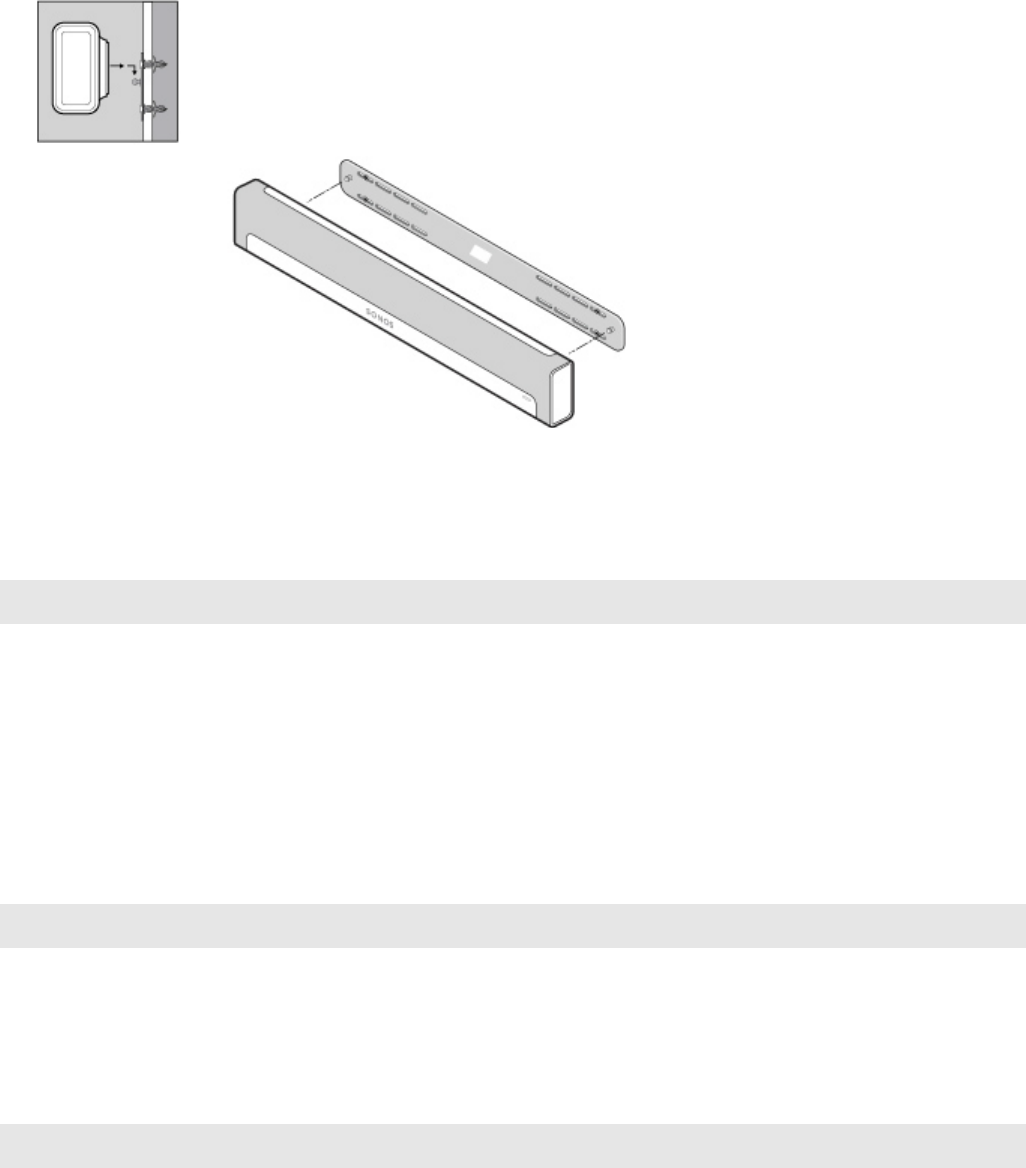
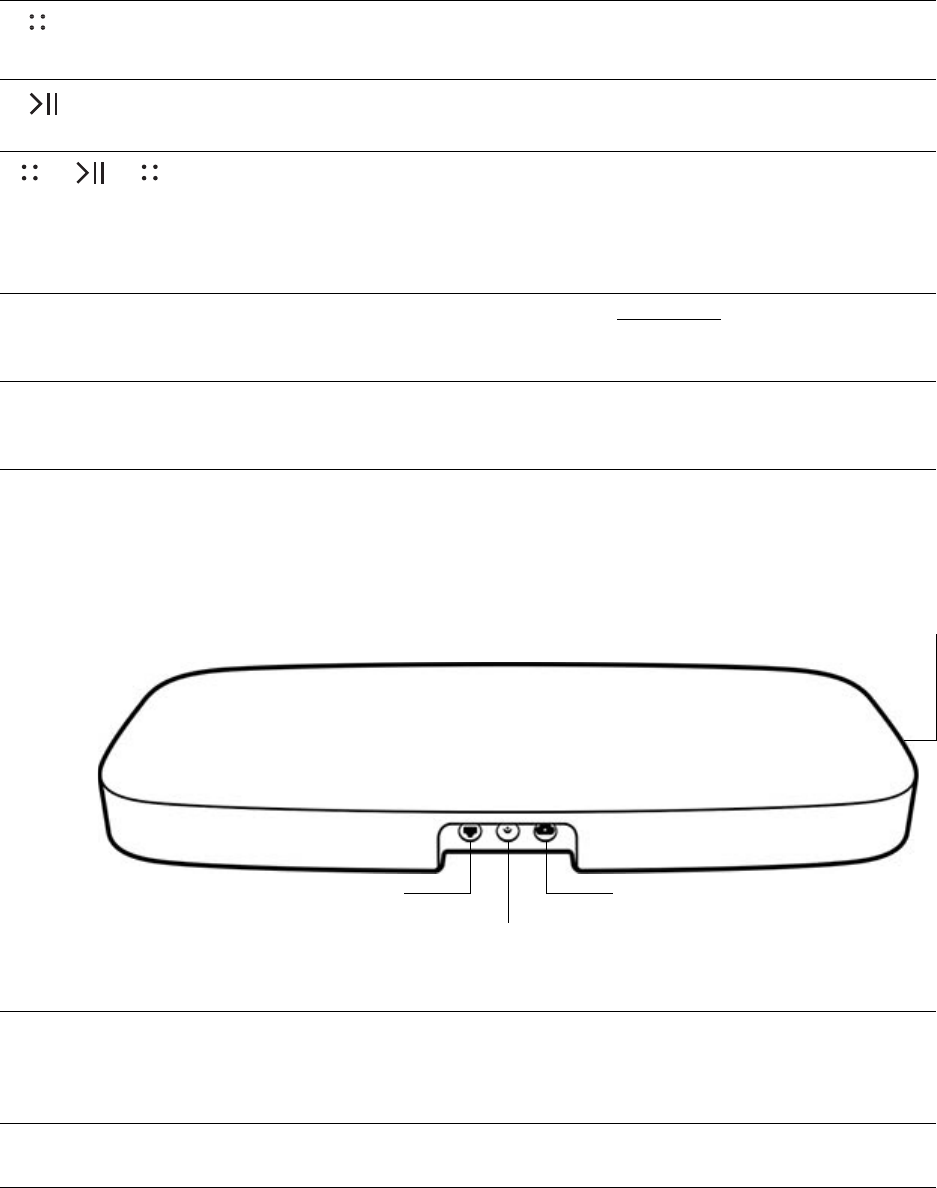
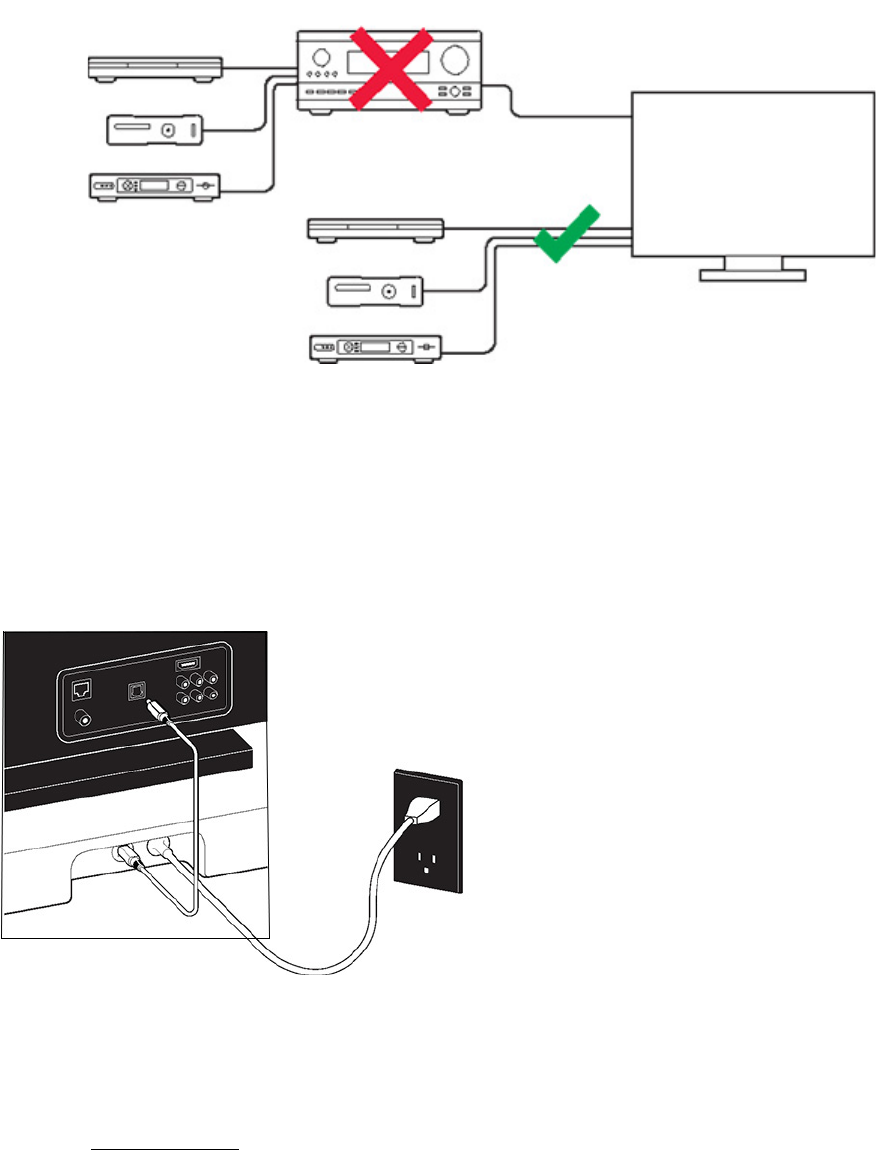
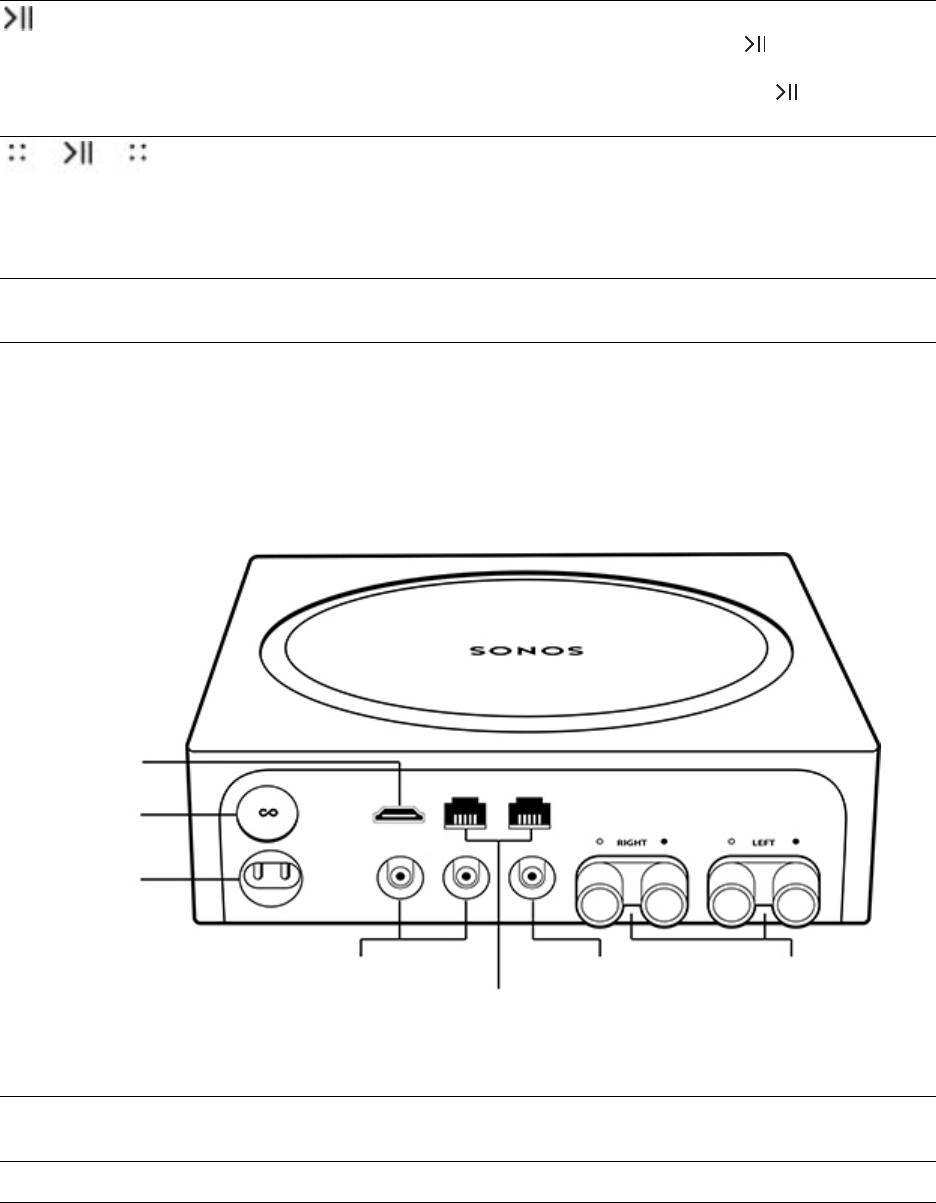
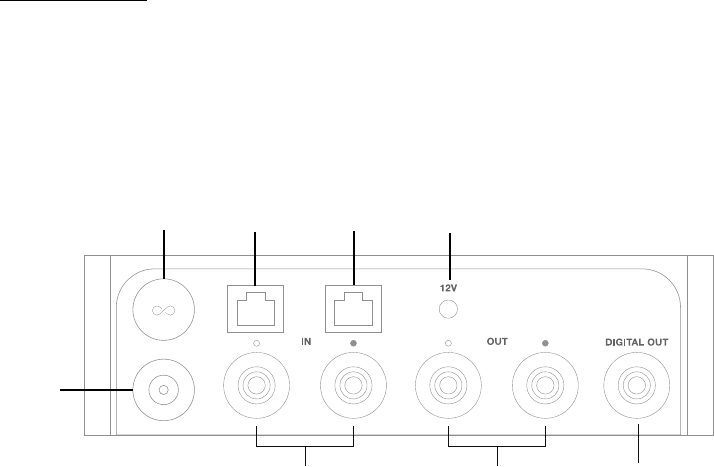
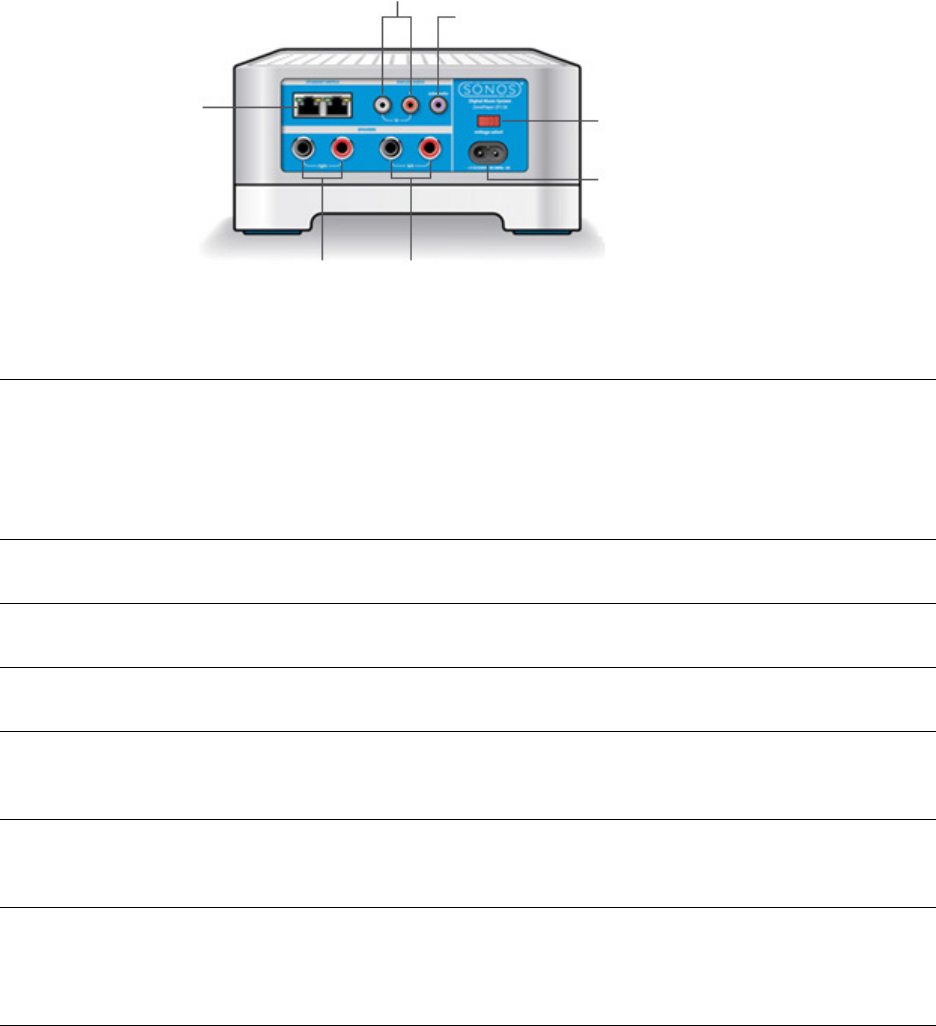
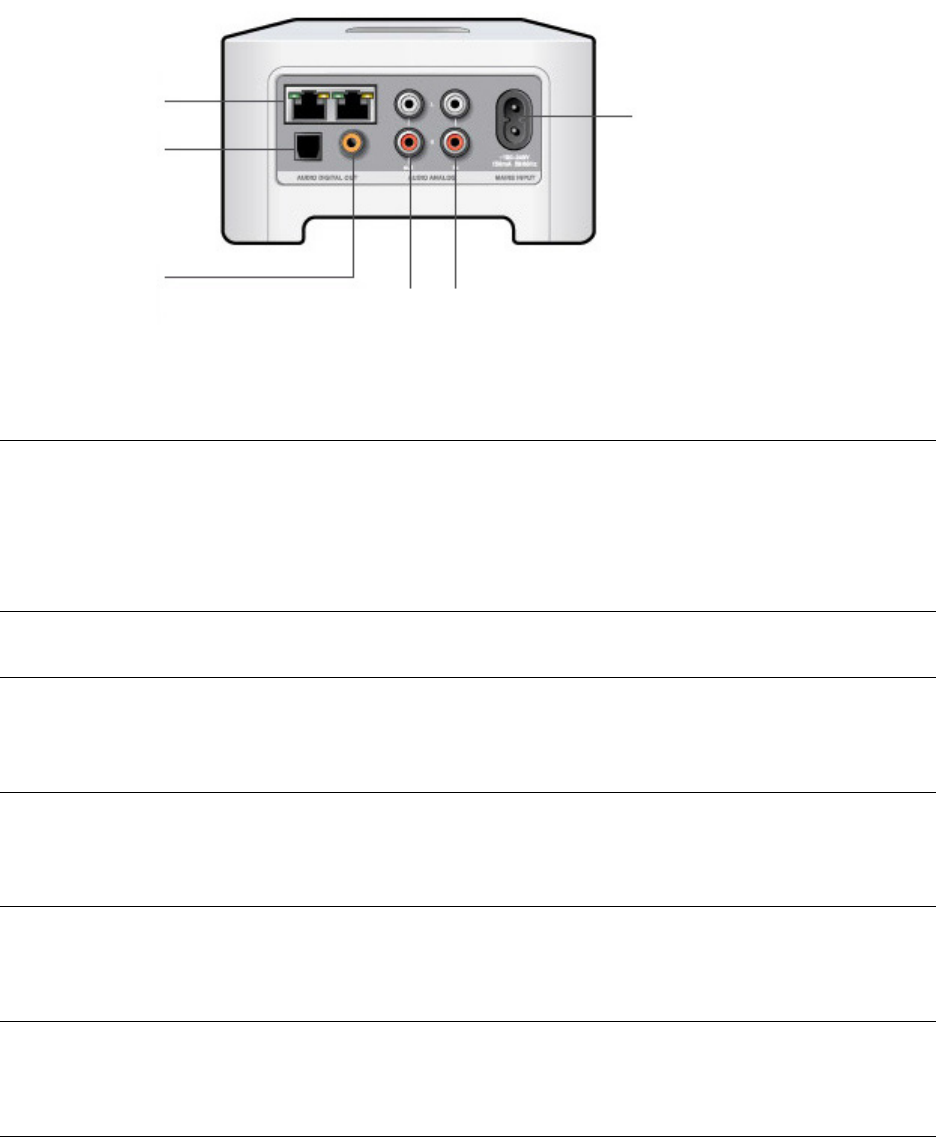
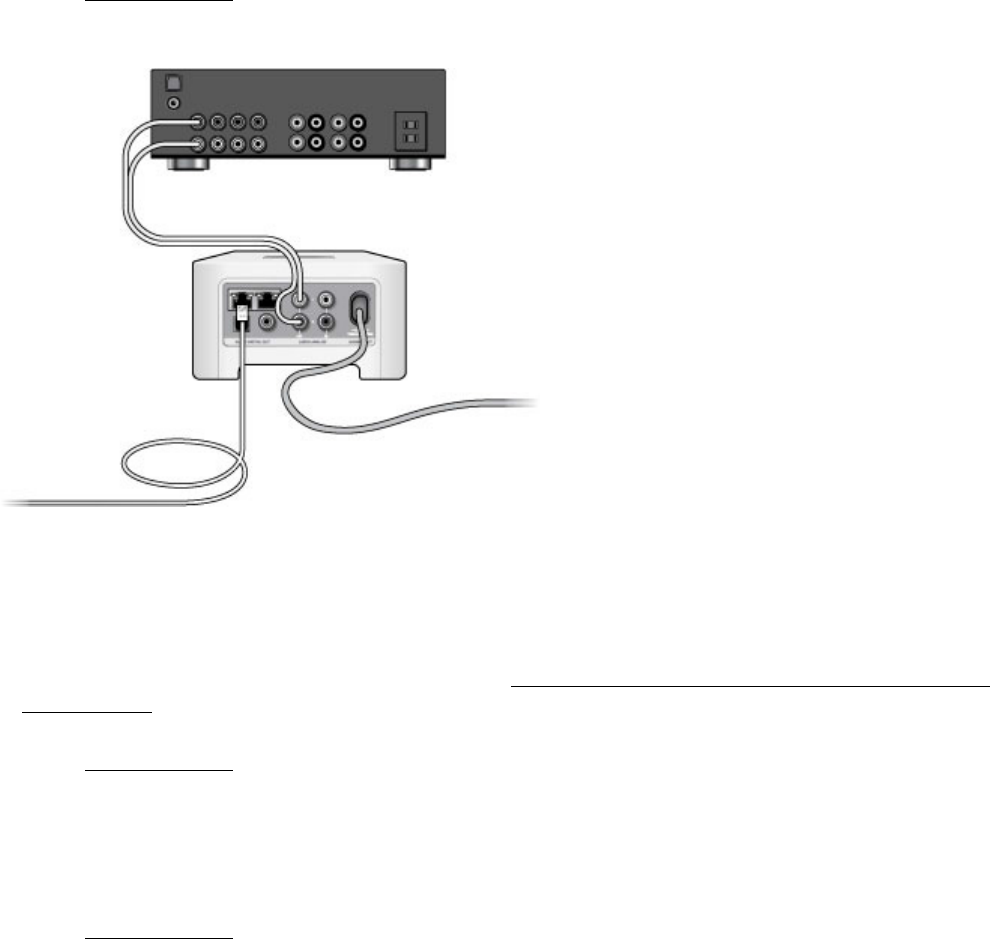
ik heb de 1e generatie Sonos 5 speakers overgenomen. Aan de achterkant zit een mogelijkheid om zo’n klikstekkertje in te steken. Betekent dat dat ik mijn TV rechtstreeks op de Sonos 5 kan aansluiten en dan met de Tweede box een stereogeluid kan krijgen ? Gesteld op 9-10-2020 om 14:22
Reageer op deze vraag Misbruik melden -
ik heb de 1e generatie Sonos 5 speakers overgenomen. Aan de achterkant zit een mogelijkheid om zo’n klikstekker Gesteld op 9-10-2020 om 14:20
Reageer op deze vraag Misbruik melden -
Aan en uit knopje geeft geen aansignaal meer. Luidspreker werkt dus niet meer Gesteld op 22-1-2020 om 11:37
Reageer op deze vraag Misbruik melden
-
heb je een cd nodig bij het installeren van sonos 5 Gesteld op 21-11-2017 om 22:37
Reageer op deze vraag Misbruik melden-
Nee hoor! Plug and play. Via je smartphone of tablet een stappenplan volgen. Geantwoord op 21-11-2017 om 23:20
Waardeer dit antwoord Misbruik melden
-
-
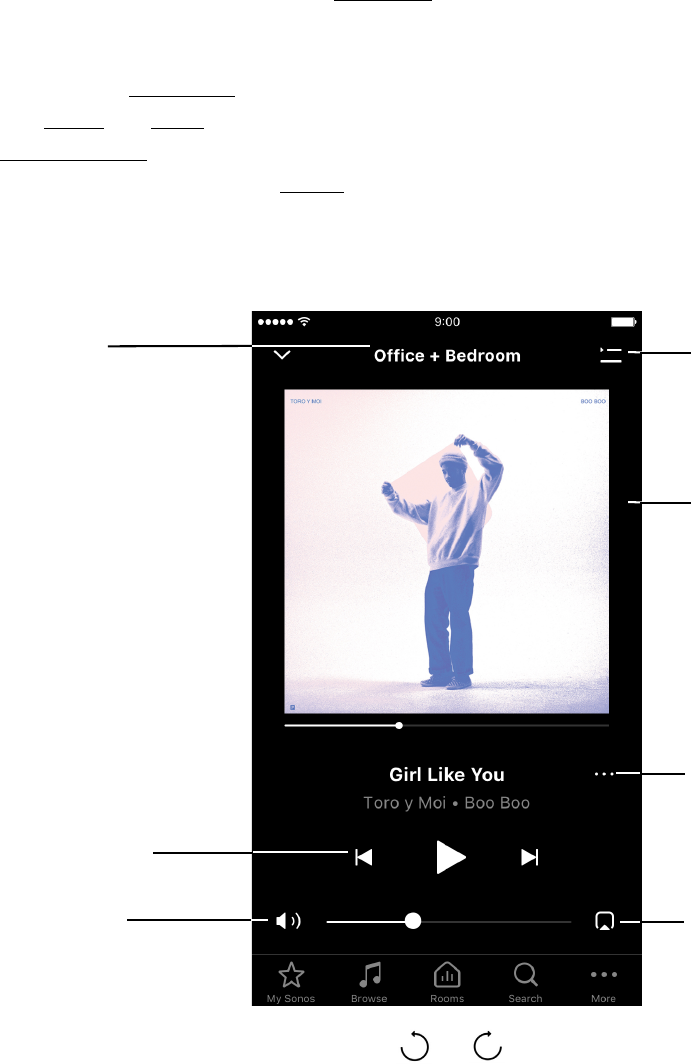
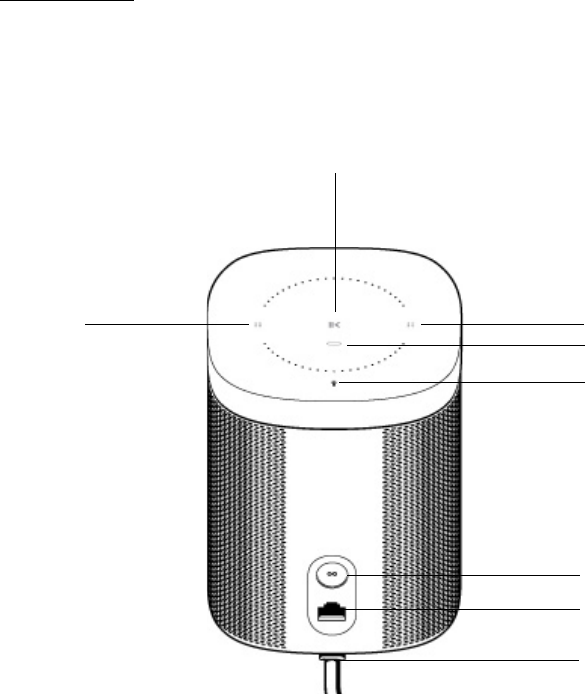
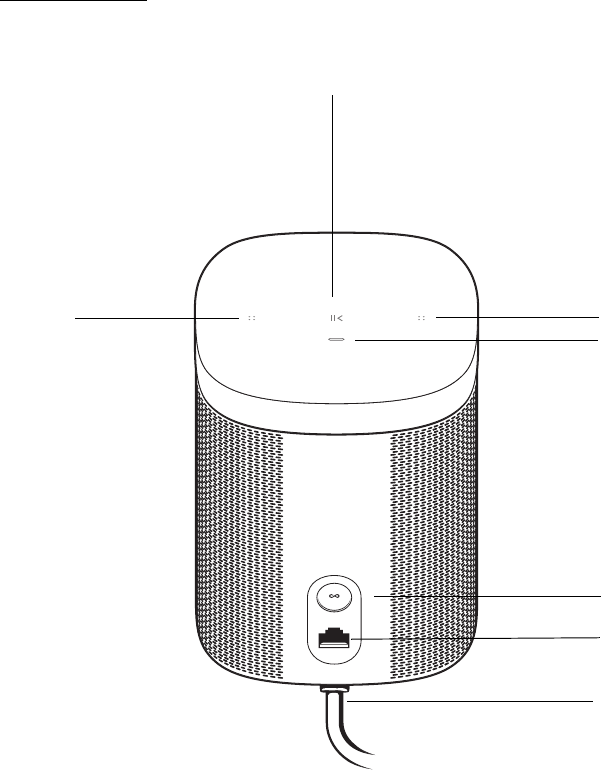
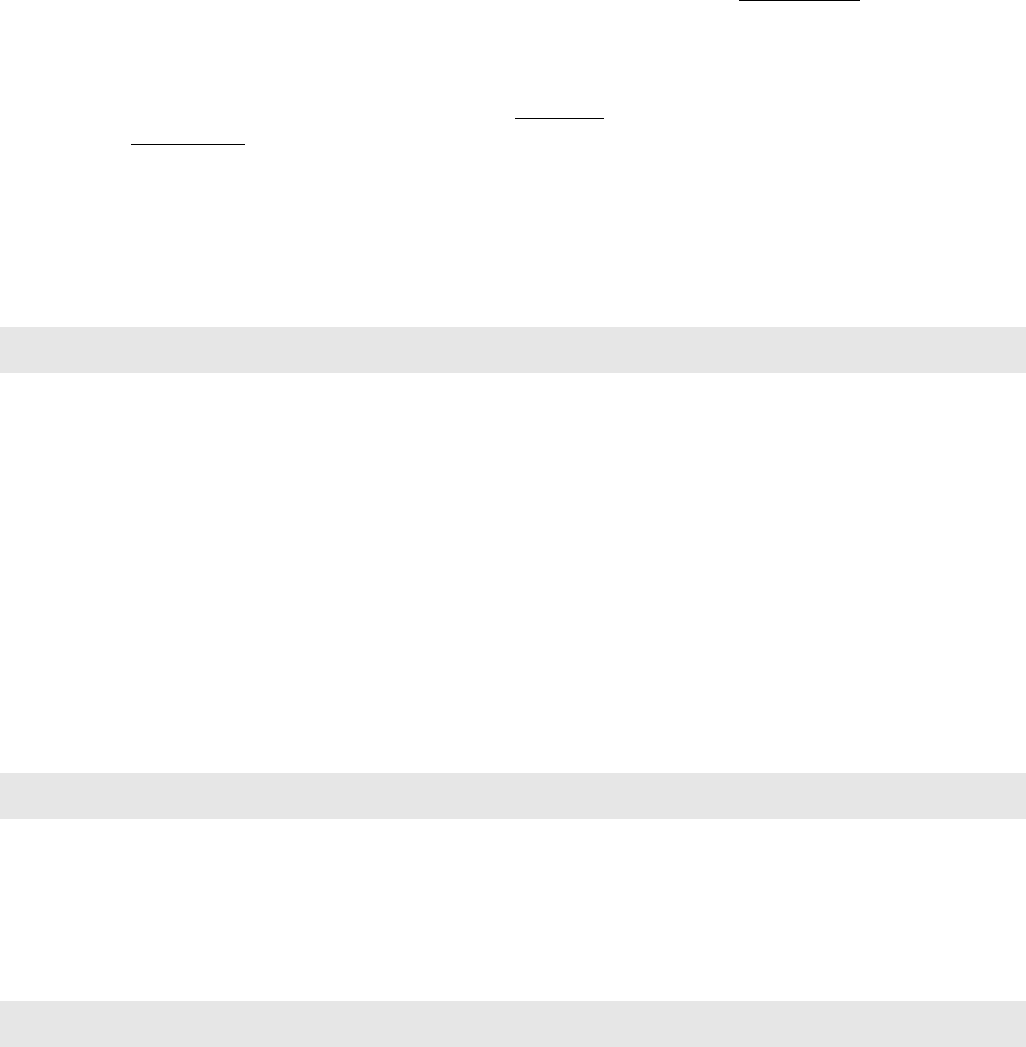
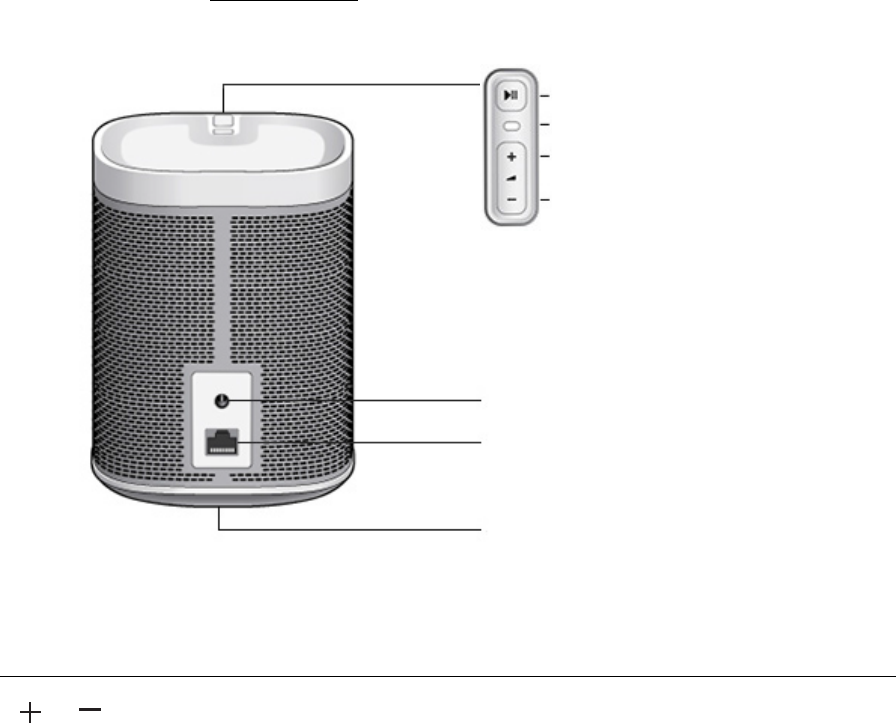
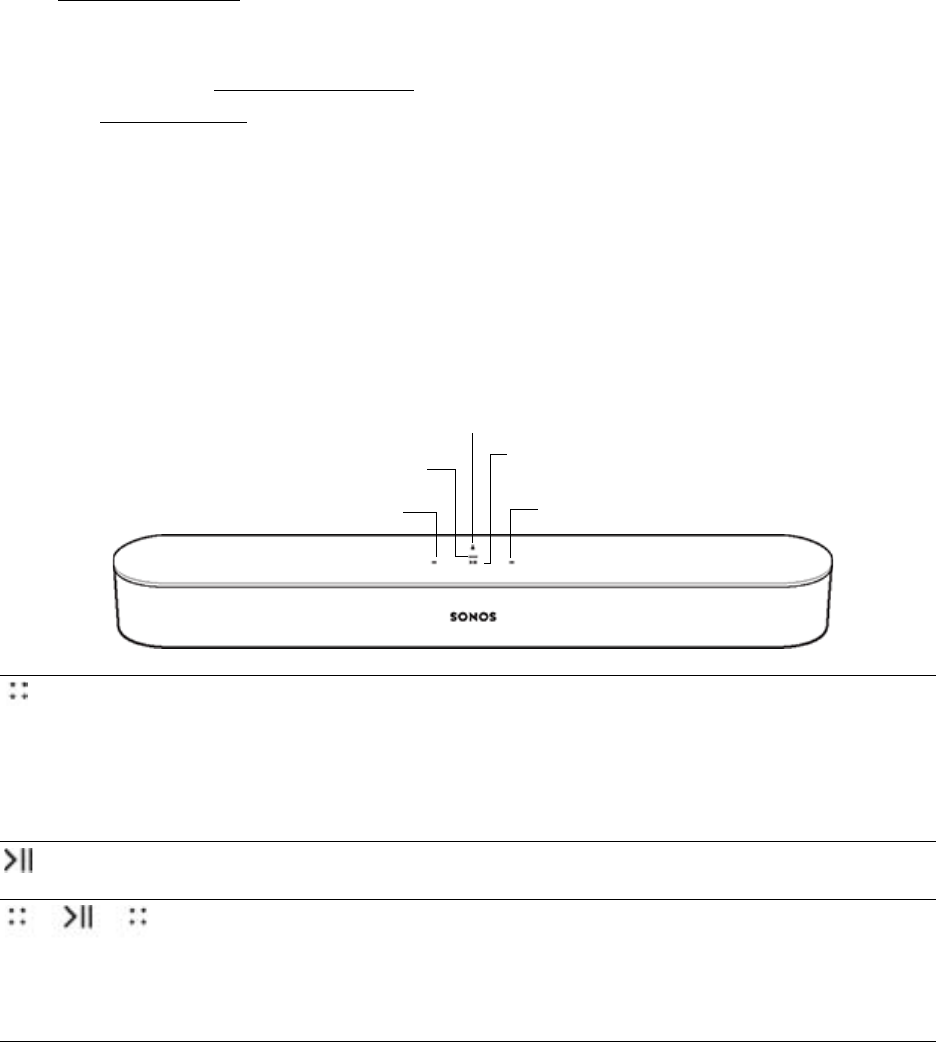
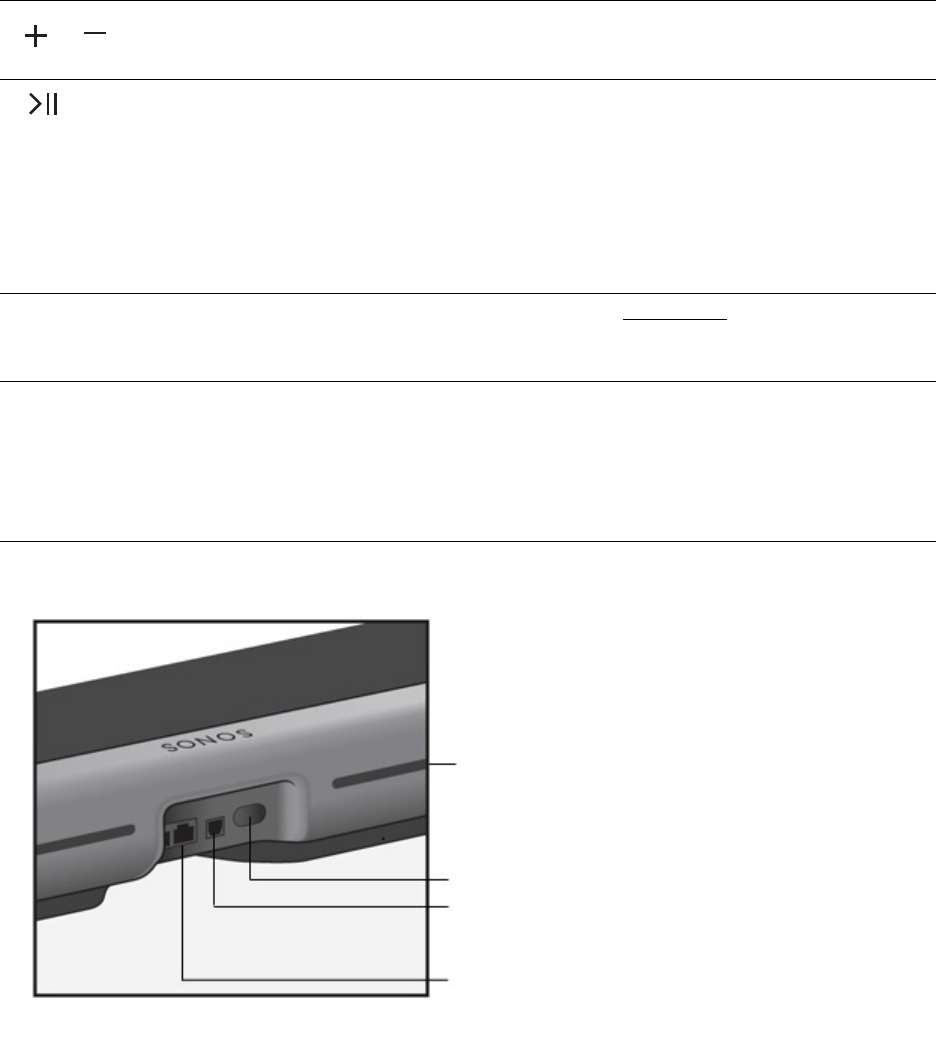
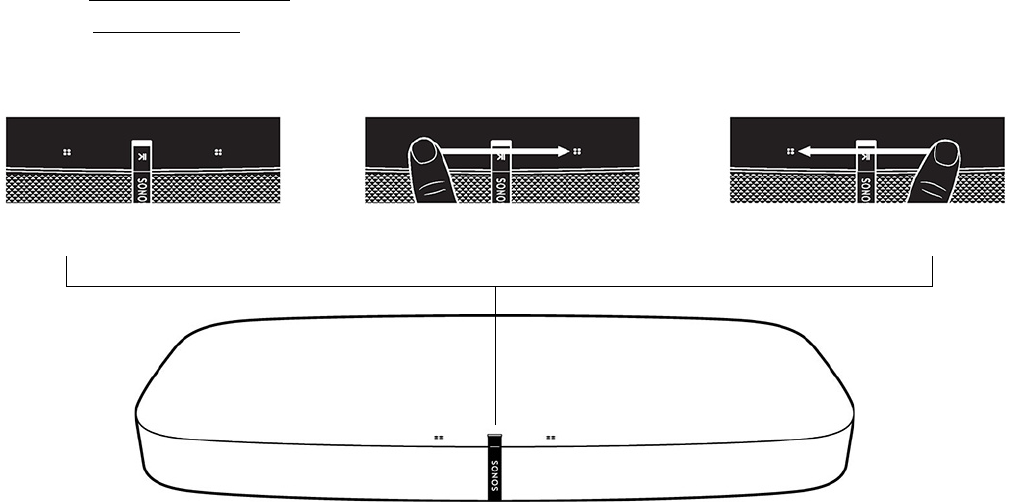
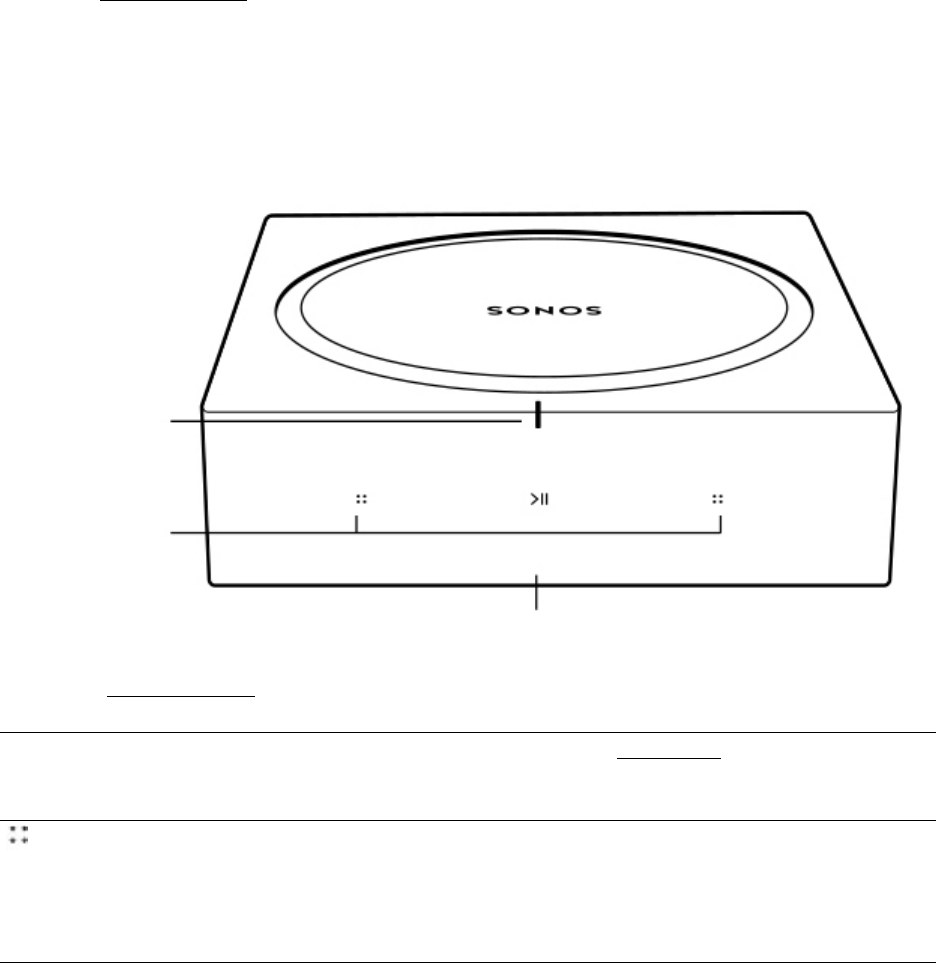
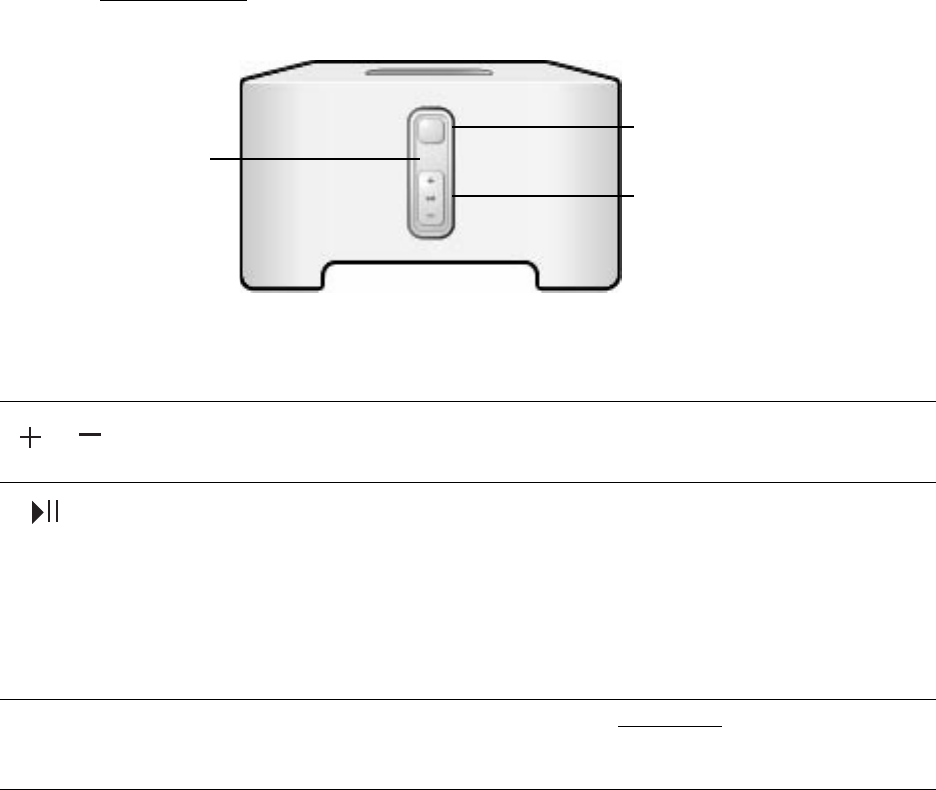
Hoe zet je de Sonos play AAN/UIT ?
Reageer op deze vraag Misbruik melden
Hoe werkt het volume ? Gesteld op 4-9-2017 om 09:55-
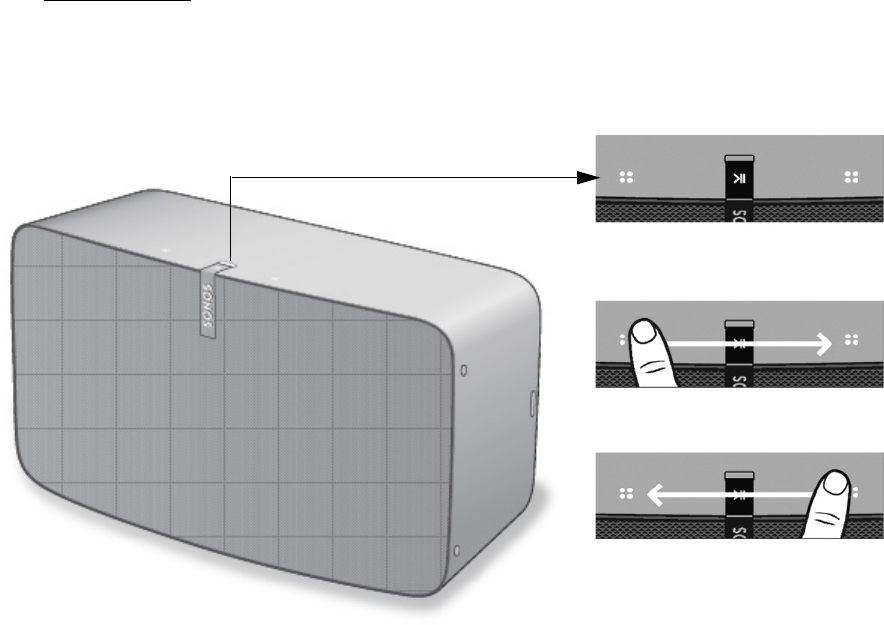
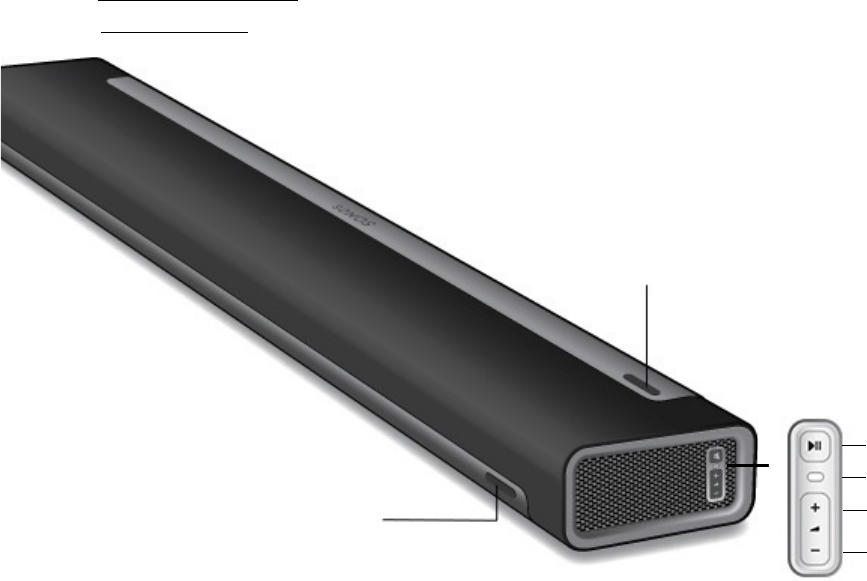
Meestal met je mobiel of tablet, maar bovenop zitten ook tiptoetsen (heel goed kijken, zijn aardig weg gewerkt), daar kan je het mee aan/uit zetten en zelfs het volume regelen. Op de app is dat ook mogelijk, deze komt na openen inzichtelijk en dan spreken de tekentjes voor zich... succes en veel sonos plezier. Wij genieten er dagelijks van. Geantwoord op 4-9-2017 om 10:34
Waardeer dit antwoord (3) Misbruik melden
-
-
Bedankt voor het bericht.
Waardeer dit antwoord (1) Misbruik melden
Toch raar dat een aantal essentiële handelingen Nergens te vinden zijn in de
handleiding. Geantwoord op 4-9-2017 om 17:34 -
Sommige handelingen spreken voor zich, maar ik vraag me af of je de tip toetsen hebt gevonden, is je probleem opgelost? Geantwoord op 4-9-2017 om 17:50
Waardeer dit antwoord (2) Misbruik melden -
lampje brand wel maar ik zie hem niet in mijn sonos overzicht Gesteld op 4-12-2016 om 11:16
Reageer op deze vraag Misbruik melden-
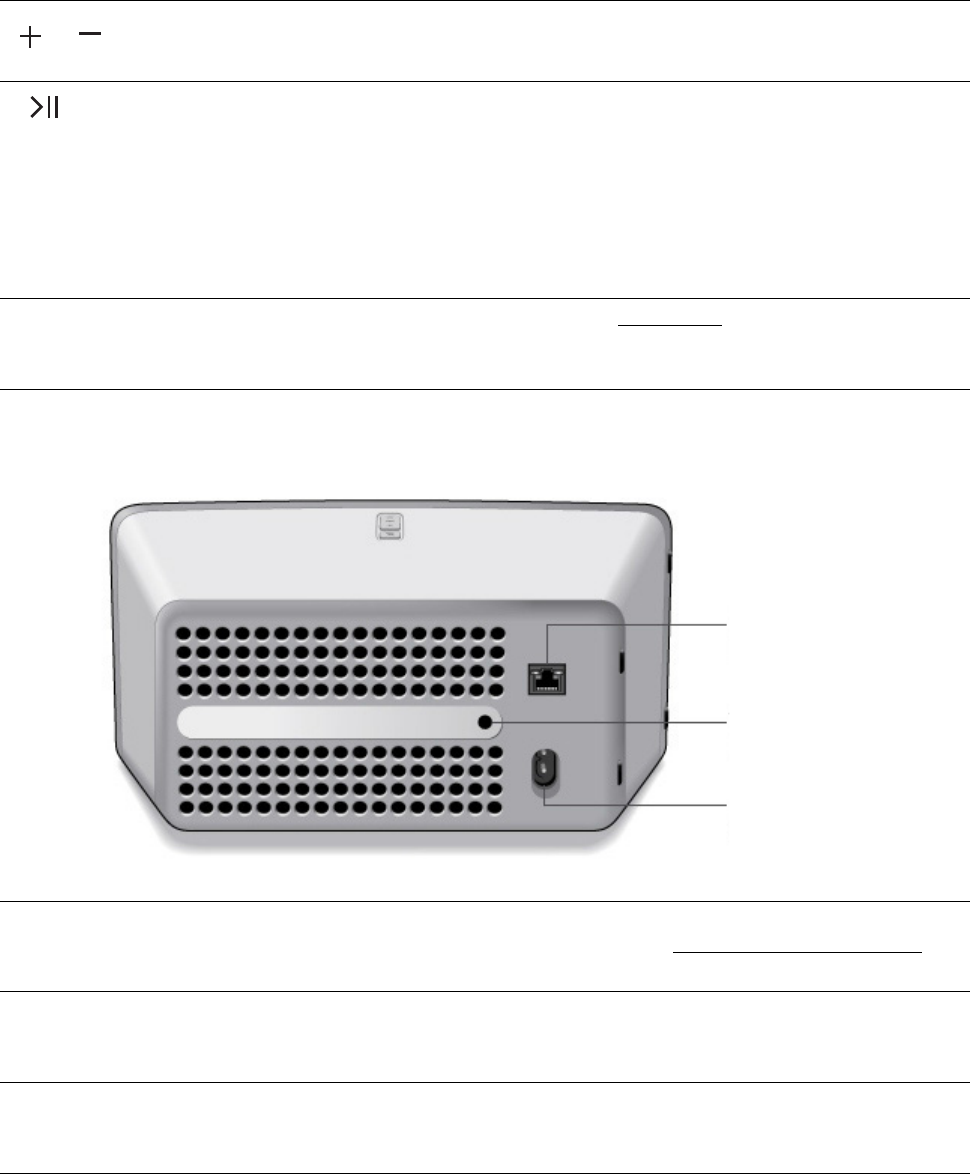
Je moet het eerst aanmelden, via knopje achter tot je de klok hoort en de rest gaat vanzelf. Of heb je dat al gedaan? Geantwoord op 4-12-2016 om 14:15
Waardeer dit antwoord (1) Misbruik melden
-
-
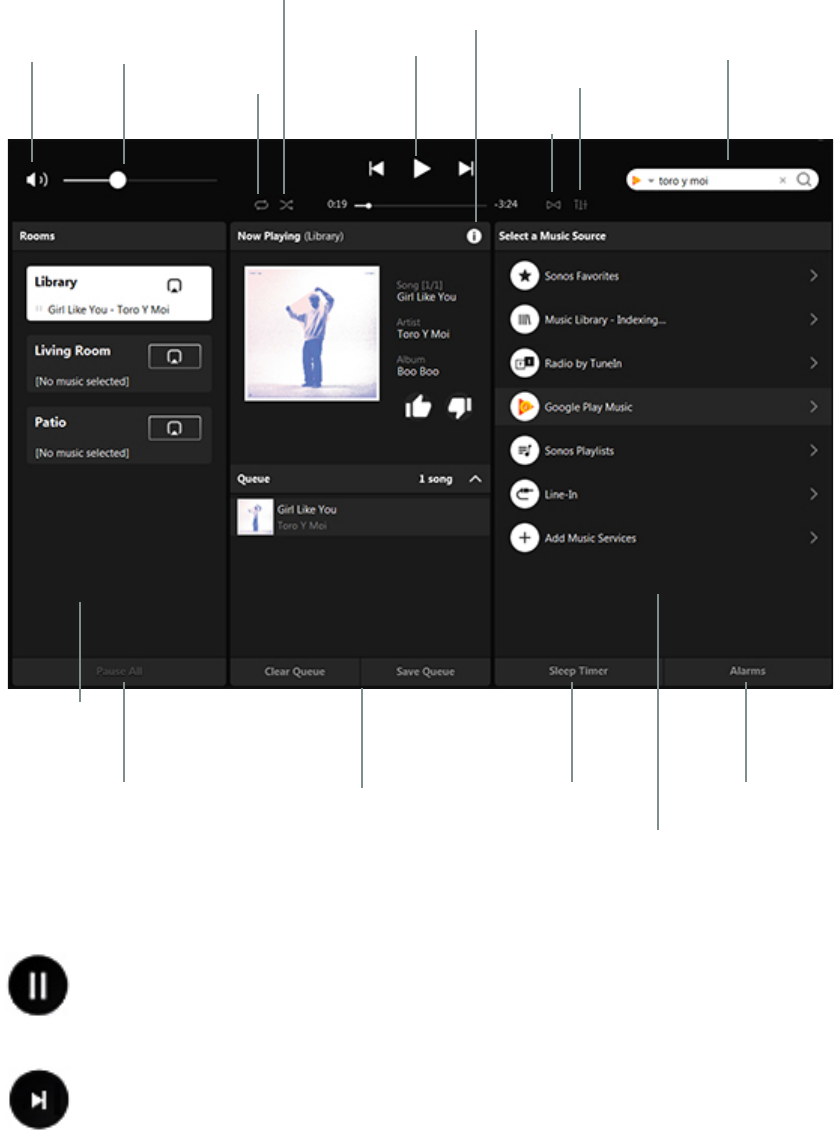
Hoe kan ik op elke speaker andere muziek eliseren (onafhankelijk van elkaa afspelen) Gesteld op 3-12-2016 om 15:51
Reageer op deze vraag Misbruik melden-
Instellen op andere kamer. Geantwoord op 5-2-2017 om 15:39
Waardeer dit antwoord Misbruik melden
-
-
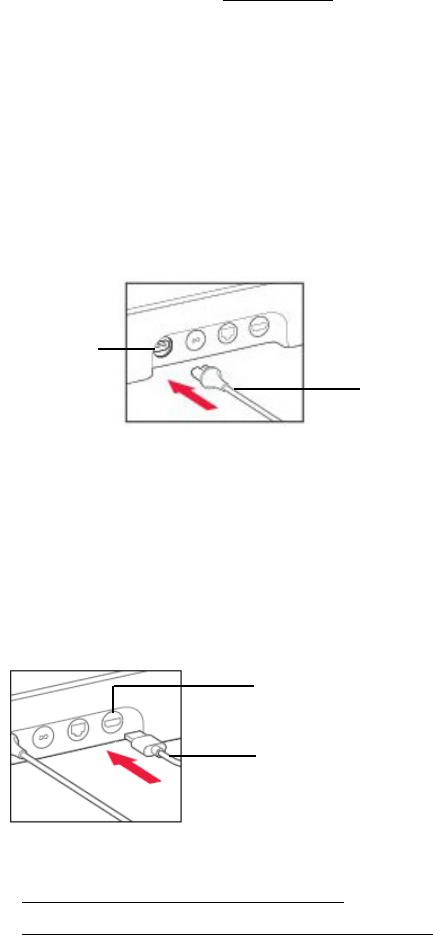
Sonos play 5: hoe gebruiken we de sonos zonder aangesloten te zijn op de router? Gesteld op 2-11-2016 om 21:35
Reageer op deze vraag Misbruik melden-
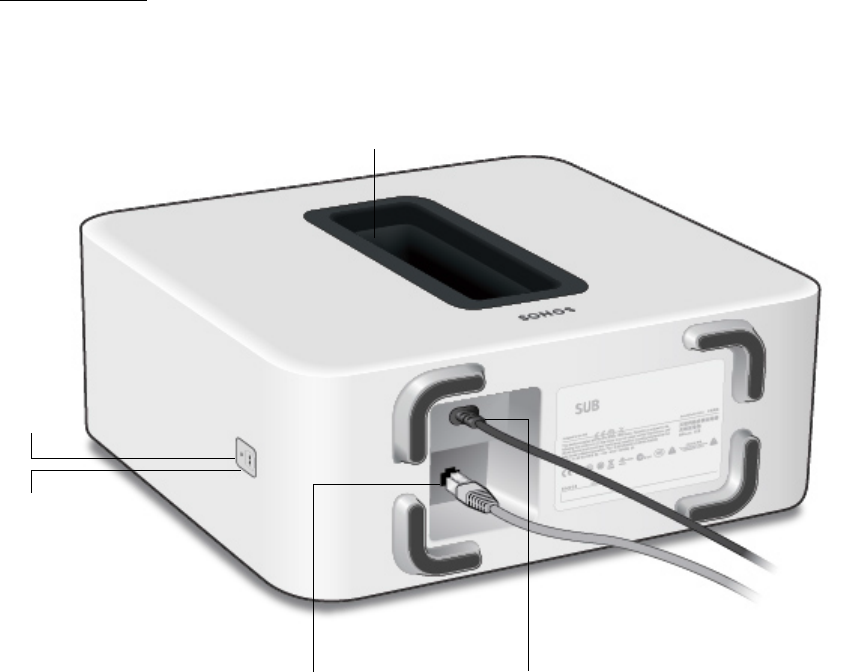
Ik heb eerst bridge aangesloten op de router zodat een ander netwerk voor Sonos gemaakt werd. Ook het systeem gedownload op mijn app van mijn i pad en Samsung gsm. Nadien de speakers aangesloten aan het stopcontact en dan de handleiding gevolgd op mijn gedownloade app. Alles is gelukt. Een keer had ik geen contact met de subwoofer. Ik dacht dat die kapot was en heb deze gereset. (Terug te vinden op internet) dan heb ik de sub met kabel aangesloten op de router van Telenet en de sub werkte. Nadien terug afgekoppeld en terug geïnstalleerd in de keuken en de sub werkte perfect.
Waardeer dit antwoord Misbruik melden
Geantwoord op 5-2-2017 om 15:47
-
-
mijn sonos 5 werkt niet meer: geen wit controle lichtje, geen enkele beweging in te krijgen.
Reageer op deze vraag Misbruik melden
wat doe ik fout??? Gesteld op 20-9-2016 om 11:01-
hetzelfde heb ik meegemaakt. terug naar de winkel en play 5 naar sonos, ter reparatie. Kon niet gerepareerd worden, kreeg echter dagwaarde terug. Niet onredelijk! Geantwoord op 27-9-2016 om 11:07
Waardeer dit antwoord Misbruik melden
-
-
Tracht mss ook eens de play 5 met kabel aan te sluiten op de router. Wel best eens resetten als dat kan. Mss op internet terug te vinden , heb dit ook met sub gehad en deze werkte nadien wel.
Waardeer dit antwoord Misbruik melden
Hopelijks geluk. Geantwoord op 5-2-2017 om 15:50 -
Bestaat de mogelijkheid nu al om youtube af te spelen via een tablet en te streamen naar Sonos.
Reageer op deze vraag Misbruik melden
Kan iemand mij helpen Gesteld op 29-5-2016 om 08:12-
Met mijn i pad lukt dit met de Sonos play 5 2de gen met kabel (stekker 3.5 mm) Ik denk dat je een connect zult moeten hebben voor een tablet. Geantwoord op 5-2-2017 om 15:52
Waardeer dit antwoord (6) Misbruik melden
-
-
kan ik met twee afstands- bedieningen bv een ipad en een mobile telefoon een sonos 5 bedienen Gesteld op 26-3-2016 om 21:48
Reageer op deze vraag Misbruik melden-
Ja dat is geen probleem! Geantwoord op 4-12-2016 om 14:20
Waardeer dit antwoord (3) Misbruik melden
-
-
Hoeveel afstandsbedieningen kunnen er op een sonos 5. Gesteld op 26-3-2016 om 21:44
Reageer op deze vraag Misbruik melden-
Ik gebruik er 3 nl. van de Iphone, Ipad en laptop; het werkt allemaal prima want de Sonos app heb ik op alle 3 geinstalleerd. Geantwoord op 27-3-2016 om 10:34
Waardeer dit antwoord Misbruik melden
-
-
Waar vind ik een handleiding om te lezen hij zat nl niet bij mijn aankoop Gesteld op 2-3-2016 om 15:35
Reageer op deze vraag Misbruik melden-
Op internet Sonos.com Geantwoord op 5-2-2017 om 15:54
Waardeer dit antwoord Misbruik melden
-
-
ik kan mijn sonos play 5 niet installeren hij vind wel de bridge maar niet de muziek. heb een andere modus gekregen van upc voorheen deed alles het perfect.wie helpt mij. Gesteld op 20-6-2014 om 07:26
Reageer op deze vraag Misbruik melden-
sluit hem aan zonder bridge dan werkt hij via uw gewone wifi Geantwoord op 8-10-2014 om 17:28
Waardeer dit antwoord Misbruik melden
-
