613726
34
Verklein
Vergroot
Pagina terug
1/40
Pagina verder
DWH SERIES
VIDEO SECURITY SYSTEM
Installation and Operation Instruction Manual
Model: CS89T
Version 1.0
This manual should be retained for future reference
1
CONTENTS
IMPORTANT NOTICE ....................................................................................................... 3
PLEASE READ BEFORE YOU START .................................................................. 3
WIRELESS DEVICES OPERATING RANGE ........................................................ 3
IMPORTANT SAFETY PRECAUTIONS ................................................................. 3
SAFETY AND INSTALLATION TIPS .............................................................................. 7
Installation Notes ........................................................................................................ 7
LCD Touch Screen Monitor ....................................................................................... 7
Camera Installation ..................................................................................................... 7
Setting the Camera Channel (optional) ...................................................................... 8
Pairing the Camera to Receiver (optional) ................................................................. 9
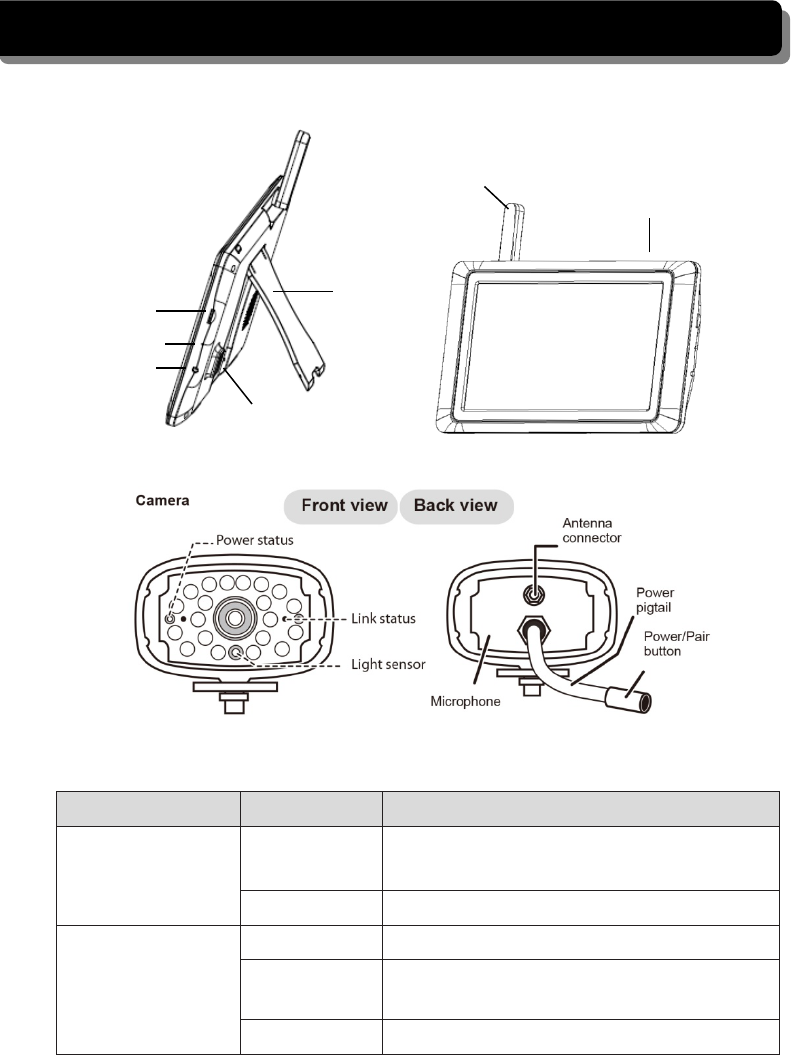
GETTING TO KNOW THE MONITOR AND CAMERA ............................................... 10
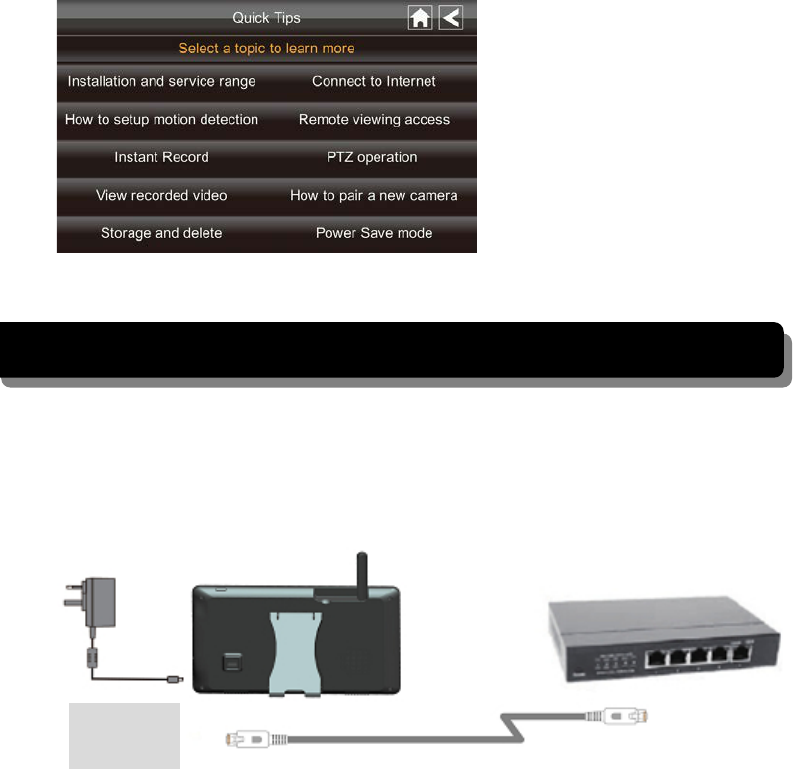
Set up the Monitor .................................................................................................... 11
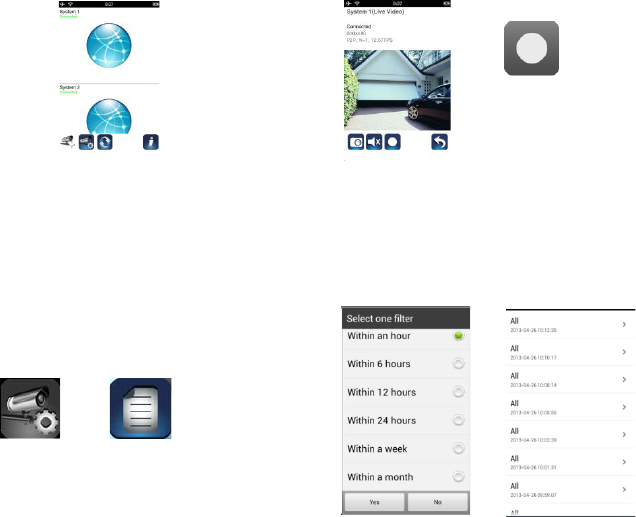
SYSTEM INTRODUCTION ............................................................................................. 12
Live Screen Displays ................................................................................................ 14
Zoom Feature ........................................................................................................... 14
Recording Live Video .............................................................................................. 14
Playing Back Recorded Video .................................................................................. 15
SYSTEM MENU ............................................................................................................... 16
SYSTEM OPERATION .................................................................................................... 17
Camera Setup Screen ................................................................................................ 17
Camera Pairing ......................................................................................................... 17
Camera Activation .................................................................................................... 17
Brightness ................................................................................................................. 18
Recorder Setup Screen ............................................................................................. 18
Motion Detection ...................................................................................................... 19
Email Alert ............................................................................................................... 19
Schedule Record ....................................................................................................... 21
Network Setup Screen .............................................................................................. 21
Internet Setup ........................................................................................................... 22
Security Code ........................................................................................................... 23
Network Information ................................................................................................ 24
Alarm Setup Screen .................................................................................................. 24
Period ....................................................................................................................... 25
Melody ..................................................................................................................... 25
System Setup Screen ................................................................................................ 26
Power Saving ............................................................................................................ 26
Screen Auto Lock ..................................................................................................... 26
Time ......................................................................................................................... 27
Clock Alarm ............................................................................................................. 27
Time Setting ............................................................................................................. 28
Time Zone ................................................................................................................ 28
2
Storage Management ................................................................................................ 29
Format ...................................................................................................................... 29
Overwrite .................................................................................................................. 30
System Upgrade ....................................................................................................... 30
Language .................................................................................................................. 31
Quick Tips ................................................................................................................ 32
REMOTE ACCESS ........................................................................................................... 32
Overview .................................................................................................................. 32
Establishing your security system on the APP ......................................................... 34
If you want to take snapshots ................................................................................... 36
If you want to view your snapshots .......................................................................... 36
If you want to record videos ..................................................................................... 37
If you want to playback your videos ........................................................................ 37
Setup the push notification ....................................................................................... 37
TROUBLE SHOOTING .................................................................................................... 38
PRODUCT SPECIFICATION .......................................................................................... 39
3
IMPORTANT NOTICE
PLEASE READ BEFORE YOU START
Always use with discretion when installing CCTV equipment, especially when there is
perceived policy. Enquire relevant local regulations applicable to the lawful installation
of video recording/surveillance. Third party consent may be required.
WIRELESS DEVICES OPERATING RANGE
Ensure the signal reception viewed from the wireless camera(s) is the best possible
reception between the camera(s) and receiver. If necessary, reduce the distance between
the camera(s) and receiver to improve overall system performance. Wireless Color
Camera Recordable CCTV Kit operating on a secure digital 2.4GHz frequency which
could greatly reduce interference from product such as wireless routers, cordless phones
or microwave ovens.
IMPORTANT SAFETY PRECAUTIONS
Damages caused by non-compliance with this operating manual will void the warranty!
We will not assume any liability for damages to items or persons caused by improper
handling or non-compliance with the safety notices! Any warranty claim will be null and
void in such cases.
1. Do not drop, puncture or disassemble the camera or receiver.
2. Avoid all contact with water, and dry hands before using.
3. Never tug on the power cords. Use the plug to unplug it from the wall outlet.
4. Do not expose the camera to high temperature or leave it in direct sunlight. This may
damage the camera or cause camera temporary malfunction.
5. Use the devices with care. Avoid pressing hard on the camera and receiver.
6. For your own safety, avoid using the camera or power off the camera when there is a
storm or lightning.
7. Remove the power adapter during long periods between usages.
8. Use only the accessories and power adapters supplied by the manufacturer.
9. To meet the regulations pertaining to parental responsibility, keep the devices out of
the reach of infants.
10. Check that power cables do not get crushed or damaged by sharp edges.
4
FCC Compliance Statement: This
device complies with Part 15 of the
FCC rules. Operation is subjected
to the following two conditions:
(1) this device may not cause harmful interference,
and (2) this device must accept any interference
received, including interference that may cause
undesired operation.
Products with CE Marking comply with
EMC Directive (2004/108/EC); Low
Voltage Directive (73/23/EEC);
R&TTE(1999/5/EC); ROHS Directive
(2011/65/EU) issued by the Commission of the
European Community. Compliance with these
directives implies conformity to the following
European Norms:
EMC: EN 301 489
LVD: EN 60950
Radio: EN 300 328
FCC/CE WARNING
This equipment has been tested and found to comply with limits for a Class B digital
device, pursuant to Part 15 of the FCC rules and ETSI(EN) 300328. These limits are
designed to provide reasonable protection against harmful interference in residential
installations. This equipment generates, uses, and can radiate radio frequency energy,
and if not installed and used in accordance with the instructions, may cause harmful
interference to radio communications. However, there is no guarantee that interference
will not occur in a particular installation. If this equipment does interference to radio or
television equipment reception, which can be determined by turning the equipment off
and on, the user is encouraged to try to correct the interference by one or more of the
following measures:
-Reorient or relocate the receiving antenna.
-Move the equipment away from the receiver.
-Plug the equipment into an outlet on a circuit different from that to which the receiver
is connected.
-Consult the dealer or an experienced radio/television technician for additional
suggestions.
You are cautioned that any change or modifications to the equipment not expressly
approved by the party responsible for compliance could void your authority to operate
such equipment.
DISPOSAL
If the camera system no longer functions or can no longer be repaired, it
must be disposed of according to the valid statutory regulations.
Disposal of spent batteries/accumulators:
You are required by law (Battery Ordinance) to return all spent batteries
and accumulators. Disposing of spent batteries/accumulators with common household
waste is prohibited! Batteries/accumulators that contain hazardous substances are
marked with the symbols on the side. These symbols indicate that it is prohibited to
dispose of these batteries/accumulators in the household waste. The abbreviations for
the respective heavy metals are: Cd=cadmium, Hg=mercury, Pb=lead. You can return
spent batteries and accumulators that can no longer be charged to the designated
collection points in your community, outlets or wherever batteries or accumulators are
sold. Following these instructions will allow you to fulfill the legal requirements and
contribute to the protection of our environment!
5
System “Device ID” and “Password” are provided on a label applied at
the back of the LCD Monitor (behind the pull out stand).
The “Device ID” and “Password” are needed for remote viewing.
For security purpose, it is recommenced for user to copy the “Device ID”
and “Password” information to the user manual, following by removing the
label containing the “Device ID” and “Password” information.
Please keep the device ID and password information in a safe place for
future reference.
6
KIT CONTENT
A Wireless Camera w/ stand
x 1
B Wireless Touch Screen LCD
Monitor x 1
C Camera Antenna x 1
D 5V/1A Power Adapter x2
E Internet Cable x 1
F Screw Bag x 1
G Instruction Manual x 1
Tools Required:
Electric drill
5mm masonry drill bit
15mm masonry drill bit
No. 2 Philips screwdriver
7
SAFETY AND INSTALLATION TIPS
Installation Notes
Always follow manufacturer’s advice when using power tools, steps, ladders, etc and
wear protective equipment (e.g, safety goggles and gloves) when drilling holes, etc.
When using ladders ensure they are positioned on a firm stable surface at an angle and
suitably secured. Check for hidden electricity wires or water pipes before drilling any
holes. If in doubt use a cable/pipe locator. It is recommended to avoid exposing the
camera to extreme weather conditions (e.g, under a gutter which is prone to water leaks).
After drilling any holes through an external wall for a cable, ensure the hole is sealed up
using a suitable sealant to prevent drafts.
To prevent a fire or electrical shock hazard, do not attempt to open the housing while the
camera is exposed to rain water or wet conditions. Do not expose any wiring connections
to weathering. If terminating any wiring connections outdoors then use a suitable
weathering box to insulate the connections.
There are no user serviceable parts inside. Refer servicing to qualified service personnel.
LCD Touch Screen Monitor
Keep away from heat sources and high temperature places
Avoid direct sunlight
Avoid humid places
Avoid vibration
Install in a ventilated environment
Supports up to 32 GB SD card (not included)
Camera Installation
Avoid positioning the camera so that it is facing directly at the sun as this will impair
the picture quality viewed.
Avoid pointing the camera lens directly through clear glass as the night vision LEDs
will cause a blurred image at night.
Avoid pointing the camera directly at any bushes, tree branches or moving objects that
might naturally move due to winds. This is also because if you need to use the motion
detection feature in the PC software to record movement the software might record
unnecessarily.
8
NOTE: The camera has an open field RF operating range of up to 150m.
Secure camera stand on the stable surface Loosen up the Thumb screw
Adjust proper view angle then secure
the joint with thumb screw.
Setting the Camera Channel (optional)
The wireless camera is supplied preset to channel 1.
The monitor supports up to 4 cameras. Follow the steps below in Camera Setup section to
setup or change the monitor channel of the camera. If you are adding another camera to
link with the supplied monitor in this kit, then ensure its channel is set to a different
channel to the existing camera(s).
9
Pairing the Camera to Receiver (optional)
Follow the steps in Camera Setup section to setup or change the channel of the camera. If
you are adding another camera to link with the supplied monitor in this kit, then ensure its
channel is set to a different channel to the existing camera(s).
Note:
If the camera is located within 1m to 1.5m from the monitor and the camera's volume on
the receiver is turned on, then you may hear a whistling noise on the monitor which is the
feedback picked up by the microphone. In this case please locate the camera further away
from the monitor to prevent this noise.
If the power connection to the camera is kept outdoors, ensure the connection is suitably
protected.
10
GETTING TO KNOW THE MONITOR AND CAMERA
WHAT THE LIGHTS MEAN
Light State What it means
Power status
On
(Red)
The camera is on.
Off The camera is off.
Link status
Flashing The camera is in pairing mode.
On
(Green)
The camera is connected to the receiver.
Off The camera is in standby.
Power
On/Off
SD slot
AC Power
Connection
Antenna
Ethernet Jack
Pull-Out
Stand
Receiver
(Back view)
Receiver
(Front view)
Reset Button
11
Set up the Monitor
1. Flip out the stand, extend the antenna, connect AC/DC adapter to the power input on
the side of the monitor. Then connect the other end of the adapter to the nearest
power outlet.
Press and hold the POWER button on the top of the monitor for 3 – 4 seconds to
power it up.
2. The receiver displays Welcome Screen for a few seconds and then transitions to the
LIVE view.
3. Place the SD card into the SD card slot located on the side of the monitor.
Note: The screen remains dark until the camera is powered up.
With the camera installed and Monitor set up, you can now customize your system
settings. Please refer to the System Operation section.
You can also establish your digital wireless security system on the APP. Please refer to
the Remote Access section.
12
SYSTEM INTRODUCTION
Your monitor’s system software operates through a series of screens that let you choose
groups of operations. For example, when you tap on the camera icon in the Pop-up menu,
you can set how you want the main viewing screen, “the Live screen” to display images
from the paired cameras. You can scan between cameras, show all cameras on a single
screen (Quad view), or only display specific camera.
The Live screen lets you view the camera transmissions. It also lets you set up your screen
display and make adjustments to it. Icons on the screen itself let you monitor power and
camera status.
13
ICON
WHAT THE ICON MEANS
Camera Mode
Select how you want the Live screen to display camera input:
Scan between cameras (5 seconds)
Quad view (all paired cameras display)
Full view (1 camera displays on full screen)
Volume
Adjust the volume level.
System Settings
Access the system software operation and setting page or view recorded
events.
SD Capacity
Indicates memory capacity remaining.
Battery Capacity
Displays battery capacity. This graphic shows battery at nearly full.
Camera Number
Displays the camera number and signal strength through the status lines
to the left of the number.
Record Status
Tap to start or stop recording for that camera
• Steady on - Not recording • Flashing - Recording
Connecting to the
Internet
Connecting your system to the internet.
Internet Connected
Connects your system to the internet.
Intranet Connected
Connects your system to the intranet.
Remote View
Indicates remote viewing is in process.
Motion
System indicates motion detection recording in progress.
Scheduled
System indicates scheduled recording in progress.
Pop Up Menu Tab
Opens and closes the pop up menu display.
No SD Card
Indicator
Displays red when the SD card is not present or is damaged.
Zoom Zoom in / out of a particular section of the live video
14
Live Screen Displays
The Live screen displays in 2 views - Quad View or Full View. Quad View displays the
images in 4 quadrants (only display camera that is ON). Tap a quadrant to display single
camera view / full view. Tap on that image again to return to Quad View.
Zoom Feature
To zoom into a particular area,
1. Go to full view, then tap
to activate zoom mode.
2. Select the zone by tapping the zone area to view zoom in screen.
Recording Live Video
1. On the Live screen, tap for the camera to begin recording.
2. Tap it again to stop recording.
You can record all cameras at the same time. With manual recording, each recording
session (video clip per camera) is two minutes in length.
15
Playing Back Recorded Video
From the pop-up menu, tap the following
icons
The Record List screen displays:
1. Tap on the highlighted day containing the recording you want to view.
The Record List screen will display that day’s recordings listed in a folder.
If you tap on a day that is not highlighted, a folder displays with no recordings
listed.
2. Tap on the recording you want to view. It displays on the screen.
3. Tap on any area of the screen that does not have control icons to bring up the
playback progress bar. Tap that area again to close it.
4. While playback progress is visible, you can fast forward/rewind by dragging the
playback bar.
5. When playback ends, tap or to return to the Record List.
16
SYSTEM MENU
From the pop-up menu, tap the following
icons
The Main Screen displays:
The SYSTEM MENU highlights the Camera Setup option as the default.
Main Screen
Sub Screens
What it Does
Camera Setup
Camera Setup
Pairs new cameras to the receiver.
Camera on
Makes the cameras visible to the monitor.
Brightness
Brightens or darkens the video of that camera.
Recorder Setup
Motion Detection
Records when something moves in front of the
camera. Continues recording for 2 minutes.
Schedule Record
Set up a schedule for pre-determined recording
times and lengths.
Network Setup
Internet Setup
Select the type of internet connection to be
used.
Security Code
Set a security code for remote access.
Network Information
Displays information about your network and
the receiver’s unique DID number.
Alarm Setup
Period
Set a length of time for the alarm to sound.
Melody
Select a melody to play for the alarm.
System Setup
Power Saving
Temporarily turns off the LCD after the
system is
idle for 2 minutes to conserve
power.
Screen Auto Lock
Locks the screen from further activity until the
screen is unlocked.
Time
Set the time in 12-hour increments.
Format Storage
Formats / erases all the data on the SD card.
System Upgrade
Upgrades the receiver firmware.
Default
Lists the original system defaults.
Quick Tips
N/A
Provides a list of 10 common questions.
17
SYSTEM OPERATION
Camera Setup Screen
Tap on camera setup.
This screen should display:
Camera Pairing
Your camera is paired to the monitor at the factory to channel 1.
To add new camera(s) to your system, you have to pair it to the different channel(s).
From the pop-up menu, tap the following
icons
The Main Screen displays:
1. Tap the camera image you want to pair. A processing icon displays for a 60 second
countdown.
2. Press and release the Pairing button on that camera’s power cord (please refer to the
Getting to Know the Monitor and Camera section). The system will indicate pairing is
successful when pairing completes.
3. The system will automatically adjust the Camera On screen.
Camera Activation
When you add a camera to your system, the system will turn on the camera automatically.
From the pop-up menu, tap the following
icons
The screen displays:
18
An X indicates a camera is OFF, a check indicates ON. Tap on the camera to turn it ON or
OFF.
Brightness
From the pop-up menu, tap the following
icons
The screen displays:
Tap the camera to change brightness level. The default brightness is 0, and the range is
from -2 through 2.
Recorder Setup Screen
19
Motion Detection
From the pop-up menu, tap the following
icons
The screen displays:
Tap the camera’s to set the sensitivity to Off, Low or High.
Default = low. The screen will return to the Motion Detection screen after 10 seconds or
when you press the Back icon.
Email Alert
The system can notify you when it detects motion from any camera by sending you an
email alert. The email alert contains information such as the time that motion was detected
and by which camera. In order to enable the Email Alert function, you must enter both
incoming and outgoing email addresses.
We strongly recommend you use Gmail to set up as the outgoing email server.
The outgoing email server (SMTP server) is responsible for sending out the email
notification to tell users when the system detects motion from any camera (Motion
Detection must be activated).
The incoming mail server (Email To) receives the email notification sent from the SMTP
server, The user must be able to receive email on a Windows PC or on mobile devices
(such as an iPhone, iPad or Android smartphone or tablet) to receive e-mail alerts from the
system.
When you receive an email alert, you can view live video from iPhone, iPad, Android
smartphone or Android tablet through apps. Free apps are available through the iTunes
App store or the Android Market.
From the pop-up menu, tap the following
icons as they appear on the screens:
The screen displays:
20
1. Tap Enable to activate Email Alert or Disable to deactivate it.
2. Tap on the SMTP Server field. A keyboard screen displays.
3. Enter your outgoing e-mail SMTP server (example: johndoe@gmail.com). You can
switch the keyboard from alphabetical characters to numbers/symbols and back again
by tapping the field to the left of the space bar. Tap Return. The Email Alert screen
displays again.
4. Repeat the previous step for the Password field. Tap Return. The password entered
here must be the same password as the password for the outgoing email account.
5. Repeat Step 3 for the Email To field. Only one incoming email account will be
accepted by the system. The incoming email account can be different from the
outgoing email account.
6. Tap OK to save the settings, then tap to return to the previous screen.
If you are using Gmail as the outgoing SMTP server, check SSL and use the data in
the following table:
For Gmail
SMTP Server
Smtp.gmail.com
Enter this.
SMTP Port
465
Enter this.
Username
XXXX@gmail.com
Enter your gmail address in full,
including @gmail.com.
Password
XXXXXXXXXX
Enter the password for this
gmail account.
Email to
XXXX@gmail.com
Enter the email address where you
want the alerts sent.
21
Schedule Record
Up to 5 scheduled recording sessions available in a single day. You are limited to the size
of the SD card for how long a total recording time you have. These recording sessions
must begin and end within a single 24-hour period. They cannot cross into the next day.
From the pop-up menu, tap the following
icons
The Schedule Record screen displays:
1. Tap the camera/channel number you want to record (1 - 4). Multiple cameras can be
selected.
2. Set the recording start and end time. Tap the hour and minutes boxes separately and
use the UP and DOWN arrows to scroll through the times.
3. Tap the AM/PM block to toggle between them.
4. Tap on the blank DATE box. The Schedule Record Calendar screen displays.
5. Tap on the date you want the recording. The previous screen displays.
6. Set up the recording and then tap Save. You can select another recording session to
schedule.
7. If you want to clear the scheduled recording, choose the scheduled recording you
want to clear (1-5) and then tap Clear. The screen resets to the default values.
Network Setup Screen
The Network Setup screen allows you to select your internet type, set a security code. You
can also display system default configuration.
22
From the pop-up menu, tap the following
icons
The Network Setup screen displays:
Internet Setup
1. Tap Internet Setup icon to display the Internet Setup screen.
2. Tap on your selection and fill in the fields requested. Tap OK.
3. Tap OK at the system reboot prompt. The Network Setup screen displays.
23
Security Code
Set up your security code to limit who can have access to the system from a remote
location.
1. Tap Security Code icon to display the Security Code screen.
2. If you have previously entered a code, the screen will display your current code
3. Tap on the change code field, a key board screen displays.
4. Enter your security code.
5. Tap OK. The system will return to Network Setup screen.
Note: Security code must be entered to gain remote access. To protect your privacy,
please be sure to change the default password 123456 into your personal security code.
24
Network Information
1. Tap the Network Information icon to display the Network Information screen.
2. Tap the BACK arrow to return to the previous screen.
Note:
The DID is a unique code specific to your monitor and is required to gain remote access
to your cameras over the internet.
The information in the DHCP setting is assigned to your monitor from your home router.
Alarm Setup Screen
From the Alarm Setup screen, you can:
Set the length of time the alarm sounds
Select a melody for the alarm.
25
Period
This selection allows you to select the alarm/siren duration for Clock Alarm and Timer.
1. Tap Period. The Set Siren Duration screen displays.
2. Select the alarm duration time required
3. Tap the BACK arrow to return to the previous screen.
Melody
This selection allows you to select a melody for the siren.
1. Tap Melody. The Change Siren Melody screen displays.
2. Select the melody required
3. Tap the BACK arrow to return to the previous screen.
26
System Setup Screen
Power Saving
In Power Saving mode, the monitor will shut off LCD after idle for 2 minutes. Press
Power button once to reactivate the monitor.
If a motion detection event or scheduled recording begins, the LCD turns back on
automatically.
1. Tap Power Saving Enable to activate power saving. Default is off.
2. A check mark appears on your selection.
3. Tap the BACK arrow to return to the previous screen.
Screen Auto Lock
In Auto Lock mode, the monitor will enter screen lock mode after it has been idle for 2
minutes. Auto Lock disables the touch screen and removed the icons from the display.
1. Tap Screen Auto Lock
27
2. Tap your selection; a check mark displays.
3. Tap the BACK arrow to return to the previous screen.
Note: From the Live screen, tap the Power button once to unlock the screen and
return to normal touch screen operation.
Time
The Time screen lets you set up clock alarms, set the system time, and set a timer.
From the pop-up menu, tap the following
icons
The screen displays:
Clock Alarm
This feature operates as an independent alarm clock. It does not affect the operation of
live video or recording video.
1. Tap to display the Clock Alarm screen.
28
2. Tap on an alarm button (total of 5 to select from).
3. Tap on the hour/minutes block then UP/DOWN arrows to set the time.
4. Tap on AM/PM to toggle between the two.
5. Tap SAVE, then back.
Time Setting
This screen contains fields to set the Month, Day, Year, Hour, Minute and AM/PM.
1. Tap
to display the Time Setting screen.
2. Tap on each field to set it. The UP/DOWN arrows shift to that field. Use UP/DOWN
to set the field.
3. Tap on the AM/PM block to switch between the two.
4. Tap SAVE when you are finished.
Time Zone
This feature allows you to setup the time zone. To optimize your receiver for the best
performance, please be sure to choose the appropriate time zone settings for your region.
29
1. Tap
to display the Time Zone screen.
2. Use UP/DOWN arrows to change the time zone for your region.
3. Tap SAVE to complete the settings.
Storage Management
The Storage Management screen lets you format the SD card or set up the SD card
overwrite function.
Format
When using an SD card other than the provided one, it is highly recommended that you
format the card using these procedures. Formatting any SD card deletes all files on that
card.
From the pop-up menu, tap the following
icons
The Format Storage screen displays:
1. Tap on the Format feature; a warning statement displays.
2. Tap OK to proceed to format storage or tap CANCEL to discontinue.
3. The system will indicate success or failure.
30
Overwrite
This feature will overwrite the oldest files when the capacity of SD card is full. Turning
on this feature will enable the system to start overwriting the oldest 300Mb files when the
available capacity is less than 100Mb.
From the pop-up menu, tap the following
icons
The Format Storage screen displays:
Tap on the Overwrite feature. The check mark indicates the feature is enabled.
System Upgrade
Please make sure your system firmware has been updated to the latest version. You can
refer to the Network Information section to check your system firmware version. Go to
vendor website to check the latest firmware version. If you need to upgrade your system
firmware, please download the latest firmware version to your Micro SD card root
directory from the vendor website and follow the steps below to upgrade the firmware to
the monitor.
1. Eject the SD card from the monitor.
2. Place the SD card into a USB card reader/writer (not included with the purchased
package).
3. Connect the flash drive to your PC.
4. Copy the latest firmware version from vendor website to your SD card root directory.
5. Remove the SD card and reinsert it into the monitor.
6. Upgrade the firmware.
31
From the pop-up menu, tap the following
icons
The screen displays:
Press the Start button to upgrade the firmware.
Language
English is the default language. If you change the language, all system settings default to
the original factory settings. You will have to reenter any specialized settings.
From the pop-up menu, tap the following
icons
The screen displays:
1. Select the language required. The Restore Default Settings screen displays.
2. Tap OK to continue. The system will shut down in about 5 seconds.
3. When the system restarts, it will ask you to perform the touch screen calibration.
Follow the instructions on the screen.
4. Select the frequency setting by tapping the frequency icon (50Hz /60Hz). Make sure
the frequency setting complies with local electrical regulations.
Note: In general the frequency for Europe is 220-240 volt, at 50 hertz frequency
32
Quick Tips
The Quick Tips screen provides additional details on important subjects of system
operation. Tap on a subject to display the information.
REMOTE ACCESS
Overview
The DWH Series Video Security System lets you view live video from your iPhone, iPad,
or Android smartphone or tablet. Free apps are available through the iTunes App Store or
the Android Market.
Requirements for Remote View
Supported Device
- iPhone / iPad / iPod Touch w/ iOS 5.0.1 or above
- Android smartphone / tablet v2.3X or above
Note: Not suitable for Windows7 or Blackberry Smartphones
Receiver
Power Supply
Adaptor
33
Recommended minimum internet upload speed
512Kbps upload speed (or bandwidth) to achieve up to an average of 2FPS viewing speed.
Average viewing speed will depend on other restrictions by your ISP (internet service
provider).
Connecting to the Internet
When the system is connected to the internet, the live video will continue to display on the
monitor, but monitors touch operation will become limited. Monitors touch operation
will resume normal after disconnecting from the internet by select Disconnect from
Internetoption from the pop up menu, or remove the Ethernet cable.
1. Connect the Ethernet cable into the back of the monitor.
2. Connect the other end of the Ethernet cable into your primary router (from your
internet service provider).
3. Turn on the monitor. The system will pop up a screen asking if you want to connect
to the internet.
4. Tap Connect. The Internet Connection Status Indicator appears on the upper left of
the Live screen indicating that the system is connected to the internet.
You can now view live video through your mobile devices.
Note: While the system is connected to the internet, the LIVE screen display rate
may reduce to 2 - 3 frames per second.
5. When you connect remotely to the monitor, the Internet Connection Status Indicator
shows that remote view is in progress.
5
34
Connecting to the Intranet (Home Network)
If you choose Disconnect from Internetoption after you connect the Ethernet cable into
the back of the monitor, you can still access your live video from smartphone(s) or tablet(s)
as long as those devices are also connected to the same network as the monitor. For
example, your smartphone is connected to your home network via WiFi, in this case, live
video will still be displayed on the monitor as well as on the smartphone.
Note: The system will automatically resume your previous internet/intranet setting once
you setup the network connectivity.
Establishing your security system on the APP
You can use the smart phone or tablet to remotely connect to and view the live camera
video. Please follow the steps below to build up your security system on the app.
Downloading Android APP
From your Android smart phone or tablet device, go to the Android Market and
search for OMGuard.
Downloading iPhone APP
From your iPhone or iPad, go to the iTunes App Store and search for OMGuard
1. Connect the Ethernet cable into the monitor. Make sure you have installed and setup
the monitor correctly.
2. Launch the app; tap ADD CAMERA icon on the boot screen to add the
camera to the app.
3. Then click the SEARCH button for a quick setup. The APP will automatically search
for your camera(s) on your local area network (LAN) and carry out the DID code in
the DID field. Enter the default password 123456.
35
Note: When you type in the default password, the system will notify you to change
it. Please follow the instruction of the Device Password section to change the default
password into your personal security code.
4. Click SAVE to complete the camera settings.
5. Repeat step 1 to 5 to add more cameras.
After you add the camera(s) to the system, the Main Screen displays and lists all the
camera connections vertically. Scroll down the snapshot list to choose the camera or tap
the camera panel to activate the video you want to view.
Main Screen
What it Does
Tap the ADD CAMERA icon to add more cameras.
Tap the ADVANCED SETTING icon to
setup camera
configuration.
Tap the DELETE icon to remove the camera connection.
Tap the EVENT LIST icon to check or playback the
recorded events.
Tap the UPDATE icon to refresh the status of camera connection(s).
Tap to setup the PIN
Lock or check the APP/API version information.
36
Live View
What it Does
Tap
to capture screen images. The snapshots will be saved into the
camera roll of your mobile device.
Tap
to record and tap again to stop recording.
Tap
to return to the main page.
If you want to take snapshots:
From the main screen, tap the camera you
want to view
From the Live View, tap the following icon:
If you want to view your snapshots:
For iOS:
You snapshots will be named with the time stamp and saved into the Camera Roll >
snapshot folder on your mobile device.
For Android:
You snapshots will be named with the time stamp and saved into the Photo gallery >
snapshot folder on your mobile device.
37
If you want to record videos:
From the main screen, tap the camera you
want to view
From the Live View, tap the following icon:
If you want to playback your videos:
From the main screen, tap the following
icons
The Event List screen displays:
Select the time intervals of the recorded video you want to see. Then tap the video name
once to playback the video clip.
Setup the push notification:
The DWH security system will notify you via text message whenever any recording event
occurs.
1. Tap (icon) on your mobile device.
2. Tap Notifications. A list of APPs displays.
3. Tap the OMGuard icon.
4. The OMGuard setting screen displays. Turn the notification ON to enable the push
notification function.
38
TROUBLE SHOOTING
TROUBLE
SOLUTIONS
No image
Screen lock may be on. Tap the Power button to unlock the
screen.
Make sure the camera is power on.
Make sure the monitor has enough charge / connect it to
AC/DC adaptor.
Move the camera closer to the monitor; it might be out of
range or flip the antenna of the receiver to obtain best
possible reception.
Poor picture quality
Flip the antenna of the receiver to obtain best possible
reception.
Clean the camera lens using lens cleaning cloth.
The motion sensor not
working
Increase or decrease the sensitivity of the motion sensor
(please refer to the Motion Detection section).
Check the settings on the RECORD screen.
No recording happens
although it has the
schedule set.
Ensure correct DATE AND TIME has been set and the
Record Schedule setup correctly.
Ensure the memory card is inserted into DVR and formatted.
There might be no movement detected,
i.e.: no moving object to trigger the motion sensor.
Unable to pair the camera
to the receiver
Make sure the camera is power on.
Press and release the pairing button quickly. Do not
press and
hold.
Power off the receiver and restart. If power button does not
respond, use a pin to press the reset button.
A white image appears at
night
The camera's infra-red LEDs shine invisible light that reflects
of surfaces such as glass will cause white light. Place the
camera on the other side of windows to improve the night
vision or place it in a well-lit area (recommend to install a
security lamp to improve lighting).
LIVE screen has no icons.
Screen lock may be on. Tap the Power button to unlock the
screen.
System locked up
Power off the receiver and restart. If power button does not
respond, use a pin to press the reset button.
Unable to use the
Windows Media Player
to play the video
clips from the SD card
The video files play with a Quicktime® player. Download
this free player from www.apple.com . You can also
download the alternative free player, VLC Media Player,
from
www.videolan.org. Ensure your PC has SD card reader.
39
PRODUCT SPECIFICATION
Camera Receiver
Maximum channels
-
4
Communication Range
150 meters in open space
LCD Monitor Resolution
800 x 480
Camera Resolution
Single Camera: 480x272 / Multiple Camera: 320x240
Operating Temperature
-10
C ~ 50
C
Operating Voltage
DC 5V / 1A
Current Consumption
500mA (MAX)
800mA (MAX)
Night Vision
8 meters
Dimension
151x74x49 mm
184x128x28 mm
Recording Time for Memory Card (32GB max)
SD Card Capacity Single Camera
(Full Screen)
Multiple Cameras
(QUAD Mode)
1GB
200 Minutes
130 Minutes
2GB
400 Minutes
260 Minutes
8GB
1,600 Minutes
1,040 Minutes
16GB
3,200 Minutes
2,080 Minutes
32GB
6,400 Minutes
4,160 Minutes
Note: Single camera file recorded with video/audio; multiple camera file recorded with
video only.
34

Hulp nodig? Stel uw vraag in het forum

Spelregels

Misbruik melden

Gebruikershandleiding.com neemt misbruik van zijn services uitermate serieus. U kunt hieronder aangeven waarom deze vraag ongepast is. Wij controleren de vraag en zonodig wordt deze verwijderd.

Product:

Bijvoorbeeld antisemitische inhoud, racistische inhoud, of materiaal dat gewelddadige fysieke handelingen tot gevolg kan hebben.

Bijvoorbeeld een creditcardnummer, een persoonlijk identificatienummer, of een geheim adres. E-mailadressen en volledige namen worden niet als privégegevens beschouwd.

Spelregels forum

Om tot zinvolle vragen te komen hanteren wij de volgende spelregels:

Belangrijk! Als er een antwoord wordt gegeven op uw vraag, dan is het voor de gever van het antwoord nuttig om te weten als u er wel (of niet) mee geholpen bent! Wij vragen u dus ook te reageren op een antwoord.

Belangrijk! Antwoorden worden ook per e-mail naar abonnees gestuurd. Laat uw emailadres achter op deze site, zodat u op de hoogte blijft. U krijgt dan ook andere vragen en antwoorden te zien.

Abonneren

Abonneer u voor het ontvangen van emails voor uw Smartwares CS89T bij:


U ontvangt een email met instructies om u voor één of beide opties in te schrijven.


Ontvang uw handleiding per email

Vul uw emailadres in en ontvang de handleiding van Smartwares CS89T in de taal/talen: Engels als bijlage per email.

De handleiding is 2,26 mb groot.


U ontvangt de handleiding per email binnen enkele minuten. Als u geen email heeft ontvangen, dan heeft u waarschijnlijk een verkeerd emailadres ingevuld of is uw mailbox te vol. Daarnaast kan het zijn dat uw internetprovider een maximum heeft aan de grootte per email. Omdat hier een handleiding wordt meegestuurd, kan het voorkomen dat de email groter is dan toegestaan bij uw provider.

Stel vragen via chat aan uw handleiding

Stel uw vraag over deze PDF

Andere handleiding(en) van Smartwares CS89T

Smartwares CS89T Snelstart handleiding - Nederlands, Deutsch, English, Français, Espanõl, Polski - 2 pagina's


Uw handleiding is per email verstuurd. Controleer uw email

Als u niet binnen een kwartier uw email met handleiding ontvangen heeft, kan het zijn dat u een verkeerd emailadres heeft ingevuld of dat uw emailprovider een maximum grootte per email heeft ingesteld die kleiner is dan de grootte van de handleiding.

Er is een email naar u verstuurd om uw inschrijving definitief te maken.

Controleer uw email en volg de aanwijzingen op om uw inschrijving definitief te maken

U heeft geen emailadres opgegeven

Als u de handleiding per email wilt ontvangen, vul dan een geldig emailadres in.

Uw vraag is op deze pagina toegevoegd

Wilt u een email ontvangen bij een antwoord en/of nieuwe vragen? Vul dan hier uw emailadres in.


Info