634274
35
Verklein
Vergroot
Pagina terug
1/57
Pagina verder
N300 Wi-Fi Outdoor Range Extender
User Manual
WLX-2100
WLX-2100 | User Manual
2
Introduction
Congratulations on your purchase of the N300 Wi-Fi Range Extender Outdoor. With this range extemder
you can easily extend the signal of a Wi-Fi hotspot and enjoy a stable Internet connection for all your
devices. Ideal for camping grounds and harbors, you can use a single code or voucher to login to the Wi-Fi
network and share Internet with friends and family. The range extender supports fast Wi-Fi speeds of up to
300 Mbps. Enjoy the things you do at home also while you’re on vacation and listen to your Spotify playlists
or watch the latest episode of your favorite Netflix show without lag or buffering. With two extra powerful
5dBi antennas, you can enjoy ultimate Wi-Fi coverage anywhere.
Weatherproof design
The N300 Wi-Fi Outdoor Range Extender is rated IP65. This means that it is protected against the ingress of
dust and water and can be used in any weather and any climate. Even harsh environments do not impact
the performance.
Easy installation
The N300 Wi-Fi Outdoor Range Extender supports Power over Ethernet (PoE) which means that you can
use the included 5m network cable and the included PoE-injector to power it. This gives you more freedom
to place the range extender further away from a power socket and have it anywhere in and around your
boat, tent or vehicle.
Compatibility and security
The N300 Wi-Fi Outdoor Range Extender is compatible with wireless-n extenders and is also backwards
compatible with older wireless technologies. The range extender also supports all existing security
standards (64/128-bit WEP, WPA, and WPA2).
Extensive 10-year warranty
The N300 Wi-Fi Outdoor Range Extender comes with an extensive 10-year warranty. Simply activate the
long-term warranty by registering your product within 3 weeks of purchase.
WLX-2100 | User Manual
3
Table of Contents
Introduction .................................................................................................................. 2
Table of Contents .......................................................................................................... 3
Get to know your range extender .................................................................................... 5
Features ......................................................................................................................................................... 5
Technical Specifications ................................................................................................................................. 6
What you get ................................................................................................................................................. 8
What you need .............................................................................................................................................. 9
Safety precautions ....................................................................................................................................... 10
Product layout ............................................................................................................................................. 11
Network Detail Flyer .................................................................................................................................... 12
Install your range extender ........................................................................................... 13
Choose a position for your range extender ................................................................................................. 13
Prepare your range extender ...................................................................................................................... 13
Prepare your computer ............................................................................................................................... 16
Prepare your Phone / Tablet ....................................................................................................................... 18
Login to the range extender ........................................................................................................................ 19
Install the range extender with the wizard ................................................................................................. 20
Get to know the range extender’s user interface .............................................................. 22
Status ........................................................................................................................................................... 22
Save/Reload ............................................................................................................................................. 22
Main ......................................................................................................................................................... 22
Wireless Client List................................................................................................................................... 23
DHCP Client Table .................................................................................................................................... 23
Connection Status .................................................................................................................................... 24
System Log ............................................................................................................................................... 25
Settings ........................................................................................................................................................ 26
Operation Mode (System properties) ..................................................................................................... 26
Wan settings ............................................................................................................................................ 27
LAN settings ............................................................................................................................................. 32
VPN Pass-through .................................................................................................................................... 33
Port Forwarding ....................................................................................................................................... 34
DMZ ......................................................................................................................................................... 36
Wireless Settings ..................................................................................................................................... 37
WLX-2100 | User Manual
4
Wireless Advanced Settings .................................................................................................................... 40
Administration ......................................................................................................................................... 42
SNMP ....................................................................................................................................................... 44
Backup/Restore Settings ......................................................................................................................... 46
Auto Reboot SettingS .............................................................................................................................. 47
Firmware Upgrade ................................................................................................................................... 48
Time Settings ........................................................................................................................................... 49
CLI Settings .............................................................................................................................................. 50
Log ........................................................................................................................................................... 51
Diagnostics ............................................................................................................................................... 52
Device Discovery ...................................................................................................................................... 54
Denial of Service Protection .................................................................................................................... 55
Addendum A: GNU GPL ................................................................................................ 56
Addendum B: Declaration of Conformity ......................................................................... 57
Revision 1.0
© Sitecom Europe BV 2016
Note: All the information contained in this manual was correct at the time of publication.
However, as our engineers are always updating and improving the product, your device’s software may
have a slightly different appearance or modified functionality than presented in this manual.
WLX-2100 | User Manual
5
Get to know your range extender
Features
Extend the signal of a Wi-Fi hotspot
Ideal for camping grounds & harbours
Use a single login account & share internet access
Wi-Fi speeds: 300 Mbps (2.4 GHz)*
Two extra powerful 5 dBI antennas
IP65-rated weatherproof housing
Powered by PoE (Power over Ethernet)
Compatible with 802.11b/g/n wireless networks
Compatible with 64/128-bit WEP, WPA, and WPA2 wireless data encryption
Supports DHCP server function
Easy to use web-based GUI (Graphical User Interface)
Two Fast Ethernet ports with one PoE (Power over Ethernet) input
* Theoretical wireless signal rate based on IEEE standard of 802.11a, b, g, n chipset used. Actual throughput
may vary. Network conditions and environmental factors lower actual throughput rate. All specifications
are subject to change without notice.
WLX-2100 | User Manual
6
Technical Specifications
Hardware Specification
Physical Interface:
2 x RJ-45 for 10/100 Fast Ethernet; one port is compatible with PoE
1 x Reset button
2x detachable 5 dBI antennas with SMA connector
Power Requirements:
Active ethernet (Power over Ethernet)
Proprietary PoE design
Power Adapter 24V / 0.6A
Temperature Range:
Operating -20°C~70°C
Storage -30°C to 80°C
Humidity (non-condensing):
0%~90% typical
Dimensions:
With antenna: W100 x D37.5 x H205 mm
Without antenna: W100 x D37.5 x H189 mm
Weight:
With antenna: 275 g
Without antenna: 242 g
Software Specification
Operation Mode:
Client Bridge, Access Point, Client Router, WDS AP, WDS Bridge, WDS Station
Wireless Specifications:
Wireless standard: 802.11n, backward compatible with 802.11b/g
Data rate: 300 Mbps
Frequency Band: 2.4 GHz
Note: The maximum power of the radio frequency band may be different depending on local regulations.
Wireless / Network Features:
Auto Channel Selection (Setting varies by Regular Domains)
Obey Regulatory Power
Distance Control (802.1x ACK (acknowledgement)
timeout)
WLX-2100 | User Manual
7
CLI Supported
802.1x Supplicant (CB Mode)
4 SSIDs
WDS AP / WDS Bridge / WDS Station
Multicast Supported
RADIUS Accounting
VLAN Tag / VLAN Pass-through
Auto Reboot
Wi-Fi Scheduling
Wireless Security:
WEP Encryption-64/128/152 bit
WPA/WPA2 Personal (WPA-PSK using TKIP or AES)
WPA/WPA2 Enterprise (WPA-EAP using TKIP)
Hide SSID in beacons
MAC address filtering, up to 50 field
Wireless STA (Client) connected list
QoS:
WMM
WLX-2100 | User Manual
8
What you get
Open the package carefully, and make sure that none of the items listed below are missing. Do not discard
the packing materials, in case of return; the unit must be shipped back in its original package.
WLX-2100 N300 Wi-Fi Range Extender Outdoor
5m network cable
PoE Injector (24 V)
2x 2.4 GHz 5dBi antenna
Power adapter 24 V / 0.6 A
Car charger 12 V
Wall mounting kit (screw set & adhesive label)
Pole mounting kit (2x cable tie + 2x hose clamp)
Installation guide
Network detail flyer
WLX-2100 | User Manual
9
What you need
To use this range extender, you will need the following things:
A Wi-Fi network or a wired Internet connection
A device with a web browser (Internet Explorer, Safari, Firefox, Opera)
WLX-2100 | User Manual
10
Safety precautions
The range extender is designed and manufactured with your safety in mind. In order to safely and
effectively use the range extender, please read the following before usage.
Usage Cautions
The range extender can operate in temperatures ranging from -20°C to 70°C. It can be stored in
temperatures ranging from -30°C to 80°C.
Do not disassemble, repair or change the range extender; any damage done will not be included in
the warranty / repair policy.
The range extender is IP65 rated. This mean it can remain outdoors where it will be subject to rain.
However, do not submerge it into water.
Make sure to follow the installation guide correctly so that water cannot get into the range
extender.
Do not shake or hit the range extender, do not press the buttons too hard and stay away from
magnetic fields.
If during electrostatic discharge or a strong electromagnetic field the product will malfunction,
unplug the power cable. The product will return to normal performance the next time it is powered
on.
Power
The range extender’s power voltage is DC 24 V 0.6 A. To use the range extender, please connect the
supplied AC adapter or car charger to the range extender’s PoE connector.
When placing the cable, make sure it can’t get damaged or be subject to pressure.
To reduce the risk of electric shock, unplug the adapter first before cleaning it.
Never connect the adapter to the range extender in a humid or dusty area.
Do not replace the adapter or cable’s wire or connector.
Repair
If you experience any problems with your range extender, please take it to the shop where you bought it or
a qualified repair centre. Never repair the range extender yourself, you might damage the range extender
or endanger yourself.
Disposing of the Wi-Fi Home Cam
When you dispose the range extender, be sure to dispose it appropriately. Some countries may regulate
disposal of an electrical device, please consult with your local authority.
WLX-2100 | User Manual
11
Product layout
Back
Letter
Description
A
Power LED: Shows the device is turned on.
B
LAN LED: Shows that a network cable is connected.
C
WLAN LED: Shows WLAN activity of the extender.
D
Signal LED: This LED shows the quality of the signal it receives from the existing network.
E
Antennas: Screws for the two antennas
Bottom
Letter
Description
A
Reset button: While the device is on, use a pin to press the button for 15 seconds.
B
Network port: Additional network port to connect a wired device (e.g. Notebook).
C
Network PoE (power) port: Use this port to connect the PoE injector to power the device.
WLX-2100 | User Manual
12
Network Detail Flyer
On the Network Detail Flyer, you can find all the information about your network such as network name
and Wi-Fi password and how to reach the user interface of the range extender.
WLX-2100 | User Manual
13
Install your range extender
Choose a position for your range extender
For optimal performance, place your Range Extender in a location that is away from any potential source of
interference. This location must be within a good signal range from the existing network, preferably above
50% signal strength.
Prepare your range extender
Step 1: Screw the antennas onto the SMA connectors of the range extender
WLX-2100 | User Manual
14
Step 2: Plug the network cable into the PoE injector
Step 3: Plug the other end of the network cable into the PoE port of the range extender
WLX-2100 | User Manual
15
Step 4: Place the cover back onto the range extender
Step 5: Connect the power cable to the PoE injector and a wall socket.
WLX-2100 | User Manual
16
Prepare your computer
Windows
Click on the icon for wireless connectivity. This is usually located in the System Tray, next to the
clock.
Select the Sitecom network. The correct network name can be found in the Network Detail Flyer.
Fill in the password for the wireless network. The correct password can be found in the Network
Detail Flyer.
Wait for the icon to display that it’s connected to the network.
WLX-2100 | User Manual
17
Mac OSX
Click on the icon for wireless connectivity. This is usually located in the System Tray, next to the
clock.
Select the Sitecom network. The correct network name can be found in the Network Detail Flyer.
Fill in the password for the wireless network. The correct password can be found in the Network
Detail Flyer.
Wait for the icon to display that it’s connected to the network.
WLX-2100 | User Manual
18
Prepare your Phone / Tablet
Go to your Wi-Fi settings and turn Wi-Fi on.
Select the Sitecom network. The correct network name can be found in the Network Detail Flyer.
Fill in the password for the wireless network. The correct password can be found in the Network
Detail Flyer.
Wait for the icon to display that it’s connected to the network.
WLX-2100 | User Manual
19
Login to the range extender
Open your web browser (e.g. Internet Explorer, Safari, Google Chrome or Firefox).
Type http://sitecom.ext in the address bar and press [Enter].
Type the user name and password. Both are admin”.
Click “Login”.
WLX-2100 | User Manual
20
Install the range extender with the wizard
After login, you will see the user interface of your range extender
Select Wizard” in the bottom left corner. Your range extender will start to scan the wireless
networks in the area.
WLX-2100 | User Manual
21
Select the Wi-Fi network you wish to extend and make sure the signal strength is at least 50% or
more.
Tip: If you are on a camp ground, vacation park or similar, it is possible, that you see several Wi-Fi
networks with the same name, this is a so called “Multi-Access Point-Network”. Make sure to
always select the network with the strongest signal.
Fill in the required password of the Wi-Fi network. If you do not have the password yet, please
contact the provider of the Wi-Fi network (e.g. campground, vacation park)
WLX-2100 | User Manual
22
Get to know the range extender’s user interface
Status
SAVE/RELOAD
On this screen you can save and apply the settings shown in the Unsaved changes list, or cancel the
unsaved changes and revert to the previous settings that were in effect.
MAIN
On this screen, you can view the summary of the current system status including system information
(hardware/software version, date/time), wired network settings (LAN) and wireless network (WLAN)
settings.
WLX-2100 | User Manual
23
WIRELESS CLIENT LIST
On this screen, you can see a list of wireless devices (clients) connected to the range extender along with
the MAC addresses and signal strength for each client.
To remove a wireless device from the list and terminate their connection to the range extender,
click the button in the Kick and Ban column.
To refresh the list, click the Refresh button below the table.
DHCP CLIENT TABLE
On this screen, you can see a list of wireless devices (clients) that are connected to the range extender
through DHCP.
The MAC addresses, IP addresses and expiry times period for each client are shown in separate
rows.
To refresh the list, click the Refresh button below the table.
WLX-2100 | User Manual
24
CONNECTION STATUS
On this screen, you can see the current status of the network.
Wireless:
The information shown includes network type, Wi-Fi network names (SSID & BSSID), connection
status, wireless mode, current channel, security, data-rate, noise level, and signal strength.
WAN:
The information shown includes the MAC address, connection type, connection status, IP address,
IP subnet mask, primary DNS and secondary DNS.
Click the Refresh button to update connections status.
WLX-2100 | User Manual
25
SYSTEM LOG
On this screen, you can see the events that the range extender logged to the internal memory.
Note: The oldest events are deleted from the log when memory is full.
Click the Save button to save the log information to a text file, click the Refresh button to update the
client list or the Clear button to remove all events.
WLX-2100 | User Manual
26
Settings
OPERATION MODE (SYSTEM PROPERTIES)
On this screen, you can set the primary function of the device. The function that is selected affects which
items are available in the main menu.
Device Name
Enter a name for the range extender. This name appears in SNMP management, it is not the Wi-Fi
network name (SSID) and is not broadcasted to other devices.
Green
Uncheck the green mode to enable the TX power function in Wireless Advanced Settings”.
Country/Region
Select a Country/Region to conform to local regulations.
Operation Mode
Use the radio button to select an operating-mode. You can switch between “Access point” and
“Client router”.
Click Save & Apply to save changes or Cancel to terminate.
WLX-2100 | User Manual
27
WAN SETTINGS
On this screen, you can configure the WAN settings for the range extender. Click on the drop down menu
under “Internet Connection Type” and select dynamic IP (DHCP), static IP, PPPoE or PPTP.
Configuring Dynamic IP (DHCP)
Dynamic IP addressing assigns a different IP address each time a device connects to an ISP service provider.
The service is most commonly used by cable Internet providers.
Account Name
Enter the account name provided by your Internet Service Provider (ISP).
Domain Name
Enter the domain name provided by your Internet Service Provider (ISP).
MTU
The maximum transmission unit (MTU) specifies the largest packet size permitted for an internet
transmission. The factory default MTU size for static IP is 1500. The MTU size can be set between
512 and 1500.
Get Automatically From ISP
Click the radio button to obtain the DNS automatically from the DHCP server.
Use These DNS Servers
Click the radio button to set up the Primary DNS and Secondary DNS servers manually.
Discard Ping on WAN
Keep it checked to recognize pings on the WLX-2100 WAN interface
Disable to block pings on the WLX-2100 WAN interface
Tip: Pinging IP addresses is a common method used by hackers to test whether the IP address is
valid. Blocking pings provides some extra security from hackers.
WLX-2100 | User Manual
28
Click Accept to save the settings or Cancel to discard the changes.
Configuring Static IP
Setting a static IP address allows an administrator to set a specific IP address for the range extender.
Options:
Account Name
Enter the account name provided by your Internet Service Provider (ISP).
Domain Name
Enter the domain name provided by your Internet Service Provider (ISP).
MTU
The maximum transmission unit (MTU) specifies the largest packet size permitted for an internet
transmission. The factory default MTU size for static IP is 1500. The MTU size can be set between
512 and 1500.
IP Address
Enter the range extender’s WAN IP address.
Subnet Mask
Enter the range extender’s WAN subnet mask.
Default Gateway
Enter the WAN gateway address.
Primary DNS
Enter the primary DNS server address.
Secondary DNS
Enter the secondary DNS server address.
Discard Ping on WAN
Keep it checked to recognize pings on the WLX-2100 WAN interface
Disable to block pings on the WLX-2100 WAN interface
Tip: Pinging IP addresses is a common method used by hackers to test whether the IP address is
valid. Blocking pings provides some extra security from hackers.
Click Accept to save the settings or Cancel to discard the changes.
WLX-2100 | User Manual
29
Configuring Point-to-Point Protocol over Ethernet (PPPoE)
Point-to-Point Protocol over Ethernet (PPPoE) is used mainly by ISPs that provide DSL modems to
connect to the Internet.
MTU
Enter the maximum transmission unit (MTU).The MTU specifies the largest packet size permitted
for an internet transmission (PPPoE default: 1492). The MTU size can be set between 512 and 1492.
Login
Enter the username assigned by your Internet Service Provider (ISP).
Password
Enter the password assigned by your Internet Service Provider (ISP).
Service Name
Enter the service name of an ISP (optional).
Connect on Demand
Select the radio button to specify the maximum idle time. Internet connection will disconnect when
it reaches the maximum idle time, but it will automatically connect when user tries to access the
network.
Keep Alive
Select whether to keep the Internet connection always on, or enter a redial period once the
internet loses connection.
Get Automatically From ISP
Click the radio button to obtain the DNS automatically from the DHCP server.
Use These DNS Servers
Click the radio button to set up the Primary DNS and Secondary DNS servers manually.
Discard Ping on WAN
Keep it checked to recognize pings on the WLX-2100 WAN interface
Disable to block pings on the WLX-2100 WAN interface
Tip: Pinging IP addresses is a common method used by hackers to test whether the IP address is
valid. Blocking pings provides some extra security from hackers.
Click Accept to save the settings or Cancel to discard the changes.
WLX-2100 | User Manual
30
Configuring Point-to-Point Tunneling Protocol (PPTP)
The point-to-point tunneling protocol (PPTP) is used in association with virtual private networks (VPNs).
There a two parts to a PPTP connection: the WAN interface settings and the PPTP settings.
MTU
Enter the maximum transmission unit (MTU). The MTU specifies the largest packet size permitted
for an internet transmission (PPPoE default: 1492). The MTU size can be set between 512 and 1492.
IP Address
Enter the router’s WAN IP address.
Subnet Mask
Enter the router’s WAN subnet IP address.
Default Gateway
Enter the router’s WAN gateway IP address.
PPTP Server
Enter the IP address of the PPTP server.
Username
Enter the username provided by your ISP.
Password
Enter the password provided by your ISP.
Connect on Demand
If you want the WLX-2100 to end the Internet connection after it has been inactive for a period of
time, select this option and enter the number of minutes you want that period of inactivity to last.
Keep Alive
If you want the WLX-2100 to periodically check your Internet connection, select this option. Then
specify how often you want the WLX-2100 to check the Internet connection. If the connection is
down, the WLX-2100 automatically re-establishes your connection.
Get Automatically From ISP
Obtains the DNS automatically from the DHCP server.
Use These DNS Servers
Click the radio button to set up the Primary DNS and Secondary DNS servers manually.
Discard Ping on WAN
Keep it checked to recognize pings on the WLX-2100 WAN interface
Disable to block pings on the WLX-2100 WAN interface
WLX-2100 | User Manual
31
Tip: Pinging IP addresses is a common method used by hackers to test whether the IP address is
valid. Blocking pings provides some extra security from hackers.
Click Accept to save the settings or Cancel to discard the changes.
WLX-2100 | User Manual
32
LAN SETTINGS
IP Address
Enter the LAN IP address.
IP Subnet Mask
Enter the LAN IP subnet mask.
Use Router as DHCP Server
Check this option to enable the WLX-2100 internal DHCP server.
Starting IP Address
Specify the starting IP address range for the pool of allocated for private IP addresses. The starting
IP address must be on the same subnet as the ending IP address; that is the first three octets
specified here must be the same as the first three octets in End IP Address.
Ending IP Address
Specify the ending IP address range for the pool of allocated for private IP addresses. The ending IP
address must be on the same subnet as the starting IP address; that is the first three octets
specified here must be the same as the first three octets in Start IP Address.
WINS Server IP
Enter the IP address of the WINS server. Click Accept to confirm the changes or Cancel to cancel
and return previous settings.
WLX-2100 | User Manual
33
VPN PASS-THROUGH
VPN Pass-through allows a secure virtual private network (VPN) connection between two computers.
Enabling the options on this page opens a VPN port and enables connections to pass through the WLX-2100
without interruption.
PPTP Pass-through
Check this option to enable PPTP pass-through mode.
L2TP Pass-through
Check this option to enable L2TP pass-through mode.
IPsec Pass-through
Check this option to enable IPsec pass-through mode. Click Accept to confirm the changes or Cancel
to cancel and return previous settings.
WLX-2100 | User Manual
34
PORT FORWARDING
On this screen, you can configure port forwarding. Port forwarding enables multiple server applications on
a LAN to serve clients on a WAN over a single WAN IP address. The router accepts incoming client packets,
filters them based on the destination WAN, or public, port and protocol and forwards the packets to the
appropriate LAN, or local, port. Unlike the DMZ feature, port forwarding protects LAN devices behind the
firewall.
Overview of port forwarding rules
NO.
Displays the sequence number of the forwarded port.
Name
Displays the name of the forwarded port.
Protocol
Displays the protocol to use for mapping from the following: TCP, UDP or Both.
Start Port
Displays the LAN port number that WAN client packets will be forward to.
End Port
Displays the port number that the WAN client packets are received.
Server IP
Displays the IP address of the server for the forwarded port.
Enable
Click to enable or disable the forwarded port profile.
Modify
Click to modify the forwarded port profile.
WLX-2100 | User Manual
35
Delete
Click to delete the forwarded port profile.
Adding port-forwarding rules
Click Add Entry to add port forwarding rules.
Click Accept to confirm the changes.
Service Name
Enter a name for the port forwarding rule.
Protocol
Select a protocol for the application: Choices are Both, TCP, and UDP.
Starting Port
Enter a starting port number.
Ending Port
Enter an ending port number. All ports numbers between the starting and ending ports will forward
users to the IP address specified in the IP Address field.
IP Address
Enter the IP address of the server computer on the LAN network where users will be redirected.
Click Save to apply the changes or Cancel to return previous settings.
35

Hulp nodig? Stel uw vraag in het forum

Spelregels
1

Forum

Sitecom-WLX-2100-v1-001
  • Wij willen en jaren ,onze wifiversterker gaan gebruiken in de blokhut achter in de tuin.
    Ik zie op mijn telefoon de sitecom, maar deze vraagt om een wachtwoord.
    Dat ben ik vergeten dus kan ik geen verbinding maken. Hoe los ik dit op? Gesteld op 28-10-2022 om 16:55
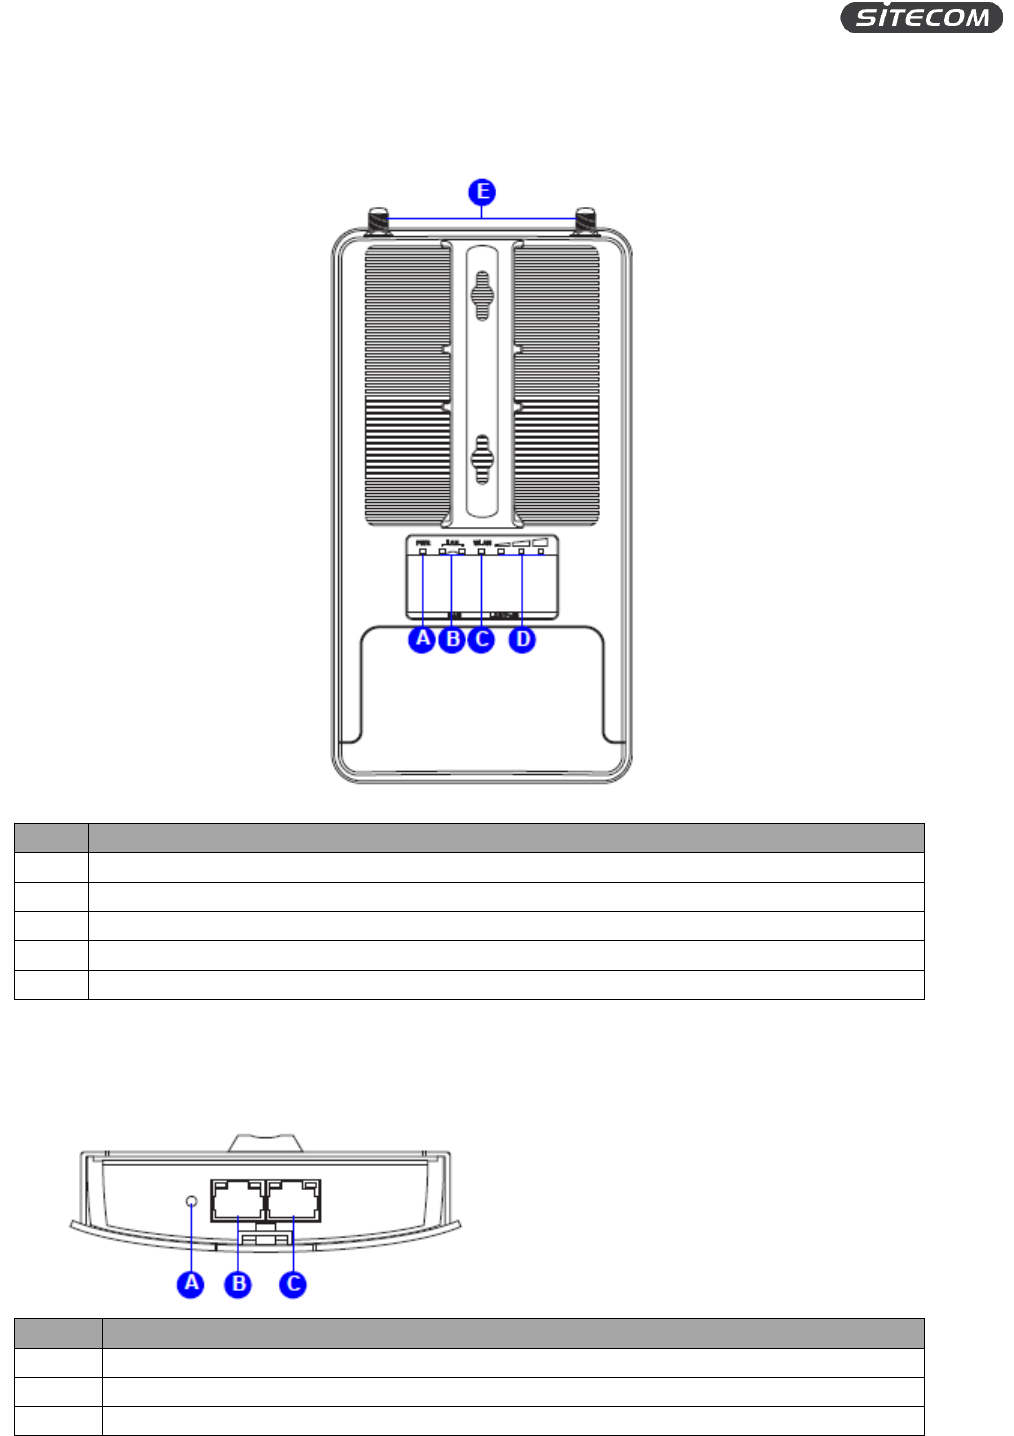
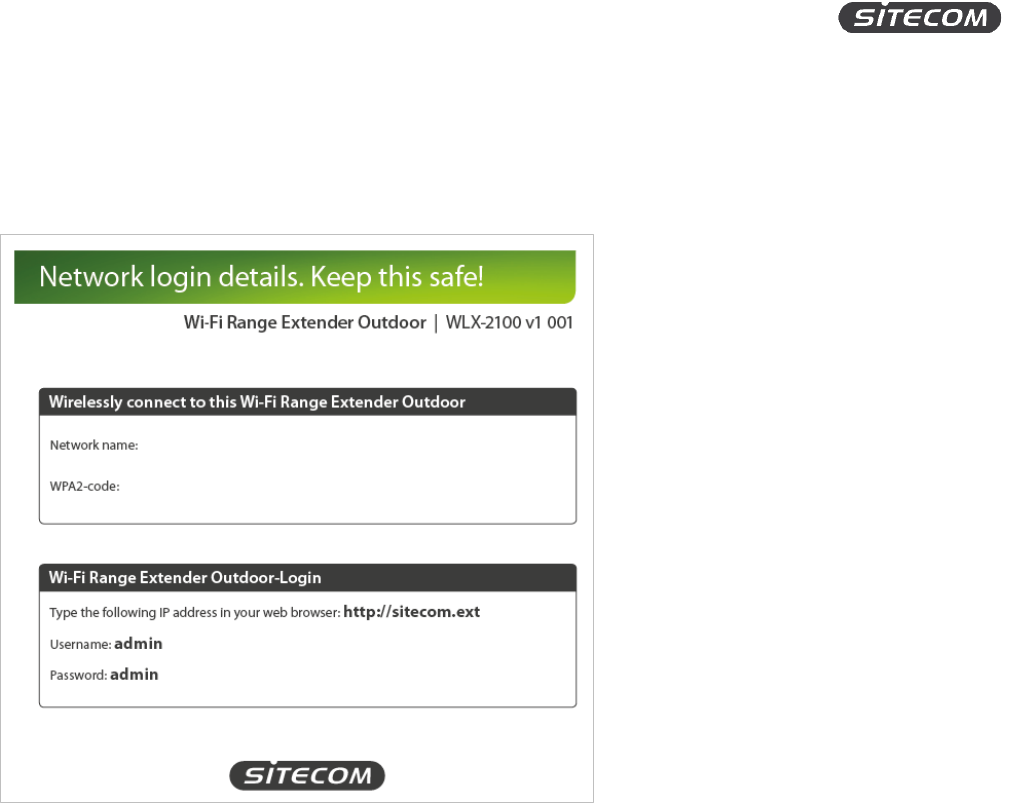
    Reageer op deze vraag Misbruik melden
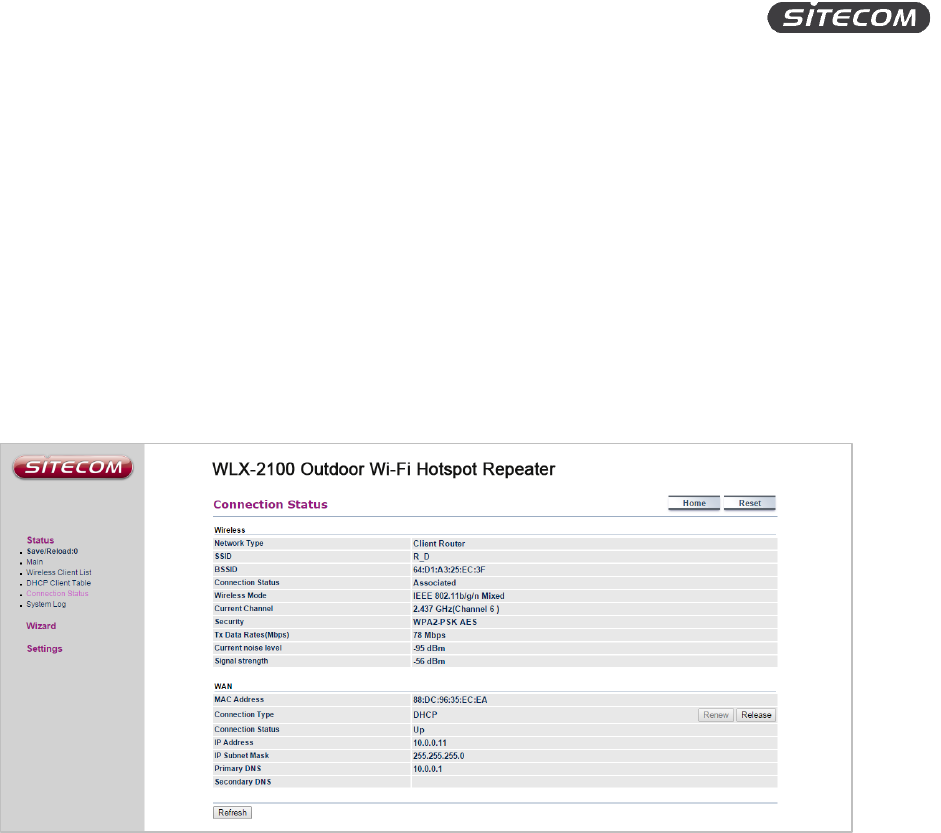
  • Mijn Android mobiel heeft een wifi verbinding met mijn Sitecom WLX-2100-v1 001 wifi extender outdoor. Uiteraard nog zonder internetverbinding. Volgens de handleiding is de volgende stap dan om in te loggen op de in de handleiding genoemde pagina sitecom.ext enz. Dit lukt echter niet. Ik krijg steeds de melding “” Adres niet gevonden”. Op mijn tablet loop ik op dezelfde manier vast.
    Ik heb de extender al een keer gereset naar de fabrieksinstellingen en goed gecontroleerd of ik geen fout in het adres heb gemaakt.
    Thuis via een bekabelde aansluiting met de PC kan ik wel inloggen. Maar ja die sleep ik natuurlijk niet mee in de Caravan.
    Wie weet wat er hier fout gaat?
    Gesteld op 28-6-2022 om 00:25

    Reageer op deze vraag Misbruik melden
  • Bij gebruik van de Sitecom wlx-2100 valt deze met enige regelmaat uit. Soms wel 10 keer op een avond. de enige manier om dit te herstellen is de troom eraf, even wachten en daarna de stroom er weer op. Daarna weer opnieuw verbinden. Dit duurt meestal enkele minuten. Erg vervelend allemaal. Oplossing niet kunnen vinden in de handleiding Gesteld op 14-7-2021 om 12:29

    Reageer op deze vraag Misbruik melden
  • Heeft u aub de hand leiding in het Nederland daar ik geen Engels kan vriendelijk dank Gesteld op 25-6-2021 om 10:19

    Reageer op deze vraag Misbruik melden
  • Ik heb mijn wlx2000 thuis getest en werkte perfect.
    Zit nu op de camping in italie en zie bij de keuze voor wifi de sitecom staan, als ik deze dan aanklik, komt hij links in beeld (ipad) als zijnde het netwerk, maar er gebeurt verder niets, ik kan dus de code die ik van de camping heb gekregen niet invullen.
    Wat doe ik fout?

    Vriendelijke groet,

    Chris Gesteld op 7-10-2018 om 12:30

    Reageer op deze vraag Misbruik melden
    • Zodra je een internet pagina gaat openen, zal het inlogscherm van de camping verschijnen en heb je de mogelijkheid om de voucher-code in te vullen.
      Lukt het helemaal niet kan je altijd de sitecom opnieuw opstarten en bv resetten zoals in de beschrijving staat. Start hij weer opnieuw op via je sitecom.ext pagina, admin inloggen, laat dan de wizard effe zijn werk doen en klik een netwerk aan wat meer als 50% bereik heeft.
      Bij het elke keer openen van je Ipad zal je ook steeds opnieuw de inlog gegegens van je voucher gebruikersnaam en wachtwoord dan moeten invullen.
      Succes. Geantwoord op 7-10-2018 om 13:19

      Waardeer dit antwoord (5) Misbruik melden
  • is de handleiding van WLX-2100 ook in het nederlands Gesteld op 12-6-2017 om 11:25

    Reageer op deze vraag Misbruik melden
6

Misbruik melden

Gebruikershandleiding.com neemt misbruik van zijn services uitermate serieus. U kunt hieronder aangeven waarom deze vraag ongepast is. Wij controleren de vraag en zonodig wordt deze verwijderd.

Product:

Bijvoorbeeld antisemitische inhoud, racistische inhoud, of materiaal dat gewelddadige fysieke handelingen tot gevolg kan hebben.

Bijvoorbeeld een creditcardnummer, een persoonlijk identificatienummer, of een geheim adres. E-mailadressen en volledige namen worden niet als privégegevens beschouwd.

Spelregels forum

Om tot zinvolle vragen te komen hanteren wij de volgende spelregels:

Belangrijk! Als er een antwoord wordt gegeven op uw vraag, dan is het voor de gever van het antwoord nuttig om te weten als u er wel (of niet) mee geholpen bent! Wij vragen u dus ook te reageren op een antwoord.

Belangrijk! Antwoorden worden ook per e-mail naar abonnees gestuurd. Laat uw emailadres achter op deze site, zodat u op de hoogte blijft. U krijgt dan ook andere vragen en antwoorden te zien.

Abonneren

Abonneer u voor het ontvangen van emails voor uw Sitecom WLX-2100 v1 001 bij:


U ontvangt een email met instructies om u voor één of beide opties in te schrijven.


Ontvang uw handleiding per email

Vul uw emailadres in en ontvang de handleiding van Sitecom WLX-2100 v1 001 in de taal/talen: Engels als bijlage per email.

De handleiding is 2,65 mb groot.


U ontvangt de handleiding per email binnen enkele minuten. Als u geen email heeft ontvangen, dan heeft u waarschijnlijk een verkeerd emailadres ingevuld of is uw mailbox te vol. Daarnaast kan het zijn dat uw internetprovider een maximum heeft aan de grootte per email. Omdat hier een handleiding wordt meegestuurd, kan het voorkomen dat de email groter is dan toegestaan bij uw provider.

Stel vragen via chat aan uw handleiding

Stel uw vraag over deze PDF

Andere handleiding(en) van Sitecom WLX-2100 v1 001

Sitecom WLX-2100 v1 001 Snelstart handleiding - English - 8 pagina's


Uw handleiding is per email verstuurd. Controleer uw email

Als u niet binnen een kwartier uw email met handleiding ontvangen heeft, kan het zijn dat u een verkeerd emailadres heeft ingevuld of dat uw emailprovider een maximum grootte per email heeft ingesteld die kleiner is dan de grootte van de handleiding.

Er is een email naar u verstuurd om uw inschrijving definitief te maken.

Controleer uw email en volg de aanwijzingen op om uw inschrijving definitief te maken

U heeft geen emailadres opgegeven

Als u de handleiding per email wilt ontvangen, vul dan een geldig emailadres in.

Uw vraag is op deze pagina toegevoegd

Wilt u een email ontvangen bij een antwoord en/of nieuwe vragen? Vul dan hier uw emailadres in.


Info