


-
LAN 1 en LAN 2 blijven knipperen, maar dataverbinding komt niet tot stand Gesteld op 28-7-2022 om 21:57
Reageer op deze vraag Misbruik melden -
De automatische installatie lukt niet, wel internet toegang, maar de oorspronkelijk handleiding m.b.v. 192.168.128.253 welke ik bij de eerste installatie gebruikt heb bestaat niet meer .
Reageer op deze vraag Misbruik melden
Hoe nu de Sitecom WLX-2003 actief te krijgen. Gesteld op 25-5-2022 om 14:16-
Bij mij is het gewoon gelukt.
Waardeer dit antwoord (1) Misbruik melden
extender in stopcontact stoppen
dan ingedrukt houden en resetten
dan verbinden met de extender via wifi
dan die site op internet explorer niet op microsoft edge invoeren.
en dan kom je er! Geantwoord op 8-1-2023 om 16:41
-
-
De pagina met de wizard wordt niet weergegeven. Wat nu? Gesteld op 9-12-2021 om 13:00
Reageer op deze vraag Misbruik melden -
Welk knopje van de router ciscoEPC3925 moet ik indrukken.? Gesteld op 29-9-2021 om 14:23
Reageer op deze vraag Misbruik melden -
Goeden middag mijn naam is Will- ik heb een probleem met mijn sitecom extender hij wil ineens niet meer aangaan, wat kan ik hier aan doen/ Gesteld op 15-8-2021 om 13:43
Reageer op deze vraag Misbruik melden -
Tot nu toe heeft de externer prima voldaan. Echter na het plaatsen van de nieuwe WiFi router X8 AC1750 wlr-8200 en de installatie hiervan krijg ik geen toegang tot de extender. Er wordt continu om het password gevraagd en uiteraard ingegeven maar het wordt niet geaccepteerd. Hoe dit op te lossen, bij voorbaat dank!
Reageer op deze vraag Misbruik melden
Gr. Leo. Gesteld op 16-1-2018 om 16:55-
Beste Leo,
Waardeer dit antwoord (39) Misbruik melden
Heb je het probleem inmiddels kunnen oplossen? Ik loop helaas tegen hetzelfde probleem aan, dus ik ben benieuwd of je de range extender weer 'aan de praat' hebt gekregen.
Met vriendelijke groet,
Govert Luijten
Geantwoord op 1-4-2018 om 12:14
-
-
Beste,
Waardeer dit antwoord (37) Misbruik melden
Ik heb ook dit probleem. Heeft iemand al een oplossing gevonden? Hij wil mijn paswoord van BBOX 3 niet aanvaarden.... Geantwoord op 16-5-2018 om 15:42 -
Is deze extender in client mode wireless te gebruiken? zo ja, hoe? Gesteld op 27-7-2017 om 17:06
Reageer op deze vraag Misbruik melden-
Dit apparaat is alleen een extender volgens de specificaties. Klik op deze LINK Geantwoord op 27-7-2017 om 22:08
Waardeer dit antwoord Misbruik melden
-
-
Ik kan maar met 1apparaat aanmelden bij de extra router. En dat is een iPhone. Samsung en Asus kunnen niet verbinden. Hoe kan dit? Gesteld op 1-5-2017 om 18:42
Reageer op deze vraag Misbruik melden-
De WLX2006 is geen router, maar een bereik-vergroter die het wifi-signaal van je router kan versterken.
Waardeer dit antwoord Misbruik melden
Als je de wifi van de Iphone helemaal uitschakelt, kun je dan wel met een ander apparaat aanmelden op de WLX2006?
Geantwoord op 1-5-2017 om 21:27
-
-
hoe kan ik 2e extender plaatsen om signal verder te uitbreiden? Gesteld op 1-4-2017 om 17:53
Reageer op deze vraag Misbruik melden-
Dat kan niet. Je kunt geen twee of meer extenders achter elkaar in serie installeren om zo het wifisignaal nog verder te transporteren.
Waardeer dit antwoord (2) Misbruik melden
Je kunt werken met twee powerline-adapters. Eén bij de router en één op de plek waar je wifi wilt. Op die poweline adapter kunt je een accesspoint prikken om wifi te krijgen. Geantwoord op 1-4-2017 om 18:04
-
-
Beste,
Reageer op deze vraag Misbruik melden
ik heb een wlx-2007 v1 001 range extender gekocht. Als ik hem probeer te configureren met mijn kpn experia box volgens de beschreven methode met OPS lukt dit niet. Het blauwe lampje brandt een paar seconden en gata vervolgens weer uit. De afstand tussen de router en de extender is minimaal.
Wat kan ik doen?
vr. grt.
Tjeerd Bottema Gesteld op 20-11-2016 om 15:08-
Ik heb exact hetzelde probleem. Is er al een oplossing aangeboden? Geantwoord op 5-12-2016 om 17:40
Waardeer dit antwoord (48) Misbruik melden
-
-
hoe komt het dat ik dagelijks de wps knop van de repeter en de router moet indrukken om signaal te bekomen Gesteld op 13-10-2016 om 21:43
Reageer op deze vraag Misbruik melden-
Goedenmorgen.
Waardeer dit antwoord (9) Misbruik melden
Helaas kan ik je hier op deze webpagina niet mee verder helpen, je kunt echter veel hulpmateriaal, zoals veelgestelde vragen, instructies en how-to videos, vinden op onze website: Klik op deze LINK
Als je liever persoonlijk contact hebt, dan kun je contact opnemen met onze helpdesk via e-mail, telefoon of live chat.
Opties voor meer ondersteuning
Telefonisch contact:
Voor Nederland: via partner Network Solution Centre 0900 381 0002 (80 cent per minuut)
Voor de gratis e-mail en live chat opties, volg deze instructies:
1.Ga naar Klik op deze LINK
2 Voer uw productcode en het versienummer in
3 Klik op een van de FAQ's (meest gestelde vragen)
4 Scroll helemaal naar beneden van de FAQ pagina (het kan zijn dat u naar de volgende pagina moet gaan)
5 Klik op de link voor persoonlijk contact
Met vriendelijke groet,
Sitecom Webcare Geantwoord op 14-10-2016 om 09:17
-
-
Ik wil graag de Sitecom WLX-2007 - Range Extender bestellen om mn tv's erop aan te sluiten. Dit zodat ik geen lange kabels hoef te trekken. Ik doe dit nu ook al met 2 extenders van telfort, de ene dus in de ethernetpoort van de hoofdmediabox en dan de stekker in de extender, dan boven zo'n andere extender en hetzelfde (dus kabel in de poort van de ethernetpoort en de andere in de extender) daarna met elkaar verbonden.
Reageer op deze vraag Misbruik melden
Nu is mijn vraag of dit ook met dit systeem kan en of ik er dan meerdere tv's op kan aansluiten en eventueel in een andere kamer een computer.
En kan ik dit systeem ook koppelen met die van telfort of moet ik ze allemaal vervangen?
Alvast bedankt voor de antwoorden
Groetjes Bianca Gesteld op 27-9-2016 om 04:30-
Hoewel het aansluiten geen probleem zal zijn, is het de vraag of uw provider toestaat om op deze manier TV over IP te bekijken.
Waardeer dit antwoord (1) Misbruik melden
Raadpleeg eerst de provider, als zij het groene licht geven dan kunt u zeker proberen op deze manier de tv's aan te sluiten.
Houd er wel rekening mee dat via een extender maar de helft van de aangegeven snelheid gehaald kan worden omdat het signaal draadloos doorgegeven wordt. Geantwoord op 27-9-2016 om 14:22
-
-
Ik weet mijn originele password meer van mijn Sitecom N300 extender
Reageer op deze vraag Misbruik melden
Hoe is dit op te losen ? Gesteld op 1-8-2016 om 12:02-
staat in het videofilmpje Geantwoord op 4-8-2016 om 18:38
Waardeer dit antwoord (14) Misbruik melden
-
-
Installeren via OPS lukt niet en via de wizard in het menu van de extender zelf ook niet. Na ingave van de sleutel krijg ik al de melding dat het mislukt is terwijl ik zeker weet dat de ingevoerde sleutel correct is.Kan het aan de lengte van de sleutel liggen (20 tekens)? Gesteld op 13-7-2016 om 16:56
Reageer op deze vraag Misbruik melden-
Hey! Ik heb precies het zelfde probleem.. Ben je er toevallig al achter hoe het wel goed lukt? Geantwoord op 7-9-2016 om 21:44
Waardeer dit antwoord (18) Misbruik melden
-
-
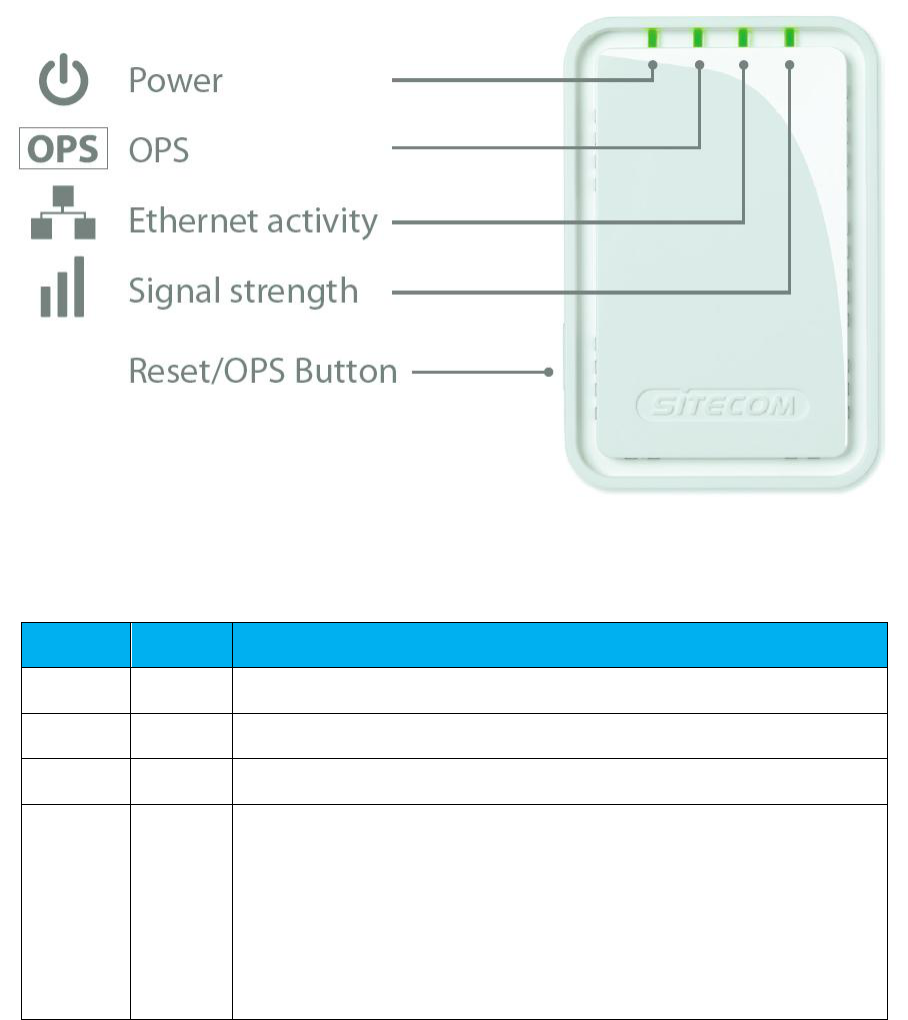
Het vierde lampje onder de drie staafjes licht niet op.
Reageer op deze vraag Misbruik melden
Het kiezen van een andere plaats in huis heeft dan geen zin. Gesteld op 1-7-2016 om 14:04-
Het vierde lampje geeft de signaalsterkte weer tussen de bron (vaak is dit uw router) en de extender. Is deze uit is de extender dus te ver van de bron, of er is helemaal geen verbinding. In het laatste geval is het raadzaam om de extender te resetten en opnieuw in te stellen:
Waardeer dit antwoord (12) Misbruik melden
- reset de extender terwijl deze in het stopcontact zit door de OPS knop aan de zijkant 20 seconden ingedrukt te houden
- wacht tot de extender is opgestart; het power lampje zal permanent branden
- verbind uw computer / tablet of telefoon draadloos met de Sitecom netwerknaam van de extender
- uw apparaat zal wellicht aangeven dat de toegang 'beperkt' is; dit klopt, want er is nog geen verbinding met internet gemaakt
- vul 192.168.128.253 in in de adresbalk van uw internetbrowser
- de gebruikersnaam en het wachtwoord zijn beiden: admin
- klik op de tab 'Wizard'
- volg de stappen
- voer het gevraagde wachtwoord van uw eigen draadloze netwerk zorgvuldig in
- uiteindelijk is een nieuwe netwerknaam aangemaakt welke uw bestaande netwerknaam is, met de toevoeging '_ext'.
- voortaan maakt u verbinding met deze nieuwe netwerknaam met uw bestaande wachtwoord als u via de extender wilt internetten
- u kunt de extender nu ook ergens anders plaatsen zonder dat de installatie opnieuw moet worden uitgevoerd
- let op het signaal ledje; wanneer deze begint te knipperen of zelfs uitgaat, betekent dit dat de afstand tussen de router en extender te groot wordt / is
Met vriendelijke groet,
Sitecom Webcare Geantwoord op 1-7-2016 om 14:49
-
-
Kun je van deze extender ook een access point maken via een lan kabel van af de router? Gesteld op 27-6-2016 om 23:52
Reageer op deze vraag Misbruik melden-
Dit is mogelijk. Reset de extender en log in in de instellingen (via 192.168.128.253 / admin:admin) en zet de DHCP server uit. Steek de kabel er in en dat is alles.
Waardeer dit antwoord (8) Misbruik melden
Met vriendelijke groet,
Sitecom Webcare Geantwoord op 28-6-2016 om 09:08
-
-
Extender aangesloten. Regelmatig verbreekt de verbinding. Extender nog wel te zien tussen wifi modums maar zodra je op verbinden klikt gooit hij je eruit. Normaal ging dat wel over met uit en aanzetten. Nu helaas niet. Kan ik deze extender resetten en opnieuw verbinden? Nogmaals, hij blijft een goede wifi verbinding geven. Maar je kunt er met geen enkel device mee verbinden.. Gesteld op 22-6-2016 om 20:33
Reageer op deze vraag Misbruik melden-
Hetzelfde probleem heb ik ook Geantwoord op 23-6-2016 om 00:58
Waardeer dit antwoord Misbruik melden
-
-
Ondertussen de extender weten te resetten. Hij heet nu weer sitecomXXXX ipv onze eige wifi_EXT. De webpagina sitecom.extender is niet beschikbaar. Hoe nu verder? Geantwoord op 23-6-2016 om 12:08
Waardeer dit antwoord (12) Misbruik melden -
Kan ik meer dan een sitecom range extender N300 instaleren Gesteld op 23-5-2016 om 15:41
Reageer op deze vraag Misbruik melden-
Dit is in theorie mogelijk, maar de vraag is wat de praktische toepassing hiervan wordt. Neem even contact op met onze helpdesk via e-mail, telefoon of live chat.
Waardeer dit antwoord (1) Misbruik melden
Opties voor ondersteuning
Telefonisch contact in Nederland via partner Network Solution Centre: 0900-3810002 (80 cent per minuut)
Voor de gratis e-mail en live chat opties, volg deze instructies:
1. Ga naar www.sitecomlearningcentre.comKlik op deze LINK
2. Voer je productcode en versienummer in
3. Klik op een willekeurige Veelgestelde vraag
4. Scrol naar het einde van de veelgestelde vraag (mogelijk moet je eerst naar de volgende pagina gaan)
5. Klik op de link voor persoonlijk contact
Met vriendelijke groet,
Sitecom Webcare
Geantwoord op 25-5-2016 om 11:18
-
-
N300 wordt niet gedetecteerd op meerdere laptops! Gesteld op 20-5-2016 om 17:48
Reageer op deze vraag Misbruik melden-
Helaas kan ik je hier op deze pagina niet verder helpen. Je kunt echter veel hulpmateriaal, zoals veelgestelde vragen, instructies en how-to video's vinden op onze website www.sitecom.com
Waardeer dit antwoord Misbruik melden
Als je liever persoonlijk contact hebt, dan kun je contact opnemen met onze helpdesk via e-mail, telefoon of live chat.
Telefonisch contact in Nederland: via partner 'Network Solution Centre': 0900-3810002 (80 cent per minuut)
Voor gratis e-mail en live chat opties, volg deze instructies:
1. Ga naar www.sitecomlearningcentre.com
2. Voer je productcode en versienummer in
3. Klik op een willekeurige Veelgestelde vraag
4. Scroll naar het einde van de veelgestelde vraag (mogelijk moet je eerst naar de volgende pagina gaan)
5. Klik op de link voor persoonlijk contact
Vriendelijke groet,
Sitecom Webcare
Geantwoord op 23-5-2016 om 10:46
-
-
Extender heft de naam van de router overgenomen met de extensie . Ext
Reageer op deze vraag Misbruik melden
Inloggen met wachtwoord van router lukt niet. Gesteld op 10-4-2016 om 16:35-
Geachte heer/mevrouw,
Waardeer dit antwoord (11) Misbruik melden
Middels onderstaande methode kunt u de extender instellen.
- Sluit een netwerk kabel aan tussen uw range extender en uw computer.
- Voert u nu een reset uit van de range extender, door de OPS knop gedurende 20 seconden ingedrukt te houden.
- Hierna wacht u 2 minuten totdat de range extender weer is opgestart.
- Opent u een webbrowser (b.v. Internet Explorer) en vult u het volgende adres in op de adresbalk: Klik op deze LINK
- U zou nu moeten kunnen inloggen met gebruikersnaam: admin en wachtwoord admin
(Komt u niet op de inlogpagina, volg dan eerst de stappen voor het instellen van een statisch IP adres zoals omschreven onderaan dit bericht)
Klikt u op het menu item 'Wizard' en volg de aanwijzingen op het scherm.
Bevestig tijdens de installatie dat het netwerk dat u probeert te verlengen een signaalsterkte heeft hoger dan 50. Indien het signaal een waarde lager dan 50 heeft, probeer de extender dan op een andere plek (dichter bij de router).
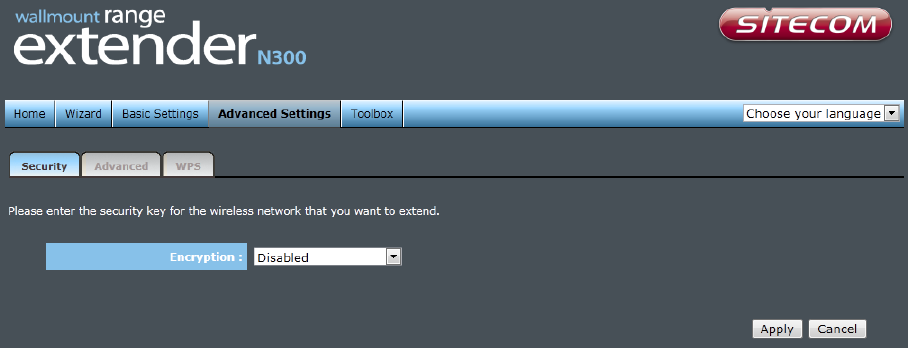
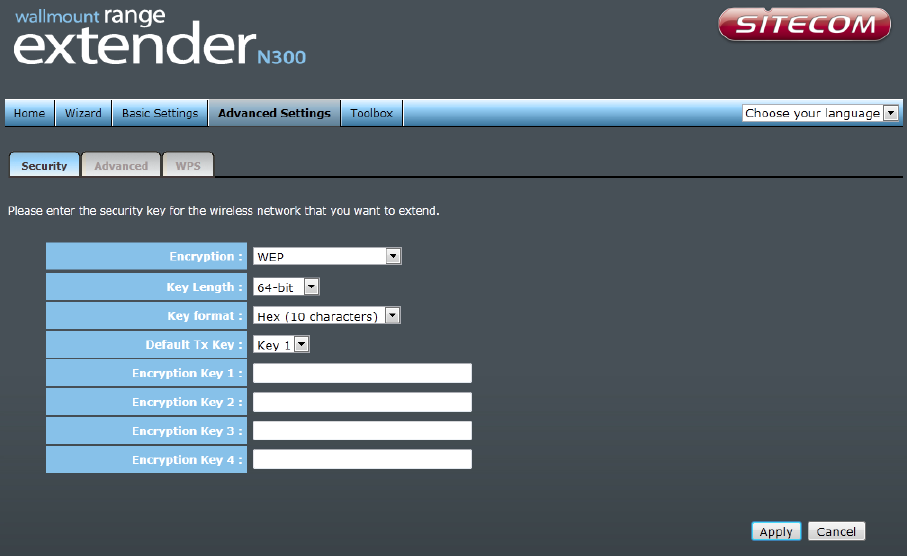
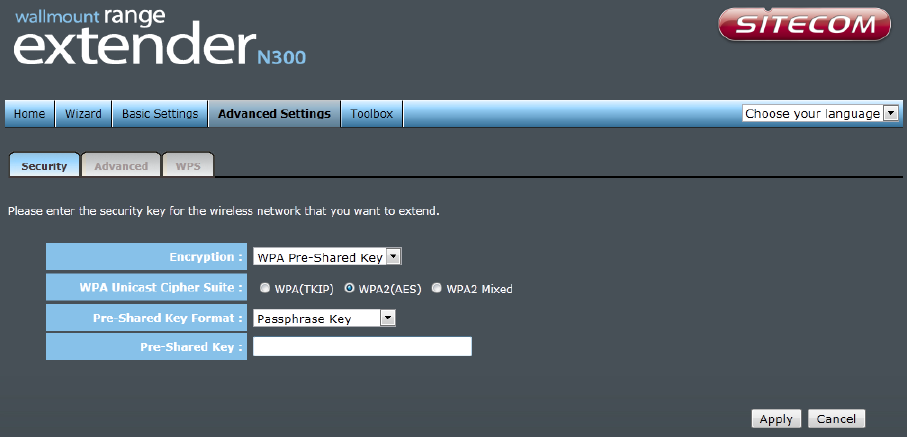
Het is aan te raden om het netwerk dat u wilt verlengen te voorzien van een vast draadloos kanaal en deze te beveiligen met alleen de WPA2 AES beveiligingstandaard (geen WPA/WPA2 of TKIP met AES).
Nadat de extender is geinstalleerd, kunt u verbinding maken met het nieuwe _EXT netwerk. Bij het verbinden gebruikt u het wachtwoord van uw oorspronkelijke netwerk.
Indien u verbindingsproblemen blijft houden, controleer dan de door de router gebruikte beveiligingstandaard en test of het wel werkt nadat u een ander kanaal instelt op uw router en de extender hiervoor configureert.
Toevoeging voor Ziggo/UPC modemrouters (zou niet nodig moeten zijn bij de Dual Band modellen):
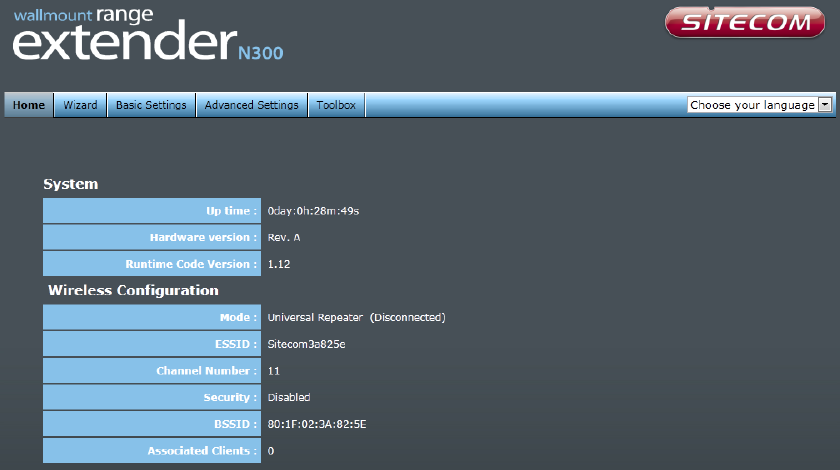
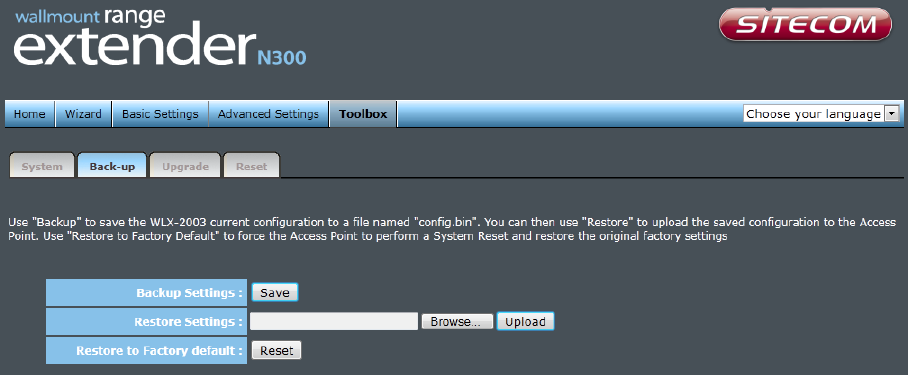
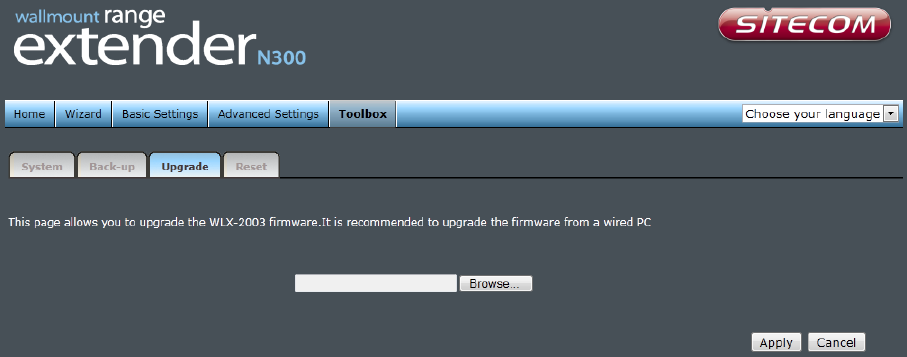
Verder, krijgt u na installatie geen verbinding, maar brandt het signaallampje wel en staat in het menu van de extender bij Mode: de status Universal Repeater (Connected), test dan eens met de DHCP client disabled (staat onder Toolbox). Let wel: na dit ingesteld te hebben verliest u toegang tot de instelpagina van de extender, u kunt indien nodig opnieuw bovenstaande stappen doorlopen om weer toegang te verkrijgen.
STATISCH IP ADRES INSTELLEN
WINDOWS VISTA/7/8/10:
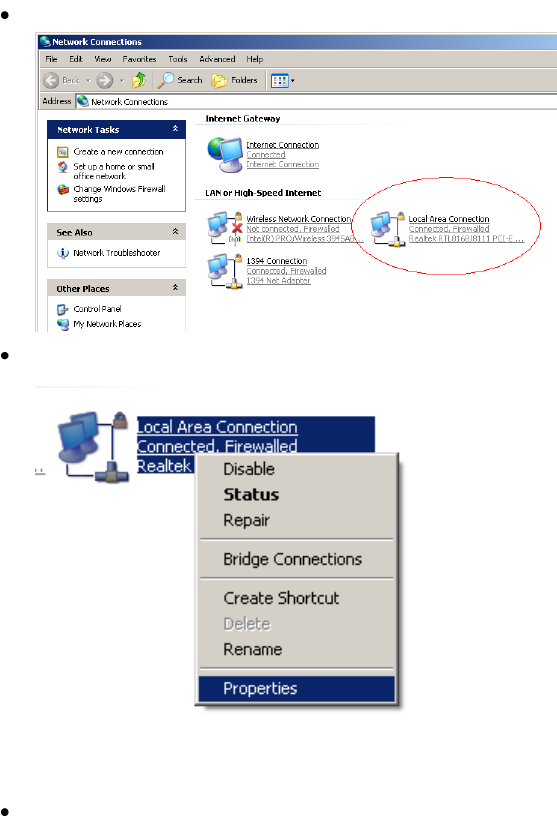
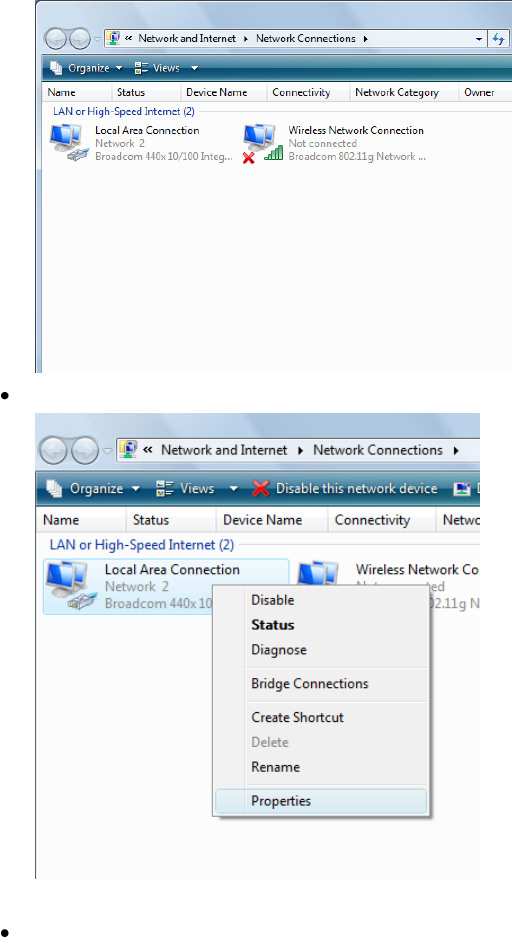
1) Klik op Start (bij Windows 8/10 met de rechtermuisknop en kies Netwerkverbindingen)
2) Selecteer Configuratiescherm in het menu.
3) Klik op Netwerkstatus en -taken weergeven, hiermee opent u het Netwerkcentrum.
4) Klik links in de takenlijst op Netwerkverbindingen beheren / Adapter instellingen wijzigen.
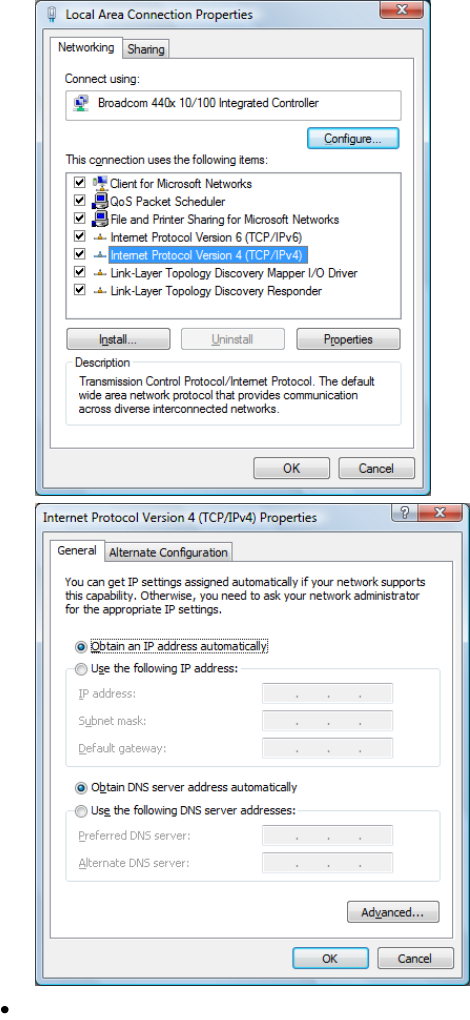
5) Klik met de rechtermuisknop op LAN-verbinding, en selecteer Eigenschappen.
6) Mocht er om toestemming gevraagd worden, klik dan op Doorgaan.
7) Klik op internetprotocol versie 4 (TCP/IPv4), en druk op de knop Eigenschappen.
8) Vul in dit scherm de volgende gegevens in:
IP-adres : 192.168.128.20
Subnetmask: 255.255.255.0
9) Klik op OK, en druk in het vorige scherm wederom op OK.
MAC OS:
1) Geef uw Mac een statisch IP adres. Klik op het Apple logo in de 'Finder' en ga naar 'Systeem Voorkeuren, klik hier vervolgens op 'Netwerk'
2) Nu kunt u uw ingebouwde 'Ethernet Adapter' selecteren. Zet vervolgens de 'IPv4 Configureren' op 'Handmatig'
3) Gebruik nu de volgende instellingen:
IP Adres: 192.168.128.20
Subnet Masker: 255.255.255.0
Router: 192.168.128.253
DNS Server 192.168.128.253
Nadien kunt u lan-verbinding weer op Automatisch IP-adres verkrijgen / DHCP terugzetten.
Met vriendelijke groet,
Sitecom Webcare Geantwoord op 11-4-2016 om 09:10
-
-
Wat is de naam van de site url om wèl te kunnen aanmelden?? Gesteld op 2-4-2016 om 18:38
Reageer op deze vraag Misbruik melden-
Dat zou ik ook graag willen weten....sitcom.extender bestaat niet
Waardeer dit antwoord (10) Misbruik melden
Geantwoord op 2-4-2016 om 18:49
-
-
Nog steeds geen verbinding mogelijk. Ook ik blijf met dit probleem. (sitecom.extender bestaat niet) Geantwoord op 9-4-2016 om 14:14
Waardeer dit antwoord (8) Misbruik melden -
ga naar Klik op deze LINK ik had dat probleem ook het zou nu moeten werken Geantwoord op 18-5-2016 om 17:57
Waardeer dit antwoord Misbruik melden -
Ik heb een sitecom extender.In de handleiding staat dat ik voor installeren naar sitecom.ext moet, maar deze pagina bestaat niet. Dus wat moet ik nu doen?
Reageer op deze vraag Misbruik melden
Gesteld op 26-2-2016 om 21:40-
Maak via WiFi verbinding met de extender (sitecom..........)
Waardeer dit antwoord (1) Misbruik melden
Tik dan in de adresregel van je browser : Klik op deze LINK
Succes,
Theo Geantwoord op 17-3-2016 om 09:36
-
-
Ik heb vandaag ok de sitecom aangeschaft .
Waardeer dit antwoord Misbruik melden
Maar breng hem zo snel mogelijk weer terug
Krijg geen verbinding ook niet met wifi Geantwoord op 26-3-2016 om 22:22 -
Klik op deze LINK is niet bereikbaar voor installatie WLX-2006v1001 Gesteld op 14-2-2016 om 20:31
Reageer op deze vraag Misbruik melden-
probeer de ip adres te vinden van dit apparaat, 198.128 ect zo lukte het bij mij Geantwoord op 16-2-2016 om 17:49
Waardeer dit antwoord (10) Misbruik melden
-
-
Hallo, ik gebruik de WLX N300 range extender van Sitecom. Nu is echter mijn router vervangen en dus ook mijn toegangsnaam en wachtwoord. Ik heb geen ops op de modem en weet niet hoe ik de extender opnieuw moet verbinden met de nieuwe gegevens. Gesteld op 27-1-2016 om 16:20
Reageer op deze vraag Misbruik melden-
Hier ben k ook benieuwd naar Geantwoord op 30-1-2016 om 20:31
Waardeer dit antwoord (3) Misbruik melden
-
-
ik zit met hetzelfde proleem. heb geen ops knop, en zou niet weten hoe ik hem via de wizard moet installeren. want de gebruiksaanwijzing geeft wel een link aan, maar ik kom dan op een heel ander soort site terecht. help? Geantwoord op 18-2-2016 om 16:27
Waardeer dit antwoord (30) Misbruik melden -
Of dit is een volkomen waardeloze extender, of ik lees niet goed. Maar kom niet eens op sitecom.extender 0f sitecom.AP. Heeft iemand deze extender aan het werk gekregen. ZOu graag weten hoe?
Reageer op deze vraag Misbruik melden
Het betreft de N300 2005 Gesteld op 27-12-2015 om 15:18-
1: Reset je extender (ops toets voor een tijdje indrukken).
Waardeer dit antwoord (9) Misbruik melden
2: Zet de Wi-Fi op je pc uit.
3: Steek je extender in een stopcontact in de buurt.
4: Verbindt je pc en extender met een ethernetkabel.
> De pc zal automatisch verbinding maken maar als dit niet zo is moet je hem gewoon manueel verbinden in de netwerkinstellingen.
5: Type bij Chrome ( of Firefox, safari, ...) als URL: www.sitecom.ext
> username: admin
> password: admin
6: Volg de simpele stappen op de site...
7: Enjoy your wifi and thank me later :) Geantwoord op 28-12-2015 om 17:03
-
-
Top dankjewel, deze volgorde is super! Geantwoord op 26-1-2016 om 11:04
Waardeer dit antwoord (3) Misbruik melden -
Hallo, wij hebben de extender in het stopcontact gedaan, en de ops knop even ingedrukt gehouden zodat hij gaat knipperen. Echter ontvangen wij op de laptop geen wifi signaal wat iets van SitecomXXXXXX heet en kunnen wij dus ook niet naar sitecom.extender om de extender in te stellen. Hoe komt dit en wat kunnen we hier aan doen?
Reageer op deze vraag Misbruik melden
Wij hebben voorheen de extender al gereset en alle stappen al meerdere keren herhaald maar het lukt steeds niet.
Hoor graag van u! Gesteld op 3-11-2015 om 20:35-
1: Reset je extender (ops toets voor een tijdje indrukken).
Waardeer dit antwoord Misbruik melden
2: Zet de Wi-Fi op je pc uit.
3: Steek je extender in een stopcontact in de buurt.
4: Verbindt je pc en extender met een ethernetkabel.
> De pc zal automatisch verbinding maken maar als dit niet zo is moet je hem gewoon manueel verbinden in de netwerkinstellingen.
5: Type bij Chrome ( of Firefox, safari, ...) als URL: www.sitecom.ext
> username: admin
> password: admin
6: Volg de simpele stappen op de site...
7: Enjoy your wifi and thank me later :) Geantwoord op 28-12-2015 om 17:04
-
-
krijg op de site van sitecom.extender geen wizard knop in beeld. Gesteld op 25-9-2015 om 14:34
Reageer op deze vraag Misbruik melden-
heeft u hier al meer info over!! ik loop hier ook vast. Geantwoord op 3-12-2015 om 18:35
Waardeer dit antwoord (1) Misbruik melden
-
-
1: Reset je extender (ops toets voor een tijdje indrukken).
Waardeer dit antwoord (1) Misbruik melden
2: Zet de Wi-Fi op je pc uit.
3: Steek je extender in een stopcontact in de buurt.
4: Verbindt je pc en extender met een ethernetkabel.
> De pc zal automatisch verbinding maken maar als dit niet zo is moet je hem gewoon manueel verbinden in de netwerkinstellingen.
5: Type bij Chrome ( of Firefox, safari, ...) als URL: www.sitecom.ext
> username: admin
> password: admin
6: Volg de simpele stappen op de site...
7: Enjoy your wifi and thank me later :) Geantwoord op 28-12-2015 om 17:04 -
Kan ik de extender resetten? De verbinding doet het niet meer. Gesteld op 14-9-2015 om 23:13
Reageer op deze vraag Misbruik melden-
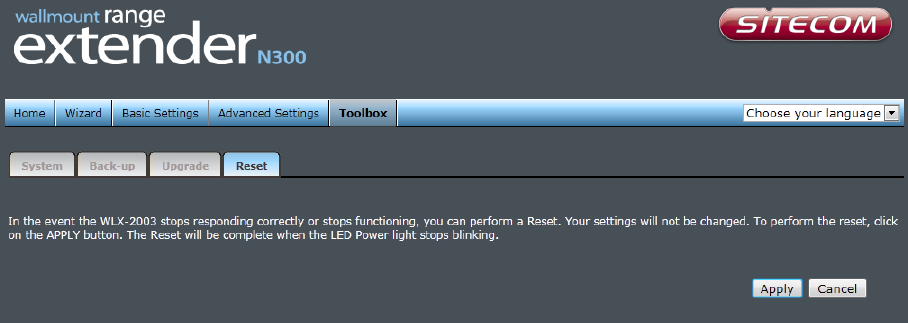
Probeert u het volgende om de extender te resetten en te herinstalleren:
Waardeer dit antwoord (30) Misbruik melden
Sluit een netwerkkabel aan tussen uw range extender en uw computer of verbindt na de hieronder genoemde reset met het draadloze netwerk van de extender.
Voer een reset uit van de range extender, door de OPS knop gedurende 20 seconden ingedrukt te houden.
Wacht 2 minuten totdat de range extender weer is opgestart.
Open een webbrowser (b.v. Internet Explorer) en open het volgende adres:
Klik op deze LINK
U zou nu moeten kunnen inloggen met gebruikersnaam: admin en wachtwoord admin
Klik op het menu item 'Wizard'.
Bevestig dat het netwerk dat u wilt verlengen een signaalsterkte heeft van hoger dan 50. Is de signaalwaarde lager dan 50, probeer dan de extender op een andere plek (dichter bij de router). Het is aan te raden om het netwerk dat u wilt verlengen te voorzien van een vast draadloos kanaal en deze te beveiligen met alleen de WPA2 AES beveiligingsstandaard (geen WPA/WPA2 of TKIP met AES).
Volg de aanwijzigen op het scherm.
Nadat de extender is geïnstalleerd, kunt u verbinding maken met het nieuwe _EXT netwerk. Bij het verbinden gebruikt u het wachtwoord van uw oorspronkelijke netwerk.
Werkt de extender na installatie niet goed, controleer dan de door de router gebruikte beveiligingsstandaard. Helpt dit niet, test dan of het wel goed werkt wanneer u de router een ander draadloos kanaal toekent en de extender hiervoor configureert.
Verder, krijgt u na installatie geen verbinding, maar gaat wel het signaallampje branden en staat in het menu van de extender bij Mode: de status Universal Repeater (Connected), test dan eens met de DHCP client disabled (staat onder Toolbox). Let wel: na dit ingesteld te hebben verliest u toegang tot de instelpagina van de extender, u kunt indien nodig opnieuw bovenstaande stappen doorlopen om weer toegang te verkrijgen.
Vriendelijke groet,
Maarten
Sitecom Webcare Geantwoord op 15-9-2015 om 09:10
-
-
hoe kan ik weer terug zetten naar fabriek instellingen ik weet mijn wachtwoord niet meer Gesteld op 27-8-2015 om 23:31
Reageer op deze vraag Misbruik melden-
Dit kan door de OPS/WPS knop voor tenminste 15 seconden ingedrukt te houden. Geantwoord op 15-9-2015 om 09:11
Waardeer dit antwoord Misbruik melden
-
-
Het door Maarten gegeven antwoord werkt prima.
Waardeer dit antwoord Misbruik melden
Gewoon even de netwerkkabel aansluiten na de 20 seconden reset en dan inloggen via de browser
Prachtig en bedankt
Albert Brasz
Geantwoord op 20-10-2015 om 20:00 -
Heb een Experia box V8 en wil hier graag een N300 Wifi extender aan hangen.
Reageer op deze vraag Misbruik melden
Nu heeft mijn router geen ops knop en heb alle knoppen gehad, tot dusver geen contact.
Op het filmpje kom ik tot aan htt://sitecom.ext(ender) hier opent hij geen nieuwe pagina waar ik kan inloggen zoals het filmpje vervolgt.
Wie heeft een oplossing?
Alvast bedankt Gesteld op 17-8-2015 om 18:42-
Ik heb hetzelfde probleem, volgens mij is de site uit de lucht. Kan iemand hier meer over vertellen? Of kunt u vertellen hoe u dit op dit moment heeft opgelost?
Waardeer dit antwoord Misbruik melden
Mvg Geantwoord op 10-9-2015 om 20:01
-
-
Wij hebben de handleinding opgevolgd tot en met de verbinding met de modem, de lampjes Power en wifi branden. Hoe moet het nu verder? Hoe krijg ik met mijn laptop verbinden met de Extender?
Reageer op deze vraag Misbruik melden
Vriendelijke groet,
A.J. Nugteren Gesteld op 29-7-2015 om 18:54-
Na installatie kunt u verbinding maken met het draadloze netwerk van de extender. Dit netwerk heeft de naam van het originele netwerk dat verlengt wordt met de toevoeging _EXT. Het verbinding maken gaat op precies dezelfde manier als het verbinding maken met het originele netwerk. Voor de meeste besturingsystemen: op het icoon voor de draadloze verbinding klikken, origineelnetwerk_EXT aanklikken, kiezen voor verbinden, het wachtwoord van het originele netwerk invoeren en dit bevestigen met OK.
Waardeer dit antwoord Misbruik melden
Vriendelijke groet,
Maarten
Sitecom Webcare
Geantwoord op 30-7-2015 om 09:15
-
-
Om de N300 range extender te installeren moet ik naar de site: Klik op deze LINK Helaas als ik de pagina open krijg ik de melding: deze webpagina is niet beschikbaar. Wat kan ik hier tegen doen en kan iemand mij helpen?
Reageer op deze vraag Misbruik melden
Vriendelijke groet,
Dijkman Gesteld op 4-6-2015 om 21:38-
Deze website opent alleen wanneer de computer waarmee u de website probeert te openen een verbinding heeft met de extender (draadloos of bedraad). In plaats van de hiervoor genoemde websites kan ook Klik op deze LINK gebruikt worden.
Waardeer dit antwoord (1) Misbruik melden
Lukt het niet, neem dan gerust contact met ons op. Contactopties vindt u hier: Klik op deze LINK
Vriendelijke groet,
Maarten
Sitecom Webcare Geantwoord op 9-6-2015 om 10:27
-
-
waar vindt ik het wacht woord van een nieuwe sitecom 300n voor wifi Gesteld op 30-5-2015 om 15:56
Reageer op deze vraag Misbruik melden-
Standaard is het draadloze netwerk van de extender niet beveiligd. Nadat u de extender heeft geïnstalleerd (dus gekoppeld met uw thuisnetwerk), neemt deze het wachtwoord over van het draadloze netwerk dat de extender verlengt.
Waardeer dit antwoord (1) Misbruik melden
Vriendelijke groet,
Maarten
Sitecom Webcare Geantwoord op 1-6-2015 om 09:42
-
-
Graag zou ik hulp voor het volgende willen hebben. Ik heb een wifi versterker gekocht: WLX-2006 Range Extender N300. Alles lukt, echter alleen op het laatste scherm van de sitecom.extender website, krijg ik steeds een melding dat er een verbindingsfout opgetreden is. Wat kan ik doen om dit te verhelpen? Bij voorbaat dank Gesteld op 2-12-2013 om 10:09
Reageer op deze vraag Misbruik melden -
Ken je hier anoniem op? Geantwoord op 22-6-2019 om 23:46
Waardeer dit antwoord Misbruik melden
