648543
3
Verklein
Vergroot
Pagina terug
1/60
Pagina verder
Wi-Fi Home Cam
User Manual
WLC-1000 / WLC-2000
Wi-Fi Home Cam User Manual
2
INTRODUCTION
Congratulations on your purchase of the Wi-Fi Home Cam. Grab your phone and keep an eye on your
home, business or loved ones, even when you are miles away. All in beautiful HD for crisp details and
vivid colours. Whether you are in another country or downstairs on the couch, check on your
favourite people or places instantly.
Beautiful HD quality.
Watch your home or your favourite people and pets on your phone in crystal clear HD quality and
enjoy crisp details and vivid colours. The 100-degree field of view lets you keep an eye on the whole
room and everybody in it. Think of the cam as your second set of eyes around the house.
Never miss a moment.
Whether it’s your cat stealing treats from the kitchen counter or somebody coming in the front door,
with the cam’s smart sound and motion alerts, you can be sure to know what’s going on in your
home. Receive a push-notification on your phone and open the MyCam app to watch the recorded
footage or check the live view to see what happens.
Watch around the clock.
Check in on your little ones throughout the night from your phone without interrupting their sleep or
know who is moving around in the living room. Night vision lets you see up to 5 meters in the dark so
you can keep an eye on your loved ones around the clock. As soon as daylight enters the room, night
vision turns off automatically and you can see everything in full-colour again.
Connect with your loved ones.
Grab your phone and say goodnight to your child when you’re not home or tell the dog to get off the
sofa. With the cam’s built-in microphone and speaker, you can not only listen in but also speak
directly to your favourite people and pets. Connect with your loved ones instantly using the MyCam
app, no matter where you are in the world.
Wi-Fi Home Cam User Manual
3
TABLE OF CONTENTS
Introduction ............................................................................................................................................. 2
Get to know the Wi-Fi Home Cam........................................................................................................... 5
What you get ....................................................................................................................................... 5
What you need .................................................................................................................................... 6
Safety precautions ............................................................................................................................... 7
Layout Wi-Fi Home Cam Mini .............................................................................................................. 8
layout Wi-Fi Home Cam Twist ............................................................................................................. 9
Install your Wi-Fi Home Cam ................................................................................................................. 11
Get to know the MyCam app ................................................................................................................ 15
Live view ............................................................................................................................................ 18
Recorded events ................................................................................................................................ 19
Camera settings ................................................................................................................................. 20
Change the camera name ............................................................................................................. 21
Change the date & time ................................................................................................................ 22
Change the video quality ............................................................................................................... 24
Activate & change the motion detection ...................................................................................... 25
Activate & change the audio detection ......................................................................................... 26
Delete the camera ......................................................................................................................... 27
MyCam account settings ................................................................................................................... 28
Update the MyCam account settings ............................................................................................ 29
Add a Google Drive account or update it ...................................................................................... 30
Update the notification settings .................................................................................................... 31
Update the firmware ..................................................................................................................... 32
Check the version info of the MyCam app .................................................................................... 33
Report a bug .................................................................................................................................. 34
Add a new camera to your MyCam account ..................................................................................... 35
Get to know the MyCam portal ............................................................................................................. 36
Home screen...................................................................................................................................... 37
Live view ............................................................................................................................................ 38
MyCam account settings ................................................................................................................... 42
Add, change or delete a camera ....................................................................................................... 43
Change the settings ....................................................................................................................... 44
Delete a camera ............................................................................................................................ 46
Add a camera ................................................................................................................................. 47
Wi-Fi Home Cam User Manual
4
Product support..................................................................................................................................... 49
Addendum A: GNU-GPL ......................................................................................................................... 50
WLC-1000 .......................................................................................................................................... 50
WLC-2000 .......................................................................................................................................... 54
Addendum B: Declaration of Conformity .............................................................................................. 58
WLC-1000 .......................................................................................................................................... 58
WLC-2000 .......................................................................................................................................... 59
Revision 1.0
© Sitecom Europe BV 2015
Note: All the information contained in this manual was correct at the time of publication.
However, as our engineers are always updating and improving the product, your device’s software
may have a slightly different appearance or modified functionality than presented in this manual.
Wi-Fi Home Cam User Manual
5
GET TO KNOW THE WI-FI HOME CAM
WHAT YOU GET
Open the package carefully and make sure that none of the items listed below are missing. Do not
discard the packing materials, in case of return; the product must be shipped back in its original
package.
Wi-Fi Home Cam Mini
Wi-Fi Home Cam Mini
110V~240V to 5V 1A switching power adapter
3 meter USB cable
Installation guide
Flyer with QR code & installation info
Wi-Fi Home Cam Twist
110V~240V to 5V 2A switching power adapter
3 meter USB cable
Installation guide
Flyer with QR code & installation info
QR-Code Flyer
The QR-Code flyer contains the details needed to install your camera.
Important note: Do not throw this flyer away. The information in the flyer is unique per product and
cannot be recovered by Sitecom. You will need this flyer again in case of any changes to your Wi-Fi
home network (new router, changing Internet providers etc.).
Wi-Fi Home Cam User Manual
6
WHAT YOU NEED
For the Wi-Fi Home Cam
A wireless home network
A free power socket
For the MyCam app
An Android or iOS smartphone or tablet
Android version 3.xx or higher
iOS version higher 6.xx or higher
For the MyCam portal (optional)
A computer with Internet Explorer or Firefox installed (neither Safari nor Google Chrome
support Java, so they will not work with the MyCam portal).
Wi-Fi Home Cam User Manual
7
SAFETY PRECAUTIONS
The Wi-Fi Home Cam is designed and manufactured with your safety in mind. In order to safely and
effectively use the Wi-Fi Home Cam, please read the following before usage.
Usage Cautions
Do not disassemble, repair or change the Wi-Fi Home Cam; any damage done will not be
included in the warranty / repair policy.
Do not let it come into contact with water or other liquids. If water is accidentally spilled on
the Wi-Fi Home Cam, please use a dry cloth to absorb the spillage.
Do not shake or hit the Wi-Fi Home Cam, do not press the buttons too hard and stay away
from magnetic fields.
If during electrostatic discharge or a strong electromagnetic field the product will
malfunction, unplug the power cable. The product will return to normal performance the
next time it is powered on.
Power
The Wi-Fi Home Cam’s power voltage is DC 12V 2A/ (1A for the Wi-Fi Home Cam Mini).
When using the Wi-Fi Home Cam, please connect the supplied AC adapter and USB cable to
the Wi-Fi Home Cam’s power jack.
When placing the adapter cable, make sure it can’t get damaged or be subject to pressure.
To reduce the risk of electric shock, unplug the adapter first before cleaning it.
Never connect the adapter to the Wi-Fi Home Cam in a humid or dusty area.
Do not replace the adapter or cable’s wire or connector.
Repair
If you experience any problems with your Wi-Fi Home Cam, please take it to the shop where you
bought it or a qualified repair centre. Never repair the Wi-Fi Home Cam yourself, you might damage
the Wi-Fi Home Cam or endanger yourself.
Disposing of the Wi-Fi Home Cam
When you dispose the Wi-Fi Home Cam, be sure to dispose it appropriately. Some countries may
regulate disposal of an electrical device, please consult with your local authority.
.
Wi-Fi Home Cam User Manual
8
LAYOUT WI-FI HOME CAM MINI
Micro USB port to power the cam:
Reset button:
Press for 3 seconds to reset the Wi-Fi Home Cam to the factory default settings.
LEDs:
Purple, blinking
Starting up, connecting to a Wi-Fi device
Purple, solid
Camera is connected to a Wi-Fi device
Blue, blinking
Connecting to your Wi-Fi home network (router / modem router)
Blue, solid
Camers is connected to your Wi-Fi home network (router / modem router)
Red, blinking
microSD card is full, please format or replace
Wi-Fi Home Cam User Manual
9
LAYOUT WI-FI HOME CAM TWIST
Micro USB port to power the cam:
Reset button:
Press for 3 seconds to reset the Wi-Fi Home Cam to the factory default settings.
LEDs:
Left LED:
Blue, solid
Power connected
Red, blinking
microSD card is full, please format or replace
Wi-Fi Home Cam User Manual
10
Right LED:
Purple, blinking
Starting up, connecting to a Wi-Fi device
Purple, solid
Camera is connected to a Wi-Fi device
Blue, blinking
Connecting to your Wi-Fi home network (router / modem router)
Blue, solid
Camers is connected to your Wi-Fi home network (router / modem router)
Wi-Fi Home Cam User Manual
11
INSTALL YOUR WI-FI HOME CAM
Step 1: Download the app.
1. Go to the App Store / Google Play and search for the MyCam’ app.
2. Download and install the app.
Info: Do not open the MyCam app yet. Wait until after step 3. (If you have already opened the app,
close it completely. Check your device manual to see how.)
Step 2: Connect the camera to mains power
1. Connect the cam to the power socket with the included power adapter and USB cable.
2. Wait one minute so that the camera can start up.
Tip: Use a socket close to your (modem) router. You can move the cam later when it’s fully setup.
Wi-Fi Home Cam User Manual
12
Step 3: Select the Wi-Fi Home Cam in your Wi-Fi settings
1. Go to settings on your iPhone / Android phone
2. Click ‘Wi-Fi’.
3. Select Home Cam Mini / Home Cam Twist” from the list of available networks.
Info: At this stage, this is an unsecured network, no password is required. After the installation, the
Wi-Fi Home Cam will be connected to your home network and this network will no longer be visible.
Step 4: Connect the camera to your Wi-Fi network
1. Open the MyCam app.
2. Click ‘OK’ in the pop-up to start the installation procedure.
Don’t see the pop-up? Click the gearwheel symbol in the corner
3. Select your Wi-Fi home network from the list of available networks.
4. Enter the password for your Wi-Fi home network
5. Wait 1 minute until the LED is solid blue.
Info: Your Wi-Fi Home Cam will no longer be connected to your phone but will instead connect to your
Wi-Fi home network.
Wi-Fi Home Cam User Manual
13
Step 5: Connect your phone back to your Wi-Fi home network
1. Go to settings on your iPhone / Android phone
2. Click ‘Wi-Fi’.
3. Select your Wi-Fi home network from the list of available networks.
Info: Your phone might connect to your Wi-Fi home network automatically. You can then skip these
steps.
Step 6: Create a MyCam account or login with your Google account
1. Open the MyCam app
2. Create a new account or link with an existing Google account.
3. If you create a new account, you have to fill in the following:
a. Name: consisting of 4-32 alphanumeric characters
b. Password: choose a secure password and confirm by typing it again
c. Email address: This cannot be a Gmail address. If you want to use your Gmail
address, please link your Google account.
Wi-Fi Home Cam User Manual
14
Step 7: Add your Wi-Fi Home Cam to your account
1. Press “Add camera” on the home screen
2. Pick an installation method. You can either scan the QR code on the back of the camera of
add the camera by entering the information from the flyer.
Step 8: Name your Wi-Fi Home Cam
1. Pick a name for your camera (e.g. living room)
2. By clicking “save”, the installation process will be completed. Your camera will now appear
on the home screen of the MyCam app.
You’re done!
Wi-Fi Home Cam User Manual
15
GET TO KNOW THE MYCAM APP
Camera overview
This screen is your home screen that you get to see after login. Here you can see all the Wi-Fi Home
Cams that have been added to your account.
Live view
The live view of the camera lets you see the camera picture, control the camera and access the
recordings of your camera.
Click on the installed camera on the camera overview screen to go to the live view.
Wi-Fi Home Cam User Manual
16
Camera settings
The camera settings screen lets you change things such as the quality of the recordings, activate the
motion and sound detection and the date & time.
Click on the gear wheel symbol next to your installed camera to go to the camera settings.
MyCam account settings
The MyCam account settings screen lets you update the account settings, Google Drive settings,
notifications settings and firmware updates.
Click on the gear wheel symbol in the bottom left corner to go to the camera settings.
Wi-Fi Home Cam User Manual
17
Add a new camera
The Add a new camera button allows you to add a new Wi-Fi Home Cam to your MyCam account to
keep an eye on more room. You can add up to 99 cameras to your MyCam account, so there is
practically no limit for you.
Click on the add camera button go to add a new camera. Follow the steps in the relevant chapter.
Wi-Fi Home Cam User Manual
18
LIVE VIEW
Full screen view
If you tilt your phone sideways 90 degrees, the live view of the camera will go to full screen.
Back to home screen
Press the “Camera list” button to go back to the camera overview screen
Control
This button is only available if your camera has the ability to move (e.g. Wi-Fi Home Cam
Twist).
Press the button to see the control arrows for the camera.
Press the arrows to move the camera left and right.
Press the home icon will bring your camera back to its original position.
Listen
Press the button to mute or unmute the microphone so that you can listen to the people or
pets you are watching.
Snapshot
Press the button to take a screenshot. The screenshot will be saved on your phone.
Speak
Press the button to speak through the speaker of your Wi-Fi Home Cam, so that the people
or pets you are watching, can hear you.
Recorded events
Press the button to go to the videos that have been recorded with the camera. See the next
chapter for an explanation of the screen.
Wi-Fi Home Cam User Manual
19
RECORDED EVENTS
On the screen, you see an overview of all the motion and sound events that the camera recorded.
Filmstrip icon: Recorded on the microSD card and not saved in your Google Drive.
Google Drive icon: Recorded on the microSD card and backed up in your Google Drive.
Watch a recording
1. Click on any event to watch the recording. The video will play automatically.
2. While watching the video, you can press “Close” in the top right corner to go back to the
recorded events screen.
3. After the video has finished playing, you will go back to the recorded events screen
automatically.
Wi-Fi Home Cam User Manual
20
CAMERA SETTINGS
You can change the settings for every camera in your MyCam account individually.
1. Click the gear wheel icon next to your camera on the camera overview screen.
2. You will see the overview screen of the Wi-Fi Home Cam settings.
Wi-Fi Home Cam User Manual
21
Change the camera name
On this screen, you can change the name you have given to your camera during the installation
process.
1. Enter a new name into the field. The camera name can be between 4-16 characters. No
spaces are allowed.
2. Click “Save” to save the changes and go back to the Camera overview screen.
Wi-Fi Home Cam User Manual
22
Change the date & time
On this screen, you can change the date & time settings. You can either sync your camera with your
phone or set the time zone manually.
Sync date & time automatically
1. Click “Sync camera time with phone” to update the camera time to the time of your phone.
2. After pressing the button, you will get to see a pop-up message telling you if the update
succeeded or failed.
3. Click “Save” to save the changes and go back to the camera overview screen.
Wi-Fi Home Cam User Manual
23
Set date & time manually
1. Click on the time zone that you currently see displayed on the screen.
2. You will see a pop-up screen with the time zones. Select the one you want to apply.
3. Click “Done” to exit the time zone menu.
4. Click “Save” to save the changes and go back to the camera overview screen.
Wi-Fi Home Cam User Manual
24
Change the video quality
On this screen, you can change the video quality. Depending on the speed and quality of your
Internet and Wi-Fi connection, you might want to set the video quality lower to save bandwidth.
1. Select one of the video quality options by clicking on them.
2. Click “Save” to save the changes and go back to the camera overview screen.
Wi-Fi Home Cam User Manual
25
Activate & change the motion detection
On this screen, you can turn the motion detection on and off and adjust the sensitivity.
With motion detection activated, your camera will start recording automatically when it detects
motion. The sensitivity of the motion detection determines when the camera will start recording and
can be adjusted to best fit your home situation.
1. Move the on/off slider to turn motion detection on.
2. Adjust the slider to customize the sensitivity of the motion detection.
Moving the slider to “High” means it will record any movement, moving the slider to “Low”
means it will record almost no movement. We suggest trying out different settings to see
which one works best for you.
3. Click “Save” to save the changes and go back to the camera overview screen.
Wi-Fi Home Cam User Manual
26
Activate & change the audio detection
On this screen, you can turn the audio detection on and off and adjust the sensitivity.
With audio detection activated, your camera will start recording automatically when it detects
sound. The sensitivity of the audio detection determines when the camera will start recording and
can be adjusted to best fit your home situation.
1. Move the on/off slider to turn audio detection on.
2. Adjust the slider to customize the sensitivity of the audio detection.
Moving the slider to “High” means it will record any sound, moving the slider to “Low”
means it will record almost no sound. We suggest trying out different settings to see which
one works best for you.
3. Click “Save” to save the changes and go back to the camera overview screen.
Wi-Fi Home Cam User Manual
27
Delete the camera
On this screen, you can remove a camera from your MyCam account. You can then add that camera
to a different MyCam account if you want to.
1. Click “Delete” to remove the camera from your MyCam account.
After you press the button, you will automatically go back to the camera overview screen
once the camera has been removed.
Wi-Fi Home Cam User Manual
28
MYCAM ACCOUNT SETTINGS
1. Press the button “Settings” in the bottom left corner
2. You will see the overview screen of the MyCam account settings.
Wi-Fi Home Cam User Manual
29
Update the MyCam account settings
On this screen, you can update your MyCam account password.
1. Type a new password in the “New password” field
2. Confirm the password by typing it again in the “Confirm new password” field
3. Click “Save”.
Wi-Fi Home Cam User Manual
30
Add a Google Drive account or update it
On this screen, you can link a Gmail account to your MyCam account to back up your recordings into
your personal Google Drive cloud or update the linked Gmail account. If you do not have an account
yet and want to find out more about Google’s storage options, go to https://www.google.com/drive.
1. Click “Activate Account”
2. Sign in with your Google account and click “Allow” on the following screen.
3. When your account was added successfully, you will see your E-Mail address and storage
capacity in the “Google Drive account settings” screen.
4. Click “Change account” link a different Google Drive account to your MyCam account.
Wi-Fi Home Cam User Manual
31
Update the notification settings
On this screen, you can turn push notifications for the Wi-Fi Home Cam on or off. You can receive a
real-time notification any time a sound or motion event occurs.
1. Swipe the button to turn notifications on or off
2. Click “Save” to save the changes.
Wi-Fi Home Cam User Manual
32
Update the firmware
On this screen, you can check if there is new firmware available for your Wi-Fi Home Cam.
1. Click “Firmware Update” to check if a new firmware is available. If a new firmware is
available, it will be listed below.
If the firmware is up to date, you will see the following screen:
2. Click “Update all” to download and install the latest firmware.
Wi-Fi Home Cam User Manual
33
Check the version info of the MyCam app
On this screen, you can see which version of the MyCam app you are using. You might need this info
when contacting the Sitecom support team.
Wi-Fi Home Cam User Manual
34
Report a bug
On this screen, you can let us know about bugs or issues that you are experiencing with the MyCam
app. Please describe the issue as detailed as possible and click “Save”.
We take a look at all the reported issues and bugs and try to fix them for in the next app update.
Wi-Fi Home Cam User Manual
35
ADD A NEW CAMERA TO YOUR MYCAM ACCOUNT
You can add as many cameras as you want to your MyCam account. Simply login to your MyCam app
and follow the steps.
Step 1: Add a Wi-Fi Home Cam to your account
3. Press “Add camera” on the home screen
4. Pick an installation method. You can either scan the QR code on the back of the camera of
add the camera by entering the information from the flyer.
Step 2: Name your Wi-Fi Home Cam
4. Pick a name for your camera (e.g. living room)
5. By clicking “save”, the installation process will be completed. Your camera will now appear
on the home screen of the MyCam app.
Wi-Fi Home Cam User Manual
36
GET TO KNOW THE MYCAM PORTAL
With the MyCam portal, you can access your Wi-Fi Home Cam from any computer via a web browser.
Since the MyCam portal uses Java Script, you need a compatible browser (Internet Explorer or
Firefox) to access it.
You can access the MyCam portal via the following URL:
https://mycamera.sitecom.com
Log in with your MyCam account credentials or your Gmail account.
Wi-Fi Home Cam User Manual
37
HOME SCREEN
On the home screen you can see all the cameras that have been added to your MyCam account.
Double click on a camera to access the live view screen.
Above each of the screens of your camera sits a status bar with several icons.
Camera status
Green: Online
Orange: Busy
Red: Offline
Timeline
Click to go to the timeline of the camera.
Settings
Click to change the settings of the camera.
Sound
Click to turn the sound on or off.
Refresh
Click to refresh the live stream.
Wi-Fi Home Cam User Manual
38
LIVE VIEW
The live view screen shows the current view of your camera, lets you control the camera and watch
recorded events.
Control
The buttons are only functional if your camera has the ability to move (e.g. Wi-Fi Home Cam
Twist).
Click on the arrows to move the camera left and right.
Click on the home icon will bring your camera back to its original position.
Wi-Fi Home Cam User Manual
39
Listen
Click to mute or unmute the microphone so that you can listen to the people or pets you are
watching.
Snapshot
Click to take a screenshot. The screenshot will be saved on your computer.
Wi-Fi Home Cam User Manual
40
Speak
Click to speak through the speaker of your Wi-Fi Home Cam, so that the people or pets you
are watching, can hear you.
Recorded events
Click one of the tabs to look back at the events by hour, day or week.
Hover the mouse over one of the blue markers in the timeline to get a pop-up containing the
events that occurred at that moment.
1. Select one of the time markers. The recording will now begin to play.
Wi-Fi Home Cam User Manual
41
Camera settings
2. Click to change the camera settings.
Wi-Fi Home Cam User Manual
42
MYCAM ACCOUNT SETTINGS
1. Click Account’ at the top of the home screen to change your MyCam account settings.
2. Type a new password in the “Password” field
3. Confirm the password by typing it again in the “Confirm password” field
4. Click the checkmark symbol in the top left corner to save your changes.
Wi-Fi Home Cam User Manual
43
ADD, CHANGE OR DELETE A CAMERA
1. Click Account’ at the top of the home screen to change your MyCam account settings.
2. Click “Device” in the top right corner.
Wi-Fi Home Cam User Manual
44
Change the settings
1. Click the settings symbol in the right column of the listed camera to adjust the settings.
2. Change the name of the camera by typing a new name in the field.
Wi-Fi Home Cam User Manual
45
3. Adjust the quality of the video recordings by selecting a radio button.
Depending on the speed and quality of your Internet and Wi-Fi connection, you might want
to set the video quality lower to save bandwidth.
4. Click “Apply” to save your changes.
5. Click “Reset” to go back to the default settings.
Wi-Fi Home Cam User Manual
46
Delete a camera
1. Click the x-symbol in the right column of the listed camera to delete the camera.
2. You will see the following message:
3. Click “OK” to confirm deleting the camera, click “Cancel” to stop the process.
Wi-Fi Home Cam User Manual
47
Add a camera
We strongly recommend to follow the steps in the printed Installation guide or in this manual, and
install the camera with the MyCam app instead of going through the steps in the portal.
1. Click the plus symbol in the top left corner to add a new camera.
Follow the steps to add a new camera until you get the following screen:
2. Enter your MAC Address and the Activation Code. You can find them on the QR-code flyer
included with your Wi-Fi Home Cam.
3. Click “Apply. If the installation was successful, the message “Success” will appear instead of
“Apply”.
Wi-Fi Home Cam User Manual
48
If the installation was not successful, the message “No matching device” will appear.
Reboot the camera by removing the power cable. Connect the cable again to switch on the
device, and make sure the camera is connected to your Wi-Fi home network. This is
necessary to activate the camera.
Please follow the steps in the Installation guide or in this manual to connect your camera to
your Wi-Fi home network.
Wi-Fi Home Cam User Manual
49
PRODUCT SUPPORT
Do you want to ask a question about the Wi-Fi Home Cam? Or is there something you don’t
understand? In our Learning Centre we answer all your questions about the Wi-Fi Home Cams and
show you how to get the most out of them.
Go to:
www.sitecomlearningcentre.com
Wi-Fi Home Cam User Manual
50
ADDENDUM A: GNU-GPL
WLC-1000
Wi-Fi Home Cam User Manual
51
Wi-Fi Home Cam User Manual
52
Wi-Fi Home Cam User Manual
53
Wi-Fi Home Cam User Manual
54
WLC-2000
Wi-Fi Home Cam User Manual
55
Wi-Fi Home Cam User Manual
56
Wi-Fi Home Cam User Manual
57
Wi-Fi Home Cam User Manual
58
ADDENDUM B: DECLARATION OF CONFORMITY
WLC-1000
Declaration of Conformity
We, as the manufacturer of Sitecom Europe BV.
P.O. BOX 12040 3004 GA Rotterdam, The Netherlands
declare under our sole responsibility that the product:
Product name: Wi-Fi Home Cam Mini
Trade name: Sitecom
Type or model: WLC-1000 v1 001
is in conformity with the essential requirements of the following directives:
EN 301 489-1 V1.9.2 (2011-09)
EN 301 489-17 V2.2.1 (2012-09)
EN 55022:2010
EN 61000-3-2:2006+A1:2009+A2:2009
EN 61000-3-3:2008
EN 55024:2010
IEC 6100-4-3 Edition 3.2 2010-04, IEC 6100-4-4 Edition 3.0 2012-04
IEC 6100-4-5 Edition 2.0 2005-11, IEC 6100-4-6 Edition 3.0 2008-10
IEC 6100-4-8 Edition 2.0 2009-09, IEC 6100-4-11 Edition 2.0 2004-03
EN 300 328 V1.8.1 (2012-06)
EN 62311:2008
IEC 60950-1:2005 2
nd
Edition
IEC 60950-1:2006
Signed for and on behalf of: ………………………….
(place and date of issue)
(name, function) (signature)
Wi-Fi Home Cam User Manual
59
WLC-2000
Declaration of Conformity
We, as the manufacturer of Sitecom Europe BV.
P.O. BOX 12040 3004 GA Rotterdam, The Netherlands
declare under our sole responsibility that the product:
Product name: Wi-Fi Home Cam Twist
Trade name: Sitecom
Type or model: WLC-2000 v1 001
is in conformity with the essential requirements of the following directives:
EN 301 489-1 V1.9.2 (2011-09)
EN 301 489-17 V2.2.1 (2012-09)
EN 55022:2010
EN 61000-3-2:2006+A1:2009+A2:2009
EN 61000-3-3:2008
EN 55024:2010
IEC 6100-4-3 Edition 3.2 2010-04, IEC 6100-4-4 Edition 3.0 2012-04
IEC 6100-4-5 Edition 2.0 2005-11, IEC 6100-4-6 Edition 3.0 2008-10
IEC 6100-4-8 Edition 2.0 2009-09, IEC 6100-4-11 Edition 2.0 2004-03
EN 300 328 V1.8.1 (2012-06)
EN 62311:2008
IEC 60950-1:2005 2
nd
Edition
IEC 60950-1:2006
Signed for and on behalf of: ………………………….
(place and date of issue)
(name, function) (signature)
Wi-Fi Home Cam User Manual
60
3

Hulp nodig? Stel uw vraag in het forum

Spelregels
1

Forum

Sitecom-WLC-1000-Wi-Fi-Home-Cam-Mini
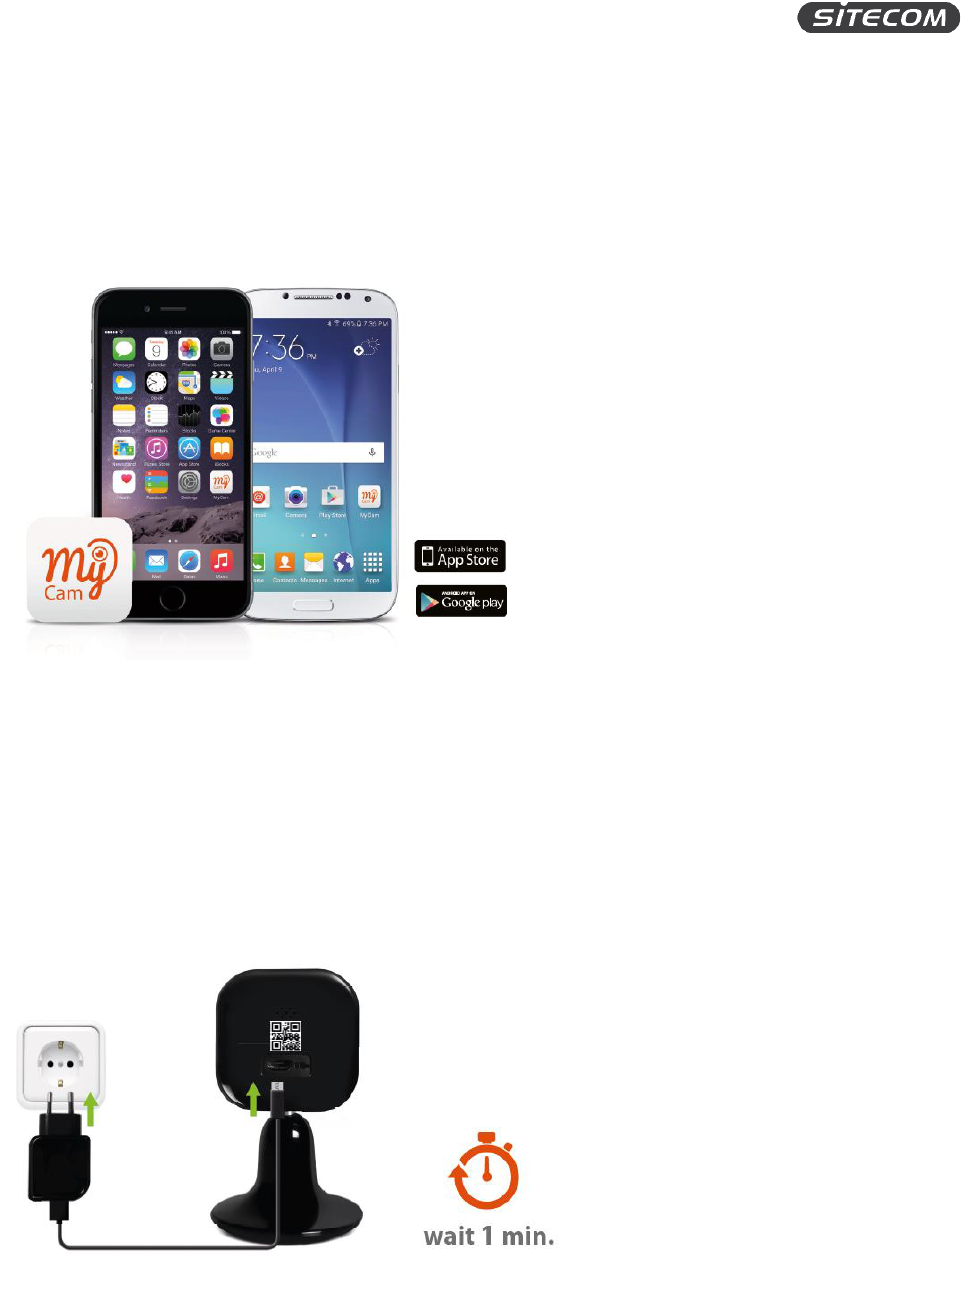
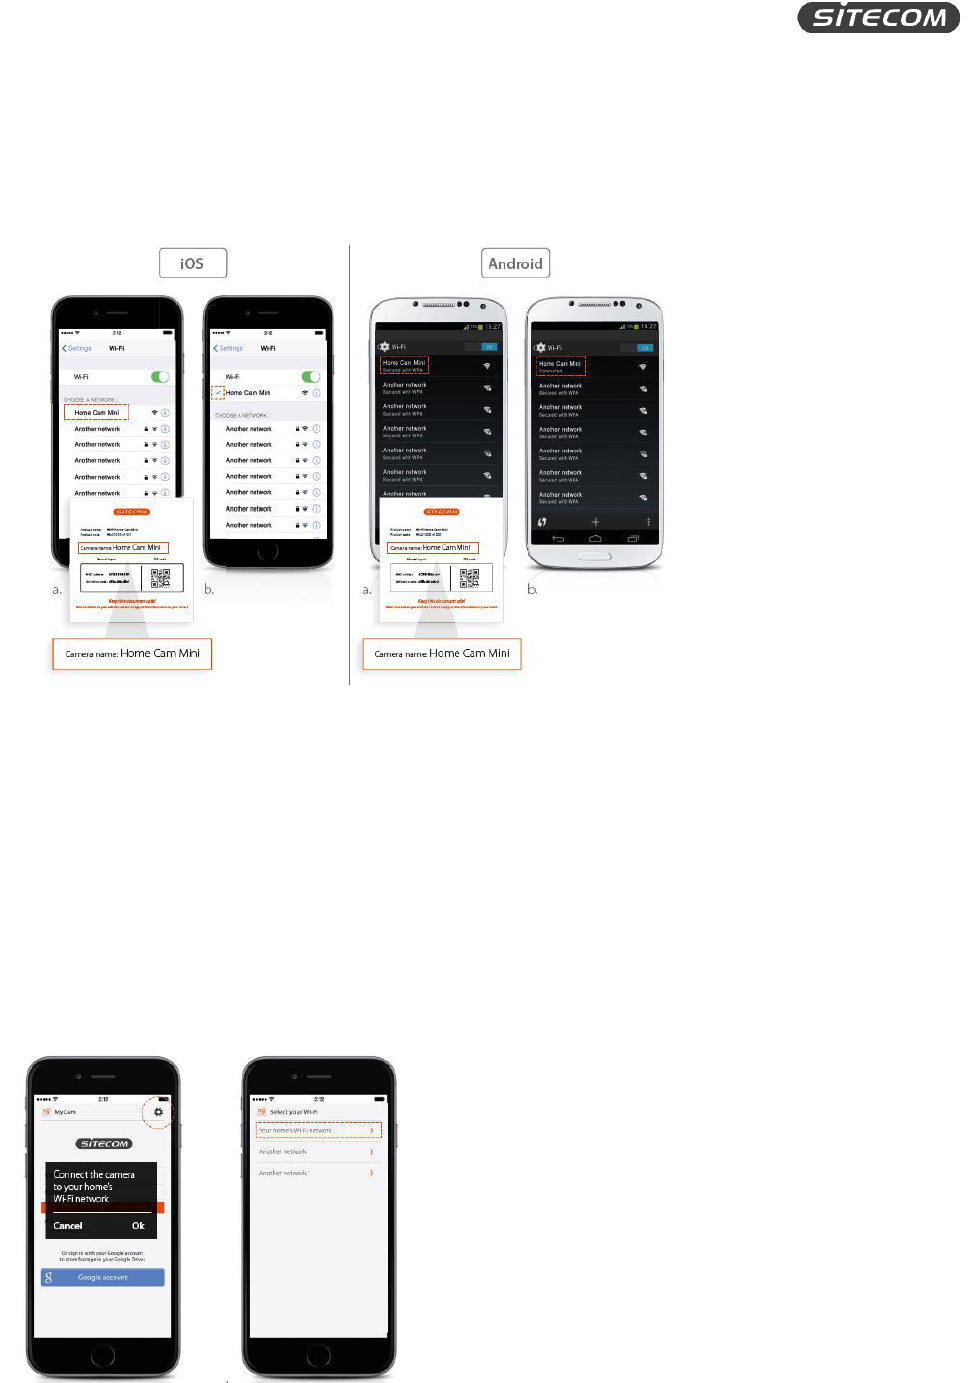
  • Hoe kan ik mijn home cam mini terug activeren via thuiswinkel en smartphone Gesteld op 8-1-2021 om 15:33

    Reageer op deze vraag Misbruik melden
  • Als ik inlog via google-account krijg ik steeds "Bevestig je gebruikersnaal en wachtwoord". Je kan dan enkel OK aangeven en that's it. Dit fenomeen treedt op sinds een paar weken. Waar ligt het aan ? Gesteld op 17-10-2017 om 20:35

    Reageer op deze vraag Misbruik melden
  • Hier ook hetzelfde probleem. Camera is niet meer te gebruiken. Geantwoord op 26-11-2017 om 13:31

    Waardeer dit antwoord Misbruik melden
  • vanaf vandaag kan ik ineens geen verbinding meer maken met beide camera's en nemen ze ook niet meer op via google drive. Wat kan ik doen? Eerder deden ze het goed Gesteld op 3-10-2017 om 21:50

    Reageer op deze vraag Misbruik melden
    • Ik heb hem net en krijg hem maar niet geïnstalleerd... ik verbind met Google account en dan blijft de app vragen om gebruikersnaam en paswoord in te geven. Doe ik dat, blijft zelfde melding komen... (via iOS apparaat) Geantwoord op 5-10-2017 om 17:35

      Waardeer dit antwoord (13) Misbruik melden
  • Heb zelfde probleem, camera werkte zeer goed toen ik hem vorig jaar installeerde, tot er een boodschap verscheen bij het inloggen dat hij met sturingsysteem van I-pad niet meer zou werken! En inderdaad na een update van I-pad aanvaard de app geen enkele google account meer. Geantwoord op 18-2-2018 om 09:12

    Waardeer dit antwoord (3) Misbruik melden
  • Firma waar sitecom mee werkte is failliet Ga naar site van sitecom om zo je aankoopbedrag terug te krijgen Geantwoord op 18-2-2018 om 09:39

    Waardeer dit antwoord (4) Misbruik melden
  • mijn home cam mini na een goed jaar werkt langs geen kanten meer.als ik via mobiele gegevens wil kijken sta erop camera offline
    Gesteld op 29-8-2017 om 13:58

    Reageer op deze vraag Misbruik melden
  • Home Cam mini,bij het installeren krijg ik steeds het bericht : please switch on camera access point mode and connect it from your WiFi list , hoe moet ik dat doen, ik kom er echt niet uit .
    mijn e-mail adres is : kroontje55@gmail.com
    Gesteld op 30-1-2017 om 16:53

    Reageer op deze vraag Misbruik melden
  • Een derden firma is failliet gegaan waardoor deze camera niet meer opslaat in de cloud. Geantwoord op 22-2-2018 om 14:31

    Waardeer dit antwoord Misbruik melden

Misbruik melden

Gebruikershandleiding.com neemt misbruik van zijn services uitermate serieus. U kunt hieronder aangeven waarom deze vraag ongepast is. Wij controleren de vraag en zonodig wordt deze verwijderd.

Product:

Bijvoorbeeld antisemitische inhoud, racistische inhoud, of materiaal dat gewelddadige fysieke handelingen tot gevolg kan hebben.

Bijvoorbeeld een creditcardnummer, een persoonlijk identificatienummer, of een geheim adres. E-mailadressen en volledige namen worden niet als privégegevens beschouwd.

Spelregels forum

Om tot zinvolle vragen te komen hanteren wij de volgende spelregels:

Belangrijk! Als er een antwoord wordt gegeven op uw vraag, dan is het voor de gever van het antwoord nuttig om te weten als u er wel (of niet) mee geholpen bent! Wij vragen u dus ook te reageren op een antwoord.

Belangrijk! Antwoorden worden ook per e-mail naar abonnees gestuurd. Laat uw emailadres achter op deze site, zodat u op de hoogte blijft. U krijgt dan ook andere vragen en antwoorden te zien.

Abonneren

Abonneer u voor het ontvangen van emails voor uw Sitecom WLC-1000 Wi-Fi Home Cam Mini bij:


U ontvangt een email met instructies om u voor één of beide opties in te schrijven.


Ontvang uw handleiding per email

Vul uw emailadres in en ontvang de handleiding van Sitecom WLC-1000 Wi-Fi Home Cam Mini in de taal/talen: Engels als bijlage per email.

De handleiding is 2,42 mb groot.


U ontvangt de handleiding per email binnen enkele minuten. Als u geen email heeft ontvangen, dan heeft u waarschijnlijk een verkeerd emailadres ingevuld of is uw mailbox te vol. Daarnaast kan het zijn dat uw internetprovider een maximum heeft aan de grootte per email. Omdat hier een handleiding wordt meegestuurd, kan het voorkomen dat de email groter is dan toegestaan bij uw provider.

Stel vragen via chat aan uw handleiding

Stel uw vraag over deze PDF

Uw handleiding is per email verstuurd. Controleer uw email

Als u niet binnen een kwartier uw email met handleiding ontvangen heeft, kan het zijn dat u een verkeerd emailadres heeft ingevuld of dat uw emailprovider een maximum grootte per email heeft ingesteld die kleiner is dan de grootte van de handleiding.

Er is een email naar u verstuurd om uw inschrijving definitief te maken.

Controleer uw email en volg de aanwijzingen op om uw inschrijving definitief te maken

U heeft geen emailadres opgegeven

Als u de handleiding per email wilt ontvangen, vul dan een geldig emailadres in.

Uw vraag is op deze pagina toegevoegd

Wilt u een email ontvangen bij een antwoord en/of nieuwe vragen? Vul dan hier uw emailadres in.


Info