462968
3
Verklein
Vergroot
Pagina terug
1/56
Pagina verder
Wireless Network
Broadband Router MiMoXR
WL-153
Full manual
1
Copyright
The contents of this publication may not be reproduced in any part or as a whole, stored,
transcribed in an information retrieval system, translated into any language, or transmitted
in any form or by any means, mechanical, magnetic, electronic, optical, photocopying, manual,
or otherwise, without the prior written permission.
Trademarks
All products, company, brand names are trademarks or registered trademarks of their
respective companies. They are used for identification purpose only. Specifications are subject
to be changed without prior notice.
FCC Interference Statement
This equipment has been tested and found to comply with the limits for a Class B digital device
pursuant to Part 15 of the FCC Rules. These limits are designed to provide reasonable
protection against radio interference in a commercial environment. This equipment can
generate, use and radiate radio frequency energy and, if not installed and used in accordance
with the instructions in this manual, may cause harmful interference to radio communications.
Operation of this equipment in a residential area is likely to cause interference, in which case
the user, at his own expense, will be required to take whatever measures are necessary to
correct the interference.
CE Declaration of Conformity
This equipment complies with the requirements relating to electromagnetic compatibility, EN
55022/A1 Class B.
The specification is subject to change without notice.
2
Table of Contents
CHAPTER 1 INTRODUCTION ............................................................................... 5
1.1 FEATURES.................................................................................................... 5
1.2 MINIMUM REQUIREMENTS .......................................................................... 6
1.3 PACKAGE CONTENT ..................................................................................... 6
CHAPTER 2 HARDWARE INSTALLATION ............................................................. 7
2.1 PANEL LAYOUT .............................................................................................. 7
2.1.1 FRONT LEDS............................................................................... FOUT! BLADWIJZER NIET GEDEFINIEERD.
2.1.2. REAR PANEL................................................................................................................................................. 8
2.2 PROCEDURE FOR HARDWARE INSTALLATION................................................ 9
2.2.1 DECIDE WHERE TO PLACE YOUR WIRELESS BROADBAND ROUTER ............................................................... 9
2.2.2 SETUP LAN CONNECTION ............................................................................................................................. 9
2.2.3 SETUP WA N CONNECTION ............................................................................................................................ 9
2.2.4 POWER ON..................................................................................................................................................... 9
CHAPTER 3 NETWORK SETTINGS AND SOFTWARE INSTALLATION................... 10
3.1 MAKE THE CORRECT NETWORK SETTINGS FOR YOUR PC ............................. 10
CHAPTER 4 CONFIGURING WIRELESS BROADBAND ROUTER ........................... 12
4.1 START-UP AND LOG IN ................................................................................ 13
4.2 STATUS ........................................................................................................ 14
4.2.1 LAN SETTINGS ........................................................................................................................................... 15
4.2.2 DEVICE STAT US ........................................................................................................................................... 17
4.2.3 INTERNET STATUS ....................................................................................................................................... 18
4.2.4 DHCP CLIENT STATUS ................................................................................................................................19
4.2.5 SYSTEM LOG ............................................................................................................................................... 20
4.2.6 STATIS TIC S .................................................................................................................................................. 21
5. RUN SETUP WIZARD ...................................................................................... 22
CHAPTER 6 WIRELESS SETTINGS.................................................................. 24
6.1 WIRELESS BASIC SETTINGS ........................................................................ 24
6.2 ADVANCED WIRELESS SETTINGS................................................................. 25
6.3 WIRELESS SECURITY OPTIONS.................................................................... 26
3
6.3.1 WEP E
NCRYPTION ...................................................................................................................................... 26
6.3.2 802.1X ONLY ............................................................................................................................................... 28
6.3.3 WPA PRE-SHARED KEY ............................................................................................................................... 29
6.3.4 WPA RADIUS .............................................................................................................................................. 29
6.4 ACCESS CONTROL ........................................................................................ 31
CHAPTER 7 FIREWALL SETTINGS................................................................... 32
7.1 DMZ ............................................................................................................. 32
7.2 DOS ATTACK ................................................................................................ 33
7.3 ACCESS CONTROL ........................................................................................ 34
7.4 URL BLOCK................................................................................................... 35
CHAPTER 8 ADVANCED SETTINGS................................................................. 37
8.1 PORT FORWARDING .................................................................................... 37
8.2 VIRTUAL SERVER ......................................................................................... 38
8.3 SPECIAL APPLICATIONS .............................................................................. 40
8.4 ALG SETTINGS ............................................................................................. 42
8.5 UPNP SETTINGS........................................................................................... 42
8.6 QOS ............................................................................................................. 43
CHAPTER 9 TOOLS ......................................................................................... 46
9.1 TIMEZONE.................................................................................................... 47
9.2 REMOTE MANAGEMENT ................................................................................ 48
9.3 FIRMWARE UPGRADE................................................................................... 49
9.4 BACK-UP SETTINGS ..................................................................................... 50
9.5 RESET (RESTART) THE ROUTER ................................................................... 51
9.6 DDNS ........................................................................................................... 51
APPENDIX A ...................................................................................................... 52
GLOSSARY ......................................................................................................... 53
4
Chapter 1 Introduction
Congratulations on purchasing this Wireless Broadband Router. This Wireless Broadband
Router is a cost-effective IP Sharing Router that enables multiple users to share the Internet
through an ADSL or cable modem. Simply configure your Internet connection settings in the
Wireless Broadband Router and plug your PC to the LAN port and you're ready to share files
and access the Internet. As your network grows, you can connect another hub or switch to the
router’s LAN ports, allowing you to easily expand your network. The Wireless Broadband
Router is embedded with a IEEE 802.11g/b access point that allows you to build up a wireless
LAN. The Wireless Broadband Router provides a total solution for the Small and Medium-sized
Business (SMB) and the Small Office/Home Office (SOHO) markets, giving you an instant
network today, and the flexibility to handle tomorrow's expansion and speed.
1.1 Features
High Internet Access throughput (50M)
Allow multiple users to share a single Internet line
Supports up to 253 users
Internet Access via Cable or xDSL modem
Access Private LAN Servers from the Public Network
Equipped with four LAN ports (10/100M) and one WAN port (10/100M)
Provides IEEE 802.11g/b wireless LAN access point
Support DHCP (Server/Client) for easy setup
Support advance features such as: Special Applications, DMZ, Virtual Servers, Access
Control, Firewall.
Allow you to monitor the router’s status such as: DHCP Client Log, System Log,
Security Log and Device/Connection Status
Easy to use Web-based GUI for configuration and management purposes
Remote Management allows configuration and upgrades from a remote site (over the
Internet)
5
1.2 Minimum Requirements
or h
One External xDSL (ADSL) or Cable modem with an Ethernet port (RJ-45)
Network Interface Card (NIC) for each Personal Computer (PC)
PCs with a Web-Browser (Internet Explorer 4.0 or higher, or Netscape Navigator 4.7
igher)
1.3 Package Content
One 4-port Wireless Broadband router unit
One Quick Installation Guide
One User Manual CD
One Power Adapter
CAT-5 UTP Fast Ethernet Cable
Note
The WAN “idle timeout” auto-disconnect function may not work due to abnormal activities of
some network application software, computer virus or hacker attacks from the Internet. For
example, some software sends network packets to the Internet in the background, even when
you are not using the Internet. So please turn off your computer when you are not using it.
This function also may not work with some ISP. So please make sure this function can work
properly when you use this function in the first time, especially your ISP charge you by time
used.
6
Chapter 2 Hardware Installation
2.1 Panel Layout
LEDs:
LED Function Color Status Description
POWER Power indication Green On Power is being applied to this product.
On
The corresponding WAN or LAN port is
linked.
Link/
Modem
Link Status Green
Blinking
The corresponding WAN or LAN port is
sending or receiving data.
On Wireless LAN had been enabled
WLAN Wireless Activity Green
Blinking Sending or receiving data via wireless.
Blinking
The corresponding WAN or LAN port is
sending or receiving data.
100Mbps
Data Rate
Green
On
Data is transmitting in 100Mbps on the
corresponding LAN port.
7
2.1.2. Rear Panel
Ports:
8
Port Description
POWER Power inlet
Modem the port where you will connect your cable (or DSL) modem
or Ethernet router.
Port 1-4 the ports where you will connect networked computers and
other devices.
Reset
To reset system settings to factory defaults, press the reset
button for at least 4 seconds.
To reboot the device, press the reset button less than 4
seconds.
2.2 Procedure for Hardware Installation
2.2.1 Decide where to place your Wireless Broadband Router
Y
m
c
in
a
ou can place your Wireless Broadband Router on a desk or other flat surface, or you can
ount it on a wall. For optimal performance, place your Wireless Broadband Router in the
enter of your office (or your home) in a location that is away from any potential source of
terference, such as a metal wall or microwave oven. This location must be close to power
nd network connection.
2.2.2 Setup LAN connection
a. Wired LAN connection: connects an Ethernet cable from your computer’s Ethernet port
to one of the LAN ports of this product.
b. Wireless LAN connection: locate this product at a proper position to gain the best
transmit performance.
Figure 2-3 Setup of LAN and WAN connections for this product.
2.2.3 Setup WAN connection
P
b
C
a
n
s
p
repare an Ethernet cable for connecting this product to your cable/xDSL modem or Ethernet
ackbone. Figure 2-3 illustrates the WAN connection.
2.2.4 Power on
onnecting the power cord to power inlet and turning the power switch on, this product will
utomatically enter the self-test phase. When it is in the self-test phase, the Power LED will
ot be lighted for about 15 seconds, and then Power will flash 9 times to indicate that the
elf-test operation has finished. Finally, power will be lit continuously to indicate that this
roduct is in normal operation.
9
Chapter 3 Network Settings and Software
Installation
To use this product correctly, you have to properly configure the network settings of your
computers and install the attached setup program into your MS Windows platform (Windows
95/98/NT/2000).
3.1 Make The Correct Network Settings for your PC
The default IP address of this product is 192.168.0.1, and the default subnet mask is
255.255.255.0. These addresses can be changed on your need, but the default values are
used in this manual. If the TCP/IP environment of your computer has not yet been configured,
you can refer to Appendix A to configure it. For example,
1. configure IP as 192.168.0.100, subnet mask as 255.255.255.0 and gateway as
192.168.0.1, or more easier,
2. configure your computers to load TCP/IP setting automatically, that is, via DHCP server
of this product.
After installing the TCP/IP communication protocol, you can use the ping command to check
if your computer has successfully connected to this product. The following example shows the
ping procedure for Windows 95 platforms. First, execute the ping command
ping 192.168.0.1
If the following messages appear:
Pinging 192.168.0.1 with 32 bytes of data:
Reply from 192.168.0.1: bytes=32 time=2ms TTL=64
a communication link between your computer and this product has been successfully
established. Otherwise, if you get the following messages,
Pinging 192.168.0.1 with 32 bytes of data:
Request timed out.
There must be something wrong in your installation procedure. You have to check the
following items in sequence:
10
1. Is the Ethernet cable correctly connected between this product and your computer?
Tip: The LAN LED of this product and the link LED of network card on your computer must
be lighted.
2. Is the TCP/IP environment of your computers properly configured?
Tip: If the IP address of this product is 192.168.0.1, the IP address of your computer
must be 192.168.0.X and default gateway must be 192.168.0.1.
11
Chapter 4 Configuring Wireless Broadband Router
This product provides Web based configuration scheme, that is, configuring by your Web
browser, such as Netscape Communicator or Internet Explorer. This approach can be adopted
in any MS Windows, Macintosh or UNIX based platforms.
12
4.1 Start-up and Log in
Activate your browser, and disable the proxy or add the IP address of this product into
the exceptions. Then, type this product’s IP address in the Location (for Netscape) or
Address (for IE) field and press ENTER. For example: http://192.168.0.1.
After the connection is established, you will see the web user interface of this product. There
are two appearances of web user interface: for general users and for system administrator.
To log in as an administrator, enter your login name and password (default: admin/admin) and
click OK. If the password is correct, the web appearance will be changed into administrator
configure mode. As listed in its main menu, there are several options for system
administration.
13
4.2 Status
The Status section allows you to monitor the current status of your router. You can use the
Status page to monitor: the connection status of the Broadband router's WAN/LAN interfaces,
the current firmware and hardware version numbers, any illegal attempts to access your
network, and information on all DHCP client PCs currently connected to your network.
14
4.2.1 LAN Settings
The LAN Port screen below allows you to specify a private IP address for your router’s LAN
ports as well as a subnet mask for your LAN segment.
Parameters Default Description
IP address 192.168.0.1 This is the routers LAN port IP address (Your LAN
clients default gateway IP address)
IP Subnet Mask 255.255.255.0 Specify a Subnet Mask for your LAN segment
802.1d Spanning Tree Disabled If 802.1d Spanning Tree function is enabled, this
router will use the spanning tree protocol to
prevent network loops.
DHCP Server Enabled You can enable or disable the DHCP server. By
Enabling DHCP server the router will
automatically give your LAN clients an IP address.
Lease Time Forever The DHCP when enabled will temporarily give
your LAN clients an IP address. In the Lease Time
setting you can specify the time period that the
DHCP lends an IP address to your LAN clients. The
DHCP will change your LAN clients IP address
when this time threshold period is reached
15
IP Address Pool You can select a particular IP address range for your DHCP server to
issue IP addresses to your LAN Clients.
Note: By default the IP range is from: Start IP 192.168.0.100
to End
IP 192.168.0.199. If you want your PC to have a static/fixed IP
address then you’ll have to choose an IP address outside this IP
address Pool
Domain Name You can specify a Domain Name for your LAN
Click <Apply> at the bottom of the screen to save the above configurations. You can now
configure other advance sections or start using the router (with the advance settings in place).
16
4.2.2 Device Status
View the Broadband router’s current configuration settings. The Device Status displays the
configuration settings you’ve configured in the Wizard/Basic Settings/Wireless Settings
section.
Parameters Description
Device Status This page displays the Broadband router LAN port’s current LAN
IP Address and Subnet Mask. It also shows whether the
DHCP Server function is enabled/disabled..
17
4.2.3 Internet Status
View the Broadband router’s current Internet connection status and other related information
Parameters Description
Internet Connection This page displays whether the WAN port is connected to a
Cable/DSL connection. It also displays the router’s WAN port:
WAN IP address, Subnet Mask, and ISP Gateway as well as
the Primary DNS and Secondary DNS being used.
18
4.2.4 DHCP Client status
View your LAN client's information that is currently linked to the Broadband router's DHCP
server.
Parameters Description
Active DHCP Client This page shows all DHCP clients (LAN PCs) currently connected
to your network. The “Active DHCP Client Table” displays the IP
address and the MAC address and Time Expired of each LAN
Client. Use the Refresh button to get the most updated situation
19
4.2.5 System Log
View the operation log of the system.
Parameters Description
System Log This page shows the current system log of the Broadband router.
It displays any event occurred after system start up.
At the bottom of the page, the system log can be saved <Save>
to a local file for further processing or the system log can be
cleared <Clear> or it can be refreshed <Refresh> to get the
most updated situation. When the system is powered down, the
system log will disappear if not saved to a local file.
20
4.2.6 Statistics
View the statistics of packets sent and received on WAN, LAN and Wireless LAN.
Parameters Description
Statistics Shows the counters of packets sent and received on WAN, LAN
and Wireless LAN.
21
5. Run Setup Wizard
Nex
Click Wizard to configure the router.
The Setup wizard will now be displayed; check that the modem is connected and click
t.
Select your country from the Country list.
From Service, select your internet provider. Click Next.
22
Depending on the chosen provider, you may need to enter your user name and
password, MAC address or hostname in the following window. After you have entered
the correct information, click Next.
Click APPLY to complete the configuration.
The router will now save the settings and restart, please wait 30 seconds and you will
transferred back to the status window. The configuration is complete.
Wait for about 10 seconds to allow the router to connect to the Internet.
23
Chapter 6 Wireless Settings
6.1 Wireless Basic Settings
You can set parameters that are used for the wireless stations to connect to this router. The
parameters include Mode, ESSID, Channel Number and Associated Client.
Parameters Description
Mode It allows you to set the AP to AP, Station, Bridge or WDS mode.
Band It allows you to set the AP fix at 802.11b or 802.11g mode. You also can
select B+G mode to allow the AP select 802.11b and 802.11g connection
automatically.
ESSID This is the name of the wireless LAN. All the devices in the same wireless
LAN should have the same ESSID. Default ESSID for this device is:
Sitecom
Channel Number The channel used by the wireless LAN. All devices in the same wireless
LAN should use the same channel.
WLAN MAC This is the MAC address used by the Wireless interface of this AP when it
is in the station mode.
Clone MAC Click the “Clone MAC” button will copy the MAC address of your PC, that
you are using to configure the AP, to the WLAN MAC.
MAC address If you want to bridge more than one networks together with wireless LAN,
you have to set this access point to “AP Bridge-Point to Point mode”, “AP
Bridge-Point to Multi-Point mode” or “AP Bridge-WDS mode. You have to
enter the MAC addresses of other access points that join the bridging.
Set Security Click the “Set Security” button, then a “WDS Security Settings” will pop
up. You can set the security parameters used to bridge access points
24
together here when your AP is in AP Bridge modes.
6.2 Advanced Wireless Settings
You can set advanced wireless LAN parameters of this router. The parameters include
Authentication Type, Fragment Threshold, RTS Threshold, Beacon Interval, Preamble Type.
You should not change these parameters unless you know what effect the changes will have
on this router.
Parameters Description
Authentication Type There are two authentication types: "Open System" and "Shared Key".
When you select "Open System", wireless stations can associate with
this wireless router without WEP encryption. When you select "Shared
Key", you should also setup WEP key in the "Encryption" page and
wireless stations should use WEP encryption in the authentication
phase to associate with this wireless router. If you select "Auto", the
wireless client can associate with this wireless router by using any one
of these two authentication types.
Fragment Threshold "Fragment Threshold" specifies the maximum size of a packet during
the fragmentation of data to be transmitted. If you set this value too
low, it will result in bad performance.
RTS Threshold When the packet size is smaller the RTS threshold, the wireless router
will not use the RTS/CTS mechanism to send this packet.
Beacon Interval The interval of time that this wireless router broadcast a beacon.
Beacon is used to synchronize the wireless network.
Data Rate “Data Rate” is the rate this access point uses to transmit data packets. The The
25
6.3.2 802.1x only
IEEE 802.1x is an authentication protocol. Every user must use a valid account to login to this
Access Point before accessing the wireless LAN. The authentication is processed by a RADIUS
server. This mode only authenticates users by IEEE 802.1x, but it does not encrypt the data
during communication.
Parameters Description
RADIUS Server IP address The IP address of external RADIUS server.
RADIUS Server Port The service port of the external RADIUS server.
RADIUS Server Password The password used by external RADIUS server.
Click <Apply> at the bottom of the screen to save the above configurations. You can now
configure other advance sections or start using the router (with the advance settings in place)
28
6.3.3 WPA Pre-shared key
Wi-Fi Protected Access (WPA) is an advanced security standard. You can use a pre-shared key
to authenticate wireless stations and encrypt data during communication. It uses TKIP or
CCMP(AES) to change the encryption key frequently. So the encryption key is not easy to be
broken by hackers. This can improve security very much.
Parameters Description
WPA(TKIP) TKIP can change the encryption key frequently to
enhance the wireless LAN security.
y
frequently. A rity.
r
communication peer automatically.
or Hexadecim For
example:
in the wirele
64-digit Hex
phrase as th
WPA2(AES) This use CCMP protocol to change encryption ke
ES can provide high level encryption to enhance the wireless LAN secu
WPA2 Mixed This will use TKIP or AES based on the othe
Pre-shared Key Format You may select to select Passphrase (alphanumeric format)
al Digits (in the “A-F”, “a-f” and “0-9” range) to be the Pre-shared Key.
Passphrase: iamguest
Hexadecimal Digits: 12345abcde
Pre-shared Key The Pre-shared key is used to authenticate and encrypt data transmitted
ss network. Fill the text box by following the rules below. Hex WEP: input
values (in the “A-F”, “a-f” and “0-9” range) or at least 8 character pass
e pre-shared keys.
6.3.4 WPA Radius
Wi-Fi Protected Access (WPA) is an advanced security standard. You can use an external
29
RADIUS server to authenticate wireless stations and provide the session key to encrypt data
during communication. It uses TKIP or CCMP(AES) to change the encryption key frequently.
This can improve security very much.
Parameters Description
WPA(TKIP) TKIP can change the encryption key frequently to
enhance the wireless LAN security.
frequently. AES .
communication peer automatically.
WPA2(AES) This use CCMP protocol to change encryption key
can provide high level encryption to enhance the wireless LAN security
WPA2 Mixed This will use TKIP or AES based on the other
RADIUS Server IP address The IP address of external RADIUS server.
RADIUS Server Port The service port of the external RADIUS server.
RADIUS Server Password The password used by external RADIUS server.
Click <Apply> at the bottom of the screen to save the above configurations. You can now
configure other advance sections or start using the router (with the advance settings in place)
30
6.4 Access Control
This wireless router provides MAC Address Control, which prevents the unauthorized MAC
Addresses from accessing your wireless network.
Parameters Description
Enable wireless access control Enable wireless access control
Add MAC address into the list Fill in the "MAC Address" and "Comment" of the wireless
station to be added and then click "Add". Then this
wireless station will be added into the "Current Access
Control List" below. If you find any issues before adding
it and want to retype again. Just click "Clear" and both
"MAC Address" and "Comment" fields will be cleared.
Remove MAC address from the list If you want to remove some MAC address from the
"Current Access Control List ", select the MAC addresses
you want to remove in the list and then click "Delete
Selected". If you want remove all MAC addresses from
the table, just click "Delete All" button. Click "Reset" will
clear your current selections.
Click <Apply> at the bottom of the screen to save the above configurations. You can now
configure other advance sections or start using the router (with the advance settings in place)
31
3

Hulp nodig? Stel uw vraag in het forum

Spelregels
1

Forum

Sitecom-WL-153
  • Hallo allemaal.

    Sinds vorige week is de wifi beveiliging wpa2 spontaan verdwenen. En de router vraagt ook niet meer naar het wachtwoord. Iedereen kan zomaar inloggen op mijn wifi. Ik kan ook niks wijzigen op de webinterface van de router. Inloggen lukt wel via ip adres, maar kan nergens iets wijzigen.

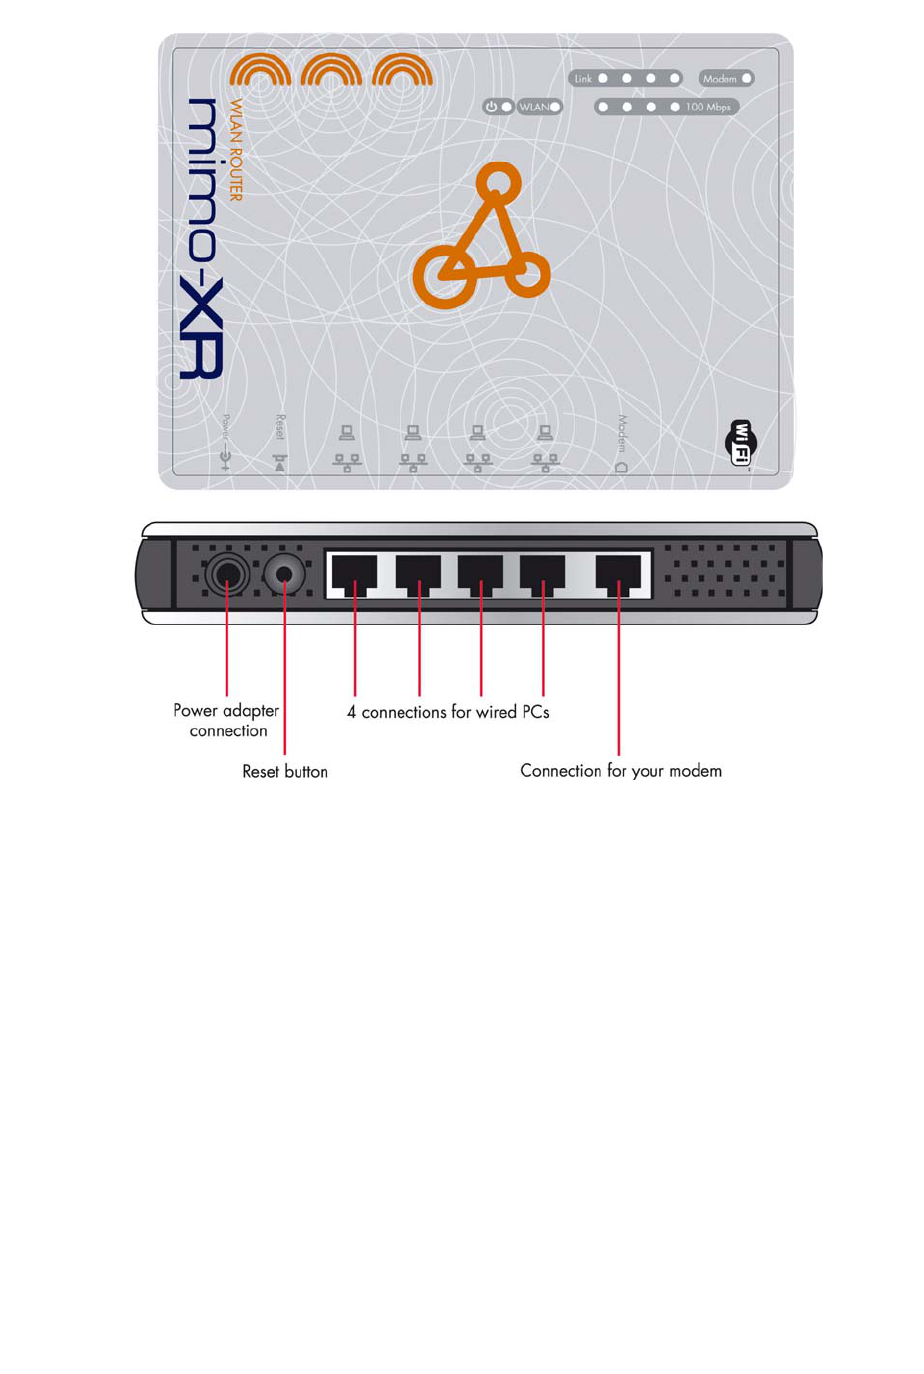
    Het gaat om het type WL 153

    hebben meerdere mensen hier last van? Gesteld op 8-1-2021 om 18:36

    Reageer op deze vraag Misbruik melden
  • Telkens wanneer modem word gereset is wachtwoord van router verdwenen waardoor onbeveiligd internet. Getracht router aan te sluiten via LAN aan laptop, maar krijg het niet meer voor elkaar...WAT MOET IK DOEN ? Gesteld op 20-1-2015 om 15:57

    Reageer op deze vraag Misbruik melden
    • Bij het resetten worden de instellingen ook gereset. Dat is dus niet handig als je een wachtwoord wilt instellen en je internet wil beveiligen.

      Wat moet je dan wel doen?
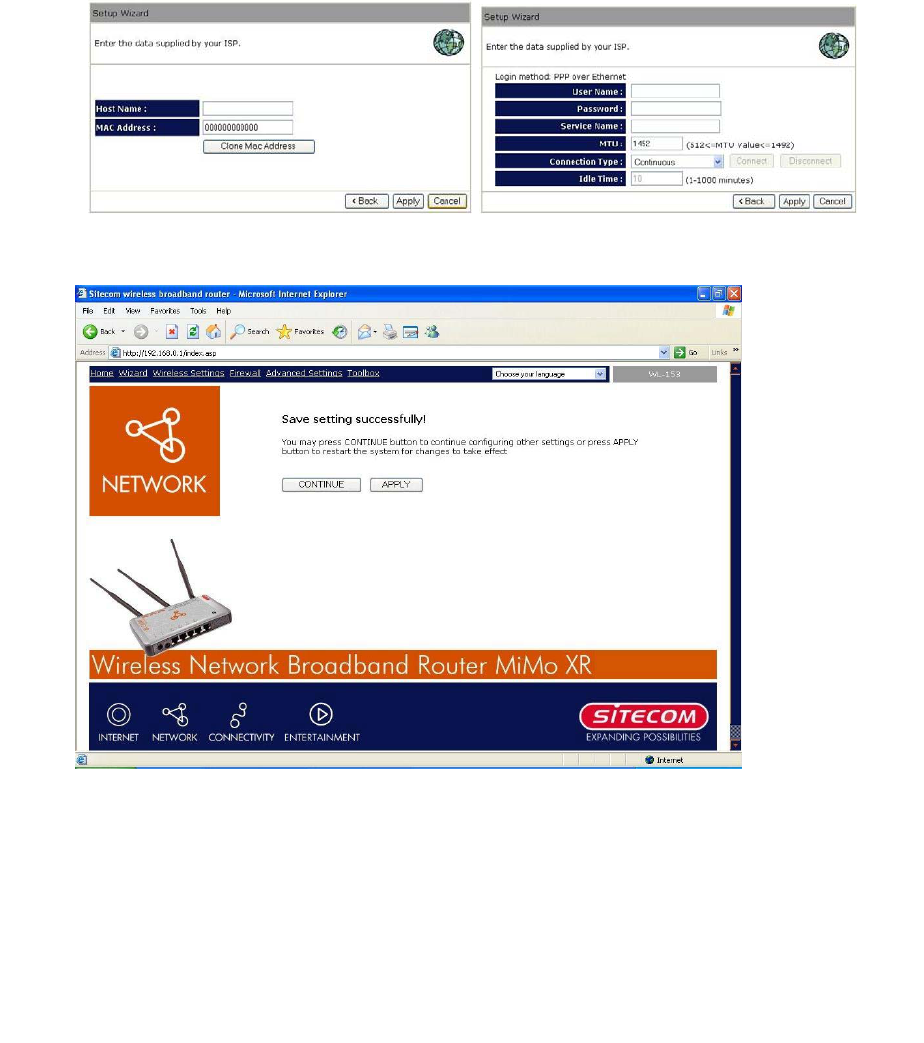
      Handig is om allereerst Firefox te downloaden (anders kan je niet alle tabs zien die je nodig hebt om het eea te wijzigen).
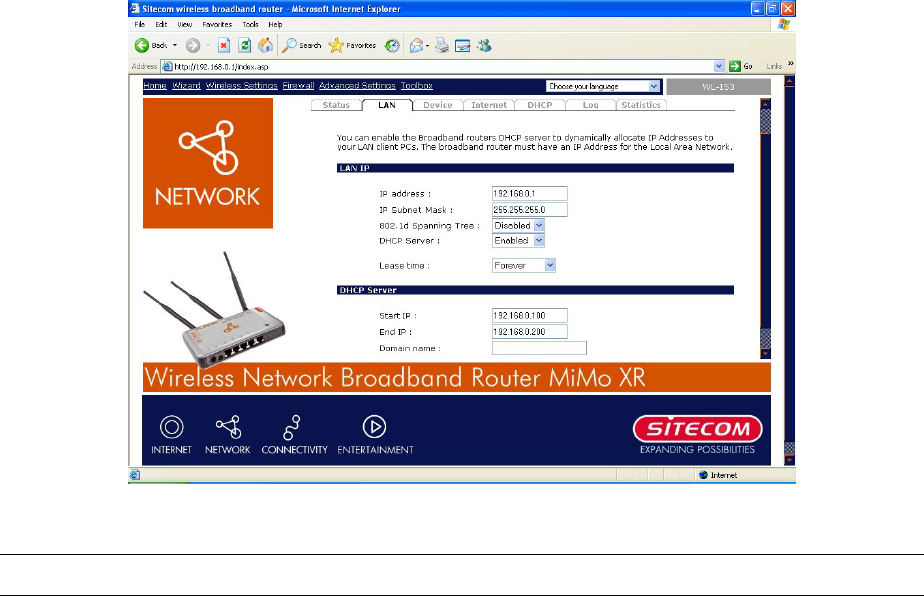
      Na het downloaden van Firefox vul je in deze browser het ip adres van de router in: 192.168.0.1

      Log vervolgens in met:
      gebruikersnaam: admin
      wachtwoord: admin

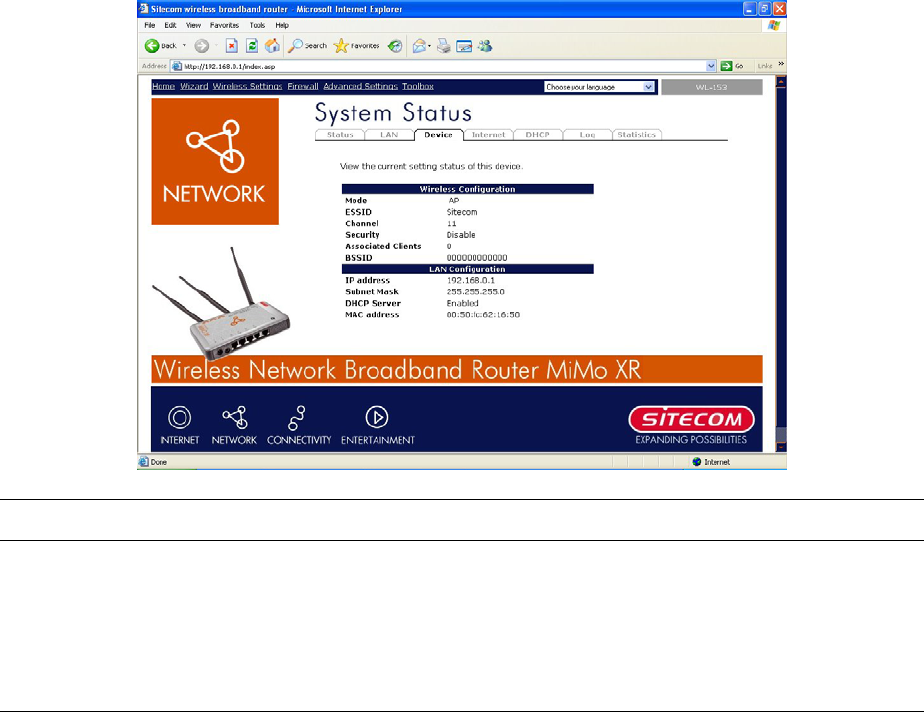
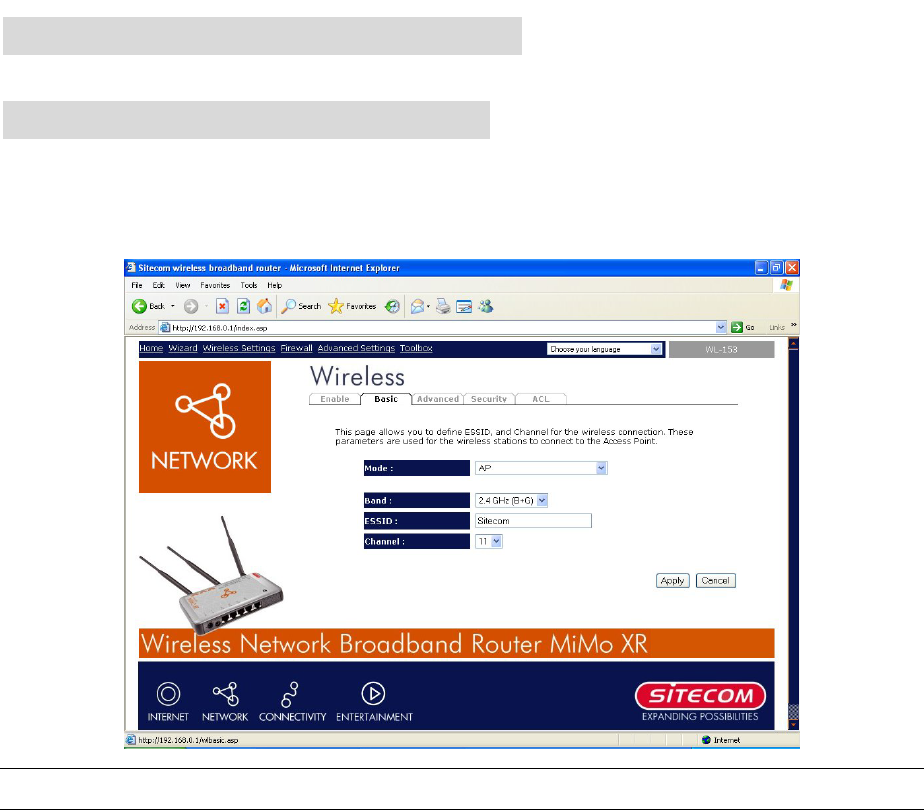
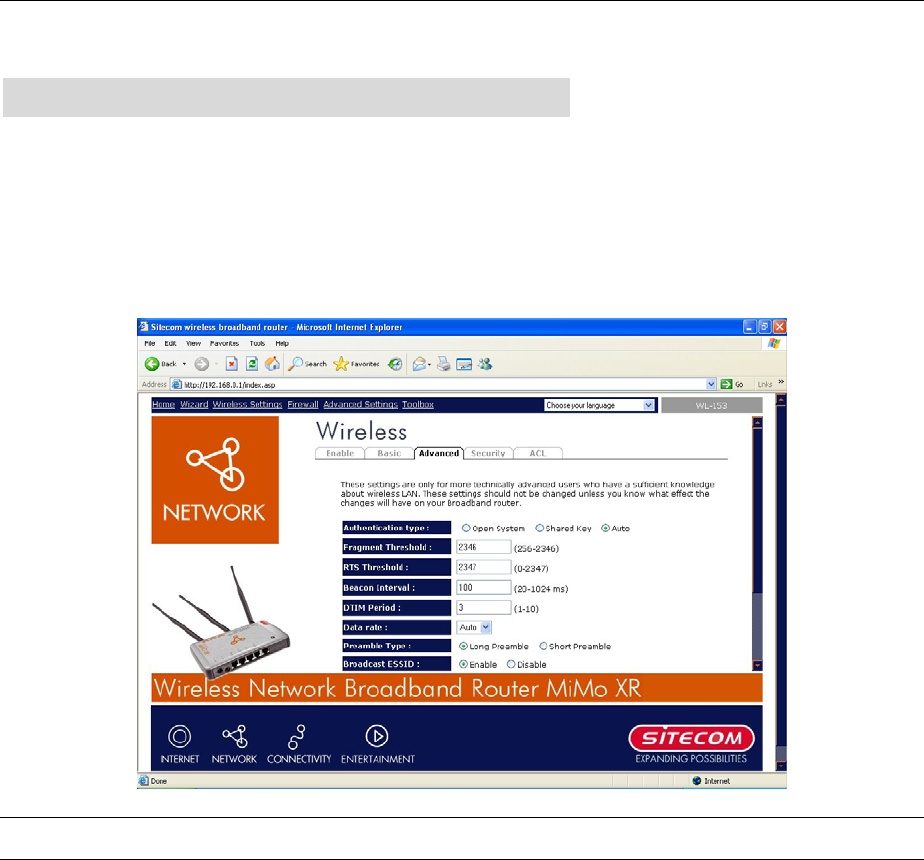
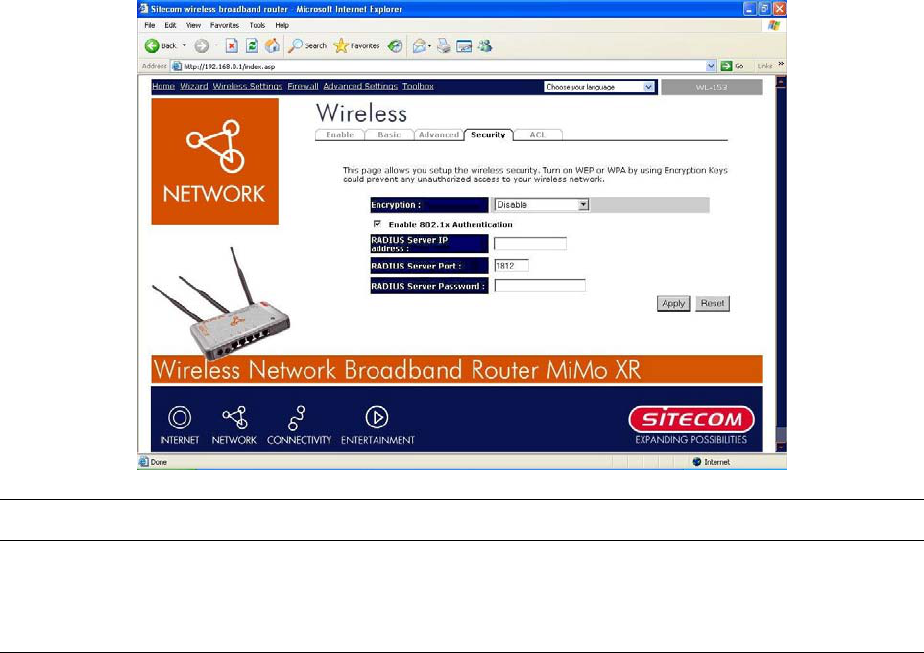
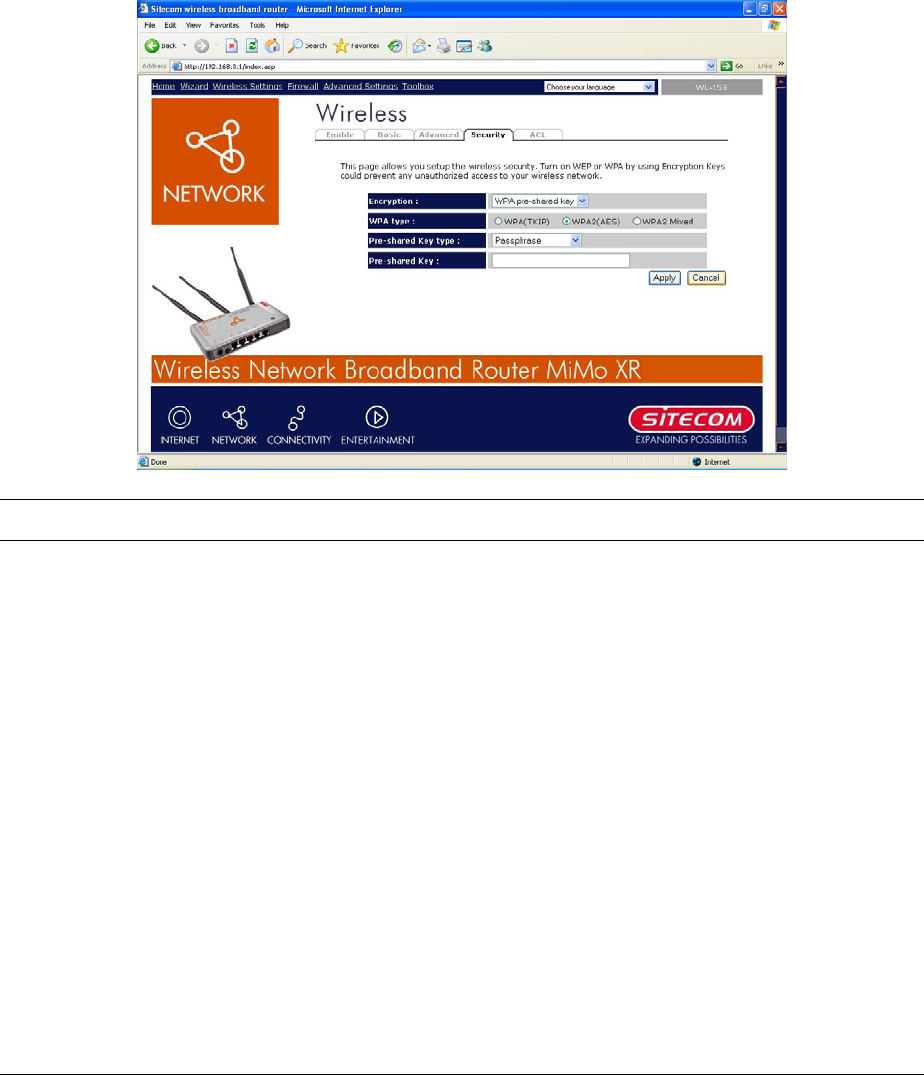
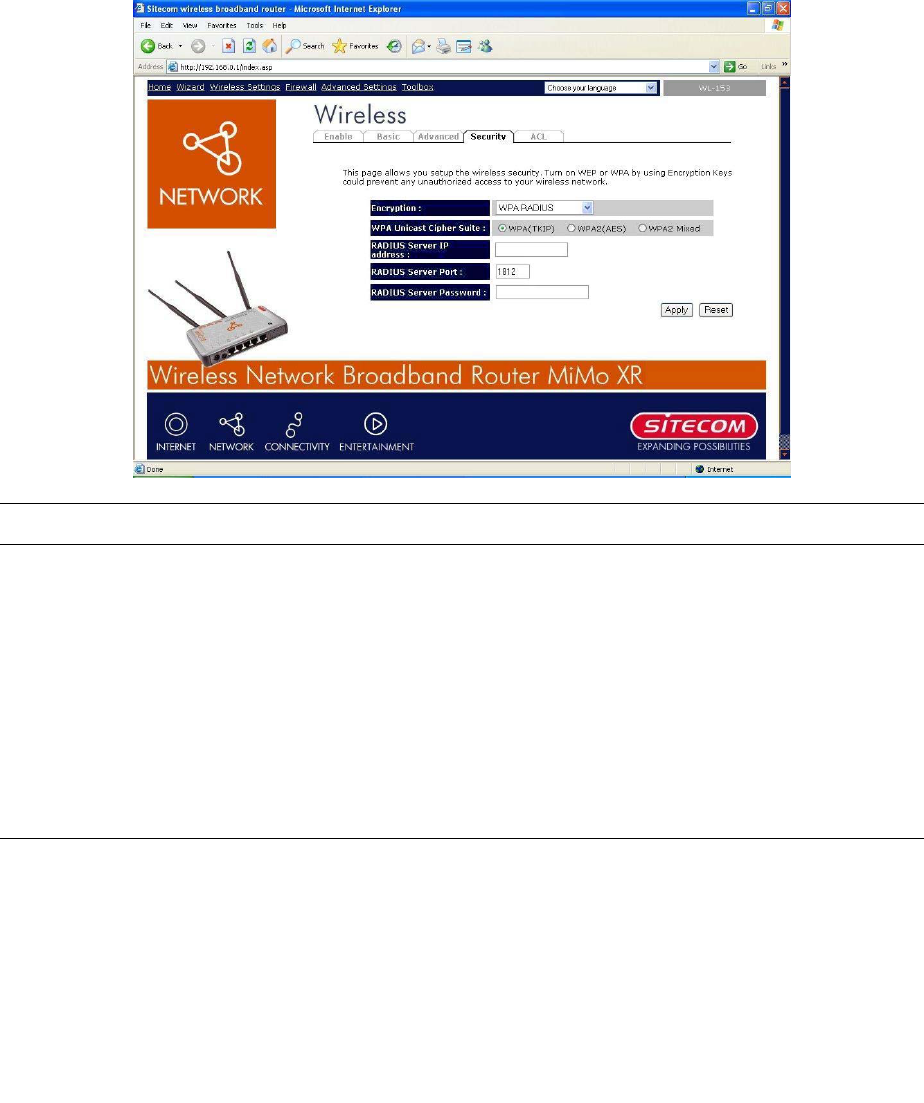
      Ga vervolgens naar "draadloze instellingen" (blauwe balkje boven). Ga vervolgens naar "beveiliging"

      In mijn geval heb ik gekozen voor (in mijn geval met windows 7) :
      Encryptie: WPA pre-shared key
      WPA type: WPA2 (AES)
      Pre-shared Sleutel type: Passphrase
      Pre-shared Sleutel: [wachtwoord naar keuze]

      Klik vervolgens op toepassen en "apply".
      Nu heb je je wachtwoord gewijzigd.

      Bedoeling is dat de bovenstaande instellingen overeenkomen met de instellingen op je pc/laptop. Hoe?

      Windows 7: Ga naar configuratiescherm > Netwerk en Internet > Netwerkcentrum > Draadloze netwerkverbinding (naam van je router) > eigenschappen van draadloos netwerk (naam router) > beveiliging. Vervolgens voer je bovenstaande instellingen in:

      Beveiligingstype: WPA2-Personal
      Versleutelingstype: AES
      Netwerkbeveiligingssleutel: wachtwoord die je bij "Pre-shared Sleutel" (zie hierboven) heb ingevoerd.

      En voilà! Je heb een beveiligde internetverbinding!

      Wil je ook de naam van je internetverbinding wijzigen? Dat kan! Hoe?
      Ga via Firefox naar 192.68.0.1.
      Ga vervolgens naar "draadloze instellingen" > Basis > ESSID: (voer een naam in)
      Kies vervolgens "Toepassen" en "Apply".

      Succes! Geantwoord op 24-6-2015 om 22:09

      Waardeer dit antwoord (3) Misbruik melden
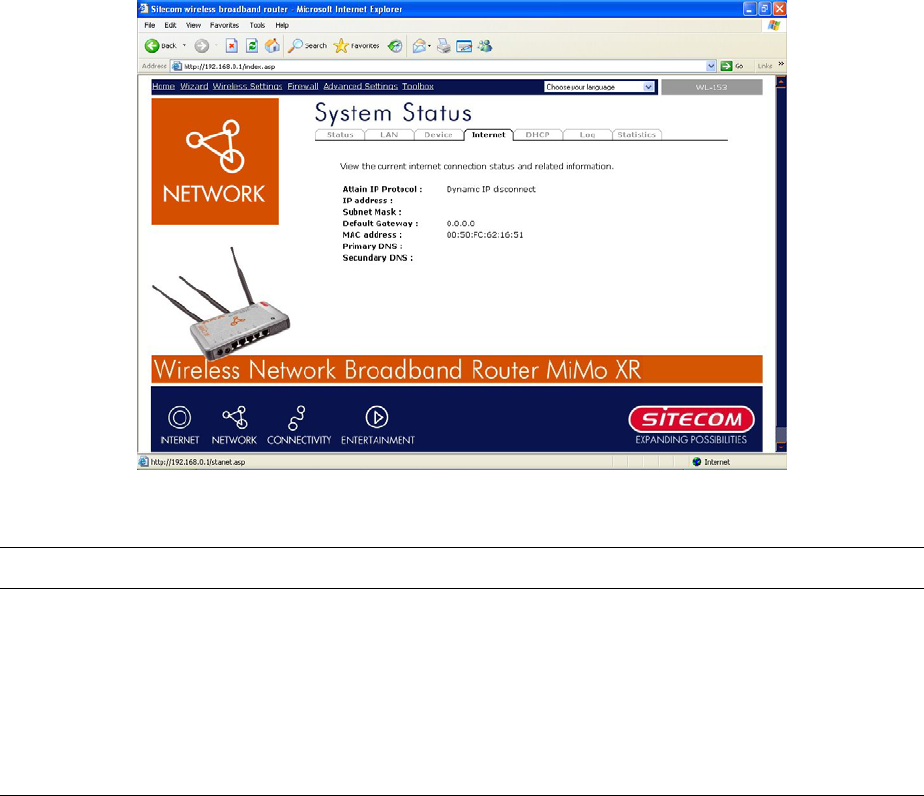
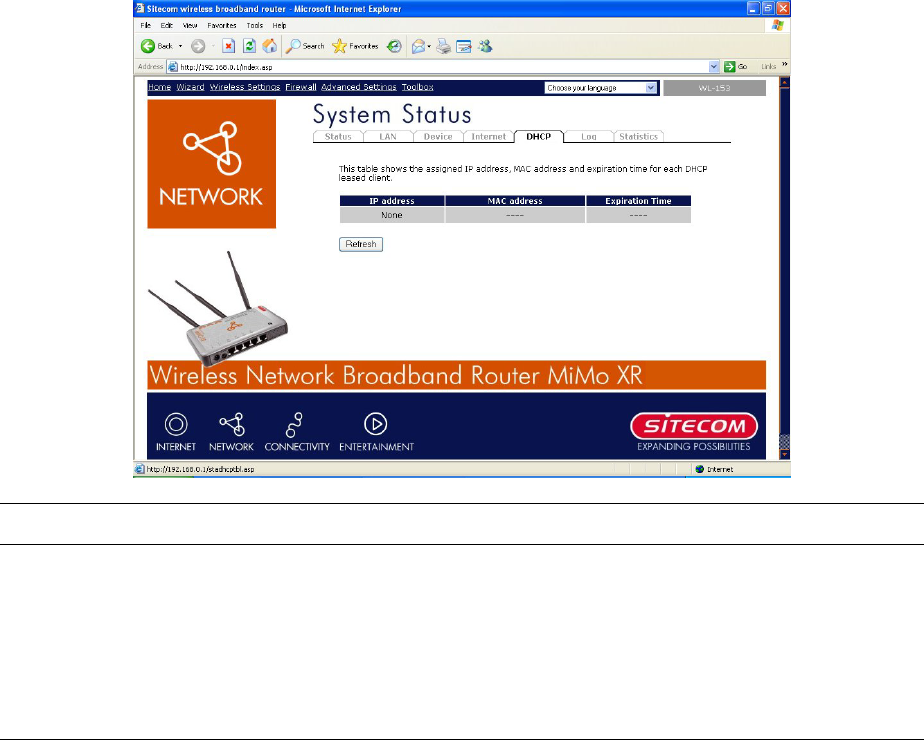
  • ik krijg bij inloggen van de ip alleen DHCP

    wat moet ik doen iedereen zit op me wifi Gesteld op 7-1-2015 om 22:54

    Reageer op deze vraag Misbruik melden
  • Had hetzelfde probleem....
    Oplossing: Installeer Firefox en de tabs worden wel getoond :-) Geantwoord op 28-3-2015 om 12:50

    Waardeer dit antwoord (3) Misbruik melden
  • Ip adres van sitecom broadband router wl153 v1 002 kan niet met wachtwoord worden beveiligd. Ip adres wordt niet herkend. Op de site alleen sdhc en geen security wireless tab aangeven.
    Gesteld op 16-6-2014 om 19:01

    Reageer op deze vraag Misbruik melden
    • Installeer Firefox als browser en vul het ip adres van de wl153 in. Dit is 192.168.0.1
      Resultaat? Alle tabs kunnen benaderd worden. Probleem: wilde wachtwoord vernieuwen in verband met beveiligen van de router. Als afronding moet ik een gebruikersnaam en alweer wachtwoord invullen. Hier loop ik juist vast. Iemand een idee? Geantwoord op 18-6-2014 om 15:24

      Waardeer dit antwoord Misbruik melden
  • what power supply is needed for
    Mod WL 153 V1 002
    ser no WL 153736 01 002
    9 v 12v 15v ??????
    Gesteld op 23-2-2014 om 10:22

    Reageer op deze vraag Misbruik melden
  • Op de beginpagina van de router is alleen optie DHCP zichtbaar. andere opties (zoals Wizzard) is wit. Hoe kan dat? Gesteld op 21-12-2013 om 12:48

    Reageer op deze vraag Misbruik melden
6
  • Het zelfde probleem.
    De web server is defect denk ik.
    Security probleem? Geantwoord op 17-1-2014 om 15:58

    Waardeer dit antwoord (2) Misbruik melden
  • Ik heb hetzelfde probleem. Geantwoord op 23-4-2014 om 14:02

    Waardeer dit antwoord (1) Misbruik melden
  • Gebruik Firefox als browser. Dan lukt het en zijn alle tabs actief in plaats van wit. Geantwoord op 18-6-2014 om 15:25

    Waardeer dit antwoord (1) Misbruik melden
  • Kan je op de wl-153 een tijdslimiet (tijdsbracket) instellen dat de router draadloos online is?
    Is er een instelling mogelijk dat bijvoorbeeld alleen tussen 08.00 en 21.00 het draadloos netwerk open staat? Gesteld op 23-4-2013 om 20:45

    Reageer op deze vraag Misbruik melden
    • Nee, dat is volgens mij niet mogelijk. Ik had hetzelfde verzoek, maar heb inmiddels een andere router gekocht, maar daar lukt het ook niet mee. Ik heb nu de ouderwetse tijdschakelaar uit de kast gehaald en tussen het gewenste tijdsbracket gaat de stroom er gewoon vanaf en dat werkt super!

      succes Geantwoord op 20-9-2013 om 09:55

      Waardeer dit antwoord (1) Misbruik melden
  • Ik heb een Mimo-XR, ben mijn wachtwoord kwijt, hoe vind ik het terug? Gesteld op 4-4-2013 om 14:11

    Reageer op deze vraag Misbruik melden
  • ik ben mij wachtwoord kwijt kan ik weer het wacht woord opvragen Geantwoord op 19-9-2013 om 17:02

    Waardeer dit antwoord (3) Misbruik melden
  • Beste,

    Wanneer ik inlog in mijn router via 192.168.0.1 kan ik enkel het tabblab DHCP openen. Alle andere kopjes zijn onzichtbaar waardoor ik ook geen wachtwoord op de router kan instellen. Iemand hier een oplossing voor ?

    Gr. Gesteld op 27-8-2012 om 23:09

    Reageer op deze vraag Misbruik melden
  • Beste,

    Wanneer ik inlog in mijn router via 192.168.0.1 kan ik enkel het tabblab DHCP openen. Alle andere kopjes zijn onzichtbaar waardoor ik ook geen wachtwoord op de router kan instellen. Iemand hier een oplossing voor ? Geantwoord op 21-9-2014 om 15:07

    Waardeer dit antwoord (14) Misbruik melden

Misbruik melden

Gebruikershandleiding.com neemt misbruik van zijn services uitermate serieus. U kunt hieronder aangeven waarom deze vraag ongepast is. Wij controleren de vraag en zonodig wordt deze verwijderd.

Product:

Bijvoorbeeld antisemitische inhoud, racistische inhoud, of materiaal dat gewelddadige fysieke handelingen tot gevolg kan hebben.

Bijvoorbeeld een creditcardnummer, een persoonlijk identificatienummer, of een geheim adres. E-mailadressen en volledige namen worden niet als privégegevens beschouwd.

Spelregels forum

Om tot zinvolle vragen te komen hanteren wij de volgende spelregels:

Belangrijk! Als er een antwoord wordt gegeven op uw vraag, dan is het voor de gever van het antwoord nuttig om te weten als u er wel (of niet) mee geholpen bent! Wij vragen u dus ook te reageren op een antwoord.

Belangrijk! Antwoorden worden ook per e-mail naar abonnees gestuurd. Laat uw emailadres achter op deze site, zodat u op de hoogte blijft. U krijgt dan ook andere vragen en antwoorden te zien.

Abonneren

Abonneer u voor het ontvangen van emails voor uw Sitecom WL-153 bij:


U ontvangt een email met instructies om u voor één of beide opties in te schrijven.


Ontvang uw handleiding per email

Vul uw emailadres in en ontvang de handleiding van Sitecom WL-153 in de taal/talen: Engels als bijlage per email.

De handleiding is 9,77 mb groot.


U ontvangt de handleiding per email binnen enkele minuten. Als u geen email heeft ontvangen, dan heeft u waarschijnlijk een verkeerd emailadres ingevuld of is uw mailbox te vol. Daarnaast kan het zijn dat uw internetprovider een maximum heeft aan de grootte per email. Omdat hier een handleiding wordt meegestuurd, kan het voorkomen dat de email groter is dan toegestaan bij uw provider.

Stel vragen via chat aan uw handleiding

Stel uw vraag over deze PDF

Andere handleiding(en) van Sitecom WL-153

Sitecom WL-153 Gebruiksaanwijzing - Nederlands - 6 pagina's


Uw handleiding is per email verstuurd. Controleer uw email

Als u niet binnen een kwartier uw email met handleiding ontvangen heeft, kan het zijn dat u een verkeerd emailadres heeft ingevuld of dat uw emailprovider een maximum grootte per email heeft ingesteld die kleiner is dan de grootte van de handleiding.

Er is een email naar u verstuurd om uw inschrijving definitief te maken.

Controleer uw email en volg de aanwijzingen op om uw inschrijving definitief te maken

U heeft geen emailadres opgegeven

Als u de handleiding per email wilt ontvangen, vul dan een geldig emailadres in.

Uw vraag is op deze pagina toegevoegd

Wilt u een email ontvangen bij een antwoord en/of nieuwe vragen? Vul dan hier uw emailadres in.


Info