289035
10
Verklein
Vergroot
Pagina terug
1/31
Pagina verder
Digital Camera with Streaming Snapshot
Owner’s Manual
About this manual
This manual is designed to assist you in using the StyleCam Blink II digital camera. Information in this
document has been carefully checked for accuracy; however, no guarantee is given to the correctness of the
contents. The information in this document is subject to change without notice.
Edition
First Edition, January 2003
Copyright
© Copyright 2003
This document contains proprietary information protected by copyright. All rights are reserved. No part of this
manual may be reproduced by any mechanical, electronic or other means, in any form, without prior written
permission of the manufacturer.
Federal Communications Commission (FCC) Compliance
This equipment has been tested and found to comply with the limits for a Class B digital device, pursuant to
Part 15 of the FCC Rules. These limits are designed to provide reasonable protection against harmful
interference in a residential installation. This equipment generates, uses, and can radiate radio frequency
energy and, if not installed and used in accordance with the instructions, may cause harmful interference to
radio communications. However, there is no guarantee that interference will not occur in a particular
installation. If this equipment does cause harmful interference to radio or television reception, which can be
determined by turning the equipment off and on, the user is encouraged to try to correct the interference by
one or more of the following measures:
Reorient or relocate the receiving antenna.
Increase the separation between the equipment and the receiver.
Connect the equipment to an outlet on a circuit different from that to which the receiver is connected.
Consult the dealer or an experienced radio/TV technician for help.
Warning!
You are cautioned that changes or modifications not expressly approved by the party responsible for
compliance could void your authority to operate the equipment.
Declaration of Conformity
This device complies with part 15 of the FCC rules. Operation is subject to the following conditions:
This device may not cause harmful interference.
This device must accept any interference received, including interference that may cause undesired
operation.
Canadian Department of Communications
This class B digital apparatus meets all requirements of the Canadian Interference-causing Equipment
Regulations.
Cet appareil numérique de la classe B respecte toutes les exigences du Réglement sur le matériel brouilieur
du Canada.
Trademark Recognition
2003 Foxlink Peripherals, Inc. StyleCam and Streaming Snapshot are trademarks of Foxlink Peripherals,
Inc. SiPix is registered by SiPix Group Ltd. and used under license. MS-DOS and Windows are registered
trademarks of the Microsoft Corporation registered in the USA and other countries. Windows is an
abbreviated term referring to the Microsoft Windows Operation System. Other company or product names
are trademarks or registered trademarks of their respective companies.
Table of Contents
GETTING STARTED .....................................................................................................................................................1
ABOUT THE STYLECAM BLINK II ....................................................................................................................................1
Unpacking the StyleCam Blink II................................................................................................................ 1
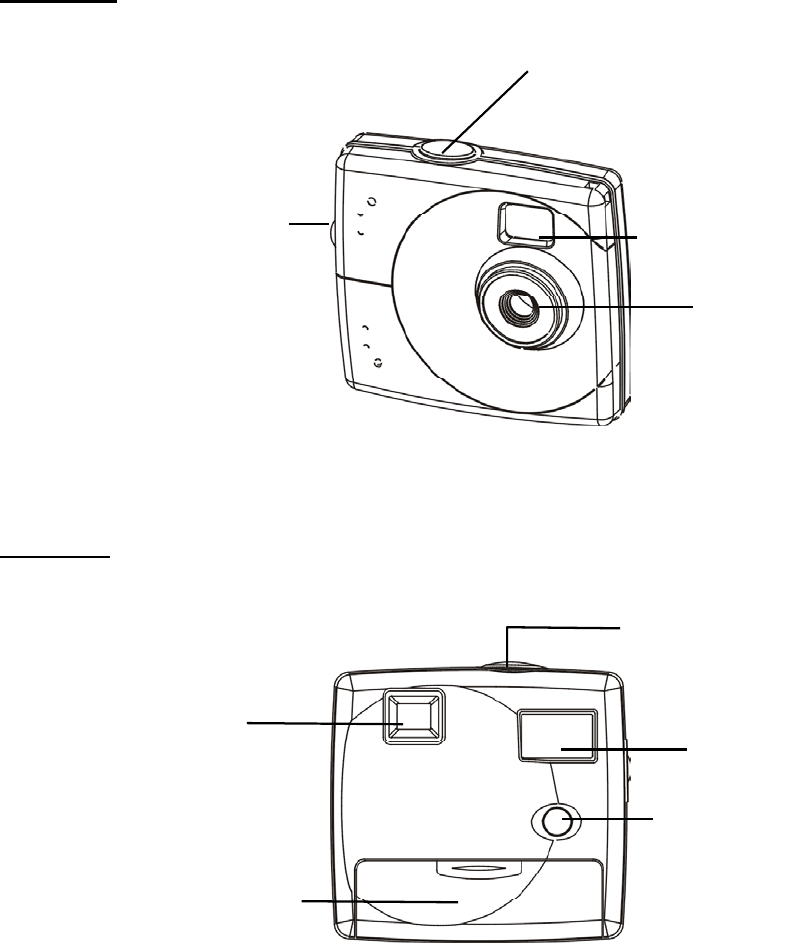
IDENTIFYING COMPONENTS ............................................................................................................................................2
Front View .................................................................................................................................................. 2
Back View .................................................................................................................................................. 2
INSERTING THE BATTERY ................................................................................................................................................3
TAKING PICTURES ......................................................................................................................................................4
TURNING THE CAMERA ON AND OFF.............................................................................................................................4
LCD MONITOR DISPLAY ................................................................................................................................................4
CAMERA ICON AND DESCRIPTION ...................................................................................................................................5
HOW TO TAKE DIGITAL STILL PICTURES ........................................................................................................................6
HOW TO TAKE STREAMING SNAPSHOTS..........................................................................................................................6
HOW TO ERASE IMAGES AND VIDEO ...............................................................................................................................7
SOFTWARE INSTALLATION......................................................................................................................................8
SOFTWARE OVERVIEW & FEATURES ..............................................................................................................................8
SiPix Picture Manager (TWAIN) ................................................................................................................ 8
SiPix CamWizard ....................................................................................................................................... 8
SiPix CamExplorer ..................................................................................................................................... 8
ArcSoft PhotoImpression ........................................................................................................................... 8
ArcSoft VideoImpression............................................................................................................................ 8
Adobe Acrobat Reader............................................................................................................................... 8
INSTALLING THE SOFTWARE ...........................................................................................................................................9
Installing the StyleCam Blink II TWAIN...................................................................................................... 9
CONNECTING TO YOUR PC.....................................................................................................................................12
HOW TO CONNECT THE STYLECAM BLINK II TO YOUR PC...........................................................................................12
DOWNLOADING FILES TO YOUR PC....................................................................................................................13
TRANSFER IMAGES & VIDEOS WITH THE STYLECAM BLINK II CAMWIZARD ...............................................................13
The SiPix CamWizard Menu Options ...................................................................................................... 13
Save Pictures and Videos to My Computer ............................................................................................. 13
Play Image Slideshow.............................................................................................................................. 14
Play Video(s) in Windows Media Player .................................................................................................. 14
View Images & Videos in the Camera ..................................................................................................... 14
T
RANSFER IMAGES WITH ARCSOFT PHOTOIMPRESSION................................................................................................14
Save Images using ArcSoft PhotoImpression.......................................................................................... 14
TRANSFER AND SAVE VIDEOS USING SIPIX CAMEXPLORER.........................................................................................15
USING THE STYLECAM BLINK II AS A PC CAMERA .......................................................................................16
HOW TO USE THE STYLECAM BLINK II AS A PC CAMERA................................................................................................16
Connecting the StyleCam Blink II to a PC ............................................................................................... 16
Using the ArcSoft VideoImpression...................................................................................................... 16
Saving Videos with Windows Media Player............................................................................................. 16
VIDEO CONFERENCING WITH NETMEETING ..................................................................................................17
HOW TO USE THE STYLECAM BLINK II WITH MICROSOFT NETMEETING .....................................................................17
STYLECAM BLINK II QUICK TIPS .........................................................................................................................18
Taking Pictures Indoors – General Do’s .................................................................................................. 18
Taking Pictures Indoors – General Don’ts ............................................................................................... 18
Taking Pictures Outdoors – General Do’s ............................................................................................... 18
Taking Pictures Outdoors – General Don’ts ............................................................................................ 18
PRODUCT SPECIFICATIONS ...................................................................................................................................19
TROUBLESHOOTING.................................................................................................................................................20
ONE YEAR LIMITED WARRANTY – USA & CANADA.......................................................................................21
WARRANTY SERVICES – USA & CANADA...........................................................................................................22
TECHNICAL SUPPORT – USA & CANADA............................................................................................................23
TECHNICAL SUPPORT & WARRANTY - EUROPE .............................................................................................25
TECHNICAL SUPPORT & WARRANTY – ASIA PACIFIC ..................................................................................26
G
G
E
E
T
T
T
T
I
I
N
N
G
G
S
S
T
T
A
A
R
R
T
T
E
E
D
D
About the StyleCam Blink II
Congratulations on your purchase of the StyleCam Blink II digital camera. Your StyleCam Blink II camera
has been ergonomically designed to allow you to quickly and easily take digital pictures and video without
the trouble of buying and developing film.
With a 1/3-inch VGA CMOS image sensor you are assured of vivid pictures. The VGA CMOS image sensor
is capable of capturing digital still images and streaming snapshots. Through the SiPix Picture Manager, the
streaming snapshots will automatically convert into digital video. You can use the StyleCam Blink II as a PC
camera, taking real-time video when connected to your computer with the supplied USB cable.
The included software enables you to easily download your pictures and video to your PC. With ArcSoft
PhotoImpression and VideoImpression software you can edit your pictures and video with ease. For more
information on how to use ArcSoft PhotoImpression and VideoImpression, you may visit their website at
www.arcsoft.com
Unpacking the StyleCam Blink II
Open the StyleCam Blink II box and remove all contents. If anything is missing or damaged, please contact
your reseller immediately. Your package should contain the following items:
StyleCam Blink II digital camera
Camera neck strap with clip
Tilt base
USB cable
1 AAA alkaline battery
Quick Start Guide
Software CD containing:
SiPix Picture Manager (TWAIN)
SiPix CamWizard
SiPix CamExplorer
ArcSoft PhotoImpression
ArcSoft VideoImpression
Owner’s Manual (PDF)
Adobe Acrobat Reader
Note: Do not discard the packaging box. You may need it to return the StyleCam Blink II digital camera.
1
I
I
d
d
e
e
n
n
t
t
i
i
f
f
y
y
i
i
n
n
g
g
C
C
o
o
m
m
p
p
o
o
n
n
e
e
n
n
t
t
s
s
Please refer to the following diagram to identify the StyleCam Blink II components:
Front View
Lens
Shutter button
USB connector
Viewfinder
Back View
Status LCD
Battery
compartment
cover
Shutter button
Power/Mode
button
Viewfinder
2
I
I
n
n
s
s
e
e
r
r
t
t
i
i
n
n
g
g
t
t
h
h
e
e
B
B
a
a
t
t
t
t
e
e
r
r
y
y
Please follow the instructions below to insert the battery into your StyleCam Blink II digital camera:
1. Turn the camera’s power to OFF.
2. Open the battery compartment cover located on the bottom of the camera by sliding the cover off
the camera.
3. Note the battery polarity inside the battery compartment, insert one new AAA alkaline battery, and
then replace and close the battery compartment door by sliding it completely shut.
IMPORTANT WARNINGS:
Do not use a rechargeable battery in the StyleCam Blink II. Using a rechargeable battery will
damage your camera.
Do not open the battery compartment when the camera is ON.
Download the pictures prior to storing your camera. Battery power is required to maintain
images in camera. Loss of image data will occur should the battery lose power.
The StyleCam Blink II allows up to 30 seconds for changing the battery without losing images
saved on the camera. We recommend that you download the images within 24 hours to avoid
losing the pictures.
Even without images in the camera, the StyleCam Blink II will slowly draw battery power. To
conserve battery power, after downloading images, remove the battery from camera.
Caution: The camera will use battery power when a battery is inserted. Remove the battery
from the camera after downloading pictures or when not in use.
3
T
T
A
A
K
K
I
I
N
N
G
G
P
P
I
I
C
C
T
T
U
U
R
R
E
E
S
S
T
T
u
u
r
r
n
n
i
i
n
n
g
g
t
t
h
h
e
e
C
C
a
a
m
m
e
e
r
r
a
a
O
O
N
N
a
a
n
n
d
d
O
O
F
F
F
F
To turn the camera’s power to ON, press the Power/Mode button. The camera will beep and the
status LCD will display the default settings.
To turn the camera’s power to OFF, press and hold the Power/Mode button for three seconds. The
camera will beep twice, and the status LCD will clear.
Note: The StyleCam Blink II will automatically power off after 30 seconds of inactivity.
L
L
C
C
D
D
M
M
o
o
n
n
i
i
t
t
o
o
r
r
D
D
i
i
s
s
p
p
l
l
a
a
y
y
The following LCD displays may vary depending on the current setting.
S
treaming
S
napshot mode
Delete
mode
Indoor/outdoor
mode
Battery
Resolution
Number of
pictures taken
Note: When scrolling through the modes, the icon on the LCD will blink when it is selected.
4
C
C
a
a
m
m
e
e
r
r
a
a
I
I
c
c
o
o
n
n
a
a
n
n
d
d
D
D
e
e
s
s
c
c
r
r
i
i
p
p
t
t
i
i
o
o
n
n
To select your desired setting, press the Power/Mode button to scroll through the different modes. The icons
will display in the status LCD; press the Shutter button to select the function displayed and the camera is
ready to take a picture or Streaming Snapshots.
The following chart provides icon images and descriptions for each icon.
Note: If you do not press any button within five seconds, the LCD screen automatically
returns to the operation mode screen.
Icon Description
Number of pictures and videos taken
HI
High Resolution mode (640x480) to take still images
LO
Low Resolution mode (320x240) to take still images and streaming snapshots
Indoor mode to take pictures indoors or in darker environment
Outdoor mode to take pictures outside
Streaming Snapshot mode to take continuous shots
ERASE ALL mode to erase all images and videos saved on the camera
ERASE LAST mode to erase the last image or videos saved on the camera
Battery Level indicator
USB connection to a computer
5
H
H
o
o
w
w
t
t
o
o
T
T
a
a
k
k
e
e
D
D
i
i
g
g
i
i
t
t
a
a
l
l
S
S
t
t
i
i
l
l
l
l
P
P
i
i
c
c
t
t
u
u
r
r
e
e
s
s
1
1
.
.
Press the Power/Mode button once to turn the camera on.
Default
Setting
2
2
.
.
Press the Power/Mode button again to scroll to the setting you want:
640 x 480 pixels
320 x 240 pixels
Press the Shutter button to save the setting and return to the main screen.
3
3
.
.
Press the Power/Mode button to scroll to indoor/outdoor:
Indoor: select when inside a building or when ambient light is low.
Outdoor: select when taking pictures outdoors.
Press the Shutter button to save the setting and return to the main screen.
4
4
.
.
Frame your subject through the viewfinder and press the Shutter button to take the picture. You will
hear a beep to confirm the picture is taken. The LCD display will show the number of pictures/videos
taken.
H
H
o
o
w
w
t
t
o
o
T
T
a
a
k
k
e
e
S
S
t
t
r
r
e
e
a
a
m
m
i
i
n
n
g
g
S
S
n
n
a
a
p
p
s
s
h
h
o
o
t
t
s
s
1
1
.
.
Press the Power/Mode button to turn the camera on.
2
2
.
.
Press the Power/Mode button to scroll to the Streaming Snapshot mode setting
.
Press the Shutter button to save the setting and return to the main screen.
3
3
.
.
Press the Power/Mode button to scroll to the resolution setting. Select the desired resolution:
320 x 240
[No Icon]
160 x 120
Press the Shutter button to save the setting and return to the main screen.
4
4
.
.
Press the Power/Mode button to scroll to indoor/outdoor, and select the desired setting:
Indoor: select when inside a building or when ambient light is low.
Outdoor: select when outside
.
Press the Shutter button to save the setting and return to the main screen.
5
5
.
.
Framing your subject in the viewfinder, press and hold the Shutter button down to take streaming
snapshots. You will hear continuous beeps as the images record. Release the shutter button to stop
recording.
6
10

Hulp nodig? Stel uw vraag in het forum

Spelregels

Misbruik melden

Gebruikershandleiding.com neemt misbruik van zijn services uitermate serieus. U kunt hieronder aangeven waarom deze vraag ongepast is. Wij controleren de vraag en zonodig wordt deze verwijderd.

Product:

Bijvoorbeeld antisemitische inhoud, racistische inhoud, of materiaal dat gewelddadige fysieke handelingen tot gevolg kan hebben.

Bijvoorbeeld een creditcardnummer, een persoonlijk identificatienummer, of een geheim adres. E-mailadressen en volledige namen worden niet als privégegevens beschouwd.

Spelregels forum

Om tot zinvolle vragen te komen hanteren wij de volgende spelregels:

Belangrijk! Als er een antwoord wordt gegeven op uw vraag, dan is het voor de gever van het antwoord nuttig om te weten als u er wel (of niet) mee geholpen bent! Wij vragen u dus ook te reageren op een antwoord.

Belangrijk! Antwoorden worden ook per e-mail naar abonnees gestuurd. Laat uw emailadres achter op deze site, zodat u op de hoogte blijft. U krijgt dan ook andere vragen en antwoorden te zien.

Abonneren

Abonneer u voor het ontvangen van emails voor uw Sipix blink bij:


U ontvangt een email met instructies om u voor één of beide opties in te schrijven.


Ontvang uw handleiding per email

Vul uw emailadres in en ontvang de handleiding van Sipix blink in de taal/talen: Engels als bijlage per email.

De handleiding is 1,66 mb groot.


U ontvangt de handleiding per email binnen enkele minuten. Als u geen email heeft ontvangen, dan heeft u waarschijnlijk een verkeerd emailadres ingevuld of is uw mailbox te vol. Daarnaast kan het zijn dat uw internetprovider een maximum heeft aan de grootte per email. Omdat hier een handleiding wordt meegestuurd, kan het voorkomen dat de email groter is dan toegestaan bij uw provider.

Stel vragen via chat aan uw handleiding

Stel uw vraag over deze PDF

Uw handleiding is per email verstuurd. Controleer uw email

Als u niet binnen een kwartier uw email met handleiding ontvangen heeft, kan het zijn dat u een verkeerd emailadres heeft ingevuld of dat uw emailprovider een maximum grootte per email heeft ingesteld die kleiner is dan de grootte van de handleiding.

Er is een email naar u verstuurd om uw inschrijving definitief te maken.

Controleer uw email en volg de aanwijzingen op om uw inschrijving definitief te maken

U heeft geen emailadres opgegeven

Als u de handleiding per email wilt ontvangen, vul dan een geldig emailadres in.

Uw vraag is op deze pagina toegevoegd

Wilt u een email ontvangen bij een antwoord en/of nieuwe vragen? Vul dan hier uw emailadres in.


Info