Gigaset 4015 Comfort, USA, A31008-G4015-B102-2-7619
vorberei.fm
25.06.03
Setting Up the Telephone
This delivery units contains:
•1 Gigaset 4215 base station
•1 Gigaset 4200 handset
•1 power supply unit
•1 telephone cord
•1 belt clip
•2 AA rechargeable NiCd batteries
•1 user manual
•1 Quick Start Guide
Installing the Base Station
The base station is designed for operation in protected rooms with a
temperature range from +40°F to +100°F.
IMPORTANT! For best reception, place the base in a high cen-
tral location, away from other electrical devices.
100° F
40° F
3
Setting Up the Telephone
Gigaset 4015 Comfort, USA, A31008-G4015-B102-2-
vorberei.fm
25.06.0
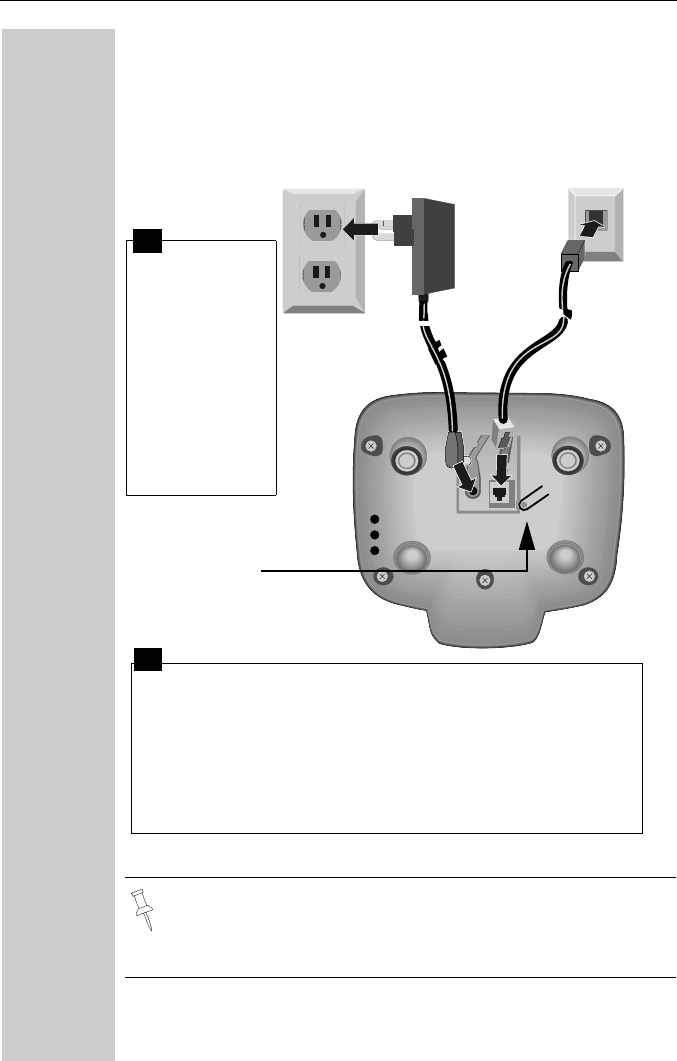
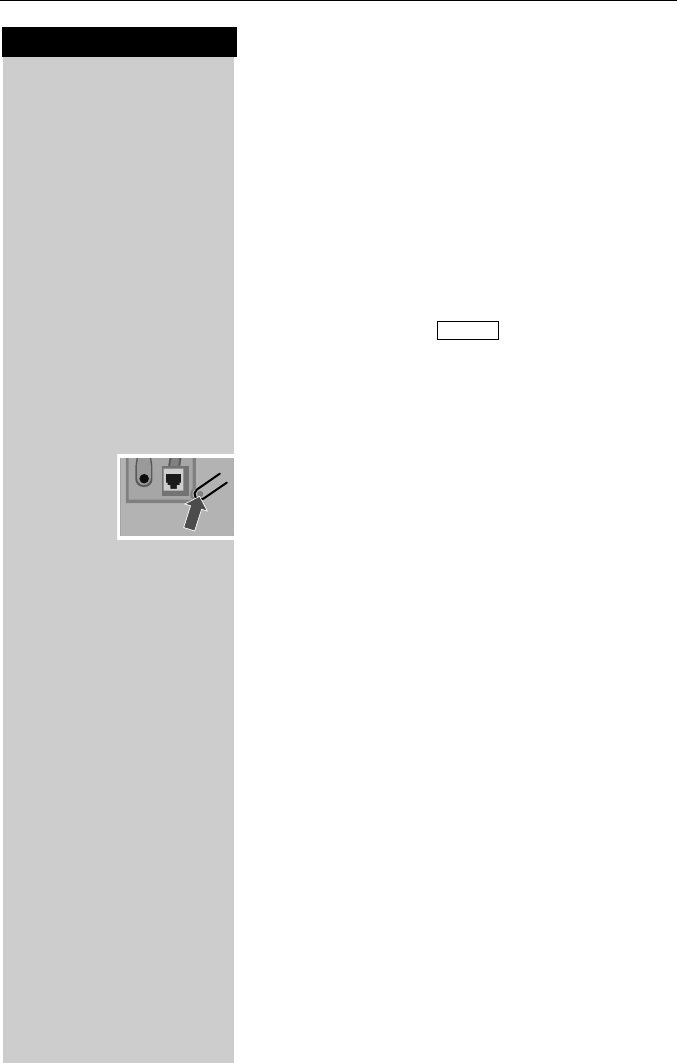
Connecting the Base Station
●Only use the power supply unit included as indicated on the
underside of the base.
●Use the telephone cord supplied. Do not use any old cords.
●Do not use an outlet controlled by a wall switch.
Power supply unit
with cord
(110VAC/60 Hz)
●Insert the
small plug on
cord into pho-
ne jack
●Place cord in
the base cable
channel,
●insert power
supply unit
into wall out-
let.
●Insert plug on the telephone cord into telephone jack on
base unit (clicks into place),
●Place cord in cable channel on the bottom of the base,
●Insert other end of plug into telephone jack on the wall.
●The installation of the base unit should allow at least 8 inches
between the base and persons to be in compliance with FCC
RF exposure guidelines
Telephone jack with telephone cord
Key to register
additional
handsets/Page
handsets.
1
2
4
Setting Up the Telephone
Gigaset 4015 Comfort, USA, A31008-G4015-B102-2-7619
vorberei.fm
25.06.03
Operating the Handset
Inserting the Batteries
●Insert the batteries, as shown above.
●Place cover and push gently upward until it clicks into place (the unit
is shipped with the battery cover off).
●To open, press the grooved area on the cover and slide back.
Placing Handset into the Base Station and Charging the
Batteries
Turn the handset off by holding down the END key then place it in the
base station with the display facing upward toward you. After about
one minute, the handset's internal number will appear on the display
(for example“INT 1”). Successful registration is signaled by a confir-
mation beep (crescendo tone sequence).
The display is protected by a plastic film.
Remove the protective plastic film!
●Use only “AA” rechargeable NiCd or NiMH batteries. Do not
use Alkaline, Lithium or non-rechargeable batteries.
●Never use non-Siemens charging units as these can damage
the batteries.
IMPORTANT! Before using your handset,you must register it
first.
For information on how toregister additional handsets (bought
separately), see page 56.
+
–
+
–
k
Ö
5
Setting Up the Telephone
Gigaset 4015 Comfort, USA, A31008-G4015-B102-2-
vorberei.fm
25.06.0
Leave the handset in the base station for about 12–14 hours the first
time the batteries are charged. The charging status symbol flashes on
the handset, indicating that the batteries are being charged:
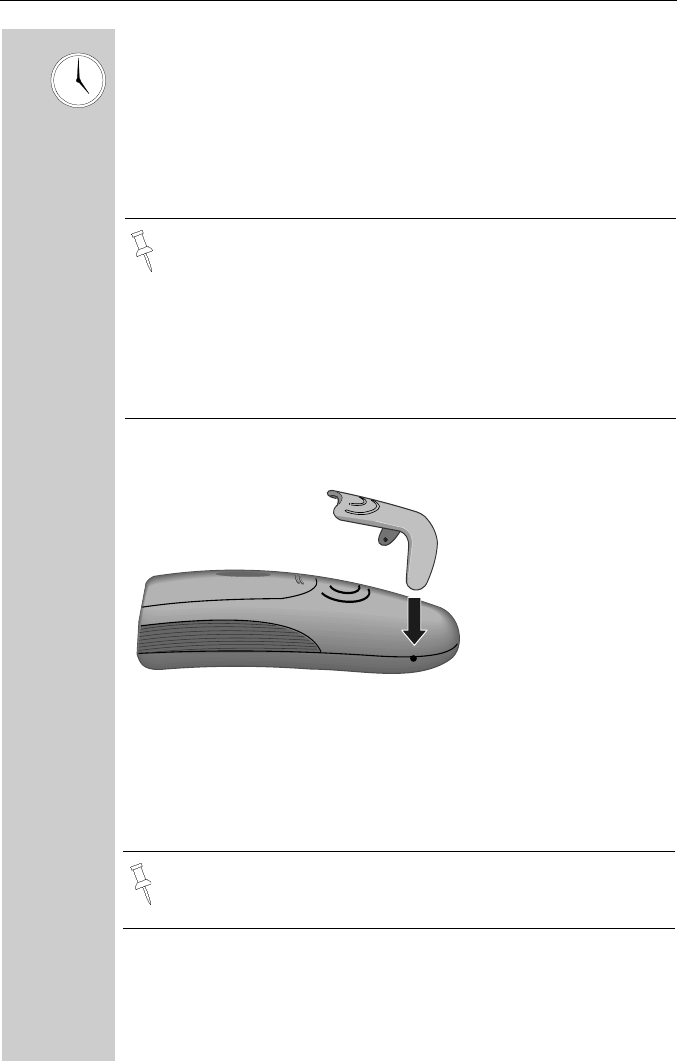
Attaching the Belt Clip
Push the belt clip onto the back of the handset until the tabs click into
place.
Turning Handset On/Off
aTo turn handset on/off, hold down the End key – you will hear a con-
firmationbeep.
Ý
Batteries empty (symbol
flashes)
Û
Batteries
2
/
3
charged
Ü
Batteries
1
/
3
charged
Ú
Batteries fully charged
●Once the initial charging operation is completed, you can re-
place your handset into the base station or charger after each
call. Charging is controlled electronically. This ensures opti-
mum charging and prolongs battery life.
●The batteries heat up during charging. This is normal and not
dangerous.
●The battery charging status is correctly displayed only after
uninterrupted charging/discharging. You should therefore avo-
id opening the battery compartment unnecessarily.
The handset is turned on as soon as you insert the batteries and
place the handset in the base station.
6
Setting Up the Telephone
Gigaset 4015 Comfort, USA, A31008-G4015-B102-2-7619
vorberei.fm
25.06.03
Turning Keypad Lock On/Off
You can disable the handset keys when carrying the unit in your pocket
or bag. This protects from accidental key presses. If there is an incom-
ing call, the key lock is automatically turned off and turned back on af-
ter the call has ended.
c
Accepting a call: Press the Talk key.
ªTo turn on/off, hold down the keypad lock, hold down the pound key –
you will hear the confirmation beep
1
!
1.Confirmation beep = rising tone sequence,
Error beep = falling tone sequence.
Note: 911/Emergency calls can not be made when the key pad
is locked.
7
Press keys:
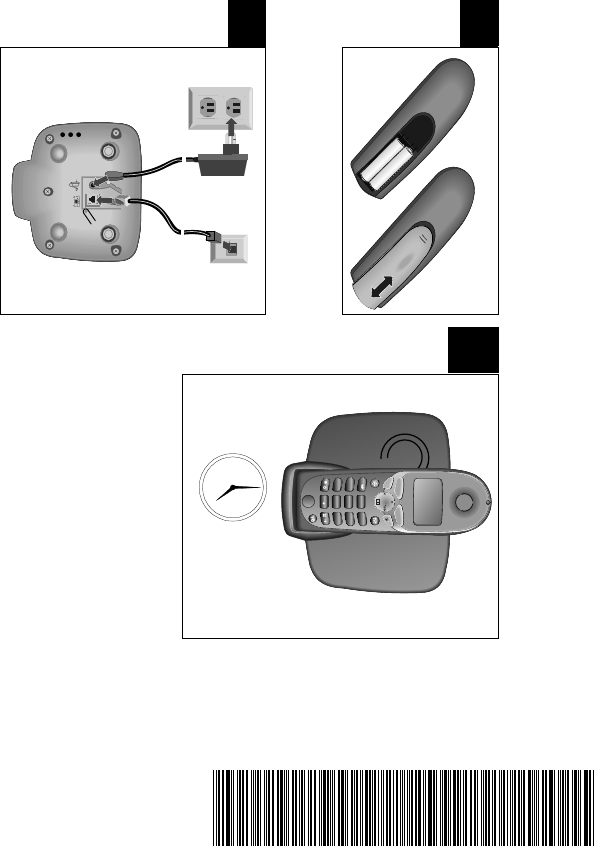
Date and Time
Gigaset 4015 Comfort, USA, A31008-G4015-B102-2-7619
uhrzeit.fm
25.06.03
Date and Time
Setting the Date and the Time
The date and time settings are necessary in order for
the date and time of the arriving of messages/incoming
calls to be displayed correctly.
You can also set the clock mode, to the 12 hour mode
(AM and PM) or 24 hour mode. If you subscribe the
Caller ID the date and time are automatically set. If you
do not subscribe to Caller ID follow the steps below to
set the date and time.
Date
MENUPress Menu.
åååååååååååååååååååååååååååååååå
DAppoint./Clock[
Scroll to Appoint/Clock and press OK.
åååååååååååååååååååååååååååååååå
DDate/Time[
Scroll to Date/Time and press OK.
The current setting is displayed in the MM-DD-YY
mode.
For example:
Þ¢ŸÞÞ]Enter the month/day/year (for example: 05-20-01, as
shown).
Time
DScroll down one line.
] ¬ Þ ¢Enter the hours/minutes (for example: 10.05, as
shown).
Factory default: 12 hour mode. If am or pm isdisplayed
next to the time, 12 hour mode is activated. If you
move the cursor to the time field, you can change from
am to pm using the left display key.
Clock Mode (12 or 24 Hours)
DScroll down one line to set mode.
F GIf necessary, select either 24 hour or 12 hour display
mode.
SaveSave the settings.
•The default setting is 12 hour mode.
•If you subscribe to Caller ID, the date and time
may be sent from your telephone serviceand
will be automatically set.
By default, the clock is set to the 12 hour mode
and am or pm is displayed next to the time. If
you move the cursor to the time field, you can
change from am to pm using the left soft key.
8
Press keys:
Date and Time
Gigaset 4015 Comfort, USA, A31008-G4015-B102-2-7619
uhrzeit.fm
25.06.03
Area Codes
To conveniently call back a user from the call log (see
page 38) you will need to key in and store the area code
where your telephone is installed (Local Area Code). If
it is installed in a Multiple Area Code Area you will also
have to key in and store the Extra Codes for that area.
Local Area Code
MENUPress Menu.
åååååååååååååååååååååååååååååååå
DBase Settings[
Scroll to Base Settings and press OK.
åååååååååååååååååååååååååååååååå
DArea Codes[
Scroll to Area Codes and press OK.
åååååååååååååååååååååååååååååååå
DLocal Area Code[
Scroll to Local Area Code and press OK.
oKey in your Local Area Code.
MENUPress Menu.
åååååååååååååååååååååååååååååååå
Save Entry[
Scroll to Save Entry and press OK.
Extra Codes
MENUPress Menu.
åååååååååååååååååååååååååååååååå
DBase Settings[
Scroll to Base Settings and press OK.
åååååååååååååååååååååååååååååååå
DArea Codes[
Scroll to Area Codes and press OK.
åååååååååååååååååååååååååååååååå
DExtra Codes[
Scroll to Extra Codes and press OK. The first entry of
list of codes will be displayed.
To add or change a code:
DScroll down using navi key desired code location.
EditPress Edit.
oKey in the Extra Code.
MENUPress Menu.
åååååååååååååååååååååååååååååååå
Save Entry[
Scroll to Save Entry and press OK.
Repeat the last steps until all the Extra Codes for your
area have been keyed in.
9
Press keys:
Making Calls
Gigaset 4015 Comfort, USA, A31008-G4015-B102-2-7619
telef.fm
25.06.03
Making Calls
Making an External Call
o XDial the telephone number. If necessary use the back-
space key to correct mistakes.
cPress the Talk key.
aTo end the call, press the End key.
To insert a pause when dialing a number:
MENUPress Menu.
åååååååååååååååååååååååååååååååå
DInsert Pause[
Scroll to Insert Pause and press Ok.
Making an Intercom Call
Intercom calls are calls to other registered handsets
and do not tie up your telephone line (for example, calls
within your home from the kitchen to the living room).
For example:
FPress INT on the navi key. Your own handset is identi-
fied by “<”.
D EcScroll to the handset you want to call and press the Talk
key.
or
e.g. ŸSimply enter the number of the handset you want to
call.
Paging All Handsets
FPress INT on the navi key.Your own handset is identi-
fied by “<”.
«Press the « key
•You can also press the Talk key first
and then
enter the telephone number – each digit is di-
aled immediately.
•You can cancel the dialing operation with the
End key.
10
Press keys:
Making Calls
Gigaset 4015 Comfort, USA, A31008-G4015-B102-2-7619
telef.fm
25.06.03
Ending an Internal Call
aPress the END key to end the call.
Answering a Call
Your handset rings (ringer) and the status LED flashes.
c
/uPress the TALK or speakerphone u key.
or
With the “Auto Answer” feature you may answer a call
by simply removing the handset from the base station
or charger (for instructions on how to turn on the “Auto
Answer” feature see page 72).
Anwering a waiting call
1
While on an active call, you will hear the Call Waiting to-
ne. Announce to the first caller that you will place them
on hold.
CPress the MEM key in lower right corner of handset for
3 seconds to answer the second caller.
åååååååååååååååååååååååååååå
R
An „R“ will be displayed as confirmation you have ans-
wered Call Waiting.
Reconnecting the first call
While on an active call, you will hear the Call Waiting to-
ne. Announce to the first caller that you will place them
on hold.
CPress the MEM key again to reconnect the first call.
Toggle between the two calls by pressing the MEM
key.
1Subscription required from your local telephone provider
11
Press keys:
Making Calls
Gigaset 4015 Comfort, USA, A31008-G4015-B102-2-7619
telef.fm
25.06.03
Accepting or rejecting a waiting call
If you receive an external call during an internal call you
will hear the call waiting tone if you subscribe to this
feature from your local telephone company.
AcceptPress Accept - The internal call is ended; you are con-
nected to the external call.
RejectPress Reject –You stay connected to the internal user.
Rgr Off Accept
5551234
12
Press keys:
Making Calls
Gigaset 4015 Comfort, USA, A31008-G4015-B102-2-7619
telef.fm
25.06.03
Answering Caller ID Calls
An incoming call is displayed as follows:
åååååååååååååååååååååååååååå
5125551234
If both number and name were transmitted, then
åååååååååååååååååååååååååååå
John Smith
both will be shown. If the number is stored in the tele-
phone book, only the name stored will appear.
ååååååååååååååååååååååååååååååå
External
If you have not applied for Caller ID service.
åååååååååååååååååååååååååååå
Private Call
The caller has chosen to block his or her number.
åååååååååååååååååååååååååååå
Out of Area
If the number is not available to your telephone compa-
ny, Out of Area will be displayed instead.
åååååååååååååååååååååååååååå
Unknown
If the caller is unknown or no available Caller ID infor-
mation is received by the local telephone company.
Caller ID is a service provided by the local tele-
phone company which allows your Gigaset to
display the name and number of the person who
is calling you. Contact your local telephone com-
pany to subscribe to Caller ID service.
Rgr Off Accept
0891234567
Telephone
number
Bell Icon
In the first displayline you see a bell:
●if you have not applied for Caller ID Service,
●if the caller has chosen to block his or her name,
●if the name is not available to your telephone com-
pany.
13
Press keys:
Making Calls
Gigaset 4015 Comfort, USA, A31008-G4015-B102-2-7619
telef.fm
25.06.03
Handset Speakerphone
Using your handset speakerphone offers the following
advantages:
●Before dialing, you hear the dial tone without having
to lift the handset to your ear.
●Other people can listen in and join on the call.
●Leaves your hands free, for example to take notes.
Dialing with the Speakerphone
oDial the desired number.
uPress the speakerphone key u.
Using the Handset Speakerphone During a Call
uPress to turn on the handset speakerphone.
To set the volume during a call, press the speakerpho-
ne key u again.
F GRaise or lower the volumeusing the navi key.
SaveSave the volume level.
cTo change from speakerphone to the handset, press
Talk to end the call, press End or replace the handset in
base or charger.
aEnd the call.
Muting the Handset
You can mute your handset during an external call to
talk privately to another person in the room. The exter-
nal caller cannot hear your conversation. You cannot
hear your caller either.
FWhile on an active call, Press Int on the navi key to
mute the microphone – the call is placed on hold and
the external caller will hear music.
ÎTo return to the external caller, press the escape key.
If you want to replace the handset in the base
station during a call (if for example the battery is
low), hold down the speakerphone keyu
.
14
Press keys:
Making Calls
Gigaset 4015 Comfort, USA, A31008-G4015-B102-2-7619
telef.fm
25.06.03
Picking up a Call from the Answering
Machine
While the answering machine is recording a message
(status LED lights up), you can still pick up the call if you
want to talk to the caller.
cPress the Talk key.
The recording will end and you can talk to the caller.
Recording a call
You can use the answering machine to record an exter-
nal call.
To start the recording while you are on an external call:
To start the recording
MENUOpen the menu.
åååååååååååååååååååååååååååååååå
DCall Record[
Scroll to Call Record and press OK.
The option is marked as active (
9
).
The answering machine symbol
¸ flashes to indicate
that call is being recorded.
To end the recording
You are recording a call.
MENUPress Menu.
åååååååååååååååååååååååååååååååå
DCall Record[
End call recording.
The marker (
9
) is deleted.
If the handset speakerphone is on, the speaker-
phone key
u flashes during recording. You can
listen in on the recording on up to four handsets.
The recorded call is stored in the message list of
the answering machine.
In some states it may be illegal to record the per-
son on the other end of a phone conversation
without their expressed permission. Please
obey your local laws and regulations. Always ask
the other party whether recording the call is OK.
15
Press keys:
Making Calls
Gigaset 4015 Comfort, USA, A31008-G4015-B102-2-7619
telef.fm
25.06.03
Telco Voice Mail
If you subscribe to voice mail from your local telephone
company, you may use your Gigaset handset to re-
trieve messages. It is recommended you store the ac-
cess number in the "1" key.
Storing Access Number for Retrieving Voice
Mail
MENUPress Menu.
åååååååååååååååååååååååååååååååå
DAnswering M.[
Scroll to Ans Machine and press OK.
åååååååååååååååååååååååååååååååå
DSet Key 1[
Select to Set Key 1 and press OK.
åååååååååååååååååååååååååååååååå
DVoice Mail[
Set the Voice Mail.
oDial thevoice mail access number.
MENUPress Menu.
åååååååååååååååååååååååååååååååå
Save Entry[
Scroll to Save Entry and press OK.
Once you have entered the voice mail access
number, simply hold down the
] key on the
handset and you are directly connected to the
Telco voice mail system. Follow the Telco instruc-
tions.
16
Press keys:
Making Calls
Gigaset 4015 Comfort, USA, A31008-G4015-B102-2-7619
telef.fm
25.06.03
Direct Inward Dialing
With direct inward dialing, an external caller can direct-
ly call an internal number (see page91). To use this fea-
ture the answering machine must be turned on.
After dialing your telephone number, the caller hears
the standard announcement or the direct inward
dialing announcement as recorded.
The call will not be answered by the answering machi-
ne if the standard announcement is set.
The caller then has five seconds in which to dial a hand-
set's internal number.
If there is still nobody to answer the call, the answering
machine (see page 53) will pick up the call.
Picking up a Call
If direct inward dialing is on and if a call is not answered
on a certain handset, you can pick up the call on your
handset.
cPress the Talk key
or
AcceptAccept the call.
An example for a direct inward dialing an-
nouncement:
“Hello this is the Smiths. To talk to John press 1.
To talk to Mary press 2. To talk to Jimmy press 3.
Press the star button if you don’t mind who you
talk to.“
17
Press keys:
Enhanced Telephone Features
Gigaset 4015 Comfort, USA, A31008-G4015-B102-1-7619
komfort.fm
25.06.03
Enhanced Telephone Features
In addition to its standard features, your Gigaset offers
a number of other fast, convenient, enhanced features.
Redial
Your handset automatically saves the last five telepho-
ne numbers dialed (see page 29).
Manual Redial
zPress the Redial soft key.
DSelect the desired telephone number/name using the
navi key.
cPress the Talk or Speakerphone key – the telephone num-
ber is dialed.
Automatic Redial
The Gigaset can automatically redial a telephone num-
ber ten times (with an interval of 20 seconds in each
case.) The speakerphone key flashes and the speaker
is active during this operation.
This functionturns itself off after 10 unsuccessful
tries.
To cancel automatic redial, press or any key.
The person you called is not available:
zPress the Redial soft key.
DScroll to the desired telephone number/name.
MENUPress Menu.
åååååååååååååååååååååååååååååååå
DAuto Redial[
Scroll to Auto Redial and press OK – After a few mo-
ments the phone will start redialing the number.
When the user answers:
cPress the Talk or Speakerphone key.
Off
Automatic redialing is turned off if you subse-
quently make a call. You must turn it back on af-
terwards.
18
Press keys:
Enhanced Telephone Features
Gigaset 4015 Comfort, USA, A31008-G4015-B102-1-7619
komfort.fm
25.06.03
Delete Entry from Redialing List
zPress the Redial soft key.
DScroll to desired telephone number.
MENUPress Menu.
åååååååååååååååååååååååååååååååå
DDelete Entry[
Scroll to Delete Entry and press OK.
Copying the Redial Number to the Directory
zPress the Redial soft key.
DScroll to desired telephone number.
MENUPress Menu.
åååååååååååååååååååååååååååååååå
DSend to Dir[
Scroll to Send to Dir and press OK.
The telephone number is already entered.
oIf desired, edit the name and number (and, if appropria-
te, an anniversary, (see page 28)).
MENUPress Menu.
åååååååååååååååååååååååååååååååå
Save Entry[
Save the entry by pressing OK.
For more information about editing letters and
characters (see page78).
19
Press keys:
Enhanced Telephone Features
Gigaset 4015 Comfort, USA, A31008-G4015-B102-1-7619
komfort.fm
25.06.03
Setting the Alarm
Your Gigaset has an alarm function to help you keep
track of your schedule. You must set the time and date
first (see page 8) in order for the alarm to work.
Turning the Alarm On
The active alarm clock rings every day at the set time.
If you have set a time for the alarm call, this is indicated
by the
¼
icon in the display.
The telephone is idle:
MENUOpen the menu.
åååååååååååååååååååååååååååååååå
DAppoint./Clock[
Scroll to Appoint./Clock and press OK.
åååååååååååååååååååååååååååååååå
DAlarm Clock[
Scroll to Alarm Clock and press OK.
The current setting is displayed.
F GScroll right (on) or left (off) with the navi key to turn
alarm on or off.
DScroll down one line to enter time.
Entering the time for the alarm
for example
Þ £Þ ÞEnter the hours/minutes. The example here is 6.00.
DScroll down one line.
Choosing the ringer melody for the alarm
F GScroll left or right to choose the ringer melody.
SaveSave the settings.
When the handset is idle, a stored time for the alarm
call is indicated by the
¼
icon.
Alarm will not sound if the room monitor is on or
during automatic redial.
20
Press keys:
Enhanced Telephone Features
Gigaset 4015 Comfort, USA, A31008-G4015-B102-1-7619
komfort.fm
25.06.03
Turning the Alarm Off
When the alarm rings and the LED flashes (about 30
seconds) press any key on the handset to turn off the
alarm sound.
MENUPress Menu.
åååååååååååååååååååååååååååååååå
DAppoint./Clock[
Scroll to Appoint./Clock and press OK.
åååååååååååååååååååååååååååååååå
DAlarm Clock[
Scroll to Alarm Clock and press OK.
F GScroll left with the navi key to turn the alarm off.
SaveSave the settings.
Stopping the Alarm Sound
An alarm clock rings and the LED flashes (about 30
seconds). Press any key on the handset to turn off the
alarm sound.
Schedule
Your handset is able to remind you of one appoint-
ment. You need to store the date and time of this ap-
pointment. You may only set one appointment at a
time.
If you have set an appointment, this is indicated by the
¼
icon
in the display.
Setting an Appointment
MENUPress Menu.
åååååååååååååååååååååååååååååååå
DAppoint./Clock[
Scroll to Appoint./Clock and press OK.
åååååååååååååååååååååååååååååååå
Set Appointment[
Scroll to Set Appointment and press OK.
Activating the appointment alarm
F GScroll right on the navi key to turn on.
DScroll down one line to enter date.
Entering the date
for example
Þ¢ŸÞEnter month/day (for example: 05.20 as shown).
DScroll down one line to enter time.
There is no snooze setting. The alarm will sound
until turned off.
The alarm will sound daily at the set time until
you turn it off through the menu.
21
Press keys:
Enhanced Telephone Features
Gigaset 4015 Comfort, USA, A31008-G4015-B102-1-7619
komfort.fm
25.06.03
Entering the time
for example
Þ¬Þ¢Enter the hours/minutes (for example: 9.05 am as
shown).
Factory setting: 12 h mode. If am or pm isdisplayed
next to the time, the 12 h format is active.
If you move the cursor into the time field, you can use
the left display key to change from am to pm.
DScroll down one line to choose ringer melody.
Choosing the ringer melody for the appointment
alarm
F GScroll with the navi key to choose the ringer melody.
SaveSave the settings.
Turning off the Appointment Alarm
An appointment alarm sounds the same way as an in-
coming call. The handset rings and the status LED flas-
hes (approx. 30 sec).
Press any key to turn off the appointment alarm.
An appointment alarm will ring only if the hand-
set is idle. An appointment alarm can not ring if
the room monitor is on or during automatic redi-
al.
22
Press keys:
Enhanced Telephone Features
Gigaset 4015 Comfort, USA, A31008-G4015-B102-1-7619
komfort.fm
25.06.03
Display Missed Appointments and
Anniversaries
If you do not answer an appointment call after nine
rings, it will automatically turn off. The calls are then sa-
ved in an appointment list.
The display will show date in lower right hand corner of
the display to show an new, unanswered appointment.
Press the right soft key to show the list of events.
Then select OK.
Proceed as follows to display the appointment:
MENUPress Menu.
åååååååååååååååååååååååååååååååå
DAppoint./Clock[
Scroll to Appoint./Clock and press OK.
åååååååååååååååååååååååååååååååå
DDates[
Scroll to Dates and press OK.
D [Select a missed appointment. The information on the
missed appointment is displayed.
A missed appointment is identified by
¼
.
A missed anniversary (see page 28) is identified by
‚.
Press Delete to delete a missed appointment/anni-
versary.
[Go back to the list.
Missed Appt.
¼
23
Press keys:
Enhanced Telephone Features
Gigaset 4015 Comfort, USA, A31008-G4015-B102-1-7619
komfort.fm
25.06.03
Directory
The Directory D allows you to store up to 200 tele-
phone numbers.
Storing a Directory Entry
DOpen the Directory list by pressing the bottom of the
navi key.
åååååååååååååååååååååååååååååååå
DNew Entry[
Scroll to New Entry and press OK.
oEnterthe telephone number (max. 32 digits).
DoScroll to the name field and enter the name (max. 16
characters)
(Optionally you can also enter the anniversary, (see
page 28) ).
MENUPress the menu.
åååååååååååååååååååååååååååååååå
Save Entry[
Save the entry by pressing OK.
Copying a Telephone Number to the Directory
During a Call
You are conducting an external call:
MENUPress Menu
åååååååååååååååååååååååååååååååå
DSend to Dir[
Scroll to Save to Dir and press OK.
A menu opens in which you can enter the telephone
number and the name of the caller. If the number has
been transmitted it automatically appears in the menu.
oEnter the name of the caller if desired.
MENUPress the menu.
åååååååååååååååååååååååååååååååå
Save Entry[
Save the entry by pressing OK.
Follow all local telephone company dialing re-
quirements, such as 7-digit, 10-digit or 11-digit di-
aling.
●Refer to character map in the Appendix
(page78) for using the keypad to enter names
and numbers.
●Control the cursor with Gor F. Delete a
character with
X. Characters are always in-
serted to the left of the cursor.
ACHTUNG: „Copying a Directory ...“ gilt nur für USA 4010 und LAM 4015!!!!!!!
ACHTUNG: „Copying a Directory ...“ gilt nur für USA 4010 und LAM 4015!!!!!!!ACHTUNG: „Copying a Directory ...“ gilt nur für USA 4010 und LAM 4015!!!!!!!
ACHTUNG: „Copying a Directory ...“ gilt nur für USA 4010 und LAM 4015!!!!!!!
Voice Dialing”
24
Press keys:
Enhanced Telephone Features
Gigaset 4015 Comfort, USA, A31008-G4015-B102-1-7619
komfort.fm
25.06.03
Dialing a Number from the Directory
DOpen the directory by pressing the bottom of the navi
key.
The names are listed in alphabetical order.
DScroll to the desired name.
orYou may enter the first letter of the desired name using
the keypad to jump ahead in the list.
For example:
^Press the 3 key
once for David.
^^Press the 3 key
twice for Eric.
^^^Press the 3
key three times for Frank.
cPress the Talk or Speakerphone key. The telephone
number is dialed.
Displaying and Editing a Directory Entry
DOpen the Directory list by pressing the bottom of the
navi key.
DScroll to desired name.
DisplayPress Display.
If desired, you can change the telephone number/
name:
EditPress Edit to open the menu for making changes.
oIf desired change the telephone number.
DoScroll to the name field and, if desired, change the
name.
DoScroll to the anniversary field and, if desired, change
the date and time of the anniversary (see page 28).
MENUPress the menu.
åååååååååååååååååååååååååååååååå
Save Entry[
Confirm changesby selecting Save Entry and pressing
OK.
●Refer to character map in the Appendix
(page78) for using the keypad to enter names
and numbers.
●Control the cursor with Gor F. Delete a
character with
X. Characters are always in-
serted to the left of the cursor.
25
Press keys:
Enhanced Telephone Features
Gigaset 4015 Comfort, USA, A31008-G4015-B102-1-7619
komfort.fm
25.06.03
Deleting a Single Entry from the Directory
DOpen the Directory list by pressing the bottom of the
navi key.
DScroll to desired name.
MENUPress Menu.
åååååååååååååååååååååååååååååååå
DDelete Entry[
Scroll to Delete Entry and press OK - A confirmation
beep sounds as the entry is deleted.
Deleting All Numbers in the Directory
DOpen the Directory list by pressing the bottom of the
navi key.
DScroll to any name.
MENUPress Menu.
åååååååååååååååååååååååååååååååå
DDelete Log[
Scroll to Delete Log and press OK.
YesConfirm to delete all entriesby pressing Yes - A confir-
mation beep sounds as the log is deleted.
Copying an Entry to Another Handset
You can copy an entry to another Gigaset 4200 handset to
save yourself time and effort.
DOpen the Directory list by pressing the bottom of the
navi key.
DScroll to desired name.
MENUPress Menu.
åååååååååååååååååååååååååååååååå
DSend Entry[
Scroll to Send Entry and press OK.
D[Scroll to handset number where entry is to be sent and
press OK - A confirmation beep sounds as the entry is
sent.
YesYou may copy further entries by pressing Yes and follo-
wing the same steps above.
or
NoExit by pressing No
You can not send an entry from a 4200 handset
to a 4000 handset.
26
Press keys:
Enhanced Telephone Features
Gigaset 4015 Comfort, USA, A31008-G4015-B102-1-7619
komfort.fm
25.06.03
Copying the Directory
You can copy the entire directory to another
Gigaset4200 handset to save yourself time and effort.
DOpen the Directory list by pressing the bottom of the
navi key.
Scroll to any name.
MENUPress Menu.
åååååååååååååååååååååååååååååååå
DSend Log[
Scroll to Send Log and press OK.
The list of internal users is displayed.
D[Scroll to handset number where log is to be sent and
press OK - A confirmation beep sounds as the log is
sent.
Receiving the Telephone Book
Once a log has been sent the display shows how many
entries have been received by the telephone. Entries
with identical numbers are not overwritten. For this re-
ason the number of stored entries can differ from the
number of transmitted entries.
The transmission will be interrupted:
●if the memory of the receiving handset is full (the
last entry is displayed)
●if you are called
You can not send the directory from a 4200 hand-
set to a 4000 handset.
27
Press keys:
Enhanced Telephone Features
Gigaset 4015 Comfort, USA, A31008-G4015-B102-1-7619
komfort.fm
25.06.03
Copying a Directory Entry to the “Directory with
Voice Dialing”
You can copy an entry from the local directory to the
voice directory and record a voice pattern (see
page36).
DOpen the Directory list by pressing the bottom of the
navi key.
DScroll to desired name.
MENUPress Menu.
åååååååååååååååååååååååååååååååå
DSend Voice Ent.[
Scroll to Send Voice Ent. and press OK.
In the directory with voice dialing the fields for phone
number and name are already preset with the data
from the telephone directory.
To record the voice pattern for this entry please refer to
"Directory with voice dialing – Recording a new entry
and voice pattern" (see page 36).
Displaying Available Memory
DOpen the Directory list by pressing the bottom of the
navi key.
DScroll to any name.
MENUPress Menu.
åååååååååååååååååååååååååååååååå
DAvailable Memory:[
Scroll to Available Memory and press OK - The memory
available is displayed.
ACHTUNG: „Directory with...“ gilt nur für USA 4010 und LAM 4015!!!!!!!
ACHTUNG: „Directory with...“ gilt nur für USA 4010 und LAM 4015!!!!!!!ACHTUNG: „Directory with...“ gilt nur für USA 4010 und LAM 4015!!!!!!!
ACHTUNG: „Directory with...“ gilt nur für USA 4010 und LAM 4015!!!!!!!
28
Press keys:
Enhanced Telephone Features
Gigaset 4015 Comfort, USA, A31008-G4015-B102-1-7619
komfort.fm
25.06.03
Entering Birthdays or Anniversaries
You can store the date and time for birthday or anni-
versary reminders.
DOpen the Directory list by pressing the bottom of the
navi key.
DScroll to desired name.
DisplayPress Display.
EditPress Edit.
DScroll to birthday/annivers. field.
EditPress Edit.
oEnter or change the date (month/day).
DoScroll down one line and enter the time and select am/
pm.
If am or pm is displayed in addition to the time the 12
hour mode is on. If you move the cursor into this field
you can use the left display key to toggle between 12
hour mode and 24 hour mode.
DScroll down one line and choose a visual reminder or
melody.
F GChoosing the indicator for the alarm.
You can choose from 10 ringer melodies in combination
with a visual indicator or a visual indicator without a rin-
ger.
[Press OK to return to the display menu.
[Press OK again to save entry.
Use the delete key Delete to delete the anniversary
alarm.
If you do not answer an anniversary call after nine rings,
it will automatically turn off. The reminders are then sa-
ved in a list.
The display will show date in lower right hand corner of
the display to show a new, unanswered anniversary.
Press the right soft key to show the list of events.
ACHTUNG: „Directory with...“ gilt nur für USA 4010 und LAM 4015!!!!!!!
ACHTUNG: „Directory with...“ gilt nur für USA 4010 und LAM 4015!!!!!!!ACHTUNG: „Directory with...“ gilt nur für USA 4010 und LAM 4015!!!!!!!
ACHTUNG: „Directory with...“ gilt nur für USA 4010 und LAM 4015!!!!!!!
29
Press keys:
Enhanced Telephone Features
Gigaset 4015 Comfort, USA, A31008-G4015-B102-1-7619
komfort.fm
25.06.03
Memory Dial List
C
CC
CThe Memory Dial allows you to store up to 9 frequently
dialed numbers for quick access using the 1–9 keys. It
is recommended that you use the "1" for answering
machine or voice mail from the telephone company.
Storing a Memory Dial Entry
CPress the MEM key.
åååååååååååååååååååååååååååååååå
New Entry[
Scroll to New Entry and press OK.
oEnterthe telephone number (max. 32 digits).
DoScroll to the name field and use the keypad to first sel-
ect a quick access key then enter the name.
Example: 3 ERIC
4x
^ = 3;
2x
^= E,
3x
¤ = R,
3x
¡ = I,
3x
Ÿ = C).
(Optionally you can: enter the anniversary, where appli-
cable, (see page 28) ).
MENUPress Menu.
åååååååååååååååååååååååååååååååå
Save Entry[
Scroll to Save Entry and press OK.
Dialing a Number from the Memory List
Long press ^ will display Eric.
cPress Talk to connect.
30
Press keys:
Enhanced Telephone Features
Gigaset 4015 Comfort, USA, A31008-G4015-B102-1-7619
komfort.fm
25.06.03
Displaying and Editing a Memory Dial Number
CPress the MEM key.
DScroll to desired number.
DisplayPress Display to see the number and name.
EditPress Edit.
FGScroll to the name or number field and use the keypad
to make the desired changes.
o
If necessary change the telephone number.
D
o
Scroll to the name field and, if necessary, change the
name.
MENUPress Menu.
åååååååååååååååååååååååååååååååå
Save Entry[
Scroll to Save Entry and press OK.
Deleting a Single Entry from the Memory Dial
List
C
CC
CPress the MEM key.
DScroll to desired number.
MENUPress Menu.
åååååååååååååååååååååååååååååååå
DDelete Entry[
Scroll to Delete Entry and press OK - A confirmation
beep sounds as the entry is deleted.
●Refer to character map in the Appendix
(page78) for using the keypad to enter names
and numbers.
●Controlling the cursor with Gor F. Dele-
ting a character with
X. Characters are al-
ways inserted to the left of the cursor.
31
Press keys:
Enhanced Telephone Features
Gigaset 4015 Comfort, USA, A31008-G4015-B102-1-7619
komfort.fm
25.06.03
Directory with Voice Dialing
You can use your voice to dial the telephone numbers
of this special directory. Each user must store a voice
pattern for each entry of this directory. Up to four users
can share this directory.
The voice dialing directory can contain a total of 20
voice patterns. Up to four voice patterns can be stored
for one entry.
Example: There are two users. Each user records a
voice pattern for each entry. They can therefore each
put 10 entries in the directory.
When you open this directory all the entries are display-
ed. If a voice pattern for the current user is stored the
entry is identified by the
´ icon.
Recording a New Entry and Voice Pattern
Step 1:
Enter the telephone number and name
DOpen the directory by pressing the bottom of the navi
key
SpeechPress Speech.
D E [Select user 1-4 and press OK.
åååååååååååååååååååååååååååååååå
DNew Entry[
Scroll to New Entry and press OK.
oEnter the telephone number.
DoScroll to the name field and enter the name.
Step 2:
Recording a voice pattern
DRecordPress Record.
BeginPress begin to start voice recording and speak the
name of the required entry – for example Anne John-
son.
Repeat the name – for example Anne Johnson.
SavePress Save.
If the directory contains an entry with an identical tele-
phone number, a check prompt is displayed. If you ans-
wer it with:
For more information about the input of letters
and characters (see page 78).
32
Press keys:
Enhanced Telephone Features
Gigaset 4015 Comfort, USA, A31008-G4015-B102-1-7619
komfort.fm
25.06.03
Yes the changed number is stored
orNo the changes are not saved.
Dialing with your Voice
You can activate your own voice dialing entry on any
handset (Gigaset 4200).
EHold downthe top of the navi key.
You are prompted to speak and the ready tone is gene-
rated.
Speak the voice pattern you recorded – for example
Anne. If your telephone was able to recognize the
voice pattern, it is repeated. The number linked to the
voice pattern is dialed.
Playing Back a Voice Pattern
DOpen the directory by pressing the bottom of the navi
key.
SpeechPress Speech.
D E [Scroll to desired user and press OK.
DScroll to desired entry.
MENUPress Menu.
åååååååååååååååååååååååååååååååå
DPlay Voice Entry[
Scroll to Play Voice Entry and press OK.
When recording a voice pattern it is recommen-
ded that you use longer names rather than shor-
ter ones. For example, the person’s first and last
name. The entire voice pattern can not be longer
than 1.5 seconds.
You are prompted to repeat the entry if your re-
cordings are too different. After four seconds
you are returned to the start of the voice recor-
ding and can begin once more.
If your voice pattern is too similar to another
user's voice pattern, you get a message. If you
end this message with
Î you return to the
start of the voice recording and can begin once
more.
33
Press keys:
Enhanced Telephone Features
Gigaset 4015 Comfort, USA, A31008-G4015-B102-1-7619
komfort.fm
25.06.03
Changing an Entry
DOpen the directory by pressing the bottom of the navi
key.
SpeechPress Speech.
D E [Scroll to desired user and press OK.
DScroll to desired entry.
DisplayPress Display.
EditPress Edit.
Step 1:
Change the telephone number and name
oEnter the telephone number.
DoScroll to the name field and enter the name.
Step 2:
Change the voice pattern
DEditScroll to the voice field and press Edit.
BeginPress Begin and record the name.
Repeat the name.
SavePress Save.
If the same telephone number exists already and you
answer the check prompt with:
Yes the changed entry is stored
or
No the changes are not saved.
Displaying an Entry
DOpen the directoryby pressing on the bottom of the
navi key.
SpeechPress Speech.
D E [Scroll to desired user and press OK.
DScroll to desired entry.
DisplayPress Display.
[Press OK to return to the list.
For more information about the input of letters
and characters (see page 78).
34
Press keys:
Enhanced Telephone Features
Gigaset 4015 Comfort, USA, A31008-G4015-B102-1-7619
komfort.fm
25.06.03
Deleting an Entry
DOpen the directory by pressing on the bottom of the
navi key.
SpeechPress Speech.
D E [Scroll to desired user and press OK.
DScroll to desired entry.
MENUPress Menu.
åååååååååååååååååååååååååååååååå
DDelete Entry[
Scroll to Delete Entry and press OK.
If you answer the check prompt with:
Press
Yes to confirm - a confirmation beep is genera-
ted.
The entry and all its voice patterns are deleted.
Deleting a Voice Pattern
For an entry you can delete the voice pattern of a spe-
cific user. The voice patterns of all other users are not
affected.
DOpen the directory by pressing on the bottom of the
navi key.
SpeechPress Speech.
D E [Scroll to desired user and press OK.
DScroll to desired entry.
MENUOpen the menu.
åååååååååååååååååååååååååååååååå
DDel Voice Entry[
Scroll to Del Voice Entry and press OK - A confirmation
beep sounds. The voice pattern is deleted.
Delete the last voice pattern (of four possible voice pat-
terns) and answer the check prompt with:
Yes if the voice pattern and the entry are to be deleted
or
No if the voice pattern and the entry are not to be dele-
ted.
If you delete the voice pattern of an entry the te-
lephone number and the relevant name are not
affected.
Prerequisite: Voice patterns of other users are
still available for this entry.
35
Press keys:
Enhanced Telephone Features
Gigaset 4015 Comfort, USA, A31008-G4015-B102-1-7619
komfort.fm
25.06.03
Copying an Entry to the Local Handset Directory
You can copy the telephone number and the name of
an entry in the voice directory to the local directory (see
page29).
DOpen the directory by pressing on the bottom of the
navi key.
SpeechPress Speech.
DE [Scroll to desired user and press OK.
DScroll to desired entry.
MENUPress Menu.
åååååååååååååååååååååååååååååååå
DTransfer Entry[
Scroll to Transfer Entry and press OK.
Changing a User Name
To change a voice pattern, a speaker must be selected
(see page31). There are four speakers. Factory default:
user 1 - 4. You can rename these entries.
DOpen the directory by pressing on the bottom of the
navi key.
SpeechPress Speech.
E DScroll to desired user.
EditPress Edit.
oRename the user (for example user 1 as "Eric").
SavePress save.
Turning On and Off the Playback of a Voice
Pattern for an Incoming Call
If the telephone number (Caller ID) transmitted for an
incoming call corresponds to an entry with a voice pat-
tern this pattern is played back on the loudspeakers of
the handset and the base station.
MENUPress Menu.
åååååååååååååååååååååååååååååååå
DBase Settings[
Scroll to Base Settings and press OK.
åååååååååååååååååååååååååååååååå
DSpec.Functions[
Scroll to Spec. Functions and press OK.
åååååååååååååååååååååååååååååååå
DCaller ID[
Scroll to Caller ID and press OK to switch between on
and off – a check indicates the feature is on.
36
Press keys:
Enhanced Telephone Features
Gigaset 4015 Comfort, USA, A31008-G4015-B102-1-7619
komfort.fm
25.06.03
Call Log
*
The numbers of the last 30 calls are saved in the Call
Log.
Call Log Settings
You can set the following options:
●only store missed calls
●store all incoming calls
?Press the Mailbox key.
åååååååååååååååååååååååååååååååå
DCalls:[
Scroll to Calls: and press OK.
MENUPress Menu.
åååååååååååååååååååååååååååååååå
Call Log[
Scroll to Call Log and press OK.
åååååååååååååååååååååååååååååååå
Missed Calls[
Scroll to Missed calls and press OK
or
åååååååååååååååååååååååååååååååå
DAll Calls[
Scroll to All Calls and press OK.
*Requires a subscription to Caller ID from your local telephone com-
pany
•Calls picked up on the first ring will not be
saved in the Call Log.
•Call Waiting calls are included in the Call Log if
you have subscribed to Caller ID with Call
Waiting from your local telephone company.
•If several calls are received under the same
number, only the last call is recorded.
•You must subscribe to Caller ID for the Call
Log to record numbers.
Default setting of Call Log is all incoming calls.
37
Press keys:
Enhanced Telephone Features
Gigaset 4015 Comfort, USA, A31008-G4015-B102-1-7619
komfort.fm
25.06.03
New Call and Message Alert
If you have received new calls or messages, the alert
symbol will be displayed and the light on top of the
handset will flash.
If the light does not flash, no new calls or messages
have been saved.
Example of a display for an entry from the missed calls
list:
Status of the entry
The call is new in the list.
The call is old in the list.
The call has been answered.
The answering machine has
picked up the call.
With the key
?
you can open the following lists:
●Message list of the Telco Voice Mail
●Call Log
●Message list of the answering machine
If there is only one list that contains new messa-
ges or calls you are taken directly to this listafter
pressing
?
.
If there are several lists with new messages or
calls you can select one by pressing
?
.
Missed Calls
New Call 02/04
51212345678
07.09.200003:35
AM
DeleteMENU
Total number of
new calls
Number of this particu-
lar new call
Date and time of the call
Call number or name
New Call
Old Call
Calls answ.
Answering M.
38
Press keys:
Enhanced Telephone Features
Gigaset 4015 Comfort, USA, A31008-G4015-B102-1-7619
komfort.fm
25.06.03
Dialing from the Call Log
If you subscribe to Caller ID and your Local Area Code
and any Extra Codes have been stored in your tele-
phone, it will behave as described below in the exam-
ple of dialing from the call log list:
Single Area Code Area (Local Area Code and no
Extra Code are stored)
If the Area Code of the call log entry is identical to the
stored Local Area Code, only the 7digit number will be
dialed. Otherwise a "1" will automatically be placed in
front of the number.
Multiple Area Code Area (Local Area Code and
Extra Code(s) are stored)
If the Area Code of the call log entry is identical to the
stored Local Area Code or one of the Extra Codes, the
call log entry will be dialed as displayed. Otherwise a
"1" will automatically be placed in front of the number.
?Press the Mailbox Key.
åååååååååååååååååååååååååååååååå
DCalls:[
Scroll to Calls: and press OK
EDScroll to the desired number.
cPress Talk to dial the number - The number is copied to
the redialing list.
Deleting a Number from the Call Log
If there are new calls a prompt appears on the display
and the status LED flashes.
?Press the Mailbox Key.
åååååååååååååååååååååååååååååååå
DCalls:[
Scroll to Calls: and press OK
E/DScroll to the desired number. Press Delete to remove
the number from the Call Log.
Important:There are certain cases (such as a
long distance call within the same Area Code)
which are not supported by this feature. In these
cases please dial thenumber manually.
39
Press keys:
Enhanced Telephone Features
Gigaset 4015 Comfort, USA, A31008-G4015-B102-1-7619
komfort.fm
25.06.03
Copying a Call Log Number to the Directory
?Press the Mailbox Key.
åååååååååååååååååååååååååååååååå
DCalls:[
Scroll to Calls: and press OK.
EDScroll to the desired number.
MENUPress Menu.
åååååååååååååååååååååååååååååååå
DSend to Dir[
Scroll to Send to Dir and press OK.
DoScroll to the name field and enter a name.
MENUPress Menu.
åååååååååååååååååååååååååååååååå
Save Entry[
Scroll to Save Entry and press OK.
Deleting the Call Log
?Press the Mailbox Key.
åååååååååååååååååååååååååååååååå
DCalls:[
Scroll to Calls: and press OK.
MENUPress Menu.
åååååååååååååååååååååååååååååååå
DDelete Log[
Scroll to Delete Log and press OK.
Displaying the Name of the Caller in the Call
Log
If your local telephone company transmits the name of
the person who called it can be displayed.
?Press the Mailbox Key.
åååååååååååååååååååååååååååååååå
DCall Log[
Scroll to Calls: and press OK.
EDScroll to desired entry.
MENUPress Menu.
åååååååååååååååååååååååååååååååå
DName/Text Msg.[
Scroll to Name/Text Msg. and press OK.
Î /[Press OK to end.
●For more information about the input of letters
and characters (see page 78).
●Please note that numbers copied from the call
log list to the telephone book may require ed-
iting, for example adding a "1" or removing the
Area Code.
Depending on your choice of Caller ID Service the
name of the caller may be transmitted and dis-
played on the handset when the call is received.
40
Press keys:
Gigaset 4015 Comfort, USA, A31008-G4015-B102-1-7619
tnet.fm
25.06.03
Using Advanced Caller ID on Call
Waiting
In many areas Advanced Caller ID on Call Waiting (Cal-
ler ID 2.5) service is available through your local tele-
phone provider. The service allows you to select from
a series of options if you are on a call and receive
another call with Call Waiting ID. The Gigaset 4215 ful-
ly supports this convenient telephone company fea-
ture. Please contact your local telephone provider for a
subscription or more details on this service.
While on a call, a second call comes in and the inco-
ming number is displayed. For the next 8 seconds you
may do one of the following:
MENUPress Menu.
åååååååååååååååååååååååååååååååå
DTAKE MSG[
Scroll to TAKE MSG and press OK – Forwards second
caller to telephone company voice mail.
or
åååååååååååååååååååååååååååååååå
DHOLD MSG[
Scroll to HOLD MSG and press OK – Informs the se-
cond caller to hold.
or
åååååååååååååååååååååååååååååååå
DCALL BACK[
Scroll to CALL BACK and press OK – Informs the se-
cond caller to call back at a later time.
or
åååååååååååååååååååååååååååååååå
DADD 2ND[
Scroll to ADD 2ND and press OK – Initiates a 3-way call
and adds second caller to current call
41
Press keys:
Operating the Answering Machine
Gigaset 4015 Comfort, USA, A31008-G4015-B102-1-7619
anrufb_comfort.fm
25.06.03
Operating the Answering
Machine
Your Gigaset 4215 is equipped with an answering ma-
chine that will record messages in your absence or al-
low you to screen calls and answer them selectively.
The answering machine in the Gigaset 4215 is automa-
tically turned on when you install your phone and com-
pletely operated through any registered 4200 handset.
Operating the answering machine is made easier by
menus and displays on the handset and by announce-
ments that you can hear on the handset.
Unless you set the date and time (see page 7), recor-
ded messages will not be “time stamped”.
In addition to the telephone's answering machine, you
can use an “voice mail service” offered by your local
network provider (e.g. telco voice). None of the follo-
wing functions relates to the network provider's voice
mail service. Check with your network provider for the-
se services.
Turning On and Off the Answering
Machine
Your answering machine is automatically turned on and
ready for operation once your base station has been in-
stalled. For recording messages with a time stamp,
you need to set the date and time (see page 7). The
answering machine is set to use the standard an-
nouncement until you record your own announcement
of your own.
MENUPress Menu.
åååååååååååååååååååååååååååååååå
DAns Machine[
Scroll to Ans Machine and press OK.
åååååååååååååååååååååååååååååååå
DAnswering M.[
Scroll to Answering M. – A check indicates the ans-
wering machine is on (no check indicates off).
[Press OK to add or remove the check – pressing OK
will toggle between the on and off settings.
EndPress End or (back arrow) to return to the previous
menu.
If the answering machine's memory is full it swit-
ches itself off. To delete old messages (see
page48).
42
Press keys:
Operating the Answering Machine
Gigaset 4015 Comfort, USA, A31008-G4015-B102-1-7619
anrufb_comfort.fm
25.06.03
Setting a Different Language
You may change the language for the voice prompts
and for the standard announcement.
MENUPress Menu.
¥ ¬ ŸFrom the keypad enter 8, 9, 2 then the number of the
desired language from the table below.
For example to set the language to English you would
press Menu then enter 8, 9, 2, 1.
Selecting an Announcement
A standard announcement is already preset: “There
is nobody available to take your call right now. Please
leave a message after the tone.”
This announcement is used until you record your own
announcement, or after you have deleted your own an-
nouncement.
When selecting an announcement you may choose
from the following two options:
●Announcement– Plays the announcement and re-
cords messages
●Announcement Only– Plays the announcement
but does not record messages
You can only select the Announcement Only if you
have already recorded an Announcement Only mes-
sage (see page 43).
MENUPress Menu.
åååååååååååååååååååååååååååååååå
DAns Machine[
Scroll to Ans Machine and press OK.
åååååååååååååååååååååååååååååååå
DAnnouncements[
Scroll to Announcements and press OK.
åååååååååååååååååååååååååååååååå
DMode[
Scroll to Mode and press OK.
åååååååååååååååååååååååååååååååå
DAnnc[
Scroll to Annc and press OK to activate the Announce-
ment (A check mark indicates option is selected) .
An announcement can be recorded.
or
åååååååååååååååååååååååååååååååå
DAnnc Only[
Scroll to Annc Only and press OK to activate the An-
nouncement Only (A check mark indicates option is
selected).
The announcement you selected is available even after
the answering machine has been switched off.
]
English^Spanish
Ÿ
French
43
Press keys:
Operating the Answering Machine
Gigaset 4015 Comfort, USA, A31008-G4015-B102-1-7619
anrufb_comfort.fm
25.06.03
Recording Your Announcement/
Announcement Only Greeting
MENUPress Menu.
åååååååååååååååååååååååååååååååå
DAns Machine[
Scroll to Ans Machine and press OK.
åååååååååååååååååååååååååååååååå
DAnnouncements[
Sroll to Announcements and press OK.
åååååååååååååååååååååååååååååååå
DRecord Annc[
Scroll to Record Annc and press OK.
or
åååååååååååååååååååååååååååååååå
DRec Annc Only[
Scroll to Rec Annc Only and press OK.
Quickly place the handset to your ear and you will hear
anotification of the recording and then the ready tone
(short beep). After the tone speak your announcement
or announcement only greeting clearly into the hand-
set.
Example of a typical announcementgreeting:
“I cannot take your call right now. Please leave a mes-
sage after the tone.”
Example of a typical announcementonly greeting:
“Our offices are closed. Please call back during busi-
ness hours between 9 a.m. and 5 p.m. on weekdays.”
EndPress End to stop the recording.
Your greeting is then automatically played back to you.
If you press
Î or aduring the recording, the recor-
ding will be terminated and the current announcement
will be deleted.
●If Annc mode is setthe standard announcement is
used.
●If Annc Only mode is setthe answering machine is
automatically turned off.
Recording is automatically terminated:
●if you exceed the maximum recording time of
170 seconds
●if you pause for more than two seconds
If the memory of the answering machine is full
and an announcement only greeting is available
the answering machine automatically switches
itself to the announcement only setting.
44
Press keys:
Operating the Answering Machine
Gigaset 4015 Comfort, USA, A31008-G4015-B102-1-7619
anrufb_comfort.fm
25.06.03
Checking an Announcement
MENUPress Menu.
åååååååååååååååååååååååååååååååå
DAns Machine[
Scroll to Ans Machine and press OK.
åååååååååååååååååååååååååååååååå
DAnnouncements[
Scroll to Announcements and press OK.
åååååååååååååååååååååååååååååååå
DPlay Annc[
Scroll to Play Annc and press OK.
or
åååååååååååååååååååååååååååååååå
DPlay Annc Only[
Scroll to Play Annc Only and Press OK.
The current announcement or announcement only
greeting is played back.
Deleting an Announcement
MENUPress Menu.
åååååååååååååååååååååååååååååååå
DAns Machine[
Scroll to Ans Machine and press OK.
åååååååååååååååååååååååååååååååå
DAnnouncements[
Scroll to Announcements and press OK.
åååååååååååååååååååååååååååååååå
DPlay Annc[
Scroll to Play Annc and press OK.
or
åååååååååååååååååååååååååååååååå
DPlay Annc Only[
Scroll to Play Annc Only and Press OK.
The current announcement or announcement only
greeting is played back.
or
åååååååååååååååååååååååååååååååå
DDelete Annc[
Scroll to Delete Annc and press OK.
After confirmation of the check prompt ,
the standard announcement is active again.
or
åååååååååååååååååååååååååååååååå
DDel Annc Only[
Scroll to Del Annc Only and Press OK.
After confirmation of the
check prompt,
the current announcement is deleted.
YesPress Yes to confirm.
While playing back an announcement or an an-
nouncement only greeting you can record a new
one by pressing the
Recordsoft key.
Delete Annc
Del Annc Only
45
Press keys:
Operating the Answering Machine
Gigaset 4015 Comfort, USA, A31008-G4015-B102-1-7619
anrufb_comfort.fm
25.06.03
Training voice control
You can use your voice to assiust in operating the an-
swering machine.
Four different users can record the
commands FORWARD, DELETE and BACK. The an-
swering machine will recognizes these commands and
acts accordingly.
But you have to train the answering machine to recognize
Gebruikershandleiding.com neemt misbruik van zijn services uitermate serieus. U kunt hieronder aangeven waarom deze vraag ongepast is. Wij controleren de vraag en zonodig wordt deze verwijderd.
Product:
Spelregels forum
Om tot zinvolle vragen te komen hanteren wij de volgende spelregels:
lees eerst de handleiding door;
controleer of uw vraag al eerder door iemand anders is gesteld;
probeer uw vraag zo duidelijk mogelijk te stellen;
heeft u een probleem en al geprobeerd om dit op te lossen, vermeld dit erbij aub;
heeft u een oplossing gekregen van een bezoeker dan horen wij dat graag in dit forum;
wilt u een reactie geven op een vraag of antwoord, gebruik dan niet dit formulier maar klik op de knop 'reageer op deze vraag';
uw vraag wordt direct op de website gezet; vermijd daarom persoonlijke gegevens in te vullen;
Belangrijk! Als er een antwoord wordt gegeven op uw vraag, dan is het voor de gever van het antwoord nuttig om te weten als u er wel (of niet) mee geholpen bent! Wij vragen u dus ook te reageren op een antwoord.
Belangrijk! Antwoorden worden ook per e-mail naar abonnees gestuurd. Laat uw emailadres achter op deze site, zodat u op de hoogte blijft. U krijgt dan ook andere vragen en antwoorden te zien.
Abonneren
Abonneer u voor het ontvangen van emails voor uw Siemens Gigaset 4215 bij:
nieuwe vragen en antwoorden
nieuwe handleidingen
U ontvangt een email met instructies om u voor één of beide opties in te schrijven.
Ontvang uw handleiding per email
Vul uw emailadres in en ontvang de handleiding van Siemens Gigaset 4215 in de taal/talen: Engels als bijlage per email.
De handleiding is 2,45 mb groot.
U ontvangt de handleiding per email binnen enkele minuten. Als u geen email heeft ontvangen, dan heeft u waarschijnlijk een verkeerd emailadres ingevuld of is uw mailbox te vol. Daarnaast kan het zijn dat uw internetprovider een maximum heeft aan de grootte per email. Omdat hier een handleiding wordt meegestuurd, kan het voorkomen dat de email groter is dan toegestaan bij uw provider.
Stel vragen via chat aan uw handleiding
Stel uw vraag over deze PDF
Uw handleiding is per email verstuurd. Controleer uw email
Als u niet binnen een kwartier uw email met handleiding ontvangen heeft, kan het zijn dat u een verkeerd emailadres heeft ingevuld of dat uw emailprovider een maximum grootte per email heeft ingesteld die kleiner is dan de grootte van de handleiding.
Er is een email naar u verstuurd om uw inschrijving definitief te maken.
Controleer uw email en volg de aanwijzingen op om uw inschrijving definitief te maken
U heeft geen emailadres opgegeven
Als u de handleiding per email wilt ontvangen, vul dan een geldig emailadres in.
Uw vraag is op deze pagina toegevoegd
Wilt u een email ontvangen bij een antwoord en/of nieuwe vragen? Vul dan hier uw emailadres in.