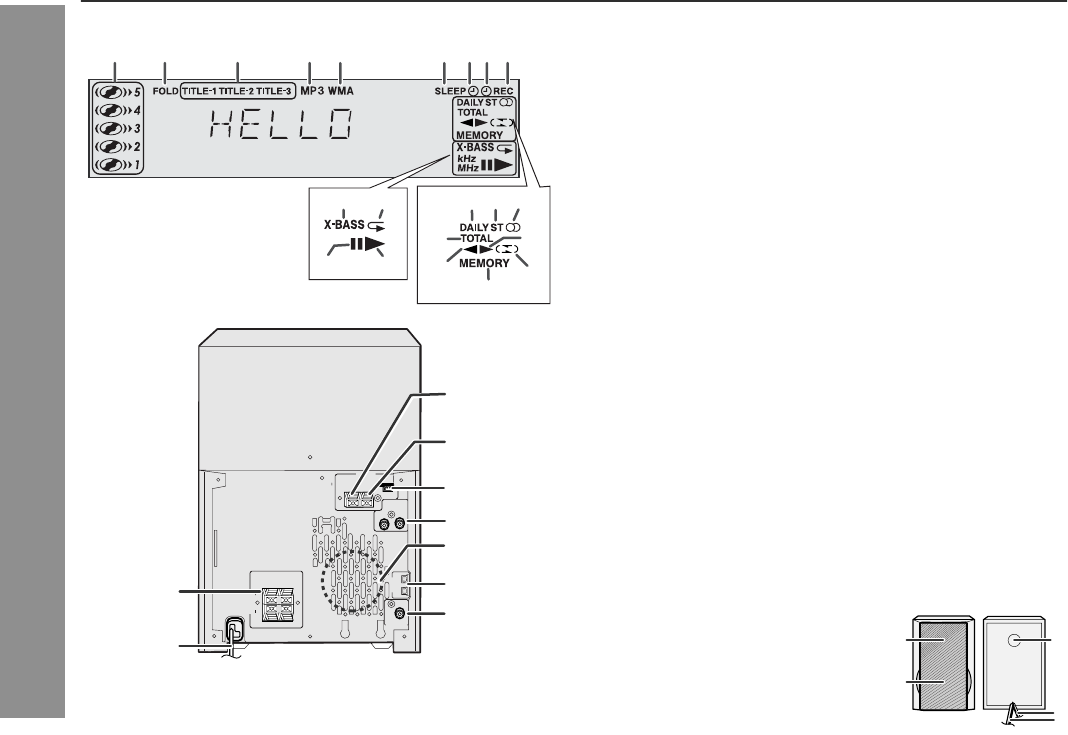
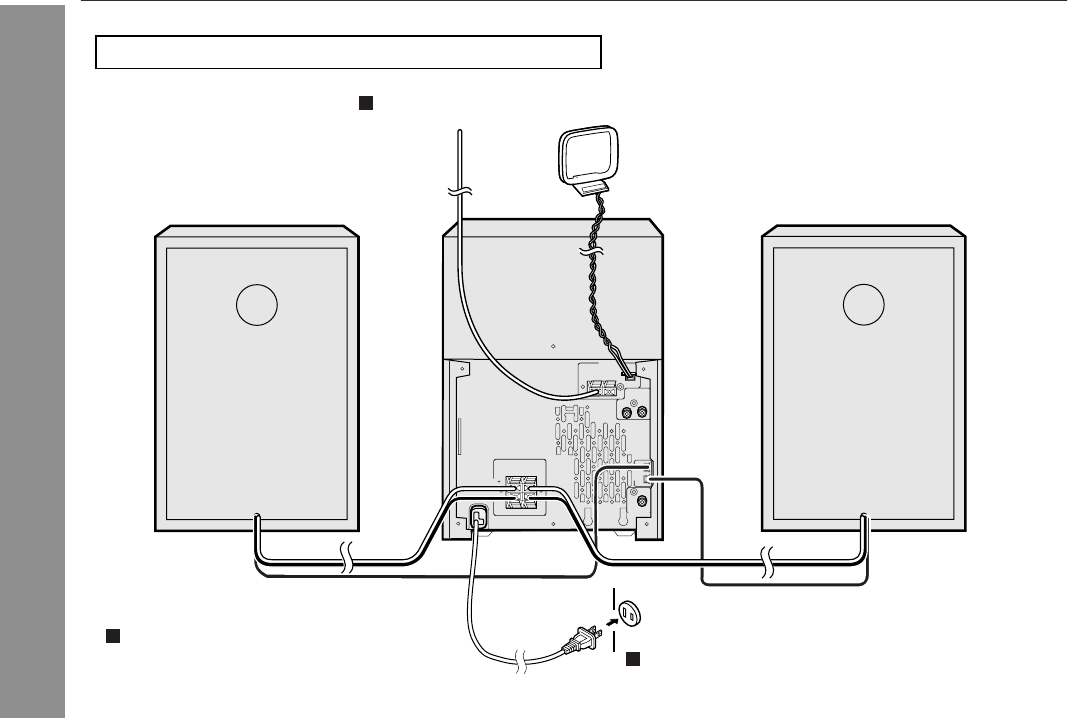
Make sure to unplug the AC power cord before any connections.
Antenna connection (see page 11)
AC power connection (see page 12)
Speaker light-up wire
Speaker light-up wire
11
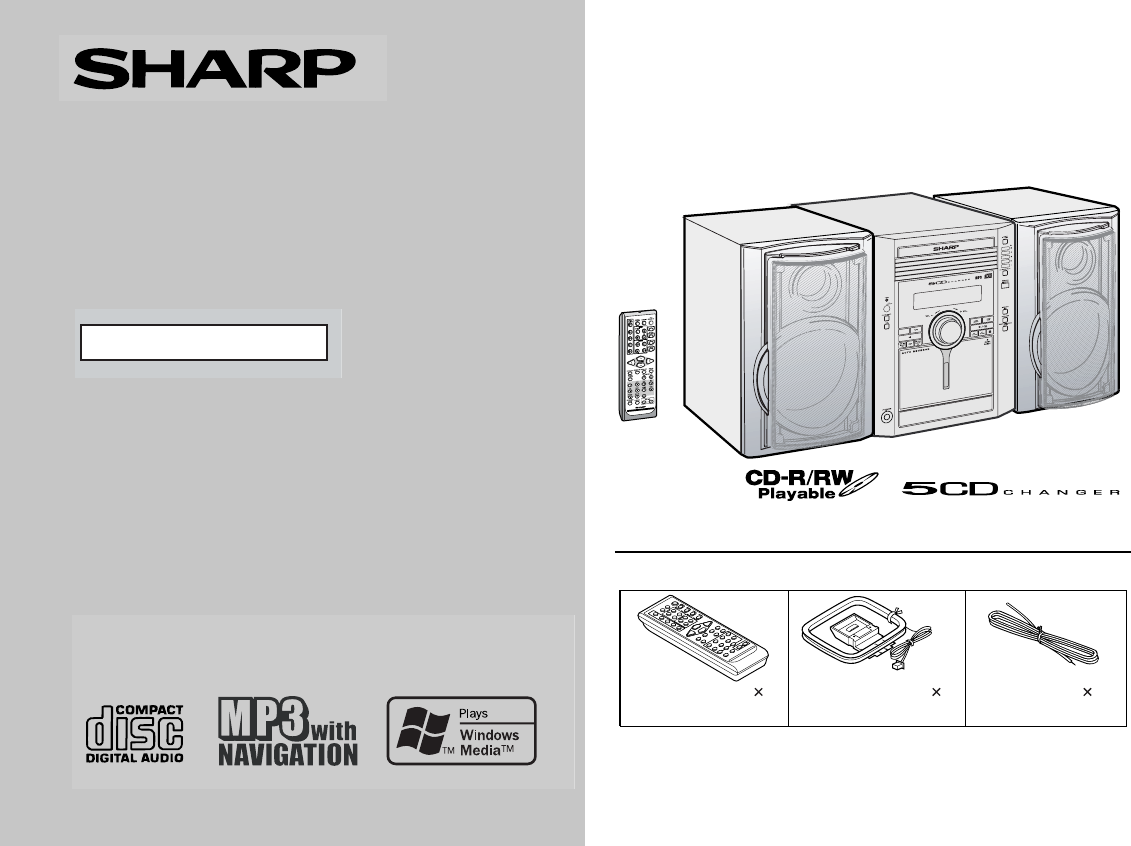
XL-MP150
Preparation for Use
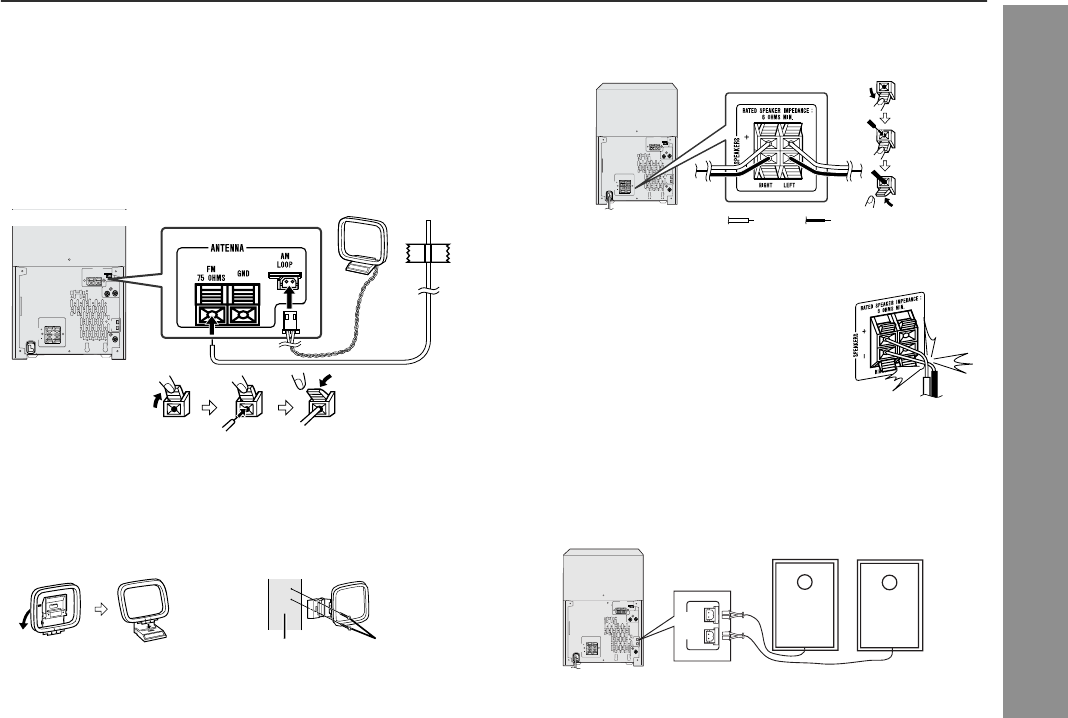
Antenna connection
Supplied FM antenna:
Connect the FM antenna wire to the FM 75 OHMS terminal and po-
sition the FM antenna wire in the direction where the strongest signal
can be received.
Supplied AM loop antenna:
Connect the AM loop antenna to the AM LOOP jack. Position the AM
loop antenna for optimum reception. Place the AM loop antenna on
a shelf, etc., or attach it to a stand or a wall with screws (not supplied).
Note:
Placing the antenna on the unit or near the AC power cord may
cause noise pickup. Place the antenna away from the unit for better
reception.
Installing the AM loop antenna:
Speaker connection
Connect the black wire to the minus (-) terminal, and the red wire to
the plus (+) terminal.
Caution:
Speaker Light-Up Connection
Connect the speaker light-up wires to the SPEAKERS LIGHT-UP
jacks for speaker illumination. To turn off the speaker light-up
feature, press the CLEAR/DIMMER button on the remote control for
2 seconds or more.
Note:
Placing the right speaker light-up wire to the RIGHT jack and the left
speaker light-up wire to the LEFT jack.
< Assembling >< Attaching to the wall >
WallScrews (not supplied)
RATED SPEAKER IMPEDANCE:
6 OHMS MIN.
AC INPUT
ANTENNA
RIGHT
RIGHTLEFT
GND
FM
75 OHMS
AM
LOOP
VIDEO/AUX
IN
SUBWOOFER
PRE-OUT
SPEAKERS
LEFT
SPEAKERS
LIGHT-UP
LEFT
RIGHT
zUse speakers with an impedance of 6 ohms or more, as lower im-
pedance speakers can damage the unit.
zDo not mistake the right and the left chan-
nels. The right speaker is the one on the right
side when you face the unit.
zDo not let the bare speaker wires touch
each other.
zDo not allow any objects to fall into or to be
placed in the bass reflex ducts.
zDo not stand or sit on the speakers. You may
be injured.
RATED SPEAKER IMPEDANCE:
6 OHMS MIN.
AC INPUT
ANTENNA
RIGHT
RIGHTLEFT
GND
FM
75 OHMS
AM
LOOP
VIDEO/AUX
IN
SUBWOOFER
PRE-OUT
SPEAKERS
LEFT
SPEAKERS
LIGHT-UP
LEFT
RIGHT
BlackRed
Incorrect
RATED SPEAKER IMPEDANCE:
6 OHMS MIN.
AC INPUT
ANTENNA
RIGHT
RIGHTLEFT
GND
FM
75 OHMS
AM
LOOP
VIDEO/AUX
IN
SUBWOOFER
PRE-OUT
SPEAKERS
LEFT
SPEAKERS
LIGHT-UP
LEFT
RIGHT
SPEAKERS
LIGHT-UP
LEFT
RIGHT
RIGHT SPEAKER
LEFT SPEAKER
12
XL-MP150
Preparation for Use
System connections (continued)
Speaker grilles are removable
AC power connection
After checking all the connections have been made correctly, plug
the AC power cord of this unit into the AC outlet. If you plug in the unit
first, the unit will enter the demonstration mode.
Notes:
zThe unit will start the tape initialization when plugged in to the AC
outlet. During this process, an initializing sound will be heard and
the unit cannot be turned on. Wait until the process is finished.
zUnplug the AC power cord from the AC outlet if the unit will not be
in use for a prolonged period of time.
Demonstration mode
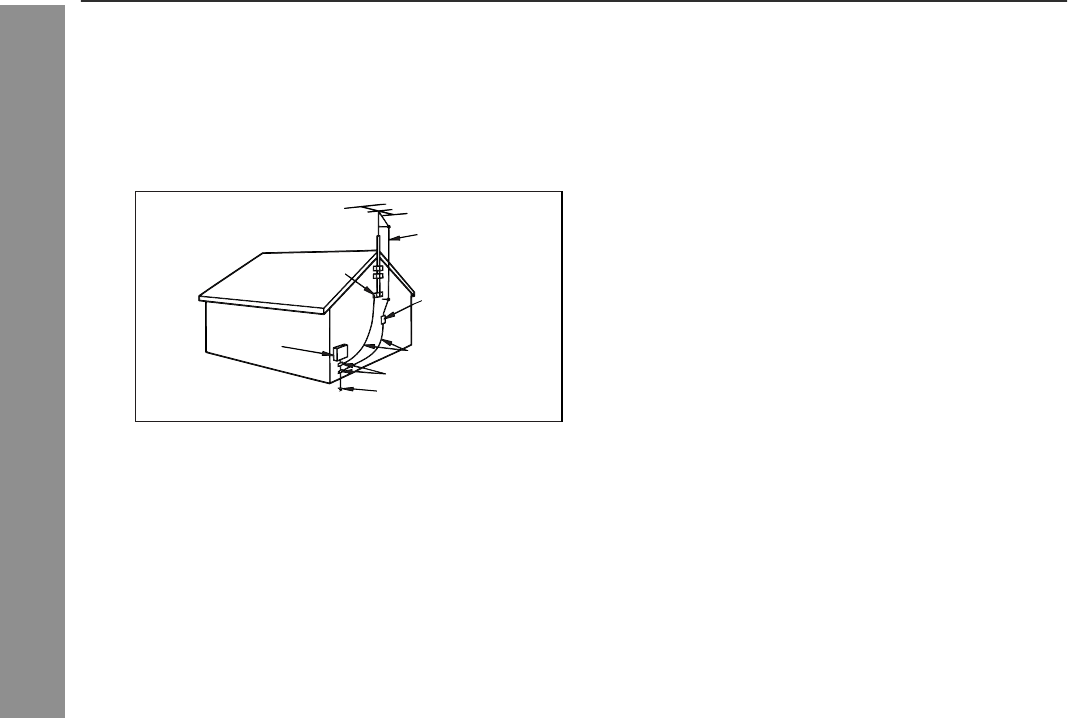
Outdoor FM antenna
Use an outdoor FM antenna if you require better reception.
Consult your dealer.
Note:
When an outdoor FM antenna is used, disconnect the supplied FM
antenna wire.
Make sure nothing comes into contact
with the speaker diaphragm when you
remove the speaker grilles.
Cooling fan:
The main unit is built with a cooling fan at the rear of the unit for im-
proved cooling. Please do not cover the opening of the fan with any
obstacles, as this will block proper ventilation.
RATED SPEAKER IMPEDANCE:
6 OHMS MIN.
AC INPUT
ANTENNA
RIGHT
RIGHTLEFT
GND
FM
75 OHMS
AM
LOOP
VIDEO/AUX
IN
SUBWOOFER
PRE-OUT
SPEAKERS
LEFT
AC outlet
(AC 120 V, 60 Hz)
SPEAKERS
LIGHT-UP
LEFT
RIGHT
RATED SPEAKER IMPEDANCE:
6 OHMS MIN.
AC INPUT
RIGHT
RIGHTLEFT
VIDEO/AUX
IN
SUBWOOFER
PRE-OUT
SPEAKERS
LEFT
LEFT
RIGHT
SPEAKERS
LIGHT-UP
The first time the unit is plugged in, the
unit will enter the demonstration mode.
You will see words scroll.
To cancel the demonstration mode:
When the unit is in the power stand-
by mode (demonstration mode),
press the X-BASS (SURROUND)/
DEMO button. The unit will enter the
low power consumption mode.
To return to the demonstration mode:
When the unit is in the power stand-by mode, press the X-BASS
(SURROUND)/DEMO button again.
Note:
When the power is on, the X-BASS (SURROUND)/DEMO button can
be used to select the surround mode.
Outdoor
FM antenna
75 ohms
coaxial cable
X-BASS (SURROUND)
/DEMO
X-BASS (SURROUND)
/DEMO
13
XL-MP150
Preparation for Use
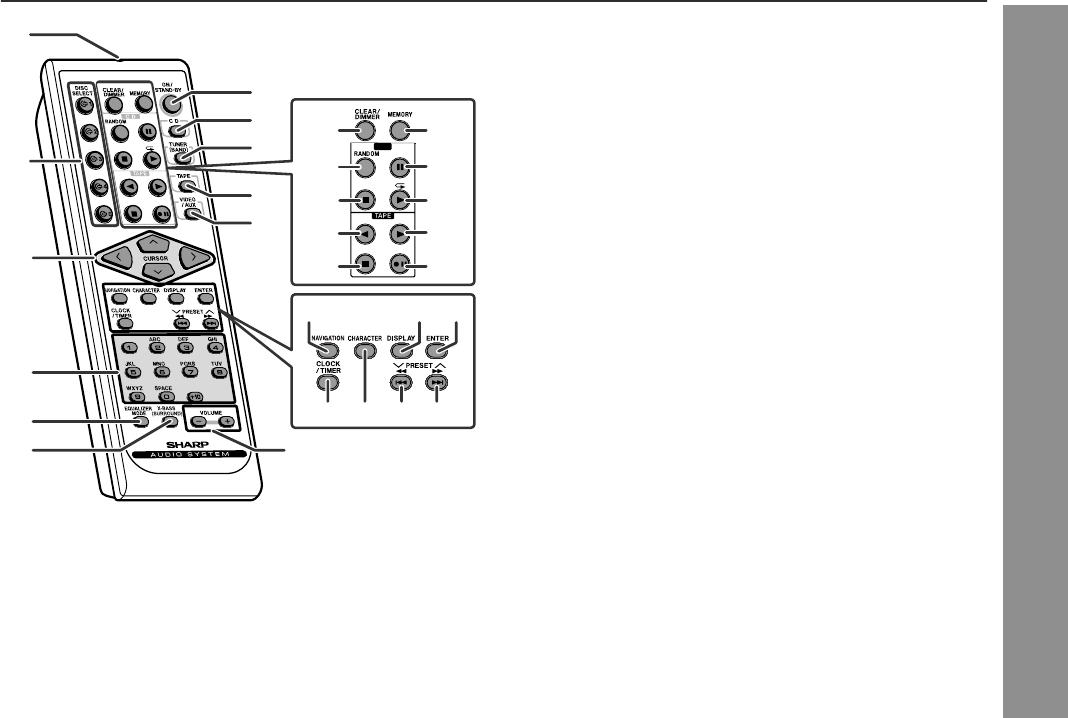
Remote control
Battery installation
Precautions for battery use:
zReplace all old batteries with new ones at the same time.
zDo not mix old and new batteries.
zRemove the batteries if the unit will not be used for long periods
of time. This will prevent potential damage due to battery leakage.
Caution:
zDo not use rechargeable batteries (nickel-cadmium battery, etc.).
zInstalling the batteries incorrectly may cause the unit to malfunc-
tion.
Battery removal:
Open the battery cover and pull up the battery to take out.
Notes concerning use:
zReplace the batteries if the operating distance is reduced or if the
operation becomes erratic.
zPeriodically clean the transmitter on the remote control and the
sensor on the unit with a soft cloth.
zExposing the sensor on the unit to strong light may interfere with
operation. Change the lighting or the direction of the unit if this
occurs.
zKeep the remote control away from moisture, heat, shock, and vi-
brations.
Test of the remote control
Check the remote control after checking all the connections (see
pages 10 - 12).
Point the remote control directly at the remote sensor on the unit.
The remote control can be used within the range shown below:
Press the ON/STAND-BY button. Does the power turn on? Now, you
can enjoy music.
Use 2 "AA" size batteries (UM/SUM-3, R6, HP-7 or similar).
Batteries are not included.
1Open the battery cover.
2Insert the batteries according to the direction indicated in
the battery compartment.
When inserting or removing the batteries, push them toward the
battery terminals.
3Close the cover.
X-BASS (SURROUND)
/DEMO
14
XL-MP150
Basic Operation
General control
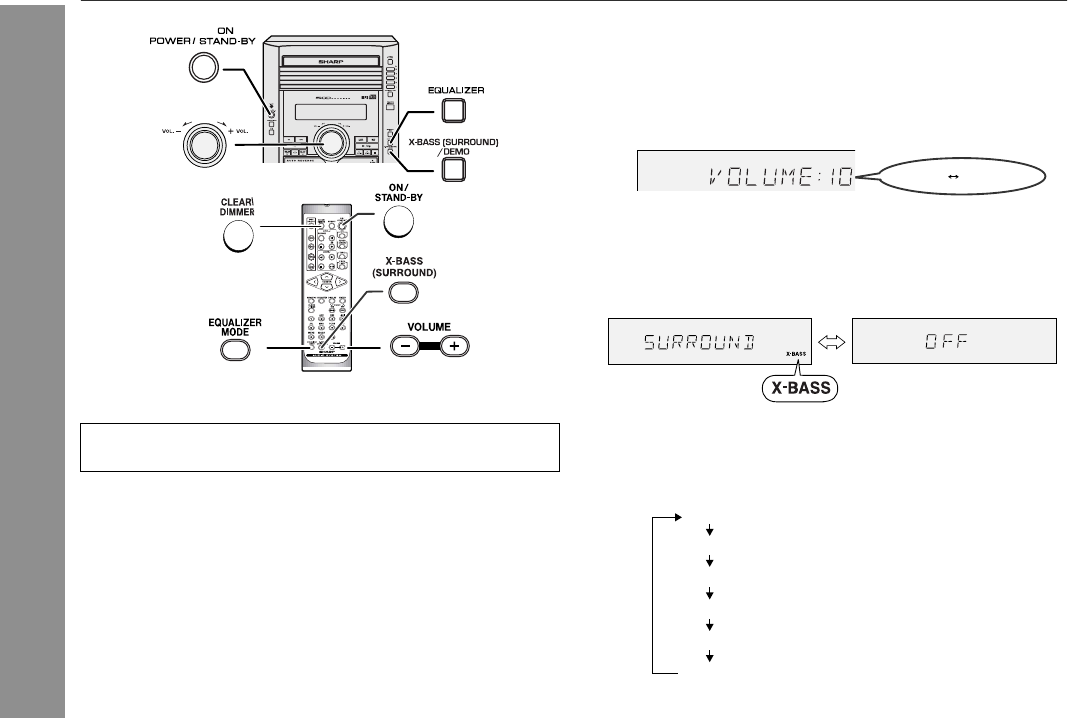
To turn the power on
Press the ON/STAND-BY button to turn the power on.
Illumination light control
When the power is turned on, light illuminates around the display.
To turn on/off the light, hold down the CLEAR/DIMMER button on
the remote control for 2 seconds or more.
Speaker light up control
The speaker will light up according to the base level of the music
source played back. To turn on/off the light, hold down the CLEAR/
DIMMER button on the remote control for 2 seconds or more.
Volume auto fade-in
If you turn off and on the main unit with the volume set to 27 or
higher, the volume starts at 16 and fades in to the last set level.
Volume control
Main unit operation:
When the VOLUME control is turned clockwise, the volume will
increase. When it is turned counterclockwise, the volume will
decrease.
Remote control operation:
Press the VOLUME (+ or -) button to increase or decrease the volume.
Surround mode
When the X-BASS (SURROUND)/DEMO [X-BASS (SURROUND)]
button is pressed, the unit will enter the surround mode and adjust
low bass and high frequency automatically according to volume
input. To cancel this mode, press the X-BASS (SURROUND)/
DEMO [X-BASS (SURROUND)] button again.
Equalizer
When the EQUALIZER (EQUALIZER MODE) button is pressed, the
current mode setting will be displayed. To change to a different
mode, press the EQUALIZER (EQUALIZER MODE) button repeat-
edly until the desired sound mode appears.
Note:
If the EQUALIZER (EQUALIZER MODE) button is pressed in the
surround mode, it will be canceled automatically.
After use:
Press the ON/STAND-BY button to enter the power stand-by mode.
30MAXIMUM0
.....
ROCK
For rock music.
FLAT
No equalization.
CLASSICFor classical music.
POPSFor pop music.
JAZZFor jazz.
VOCALVocals are enhanced.
15
XL-MP150
Basic Operation
Setting the clock
In this example, the clock is set for the 12-hour (AM 12:00) display.
To confirm the time display:
[When the unit is in the stand-by mode]
Press the CLOCK/TIMER button.
The time display will appear for about 10 seconds.
[When the power is on]
Press the CLOCK/TIMER button.
Within 10 seconds, press the or button to display the
time.
The time display will appear for about 10 seconds.
Note:
The "CLOCK" will appear or time will flash to confirm the time dis-
play when the AC power supply is restored after a power failure or
unplugging the unit. If incorrect, readjust the clock as follows.
To readjust the clock:
Perform "Setting the clock" from step 1. If the "CLOCK" does not
appear in step 3, step 4 (for selecting the 12-hour or 24-hour dis-
play) will be skipped.
To change the 12-hour or 24-hour display:
Note:
The clock can also be set with the remote control.
1Press the ON/STAND-BY button to turn the power on.
2Press the CLOCK/TIMER button.
3Within 10 seconds, press the or button to se-
lect "CLOCK", and press the MEMORY/SET button.
4
Press the or button to select 12-hour or 24-
hour display and then press the MEMORY/SET button.
"AM 12:00"The 12-hour display will appear.
(AM 12:00 - PM 11:59)
"AM 0:00"The 12-hour display will appear.
(AM 0:00 - PM 11:59)
"0:00"The 24-hour display will appear.
(0:00 - 23:59)
X-BASS (SURROUND)
/DEMO
5Press the or button to adjust the hour and
then press the MEMORY/SET button.
Press the or button once to advance the time by
1 hour. Hold it down to advance continuously.
6Press the or button to adjust the minutes and
then press the MEMORY/SET button.
Press the or button once to advance the time by
1 minute. Hold it down to change the time in 5-minute intervals.
1Clear all the programmed contents. [Refer to "Clearing all the
memory (reset)" on page 39 for details.]
2Perform "Setting the clock" from step 1.
16
XL-MP150
CD or MP3/WMA disc Playback
Listening to a CD or MP3/WMA disc
This system can play back a standard CD, CD-R/RW in the CD format
and CD-R/RW with MP3 or WMA files, but cannot record on them.
Some audio CD-R and CD-RW discs may not be playable due to the
state of the disc or the device that was used for recording.
MP3:
MP3 is a form of compression. It is an acronym which stands
for MPEG Audio Layer 3.
MP3 is a type of audio code which is processed by significant
compression from the original audio source with very little loss
in sound quality.
zThis system supports MPEG 1 Layer 3, MPEG 2 Layer 3, and
VBR files.
zDuring VBR file playback, time counter in the display may differ
from its actual playback time.
WMA:
WMA files are Advanced System Format files that include audio
files which are compressed with Windows Media Audio codec.
WMA is developed by Microsoft as an audio format file for Win-
dows Media Player.
z"MP3" or "WMA" indicator will light up after the unit reads infor-
mation on an MP3 or WMA disc.
Auto power on function:
When you press any of the following buttons, the unit turns on.
zCD button (main unit and remote control): The unit turns on and
the "CD" function is activated.
zCD / button on the remote control: The unit turns on and CD
playback starts (regardless of the last function).
z / button on the main unit: The unit turns on and playback of
the last function starts (CD,TAPE,TUNER,VIDEO/AUX).
Auto power off function:
In the stop mode of CD, MP3 or WMA operation, the main unit enters
the stand-by mode after 15 minutes of inactivity.
.
X-BASS (SURROUND)
/DEMO
17
XL-MP150
CD or MP3/WMA disc Playback
zPlayback will begin from track 1 on DISC 1. After that disc fin-
ishes playing, the next disc will automatically play.
zAfter the last track on the fifth disc is played, the unit will stop
automatically.
zWhen there is no disc in one of the disc trays (1 - 5), the empty
tray will be skipped to the next tray with a disc.
To exchange other discs while playing a disc:
Press one of the 1 - 5 buttons for the stopped disc and within 5
seconds, press the OPEN/CLOSE button and exchange discs.
To remove the discs:
In the stop mode, press the 1 - 5 button and within 5 seconds,
press the OPEN/CLOSE button.
Caution:
zDo not place two discs in one disc tray.
zDo not play discs of special shapes (heart, octagon, etc).
It may cause malfunctions.
zDo not push the disc tray while it is moving.
zIf the power fails while the tray is open, wait until the power is re-
stored.
zIf the disc tray is stopped with force, "ER-CD20" will appear on the
display for 3 seconds and the unit will not function. If this occurs,
press the ON/STAND-BY button to enter the power stand-by
mode and then turn the power on again.
zIf TV or radio interference occurs during CD operation, move the
unit away from the TV or radio.
zIf a disc is damaged, dirty, or loaded upside down, the disc will be
skipped.
1Press the ON/STAND-BY button to turn the power on.
2Press the CD button.
3Press the 1 button and within 5 seconds, press the
OPEN/CLOSE button to open the disc tray 1.
4Place the disc on the disc tray 1, label side up.
Be sure to place 3" (8 cm) disc in the middle of the disc trays.
5Press the OPEN/CLOSE button to close the disc tray 1.
zDue to the structure of the disc information, it takes longer to
read an MP3/WMA disc than a normal CD (approximately 20
to 90 seconds).
6You can place discs on the trays 2 - 5 by following steps
3 - 5.
7Press the / button to start playback.
5" (12 cm)3" (8 cm)
[CD]
Total number of
tracks on the disc
Total playing
time of the disc
Total number
of folders
Total number
of files
MP3 indicator
[MP3/WMA]
WMA indicator
Disc play indicator
18
XL-MP150
CD or MP3/WMA disc Playback
Listening to a CD or MP3/WMA disc (continued)
Various disc functions
Notes for CD:
Notes for MP3/WMA discs:
zTrack up/track down is possible only within individual discs.
zThe sound is heard during fast forward/fast reverse with a CD, but
not with an MP3/WMA disc. For fast forward or fast reverse of an
MP3/WMA disc, refer to playback time on the display.
zFast forward/fast reverse is possible only within individual tracks.
zWhen the end of the track is reached during fast forward, the next
track will be played. Playback of the track will begin when its be-
ginning is reached during fast reverse.
To change the display (MP3/WMA discs only)
FunctionMain unitRemote
control
Operation
PlayPress in the stop
mode.
StopPress in the playback
mode.
PausePress in the playback
mode. Press the /
button to resume play-
back from the paused
point.
Track up/
Track down
Press in the playback
or stop mode.
If you press the button
in the stop mode,
press the / button
to start the desired
track.
Fast for-
ward/Fast
reverse
Press and hold down
in the playback mode.
Release the button to
resume playback.
zTrack up/track down is possible only within individual discs.
zFast forward/fast reverse is possible only within individual discs.
zWhen the end of the last track is reached during fast forward,
"END" will appear on the display and CD operation will be paused.
When the beginning of the first track is reached during fast
reverse, the unit will enter the playback mode.
While a disc is playing, press the DISPLAY
button.
Each time the button is pressed, the display
will change as follows.
Folder name
File name
Track number
Elapsed
playback time
19
XL-MP150
CD or MP3/WMA disc Playback
Advanced CD or MP3/WMA disc playback
To specify a disc to play
You can play a disc by specifying the disc number.
zPlayback will begin from track 1 on the chosen disc.
zAfter the last track on the chosen disc is played, the unit stops
automatically.
Note:
If a disc tray with no disc is selected, playback will not start and the
disc indicator will go out.
To stop playback:
Press the (CD ) button.
Direct track search
By using the direct search buttons, the desired tracks on the current
disc can be played.
If the direct search buttons are pressed while the disc is stopped,
press the / button to start the desired track on the current disc.
Notes:
zA track number higher than the number of tracks on the disc can-
not be selected.
zDuring random play, direct search is not possible.
1Press one of the 1 - 5 buttons to select the desired disc.
Selected disc number
2Within 5 seconds, press the CD DIRECT PLAY button on
the main unit.
X-BASS (SURROUND)
/DEMO
Use the direct search buttons on
the remote control to select the de-
sired track while playing the se-
lected disc.
Selected track number
zThe direct search buttons allow you to select up to number 9.
zWhen selecting number 10 or higher, use the "+10" button.
A. For example, to choose 13
1Press the "+10" button once.
2Press the "3" button.
B. For example, to choose 30
1Press the "+10" button three times.
2Press the "0" button.
20
XL-MP150
CD or MP3/WMA disc Playback
Advanced CD or MP3/WMA disc playback (continued)
Repeat play
Repeat play can play all 5 discs, all tracks on a chosen disc, or a
programmed sequence continuously.
To cancel repeat play:
Press the / button again.
"" will go out.
To cancel repeat play:
Press the CD DIRECT PLAY button again.
"" will go out.
Random play
The tracks on the disc(s) can be played in random order automatically.
To cancel random play:
Press the / button.
"R" will go out.
To cancel random play:
Press the CD DIRECT PLAY button.
"R" will go out.
Notes:
zIf you press the button during random play, you can move to
the track selected next by the random operation. On the other
hand, the button does not allow you to move to the previous
track. The beginning of the track being played will be located.
zIn random play, the unit will select and play tracks automatically.
(You cannot select the order of the tracks.)
Caution:
After performing repeat or random play, be sure to press the (CD
) button. Otherwise, the disc(s) will play continuously.
To repeat all tracks on up to 5 discs:
Press the / button twice.
To repeat desired tracks:
Perform steps 1 - 6 in "Programmed play" section on page 21 and
then press the / button twice.
To repeat all tracks on the chosen disc:
1Press one of the 1 - 5 buttons.
2Within 5 seconds, press the CD DIRECT
PLAY button twice.
To random play all tracks on up to 5 discs:
Press the RANDOM button on the remote control.
To random play all tracks on the chosen disc:
1Press one of the 1 - 5 buttons.
2Within 5 seconds, press the CD DI-
RECT PLAY button.
3Press the RANDOM button on the re-
mote control.
21
XL-MP150
CD or MP3/WMA disc Playback
Programmed play
You can choose up to 32 selections for playback in the order you like.
To cancel the programmed play mode:
While in the stop mode and the "MEMORY" indicator is lit, press the
CLEAR/DIMMER button on the remote control. The "MEMORY" in-
dicator will disappear and all the programmed contents will be
cleared.
Adding tracks to the program:
If a program has been previously stored, the "MEMORY" indicator
will be displayed. Then follow steps 1 - 6 to add tracks. The new
tracks will be stored after the last track of the original program.
To check which tracks are programmed:
While the unit is stopped in the programmed play mode, press the
or button.
Notes:
zWhen a disc with programmed tracks is ejected, the program is
automatically canceled.
zEven if you press the ON/STAND-BY button to enter the stand-by
mode or change the function from CD to another, the programmed
selections will not be cleared.
zDuring the program operation, random play is not possible.
zDuring programmed play, the CD DIRECT PLAY button will not
work.
1While in the stop mode, press the
MEMORY/SET (MEMORY) button
to enter the programming save
mode.
2Press one of the 1 - 5 buttons
to select the desired disc.
Selected disc number
3Press the direct search buttons
on the remote control to select
the desired track.
Selected track number
You can also select a track by pressing the or button.
4Press the MEMORY/SET (MEMO-
RY) button to save the track
number.
5Repeat steps 2 - 4 for other tracks. Up to 32 tracks can be
programmed.
If you make a mistake, the programmed tracks can be cleared
by pressing the CLEAR/DIMMER button.
6
Press the (CD ) button.
The total number in memory will ap-
pear.
7Press the / button to start playback.
To clear the programmed selections:
Press the CLEAR/DIMMER button on the re-
mote control while the "MEMORY" indicator
is flashing.
Each time the button is pressed, one track will
be cleared, beginning with the last track pro-
grammed.
22
XL-MP150
CD or MP3/WMA disc Playback
MP3/WMA navigation (only for MP3/WMA files)
MP3/WMA navigation:
You can search and play files by folder or title. For example, when
you assign three titles to a file, enter genre (such as jazz) as title 1,
album name as title 2, and music title as title 3 to search the file by
any title.
zYou can search and play files by folder or title 1/2/3 within one
MP3/WMA disc (see page 23).
zBy entering a name, you can search files by folder or title 1/2/3
within one MP3/WMA disc (see page 24).
zFolders or titles can be programmed within one MP3/WMA disc
(see page 25).
When you enter file names on your PC, connect words with
hyphens. This product recognizes the first word as title 1, second
one as title 2, and third one as title 3. Up to three words can be rec-
ognized.
Notes:
zMP3 files must have the extension ".mp3".
zWMA files must have the extension ".wma".
zUp to 100 folders or 300 files can be read on the unit. If either
limit is exceeded, no more folders/files are displayed.
zThis unit recognizes and displays up to 48 characters for folder
names, and up to 32 characters for title 1/2/3.
zAll file/folder names appear in uppercase.
Example:
(File name)
(POPULAR-HITS 1-A MUSIC.mp3)
AAA
(POPULAR-HITS 2-B MUSIC.mp3)
(JAZZ-HITS 1-A MUSIC.mp3)
BBB
(JAZZ-HITS 2-B MUSIC.mp3)
(ROCK-HITS 1-A MUSIC.mp3)
CCC
(ROCK-HITS 2-B MUSIC.mp3)
(ROCK-HITS 3-C MUSIC.mp3)
(ROCK-HITS 4-D MUSIC.mp3)
Folder
Title 1Title 2Title 3
23
XL-MP150
CD or MP3/WMA disc Playback
File search (by folder or title 1/2/3)
You can search and play files by folder or title 1/2/3 within one MP3/
WMA disc.
File search by title 1/2/3:
zIn step 5, select "T-1", "T-2" or "T-3" and follow the same steps as
file search by folder.
zThe unit searches all files on the disc, regardless of the folder.
To stop playback:
Press the CD button.
To exit the MP3/WMA navigation mode:
In the stop mode, press the CD button.
Notes:
zIn the MP3/WMA navigation mode, direct play and direct search
functions are disabled.
zIf a folder, title or file name does not appear, or appears incor-
rectly, remove and reinsert the disc and try again.
zIf you press the RANDOM button in the stop mode, the MP3/
WMA navigation mode will be canceled.
1Press one of the 1 - 5 buttons to select a disc tray con-
taining an MP3/WMA disc.
2Press the / button, and the unit starts to read the MP3/
WMA disc.
3Press the CD button to stop playback.
"NAVI READ" appears and the display shows the total number
of folders and files on the selected disc.
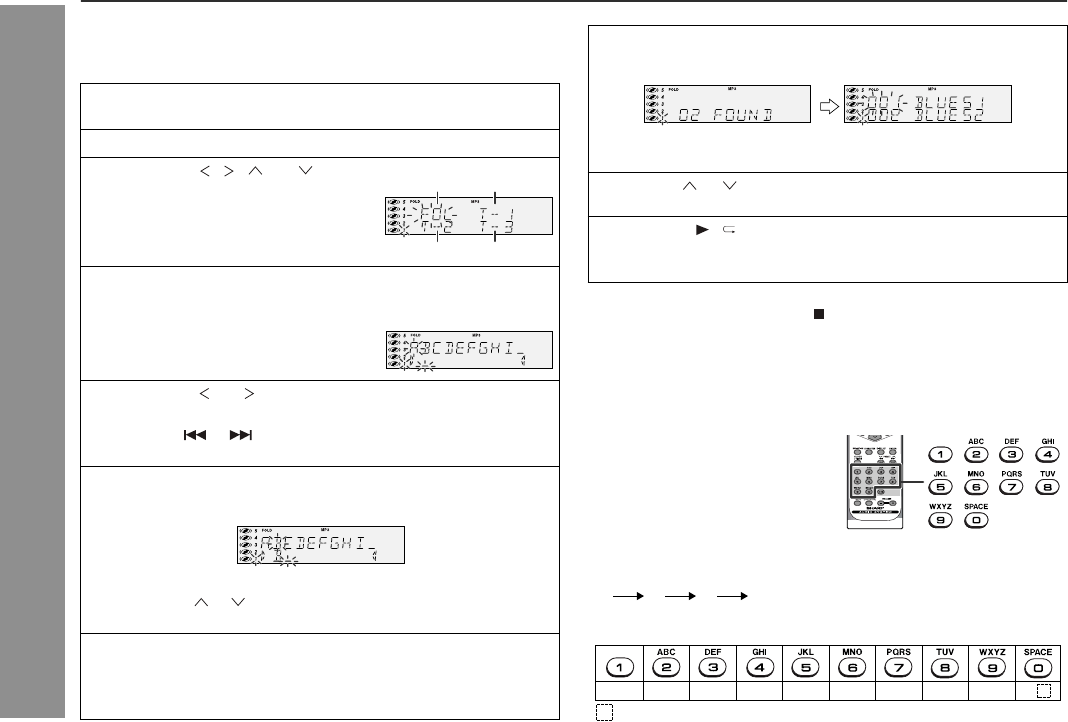
4Press the NAVIGATION button.
5
Press the , , or cursor but-
ton on the remote control to select
"FOL", "T-1", "T-2" or "T-3". To
search files by folder name, select
"FOL" (will flash).
The following steps describe file search by folder:
6Press the ENTER button.
The total number of folders (or titles) appears for 2 seconds,
and names of the first 2 folders (or titles) are displayed.
z
The NAVIGATION button allows you to go one step back.
zPress the DISPLAY button to
check the number of files.
Total number
of folders
Total number
of files
MP3 indicator
WMA indicator
FolderTitle 1
Title 2Title 3
Folder name
7Use the or cursor button to scroll and select a folder
(or title), and then press the ENTER button.
If you press the / button instead of the ENTER button, all
files in the selected folder (or title) are played.
8Use the or cursor button to scroll and select a file.
9Press the / button to start playback.
The unit plays from the selected file to the last file in the select-
ed folder (or title), and the previous display returns.
Folder name
File name
24
XL-MP150
CD or MP3/WMA disc Playback
MP3/WMA navigation (only for MP3/WMA files) (continued)
Character search (for folder or title 1/2/3)
By entering a name, you can search files by folder or title 1/2/3
within one MP3/WMA disc.
To exit the MP3/WMA navigation mode:
In the stop mode, press the CD button.
Notes:
zThe unit searches regardless of the case, and names found will
appear in uppercase.
zSome symbols do not appear properly.
Character entry with direct buttons:
For example, press "2" four times to enter "C".
1Perform steps 1 - 3 in "File search (by folder or title 1/2/3)"
on page 23.
2Press the NAVIGATION button.
3Press the , , or cursor
button on the remote control to
select "FOL", "T-1", "T-2" or "T-3".
To search files by folder name,
select "FOL" (will flash).
4Press the CHARACTER button for 2 seconds.
The display will be ready for editing characters.
1st row: String table
2nd row: Input editor (8 digits)
5Press the or cursor button to select the desired
alphabet.
Press the or button to go to the next page of character
display.
6Press the CHARACTER button and the active character will
be entered in the 2nd row of the display.
To delete an entered character, move the cursor to the charac-
ter with the or button and press the CLEAR/DIMMER but-
ton on the remote control.
7Repeat steps 5 and 6 to enter characters.
In the folder (or title) name search, you do not have to enter the
full name. The unit searches for names beginning with the en-
tered characters.
FolderTitle 1
Title 2Title 3
8When finished, press the ENTER button. The unit searches
for the same name within folders (or titles).
If the search word is not in the folder (or title) name, "NOT
FOUND" appears and the menu returns.
9Use the or cursor button to scroll and select a folder
(or title).
10Press the / button to start playback.
All files in the selected folder (or title) are played, and the previ-
ous display returns.
The direct buttons on the remote
control can also be used for charac-
ter entry.
In step 5 on the left, use buttons 0 -
9 to enter alphabets.
Alphabet types change as you
press a button.
2ABC
12 ABC3 DEF4 GHI5 JKL6 MNO
7 PQRS
8 TUV
9 WXYZ
0
: indicates a space.
Characters:
25
XL-MP150
CD or MP3/WMA disc Playback
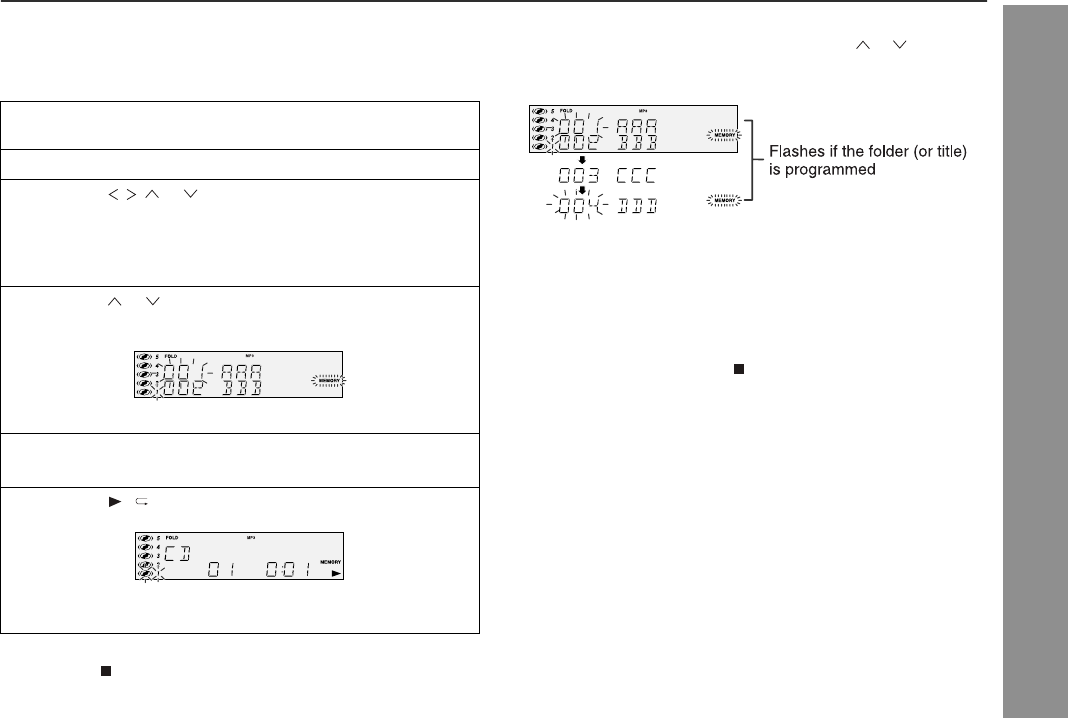
Programmed play (for folder, title 1/2/3)
Folders or titles can be programmed within one MP3/WMA disc.
Folder, title 1, title 2 and title 3 cannot be programmed together
simultaneously.
To stop playback:
Press the CD button.
zThe programmed contents are not cleared.
To check, add or delete programmed contents:
In the stop mode, select a folder (or title) with the or cursor but-
ton. If the folder (or title) is programmed, "MEMORY" indicator
flashes.
zWhen you press the MEMORY button with "MEMORY" flashing,
the folder (or title) is removed from the program.
zIf you press the MEMORY button with "MEMORY" off, the folder
(or title) is added to the program.
zTo clear all programs, press the CLEAR/DIMMER button in the
stop mode.
To exit the MP3/WMA navigation mode:
In the stop mode, press the CD button.
zThe programmed contents are cleared.
Notes:
zThe programmed contents are cleared when you eject a disc,
play another disc, switch the function, or enter the stand-by mode
with the ON/STAND-BY button.
zDuring programmed play, the CD DIRECT PLAY button on the
main unit will not work.
zIf you press the RANDOM button in the stop mode, the MP3/
WMA navigation mode will be canceled.
If tracks are programmed using track numbers (see "Pro-
grammed play" on page 21):
In the MP3/WMA navigation mode, only programs by folder (or title)
name are played. When you exit the mode, the programs by folder
(or title) name are cleared.
When you exit the MP3/WMA navigation mode, programs by track
number are canceled.
(Programs by track number are cleared when you remove the disc.)
1
Perform steps 1 - 3 in "File search (by folder or title 1/2/3)"
on page 23.
2Press the NAVIGATION button.
3Press the , , or cursor button on the remote control
to select "FOL", "T-1", "T-2" or "T-3" and then press the
ENTER button.
The total number of folders (or titles) appears for 2 seconds,
and names of the first 2 folders (or titles) are displayed.
4Press the or cursor button to select the desired folder
(or title) and then press the MEMORY button.
The folder (or title) is memorized with all the files.
5
Repeat step 4 for other folders (or titles).
Up to 10 folders (or 10 titles) can be programmed.
6Press the / button to start playback.
Programmed play will always start from the smallest folder (or
title) number.
26
XL-MP150
Radio
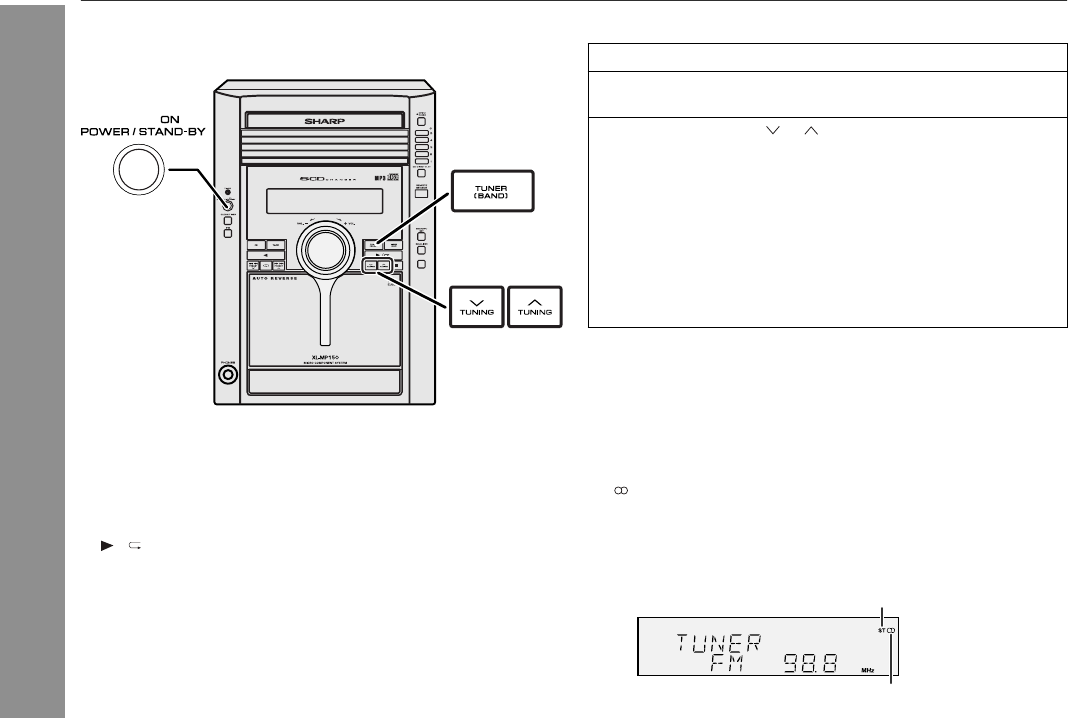
Listening to the radio
Auto power on function:
When you press any of the following buttons, the unit turns on.
zTUNER (BAND) button (main unit and remote control): The unit
turns on and the "TUNER" function is activated.
z / button on the main unit: The unit turns on and playback of
the last function starts (CD,TAPE,TUNER,VIDEO/AUX).
Tuning
Notes:
zWhen radio interference occurs, auto scan tuning may stop auto-
matically at that point.
zAuto scan tuning will skip weak signal stations.
zTo stop the auto tuning, press the TUNING button again.
To receive an FM stereo transmission:
Press the TUNER (BAND) button to display the "ST" indicator.
z"" will appear when an FM broadcast is in stereo.
zIf the FM reception is weak, press the TUNER (BAND) button to
extinguish the "ST" indicator. The reception changes to monaural,
and the sound becomes clearer.
X-BASS (SURROUND)
/DEMO
1Press the ON/STAND-BY button to turn the power on.
2Press the TUNER (BAND) button repeatedly to select the
desired frequency band (FM or AM).
3Press the TUNING ( or ) button to tune in to the desired
station.
Manual tuning:
Press the TUNING button as many times as required to tune in
to the desired station.
Auto tuning:
When the TUNING button is pressed for more than 0.5 sec-
onds, scanning will start automatically and the tuner will stop at
the first receivable broadcast station.
FM stereo mode indicator
FM stereo receiving indicator
27
XL-MP150
Radio
Memorizing a station
You can store 40 AM and FM stations in memory and recall them at
the push of a button. (Preset tuning)
Note:
The backup function protects the memorized stations for a few
hours should there be a power failure or the AC power cord become
disconnected.
To recall a memorized station
To scan the preset stations
The stations saved in memory can be scanned automatically. (Pre-
set memory scan)
To erase entire preset memory
1Perform steps 1 - 3 in "Tuning" on page 26.
2Press the MEMORY/SET (MEMORY) button to enter the
preset tuning saving mode.
3Within 30 seconds, press the PRESET ( or ) button to
select the preset channel number.
Store the stations in memory, in order, starting with preset
channel 1.
4Within 30 seconds, press the MEMORY/SET (MEMORY)
button to store that station in memory.
If the "MEMORY" and preset number indicators go out before
the station is memorized, repeat the operation from step 2.
5Repeat steps 1 - 4 to set other stations, or to change a pre-
set station.
When a new station is stored in memory, the station previously
memorized for that preset channel number will be erased.
Press the PRESET ( or ) button for less than 0.5 seconds to se-
lect the desired station.
1Press the PRESET ( or ) button for more than 0.5 seconds.
The preset number will flash and the programmed stations will be
tuned in sequentially, for 5 seconds each.
2Press the PRESET ( or ) button again when the desired sta-
tion is located.
1Press the ON/STAND-BY button to enter the stand-by mode.
2While pressing down the button and the X-BASS (SUR-
ROUND)/DEMO button, press the TUNING button until "TUN-
ER CL" appears.
CD
POWER/
PRESET
X-BASS (SURROUND)
/DEMO
28
XL-MP150
Tape Playback
Listening to a cassette tape
Tape playback
Auto power on function:
When you press any of the following buttons, the unit turns on.
zTAPE button (main unit and remote control): The unit turns on and
the "TAPE" function is activated.
zTAPE button on the remote control: The unit turns on and side
A playback starts (regardless of the last function).
z / button on the main unit: The unit turns on and playback of
the last function starts (CD,TAPE,TUNER,VIDEO/AUX).
Auto power off function:
In the stop mode of tape operation, the main unit enters the stand-by
mode after 15 minutes of inactivity.
Before playback:
zFor playback, use normal or low-noise tapes for
the best sound. (Metal or CrO tapes are not rec-
ommended.)
zDo not use C-120 tapes or poor-quality tapes, as
they may cause malfunctions.
zBefore loading a tape into the cassette compartment,
tighten the slack with a pen or a pencil.
X-BASS (SURROUND)
/DEMO
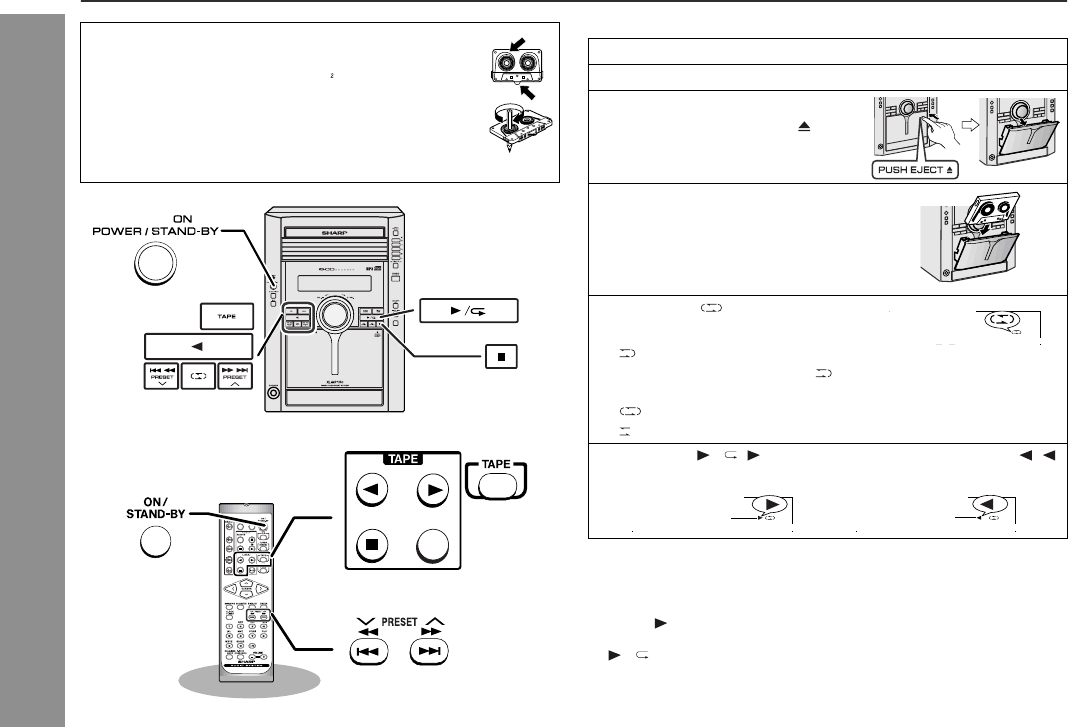
1Press the ON/STAND-BY button to turn the power on.
2Press the TAPE button.
3Open the cassette door by push-
ing the area marked " PUSH
EJECT".
4Load a cassette into the cas-
sette compartment with side A
facing you.
5Press the button to choose
one side or both sides.
...To listen to both sides.
To play both sides (), start from side A. When play-
back starts from side B, side A will not be played.
...For endless repeat play of both sides.
...To listen to one side.
6Press the / () button to listen to side A, or the ()
button for side B.
Forward play
Reverse play
29
XL-MP150
Tape Recording
Various tape functions
Caution:
zTo remove the cassette, press the (TAPE ) button, and then
open the compartment.
zIf a power failure occurs during tape operation, the tape head will
remain engaged with the tape and the cassette door will not open.
In this case, wait until the power is restored.
Recording on a cassette tape
FunctionMain unitRemote
control
Operation
Side A play-
back
Press in the stop
mode.
Side B play-
back
Press in the stop
mode.
StopPress in the playback,
fast forward or fast re-
wind mode.
Fast for-
ward/Fast
rewind
Press in the playback
or stop mode.
Before recording:
zWhen recording important selections, make a preliminary test to
ensure that the desired material is properly recorded.
zSHARP is not liable for damage or loss of your recording arising
from malfunction of this unit.
zThe volume and sound controls can be adjusted with no effect
on the recorded signal (Variable Sound Monitor).
zFor recording, use only normal tapes. Do not use metal or
CrO tapes.
Erase-prevention tab of cassette tapes:
zWhen recording on a cassette tape, make sure that the erase-
prevention tabs are not removed. Cassettes have removable
tabs that prevent accidental recording or erasing.
zTo protect the recorded sound, remove the tab after recording.
Cover the tab hole with adhesive tape to record on the tape with-
out the tab.
Side A
Tab for side B
Tab for side A
30
XL-MP150
Tape Recording
Recording on a cassette tape (continued)
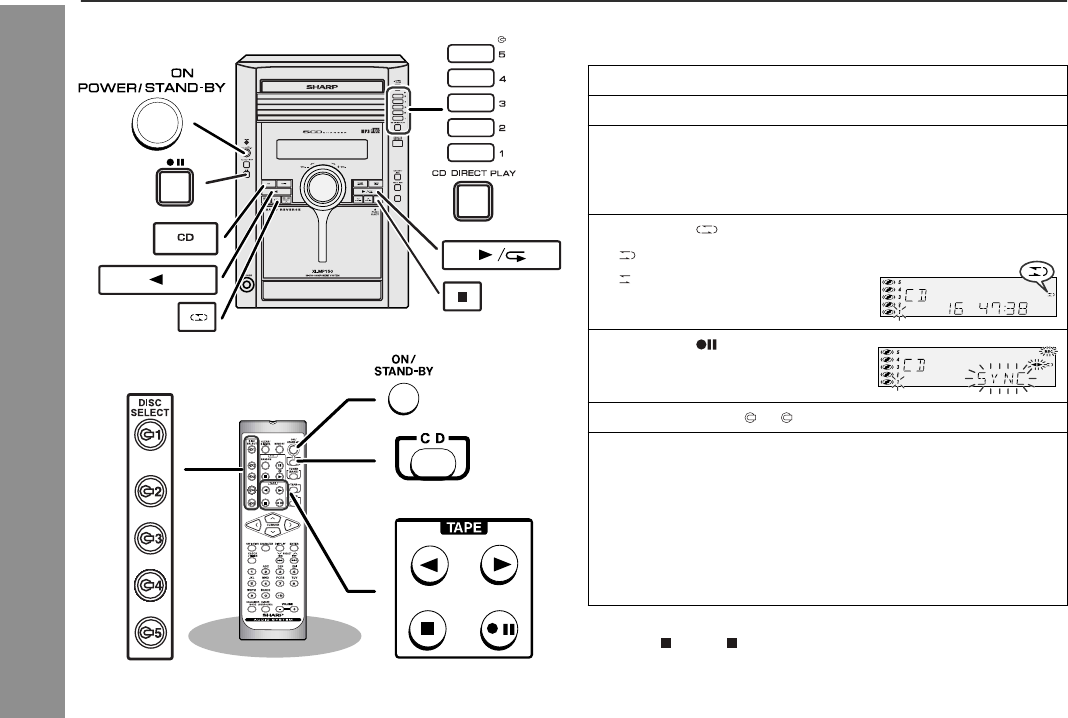
Recording from a CD or MP3/WMA disc
You can record the desired disc using the CD DIRECT PLAY button.
To stop recording:
Press the (TAPE ) button.
The disc and tape will stop.
X-BASS (SURROUND)
/DEMO
1Press the ON/STAND-BY button to turn the power on.
2Press the CD button.
3Load a cassette into the cassette compartment with side A
facing you.
Wind past the leader of the tape, on which recording cannot be
performed.
4Press the button to choose one side or both sides.
...To record on both sides.
...To record on only one
side.
5Press the button.
Recording will be paused.
6Press one of the 1 - 5 buttons to select the desired disc.
7Within 5 seconds, press the CD DIRECT PLAY button to
start recording.
zRecording starts from side A.
zRecording is started from the selected disc. When the play-
back of the last track is finished or the end of the tape is
reached, the disc and the cassette will stop automatically.
zPlayback of the disc will start approximately 7 seconds after
the tape starts.
31
XL-MP150
Tape Recording
Sequential recording from several discs:
To perform programmed recording:
To stop recording:
Press the (TAPE ) button.
The disc and tape will stop.
Note:
To record on both sides, begin with side A. (If recording is started
from side B, the tape will not switch over to side A.)
Auto restart function:
If the recording side is switched from side A to B during recording,
the system will record the interrupted track on side B from its begin-
ning. The recording will be made without cutting the beginning of the
track on side B.
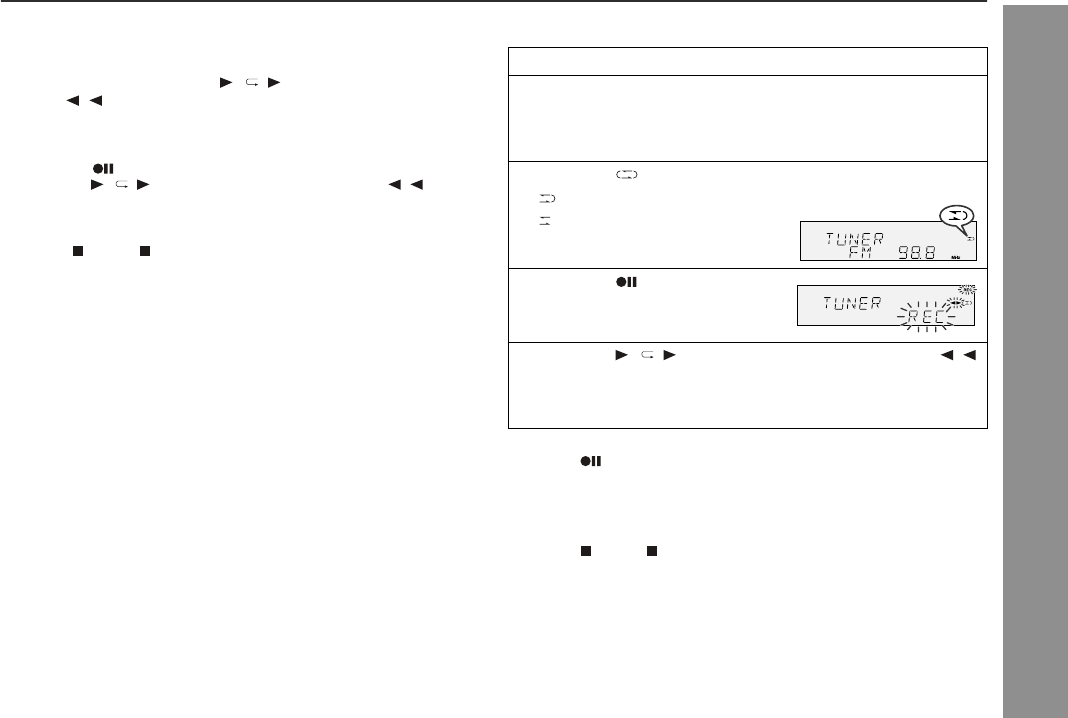
Recording from the radio
To interrupt recording:
Press the button.
To resume recording, press the same recording button you pressed
in step 5. Other buttons do not allow resuming.
To stop recording:
Press the (TAPE ) button.
Note:
If you hear a whistling noise while recording an AM station, move the
AM loop antenna.
Erasing recorded tapes
1Press the TAPE button.
2Follow steps 2 - 5 in "Recording from the radio".
1Perform steps 1 - 6 in "Recording from a CD or MP3/WMA disc"
on page 30.
2Within 5 seconds, press the / () button to record on side A,
or the () button for side B.
1Program discs and tracks (see pages 21).
2Press the button.
3Press the / () button to record on side A, or the () button
for side B.
1Tune in to the desired station (see page 26).
2Load a cassette into the cassette compartment with side A
facing you.
Wind past the leader of the tape, on which recording cannot be
performed.
3Press the button to choose one side or both sides.
...To record on both sides.
...To record on only one
side.
4Press the button.
Recording will be paused.
5Press the / () button to record on side A, or the ()
button for side B.
To record on both sides, begin with side A. (If recording is start-
ed from side B, the tape will not switch over to side A.)
32
XL-MP150
Advanced Features
Timer and sleep operation
Timer playback:
The unit turns on and plays the desired source (CD, TUNER, TAPE)
at a preset time.
Timer recording:
The unit turns on and starts recording from the tuner at the preset
time.
Using the once timer and daily timer in combination:
For example, use the once timer to record a radio program, and use
the daily timer to wake up.
Note:
When set times for the daily timer and once timer overlap, the once
timer takes priority. Allow an interval of at least 1 minute between op-
erations.
Timer playback or timer recording
Before setting timer:
Continued to the next page
This unit has 2 types of timer: ONCE TIMER and DAILY TIMER.
Once timer:Once timer play or once timer recording works for
one time only at a preset time.
For example, if you are away but want to record a program on a ra-
dio station.
Daily timer:Daily timer play or daily timer recording works at
the same preset time every day.
For example, set the timer as a wake-up call every morning.
1Set the daily timer (pages 32 - 34).
2Set the once timer (pages 32 - 34).
Start
Daily timer
Once timer
1 minute or more
StopStartStop
1Check that the clock is set to the correct time (refer to page 15).
If it is not set, you cannot use the timer function.
2For timer playback:Load a cassette or discs to be played.
For timer recording:Load a cassette for recording in the cas-
sette compartment.
1Press the ON/STAND-BY button to turn the power on.
2
Press the CLOCK/TIMER button.
3Within 10 seconds, press the or button to se-
lect "ONCE" or "DAILY", and press the MEMORY/SET but-
ton.
Set the clock to the correct time if "ONCE" or "DAILY" does not
appear.
X-BASS (SURROUND)
/DEMO
33
XL-MP150
Advanced Features
Continued to the next page
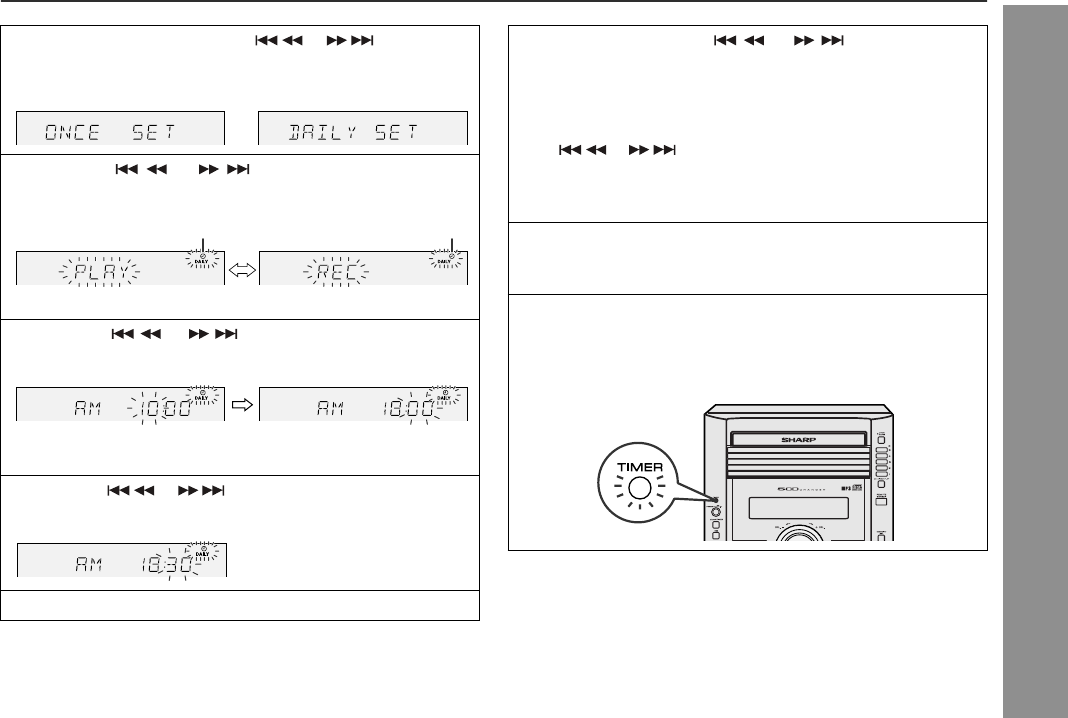
4Within 10 seconds, press the or button to se-
lect "ONCE SET" or "DAILY SET", and press the MEMORY/
SET button.
5Press the or button to select "PLAY" or
"REC", and press the MEMORY/SET button.
The illustrations show the daily timer setting.
6Press the or button to adjust the hour and
then press the MEMORY/SET button.
The illustrations show the timer playback setting in the daily tim-
er mode.
7Press the or button to adjust the minutes and
then press the MEMORY/SET button.
8Set the time to finish as in steps 6 and 7 above.
WhiteRed
9Switch input with the or button, and then
press the MEMORY/SET button.
To select the timer playback source: CD, TUNER or TAPE.
To select the timer recording source: TUNER.
zWhen you select the tuner, select a station by pressing the
or button, and then press the MEMORY/SET
button.
zIf a station has not been programmed, "NO PRESET" will be
displayed and timer setting will be canceled.
10
Adjust the volume using the VOLUME control, and then
press the MEMORY/SET button.
Do not turn the volume up too high.
11Press the ON/STAND-BY button to enter the power stand-
by mode.
The "TIMER" indicator lights up and the unit is ready for timer
playback or timer recording.
34
XL-MP150
Advanced Features
Timer and sleep operation (continued)
Note:
Checking the timer setting in the timer stand-by mode:
Canceling the timer setting in the timer stand-by mode:
Reusing the memorized timer setting:
The timer setting will be memorized once it is entered. To reuse the
same setting, perform the following operations.
Note:
The timer can also be set with the remote control.
12When the preset time is reached, playback or recording will
start.
The volume will increase gradually until it reaches the preset
volume.
13When the timer end time is reached, the system will enter
the power stand-by mode automatically.
Once timer:
The timer will be canceled.
Daily timer:
The timer will operate at the same time every day. It will contin-
ue until the daily timer setting is canceled. Cancel the daily tim-
er when it is not in use.
When performing timer playback or recording using another unit con-
nected to the VIDEO/AUX IN jacks, select "VIDEO" in step 9.
This unit will turn on or enter the power stand-by mode automatically,
however, the connected unit will not turn on or off.
1Press the CLOCK/TIMER button.
2Within 10 seconds, press the or button to select
"ONCE" or "DAILY", and press the MEMORY/SET button.
3Within 10 seconds, press the or button to select
"ONCE CALL" or "DAILY CALL", and press the MEMORY/SET
button.
The unit returns to the timer stand-by mode after displaying the
settings in order.
1Press the CLOCK/TIMER button.
2Within 10 seconds, press the or button to select
"ONCE" or "DAILY", and press the MEMORY/SET button.
3Within 10 seconds, press the or button to select
"ONCE OFF" or "DAILY OFF", and press the MEMORY/SET but-
ton.
Timer will be canceled (the setting will not be canceled).
1Turn the power on and press the CLOCK/TIMER button.
2Within 10 seconds, press the or button to select
"ONCE" or "DAILY", and press the MEMORY/SET button.
3Within 10 seconds, press the or button to select
"ONCE ON" or "DAILY ON", and press the MEMORY/SET button.
4Press the ON/STAND-BY button to enter the power stand-by
mode.
35
XL-MP150
Advanced Features
Sleep operation
The radio, compact disc and cassette tape can all be turned off au-
tomatically.
To confirm the remaining sleep time:
To cancel the sleep operation:
Press the ON/STAND-BY button while "SLEEP" is indicated.
To cancel the sleep operation without setting the unit to the stand-by
mode, proceed as follows.
To use timer and sleep operation together
Sleep and timer playback:
For example, you can fall asleep listening to the radio and wake up
to CD in the next morning.
Sleep and timer recording:
For example, you can fall asleep listening to the CD and record radio
programs while sleeping.
Caution:
When using the cassette deck, be sure the tape length is long
enough to perform both functions. If you want to sleep and wake up
listening to a tape, and the length of the tape is shorter than the
sleep timer setting, timer playback or recording will not be possible.
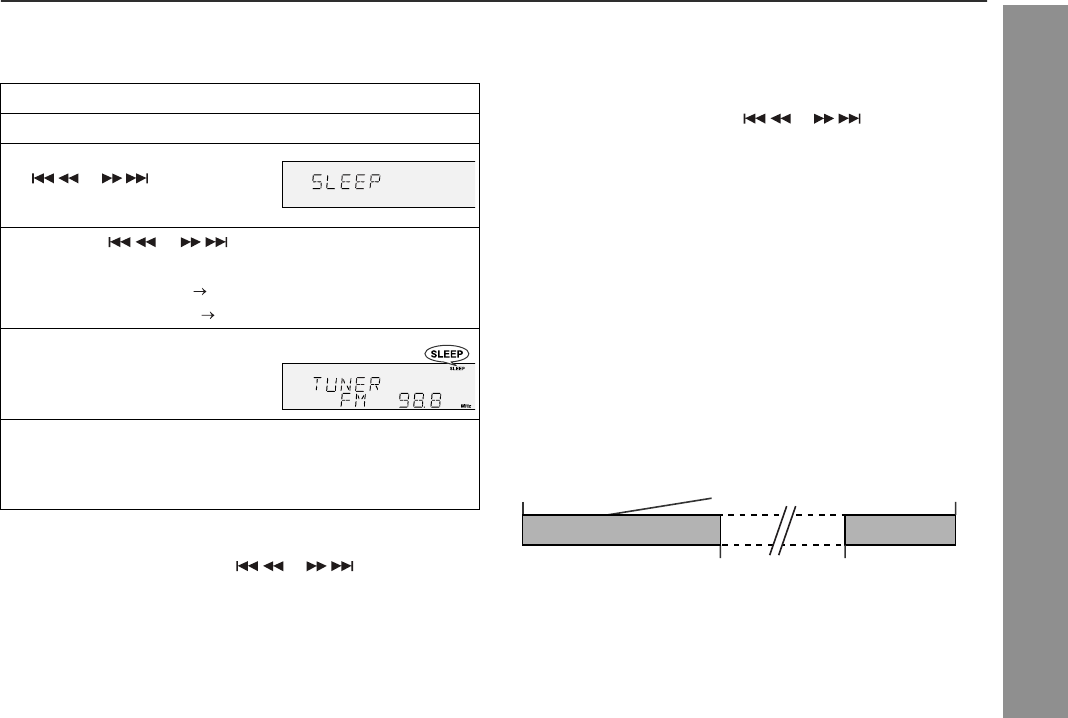
1Play back the desired sound source.
2Press the CLOCK/TIMER button.
3Within 10 seconds, press the
or button to select
"SLEEP", and press the MEMO-
RY/SET button.
4Press the or button to select the time.
(Maximum: 3 hours - Minimum: 1 minute)
z3 hours - 5 minutes 5-minute intervals
z5 minutes - 1 minute 1-minute intervals
5Press the MEMORY/SET but-
ton.
"SLEEP" will appear.
6The unit will enter the power stand-by mode automatically
after the preset time has elapsed.
The volume will be turned down 1 minute before the sleep op-
eration finishes.
1While "SLEEP" is indicated, press the CLOCK/TIMER button.
2Within 10 seconds, press the or button to select
"SLEEP X : XX".
"X : XX" is sleep remaining time.
zThe remaining sleep time is displayed for about 10 seconds.
zYou can change the remaining sleep time while it is displayed by
pressing the MEMORY/SET button (steps 4 - 5).
1While "SLEEP" is indicated, press the CLOCK/TIMER button.
2Within 10 seconds, press the or button to select
"SLEEP OFF", and press the MEMORY/SET button.
1Set the sleep time (see left, steps 1 - 5).
2While the sleep timer is set, set the timer playback or recording
(steps 2 - 10, pages 32 - 33).
Sleep timer setting
Timer playback or
recording setting
Sleep operation will
automatically stop.
Timer playback or recording
start time
End time
1 minute - 3 hoursDesired time
36
XL-MP150
Advanced Features
Enhancing your system
The connection cord is not included. Purchase a commercially avail-
able cord as shown below.
Auto power on function:
When you press any of the following buttons, the unit turns on.
zVIDEO/AUX button (main unit and remote control): The unit turns
on and the "VIDEO" function is activated.
z / button on the main unit: The unit turns on and playback of
the last function starts (CD,TAPE,TUNER,VIDEO/AUX).
Listening to the playback sounds from VCR,
DVD, etc.
Note:
To prevent noise interference, place the unit away from the televi-
sion.
To record on a tape
Headphones
zBefore plugging in or unplugging the headphones, reduce the vol-
ume.
zBe sure your headphones have a 1/8" (3.5 mm) diameter plug and
impedance between 16 and 50 ohms. The recommended imped-
ance is 32 ohms.
zPlugging in the headphones disconnects the speakers automati-
cally. Adjust the volume using the VOLUME control.
RATED SPEAKER IMPEDANCE:
6 OHMS MIN.
AC INPUT
ANTENNA
RIGHT
RIGHTLEFT
GND
FM
75 OHMS
AM
LOOP
VIDEO/AUX
IN
SUBWOOFER
PRE-OUT
SPEAKERS
LEFT
X-BASS (SURROUND)
/DEMO
1Use a connection cord to connect the VCR, DVD, etc. to the
VIDEO/AUX IN jacks.
When using video equipment, connect the audio output to this
unit and the video output to a television.
2Press the ON/STAND-BY button to turn the power on.
3Press the VIDEO/AUX button.
4Play the connected equipment.
1Insert a cassette in the cassette compartment.
2
Press the VIDEO/AUX button.
3Press the button.
4Press the / () or () button.
5Play the VCR, DVD, etc.
37
XL-MP150
References
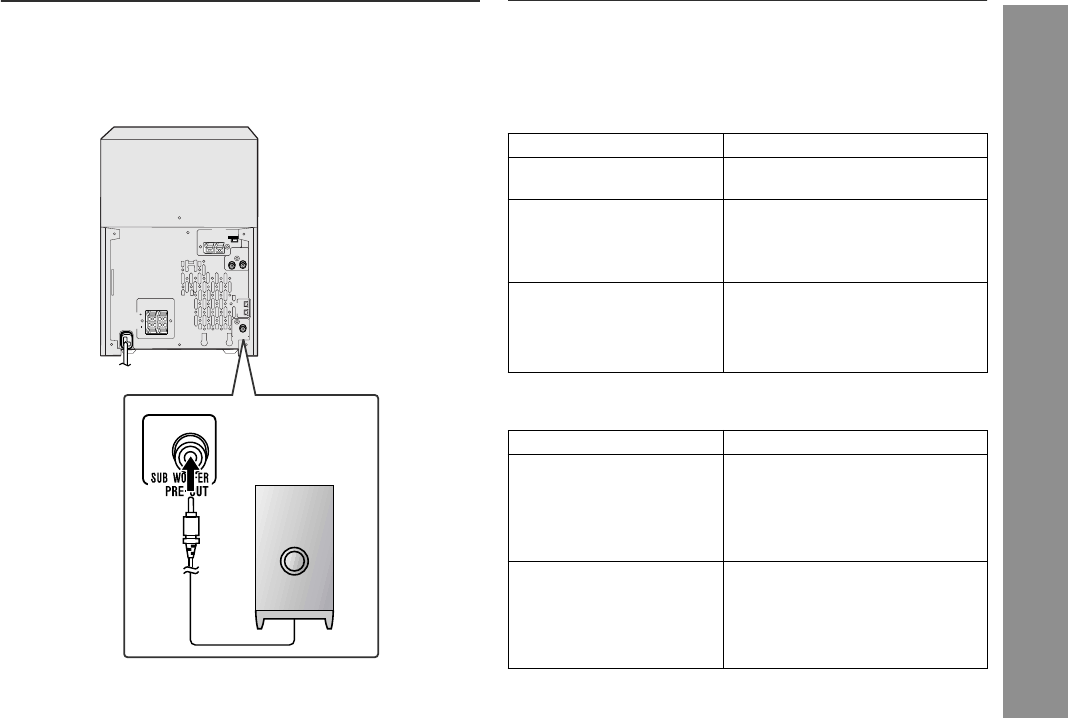
Subwoofer connection
When a commercially available speaker with a built-in amplifier is
connected to this unit, you can enjoy sound with emphasized bass.
Connect an RCA cord from a commercially available speaker with a
built-in amplifier to the SUBWOOFER PRE-OUT jack.
Troubleshooting chart
Many potential problems can be resolved by the owner without call-
ing a service technician.
If something is wrong with this product, check the following before
calling your authorized SHARP dealer or service center.
General
CD player
RATED SPEAKER IMPEDANCE:
6 OHMS MIN.
AC INPUT
ANTENNA
RIGHT
RIGHTLEFT
GND
FM
75 OHMS
AM
LOOP
VIDEO/AUX
IN
SUBWOOFER
PRE-OUT
SPEAKERS
LEFT
Speaker with a
built-in amplifier
SPEAKERS
LIGHT-UP
LEFT
RIGHT
SymptomPossible cause
zThe clock is not set to the
correct time.
zDid a power failure occur? Reset
the clock.
zWhen a button is pressed,
the unit does not respond.
zSet the unit to the power stand-
by mode and then turn it back on.
zIf the unit still malfunctions, reset
it.
zNo sound is heard.zIs the volume level set to "0"?
zAre the headphones connected?
zAre the speaker wires discon-
nected?
SymptomPossible cause
zPlayback does not start.zIs the disc loaded upside down?
zPlayback stops in the mid-
dle or is not performed
properly.
zDoes the disc satisfy the stan-
dards?
zIs the disc distorted or
scratched?
zPlayback sounds are
skipped, or stopped in the
middle of a track.
zIs the unit located near excessive
vibrations?
zIs the disc very dirty?
zHas condensation formed inside
the unit?
38
XL-MP150
References
Troubleshooting chart (continued)
Cassette deck
Remote control
Tuner
Condensation
Sudden temperature changes, storage or operation in an extremely
humid environment may cause condensation inside the cabinet (CD
pickup, tape heads, etc.) or on the transmitter on the remote control.
Condensation can cause the unit to malfunction. If this happens,
leave the power on with no disc (or cassette) in the unit until normal
playback is possible (about 1 hour). Wipe off any condensation on
the transmitter with a soft cloth before operating the unit.
SymptomPossible cause
zCannot record.zIs the erase-prevention tab re-
moved?
zCannot record tracks with
proper sound quality.
zIs it a normal tape? (You cannot
record on a metal or CrO tape.)
zCannot erase completely.
zSound skipping.zIs there any slack?
zIs the tape stretched?
zCannot hear treble.zAre the capstans, pinch rollers,
or heads dirty?
zSound fluctuation.
zCannot remove the tape.zIf a power failure occurs during
playback, the heads remain en-
gaged with the tape. Do not open
the compartment with great
force.
SymptomPossible cause
zThe remote control does
not operate.
zIs the AC power cord of the unit
plugged in?
zIs the battery polarity correct?
zAre the batteries dead?
zIs the distance or angle incor-
rect?
zDoes the remote control sensor
receive strong light?
SymptomPossible cause
zThe radio makes unusual
noises continuously.
zIs the unit placed near the TV or
computer?
zIs the FM antenna or AM loop an-
tenna placed properly? Move the
antenna away from the AC power
cord if it's located nearby.
39
XL-MP150
References
If trouble occurs
When this product is subjected to strong external interference (me-
chanical shock, excessive static electricity, abnormal supply voltage
due to lightning, etc.) or if it is operated incorrectly, it may malfunc-
tion.
If such a problem occurs, do the following:
1Set the unit to the stand-by mode and turn the power on again.
2If the unit is not restored in the previous operation, unplug and
plug in the unit, and then turn the power on.
Note:
If neither operation above restores the unit, clear all the memory by
resetting it.
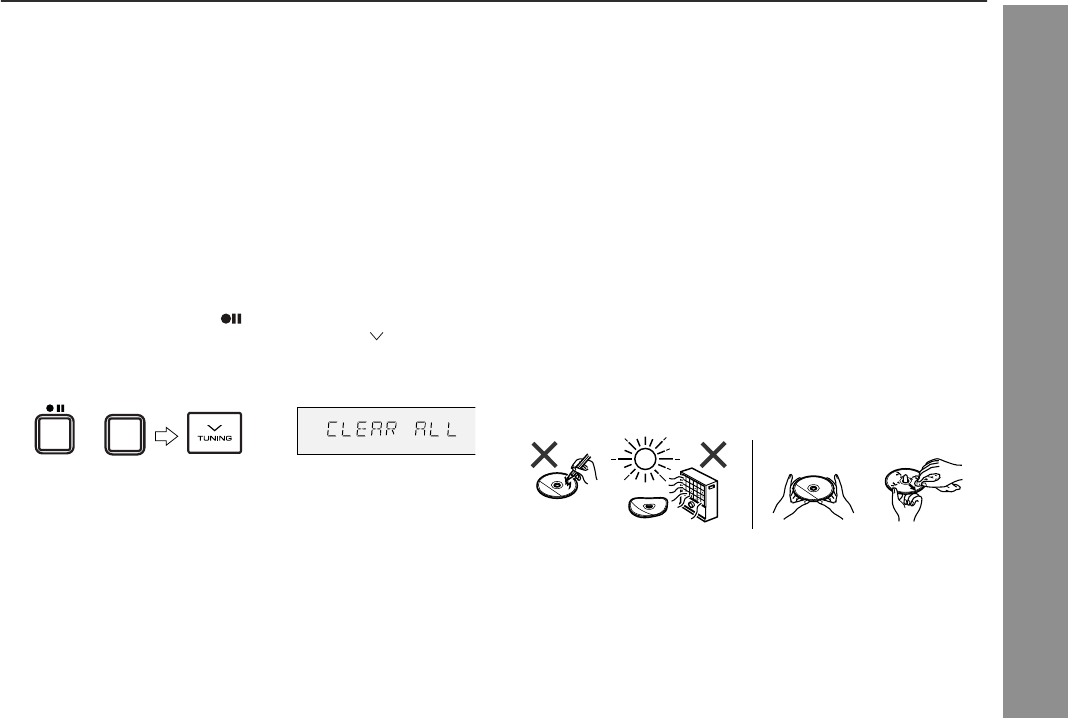
Clearing all the memory (reset)
1Press the ON/STAND-BY button to enter the power stand-by
mode.
2While pressing down the button and the X-BASS (SUR-
ROUND)/DEMO button, press the TUNING button until
"CLEAR ALL" appears.
Caution:
This operation will erase all data stored in memory including clock,
timer settings, tuner preset, and CD program.
Before transporting the unit
Remove all CDs from the unit. Make sure there is no CD in the disc
tray. Then, set the unit to the power stand-by mode. Carrying the
unit with discs left inside can damage the unit.
Care of compact discs
Compact discs are fairly resistant to damage, however mistracking
can occur due to an accumulation of dirt on the disc surface. Follow
the guidelines below for maximum enjoyment from your CD collec-
tion and player.
zDo not write on either side of the disc, particularly the non-label
side from which signals are read. Do not mark this surface.
zKeep your discs away from direct sunlight, heat, and excessive
moisture.
zAlways hold the CDs by the edges. Fingerprints, dirt, or water on
the CDs can cause noise or mistracking. If a CD is dirty or does
not play properly, clean it with a soft, dry cloth, wiping straight out
from the center, along the radius.
X-BASS (SURROUND)
/DEMO
NOYES
Correct
40
XL-MP150
References
Maintenance
Cleaning the tape-handling parts
zDirty heads, capstans or pinch rollers can cause poor sound and
tape jams. Clean these parts with a cotton swab moistened with
commercial head/pinch roller cleaner or isopropyl alcohol.
zWhen cleaning the heads, pinch rollers, etc., unplug the unit which
contains high voltages.
zAfter long use, the deck's heads and capstans may become mag-
netized, causing poor sound. Demagnetize these parts once
every 30 hours of playing/recording time by using a commercial
tape head demagnetizer. Read the demagnetizer's instructions
carefully before use.
Cleaning the CD pickup lens
In order to ensure proper operation of the CD player, preventative
maintenance (cleaning of the laser pickup lens) should be per-
formed periodically. Lens cleaners are commercially available. Con-
tact your local CD software dealer for options.
Cleaning the cabinet
Periodically wipe the cabinet with a soft cloth and a diluted soap
solution, then with a dry cloth.
Caution:
zDo not use chemicals for cleaning (gasoline, paint thinner, etc.). It
may damage the cabinet finish.
zDo not apply oil to the inside of the unit. It may cause malfunc-
tions.
Pinch rollersErase head
CapstansRecording/Playback head
A
A
C
D
BB
41
XL-MP150
References
Specifications
As part of our policy of continuous improvement, SHARP reserves
the right to make design and specification changes for product
improvement without prior notice. The performance specification fig-
ures indicated are nominal values of production units. There may be
some deviations from these values in individual units.
General
Amplifier
CD player
Tuner
Cassette deck
Speaker
Power sourceAC 120 V, 60 Hz
Power
consumption
96 W
DimensionsWidth: 7-1/4" (185 mm)
Height: 10-1/4" (260 mm)
Depth: 12" (307 mm)
Weight13.9 lbs. (6.3 kg)
Output power110 watts minimum RMS per channel into 6
ohms from 100 Hz to 20 kHz, 10% total har-
monic distortion
Output terminalsSpeakers: 6 ohms
Headphones: 16 - 50 ohms
(recommended: 32 ohms)
Subwoofer pre-out (audio signal):
200 mV/10 k ohms at 70 Hz
Input terminalsVideo/Auxiliary (audio signal):
500 mV/47 k ohms
Type5-disc multi-play compact disc player
Signal readoutNon-contact, 3-beam semiconductor laser
pickup
D/A converter1-bit D/A converter
Frequency
response
20 - 20,000 Hz
Dynamic range90 dB (1 kHz)
Frequency rangeFM: 87.5 - 108 MHz
AM: 530 - 1,720 kHz
Frequency
response
50 - 14,000 Hz (normal tape)
Signal/noise ratio50 dB (recording/playback)
Wow and flutter0.3 % (WRMS)
Type2-way type light-up speaker system
2" (5 cm) tweeter
5-1/8" (13 cm) woofer
Maximum input
power
220 W
Rated input power110 W
Impedance6 ohms
DimensionsWidth: 7-1/4" (185 mm)
Height: 10-1/4" (260 mm)
Depth: 10-1/4" (260 mm)
Weight6.8 lbs. (3.1/ kg/each)
CONSUMER LIMITED WARRANTY
SHARP ELECTRONICS CORPORATION warrants to the first consumer purchaser that this Sharp brand product (the “Product”), when shipped in its original con-
tainer, will be free from defective workmanship and materials, and agrees that it will, at its option, either repair the defect or replace the defective Product or part thereof
with a new or remanufactured equivalent at no charge to the purchaser for parts or labor for the period(s) set forth below.
This warranty does not apply to any appearance items of the Product nor to the additional excluded item(s) set forth below nor to any Product the exterior of which has
been damaged or defaced, which has been subjected to improper voltage or other misuse, abnormal service or handling, or which has been altered or modified in
design or construction.
In order to enforce the rights under this limited warranty, the purchaser should follow the steps set forth below and provide proof of purchase to the servicer.
The limited warranty described herein is in addition to whatever implied warranties may be granted to purchasers by law. ALL IMPLIED WARRANTIES INCLUDING
THE WARRANTIES OF MERCHANTABILITY AND FITNESS FOR USE ARE LIMITED TO THE PERIOD(S) FROM THE DATE OF PURCHASE SET FORTH BELOW.
Some states do not allow limitations on how long an implied warranty lasts, so the above limitation may not apply to you.
Neither the sales personnel of the seller nor any other person is authorized to make any warranties other than those described herein, or to extend the duration of any
warranties beyond the time period described herein on behalf of Sharp.
The warranties described herein shall be the sole and exclusive warranties granted by Sharp and shall be the sole and exclusive remedy available to the purchaser.
Correction of defects, in the manner and for the period of time described herein, shall constitute complete fulfillment of all liabilities and responsibilities of Sharp to the
purchaser with respect to the Product, and shall constitute full satisfaction of all claims, whether based on contract, negligence, strict liability or otherwise. In no event
shall Sharp be liable, or in any way responsible, for any damages or defects in the Product which were caused by repairs or attempted repairs performed by anyone
other than an authorized servicer. Nor shall Sharp be liable or in any way responsible for any incidental or consequential economic or property damage. Some states
do not allow the exclusion of incidental or consequential damages, so the above exclusion may not apply to you.
THIS WARRANTY GIVES YOU SPECIFIC LEGAL RIGHTS. YOU MAY ALSO HAVE OTHER RIGHTS WHICH VARY FROM STATE TO STATE.
Model Specific Section
Your Product Model Number & Description:
(Be sure to have this information available when you need service for your Product.)
Warranty Period for this Product:One (1) year parts and labor from the date of purchase.
Additional Item(s) Excluded from Warranty Coverage (if any):Non-functional accessories, supplies, and consumable items.
Where to Obtain Service:At a Sharp Authorized Servicer located in the United States.
To find a location of the nearest Sharp Authorized Servicer, call Sharp toll free at 1-800-BE-SHARP.
What to do to Obtain Service:Ship prepaid or carry in your Product to a Sharp Authorized Servicer.
Be sure to have Proof of Purchase available. If you ship the Product, be sure it is insured and
packaged securely.
TO OBTAIN SUPPLY, ACCESSORY OR PRODUCT INFORMATION, CALL 1-800-BE-SHARP.
0311
Printed in Malaysia
TINSEA081AWZZ
04L R AS 1
SHARP ELECTRONICS CORPORATION
Sharp Plaza, Mahwah, New Jersey 07430-2135
SHARP CORPORATION
CONSUMER LIMITED WARRANTY
SHARP ELECTRONICS CORPORATION warrants to the first consumer purchaser that this Sharp brand product (the "Product"), when shipped in its original con-
tainer, will be free from defective workmanship and materials, and agrees that it will, at its option, either repair the defect or replace the defective Product or part thereof
with a new or remanufactured equivalent at no charge to the purchaser for parts or labor for the period(s) set forth below.
This warranty does not apply to any appearance items of the Product nor to the additional excluded item(s) set forth below nor to any Product the exterior of which has
been damaged or defaced, which has been subjected to improper voltage or other misuse, abnormal service or handling, or which has been altered or modified in
design or construction.
In order to enforce the rights under this limited warranty, the purchaser should follow the steps set forth below and provide proof of purchase to the servicer.
The limited warranty described herein is in addition to whatever implied warranties may be granted to purchasers by law. ALL IMPLIED WARRANTIES INCLUDING
THE WARRANTIES OF MERCHANTABILITY AND FITNESS FOR USE ARE LIMITED TO THE PERIOD(S) FROM THE DATE OF PURCHASE SET FORTH BELOW.
Some states do not allow limitations on how long an implied warranty lasts, so the above limitation may not apply to you.
Neither the sales personnel of the seller nor any other person is authorized to make any warranties other than those described herein, or to extend the duration of any
warranties beyond the time period described herein on behalf of Sharp.
The warranties described herein shall be the sole and exclusive warranties granted by Sharp and shall be the sole and exclusive remedy available to the purchaser.
Correction of defects, in the manner and for the period of time described herein, shall constitute complete fulfillment of all liabilities and responsibilities of Sharp to the
purchaser with respect to the Product, and shall constitute full satisfaction of all claims, whether based on contract, negligence, strict liability or otherwise. In no event
shall Sharp be liable, or in any way responsible, for any damages or defects in the Product which were caused by repairs or attempted repairs performed by anyone
other than an authorized servicer. Nor shall Sharp be liable or in any way responsible for any incidental or consequential economic or property damage. Some states
do not allow the exclusion of incidental or consequential damages, so the above exclusion may not apply to you.
THIS WARRANTY GIVES YOU SPECIFIC LEGAL RIGHTS. YOU MAY ALSO HAVE OTHER RIGHTS WHICH VARY FROM STATE TO STATE.
Model Specific Section
Your Product Model Number & Description:
(Be sure to have this information available when you need service for your Product.)
Warranty Period for this Product
:One (1) year parts and labor from the date of purchase.
Additional Item(s) Excluded from Warranty Coverage (if any):
Non-functional accessories, supplies, and consumable items.
Where to Obtain Service:
At a Sharp Authorized Servicer located in the United States.
To find a location of the nearest Sharp Authorized Servicer, call Sharp toll free at 1-800-BE-SHARP.
What to do to Obtain Service:
Ship prepaid or carry in your Product to a Sharp Authorized Servicer.
Be sure to have Proof of Purchase available. If you ship the Product, be sure it is insured and
packaged securely.
TO OBTAIN SUPPLY, ACCESSORY OR PRODUCT INFORMATION, CALL 1-800-BE-SHARP.
Gebruikershandleiding.com neemt misbruik van zijn services uitermate serieus. U kunt hieronder aangeven waarom deze vraag ongepast is. Wij controleren de vraag en zonodig wordt deze verwijderd.
Product:
Spelregels forum
Om tot zinvolle vragen te komen hanteren wij de volgende spelregels:
lees eerst de handleiding door;
controleer of uw vraag al eerder door iemand anders is gesteld;
probeer uw vraag zo duidelijk mogelijk te stellen;
heeft u een probleem en al geprobeerd om dit op te lossen, vermeld dit erbij aub;
heeft u een oplossing gekregen van een bezoeker dan horen wij dat graag in dit forum;
wilt u een reactie geven op een vraag of antwoord, gebruik dan niet dit formulier maar klik op de knop 'reageer op deze vraag';
uw vraag wordt direct op de website gezet; vermijd daarom persoonlijke gegevens in te vullen;
Belangrijk! Als er een antwoord wordt gegeven op uw vraag, dan is het voor de gever van het antwoord nuttig om te weten als u er wel (of niet) mee geholpen bent! Wij vragen u dus ook te reageren op een antwoord.
Belangrijk! Antwoorden worden ook per e-mail naar abonnees gestuurd. Laat uw emailadres achter op deze site, zodat u op de hoogte blijft. U krijgt dan ook andere vragen en antwoorden te zien.
Abonneren
Abonneer u voor het ontvangen van emails voor uw Sharp XLMP150 bij:
nieuwe vragen en antwoorden
nieuwe handleidingen
U ontvangt een email met instructies om u voor één of beide opties in te schrijven.
Ontvang uw handleiding per email
Vul uw emailadres in en ontvang de handleiding van Sharp XLMP150 in de taal/talen: Engels als bijlage per email.
De handleiding is 2,48 mb groot.
U ontvangt de handleiding per email binnen enkele minuten. Als u geen email heeft ontvangen, dan heeft u waarschijnlijk een verkeerd emailadres ingevuld of is uw mailbox te vol. Daarnaast kan het zijn dat uw internetprovider een maximum heeft aan de grootte per email. Omdat hier een handleiding wordt meegestuurd, kan het voorkomen dat de email groter is dan toegestaan bij uw provider.
Stel vragen via chat aan uw handleiding
Stel uw vraag over deze PDF
Uw handleiding is per email verstuurd. Controleer uw email
Als u niet binnen een kwartier uw email met handleiding ontvangen heeft, kan het zijn dat u een verkeerd emailadres heeft ingevuld of dat uw emailprovider een maximum grootte per email heeft ingesteld die kleiner is dan de grootte van de handleiding.
Er is een email naar u verstuurd om uw inschrijving definitief te maken.
Controleer uw email en volg de aanwijzingen op om uw inschrijving definitief te maken
U heeft geen emailadres opgegeven
Als u de handleiding per email wilt ontvangen, vul dan een geldig emailadres in.
Uw vraag is op deze pagina toegevoegd
Wilt u een email ontvangen bij een antwoord en/of nieuwe vragen? Vul dan hier uw emailadres in.