17286
74
Verklein
Vergroot
Pagina terug
1/384
Pagina verder
72
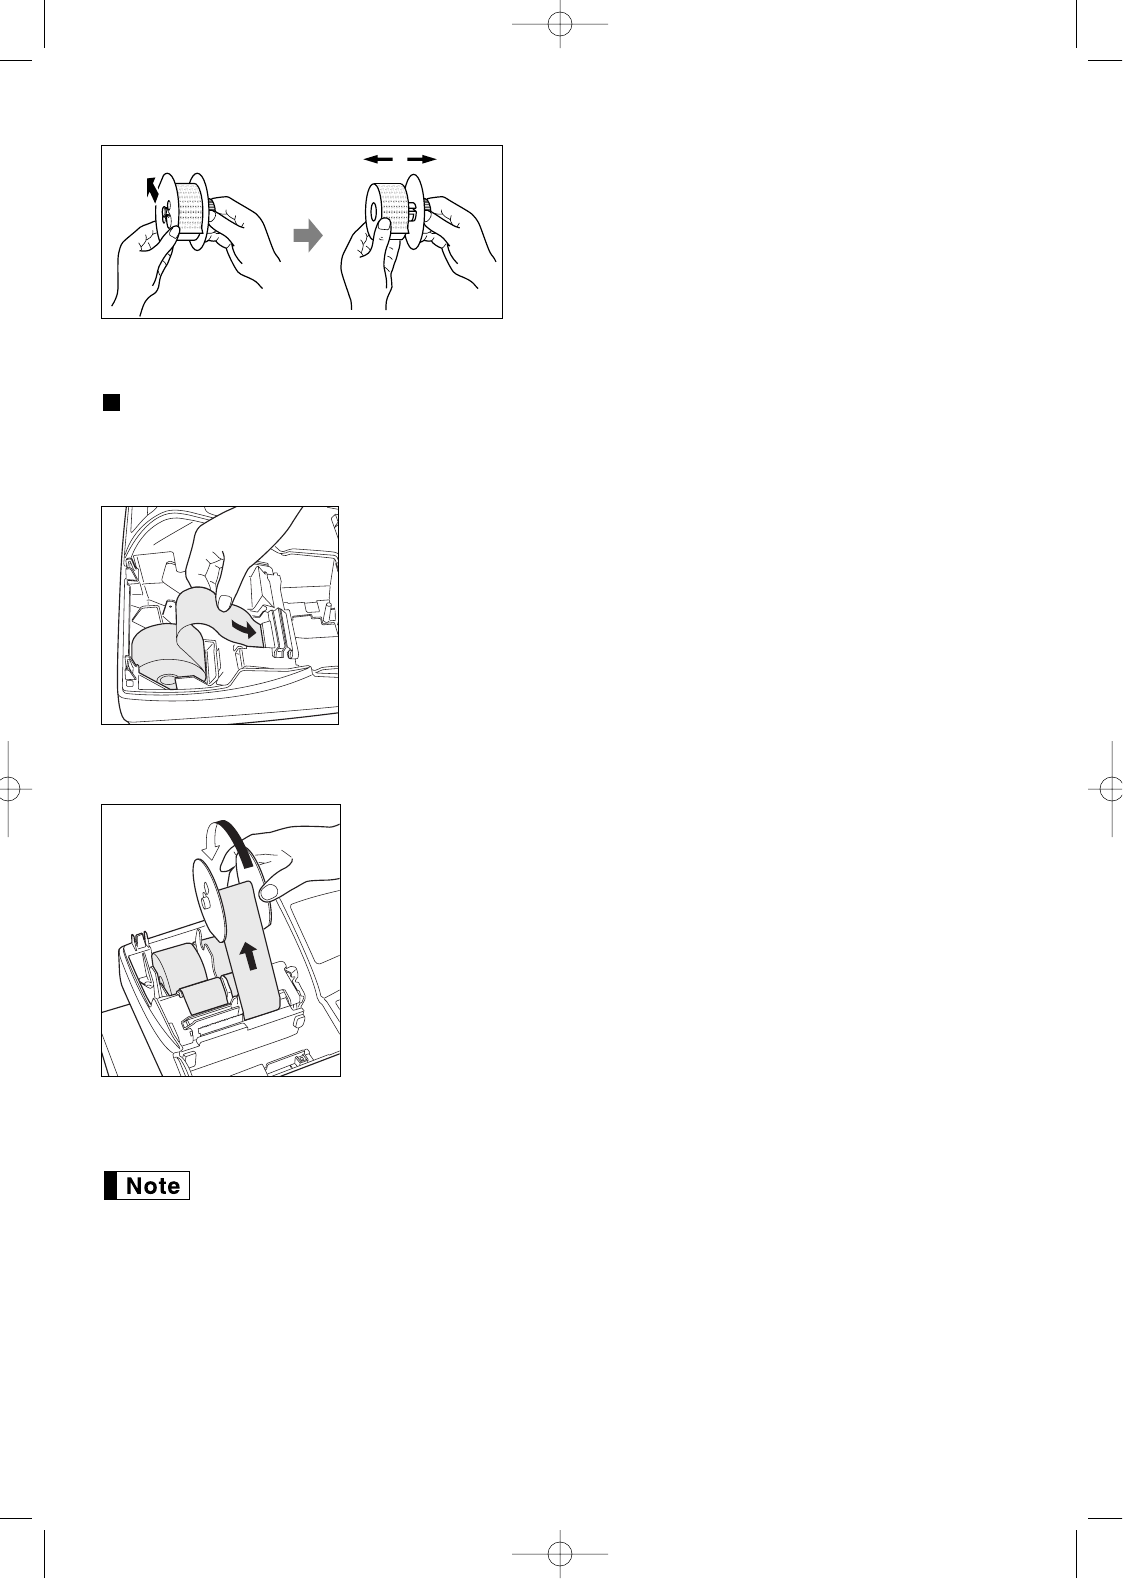
8. Remove the outer side of the take-up spool as shown
on the left.
9. Remove the printed journal roll from the take-up spool.
Installing the paper roll
Caution: The paper cutter is mounted on the printer (receipt side). Be careful not to cut yourself.
Installing the receipt paper roll:
1. Turn the mode switch to the REG position with the power cord connected.
2. Remove the printer cover.
3. Check that the print head release lever is in the printing position.
4. Set the paper correctly in the paper roll cradle of the receipt side.
5. Insert the end of the paper into the paper chute of the printer until it is caught
by the printer auto-feed and comes out of the top of the printer.
If the printer does not catch the paper, feed the paper while pressing the
{
key.
6. Cut off the excess paper using the paper cutter, and replace the printer
cover.
Installing the journal paper roll:
1. Turn the mode switch to the REG position with the power cord connected.
2. Remove the printer cover.
3. Check that the print head release lever is in the printing position.
4. Set the paper correctly in the paper roll cradle of the journal side.
5. Insert the end of the paper into the paper chute of the printer until it is caught
by the printer auto-feed and comes out of the top of the printer.
If the printer does not catch the paper, feed the paper while pressing the
}
key.
6. Insert the end of the paper into the slit in the paper spool. (Press the
}
key to feed more paper if required.)
7. Wind the paper two or three turns around the spool shaft.
8. Set the spool on the bearing, and press the
}
key to take up excess slack
in the paper.
9. Replace the printer cover.
When you want to manually install a new roll of paper while the machine is turned off, follow the
steps shown below:
1. Pull the print head release lever toward you (to the head-up position). (Refer to the diagram on page 70.)
2. Correctly place the new paper roll into the paper roll cradle of the receipt/journal side.
3. Insert the paper end into the printer until it comes out of the printer.
4. Cut or roll the paper onto the take-up spool as described above.
5. Return the print head release lever to its original position.
A301_5(En) 03.4.24 7:45 PM Page 72
74

Hulp nodig? Stel uw vraag in het forum

Spelregels
1

Forum

Sharp-XEA301

Zoeken resetten

Misbruik melden

Gebruikershandleiding.com neemt misbruik van zijn services uitermate serieus. U kunt hieronder aangeven waarom deze vraag ongepast is. Wij controleren de vraag en zonodig wordt deze verwijderd.

Product:

Bijvoorbeeld antisemitische inhoud, racistische inhoud, of materiaal dat gewelddadige fysieke handelingen tot gevolg kan hebben.

Bijvoorbeeld een creditcardnummer, een persoonlijk identificatienummer, of een geheim adres. E-mailadressen en volledige namen worden niet als privégegevens beschouwd.

Spelregels forum

Om tot zinvolle vragen te komen hanteren wij de volgende spelregels:

Belangrijk! Als er een antwoord wordt gegeven op uw vraag, dan is het voor de gever van het antwoord nuttig om te weten als u er wel (of niet) mee geholpen bent! Wij vragen u dus ook te reageren op een antwoord.

Belangrijk! Antwoorden worden ook per e-mail naar abonnees gestuurd. Laat uw emailadres achter op deze site, zodat u op de hoogte blijft. U krijgt dan ook andere vragen en antwoorden te zien.

Abonneren

Abonneer u voor het ontvangen van emails voor uw Sharp XEA301 bij:


U ontvangt een email met instructies om u voor één of beide opties in te schrijven.


Ontvang uw handleiding per email

Vul uw emailadres in en ontvang de handleiding van Sharp XEA301 in de taal/talen: Nederlands, Duits, Engels, Frans als bijlage per email.

De handleiding is 4,87 mb groot.


U ontvangt de handleiding per email binnen enkele minuten. Als u geen email heeft ontvangen, dan heeft u waarschijnlijk een verkeerd emailadres ingevuld of is uw mailbox te vol. Daarnaast kan het zijn dat uw internetprovider een maximum heeft aan de grootte per email. Omdat hier een handleiding wordt meegestuurd, kan het voorkomen dat de email groter is dan toegestaan bij uw provider.

Stel vragen via chat aan uw handleiding

Stel uw vraag over deze PDF

loading

Andere handleiding(en) van Sharp XEA301

Sharp XEA301 Gebruiksaanwijzing - Deutsch - 80 pagina's

Sharp XEA301 Gebruiksaanwijzing - English - 80 pagina's

Sharp XEA301 Gebruiksaanwijzing - Espanõl - 80 pagina's


Uw handleiding is per email verstuurd. Controleer uw email

Als u niet binnen een kwartier uw email met handleiding ontvangen heeft, kan het zijn dat u een verkeerd emailadres heeft ingevuld of dat uw emailprovider een maximum grootte per email heeft ingesteld die kleiner is dan de grootte van de handleiding.

Er is een email naar u verstuurd om uw inschrijving definitief te maken.

Controleer uw email en volg de aanwijzingen op om uw inschrijving definitief te maken

U heeft geen emailadres opgegeven

Als u de handleiding per email wilt ontvangen, vul dan een geldig emailadres in.

Uw vraag is op deze pagina toegevoegd

Wilt u een email ontvangen bij een antwoord en/of nieuwe vragen? Vul dan hier uw emailadres in.


Info