In Box .......................................................................................................................................................................................8
Turning Phone On or O .........................................................................................................................................................13
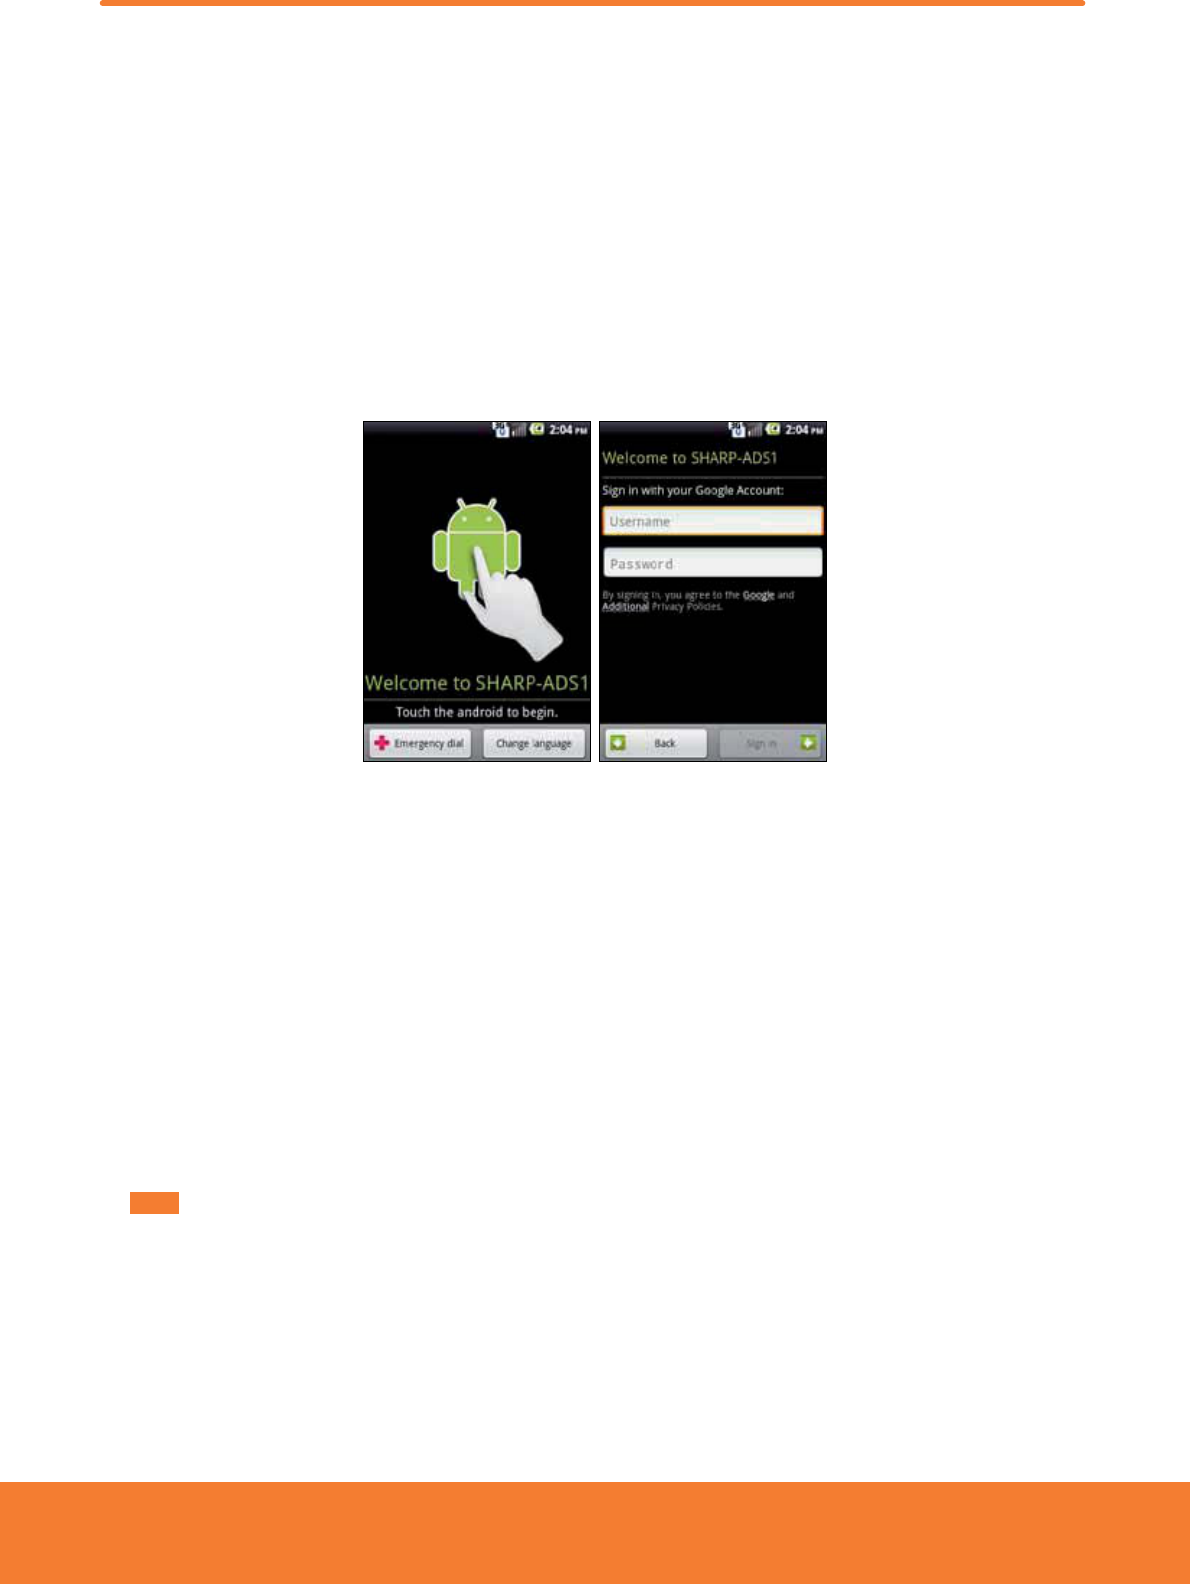
Entering Your PIN ....................................................................................................................................................................13
Using the QWERTY Keyboard .................................................................................................................................................15
Using the Onscreen Keyboard ................................................................................................................................................16
Using the Android Keyboard ..................................................................................................................................................16
Using Swype Text Entry Method ............................................................................................................................................18
Editing Text .............................................................................................................................................................................21
Google Account ......................................................................................................................................................................22
Getting to Know the Home Screen .........................................................................................................................................24
Customizing the Home Screen ...............................................................................................................................................25
Opening and Switching Between Applications ......................................................................................................................29
Searching Your Phone and the Web .......................................................................................................................................32
Connecting Your Phone to a Computer ...................................................................................................................................33
Making Calls ...........................................................................................................................................................................34
Answering or Rejecting Calls ..................................................................................................................................................36
Using In-Call Options ..............................................................................................................................................................37
Using Call Log .........................................................................................................................................................................39
Listening to Your Voicemail ....................................................................................................................................................41
Dialing by Voice ......................................................................................................................................................................41
About Contacts .......................................................................................................................................................................42
Opening Your Contacts ...........................................................................................................................................................42
Getting Started .......................................................................................................................................................................42
Groups ....................................................................................................................................................................................50
About Messaging ...................................................................................................................................................................52
Google Talk .............................................................................................................................................................................59
Latitude ..................................................................................................................................................................................68
Bluetooth .....................................................................................................................................88
Using Bluetooth .....................................................................................................................................................................88
Disconnecting or Unpairing from a Bluetooth Device ............................................................................................................89
Connecting to a Bluetooth Headset .......................................................................................................................................89
Sending and Receiving Information Using Bluetooth ............................................................................................................90
Entertainment ..............................................................................................................................91
Music Player ...........................................................................................................................................................................96
My Files.................................................................................................................................................................................101
Live TV ..................................................................................................................................................................................106
Settings on Your Phone ........................................................................................................................................................108
USB Tethering for Windows Computer .................................................................................................................................112
USB Networking for Mac® ....................................................................................................................................................113
Safety Information .....................................................................................................................117
Safety Information for Wireless Handheld Phones ...............................................................................................................117
Hearing AID Compatibility with Mobile Phones ...................................................................................................................119
Safety Information for FCC RF Exposure ...............................................................................................................................119
SAR Information ...................................................................................................................................................................120
FDA Consumer Update..........................................................................................................................................................121
Compliance with Other FCC Regulations ..............................................................................................................................126
General Safety ......................................................................................................................................................................126
Games ..................................................................................................................................................................................128
Recycle Your Cell Phone! .......................................................................................................................................................129
FCC Compliance Information ................................................................................................................................................130
If you create a new folder, you can drag icons into the folder to organize them.
Wallpapers
You can choose from your Gallery photos , Live wallpapers or static Wallpapers to change the display
background.
Moving an item on the Home screen
1. From the Home screen, tap and hold the item you want to move until it vibrates. Don’t lift your nger.
2. Drag the item to a new location on the Home screen.
3. Lift your nger at the location where you want the item.
To add a shortcut to any application from the Launcher, tap
Apps, tap and hold the item, then drag it o the Launcher
and onto a Home screen.
Removing an item from the Home screen
1. From the Home screen, tap and hold an item until it vibrates. Don’t lift your nger. The Dock menu changes into the .
2. Drag the item to the
.
3. When the item turns red, lift your nger.
Changing the Wallpaper of the Home screen
1. From the Home screen, press Menu >Wallpaper. Or just tap and hold any empty area on a Home screen >
Wallpapers.
2. Tap one of the following:
Gallery
Choose a photo from your camera gallery or memory card storage. You can crop the image before setting it
as the wallpaper.
Live wallpapers
Choose from pre-loaded animated wallpapers. Additional live wallpapers can be downloaded from the
Google Marketplace.
Wallpapers
Choose from the pre-loaded animated or static wallpapers. Additional wallpapers can be downloaded from
the Google Marketplace.
3. Tap Save or Set wallpaper.
25
Renaming a folder
1. Tap the folder to open it.
2. Tap and hold the title bar of the folder window.
3. Enter a new name in the dialog box that appears, and then tap
OK.
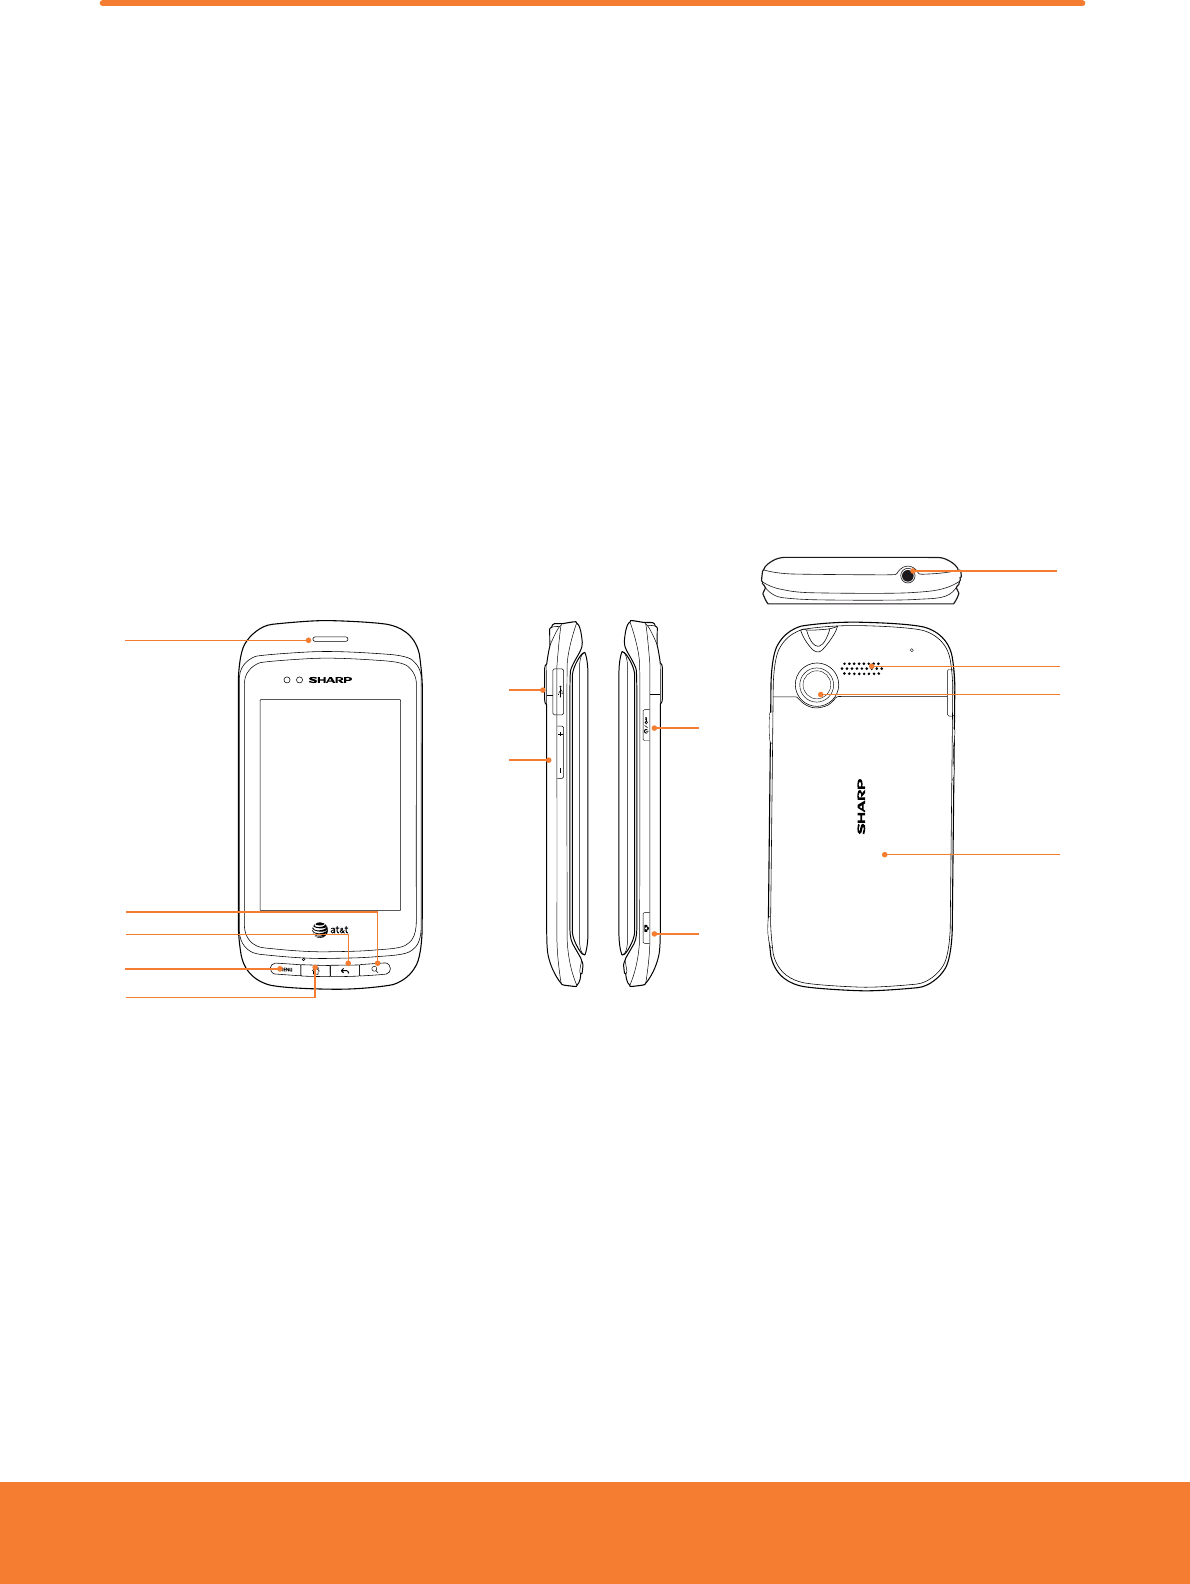
Essential Display Icons
Status icons
You can tell a lot about your phone when you understand the icons in the Status bar. Here’s what each one means:
Signal strength
No signal
Airplane mode
GPRS connected
GPRS data downlink active
GPRS data uplink & downlink active
EDGE connected
EDGE data downlink active
EDGE data uplink & downlink active
3G connected
3G data downlink active
3G data uplink & downlink active
3G voice connection only (WiFi data in use)
3G (HSDPA) connected
3G (HSDPA) data uplink & downlink active
3G (HSDPA) voice connection only (WiFi data in use)
Data synchronizing
Synchronization error
Wi-Fi is on but not connected
Connected to a Wi-Fi network
TTY connected
Battery is full
Battery is charging
~
Remaining battery life
No battery
Unknown battery
Silent mode-no audio or vibration
Vibrate only mode
Speakerphone is on
Wired headset connected
Bluetooth is on
GPS is on and active
Bluetooth device connected
Tethering or USB connected
26
Notification icons
Notication icons in the Status bar alert you to items that may require your attention such as new messages, calendar
event reminders, missed call notications, etc. Here’s what each one means:
Call in progressDownloading data
Call using a Bluetooth headsetUploading data (animated)
Call on hold
General Alert Icon
Call forwarding is activeUSB debugging connected
Missed callNo microSD card installed
Connected to a computer via USB cable
MicroSD card is being prepared
Storage card memory is low.
Microphone is muted
More (not displayed) notications
Alarm is set
Network sharing is onWi-Fi is on and wireless networks are available
New Google Talk instant message
Bluetooth Sharing is on
New voicemailAT&T Hotspot connected
New messageUpdates available (Market)
New GmailTwitter sync
New Email
27
Notifications Panel
When you receive a new notication, an icon will be displayed in your status bar at the top of your screen.
Viewing and responding to Notifications
1. Tap and hold Status bar, and then slide your nger downward to open the Notications panel.
2. If you have multiple notications, you may need to scroll to see them all.
3. Tap a notication to respond to it.
Closing the Notifications panel
Drag the bottom bar of the panel up. Or just press Back.
28
Opening and Switching Between Applications
The Launcher, which you open from the Home screen, shows the icons of all installed applications on your phone.
Opening and closing the Launcher
1. To open, from the Home screen, tap Apps.
2. To close, press
Home or Back.
Switching to a recently used application
1. From any screen, press and holdHome.
2. Tap an icon to open the application or press
Back to return to your previous screen.
29
Sleep Mode
Sleep mode saves battery power by turning o your display. You will still receive messages and calls when the display is
turned o.
Switching to Sleep mode
Press Power/Lock to switch your phone to Sleep mode.
Your phone automatically turns o the display after a period of inactivity. To customize the screen timeout settings, from
the Home screen, tap
Apps > Settings > Display > Screen timeout.
Waking up from Sleep mode
Your phone automatically wakes up when you have an incoming call.
To wake it up manually, slide open the QWERTY keyboard or press
Power/Lock, Back, Menu, Home
or
Search.You’ll need to unlock the screen as described below.
Unlocking the screen
On the lock screen, tap the unlock icon and slide your nger in the direction of the arrows to unlock the screen.
The screen unlocks automatically when you answer an incoming call.
NOTE
If you have set up a screen unlock pattern, pin, or password, you will be asked to draw the pattern on the screen or enter the PIN or password to access
the phone software.
Activating Secure Screen Lock
1. From the Home screen, tap Apps > Settings. Or press Menu > Settings.
2. Tap
Location & security > Set up screen lock.
ⰺ
If you have already congured the screen lock, tap
Change screen lock to change how to lock or unlock your screen.
3. Tap
Pattern, PIN, or Password. And then, enter a custom pattern, PIN or password as prompted.
ⰺ
If you select ‘None’, screen unlock security is cancelled.
30
Adjusting Volume
Ringtone and Media volume are independent of each other and adjusted separately.
Adjusting the ringer volume
From the Home screen, press Volume up or Volume down on the left side of the phone to adjust the ringer volume
to your desired level.
ⰺ
While in the lowest ringer volume level, press
Volume down once to set your phone to Vibrate mode. Press Volume
down
again to set your phone to Silent mode.
ⰺ
While in the Silent mode, press
Volume up once to switch to Vibrate mode. Press Volume up again to switch to
ringtone mode.
Adjusting the media volume
While playing music, watching a video or using preloaded or downloaded games or applications, press Volume up or
Volume down on the left panel of the phone to adjust the media volume.
Adjusting the earpiece volume for phone calls
During a phone call, press Volume up or Volume down.
Adjusting the volume via Settings menu
1. From the Home screen, tap Apps > Settings. Or press Menu > Settings.
2. Tap
Sound > Volume.
3. Drag the volume sliders left or right to adjust your phone’s Ringtone, Media, and Alarm. Your phone plays a sample tone at
the selected volume level while you drag the slider.
NOTE
If you uncheck the option to use call volume for notications, you can set the notication ringtone volume independently.
4. When you’re done, tap OK.
31
Searching Your Phone and the Web
The search key is a powerful part of the Sharp FX PLUS’s software and enables you to quickly locate les, contacts, and
applications. You can also search the web using your favorite web search service.
1. Press
Search. Or tap Apps > Google Search.
2. Begin entering text, or tap a previously used search term.
ⰺ
As you enter the text, matching items on your phone and suggestions from Google web search will appear on the
screen.
3. Tap a suggestion to go directly to that result.
13
4
2
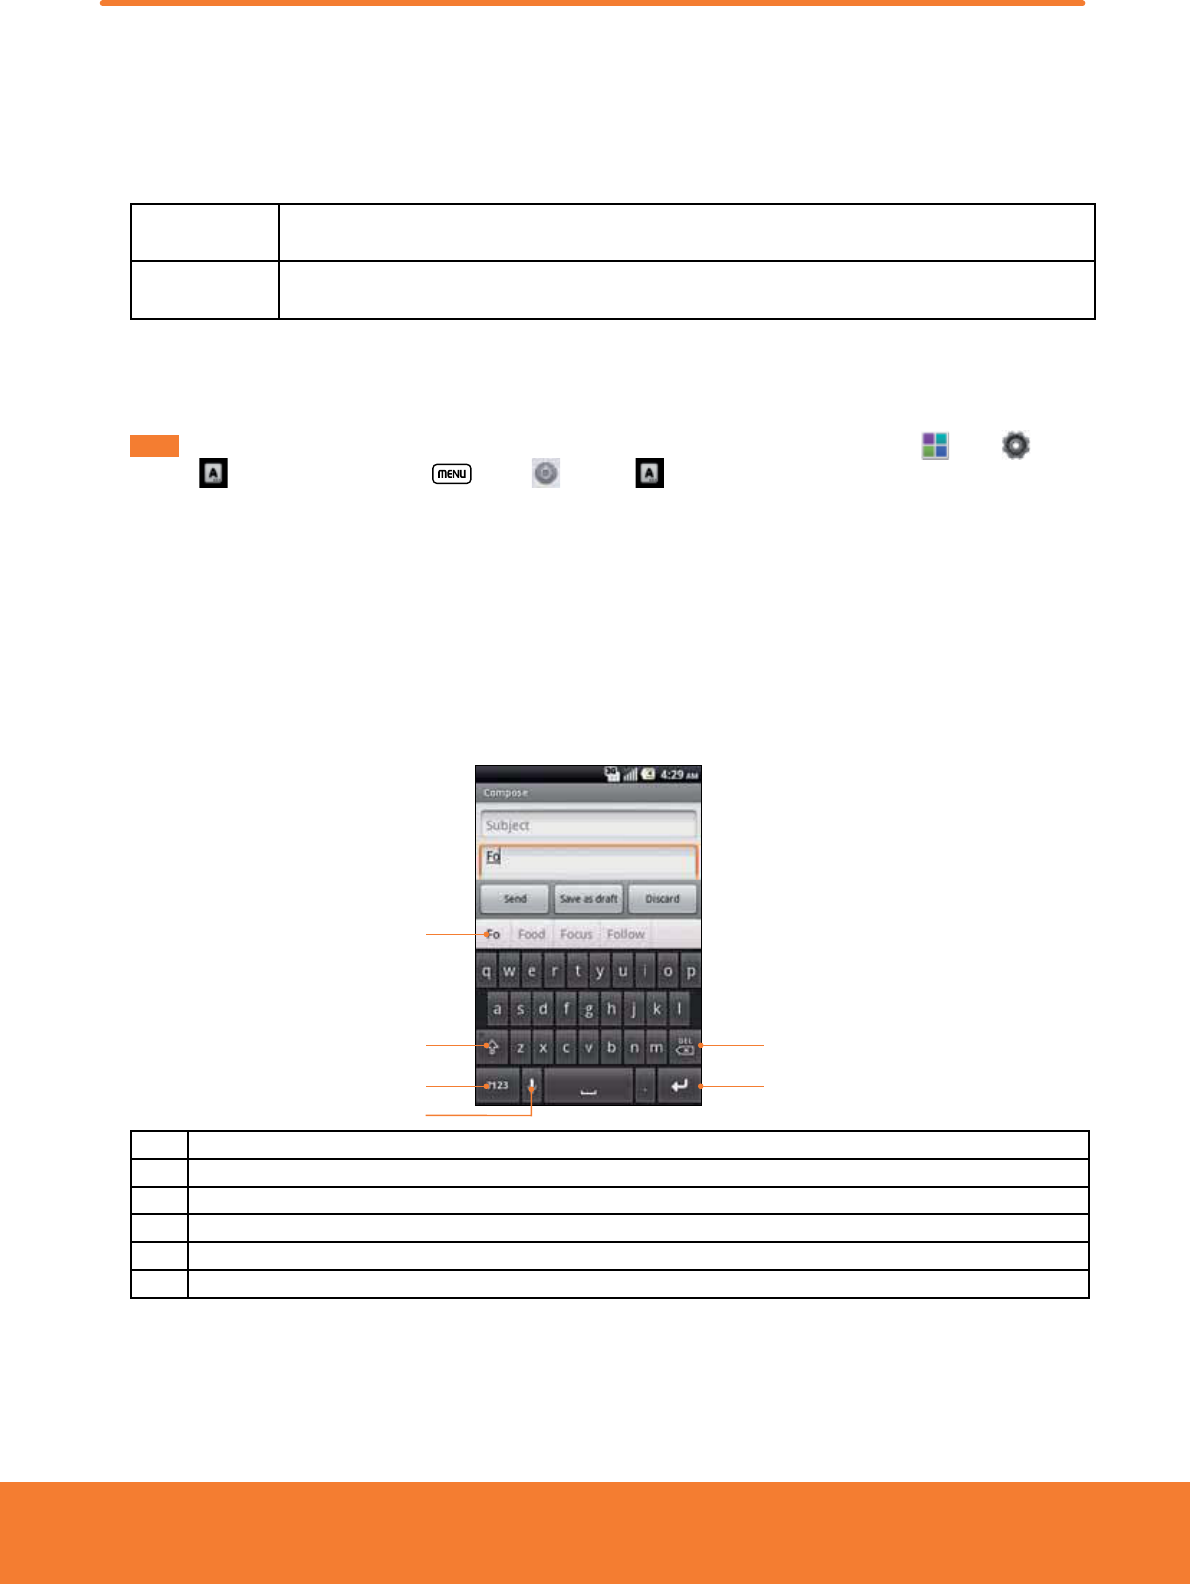
1Tap to change the target of your search location(All, Web, Apps or Contacts).
2Type in your search criteria.
3Tap to search by voice.
4Suggested similar or previous searches.
Setting search options
1. Press Search.
2. Press
Menu > Search settings.
3. Tap any of the following:
WebGoogle searchShow web suggestions, Use My Location, Search history,Manage search history.
PhoneSearchable itemsOpens list of searchable locations on your phone.
Clear shortcutsErases the list of previously chosen search suggestions.
Using Voice search
1. Press and hold Search.
Or tap the
in the Google search box or in the Browser’s URL box.
2. Speak what you want to search for.
3. Searched words with similar pronunciations are listed. If you select a desired search result, the Google result appears with
the corresponding keyword.
ⰺ
If you speak inaccurately, the desired keyword may not appear.
32
Connecting Your Phone to a Computer
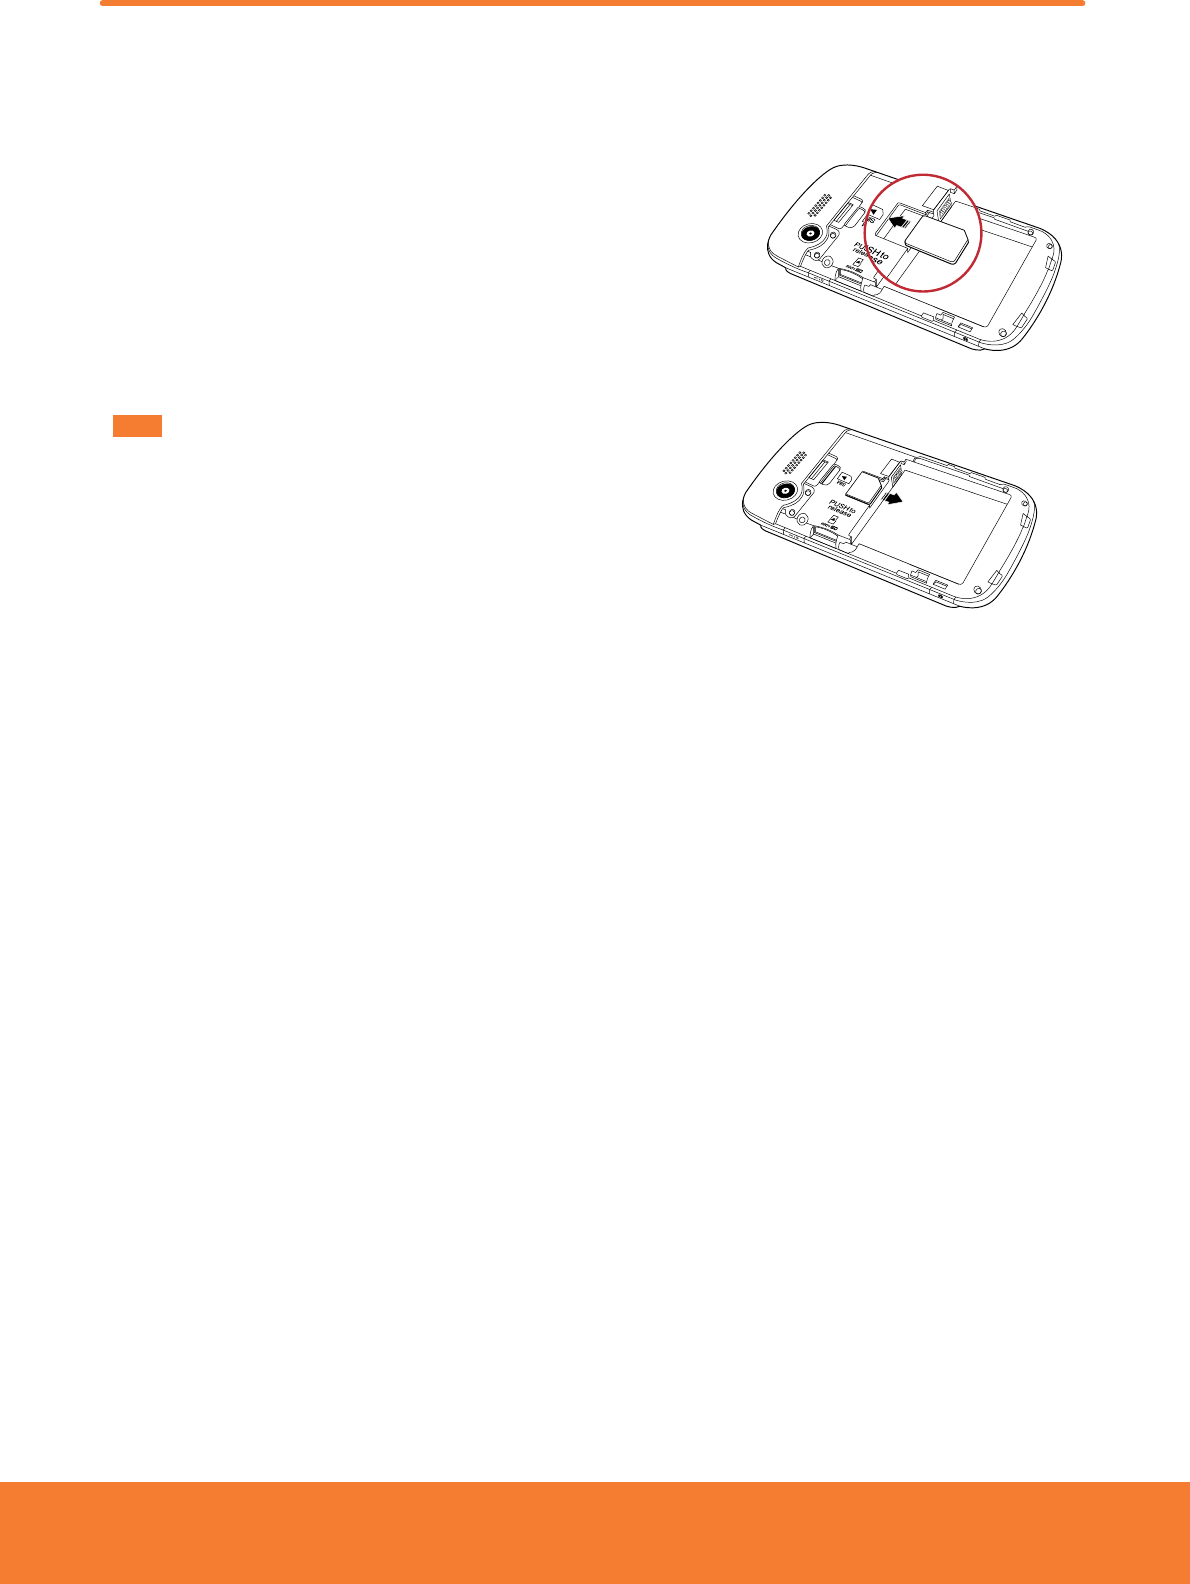
Copying files to/from the microSD card
You can copy your music, photos, and other les to the microSD card of your phone.
Gebruikershandleiding.com neemt misbruik van zijn services uitermate serieus. U kunt hieronder aangeven waarom deze vraag ongepast is. Wij controleren de vraag en zonodig wordt deze verwijderd.
Product:
Spelregels forum
Om tot zinvolle vragen te komen hanteren wij de volgende spelregels:
lees eerst de handleiding door;
controleer of uw vraag al eerder door iemand anders is gesteld;
probeer uw vraag zo duidelijk mogelijk te stellen;
heeft u een probleem en al geprobeerd om dit op te lossen, vermeld dit erbij aub;
heeft u een oplossing gekregen van een bezoeker dan horen wij dat graag in dit forum;
wilt u een reactie geven op een vraag of antwoord, gebruik dan niet dit formulier maar klik op de knop 'reageer op deze vraag';
uw vraag wordt direct op de website gezet; vermijd daarom persoonlijke gegevens in te vullen;
Belangrijk! Als er een antwoord wordt gegeven op uw vraag, dan is het voor de gever van het antwoord nuttig om te weten als u er wel (of niet) mee geholpen bent! Wij vragen u dus ook te reageren op een antwoord.
Belangrijk! Antwoorden worden ook per e-mail naar abonnees gestuurd. Laat uw emailadres achter op deze site, zodat u op de hoogte blijft. U krijgt dan ook andere vragen en antwoorden te zien.
Abonneren
Abonneer u voor het ontvangen van emails voor uw Sharp FX Plus bij:
nieuwe vragen en antwoorden
nieuwe handleidingen
U ontvangt een email met instructies om u voor één of beide opties in te schrijven.
Ontvang uw handleiding per email
Vul uw emailadres in en ontvang de handleiding van Sharp FX Plus in de taal/talen: Engels als bijlage per email.
De handleiding is 3,56 mb groot.
U ontvangt de handleiding per email binnen enkele minuten. Als u geen email heeft ontvangen, dan heeft u waarschijnlijk een verkeerd emailadres ingevuld of is uw mailbox te vol. Daarnaast kan het zijn dat uw internetprovider een maximum heeft aan de grootte per email. Omdat hier een handleiding wordt meegestuurd, kan het voorkomen dat de email groter is dan toegestaan bij uw provider.
Stel vragen via chat aan uw handleiding
Stel uw vraag over deze PDF
Uw handleiding is per email verstuurd. Controleer uw email
Als u niet binnen een kwartier uw email met handleiding ontvangen heeft, kan het zijn dat u een verkeerd emailadres heeft ingevuld of dat uw emailprovider een maximum grootte per email heeft ingesteld die kleiner is dan de grootte van de handleiding.
Er is een email naar u verstuurd om uw inschrijving definitief te maken.
Controleer uw email en volg de aanwijzingen op om uw inschrijving definitief te maken
U heeft geen emailadres opgegeven
Als u de handleiding per email wilt ontvangen, vul dan een geldig emailadres in.
Uw vraag is op deze pagina toegevoegd
Wilt u een email ontvangen bij een antwoord en/of nieuwe vragen? Vul dan hier uw emailadres in.