●CAUTIONS ON USING..................................................................................................................................... 6
INDEX .............................................................. 83
6
CAUTIONS
Follow the cautions below when using this machine.
CAUTIONS ON USING
Warning:
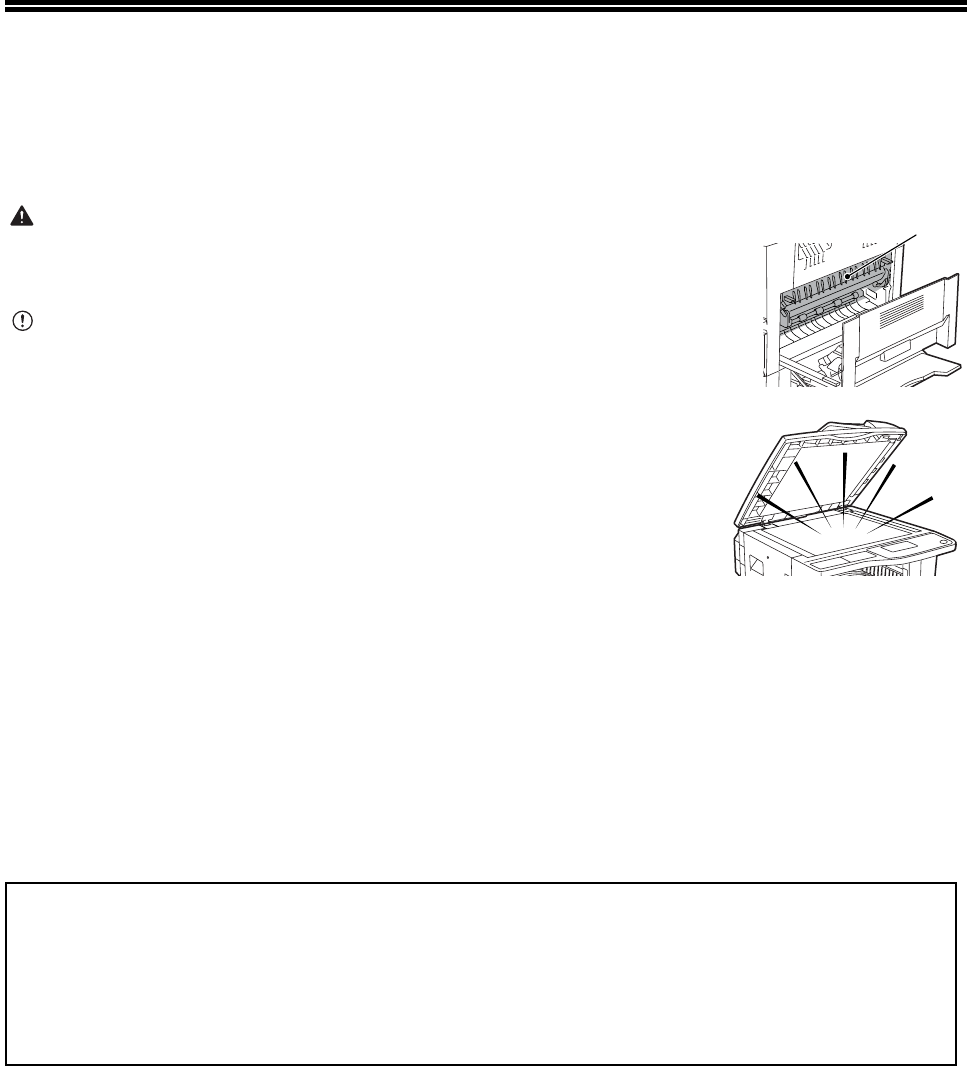
•The fusing area is hot. Exercise care in this area when removing misfed paper.
•Do not look directly at the light source. Doing so may damage your eyes.
Caution:
•Do not switch the machine rapidly on and off. After turning the machine off, wait 10
to 15 seconds before turning it back on.
•Place the machine on a firm, level surface.
•When the machine is not used for a long time, for example, during prolonged
holidays, turn the power switch off and remove the power cord from the outlet.
•When moving the machine, be sure to turn the power switch off and remove the
power cord from the outlet.
•Do not cover the machine with a dust cover, cloth or plastic film while the power is
on. Doing so may prevent heat dissipation, damaging the machine.
•Do not make any modifications to this machine. Doing so may result in personal
injury or damage to the machine.
•Do not make copies of anything which is prohibited from copying by law. The
following items are normally prohibited from printing by national law. Other items
may be prohibited by local law.
• Money • Stamps • Bonds • Stocks
• Bank drafts • Checks • Passports • Driver's licenses
•Do not touch the photoconductive drum. Scratches or smudges on the drum will
cause dirty prints.
•Store spare toner cartridges in a cool dry place without removing from the package
before use.
•If they are exposed to direct sunlight or excessive heat, poor copies may result.
"BATTERY DISPOSAL"
THIS PRODUCT CONTAINS A LITHIUM PRIMARY MEMORY BACK-UP BATTERY THAT MUST BE DISPOSED OF
PROPERLY. PLEASE CONTACT YOUR LOCAL SHARP DEALER OR AUTHORIZED SERVICE REPRESENTATIVE FOR
ASSISTANCE IN DISPOSING OF THIS BATTERY.
This product utilizes tin-lead solder, and a fluorescent lamp containing a small amount of mercury.
Disposal of these materials may be regulated due to environmental considerations.
For disposal or recycling information, please contact your local authorities or the Electronics Industries Alliance: www.eia.org
Fusing unit
7
CAUTIONS
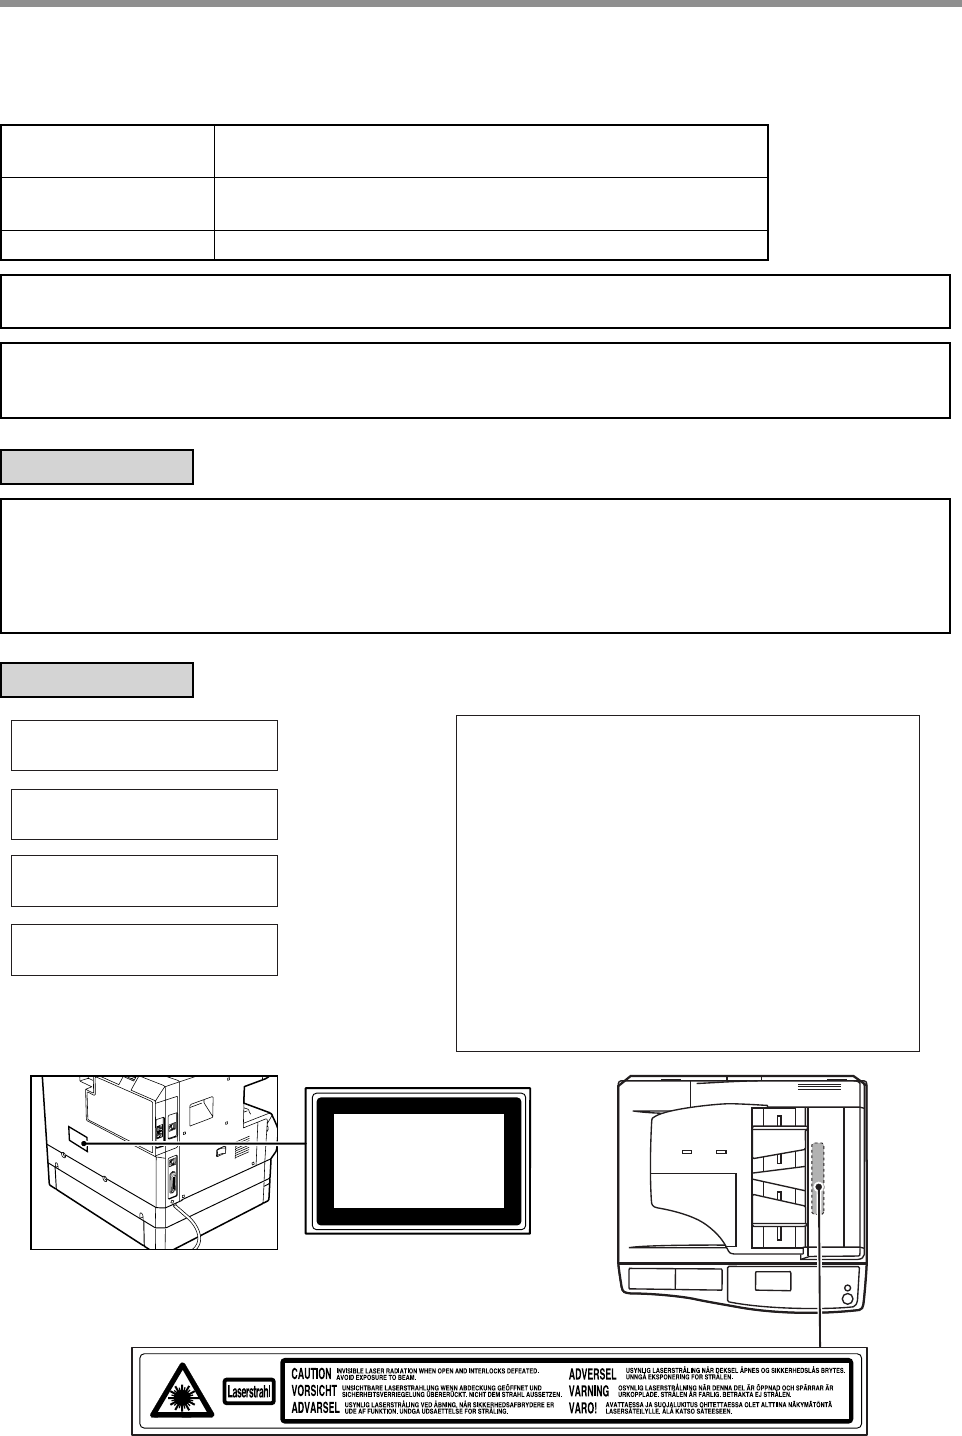
LASER INFORMATION
Wave length
785 nm
+10 nm
-15 nm
Pulse timesNorth America: (3.1 µs ± 3.1 ns)/7 mm
Europe: (3.7 µs ± 3.7 ns)/7 mm
Output powerMax 0.8 mW
At the production line, the output power of the scanner unit is adjusted to 0.8 MILLIWATT PLUS 10 % and is maintained
constant by the operation of the Automatic Power Control (APC).
Caution
Use of controls or adjustments or performance of procedures other than those specified herein may result in hazardous
radiation exposure.
For North America:
SAFETY PRECAUTIONS
This Digital Equipment is rated Class 1 and complies with 21 CFR 1040.10 and 1040.11 of the CDRH standards. This means
that the equipment does not produce hazardous laser radiation. For your safety, observe the precautions below.
• Do not remove the cabinet, operation panel or any other covers.
• The equipment's exterior covers contain several safety interlock switches. Do not bypass any safety interlock by inserting
wedges or other items into switch slots.
For Europe:
CLASS 1 LASER PRODUCT
LASER KLASSE 1
LUOKAN 1 LASERLAITE
KLASS 1 LASERAPPARAT
CAUTION
INVISIBLE LASER RADIATION
WHEN OPEN INTERLOCKS
DEFEATED. AVOID EXPOSURE
TO BEAM.
VORSICHT
UNSICHTBARE
LASERSTRAHLUNG WENN
ABDECKUNG GEÖFFNET UND
SICHERHEITSVERRIEGELUNG
ÜBERBRÜCKT. NICHT DEM
STRAHL AUSSETZEN.
ADVARSEL
USYNLIG LASERSTRÅLNING
VED ÅBNING, NÅR
SIKKERHEDSBRYDERE ER
UDE AF FUNKTION. UNDGÅ
UDSAETTELSE FOR
STRÅLNING.
VAROITUS!
LAITTEEN KÄYTTÄMINEN
MUULLA KUIN TÄSSÄ
KÄYTTÖOHJEESSA
MAINITULLA TAVALLA SAATTAA
ALTISTAA KÄYTTÄJÄN
TURVALLISUUSLUOKAN 1
YLITTÄVÄLLE
NÄKYMÄTTÖMÄLLE
LASERSÄTEILYLLE.
VARNING
OM APPARATEN ANVÄNDS PÅ
ANNAT SÄTT ÄN I DENNA
BRUKSANVISNING
SPECIFICERATS, KAN
ANVÄNDAREN UTSÄTTAS FÖR
OSYNLIG LASERSTRÅLNING,
SOM ÖVERSKRIDER GRÄNSEN
FÖR LASERKLASS 1.
CLASS 1
LASER PRODUCT
LASER KLASSE 1
8
INSTALLATION REQUIREMENTS
Improper installation may damage this product. Please note the following during initial installation and whenever the
machine is moved.
1. The machine should be installed near an accessible power outlet for easy connection.
2. Be sure to connect the power cord only to a power outlet that meets the specified voltage and current
requirements. Also make certain the outlet is properly grounded.
•For the power supply requirements, see the name plate on the back of the main unit.
3. Do not install your machine in areas that are:
•damp, humid, or very dusty
•exposed to direct sunlight
•poorly ventilated
•subject to extreme temperature or humidity changes, e.g., near
an air conditioner or heater.
4. Be sure to allow the required space around the machine for
servicing and proper ventilation.
ENVIRONMENTAL INFORMATION
Connect the machine to a power outlet which is not used for other electric appliances. If a lighting fixture is
connected to the same outlet, the light may flicker.
A small amount of ozone is produced within the printer during operation. The emission level is insufficient to cause any health
hazard.
NOTE:
The present recommended long term exposure limit for ozone is 0.1 ppm (0.2 mg/m
3
) calculated as an 8 hr. time-weighted
average concentration.
However, since the small amount that is emitted may have an objectionable odor, it is advisable to place the copier in a
ventilated area.
As an ENERGY STAR
®
Partner, SHARP has determined that this product meets the ENERGY
STAR
®
guidelines for energy efficiency.
The Environmental Choice Program guidelines are applied to the products only in Canada. The
products that meet the Environmental Choice Program guidelines carry the logo shown to the left.
The products without the logo may not meet the Environmental Choice Program guidelines.
USB 2.0 compatible (dual function board (AR-EB9))
When connecting the machine by USB 2.0 (Hi-Speed mode), be sure to read "System requirements
for USB 2.0 (Hi-Speed mode)" (see the "Key operator's guide") to verify that your system and the
machine settings are configured appropriately.
Note
8" (20 cm)
8"
(20 cm)
8"
(20 cm)
9
MANUALS PROVIDED WITH THE PRODUCT
Multiple manuals are provided for use of the machine. Please read each manual as appropriate for the functions that
you wish to use.
Operation manual (for general information and copier) (this manual):
The first half of this manual contains general information on the machine, including safety precautions and the
procedures for loading paper, removing misfeeds, and performing regular maintenance.
The second half of the manual contains explanations of how to use the copy function of the machine.
Key operator's guide
This explains key operator programs for machine management and copier related functions.
Explanations of key operator programs related to the fax, printer, and network scanner functions can be found in the
respective manuals for those functions.
The key operator programs are used by the administrator of the machine to enable or disable functions to suit the
needs of your workplace.
Software setup guide
This explains how to install and configure the printer driver.
Operation manual (for facsimile)*
1
:
This explains how to use the fax function of the machine. To use the fax function, the optional facsimile expansion kit
(AR-FR11) must be installed.
Operation manual (for printer and scanner)*
2
:
This explains how to use the machine as a printer and a scanner when it is connected to a computer.
Operation manual (for network printer)*
2
:
This explains how to use the machine as a network printer.
To use the machine as a network printer, the optional network expansion kit (AR-NB3) must be installed.
Operation manual (for network scanner)*
2
:
This explains how to use the machine as a network scanner when it is connected to a computer. To use the machine
as a network scanner, the optional network expansion kit must be installed.
*1The "Operation manual (for facsimile)" is contained in the optional facsimile expansion kit.
*2The "Operation manual (for printer and scanner)" is contained in the accompanying CD-ROM in PDF format. The "Operation
manual (for network printer)" and the "Operation manual (for network scanner)" are contained in PDF format in the CD-ROM
that accompanies the network expansion kit. (These manuals are not provided in printed form.)
The meaning of "R" in original and paper size indications
An "R" appearing at the end of an original or paper size (8-1/2" x 11"R,
5-1/2" x 8-1/2"R (A4R, B5R), etc.) indicates that the original or paper is
oriented horizontally as shown below.
Sizes that can be placed only in the horizontal (landscape) orientation (11" x
17", 8-1/2" x 14" (A3, B4)) do not contain the "R" in their size indication.
Conventions used in this manual
This manual refers to the Reversing single pass feeder as the "RSPF" and the single pass feeder as the "SPF".
Unless specific mention is made, both the RSPF and the SPF are referred to simply as "SPF".
Warns the user that injury may result if the contents of the warning are not properly followed.
Cautions the user that damage to the machine or one of its components may result if the contents
of the caution are not properly followed.
Notes provide information relevant to the machine regarding specifications, functions,
performance, operation and such, that may be useful to the user.
Horizontal (Landscape) orientation
Warning
Caution
Note
10
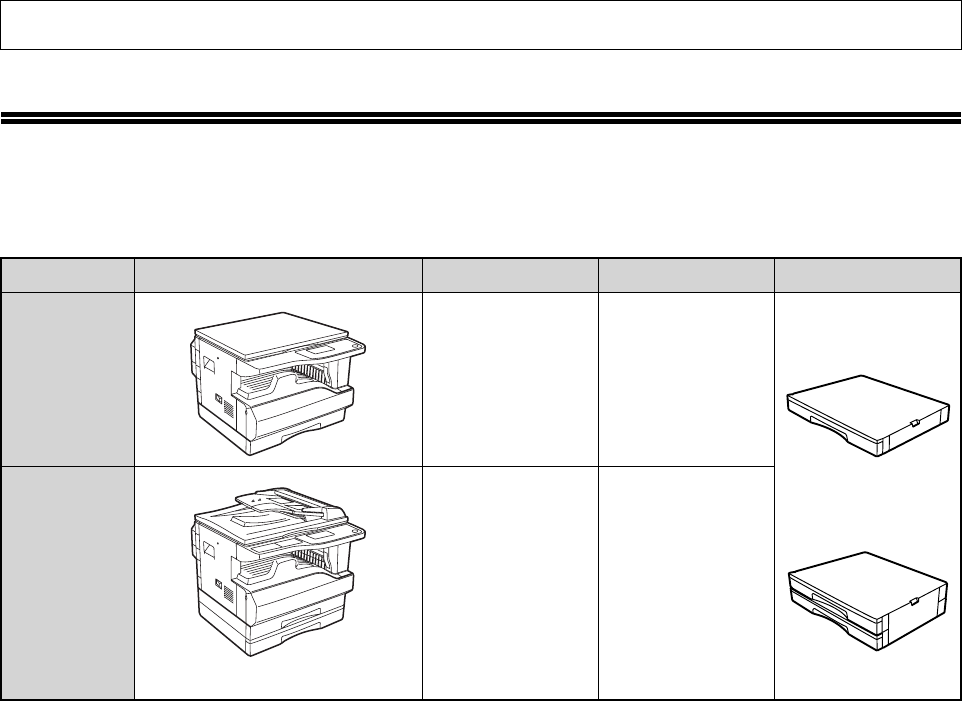
MAIN FEATURES
High-speed laser copying
•First-copy time*
1
at 300 dpi*
2
is only 7.2 seconds.
•Copying speed is 20 (AR-M207) or 16 (AR-M162) copies per minute. This provides a big boost to workplace
productivity.
*1Measured after the machine has warmed up following power-on, copying using the document glass (8-1/2" x 11" (A4) paper
fed from machine tray 1). The first-copy time may vary depending on machine operating conditions and ambient conditions
such as temperature and power voltage.
*2"dpi" ("dots per inch") is a unit that is used to measure resolution. Resolution indicates how much detail can be reproduced in
a printed or scanned image.
High-quality digital image
•High-quality copying at 600 dpi is performed.
• In addition to automatic exposure adjustment, two exposure modes can be selected: "TEXT" for text-only originals,
and "PHOTO" for photographs. The exposure can be adjusted to five levels in each mode.
•
Photo mode allows clear copying of originals with delicate halftones such as monochrome photos and color photos.
Enhanced copying features
•The zoom function can be used to reduce or enlarge copies from 25% to 400% in increments of 1%. (When the
SPF is used, the zoom copy ratio range is 50% to 200%.)
•Up to 999 copies can be made of an original scanned just once. (This can be changed to a maximum of 99 copies
in the key operator programs.)
• The key operator programs allow functions to be selected and managed to meet your specific needs. For example,
access to the machine can be controlled by enabling audit mode.
•The optional dual function board can be installed to enable use of rotation copy and other convenient functions.
*When the dual function board is installed.
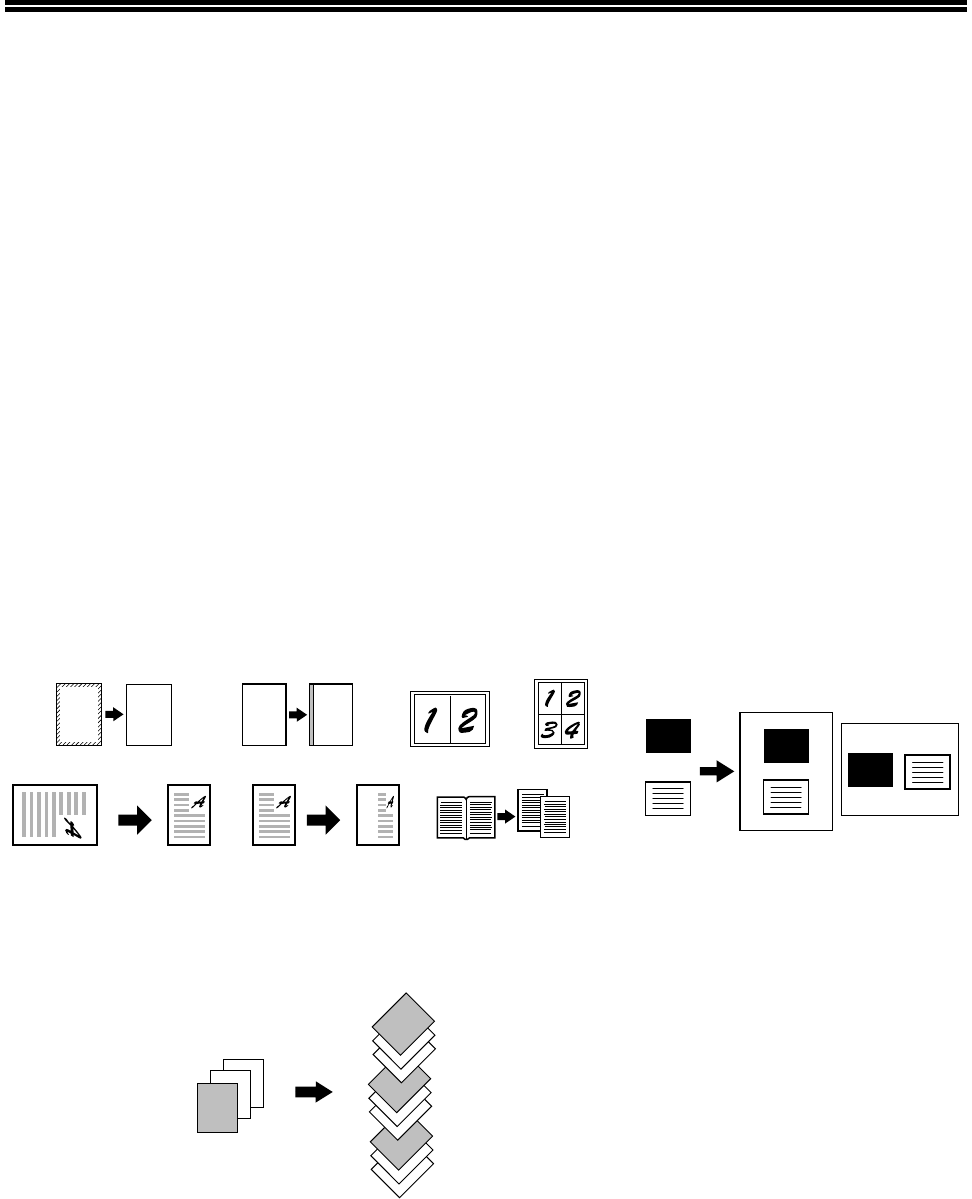
Sort function (when the dual function board is installed)
Copies of multiple original pages can sorted into sets.
Laser printer function / color scanner function
•The machine is equipped standard with a USB 1.1 port and a parallel port. A computer can be connected to these
ports to use the machine as a printer or a scanner.
•To use the machine as a printer or scanner, the printer driver or scanner driver must first be installed as explained
in the "Software setup guide".
•The scanning feature is only available when the computer is connected to the USB port and is running Windows
98/Me/2000/XP. If the computer is running Windows 95/NT 4.0 or is connected to the parallel port, only printing is
available.
A
A
AA
CARD
CARD
CARD
Erase copy*Margin shift*2 in 1 copy*4 in 1 copy*
Dual page copyRotation copy*XY zoom copying
Back
Card shot*
Front
2
1
3
2
1
3
1
2
3
2
1
3
11
MAIN FEATURES
Fax function (option)
Installation of the optional facsimile expansion kit enables the plain-paper, Super G3 laser fax function to be used.
Network connection (option)
The optional network expansion kit (AR-NB3) can be installed to enable the machine to be used as a network printer
and network scanner.
Environment and people friendly design
•Preheat and auto power shut-off modes are provided to reduce power consumption when the machine is not in
active use.
•A universal design has been implemented in the product whereby the height of the operation panel and shape of
the keys are designed to be usable by as many people as possible.
12
1
BEFORE USING THE PRODUCT
This chapter contains basic information required for use of the machine. Please read this chapter before using the
machine.
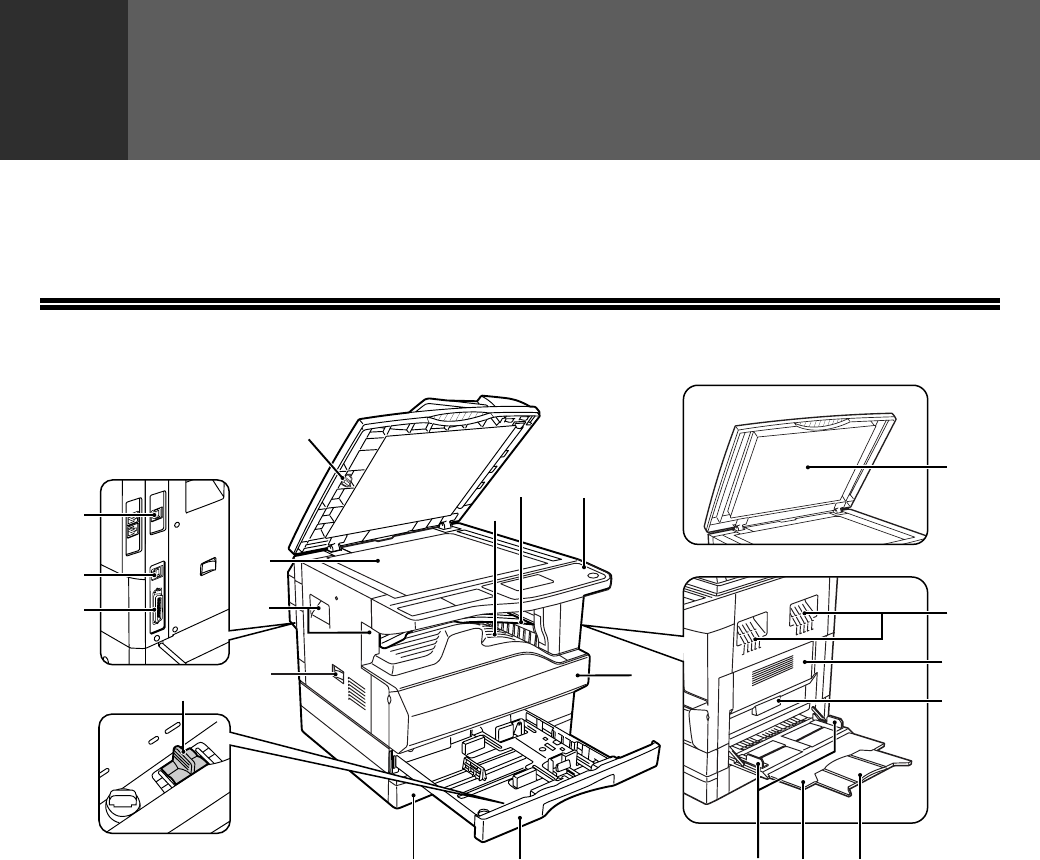
PART NAMES AND FUNCTIONS
(1)USB 2.0 port (USB-2) (when the dual function
board is installed)
Connect to your computer to this port to use the
printer and scanner functions.
(2)USB 1.1 port (USB-1)
Connect to your computer to this port to use the
printer and scanner functions.
(3)Parallel port
Connect to your computer to this port to use the
printer function.
(4)Charger cleaner
Use to clean the transfer charger.
(5)Glass cleaner
Use to clean the original scanning glass.
(6)Document glass
Place an original that you wish to scan face down
here. (Page 45)
(7)Handles
Use to move the machine.
(8)Power switch
Press to turn the machine power on and off.
(9)Center tray
Copies and printed pages are output to this tray.
(10)Top tray (when the job separator tray kit is
installed)
Received faxes (when the fax option is installed)
and print jobs are delivered to this tray.
(11)Operation panel
Contains operation keys and indicator lights.
(12)Front cover
Open to remove paper misfeeds or replace the
toner cartridge.
(13)Tray 1
Tray 1 can hold approximately 250 sheets of
copy paper (20 lbs. (80 g/m
2
)).
For restrictions on paper types and weights, see
"PAPER" (page 18).
(14)Tray 2
Tray 2 can hold approximately 250 sheets of
copy paper (20 lbs. (80 g/m
2
)).
For restrictions on paper types and weights, see
"PAPER" (page 18).
(15)
(11)
(12)
(13)(14)
(10)
(9)
(2)
(1)
(3)
(6)
(7)
(8)
(7)
(16)
(17)
(18)(19)(20)
(5)
(4)
13
BEFORE USING THE PRODUCT
1
(15)Document cover (when installed)
Open to make a copy from the document glass.
(16)Side cover
Open to remove misfed paper.
(17)Side cover handle
Pull to open the side cover.
(18)Bypass tray guides
Adjust to the width of the paper when using the
bypass tray.
(19)Bypass tray
Special paper (heavy paper or transparency film)
can be fed from the bypass tray.
(20)Bypass tray extension
Pull out when feeding large paper such as 11" x
17" and 8-1/2" x 14" (A3 and B4).
(21)Toner cartridge lock release lever
To replace the toner cartridge, pull out the toner
cartridge while pushing on this lever.
(22)Toner cartridge
Contains toner.
(23)Document feeder tray (when the SPF is
installed)
Place the original(s) that you wish to scan face up
here. Up to 40 sheets can be placed.
(24)Original guides (when the SPF is installed)
Adjust to the size of the originals.
(25)Feeding roller cover (when the SPF is
installed)
Open to remove misfed originals.
(26)Right side cover (when the SPF is installed)
Open to remove misfed originals.
(27)Fusing unit release levers
To remove the paper misfed in the fusing unit,
push down on these levers and remove the
paper.
(28)Roller rotating knob
Rotate to remove misfed paper.
(29)Exit area (when the SPF is installed)
Originals exit the machine here after
copying/scanning when the SPF is used.
(30)Reversing tray (when the RSPF is installed)
Pull out to remove misfed originals.
(31)Photoconductive drum
Images are formed on the photoconductive drum.
(32)Fusing unit paper guide
Open to remove misfed paper.
(27)(28)
(22)
(21)
(23)(24)(25)
(26)
(31)(32)
(29) (30)
The fusing unit is hot. Do not touch
the fusing unit when removing
misfed paper. Doing so may cause a
burn or injury.
Do not touch the photoconductive drum
(green portion) when removing the misfed
paper. Doing so may damage the drum and
cause smudges on copies.
The model name is on the front cover of the
machine.
Warning
Caution
Note
14
BEFORE USING THE PRODUCT
OPERATION PANEL
(1)Keys for fax function (when the fax option is
installed)
These are used in fax mode. For more
information, see the "Operation manual (for
facsimile)" that accompanies the optional
facsimile expansion kit.
(2)[COPY] key / indicator
Press to select copy mode. If pressed when
"Ready to copy." appears or during warm-up, the
total number of sheets used (page 36) appears
while the key is pressed.
(3)[PRINT] key / indicator
Press to select print mode.
•ONLINE indicator
Print jobs can be received when this indicator is
lit.
•DATA indicator
This lights steadily when there is a print job in
memory that has not been printed, and blinks
during printing.
(4)[SCAN] key / indicator
Press to select scan mode. (To connect a
computer to the USB port on the machine and
use the scanner function, see the "Operation
manual (for printer and scanner)". To use the
machine as a network scanner, see the
"Operation manual (for network scanner)" that
accompanies the optional network expansion kit.)
(5)Display
Shows various messages. For more information
see page 16.
(6)[BACK] key
Press to return the display to the previous screen.
(7)[FAX STATUS] key (when the fax option is
installed)
This key is used in fax mode. For more
information, see the "Operation manual (for
facsimile)" that accompanies the optional
facsimile expansion kit.
(8)[OK] key
Press to enter the selected setting.
(9)Copy number display
The selected number of copies appears. During
copying, this shows the remaining number of
copies.
(10)Numeric keys
Use to select the number of copies.
(11)[INTERRUPT] key () / INTERRUPT indicator
Interrupts a copy run to allow an interrupt copy
job to be performed. (Page 63)
(12)[C] key
Press to clear the set number of copies or stop a
copy run.
ON LINE
DATA
LINE
DATA
SCAN
FAX
PRINT
2627282930
3132333435
4142434445
4647484950
3637383940
ABCDE
FGHIJ
KLMNO
PQRTS
UVWXYZSP
SPEAKER
SHIFT
REDIAL/PAUSESPEED
SYMBOL
COMM. SETTING
SPACE/–
COPY
(13)
(2)
(1)
(3)(4)
(14)
15
BEFORE USING THE PRODUCT
1
(13)LINE STATUS indicator (when the fax option
is installed)
This key is used in fax mode. For more
information, see the "Operation manual (for
facsimile)" that accompanies the optional
facsimile expansion kit.
(14)[FAX] key / indicator (when the fax option is
installed)
LINE indicator, DATA indicator
This key is used in fax mode. For more
information, see the "Operation manual (for
facsimile)" that accompanies the optional
facsimile expansion kit.
(15)[EXPOSURE] key
Use to select the exposure mode. "AUTO",
"TEXT", or "PHOTO" can be selected. (Page 48)
(16)[PAPER] key
Use to manually select a paper tray. (Page 49)
(17)[ZOOM] key
Press to select a reduction or enlargement copy
ratio. (Page 52)
(18)[AUTO%] key
Press to have the copy ratio selected
automatically. (Page 52)
(19)[OUTPUT] key (Only effective when the dual
function board is installed)
Use to select the sort function. (Page 64)
(20)[DUPLEX] key (only on models that support
two-sided printing)
Select the two-sided copying mode. (Page 56)
(21)Arrow keys
Press to move the highlighting (which indicates
that an item is selected) in the display.
(22)[SPECIAL FUNCTION] key
Press to select special functions.
(23)[ACC.#-C] key ()
Press the end the use of an account and return
the display to the account number entry screen.
(Page 23)
(24)[0] key
Press during a continuous copy run to display the
number of copies completed.
(25)[READ-END] key ()
When copying in sort mode from the document
glass, press this key when you have finished
scanning the original pages and are ready to start
copying. (Page 64)
(26)[START] key () / indicator
Copying is possible when this indicator is on.
Press the key to start copying.
(27)[CA] key
Clears all selected settings and returns the
machine to the default settings. (Page 18)
ABCDEF
JKLGHIMNO
TUVPQRSWXYZ
@.-
_
COPY
EXPOSURE
PAPERZOOM
AUTO %
OUTPUTDUPLEX
SPECIAL FUNCTION
ACC. #-C
READ-END
SCAN
FAX
COLOR MODE
PROGRAM
RESOLUTION
RESOLUTION
ADDRESSFORMAT
ORIGINAL SIZEDUPLEX SCAN
DUPLEX SCAN
ORIGINAL SIZE
ADDRESS
BROADCAST
OK
BACK
FAX STATUS
(5)(9)(6)(7)(8)(10)(11)(12)
(15)(16)(17)(18)(19)
(20)
(21)(22)(27)(26)(25)(23)(24)
16
BEFORE USING THE PRODUCT
Display (base screen)
Example: Copy mode
*The display shown is the AR-M207 (when the optional
RSPF is installed) display.
Icons appearing in the special function icon display
*These only appear when the dual function board is
installed.
(1)Exposure display
Indicates the selected exposure mode.
(2)Special function icon display
Icons of enabled special functions will appear.
(3)Message display
Messages are displayed regarding machine
status and operation.
(4)Original size display
The size of the placed original and the icon of the
original scanning mode will appear.
: One-sided scanning in the SPF.
: Scanning on the document glass
: Two-sided scanning in the RSPF.
(5)Copy ratio display
Displays the copy ratio for reduction or
enlargement.
(6)Paper size display
Displays the selected paper size. When "AUTO"
appears, the most suitable size of paper is
automatically selected.
(7)Paper tray display
The selected paper tray is highlighted.
OPERATION IN COPY, PRINT, SCAN, AND FAX MODES
Some operations in the various modes of the machine cannot take place simultaneously.
*1Can be used after pressing the [INTERRUPT] key ().
*2After the page that is currently being printed is output, the job is interrupted.
*3Only possible when the computer is connected to the USB-2 port.
*4Only possible when the computer is connected to the parallel port or USB-1 port; the job is interrupted after the page that is
currently being printed is output.
*5After output of the page that is currently being printed via the parallel port or USB-1 port, the job is interrupted.
Ready to copy.
8 x11
100%
8 x11
AUTO
AUTO
(2)(3)(4)
(5)
(1)
(7)(6)
1
2
1
2
1-sided to 2-sided
copy
Center erase
copy*
2-sided to 2-sided
copy
Edge + Center
erase*
2-sided to 1-sided
copy
2 in 1 copy*
Sort function*4 in 1 copy*
Margin shift copy*Dual page copy
Edge erase copy*Card shot*
Interrupting operation
Copy outputPrintingScanning
Faxing
Scanning
originals
Printing
faxes
Interrupted operation
CopyingOutputYes*
1
NoNoNoNo
PrintingOutputYes*
2
Yes*
4
Yes*
5
No
Scanning
Scanning an original
NoNoNoNo
Faxing
Scanning an original
NoYes*
3
NoYes
OutputYes*
2
NoYes*
2
Yes
•Printing is not possible when the front or side cover is opened for machine maintenance, or when a misfeed
occurs or the machine runs out of paper or toner, or when the drum cartridge reaches its replacement time.
•If an original misfeed occurs in the SPF, printing will not be possible until the misfed original is removed and
the SPF is ready for use.
Note
17
1
TURNING THE POWER ON AND OFF
The power switch is located on the left side of the machine.
POWER ON
Turn the power switch to the "ON" position
•It will take about 45 seconds
for the machine to warm up.
•When the power switch is
turned to the "ON" position,
the message "System check."
will appear in the message
display and warm-up will start.
Once the copier has finished warming up, the
message display will change to "Ready to copy." and
the START indicator will light up to indicate that
copying is possible. Copy settings can be selected
during warm-up.
•If auditing mode has been enabled (see the "Key
operator's guide"), the message "Enter your account
number." will appear after warming up. Once a valid
account number has been entered, the message
display will change to "Ready to copy." and copying
will be possible.
POWER OFF
Make sure that the machine is not in operation
and then turn the power switch to the "OFF"
position.
If the power switch is turned off
while the machine is in
operation, a misfeed may occur
and the job that was in progress
will be canceled.
Power save modes
The machine has two power save modes to reduce power consumption, thereby helping to reduce environmental
pollution and conserve resources.
Preheat mode
This function automatically switches the machine to a low power consumption state if the duration of time set in the
key operator programs elapses without the machine being used when the power is on. In preheat mode the display
turns off. Normal operation automatically resumes when a key on the operation panel is pressed, an original is
placed, or a print job or fax is received.
Auto power shut-off mode
This function automatically switches the machine to a state that consumes even less power than preheat mode if the
duration of time set in the key operator programs elapses without the machine being used when the power is on.
During auto power shut-off, only the mode key indicators are lit. To restore the machine to normal operation, press
any one of the mode keys. Normal operation also resumes automatically when a print job or fax is received or
scanning is begun from a computer. While auto power shut-off is in effect, pressing a key other than a mode key will
have no effect.
•If the fax option is installed, be sure to keep the power turned on.
Faxes cannot be received when the power is turned off.
•The machine is set at the factory to return all settings to the default settings one minute after a copy job is
finished (auto clear function). When the settings return to the default settings, any functions that were selected
are canceled. The auto clear time can be changed in the key operator programs. (See the "Key operator's
guide".)
The preheat mode activation time and the "Auto power shut-off timer" can be changed in the key operator
programs. (See the "Key operator's guide".)
Note
Note
18
BEFORE USING THE PRODUCT
Default settings
The machine is set at the factory to return all settings to the default settings one minute after a copy job is finished
(auto clear function) or when the [CA] key is pressed. When the settings return to the default settings, any functions
that were selected are canceled.
The auto clear time can be changed in the key operator programs. (See the "Key operator's guide".)
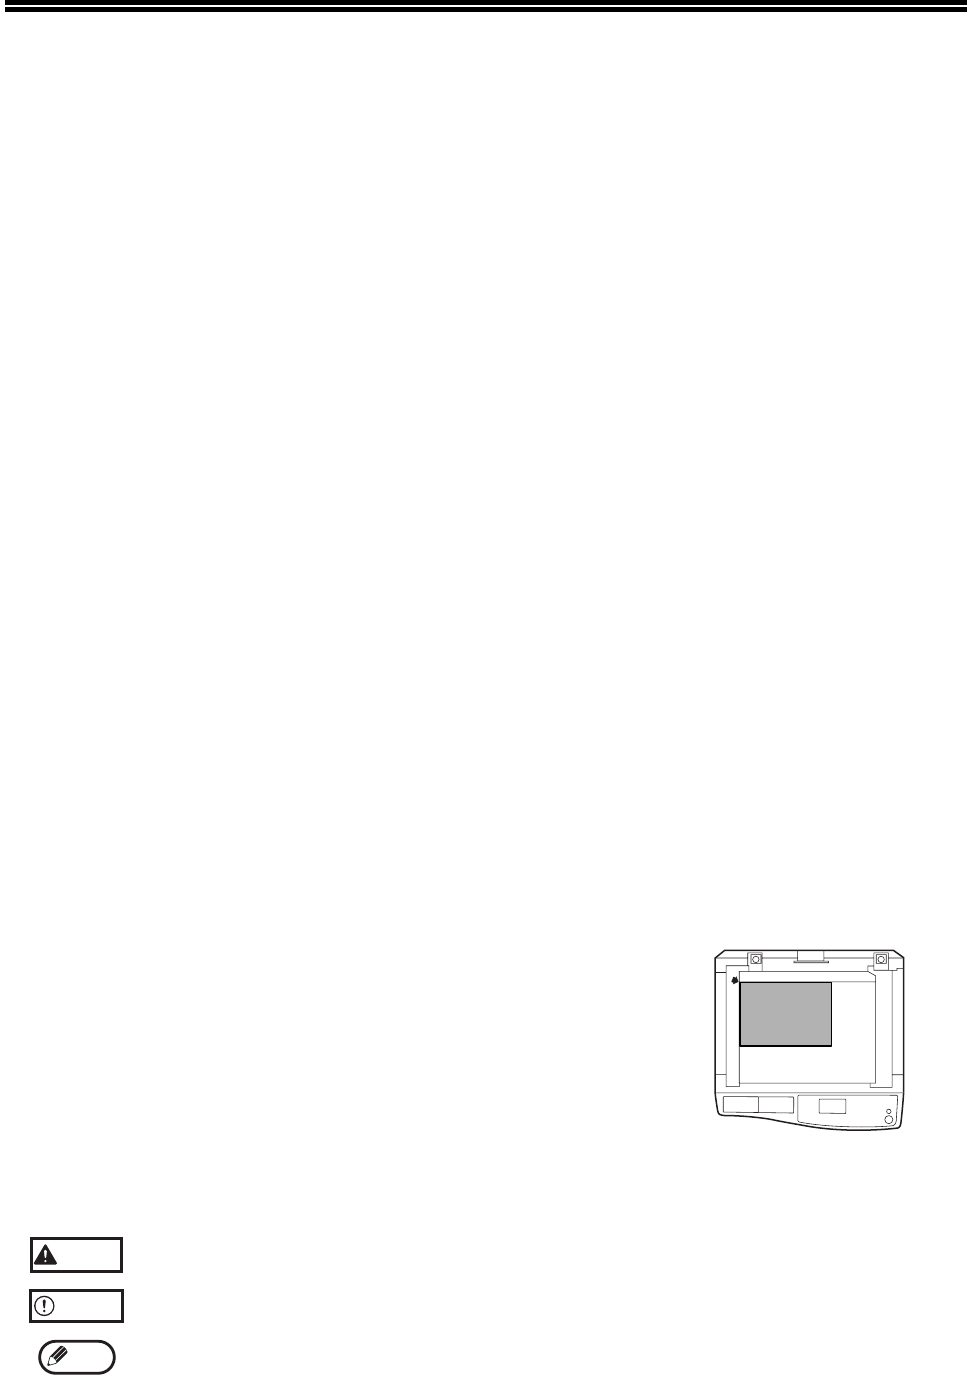
In the default state the display shown below appears. The default state of the display may vary depending on
settings in the key operator programs.
*The screen is that of the AR-M207 (when the RSPF is installed).
LOADING PAPER
The message "TRAY<>:Add paper." will be displayed when there is no copy paper in the selected paper tray.
(<> is the tray number.) Load paper in the indicated paper tray.
PAPER
The specifications for the types and sizes of paper that can be loaded in the paper trays are shown below.
*15-1/2" x 8-1/2" (A5) can be used in tray 1 but cannot be used in other trays (including trays in optional paper feeding unit).
*2When making a large number of copies or prints using 24 lbs. (90
g
/m
2
) paper, remove the output from the paper output tray
when about 100 pages have been printed. The output may not stack correctly if more than 100 pages are allowed to accumulate.
*3The number of sheets of the paper which can be set changes with the weight of a paper. (The indicated numbers are for 20
lbs. (80 g/m
2
) paper.)
*4The trays are numbered 1, 2, 3, and 4 from the top.
Paper that can be used for automatic 2-sided printing
Paper used for automatic two-sided printing must meet the following conditions:
Paper type: Plain paper (special paper cannot be used.)
Paper size: Standard sizes (11" x 17", 8-1/2" x 14", 8-1/2" x 13", 8-1/2" x 11", 8-1/2" x 11"R, A3, B4, A4, A4R, B5, B5R, A5)
Paper weight: 15 lbs. to 24 lbs. (56 g/m
2
to 90 g/m
2
)
Paper trayTray No.*
4
Paper typePaper sizeWeightCapacity
Tray 11
Standard paper
Recycled paper
5-1/2" x 8-1/2"*
1
(Invoice),
8-1/2" x 11" (Letter), 8-1/2"
x 11"R, 8-1/2" x 13"
(Foolscap), 8-1/2" x 14"
(Legal), 11" x 17" (Ledger)
(A5*
1,
B5, B5R, A4, A4R,
B4, A3)
15 lbs. to 24 lbs.*
2
(56 g/m
2
to 90 g/m
2
)*
2
250 sheets (20
lbs. (80 g/m
2
))*
3
(Load paper lower
than the line on
the tray)
Tray 22
Tray of
250-sheet
paper feed unit
2 or 3
Tray of 2 x
250-sheet
paper feed unit
2 or 3
3 or 4
Bypass tray
Standard paper
Recycled paper
5-1/2" x 8-1/2" (Invoice) to
11" x 17" (Ledger)
(A6R to A3)
15 lbs. to 20 lbs.
(56 g/m
2
to 80 g/m
2
)
100 sheets*
3
Thick paper
Max. 54 lbs.
(200 g/m
2
)
Load one sheet of
these papers at a
time to the bypass
tray.
Transparency film
Labels
Envelopes
Commercial 9 (3-7/8" x
8-7/8"), Commercial 10
(4-1/8" x 9-1/2")
International DL (110 mm x
220 mm), International C5
(162 mm x 229 mm)
5 sheets
Ready to copy.
A4
100%
8 x11
AUTO
AUTO
1
2
19
BEFORE USING THE PRODUCT
1
Special paper
Follow these guidelines when using special paper.
•Use SHARP recommended transparency film and label sheets. Using other than SHARP recommended paper
may result in misfeeds or smudges on the output.
•There are many varieties of special paper available on the market, and some cannot be used with this machine.
Before using special paper, contact a SHARP service center.
•Before using other than SHARP recommended paper, make a test copy to see if the paper is suitable.
LOADING PAPER
Make sure that the machine is not copying or printing, and then follow these steps to load paper.
Loading paper in a tray
1
Gently lift and pull out the paper tray.
If you are adding the same size
of paper, go to step 3. If you are
loading a different size of paper,
go to the next step.
2
Adjust the plates in the tray to the
length and width of the paper.
•The plate A is a slide-type
guide. Grasp the locking knob
on the guide and slide the
guide to the indicator line of
the paper to be loaded.
•The plate B is an insert-type
guide. Remove it and then
insert it at the indicator line of
the paper to be loaded.
•When using 11" x 17" sized
paper store the plate B in the
slot at the left front of the
paper tray.
3
Push the pressure plate down.
Push the center of the pressure
plate down until it locks into
place.
4
Fan the paper.
Fan the paper well before
loading it. If the paper is not
fanned, double-feeds or
misfeeds may occur.
5
Place the paper in the tray.
6
Push the paper tray back in.
Push the upper paper tray in
completely.
Plate B
Plate A
•Do not load paper higher than the line on
the tray (up to 250 sheets).
•Make sure that the paper fits under the
tab on the right side of the tray.
•Make sure the stack of paper is straight
before loading it. When adding paper,
take the remaining paper out and combine
it into a single stack with the new paper.
If the size of the loaded paper is different
from the size shown in the display, be sure
to follow the procedure in "CHANGING THE
PAPER SIZE SETTING OF A TRAY" (page
21) to change the paper size setting of the
tray.
Note
Note
20
BEFORE USING THE PRODUCT
Loading paper in the bypass tray
1
Open the bypass tray.
Pull out the bypass tray
extension to load 8-1/2" x 14"
and 11" x 17" (B4 and A3) size
paper.
2
Set the bypass tray guides to the
paper width.
3
Insert the copy paper (print side
down) all the way into the bypass tray.
Make sure that the print side of
the paper is face down.
To prevent a misfeed, verify
once more that the bypass tray
guides are adjusted to the width
of the paper.
Important points when inserting
paper in the bypass tray
•Up to 100 sheets of standard copy paper can be set
in the bypass tray.
•Be sure to place 5-1/2" x 8-1/2" (A6 and B6) size
paper and envelopes horizontally as shown in the
following diagram.
•When loading envelopes, make sure that they are
straight and flat and do not have loosely glued
construction flaps (not the closure flap).
•Special papers except SHARP recommended
transparency film, labels, and envelopes must be fed
one sheet at a time through the bypass tray.
•When adding paper, first remove any paper
remaining in the tray, combine it with the paper to be
added and then reload as a single stack. The paper
to be added must be the same size and type as the
paper already in the tray.
•Do not use paper that is smaller than the original.
This may cause smudges or unclean images.
•Do not use paper that has already been printed on
by a laser printer or plain paper fax machine. This
may cause smudges or unclean images.
Envelopes
Do not use the following envelopes, as misfeeds will
occur.
•Envelopes with metal tabs, clasps, strings, holes, or
windows.
• Envelopes with rough fibers, carbon paper, or glossy
surfaces.
•Envelopes with two or more flaps.
•Envelopes with tape, film, or paper attached to the
flap.
•Envelopes with a fold in the flap.
•Envelopes with glue on the flap to be moistened for
sealing.
•Envelopes with labels or stamps.
•Envelopes that are slightly inflated with air.
•Envelopes with glue protruding from the seal area.
•Envelopes with part of the seal area peeled off.
If you loaded paper in the bypass tray, press
the [PAPER] key to select the bypass tray.
Note
21
BEFORE USING THE PRODUCT
1
CHANGING THE PAPER SIZE SETTING OF A TRAY
If the size of the loaded paper is different from the size shown in the display, follow the steps below to change the
paper size setting of the tray.
The paper size setting cannot be changed during copying, printing, fax printing (when the fax option is installed), or
interrupt copying, or when a misfeed has occurred. However, if the machine is out of paper or out of toner, the paper
size setting can be changed during copying, printing, and fax printing.
See "PAPER" (page 18) for information on the specifications for the types and sizes of paper that can be loaded in
the paper trays.
The paper size cannot be set for the bypass tray.
1
Press the [SPECIAL FUNCTION] key.
The special function
screen will appear.
The screen shown above is the copy mode screen.
2
Press the [] or [] key to select
"PAPER SIZE SET".
3
Press the [OK] key.
The paper size setting
screen will appear.
4
Press the [] or [] key to select the
paper tray for which the paper size is
being changed.
Example: Tray 2
5
Press the [] key.
The cursor moves to the
paper size selection
position on the right.
6
Press the [] or [] key to select the
paper size.
Example: Selecting 8-1/2" x
14" size
To change the size of another paper tray, press the
[] key and then repeat steps 4 to 6.
7
Press the [OK] key.
A message asking you to
confirm the new paper size
setting will appear.
8
Press the [OK] key.
The selected paper size will be
stored and the display will
return to the base screen.
: Shows tray "1".
: Shows tray "2".
For the paper trays and tray numbers, see
"PAPER" on page 18.
DUPLEX
SPECIAL FUNCTION
ACC.
DUPLEX SCAN
DUPLEX SCAN
SPECIAL FUNCTION
SPECIAL MODES
ORIG. SIZE ENTER
PAPER SIZE SET
DISPLAY CONTRAST
GH
PQR
DUPLEX
SPECIAL FUNCTION
DUPLEX SCAN
SPECIAL FUNCTION
SPECIAL MODES
ORIG. SIZE ENTER
PAPER SIZE SET
DISPLAY CONTRAST
GHI
OK
BACK
PAPER SIZE SET
8 x11R 11x17
11x17 8 x14
8 x13
8 x11
1
2
1
2
1
2
1
2
Note
PAPER SIZE SET
8 x11 11x17
11x17 8 x14
8 x13
8 x11
1
2
1
2
1
2
1
2
Affix the paper size label for the paper size
selected in step 6 to the label position on the
right end of the tray.
PAPER SIZE SET
8 x1111x17
11x17 8 x14
8 x13
8 x11
1
2
1
2
1
2
1
2
PAPER SIZE SET
8 x11 11x17
11x178 x14
8 x13
8 x11
1
2
1
2
1
2
1
2
OK
OK
Note
22
BEFORE USING THE PRODUCT
DISABLING (ENABLING) AUTO TRAY SWITCHING
When auto tray switching is enabled and paper runs out during copying or printing, the job will continue using paper
from a different tray if that tray has the same size of paper in the same orientation. (This function does not operate
when using the bypass tray or when a fax is being printed.) This function has been enabled at the factory. If you
prefer to disable the function, follow the steps below.
1
Press the [SPECIAL FUNCTION] key.
The special function
screen will appear.
The above screen appears in copy mode.
2
Select "PAPER SIZE SET" with the []
or [] key.
3
Press the [OK] key.
The paper size setting
screen will appear.
4
Press the [] key repeatedly until
"AUTO TRAY SWITCHING" appears.
Move the cursor to the lowest tray and then press the
[] key again. The above screen will appear.
5
Press the [OK] key.
When a checkmark does not appear in the checkbox,
the auto tray switching function will not operate.
6
Press the [] key.
You will return to the
paper size setting screen.
To re-enable auto tray switching, press the [OK] key in
the screen of step 5 so that a checkmark appears.
DUPLEX
SPECIAL FUNCTION
ACC.
DUPLEX SCAN
DUPLEX SCAN
SPECIAL FUNCTION
SPECIAL MODES
ORIG. SIZE ENTER
PAPER SIZE SET
DISPLAY CONTRAST
GH
PQR
DUPLEX
SPECIAL FUNCTION
DUPLEX SCAN
SPECIAL FUNCTION
SPECIAL MODES
ORIG. SIZE ENTER
PAPER SIZE SET
DISPLAY CONTRAST
GHI
OK
BACK
PAPER SIZE SET
8 x11R 11x17
11x17 8 x14
8 x13
8 x11
1
2
1
2
1
2
1
2
PAPER SIZE SET
AUTO TRAY
SWITCHING
OK
PAPER SIZE SET
AUTO TRAY
SWITCHING
PAPER SIZE SET
8 x11R 11x17
11x17 8 x14
8 x13
8 x11
1
2
1
2
1
2
1
2
23
1
AUDITING MODE
When auditing mode is enabled, a count is kept of the pages printed by each account. The page counts can be
viewed in the display.
This function is enabled in the key operator programs. (For the counts in copy, print, and scan modes, see the "Key
operator's guide". For the counts in fax mode, see the "Operation manual (for facsimile)" that accompanies the
optional facsimile expansion kit.)
NUMBER OF ACCOUNTS IN AUDITING MODE
USING AUDITING MODE
When auditing mode is turned on, the account number entry screen is displayed. Enter your account number
(five-digit identification number) as explained below before performing a copy, fax, or scan operation.
1
Enter your account number (five
digits) with the numeric keys.
•As the account number is entered, the hyphens (-)
change to asterisks (). If you enter an incorrect
digit, press [C] key and re-enter the correct digit.
•When a valid account number is entered, the current
count of the account will appear in the message
display of the base screen. After 6 seconds (factory
default setting), the base screen appears. (Page 18)
*In copy mode and print mode, the number of sheets
remaining until the limit is reached is also shown if
"ACCOUNT LIMIT" (see the "Key operator's guide") is
enabled in the key operator programs.
Example: Copy mode
2
When the copy job is finished, press
the [ACC.#-C] key ().
If you are performing an
interrupt copy job (page 63)
when auditing mode is enabled,
be sure to press the
[INTERRUPT] key (), [CA]
key, or [ACC.#-C] key ()
when finished to exit interrupt
mode.
ModeNumber of accountsRemarks
(1)
Same for copy, print,
and scan modes
50 maximum
Copying, printing, and scanning counts are managed
under one account number.
(2)Fax50 maximumFax counts are managed under one account number.
The same account number can be assigned to (1) and (2).
Note
Enter your account
number.
ACCOUNT #:-----
˚˚˚˚˚
ABCDEF
JKLGHIMNO
TUVPQRSWXYZ
@.-
_
FUNCTION
ACC. #-C
READ-END
OK
Enter your account
number.
ACCOUNT #: ---
COPIES MADE:000,000
REMAINING:050,000
100%
8 x11
AUTO
AUTO
1
2
•If you enter a account number for copy
mode that has also been programmed for
fax mode, you can change to fax mode
after completing the copy operation and
continue with the fax operation without
re-entering your account number.
If you enter an account number for copy
mode that has not been programmed for
fax mode, enter your account number for
fax mode after you press the [FAX] key to
change to fax mode.
•If an invalid account number is entered in
step 1, the account number entry screen
reappears.
•
When "ACC. # SECURITY" (see the "Key
operator's guide") in the key operator
programs is enabled, a warning message
will appear and operation will not be
permitted for 1 minute if an invalid account
number is entered 3 times in a row.
Note
@.-
_
FUNCTION
ACC. #-C
READ-E
24
2
TROUBLESHOOTING AND
MAINTENANCE
This chapter explains general troubleshooting and maintenance procedures such as removing misfeeds, replacing
the toner cartridge, and cleaning the machine, as well as troubleshooting for the copy function. For troubleshooting
for the fax function, printer function, and scanner function, see the respective manuals for each function.
TROUBLESHOOTING
MACHINE/COPYING PROBLEMS
The machine does not operate.................................................................................................................. 25
Power is on but copying is not possible.....................................................................................................25
Copies are too dark or too light.................................................................................................................. 25
Text is not clear in a copy.......................................................................................................................... 25
The paper size used for the copy is different from the selected paper size (part of the image is cut off or
too much of the page is blank)................................................................................................................... 26
Wrinkles appear in the paper or the image disappears in places.............................................................. 26
Paper misfeed............................................................................................................................................26
The original size is not automatically selected or the copy is not made on paper that matches the size
of the original. ............................................................................................................................................ 27
Copies are smudged or dirty......................................................................................................................27
White or black lines appear on copies....................................................................................................... 27
A tray's paper size setting cannot be set...................................................................................................27
A copy job stops before it is finished.......................................................................................................... 27
Scanning of the original stops before it is completed................................................................................. 27
A light in the room flickers..........................................................................................................................27
INDICATORS AND DISPLAY MESSAGES......................................28
When the network expansion kit is installed in the machine, a document or photo can be scanned into an image file
and sent over a network or the Internet to a file server, e-mail destination, or your own computer.
You can select from the following transmission methods as the destination where you wish to send the scanned
image, depending on where you wish to send the scanned image data.
1.The scanned image can be sent to a memory
storage device on a network (a designated
directory on an FTP server). (This is called
"Scan to FTP"
in this manual.)
When sending a scanned image to an FTP
server, an e-mail message can also be sent to
a preset e-mail address to inform the recipient
of the location of the scanned image data. (This
is called
"Scan to FTP (Hyperlink)"
in this
manual.)
2.A scanned image can be sent to a computer
connected to the same network as the
machine. (This is called
"Scan to Desktop"
in
this manual.)
*Before Scan to Desktop can be performed, the
software in the CD-ROM that accompanies the
network expansion kit (AR-NB3) must be
installed. For the procedure for installing the
software, see the "Sharpdesk installation
guide".
3.The scanned image can be sent to an e-mail
recipient. (This is called
"Scan to E-mail"
in
this manual.)
4
SETTINGS AND PROGRAMMING
REQUIRED FOR THE NETWORK
SCANNER FEATURE
To use the Network Scanner feature, settings for the SMTP server, DNS server, and destination addresses must be
configured.
To configure the settings, use a computer that is connected to the same network as the machine to access the
machine's Web server. The Web page can be viewed with your Web browser (Internet Explorer 5.5 or later
(Windows)/5.1 or later (Macintosh), or Netscape Navigator 6.0 or later).
HOW TO ACCESS THE WEB PAGE AND VIEW HELP
Use the following procedure to access the Web pages. [Help] can be clicked at the bottom of the menu frame to view
information on the various function settings that can be operated remotely over the network from the machine's Web
pages. For the settings of each function, see the explanations in Help.
1
Open the Web browser on your
computer.
Supported browsers:
Internet Explorer 5.5 or later (Windows)/
5.1 or later (Macintosh)
Netscape Navigator 6.0 or later
2
In the "Address" field of your Web
browser, enter the IP address of the
machine.
To check the IP address,
see "
CHECKING THE IP
ADDRESS" (page 37).
When the connection is complete, the Web page will
appear in your Web browser.
☞ABOUT THE WEB PAGE (FOR USERS) (page 5)
3
Click [Help] under the menu frame.
For an explanation of a
function or setting in the
Web page, click the
corresponding item in the
Help screen.
4
Close the Web page.
When you have finished
using the Web page, click
the (close) button in
the top right corner of the
page.
5
1
ABOUT THE WEB PAGE (FOR USERS)
When you successfully connect to the Web server in the machine, the following page will appear in your browser.
A menu frame appears on the left side of the page. When you click an item in the menu, a screen appears in the
right frame that allows you to establish settings for that item.
For detailed explanations of the procedures for configuring settings, click [Help] in the menu frame.
(1)Menu frame
The various settings appear in this frame. Click a
menu item to configure the corresponding setting.
(2)System Information
This shows the model name and current status of
the machine.
•Device Status
This shows information on the machine's paper
trays and output trays, toner and other supplies,
and the total sheet usage count.
Out of paper and other warnings appear in red.
•Device Configuration
Shows what options are installed.
•Network Status
Shows general information as well as the status
of TCP/IP, NetWare, AppleTalk, and NetBEUI.
(3)Image Send Management
This is the base screen for storing, editing, and
deleting destination information.
•Destination (page 6
)
Store destinations for Scan to FTP, Scan to
FTP (Hyperlink), Scan to Desktop, and Scan to
E-mail. You can also edit or delete previously
stored destination information.
•
Network Scanning (changing custom index names)
This enables to change custom index names.
Click the [Submit] button to store the entered
information as index names.
The custom index consists of six indexes. A
6-character index name can be stored for each
index, allowing destinations to be grouped.
(4)Admin Mode
Click here to open the adminstrator Web page
and enter the administrator user name and
password.
☞PROTECTING INFORMATION PROGRAMMED IN
THE WEB PAGE ([Passwords]) (page 14)
☞ABOUT THE WEB PAGE (FOR THE
ADMINISTRATOR) (page 11)
(2)
(1)
(3)
(4)
6
BEFORE USING THE NETWORK SCANNER FUNCTION
STORING DESTINATIONS
To store scanning destinations, click [Destination] in the Web page menu frame. This screen can also be used to
edit or delete stored destinations. (Page 10
)
A total of 200 destinations* can be stored, including E-mail, FTP, Desktop, and Group destinations.*
*Multiple e-mail addresses can be stored as a group (up to 100). Note that this may reduce the maximum number of
destinations (normally 200) that can be stored.
E-mail:See below
FTP:See page 7
.
Desktop:See page 8
.
Group (E-mail):See page 9
.
Storing destinations for Scan to E-mail
1
Click [Destination] in the menu frame
of the Web page.
2
Click [E-mail].
3
Enter the destination information.
For each setting, see the following table.
4
When you have finished entering the
information, click [Submit].
The entries will be stored.
E-mail destination information
Click here to store
destinations.
To perform Scan to E-mail, the SMTP server settings must first be established. (Page 13)
ItemDescription
Name (Required)Enter the name of the destination (up to 36 characters).
Initial (Optional)
Enter initial text for the destination (maximum of 10 characters). When the destination list is
displayed in the destination control screen, the initial text is used to group the destinations.
Custom IndexNames can be assigned to the custom indexes as desired (page 5), allowing
convenient grouping of destinations.
Drop down list:Select a custom index for the destination to be stored.
User checkbox:
When this is selected, the destination is stored in the user tab of the address
book. (Page 22
)
E-mail Address
(Required)
Enter the e-mail address of the destination (up to 64 characters). If an LDAP server is being used,
you can click the [Global Address Search] button to search for an address on the LDAP server.
Note
7
BEFORE USING THE NETWORK SCANNER FUNCTION
1
Storing destinations for Scan to FTP
1
Click [Destination] in the menu frame
of the Web page.
2
Click [FTP].
3
Enter the destination information.
For the settings, see the following table.
4
When you have completed all the
entries, click [Submit].
The entries will be stored.
FTP destination information
*1If you entered a host name in "Hostname or IP Address", you will need to enter the DNS server settings. (Page 13)
*2To perform Scan to FTP (Hyperlink), you must also enter the settings for the e-mail server.
If you select the "Enable Hyperlink to FTP server to be e-mailed" checkbox and select a previously stored recipient (page
6) from "E-mail Destination", an e-mail will be sent to the recipient informing them of the file format and location of the
scanned image data (Scan to FTP (Hyperlink)). A hyperlink to the file server to which the scanned image data was sent
appears in the e-mail, and the recipient can click the hyperlink to go directly to the location where the image data is stored.
ItemDescription
Name (Required)Enter the name of the destination (up to 36 characters).
Initial (Optional)
Enter initial text for the destination (maximum of 10 characters). When the destination list is
displayed in the destination control screen, the initial text is used to group the destinations.
Custom IndexNames can be assigned to the custom indexes as desired (page 5), allowing
convenient grouping of destinations.
Drop down list:Select a custom index for the destination to be stored.
User checkbox:
When this is selected, the destination is stored in the user tab of the address
book. (Page 22
)
Hostname or IP Address
(required)*
1
Enter the IP address or host name of the FTP server (maximum of 127 characters).
User Name (Optional)Enter the login user name for the FTP server (maximum of 32 characters).
Password (Optional)Enter the login password for the FTP server (maximum of 32 characters).
Directory (Optional)If you wish to specify a destination directory on the FTP server, enter the directory
(maximum of 200 characters).
Enable Hyperlink to FTP
server to be e-mailed
(Checkbox)*
2
When you send a scanned file to an FTP server, you can have a transmission
notification automatically sent to the file recipient by e-mail. To have transmission
notifications sent, select the checkbox. The FTP server name will appear in the
transmission notification as a hyperlink.
E-mail Destination
Select the recipient that you wish to notify of the file transmission to the FTP server. To select
a recipient here, the recipient's e-mail address must have been previously stored. (Page 6
)
Note
8
BEFORE USING THE NETWORK SCANNER FUNCTION
Storing destinations for Scan to Desktop
The destination for Scan to Desktop is stored by the Sharp Network Scanner Tool Setup Wizard when "Network
Scanner Tool" is installed in your computer. For this reason, there is no need to store the Scan to Desktop
destination in the Web page. (The Network Scanner Tool is on the "Sharpdesk" CD-ROM that accompanies the
Network Expansion Kit.)
For information on Scan to Desktop system requirements, installing the Network Scanner Tool, and storing
the destination, see the "Sharpdesk installation guide" that accompanies the network expansion kit.
Normally your computer is stored as the destination by the method indicated above.
The following page for storing Scan to Desktop destination information appears when [Destination] is selected in the
menu frame, followed by [Desktop]. This page is used mainly by the system administrator in the following circumstance.
•When another machine that also has the network expansion kit is added to your network and you wish to send an
image scanned on the new machine to a destination stored on the existing machine
See "
Editing and deleting programmed transmission destinations" (page 10) to select the Scan to Desktop
destination information that you wish to use on the new machine and enter the displayed information in this screen in
the new machine. (When you have completed all entries, click [Submit].)
If there are several destinations that you wish to use on the new machine, repeat this procedure as needed.
If the information entered here differs from the information entered on the host computer, transmission/reception will
not be possible.
For the settings, see the following table.
Scan to Desktop destination information
*If you entered a host name in "Hostname or IP Address", you will need to enter the DNS server settings. (Page 13)
ItemDescription
Name (Required)Enter the name of the destination (up to 36 characters).
Initial (Optional)Enter initial text for the destination (maximum of 10 characters). When the destination
list is displayed in the destination control screen, the initial text is used to group the
destinations.
Custom IndexNames can be assigned to the custom indexes as desired (page 5
), allowing
convenient grouping of destinations.
Drop down list:Select a custom index for the destination to be stored.
User checkbox:
When this is selected, the destination is stored in the user tab of the address
book. (Page 22
)
Hostname or IP Address
(Required)*
Enter the IP address or host name of the FTP server (maximum of 127 characters).
Port Number (Required)Enter a port number from 0 to 65535 for the desktop network scanner tool.
Process Directory
(Optional)
Enter the destination directory name for the file (maximum of 200 characters). The file
will be processed in this directory after it is received.
User Name (Optional)Enter the login user name for the network scanner tool (maximum of 32 characters).
Password (Optional)Enter the login password for the network scanner tool (maximum of 32 characters).
9
BEFORE USING THE NETWORK SCANNER FUNCTION
1
Storing Groups (Scan to E-mail)
You can send a scanned image to multiple e-mail destinations in a single Scan to E-mail operation. If you frequently
transmit to a fixed group of destinations, you can store the destinations as a group.
1
Click [Destination] in the menu frame
of the Web page.
2
Click [Group(E-mail)].
3
Enter the destination information.
For the settings, see the following table.
4
When you have completed all of the
entries, click [Submit].
The entries will be stored.
Storing a group of destinations
Up to 100 destinations can be stored in one group.
Note
ItemDescription
Name (Required)Enter a name for the group (up to 36 characters).
Initial (Optional)Enter initial text for the destinations (maximum of 10 characters). When the
destination list is displayed in the destination control screen, the initial text is used to
group the destinations.
Custom IndexNames can be assigned to the custom indexes as desired (page 5
), allowing
convenient grouping of destinations.
Drop down list:Select a custom index for the destination to be stored.
User checkbox:
When this is selected, the destination is stored in the user tab of the address
book. (Page 22
)
Address(es) (Required)Select the address of each destination from the "E-mail" list box. Programmed e-mail
destinations appear in each of the destination lists. To select multiple destinations,
click each address while holding down the [Ctrl] key on the keyboard. If you need to
cancel an address that has been selected, click the address again while holding down
the [Ctrl] key.
If an LDAP server is being used, you can click the [Global Address Search] button to
search for an address on the LDAP server. Multiple e-mail addresses can be entered.
Separate the e-mail addresses with a comma (,), semi-colon (;), space ( ), or colon (:).
10
BEFORE USING THE NETWORK SCANNER FUNCTION
Editing and deleting programmed transmission destinations
To edit or delete programmed destinations, click [Destination] in the menu frame of the Web page.
1
Click [Destination] in the menu frame
of the Web page.
2
In the Destinations List, click the
checkbox of the destination that you
want to edit or delete.
3
To edit the selected destination, click [Edit]
at the bottom of the Destinations List.
The programming screen
of the destination
selected in step 2
appears. Edit the
information in the same
way as you initially stored
it.
When finished, be sure to click [Submit] to save
your changes.
4
To delete the selected destination,
click [Delete] at the bottom of the
Destinations List.
A message appears
asking you to confirm the
deletion. Click [Yes] to
delete.
Printing lists of programmed destinations
You can print lists showing the destinations that have been programmed.
The following lists can be printed.
•
Print individual list: Shows the information programmed in e-mail, FTP, desktop, and group destinations.
•Print group list: Shows only the information programmed in group (e-mail) destinations.
1
Click [Destination] in the menu frame
of the Web page.
2
To print the individual list, click [Print
Individual List] at the bottom of the
destinations list.
3
To print the group list, click [Print
Group List] at the bottom of the
destinations list.
If you attempt to delete a programmed destination in the following situations, a warning message will appear and
deletion will not be possible.
•The destination is included in a group.
If the destination is being used for a current transmission, cancel the transmission or wait until it is completed and
then delete the destination. If the destination is included in a group, delete the destination from the group and
then delete the destination.
Note
11
1
ABOUT THE WEB PAGE (FOR THE
ADMINISTRATOR)
In addition to the menu that appear in the user Web page, the Web page for the administrator also shows menus
that can only be established by the administrator.
A menu frame appears on the left side of the page. When you click an item in the menu, a screen appears in the
right frame that allows you to configure settings for that item.
Settings that can only be configured by the administrator are explained here.
(1)Network Scanning (page 12
)
This lets you select transmission methods for the
network scanner function and configure settings
for Scan to E-mail.
(2)Passwords (page 14
)
The administrator can establish passwords to
protect the Web site. Enter the password that you
wish to establish and click the [Submit] button.
A password can be set for the administrator and
users.
(3)Clock Adjust
This is used to set the time in the machine. Make
sure the time is set correctly when performing
Scan to E-mail.
This setting does not appear on models that have
the fax function. If your model has the fax
function, see the "Operation manual (for
facsimile)" to set the time at the operation panel
of the machine.
(4)Quick Setup (page 13
)
This is used to configure basic settings for the
SMTP, DNS, and LDAP servers.
(5)Security
Port numbers can be changed or disabled for
security purposes.
(6)Services (page 13
)
This is used to configure advanced SMTP and DNS
server settings as needed for each transmission method.
(7)LDAP (page 13)
This is used to configure advanced settings for
global address searches.
(6)
(7)
(1)
(2)
(3)
(4)
(5)
If "HTTP" is disabled, it will not be possible
to open the Web page. To open the Web
page in this case, the network expansion kit
must be reset.
☞How to reset the network expansion kit
(page 37)
Note
12
BEFORE USING THE NETWORK SCANNER FUNCTION
BASIC SETTINGS FOR NETWORK SCANNING
Click [Network Scanning] in the menu frame and configure the required settings. A password is required to access
this screen. (Page 14
) These settings should only be configured by the network administrator. For explanations of
each of the items, click [Help] in the menu frame.
1
Click [Network Scanning] in the menu
frame.
The Network Scanning
setup page appears.
2
Select the transmission methods that
you wish to use.
Select the scanner delivery methods that you
want to use. In the "Enable Scanner Delivery to:"
field, click the checkbox next to each method that
you want to use so that a checkmark appears in
the checkbox.
All transmission methods are initially selected
(factory default settings).
3
Configure the Advanced Setup
settings.
Select advanced functions that can be used for
Scan to E-mail.
If you wish to BCC a copy of a Scan to E-mail
transmission to an e-mail address, select the
[Bcc] checkbox and enter the e-mail address.
4
Set a limit for the size of image files.
To prevent the transmission of excessively large
files by Scan to E-mail, you can set a size limit.
If the image file created from the scanned image
is larger than the set limit, the image file is
discarded. The limit can be set from 1 MB to 10
MB in increments of 1 MB.
The factory default setting is [Unlimited]. If you
wish to set a limit, remove the checkmark from
the [Unlimited] checkbox and enter the desired
limit.
5
Select the method for assigning a file
name to a scanned image.
Select the method for assigning a file name to a
scanned image. In "File Naming", click the items
that you wish to use in the file name. "Destination
Name" and "Date & Time" are initially selected.
6
Selecting an e-mail subject (only used
for Scan to E-mail).
The setting is used to enter the subject that
appears in the recipient's e-mail program when
you perform Scan to E-mail. (This setting is not
necessary if you will not be using Scan to E-mail.)
Enter a subject (maximum of 80 characters). If
nothing is entered, "Scanned image from <Device
Name>*" will appear.
*The name that appears in Device Name is the name
stored in "Name" in the screen that appears when
you click [System Information] in the menu frame. If a
name has not been stored, the product name will
appear.
7
Click [Submit].
After entering the
settings, be sure to click
[Submit] to store them.
If you are going to send images to the same
recipient more than once, we recommend
that you also select "Session Page Counter"
or "Unique Identifier" to prevent sending
multiple files with the same name, which
would result in each successive file
overwriting the previous file.
Note
13
BEFORE USING THE NETWORK SCANNER FUNCTION
1
VARIOUS SERVER SETTINGS
The procedures for using [Quick Setup] are explained here. [Quick Setup] is used to quickly configure only the
required settings for "SMTP", "DNS", and "LDAP" servers. These settings are normally configured first.
SMTP server:SMTP is used to transmit e-mail that is sent using Scan to E-mail or Scan to FTP (Hyperlink). To use
these transmission methods, your SMTP server settings must be configured.
DNS server:If you entered a host name in "Primary SMTP Server" or "Secondary SMTP Server" of "SMTP", you
must also configure your DNS server settings.
You will also need to configure your DNS server settings if host names will be entered in "Hostname
or IP Address" when storing destinations for Scan to FTP (Scan to FTP (Hyperlink)) or Scan to
Desktop.
LDAP server:If mail addresses are managed on your network by an LDAP server, the e-mail addresses stored in
the LDAP server can be used for Scan to E-mail.
To allow the machine to use the e-mail addresses in the LDAP server, the LDAP server settings must
be configured in the Web page.
Configuring SMTP, DNS and LDAP server settings.
1
Click [Quick Setup] in the menu frame.
2
Enter the required information in
"SMTP", "DNS" and "LDAP".
For explanations of each setting, click [Help] in
the upper right-hand corner of the window.
3
When you have completed all of the
entries, click [Submit].
The entries will be stored.
If you need to configure advanced settings for the SMTP, DNS, and LDAP servers, follow the procedures below.
•Configuring SMTP and DNS server settings
Click [Services] in the menu frame to display the services setup screen. Select the desired server and then
configure the required parameters for that server.
•Configuring LDAP server settings
Click [LDAP] in the menu frame to display the LDAP setup screen. Configure the required parameters.
Note
14
BEFORE USING THE NETWORK SCANNER FUNCTION
PROTECTING INFORMATION PROGRAMMED IN THE
WEB PAGE ([Passwords])
The settings and information programmed in the Web page can be protected by establishing passwords (click
[Passwords] in the menu frame). The administrator must change the factory default password to a new password.
The administrator should also take care to remember the new password. From now on, the new password must be
entered each time you wish to configure settings in the Web pages.
A password can be set for the administrator and users.
1
Click [Passwords] in the menu frame.
2
Enter the current password in "Admin
Password".
When establishing a password for the first time,
enter "Sharp" in "Admin Password".
3
Enter passwords in "User Password"
and "Admin Password".
•A maximum of 7 characters and/or numbers
can be entered for each password (passwords
are case sensitive).
•Be sure to enter the same password in
"Confirm Password" as you did in "New
Password".
4
When you have completed all entries,
click [Submit].
The entered password is stored.
After setting the password, turn the machine
power off and then back on.
Be sure to enter "S" in upper case
and "harp" in lower case (passwords
are case sensitive).
Caution
When prompted to enter the password, a user
should enter "user" in "User Name" and an
administrator should enter "admin" in "User Name".
The appropriate password should be entered in
"Password". For more information, click [Help] in the
upper right-hand corner of the window.
15
2
HOW TO USE THE NETWORK
SCANNER FUNCTION
This chapter explains how to use the network scanner function at the operation panel of the machine after the
settings have been configured in the Web page. The network scanner function is used to convert paper-based
information such as a photo or document into image data for transmission over a corporate network (intranet) or the
Internet to an FTP server or computer. When transmitting an image using the network scanner function, the
destination is specified by selecting a previously stored destination at the operation panel.
There are three methods for transmitting images:
1.The scanned image can be sent to a designated directory on an FTP server. (Scan to FTP)
2.The scanned image can be sent to a computer desktop on the network. (Scan to Desktop)
3.The scanned image can be sent to an e-mail recipient. (Scan to E-mail)
Before Scan to Desktop can be performed, the software in the CD-ROM that accompanied the network
expansion kit (AR-NB3) must be installed. (For the procedure for installing the software, see the "Sharpdesk
installation guide".)
Note
16
A LOOK AT THE MACHINE
OPERATION PANEL
(1)Keys for the fax function
(when the fax option is installed)
These keys are used in fax mode. For more
information, see the "Operation manual (for
facsimile)".
(2)Display (page 18
)
This displays the base screen and the function
settings screen.
(3)[BACK] key
In a setting or programming screen, this key is
used to move back to the previous screen.
(4)[OK] key
This key is used to enter a setting that has been
selected with the arrow () or other keys.
(5)Numeric keys
These are used to enter destination addresses,
address search characters, and numeric values
for various settings.
For more information on entering characters, see
"
ENTERING CHARACTERS" (page 31).
(6)[C] key
This is used to clear a mistake while entering
destination addresses, address search
characters, and numeric values for various
settings. One digit is cleared each time the key is
pressed.
The key is also used to cancel a job.
(7)[CA] key
This is used to cancel a transmission or
programming operation. When pressed during a
programming operation, the operation is
canceled and the display returns to the base
screen described on page 18
.
This key is also used to cancel a resolution,
paper size, or special function setting that was
selected at the time of transmission.
(8)[MODE SELECT] keys (step 1 on page 20
)
Use these keys to change current operation
mode.
(9)[SCAN] key
Press to switch to scan mode. The initial screen
of scan mode will appear in the display.
(10)[COLOR MODE] key (page 27
)
Use this key to select "COLOR", "GRAY", or
"B/W" for the scanning mode.
(11)[RESOLUTION] key (page 27
)
Use this key to select the scanning resolution.
(12)[ADDRESS] key (page 22
)
Use this key to search for destination addresses
such as e-mail address in the address directory.
ON LINE
DATA
LINE
DATA
SCAN
FAX
PRINT
2627282930
3132333435
4142434445
4647484950
3637383940
ABCDE
FGHIJ
KLMNO
PQRTS
UVWXYZSP
SPEAKER
SHIFT
REDIAL/PAUSESPEED
SYMBOL
COMM. SETTING
SPACE/–
COPY
(1)
(8)(9)
17
HOW TO USE THE NETWORK SCANNER FUNCTION
2
(13)[FORMAT] key (page 28)
When you send an image to one or more
recipients using Scan to E-mail or Scan to FTP,
the [FORMAT] key enables you to temporarily
override the individual file format settings (file
type / compression mode) stored for each
recipient and send the image to all of the
recipients using a single file format setting.
(14)[ORIGINAL SIZE] key (page 26
)
This is used to set the size of the original to be
transmitted.
(15)[DUPLEX SCAN] key (page 25
)
Press this key to use the duplex scan function.
(when the RSPF is installed)
(16)[SPECIAL FUNCTION] key
This key is used to select a special transmission
function, configure function settings, and access
the key operator programs.
(17)Arrow keys ( )
These are used to select items and move through
pages.
(18)[START] key ()
This is used at the following times:
(1) When starting transmission
(2) When scanning an original
(3) When configuring and storing settings
ABCDEF
JKLGHIMNO
TUVPQRSWXYZ
@.-
_
COPY
EXPOSURE
PAPERZOOM
AUTO %
OUTPUTDUPLEX
SPECIAL FUNCTION
ACC. #-C
READ-END
SCAN
FAX
COLOR MODE
PROGRAM
RESOLUTION
RESOLUTION
ADDRESSFORMAT
ORIGINAL SIZEDUPLEX SCAN
DUPLEX SCAN
ORIGINAL SIZE
ADDRESS
BROADCAST
OK
BACK
FAX STATUS
(2)(3)(4)(5)(6)(7)
(10)
(11)(12)(13)(14)(15)(16)(17)(18)
•When the auto power shut-off function
activates, all lights except the mode key
indicators go off. For information on auto
power shut-off, see the "Operation
manual (for general information and
copier)".
•For information on the keys and indicators
which are used for the copy function and
other functions, see "OPERATION
PANEL" in the manual for each function.
Note
18
HOW TO USE THE NETWORK SCANNER FUNCTION
SCAN MODE (BASE SCREEN)
The base screen of scan mode is displayed by pressing the [SCAN] key from the base screen of copy mode, print
mode, or fax mode.
Base screen of scan mode
(1)Message display
Messages appear here to indicate the current
status of the machine.
(2)Destination display
This shows the selected destination.
There are four scanner transmission modes:
Scan to E-mail, Scan to FTP, Scan to FTP
(Hyperlink), and Scan to Desktop.
This shows the currently selected destination and
transmission mode.
(3)Color mode display
This shows the currently selected color mode for
scanning.
(4)File type display
This shows the image data file type to be created.
(5)Original display (page 26)
This displays an icon to indicate the original
scanning mode when an original has been
placed.
: One-sided scanning in the SPF.
: Document glass
: Two-sided scanning in the RSPF.
The size of the original is also displayed.
(6)Transmission mode display
When appears to the right of the icon, the []
key can be pressed to show a list of the currently
selected destinations.
A destination can also be deleted in this screen.
(7)Resolution display
The shows the scanning resolution.
(8)File creation display
This shows the currently selected file creation
method.
If a screen appears asking you what type of connection you are using after you press the [SCAN] key, select
"NETWORK" with the [] or [] key and press the [OK] key.
Note
Ready to scan.
XXXXX
COLOR 150dpi
PDF MULTI
8 x11
1
2
(2)
(3)
(4)
(5)
(1)
(7)
(8)
(6)
19
HOW TO USE THE NETWORK SCANNER FUNCTION
2
AUDITING MODE
Auditing mode is used to restrict the use of scan mode to valid accounts (up to 50 accounts can be created) and to
keep a count of pages transmitted by each account.
Using audit mode
When auditing mode is enabled, the account number entry screen is displayed. Enter your account number
(five-digit identification number) as explained below before performing a scanner operation.
1
Enter your account number (five
digits) with the numeric keys.
•As the account number is entered, the hyphens (-)
change to asterisks (). If you enter an incorrect
digit, press [C] key and re-enter the correct digit.
•After you enter your account number, the base
screen of scan mode (page 18
) appears.
2
When you have finished using scan
mode, press the [ACC.#-C] key ().
Enter your account
number.
ACCOUNT #:-----
•If you enter an account number for copy
mode has also been programmed for
scan mode, you can change to scan mode
after completing the copy operation and
continue with the scan operation without
re-entering your account number.
If you enter an account number for copy
mode that has not been programmed for
scan mode, enter your account number
for scan mode after you press the [SCAN]
key to change to scan mode.
•When "ACC. # SECURITY" is enabled in
the key operator programs (see the "Key
operator's guide"), the message "Please
see your key operator for assistance" will
appear for one minute if an invalid
account number is entered three times in
a row. During that time operation of the
machine will not be possible.
ABCDEF
JKLGHIMNO
TUVPQRSWXYZ
@.-
_
FUNCTION
ACC. #-C
READ-END
OK
Enter your account
number.
ACCOUNT #: ---
Note
@.-
_
FUNCTION
ACC. #-C
READ-E
20
SENDING AN IMAGE
BASIC TRANSMISSION PROCEDURE
1
Make sure the machine is in scan
mode.
When the SCAN indicator is lit,
the machine is in scan mode.
If the indicator is not lit, press
the [SCAN] key. If auditing
mode has been enabled for
the scan function in the key
operator programs, a
message will appear prompting you to enter your
account number when you switch to scan mode. Enter
your account number (five digits) with the numeric
keys. (Page 19
)
2
Place the original(s) in the document
feeder tray or on the document glass.
For detailed information on placing an original, see "4.
COPY FUNCTIONS" of the "Operation manual (for
general information and copier)".
If you are using the document glass to send multiple
pages, place the first page first.
3
Check the original size. If the original
is a non-standard size or the size was
not detected correctly, press the
[ORIGINAL SIZE] key.
When the [ORIGINAL SIZE] key is pressed, the size
selection screen appears. See "
MANUALLY SETTING
THE SCANNING SIZE" (page 26) to set the original size.
4
If needed, select the color mode (page
27).
To adjust the color mode, press the [COLOR MODE]
key. (See "
SELECTING THE COLOR MODE" (page
27).)
5
If needed, select the resolution setting
(page 27
).
The initial factory setting is [150dpi].
6
If needed, select the format (page 28).
The initial factory setting is [PDF].
7
Press the [ADDRESS] key.
You cannot place originals in both the
document feeder tray and on the document
glass and send them in a single transmission.
COPY
LINE
DATA
SCAN
FAX
PRINT
EXP
SCAN
COL
Note
OM
AUTO %
OUTPUTDUPLEX
SPEC
ESSFORMAT
ORIGINAL SIZEDUPLEX SCAN
DUPLEX SCAN
ORIGINAL SIZE
ESS
BROADCAST
ORIGINAL SIZE
11x17
8 x14
8 x11
INCH
1
2
1
2
COPY
DATA
EXPOSURE
PAPERZOO
SCAN
FAX
COLOR MODE
PROGRAM
RESOLUTION
RESOLUTION
ADDR
ADDR
COLOR MODE
COLOR
GRAY
B/W
•Information on the destination can be
stored in the Web page.
•The sender name is normally set to the
name stored in "Reply E-mail Address" in
"SMTP Setup" in the Web page.
COPY
EXPOSURE
PAPERZOOM
AUTO
SCAN
FAX
COLOR MODE
PROGRAM
RESOLUTION
RESOLUTION
ADDRESSFORM
ADDRESS
BROADC
RESOLUTION
100dpi
150dpi
200dpi
300dpi
PERZOOM
AUTO %
OUTPUTDUPL
OLUTION
OLUTION
ADDRESSFORMAT
ORIGINAL SIZEDUPLEX
DUPLEX
ORIGINAL SIZE
ADDRESS
BROADCAST
FORMAT
PDF
PDF G3
MULTI
ALL PAGES 1FILE
Note
OSURE
PAPERZOOM
AUTO %
OUTP
R MODE
GRAM
RESOLUTION
RESOLUTION
ADDRESSFORMAT
ORIGINA
ORIGINA
ADDRESS
BROADCAST
DESTINATION SELECT
ADDRESS BOOK
ADDRESS ENTRY
ADDRESS SEARCH
21
HOW TO USE THE NETWORK SCANNER FUNCTION
2
8
Select the destination selection
method (page 22
).
Select from the following three destination selection methods:
•"ADDRESS BOOK" (page 22)
Select one of the stored destinations directly from
the operation panel.
•"ADDRESS ENTRY" (page 23
)
Directly enter the e-mail address. (Only for Scan to
E-mail.)
•"ADDRESS SEARCH" (page 24
)
Access a directory data base on the Internet or your
intranet and search for a destination e-mail address.
During a global address search, multiple addresses
can be entered to perform a broadcast transmission.
When you have finished searching for the destination,
you will return to the following base screen.
9
Press the [START] key ().
Scanning begins.
If scanning is completed
normally, the following
screen is appears briefly
and then the display
returns to the base screen.
9
Press the [START] key().
Scanning begins.
10
If you have another page to scan, change
pages and then press [START] key
()
.
•
Repeat this sequence until all pages have been scanned.
•You can change the color mode and resolution
setting as needed for each page. (page 27
)
•If no action is taken for one minute (the [START] key
() is not pressed), scanning automatically ends
and transmission begins.
11
When the final original page has been
scanned, press the [READ-END] key ().
Open the SPF and remove the document. When the
original is removed or any key operation is performed,
the display returns to the base screen.
Using the SPF
Ready to scan.
XXXXX
COLOR 150dpi
PDF MULTI
8 x11
1
2
WXYZ
@.-
_
READ-END
Reading P-xxx
XXXXX
COLOR 150dpi
PDF MULTI
8 x11
1
2
Complete.
XXXXX
COLOR 150dpi
PDF MULTI
8 x11
1
2
Using the document glass
WXYZ
@.-
_
READ-END
Reading P-xxx
XXXXX
COLOR 150dpi
PDF MULTI
8 x11
1
2
[START]:CONTINUE
[#]:READ-END
COLOR 150dpi
PDF MULTI
8 x11
1
2
@.-
_
. #-C
READ-END
[START]:CONTINUE
[#]:READ-END
COLOR 150dpi
PDF MULTI
8 x11
1
2
•Canceling transmission
To cancel the transmission while "Reading" appears or before the key is pressed, press the [C] or [CA] key.
•If the power is turned off or a power failure occurs while a document is being scanned in the SPF, the machine
will stop and a document misfeed will occur. After the power is restored, remove the misfed original as
explained in "REMOVING MISFEEDS" in "2. TROUBLESHOOTING AND MAINTENANCE" in the "Operation
manual (for general information and copier)".
•
When performing a Scan to E-mail transmission, note the following points:
Be careful not to send image data files that are too large. Your mail server's system administrator may have placed a limit
on the amount of data that can be sent in one e-mail transmission. If this limit is exceeded, the e-mail will not be delivered
to the recipient. Even if there is no limit and your e-mail is successfully delivered, a large data file may take a long time to
be received and place a heavy burden on the recipient's network, depending on the recipient's network (Internet)
environment. If large image data files are repeatedly sent, the resulting burden on the network may slow down the speed of
other, unrelated data transmissions and in some cases, may even cause the mail server or network to go down. In cases
where you need to send a large file or multiple images, try lowering the resolution or reducing the scanned original size.
Note
22
HOW TO USE THE NETWORK SCANNER FUNCTION
SELECTING A DESTINATION (USING THE [ADDRESS]
KEY)
A destination can be selected using one of three methods: Selecting from "ADDRESS BOOK", using "ADDRESS
ENTRY", or "ADDRESS SEARCH".
"ADDRESS BOOK"
1
Perform steps 1 to 6 of "BASIC
TRANSMISSION PROCEDURE" (page 20
).
2
Press the [ADDRESS] key.
The address selection
screen appears
3
Press the [OK] key.
4
Change tabs as needed with the [] or
[] key and select the desired
destination with the [] or [] key.
•The [USER] tab changes as follows each time you
press the [] key:
[USER]
→[ABCD]→[EFGHI]→[JKLMN]→[OPQRST]
→[UVWXYZ]→[USER]→[ABCD]→...
To move backwards through the tabs, press the []
key.
•You can switch between information on the selected
destination and the destination list by pressing the
key.
5
Press the key.
A checkmark appears by the
selected destination. To
cancel the selection, press the
key once again to remove
the checkmark.
To select multiple
destinations, repeat steps 4
and 5.
6
Press the [OK] key.
Multiple destinations can be
selected for a Scan to E-mail
transmission. (Maximum of
20.)
Only one destination can be selected for a Scan to
FTP or Scan to Desktop transmission.
7
Continue from step 9 of "BASIC
TRANSMISSION PROCEDURE" (page 21
).
8
OSURE
PAPERZOOM
AUTO %
OUTP
R MODE
GRAM
RESOLUTION
RESOLUTION
ADDRESSFORMAT
ORIGINA
ORIGINA
ADDRESS
BROADCAST
DESTINATION SELECT
ADDRESS BOOK
ADDRESS ENTRY
ADDRESS SEARCH
GHI
OK
BACK
USER
PPD
SALES
[#]:LIST DETAIL
[ ]:SELECT ON/OFF
GH
PQR
DUPLEX
SPECIAL FUNCTION
DUPLEX SCAN
USER
PPD
SALES
SUPPORT
[ ]:SELECT ON/OFF
Canceling transmission
•To cancel the transmission while
"Reading" appears or before the key is
pressed, press the [C] or [CA] key.
•If the power is turned off or a power failure
occurs while a document is being
scanned in the SPF, the machine will stop
and a document misfeed will occur. After
the power is restored, remove the
document as explained in "ORIGINAL
MISFEED IN THE SPF" in "Operation
manual (for general information and
copier)".
@.-
_
FUNCTION
ACC. #-C
READ-E
OK
Note
23
HOW TO USE THE NETWORK SCANNER FUNCTION
2
"ADDRESS ENTRY"
1
Perform steps 1 to 6 of "BASIC
TRANSMISSION PROCEDURE" (page 20
).
2
Press the [ADDRESS] key
The address selection
screen appears.
3
Select "ADDRESS ENTRY" with the
[] key.
4
Press the [OK] key.
The e-mail address entry
screen appears.
5
Enter the destination address.
To enter characters, see
"
ENTERING CHARACTERS"
(page 31).
If you make a mistake, press
the [C] key and to clear the
mistake.
6
Press the [OK] key.
The base screen
appears.
7
To enter another address, repeat
steps 2 through 6.
Multiple destinations can be selected for a Scan to
E-mail transmission. (Maximum of 20.)
8
Continue from step 9 of "BASIC
TRANSMISSION PROCEDURE" (page 21
).
9
10
OSURE
PAPERZOOM
AUTO %
OUTP
R MODE
GRAM
RESOLUTION
RESOLUTION
ADDRESSFORMAT
ORIGINA
ORIGINA
ADDRESS
BROADCAST
DESTINATION SELECT
ADDRESS BOOK
ADDRESS ENTRY
ADDRESS SEARCH
GH
PQR
DUPLEX
SPECIAL FUNCTION
DUPLEX SCAN
DESTINATION SELECT
ADDRESS BOOK
ADDRESS ENTRY
ADDRESS SEARCH
GHI
OK
BACK
ADDRESS ENTRY
[10-key]:ENTRY
ABCDEF
JKLGHIMNO
TUVPQRSWXYZ
@.-
_
FUNCTION
ACC. #-C
READ-END
OK
OK
Ready to scan.
ppdl@sharp.corp
COLOR 150dpi
PDF MULTI
8 x11
1
2
24
HOW TO USE THE NETWORK SCANNER FUNCTION
"ADDRESS SEARCH" search
1
Perform steps 1 to 6 of "BASIC
TRANSMISSION PROCEDURE" (page 20
).
2
Press the [ADDRESS] key
3
Select "ADDRESS SEARCH" with the
[] key.
4
Press the [OK] key.
The address search
screen appears.
5
Enter the search characters.
To enter characters, see
"
ENTERING CHARACTERS"
(page 31).
If you make a mistake, press
the [C] key to clear the
mistake.
6
Press the [OK] key.
The search results
appear.
7
Select the desired destination with the
[] or [] key.
8
Press the [OK] key.
The base screen
appears.
9
To perform another search, repeat
steps 2 through 8.
Multiple destinations can be selected for a Scan to
E-mail transmission. (Maximum of 20.)
10
Continue from step 9 of "BASIC
TRANSMISSION PROCEDURE" (page 21
).
OSURE
PAPERZOOM
AUTO %
OUTP
R MODE
GRAM
RESOLUTION
RESOLUTION
ADDRESSFORMAT
ORIGINA
ORIGINA
ADDRESS
BROADCAST
DESTINATION SELECT
ADDRESS BOOK
ADDRESS ENTRY
ADDRESS SEARCH
GH
PQR
DUPLEX
SPECIAL FUNCTION
DUPLEX SCAN
DESTINATION SELECT
ADDRESS BOOK
ADDRESS ENTRY
ADDRESS SEARCH
GHI
OK
BACK
ADDRESS SEARCH
_
[10-key]:ENTRY
ABCDEF
JKLGHIMNO
TUVPQRSWXYZ
@.-
_
FUNCTION
ACC. #-C
READ-END
OK
OK
SEARCH RESULT
Tanaka a
Tanaka b
Tanaka c
Tanaka d
GH
PQR
DUPLEX
SPECIAL FUNCTION
DUPLEX SCAN
SEARCH RESULT
Tanaka a
Tanaka b
Tanaka c
Tanaka d
OK
Ready to scan.
Tanaka c
COLOR 150dpi
PDF MULTI
8 x11
1
2
25
HOW TO USE THE NETWORK SCANNER FUNCTION
2
TRANSMITTING A TWO-SIDED ORIGINAL
Follow these steps to automatically transmit a two-sided original. (This is only possible on models that have an RSPF installed.)
1
Make sure the machine is in scan
mode.
When the SCAN indicator is lit,
the machine is in scan mode. If
the indicator is not on, press
the [SCAN] key. If auditing
mode has been enabled for the
scan function in the key
operator programs, a message
will appear prompting you to enter your account number
when you switch to scan mode. Enter your account
number (five digits) with the numeric keys. (Page 19
)
2
Place the original(s) in the document
feeder tray.
For information on placing an original, see "4. COPY
FUNCTIONS" of the "Operation manual (for general
information and copier)".
3
Check the original size.
Press the [ORIGINAL SIZE] key to open the original
size selection screen. See "
MANUALLY SETTING THE
SCANNING SIZE" (page 26) to set the original size.
4
Press the [DUPLEX SCAN] key.
The duplex mode
selection screen appears.
5
Select "2-SIDED" with the [] or []
key.
6
Press the [OK] key.
The duplex original type
selection screen appears.
7
Select booklet or tablet for the duplex
original type with the [] or [] key.
8
Press the [OK] key.
You will return to the base screen and the duplex
scanning mode icon will appear.
9
Continue from step 4 of "BASIC
TRANSMISSION PROCEDURE" (page 20
).
Do not use an original that is not a standard size (11" x 17", 8-1/2" x 14", 8-1/2" x 11", 8-1/2" x 11"R, 5-1/2" x 8-1/2", A3, B4, A4, A4R, B5, B5R, or A5).
Otherwise a scanning error or cut-off image may result.
Note
COPY
LINE
DATA
SCAN
FAX
PRINT
EXP
SCAN
COL
OM
AUTO %
OUTPUTDUPLEX
SPEC
ESSFORMAT
ORIGINAL SIZEDUPLEX SCAN
DUPLEX SCAN
ORIGINAL SIZE
ESS
BROADCAST
ORIGINAL SIZE
11x17
8 x14
8 x11
INCH
1
2
1
2
O %
OUTPUTDUPLEX
SPECIAL FUNCTI
MAT
ORIGINAL SIZEDUPLEX SCAN
DUPLEX SCAN
ORIGINAL SIZE
CAST
DUPLEX SCAN
1-SIDED
2-SIDED
GH
PQR
DUPLEX
SPECIAL FUNCTION
DUPLEX SCAN
DUPLEX SCAN
1-SIDED
2-SIDED
GHI
OK
BACK
DUPLEX STYLE
BOOKLET
OK
•
Two-sided scanning is not possible when "COLOR MODE" is set to "COLOR" or "GRAY".
•Booklets and tablets
Two-sided originals that are bound at the side are booklets, and two-sided
originals that are bound at the top are tablets.
•Two-sided scanning mode turns off after the transmission is finished. Two-sided
scanning mode can also be canceled by pressing the [CA] key.
•Two-sided scanning is only possible when an RSPF is used. Automatic scanning
of both sides of an original is not possible when the document glass is used.
•Two-sided scanning of originals longer than 11" x 17" (A3) is not possible.
•
To cancel two-sided scanning, select "1-SIDED" in step 5 and then press the [OK] key.
Note
BOOKLETTABLET
26
CHECKING THE SIZE OF A PLACED
ORIGINAL
When a standard-size* original is placed in the document feeder tray or on the
document glass, the original size is automatically detected (automatic original detection
function) and displayed in the original display. Make sure that the size has been
detected correctly.
(1)When an original is placed, an icon appears to indicate the original scanning mode.
:One-sided scanning from the SPF
:Scanning from the document glass
:Two-sided scanning from the RSPF
(2)The original size is displayed.
If a non-standard size original is placed or if you wish to change the scanning size, follow the steps below to
manually set the original scanning size.
STORING SCANNING SETTINGS
Sets of scanning settings (scan size, color mode, resolution, file type, etc.) can be stored for use in various scanning
applications.
MANUALLY SETTING THE SCANNING SIZE
If you load an original that is not a standard size, or the original size is not correctly detected, be sure to press the
[ORIGINAL SIZE] key and set the original size manually.
Perform the following steps after loading the document in the document feeder tray or on the document glass.
1
Press the [ORIGINAL SIZE] key.
The original size
selection screen will
appear.
2
Select the original size with the [] or
[] key.
The selected original size
is highlighted.
To select an AB size, press the [] key and go to step
4.
When the [] key is
pressed, the original size
selection screen for AB
sizes appears.
3
Press the [OK] key.
You will return to the base
screen and the selected original
size will appear in the original
display.
*Standard sizes:
The following sizes are standard sizes: 11" x 17", 8-1/2" x 14", 8-1/2" x 11", 8-1/2" x 11"R, 5-1/2" x 8-1/2" (A3, B4,
A4, A4R, B5, B5R, A5). If a non-standard size original (including a special size) is placed, a standard size close
to the original size may appear, or the original size may not be displayed.
Ready to scan.
XXXXX
COLOR 150dpi
PDF MULTI
8 x11
1
2
(2)(1)
Note
OM
AUTO %
OUTPUTDUPLEX
SPEC
ESSFORMAT
ORIGINAL SIZEDUPLEX SCAN
DUPLEX SCAN
ORIGINAL SIZE
ESS
BROADCAST
ORIGINAL SIZE
11x17
8 x14
8 x11
INCH
1
2
1
2
GH
PQR
DUPLEX
SPECIAL FUNCTION
DUPLEX SCAN
ORIGINAL SIZE
11x17
8 x14
8 x11
INCH
1
2
1
2
ORIGINAL SIZE
A3
B4
A4
AB
GHI
OK
BACK
27
HOW TO USE THE NETWORK SCANNER FUNCTION
2
Selecting an AB original size
4
Select the original size with the [] or
[] key.
To return to the selection of inch original sizes, press
the [] key and return to step 2.
5
Press the [OK] key.
You will return to the base
screen and the selected original
size will appear in the original
display.
SELECTING THE COLOR MODE
After placing the original, you can select an appropriate color mode for the original type. Place the original in the
document feeder tray or on the document glass (steps 1 to 3 on page 20
) and then follow the steps below.
The factory default setting for the color mode is "COLOR". To change the color mode, follow these steps.
1
Press the [COLOR MODE] key.
The color mode selection
screen appears.
2
Select the color mode with the [] or
[] key.
The selected mode is
highlighted.
COLOR:Select this mode for color originals.
GRAY:Select this mode for a black and white
photograph or when a monochrome image is
needed.
B/W: Select this mode when you wish to scan a
photo in monochrome or when you wish to
make text clearer.
3
Press the [OK] key.
You will return to the base
screen and the selected mode
will appear in the color mode
display.
SELECTING THE RESOLUTION
The scanning resolution can be selected. After selecting scan mode and placing the original (steps 1 to 3 on page
20), perform the procedure below.
The factory default setting for the resolution is "150dpi" (e-mail/FTP mode).
If you need to change the resolution, follow these steps.
1
Press the [RESOLUTION] key.
The resolution selection
screen appears.
2
Select the resolution with the [] or
[] key.
The selected resolution is
highlighted.
ORIGINAL SIZE
A3
B4
A4
AB
To cancel a manual original size setting,
press the [CA] key.
If it is not possible to select the actual original
size, select a size that is larger than the actual
original size. If a smaller size is selected, part
of the original will not be transmitted.
OK
Note
COPY
DATA
EXPOSURE
PAPERZOO
SCAN
FAX
COLOR MODE
PROGRAM
RESOLUTION
RESOLUTION
ADDR
ADDR
COLOR MODE
COLOR
GRAY
B/W
GH
PQR
DUPLEX
SPECIAL FUNCTION
DUPLEX SCAN
COLOR MODE
COLOR
GRAY
B/W
Two-sided scanning is not possible when
"COLOR MODE" is set to "COLOR" or "GRAY".
GHI
OK
BACK
Note
COPY
EXPOSURE
PAPERZOOM
AUTO
SCAN
FAX
COLOR MODE
PROGRAM
RESOLUTION
RESOLUTION
ADDRESSFORM
ADDRESS
BROADC
RESOLUTION
100dpi
150dpi
200dpi
300dpi
GH
PQR
DUPLEX
SPECIAL FUNCTION
DUPLEX SCAN
RESOLUTION
100dpi
150dpi
200dpi
300dpi
28
HOW TO USE THE NETWORK SCANNER FUNCTION
3
Press the [OK] key.
You will return to the base
screen and the selected
resolution will appear in the
resolution display.
SELECTING THE FILE FORMAT
After selecting scan mode and placing the original (steps 1 to 3 on page 20), perform the procedure below.
The factory default settings are "PDF" for the file type and "MULTI" for the file creation method (multiple scanned
images are combined into one file).
If you need to change the file format, follow these steps.
1
Press the [FORMAT] key.
The format selection
screen appears.
2
Select the file type with the [] or []
key.
The selected file type is
highlighted.
To set the file creation method, press the [] or []
key.
When "SINGLE" is selected, a one-page file is created
for the scanned image.
When "MULTI" is selected, all scanned images can be
combined into a single file, or one file can be created
for each page (pages 2 to 6).
3
Press the [OK] key.
You will return to the base
screen and the selected format
will appear in the file type and
file creation method display.
GHI
OK
BACK
Resolution
•The default resolution setting is 150 dpi.
For typical text documents, a resolution of
200 dpi or 300 dpi produces sufficiently
legible image data. (A resolution of 200
dpi corresponds to the generally used
"FINE" in fax mode.
For this reason, the 600 dpi setting should
only be used in cases where high-clarity
image reproduction is required, such as
an original that includes photographs or
illustrations.
•
When an original is scanned at the maximum
resolution (600 dpi), the amount of memory
available, the original size, the color mode,
and other setting conditions may cause the
resolution to change. For information on the
setting conditions, see "
MAXIMUM
RESOLUTION" (page 35).
Note
PERZOOM
AUTO %
OUTPUTDUPL
OLUTION
OLUTION
ADDRESSFORMAT
ORIGINAL SIZEDUPLEX
DUPLEX
ORIGINAL SIZE
ADDRESS
BROADCAST
FORMAT
PDF
PDF G3
MULTI
ALL PAGES 1FILE
GH
PQR
DUPLEX
SPECIAL FUNCTION
DUPLEX SCAN
FORMAT
PDF
PDF G3
MULTI
ALL PAGES 1FILE
FORMAT
PDF
PDF G3
SINGLE
1PAGE 1FILE
•When the file type is set to "JPEG", the file
creation method can only be set to
"SINGLE".
•To open the scanned image without using
the software program in the accompanied
CD-ROM, the recipient must have a
viewer program that can open the image
format (file type) that was selected as
explained above.
If the recipient cannot open the image, try
sending the image in a different format.
GHI
OK
BACK
Note
29
HOW TO USE THE NETWORK SCANNER FUNCTION
2
SETTING THE LIGHT SOURCE COLOR
When scanning in black and white mode, you can set the light source color.
For example, if you do not wish to scan the red parts of an original, set the light source color to "RED". ("WHITE" will
cause all colors to be scanned.)
Select scan mode, place the original (steps 1 to 3 on page 20
), and then follow the procedure below.
The factory default setting for the light source color is "WHITE".
If you need to change the light source color, follow these steps.
1
Press the [SPECIAL FUNCTION] key in
scan mode.
Perform this operation from the
base screen of scan mode.
When the [SPECIAL
FUNCTION] key is pressed, the
special function menu appears.
(To select scan mode, see step
1 on page 20
.)
2
Select "LIGHT SOURCE" with the []
or [] key.
3
Press the [OK] key.
4
Select the desired light source color
with the [] or [] key.
5
Press the [OK] key.
The setting is stored and you
return to the base screen.
ADJUSTING THE THRESHOLD VALUE
When scanning in black and white mode, you can adjust the threshold value. As the threshold value is increased,
black becomes stronger. As the threshold value is decreased, white becomes stronger.
Select scan mode, place the original (steps 1 to 3 on page 20
), and then follow the procedure below.
The factory default setting for the threshold value is "128".
To change the threshold value, follow these steps:
1
Press the [SPECIAL FUNCTION] key in
scan mode.
Perform this operation from the
base screen of scan mode.
When the [SPECIAL
FUNCTION] key is pressed, the
special function menu appears.
(To select scan mode, see step
1 on page 20
.)
2
Select "B/W THRESHOLD" with the
[] or [] key.
The light source color can only be selected when the color mode is set to "B/W". (Page 27)
Note
DUPLEX
SPECIAL FUNCTION
ACC.
DUPLEX SCAN
DUPLEX SCAN
GH
PQR
DUPLEX
SPECIAL FUNCTION
DUPLEX SCAN
SPECIAL FUNCTION
B/W THRESHOLD
LIGHT SOURCE
VOID AREA
PAPER SIZE SET
GHI
OK
BACK
LIGHT SOURCE
WHITE
RED
GREEN
BLUE
OK
The threshold value can only be adjusted when the color mode is set to "B/W". (Page 27)
Note
DUPLEX
SPECIAL FUNCTION
ACC.
DUPLEX SCAN
DUPLEX SCAN
GH
PQR
DUPLEX
SPECIAL FUNCTION
DUPLEX SCAN
SPECIAL FUNCTION
B/W THRESHOLD
LIGHT SOURCE
VOID AREA
PAPER SIZE SET
30
HOW TO USE THE NETWORK SCANNER FUNCTION
3
Press the [OK] key.
4
Select the desired threshold value
with the [] or [] key.
The default setting is "128". White becomes stronger
as the displayed value approaches "1". Black becomes
stronger when the displayed value approaches "254".
5
Press the [OK] key.
The set value is stored and you
return to the base screen.
ENABLING SCANNING MARGINS (VOID AREA)
When this function is enabled, margins (void areas that are not scanned) are created around the edges of the machine's
maximum scanning area.
Select scan mode, place the original (steps 1 to 3 on page 20), and then follow the procedure below.
The factory default setting for the void area is "ON" (enabled).
If you need to change the void area setting, follow these steps.
Void area: 7/64" (2.5 mm) from the top and bottom edges
1/8" (3.0 mm) from the left and right edges
1
Press the [SPECIAL FUNCTION] key in
scan mode.
Perform this operation from the
base screen of scan mode.
When the [SPECIAL
FUNCTION] key is pressed, the
special function menu appears.
(To select scan mode, see step
1 on page 20
.)
2
Select "VOID AREA" with the [] or
[] key.
3
Press the [OK] key.
4
Select "ON" or "OFF" with the [] or
[] key.
5
Press the [OK] key.
The setting is stored and you
return to the base screen.
GHI
OK
BACK
B/W THRESHOLD
128
(1~254)
OK
DUPLEX
SPECIAL FUNCTION
ACC.
DUPLEX SCAN
DUPLEX SCAN
GH
PQR
DUPLEX
SPECIAL FUNCTION
DUPLEX SCAN
SPECIAL FUNCTION
B/W THRESHOLD
LIGHT SOURCE
VOID AREA
PAPER SIZE SET
GHI
OK
BACK
VOID AREA
ON
OFF
OK
31
HOW TO USE THE NETWORK SCANNER FUNCTION
2
IMAGE ORIENTATION AND STANDARD ORIGINAL
PLACEMENT ORIENTATION
When using the document glass, the original should be placed face down in the far left corner of the glass with the
top edge of the original at the left edge of the glass.
When using the SPF, the original should be placed face up in the middle of the document feeder tray, with the top of
the original to the right.
Long horizontal originals of size 11" x 17", 8-1/2" x 14", A3, or B4 can only be placed as shown below. For this
reason, the scanned image will be rotated 90° when viewed on a computer.
ENTERING CHARACTERS
Characters are entered by pressing the numeric keys on the operation panel. The letters entered with each numeric
key are shown below.
Document glassSPFScanning result
Document glassSPFScanning result
Characters that can be entered
Key
Directly entering an e-mail
address
Searching for an address on an
LDAP server
111Space
2abc2ABCABC2abc
3def3DEFDEF3def
4ghi4GHIGHI4ghi
5jkI5JKLJKL5jkl
6mno6MNOMNO6mno
7pqrs7PQRSPQRS7pqrs
8tuv8TUVTUV8tuv
9wxyz9WXYZWXYZ9wxyz
_-.@* } {][?>=;:,+)('&%$"!/_-.@#
000
#@.-_#@.-_/!"$%&'()+,:;=>?[]{} *
To enter two characters in succession that require the same key, press the [] key to move the cursor after
entering the first character.
Example:Entering "ab" (when directly entering an e-mail address)
Press the [2] key once, press the [] key once to move the cursor, and then press the [2] key twice.
ABCDEF
JKLGHIMNO
TUVPQRSWXYZ
@.-
_
READ-ENDACC.#-C
Note
32
3
KEY OPERATOR PROGRAMS
The key operator programs allow the administrator of the machine (key operator) to enable and disable functions to
suit the needs of the workplace. This chapter explains the key operator programs for the network scanner functions.
For key operator programs for general use of the machine, see the "Key operator's guide". To access the key
operator programs, the key operator code must be entered.
KEY OPERATOR PROGRAM LIST
The key operator programs for the network and printer functions are shown in the following table.
Factory default settings are indicated in bold.
For the initial key operator code set at the factory, see "PROGRAMMING A KEY OPERATOR CODE" in the
"Key operator's guide".
ModeProgramSettingsExplanation
SCANNERDISABLE USB SCANYES,
NO
Select whether or not
scanning from a computer
and scanning from the
machine are disabled when a
USB connection is used.
When "YES" is selected, USB
scanning is disabled.
INITIAL COND.COLOR MODEThis is used to change the
default settings for the color
mode, format, and resolution.
(For more information, see
"
STORING SCANNING
SETTINGS" (page 26).)
FORMAT
RESOLUTION
33
3
USING THE KEY OPERATOR PROGRAMS
1
Press the [SPECIAL FUNCTION] key.
The special function
screen will appear.
2
Select "KEY OPERATOR PRG." with
the [] or [] key.
3
Press the [OK] key.
The key operator code
entry screen appears.
4
Enter the key operator code with the
numeric keys.
•"" will appear for each digit will enter.
•The mode selection screen will appear.
5
Select the desired mode with the []
or [] key.
6
Press the [OK] key.
The settings of the
selected mode will
appear.
Example: The screen when "SCANNER" is selected.
7
Select the desired program with the
[] or [] key.
•If a checkbox appears to the left of the program
name, the program is enabled by pressing the [OK]
key to make a checkmark appear. The program is
disabled by pressing the [OK] key once again to
clear the checkmark. After making the selection, go
to step 9.
•If a checkbox does not appear by a program, press
the [OK] key to display the settings screen for the
program.
8
Press the [OK] key and follow the
instructions in the program screen.
9
To use another program for the same
mode, select the desired program with
the [] or [] key.
To use a program for a different mode, press the
[BACK] key and select the desired mode. Press the
[CA] key to exit the key operator programs.
DUPLEX
SPECIAL FUNCTION
ACC.
DUPLEX SCAN
DUPLEX SCAN
GH
PQR
DUPLEX
SPECIAL FUNCTION
DUPLEX SCAN
SPECIAL FUNCTION
PAPER SIZE SET
DISPLAY CONTRAST
TOTAL COUNT
KEY OPERATOR PRG.
GHI
OK
BACK
Enter key operator
code.
KEY OPERATOR CODE:
-----
ABCDEF
JKLGHIMNO
TUVPQRSWXYZ
@.-
_
FUNCTION
ACC. #-C
READ-END
OK
MODE SELECT
KEY OP. # CHANGE
COPIER
PRINTER
SCANNER
MODE SELECT
KEY OP. # CHANGE
COPIER
PRINTER
SCANNER
OK
SCANNER
DISABLE USB SCAN
INITIAL COND.
OK
34
4
TROUBLESHOOTING
TROUBLESHOOTING
If a problem or question arises, try to solve the situation using the following information before contacting your
authorized SHARP dealer.
Image transmission problems are explained here.
For image scanning problems, see the "Operation manual (for general information and copier)".
ProblemCause and solution
The scanned image is clipped.
The original scan size setting is smaller than the actual original
size.
→Set the actual original size (page 26).
If you have intentionally set a smaller size than the actual original size,
place the original taking into account the guides for the set original
size. For example, if the actual size is 8-1/2" x 11" (A4) and you
selected 5-1/2" x 8-1/2" (B5) for the size setting, place the original so
that the part that you wish to scan is within the 5-1/2" x 8-1/2" (B5) area
indicated by the guides at the far left corner of the document glass.
The received image data
cannot be opened.
The viewer program used by the recipient does not support the
format of the received image data.
→
Try selecting a different file type (TIFF, JPEG, or PDF) and/or a different
compression format (None, G3, or G4) for the image data.
Otherwise, have the recipient use Sharpdesk or a viewer program that
supports the above combinations of file types and compression formats.
When the same file name is
used for two successive Scan
to FTP transmissions, the
second file is not sent.
The first file may still remain in the cache of the file server client. Disable
use of the cache in the client software.
The recipient does not receive
a transmitted data.
There is a mistake in the stored destination information or the
wrong destination was selected.
→Make sure that the correct destination information is stored. If there is a
mistake, correct it. (Page 10
)
*If delivery by e-mail (Scan to E-mail) is unsuccessful, an error
message such as "Undelivered Message" may be sent to the
designated administrator's e-mail address. This information may help
you determine the cause of the problem.
The recipient does not receive
data sent by e-mail (Scan to
E-mail).
Check the Web page to see if a limit has been set for the size of image
files sent using Scan to E-mail (the factory default setting is "Unlimited").
A limit can be set from 1 MB to 10 MB. Consult the administrator of the
Web page to select a suitable limit. (Page 12
)
The amount of data that can be sent in one e-mail transmission is
sometimes limited by the administrator of the mail server. Even if the file
size is within the limit explained above, if it exceeds the limit set by the
administrator of the mail server, the file will not be delivered to the
recipient.
Decrease the amount of data sent in the e-mail transmission (reduce the
number of pages scanned). (Ask your mail server administrator what the
data limit is for one e-mail transmission.)
Transmission takes a long
time.
When there is a large amount of image information, the data file is also
large and transmission takes a long time.
35
TROUBLESHOOTING
4
MAXIMUM RESOLUTION
When scanning takes place with the resolution set to the maximum resolution (600 dpi), the resolution may change
depending on the amount of memory available, the original size, the color mode, and other scanning conditions. The
table below shows the relation between the possible scanning area and the scanning conditions. (Note that the following
examples are for standard memory in the machine and 128 MB or more of memory in the network expansion kit.)
(dpi)
:Scanning is possible at the maximum resolution (600 dpi).
DISPLAY MESSAGES
If a transmission error occurs when you send a scanned image, a message informing you of the error and an error
code will appear in the display on the machine.
IF YOUR E-MAIL IS RETURNED
If a Scan to E-mail transmission is not successful, an e-mail informing you of this fact is sent to the return address configured
in the SMTP server. If this happens, read the e-mail and determine the cause of the error, and then repeat the transmission.
Models without the two-sided printing function
Models with the two-sided printing function
ColorGrayB/WColorGrayB/W
11" x 17"150300
300
300
8-1/2" x 14"
200400400
8-1/2" x 11"
8-1/2" x 11"R
5-1/2" x 8-1/2"
5-1/2" x 8-1/2"R
300400
A3150
300
200
300
B4
200
400
A4, A4R
400
B5, B5R
300
300
A5, A5R
400
Error CodeSolutionPage
CE-00
CE-01
Turn off the power and then turn it back on. Consult with your network administrator to
make sure that no problems exist on the network or in the server. If the error is not
cleared after turning the power off and on, turn off the power and contact your dealer.
–
CE-02
CE-04
The scanned image was not sent because a connection to the server could not be
established. Make sure that the SMTP server settings or Scan to FTP destination
settings in the Web page are correct.
The procedure for configuring the SMTP server is explained in "VARIOUS SERVER
SETTINGS", and the procedure for editing Scan to FTP destination information is
explained in "Editing and deleting programmed transmission destinations
". For
information on the settings to be entered, see Help in the Web page.
10
, 13
CE-03
The scanned image was not sent because the server was busy or there was too much
traffic on line. Wait briefly and then try again.
–
CE-05
The scanned image was not sent because the directory of the destination FTP server was not
correct. Make sure that the correct FTP server information is configured in the Web page.
10
CE-09
The size of the scanned image file exceeds the limit set in "Maximum Size of E-mail
attachments" in the Web page. Reduce the number of original pages scanned into the
file, or change the limit set in "Maximum Size of E-mail attachments".
12
CE-11
The memory became full during scanning. Scan less pages, lower the resolution, or
change the color mode so that the file size is smaller, and try scanning again.
27, 28
CE-12
The maximum number of destinations of a global address search has been exceeded.
Increase the number of search characters to narrow the range of the global address search.
24
36
TROUBLESHOOTING
IMPORTANT POINTS WHEN USING SCAN TO E-MAIL
Be careful not to send image data files that are too large.
Your mail server's system administrator may have placed a limit on the amount of data that can be sent in one e-mail
transmission. If this limit is exceeded, the e-mail will not be delivered to the recipient. Even if there is no limit and
your e-mail is successfully delivered, a large data file may take a long time to be received and place a heavy burden
on the recipient's network, depending on the recipient's network (Internet) connection environment.
If large image data files are repeatedly sent, the resulting burden on the network may slow down the speed of other,
unrelated data transmissions and in some cases, may even cause the mail server or network to go down.
The following table shows the approximate file sizes when the 8-1/2" x 11" (A4) size originals (one page each)
shown below are scanned.
*All sizes are for image files created in TIFF G4 format.
If multiple images are scanned, the file size will be approximately (Size of each image as indicated above) x (Number of images
scanned).
Although the actual limitation depends on your network environment, a general guideline for the maximum file size
for Scan to E-mail is 2000 KB (2 MB). In cases where you need to send multiple images in one transmission, try
such measures as lowering the resolution mode.
Original image samples
The original images shown below are samples to help you understand the above explanations. Note that these
images are smaller than the actual originals (the actual originals are 8-1/2" x 11" or A4).
●ABOUT THE CD-ROMS................................................................................................................................... 2
1
INSTALLING THE SOFTWARE (THAT ACCOMPANIES THE MACHINE)
BEFORE INSTALLATION.........................................................................................................................7
●HARDWARE AND SOFTWARE REQUIREMENTS......................................................................................... 7
●INSTALLATION ENVIRONMENT AND USEABLE SOFTWARE..................................................................... 7
INSTALLING THE SOFTWARE................................................................................................................7
●INSTALLATION USING THE INSTALLER....................................................................................................... 7
INSTALLING THE PPD FILE...................................................................................................................32
●INSTALLATION IN MAC OS X....................................................................................................................... 32
●INSTALLATION IN MAC OS 8.6 TO 9.2.2...................................................................................................... 34
●INSTALLING THE SCREEN FONTS (MAC OS 8.6 - 9.2.2)........................................................................... 34
CONFIGURING THE PRINTER DRIVER ................................................................................................ 35
●MAC OS X V10.2 TO 10.3.4........................................................................................................................... 35
●MAC OS X v10.1.5.......................................................................................................................................... 37
●MAC OS 8.6 TO 9.2.2..................................................................................................................................... 38
Gebruikershandleiding.com neemt misbruik van zijn services uitermate serieus. U kunt hieronder aangeven waarom deze vraag ongepast is. Wij controleren de vraag en zonodig wordt deze verwijderd.
Product:
Spelregels forum
Om tot zinvolle vragen te komen hanteren wij de volgende spelregels:
lees eerst de handleiding door;
controleer of uw vraag al eerder door iemand anders is gesteld;
probeer uw vraag zo duidelijk mogelijk te stellen;
heeft u een probleem en al geprobeerd om dit op te lossen, vermeld dit erbij aub;
heeft u een oplossing gekregen van een bezoeker dan horen wij dat graag in dit forum;
wilt u een reactie geven op een vraag of antwoord, gebruik dan niet dit formulier maar klik op de knop 'reageer op deze vraag';
uw vraag wordt direct op de website gezet; vermijd daarom persoonlijke gegevens in te vullen;
Belangrijk! Als er een antwoord wordt gegeven op uw vraag, dan is het voor de gever van het antwoord nuttig om te weten als u er wel (of niet) mee geholpen bent! Wij vragen u dus ook te reageren op een antwoord.
Belangrijk! Antwoorden worden ook per e-mail naar abonnees gestuurd. Laat uw emailadres achter op deze site, zodat u op de hoogte blijft. U krijgt dan ook andere vragen en antwoorden te zien.
Abonneren
Abonneer u voor het ontvangen van emails voor uw Sharp ARM162 bij:
nieuwe vragen en antwoorden
nieuwe handleidingen
U ontvangt een email met instructies om u voor één of beide opties in te schrijven.
Ontvang uw handleiding per email
Vul uw emailadres in en ontvang de handleiding van Sharp ARM162 in de taal/talen: Engels als bijlage per email.
De handleiding is 6,66 mb groot.
U ontvangt de handleiding per email binnen enkele minuten. Als u geen email heeft ontvangen, dan heeft u waarschijnlijk een verkeerd emailadres ingevuld of is uw mailbox te vol. Daarnaast kan het zijn dat uw internetprovider een maximum heeft aan de grootte per email. Omdat hier een handleiding wordt meegestuurd, kan het voorkomen dat de email groter is dan toegestaan bij uw provider.
Stel vragen via chat aan uw handleiding
Stel uw vraag over deze PDF
Uw handleiding is per email verstuurd. Controleer uw email
Als u niet binnen een kwartier uw email met handleiding ontvangen heeft, kan het zijn dat u een verkeerd emailadres heeft ingevuld of dat uw emailprovider een maximum grootte per email heeft ingesteld die kleiner is dan de grootte van de handleiding.
Er is een email naar u verstuurd om uw inschrijving definitief te maken.
Controleer uw email en volg de aanwijzingen op om uw inschrijving definitief te maken
U heeft geen emailadres opgegeven
Als u de handleiding per email wilt ontvangen, vul dan een geldig emailadres in.
Uw vraag is op deze pagina toegevoegd
Wilt u een email ontvangen bij een antwoord en/of nieuwe vragen? Vul dan hier uw emailadres in.