690299
9
Verklein
Vergroot
Pagina terug
1/57
Pagina verder
DECT Wireless Headset System
SDW 10 HS
SDW 30 HS
SDW 60 HS
SDW 3 BS
SDW 5 BS
BTD 800 USB
User Guide
SDW 5000 Series
SDW 5000 series headset system
CONTENTS1
Contents
Package contents ................................................................................................................................................................. 2
Base stations with components ............................................................................................................................................2
Headset with components .....................................................................................................................................................3
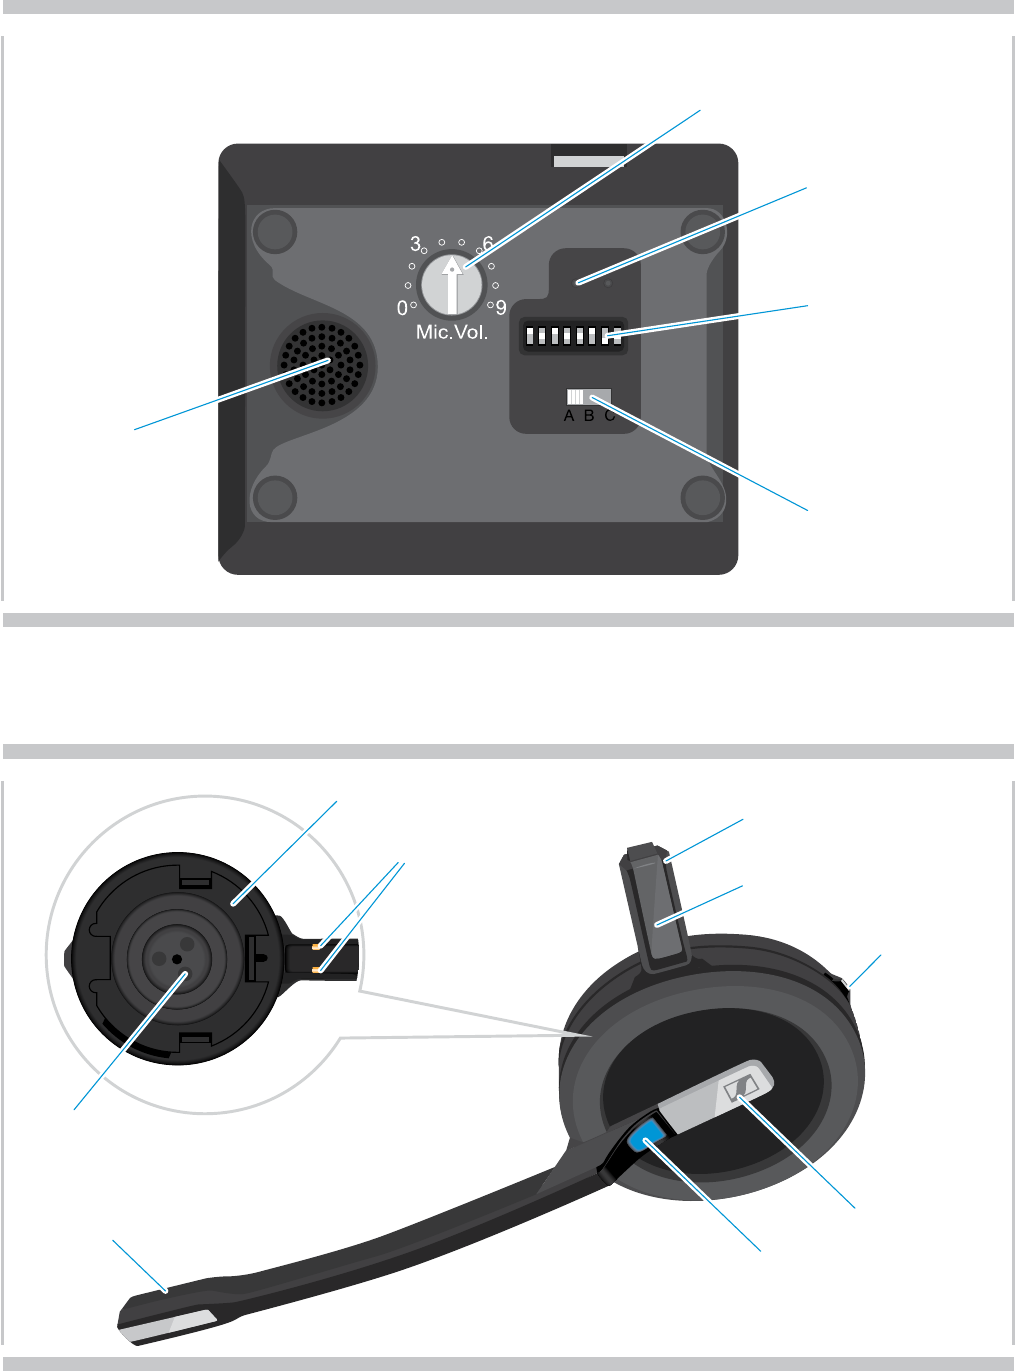
Product overview ..................................................................................................................................................................4
Overview of the base station .................................................................................................................................................4
Overview of the headset ........................................................................................................................................................5
Overview of the BTD 800 USB dongle .................................................................................................................................. 7
Overview of the LEDs ............................................................................................................................................................. 7
Connecting the base station ............................................................................................................................................... 9
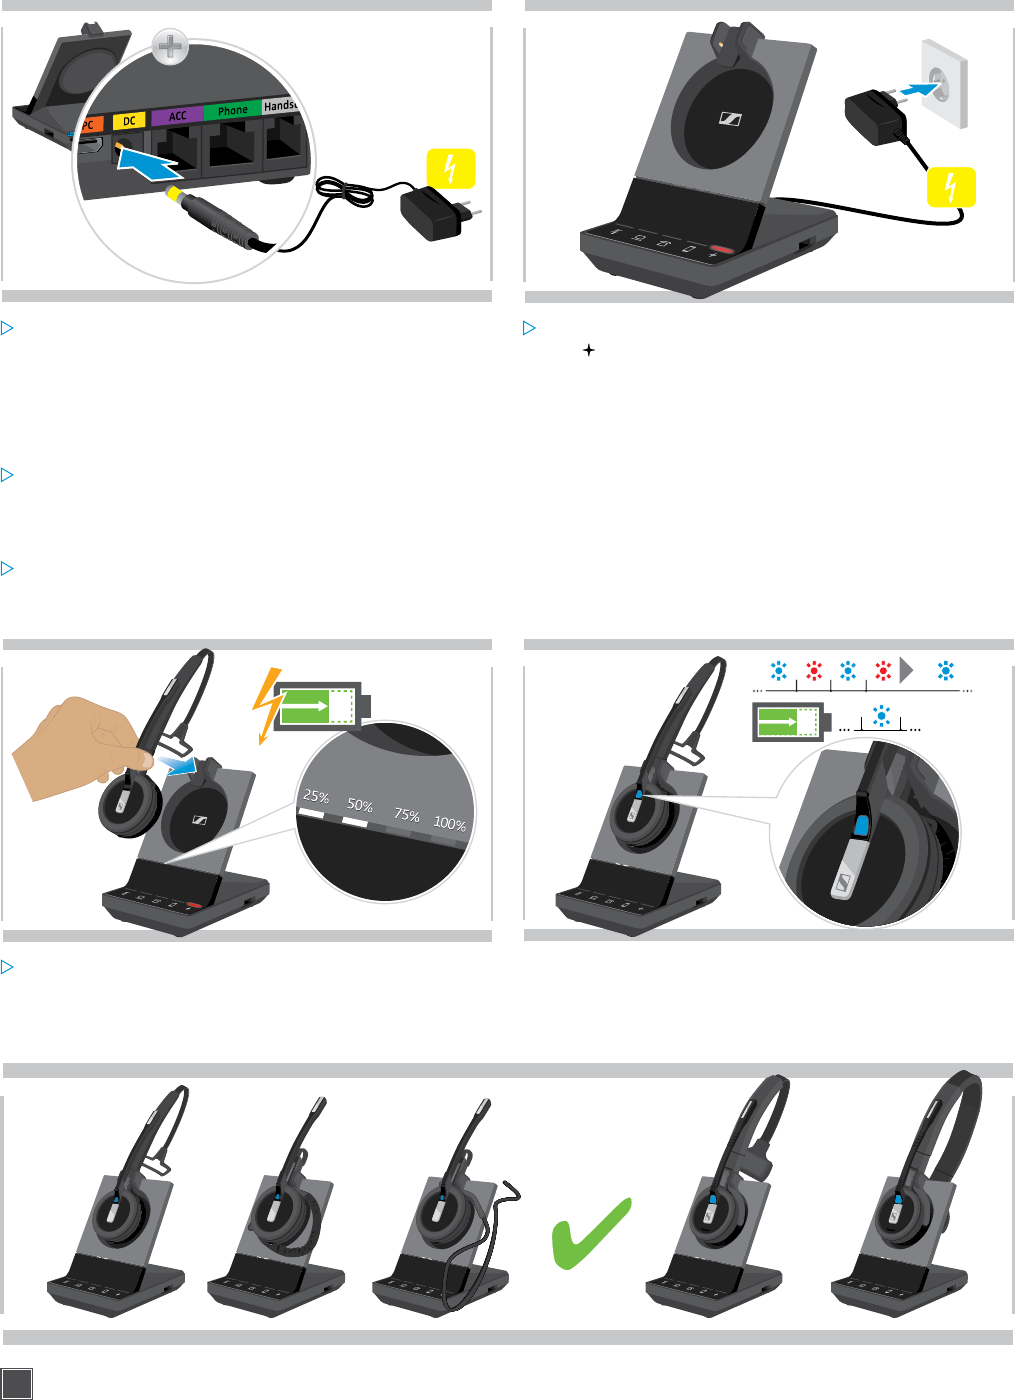
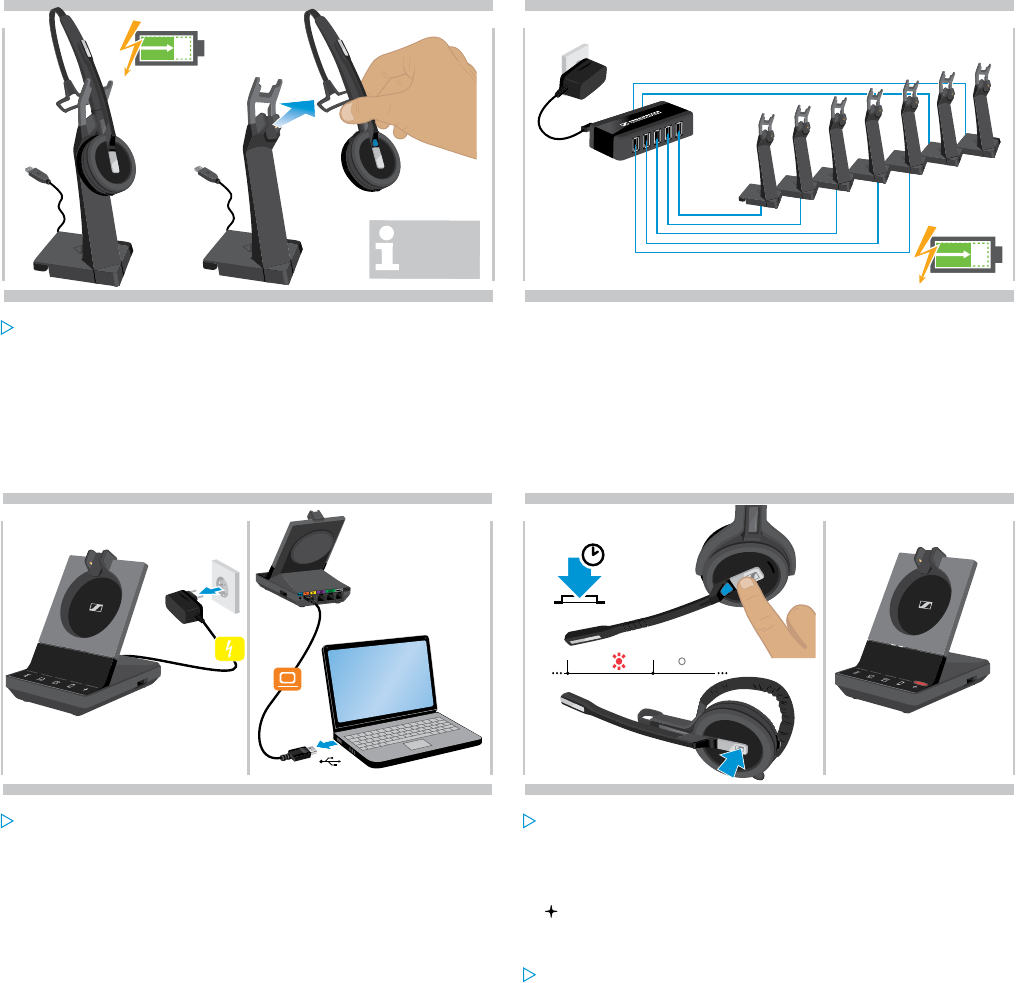
Connecting the base station to the mains power supply ................................................................................................. 10
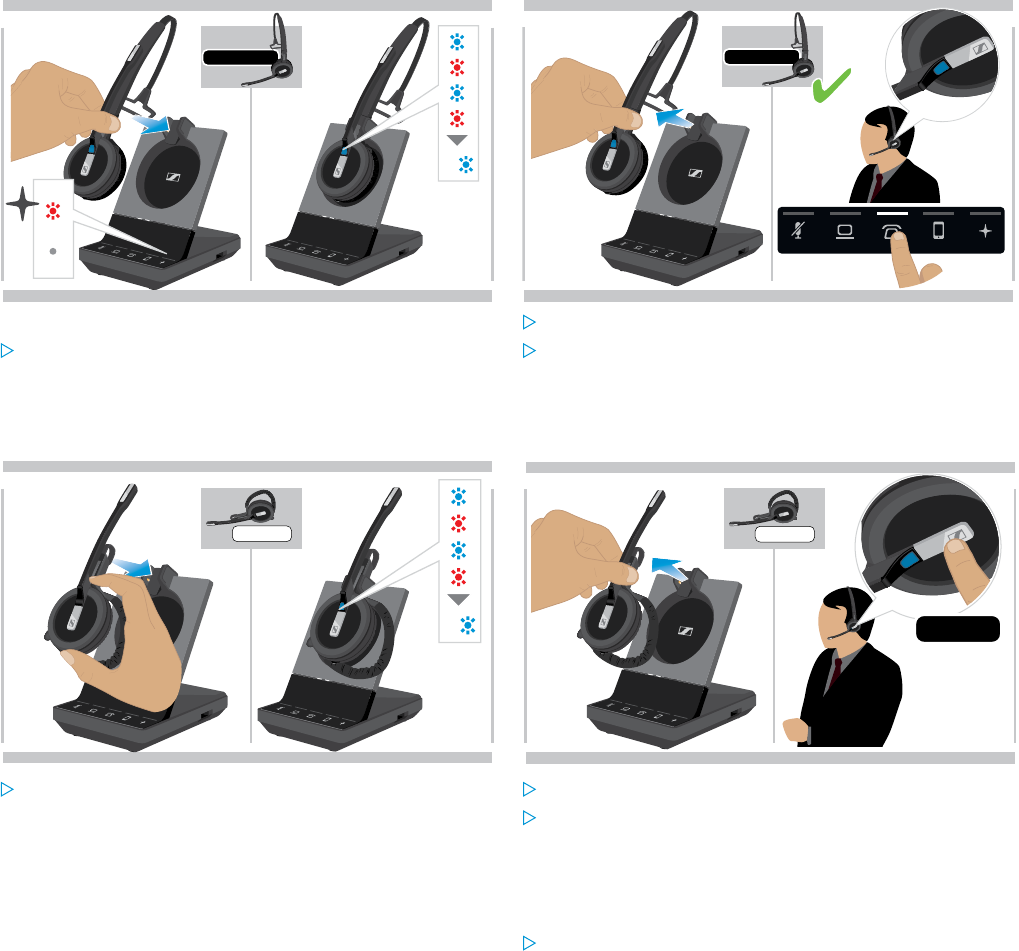
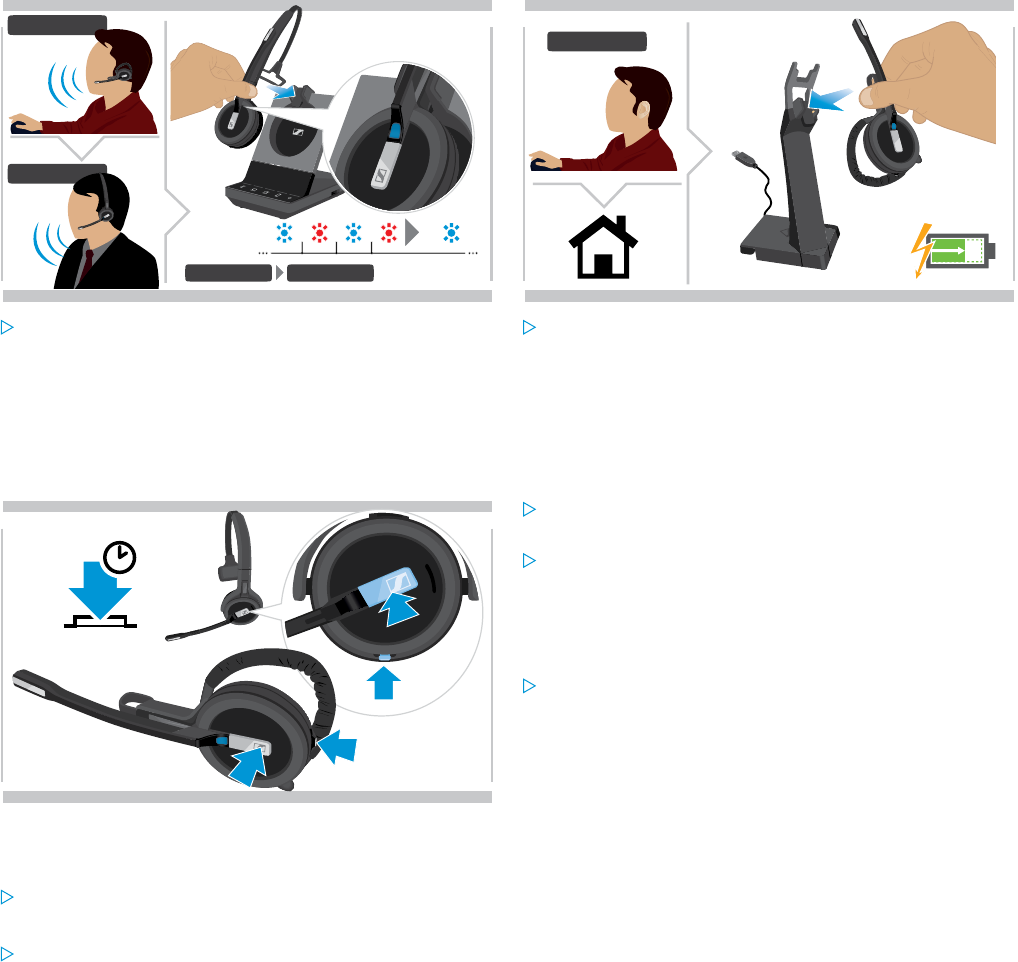
Pairing and charging the headset before first use ............................................................................................................ 10
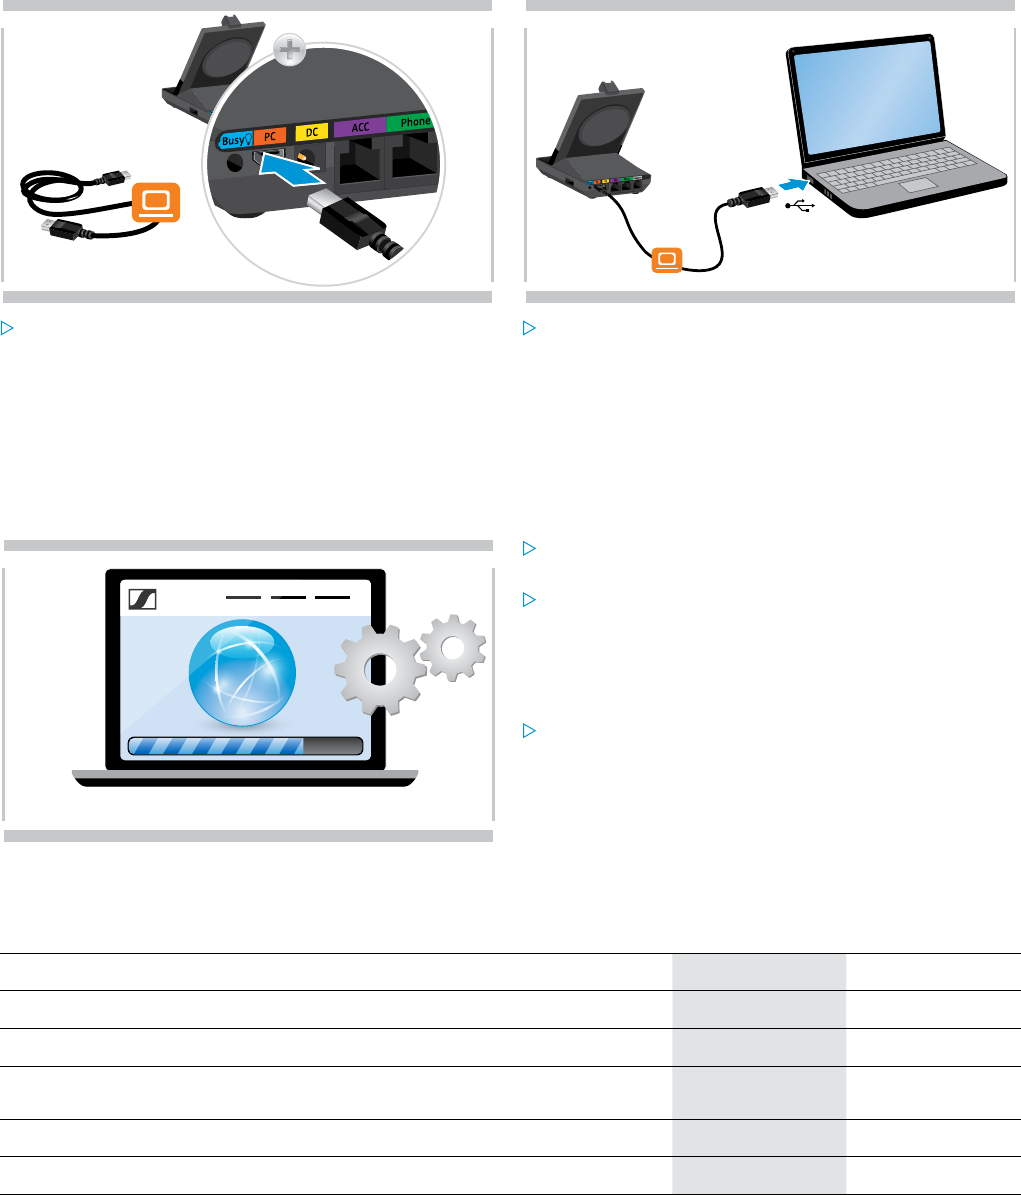
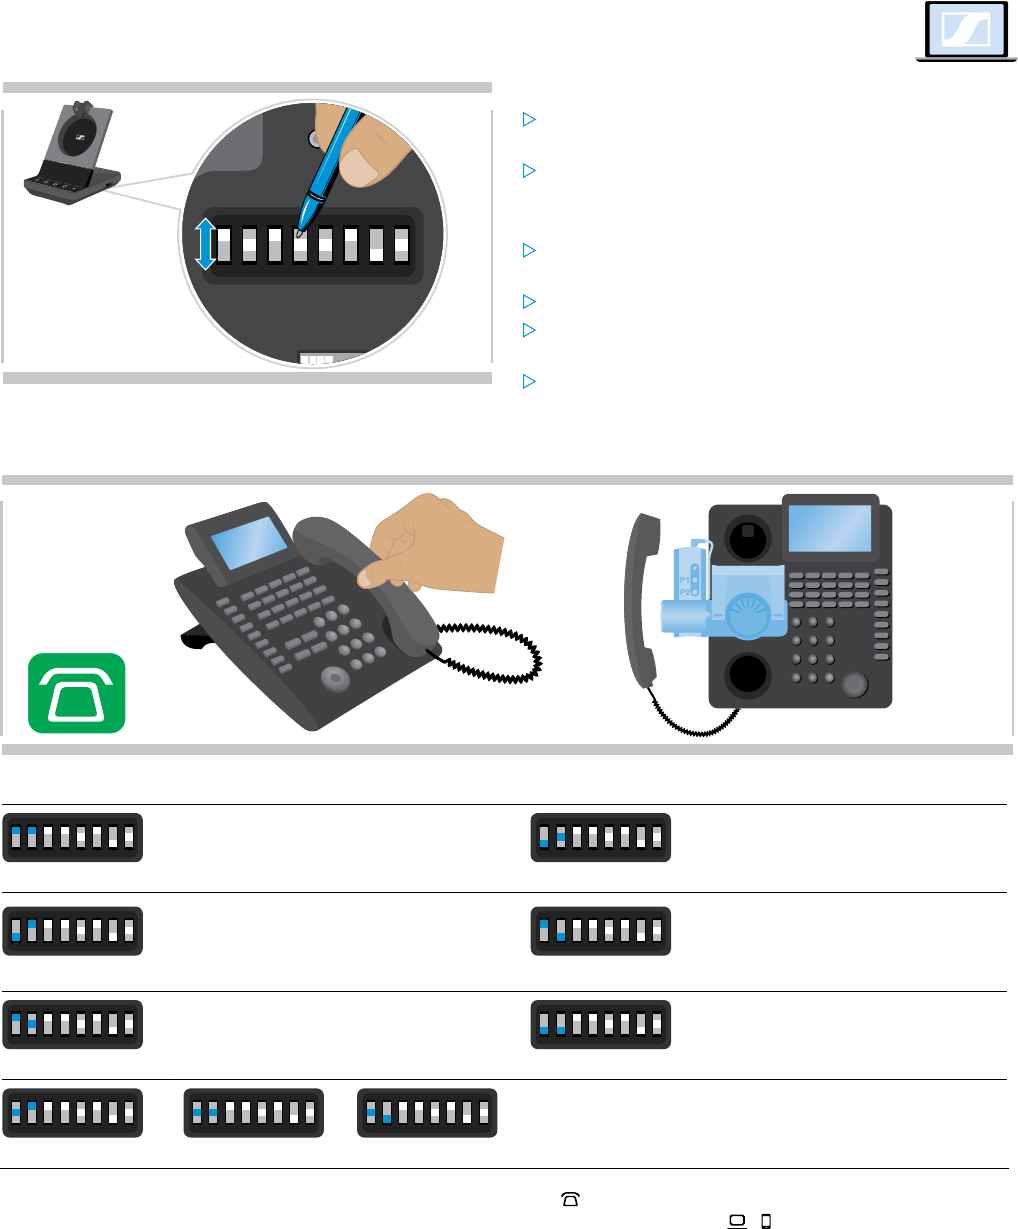
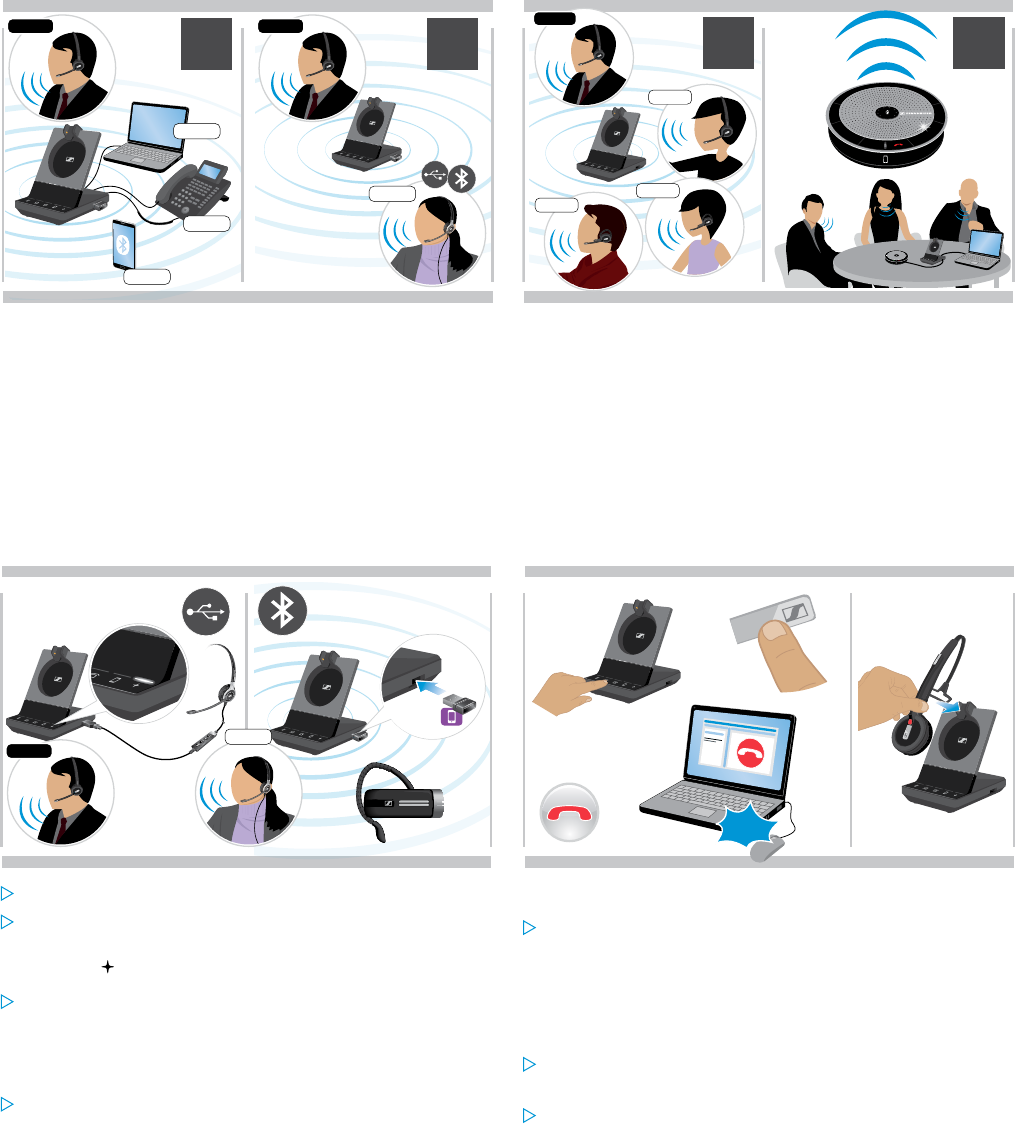
Connecting the base station to a fixed line phone – SDW 5 BS only ..............................................................................11
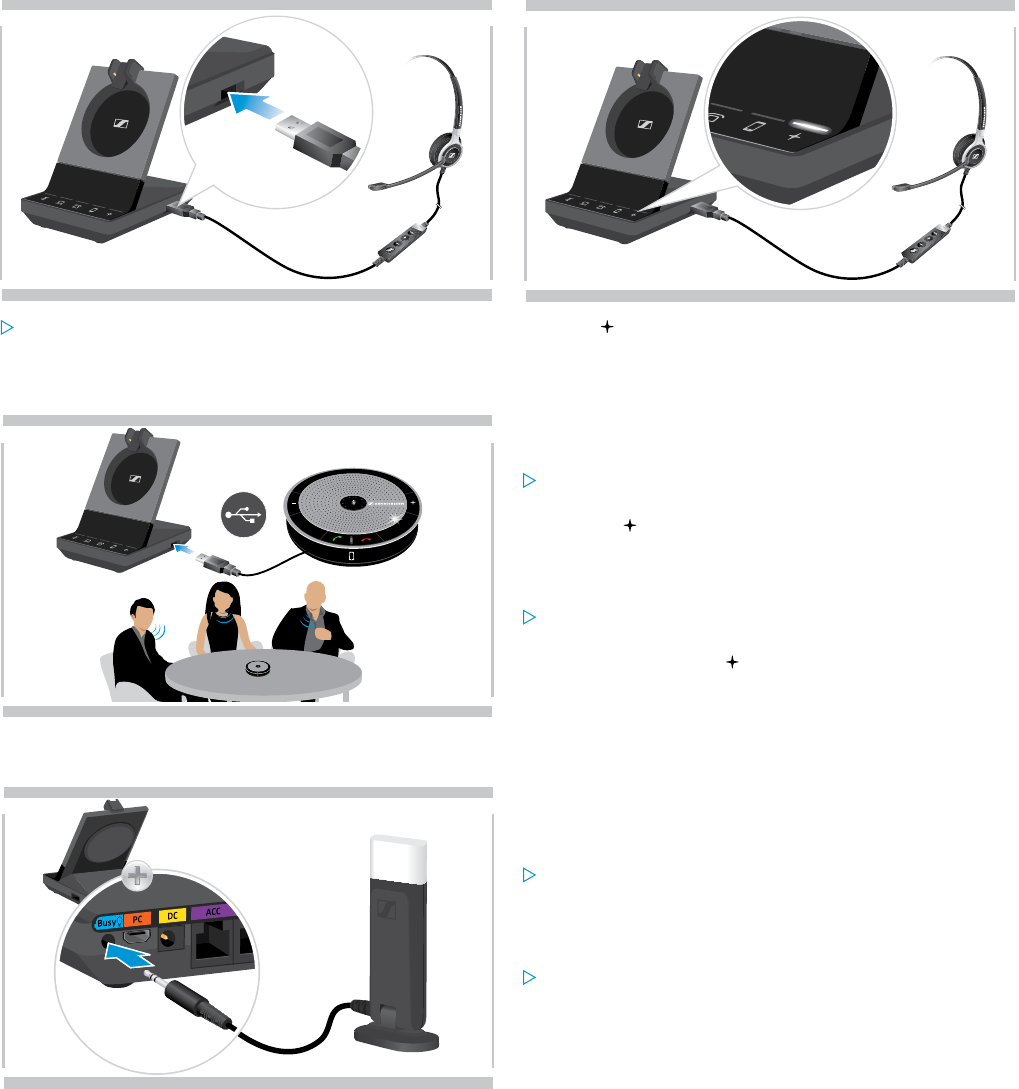
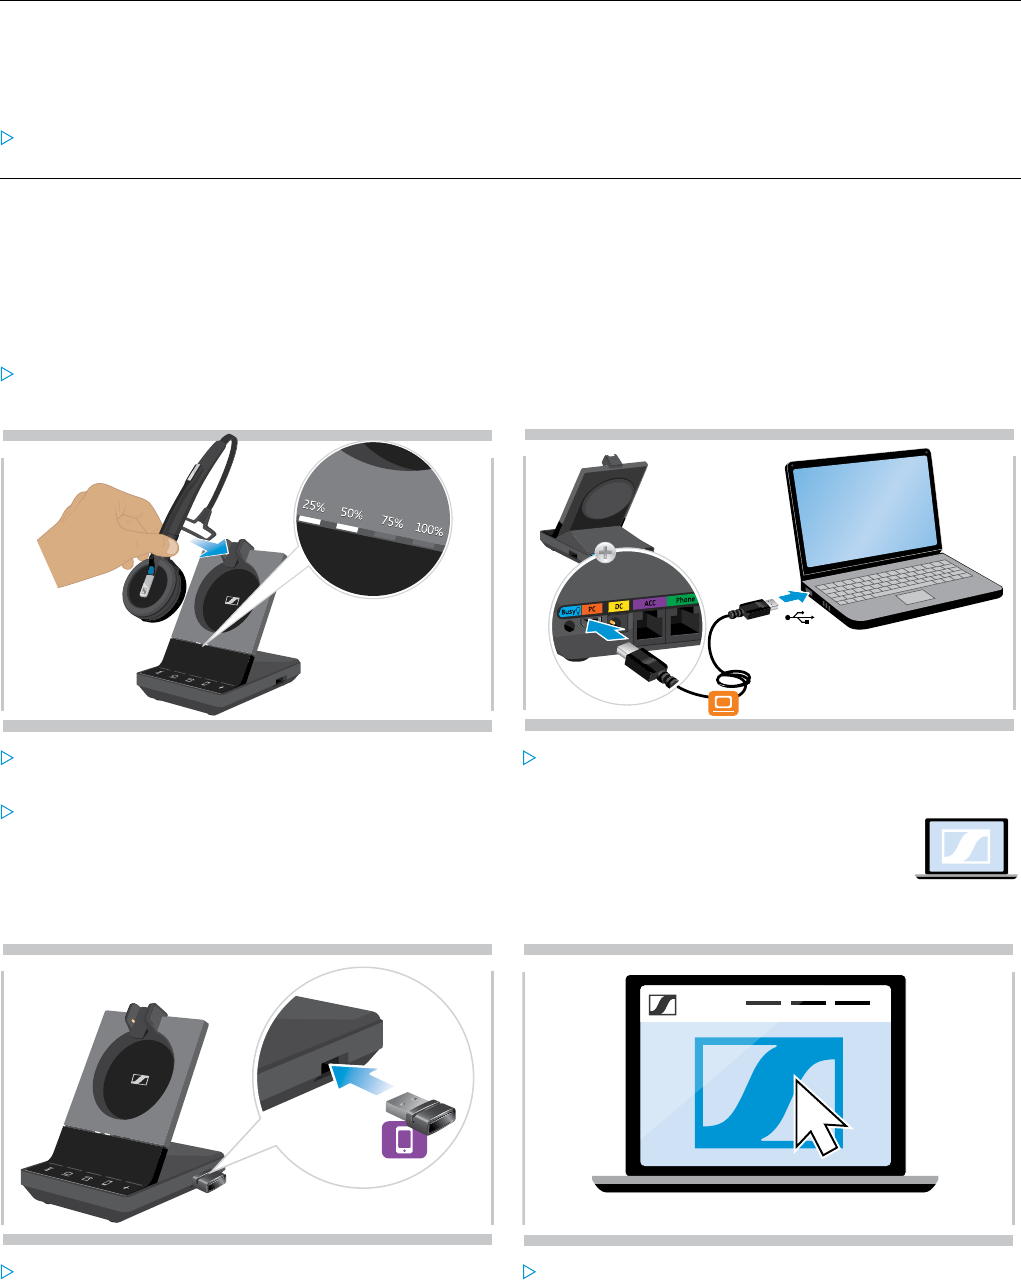
Connecting the base station to a computer ...................................................................................................................... 13
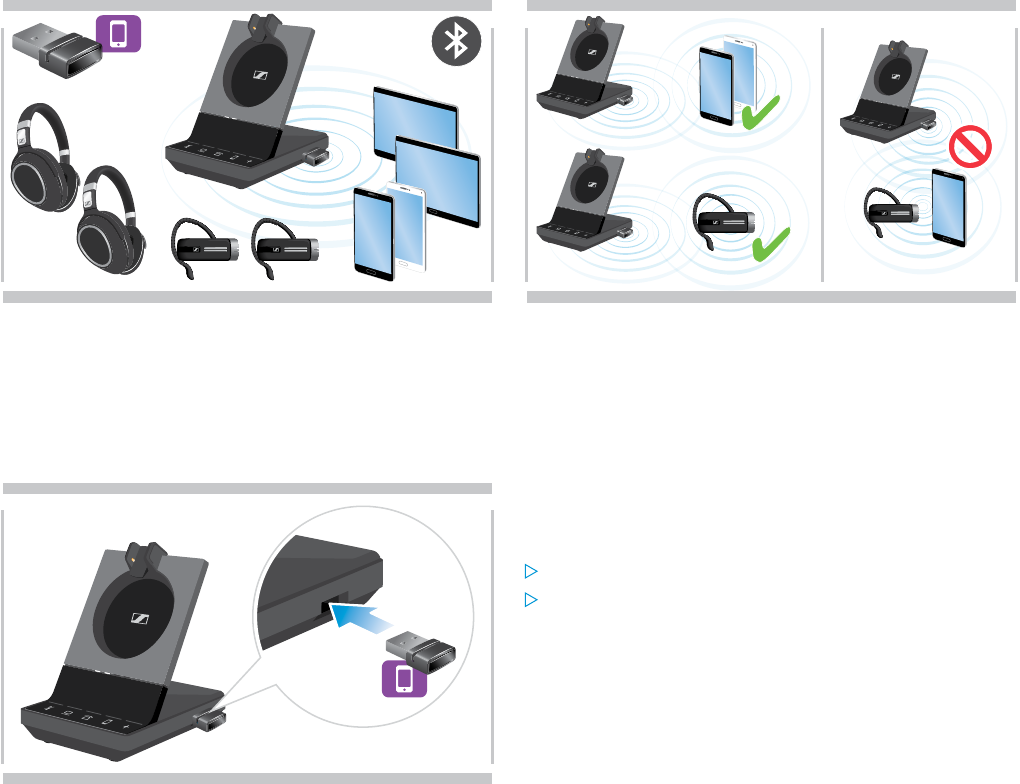
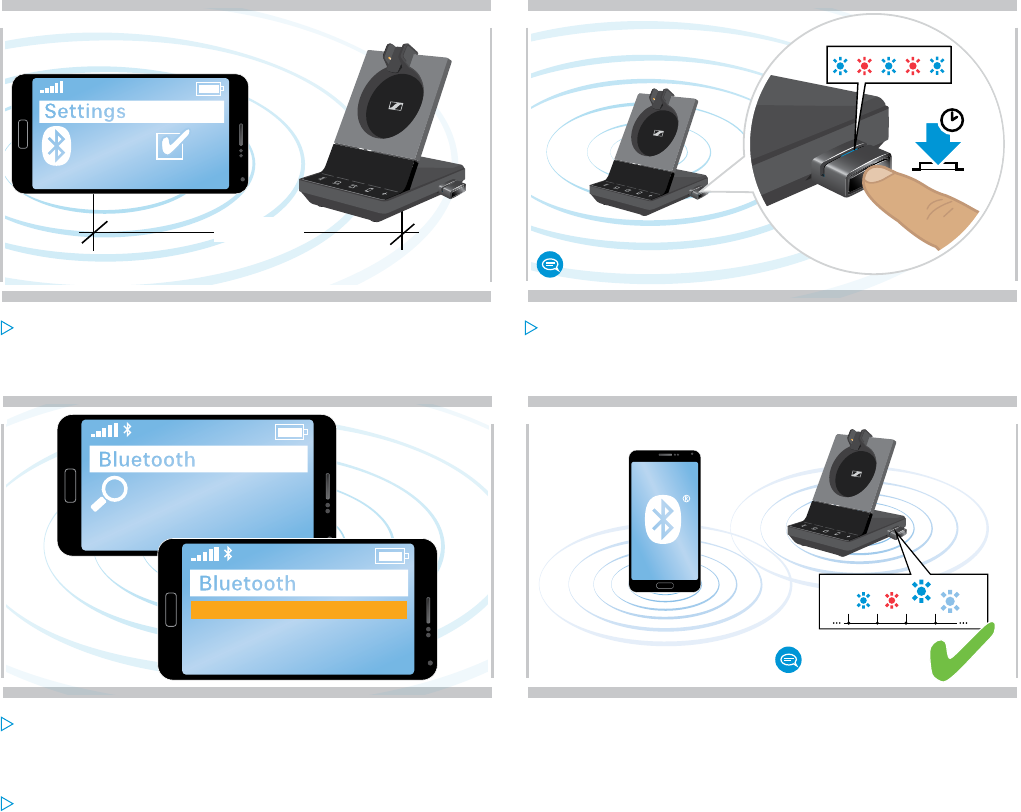
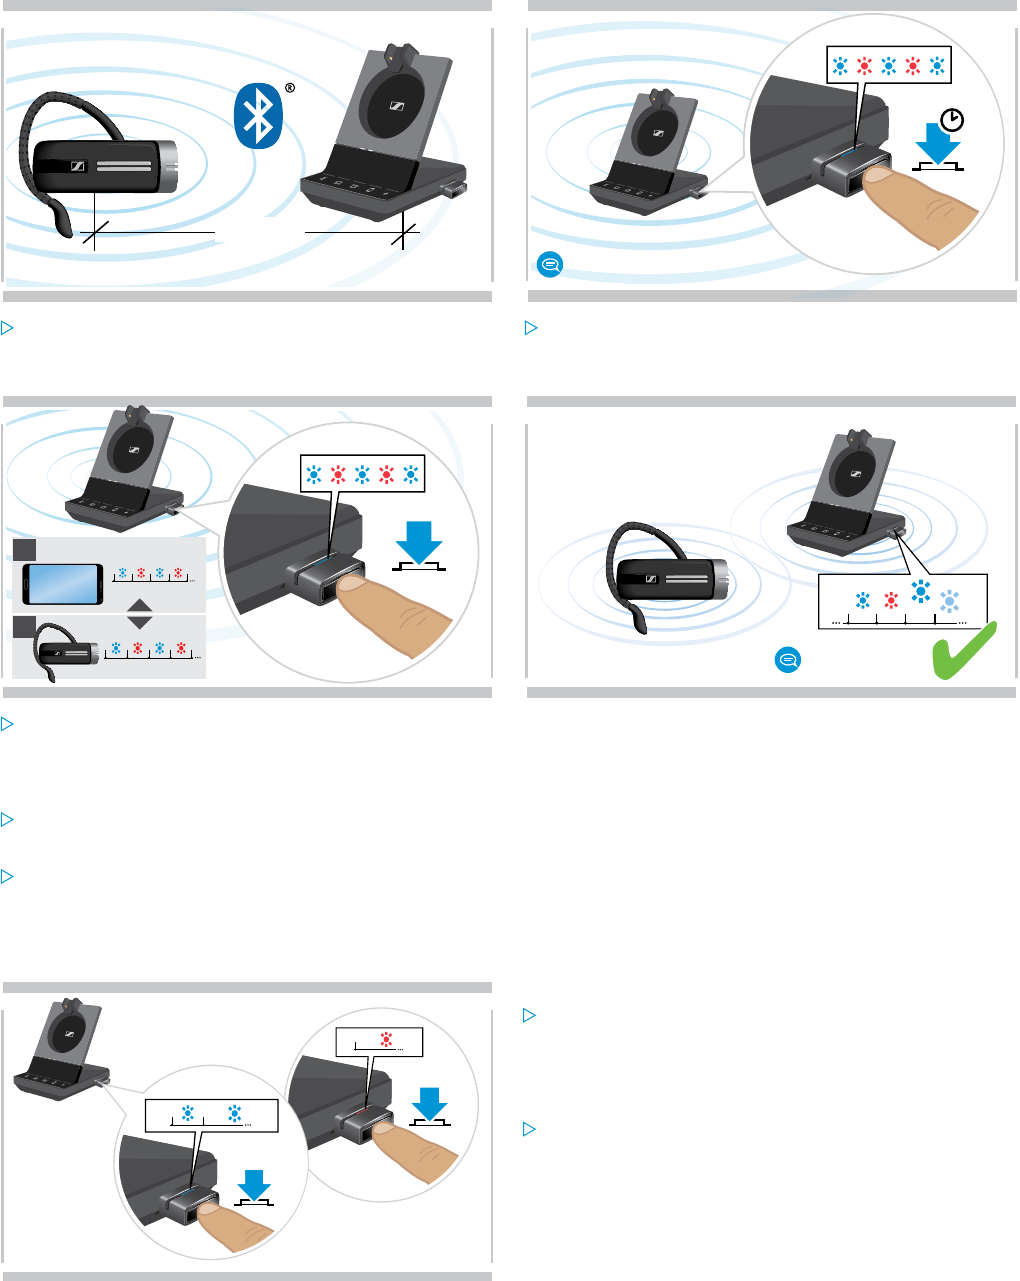
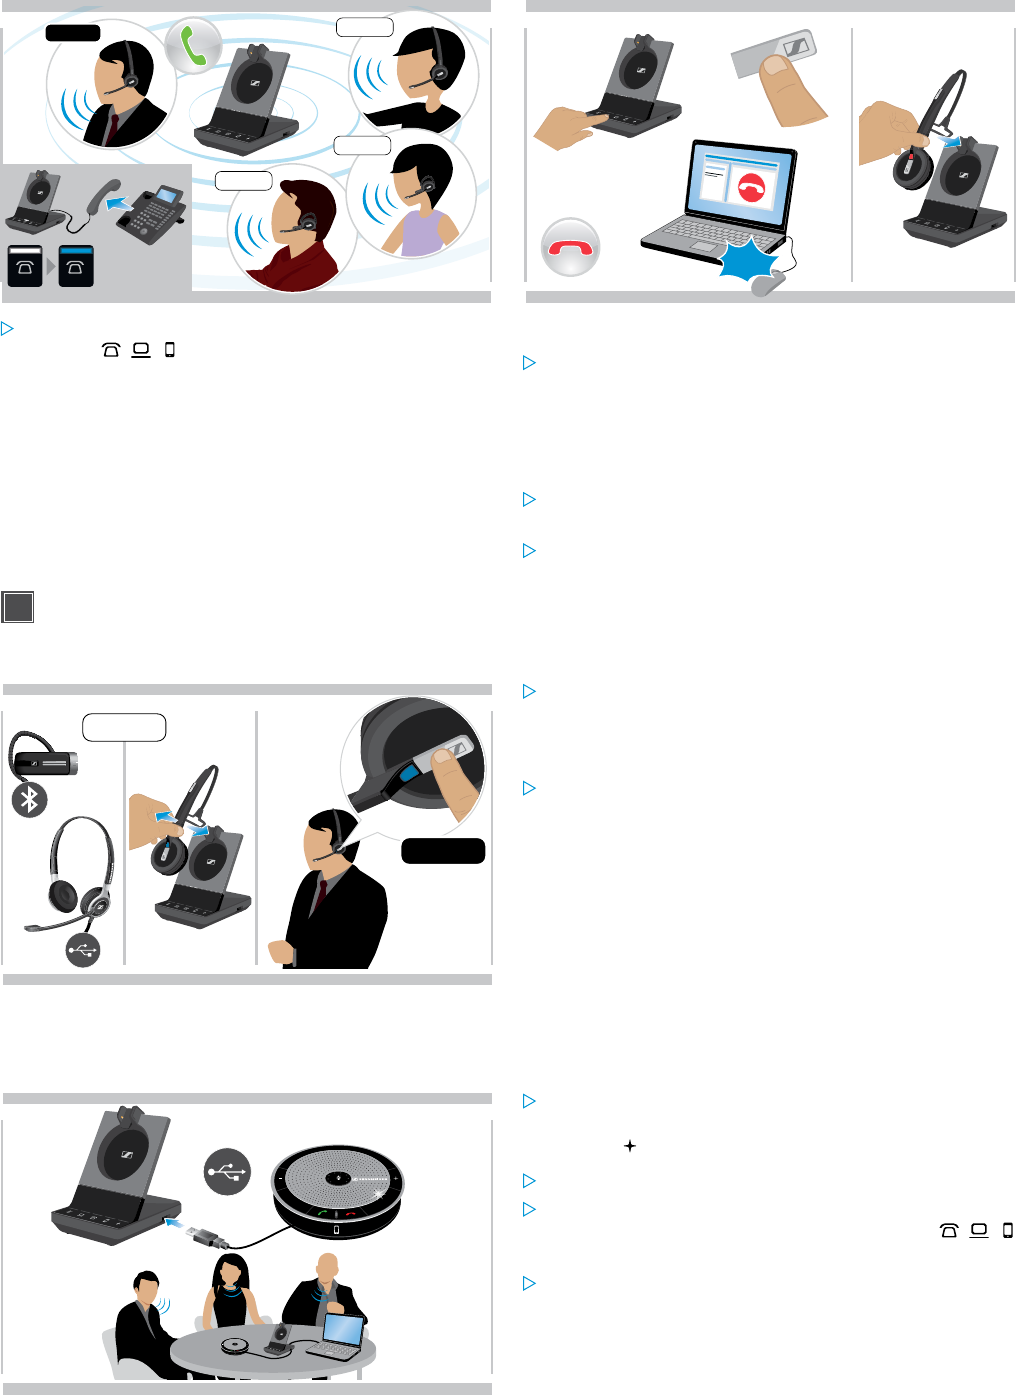
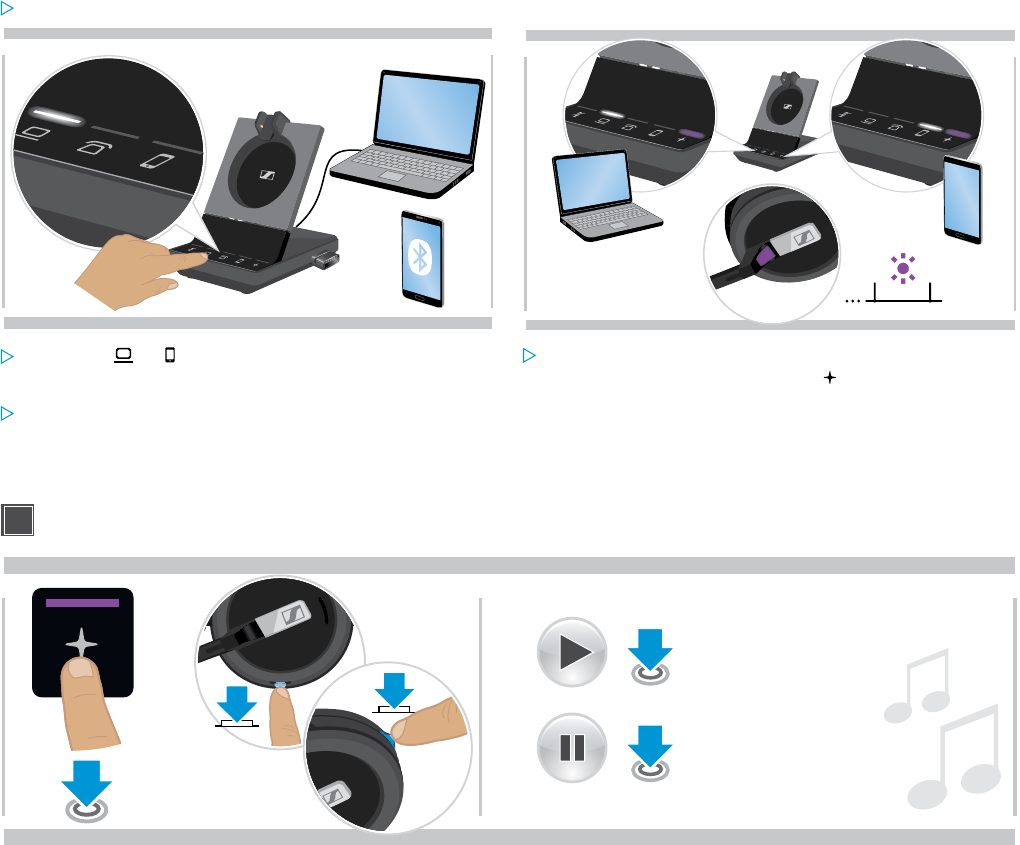
Connecting the base station to Bluetooth devices – BTD 800 USB only ....................................................................... 14
Reconnecting/disconnecting Bluetooth ............................................................................................................................ 16
Connecting an optional USB headset or speakerphone ...................................................................................................17
Connecting an optional busy light ......................................................................................................................................17
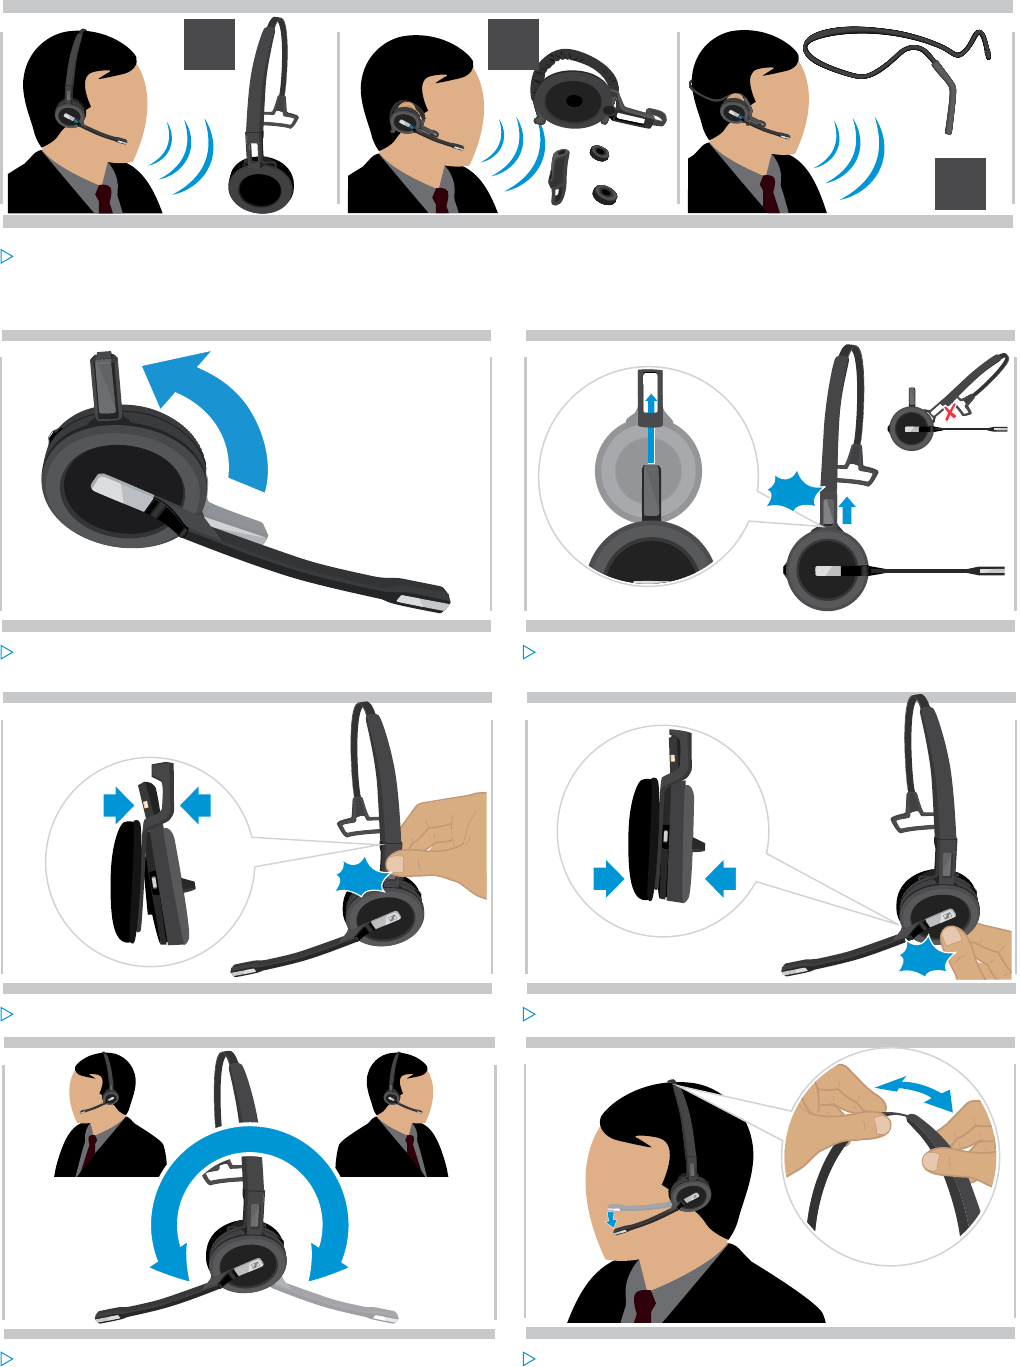
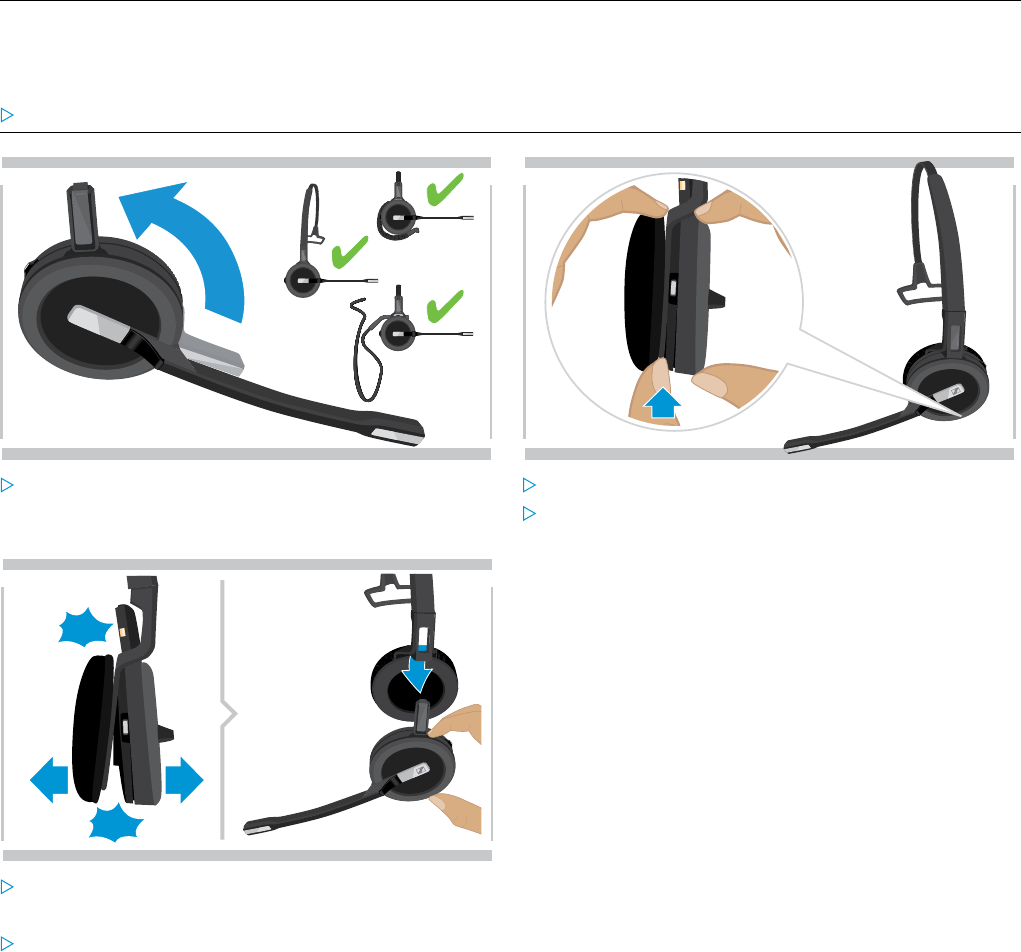
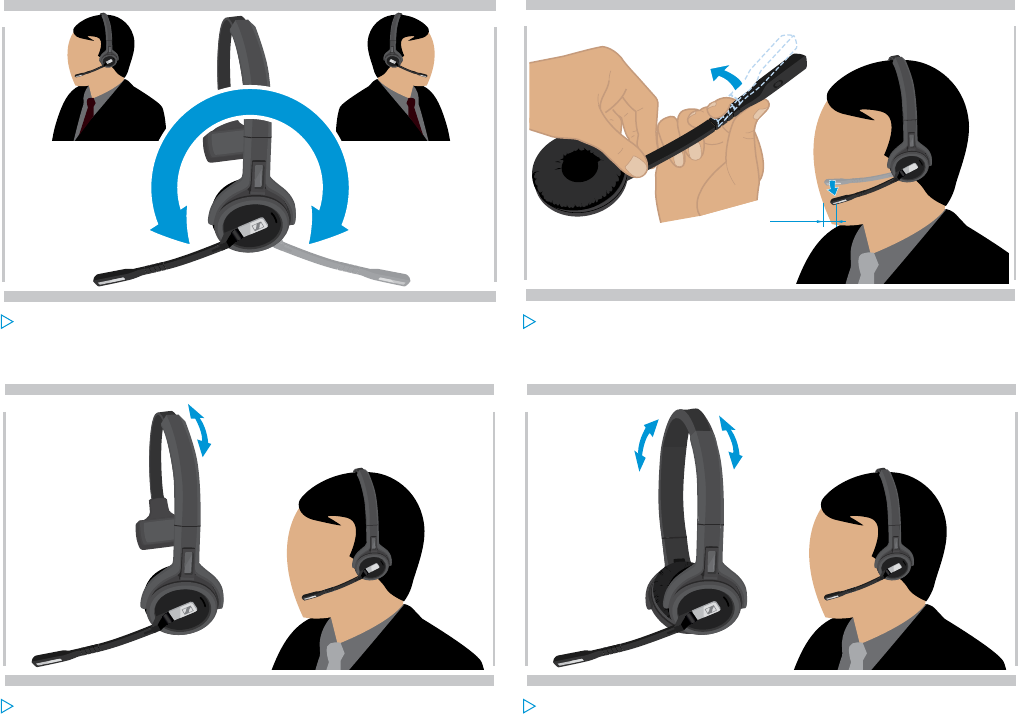
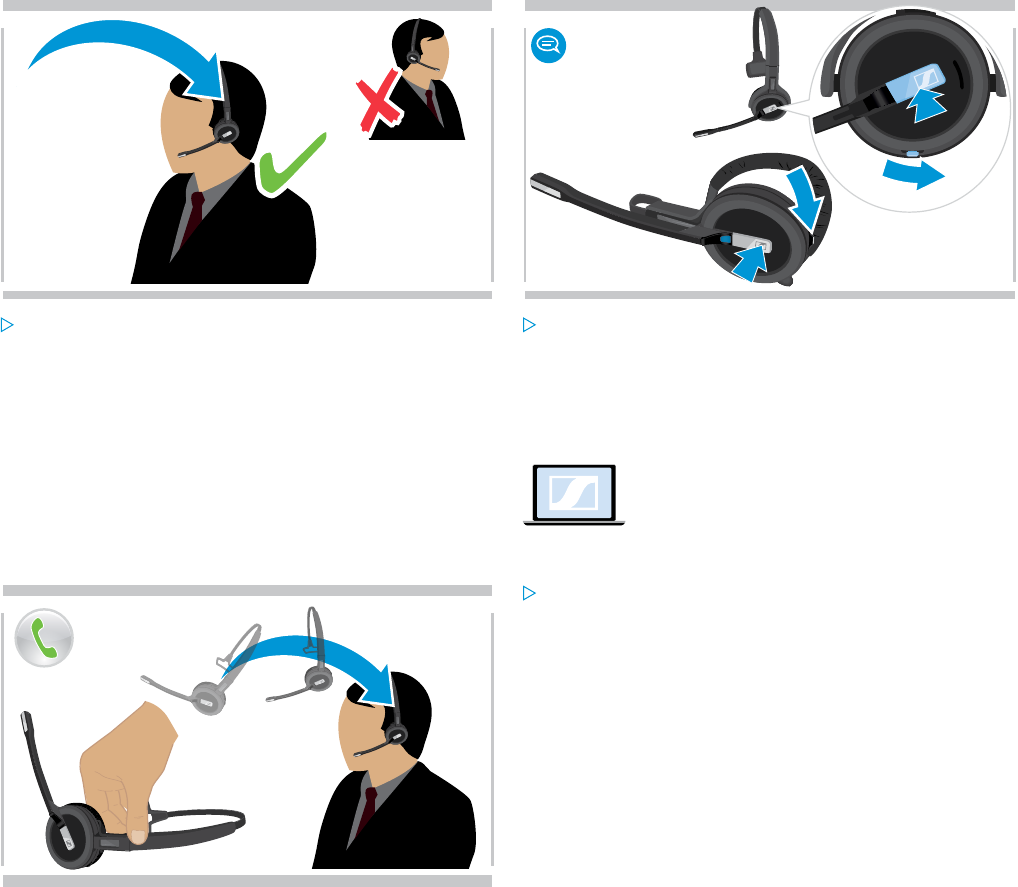
Assembling and wearing the headset SDW 10 HS ...........................................................................................................18
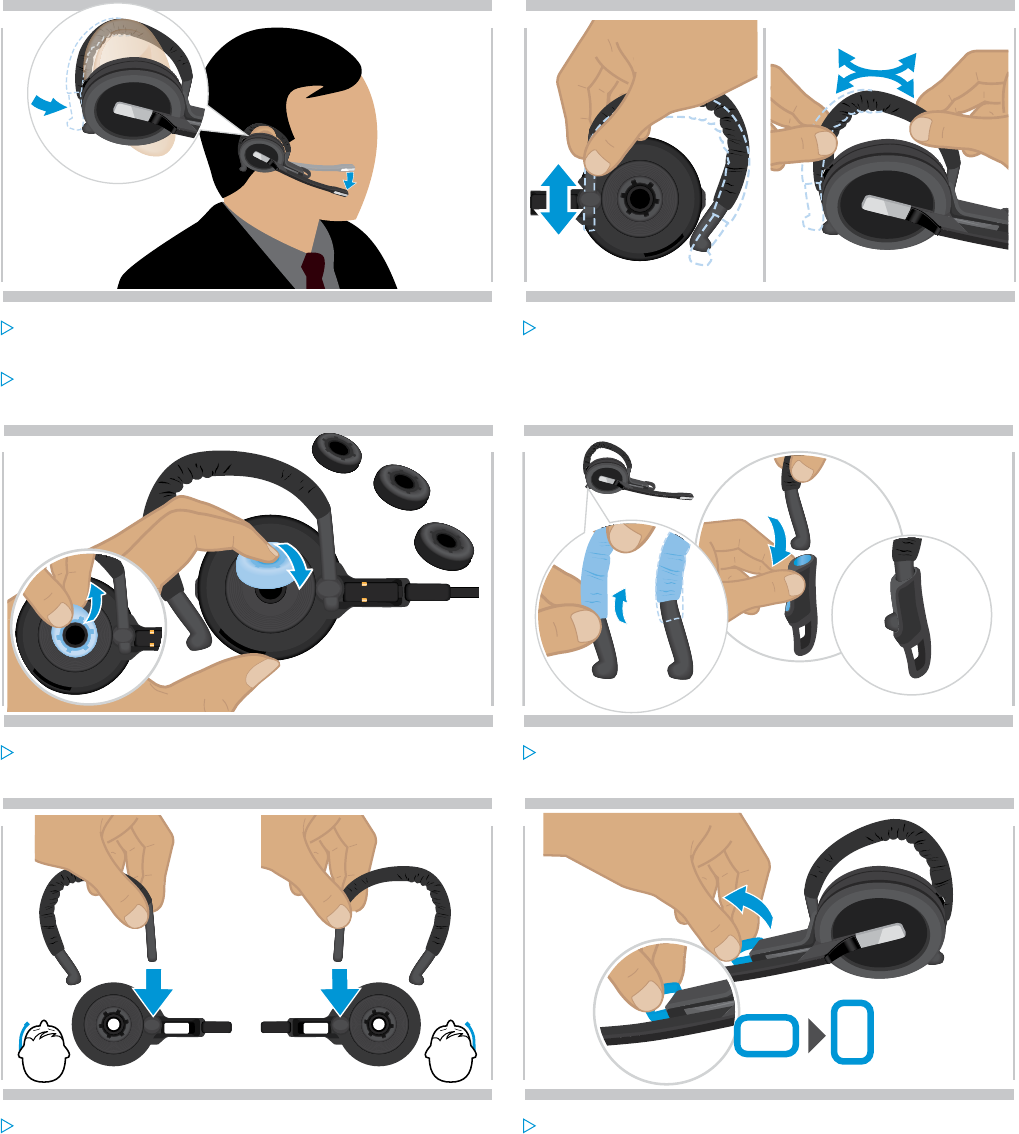
Using the headset with the headband ................................................................................................................................ 18
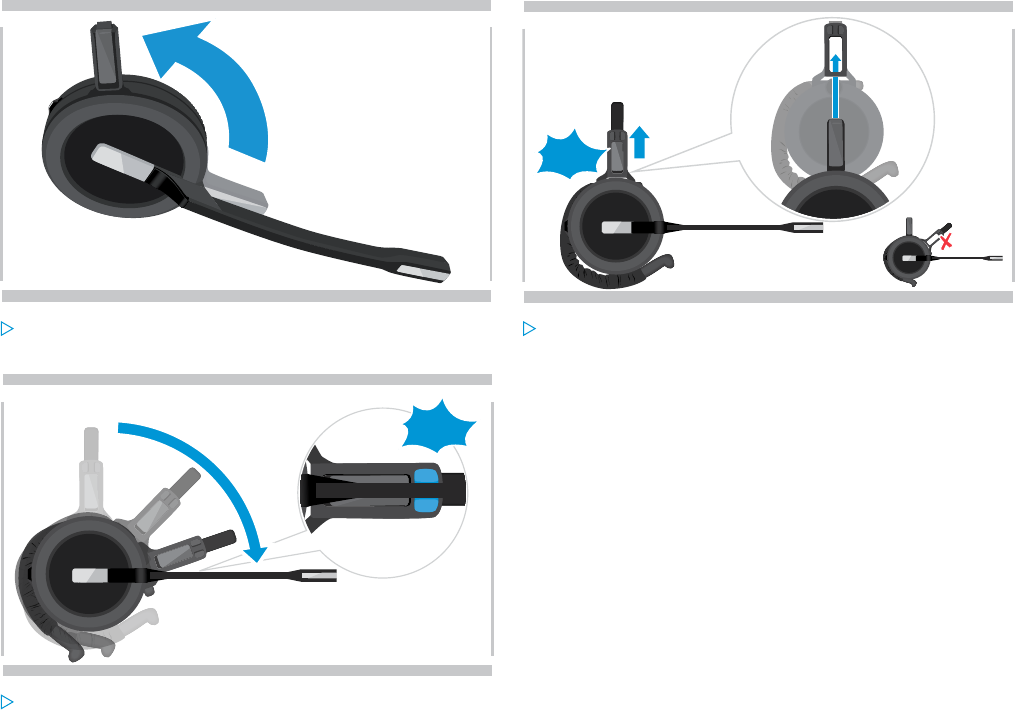
Using the headset with the ear hook .................................................................................................................................. 19
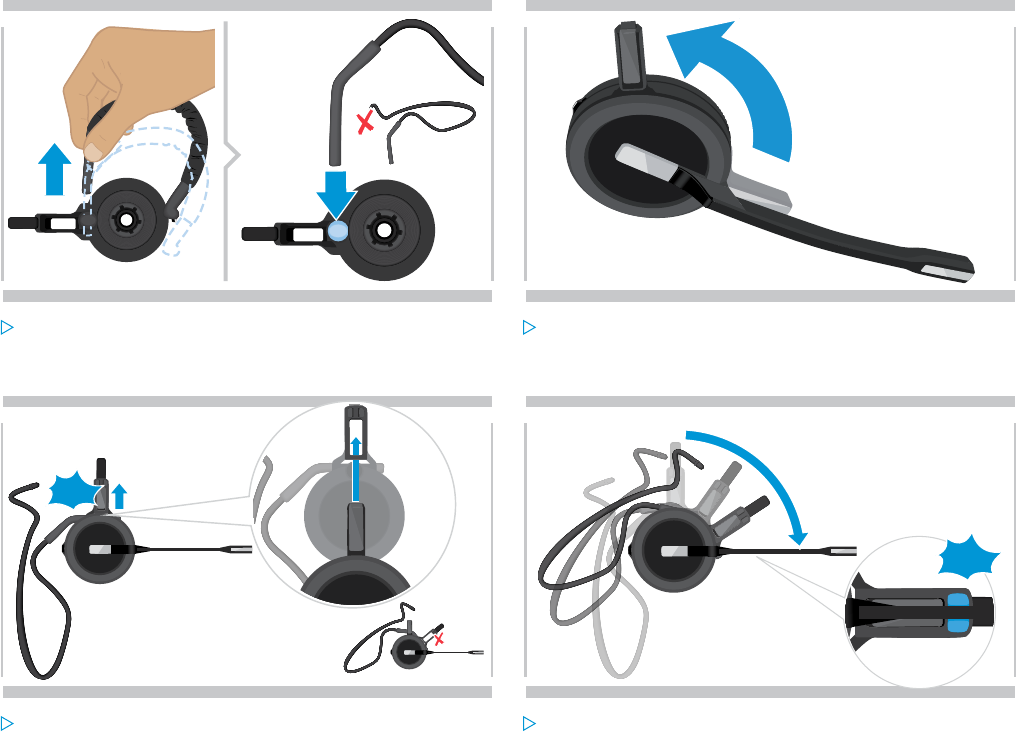
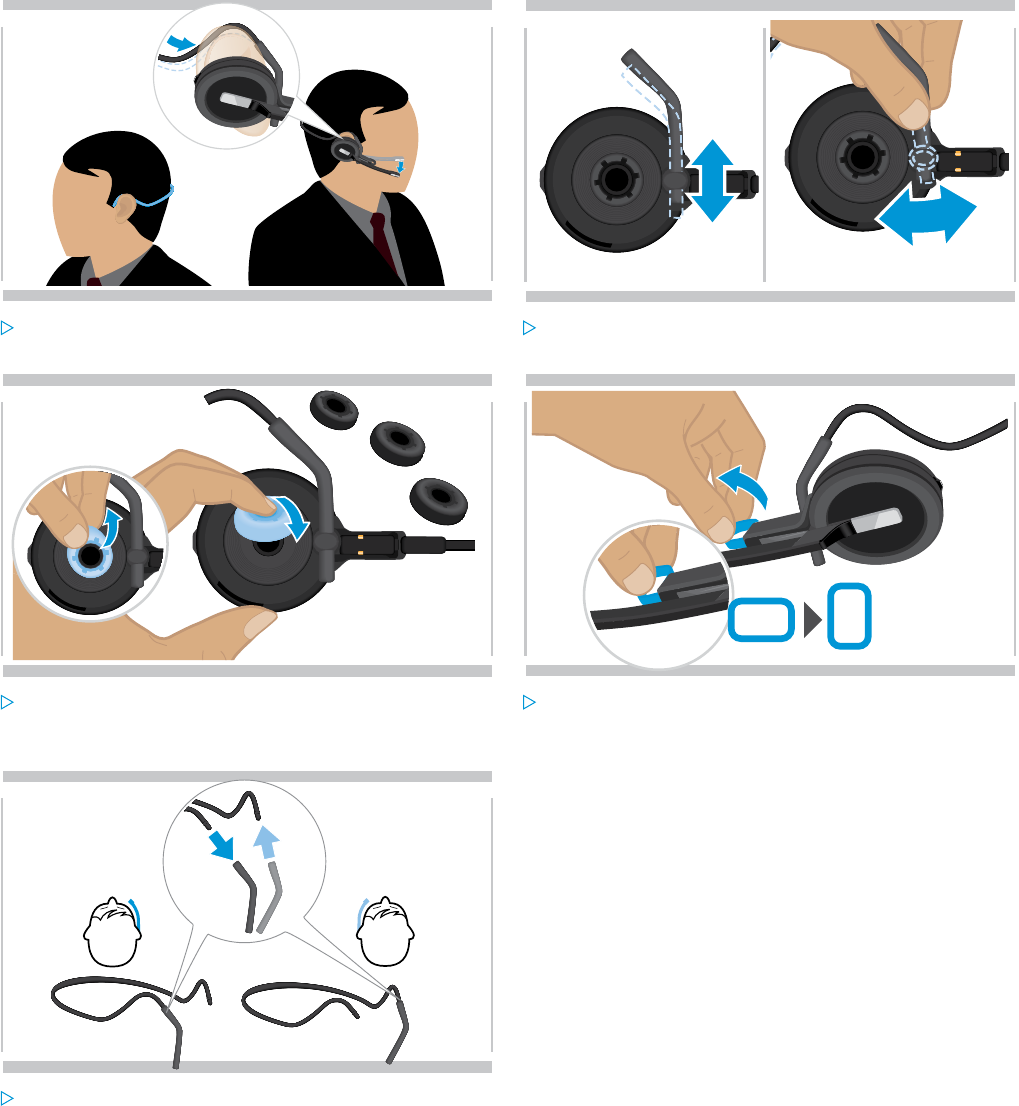
Using the headset with the neckband ................................................................................................................................ 21
Detaching headband, ear hook or neckband .....................................................................................................................23
Adjusting and wearing the headset SDW 30 HS | SDW 60 HS .......................................................................................24
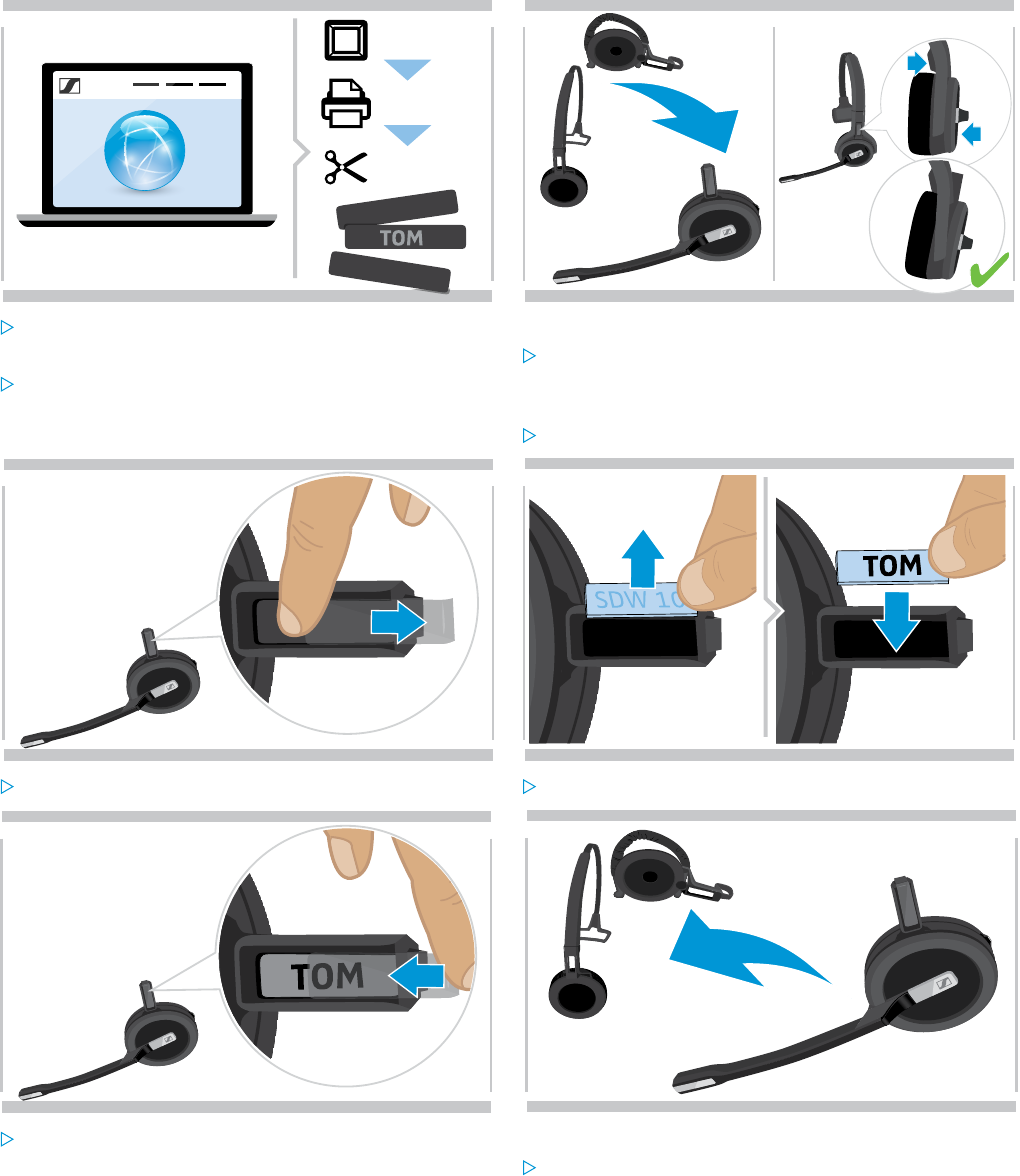
Labeling the headset ......................................................................................................................................................... 25
Configuring the headset system ....................................................................................................................................... 26
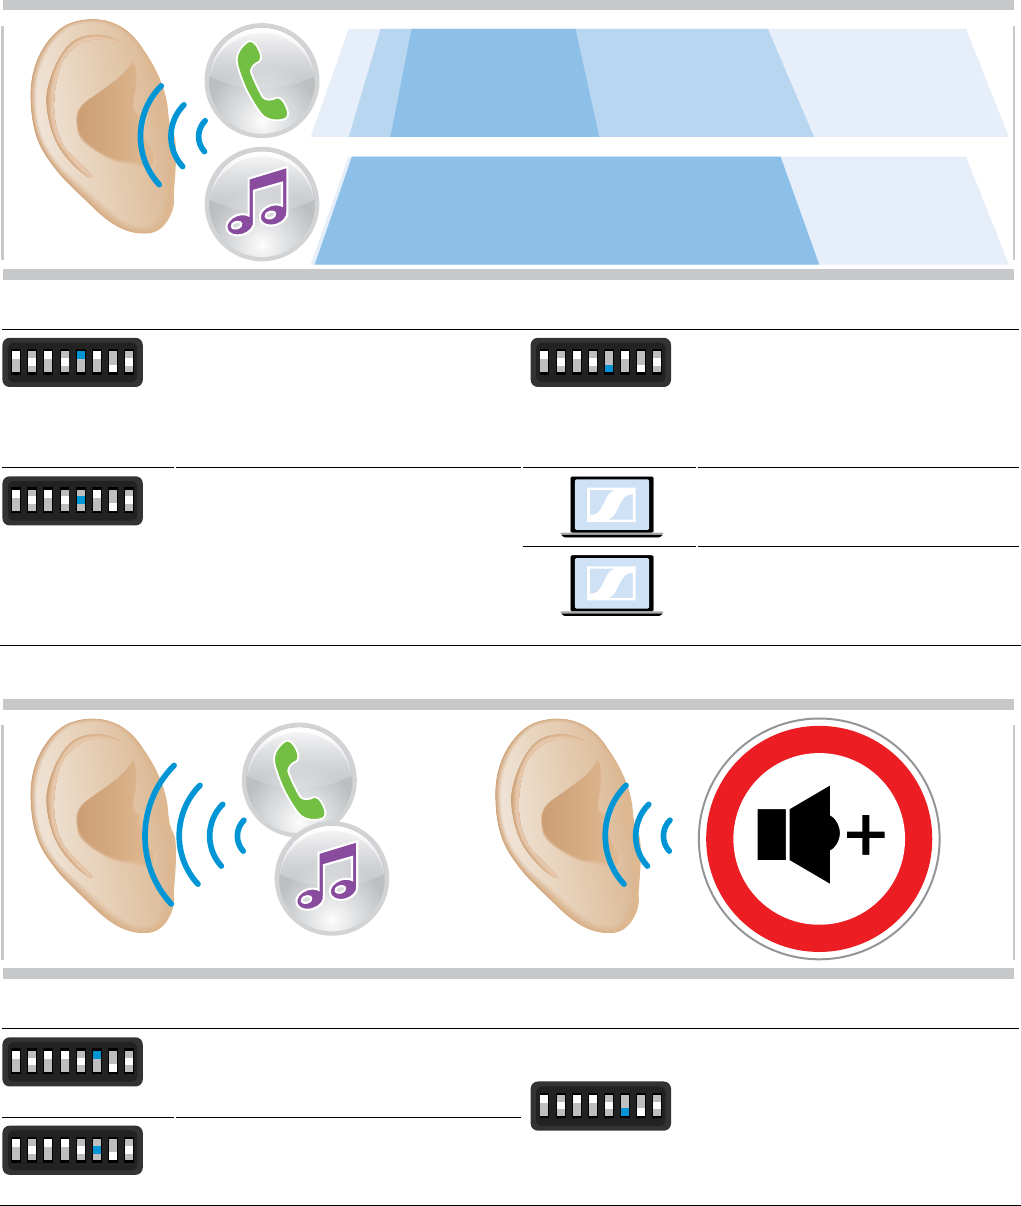
Configuring the headset system using HeadSetup™ Pro or the DIP switches ..............................................................26
Adjusting the audio signal for desk phones using the ABC switch – SDW 5 BS only ..................................................30
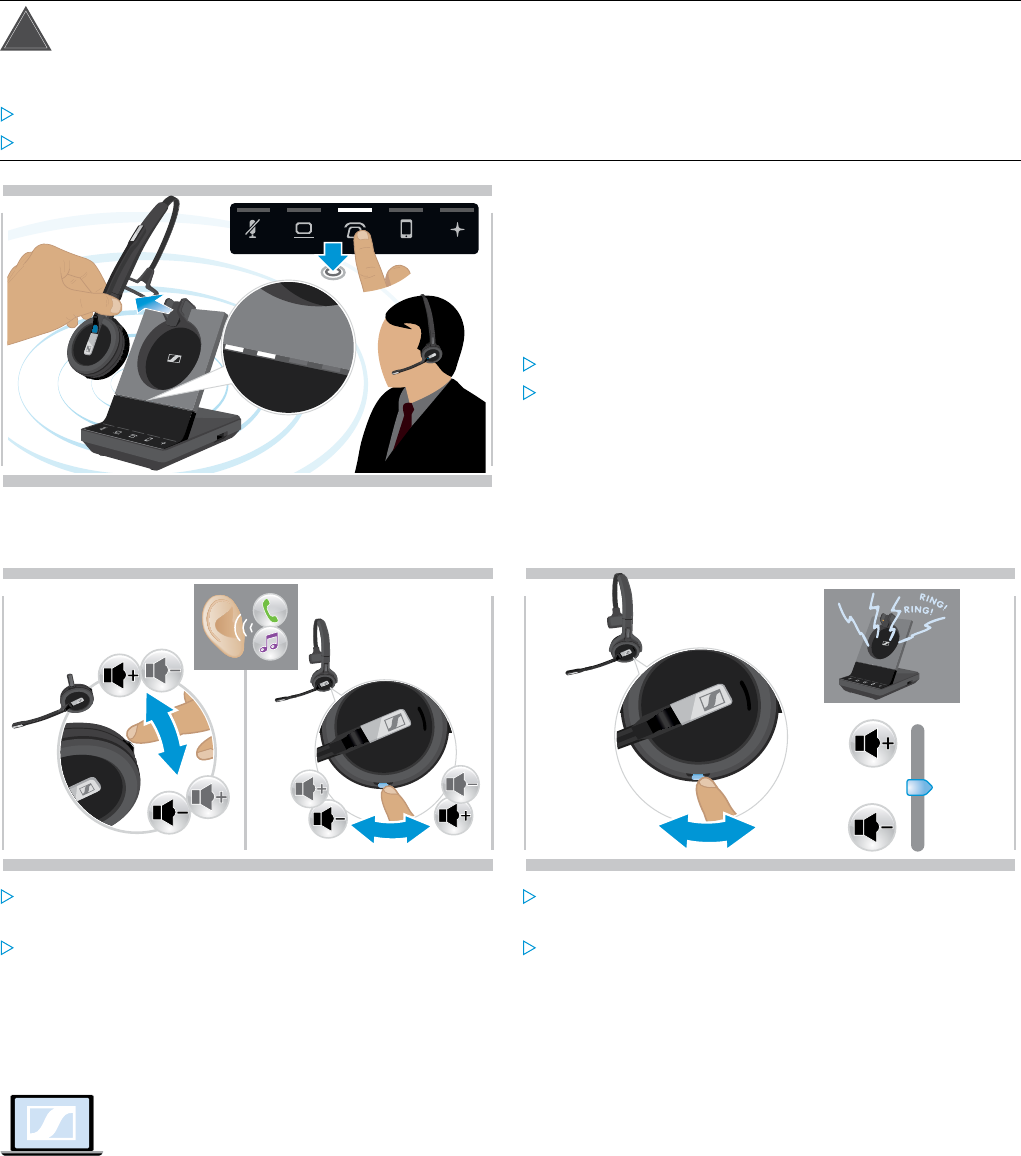
Adjusting the transmission volume ....................................................................................................................................30
Setting up and using the headset ......................................................................................................................................31
Adjusting the volume ............................................................................................................................................................ 31
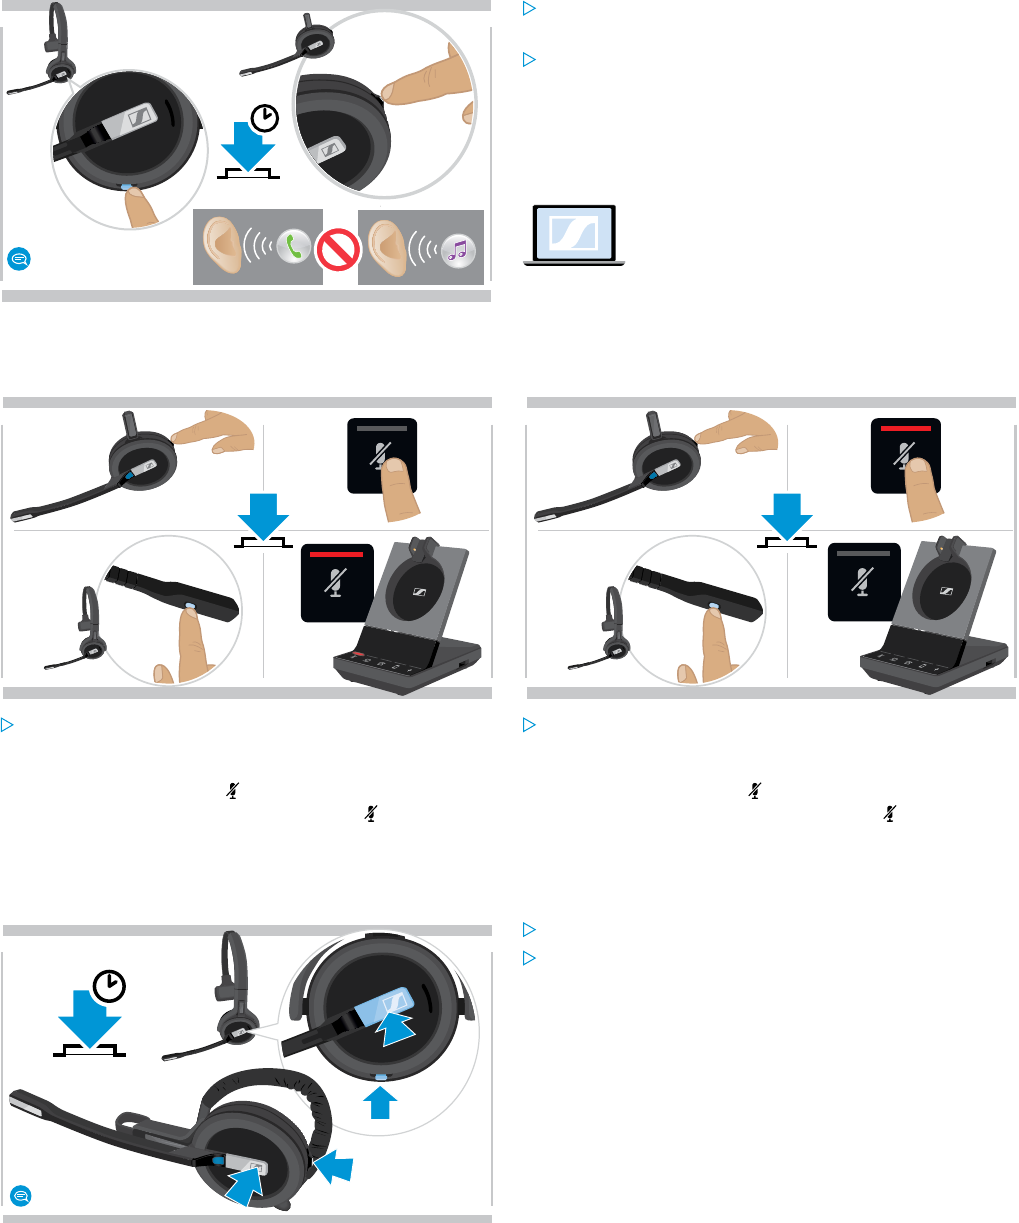
Muting the headset’s microphone ......................................................................................................................................32
Enabling/disabling voice prompts ......................................................................................................................................32
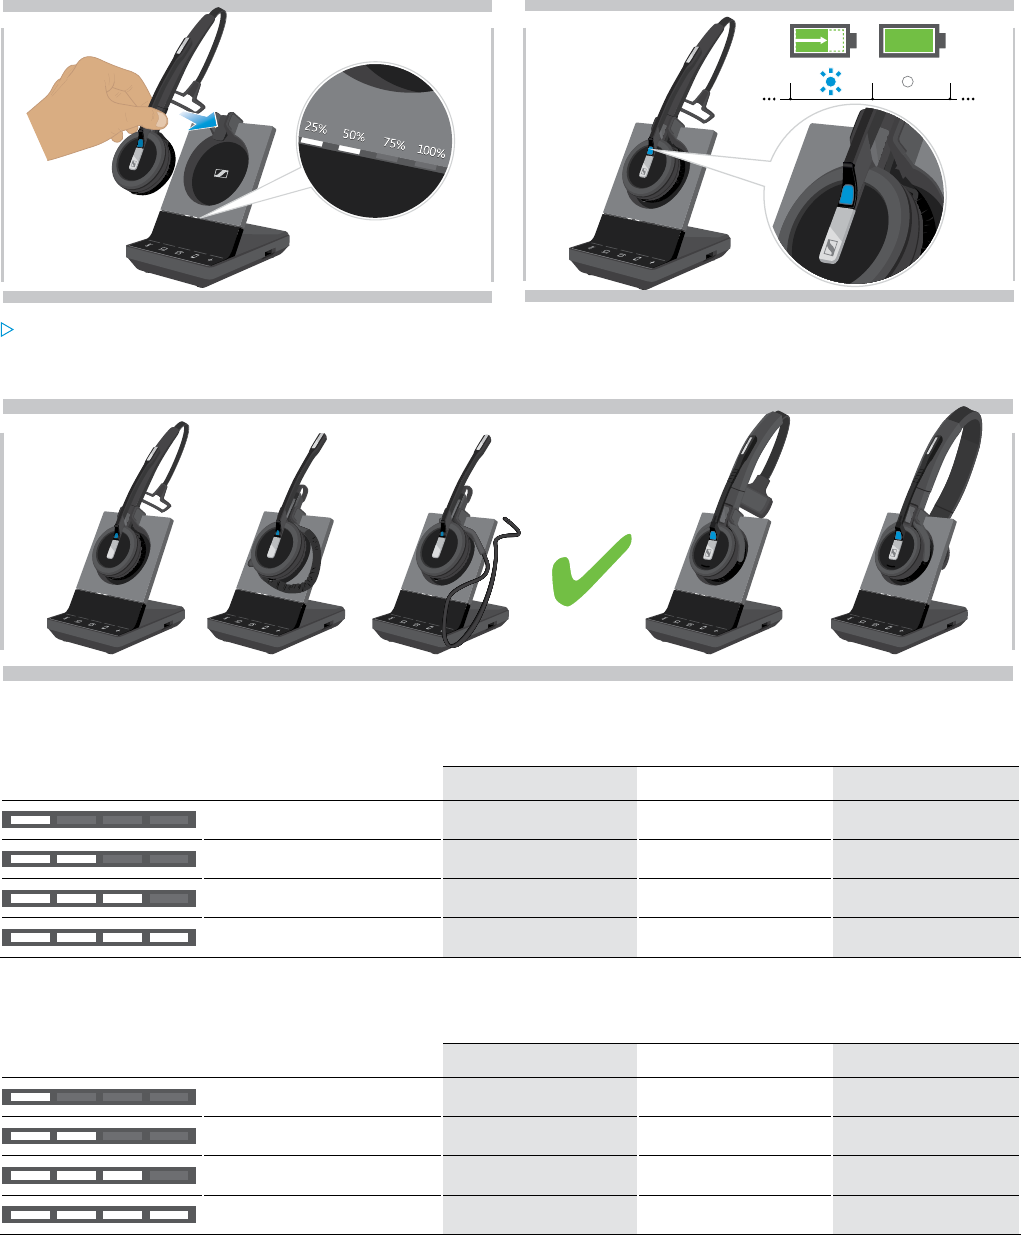
Verifying battery life .............................................................................................................................................................33
If you leave the DECT or Bluetooth range ..........................................................................................................................33
Making calls using the headset system ...........................................................................................................................34
Preparing calls - initial settings ...........................................................................................................................................34
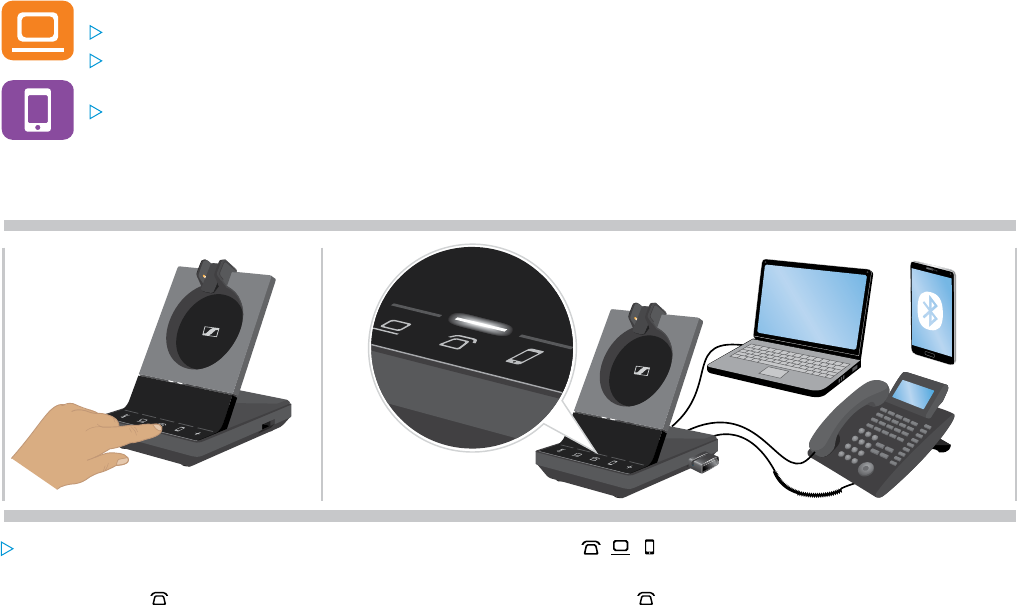
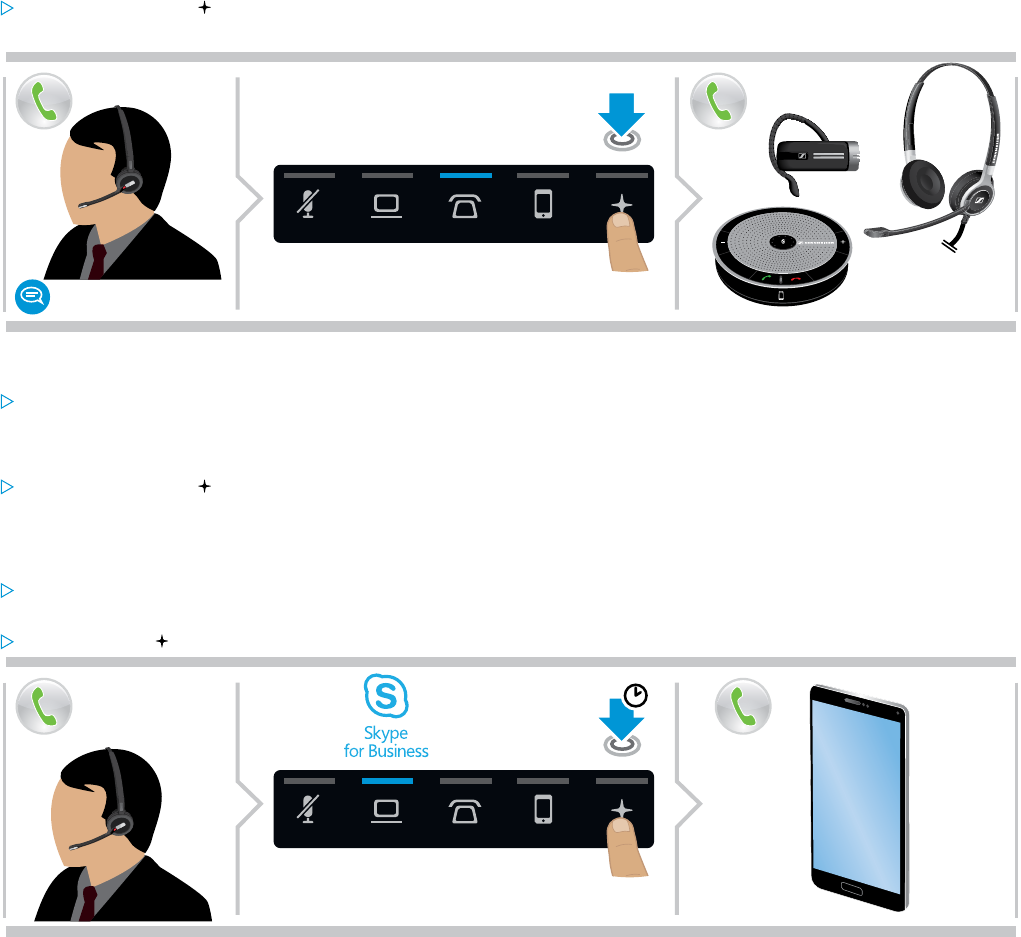
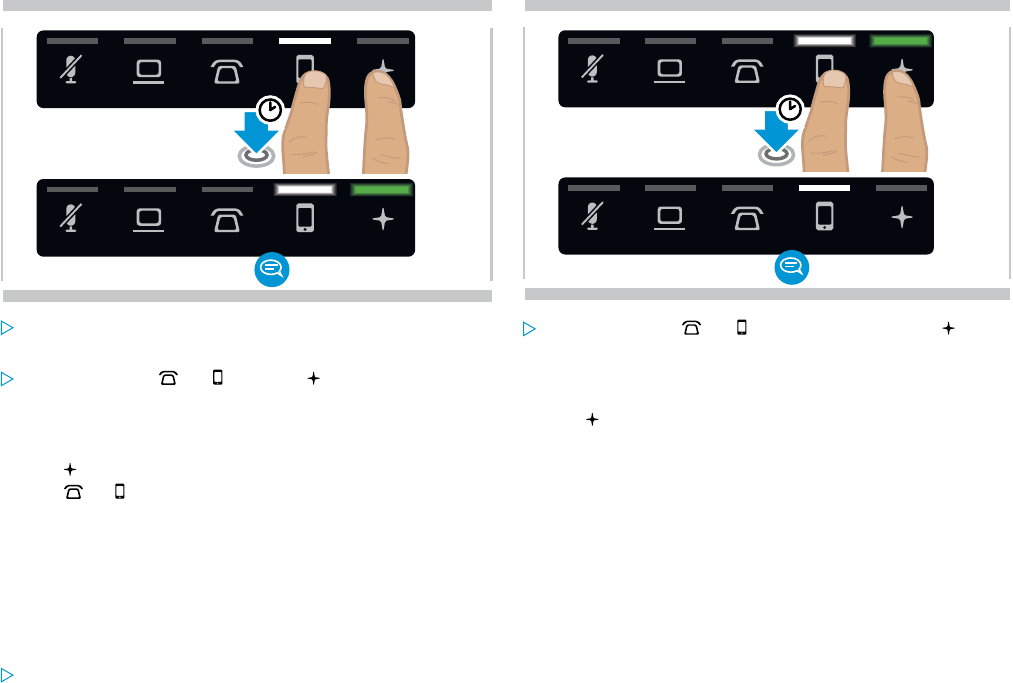
Selecting audio source – fixed line phone/ computer/ mobile phone ...........................................................................34
Making a call ..........................................................................................................................................................................35
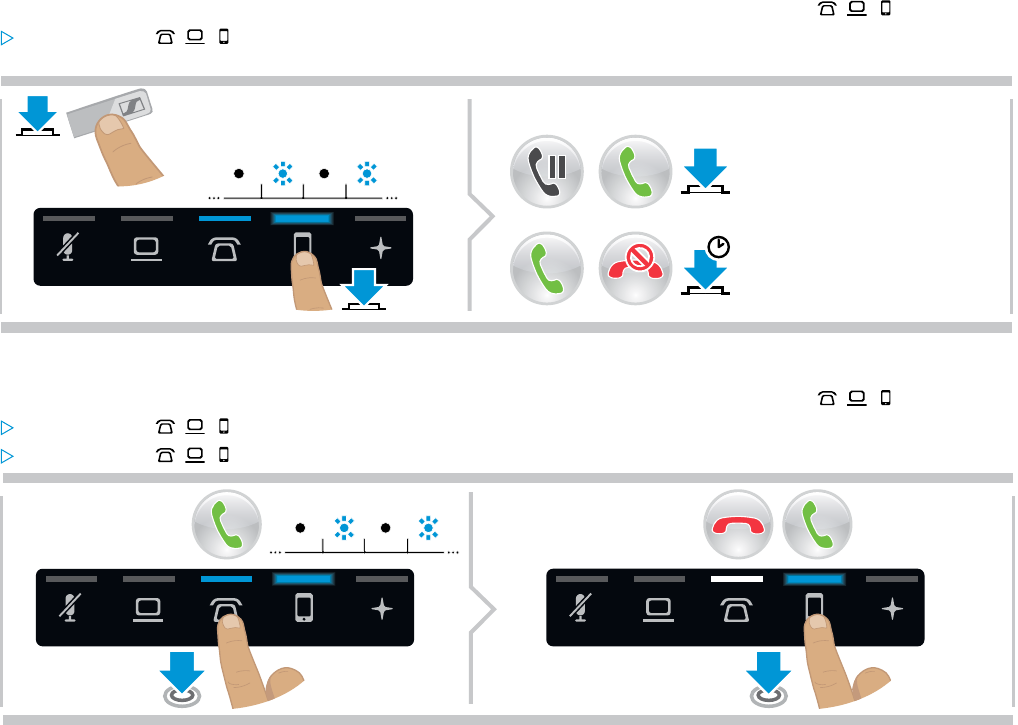
Accepting/rejecting a call ...................................................................................................................................................35
Transferring calls to connected devices ............................................................................................................................36
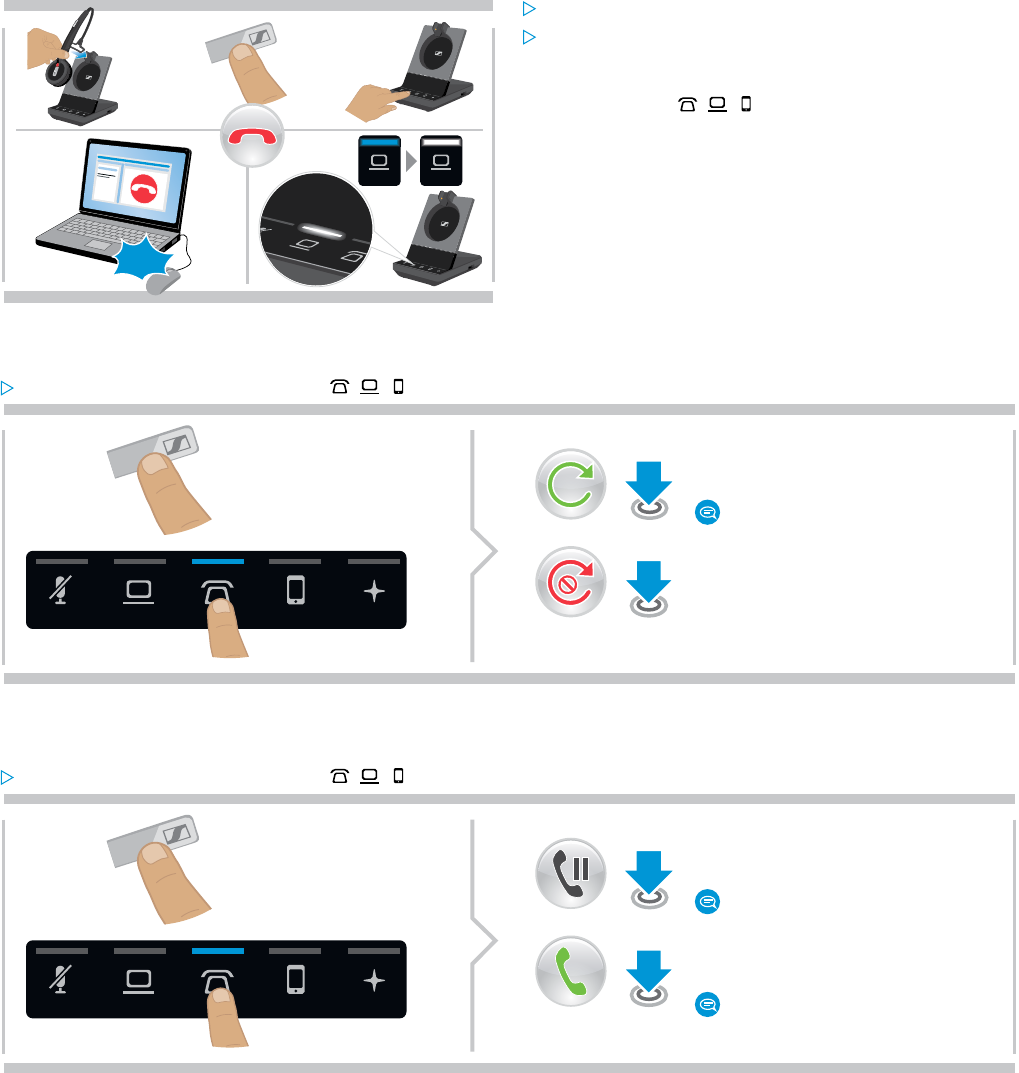
Ending a call...........................................................................................................................................................................37
Redialing ................................................................................................................................................................................37
Putting a single active call on hold .....................................................................................................................................37
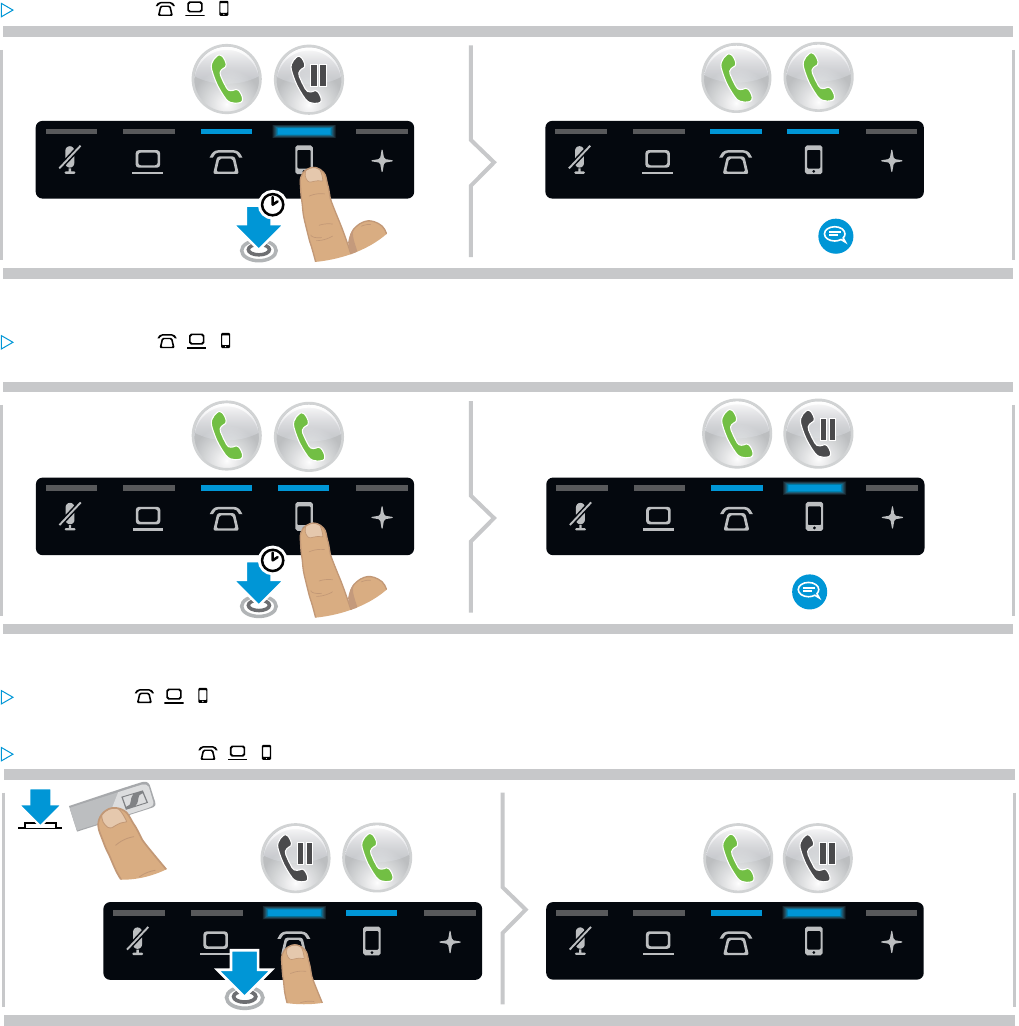
Managing multiple calls - two calls from two audio sources ..........................................................................................38
Setting up conference call .................................................................................................................................................. 40
Using the dictation mode ...................................................................................................................................................43
Listening to music using the headset ............................................................................................................................... 44
Using the motion sensor ....................................................................................................................................................45
Charging the headset and storing the headset system ..................................................................................................46
Charging the headset ...........................................................................................................................................................46
Switching the headset system off during extended non-use ..........................................................................................47
Sharing a workplace ........................................................................................................................................................... 48
Using the headset with a third party base station (DECT-GAP telephone) ...................................................................48
Cleaning and maintaining the headset system ...............................................................................................................49
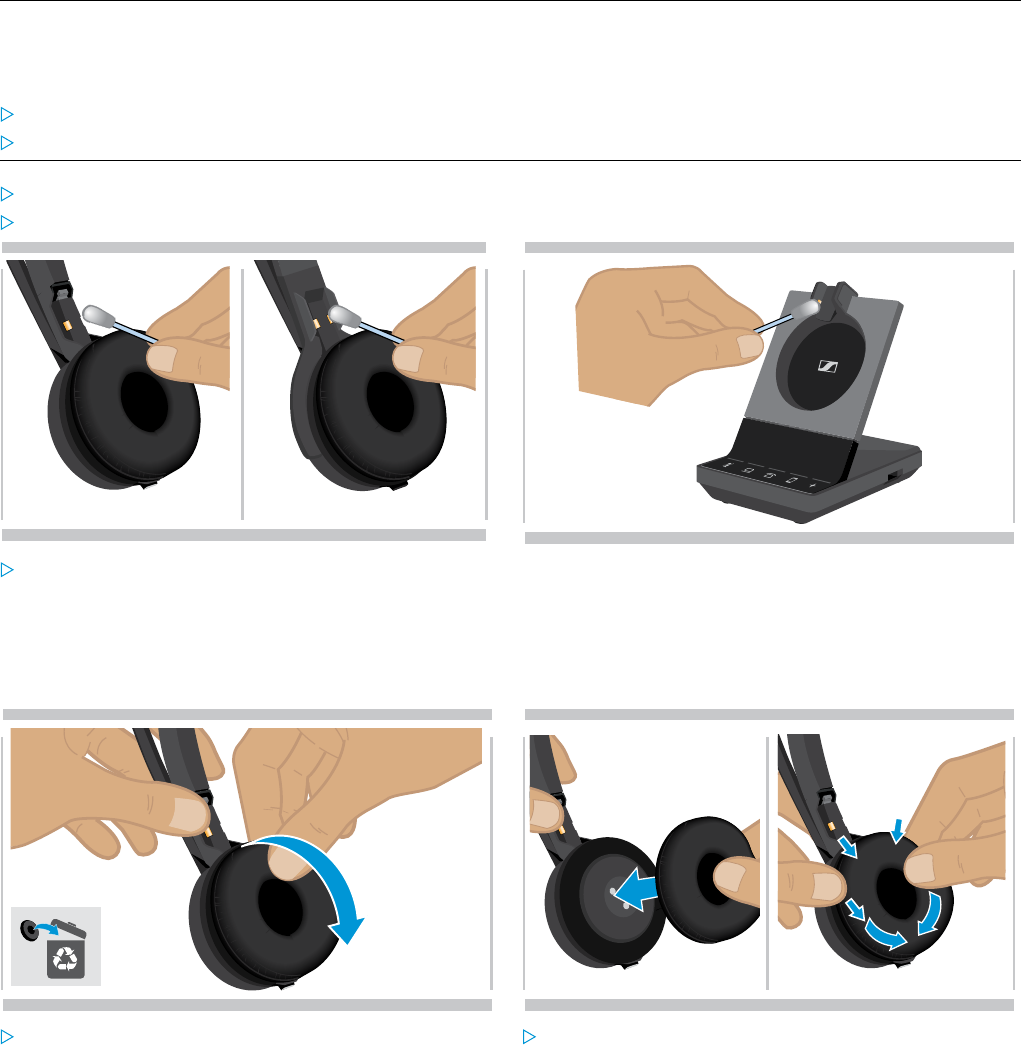
Replacing the ear pads .........................................................................................................................................................49
Replacing/removing the headset‘s rechargeable battery .............................................................................................. 50
Updating the firmware of the products ............................................................................................................................. 50
If a problem occurs ... ..........................................................................................................................................................51
Specifications .....................................................................................................................................................................54
SDW 5000 series headset system
PACKAGE CONTENTS2
Package contents
In the SDW 5000 Series, all headsets and base stations are compatible with each other, allowing you to combine the
products to meet your needs.
For safety instructions, consult the Safety Guide.
A list of accessories can be found on the product page at www.sennheiser.com/headsets. For information
on suppliers, contact your local Sennheiser partner: www.sennheiser.com/headsets > “Find a dealer.
Base stations with components
Safety
Guide
Quick
Guide
Compliance
sheet
SDW 3 BS SDW 5013 & SDW 5014 bundle
Safety
Guide
Quick
Guide
Compliance
sheet
SDW 5 BS SDW 5015 & SDW 5016 bundle
EU/UK/US/AUS
EU/UK/US/AUS
SDW 5016 bundle
+ BTD 800 USB
SDW 5014 bundle
+ BTD 800 USB
i
SDW 5000 series headset system
PACKAGE CONTENTS3
Headset with components
Headset SDW 10 HS
L
S
M
Safety
Guide
Quick
Guide
Compliance
sheet
*
Headband Ear hook and adapter Neckband
pre-mounted
*The wearing style adapter is also needed for assembling the neckband (see page 21).
Headset SDW 30 HS | SDW 60 HS
Safety
Guide
Quick
Guide
Compliance
sheet
SDW 30 HS SDW 60 HS
SDW 5000 series headset system
PRODUCT OVERVIEW4
Product overview
Overview of the base station
Overview of the front
USB port
Headset
battery
status LED
Headset charging dock with magnetic holder
Microphone
mute
Computer
Phone
(SDW 5 BS only)
Mobile phone
Multi-function
Touch panel with LED
Overview of the rear sockets
SDW 5 BS SDW 3 BS
BUSY
Busy Light
PC
Computer
(USB)
DC
Power
supply
Phone
Desk phone
Handset
ACC
Handset
Lifter
BUSY
Busy Light
PC
Computer
(USB)
DC
Power
supply
SDW 5000 series headset system
PRODUCT OVERVIEW5
Overview of the bottom
1 2 3 4 5 6 7 8
S1 S2
Microphone
volume control
(SDW 5 BS only)
Speaker
ABC switch
(SDW 5 BS only)
DIP switches
Reset button
Overview of the headset
Overview of the headset SDW 10 HS
Microphone
Name plate
Headset
LED
Hook
button
Mute & Volume
button
Charging contacts
Battery compartment
Speaker
Charging pin*
*Inserted into the holder of the headband or wearing style adapter
SDW 5000 series headset system
PRODUCT OVERVIEW6
Overview of the headset SDW 30 HS
Microphone
Name plate
Headset LED
Hook button
Mute & Volume
button
Charging contacts
Battery compartment
Speaker
Mute button
Overview of the headset SDW 60 HS
Microphone
Name plate
Headset LED
Hook button
Mute & Volume
button
Charging contacts
Battery compartment
Speaker
Mute button
SDW 5000 series headset system
PRODUCT OVERVIEW7
Overview of the BTD 800 USB dongle
Link LEDUSB plug
Link button
Overview of the LEDs
Overview of the base station LEDs
Base station LED Meaning
off Headset microphone is active
constant Headset microphone is muted
off Corresponding device is not in focus*
constant
Corresponding device is in focus*
*Focus device: the device that initiates an outgoing call when
the headset’s hook button is tapped.
constant
outgoing call / active call
Merged calls from two audio sources:
two LEDs light up
+ / + / + :
flashes fast Incoming call
flashes slow Call on hold
off No external USB or Bluetooth headset connected/ no music
constant
USB headset connected or
Bluetooth headset connected via dongle
constant No headset connected
flashes
Incoming call - no headset connected
Connected USB headset is not supported
constant*
Music streaming
* The LED is off per default and can be enabled via HeadSetup™ Pro.
constant Dictation mode on
segments
1 – 4 are lit
Charging status of the headset battery (see page 46)
off
Headset battery flat
no SDW 5000 headset connected
SDW 5000 series headset system
PRODUCT OVERVIEW8
Overview of the headset LED
Headset LED Meaning
2s2s
0.2s 0.2s
3x
3x
3s 3s
Headset is being charged in the base station
Headset fully charged in CH 30 charger
2s2s
0.2s 0.2s
3x
3x
3s 3s
Headset is being paired to base station
2s2s
0.2s 0.2s
3x
3x
3s 3s
Headset switches on
Headset successfully connected to the base station
2s2s
0.2s 0.2s
3x
3x
3s 3s
Headset switches off
2s2s
0.2s 0.2s
3x
3x
3s 3s
Incoming call
Outgoing/active call
Softphone status: BUSY
2s2s
0.2s 0.2s
3x
3x
3s 3s
Music streaming
* The LED is off per default and can be enabled via HeadSetup™ Pro.
Headset is fully charged in the base station
Firmware upgrade
Overview of the dongle BTD 800 USB LED
Dongle LED Meaning
1s1s 1s1s
0.5s 0.5s 0.5s 0.5s
mode 1:
mode 2:
Dongle in pairing mode:
searching for Bluetooth devices to pair and connect
Search mode 1: Mobile phone
Search mode 2: Bluetooth headset
2s2s
0.2s 0.2s
3x
3x
3s 3s
Pairing successful
2s2s
0.2s 0.2s
3x
3x
3s 3s
Pairing failed
2s2s
0.2s 0.2s
3x
3x
3s 3s
Dongle tries to connect to a Bluetooth device
Dongle and Bluetooth device connected
2s2s
0.2s 0.2s
3x
3x
3s 3s
Outgoing/active call
Music streaming in standard quality
2s2s
0.2s 0.2s
3x
3x
3s 3s
Incoming call
2s2s
0.2s 0.2s
3x
3x
3s 3s
Music streaming in high quality
2s2s
0.2s 0.2s
3x
3x
3s 3s
Microphone of the connected Bluetooth device is muted
Overview of the busy light LED UI 10 BL
Busy light LED Meaning
Presence status softphone: AVAILABLE
No active call
Music streaming
Presence status softphone: AWAY/ be right back
Headset out of range
No headset connected
Presence status softphone:
BUSY/ Presenting/ Do not disturb
Active call on softphone, desk phone or mobile phone
UC* client in meeting
*UC Client = Unified communications client such as Microsoft® Skype for Business
SDW 5000 series headset system
CONNECTING THE BASE STATION9
Connecting the base station
The base station controls the wireless communication to the headset.
Depending on the variant you can plug in the headset system to your fixed line phone and/or your computer.
Via the Bluetooth dongle BTD 800 USB you can connect mobile phones or Bluetooth headsets.
+
Additionally you can plug a USB headset or speakerphone in the USB port or the busy light UI 10 BL in the back of the
base station.
SDW 5000 series headset system
CONNECTING THE BASE STATION10
Connecting the base station to the mains power supply
1
2
Connect the plug of the power supply unit to the
DC socket (marked yellow).
Connect the power supply unit to a wall socket.
The LED lights up red.
See page 13 for supported features with and without
power supply connection.
Disconnecting the base station from the mains power supply
Unplug the power supply unit from the wall socket, if the product is not used for extended periods of time.
Pairing and charging the headset before first use
Charge the rechargeable battery for at least 20 minutes before using it for the first time.
A complete charging process takes about 60 minutes for SDW 10 HS and 90 minutes for SDW 30 HS/ SDW 60 HS
(see page 46).
1
2
3x
Place the headset into the magnetic holder of the base
station.
The Headset battery status LEDs on the base station
indicate the charge status.
If the headset and base station are not paired, the
headset LED flashes blue and red shortly. The LED turns
blue when pairing is complete and the headset will start
charging.
SDW 10 HS SDW 30 HS SDW 60 HS
During the first charging process and after long periods of non-use, it may take up to 5 minutes until the headset
LED lights up.
i
SDW 5000 series headset system
CONNECTING THE BASE STATION11
Connecting the base station to a fixed line phone – SDW 5 BS only
Check which connection possibility is best suited for your telephone and follow the instructions
in the corresponding chapter A, B, C or D.
Place the base station at a minimum distance of 15 cm from the fixed line phone.
Connecting the base station to a fixed line phone without headset socket
1
A
2
1 2 3 4 5 6 7 8
Disconnect the handset cable from the telephone.
Connect it to the Handset socket on the base station.
Connect the telephone cable to the handset socket
and to the Phone socket on the base station.
Use a pointed object to set the DIP switches 1 and 2 at
the bottom of the base station to the position shown.
Connecting the base station to a fixed line phone with headset socket
1
B
2
Connect the telephone cable to the headset socket on
the telephone and to the Phone socket (marked green)
on the base station.
Use a pointed object to set the DIP switches 1 and 2 to
the position shown.
SDW 5000 series headset system
CONNECTING THE BASE STATION12
Connecting the base station to an optional mechanical handset lifter
The handset lifter allows you to answer calls even when you are away from your desk. The Sennheiser HSL 10 II
mechanical handset lifter is available from your Sennheiser partner.
1
C
A
2
Connect the base station to the fixed line phone as
described in chapter A.
Connect the handset lifter to the fixed line phone. For
more information, refer to the instruction manual of the
HSL 10 II handset lifter.
Connect the handset lifter to the ACC socket on the
base station.
Connecting the base station to an optional electronic hook switch control (EHS)
The necessary EHS connection cables as well as adapter cables for manufacturer specific standards are available
from your Sennheiser partner.
For further information concerning corresponding phones and cables visit
www.sennheiser.com/headsetcompatibility.
Quick Guides are supplied with the cables or can be found on the product page on our website at
www.sennheiser.com/headsets.
1
Cisco
Alcatel
Polycom
Avaya
Snom
ShoreTel
Panasonic
D
2
1 2 3 4 5 6 7 8
S1 S2
Connect the base station to the fixed line phone as
shown in the cable Quick Guide.
Use a pointed object (e.g. a ball pen) to set the DIP
switch to the position shown in the cable Quick Guide.
SDW 5000 series headset system
CONNECTING THE BASE STATION13
Connecting the base station to a computer
1 2
Connect the USB cable to the PC socket on the base
station.
Connect the USB cable to a USB socket on your
computer.
The operating system detects the USB audio device
“Sennheiser SDW 5 BS” or “Sennheiser SDW 3 BS”
and installs the necessary drivers.
Installing Sennheiser software
The Sennheiser software allows you to add value to your Sennheiser products. HeadSetup™ Pro enables easy set-up,
configuration and update of your SDW 5000 series.
www.sennheiser.com/software
Download the software from
www.sennheiser.com/software.
Install the software.
To install the software, you need administrator rights
on your computer. If necessary, contact your IT
department.
To make calls via the computer:
Install a softphone (VoIP Software), such as Skype for
Business or ask your admin for support.
Features with and without power supply connection
Feature
Power via USB
only
Power via USB +
power supply unit
Full softphone functionality
ü ü
Conferencing with multiple SDW 5000 headsets
ü ü
Desk phone connection
û ü
USB port functions: Bluetooth headsets & mobile via dongle, USB headsets
& speakerphones
û ü
Busy light support
û ü
Fast charging
û ü
SDW 5000 series headset system
CONNECTING THE BASE STATION14
Connecting the base station to Bluetooth devices – BTD 800 USB only
With the dongle BTD 800 USB you can either connect mobile phones or headsets via Bluetooth to the base station.
The dongle complies with the Bluetooth 4.2 standard. Pair Bluetooth devices that support the “hands free profile(HFP),
the “headset profile” (HSP) or the “advanced audio distribution profile” (A2DP).
The dongle can save up to eight paired Bluetooth devices.
If you pair a ninth device, the saved connection profile of
the least used Bluetooth device will be overwritten. If you
want to re-establish a connection with this device, you
have to pair the devices again.
After switch-on, the dongle automatically tries to connect
to the two last connected Bluetooth devices – mobile
phone and headset cannot be combined. You can only
connect a third Bluetooth device after having switched
off the first or the second Bluetooth device.
Connecting the Bluetooth dongle to the base station
The BTD 800 USB dongle is supplied together with the
SDW 50X4 and SDW 50X6 bundles and also available as
an accessory.
Plug the dongle into the USB port of the base station.
Follow the instructions in one of the two next chapters.
New unused dongles switch automatically to pairing
mode. The LED alternately flashes blue and red.
SDW 5000 series headset system
CONNECTING THE BASE STATION15
Pairing a mobile phone or tablet via Bluetooth
1
<20 cm
Bluetooth
2
Press & hold
3s
”Pairing“
Activate Bluetooth on your mobile phone or tablet (see
the instruction manual of your device).
Press and hold the dongles button for 3 seconds to
enter pairing mode.
The LED alternately flashes blue and red.
3
keyword:
0000
Search devices...
Sennheiser BTD 800 USB
Laptop Nick
4
3x
”Connected“
Start the search for new Bluetooth devices.
All available devices in the proximity of your mobile
phone or tablet are displayed.
Select “Sennheiser BTD 800 USB” to pair the dongle. If
necessary, enter the default PIN code “0000”.
Once the Bluetooth devices are paired, the LED flashes
3 times blue and then lights up in a constant dim blue.
SDW 5000 series headset system
CONNECTING THE BASE STATION16
Pairing a headset via Bluetooth
1
<20 cm
2
Press & hold
3s
”Pairing“
Activate the pairing mode on your Bluetooth headset
(see the instruction manual of your device).
Press and hold the dongles button for 3 seconds to
enter pairing mode.
The LED alternately flashes blue and red.
3
A
B
1s 1s 1s 1s
0.5s 0.5s 0.5s 0.5s
4
”Connected“
3x
Press the button again to switch between pairing mode
for mobile phones A or headsets B.
Once the Bluetooth devices are paired, the LED flashes
3 times blue and then lights up in a constant dim blue.
Clearing the list of previously paired devices
Press and hold the dongles button for 3 seconds to enter pairing mode.
The LED alternately flashes blue and red.
Double press the dongles button.
The LED flashes purple three times. The pairing list is cleared.
Reconnecting/disconnecting Bluetooth
3x
2x
3x
To reconnect a Bluetooth device:
Tap the dongle’s button.
The LED lights up blue once and after that flashes
3 times blue. The LED is lit constantly in dim blue.
To disconnect a Bluetooth device:
Double tap the dongles button.
Bluetooth will be disconnected. The LED flashes
3 times red. The dongle starts flashing blue and
searches for other Bluetooth devices.
SDW 5000 series headset system
CONNECTING THE BASE STATION17
Connecting an optional USB headset or speakerphone
You can connect a Sennheiser USB headset or a USB speakerphone at any time, if for example the battery of your
SDW headset is empty or to add other participants to your conference call.
Connecting a USB headset
1
2
Connect the headset to the USB socket on the base
station.
The LED lights up white.
Connecting a speakerphone
-
+
To use an external speaker with microphone such as the
Sennheiser speakerphone SP 10, SP 20 or SP 220:
Connect your speakerphone to the USB socket of the
base station.
The LED lights up white.
If you want to recharge the SDW headset - while using
the speakerphone:
Ensure the headset is docked before you initiate the
call OR
Double tap the icon on the base station to transfer
the call from the headset to the speakerphone.
Connecting an optional busy light
The busy light UI 10 BL signals to your colleagues if
you are available or in a call. The busy light UI 10 BL is
available as an accessory.
Connect the busy light to the Busy socket of the base
station.
The LED of the busy light lights up while the base
station is switched on (see page 8).
Attach the busy light to your monitor or to your desk –
if required (see UI 10 BL Quick Guide).
SDW 5000 series headset system
ASSEMBLING AND WEARING THE HEADSET SDW 10 HS18
Assembling and wearing the headset SDW 10 HS
You can wear the headset either with the headband, the ear hook or the neckband.
L
S
M
A B
C
pre-mounted
Before assembly, remove the stickers showing where the charging pin should be inserted.
Using the headset with the headband
1 2
CLICK!
Rotate the headset’s charging pin away from the
microphone boom.
Slide the charging pin into the holder of the headband.
3
CLICK!
4
CLICK!
Snap the charging pin into the headband. Snap the headset into the circular part of the headband.
5
6
Rotate the microphone boom to change wearing side. Adjust the headset so that the ear pad rests comfortably
on your right or left ear.
SDW 5000 series headset system
ASSEMBLING AND WEARING THE HEADSET SDW 10 HS19
Using the headset with the ear hook
Assembling the ear hook and the headset
1
2
CLICK!
Rotate the headset’s charging pin away from the
microphone boom.
Insert the charging pin into the holder of the wearing
style adapter.
3
CLICK!
Rotate the boomarm to snap it in the wearing style
adapter.
SDW 5000 series headset system
ASSEMBLING AND WEARING THE HEADSET SDW 10 HS20
Adjusting the ear hook for perfect wearing comfort
Fit the ear hook around your ear with the ear bud
placed in your ear.
Bend the flexible ear hook so that the headset sits
comfortably and securely on your ear.
Adjust the ear hook’s height and shape.
S
M
L
Change ear bud size for optimal fit – if required. Mount the ear hook stabilizer for an improved fit – if
required.
Change wearing side – if required. Rotate the cheek spacer to increase or decrease the
distance between the microphone and your mouth – if
required.
SDW 5000 series headset system
ASSEMBLING AND WEARING THE HEADSET SDW 10 HS21
Using the headset with the neckband
Assembling the neckband and the headset
1 2
Remove the ear hook from the wearing style adapter
and insert the neckband instead. Make sure the
inserted side has the holder mounted on the neckband.
Rotate the headset’s charging pin away from the
microphone boom.
3
CLICK!
4
CLICK!
Insert the charging pin into the holder of the wearing
style adapter.
Rotate the boomarm to snap it on the wearing style
adapter like shown.
SDW 5000 series headset system
ASSEMBLING AND WEARING THE HEADSET SDW 10 HS22
Adjusting the neckband for perfect wearing comfort
Fit the neckband around your neck and both ears.
Ensure that the ear bud is placed in your ear.
Adjust the neckband’s height and angle.
S
M
L
Change ear bud size for optimal fit – if required. Rotate the cheek spacer to increase or decrease the
distance between the microphone and your mouth – if
required.
Change wearing side – if required.
SDW 5000 series headset system
ASSEMBLING AND WEARING THE HEADSET SDW 10 HS23
Detaching headband, ear hook or neckband
CAUTION
Improper handling can damage the product!
If the charging pin and microphone boom overlap while detaching, they can break.
Rotate the charging pin as shown.
1
2
Rotate the holder with the charging pin away from the
microphone boom.
Hold the headset with the one hand.
Slide one finger of the other hand into the small recess
on the headband or wearing style adapter.
3
CLICK!
CLICK!
Pull the two units apart from each other.
The headset loosens and you hear a click.
Remove the headset from the holder.
SDW 5000 series headset system
ADJUSTING AND WEARING THE HEADSET SDW 30 HS  SDW 60 HS24
Adjusting and wearing the headset SDW 30 HS | SDW 60 HS
2-3 cm
Rotate the microphone boom to change wearing side. Bend and rotate the microphone boom so that the
microphone is about 0.8” (2 cm) from the corner of
your mouth.
Adjust the headset so that the ear pad rests comfortably
on your right or left ear.
Adjust the headset so that the ear pads rest comfortably
on your ears.
SDW 5000 series headset system
LABELING THE HEADSET 25
Labeling the headset
1
www.sennheiser.com/name-plate-maker
TYPE
PRINT
CUT
A
Tina
SDW 60
Name Plate Maker
2
SDW 10 HS SDW 30 HS
SDW 60 HS
Open the „Name Plate Maker“ under:
www.sennheiser.com/name-plate-maker.
Follow the instructions to create your nameplate.
SDW 10 HS:
Detach the headband or wearing style adapter from
the headset (see page 23).
SDW 30 HS | SDW 60 HS:
Tilt the earcup with the boom arm as shown.
3
SD W 10
4
Remove the cover. Replace the name plate.
5
6
Slide the cover in the holder. SDW 10 HS:
Reassemble the headset with the headband or wearing
style adapter (see page 18).
SDW 5000 series headset system
CONFIGURING THE HEADSET SYSTEM26
Configuring the headset system
Configuring the headset system using HeadSetup™ Pro or the DIP switches
You can adjust the headset system via the software HeadSetup™ Pro or the DIP switches on the base station. Changes
in HeadSetup™ Pro overwrite the DIP switch settings.
HeadSetup™ Pro offers additional settings – marked with the adjacent icon in the following chapters. In
addition to the settings described here, HeadSetup™ Pro offers further configurations – see options in
the software.
1 2 3 4 5 6 7 8
S1 S2
To configure the system via the DIP switches:
Use a pointed object to set the DIP switches to the
desired position. After a DIP switch is changed:
Re-boot the system by disconnecting the power supply
and USB cable shortly from the power.
To configure the system via HeadSetup™ Pro:
Connect the base station to your computer and install
the required software (see page 13).
Start HeadSetup™ Pro.
Click on “Settings” in the menu and choose your
SDW 5000 device.
Change to the desired values and save.
Configuring the desk phone – DIP switches 1 and 2 – SDW 5 BS only
If you do not have a desk phone with an EHS solution, the HSL 10 II can be used for remote call control.
Switch position Function Switch position Function
1 2 3 4 5 6 7 8
DHSG mode
Call control with phones using DHSG
standard
1 2 3 4 5 6 7 8
Panasonic mode
Call control with Panasonic
phones
1 2 3 4 5 6 7 8
Manual mode
Manual operation* of handset or
handset lifter HSL 10 II
1 2 3 4 5 6 7 8
Auto link
Wireless link between headset
and base station established
automatically
1 2 3 4 5 6 7 8
OptiPoint mode
Call control with OptiPoint phones
1 2 3 4 5 6 7 8
MSH mode
Call control with phones using
MSH standard
1 2 3 4 5 6 7 8
1 2 3 4 5 6 7 8
1 2 3 4 5 6 7 8
No assigned modes
* For undetectable phones without call control: Touch the icon
to manually establish a link to the desk phone. A
second touch will close the link and allows to operate calls on other audio sources ( / ).
SDW 5000 series headset system
CONFIGURING THE HEADSET SYSTEM27
Adjusting the radio range – DIP switch 3
If many DECT systems are operated in a confined space, interference can occur. In this case, you should change the
radio range on the DECT systems.
100 m
Switch position Function Switch position Function
1 2 3 4 5 6 7 8
Long range
Up to 100 m indoors
1 2 3 4 5 6 7 8
Short range
Up to 10 m indoors; for minimal
interference with other DECT
devices in dense environments
1 2 3 4 5 6 7 8
Medium range
Up to 50 m indoors
Adjust how the system handles incoming calls – DIP switch 4
Switch position Function Switch position Function
1 2 3 4 5 6 7 8
Manual Hook
Manual answering of calls via hook
button on headset
1 2 3 4 5 6 7 8
Auto Hook
Automatic answering of incoming
calls when headset undocked
1 2 3 4 5 6 7 8
Fast Link
Manual answering and audio link to base station always open for fast response times
SDW 5000 series headset system
CONFIGURING THE HEADSET SYSTEM28
Adjusting the audio quality – DIP switch 5
Narrowband Wideband
Super
Wideband
300 Hz – 3.5 kHz 150 Hz – 6.8 kHz 100 Hz – 11.5 kHz
Ultra Wideband Full band
20 Hz – 12 kHz 20 Hz – 16 kHz
Switch position Function Switch position Function
1 2 3 4 5 6 7 8
Best
calls: Super Wideband
music: Full band
1 2 3 4 5 6 7 8
Good
calls: Narrowband
music: Ultra Wideband
max battery and density
performance
1 2 3 4 5 6 7 8
Better
calls: Wideband
music: Ultra Wideband
max talk time performance
Better (Mode 2)
like “Better” but optimized for max
density performance
Narrowband Desk Phone
changes desk phone audio quality
to narrowband, while enjoying a
“better” sound with other devices
Limiting the volume – DIP switch 6
Switch position Function Switch position Function
1 2 3 4 5 6 7 8
off
1 2 3 4 5 6 7 8
AU limiter
Compliant with Directive
AS/ACIF G616:2006
1 2 3 4 5 6 7 8
EU/US limiter
Compliant with Directive 2003/10/EC
SDW 5000 series headset system
CONFIGURING THE HEADSET SYSTEM29
Adjusting the ring tone and ring tones volume of the base station – DIP switch 7 and 8
Switch position Function Switch position Function
1 2 3 4 5 6 7 8
Ringing volume
High
1 2 3 4 5 6 7 8
Ring tone 1
Active
1 2 3 4 5 6 7 8
Ringing volume
Low
1 2 3 4 5 6 7 8
Ring tone 2
Active
1 2 3 4 5 6 7 8
Ringing volume
Off
1 2 3 4 5 6 7 8
Ring tone 3
Active
Ringing volume
Very low
Medium
SDW 5000 series headset system
CONFIGURING THE HEADSET SYSTEM30
Adjusting the audio signal for desk phones using the ABC switch – SDW 5 BS only
1
2
Put on the headset. Press the button on the base station.
3
4
1 2 3 4 5 6 7 8
S1 S2
Lift the handset.
You hear a dial tone.
Set the ABC switch to the position A, B or C so that you
can hear a clear dial tone in the headset.
Adjusting the transmission volume
Adjusting the microphone volume for the connected desk phone – SDW 5 BS only
By default, the microphone volume control is set to 4. This setting is suitable for most telephones.
1
2
1 2 3 4 5 6 7 8
S1 S2
Make a call to someone who will help you find the
correct sensitivity setting for your microphone
(see page 34).
Turn the microphone volume control so that the other
party can hear you at a comfortable level.
Adjusting the microphone volume for the connected computer
Activate the option “Automatically adjust microphone sensitivity” in the settings of your softphone – if available.
Adjust the microphone sensitivity via your operating system, so that the other party can hear you at a comfortable
level (see Help function of your operating system).
SDW 5000 series headset system
SETTING UP AND USING THE HEADSET31
Setting up and using the headset
Adjusting the volume
!
CAUTION
Hearing damage due to high volumes!
Listening at high volume levels for long periods can lead to permanent hearing defects.
Set the volume to a low level before putting on the headset.
Do not continuously expose yourself to high volumes.
1
You can adjust two independent volume settings for the
headset:
speaker volume, audio signal
volume for the ring tone, the beeps and the voice
prompts
The direction of the volume buttons could be swapped.
Put on the headset.
Choose your audio source.
The corresponding LED lights up.
Adjusting the volume of the audio signal Adjusting the volume of the ring tone, the beeps and
the voice prompts
2
2
Make a call (see page 35) or
play music (see page 44).
Move the Mute & Volume button as shown to adjust
the volume.
Make sure that the headset is in idle mode (no active
call or music reproduction).
Move the Mute & Volume button as shown to adjust
the volume.
When the minimum or maximum volume is reached, the voice prompt “Volume minor Volume max” is announced
in the headset. When the voice prompts are disabled, you hear a beep in the headset instead.
Adjusting the sidetone
The sidetone in the SDW headsets can be adjusted via HeadSetup™ Pro.
SDW 5000 series headset system
SETTING UP AND USING THE HEADSET32
Swapping the direction of the volume buttons
You can change the direction of the Volume buttons up/down function if, for example, you want to wear the headset
on the other ear. SDW 10 HS: If the motion sensor is enabled, the volume keys automatically swap direction when you
change the wearing side.
“Swap volume keys
3s
Make sure that the headset is in idle mode (no active
call or music reproduction).
Press and hold the Mute & Volume button.
The direction of the buttons volume up/down function
is changed. The voice prompt “Swap volume keys is
announced in the headset.
SDW 60 HS:
Stereo channels left/right will be changed too.
You can also change this setting via
HeadSetup™ Pro.
Muting the headset’s microphone
Muting the microphone Unmuting the microphone
SDW 10 HS
SDW 30 HS
SDW 60 HS
SDW 10 HS
SDW 30 HS
SDW 60 HS
Press the Mute & Volume button on the headset OR
SDW 30 HS | SDW 60 HS: Mute button on the boom
arm OR
Touch the Mute button on the base station.
The microphone is muted and the LED lights up red.
The voice prompt “Mute on is announced.
Press the Mute & Volume button on the headset OR
SDW 30 HS | SDW 60 HS: Mute button on the boom
arm OR
Touch the Mute button on the base station.
The muting is canceled and the LED switches off.
The voice prompt “Mute off“ is announced.
Enabling/disabling voice prompts
3s
”Voice on” / ”Voice off
Take the headset out of the base station.
Simultaneously press and hold the hook and mute
button until you hear 2 beeps, then release the button.
The voice prompts are now activated/deactivated
and the voice prompt “Voice on” or “Voice off is
announced in the headset.
If the voice prompts are deactivated, the headset
emits beeps.
SDW 5000 series headset system
SETTING UP AND USING THE HEADSET33
Verifying battery life
1s
You can retrieve information on the remaining battery life
at any time except when you are on a call or listening to
music:
Press the hook button for 1 second.
The remaining battery life is announced.
It is also possible to verify the remaining headset battery
life at any time via the base station battery LEDs.
Information announced Remaining battery life
“More than eighty percent battery left”
> 80%
“More than sixty percent battery left”
> 60%
“More than forty percent battery left”
> 40%
“More than twenty percent battery left”
> 20%
“Less than twenty percent battery left”
< 20%
„Recharge headset“
less than 15 minutes talk time; automatic voice prompt
Recharge headset (see page 46).
If you leave the DECT or Bluetooth range
100 m
In office buildings, the range between DECT headset and
base station is up to 100 m. Further information on how to
adjust radio range is given on page 27).
The range between a Bluetooth headset and base station
or between the mobile phone and the base station/dongle
is device dependent.
If the audio quality deteriorates during a call or the link
breaks down completely, the voice prompt “device
disconnected” is announced in the headset. The LED on
the headset is off and the LED
on the base station lights
up red.
Re-enter the radio range of the base station to resume
the call.
If your softphone supports call control, the call will
automatically be ended 60 seconds after leaving the
radio range.
SDW 5000 series headset system
MAKING CALLS USING THE HEADSET SYSTEM34
Making calls using the headset system
In the following chapters the most important functions of the connected devices will be explained. Some functions
depend on the configuration of the base station (see page 26).
For information on how to set up a teleconference combining multiple phone calls or headsets see chapter “Setting
up conference call” on page 40.
If the optional UI 10 BL is connected (see page 17) the current state will be indicated by the busy light (see page 8).
Preparing calls - initial settings
Call control – manage calls directly via the headset:
Visit our website at www.sennheiser.com and check whether your softphone is supported.
Install our free software to enable call control support – if required.
Ensure your BTD 800 USB dongle is paired and connected to your mobile phone (see page 14).
Selecting audio source – fixed line phone/ computer/ mobile phone
Touch the icon of the desired audio source on your base station / / .
The chosen audio source is in focus and the LED lights up white.
If for example
is in focus, press the hook button (or touch the icon again) to initiate a call via your fixed line
phone – depending on the settings. The fixed line phone will remain your default audio source for outgoing calls
until you change it.
SDW 5000 series headset system
MAKING CALLS USING THE HEADSET SYSTEM35
Making a call
+44 1234
Put on the headset.
Press the hook button on the headset OR
touch the icon on your base station to:
Computer
: launch your softphone
Desk phone
: activate the dial tone*
Mobile phone
: initiate voice assistant
Dial the desired number or choose your contact
The connection is established.
The base station LED / / lights up blue.
* For undetectable phones without call control (Manual mode, see page 26):
Touch the icon to manually establish a link to the desk phone. A second touch will close the link and allows to
operate calls on other audio sources ( / ).
Accepting/rejecting a call
You hear a ringing in the headset, on the base station*, desk phone* or mobile phone* (*if enabled).
The base station LED
/ / flashes blue.
1
CLICK!
2
Accept a call*
Accept the call via the audio source OR
Press the hook button on the headset OR
Touch the icon / / of the flashing LED.
The connection is established. The LED stops flashing
and is fixed blue.
Reject a call
Press the icon / / of the flashing LED for
1 second OR
Press the hook button on the headset for 1 second.
The voice prompt “Call rejected“ is announced. The
LED stops flashing and is fixed white.
While the SDW headset is docked for charging, the call can be accepted via the connected Bluetooth/USB
headset or speakerphone.
*For automatic answering functionality, enable “Auto Hook” (see page 27) or motion sensor (see page 45).
i
SDW 5000 series headset system
MAKING CALLS USING THE HEADSET SYSTEM36
Transferring calls to connected devices
Transferring the call to the optional Bluetooth/USB headset or speakerphone
To transfer an active call, e. g. if the headset battery is almost flat:
Double tap the icon on the base station.
The call is transferred to the Bluetooth/ USB headset or speakerphone.
2x
“Recharge headset“
To switch an active call back to the SDW headset:
Undock the SDW headset from the base station.
The call is automatically transferred to the SDW headset.
If the SDW headset is already undocked from the base station:
Double tap the icon on the base station.
The call is transferred to the SDW headset.
Transferring a softphone call to the mobile phone – “Skype for Business” only
Set up your mobile phone number in the “Skype for Business” options menu. For more information visit the “Skype
for Business” support website.
Touch the icon on the base station for 1 second to transfer the call to your mobile phone.
1s
SDW 5000 series headset system
MAKING CALLS USING THE HEADSET SYSTEM37
Ending a call
OR OR
CLICK!
End the call via the audio source OR
Place the headset into the charging cradle of the base
station OR
Press the hook button on the headset OR
Touch the icon / / on the base station.
The call is ended. The base station LED lights up white.
If the other party hangs up, your audio source and your
headset become automatically ready to receive the
next call.
Redialing
Double tap the corresponding icon / / on the base station OR the hook button on the headset.
”Redialing“
2x
OR
Redials the last number
Cancels redialing
Putting a single active call on hold
Double tap the corresponding icon / / on the base station OR the hook button on the headset.
”Call held“
”Call unheld“
2x
OR
Holds the call
Resumes the call
SDW 5000 series headset system
MAKING CALLS USING THE HEADSET SYSTEM38
Managing multiple calls - two calls from two audio sources
Accepting/rejecting a second call
If you receive a call on a second device while you are in an active call, the corresponding LED / / flashes.
Touch the icon / / on the base station corresponding to the flashing LED
OR double tap the headset’s hook button:
1s
2x
Accepts the incoming call &
puts an active call on hold
Headset: press 2x,
Base station: tap 1x
Rejects the incoming call &
continues the active call
Active call 2nd incoming call
Ending the active and accepting the incoming call
If you receive a call on a second device while you are in an active call, the corresponding LED / / flashes.
Touch the icon / / of the blue lit-up LED on the base station to end the active call.
Touch the icon / / corresponding to the flashing LED to accept the call.
SDW 5000 series headset system
MAKING CALLS USING THE HEADSET SYSTEM39
Merging a held call into an active call – Mini conference
Touch the icon / / of the held call for 1 second (LED stops flashing when merged).
“Call merged“
1s
Unmerging a call from a Mini conference and put in on hold
Touch the icon / / of the audio source with the call you want to put on hold for 1 second (LED of unmerged
call starts flashing).
“Call unmerged“
1s
Toggling between active and held call
Tap the icon / / of the held call (flashing LED) OR double tap the headset’s hook button.
If both calls are on the same source:
Double tap the icon / / of the active call to toggle between the calls.
2x
SDW 5000 series headset system
MAKING CALLS USING THE HEADSET SYSTEM40
Setting up conference call
With one base station, you can:
MASTER
CALL 2
CALL 1
MASTER
GUEST 1
A B
CALL 3
MASTER
GUEST 3
GUEST 1
GUEST 2
-
+
C D
A merge up to three calls from the connected audio
sources into one teleconference (see previous
chapter),
B set up a small conference with an SDW 5000
headset and an additional Sennheiser USB or
Bluetooth headset,
C a large conference with up to
four SDW 5000 headsets,
D set up a conference with a Sennheiser USB
speakerphone (e. g. SP 20).
All conferencing options can be combined. It is for example possible to set up a large conference with 2 audio sources
merged, where multiple SDW headsets and one Bluetooth or USB device is connected.
Setting up a small conference via USB or Bluetooth headset
MASTER
GUEST 1
CLICK!
OR
Put on the MASTER headset.
Connect your USB or Bluetooth headset (see
page 16/17) with the base station.
The LED lights up white.
Press the hook button on the MASTER headset within
10 seconds to add the GUEST headset.
The voice prompt “Conference pairing successful“ is
announced in the GUEST headset.
Call the other party (see page 34).
To end the call but keep the conference:
End the call via your audio source, the base station or
the MASTER headset.
All conference participants remain connected and a
new call can be initiated with them.
To end the call and the conference:
End the call via your audio source, the base station or
the MASTER headset.
Place the MASTER headset in the magnetic holder
of the base station to disconnect all conference
participants.
SDW 5000 series headset system
MAKING CALLS USING THE HEADSET SYSTEM41
Setting up a large conference with up to 4 SDW series headsets
The headset system allows you to make a conference call with up to 4 SDW 5000 headsets. The first paired headset
(MASTER) is used to control the call.
1
New MASTER
2x
2
New MASTER
If you want to use a new MASTER headset:
Place the headset into the base station.
The Headset LED alternately flashes blue/red until a
link to the base station is established. The Headset
LED flashes blue twice.
Put on the MASTER headset.
Change audio source – if required (see page 34).
3
2x
GUEST 1-3
4
MASTER
GUEST 1-3
Press and hold the Mute & Volume button while
placing the GUEST headset into the base station of the
MASTER headset.
The Headset LED alternately flashes blue/red until a
link to the base station is established. The Headset
LED flashes blue twice.
The voice prompt “Conference pairing“ is announced
in the MASTER headset.
Take the GUEST headset out of the base station.
To add the GUEST headset to the conference call,
press the hook button on the MASTER headset within
10 seconds.
The voice prompt “Conference pairing successful“ is
announced in the GUEST headset.
Add additional GUEST headsets – if required.
SDW 5000 series headset system
MAKING CALLS USING THE HEADSET SYSTEM42
5
MASTER
GUEST 3
GUEST 1
GUEST 2
6
CLICK!
OR
Call the other party.
The LED / / lights up blue on the base station.
The GUEST can leave the call by pressing the hook button
on the GUEST headset.
To end the call but keep the conference:
End the call via your audio source, the base station or
the MASTER headset.
A new call can now be initiated with the same
conference participants.
To end the call and the conference:
End the call via your audio source, the base station or
the MASTER headset.
Place the MASTER headset in the magnetic holder of
the base station to end the conference.
easy pairing” To subsequently use the GUEST headset with other base stations, place the GUEST headsets into
the other base stations. The Headset LED alternately flashes blue/red until a link is established.
Adding a GUEST headset during a call with the MASTER headset
MASTER
GUEST
Connect your USB or Bluetooth headset
(see page 16/17) with the base station OR
Dock and undock the GUEST SDW 5000 headset (no
need to press the Mute button).
Press the hook button on the MASTER headset within
10 seconds to add the GUEST headset.
The voice prompt “Conference pairing successful“ is
announced.
The GUEST can leave the conference by ending the
call on the GUEST headset.
Making a conference call with a Sennheiser USB speakerphone
If the SDW headset is docked in the base station the speakerphone becomes the MASTER. If the SDW headset is
undocked, the speakerphone works as GUEST.
Connect the speakerphone to the USB socket on the
base station.
The LED lights up white.
Choose your audio source (s) (see page 34).
Call the other party.
Depending on the audio source the LED / /
lights up blue on the base station.
End the call via your audio source or speakerphone
and unplug the speakerphone from the USB socket.
i
SDW 5000 series headset system
USING THE DICTATION MODE43
Using the dictation mode
Recording desk or mobile phone calls with the Dictation mode
SDW 5000 offers a Dictation mode which allows recording of phone calls via an application on your computer. In
this mode the microphone is always open towards the computer, so that a call on the desk or mobile phone can be
recorded.
To switch the Dictation mode on: To switch the Dictation mode off:
1s
“Dictation mode ON“
1s
“Dictation mode OFF“
Make sure, that the system is in idle mode (no active
call or music).
Touch the icon or and the on the base station
simultaneously for 1 second.
The Dictation mode is switched on. The voice prompt
“Dictation mode ON“ is announced. The base station
LED lights up green and the selected audio source
LED or lights up white.
The Dictation mode will stay on if the headset is docked.
Calls can only be received and made from the selected
audio source (desk or mobile phone). Other audio
sources are inactive.
If you receive a call on an inactive source:
Switch the Dictaphone mode off and accept the call.
Touch the icon or (LED white) and the on the
base station simultaneously for 1 second.
The Dictation mode is switched off. The voice prompt
“Dictation mode OFF“ is announced. The base station
LED
switches off.
Dictation mode will also be switched off if the base
station is powered off or re-booted.
Recording computer‘s audio
You can record calls or any audio signal directly via a computer application. Listening to recordings on a computer is
only possible, while Dictation mode for phones is switched off (see above).
SDW 5000 series headset system
LISTENING TO MUSIC USING THE HEADSET44
Listening to music using the headset
You can listen to music from your computer or mobile device.
If you use the Bluetooth dongle BTD 800 with a mobile phone:
Activate Bluetooth on your mobile phone.
1
2
Touch the or icon.
The corresponding LED lights up white.
Put on the headset.
Play the music on your audio source.
The headset LED and the LED
on the base station
light up purple.
The LED is off per default and can be enabled via
HeadSetup™ Pro.
If you receive and accept a call, the music is paused and restarts after the call (if the music player supports this
feature).
Plays the track
Pauses the track
i
SDW 5000 series headset system
USING THE MOTION SENSOR45
Using the motion sensor
The headset is equipped with a motion sensor that registers when the headset is put in or out of rest position.
Enabling/disabling the motion sensor
“Motion sensor on
“Motion sensor off“
Put on the headset and place the ear cup on the left
ear.
Press the volume button as shown and simultaneously
the hook button. Hold the buttons until you hear three
beeps.
The motion sensor is enabled/disabled and you can
choose your wearing side. The voice prompt “Motion
sensor on” or “Motion sensor off” is announced.
You can also change this setting via
HeadSetup™ Pro.
Using the motion sensor
Lift the headset from the desk and put it on.
The sensor registers motion and the incoming call is
accepted.
SDW 30 HS | SDW 60 HS:
Music will be paused when you lay down the headset and
resumed when you put on the headset again.
SDW 5000 series headset system
CHARGING THE HEADSET AND STORING THE HEADSET SYSTEM46
Charging the headset and storing the headset system
Charging the headset
Always place the headset at the base station to ensure that it is fully charged when needed.
Shortly before the rechargeable battery is about to run flat (15 minutes remaining) the voice prompt “recharge
headset“ is announced in the headset.
If the headset has not been used for 12 hours, it will switch off in order to conserve battery power. To switch it on
again, press the headset’s hook button. This feature can be disabled via HeadSetup™ Pro.
1
2
100%
Place the headset into the magnetic holder of the base
station. The headset battery status LEDs on the base
station indicate the charge status.
During charging the Headset LED lights up blue. The
LED switches off when the headset is fully charged.
SDW 10 HS SDW 30 HS SDW 60 HS
Charging overview SDW 10 HS
LED segment Required charging time Corresponds to a talk time of
Super Wideband Wideband Narrowband
approx. 10 minutes approx. 1 hour approx. 2 hours approx. 3 hours
approx. 20 minutes approx. 2 hours approx. 4 hours approx. 6 hours
approx. 40 minutes approx. 3 hours approx. 6 hours approx. 9 hours
approx. 60 minutes approx. 6 hours approx. 8 hours approx. 10 hours
Charging overview SDW 30 HS | SDW 60 HS
LED segment Required charging time Corresponds to a talk time of
Super Wideband Wideband Narrowband
approx. 10 minutes approx. 1 hour approx. 2 hours approx. 2 hours
approx. 20 minutes approx. 2 hours approx. 3 hours approx. 4 hours
approx. 40 minutes approx. 5 hours approx. 7 hours approx. 8 hours
approx. 90 minutes approx. 9 hours approx. 11 hours approx. 14 hours
SDW 5000 series headset system
CHARGING THE HEADSET AND STORING THE HEADSET SYSTEM47
Charging the headset using the CH 30 charger | Charging several headsets simultaneously
The CH 30 headset charger and the MCH 7 multi USB power source are optional accessories. The CH 30 allows you
to charge additional SDW headsets, e.g. for sharing the same base station when working in shifts. Several CH 30 in
connection with the MCH 7 allow to charge up to 7 headsets simultaneously.
CH 30
optional
MCH 7
Refer to the Quick Guide of the CH 30 or MCH 7 for more information.
Switching the headset system off during extended non-use
You can switch off the headset system or the headset when not using the products for extended periods of time
(e.g. when you are on holiday).
Switching the headset system off Switching the headset off
3x
5s
Disconnect the base station from the mains power
supply and the computer.
The base station and headset switch off immediately,
all LEDs switch off.
Press and hold the hook button for 5 seconds to switch
off the headset.
The Headset LED flashes red 3 times. The Headset
battery status LEDs on the base station switch off. The
LED lights up red.
To switch the headset on again:
Press the hook button.
SDW 5000 series headset system
SHARING A WORKPLACE48
Sharing a workplace
The SDW 5000 headsets and base stations are compatible with each other. If you share a workplace, you can use one
base station with different headsets.
TIM
Fredrik
TIM
Fredrik
2x
CH 30
Fredrik
Place the headset to be used into the magnetic holder
of the base station.
The Headset LED alternately flashes blue/red and
flashes blue twice if pairing is successful. The headset
is ready for use.
Charge the headsets that are not in use with the
optional headset charger CH 30 (see page 47).
Using the headset with a third party base station (DECT-GAP telephone)
5s
Place the headset at a maximum distance of 1 m from
the third party base station.
Press and hold the headset’s hook button and mute
button simultaneously until you hear 3 beeps, then
release the button.
The headset switches to a special pairing mode and
the Headset LED flashes blue/red alternately.
Set the third party base station to a special pairing
mode (see the instruction manual of the third party
base station). The default code for the headset is
“0000”.
The headset pairs with the third party base station. If
pairing is successful, the Headset LED switches off.
If pairing is not successful within 60 seconds, the headset switches back to standby mode.
To pair the headset to a SDW 5000 series base station, after having paired it to a GAP enabled device:
Place the headset into the magnetic holder of the base station.
In this case, the pairing will not be initiated the first time, therefore:
Undock the headset and re-dock it again.
The headset LED flashes blue/red shortly and turns blue when pairing is complete. The headset will start charging.
SDW 5000 series headset system
CLEANING AND MAINTAINING THE HEADSET SYSTEM49
Cleaning and maintaining the headset system
CAUTION
Liquids can damage the electronics of the product!
Liquids entering the housing of the device can cause a short circuit and damage the electronics.
Keep all liquids far away from the product.
Do not use any cleansing agents or solvents.
Before cleaning, disconnect the base station from the mains power supply.
Only use a dry and soft cloth to clean the product.
SDW 10 HS SDW 30 HS | SDW 60 HS
SDW 3 BS
SDW 5 BS
Clean the charging contacts of the base station and the headset from time to time using e.g. a cotton swab.
Replacing the ear pads
For hygienic reasons, you should replace the ear pads from time to time. Spare ear pads are available from your
Sennheiser partner.
Carefully remove the old ear pad from the ear cup. Attach the new ear pad to the ear cup by pressing
firmly around the ear pad.
SDW 5000 series headset system
CLEANING AND MAINTAINING THE HEADSET SYSTEM50
Replacing/removing the headset‘s rechargeable battery
CAUTION
Danger of damage to the product!
During the warranty period, the rechargeable battery must only be replaced by an authorized Sennheiser service
center, otherwise the warranty will be null and void.
Contact your Sennheiser service center if the rechargeable battery needs to be replaced. To find a Sennheiser
service partner in your country, visit www.sennheiser.com.
Outside the warranty period, the rechargeable battery may be replaced or removed by any qualified service center
or qualified technician of your IT or Service department. Instructions for qualified technicians on how to replace or
remove the battery are available from the Sennheiser service partner.
Updating the firmware of the products
You can update the firmware of your headset system and Bluetooth dongle by using the free HeadSetup™ Pro software.
Connect the base station to your computer and install the required software (see page 13).
Updating the firmware of the base station and the headset
1
2
Place the headset into the magnetic holder of the base
station.
Connect the base station via the USB cable with a USB
port of your computer.
Start HeadSetup™ Pro.
HeadSetup™ Pro checks if the installed firmware is the latest version available on the Sennheiser
server. If required, upgrade to the latest version. The headset is automatically updated via the base
station.
Updating the firmware of the Bluetooth dongle BTD 800 USB
Headsetup Pro
Insert the BTD 800 USB into the USB port on the
base station. Some older dongle versions need to
be connected directly to the computer in order to be
updated. “New” dongles can be identified by the two
grey lines on the bottom side of the housing.
Start HeadSetup™ Pro.
HeadSetup™ Pro checks if the installed firmware is the
latest version available on the Sennheiser server. If
required, upgrade to the latest version.
SDW 5000 series headset system
IF A PROBLEM OCCURS ...51
If a problem occurs ...
Problem Possible cause Solution Page
The headset is placed
into the base station but
the charge status LED
is off
Base station is not connected to
the mains power supply
Connect the base station to the mains
power supply.
10
Rechargeable battery is deeply
discharged
Wait several minutes until the Charge
status LED lights up.
46
Firmware version of the base
station is older than the firmware
version of the headset
Update the firmware of the base
station.
50
Link between headset
and base station cannot
be established
Headset is not paired with the
base station, the
LED lights up
red
Place the headset into the base station. 46
Bad connection between
headset and base station
Transmission range is exceeded
Reduce the distance between headset
and base station.
33
Adjust the radio range. 27
Noise interference and
connection loss
Microphone rubs on the cheek or
perhaps the beard
Adjust the headset so that the
microphone is about 0.8 - 1.2” (2 - 3 cm)
from the corner of your mouth.
18
Too many DECT systems within
the radio range
Reduce the radio range. 27
Distance between base station
and fixed line phone is so small
that interference occurs
Increase the distance between base
station and fixed line phone.
Headset battery cannot
be charged
Charging contacts of the headset
or the base station are dirty
Clean the charging contacts on the
headset and on the base station.
49
Rechargeable battery is defective/
worn out
Ask a technician to replace the
rechargeable battery.
50
Headset is not properly placed in
the base station
Check if the headset is properly placed
into the magnetic holder.
46
The sound from the fixed
line phone is distorted
and disturbed
Base station is not adjusted to the
fixed line phone.
Use the ABC switch to adjust the base
station to your fixed line phone.
30
Beeps instead of voice
prompts
The voice prompts are deactivated
Activate the voice prompts. 32
SDW 5000 series headset system
IF A PROBLEM OCCURS ...52
Problem Possible cause Solution Page
The talk time is reduced Worn-out rechargeable battery
Ask a technician to replace the
rechargeable battery.
50
Large distance between base
station and headset
Reduce the distance if possible. Larger
distances require a higher transmission
power and reduce the talk time.
Fast Link activated
Deactivate Fast Link to save battery
power.
27
Many DECT systems in the same
area
Switch off DECT systems that are
currently not required. Congestion
requires a higher transmission power
and reduces the talk time.
How many DECT systems can be used in
the same room? This depends on various
conditions:
Americas: up to 40 SDW systems
in narrowband mode or in high
density wideband mode (available in
HeadSetup™ Pro)
Rest of World: up to 80 SDW systems
in narrowband mode or in high
density wideband mode (available in
HeadSetup™ Pro)
Narrowband/wideband setting
Set the base station to narrowband
transmission as it requires less power
than wideband transmission.
28
Dropped calls due to
high density
High density: Too many DECT
systems in the same area
Reduce the radio range on all DECT
systems in the area.
27
Reduce audio quality to narrowband or
wideband.
28
Ensure “Fast Link” is not selected on
DIP switch 4.
27
Bad audio quality:
you sound too low/
distorted/ echoing to the
other party/ background
noise
Microphone sensitivity is not
correctly adjusted
Adjust the microphone sensitivity. 30
Microphone is too far away from
your mouth
Adjust the microphone position. 18
DIP switch settings do
not work
Base station settings were
updated and overwritten via
HeadSetup™ Pro
Reset the system 53
No system re-boot after DIP
switches were changed
Disconnect the base station shortly
from power.
26
Headset/ base station
does not react to any
button press
The operation of the headset or
base station is faulty
Reset the products to the factory
default settings.
53
Battery status LED’s
on the base station
are flashing and the
multi-function button is
lit up red
Firmware version of the headset is
older than the firmware version of
the base station
Update the firmware of the headset. 50
No Bluetooth connection
via dongle BTD 800 USB
Dongle not inserted correctly in
the base station
Plug in the dongle again. 14
Dongle and mobile device not
connected
Pair the dongle and your mobile device
(Pairing).
15
Activate Bluetooth on your mobile
device.
Dongle and Bluetooth headset not
connected
Pair the dongle and your headset
(Pairing).
16
SDW 5000 series headset system
IF A PROBLEM OCCURS ...53
Problem Possible cause Solution Page
Dongle BTD 800 USB
does not accept new
devices (Pairing)
Dongles pairing list disturbed
Clear the list of previously paired
devices.
16
Guest headset is not
accepted
Guest headset not accepted on
Master headset
Repeat the procedure and accept the
guest headset on the master.
42
Guest headset accepted too late
on Master headset
Too many Guest headsets in use
Leave the conference with one of the
other headsets by pressing the hook
button on this headset.
Busy light does not light
up
USB port is deactivated: the busy
light socket is linked to the USB
port
Activate the USB port via
HeadSetup™ Pro.
If a problem occurs that is not listed in the above table or if the problem cannot be solved with the proposed solutions,
please contact your local Sennheiser partner for assistance.
To find a Sennheiser partner in your country, search at www.sennheiser.com.
Restoring factory default settings (Reset)
1 2 3 4 5 6 7 8
S1 S2
1 2 3 4 5 6 7 8
S1 S2
10s
Make sure that the base station is powered via USB
cable or power supply unit.
Use a pointed object to press the Set button S1 for
approx. 10 seconds.
The base station factory default settings are restored.
SDW 5000 series headset system
SPECIFICATIONS54
Specifications
Headset SDW 10 HS
Dimensions (W x H x D)
50 x 25 x 140 mm
/ 1.97 x 0.98 x 5.51 in
Weight with...
ear hook: 44 g / 1.55 oz / 0.097 lbs
headband: 58 g / 2.05 oz / 0.13 lbs
neckband: 43 g / 1.52 oz / 0.095 lbs
Talk time
narrowband: up to 10 hours
wideband: up to 8 hours
super wideband: up to 6 hours
Standby time
48 hours
Charging time
50%: approx. 30 minutes
100%: approx. 1 hour
Range (environment dependent)
free line of sight: up to 180 m / 590 ft
in office buildings: up to 55 m / 180 ft
Frequency response speaker
20 Hz – 16 kHz (depends on settings)
Rechargeable battery (built-in)
Lithium Polymer; 3.7 V; 335 mAh
Output power
European Union/Japan: max. 250 mW (EIRP)
United States: max. 100 mW (EIRP)
Speaker type
neodymium magnet
Microphone type
Digital MEMs microphone (2 microphones), noise cancelling
Headset SDW 30 HS | Headset SDW 60 HS
Dimensions (W x H x D)
SDW 30 HS: 165 x 165 x 62 mm / 6.50 x 6.50 x 2.44 in
SDW 60 HS: 165 x 170 x 62 mm / 6.50 x 6.69 x 2.44 in
Weight
SDW 30 HS: 98 g / 3.46 oz / 0.22 lbs
SDW 60 HS: 136 g / 4.80 oz / 0.30 lbs
Talk time
narrowband: up to 14 hours
wideband: up to 11 hours
super wideband: up to 9 hours
Listening time
wideband: up to 12 hours
fullband: up to 9 hours
Standby time
44 hours
Charging time
50%: approx. 30 minutes
100%: approx. 1 hour 30 minutes
Range (environment dependent)
free line of sight: up to 180 m / 590 ft
in office buildings: up to 55 m / 180 ft
Frequency response speaker
20 Hz – 20 kHz (depends on settings)
Rechargeable battery (built-in)
Lithium Polymer; 3.7 V; 530 mAh
Output power
European Union/Japan: max. 250 mW (EIRP)
United States: max. 100 mW (EIRP)
Speaker type
neodymium magnet
Microphone type
Digital MEMs microphone (2 microphones), noise cancelling
SDW 5000 series headset system
SPECIFICATIONS55
Base station
SDW BS 3 SDW BS 5
Dimensions (W x H x D)
87 x 122 x 105 mm / 3.43 x 4.80 x 4.13 in
Weight
320 g / 11.29 oz / 0.71 lbs
Connectors
Power supply socket DC
Micro-USB socket PC
USB socket
Busy light socket Busy
Power supply socket DC
Micro-USB socket PC
USB socket
Busy light socket Busy
Accessory socket ACC
Fixed line phone socket Phone
Handset socket Handset
DECT frequency range
European Union: 1880 – 1900 MHz
United States: 1920 – 1930 MHz
Japan: 1893 – 1906 MHz
RF output power
European Union/Japan: max. 250 mW (EIRP)
United States: max. 100 mW (EIRP)
Power supply unit
Nominal input voltage
100 – 240 V~
Nominal input current
max. 0.3 A
Mains frequency
50 – 60 Hz
Nominal output voltage
5.0 V
$
Nominal output current
2 A
Weight
approx. 100 g / 3.53 oz / 0.22 lbs
Bluetooth dongle BTD 800 USB
Dimensions (W x H x D)
22 x 16 x 6 mm / 0.87 x 0.63 x 0.24 in
Weight
2 g / 0.07 oz / 0.004 lbs
Bluetooth
version 4.2/ power class 1
Range
up to 25 m (device-dependent)
Transmission frequency
2402 – 2480 MHz
Profiles
HSP Headset Profile (version 1.2)
HFP Handsfree Profile (version 1.7)
A2DP Advanced Audio Distribution Profile (version 1.3)
AVRCP Audio Video Remote Control Profile (version 1.6)
Output power
max. 8 dBm (EIRP)
Typical sensitivity
-89 dBm
Base station | Headset | BTD 800 USB | Power supply unit
Temperature range
operation: +5 °C to +45 °C / +41 °F to +113 °F
storage: -20 °C to +70 °C / -4 °F to +158 °F
Relative humidity
operation: 20% to 85%
storage: 20% to 95%
Trademarks
The Bluetooth® word mark and logos are registered trademarks owned by Bluetooth SIG, Inc. and any use of such
marks by Sennheiser Communications A/S is under license.
SDW 5000 series headset system
SPECIFICATIONS56
Sennheiser Communications A/S
Industriparken 27, DK-2750, Denmark
www.sennheiser.com
Publ. 02/19, A03
9

Hulp nodig? Stel uw vraag in het forum

Spelregels
1

Forum

Sennheiser-SDW-60-HS

Misbruik melden

Gebruikershandleiding.com neemt misbruik van zijn services uitermate serieus. U kunt hieronder aangeven waarom deze vraag ongepast is. Wij controleren de vraag en zonodig wordt deze verwijderd.

Product:

Bijvoorbeeld antisemitische inhoud, racistische inhoud, of materiaal dat gewelddadige fysieke handelingen tot gevolg kan hebben.

Bijvoorbeeld een creditcardnummer, een persoonlijk identificatienummer, of een geheim adres. E-mailadressen en volledige namen worden niet als privégegevens beschouwd.

Spelregels forum

Om tot zinvolle vragen te komen hanteren wij de volgende spelregels:

Belangrijk! Als er een antwoord wordt gegeven op uw vraag, dan is het voor de gever van het antwoord nuttig om te weten als u er wel (of niet) mee geholpen bent! Wij vragen u dus ook te reageren op een antwoord.

Belangrijk! Antwoorden worden ook per e-mail naar abonnees gestuurd. Laat uw emailadres achter op deze site, zodat u op de hoogte blijft. U krijgt dan ook andere vragen en antwoorden te zien.

Abonneren

Abonneer u voor het ontvangen van emails voor uw Sennheiser SDW 60 HS bij:


U ontvangt een email met instructies om u voor één of beide opties in te schrijven.


Ontvang uw handleiding per email

Vul uw emailadres in en ontvang de handleiding van Sennheiser SDW 60 HS in de taal/talen: Engels als bijlage per email.

De handleiding is 9,08 mb groot.


U ontvangt de handleiding per email binnen enkele minuten. Als u geen email heeft ontvangen, dan heeft u waarschijnlijk een verkeerd emailadres ingevuld of is uw mailbox te vol. Daarnaast kan het zijn dat uw internetprovider een maximum heeft aan de grootte per email. Omdat hier een handleiding wordt meegestuurd, kan het voorkomen dat de email groter is dan toegestaan bij uw provider.

Stel vragen via chat aan uw handleiding

Stel uw vraag over deze PDF

Andere handleiding(en) van Sennheiser SDW 60 HS

Sennheiser SDW 60 HS Gebruiksaanwijzing - Nederlands - 57 pagina's

Sennheiser SDW 60 HS Gebruiksaanwijzing - Deutsch - 57 pagina's


Uw handleiding is per email verstuurd. Controleer uw email

Als u niet binnen een kwartier uw email met handleiding ontvangen heeft, kan het zijn dat u een verkeerd emailadres heeft ingevuld of dat uw emailprovider een maximum grootte per email heeft ingesteld die kleiner is dan de grootte van de handleiding.

Er is een email naar u verstuurd om uw inschrijving definitief te maken.

Controleer uw email en volg de aanwijzingen op om uw inschrijving definitief te maken

U heeft geen emailadres opgegeven

Als u de handleiding per email wilt ontvangen, vul dan een geldig emailadres in.

Uw vraag is op deze pagina toegevoegd

Wilt u een email ontvangen bij een antwoord en/of nieuwe vragen? Vul dan hier uw emailadres in.


Info