Prior to using this appliance, please read the user’smanual thoroughly, even in cases, when one has already familiarised themselves with previous use of similar types of appliances.
Only use the appliance in the manner described in this user’smanual. Keep this user’smanual in asafe place where it can be easily retrieved for future use.
■We recommend saving the original cardboard box, packaging material, purchase receipt and responsibility statement of the vendor or warranty card for at least the duration of
the legal liability for unsatisfactory performance or quality. In the event of transportation, we recommend that you pack the appliance in the original box from the manufacturer.
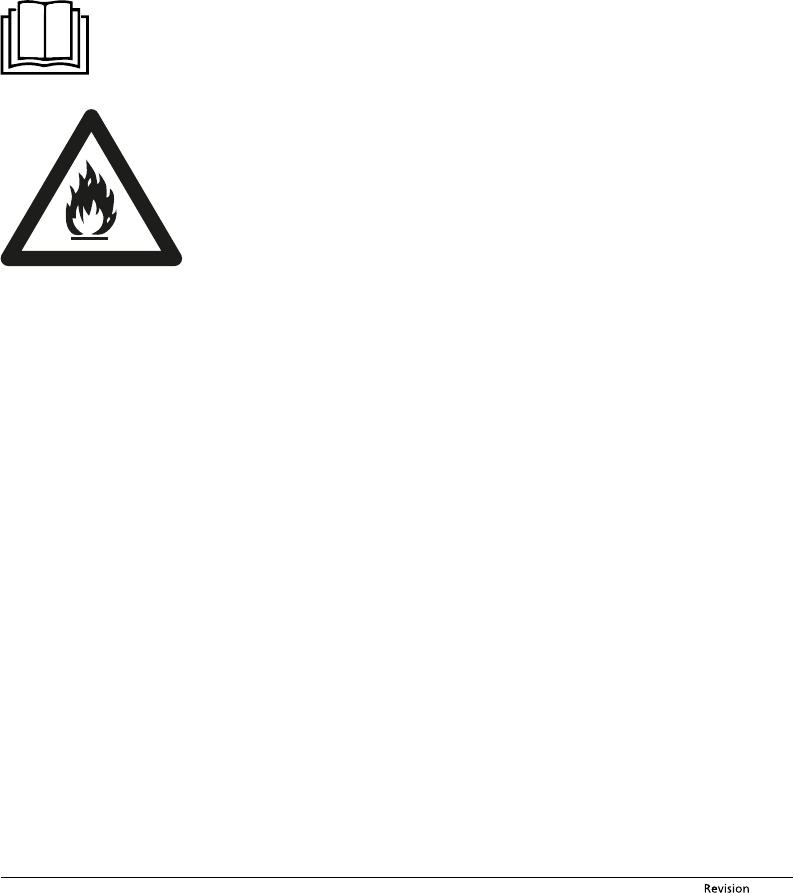
DESCRIPTION OF THE APPLIANCE
A1 Air outlet
A2 Control panel
A3 Handles (located along both sides)
A4 Travel wheels
A5 Air outlet
A6 Power cord
A7 Top air inlet
A8 Top drain outlet
A9 Bottom air inlet
A10 Condensate drain hole
DESCRIPTION OF ACCESSORIES
B1 Flexible air exhaust hose
B2 Window outlet
B3 End piece
B4 Remote control
B5 Drain hose
B5 Textile window gasket seal
(not shown)
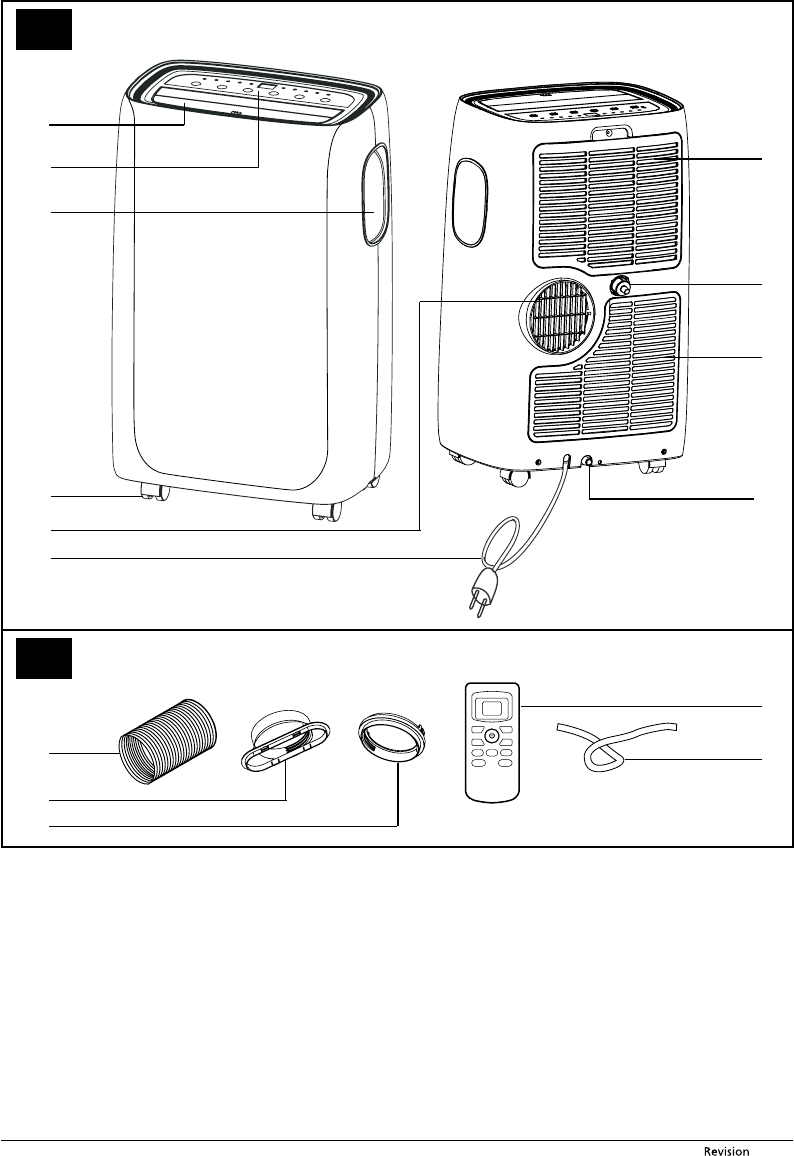
DESCRIPTION OF THE CONTROL PANEL
C1 Heating mode indicator
(only models SAC MT1224CH and SAC MT1225CH)
C2 Cooling mode indicator
C3 Dehumidification mode indicator
C4 Fan mode indicator
C5 Timer indicator
C6 Display
C7 Fan speed indicators (High, Medium, Low, Auto)
C8 On/Off POWER button
C9 FAN button for setting the fan speed
C10 – button
C11 + button
C12 TIMER button for setting the timer
C13 MODE button for selecting an operating mode
REMOTE CONTROL
D1 Display
D2 On/Off button
D3 MODE button for selecting an operating mode
D4 TIMER button for setting the timer
D5 SLEEP button
D6 SWING button
D7 ▲ button
D8 ▼ button
D9 FAN button for setting the fan speed
D10 °C/ °F button for changing the temperature units
INSTALLATION
Installation location for the portable air conditioner
■Locate the portable air conditioner on an even, dry and stable surface and within reach of agrounded power socket.
■For easier handling, the portable air conditioner is equipped with travel wheels A4. Do not use the travel wheels A4 when you need to move the air conditioner over carpets or
similar surfaces. Avoid riding over objects.
■To achieve optimal efficiency, maintain adistance of at least 45 cm from the wall or other obstacles.
■To ensure sufficient efficiency of the portable air conditioner, keep all windows and doors closed and blinds and drapes drawn.
■Make sure that there is no heat source located in the room. Do not locate the portable air conditioner in aroom with high humidity, e.g. laundry.
Note:
Do not use the portable air conditioner to cool aroom where computer servers, etc. are located.
Installation, adjustment, maintenance and repairs must only be performed by aqualified person.
Installation of flexible hose on to the portable air conditioner
■The flexible hose B1 must be connected to the portable air conditioner and installed into awindow in accordance with the operating modes that you wish to set. Install the
flexible hose B1 when you wish to select the operating modes: cooling, dehumidification or automatic mode. It is not necessary to install the flexible hose B1 when you wish
to select the fan mode.
■Extend the flexible hose B1 to the required length. Put the end piece B3 on to the end of the flexible hose B1. Insert it into the air inlet A5 and turn it to the right to secure the
hose B1 in place.
■Put the window outlet B2 on to the end of the flexible hose B1.
Installing the flexible hose using the textile gasket seal
■The textile gasket seal B7 is suitable for tilt-open, sash and roof windows. The textile gasket seal B7 is fitted with aVelcro zip tape to make its installation in the window easier.
Open the window and into the created crevice install the textile gasket seal B7. We recommend that you thoroughly degrease the location (frame and sash) where you will be
attaching the textile gasket seal B7 using an appropriate cleaning agent. Remove the protective paper strip and stick the tape on to the window frame. Never stick it on to the
inner surface of the frame, otherwise you will not be able to close the window. Then stick on the second part of the textile gasket seal B7 on the inner or outer part of the window
sash. Check that you can close the window.
■
In order to be able to insert he flexible hose B1, the gasket seal is fitted with an integrated zip. Open the zip in such alocation that will enable you to easily insert the flexible hose B1.
■
It is not necessary to remove the textile gasket seal B7 from the window when not using the portable air conditioner. The window can be closed even with the gasket seal installed.
CONTROLS OF THE PORTABLE AIR CONDITIONER
A. CONTROL PANEL
■Insert the power plug into apower socket. Now the portable air conditioner sets itself to the stand-by mode.
Turning the portable air conditioner on and off
■To turn on the portable air conditioner, press button POWER C8. Press it again to turn the portable air conditioner off.
Note:
Never turn off the portable air conditioner by pulling the power cord out of the power socket. Turn off the portable air conditioner using button POWER C8, wait afew
■Repeatedly press button MODE C13 until the cooling indicator C2 is lit. Use buttons –/+ C10 aC11 to set the desired temperature. You can set the temperature in the range
from 18 to 32 °C.
■Using button FAN C9, set the fan speed. Repeatedly press button FAN C9 to switch the speed in the following order: High (high speed) – Medium (medium speed) – Low (low
speed) – Auto (automatic speed). Each time the button is pressed, the respective indicator will be lit on the control panel.
2. Heating mode (only models SAC MT1224CH and SAC MT1225CH)
■Repeatedly press button MODE C13 until the heating indicator C1 is lit. Use buttons –/+ C10 aC11 to set the desired temperature. You can set the temperature in the range
from 13 to 27 °C.
■Using button FAN C9, set the fan speed. Repeatedly press button FAN C9 to switch the speed in the following order: High (high speed) – Medium (medium speed) – Low (low
speed) – Auto (automatic speed). Each time the button is pressed, the respective indicator will be lit on the control panel. The air conditioner will start heating within afew
minutes. The fan may run in short intervals even when the temperature has been reached.
■During the heating mode, water will condense from the air in the air conditioner and accumulate in the internal condensate tank. When the condensate tank is full, the display
C6 will show (full condensate tank) and it will be necessary to remove the water from the condensate tank. Proceed according to the instructions in section “Condensate
drain outlet” later in this user’smanual. Once the condensate tank is empty, the air conditioner will start running again.
Note:
In the event that the air conditioner is located in avery cold room, the air conditioner will defrost automatically. It may stop running temporarily. The display C6 will show
. Likewise, you may register an increased noise level. This is normal.
3. Fan mode
■Repeatedly press button MODE C13 until the fan mode indicator C4 is lit. Using button FAN C9, set the fan speed. Repeatedly press button FAN C9 to switch the speed in the
following order: High (high speed) – Medium (medium speed) – Low (low speed). Each time the button is pressed, the respective indicator will be lit on the control panel and,
likewise, agraphical indicator will show the selected speed on the display C6. In this mode, it is not possible to set the temperature, nor is it necessary to connect the flexible
hose B1 to the portable air conditioner.
4. Dehumidification mode
■Make sure that the flexible hose B1 is connected to the air conditioner and goes into the window. Repeatedly press button MODE C13 until the dehumidification indicator C3 is
lit. The display C6 will show . It is not possible to set the temperature or fan speed in this mode. The fan speed is automatically set.
Functions of the portable air conditioner
1. Automatic start function
■
Start the portable air conditioner by pressing button POWER C8. Using button MODE C13, select the operating mode in which you wish to turn on the portable air conditioner. Use
buttons –/+ C10 and C11 to set the desired temperature and use button FAN C9 to select afan speed as required. Turn off the portable air conditioner using button POWER C8.
■Now press button TIMER C12, awristwatch icon together with aflashing time will appear on the display C6. Use the buttons –/+ C10 andC11 to set the time after which the
portable air conditioner will turn on automatically. The automatic start time can be set in the range between 30 minutes and 24 hours (set in 30 minute intervals until 10 hours,
and one hour intervals until 24 hours).
■After afew seconds, the time is saved to the memory of the air conditioner and the automatic start indicator appears on the display C6. Once the set time elapses, the portable
air conditioner will start automatically.
■If button TIMER C12 or POWER C8 are pressed after the automatic start is set, then this setting will automatically be cancelled.
2. Automatic shut-off function
■When the portable air conditioner is running, press button TIMER C12, awristwatch icon together with aflashing time will appear on the display C6. Use the buttons –/+ C10
andC11 to set the time after which the portable air conditioner will automatically stop.
■The automatic shut-off time can be set in the range between 30 minutes and 24 hours.
■
After afew seconds, the time is saved to the memory of the air conditioner and the automatic shut-off indicator appears on the display C6. Once the set time elapses, the portable
air conditioner will shut off automatically.
■If button TIMER C12 or POWER C8 are pressed after the automatic shut-off is set, then this setting will automatically be cancelled.
B. REMOTE CONTROL
Inserting and replacing batteries
■Slide out the battery compartment cover, which is located on the rear side of the remote control. Place two AAA/LR03 (2× 1.5 V) alkaline batteries into the battery compartment
and close the cover.
■When inserting the batteries ensure the correct polarity as shown in the battery compartment.
■When replacing the batteries, always use batteries of the same type, never combine old and new batteries or batteries of various types.
Note:
Removing the batteries from the remote control will delete all the settings. After new batteries are inserted the default remote control settings as programmed by the
manufacturer will be renewed.
■If you will not be using the remote control for longer than 2 months, remove the batteries.
Using the remote control
■For the remote control to work correctly, ensure that the maximum distance of the remote control from the portable air conditioner is not greater than 7 m and that there is no
obstacle between the remote control and the portable air conditioner that could prevent the transmission of the signal.
■Point the remote control directly at the portable air conditioner. The transmission of the signal is confirmed by ashort sound signal.
■Do not expose the remote control to direct sunlight or high temperatures. Otherwise the signal may not be transmitted.
Turning the portable air conditioner on and off
■To turn on the portable air conditioner, press button D2 once. Press button D2 again to turn the portable air conditioner off.
Operating modes
1. Cooling mode
■
Repeatedly press button MODE D3 until the arrow on the display D1 stops at symbol . Use buttons ▲/▼D7 and D8 to set the desired temperature. You can set the temperature
in the range from 18 to 32 °C.
■Use button FAN D9 to set the fan speed. Repeatedly press button FAN D9 to switch the speed in the following order: High (high speed) – Medium (medium speed) – Low (low
speed) – Auto (automatic speed). Each time the button is pressed, the arrow at the speed bar on the display D1 will switch.
2. Heating mode (only models SAC MT1224CH and SAC MT1225CH)
■Repeatedly press button MODE D3 until the arrow on the display D1 stops at symbol .
■Use buttons ▲/▼D7 and D8 to set the desired temperature. You can set the temperature in the range from 10–25 °C.
■Use button FAN D9 to set the fan speed. Repeatedly press button FAN D9 to switch the speed in the following order: High (high speed) – Medium (medium speed) – Low (low
speed) – Auto (automatic speed). Each time the button is pressed, the arrow at the speed bar on the display D1 will switch.
■During the heating mode, water will condense from the air in the air conditioner and accumulate in the internal condensate tank. When the condensate tank is full, the display
C6 will show
(full condensate tank) and it will be necessary to remove the water from the condensate tank. Proceed according to the instructions in section “Condensate
drain outlet” later in this user’smanual. Once the condensate tank is empty, the air conditioner will start running again.
Note:
In the event that the air conditioner is located in avery cold room, to prevent potentially freezing, the air conditioner will start automatically heating the internal system.
It may stop running temporarily. The display C6 will show . Likewise, you may register an increased noise level. This is normal.
3. Fan mode
■Repeatedly press button MODE D3 until the arrow on the display D1 stops at symbol .
■Use button FAN D9 to set the fan speed. Repeatedly press button FAN D9 to switch the speed in the following order: High (high speed) – Medium (medium speed) – Low (low
speed). Each time the button is pressed, the arrow at the speed bar on the display D1 will switch.
Note:
In the fan mode, it is not possible to set the temperature, therefore no temperature information will be shown on the display D1.
4. Dehumidification mode
■Repeatedly press button MODE D3 until the arrow on the display D1 stops at symbol . “dH” is shown on the display D1.
■It is not possible to change the fan speed in the dehumidification mode.
5. Automatic mode
■If you select an automatic mode, the portable air conditioner will automatically select an operating mode based on the temperature in the room.
■Repeatedly press button MODE D3 until the arrow on the display D1 stops at symbol
.
■Use button FAN D9 to set the fan speed. Repeatedly press button FAN D9 to switch the speed in the following order: High (high speed) – Medium (medium speed) – Low (low
speed) – Auto (automatic speed). Each time the button is pressed, the arrow at the speed bar on the display D1 will switch.
■For models SAC MT9020C and SAC MT1220C (without the heating function) – the portable air conditioner will start in the fan mode, when the temperature in the room is less
than 23 °C, and in the cooling mode when the temperature in the room is higher than 23 °C.
■For models SAC MT1224CH and SAC MT1225CH (with the heating function) – the portable air conditioner will start in the heating mode, when the temperature in the room
is less than 20 °C, in the fan mode if the temperature in the room is between 20 and 23 °C, and in the cooling mode when the temperature in the room is higher than 23 °C.
Functions of the portable air conditioner
1. Sleep function
■The sleep function is used to reduce overnight power consumption, when aconstant temperature is not necessary.
■Selecting an operating mode – heating or cooling – see previous part of the user’smanual.
■Press button D5, symbol
will appear on the display D1. The portable air conditioner will run in the last selected mode.
■If the cooling mode was selected, the temperature will increase by 2 °Cover aperiod of two hours. This new temperature will be maintained for aperiod of 6 hours and then the
portable air conditioner will turn itself off.
■If the heating mode was selected, the temperature will decrease by 3 °Cover aperiod of three hours. This new temperature will be maintained for aperiod of 5 hours and then
the portable air conditioner will turn itself off.
■The sleep function can be cancelled at any time by pressing button D5, D3 or D9.
■The sleep function cannot be set in the fan and dehumidification modes.
2. Automatic start and shut-off function
Automatic start
■The automatic start function makes it possible to set atime after which the portable air conditioner will start automatically.
■
Start the portable air conditioner by pressing button D1. Using button D3, select the operating mode in which you wish to turn on the portable air conditioner. Use buttons ▲/▼
D7 and D8 to set the desired temperature and use button D9 to select afan speed as required. Turn off the portable air conditioner using button D1.
■
Press button D4 twice, the time and symbol will appear on the display D1. Use buttons ▲/▼D7 andD8 to set atime after which the portable air conditioner will
automatically start. The automatic start time can be set in the range between 30 minutes and 24 hours (set in 30 minute intervals until 10 hours, and one hour intervals until 24 hours).
■Press button D4 once to confirm the setting. The set time will appear on the display D1 and symbol will remain lit.
■Once the set time elapses, the portable air conditioner will start automatically. If button D4 or D2 are pressed after the automatic start is set, then this setting will automatically
be cancelled.
Automatic shut-off
■The automatic shut-off function makes it possible to set atime after which the portable air conditioner will shut off automatically.
■While the portable air conditioner is turned on, press button D4 once. The time and symbol will be shown on the display D1.
■Use buttons ▲/▼D7 andD8 to set atime after which the portable air conditioner will automatically turn off. The automatic shut-off time can be set in the range between
30minutes and 24 hours (set in 30 minute intervals until 10 hours, and one hour intervals until 24 hours).
■Press button D4 once to confirm the setting. The set time will appear on the display D1 and symbol will remain lit.
■
Once the set time elapses, the portable air conditioner will shut off automatically. If button D4 or D2 are pressed after the automatic shut-off is set, then this setting will
automatically be cancelled.
3. Flap angle setting function
■Button D7 can be used to select either left or right air flow. Press button D7 once, an arrow and symbol will appear on the display D1. Pressing button D7 will cause the arrow
to disappear and the function to be cancelled.
Changing temperature units
■While the air conditioner is in stand-by mode, press button D10 to toggle the temperature units from °Cto °F and vice versa.
MAINTENANCE AND CLEANING
■Before cleaning the portable air conditioner, turn it off and wait afew minutes, and then pull the power cord out of the power socket.
Cleaning the air filters
■When the portable air conditioner is used regularly, it is necessary to clean the filters located behind the protective grille of the top and bottom air inlets A7 and A9 at least once
every 14 days to prevent the fan from being clogged by dust.
■Carefully remove the protective grille and take out the filters. To remove the dust, use avacuum cleaner. In the event of greater soiling, wash the filters by hand in asolution of
lukewarm water (max. 40 °C) and neutral detergent. Then thoroughly rinse under running water and allow to dry naturally. Do not dry it in aclothes dryer or in direct sunlight.
Once the filters are dry, you can install them back in their place.
Note:
Do not use the portable air conditioner without the air filters properly installed and do not use it with wet or damp air filters.
■The water collection (condensation) tank must be drained immediately when the code “Ft” appears on the display C1 and also before this appliance is stored in order to prevent
the formation of moulds.
■In households with pets, it is necessary to wipe the grille regularly to prevent it from becoming clogged by animal fur.
■To clean the outer case, use asoft wiping cloth dipped in asolution of lukewarm water and neutral detergent. Then wipe the surface dry.
■When cleaning it, do not spray the portable air conditioner with water or any other liquid, do not pour water on it or submerge it in water or in any other liquid.
■Do not use abrasive cleaning products, solvents, petrol, etc. for cleaning.
Storing the portable air conditioner
■In order to dry it and to prevent the formation of moulds, leave the portable air conditioner running in awarm room in the fan mode for approximately 12 hours.
■Disconnect the flexible hose B1 and store it in asafe place out of the reach of children.
■Drain all the condensate from the condensate tank – see chapter “Condensate drain outlet”.
■Clean the air filters and reinstall them. Wipe the outer case of the portable air conditioner. Remove the batteries from the remote control.
■Store the air conditioner in acool, dry and dark location.
Condensate drain outlet
■If the water level inside the condensate tank reaches apredetermined level, the portable air conditioner will show “Ft” (full condensate tank) on the display C6. In order to drain
the condensate from the air conditioner, proceed as follows:
1. Disconnect the power plug from the power socket.
2. Carefully re-locate the portable air conditioner to alocation where the water may be drained.
3. Underneath the drain outlet A10, place acontainer into which the condensate will flow. Carefully remove the plug of the drain outlet A10. Connect the drain hose B6 and
allow the condensate to flow out.
4. Once the condensate tank is empty (condensate has stopped flowing), disconnect the drain hose B6 and put the plug back into the drain outlet A10.
5. Insert the power plug into apower socket and turn on the portable air conditioner.
■
If you need to ensure the condensate to be continuously drained from the portable air conditioner, it is possible to connect the drain hose B6 to awaste water drain. Proceed as follows:
1. Disconnect the power plug from the power socket.
2. Remove the plug of the top drain outlet A8. Connect the drain hose B6. If the length of the drain hose B6 is insufficient, then it is necessary to purchase alonger hose of the
same type. Never extend the length of the drain hose B6 using extensions.
3. Connect the end of the drain hose B6 to the waste water drain.
4. Insert the power plug into apower socket and turn on the portable air conditioner.
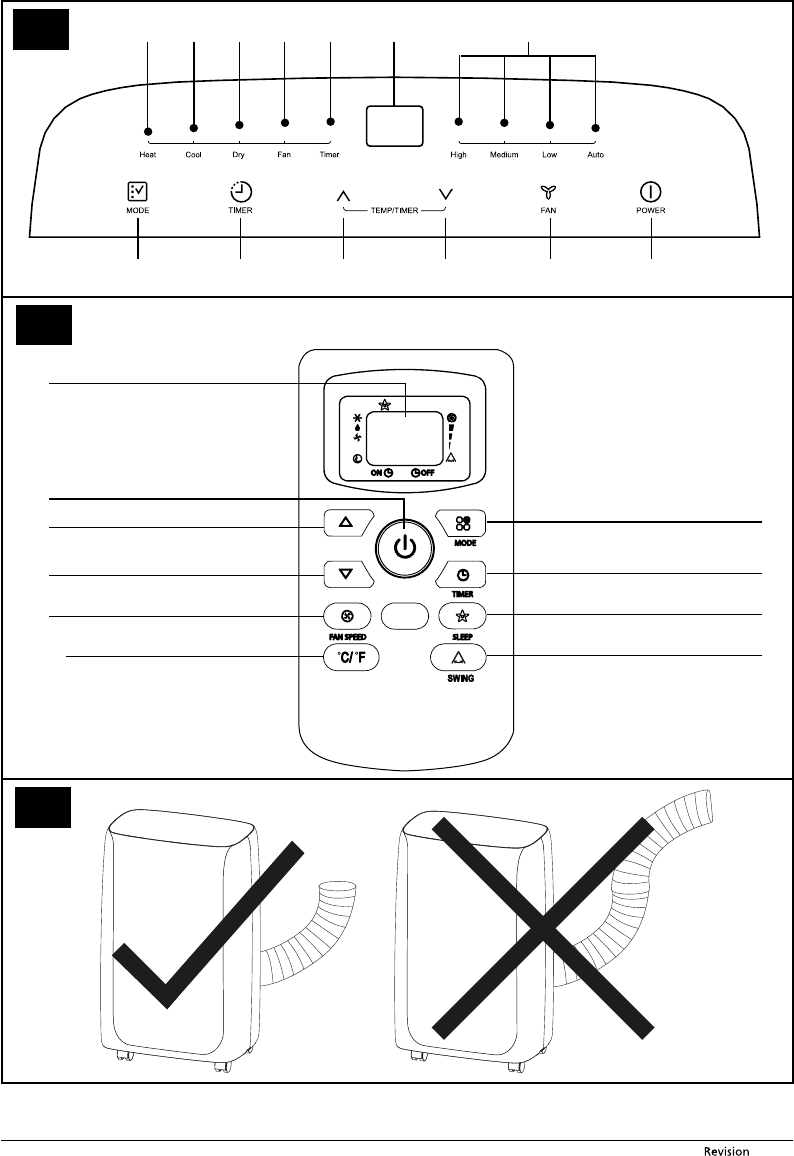
Note:
The drain hose B6 should be installed at the same height or lower than the top drain outlet A8. Otherwise, the condensate will not be properly drained from the
condensate tank.
Putting into operation again
■Check that the power cord and plug are not damaged and that the air filters are clean. Insert anew set of batteries into the remote control. Proceed according to the instructions
in section “Inserting and replacing batteries”. Install the portable air conditioner according to the instructions contained in the preceding part of this user’smanual “Installation”.
TROUBLESHOOTING
Error messages
Shown on the displayMeaningSolution
Low temperatureThe portable air conditioner has asystem that prevents freezing at very low temperatures.
The air conditioner will start again once the internal system is defrosted.
Defect of the heat sensorContact an authorised service centre.
Full condensate tankEmpty the condensate tank. Proceed according to the instructions in section "Condensate drain outlet" described
previously in this user'smanual.
Note:
In the event that one of the aforementioned faults occurs, turn off the portable air conditioner and check for the cause of the fault. Turn it on again, and if the fault
reoccurs, turn it off, disconnect the power cord from the power socket and contact the manufacturer, an authorised service centre or aperson with relevant qualifications
and have the unit repaired.
Troubleshooting
■Before contacting an authorised service centre, please check the appliance according to the following instructions:
ProblemPossible causeRemedy
The portable air conditioner did not turn on.There is no current in the power socket.Engage the circuit breaker or, alternatively, try adifferent power socket.
The power plug is not inserted in apower socket.Connect the power plug to the power socket.
The internal safety fuse is disengaged.Wait 30 minutes, and if the problem persists, please contact an authorised
service centre.
The portable air conditioner runs only for
ashort time.
The flexible air exhaust hose B1 is not connected
or it is blocked.
Turn off the air conditioner, disconnect the hose, check that it is not
blocked and reconnect the hose.
Air inlets A7 and A9 are blocked.Remove the obstacles preventing air supply to the inlets.
The portable air conditioner is on, but is not
cooling.
The windows and doors of the room are open.Make sure that all doors and windows are closed.
There are heat sources inside the room.If possible remove these heat sources.
The flexible air exhaust hose B1 is not connected.Attach the flexible hose B1.
The room area is too large.Perform adouble-check of the cooled area.
An unpleasant odour is sensed while it is
running.
The air filters are clogged with dirt and dust or
animal fur.
Turn off the air conditioner and clean the filters according to the provided
instructions.
The portable air conditioner turns off approx.
3minutes after it is turned on again.
Then compressor'ssafety fuse is protecting the
air conditioner against damage if turned on
sooner than after 3 minutes.
Wait several minutes and then turn the air conditioner on again.
An error message appeared on the display C1.Proceed according to the instructions in section "Error messages".
Power supply................................................................................................................................................................................................................................................................................................220–240 V~ / 50 Hz
Cooling power ...........................................................................................................................................................................................................................................................................................................9 kBtu / hour
Power input ..........................................................................................................................................................................................................................................................................................................................1,000 W
Current consumption ..........................................................................................................................................................................................................................................................................................................4.35 A
Dehumidification capacity ............................................................................................................................................................................................................................................................................................1 l / hour
Capacity of the built-in condensate tank ..........................................................................................................................................................................................................................................................................0.4 l
Refrigerant type and weight ...................................................................................................................................................................................................................................................................................R290/205 g
Air flow volume ................................................................................................................................................................................................................................................................................................................290 m
3
/h
Noise level ..............................................................................................................................................................................................................................................................................................65 dB (A) (high setting)
Maximum permitted value of excess operating pressure:
Suction / exhaust part of the cooling circuit ....................................................................................................................................................................................................................................................1.2/2.3 MPa
Dimensions of the portable air conditioner (w× d × h)............................................................................................................................................................................................................. 440 × 325 × 695 mm
Weight .............................................................................................................................................................................................................................................................................................................................. 29 kg (net)
Operating temperature (cooling) ...............................................................................................................................................................................................................................................................................18–32 °C
Recommended room area ...........................................................................................................................................................................................................................................................................................20–31 m
2
SAC MT1220C
Power supply................................................................................................................................................................................................................................................................................................220–240 V~ / 50 Hz
Cooling power ..............................................................................................................................................................................................................................................................................................max. 12 kBtu / hour
Power input ..........................................................................................................................................................................................................................................................................................................................1,170 W
Current consumption .............................................................................................................................................................................................................................................................................................................5.2 A
Dehumidification capacity ........................................................................................................................................................................................................................................................................................1.5 l / hour
Capacity of the built-in condensate tank ..........................................................................................................................................................................................................................................................................0.4 l
Refrigerant type and weight ...................................................................................................................................................................................................................................................................................R290/235 g
Air flow volume ...............................................................................................................................................................................................................................................................................................................280 m3/h
Noise level ..............................................................................................................................................................................................................................................................................................65 dB (A) (high setting)
Maximum permitted value of excess operating pressure: Suction / exhaust part of the cooling circuit ................................................................................................................................1.2 / 2.3 MPa
Dimensions of the portable air conditioner (w× d × h)............................................................................................................................................................................................................. 440 × 369 × 720 mm
Weight .............................................................................................................................................................................................................................................................................................................................. 31 kg (net)
Operating temperature (cooling) ...............................................................................................................................................................................................................................................................................18–32 °C
Recommended room area ..........................................................................................................................................................................................................................................................................................30–41 m2
SAC MT1224CH / SAC MT1225CH
Power supply................................................................................................................................................................................................................................................................................................220–240 V~ / 50 Hz
Cooling power ...............................................................................................................................................................................................................................................................................................max. 12 kBtu/ hour
Heating power ........................................................................................................................................................................................................................................................................................................10 kBtu / hour
Power input (cooling/heating) .................................................................................................................................................................................................................................................................. 1,230 W/ 1,035 W
Current consumption (cooling/heating) ...........................................................................................................................................................................................................................................................5.4 A/ 4.6 A
Dehumidification capacity ........................................................................................................................................................................................................................................................................................1.5 l / hour
Capacity of the built-in condensate tank ..........................................................................................................................................................................................................................................................................0.4 l
Refrigerant type and weight ...................................................................................................................................................................................................................................................................................R290/260 g
Air flow volume ................................................................................................................................................................................................................................................................................................................280 m
3
/h
Noise level ..............................................................................................................................................................................................................................................................................................65 dB (A) (high setting)
Maximum permitted value of excess operating pressure: Suction / exhaust part of the cooling circuit ................................................................................................................................1.2 / 2.3 MPa
Dimensions of the portable air conditioner (w× d × h)............................................................................................................................................................................................................. 440 × 369 × 720 mm
Weight .............................................................................................................................................................................................................................................................................................................................. 31 kg (net)
Operating temperature (cooling) ...............................................................................................................................................................................................................................................................................18–32 °C
Operating temperature (heating)...............................................................................................................................................................................................................................................................................10–25 °C
Recommended room area ...........................................................................................................................................................................................................................................................................................30–41 m
2
The declared noise emission level of the appliance is 65 dB(A), which represents alevel Aof sound power with respect to areference sound power of 1 pW.
Note:
The efficiency of the portable air conditioner may be reduced in the event that it is used outside the above described operating temperature range.
We reserve the right to change text and technical specifications.
INSTRUCTIONS AND INFORMATION REGARDING THE DISPOSAL OF USED PACKAGING MATERIALS
Dispose of used packaging material at asite designated for waste in your municipality.
DISPOSAL OF USED ELECTRICAL AND ELECTRONIC EQUIPMENT
This symbol on products or original documents means that used electric or electronic products must not be added to ordinary municipal waste. For proper disposal,
renewal and recycling hand over these appliances to determined collection points. Alternatively, in some European Union states or other European countries you
may return your appliances to the local retailer when buying an equivalent new appliance.
Correct disposal of this product helps save valuable natural resources and prevents potential negative effects on the environment and human health, which could
result from improper waste disposal. Ask your local authorities or collection facility for more details.
In accordance with national regulations penalties may be imposed for the incorrect disposal of this type of waste.
For business entities in European Union states
If you want to dispose of electric or electronic appliances, ask your retailer or supplier for the necessary information.
Disposal in other countries outside the European Union.
This symbol is valid in the European Union. If you wish to dispose of this product, request the necessary information about the correct disposal method from the local council or
from your retailer.
This product meets all the basic requirements of EU directives related to it.
Gebruikershandleiding.com neemt misbruik van zijn services uitermate serieus. U kunt hieronder aangeven waarom deze vraag ongepast is. Wij controleren de vraag en zonodig wordt deze verwijderd.
Product:
Spelregels forum
Om tot zinvolle vragen te komen hanteren wij de volgende spelregels:
lees eerst de handleiding door;
controleer of uw vraag al eerder door iemand anders is gesteld;
probeer uw vraag zo duidelijk mogelijk te stellen;
heeft u een probleem en al geprobeerd om dit op te lossen, vermeld dit erbij aub;
heeft u een oplossing gekregen van een bezoeker dan horen wij dat graag in dit forum;
wilt u een reactie geven op een vraag of antwoord, gebruik dan niet dit formulier maar klik op de knop 'reageer op deze vraag';
uw vraag wordt direct op de website gezet; vermijd daarom persoonlijke gegevens in te vullen;
Belangrijk! Als er een antwoord wordt gegeven op uw vraag, dan is het voor de gever van het antwoord nuttig om te weten als u er wel (of niet) mee geholpen bent! Wij vragen u dus ook te reageren op een antwoord.
Belangrijk! Antwoorden worden ook per e-mail naar abonnees gestuurd. Laat uw emailadres achter op deze site, zodat u op de hoogte blijft. U krijgt dan ook andere vragen en antwoorden te zien.
Abonneren
Abonneer u voor het ontvangen van emails voor uw Sencor SAC MT9021C bij:
nieuwe vragen en antwoorden
nieuwe handleidingen
U ontvangt een email met instructies om u voor één of beide opties in te schrijven.
Ontvang uw handleiding per email
Vul uw emailadres in en ontvang de handleiding van Sencor SAC MT9021C in de taal/talen: Engels als bijlage per email.
De handleiding is 1,29 mb groot.
U ontvangt de handleiding per email binnen enkele minuten. Als u geen email heeft ontvangen, dan heeft u waarschijnlijk een verkeerd emailadres ingevuld of is uw mailbox te vol. Daarnaast kan het zijn dat uw internetprovider een maximum heeft aan de grootte per email. Omdat hier een handleiding wordt meegestuurd, kan het voorkomen dat de email groter is dan toegestaan bij uw provider.
Stel vragen via chat aan uw handleiding
Stel uw vraag over deze PDF
Uw handleiding is per email verstuurd. Controleer uw email
Als u niet binnen een kwartier uw email met handleiding ontvangen heeft, kan het zijn dat u een verkeerd emailadres heeft ingevuld of dat uw emailprovider een maximum grootte per email heeft ingesteld die kleiner is dan de grootte van de handleiding.
Er is een email naar u verstuurd om uw inschrijving definitief te maken.
Controleer uw email en volg de aanwijzingen op om uw inschrijving definitief te maken
U heeft geen emailadres opgegeven
Als u de handleiding per email wilt ontvangen, vul dan een geldig emailadres in.
Uw vraag is op deze pagina toegevoegd
Wilt u een email ontvangen bij een antwoord en/of nieuwe vragen? Vul dan hier uw emailadres in.