26 français
• Utiliser la machine uniquement dans un parfait état
technique, conformément aux dispositions, en ayant
conscience des dangers et de la sécurité et en re-
spectant les instructions de service ! Eliminer (faire
éliminer) immédiatement toutes pannes, et surtout
celles susceptibles de porter atteinte à la sécurité !
• Les consignes de sécurité, ainsi que les prescriptions
pour le travail et la maintenance, fournies par le fabri-
cant doivent être respectées au même titre que les
dimensions indiquées dans les caractéristiques tech-
niques.
• Les consignes correspondantes pour la prévention des
accidents et les autres réglementations généralement
reconnues doivent être respectées.
• Seules des personnes compétentes ayant été initiées et
informées sur les dangers possibles ont le droit de manier,
d’entretenir ou de réparer la machine. Des modifications
sur la machine effectuées sans autorisation entraînent
une exclusion de la responsabilité du fabricant pour tous
dangers éventuels en résultant.
• La machine ne doit être utilisée qu’avec des accessoires
et des outils d’origine de scheppach.
• Toute utilisation autre que celle spécifiée est considérée
comme non conforme. Le fabricant ne peut être tenu
responsable pour d’éventuels dommages résultant d’une
telle utilisation, seul l’exploitant en est responsable.
• Scie circulaire à chevalet: La scie est uniquement con-
struite pour le sciage en coupe transversale du bois de
chauffage d’une longueur max. de 1 m
• Scie circulaire à chevalet et à table / scie circulaire à
table mobile: La scie est uniquement construite pour le
sciage en coupe transversale et longitudinale du bois
ainsi que du bois de chauffage.
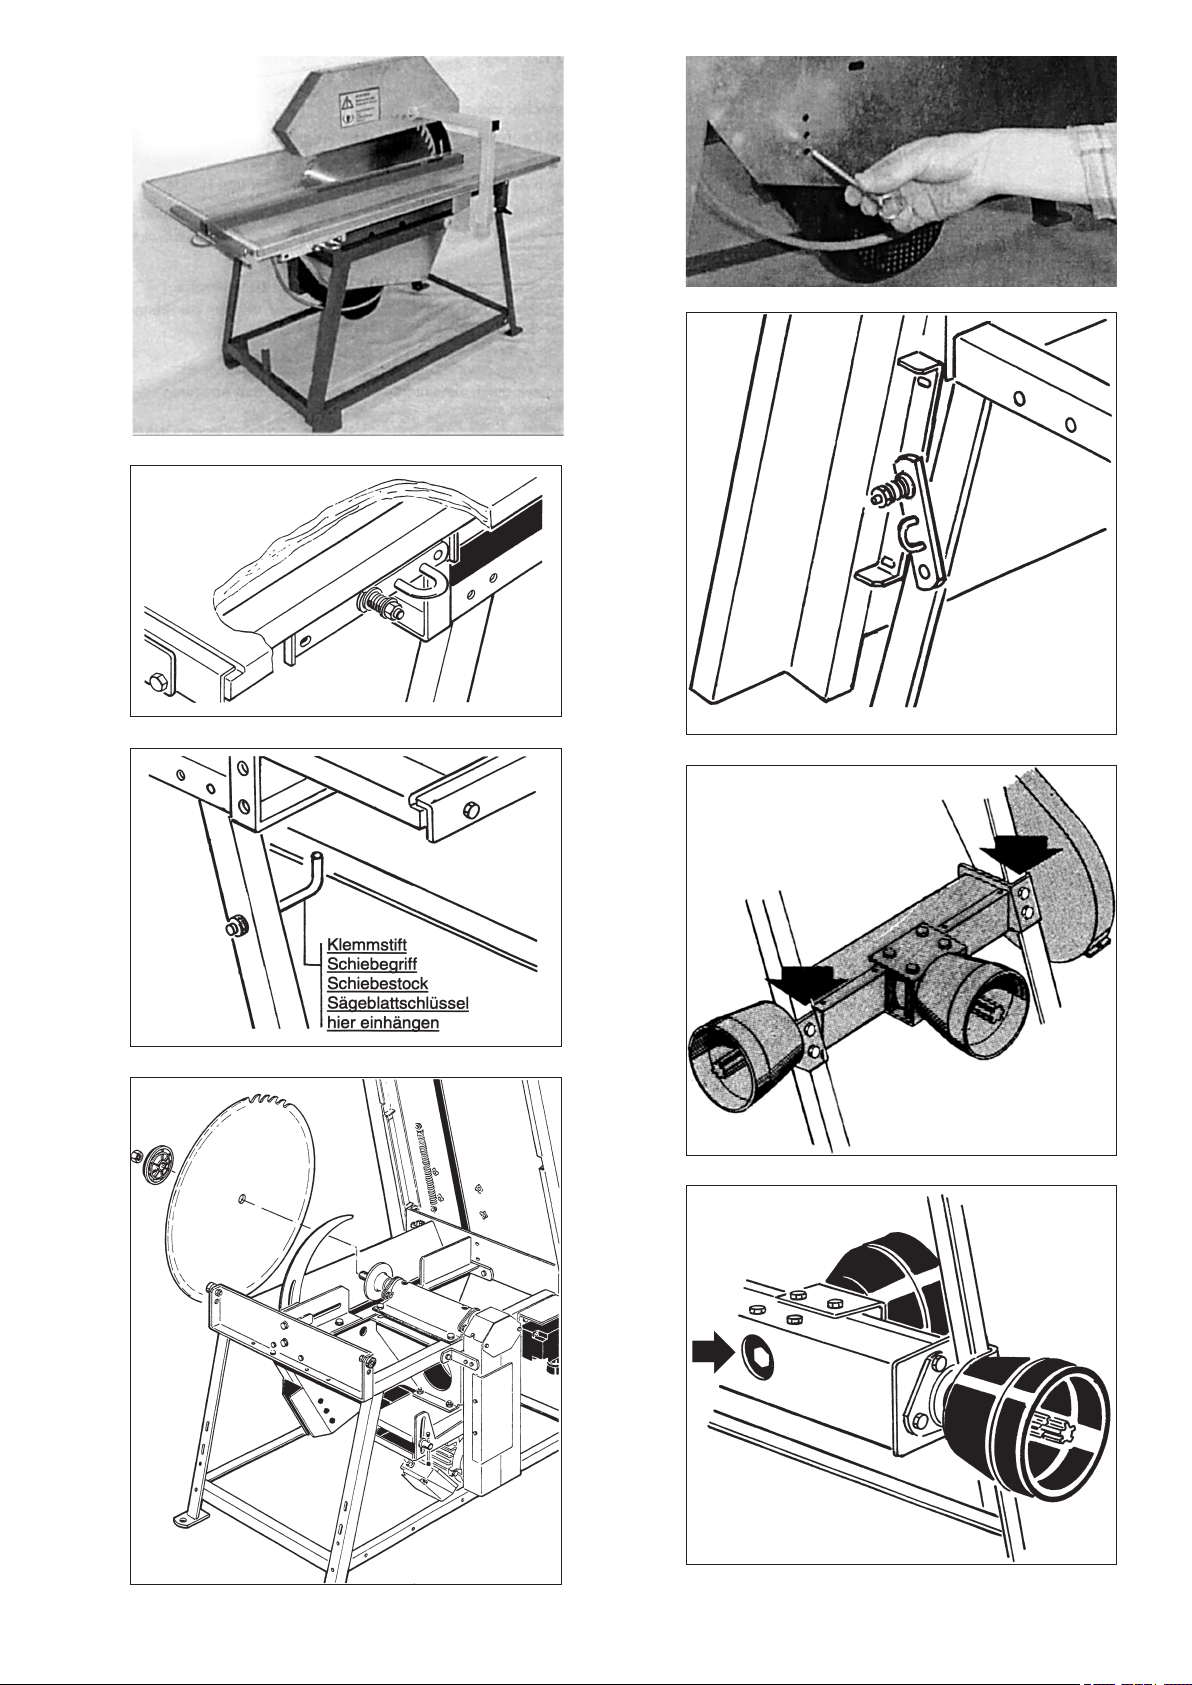
• Mette en place la butée longitudinale pour les coupes
longitudinales et monter la protection de lame corre-
spondante. Utiliser la pièce de poussée.
Risques résiduels
La machine est construite selon l’état actuel de la tech-
nique et conformément aux réglementations reconnues
en matière de sécurité. Le travail avec la machine peut
toutefois présenter des risques résiduels.
• Risque de se blesser les doigts et les mains par la
rotation de la lame lorsque l’outil n’est pas tenu
correctement.
• Les poussières ou les copeaux de bois présentent des
risques pour la santé.
• Il faut obligatoirement porter des équipements de
protection individuelle, tels qu’une protection des yeux
et un masque antipoussières.
• Le bruit présente des risques pour la santé. Le niveau
sonore admissible est dépassé lors du travail avec la
machine. Il faut obligatoirement porter des équipements
de protection individuelle (protège-oreilles).
• Le courant présente un risque en cas d’utilisation de
lignes de branchement électrique non-conformes.
• Des risques résiduels non apparents sont toutefois
encore possibles malgré toutes les mesures prises.
• Il est possible de réduire les risques résiduels en re-
spectant les «consignes de sécurité» et «l’utilisation
conforme» ainsi que les instructions de service.
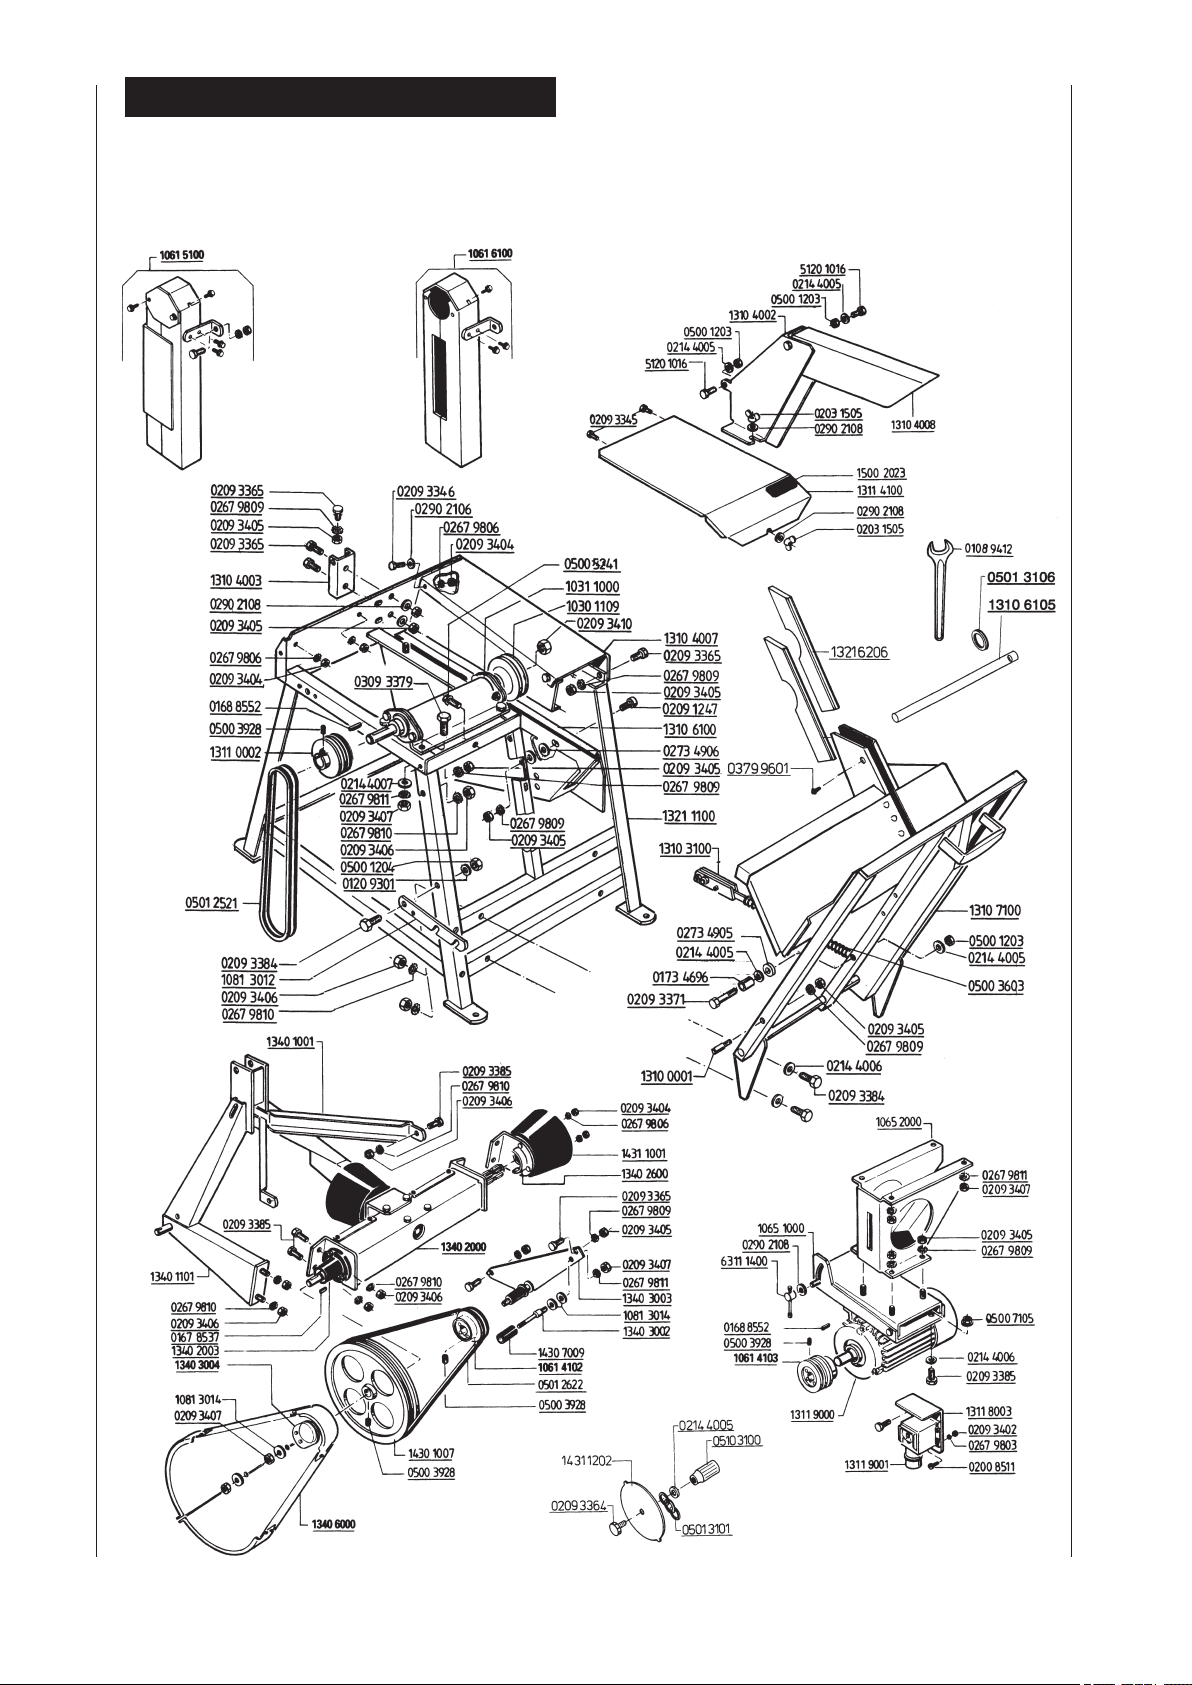
Montage
La machine est livrée à l’état entièrement monté et elle est
donc immédiatement prête au fonctionnement.
KE d700: Démonter la poignée de l’articulation du chevalet
et l’introduire dans la paroi latérale gauche du bâti.
Mise en place et ajustement
Veillez à ce que la scie circulaire à chevalet soit placée sur
un sol plat et stable. Les trous sur les pieds de table per-
mettent une fixation encore plus solide au sol.
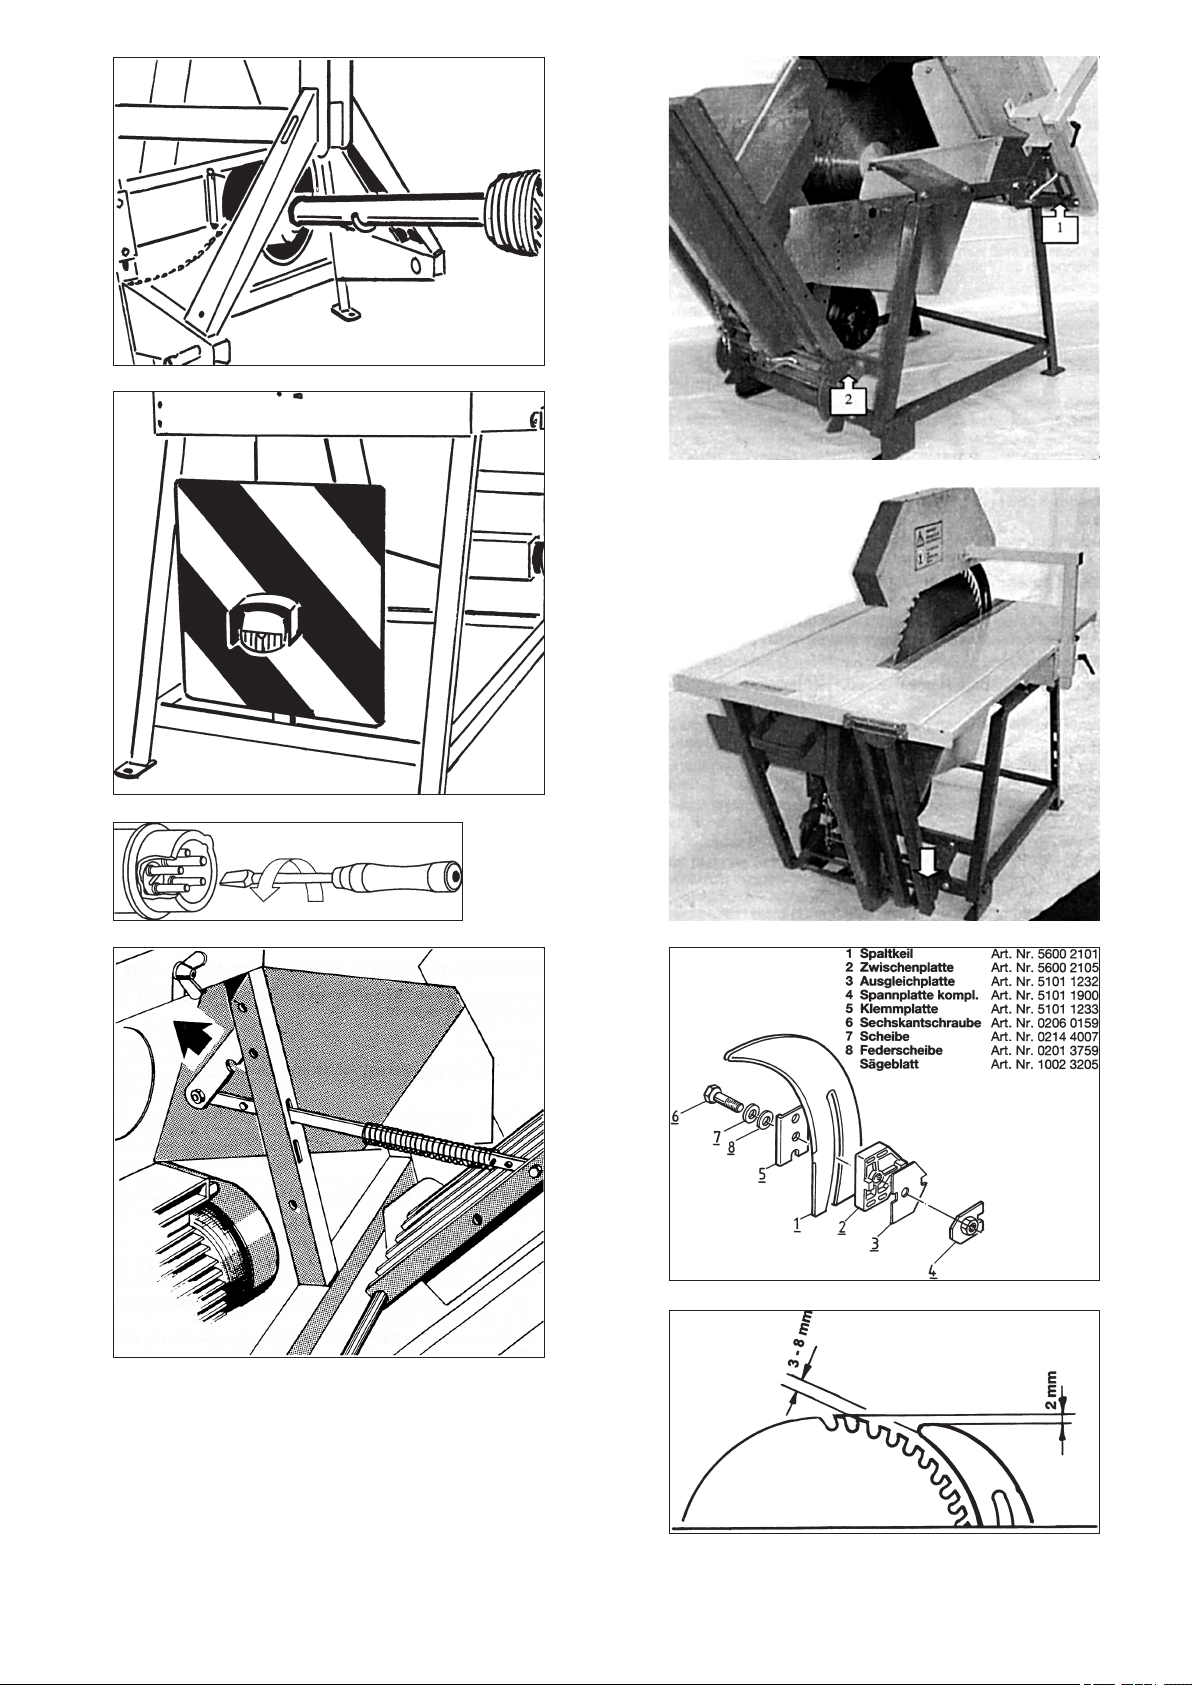
Attelage d’un remorqueur
Fig. 01
• Pour couper du bois de chauffage, accrocher la scie
circulaire dans le sens de la longueur à l’attelage
hydraulique à trois points du remorqueur.
• Pour la refente dans le sens de la longueur, désaccoupler
la scie du système hydraulique de l’attelage et la placer
90° à l’horizontal par rapport au remorqueur.
• Placer le couvercle protecteur sur l’embout d’arbre
cannelé libre.
• Eviter que la courroie sur l’arbre de transmission ne
patine.
• Accrocher l’arbre de transmission au crochet d’outil
après désaccouplement du remorqueur.
• Toujours arrêter le remorqueur avant de quitter le poste
de travail et enlever la clé de contact.
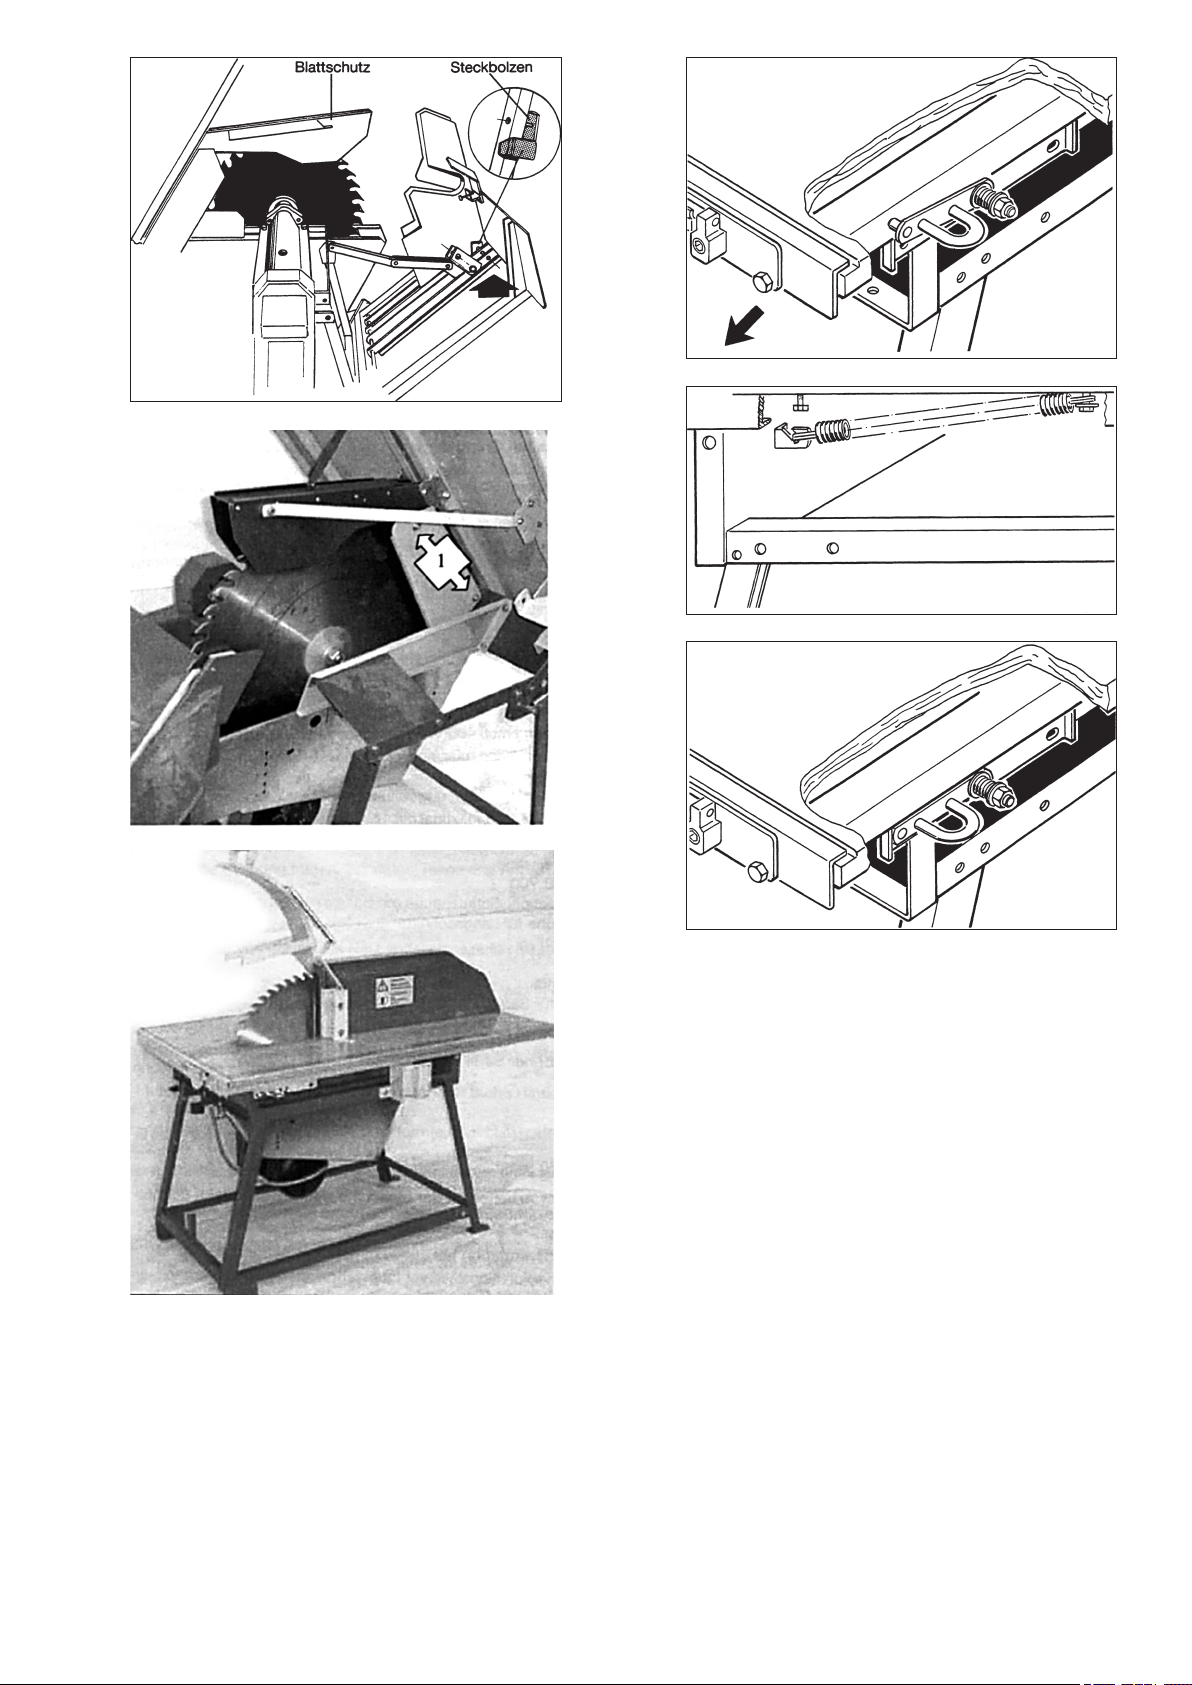
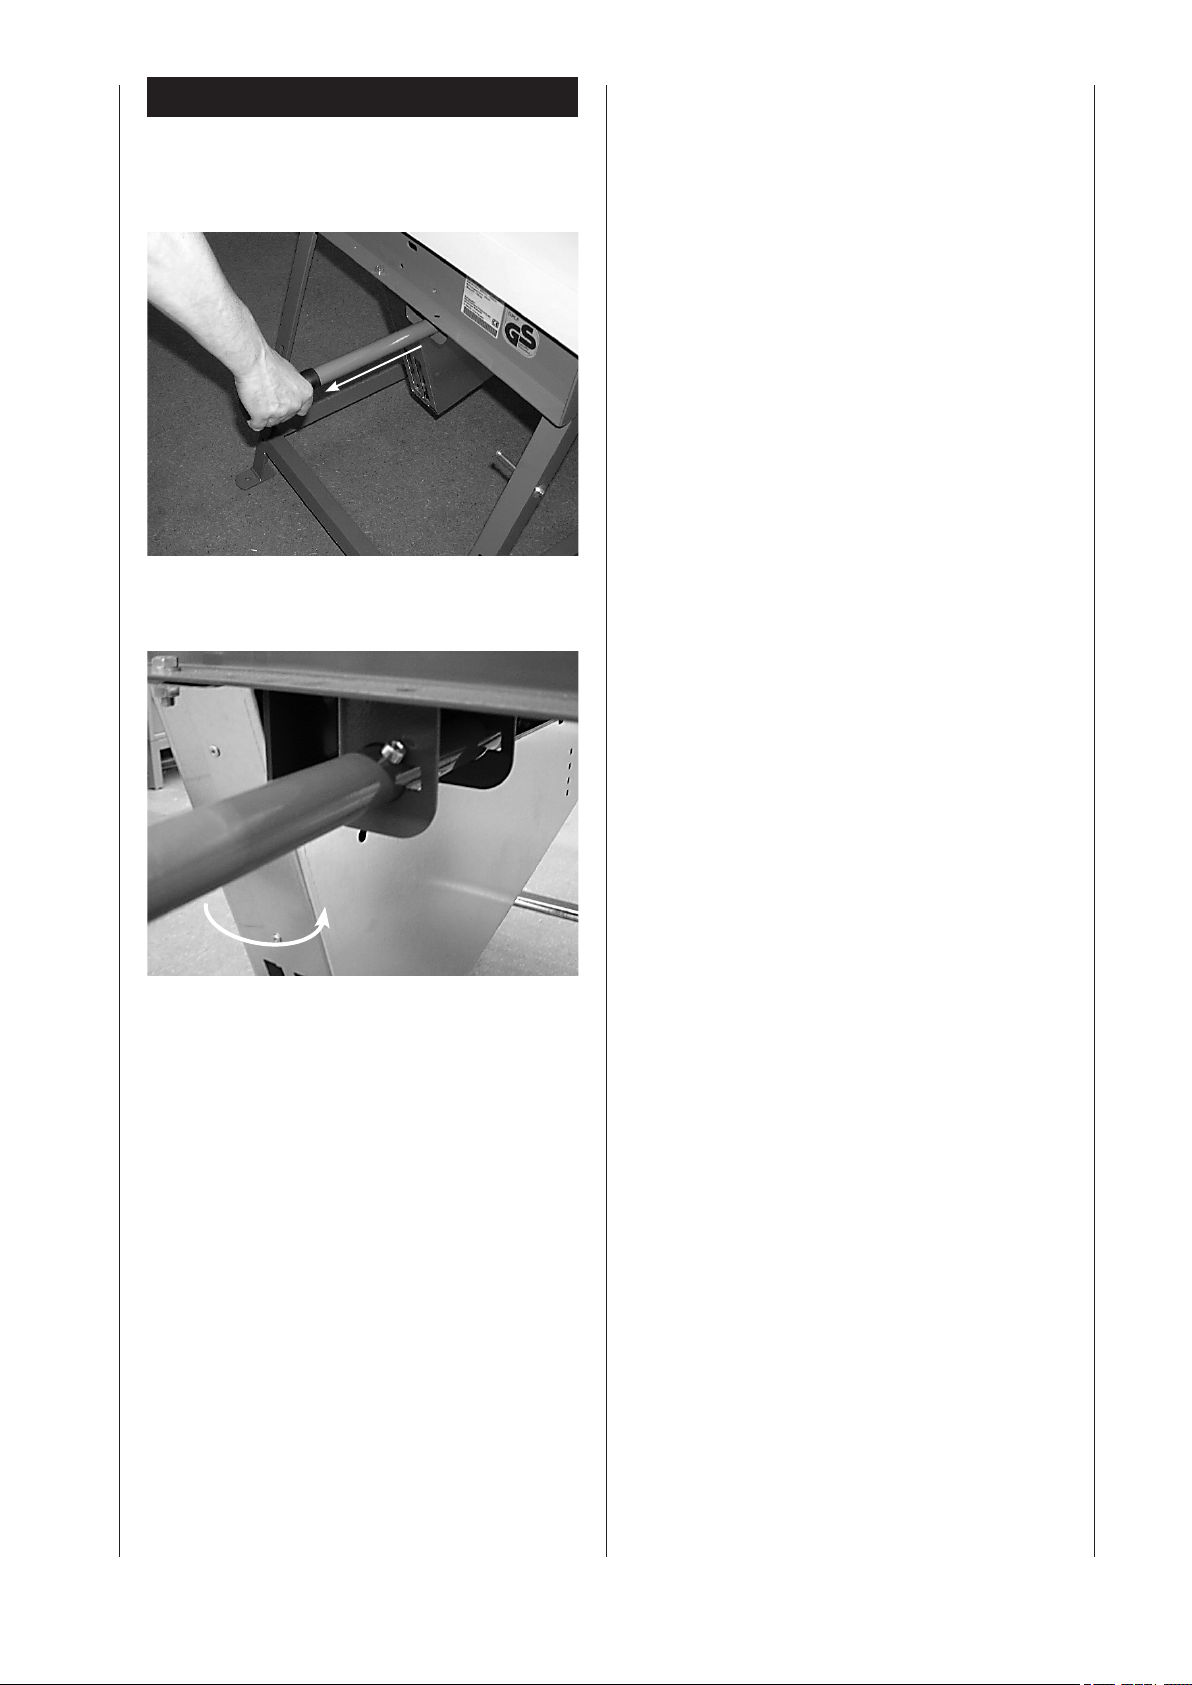
Transport de la machine
Scie circulaire à chevalet/Scie circulaire à chevalet et
à table KW et KWZ
Fig. 02
• Pour transporter la scie circulaire à chevalet, verrouiller
le dispositif de blocage du chevalet.
• Pour transporter la scie circulaire à chevalet et à table,
rabattre et verrouiller la table.
• KW 7: Pour transporter la machine, sortir la poignée de
transport (1) et la tourner (2) pour assurer un transport
en toute sécurité (protection par la tête de vis dans la
poignée de transport).
Scies circulaires à table mobile KE et KEZ
• KE 70m et KEZ 700: Pour le transport de la scie circulaire
à table mobile, mettre la table en position horizontale et
bloquer le verrou de la table.
• KE d 700: La machine ne peut être transportée qu’en
biais par rapport à la lame. Sortir la poignée de transport
(1) et la tourner (2) pour assurer un transport en toute
sécurité (protection par la tête de vis dans la poignée de
transport).
Attelage d’un remorqueur
• Arrêter la prise de force avant tout transport de la scie.
• Le tableau de signalisation avec les feux rouges DIN doit
être monté sur la scie, et les feux rouges branchés sur le
remorqueur (voir aussi la Fig. 02).
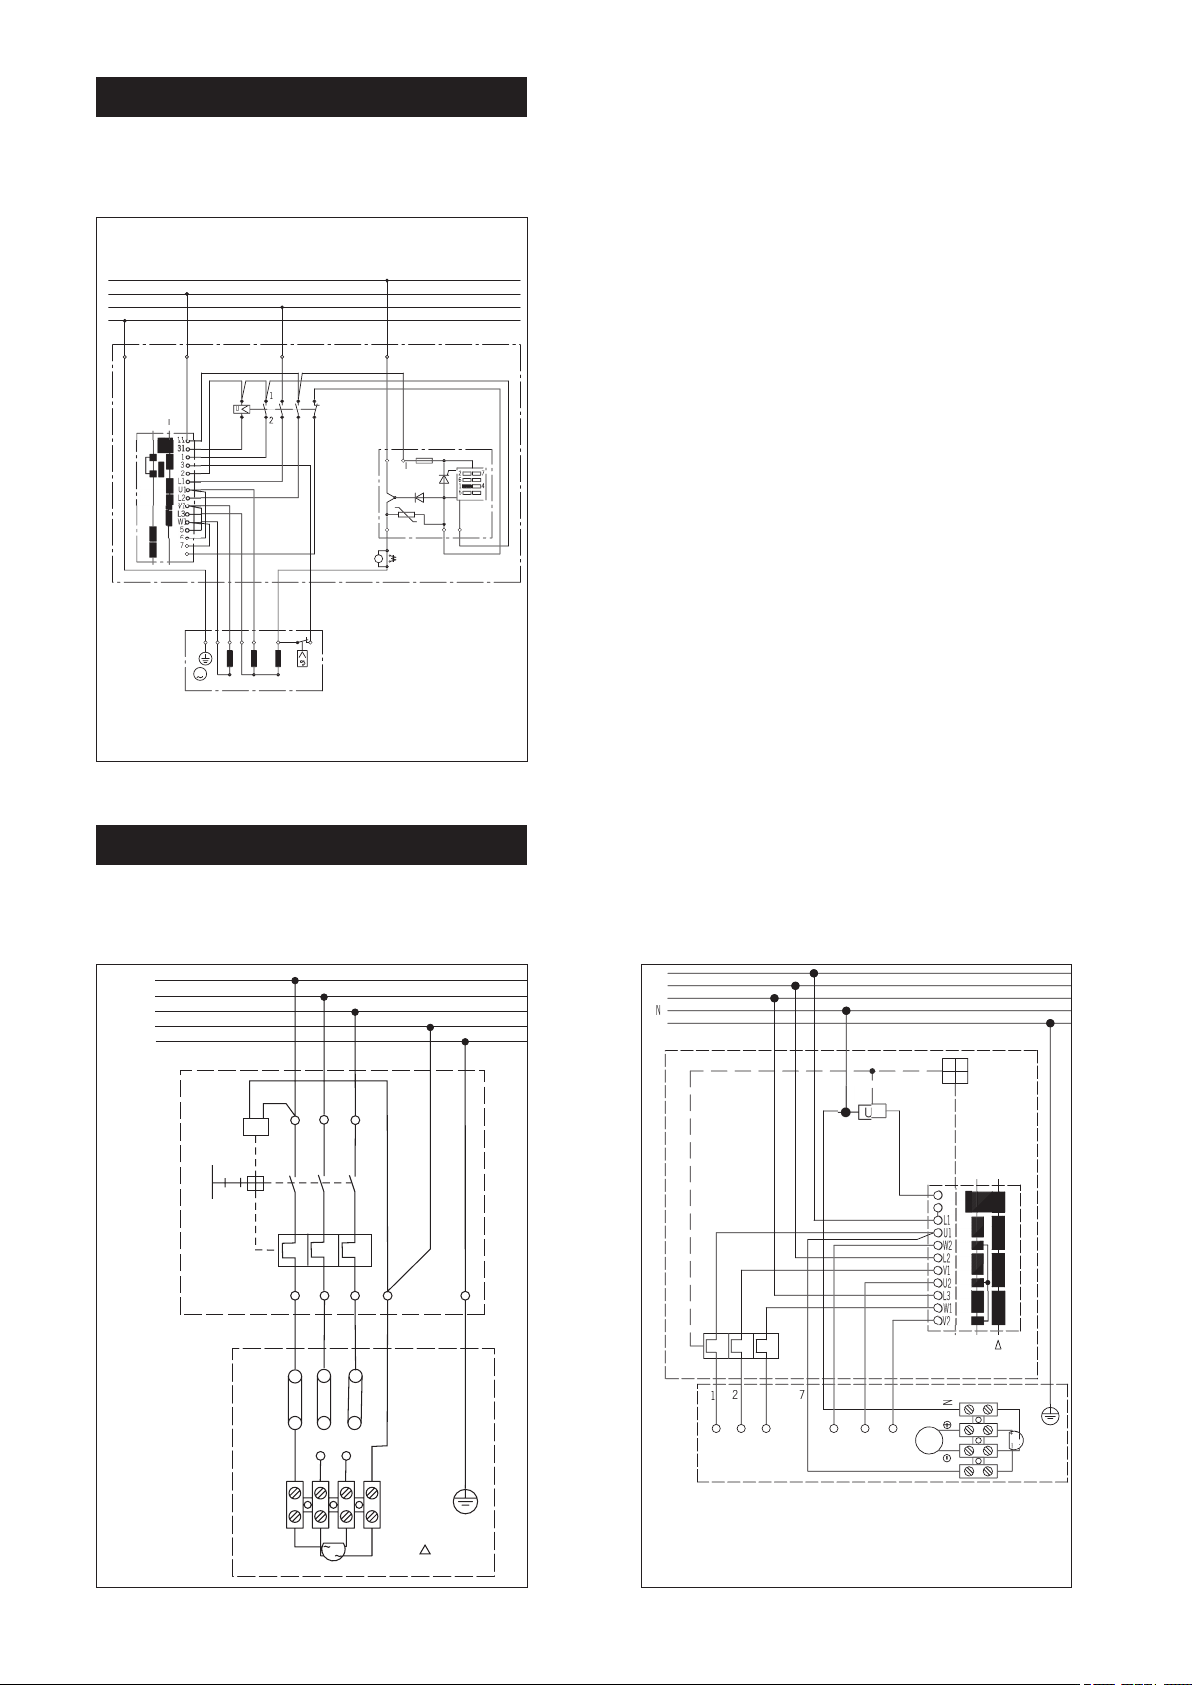
Branchement électrique
• Brancher la machine au secteur avec le connecteur CEE,
le câble d’alimentation doit être protégé par fusibles de
16 A.
• Mettre la machine en circuit en actionnant l’interrupteur
de service, l’arbre de scie se met en marche.
• Lors de la mise hors circuit, l’arbre de scie est freinée en
l’espace de 10 secondes.