12 english
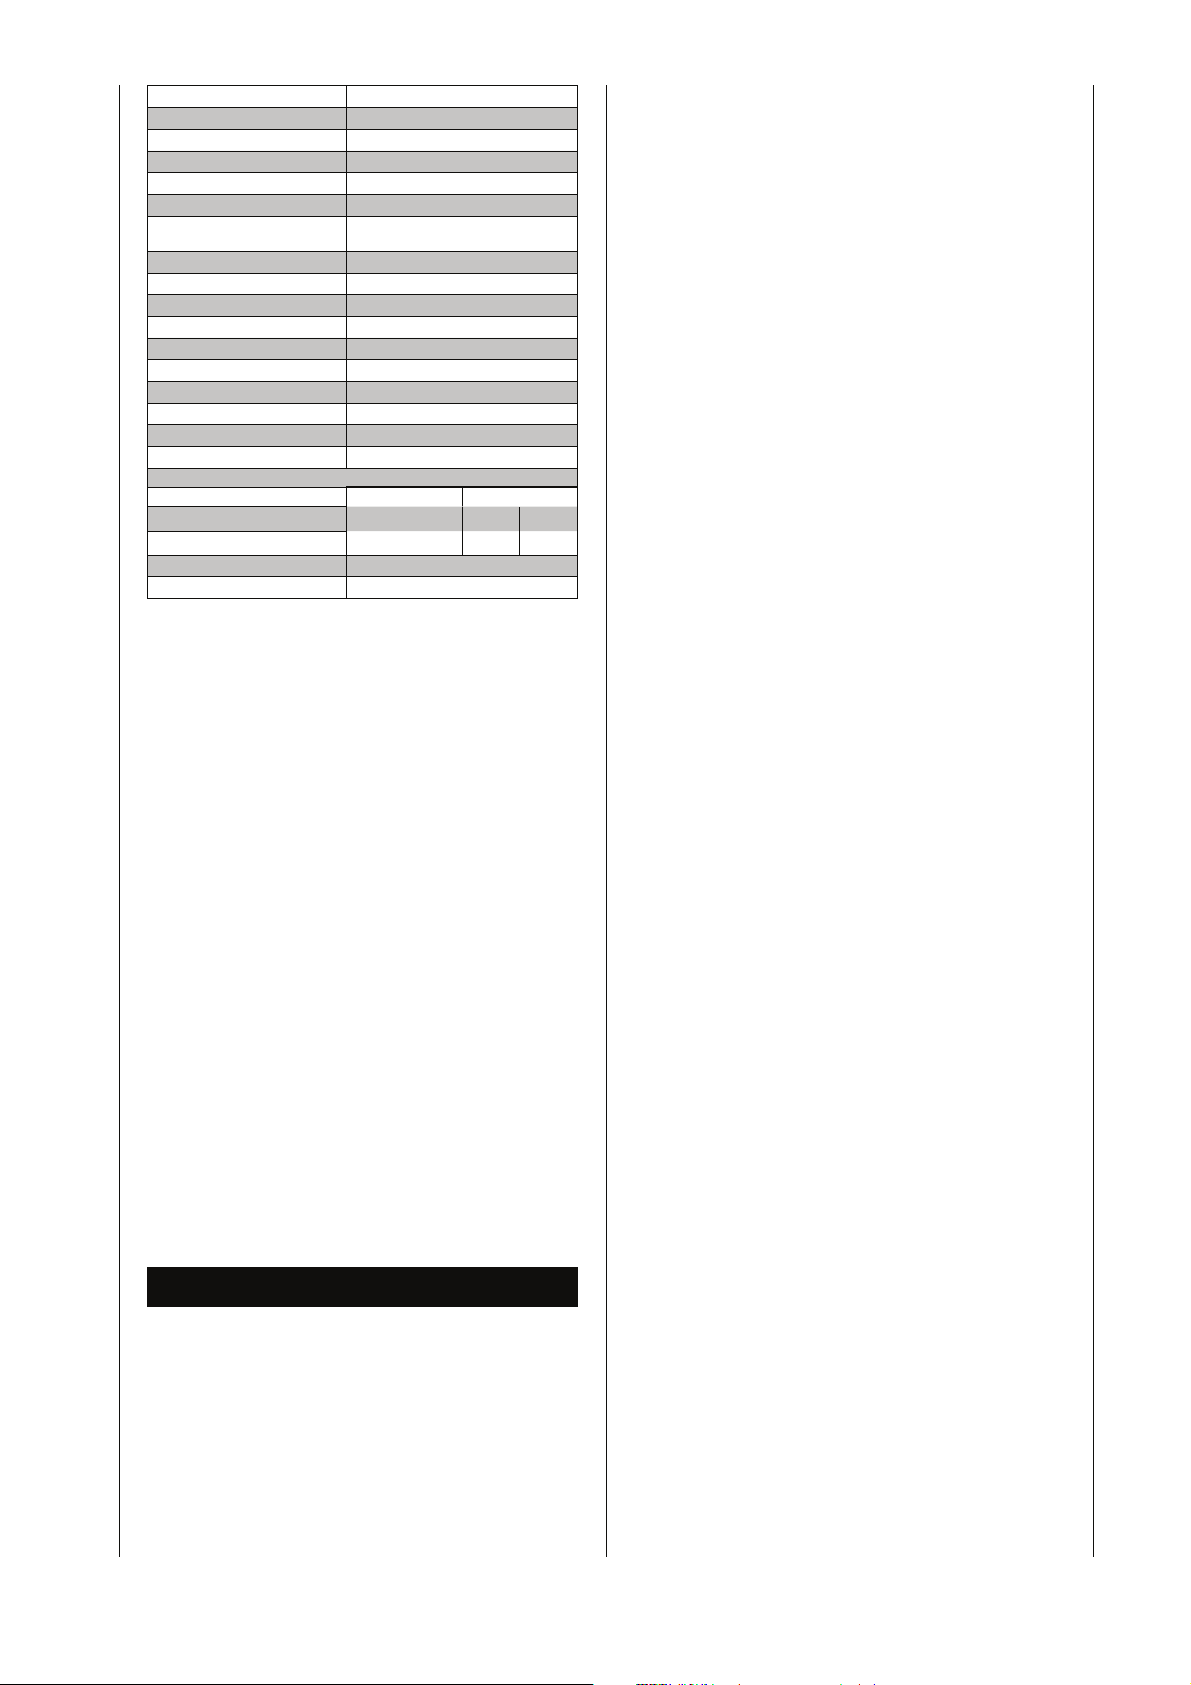
Table height 850 mm
Saw blade diameter max. 315 mm
Saw blade diameter min. 250 mm
Teeth width 2,8 mm
Cutting height at 90° 82 mm
Cutting height at 45° 65 mm
Cutting width at 90° angular
cut 260 mm
Saw blade height adjustment 85 mm
Saw blade slewing range 90° – 45°
Speed 2800 /min.
Cutting speed 46 m/sec.
Parallel cuts - max. width 345 mm
Cross cutting jig 0° – 60°
Weight 60 kg
Suction connection ø Ø 100 mm
Volume flow 565 m3/h
stat. under pressure (20m/sec) 560 Pa
Drive
Electric motor (v~ / Hz) 110/230/50 400/50
Input P1 2200 3000 4200
Output P2 1500 2200 3000
Motor speed 2800 min
-1
Operating mode S6 / 40 %
Noise parameters
The noise emission values determined according to EN
23746 for the sound level and according to EN 31202
(coefficient of correction k3 calculated according to Ap-
pendix A.2 of EN 31204) for the sound level at the work-
place are as follows, based on the working conditions
listed in ISO 7904 Appendix A:
Sound level in dB
Idle running LWA = 90 dB(A)
Operation LWA = 105 dB(A)
Sound level at the workplace in dB
Idle running LpAeq = 77,2 dB(A)
Operation LpAeq = 89,3 dB(A)
A measurement uncertainty allowance K = 4
dB applies to the mentioned emission values.
Dust emission values
The dust emission values measured according to the
“Principles for the inspection of the dust emission (con-
centration parameters) of wood working devices” of the
Technical Committee Wood are below 2 mg/m3. Thus, a
permanently reliable compliance with the TRK limit value
for wood dust valid in the Federal Republic of Germany
can be expected if the machine is connected to a proper
operational aspiration with an air speed of at least 20 m/s.
Assembly
For reasons of packaging technology, your Scheppach ma-
chine is not completely pre-installed.
Put the saw tabletop on the reverse for the installation.
Insert a piece of cardboard to protect the table surface.
Assembly tools
The following tools are included:
2 saw blade keys SW 46/19 and SW 17
For reasons of packaging technology, your Scheppach ma-
chine is not completely pre-installed.
Put the saw tabletop on the reverse for the installation.
Place a piece of cardboard underneath to protect the table
surface.
Installation of the dust suction connector, Fig. 1
1 Mount the dust suction connector on the casing cover.
4 hexagon head cap screws M6 x 10
4 hexagon nuts M6
Installation of the base feet, Fig. 2
1 Hand-tighten all screws and nuts.
2 Each base foot is screwed on the tabletop with 4 hexa-
gon head cap screws M6x16, 4 serrated lock washers
A6,4, and 4 hexagon nuts M6.
The cheese head screw M6 x 40 is fastened with two
nuts on the left side of the frame foot and serves as
support for the sliding stick. The running gear is fas-
tened on the rear side of the frame feet using two hexa-
gon head cap screws M8 x 16 with nuts and washers.
Then put the foot caps on the base feet.
Installation of the longitudinal and cross struts, Fig. 2
1 Each longitudinal and cross strut is screwed on the
tabletop with 1 hexagon head cap screw M6x16, 1
serrated lock washer A6,4, and 1 hexagon nut M6.
2 Finally tighten all screws and nuts.
Installation of the switch, Fig. 3
1 Fasten the switch mounting part with 2 hexagon head
cap screws M8x16, 2 washers A8,4, and 2 hexagon
nuts M8 on the tabletop.
Installation of the table extension, Fig. 4
1 Hand-tighten all screws and nuts.
2 Fasten the table extension panel with 2 hexagon head
cap screws M6x16, 2 washers Ø6 and 2 hexagon nuts
M6 on the saw table rear.
3 Fasten the supporting frames with 2 hexagon head cap
screws M6x16, 2 hexagon nuts M6, and 2 washers Ø6
on the cross strut.
4 Fasten the supporting frames with 2 hexagon head
cap screws M6x16 and 2 hexagon nuts M6 on the
table extension.
Put the circular saw bench on its feet again. Align the
machine. Adjust the table extension panel to the height of
the saw tabletop, and tighten all screws.
Installation of the splitting wedge, Fig. 5
Release the hexagon head cap screw of the splitting wedge
carrier with 2 - 3 rotations, but DO NOT UNSCREW.
The adjustment is performed after the installation of the
saw blade and must be performed after each exchange.
Finally tighten the hexagon head cap screw.
Installation of the covering cap, Fig. 6
1 Fasten the covering cap with 1 saucer-head screw
M6x40, 1 washer A6,4, and 1 wing nut M6 on the
splitting wedge.
2 Insert the suction tube NW50.
Fig. 7
1 Fasten the tube support on the right back of the table
edge, insert the tube.