458913
11
Verklein
Vergroot
Pagina terug
1/54
Pagina verder
Schaerer Coffee Joy
Operating instructions
V02 / 08.2012
Schaerer Ltd. P.O. Box Original operating instructions
Schaerer Ltd.
P.O. Box
Allmendweg 8
CH-4528 Zuchwil
info@schaerer.com
www.schaerer.com
Original operating instructions
N° 022441
BASCJ_en
1
Inlet for ground coffee
2
Bean hopper
3
Hot water dispensing
4
Grounds container
5
Drip tray with drip grid
6
Brewing unit shaft cover
7
On/off
8
User panel
9
Beverage outlet
10
Drinking water reservoir
3
9
4
5
7
8
10
6
2
1
1
4
2
3
5
6
a
b
d
c
e
1
Display
2
Hot water
3
Beverage buttons
 Press and hold
a
b
c
d
e
Espresso
Café crème
Latte Macchiato
Cappuccino
Hot milk
2 espressos
2 café crème
Milk coffee
2 cappuccinos
Milk foam
4
Cancel
5
Cleaning menu
6
Programming menu
7
Change adjustable values/
Navigate through menus
7
www.schaerer.com
BASCJ_EN
V02 | 08.2012
3
Schaerer Coffee Joy
Operating instructions
V02 / 08.2012
Published by
Schaerer Ltd., P.O. Box, Allmendweg 8, CH-4528 Zuchwil
Edition
Version 02 | 08.2012
Software
V0.10
Concept and editorial department
Schaerer Ltd., P.O. Box, Allmendweg 8, CH-4528 Zuchwil
Copyright by ©
Schaerer Ltd., P.O. Box, Allmendweg 8, CH-4528 Zuchwil
This document is copyrighted. All rights are reserved. The reproduction, distribution, transmission via electronic systems or trans-
lation of this document in another language is not permitted without the written consent of Schaerer Ltd. This applies to the entire
document, as well as to individual excerpts thereof. The contents of the document are based on the most current data available at
the time of printing. Schaerer Ldt. reserves the right to make changes at any time without further notice. All pictures, illustrations
and display messages in this manual serve only as examples. Due to the wide variety of possible options, a particular machine
may differ from the devices depicted here. Schaerer AG is only liable for the contents of the original German document.
BASCJ_EN
V02 | 08.2012
4
www.schaerer.com
Table of contents
Welcome . . . . . . . . . . . . . . . . . . . . . . . . . . . . . . . . . . .6
Welcome. . . . . . . . . . . . . . . . . . . . . . . . . . . . . . . . . . . . . . . . .6
Signs and symbols . . . . . . . . . . . . . . . . . . . . . . . . . . . . . . . . .6
Product description . . . . . . . . . . . . . . . . . . . . . . . . . .7
Intended use . . . . . . . . . . . . . . . . . . . . . . . . . . . . . . . . . . . . . .7
Beverage types and output. . . . . . . . . . . . . . . . . . . . . . . . . . .7
Scope of delivery and accessories . . . . . . . . . . . . . . . . . . . . .8
Options and optional accessories. . . . . . . . . . . . . . . . . . . . . .8
Technical data . . . . . . . . . . . . . . . . . . . . . . . . . . . . . . . . . . . .9
Serial plate . . . . . . . . . . . . . . . . . . . . . . . . . . . . . . . . . . . . . .10
Declaration of conformity . . . . . . . . . . . . . . . . . . . . . . . . . . .10
Manufacturer's address. . . . . . . . . . . . . . . . . . . . . . . . . . .10
Applied standards . . . . . . . . . . . . . . . . . . . . . . . . . . . . . . .10
Installation and commissioning . . . . . . . . . . . . . . .11
Setting up the coffee machine . . . . . . . . . . . . . . . . . . . . . . .11
Location. . . . . . . . . . . . . . . . . . . . . . . . . . . . . . . . . . . . . . .11
Ambient conditions . . . . . . . . . . . . . . . . . . . . . . . . . . . . . .11
Power supply . . . . . . . . . . . . . . . . . . . . . . . . . . . . . . . . . . . .11
Conditions . . . . . . . . . . . . . . . . . . . . . . . . . . . . . . . . . . . . .11
Power requirements . . . . . . . . . . . . . . . . . . . . . . . . . . . . .12
Water connection/draining . . . . . . . . . . . . . . . . . . . . . . . . . .12
Conditions . . . . . . . . . . . . . . . . . . . . . . . . . . . . . . . . . . . . .12
Power requirements . . . . . . . . . . . . . . . . . . . . . . . . . . . . .13
Installation. . . . . . . . . . . . . . . . . . . . . . . . . . . . . . . . . . . . . . .13
Unpacking the machine. . . . . . . . . . . . . . . . . . . . . . . . . . .13
Install a mains water supply (Option) . . . . . . . . . . . . . . . .13
Connecting the milk. . . . . . . . . . . . . . . . . . . . . . . . . . . . . .13
Commissioning program. . . . . . . . . . . . . . . . . . . . . . . . . . . .14
Deinstallation and disposal . . . . . . . . . . . . . . . . . . . . . . . . . .15
Operation . . . . . . . . . . . . . . . . . . . . . . . . . . . . . . . . . .16
Check before switching on . . . . . . . . . . . . . . . . . . . . . . . . . .16
Filling and connecting . . . . . . . . . . . . . . . . . . . . . . . . . . . . . .16
Coffee beans . . . . . . . . . . . . . . . . . . . . . . . . . . . . . . . . . . .16
Water. . . . . . . . . . . . . . . . . . . . . . . . . . . . . . . . . . . . . . . . .16
Milk . . . . . . . . . . . . . . . . . . . . . . . . . . . . . . . . . . . . . . . . . .17
Switching on . . . . . . . . . . . . . . . . . . . . . . . . . . . . . . . . . . . . .17
Dispensing . . . . . . . . . . . . . . . . . . . . . . . . . . . . . . . . . . . . . .18
Prewarming the cups. . . . . . . . . . . . . . . . . . . . . . . . . . . . .18
Adjusting outlets . . . . . . . . . . . . . . . . . . . . . . . . . . . . . . . .18
Beverages . . . . . . . . . . . . . . . . . . . . . . . . . . . . . . . . . . . . .18
Hot water . . . . . . . . . . . . . . . . . . . . . . . . . . . . . . . . . . . . . .19
Hot milk . . . . . . . . . . . . . . . . . . . . . . . . . . . . . . . . . . . . . . .19
Milk foam . . . . . . . . . . . . . . . . . . . . . . . . . . . . . . . . . . . . . .19
Double beverage . . . . . . . . . . . . . . . . . . . . . . . . . . . . . . . .19
Beverages with ground coffee. . . . . . . . . . . . . . . . . . . . . .20
Dispensing options . . . . . . . . . . . . . . . . . . . . . . . . . . . . . . . .20
Stopping continuous dispensing . . . . . . . . . . . . . . . . . . . .20
Select coffee strength . . . . . . . . . . . . . . . . . . . . . . . . . . . .20
Emptying. . . . . . . . . . . . . . . . . . . . . . . . . . . . . . . . . . . . . . . .21
Grounds container. . . . . . . . . . . . . . . . . . . . . . . . . . . . . . .21
Drip tray. . . . . . . . . . . . . . . . . . . . . . . . . . . . . . . . . . . . . . .21
Transport conditions . . . . . . . . . . . . . . . . . . . . . . . . . . . . . . 21
Display messages/instructions . . . . . . . . . . . . . . . . . . . . . . 21
Switching off . . . . . . . . . . . . . . . . . . . . . . . . . . . . . . . . . . . . 23
End of operation . . . . . . . . . . . . . . . . . . . . . . . . . . . . . . . 23
Lengthy downtimes (more than 1 week) . . . . . . . . . . . . . 23
Cleaning . . . . . . . . . . . . . . . . . . . . . . . . . . . . . . . . . . 24
Cleaning intervals . . . . . . . . . . . . . . . . . . . . . . . . . . . . . . . . 24
Mandatory cleaning . . . . . . . . . . . . . . . . . . . . . . . . . . . . . . . 24
Daily cleaning . . . . . . . . . . . . . . . . . . . . . . . . . . . . . . . . . . . 25
Automatic coffee system rinsing . . . . . . . . . . . . . . . . . . . 25
Milk system rinse . . . . . . . . . . . . . . . . . . . . . . . . . . . . . . . 25
Grounds container . . . . . . . . . . . . . . . . . . . . . . . . . . . . . . 25
Drip tray . . . . . . . . . . . . . . . . . . . . . . . . . . . . . . . . . . . . . . 25
Internal drinking water tank . . . . . . . . . . . . . . . . . . . . . . . 25
Milk container. . . . . . . . . . . . . . . . . . . . . . . . . . . . . . . . . . 25
Side cooling unit (Option). . . . . . . . . . . . . . . . . . . . . . . . . 26
Weekly cleaning . . . . . . . . . . . . . . . . . . . . . . . . . . . . . . . . . 27
Monthly cleaning . . . . . . . . . . . . . . . . . . . . . . . . . . . . . . . . . 29
Brewing unit . . . . . . . . . . . . . . . . . . . . . . . . . . . . . . . . . . . 29
As needed . . . . . . . . . . . . . . . . . . . . . . . . . . . . . . . . . . . . . . 29
Outer surfaces of the coffee machine . . . . . . . . . . . . . . . 29
Cleaning the steam nozzle. . . . . . . . . . . . . . . . . . . . . . . . 30
Optional accessories (Option). . . . . . . . . . . . . . . . . . . . . . . 30
Warm-up rinse. . . . . . . . . . . . . . . . . . . . . . . . . . . . . . . . . . . 30
HACCP Cleaning Concept . . . . . . . . . . . . . . . . . . . . . . . . . 31
Cleaning regulations . . . . . . . . . . . . . . . . . . . . . . . . . . . . 31
Cleaning schedule . . . . . . . . . . . . . . . . . . . . . . . . . . . . . . 31
Cleaning products . . . . . . . . . . . . . . . . . . . . . . . . . . . . . . . . 33
Cleaning tablet. . . . . . . . . . . . . . . . . . . . . . . . . . . . . . . . . 33
Milkpure . . . . . . . . . . . . . . . . . . . . . . . . . . . . . . . . . . . . . . 33
Decalcifier . . . . . . . . . . . . . . . . . . . . . . . . . . . . . . . . . . . . 33
Service and maintenance . . . . . . . . . . . . . . . . . . . . 34
Decalcification . . . . . . . . . . . . . . . . . . . . . . . . . . . . . . . . . . . 34
Adjusting the grinding fineness . . . . . . . . . . . . . . . . . . . . . . 35
Water filter (Option). . . . . . . . . . . . . . . . . . . . . . . . . . . . . . . 35
Installing the water filter for the internal drinking
water tank (Option) . . . . . . . . . . . . . . . . . . . . . . . . . . . . . 35
Changing the water filter for the internal drinking
water tank (Option) . . . . . . . . . . . . . . . . . . . . . . . . . . . . . 36
Maintenance . . . . . . . . . . . . . . . . . . . . . . . . . . . . . . . . . . . . 37
Programming . . . . . . . . . . . . . . . . . . . . . . . . . . . . . . 38
Navigation . . . . . . . . . . . . . . . . . . . . . . . . . . . . . . . . . . . . . . 38
Overview . . . . . . . . . . . . . . . . . . . . . . . . . . . . . . . . . . . . . . . 38
cup size (beverage volume) . . . . . . . . . . . . . . . . . . . . . . . . 38
beverage settings . . . . . . . . . . . . . . . . . . . . . . . . . . . . . . . . 39
basic settings. . . . . . . . . . . . . . . . . . . . . . . . . . . . . . . . . . . . 40
counters. . . . . . . . . . . . . . . . . . . . . . . . . . . . . . . . . . . . . . . . 43
system information . . . . . . . . . . . . . . . . . . . . . . . . . . . . . . . 44
Troubleshooting. . . . . . . . . . . . . . . . . . . . . . . . . . . . 45
Faults with display message . . . . . . . . . . . . . . . . . . . . . . . . 45
www.schaerer.com
BASCJ_EN
V02 | 08.2012
5
Faults without display message . . . . . . . . . . . . . . . . . . . . . . 46
Water quality . . . . . . . . . . . . . . . . . . . . . . . . . . . . . . 48
Water values . . . . . . . . . . . . . . . . . . . . . . . . . . . . . . . . . . . . 48
Determining the water hardness . . . . . . . . . . . . . . . . . . . . . 49
Filter technology. . . . . . . . . . . . . . . . . . . . . . . . . . . . . . . . . . 49
Safety notes. . . . . . . . . . . . . . . . . . . . . . . . . . . . . . . 50
User at risk. . . . . . . . . . . . . . . . . . . . . . . . . . . . . . . . . . . . . . 50
Risk from cleaning products. . . . . . . . . . . . . . . . . . . . . . . . . 51
Application . . . . . . . . . . . . . . . . . . . . . . . . . . . . . . . . . . . . 51
Storage . . . . . . . . . . . . . . . . . . . . . . . . . . . . . . . . . . . . . . . 51
Disposal . . . . . . . . . . . . . . . . . . . . . . . . . . . . . . . . . . . . . . 51
Emergency information. . . . . . . . . . . . . . . . . . . . . . . . . . . 51
Risk of damage to the machine . . . . . . . . . . . . . . . . . . . . . . 52
Hygiene regulations . . . . . . . . . . . . . . . . . . . . . . . . . . . . . . . 52
Water . . . . . . . . . . . . . . . . . . . . . . . . . . . . . . . . . . . . . . . . 52
Coffee . . . . . . . . . . . . . . . . . . . . . . . . . . . . . . . . . . . . . . . . 53
Milk . . . . . . . . . . . . . . . . . . . . . . . . . . . . . . . . . . . . . . . . . . 53
Liability. . . . . . . . . . . . . . . . . . . . . . . . . . . . . . . . . . . 54
Operator responsibilities . . . . . . . . . . . . . . . . . . . . . . . . . . . 54
Warranty and liability . . . . . . . . . . . . . . . . . . . . . . . . . . . . . . 54
www.schaerer.com Welcome
BASCJ_EN
V02 | 08.2012
6
Welcome
Welcome
This coffee machine is part of the next generation of fully automatic coffee machines. Our com-
pany's core competence as well as decades of experience flowed into designing this equip-
ment.
These operating instructions provide information about the product, its operation and how to
clean the coffee machine. If the coffee machine is not used according to the instructions, we
shall not be held liable for any damages. However, these operating instructions cannot take
every conceivable application into account. For further information, please contact our custom-
er service.
The performance of the coffee machine depends on its correct operation and the mainte-
nance. Carefully read the operating instructions before using the machine for the first time, and
keep the instructions in an easily accessible place.
We hope you enjoy using your new coffee machine!
Signs and symbols
The following signs and symbols are used in these operating instructions to point out sources
of danger and special features:
DANGER!
Risk of electrocution!
An imminently dangerous situation that may result in death or serious injury from elec-
tric shock.
The measures described to prevent this danger must be adhered to.
CAUTION!
User at risk!
A generally dangerous situation that may result in injury.
The measures described to prevent this danger must be adhered to.
CAUTION!
Risk of machine
damage!
A situation that may result in damage to the machine.
The measures described to prevent this danger must be adhered to.
CAUTION!
Hot fluid!
A dangerous situation that may result in scalding injuries. The danger arises at the dis-
pensing locations. In the following description, this danger is only indicated by the
symbol.
The measures described to prevent this danger must be adhered to.
CAUTION!
Hot steam!
A dangerous situation that may result in scalding injuries. The danger arises at the dis-
pensing locations. In the following description, this danger is only indicated by the
symbol.
The measures described to prevent this danger must be adhered to.
CAUTION!
Hot surface!
A dangerous situation that may result in burn injuries. The danger arises at the dispens-
ing locations and cup warmer locations (option). In the following description, this dan-
ger is only indicated by the symbol.
The measures described to prevent this danger must be adhered to.
CAUTION!
Risk of trapping
fingers!
A dangerous situation that may result in crushing injuries. In the following description,
this danger is only indicated by the symbol.
The measures described to prevent this danger must be adhered to.
See also "Safety notes".
BASCJ_EN
V02 | 08.2012
7
www.schaerer.comProduct description
Product description
Intended use
Schaerer Coffee Joy is designed to dispense variations of coffee beverages and/or milk bev-
erages in cups or mugs. The device can also dispense hot water.
This machine is designed for private and commercial use. It can be used in businesses, offic-
es, restaurants, hotels and similar establishments. It can also be used in domestic situations.
The machine must be cleaned and cared for by specially trained personnel. The machine may
be placed in self-service areas if attended to by trained personnel.
CAUTION!
Risk of machine
damage!
Improper handling of the coffee machine can result in damage.
The Schaerer Coffee Joy must not be used to heat or dispense any liquid other than cof-
fee, hot water (beverage, cleaning) or milk (refrigerated, pasteurised, homogenised,
UHT) under any circumstances.
Beverage types and output
Depending on the machine model and options, the following beverages can be prepared (bev-
erage output is specified in cups per hour/day):
Use of this equipment is subject to the "General Terms and Conditions" of Schaerer AG and
these operating instructions. In legal terms, any other use is not an intended use. The manu-
facturer accepts no liability for damage resulting from unintended use.
Espresso (50 – 60 ml) ±50 cups
Café creme (120 ml) ±40 cups
Milk beverages ±30 cups
Hot water ±7.5 l
www.schaerer.com Product description
BASCJ_EN
V02 | 08.2012
8
Scope of delivery and accessories
* * Depending on machine version.
Options and optional accessories
Quantity Designation Article number
1 Schaerer Coffee Joy coffee machine -
Documentation
1 Operating instructions (EN) See the document
1
See the installation instructions of the mains water sup-
ply
*
See the document
1 Weekly Cleaning Reference Card (EN) See the document
1 Delivery Quality Form -
General accessories
1 Milk nozzle, black (diameter: 1.3) 33.2415.1000
1 Milk nozzle, brown (diameter: 1.5) 33.2415.2000
1 Grease for sealing rings (tube) 33.2179.9000
1 Air suction tube 33.2832.0000
1 Steam nozzle 33.2427.7000
1 Multitool 33.2397.7000
Accessory for mains water supply
*
1 FWS connector housing + drinking water tank complete 071930
1 Plug-in power supply 90 – 264 VAC/47 – 63 Hz 071910
1 Input plug, EU plug-in power supply 071911
1 Armoured hose 1.5 m 3/8" 067766
2 Flat seal 10/15x0.8 064249
2 Cable holder 071933
Cleaning/cleaning accessories
1 "Milkpure" cleaner 071531
1 Cleaning tablets (blister with 10 tablets) 062867
1 Cleaning brushes (set of 2) 33.2408.0000
1 Carbonate hardness test (bag with 2 test strips) 067720
Example Option Description
Side cooling unit External cooling unit for machines with Milk
Smart.
Capacity: 2 l
Add-on bean hopper Additional mountable bean hopper for grea-
ter bean capacity.
Capacity: 400 g
BASCJ_EN
V02 | 08.2012
9
www.schaerer.comProduct description
Technical data
We reserve the right to make technical changes.
* For special equipment, see serial plate. The values specified here apply to the basic equip-
ment.
** The A-weighted noise level (slow) and Lpa (impulse) at the workplace of the operating per-
sonnel is below 70 dB (A) for every operating mode.
Water filter for internal drinking water tank The water filter can be installed in the internal
drinking water tank.
Capacity: 200 l
Mains water supply The tank is filled via a water inlet outside of
the machine. This option can be retrofitted.
For detailed information, please contact your sales partner.
Example Option Description
Nominal power* 1700 – 2300 W
Operating temperature Steam boiler Hot water boiler
Minimum operating temperature (T min.): 130°C 86°C
Maximum operating temperature (T max.) 130°C 102°C
Overpressure Steam boiler Hot water boiler
Working overpressure 2.5 bar 16 bar
Permissible working overpressure (p max): 16 bar 16 bar
Test overpressure 24 bar 24 bar
Water tank capacity 2.2 l
Bean hopper capacity 250 g
Grounds container capacity 15 – 20 coffee grounds cakes
External dimensions
Width 305 mm
Height 400 mm
Depth 443 mm
Empty weight 16 kg
Permanent noise level** <70 dB (A)
www.schaerer.com Product description
BASCJ_EN
V02 | 08.2012
10
Serial plate
The serial plate is located behind the drip tray on the left side
In the event of a technical problem or warranty claim, specify the serial number shown on
the serial plate.
Declaration of conformity
Manufacturer's address
Applied standards
The following harmonised standards have been applied:
The stated manufacturer declares herewith that this machine complies with all relevant stipu-
lations of the specified EU directives. In case of any modifications of the units that have not
been approved by Schaerer, this declaration is rendered invalid.
Example of a serial plate
Manufacturer Responsible for documentation
Schaerer AG
P.O.Box
Allmendweg 8
CH-4528 Zuchwil, Switzerland
Tel. +41 (0) 32 681 62 00
F +41 (0)32 681 64 04
info@schaerer.com
www.schaerer.com
Schaerer AG
Hans-Ulrich Hostettler
P.O.Box
Allmendweg 8
CH-4528 Zuchwil, Switzerland
Low Voltage Directive 2006/95/EC EMC Directive 2004/108/EC
EN 60335-1:2002 +A1 +A11 +A12 +A13
+A14 +A15 +A2
EN 60335-2-75:2004 +A1 +A11 +A2
+A12
EN 62233:2008
EN 55014-1:2006 +A1
EN 55014-2:1997 +A1 +A2
EN 61000-3-2:2006 +A1 +A2
EN 61000-3-3:2008
Safety EMC
IEC 60335-1:2001 +A1 +A2
IEC 60335-2-14:2006 +A1
IEC 60335-2-15:2002 +A1 +A2
IEC 60335-2-75:2002 +A1 +A2
IEC 62233 Ed1:2005
CISPR 14-1 Ed 5.1: 2009
CISPR 14-2 Ed 1.2: 2008
IEC 61000-3-2 Ed 3.2: 2009
IEC 61000-3-2 Ed2.1:2001
IEC 61000-3-3:2008
BASCJ_EN
V02 | 08.2012
11
www.schaerer.comInstallation and commissioning
Installation and commissioning
Setting up the coffee machine
Location
CAUTION!
Risk of machine
damage!
The location where the coffee machine is set up must meet the conditions specified be-
low. If these conditions are not ensured, the coffee machine may become damaged.
The following conditions absolutely must be met:
The installation surface must be stable and level so that is does not become deformed un-
der the weight of the coffee machine.
Do not set up the coffee machine on hot surfaces or close to ovens.
Set up the coffee machine in such a way that it can be monitored by trained personnel at
any time.
Route the necessary supply connections to within 1 m of the machine location according
to the on-site installation plans.
Maintain the following clearances for maintenance work and operation:
Allow enough space above the machine to refill beans.
Leave a clearance of ±35 cm on the left side.
Leave a clearance of min. 15 cm from the rear of the machine to the wall (air circula-
tion).
Leave a clearance of min. 250 mm above the machine (needed to remove the brewing
unit for cleaning and maintenance).
Comply with all applicable local kitchen regulations.
Ambient conditions
CAUTION!
Risk of machine
damage!
The location where the coffee machine is set up must provide the ambient conditions
specified below. If these conditions are not ensured, the coffee machine may become
damaged.
The following conditions absolutely must be met:
Ambient temperature of +10 °C to +40 °C (50 °F to 104 °F)
Relative humidity of max. 80 % RH
The coffee machine is designed for indoor use only. Do not use in the open and never expose
to the weather (rain, snow, subzero temperatures).
If the coffee machine was exposed to subzero temperatures:
Contact customer service before commissioning.
Power supply
Conditions
The power supply connection must be made in accordance with the applicable requirements
and the regulations of the respective country. The voltage specified on the serial plate must
match the supply voltage at the installation location.
www.schaerer.com Installation and commissioning
BASCJ_EN
V02 | 08.2012
12
DANGER!
Risk of electrocution!
Danger of electric shock!
Please adhere to the following points:
The phase must be fused at the ampere value specified on the serial plate.
It must be possible to disconnect the device from the mains power supply at all poles.
Never operate a device with a damaged power cord. Have a defective power cord or plug
replaced immediately by a qualified service technician.
Schaerer AG recommends against using an extension cable. If, despite this, an extension
cable is used (minimum cross-section: 0.75 mm²), observe the manufacturer data for the
cable (operating instructions) and the locally applicable regulations.
Route the power cord in such a way that it does not present a tripping hazard. Do not pull
the cord over corners or sharp edges, pinch it between objects or allow it to hang loosely
in the open. Do not position the cord over hot objects, and protect the cord from exposure
to oil and aggressive cleaning products.
Never lift or pull the device by the power cable. Never pull the plug out of the socket by its
cord. Never touch the power cord or plug with wet hands. Never insert a wet plug into a
power socket.
Power requirements
Water connection/draining
Conditions
CAUTION!
Risk of machine
damage!
The machine can suffer damage due to bad material and wrong water values.
It is imperative that the following points are complied with:
The water must be free of contaminants and the chlorine content must not exceed 100 mg per
litre.
Do not connect the machine to pure reverse osmosis water or other aggressive types of water.
The carbonate hardness must not exceed 5 – 6°dKH (German carbonate hardness) or 8 –
10°fKH (French carbonate hardness) and the total hardness value must always be greater
than the carbonate hardness.
The minimum carbonate hardness is 4°dKH or 7°fKH. The pH value must be between 6.5 – 7.
Always use the new hose set (fresh water/waste water hose) provided with the machine.
The water supply connection must be made in accordance with the applicable requirements
and the regulations of the respective country. If the machine is connected to a newly installed
water pipe, the pipe and infeed hose must be rinsed well to ensure that no dirt gets into the
machine.
The coffee machine must be connected to an installed drinking water line with a shut-off valve.
Mains Power requirements
Fuse protec-
tion (site
face)
Connecting
cable con-
ductor
cross-sec-
tion
1L, N, PE 220 – 240 V ~ 50/60 Hz 1700 – 2300 W 10 – 16 A
3 x 0.75 mm²
3 x 1 mm²
1L, N, PE 110 – 120 V ~ 50/60 Hz 1200 W 15 A NEMA 5 15
2L, PE 220 2 V ~ 50/60 Hz 2000 W 10 – 16 A
1L, N, PE 110 V ~ 60 Hz 1210 W 13 A NEMA 1 15
BASCJ_EN
V02 | 08.2012
13
www.schaerer.comInstallation and commissioning
Power requirements
Installation
Unpacking the machine
Unpack the machine.
Check the remaining package contents for accessories.
Remove the accessories supplied in the grounds container and water tank.
Keep the original packaging in case the equipment needs to be sent back.
Install a mains water supply (Option)
Connecting the milk
Mounting the milk hose on the beverage outlet (see figure).
Select a suitable milk nozzle (brown = for cooled milk; transparent = for uncooled milk) and
insert at the lower end of the milk hose.
Insert the beverage outlet into the holder.
Remove the grounds container out of the coffee machine.
Move the beverage outlet to the lowest position.
Clamp the milk hose in the provided guide.
Water pressure
Minimum: 0.2 MPa (2 bar)
Maximum: 0.6 MPa (6 bar)
Water inlet temperature
Minimum: 10°C
Maximum: 35°C
Read the "Setting up the coffee machine" and "Power supply" chapters carefully before install-
ing.
Important: When operating the machine with a mains water supply, it is important that you
keep the provided internal drinking water tank. It is needed during the decalcification process.
See the supplied installation instructions on the mains water supply.
See "Operation" - "Fill and connect" - "Milk" for filling milk.
If an external cooling unit is used: install the cooling unit as described in the operating instruc-
tions and route the milk hose from the coffee machine to the external cooling unit.
www.schaerer.com Installation and commissioning
BASCJ_EN
V02 | 08.2012
14
Commissioning program
When the coffee machine is started for the first time, the commissioning program is executed
automatically. It goes through the initial settings step by step. A detailed description of all steps
follows.
Press the button.
The coffee machine switches on and the commissioning program begins.
Follow the instructions on the touch screen.
Display / display text Parameter description Setting range Notes
language: English Select the required language with and
.
Confirm by touching .
"Initial setup of your Coffee Joy" appears
on the display in the selected language.
German
English
French
Dutch
Swedish
Danish
Norwegian
Russian
Italian
Spanish
Japanese
The presetting is
"English".
Time hh:mm To set the current time:
Set the hours with and .
Confirm by touching .
Set the minutes with and .
Confirm by touching .
The next step appears.
hh = hours
mm = minutes
Date dd:mm:yyyy Set the current date:
Set the day with and .
Confirm by touching .
Set the month with and .
Confirm by touching .
Set the year with and .
Confirm by touching .
The next step appears.
dd = day
mm = month
yy = year
Switching off time: 30 min The switching off time is defined in this step. Af-
ter a beverage is dispensed, if the defined time
elapses without another beverage being
dispensed, the machines switches off au-
tomatically.
Set the minutes with and .
Confirm by touching .
The next step appears.
0min
5 – 180 min
If set to "0 min", the
machine does not switch
off automatically.
Water hardness: 13 – 16 To set the water hardness:
Perform the water hardness test.
See "Service and maintenance" - "Determine the
water hardness".
Set the water hardness with and .
Confirm by touching .
The next step appears.
0 – 4
5 – 8
9 – 12
13 – 16
>16
BASCJ_EN
V02 | 08.2012
15
www.schaerer.comInstallation and commissioning
Deinstallation and disposal
The coffee machine must be disposed of correctly in conformity with local and legal regula-
tions.
Contact service partner.
Water filter: no To set the use of a water filter:
Set the use with and .
Confirm by touching .
Option 1: Input "no"
The next step appears.
Option 2: If "yes" is set, the filter rinse is ex-
ecuted automatically.
Place a container with a capacity of ca. 3 l
under the hot water outlet.
Fill the drinking water container completely.
After the filter rinse cycle is completed,
the next step is displayed.
yes / no If "Yes" is set, a filter rin-
se is then executed au-
tomatically.
The machine heats up The coffee machine begins heating up.
After heating, the coffee system is rinsed.
Place a container under the beverage outlet.
The rinse cycle takes ca. 40 sec.
The coffee system rinse
cleans and warms up all
pipes.
"Espresso" beverage button
A test brewing is performed at the end of the
commissioning program.
The button flashes.
Place a suitable container below the bever-
age outlet.
Press the button.
The test brewing starts.
Pour away the test beverage; do not drink it.
––
Your selection please The coffee machine is now ready to use. All settings that were
made now can be
changed later.
See "Programming".
Display / display text Parameter description Setting range Notes
www.schaerer.com Operation
BASCJ_EN
V02 | 08.2012
16
Operation
Check before switching on
Before switching on the coffee machine, check whether the following conditions are ful-
filled.
Conditions for switching on the coffee machine:
The fresh water supply is open or the water tank is filled.
The bean hopper is filled.
The coffee grounds container is empty and inserted correctly.
The coffee machine is correctly connected to the mains power supply.
Filling and connecting
Coffee beans
CAUTION!
User at risk!
Danger of injury from rotating grinding discs.
Never reach into the bean hopper while the coffee machine is switched on.
CAUTION!
Risk of machine
damage!
Filling foreign bodies into the hopper can lead to clogging or destruction of the grinder.
Never fill anything other than beans into the bean hopper.
Open the bean hopper lid (see figure).
Fill in beans (max. 250 g).
Close the lid again.
Water
Option 1: Internal drinking water tank
Remove the drinking water tank daily and rinse out thoroughly with fresh water.
Fill the drinking water tank with fresh drinking water before using it.
Reinsert the drinking water tank.
Option 2: Mains water supply
CAUTION!
Risk of machine
damage!
The machine can suffer damage, if the pump runs dry.
Before switching on the machine make sure that the main water valve is open.
Open the stop valve on the main water valve.
For reasons relating to insurance law it is advisable that the main water valve is closed at the
end of the day.
BASCJ_EN
V02 | 08.2012
17
www.schaerer.comOperation
Milk
Option 1: Milk Smart
Have fresh, pre-cooled milk (3 – 5°C) ready.
Hang the hose or hoses into the milk.
The hose end must be in contact with the container floor.
Option 2: Additional cooling unit
Open the door.
Remove and rinse the milk container.
Fill in fresh, pre-cooled milk (3 – 5°C).
Place the milk container into the cooling unit.
Hang the hose or hoses into the container.
The hose end must be in contact with the container floor.
Close the door.
Switching on
- Press the button.
The coffee machine switches on and the greeting message appears on the display.
Place a container under the beverage outlet.
The coffee machine begins heating up.
After heating up, the coffee machine performs a coffee system rinse (duration:
ca. 40 sec).
Option 1: Mains water unit
Connect the mains water unit to the power supply.
Option 2: Side cooling unit
Connect the side cooling unit to the mains power supply and switch on by means of the
main switch.
No more than 40 cm should be between the milk package and the beverage outlet.
See also "Safety notes" - "Hygiene" - "Milk".
Note the voltage specifications on the serial plate of the mains water supply.
Take heed of the operating instructions of the side cooling unit.
See "Operation" - "Filling and connecting" - "Milk" - "Option: side cooling unit".
www.schaerer.com Operation
BASCJ_EN
V02 | 08.2012
18
Dispensing
Prewarming the cups
A storage area for cups is located on top of the coffee machine. When the machine is switched
on, the storage area is heated and the cups are prewarmed.
Place the cups on the storage area.
The cups are pre-warmed when the coffee machine is switched on.
Adjusting outlets
CAUTION!
Hot surface!
Hot surfaces can cause burns.
Exercise care when moving the beverage outlet.
Place a cup under the beverage outlet.
Grasp the beverage outlet from the front and slide it into the correct position (see figure).
Remove the cup after the beverage has been dispensed.
Beverages
The machine is ready to dispense a beverage when the beverage symbol appears.
Place a cup under the beverage outlet.
Adjust the height of the beverage outlet to the cup size.
The following beverages are available:
a Press briefly: espresso/press and hold: 2 espresso
b Press briefly: café creme/press and hold: 2 café cremes
c Press briefly: latte macchiato/press and hold: milk coffee
d Press briefly: cappuccino/press and hold: 2 cappuccinos
e Outlet at top, press briefly: hot milk/outlet at bottom, press and hold: foam
CAUTION!
Hot fluid!
Press the required beverage button.
Only the symbol of the selected beverage appears; dispensing of the beverage begins.
The beverage name appears on the display.
Remove the cup after the beverage has been dispensed.
Adjustable height = 70 – 135 mm.
BASCJ_EN
V02 | 08.2012
19
www.schaerer.comOperation
Hot water
Three different dosing variants are available for dispensing hot water:
Place a cup under the hot water outlet.
Adjust the height of the beverage outlet to the cup size.
CAUTION!
Hot fluid!
Option 1: Dosed
Press the button.
The set quantity is dispensed.
Option 2: Freeflow
Press and hold the button.
Dispensing takes place while the button is pressed.
Option 3: Start/stop
Press the button.
Hot water is dispensed.
Stop dispensing by pressing the button again.
Hot milk
Hot milk and milk foam are dispensed using the same button. Milk is dispensed when the outlet
is all the way up. Milk foam is dispensed when the outlet is in a lower position.
Place a cup under the beverage outlet.
Slide the beverage outlet to the highest position.
Air is always added to the milk unless the outlet is in the highest position.
CAUTION!
Hot fluid!
- Press the button.
Hot milk is dispensed.
Milk foam
Hot milk and milk foam are dispensed using the same button. Milk is dispensed when the outlet
is all the way up. Milk foam is dispensed when the outlet is in a lower position.
Place a cup under the beverage outlet.
Push the beverage outlet down as far as possible.
CAUTION!
Hot fluid!
- Press and hold the button.
Dispensing takes place while the button is pressed.
Double beverage
Two beverages can be dispensed at the same time. This only applies to espresso, café creme
and cappuccino.
Place two cups under the beverage outlet.
Adjust the height of the beverage outlet to the cup size.
See "Dispensing options" - "Stop dispensing" to stop dispensing of the beverage.
The service technician can deactivate unrequired dosing variants or adjust the dosing quantity
of the "dosed" variant.
If dispensing is not stopped manually by pressing the button, dispensing ends automati-
cally after a defined time period. This can be defined by the service technician.
www.schaerer.com Operation
BASCJ_EN
V02 | 08.2012
20
CAUTION!
Hot fluid!
Press the required beverage button for ca. 3 sec.
Only the symbol of the selected beverage appears; dispensing of the beverage begins.
The display shows "2x beverage name".
Remove the cups after the beverage has been dispensed.
Beverages with ground coffee
CAUTION!
Risk of machine
damage!
Incorrect use may damage the machine.
Never put anything into the inlet other than ground coffee or cleaning tablets.
Open the inlet lid (see figure).
The "insert coff. grounds" instruction appears.
Fill ground coffee (max. 15 g).
Close the inlet lid.
The "select beverage" instruction appears.
Press the required beverage button.
Only the symbol of the selected beverage appears; dispensing of the beverage begins.
The beverage name appears on the display.
Remove the cup after the beverage has been dispensed.
Dispensing options
Stopping continuous dispensing
The dispensing of beverages and hot water can be stopped at any time.
Press the button.
The current dispensing process is stopped.
Select coffee strength
Before dispensing, the coffee strength can be selected. The following strengths are available:
Strong (ca. 15% stronger than the setting of the particular beverage)
Normal (presetting of the particular beverage)
Mild (ca. 15% milder than the setting of the particular beverage)
If "strong" or "mild" is selected, the grinding time of the grinder and thus the quantity of ground
coffee is adjusted accordingly.
If no preselection is made, the strength is automatically set to "Normal".
Use the button and the button to select the beverage strength.
The selection only applies to the beverage that will be dispensed next.
Place a cup under the beverage outlet.
Adjust the height of the beverage outlet to the cup size.
Request the desired beverage.
The beverage is dispensed.
The beverage name and strength are shown in the display.
See "Dispensing options" - "Stop dispensing" to stop dispensing of the beverage.
BASCJ_EN
V02 | 08.2012
21
www.schaerer.comOperation
Emptying
Grounds container
The grounds container must be emptied regularly, at the latest when the instruction to do so
appears on the display.
Remove and empty the grounds container.
Dispensing of beverages is blocked while the grounds container is not in place.
Reinsert the grounds container.
"grounds. cont. empty?" appears on the display.
Confirm with the button.
Drip tray
The drip tray must be emptied as soon as the floater appears, but at least once daily.
CAUTION!
Risk of trapping
fingers!
Carefully pull out the drip tray.
Empty the drip tray and reinsert it.
Check that it is correctly positioned; an incorrectly inserted drip tray can cause water to leak
or blocking of the machine.
Transport conditions
Before moving the coffee machine, it is essential that you detach the drinking water supply,
power supply and waste water outlet.
Before moving the coffee machine, check the floor for obstacles and uneven areas.
CAUTION!
Risk of machine
damage!
Improper transport of the machine could damage the machine.
Adhere to the following instructions when moving machines on a cart:
For safety reasons, the cart must be pulled and not pushed when moving the coffee ma-
chine.
Only pull on the cart and never on the machine.
The cart is not intended for transporting cargo.
Display messages/instructions
The machine displays messages if intervention by a user or service technician is needed to
ensure operating readiness of the machine. There are two different categories of messages:
•Note
Fault
Messages are usually instructions, such as the instruction to fill the drinking water tank.
Perform the task as described in the following table.
If the display message persists, a malfunction may exist.
If the request is accidentally confirmed with "No" after the grounds container is emptied, the
display instruction to empty the container persists. The grounds container must be removed
and inserted again, and the instruction then reappears.
The manufacturer cannot be held liable for any damage resulting from unintended use of the
cart or from failure to follow the operating instructions.
See "Troubleshooting" - "Malfunction with display message".
www.schaerer.com Operation
BASCJ_EN
V02 | 08.2012
22
Display message Cause What to do
Empty grounds container The grounds container is full. Remove and empty the grounds container.
Dispensing of beverages is blocked
while the grounds container is not in
place.
Place back the grounds container.
"grounds. cont. empty?" appears on the
display.
Confirm with the button.
beverage sel. locked
refill water tank
The drinking water tank is empty.
Beverages cannot be dispensed.
Option: With internal drinking water tank
Open the stop valve of the water supply.
Remove the drinking water tank and fill it
with fresh drinking water.
Reinsert the drinking water tank.
Option: With mains water supply
Open the stop valve of the water supply.
refill beans
confirm beverage
There are not enough beans in the grinder.
The grinder stops and beverage dispensing is
interrupted.
Open the bean hopper lid (see figure).
Pour in coffee beans (max. 250 g).
Close the lid again.
Press the beverage button again.
Dispensing of the previously selected
beverage is completed.
insert coff. grounds
select beverage
The lid of the ground coffee inlet is open.
Beverages cannot be dispensed.
Option 1: Requesting a beverage with
ground coffee
Fill ground coffee (max. 15 g).
Close the inlet lid.
The "select beverage" instruction ap-
pears.
Press the desired beverage button.
Dispensing begins.
Option 2: Stopping dispensing of the bever-
age
Close the inlet lid.
Stop dispensing with the button.
Change water filter The water filter in the drinking water tank must
be changed.
Change the water filter.
See "Service and maintenance" - "Changing
the water filter".
tank lid missing? The lid of the drinking water tank is not in place.
Beverages cannot be dispensed.
Correctly place the lid on the drinking water
tank.
Slide the drinking water tank into the ma-
chine.
beverage sel. locked
lid open
The brewing unit lid is open or was not closed
correctly.
Beverages cannot be dispensed.
Correctly close the brewing unit lid.
Clean display The operating panel is dirty.
The buttons no longer react.
- Press the button for 5 sec.
The machine switches off.
Clean the display with a moist cloth.
- Press the button.
The machine switches back on.
BASCJ_EN
V02 | 08.2012
23
www.schaerer.comOperation
Switching off
End of operation
Only perform the following steps if the machine is not operated with automatic switch-
ing off time.
- Press the button for 5 sec.
If beverages with milk were prepared, an instruction to rinse the milk system appears
on the display.
Follow the instructions on the display.
After the milk system is rinsed, the coffee system is rinsed automatically.
CAUTION!
User at risk!
If the machine is switched off automatically via the switching off time, a milk system
rinse is not performed. If the machine remains switched off for an extended period, the
milk residue in the milk hose will produce germs and mould.
Perform the milk system rinse daily during the operating times. If the machine is to be
switched off for an extended period, a milk system rinse must be started manually be-
fore switching the machine off.
The machine switches off after the milk system is rinsed.
Empty the grounds container, clean it and reinstall it.
Only perform the following steps if the machine is not operated with an automatic
switching on time.
Disconnect the power plug.
Option 1: Mains water supply
Close the main water valve of the mains water supply.
Option 2: Drinking water tank
Empty the drinking water container, clean it and reinstall it.
Lengthy downtimes (more than 1 week)
Perform all activities described in the "End of operation" chapter.
If the machine will be exposed to subzero temperatures, the boiler must be drained before-
hand.
Please contact your service partner.
CAUTION!
Risk of machine
damage!
c
The boilers can be destroyed by freezing water as it expands.
In rooms where the temperature can fall below zero, the boilers must be emptied.
See also "Cleaning".
Failure to do so will result in a loss of warranty coverage in the event of damage.
During extended periods of disuse, such as during company holidays, the coffee machine and
the associated accessories must be taken out of service.
When taking the machine back into service, perform a daily cleaning first.
www.schaerer.com Cleaning
BASCJ_EN
V02 | 08.2012
24
Cleaning
Cleaning intervals
Mandatory cleaning
If a pending cleaning procedure is not performed although it is requested on the display, man-
datory cleaning will set in (if programmed) after a certain time. When mandatory cleaning sets
in, dispensing of beverages is blocked.
Beverages cannot be dispensed again until after the machine has been cleaned.
Cleaning intervals
Daily
Weekly
Once a month
Automatically
As instructed
As needed
Coffee machine
x x x Coffee system rinse
x x Milk system rinse
x Clean the milk system
x Machine cleaning (cleaning programme)
x Clean the brewing unit
x Rinse the drinking water tank with fresh water
x x Empty and clean the grounds container
x x Empty and clean the drip tray
x Clean the bean hopper
x Clean the steam nozzle
x Clean the outer surfaces of the coffee machine
Optional accessories/options
x Clean the milk container
x Clean the interior of the additional cooling unit
x Clean the outer surfaces of the side cooling unit
Legend
Daily: At least once a day or more often if necessary.
Weekly: At least once a week or more often if necessary.
Monthly: At least once monthly or more often if necessary.
Automatically: Automatically when switching the machine on or off.
As instructed: An instruction appears on the display.
As needed: As needed (if dirty).
For a better overview of the cleaning steps that are required or that have already been per-
formed, use the cleaning schedule in this chapter.
Mandatory cleaning and the period that elapses before it sets in can only be programmed by
the service technician.
BASCJ_EN
V02 | 08.2012
25
www.schaerer.comCleaning
Daily cleaning
Automatic coffee system rinsing
The coffee system rinse is automatically performed every time the coffee machine is switched
on and off. User actions are not required.
Milk system rinse
If milk was dispensed, the milk system is automatically rinsed every time the coffee machine
is switched off. The following steps need to be performed:
Place a container under the beverage outlet.
Slide the beverage outlet to the highest position.
Insert the milk hose with the milk nozzle in the hot water outlet and turn it clockwise all the
way.
The milk system rinse begins.
After the milk system rinse, wipe off the outside of the milk hose with a moist cloth.
The milk system can also be rinsed as needed.
Press the button.
The cleaning menu appears.
Leaf to the "milk system rinsing" menu with the button.
Press the button.
Perform all steps as described above.
Grounds container
CAUTION!
User at risk!
Coffee grounds in the grounds container can quickly lead to mould formation. The
spread of mould spores in the machine results in the danger of contamination of the
coffee.
Therefore, clean the grounds container daily.
Thoroughly clean the grounds container with water and a household cleaning product.
Rinse with clear water and dry with a clean cloth.
Drip tray
Thoroughly clean the drip tray and the drip grid with water and a household cleaning prod-
uct.
Rinse with clear water and dry with a clean cloth.
Internal drinking water tank
CAUTION!
User at risk!
There is a danger of contamination of the drinking water tank due to deposits and bac-
teria.
Rinse the drinking water tank daily; do not use cleaning products.
Thoroughly rinse the drinking water tank with fresh water several times.
Dry with a clean cloth.
Milk container
CAUTION!
User at risk!
There is a risk of contamination of the milk and milk container due to milk deposits and
bacteria.
Clean the milk container daily and every time before filling.
Mix 5 ml of Daypure cleaning product with 500 ml of warm water in a container.
www.schaerer.com Cleaning
BASCJ_EN
V02 | 08.2012
26
Clean the milk container using the prepared cleaning solution.
Rinse with clear water and dry with a clean cloth.
Side cooling unit (Option)
CAUTION!
User at risk!
There is a risk of contamination of the milk and cooling unit due to milk deposits and
bacteria.
Clean the cooling unit daily.
Take the milk out of the cooling unit.
Thoroughly clean the interior of the cooling unit with water and a household cleaning prod-
uct.
Place the milk back into the cooling unit.
BASCJ_EN
V02 | 08.2012
27
www.schaerer.comCleaning
Weekly cleaning
Weekly cleaning
Schaerer Coffee Joy
Schaerer Ltd. P.O. Box
CAUTION!
User at risk!
There is a risk of scalding in the dispensing area of beverages, hot water and steam.
Never reach under the dispensing areas during dispensing or cleaning.
See also "Safety instructions" and "Cleaning" in the operating instructions.
Machine cleaning (cleaning programme)
Ź - Press the button.
; The "Maintenance program" menu
appears.
Ź Leaf through the menu to "Machine
cleaning" using and .
Ź Confirm with .
; The cleaning programme starts.
Ź Empty the drip tray.
Ź Fill the drinking water tank.
Ź Place a container (min. 2 l) under the
beverage outlet.
Ź Drop the cleaning tablet into the inlet
with the little sponge.
Ź Close the inlet lid and confirm with .
; Cleaning starts.
; The remaining cleaning duration
appears on the display.
Milk system cleaning (manual)
After the machine cleaning programme is
finished, the instruction for manual milk
system cleaning appears on the display.
Ź Slide the beverage outlet to the highest
position.
Ź Press the release on the back of the
beverage outlet and pull the foamer
head down and off.
Ź Remove the grounds container and re-
lease the milk hose out of the guide.
Ź Disassemble all parts.
Ź Immerse all parts in a solution of
500 ml of hot water and 25 ml of "Milk-
pure" cleaning product for ± 30 min.
Ź Wash all parts under luke warm, run-
ning water.
Ź Clean the outlets of the foamer head
with the brushes contained in the
scope of supply.
Ź Let the parts dry fully.
Ź Reassemble all parts.
Ź Attach the foamer head.
Ź Clamp the milk hose into the guide in-
tended for this purpose.
Ź Insert the grounds container.
www.schaerer.com Cleaning
BASCJ_EN
V02 | 08.2012
28
Schaerer Ltd.
P.O. Box
Allmendweg 8
CH-4528 Zuchwil
info@schaerer.com
www.schaerer.com
Schaerer Coffee Joy | V02 | 08.2012
N° 022481
QRCSCJ_w_en
CAUTION!
User at risk!
Danger of injury from the rotating grinding discs in the grinder.
Never reach into the bean hopper while the coffee machine is switched on.
CAUTION!
User at risk!
Improper handling of beans, water, milk, powder or other coffee ingredients can lead to health prob-
lems!
Comply with the hygiene regulations stipulated in HACCP!
Cleaning the bean hopper
Old bean grease in the bean hopper can
have a negative impact on the coffee qual-
ity.
Ź Wipe the inside of the bean hopper with
a moist cloth.
Ź Dry with a clean cloth.
See "Safety instructions" - "HACCP hygiene regulations" in the operating instructions.
BASCJ_EN
V02 | 08.2012
29
www.schaerer.comCleaning
Monthly cleaning
Brewing unit
CAUTION!
User at risk!
Coffee residue in the brewing unit can quickly lead to the formation of mould. The
spread of mould spores in the machine results in the danger of contamination of the
coffee.
Clean the brewing unit monthly (depending on the degree of soiling) as described.
CAUTION!
Risk of machine
damage!
Never wash the brewing unit in a dishwasher as this may damage the unit considerably.
Only clean the brewing unit as described below.
Remove the lid over the brewing unit.
Pull back the latch of the brewing unit (A).
Pull the brewing unit out of the machine while pushing it slightly to the right (B).
Turn the thread on the head of the brewing unit anticlockwise until the ejector is located in
the front position.
Clean the brewing unit under flowing water.
Let the brewing unit dry fully before reinstalling it in the machine.
Turn the thread on the head of the brewing unit back into the original position (rear scrap-
er).
Place the lid on the brewing chamber.
As needed
Outer surfaces of the coffee machine
Switch off the machine before cleaning the outer surfaces.
Spray commercially available glass cleaner onto a paper towel.
Use it to clean the user panel of the coffee machine.
Clean the remaining outer surfaces of the coffee machine with a moist cloth.
www.schaerer.com Cleaning
BASCJ_EN
V02 | 08.2012
30
Cleaning the steam nozzle
The steam nozzle is located at the top in the beverage outlet. If needed, a second steam noz-
zle is contained in the scope of supply.
Slide the beverage outlet to the highest position.
Press the release on the back of the beverage outlet and pull the foamer head down and
off.
Take out the steam nozzle located in the beverage outlet at the top.
Clean the steam nozzle with the brush.
Insert the steam nozzle back into the beverage outlet.
Attach the foamer head.
Optional accessories (Option)
CAUTION!
User at risk!
There is a risk of contamination of the milk and cooling unit due to milk deposits and
bacteria.
Clean the cooling unit daily.
Take the milk out of the cooling unit.
Thoroughly clean the interior of the cooling unit with water and a household cleaning prod-
uct.
Place the milk back into the cooling unit.
Warm-up rinse
The warm-up rinse rinses and warms the coffee machine pipes. If a beverage has not been
dispensed for some time, a warm-up rinse can be performed before the next beverage is dis-
pensed. This guarantees that the beverage has an optimal temperature.
Press the button.
The cleaning menu appears.
Leaf to the "warm up rinsing" menu with the button.
Press the button.
A warm-up rinse is performed.
BASCJ_EN
V02 | 08.2012
31
www.schaerer.comCleaning
HACCP Cleaning Concept
Cleaning regulations
When installed, maintained, cared for and cleaned properly, Schaerer AG coffee machines ful-
fil HACCP regulations.
CAUTION!
Risk of machine
damage!
If the coffee machine is not cared for and cleaned properly, the dispensing of milk bev-
erages will become a health hazard in terms of food hygiene.
Note and adhere to the following instructions:
Wear safety gloves during cleaning.
Wash your hands thoroughly before and after cleaning.
Clean the coffee machine daily after beverage dispensing has ended.
Clean the milk container every time before filling and after you have finished dispensing bev-
erages for the day.
Never put cleaning products in the milk container.
Never put cleaning products in the drinking water tank (internal/external).
Never mix cleaning products.
Store cleaning products separately from coffee, milk and coffee machine powder.
Do not use any abrasive products, brushes or cleaning tools made of metal.
Do not touch parts that come into contact with beverages after cleaning.
Read and follow the dosing and safety instructions specified on the cleaning product.
For daily and weekly cleaning, proceed as described in the operating instructions and on the
cleaning cards.
Cleaning schedule
Copy the HACCP Cleaning Concept and store/post it in the vicinity of the machine.
Record each cleaning with the time and a signature.
For a better overview of the cleaning steps that are required or that have already been per-
formed, use the cleaning schedule in this chapter.
www.schaerer.com Cleaning
BASCJ_EN
V02 | 08.2012
32
BASCJ_EN
V02 | 08.2012
33
www.schaerer.comCleaning
Cleaning products
CAUTION!
Risk of machine
damage!
Use of incorrect cleaning products can damage the machine.
Use only cleaning products for daily and weekly cleaning that are recommended by
Schaerer AG.
Cleaning tablet
Milkpure
Decalcifier
Before using cleaning product, read the information on the package label and the HEALTH &
SAFETY DATA SHEET carefully. If a HEALTH & SAFETY DATA SHEET is not present,
please request it from the sales partner.
Information
Application Weekly cleaning, coffee system
Purpose of cleaning Removal of grease residue in the coffee system
Application interval Once a week
Information
Application Weekly cleaning of the milk system
Purpose of cleaning
Removal of lime scale deposits and milk stone from the milk
system and steam nozzle.
Application interval Once a week
Information
Application Decalcification of boiler and line system
Purpose of cleaning Removal of lime scale deposits in the coffee machine
Application interval As instructed by the coffee machine
www.schaerer.com Service and maintenance
BASCJ_EN
V02 | 08.2012
34
Service and maintenance
Decalcification
When the machine needs to be decalcified, a corresponding request appears on the display.
The decalcification interval depends on the following factors:
Water hardness
Water flow rate
Use of a water filter
CAUTION!
User at risk!
Danger of poisoning from ingesting or inhaling the decalcifier.
Do not drink or inhale the decalcifier or the rinse water output during the decalcification
process.
CAUTION!
Risk of machine
damage!
Household decalcifiers can destroy the coffee machine.
For decalcification, use Schaerer decalcifiers only. Liability cannot be accepted for
damage resulting from the use of other decalcifiers.
The decalcification message on the display can be delayed by pressing the - button. However,
dispensing of beverages will be blocked after another 50 brewings. After that, the decalcifica-
tion process must be carried out.
Slide the beverage outlet to the highest position.
Press the release on the back of the beverage outlet and pull the foamer head down and
off.
Detach the milk hose from the milk foamer.
Press the button.
The cleaning menu appears on the display.
Use the button and button to navigate to the "machine descaling" menu item.
Confirm the selection with the button.
Empty the drip tray.
Take the drinking water tank out of the machine.
Remove the water filter (if present).
Pour a full bottle of Schaerer decalcifier (750 ml) into the drinking water tank.
Fill the drinking water tank all the way with water.
Slide the drinking water tank back into the machine.
Place a large container (min. 3 l) under the beverage and hot water outlet.
Start the decalcification process with the button.
The decalcification process begins.
The remaining decalcification time is shown on the display.
After approx. 30 min, the request to empty the drinking water tank appears on the display.
Empty the drinking water tank and rinse it thoroughly
Confirm the display request with the button.
Fill the drinking water tank with fresh water and slide it back into the machine.
Confirm the display request with the button.
The decalcification process is continued.
The remaining decalcification time is shown on the display.
Recommendation: After the decalcification process is completed, dispense a test beverage
and pour it away.
BASCJ_EN
V02 | 08.2012
35
www.schaerer.comService and maintenance
Adjusting the grinding fineness
The grinding fineness is influenced by wear on the grinder disk. To ensure a constant grinding
quality, the grinding fineness needs to be adjusted when required.
CAUTION!
User at risk!
Danger of injury from rotating grinding discs in the grinder.
Never reach into the bean hopper while the coffee machine is switched on.
CAUTION!
Risk of machine
damage!
If the grind level is set while the grinder is idle, the grinder can be set too firmly and may
not start as a result.
The grinder must always be running while it is being adjusted.
Open the cover of the bean hopper.
Place the multitool onto the grind level adjuster (see figure).
Press the beverage button (e.g. espresso) and wait for the grinder to start running.
Option 1: Finer setting of grind level
Press the multitool down and turn anticlockwise.
Option 2: Coarser setting of grind level
Press the multitool down and turn clockwise.
Water filter (Option)
Installing the water filter for the internal drinking water tank (Option)
The "Filter for the internal drinking water tank" initial installation set can be obtained from
Schaerer AG if the water quality is insufficient (order number: 071398).
Remove the water outlet filter installed in the water tank.
Open the water filter box.
The water filter adapter is located on top, and the filter cartridge is packaged separately
underneath it.
Pull up the locking mechanism on the adapter.
Attach the adapter to the water outlet connector from above and push down the locking
mechanism.
Read the previous chapter entitled "Water quality".
The water filter is only suitable for installation in the internal drinking water tank of the machine.
www.schaerer.com Service and maintenance
BASCJ_EN
V02 | 08.2012
36
Unpack the filter cartridge and place it in water.
Tiny bubbles will rise from the cartridge.
When there are no more bubbles, remove the filter cartridge from the water.
Attach the filter cartridge to the adapter.
Changing the water filter for the internal drinking water tank (Option)
When the filter needs to be changed, a corresponding prompt appears on the display.
Remove the drinking water tank from the machine.
Take the old filter cartridge out of the adapter.
Unpack the new filter cartridge and place it in water.
Tiny bubbles will rise from the cartridge.
When there are no more bubbles, remove the filter cartridge from the water and attach it
to the adapter.
Slide the drinking water tank back into the machine.
For correct calculation of the decalcification time, the hardness of the water (determined by the
water hardness test) and the use of a filter must be entered in the coffee machine program-
ming.
See "Programming" - "Basis settings".
Replacement cartridges can be ordered in sets of 4 from Schaerer AG (order number:
071397).
BASCJ_EN
V02 | 08.2012
37
www.schaerer.comService and maintenance
Maintenance
The coffee machine does not require regular maintenance. The maintenance schedule de-
pends on multiple factors, especially the degree to which the machine is used.
When maintenance is due, the machine indicates this on the display. The machine can con-
tinue to be operated normally.
Notify your service partner that maintenance is due.
CAUTION!
Risk of machine
damage!
Failure to perform a required maintenance in due time may lead to wear and reliable op-
eration is no longer assured.
Inform the service partner as soon as possible after the maintenance message appears.
www.schaerer.com Programming
BASCJ_EN
V02 | 08.2012
38
Programming
Navigation
Overview
- Press the button.
The programming opens.
Navigate using button and button.
The programming contains the following menus:
Cup size
Beverage settings
basic settings
counters
System information
cup size (beverage volume)
The total cup volume of the various beverages can be adjusted in the "cup size" menu.
Navigate to the "cup size" menu in the programming.
Press the button.
Select the beverage you wish to set.
The "cup volume" menu appears.
Symbol Description
Cancel the procedure.
Leave the programming.
"No" in response to requests.
Opens the cleaning menu of the machine.
Opens the programming of the machine.
"OK" to confirm new or existing settings and continue to the next
menu item.
"Yes" in response to requests.
Navigate forward in the programming.
Set parameters.
Navigate back in the programming.
Set parameters.
The menus and menu options are described below in this chapter.
The ingredients of the beverages are adjusted to the new cup volume without affecting the
composition and quality.
BASCJ_EN
V02 | 08.2012
39
www.schaerer.comProgramming
beverage settings
Various beverage parameters can be set in the "beverage settings" menu.
Navigate to the "beverage settings" menu in the programming.
Press the button.
Select the beverage you wish to set.
The first menu item appears.
The menu contains:
water volume
strength
milk volume
rest period (for latte macchiato)
sequence (dispensing sequence of milk and coffee, e.g. for cappuccino)
pre brew
Display/ display text Parameter description Setting range Notes
Cup volume: 100% Set the cup volume using the button and
button.
A test beverage can be dispensed by pressing
the selected beverage button.
Press the button to exit the setting.
50 – 150%
Menu option (display text) Description Setting range Notes
Water volume: 35 ml This menu item can be used to adjust the water
content of a beverage.
Set the water volume using the button
and button.
A test beverage can be dispensed by pressing
the selected beverage button.
Press the button to exit the setting.
20 – 300 ml Factory setting:
Espresso: 35 ml
Café creme: 140 ml
Strength: 100% The coffee strength can be adjusted for every
beverage. This setting changes the grinding time
in the grinder and thus the quantity of ground
coffee.
Set the coffee strength using the button
and button.
A test beverage can be dispensed by pressing
the selected beverage button.
Press the button to exit the setting.
50 – 150% The coffee strength can
also be adjusted for
each individual bevera-
ge that is dispensed.
See "Operation" - "Se-
lecting the coffee
strength".
Milk volume: 9 sec This menu item can be used to set the dispen-
sing duration of the milk and thus the milk quan-
tity.
Set the milk volume using the button and
button.
A test beverage can be dispensed by pressing
the selected beverage button.
Press the button to exit the setting.
2 – 60 sec Factory setting:
Cappuccino: 9 sec
Latte macchiato: 19 sec
Milk coffee: 9 sec
www.schaerer.com Programming
BASCJ_EN
V02 | 08.2012
40
basic settings
Various machine parameters can be set in the "basic settings" menu.
Navigate to the "basic settings" menu in the programming.
Press the button.
The first menu item appears.
The menu contains:
language
•time
date
date/time (display)
switch-on/off time
water hardness
water filter
sound
brewing temperature
factory setting
display contrast
Rest period: 15 sec The rest period is a pause between the milk out-
put and the coffee output.
Set the duration of the rest period using the
button and button.
A test beverage can be dispensed by pressing
the selected beverage button.
Press the button to exit the setting.
2 – 60 sec When dispensing latte
macchiato, the rest peri-
od allows time for the
milk to settle. This re-
sults in the pronounced
layering typical of this
beverage.
Recommendation:
15 sec
sequence: milk-coffee This menu item can be used to set the dispen-
sing sequence of the milk and coffee.
Set the sequence using the button and
button.
A test beverage can be dispensed by pressing
the selected beverage button.
Press the button to exit the setting.
milk-coffee
milk+coffee
coffee-milk
Pre brew: 9 sec This menu can be used to switch pre-brewing on
or off.
During pre-brewing, the ground coffee is mois-
tened with water to let it swell. This enables a
uniform and more thorough extraction. The
brewing process is lengthened slightly.
Switch pre-brewing on or off using the
button and button.
A test beverage can be dispensed by pressing
the selected beverage button.
Press the button to exit the setting.
2 – 60 sec Recommendation:
Activate pre-brewing for
espresso, cappuccino
and latte macchiato.
Menu option (display text) Description Setting range Notes
BASCJ_EN
V02 | 08.2012
41
www.schaerer.comProgramming
Menu option (display text) Description Setting range Notes
Language: German Set the language using the button and
button.
Press the button to exit the setting.
German,
English, Dutch,
Spanish,
French, Italian,
Danish,
Swedish, Nor-
wegian
Time: hh/mm/ss Set the hours using the button and
button.
- Press the button.
Set the minutes using the button and
button.
- Press the button.
Set the seconds using the button and
button.
Press the button to exit the setting.
hh: 00 – 23
mm: 00 – 59
ss: 00 – 59
Date: dd/mm/yy Set the day using the button and but-
ton.
- Press the button.
Set the month using the button and
button.
- Press the button.
Set the year using the button and but-
ton.
Press the button to exit the setting.
dd: 01 – 31
mm: 01 – 12
yy: 2000 – 2099
If a non-existent date is
entered (e.g.
31.06.2011), the date
returns to its initial value
after the setting is exi-
ted.
Date/time: on This menu item can be used to switch the date
and time display on and off.
Switch the display on and off using the
button and button.
Press the button to exit the setting.
On/Off
Switch-on time: on This menu item can be used to set the coffee
machine to switch on automatically at a certain
time.
Switch the switch-on time on or off using the
button and button.
- Press the button.
The switch-on time is set to "on":
The time setting for the switch-on time
appears.
Set the switch-on time using the button
and button.
Press the button to exit the setting.
On/Off Recommendation:
Set the machine to swit-
ch on 10 min before it
needs to be ready for
operation. The machine
will then be warm and
ready to dispense be-
verages by the time it
needs to be operational.
Before beginning with
dispensing, ensure that
the drinking water tank is
full or that the mains wa-
ter supply is connected.
www.schaerer.com Programming
BASCJ_EN
V02 | 08.2012
42
Switch-off time: 30 min The switch-off time setting is used to switch off
the machine after a certain period elapses du-
ring which no beverage was dispensed.
Set the switch-off time using the button
and button.
Press the button to exit the setting.
The machine needs to be switched on again to
dispense the next beverage.
CAUTION!
Risk of machine
damage!
If the machine is switched off automatically
via the switch-off time, a milk system rinse is
not performed. If the machine remains
switched off for an extended period, the milk
residue in the milk hose will produce germs
and mould.
Perform the milk system rinse daily during
the operating times. If the machine is to be
switched off for an extended period, a milk
system rinse must be performed before
switching the machine off.
0 (= off)
5 – 112 min
Automatic switching off
of the machine during
extended periods of di-
suse saves power.
Water hardness: 5-8 This menu item can be used to set the hardness
of the water being used in the coffee machine.
Set the water hardness using the button
and button.
Press the button to exit the setting.
0-4
5-8
9-12
13-16
> 16
This parameter is set du-
ring the commissioning
program.
See "Installation and
commissioning" - "Com-
missioning program" for
further information.
Water filter: yes This menu item can be used to set the use of a
water filter.
Set the use of a water filter to "Yes" or "No"
using the button and button.
Press the button to exit the setting.
yes/no This parameter is set du-
ring the commissioning
program.
See "Installation and
commissioning" - "Com-
missioning program" for
further information.
Sound: on This menu item can be used to switch the acou-
stic signal for navigation in the programming and
for beverage dispensing on and off.
Switch the acoustic signal on or off using the
button and button.
Press the button to exit the setting.
On/Off
Water tank yes/no Under this menu item, you define whether a nor-
mal drinking water tank or the mains water sup-
ply option is being used.
Set the use of a water filter to "Yes" or "No"
using the button and button.
Press the button to exit the setting.
Yes = drinking
water tank
No = mains wa-
ter supply
This parameter is
available as of software
version 0.10.
Brewing temperature: 92°C This menu item can be used to set the brewing
water temperature.
Set the temperature using the button and
button.
Press the button to exit the setting.
60 – 95°C Recommendation: 92°C
Menu option (display text) Description Setting range Notes
BASCJ_EN
V02 | 08.2012
43
www.schaerer.comProgramming
counters
In the "counters" menu, the dispensing counter for all beverages can be viewed and cleared.
Navigate to the "counters" menu in the programming.
Press the button.
Select the beverage you wish to set.
The first menu item appears.
The menu contains:
Counter, Espresso
Counter, Café Creme
Counter, Cappuccino
Counter, Latte Macchiato
Counter, mug of milk
Counter, Hot Water
Counter, 2x espresso
Counter, 2x café creme
Counter, 2x cappuccino
total counter
reset all counters
Factory setting Activating the factory setting resets all pro-
gramming settings to the factory setting.
Set the factory setting to "yes" or "no" using
the button and button.
Press the button to exit the setting.
The "yes" setting resets all settings to the
factory settings.
yes/no
display contrast This menu item can be used to set the display
contrast.
Set the contrast using the button and
button.
The contrast changes simultaneously.
Press the button to exit the setting.
Lighter + softer/
darker + shar-
per
Menu option (display text) Description Setting range Notes
Menu item (display text) Description Setting range Notes
Espresso: 23 All beverage counters are listed in the "counters"
menu.
Navigate through the counters using the
button and button.
Espresso
Café Creme
Cappuccino
Latte Macchiato
mug of milk
Hot Water
2x Espresso
2x Café Creme
2x Cappuccino
total counter: 50 The total count of all dispensed beverages is dis-
played after the individual counters.
Navigate further using the button.
––
www.schaerer.com Programming
BASCJ_EN
V02 | 08.2012
44
system information
The "system information" menu contains information on the machine.
Navigate to the "system information" menu in the programming.
Press the button.
The first menu item appears.
The menu contains the following information:
Software version and date
Machine name and version
Fabrication number
Production date
reset all counters The request to reset all counters appears at the
end.
Press the button for "Yes" to reset all
counters.
or
Press the button for "No" to retain all
counter values.
yes/no
Menu item (display text) Description Setting range Notes
BASCJ_EN
V02 | 08.2012
45
www.schaerer.comTroubleshooting
Troubleshooting
General troubleshooting procedure:
Switch the coffee machine off and, after several seconds, on again.
In most cases, the fault will be eliminated automatically.
Repeat the steps that led to the fault.
If the fault occurs again:
Find the fault in the following tables.
Perform the described troubleshooting steps.
If the fault persists:
Contact your service partner and describe the fault.
Faults with display message
Messages are displayed if intervention by a user or service technician is needed to ensure op-
erating readiness of the machine. There are two different causes for display messages:
•Note
Fault
The following table describes display messages pertaining to faults as well as the steps need-
ed to eliminate these.
If a fault occurs that is not described in this chapter, please contact your service partner imme-
diately.
See "Operation" - "Display messages" for notes.
Display message Cause What to do
place brewer The brewing unit is not inserted. Insert the brewing unit.
Brewer position switch The brewing unit is not correctly insert-
ed.
Check that the brewing unit is correctly seated.
The brewing unit is stiff. Remove the brewing unit.
There are two nozzles with black sealing rings
on the inside of the machine.
Grease the sealing rings with grease from the ac-
cessories.
Put the brewing unit back in place.
www.schaerer.com Troubleshooting
BASCJ_EN
V02 | 08.2012
46
Faults without display message
Clear flow stopped There is too much air in the pipes. Dispense a cup of hot water.
This bleeds the pipes.
The water filter or the associated sieve
is clogged.
Clean the sieve of the water filter.
If this does not eliminate the problem:
Change the water filter.
The non-return valve at the outlet of the
drinking water tank is contaminated.
Clean the outlet and the non-return valve with one
of the small brushes in the accessories.
The brewing unit is clogged. Remove and clean the brewing unit.
See "Cleaning" - "Weekly cleaning".
The grind level is too fine. The fine cof-
fee powder contaminates the pipes.
Set the grind level to a coarser setting.
See "Service and maintenance" - "Finer setting of
grind level".
Remove and clean the brewing unit.
See "Cleaning" - "Weekly cleaning".
Cleaning halted
Clear flow stopped
The brewing screen is clogged. Clean the brewing screen.
"Cleaning" - "Weekly cleaning".
EEPROM error System error Switch the machine off and back on.
motor driver error System error Switch the machine off and back on.
grinder blocked The grinder is blocked. Switch off the machine and disconnect the power
plug.
Stir the coffee beans in the bean hopper using a
spoon.
If the error persists:
Switch off the machine and disconnect the power
plug.
Extract the beans, check the grinder and remove
any blockages.
Temperature sensor steam Overheating Switch off the machine and let it cool for some
time.
Temperature sensor water Overheating Switch off the machine and let it cool for some
time.
Display message Cause What to do
Fault description Cause What to do
No milk foam or milk output al-
though there is milk in the con-
tainer.
The milk hose is kinked at some loca-
tion, preventing milk from flowing.
Check the milk hose and reroute if necessary.
The foamer head is clogged. Take the foamer head out of the beverage outlet
and clean it.
See "Cleaning" - "Weekly cleaning".
No milk foam, only warm milk. Blockage in milk system. Clean the milk system.
See "Cleaning" - "Weekly cleaning".
The milk or milk foam is too
cold.
Wrong milk nozzle. The scope of delivery contains two different milk noz-
zles.
Change the milk nozzle.
BASCJ_
V02 | 08.2012
47
www.schaerer.comTroubleshooting
The milk is too hot, its quantity
is too low or the milk foam has
bubbles..
The milk in the milk container is too
warm.
Only use pre-cooled milk (3 – 5°C).
Cool the milk constantly during use.
Wrong milk nozzle. The scope of delivery contains two different milk noz-
zles.
Change the milk nozzle.
The water tank is difficult to
slide in place.
The O-ring on the water outlet connec-
tor must be greased.
Grease the O-ring with grease from the accesso-
ries.
The brewing unit is difficult to
pull out and slide back in.
The brewing unit is stiff. Remove the brewing unit.
There are two nozzles with black sealing rings
on the inside of the machine.
Grease the sealing rings with grease from the ac-
cessories.
Put the brewing unit back in place.
The pump makes loud noises. There is too much air in the pipes. Dispense a cup of hot water.
This bleeds the pipes.
The coffee has no crema. The coffee is no longer fresh. Replace the beans.
The grind level is too coarse. Set the grind level to a finer setting.
See "Cleaning" - "Weekly cleaning".
The brewing unit cannot be re-
inserted.
The brewing unit is in the wrong posi-
tion.
While inserting the brewing unit, readjust it using
the multitool until it can be reinserted.
The brewing unit cannot be
pulled out.
The brewing unit is in the wrong posi-
tion.
Readjust the brewing unit using the multitool until
it can be pulled out.
Internal/external cooling unit
does not cool.
The cooling unit is not switched on or is
switched on incorrectly.
Set the rocker switch on the rear of the cooling unit
to "COLD".
Fault description Cause What to do
www.schaerer.com Water quality
BASCJ_EN
V02 | 08.2012
48
Water quality
A cup of coffee consists of 99 percent water. Therefore, the water has a significant effect on
the coffee's taste. To obtain an excellent cup of coffee, you need excellent water.
The water is important not only to the taste of the coffee but also to the coffee machine itself.
Poor water quality can lead to permanent machine damage.
Therefore, close attention needs to be paid to the water quality in order to obtain high quality
coffee and protect the coffee machine.
Water values
CAUTION!
Risk of machine
damage!
Poor water values can lead to machine damage.
It is imperative that the specified values be complied with. Otherwise, Schaerer AG shall
not accept liability.
The following water values are a precondition for the correct operation of the coffee machine:
4 – 6°dKH (German carbonate hardness)
7 – 8°dGH (German total hardness)
pH value 6.5 – 7 (pH-neutral)
Chlorine content max. 100 mg per litre
Water is referred to as hard or soft depending on its composition. The hardness of water is
referred to as its total hardness.
The total hardness is differentiated into carbonate hardness (temporary hardness) and non-
carbonate hardness (permanent hardness). In terms of the water hardness, the concentration
of bicarbonate anions (HCO3) is of special significance. The concentration of bicarbonate
ions or the equivalent quantity of alkaline earth metal ions is referred to as carbonate hard-
ness.
If the water values do not correspond to the above-mentioned specifications, the water must
be prepared accordingly (decalcification/enrichment with minerals).
International conversion table
(factors apply to total hardness and carbonate hardness)
Unit ° dH ° eH ° fH ppm mmol/l
German hardness 1°dH 1 1.253 1.78 17.8 0.1783
English hardness 1°eH 0.798 1 1.43 14.3 0.142
French hardness 1°fH 0.560 0.702 1 10 0.1
Part(s) per million (USA) 1 ppm 0.056 0.07 0.1 1 0.01
Millimole per litre 1 mmol/l 5.6 7.02 10 100 1
Acidic Neutral Alkaline
0714
The service partner can provide detailed information on filter options and versions and can in-
stall this equipment at your location.
BASCJ_EN
V02 | 08.2012
49
www.schaerer.comWater quality
Determining the water hardness
A water hardness test must be performed to determine whether a water filter is needed. If the
water values are poor, trouble-free operation of the machine cannot be ensured.
The water values must also be entered when the machine is taken into service and can be
readily adjusted in the machine menu. On the basis of the entered values, the machine calcu-
lates the time to the next filter change (if a filter is in use) and the time to the next decalcification
routine.
Check whether a house filter system is already connected upstream from the machine.
Option 1: Requesting information from the drinking water supplier
Ask the local drinking water supplier for information on the water hardness (total hardness)
of the drinking water.
Option 2: Performing a test
Determine the water hardness using the test strips included in the scope of delivery.
Dip the test strip into the tap water for ca. 1 sec.
Remove the test strip and wait for ca. 1 min.
The test strips changes colour.
Compare the water analysis result with the "Total hardness" table in the "Water values"
chapter.
Install a water filter if the test result is poor.
Filter technology
To protect the coffee machines and the coffee quality against hard or soft water, filters are
used. Filters are essential for the care and maintenance of the machine, not to mention for hy-
giene, and for the best quality of coffee.
Even when using a filter, it is still necessary to measure the water values once a year. Water
is a living element and therefore changes frequently.
In most water, the carbonate hardness is markedly lower than the total hardness. This is a
good indicator for determining whether the water is straight from the mains or if it first passed
through a house filter system.
See "Filter equipment" in this chapter or, for machines that are operated with drinking water,
see the chapter entitled "Service and maintenance" - "Installing a water filter for the internal
drinking water tank".
The service partner can provide detailed information on filter options and versions and can in-
stall this equipment at your location.
www.schaerer.com Safety notes
BASCJ_EN
V02 | 08.2012
50
Safety notes
Maximum safety is one of Schaerer AG's most important product features. The effectiveness
of the safety devices is guaranteed only if the following instructions are observed to prevent
injuries and health hazards:
Read the User Manual carefully before using the device.
Do not touch hot machine parts.
Do not use the coffee machine if it is not working properly or is damaged.
Under no circumstances may the installed safety devices be modified.
User at risk
DANGER!
Risk of electrocution!
Improper handling of electrical devices can result in electric shock.
The following instructions absolutely must be complied with:
Work on electrical systems may only be performed by skilled electricians.
The device must be connected to a fused electrical network (we recommend passing the
connection through a fault current circuit breaker).
All relevant guidelines on low voltage and/or country-specific or local safety regulations
and laws must be observed.
The connection must be properly earthed and protected from electric shock.
The voltage must correspond to the data on the device's serial plate.
Never touch energised parts.
Before carrying out service work, always switch off the main switch and/or disconnect the
device from the power supply system.
The power cable may only be replaced by qualified service technicians.
CAUTION!
User at risk!
Improper handling of the coffee machine can lead to light injuries.
The following instructions absolutely must be complied with:
This device is not intended to be operated by persons (including children) with limited phys-
ical, sensory or mental capabilities or a lack of experience and/or knowledge unless they
are supervised by a person responsible for their safety or obtain instructions from this per-
son on how to operate the device.
Supervise children to ensure that they do not play with the device.
The coffee machine must be installed so that there are no impediments to care and main-
tenance.
In both self-service and full-service applications, trained personnel must supervise the ma-
chine in order to ensure that the care instructions are observed and the personnel is avail-
able for questions regarding use.
Fill the bean hopper with beans only, the powder container with coffee machine powder
only and the manual inlet with ground coffee only (or cleaning tablets during cleaning).
CAUTION!
Hot fluid!
There is a risk of scalding in the dispensing area of beverages, hot water and steam.
During dispensing or cleaning, never reach under the dispensing positions.
CAUTION!
Hot surface!
The dispensing positions and the brewing unit may be hot.
Do not touch any part of the dispensing equipment except the grips provided for this
purpose. Only clean the brewing unit when the coffee machine has cooled down.
CAUTION!
Risk of trapping
fingers!
There is a risk of trapping fingers or hands when handling moving components.
While the coffee machine is switched on, never reach into the bean or powder contain-
ers or into the opening of the brewing unit.
BASCJ_EN
V02 | 08.2012
51
www.schaerer.comSafety notes
Risk from cleaning products
Application
CAUTION!
User at risk!
Danger of poisoning from swallowing cleaning products.
Please adhere to the following points:
Store cleaning products away from children and unauthorised persons.
Do not swallow the cleaning products.
Never mix cleaning products with other chemicals or acids.
Never put cleaning products in the milk container.
Never put cleaning products in the drinking water tank (internal/external).
Only use the cleaning and decalcifiers for the intended purpose (see label).
Do not eat or drink while handling cleaning products.
Ensure that the area is well-ventilated when handling cleaning products.
Wear safety gloves when handling cleaning products.
Wash your hands thoroughly after handling cleaning products.
Storage
The following instructions absolutely must be complied with:
Store them in a place that is inaccessible to children and unauthorised persons.
Protect cleaning products from heat, light and moisture.
Store them in a separate location from acids.
Store them in the original packaging only.
Store cleaning products for daily and weekly use separately.
Do not store them together with foodstuffs or other edibles.
Disposal
If the cleaning products and their containers cannot be used otherwise, dispose of them ac-
cording to the HEALTH & SAFETY DATA SHEET and legal regulations.
Emergency information
Obtain the phone number of the emergency information service (toxicology information centre)
from the cleaning product manufacturer (see cleaning product label). If your country does not
have this type of institution, note the following table:
Before using cleaning product, read the information on the package label and the HEALTH &
SAFETY DATA SHEET carefully. If a HEALTH & SAFETY DATA SHEET is not present,
please request it from the sales partner.
Swiss Toxicology Information Centre
International calls +41 44 251 51 51
Call from Switzerland 145
Internet www.toxi.ch
www.schaerer.com Safety notes
BASCJ_EN
V02 | 08.2012
52
Risk of damage to the machine
CAUTION!
Risk of machine
damage!
Improper handling of the coffee machine can lead to damage or contamination.
The following instructions absolutely must be complied with:
For water with a carbonate hardness above 5°dKH, install a water filter, as otherwise the
coffee machine can be damaged due to calcification.
For insurance law reasons, always ensure that after closing for the day, the main water
valve (coffee machine with mains water supply) is closed and the electrical main switch is
switched off or the mains plug is unplugged.
All relevant guidelines on low voltage and/or country-specific or local safety regulations
and laws must be observed.
Do not operate the device if the water supply is blocked. Otherwise, the boilers will not be
refilled and the pump will run dry.
To prevent water damage in case of hose breakage, Schaerer AG recommend routing the
water supply connection via a water stop valve (at the installation site).
After extended downtime (e.g. holiday), the coffee machine must be cleaned before it is
put back into operation.
Protect the coffee machine from weather (frost, humidity etc.).
Faults may be remedied by a qualified service technician only.
Only use Schaerer AG original spare parts.
Report any noticeable damage or leaks immediately to an authorised service partner and
have any faulty parts replaced and/or repaired.
Never spray the device with water or clean it with a steam cleaner.
When using caramelised coffee (flavoured coffee), clean the brewing unit twice daily.
Fill the bean hopper with beans only, the powder container with coffee machine powder
only and the manual inlet with ground coffee only (or cleaning tablets during cleaning).
Never use freeze-dried coffee as it clogs the brewing unit.
If the coffee machine and/or accessories are transported at temperatures below 10°C, the
coffee machine and/or accessories must be stored for three hours at room temperature be-
fore the coffee machine and/or accessories are connected to the mains and switched on.
Failure to observe this precaution can result in a danger of short-circuit or damage to elec-
trical components.
Always use the new hose set (drinking water/waste water hose) provided with the machine.
Never use old hose sets.
Hygiene regulations
Water
CAUTION!
User at risk!
Improper handling of water can lead to health problems.
The following instructions absolutely must be complied with:
The water must be uncontaminated.
Do not connect the machine to pure reverse osmosis water or other aggressive types of
water.
The carbonate hardness must not exceed 4-6°dKH (German carbonate hardness) or 7-
10°fKH (French carbonate hardness).
The total hardness must always be higher than the carbonate hardness.
The minimum carbonate hardness is 4°dKH or 7°fKH.
Maximum chlorine content of 100 mg per litre.
pH value between 6.5 – 7 (pH neutral).
Machines with drinking water tank (internal & external)
Fill the drinking water tank daily with fresh water.
Rinse the drinking water tank thoroughly before filling.
BASCJ_EN
V02 | 08.2012
53
www.schaerer.comSafety notes
Coffee
CAUTION!
User at risk!
Improper handling of coffee can lead to health problems.
The following instructions absolutely must be complied with:
Check the packaging for damage before opening.
Do not add more beans than will be needed for one day.
Close the bean hopper lid immediately after filling.
Store coffee in a cool, dry and dark location.
Store coffee separately from cleaning products.
Use the oldest products first ("first-in-first-out" principle).
Use before the expiry date.
Always reclose packages after opening to ensure that the contents remain fresh and are
protected from contamination.
Milk
CAUTION!
User at risk!
Improper handling of milk can lead to health problems.
The following instructions absolutely must be complied with:
Do not use unpasteurised or raw milk.
Only use pasteurised milk or milk heated at ultra-high temperatures.
Only use homogenised milk.
Use pre-cooled milk at a temperature between 3-5°C.
When working with milk, wear protective gloves.
Use milk directly from the original packaging.
Never refill milk. Always clean the container thoroughly before filling.
Check the packaging for damage before opening.
Do not add more milk than will be needed for one day.
Close the milk container lid and cooling unit (internal/external ) immediately after filling.
Store milk in a cool, dry (max. 7°C) and dark location.
Store milk separately from cleaning products.
Use the oldest products first ("first-in-first-out" principle).
Use before the expiry date.
Always reclose packages after opening to ensure that the contents remain fresh and are
protected from contamination.
www.schaerer.com Liability
BASCJ_EN
V02 | 08.2012
54
Liability
Operator responsibilities
The operator must ensure that the machine undergoes regular maintenance and that the safe-
ty devices are checked regularly by a Schaerer AG service partner, a representative thereof,
or other authorised persons.
Complaints about material defects must be reported to Schaerer AG in writing within 30 days!
For hidden defects, this period is extended to 12 months from the date of installation (work re-
port, handover report), but no longer than 18 months after the product leaves the factory in
Zuchwil.
Safety-relevant parts such as safety valves, safety thermostats, boilers etc. must not be re-
paired in any circumstances. They must always be replaced!
The following intervals apply:
Safety valves: every 12 months.
Boilers (steam boilers, flow heaters) every 72 months.
These measures are performed by a Schaerer AG service technician or your service partner
as part of the maintenance routine.
Warranty and liability
No responsibility will be taken for warranty or liability claims in the event of personal injury or
material damage as a result of one or more of the following causes:
Non-intended use of the machine.
Improper installation, commissioning, operation, cleaning and maintenance of the device and
the associated optional devices.
Failure to observe maintenance intervals.
Operating the unit with defective safety devices or safety and protective equipment that is not
properly installed or is not functional.
Failure to observe the safety notes in the operating instructions pertaining to storage, installa-
tion, commissioning, operation and maintenance of the machine.
Operating the device when it is not in perfect condition.
Repairs carried out improperly.
Use of spare parts that are not original Schaerer AG spare parts.
Use of cleaning products that are not recommended by Schaerer AG.
Catastrophic incidents due to foreign objects, accident, vandalism or force majeure.
Penetrating the device with any type of object or opening the housing.
The manufacturer only accepts liability or honours warranty claims provided that all specified
maintenance and service intervals have been kept and that only original spare parts supplied
by the manufacturer or by a supplier authorised by the manufacturer have been used.
The "General Terms and Conditions" of Schaerer AG apply.
11

Hulp nodig? Stel uw vraag in het forum

Spelregels
1

Forum

Schaerer-Coffee-Joy
6
  • Kaffee joy geeft doorstroming gestopt.Alles in de handleiding gedaan.Storing blijft zich voordoen,behalve bij caffee crème.Deze doet het lang goed.Denk dat het voorzetten oftewel padjes voor bevochtigen stopt of niet goed wordt uitgevoerd omdat de gemalen koffie bonen droog worden afgevoerd.Wie weet er raad,?
    groet rene Gesteld op 29-5-2023 om 13:09

    Reageer op deze vraag Misbruik melden
  • apparaat is naar de kringloop Geantwoord op 14-8-2023 om 10:09

    Waardeer dit antwoord Misbruik melden
  • Mijn machine geeft time-out niveau aan. Wat moet ik doen. Of wat is er dan aan de hand met deze machine. Gesteld op 28-4-2023 om 21:45

    Reageer op deze vraag Misbruik melden
  • Goedemiddag
    Mijn vraag is:apparaat geeft aan molen blokkeert; hoe los ik dit op? Gesteld op 26-4-2023 om 17:46

    Reageer op deze vraag Misbruik melden
  • Foutmelding drankkeuze geblokeerd zeteenh.eindschak wat kan dat wezen Gesteld op 14-12-2022 om 10:35

    Reageer op deze vraag Misbruik melden
    • brewer verwijderen en kijken onderaan in toestel, zit waarschijnlijk vol koffiedras waardoor brewer niet meer naar home posistie kan gaan Geantwoord op 9-4-2023 om 13:39

      Waardeer dit antwoord (5) Misbruik melden
  • Goedendag,

    Mijn Schaerer Coffee apparaat geeft de melding 'brewer verstopt'. Nu heb ik de brewer verwijderd, schoongemaakt en afgespoeld maar het probleem blijft. Weet iemand op dit forum wat ik nog meer kan doen om dit te verhelpen?

    Met vriendelijke groeten,

    Frits
    Gesteld op 13-7-2022 om 15:53

    Reageer op deze vraag Misbruik melden
  • bij ons geeft de machine steeds time out rechterkant aan... vanalles geprobeerd maar doet het nog steeds niet wie weet een oplossing Gesteld op 20-4-2022 om 11:15

    Reageer op deze vraag Misbruik melden
12
  • Wat betekent bij de schaerer coffee joy de tekst
    opwarmen time-out niveau
    Gesteld op 6-3-2022 om 09:51

    Reageer op deze vraag Misbruik melden
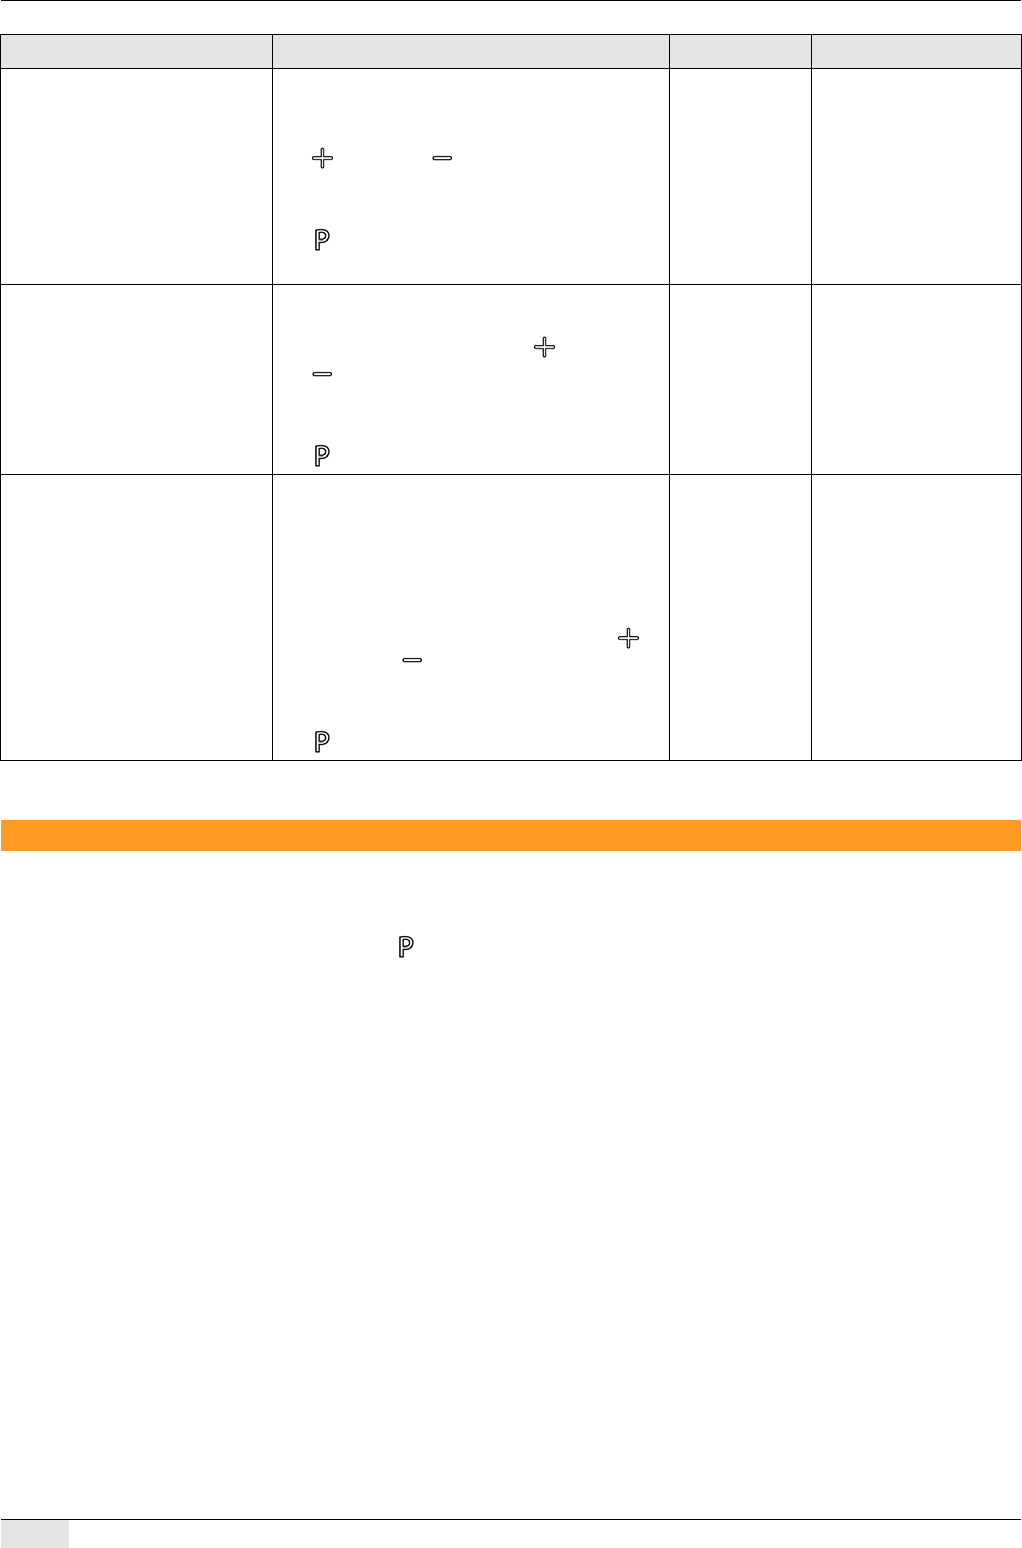
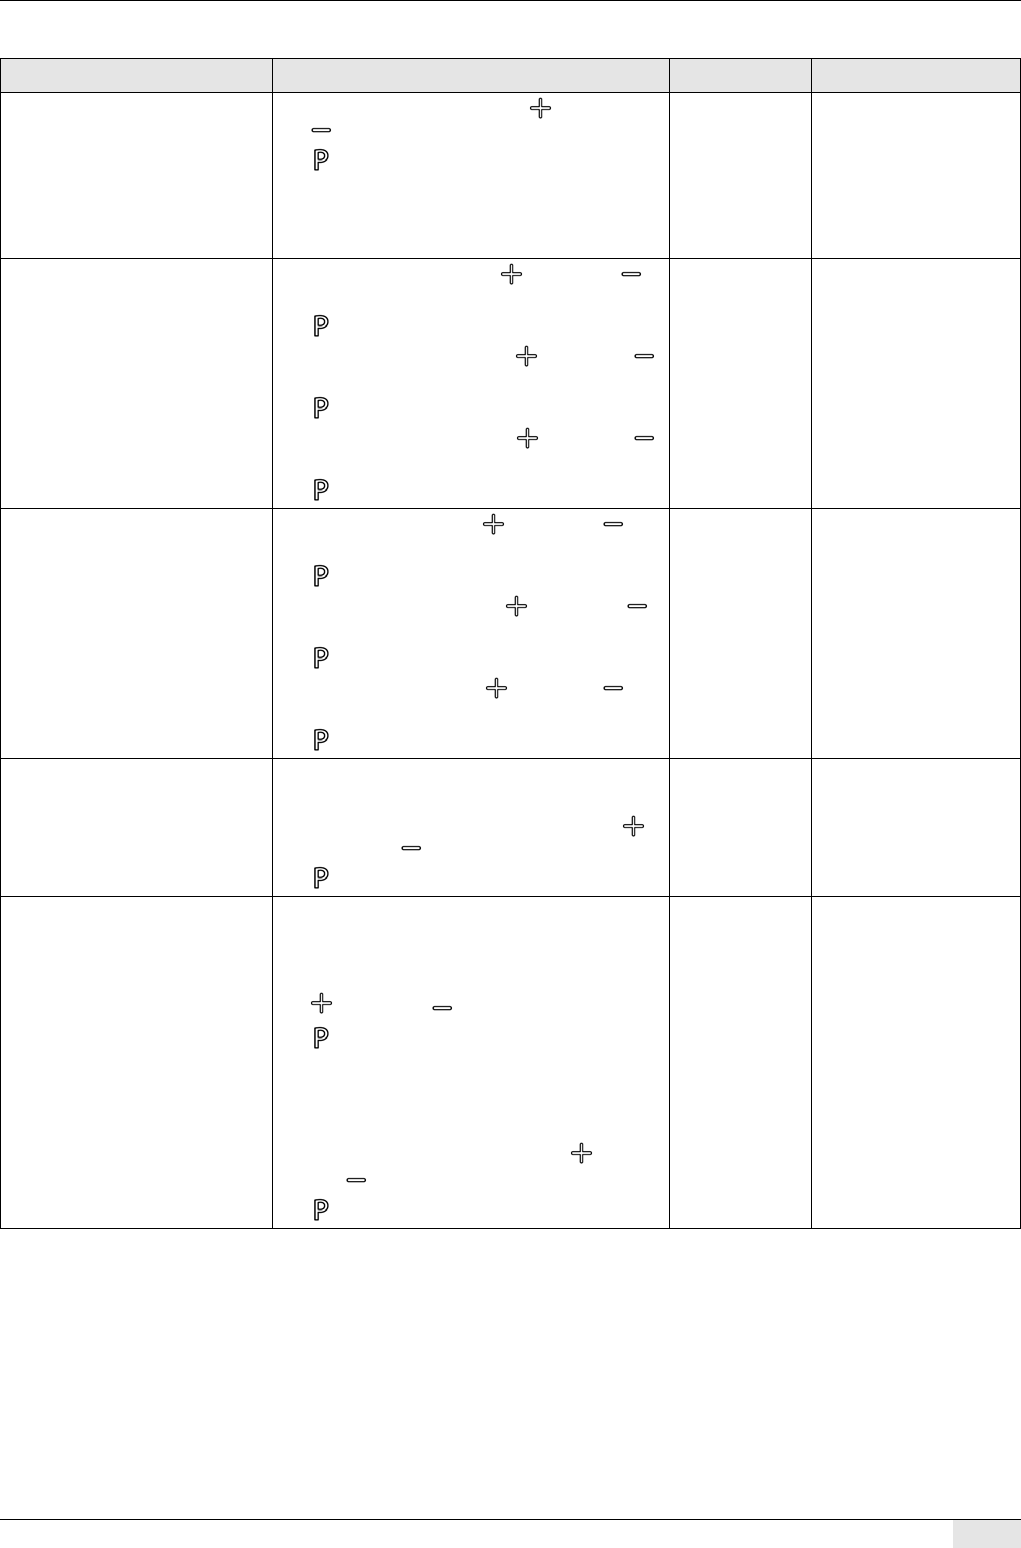
  • Ik zoek een lekbak voor de Schaerer Coffee Joy. Het lipje wat de aanwezigheid van de bak moet aangeven is afgebroken. Wie kan me daar aan helpen? Gesteld op 8-11-2021 om 11:07

    Reageer op deze vraag Misbruik melden
    • Goede middag. Wij hebben nog een nette gebruikte onderbak liggen. Als u interesse heeft kunt u mij bereiken via Koffieservice Flakkee Geantwoord op 20-11-2021 om 00:43

      Waardeer dit antwoord Misbruik melden
  • Ik heb n schroefje op deze plek van binnenuit naar buiten gedraaid. En de afstand zo aangepast dat de machine weer de lekvak herkent. Het werkt perfect Geantwoord op 14-11-2024 om 14:02

    Waardeer dit antwoord Misbruik melden
  • Ik heb een machine van mijn schoonzoon hier staan maar daar kan ik niet voor latte of cappuccino kiezen omdat deze knoppen niet oplichten..... dit is waarschijnlijk een keer uitgezet door een service monteur omdat deze machine in een supermarkt stond. Nu wil hij hem thuis gebruiken maar hoe zet ik deze functies weer aan? Gesteld op 27-10-2021 om 22:20

    Reageer op deze vraag Misbruik melden
  • Of via de service software Geantwoord op 13-5-2022 om 11:35

    Waardeer dit antwoord Misbruik melden
  • dient via laptop en programma aangepast te worden Geantwoord op 9-4-2023 om 13:41

    Waardeer dit antwoord Misbruik melden
  • Wij hebben een koffiemachine joy, maar als je koffie wil zetten blijft het water maar opwarmen en komt er stoom uit. Weet jij de reden Gesteld op 10-4-2021 om 16:53

    Reageer op deze vraag Misbruik melden
  • Ik heb een Schaerer Joy staan en blijft de melding opwarmen geven, en als je op een knop drukt geeft hij de melding drankkeuze geblokkeerd bedieningspaneel reinigen. Maar je hoort hem wel opwarmen als je hem aan zet, je kan ook niet in programma komen. Maar het paneel is inmiddels brandschoon. Er zitten wel een paar stickers op maar die zitten er al jaren op omdat de machine op een locatie staat voor verstandelijk beperkten. Gesteld op 19-3-2021 om 20:23

    Reageer op deze vraag Misbruik melden
  • rectificatie: .... die na 30 JAAR nog steeds werken ... Gesteld op 15-1-2021 om 07:43

    Reageer op deze vraag Misbruik melden
18
  • Wij hebben in 2015 de schaerer coffee joy gekocht.
    Sinds juli 2020 lekt de machine water dat ergens onderuit de machine loopt.
    De zet-groep/Brewer-groep er uit gehaald en schoongemaakt zoals ik dat overigens altijd ook al volgens het wekelijkse Schaerer onderhoudsschema deed (wekelijkse Brewer cleaning).
    Een paar probleem kenmerken van onze machine:
    - er lekt dus koffie water onderuit de machine op het keukenblad;
    - de koffie droes in de opvangbak is niet droog maar nat;
    - de persunit waar de gemalen koffie in gaat en waar het 'hete water' onder 'druk' doorheen geperst
    wordt, hoort normaal leeg te zijn, maar daar blijft nu water in staan;
    - geeft tevens e.o.a. foutmelding op het display;

    Ik heb deze machine altijd volgens het standaard bijgeleverde 'Schaerer schema' gereinigd en de machine ziet er nog als nieuw uit en is alleem bij ons thuis gebruikt en niet op het kantoor (waar deze machine volgens Schaerer) geschikt is.
    Wij balen er van dat een erg dure machine van dit merk, dat alleen maar particulier gebruikt wordt, zo snel al 'verstek' laat gaan. Ik heb hier thuis nog een koffiemachine van Philips (koffiemaal met filter doorloop) machines, die na 3 jaar nog steeds werken en in vergelijk, maar een fractie van de prijs kosten.....

    Onderdelen schijnen nog al moeilijk verkrijgbaar te zijn en ontzettend duur.

    Is er iemand die een idee heeft wat hiermee aan de hand kan zijn? Gesteld op 15-1-2021 om 07:39

    Reageer op deze vraag Misbruik melden
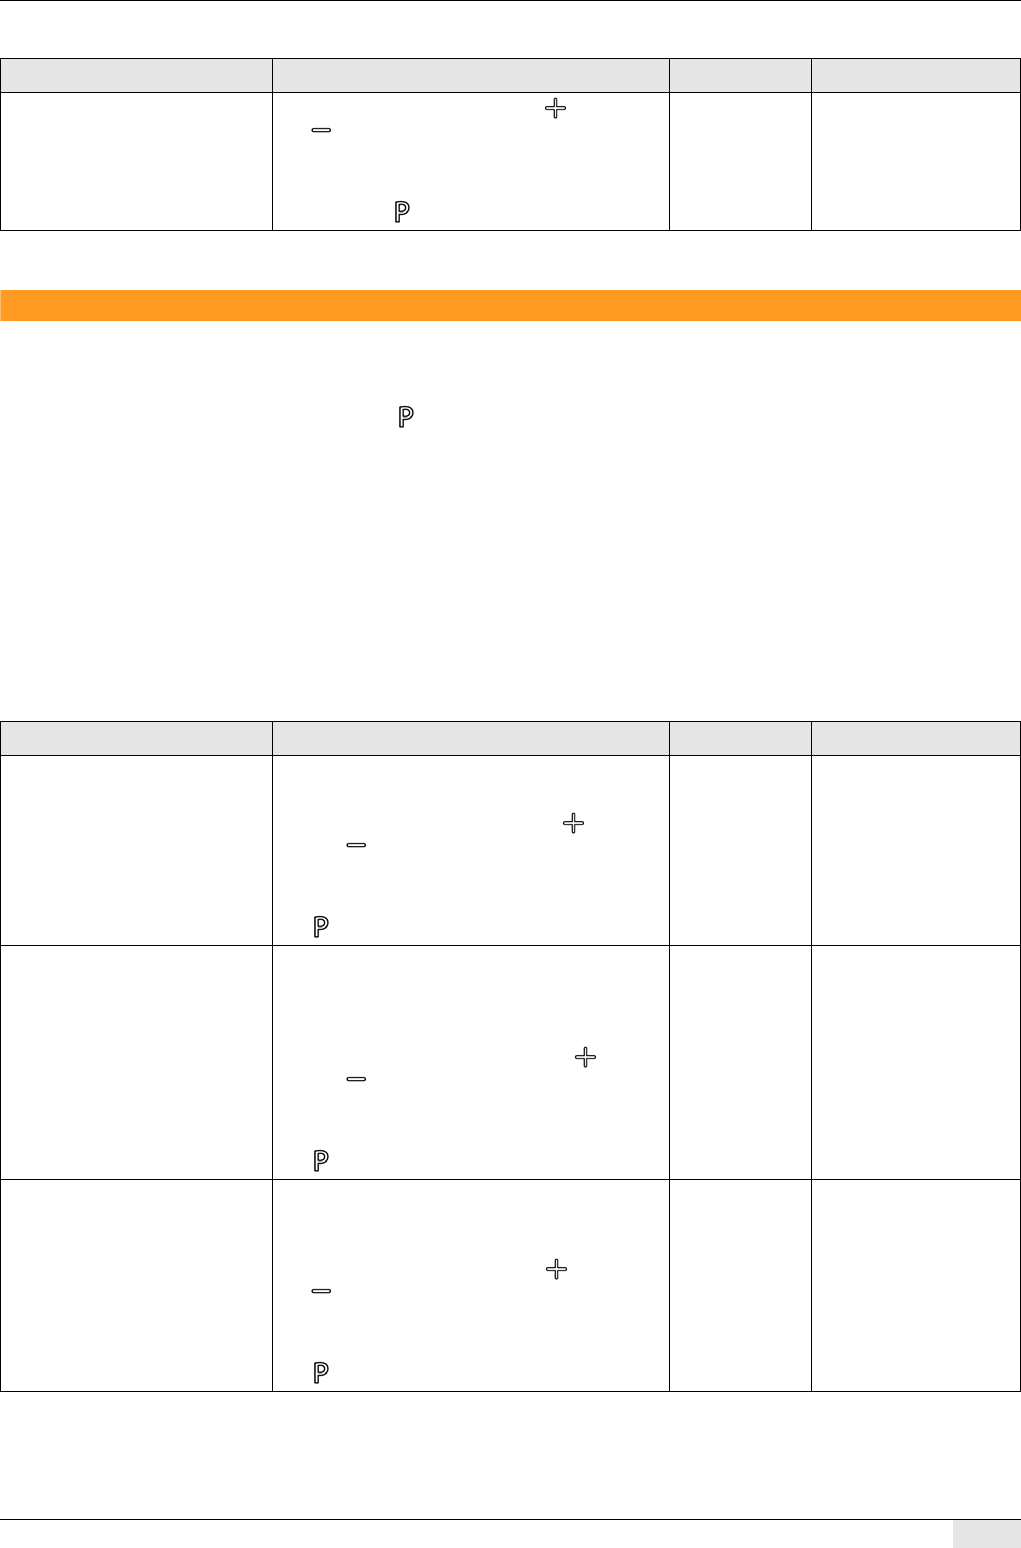
  • Het water wat onder de machine ligt komt waarschijnlijk door een versleten o-ring bij de aansluiting van de watertank, als je de watertank verwijderd zie je hem vanzelf.
    Ook kan het zijn dat de lekbak wat achterover hangt, zodat het overloopje in het midden vooraan het water achter het lekbakje eruit gooit, oplossing 2 stukjes vilt(wat ook onder stoelen wordt geplakt) onder het lekbakje plakken zodat hij weer recht en goed aansluit Geantwoord op 14-11-2021 om 13:08

    Waardeer dit antwoord (4) Misbruik melden
  • koffieventiel sluit niet meer en brewerkamer loopt hierdoor vol Geantwoord op 9-4-2023 om 13:43

    Waardeer dit antwoord (2) Misbruik melden
  • SCJoy is vastegelopen. Op display : zeteenheid eindschak.....
    Hoe kan ik dit oplossen? Gesteld op 21-12-2020 om 20:49

    Reageer op deze vraag Misbruik melden
  • Op de display staat:
    Opwarmen
    Zeteenh. eindschak
    Wat betekend dit en hoe los ik dit op? Gesteld op 23-11-2020 om 16:47

    Reageer op deze vraag Misbruik melden
    • De bovenste of onderste positie van de zetgroep wordt niet gehaald. Misschien koffie prut waar hij op klem loopt? Of er is een reedswitch defect die ziet of de brewer in een van die twee posities staat. In dat geval ga je zelf niets oplossen. Wordt reparatie. Geantwoord op 10-12-2020 om 20:51

      Waardeer dit antwoord (16) Misbruik melden
  • Wij hebben al een aantal jaren de coffee jou en hij doet het prima en nog steeds, vroeg ons eigen af of de mesjes wel eens vervangen moeten worden die de bonen vermalen

    Mvg
    Peter Gesteld op 22-11-2020 om 09:33

    Reageer op deze vraag Misbruik melden
    • Kan, maar ze kunnen wel 35000-40000 koffie consumpties mee. Als je slappe koffie hebt, fijner afstellen helpt niet meer dan wordt het tijd. Geantwoord op 10-12-2020 om 20:54

      Waardeer dit antwoord (3) Misbruik melden
  • steeds gemalen koffie inwerpen maar ik wil geen gemalen koffie Gesteld op 3-11-2020 om 20:19

    Reageer op deze vraag Misbruik melden
    • Als je deksel er af tilt. Zodat je bij de zetgroep kan komen. Dan zitten er in het midden, boven aan, bij de achterwand, 2kleine schakelaars. Een van 2 is van het decafklepje/ tablet inworp klepje. Daar gaat het fout. Of je pinnetje van het klepje is afgebroken. Geantwoord op 10-12-2020 om 20:58

      Waardeer dit antwoord (3) Misbruik melden
  • Op de display op de machine wordt vermeld: "Opwarmen Timeout niveau" wat houdt dit in, lijkt er op dat de koffiemachine niets doet Gesteld op 21-10-2020 om 10:43

    Reageer op deze vraag Misbruik melden
24
  • Mijn koffie apparaat doet het niet meer er staat opwarmen Temp. Sensor stoom
    Wat kan ik doen Gesteld op 29-8-2020 om 10:42

    Reageer op deze vraag Misbruik melden
    • Temp sensor stoomboiler kapot. Wordt nieuwe boiler, of je moet een boiler hebben waar de tempsensor los in kan worden geschoven. Dan kun je die vervangen. De oudere types kunnen dat niet. Geantwoord op 10-12-2020 om 21:00

      Waardeer dit antwoord Misbruik melden
  • Wij hebben de watertoevoer rechtstreeks vanuit de waterleiding in de koffiemachine. Bij reiniging moet het waterreservoir gevuld worden. Hoe doe ik dit? Waar zit dit reservoir? Rechts, maar hoe kan ik hier bij komen? Gesteld op 12-2-2020 om 10:01

    Reageer op deze vraag Misbruik melden
    • wij hebben ook rechtstreeks aangesloten op de waterleiding. maar ik hoef voor het reinigen van de machine niet het waterreservoir gevuld te hebben. Geantwoord op 13-2-2020 om 09:44

      Waardeer dit antwoord Misbruik melden
  • Dat komt omdat die vastwater kit die ke er bij hebt, een slechte oplossing is. In die zwarte box die er bij zit, zit een klep die steeds open en dicht gestuurd wordt als er water nodig is. Maar de diameter van die klep is vrij kritiek, om binnen een "X" tijd die de machine stelt, op het benodigde waterniveau te komen. De ene kit doet het zonder problemen en de andere mauwt er steeds over. Maar als het goed is moet de reiniging wel lukken. Alleen met wat meer pauzes/ onderbrekingen. Geantwoord op 10-12-2020 om 21:07

    Waardeer dit antwoord Misbruik melden
  • Waar kan ik onderdelen kopen voor de zetgroep van de Coffee joy? Gesteld op 8-2-2020 om 13:37

    Reageer op deze vraag Misbruik melden
    • Ik heb nog een compleet aparaat staan voor onderdelen is nog helemaal compleet geeft alleen storing aan stoomcensor seteenheid is nog helemaal top in orde Geantwoord op 26-11-2020 om 16:27

      Waardeer dit antwoord (10) Misbruik melden
  • Mijn email is c.roozenburg@ xs4all.nl voor vragen mail mij even Geantwoord op 26-11-2020 om 16:28

    Waardeer dit antwoord (5) Misbruik melden
  • Koffiemachine heeft water onder zich liggen, ligt ook soms natte koffiegruis achter waterreservoir, al meerdere malen grondig gereinigd maar nog steeds probleem. Wat kan dit zijn Gesteld op 1-2-2020 om 13:03

    Reageer op deze vraag Misbruik melden
  • Ik ben de machine aan het reinigen maar in de display blijft de melding Tablet inwerpen in handinworp Gesteld op 18-1-2020 om 13:12

    Reageer op deze vraag Misbruik melden
  • drankkeuze geblokkeerd timeout niveau

    wat is er dan defect? Gesteld op 9-8-2019 om 08:59

    Reageer op deze vraag Misbruik melden
30
  • onder schoon maken gaat hij niet verder en geeft waterreservoir vullen aan Gesteld op 11-11-2018 om 13:21

    Reageer op deze vraag Misbruik melden
  • ik heb het water resevoir gewoon zelf gevuld met een kannetje en daarna terug geplaatst nu doet die het gewoon goed Geantwoord op 8-12-2018 om 22:04

    Waardeer dit antwoord Misbruik melden
  • Display geeft deze melding aan; brewereindsch.
    Iemand een idee?
    Schoongemaakt, teruggeplaatst maar melding blijft, melding alleen een servicemonteur kan dit probleem oplossen.. Gesteld op 22-10-2018 om 22:18

    Reageer op deze vraag Misbruik melden
  • mijn schaerer lekt aan de onderkant, weet iemand wat er mis kan zijn? Gesteld op 29-4-2018 om 16:20

    Reageer op deze vraag Misbruik melden
  • De flush slang die in de lekbak uit komt is dan los, machine open maken en de slang weer vast zetten Geantwoord op 12-10-2020 om 13:11

    Waardeer dit antwoord (6) Misbruik melden
  • Dezevraag werd al eerder gesteld maar geen duidelijk antwoord. Ook ik wordt helemaal gek van dat apparaat.hij lekt water aan de onderkant.en ik krijg hele lichte koffie. Als je de brewer eruit haalt ligt er steeds gemalen koffie naast. De koffie uitworp lijkt niet in de cup voor de persing te vallen of maar heel weinig waardoor er nauwelijks koffie in een gezet kopje zit.
    Wie kent het probleem en weet de oplossing? Gesteld op 31-7-2017 om 16:41

    Reageer op deze vraag Misbruik melden
    • Dat probleem heb ik ook met de brewer hier onder in de antwoorden zeg iemand dat je 4 klepjes moet schoonmaken ga ff bekijken of ik ze vinden kan
      Geantwoord op 3-12-2017 om 15:08

      Waardeer dit antwoord (15) Misbruik melden
  • gemal koffie inwerpen geeft het apparaat aan terwijl er bonen inzitten Gesteld op 16-1-2017 om 10:54

    Reageer op deze vraag Misbruik melden
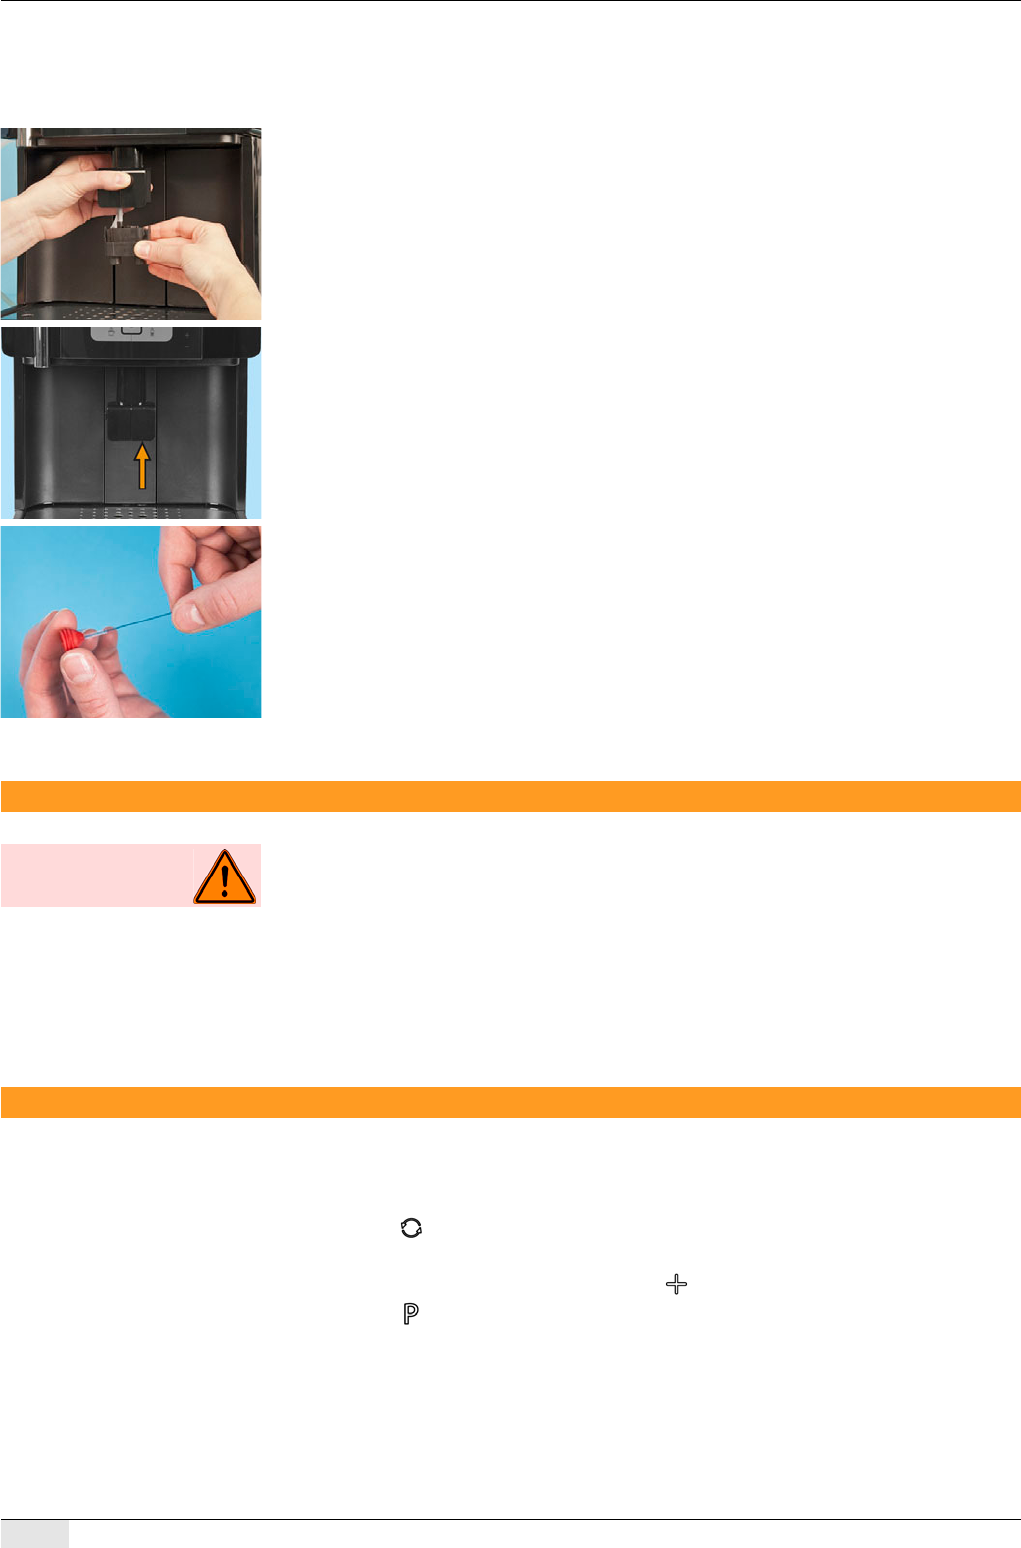
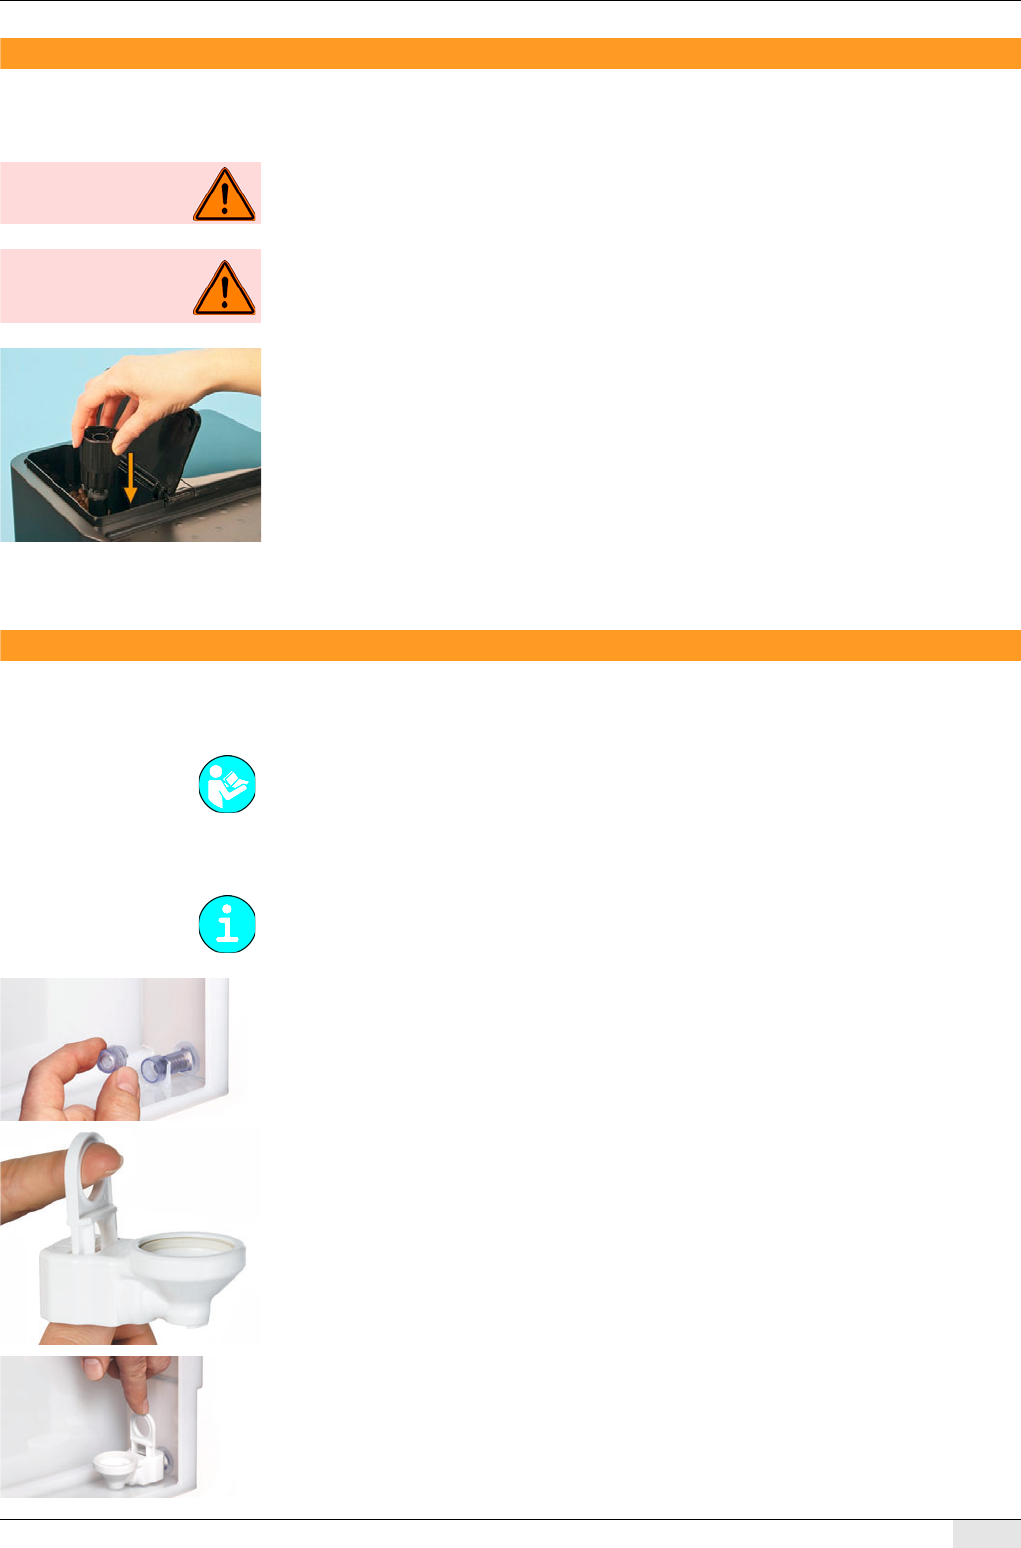
    • Hoi ik ben alleen gebruiker van de zelfde machine en heb deze melding opgelost door machine uit te schakelen, alle bonen er uit halen laatste reste lukt helaas alleen met een stofzuiger.
      Dan zie je een zwart dopje met een schroefje erin als je die losmaakt en nogmaals de stofzuiger erin zet is ook het molentje leeg nu kun je kijken of er wellicht een boontje dwars zit en de molen blokkeert.Bij mij was het toen opgelost hoop dat je er wat aan hebt. Geantwoord op 17-1-2017 om 15:52

      Waardeer dit antwoord (14) Misbruik melden
  • Oplossing is heel makkelijk. Zorg dat de drie klepjes bovenop goed gesloten zitten. vooral de middelste waar het tabletje ingaat. Dan is het euvel als het goed is verholpen. Geantwoord op 27-2-2017 om 10:04

    Waardeer dit antwoord (6) Misbruik melden
  • "Zeteenheid eindschak" geeft de machine aan......hoe kan ik dit oplossen? Gesteld op 28-12-2016 om 08:53

    Reageer op deze vraag Misbruik melden
36
42

Misbruik melden

Gebruikershandleiding.com neemt misbruik van zijn services uitermate serieus. U kunt hieronder aangeven waarom deze vraag ongepast is. Wij controleren de vraag en zonodig wordt deze verwijderd.

Product:

Bijvoorbeeld antisemitische inhoud, racistische inhoud, of materiaal dat gewelddadige fysieke handelingen tot gevolg kan hebben.

Bijvoorbeeld een creditcardnummer, een persoonlijk identificatienummer, of een geheim adres. E-mailadressen en volledige namen worden niet als privégegevens beschouwd.

Spelregels forum

Om tot zinvolle vragen te komen hanteren wij de volgende spelregels:

Belangrijk! Als er een antwoord wordt gegeven op uw vraag, dan is het voor de gever van het antwoord nuttig om te weten als u er wel (of niet) mee geholpen bent! Wij vragen u dus ook te reageren op een antwoord.

Belangrijk! Antwoorden worden ook per e-mail naar abonnees gestuurd. Laat uw emailadres achter op deze site, zodat u op de hoogte blijft. U krijgt dan ook andere vragen en antwoorden te zien.

Abonneren

Abonneer u voor het ontvangen van emails voor uw Schaerer Coffee Joy bij:


U ontvangt een email met instructies om u voor één of beide opties in te schrijven.


Ontvang uw handleiding per email

Vul uw emailadres in en ontvang de handleiding van Schaerer Coffee Joy in de taal/talen: Engels als bijlage per email.

De handleiding is 3,63 mb groot.


U ontvangt de handleiding per email binnen enkele minuten. Als u geen email heeft ontvangen, dan heeft u waarschijnlijk een verkeerd emailadres ingevuld of is uw mailbox te vol. Daarnaast kan het zijn dat uw internetprovider een maximum heeft aan de grootte per email. Omdat hier een handleiding wordt meegestuurd, kan het voorkomen dat de email groter is dan toegestaan bij uw provider.

Stel vragen via chat aan uw handleiding

Stel uw vraag over deze PDF

Andere handleiding(en) van Schaerer Coffee Joy

Schaerer Coffee Joy Gebruiksaanwijzing - Nederlands - 50 pagina's

Schaerer Coffee Joy Gebruiksaanwijzing - Deutsch - 56 pagina's


Uw handleiding is per email verstuurd. Controleer uw email

Als u niet binnen een kwartier uw email met handleiding ontvangen heeft, kan het zijn dat u een verkeerd emailadres heeft ingevuld of dat uw emailprovider een maximum grootte per email heeft ingesteld die kleiner is dan de grootte van de handleiding.

Er is een email naar u verstuurd om uw inschrijving definitief te maken.

Controleer uw email en volg de aanwijzingen op om uw inschrijving definitief te maken

U heeft geen emailadres opgegeven

Als u de handleiding per email wilt ontvangen, vul dan een geldig emailadres in.

Uw vraag is op deze pagina toegevoegd

Wilt u een email ontvangen bij een antwoord en/of nieuwe vragen? Vul dan hier uw emailadres in.


Info